

Configure call transfers#
Configure the inbound and outbound SIP trunks and your SIP platform so that
DIDWW can redirect or transfer an inbound call to an external phone number.
Your platform triggers the transfer with a SIP 301 or 302 response
before answering the call, or with an in-dialog SIP REFER request after
answering it. DIDWW then places a new call to the destination through your
outbound trunk.
For an explanation of both methods, including SIP messages, call flows, and use cases, see Inbound call redirection.
Before you begin#
Access to DIDWW outbound trunks is required. See Get Access to DIDWW Outbound Termination.
At least one DID number is required to receive inbound calls.
Your SIP platform, such as a PBX, IVR, AI agent, or custom SIP application, must support SIP
301or302responses, in-dialog SIPREFERrequests, or both.
Create the outbound trunk that DIDWW uses to place the redirected or transferred call.
Enable the required method and authorize it with the outbound trunk credentials.
Send a SIP 301 or 302 response or a SIP REFER request to DIDWW.
1. Create the outbound SIP trunk#
The outbound trunk must use Credentials & IP-Based authentication and accept signaling from the DIDWW inbound SIP addresses. The inbound trunk stores the outbound trunk credentials, which DIDWW uses to authenticate the new outbound call.
Step 1: Start trunk creation#
In the DIDWW User Panel, go to Voice > Outbound Trunks.
Click Create New.
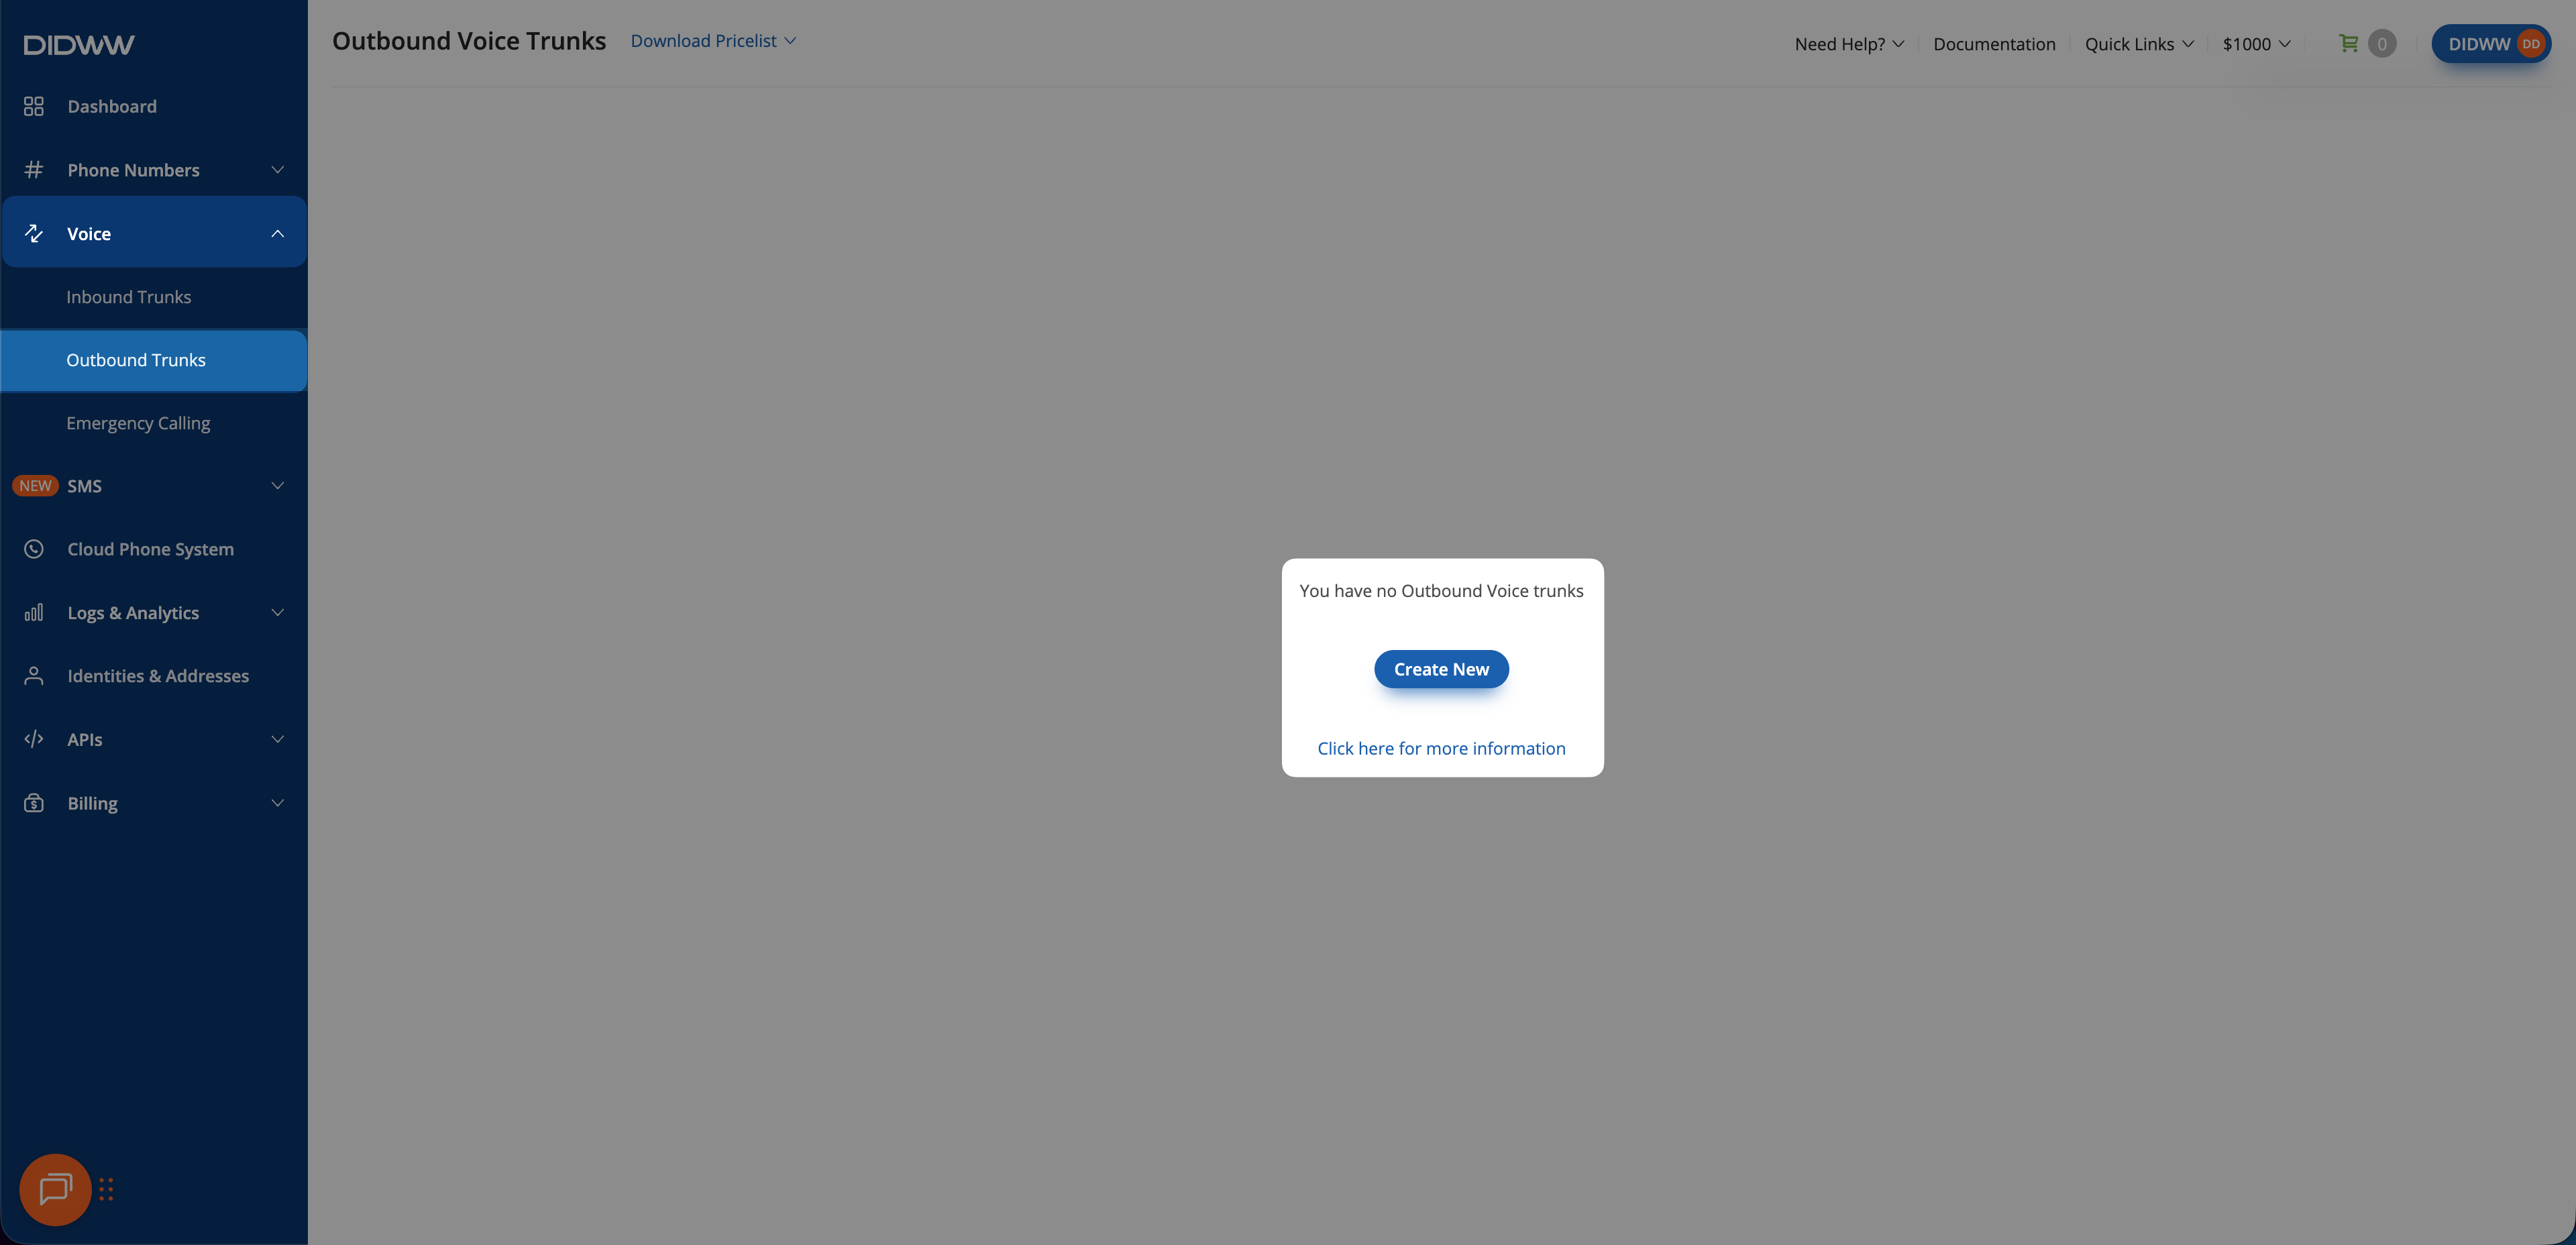
Fig. 1. Starting outbound trunk creation#
Step 2: Configure and create the outbound trunk#
Enter a descriptive Name, for example
Call Transfers.Keep Credentials & IP-Based authentication selected.
In Allowed SIP IP addresses, add:
The outbound SIP signaling IP addresses of your SIP platform, if it uses fixed IP addresses.
The DIDWW inbound SIP signaling addresses. They are required for redirects and transfers.
Copy the DIDWW inbound SIP address list for your IP version:
46.19.209.14 46.19.210.14 46.19.212.14 46.19.213.14 46.19.214.14 46.19.215.14 185.238.173.14
2a01:ad00:1:14::14 2a01:ad00:2:14::14 2a01:ad00:4:14::14 2a01:ad00:5:14::14 2a01:ad00:6:14::14 2a01:ad00:7:14::14 2a01:ad00:8:14::14
Click Create.
Warning
Adding 0.0.0.0/0 removes all IP restrictions. SIP Digest
authentication still verifies each request, but this configuration is not
recommended. Restrict access to known signaling addresses.
For all outbound trunk fields, see Create an outbound trunk.
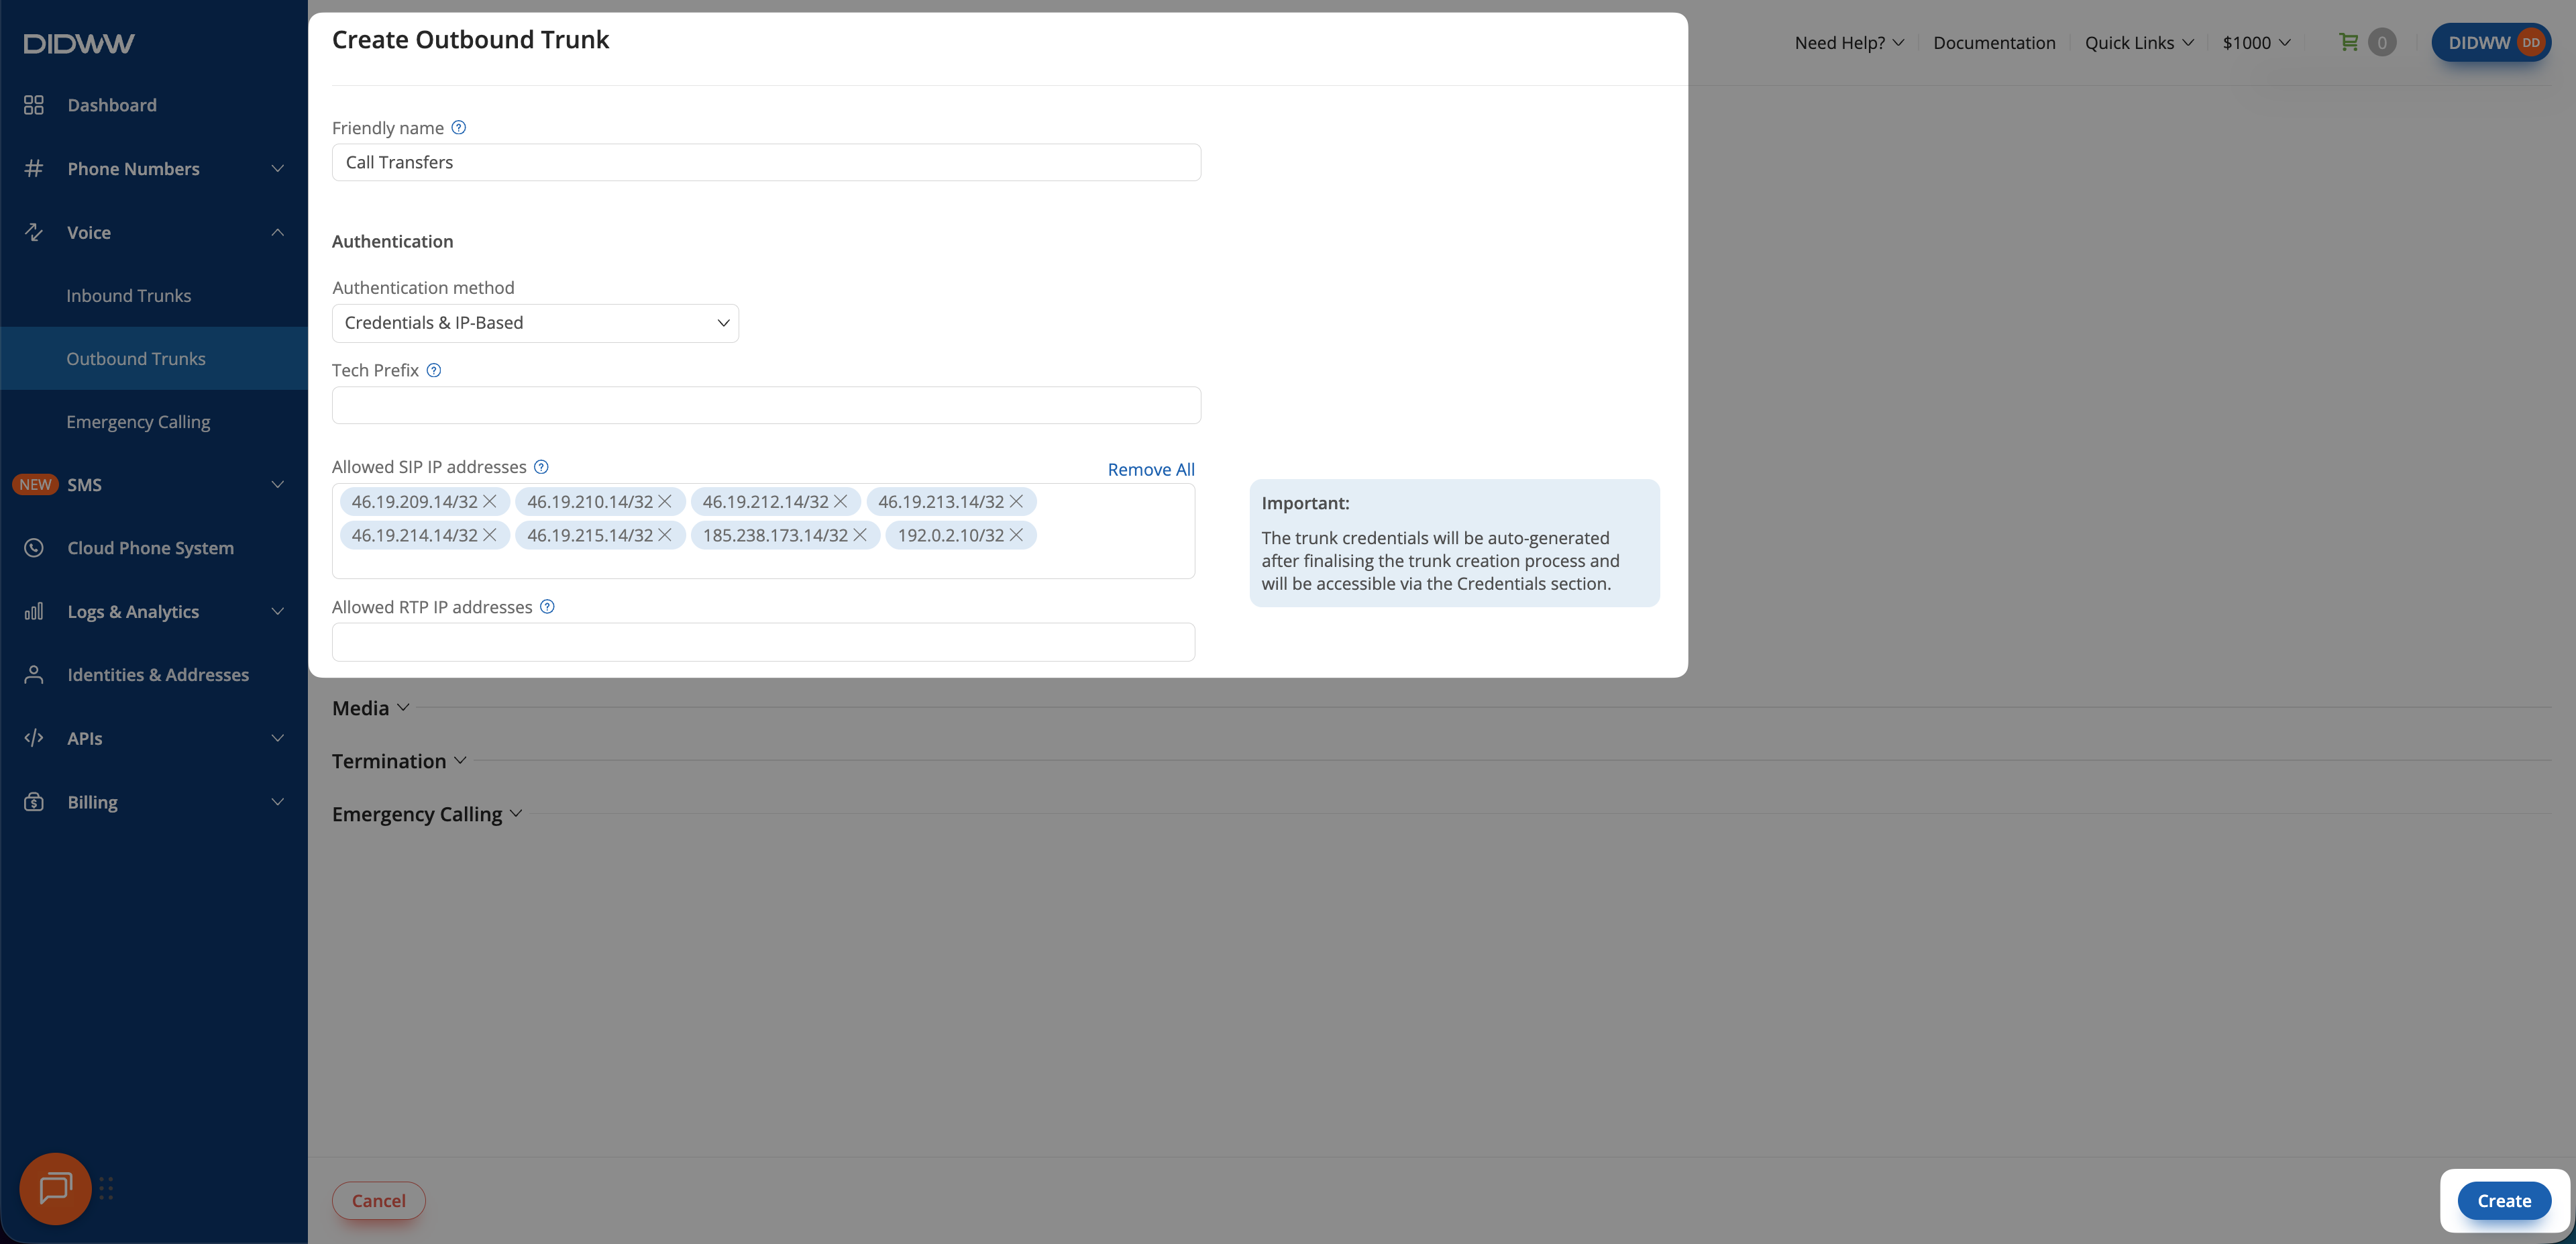
Fig. 2. Configuring the outbound SIP trunk#
Step 3: Copy the outbound trunk credentials#
Go to Voice > Outbound Trunks.
Locate the trunk and click the key icon in the Credentials column.
Copy the Username and Password. Click the eye icon to reveal the password.
You will enter these credentials in the Authorization tab of the inbound SIP trunk. Your SIP platform also uses them for outbound SIP authentication.
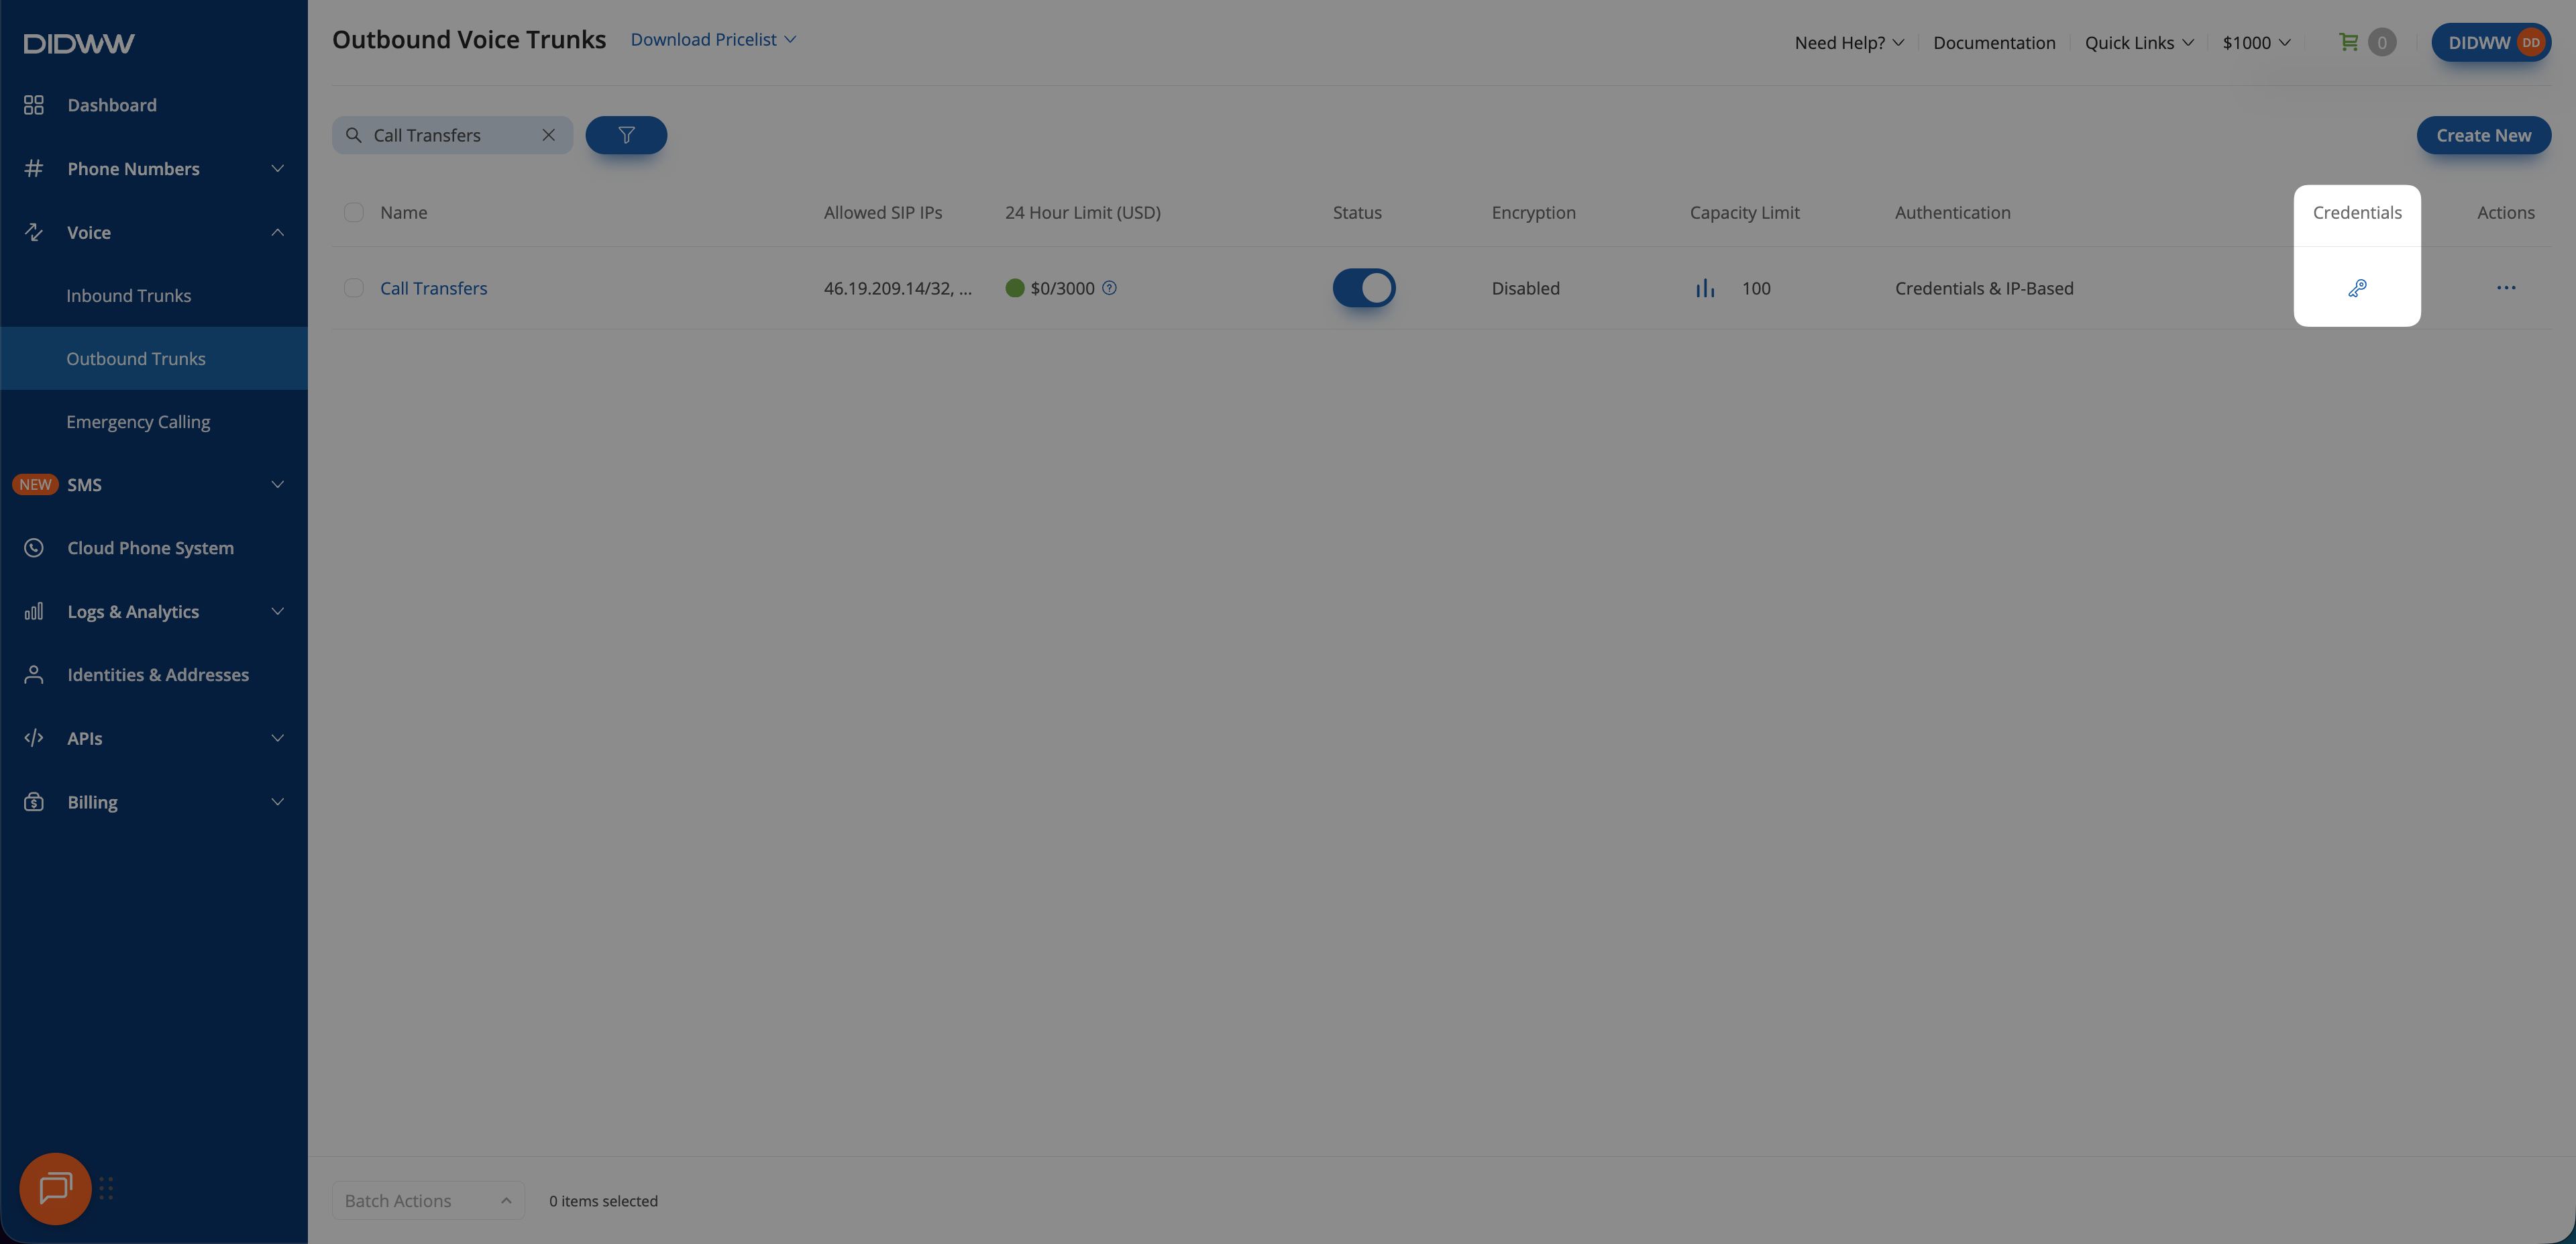
Fig. 3. Viewing the outbound trunk credentials#
2. Create the inbound SIP trunk#
The inbound trunk must enable the required method and have Authorization enabled with the outbound trunk credentials. For Static Endpoint routing, Network Protocol must match the IP version of the DIDWW inbound signaling addresses configured under Allowed SIP IP addresses on the outbound trunk. To use an existing inbound SIP trunk, edit it and apply the same settings.
Step 1: Start trunk creation#
In the DIDWW User Panel, go to Voice > Inbound Trunks.
Click Create New > SIP Trunk.
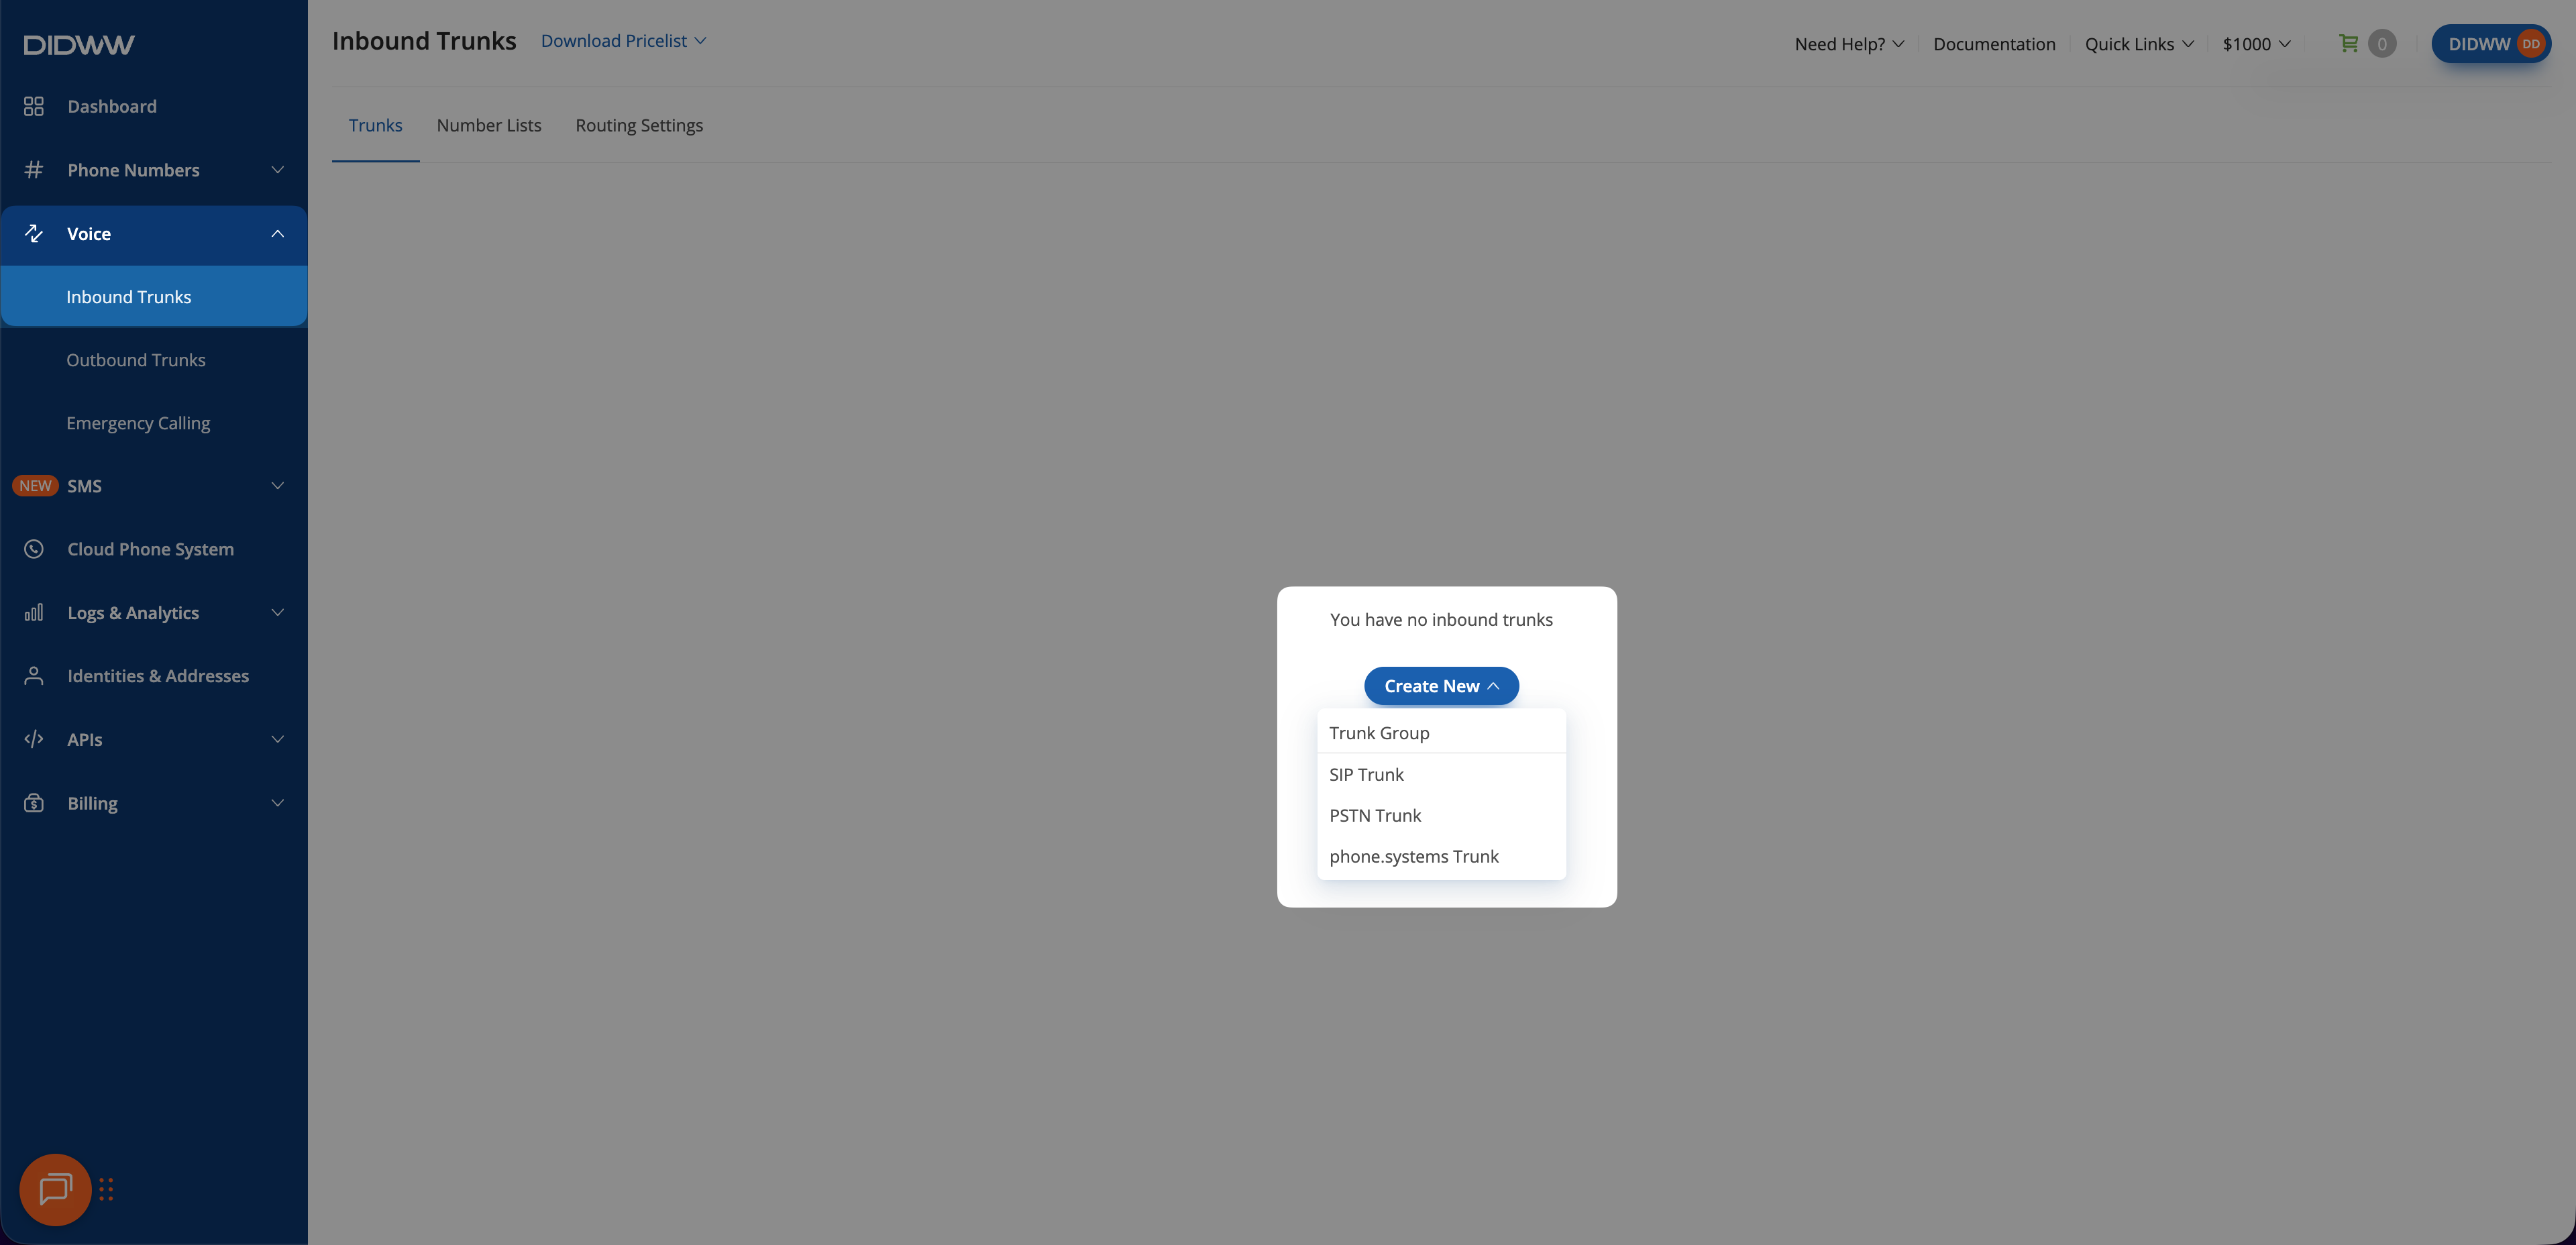
Fig. 4. Starting inbound SIP trunk creation#
Step 2: Configure general settings#
In the General tab, enter a descriptive Name, for example
Call Transfers.Select the SIP routing method used by your platform. For Static Endpoint, configure Host, Transport, and Port as required by your platform.
If the trunk uses Static Endpoint, set Network Protocol to match the IP version of the DIDWW inbound signaling addresses you allowed on the outbound trunk:
If the outbound trunk allows IPv4 addresses, select IPv4 only.
If the outbound trunk allows IPv6 addresses, select IPv6 only.
A mismatch between IP versions prevents the transfer from completing.
For all routing fields, see Create a SIP trunk.
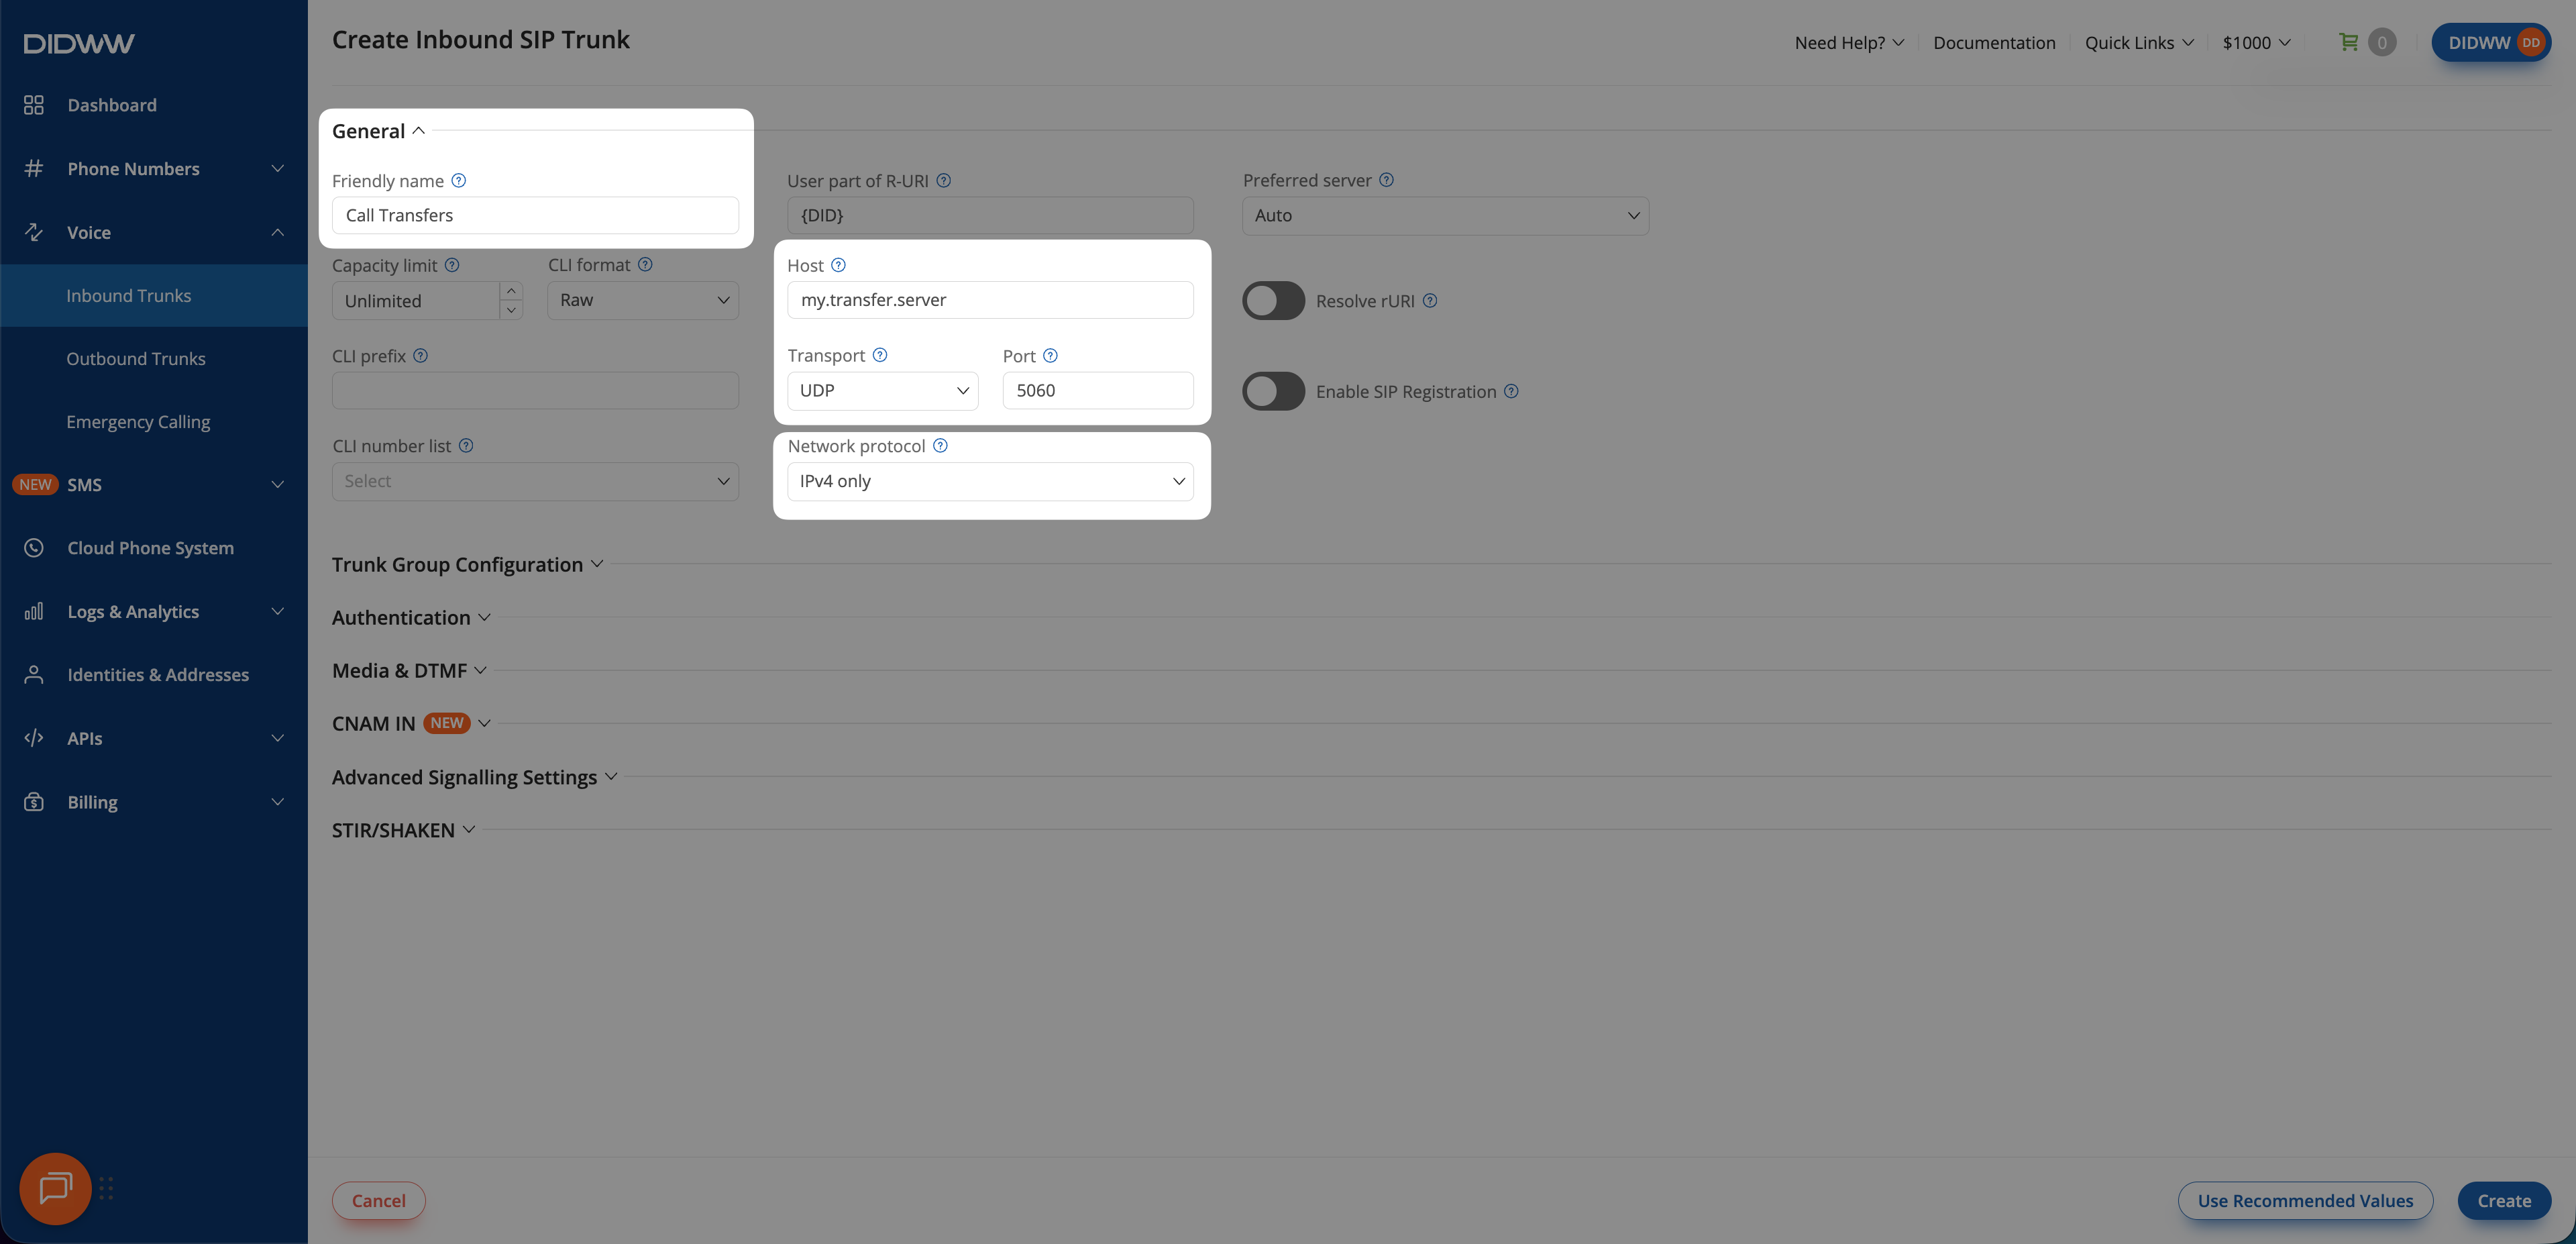
Fig. 5. Configuring general settings and Network Protocol#
Step 3: Enable authorization#
Open the Authorization tab.
Turn on Enable Authorization.
Paste the outbound trunk Username into Auth User and its Password into Auth Password.
DIDWW uses these credentials to authenticate the new outbound call after a redirect or transfer request.
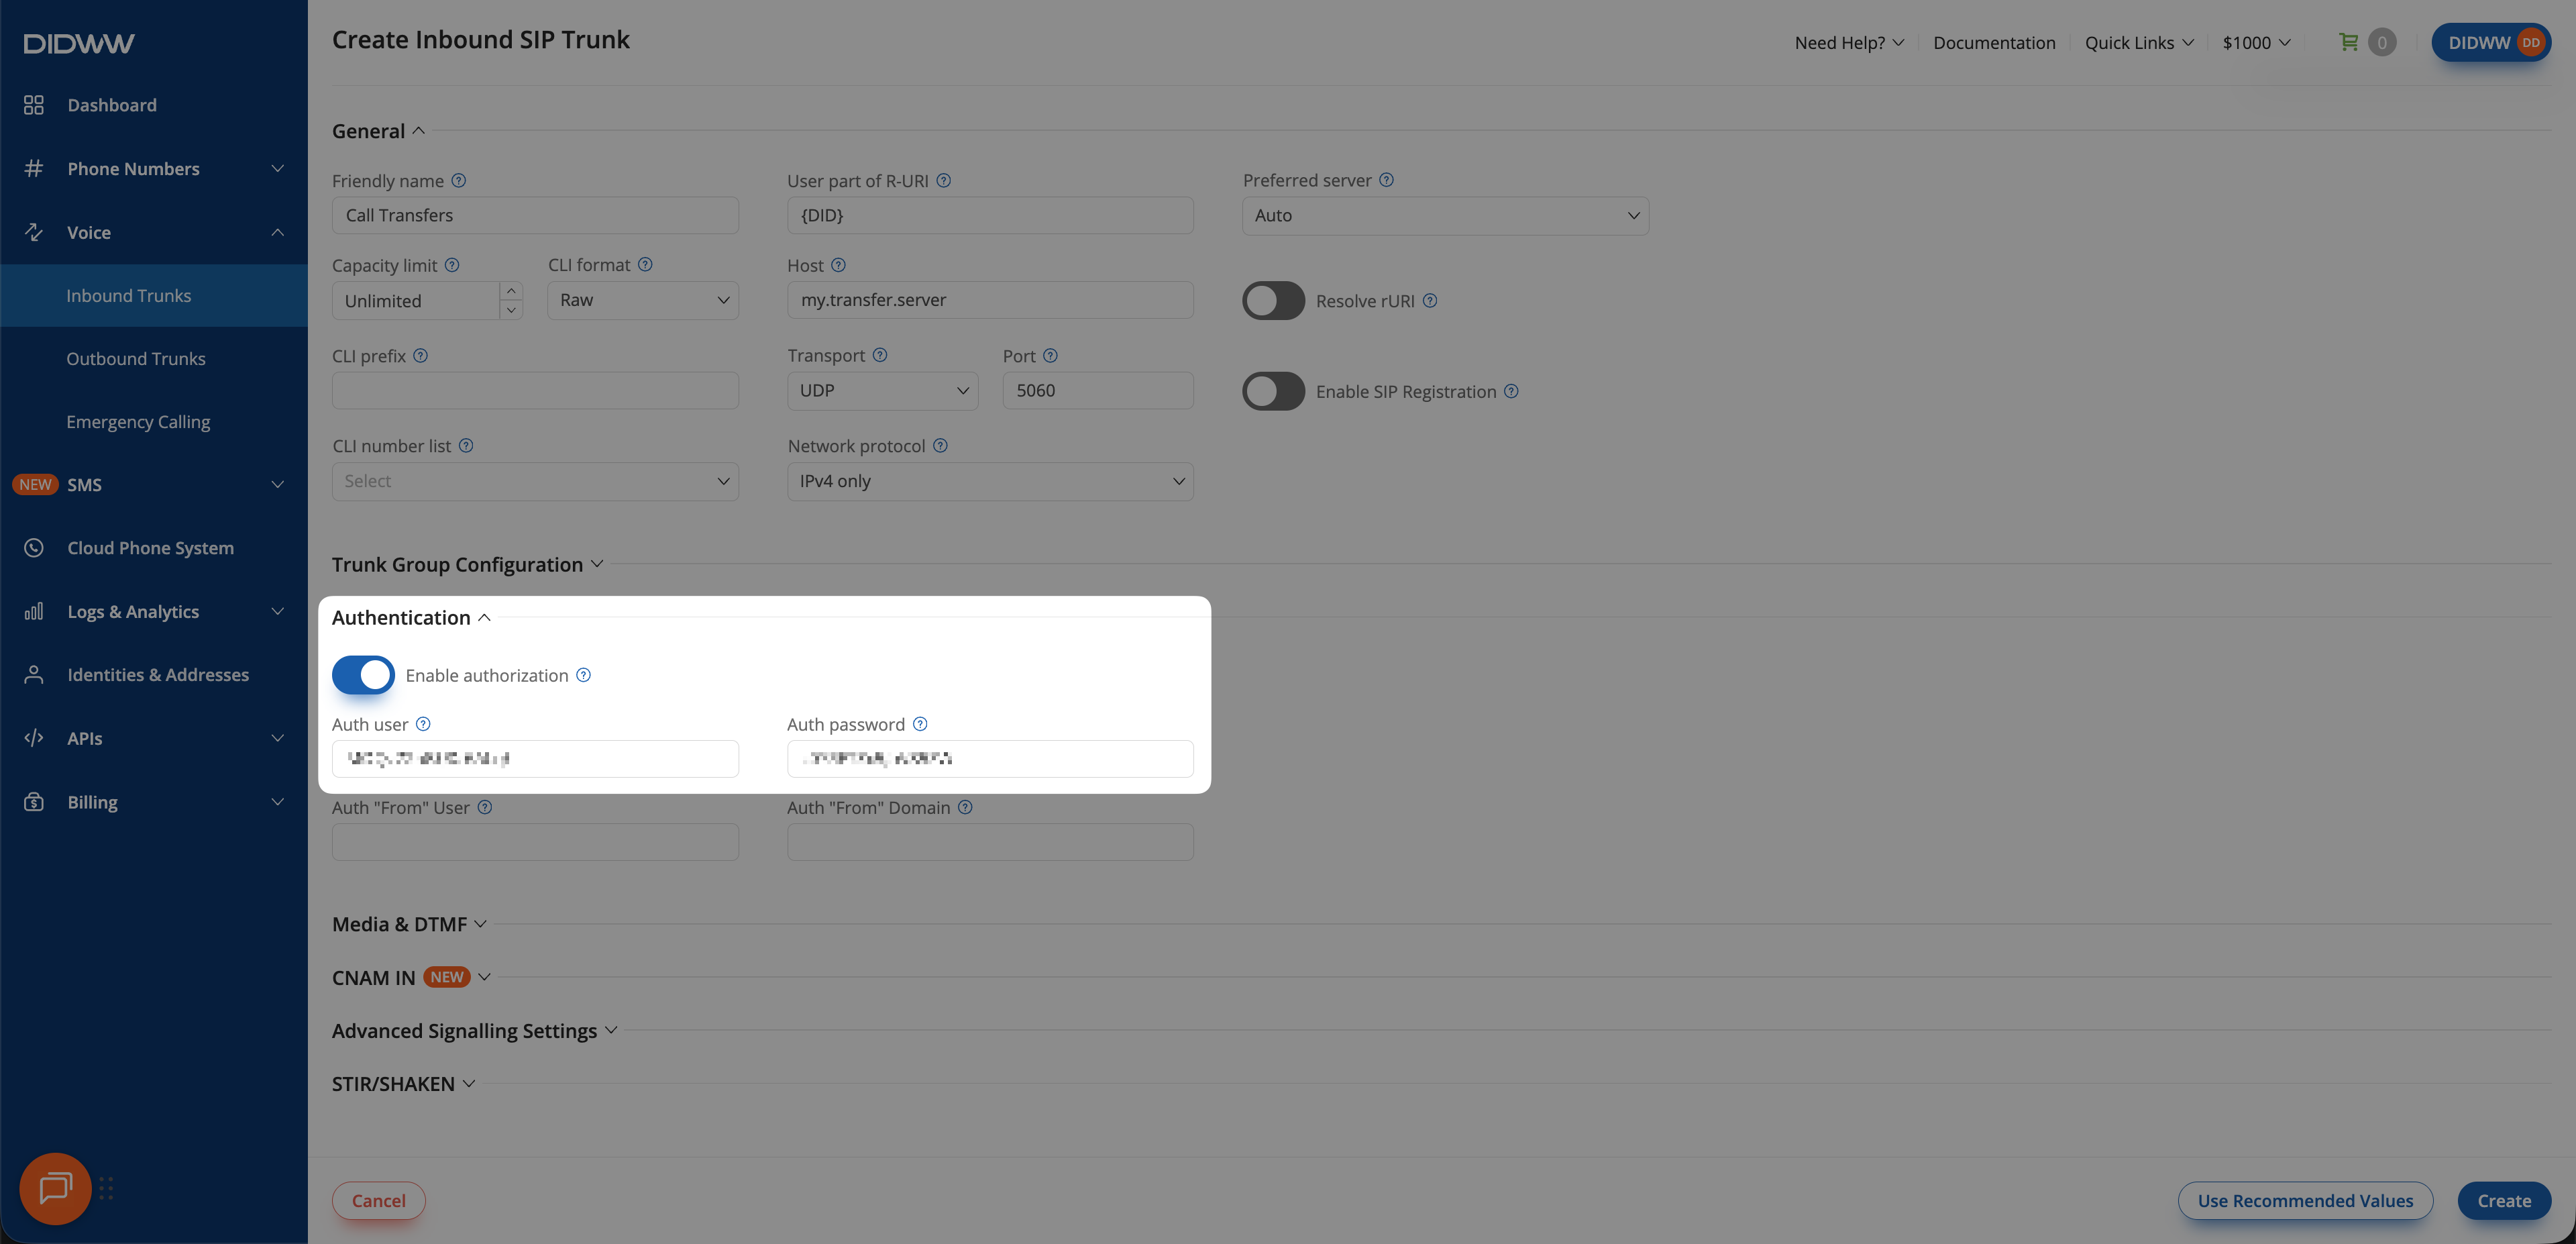
Fig. 6. Enabling authorization with the outbound trunk credentials#
Step 4: Enable the transfer method#
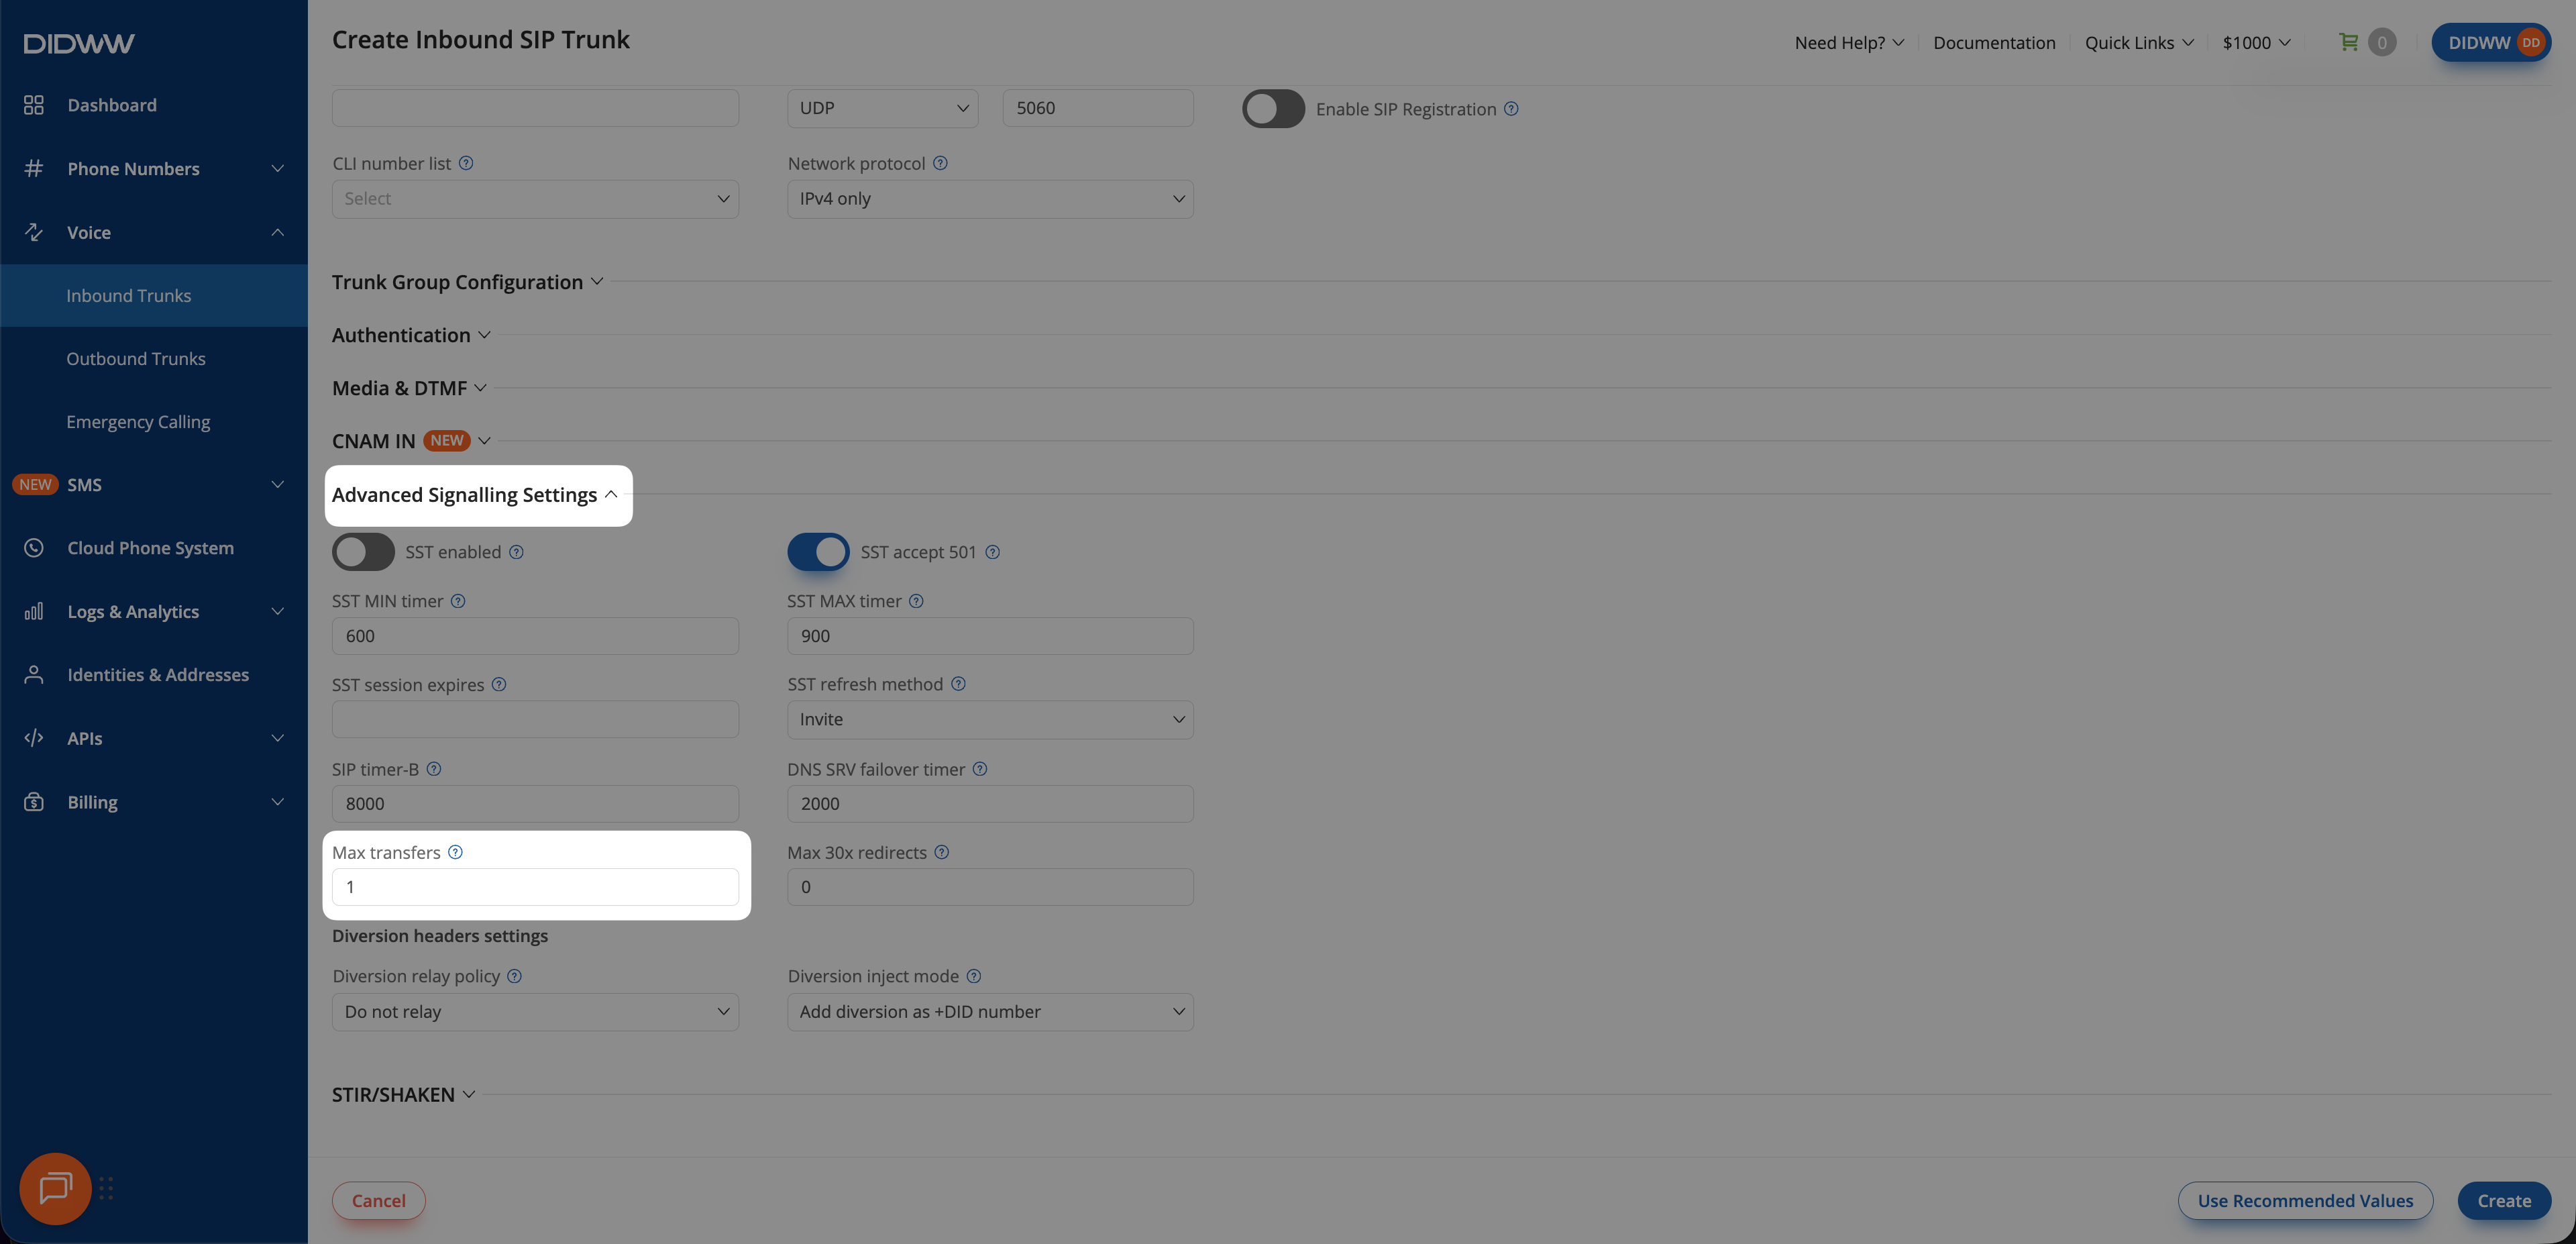
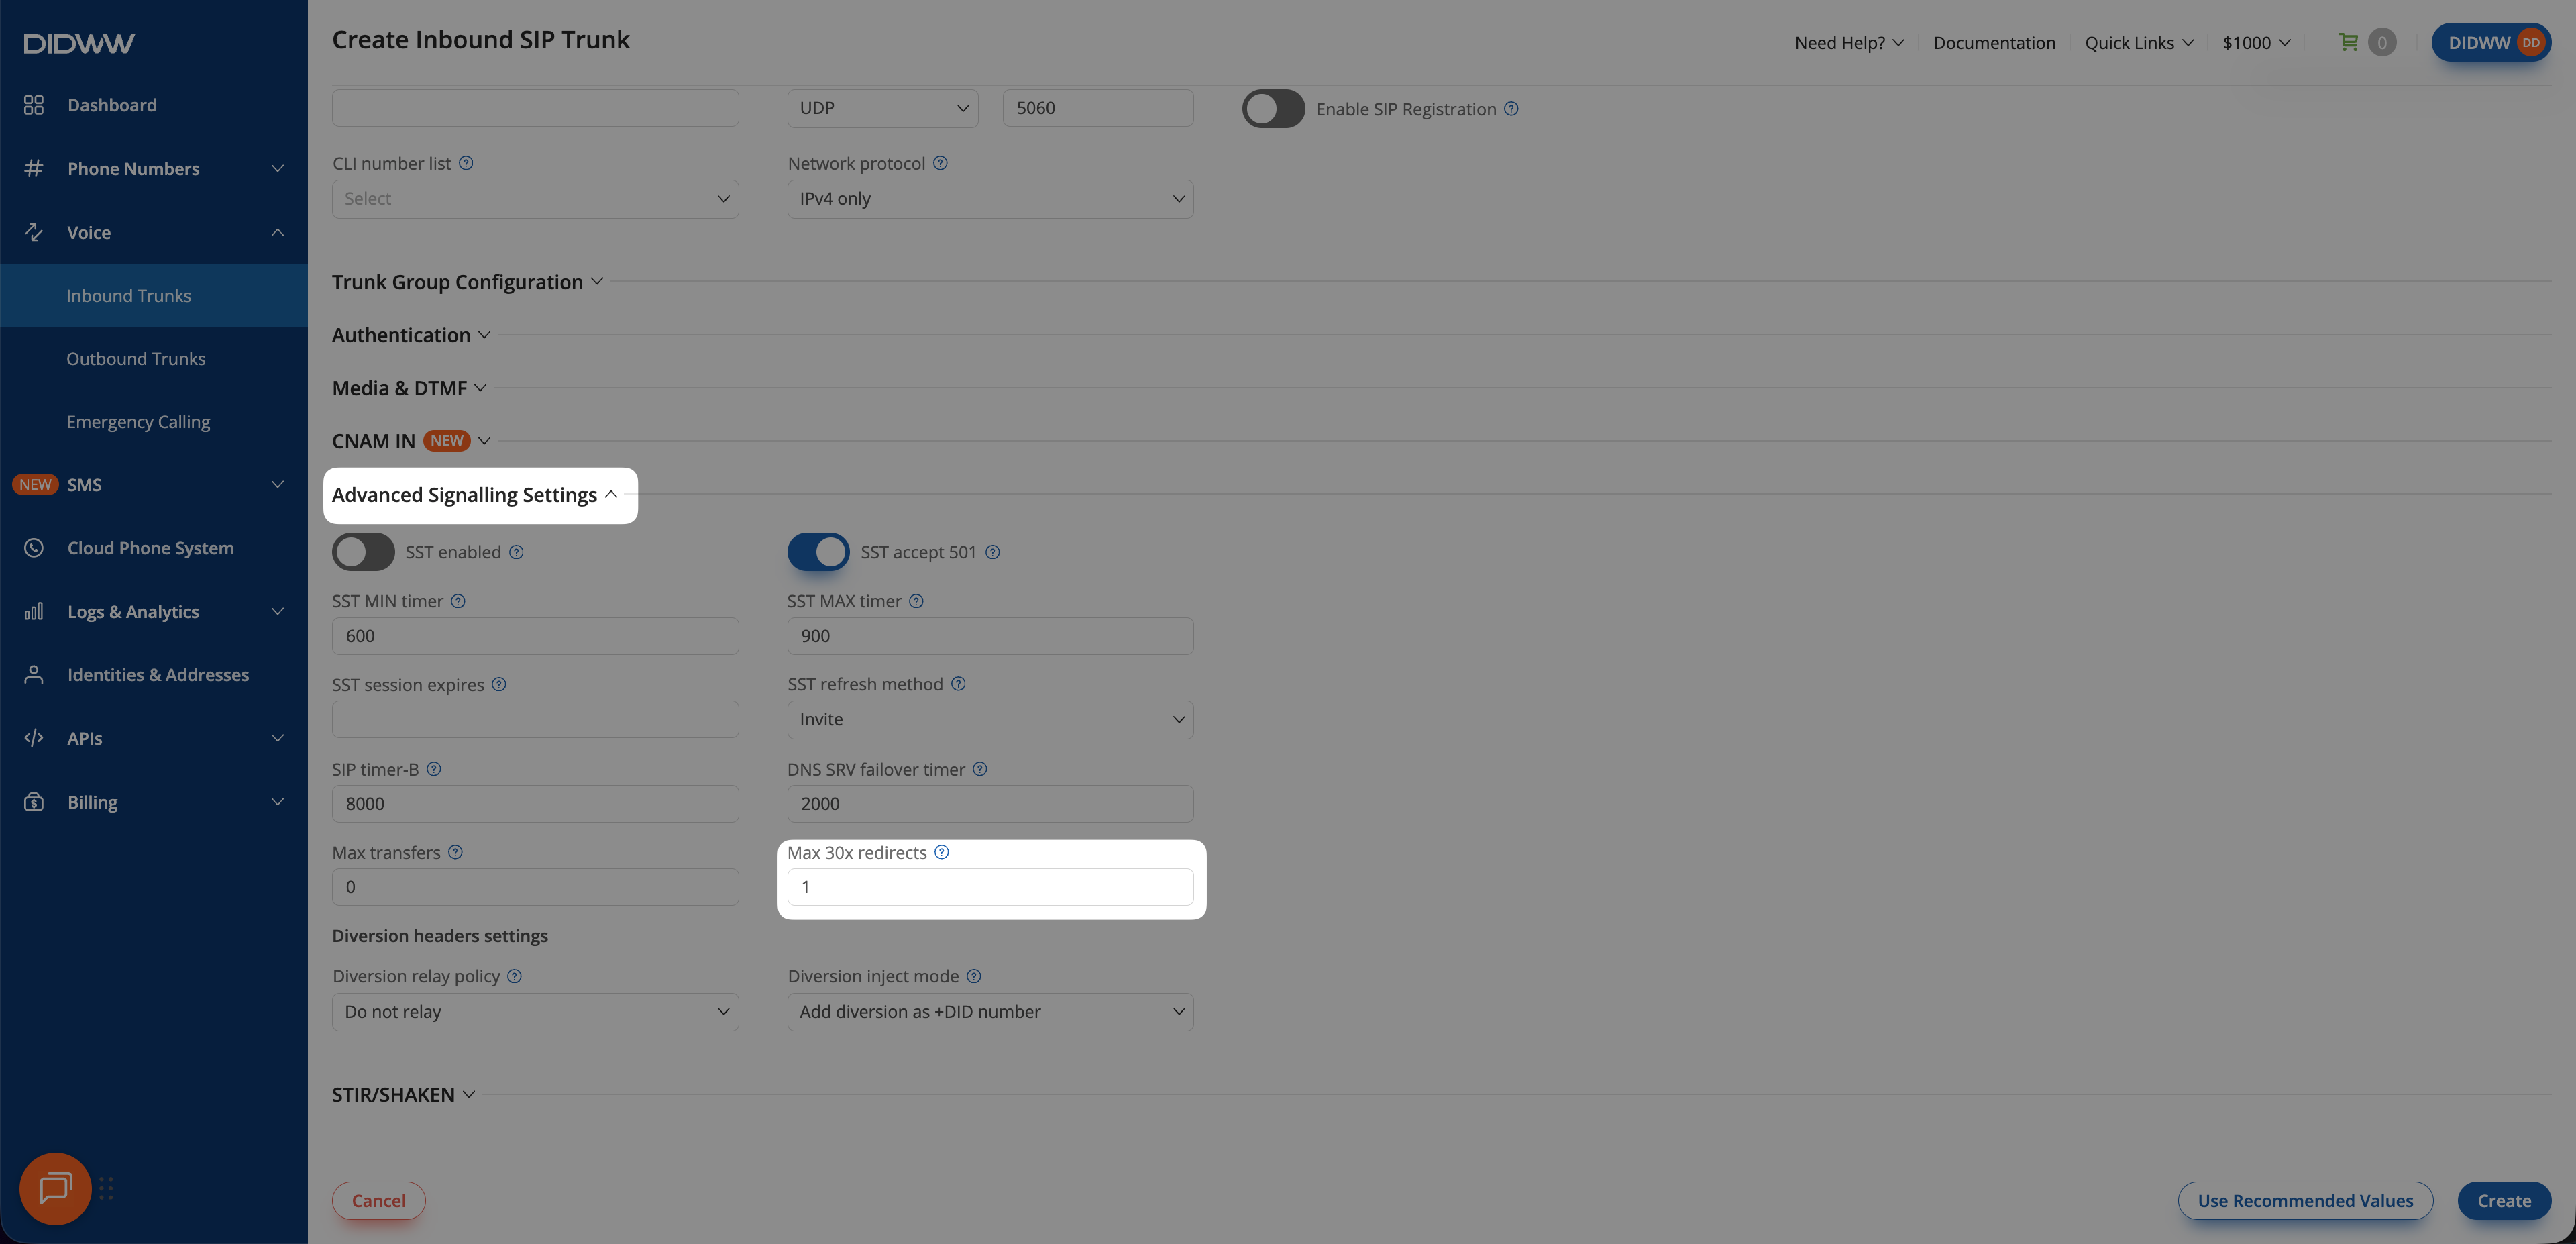
Open the Signalling tab and enable the method your platform uses.
Configure both fields when the platform uses both methods. The default value
of 0 disables the corresponding method.
Field definitions and supported ranges are listed under Authorization and Signalling in the SIP trunk settings reference.
Step 5: Create the trunk#
Click Create to save the inbound SIP trunk. For an existing trunk, click Submit.
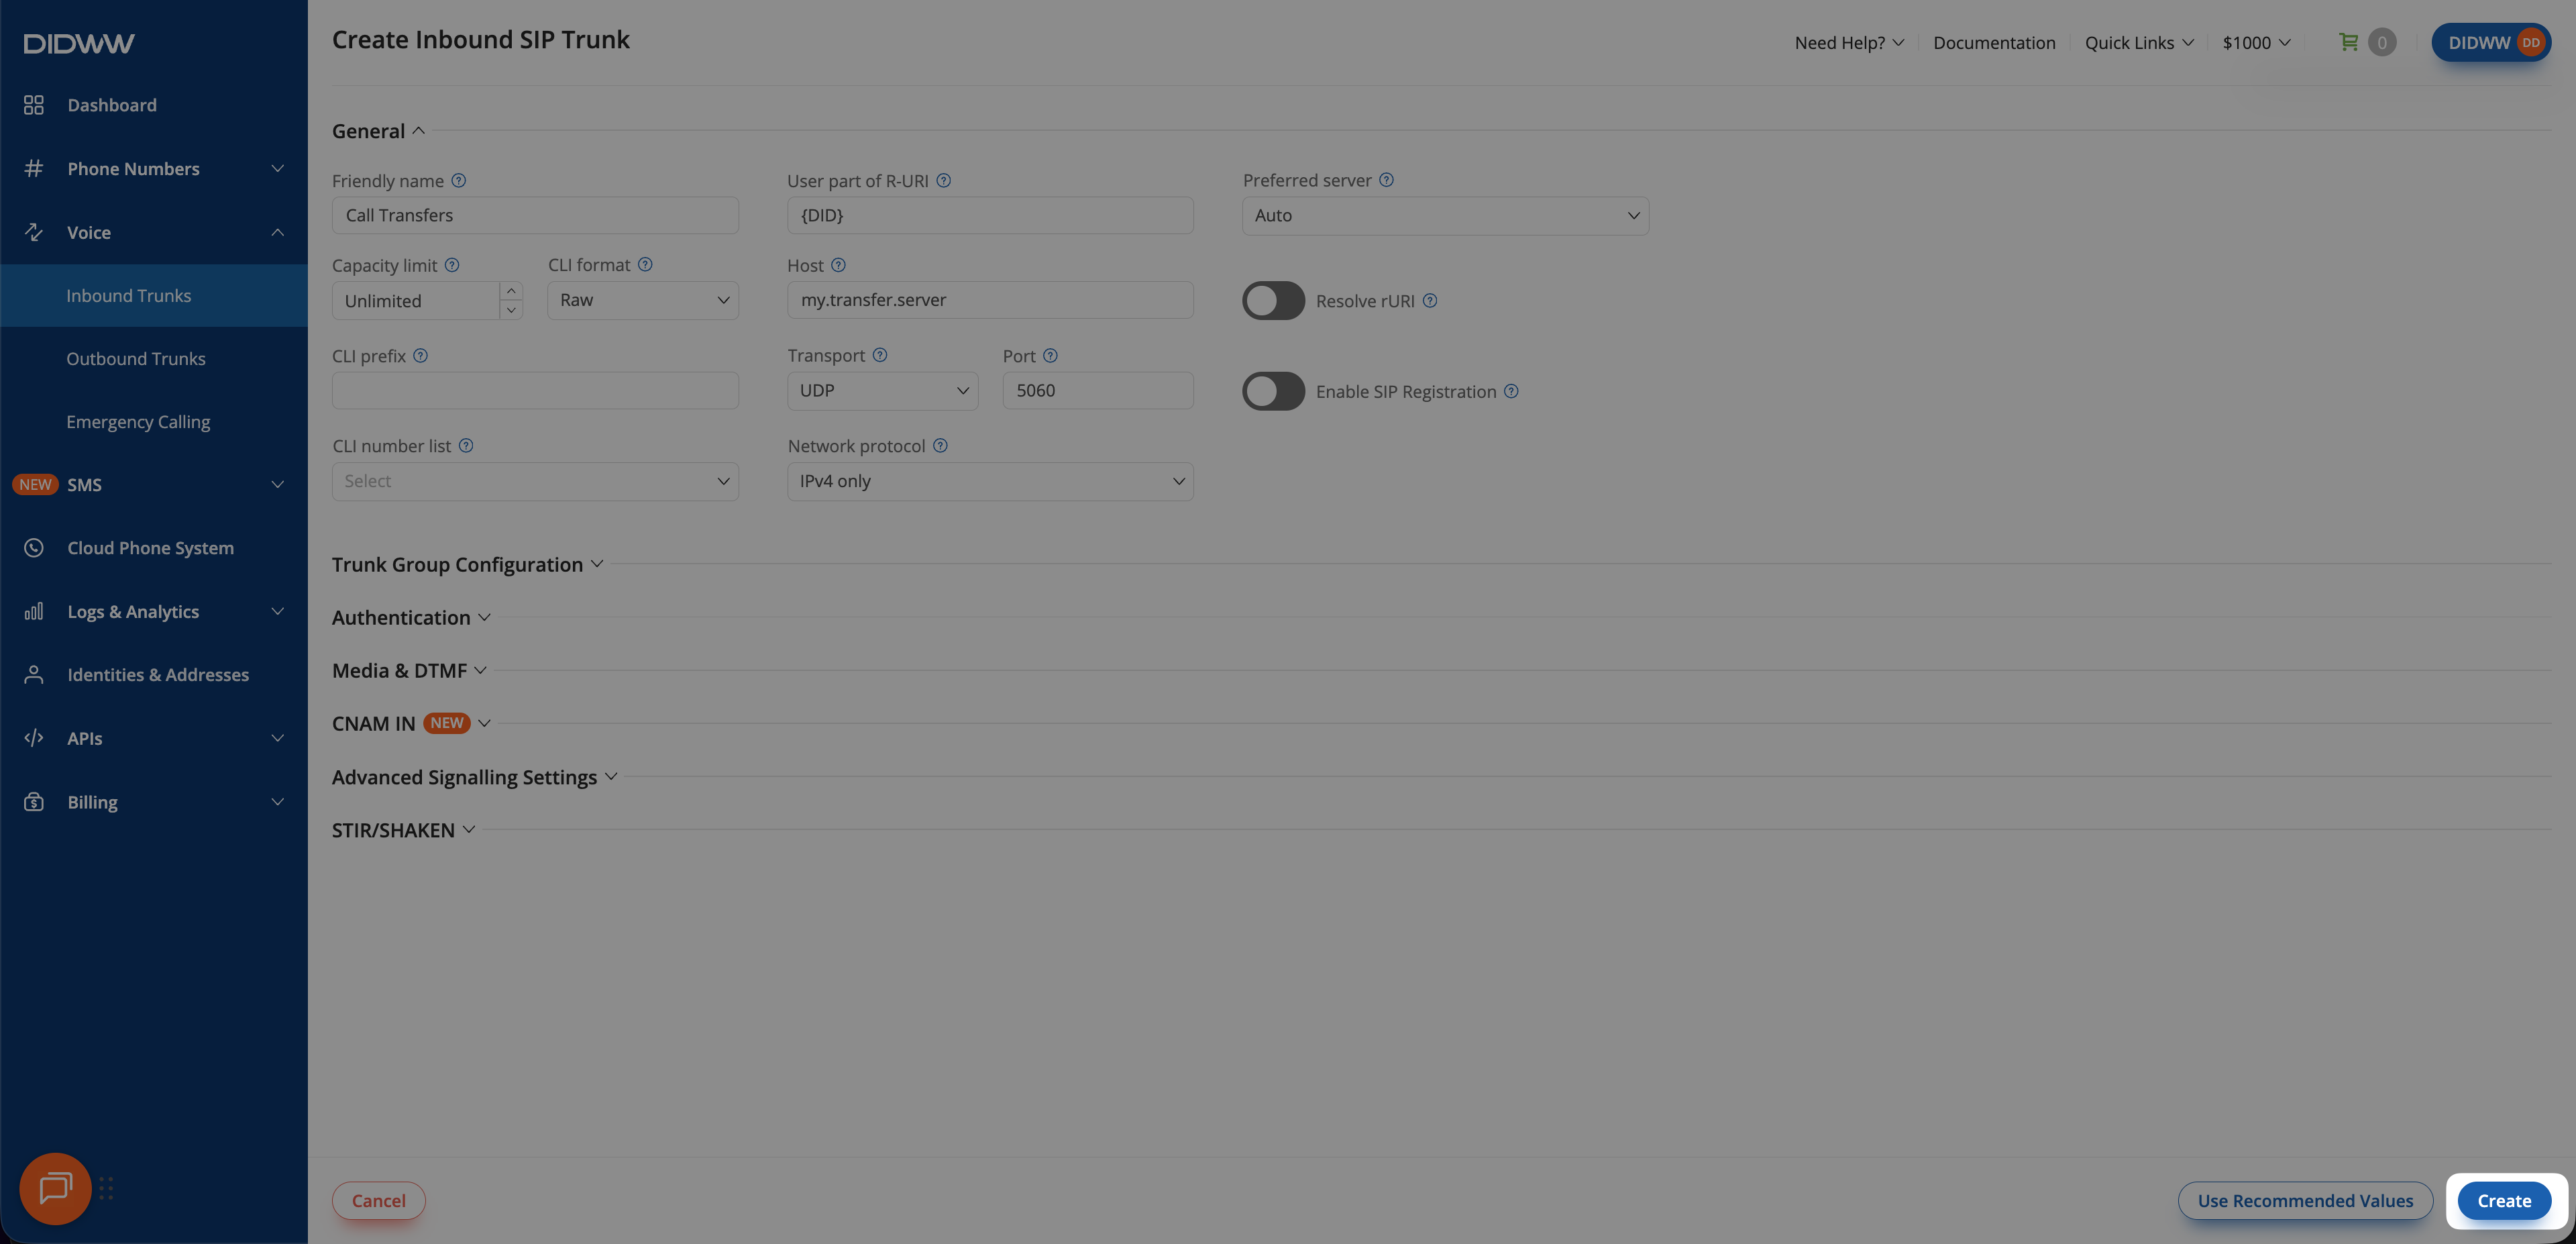
Fig. 9. Creating the inbound SIP trunk#
Step 6: Assign the trunk to DID numbers#
Calls can be redirected or transferred only after the DID number routes to the inbound trunk.
Go to Phone Numbers > My Numbers.
Select the DID numbers to assign to the inbound SIP trunk.
Click Batch Actions > Update Trunks.
Select the inbound SIP trunk you created.
Click Confirm.
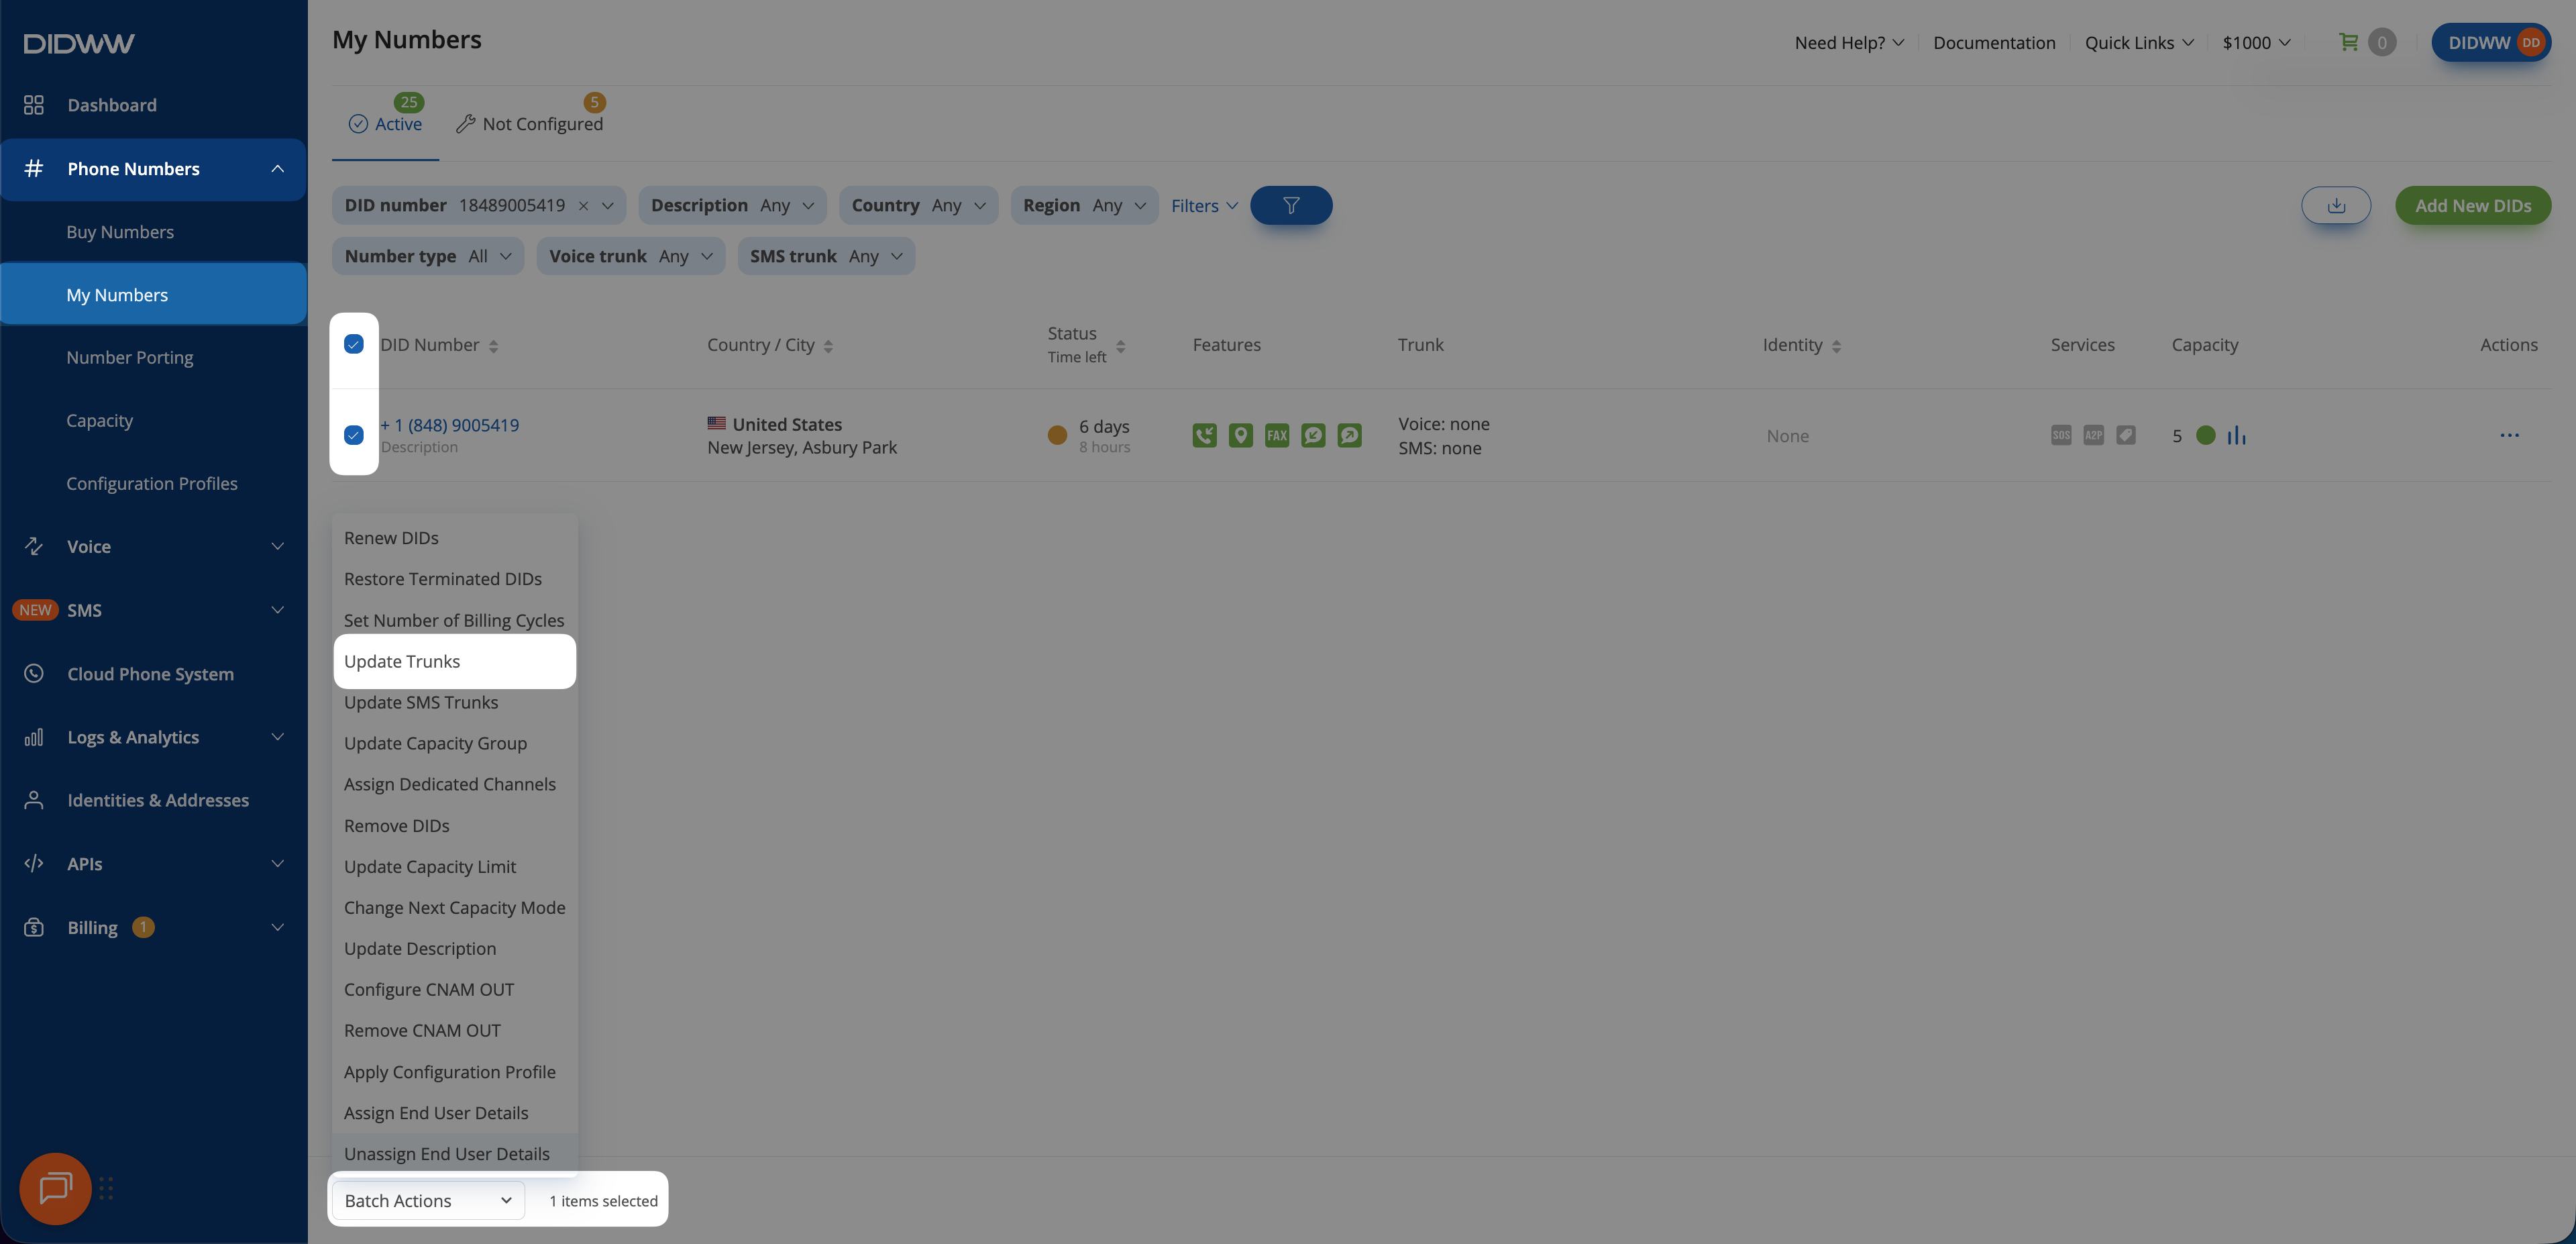
Fig. 10. Selecting Update Trunks from Batch Actions#
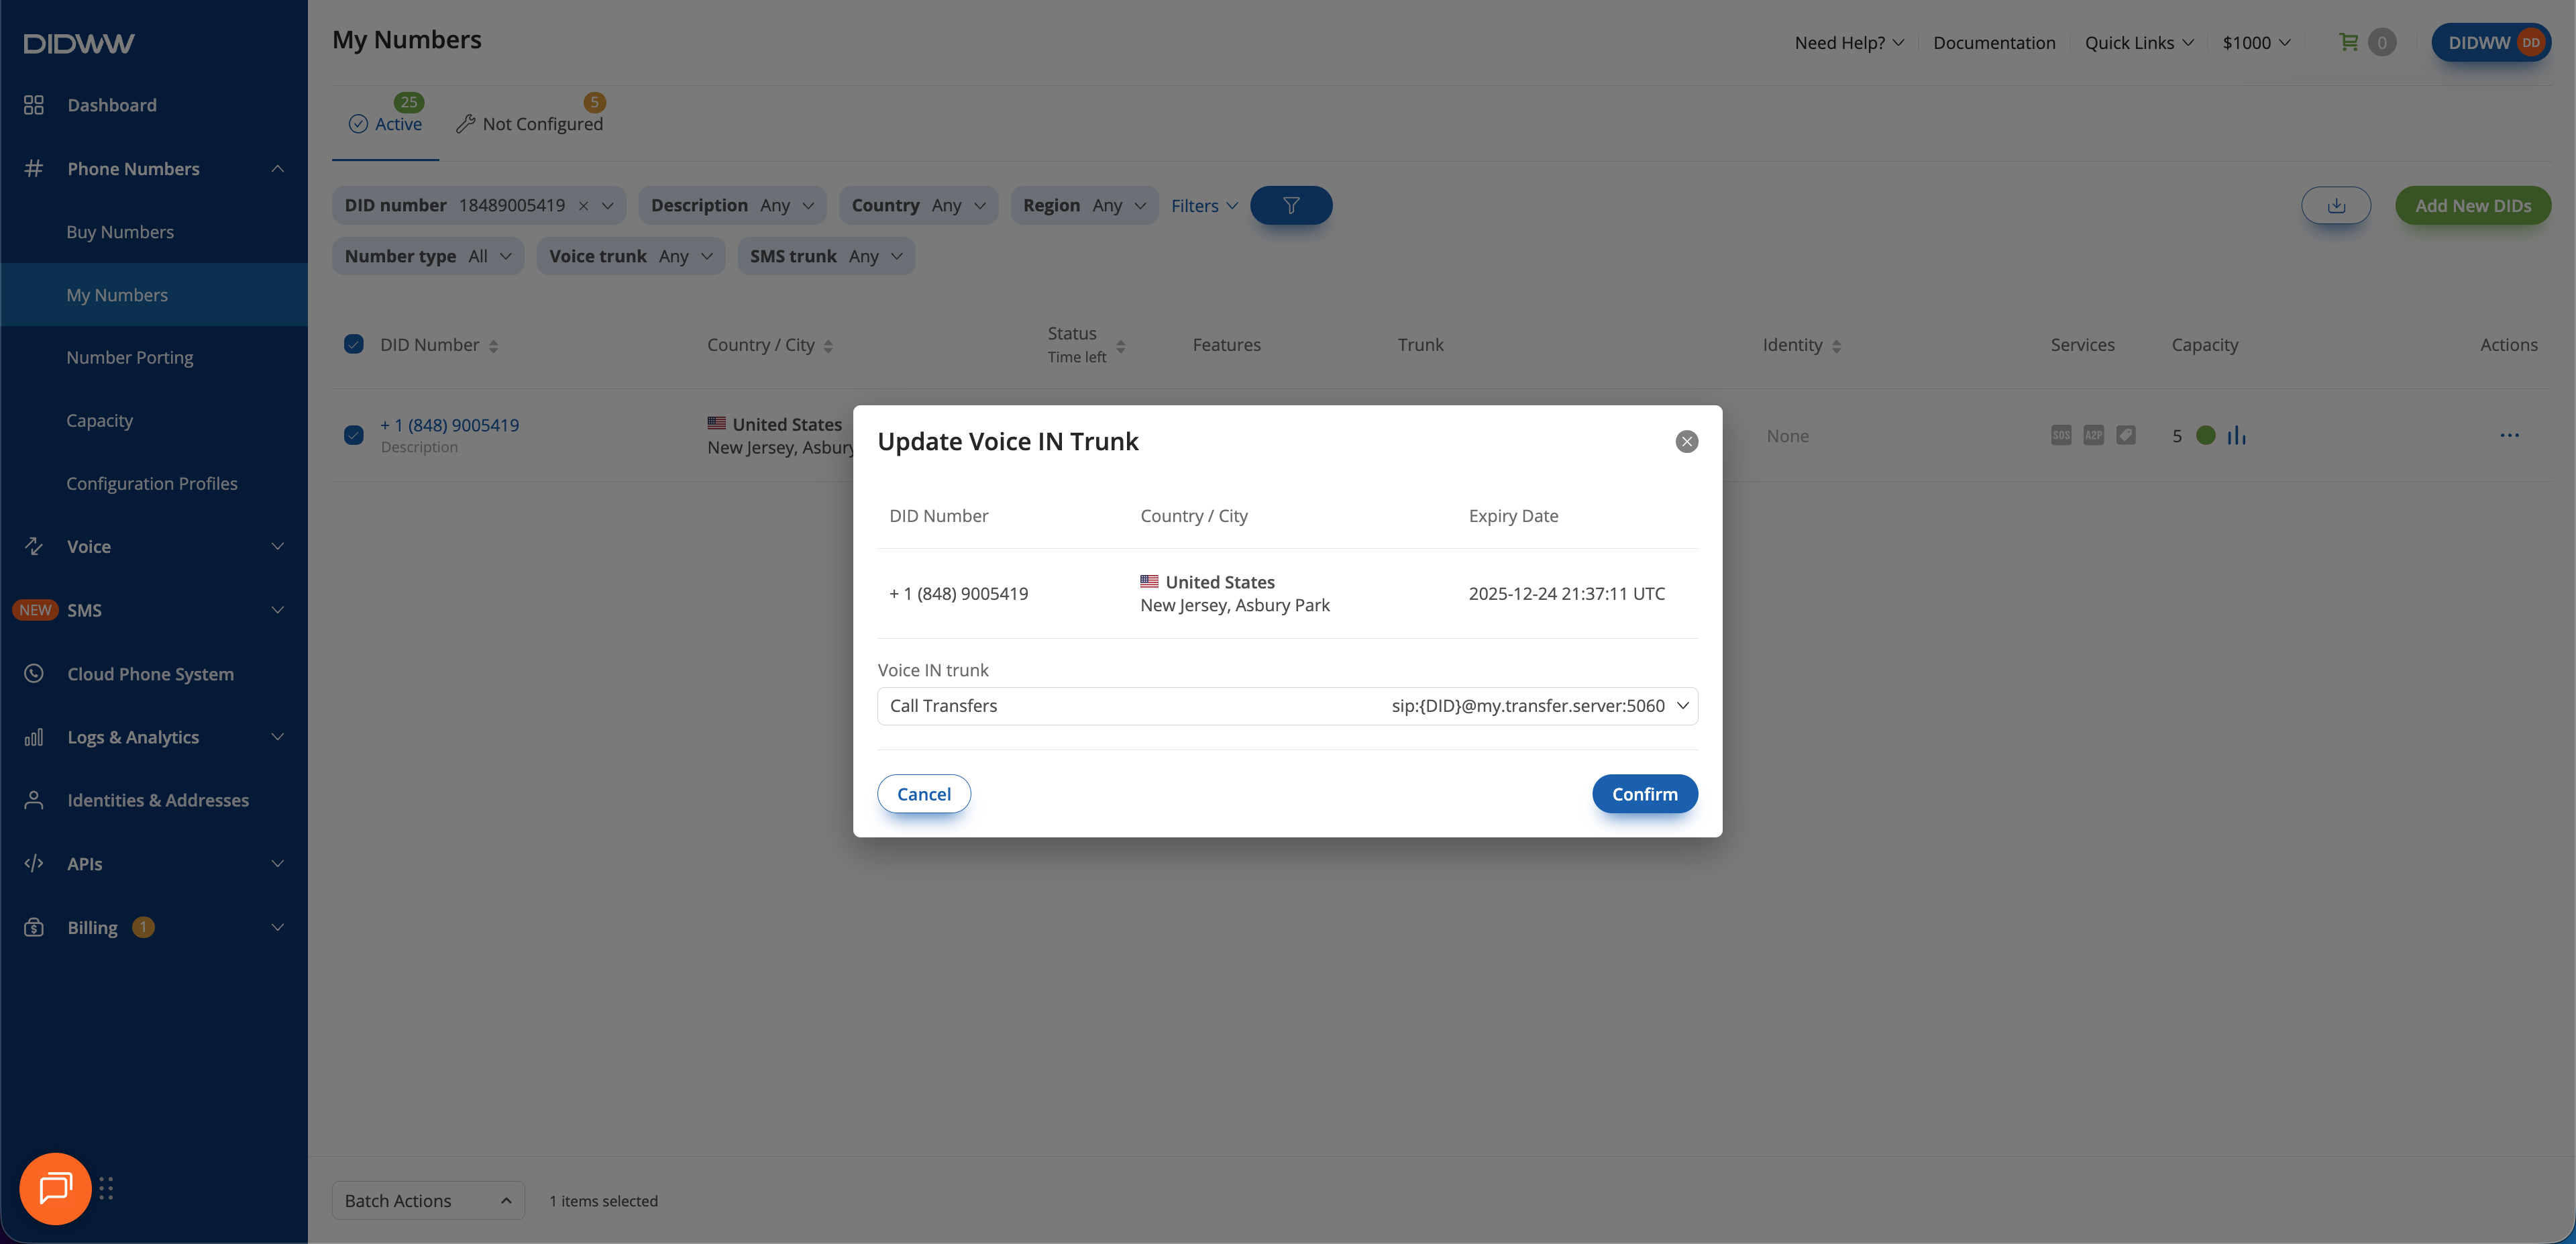
Fig. 11. Assigning the inbound SIP trunk to the selected DID numbers#
3. Configure your SIP platform#
Step 1: Build the destination SIP URI#
Construct the destination as a sip: URI that points to a DIDWW
outbound signaling endpoint:
sip:NEW_PSTN_NUMBER@<outbound_endpoint>
NEW_PSTN_NUMBER is the destination phone number in E.164 format without
the leading +. <outbound_endpoint> is a DIDWW outbound signaling
endpoint. For example:
sip:12025550199@fra.eu.out.didww.com
Place this URI in the Contact header of a SIP 301 or 302 response, or in
the Refer-To header of a SIP REFER request.
Step 2: Trigger the transfer#
Use this method when the call must be answered before the destination is selected.
Answer the inbound call to establish a SIP dialog.
Send an in-dialog SIP
REFERrequest to DIDWW.Place the destination SIP URI in the
Refer-Toheader:Refer-To: <sip:12025550199@fra.eu.out.didww.com>
Wait for DIDWW to respond with
200 OKor202 Accepted.Send
BYEto close the original call leg.
DIDWW validates the request against Max Transfers and places a new call through the outbound trunk. See SIP REFER transfer for a request example and call flow.
Use this method when the destination can be selected before the call is answered.
Receive the inbound SIP
INVITEfrom DIDWW without answering it.Respond with
301 Moved Permanentlyor302 Moved Temporarily.Place the destination SIP URI in the
Contactheader:Contact: <sip:12025550199@fra.eu.out.didww.com>
DIDWW validates the response against Max 30x Redirects and places a new call through the outbound trunk. See SIP 30x Redirect for a response example and call flow.
Warning
Ensure that the destination does not route back to the original DID number. Otherwise, the configuration can create a call loop.
Step 3: Test the transfer#
Call a DID number assigned to the inbound SIP trunk.
Answer the call on your platform.
Trigger a SIP
REFERtransfer.Confirm that the original call leg ends and the new outbound call is established.
Call a DID number assigned to the inbound SIP trunk.
Do not answer the call on your platform.
Confirm that the platform sends a SIP 301 or 302 response.
Confirm that the call is redirected and two-way audio is established with the destination.
Review Inbound Call Logs and Outbound Call Logs to verify both call legs and their SIP responses. If the transfer does not complete, contact DIDWW Support at support@didww.com.
Expected result#
A valid SIP 301 or 302 response redirects the unanswered inbound call to the URI in the
Contactheader.A valid in-dialog SIP
REFERrequest transfers the answered call to the URI in theRefer-Toheader.DIDWW authenticates the new call with the outbound trunk credentials stored in the inbound trunk’s Authorization settings.