Pay-per-minute Channels
Pay-per-minute channels (also called metered channels) define the inbound voice capacity and determine how many concurrent calls your DID numbers can handle. Unlike flat-rate channels, there are no setup or monthly charges. Instead, usage is billed at a low per-minute rate based on the selected channel pool.
Metered channels are assigned through Capacity Groups, which let multiple DIDs share the same channels. You can assign up to 1,000 metered channels per group.
By default, two capacity plans are available, each with its own country coverage and pricing:
Standard Channels Pool – Includes a defined list of core countries.
Extended Channels Pool – Covers additional countries not available in the Standard pool.
Optionally, a Custom Channel Pool may be enabled for your account as part of a specific agreement. If available, it will appear in the User Panel under its custom name and will have its own coverage and pricing.
Note
Countries are color-coded in the channel pool list to indicate which plan they belong to.
Standard pool countries appear in gray.
Extended pool countries appear in blue.
If a country belongs to a custom pool, it will appear under that pool with a unique color.
If your required country is not listed in either pool, or if you are unsure which pool to select, contact sales@didww.com for assistance.
Assign Metered Channels
Use metered capacity to control the maximum number of simultaneous inbound calls for one or more DIDs within a capacity group.
Before You Begin
At least one active DID number is required to assign shared and metered channels.
A positive prepaid balance is required to use metered (pay-per-minute) channels. To add funds, go to Payment Methods and use your preferred payment option.
Step 1. Open Capacity & Select Channel Pool
In the DIDWW User Panel, go to Phone Numbers > Capacity.
Select the channel pool (Standard or Extended) based on the country of your DID numbers.
Note
The pay-per-minute cost is shown in the pricing block under Metered capacity cost.
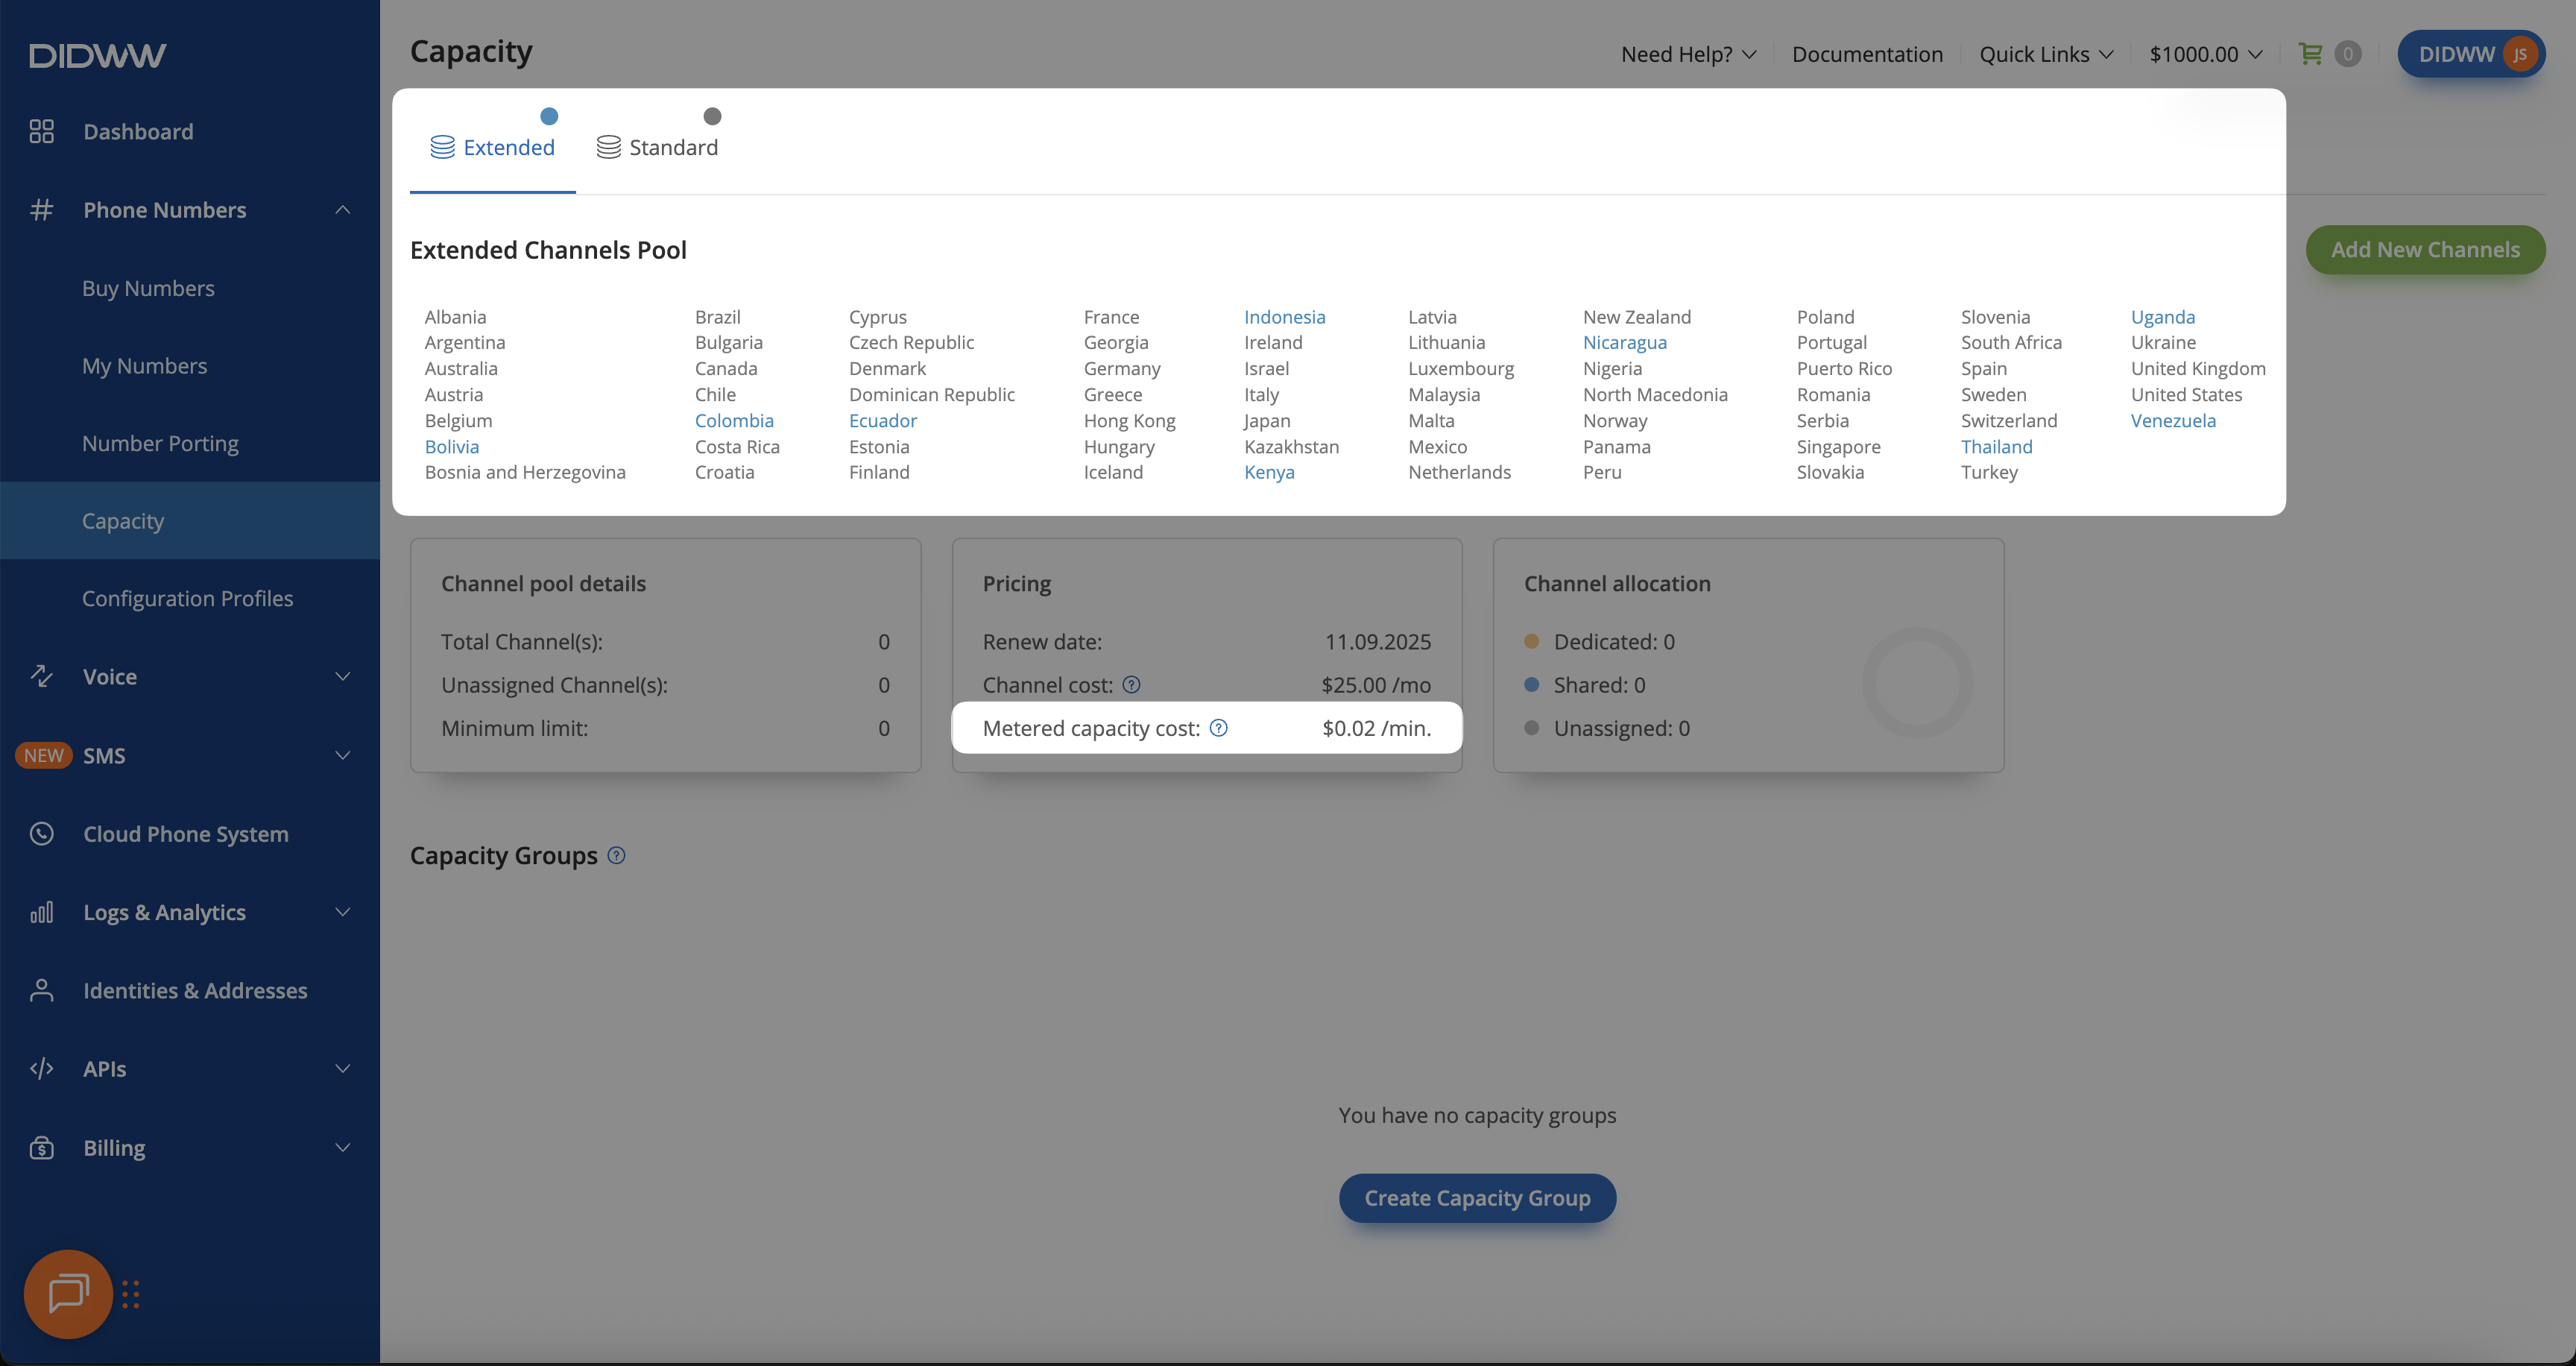
Fig. 1. Capacity page before ordering metered (pay-per-minute) channels
Step 2: Create a Capacity Group
In the DIDWW User Panel, go to Phone Numbers > Capacity.
Select the capacity pool (Standard or Extended) where you have at least one unassigned channel.
Click Create Capacity Group.
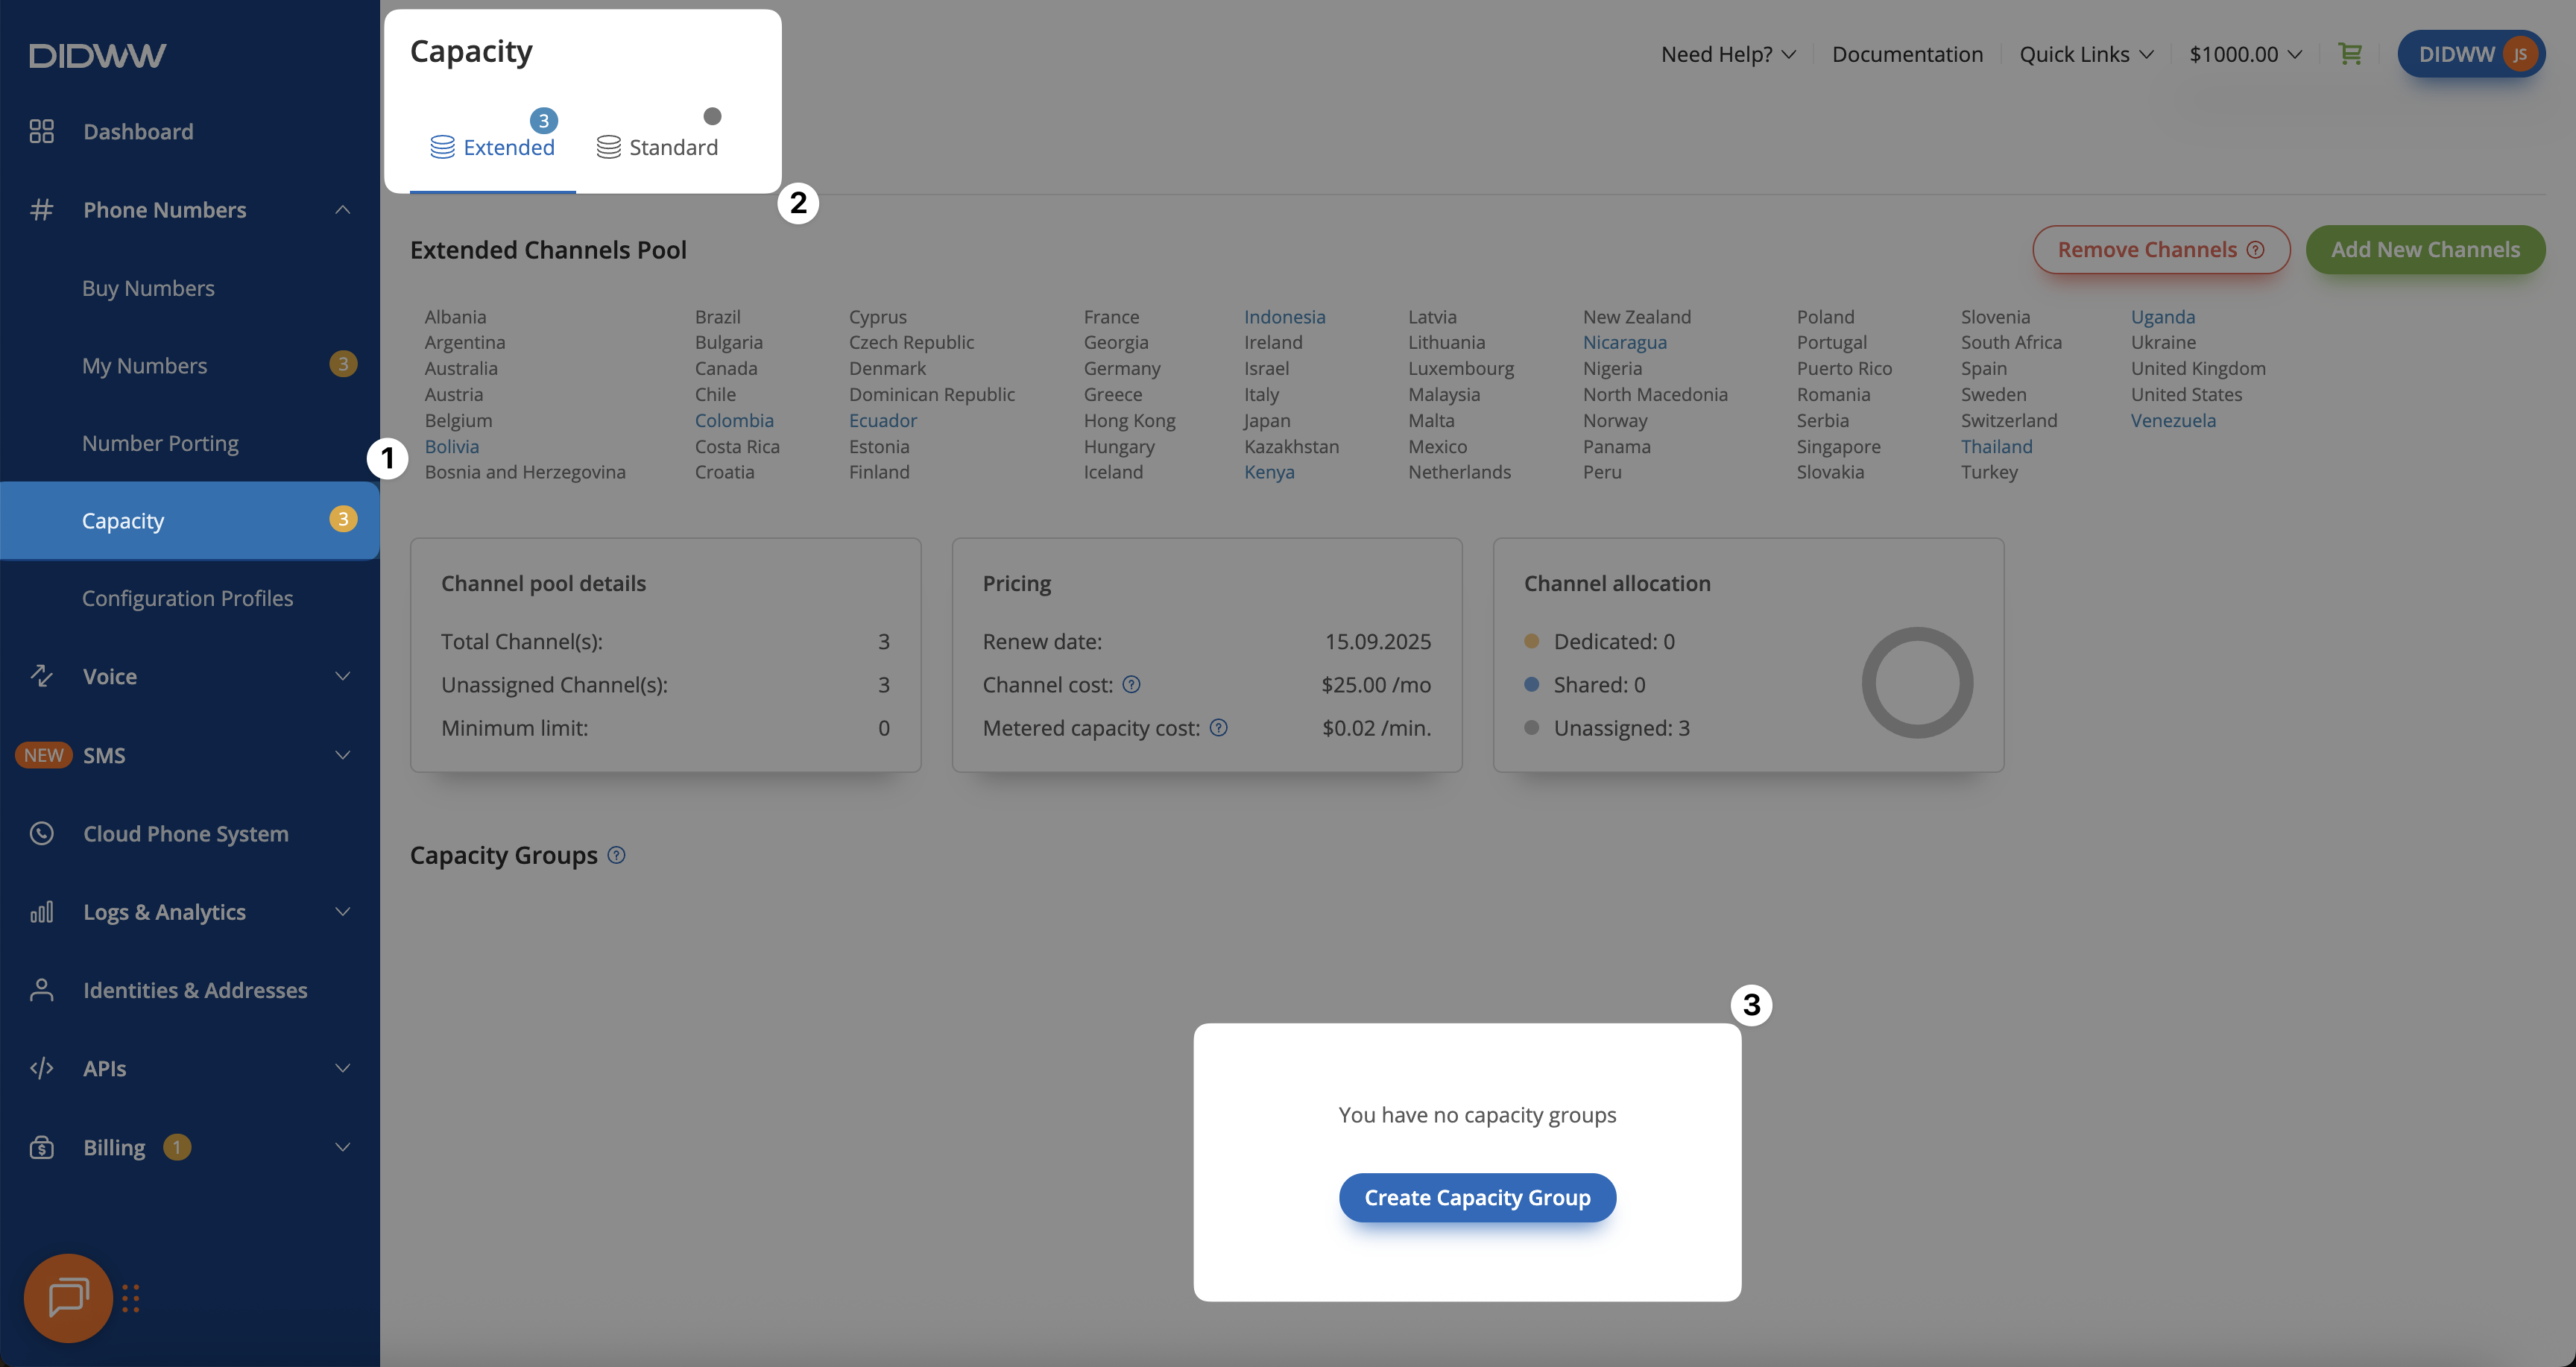
Fig. 2. Create Capacity Group for metered (pay-per-minute) channels
Step 3: Assign Metered Channels
In the pop-up window, enter a Group name.
Under Assigned metered Channels, specify the number of channels (up to 1,000).
Click Create.
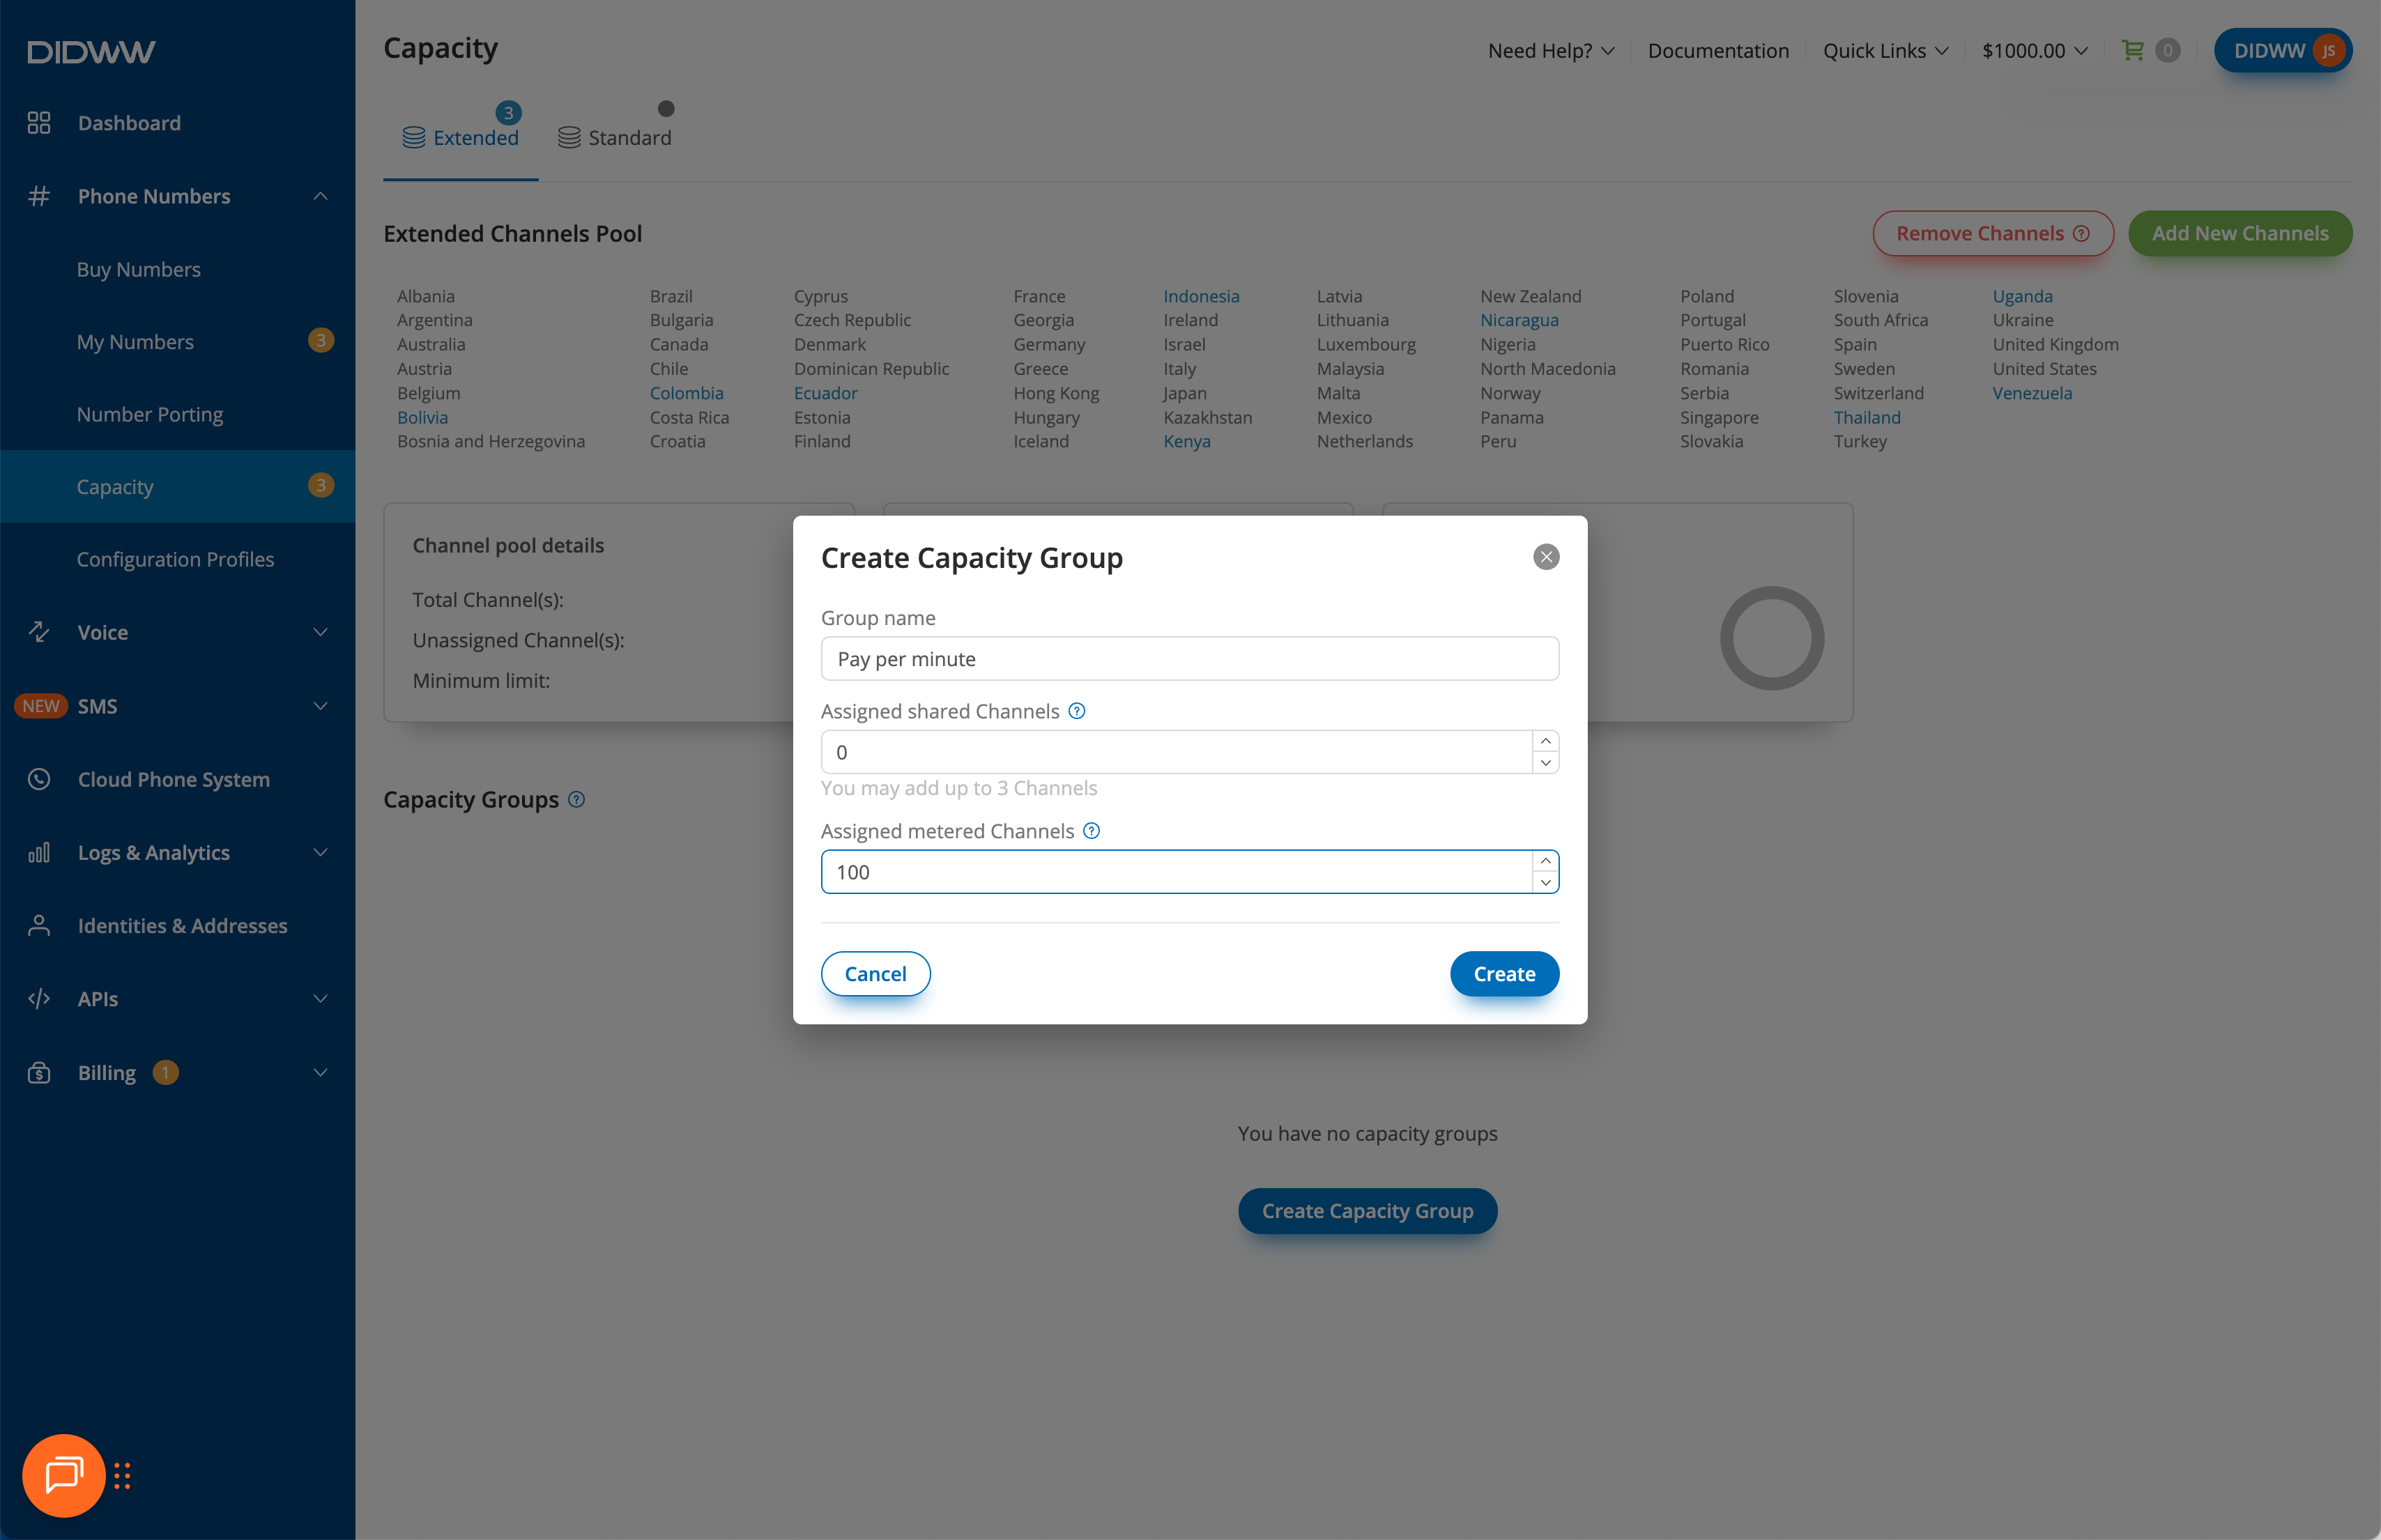
Fig. 3. Create Capacity Group and assign metered (pay-per-minute) channels
Step 4: Select DID(s) and Open Batch Actions
After creating a Capacity Group and assigning metered (pay-per-minute) channels to it, you need to Update Capacity Group and assign your DID numbers to that group.
In the DIDWW User Panel, go to Phone Numbers > My Numbers.
Use filters to quickly locate the DID number(s) you want to update, and select them.
At the bottom of the page, click Batch Actions and choose Update Capacity Group.
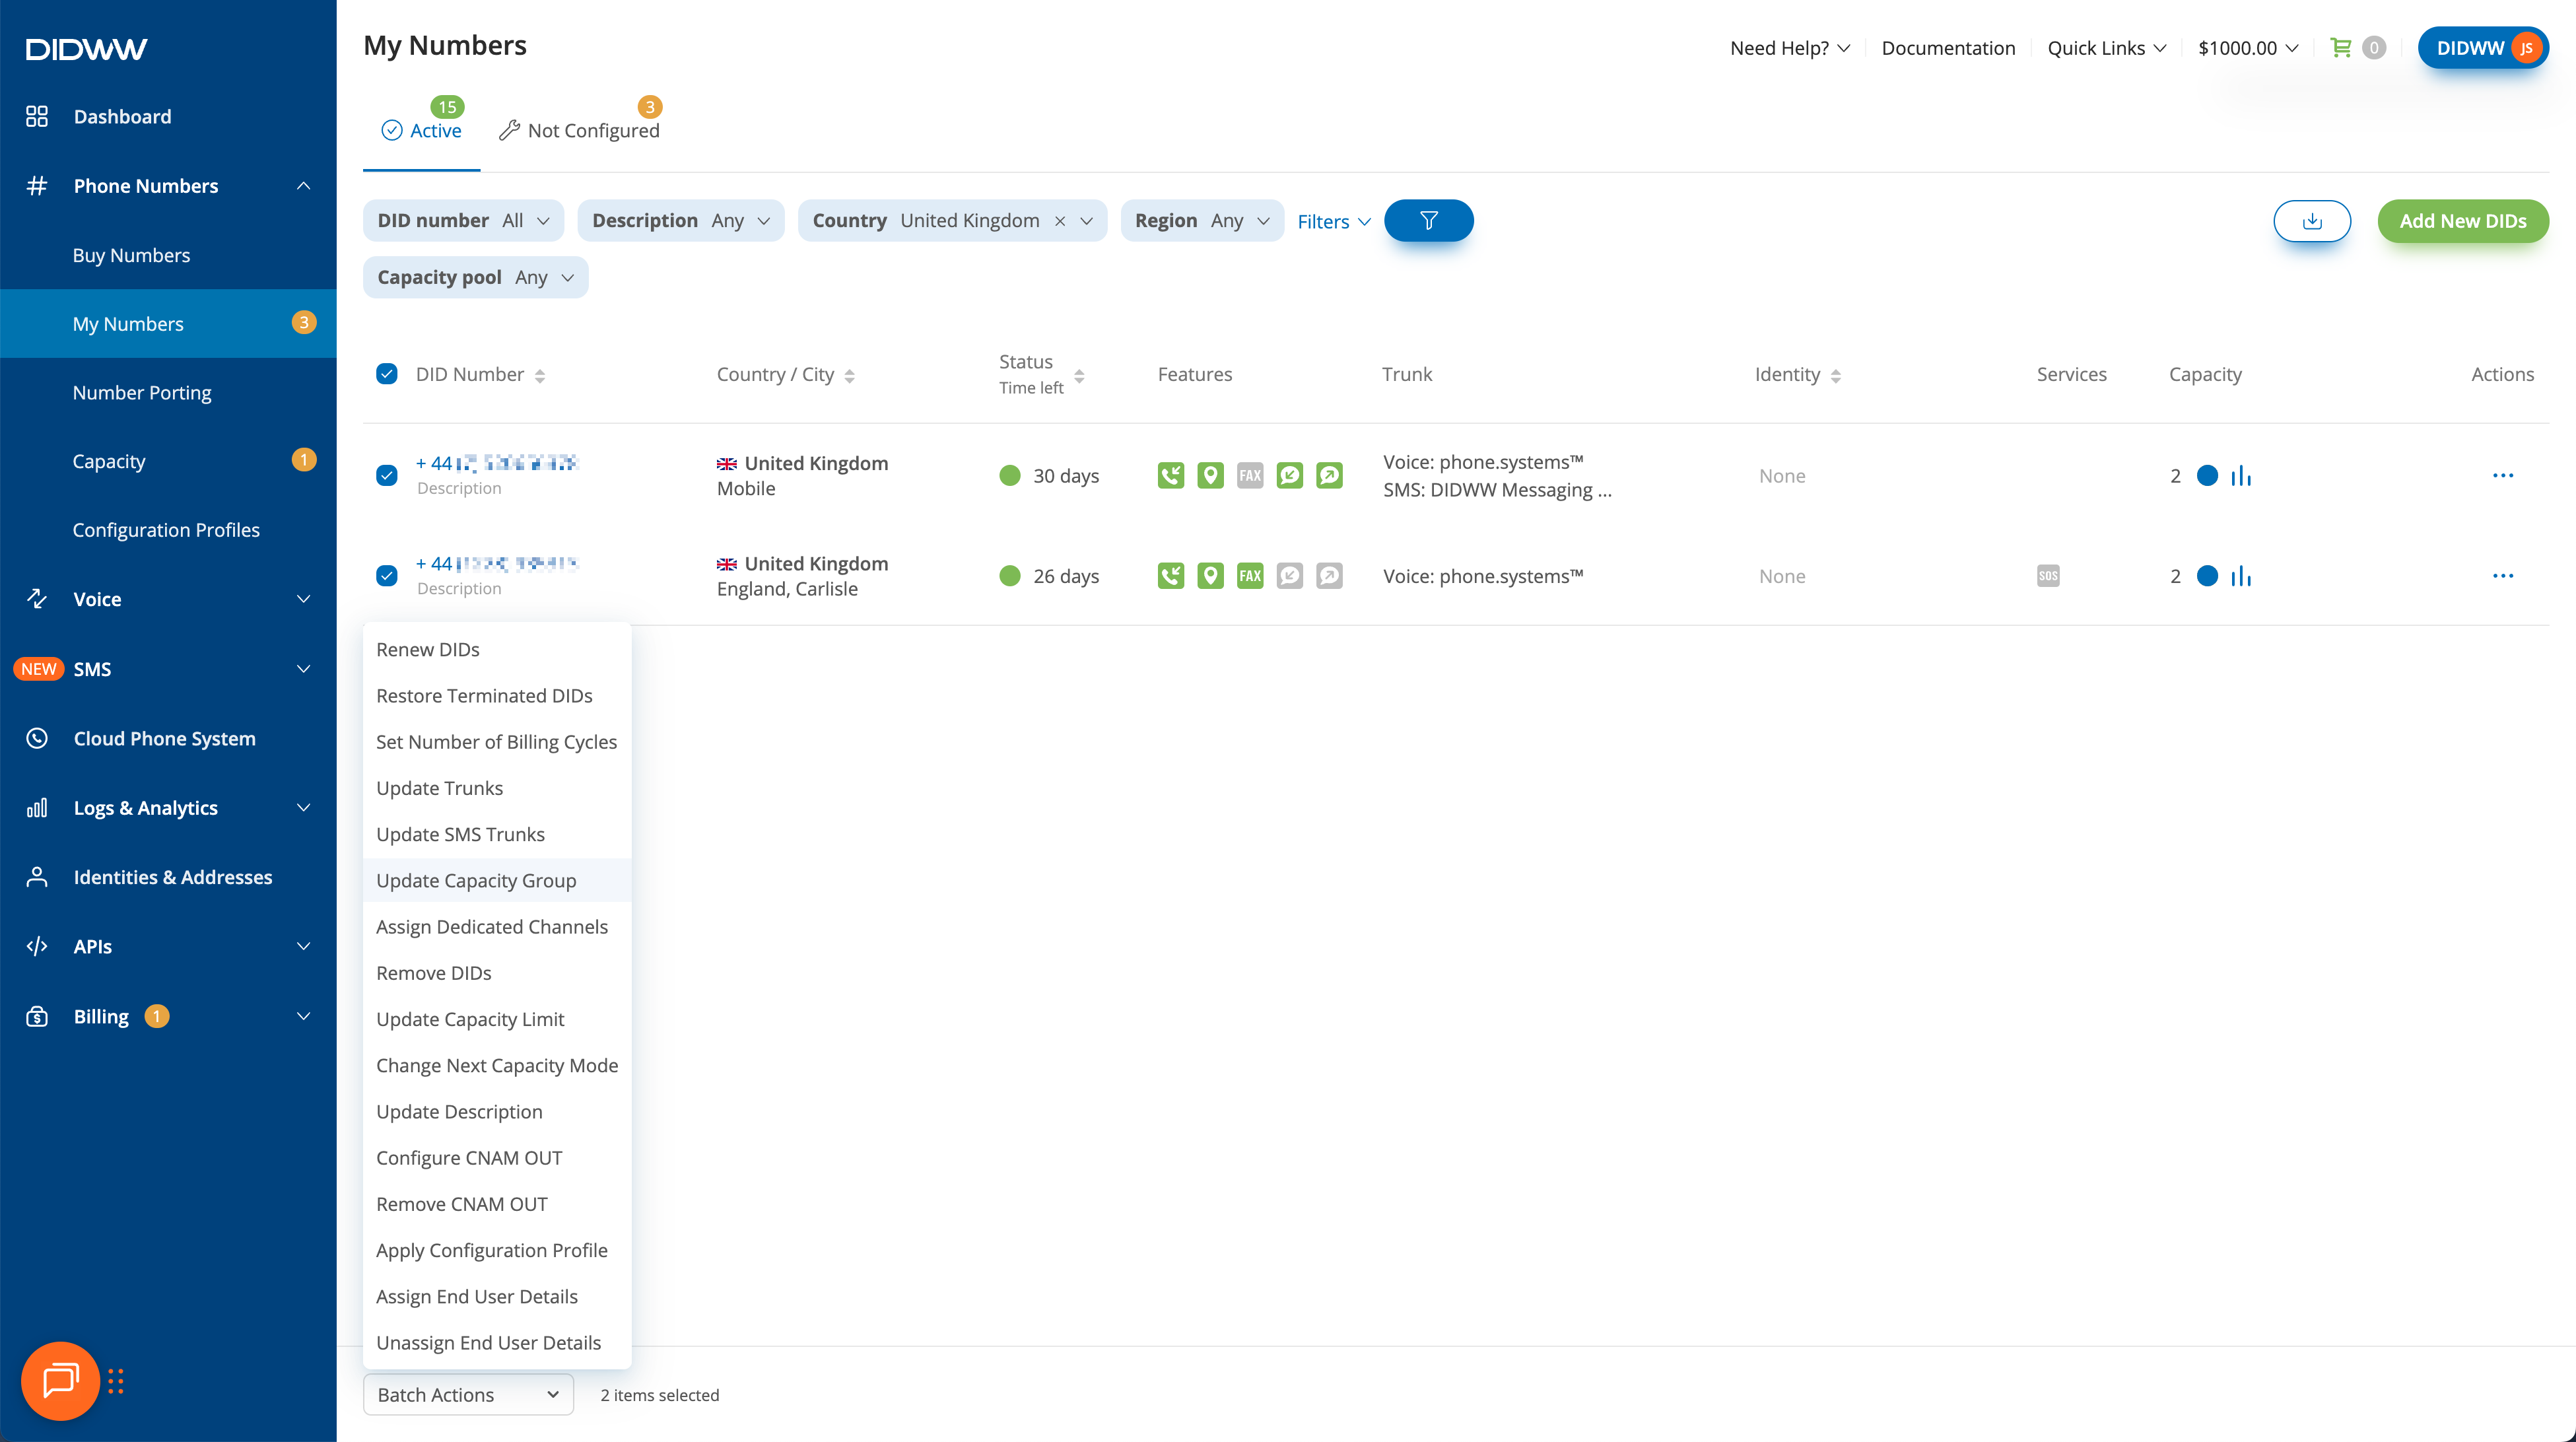
Fig. 4. Select DIDs and assign them to a Capacity Group with metered (pay-per-minute) channels
Step 5: Update Capacity Group
Important
Only DIDs that support additional capacity can be assigned to a Capacity Group.
Shared flat-rate channels always take priority over metered (pay-per-minute) channels. Metered capacity is used only when no shared channels are assigned to the group, or when all dedicated channels (for example, from the DID+2 plan) and shared channels are already in use.
DID numbers purchased with the Pay-per-minute Capacity option are automatically added to a Capacity Group in the Standard Channels Pool, with 100 metered channels assigned by default.
In the Update Capacity Group window, select a Capacity Group and choose the Group Name. You will also see which capacity pool the group belongs to and how many metered (pay-per-minute) channels are currently assigned to it.
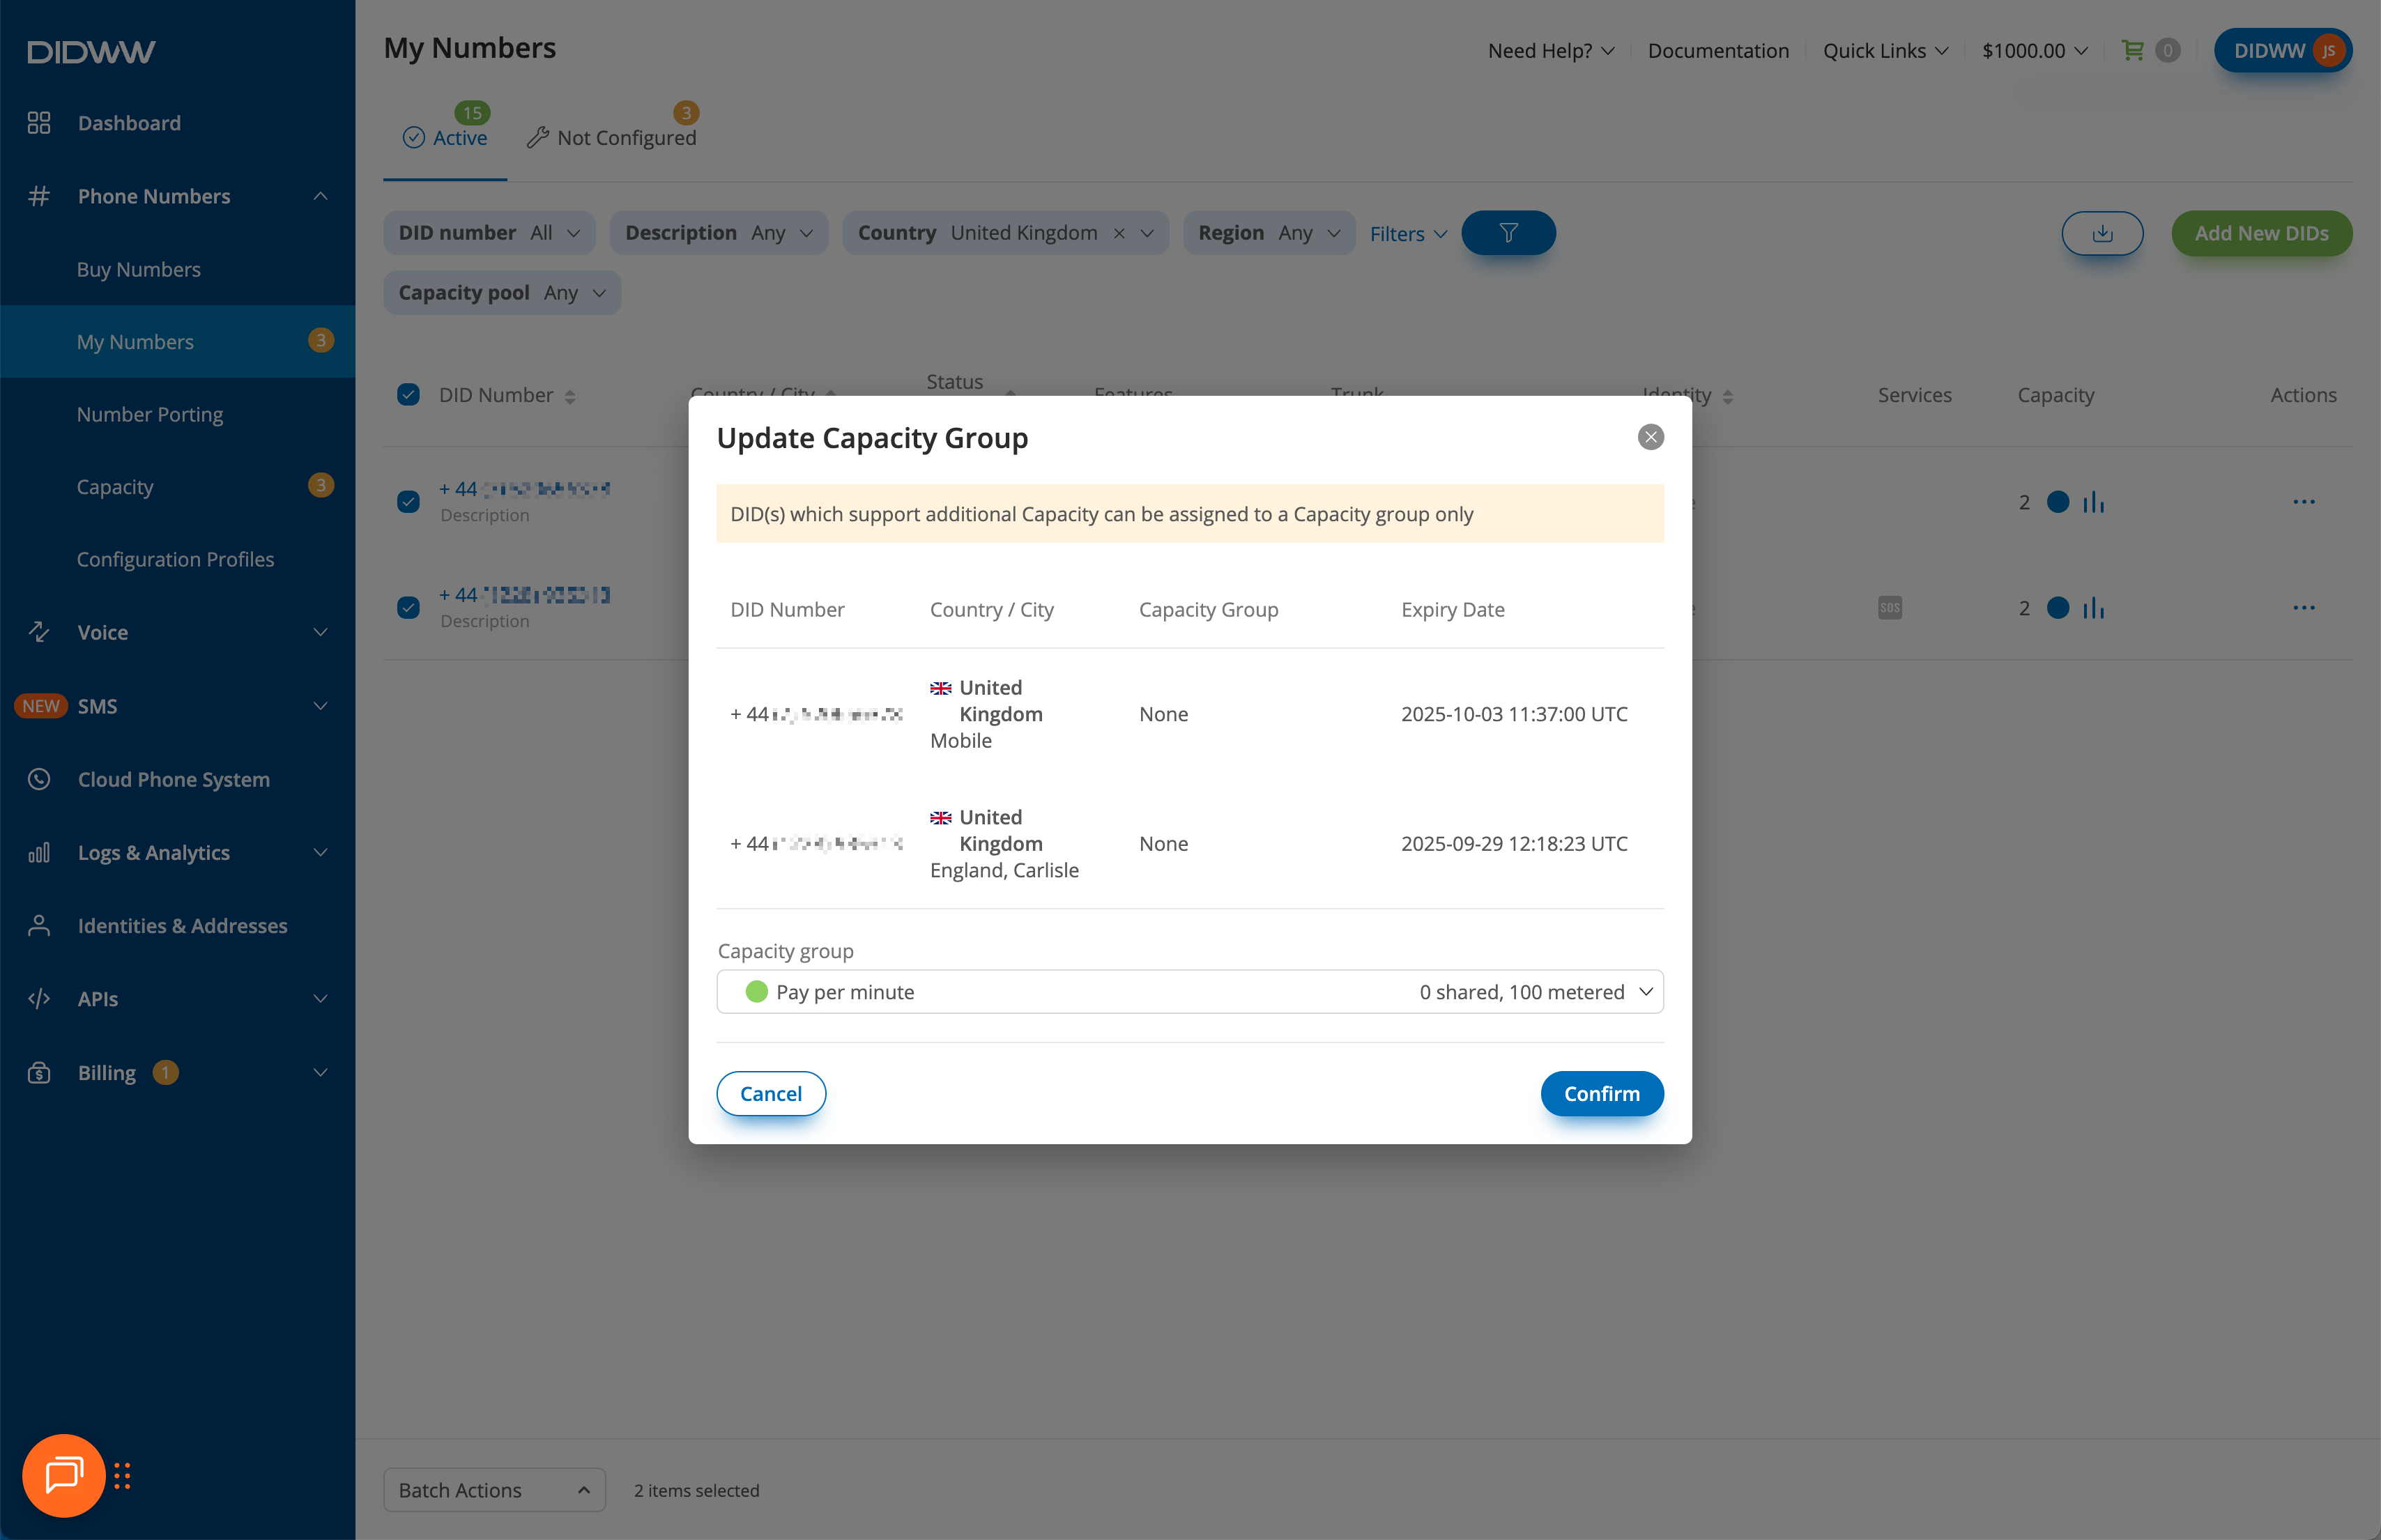
Fig. 5. Updating a Capacity Group with metered (pay-per-minute) channels
Unassign Metered Channels
If you no longer want a DID to use additional pay-per-minute (metered) capacity, you can unassign it from its Capacity Group.
Step 1: Filter Numbers by Capacity Group
In the DIDWW User Panel, go to Phone Numbers > My Numbers.
Select the Active or All Numbers tab.
To quickly locate numbers with dedicated channels, open Filters and enable the Capacity group filter.
When the filter is added, choose the capacity pool (Standard or Extended) and select the name of the Capacity Group (e.g., Pay per minute).
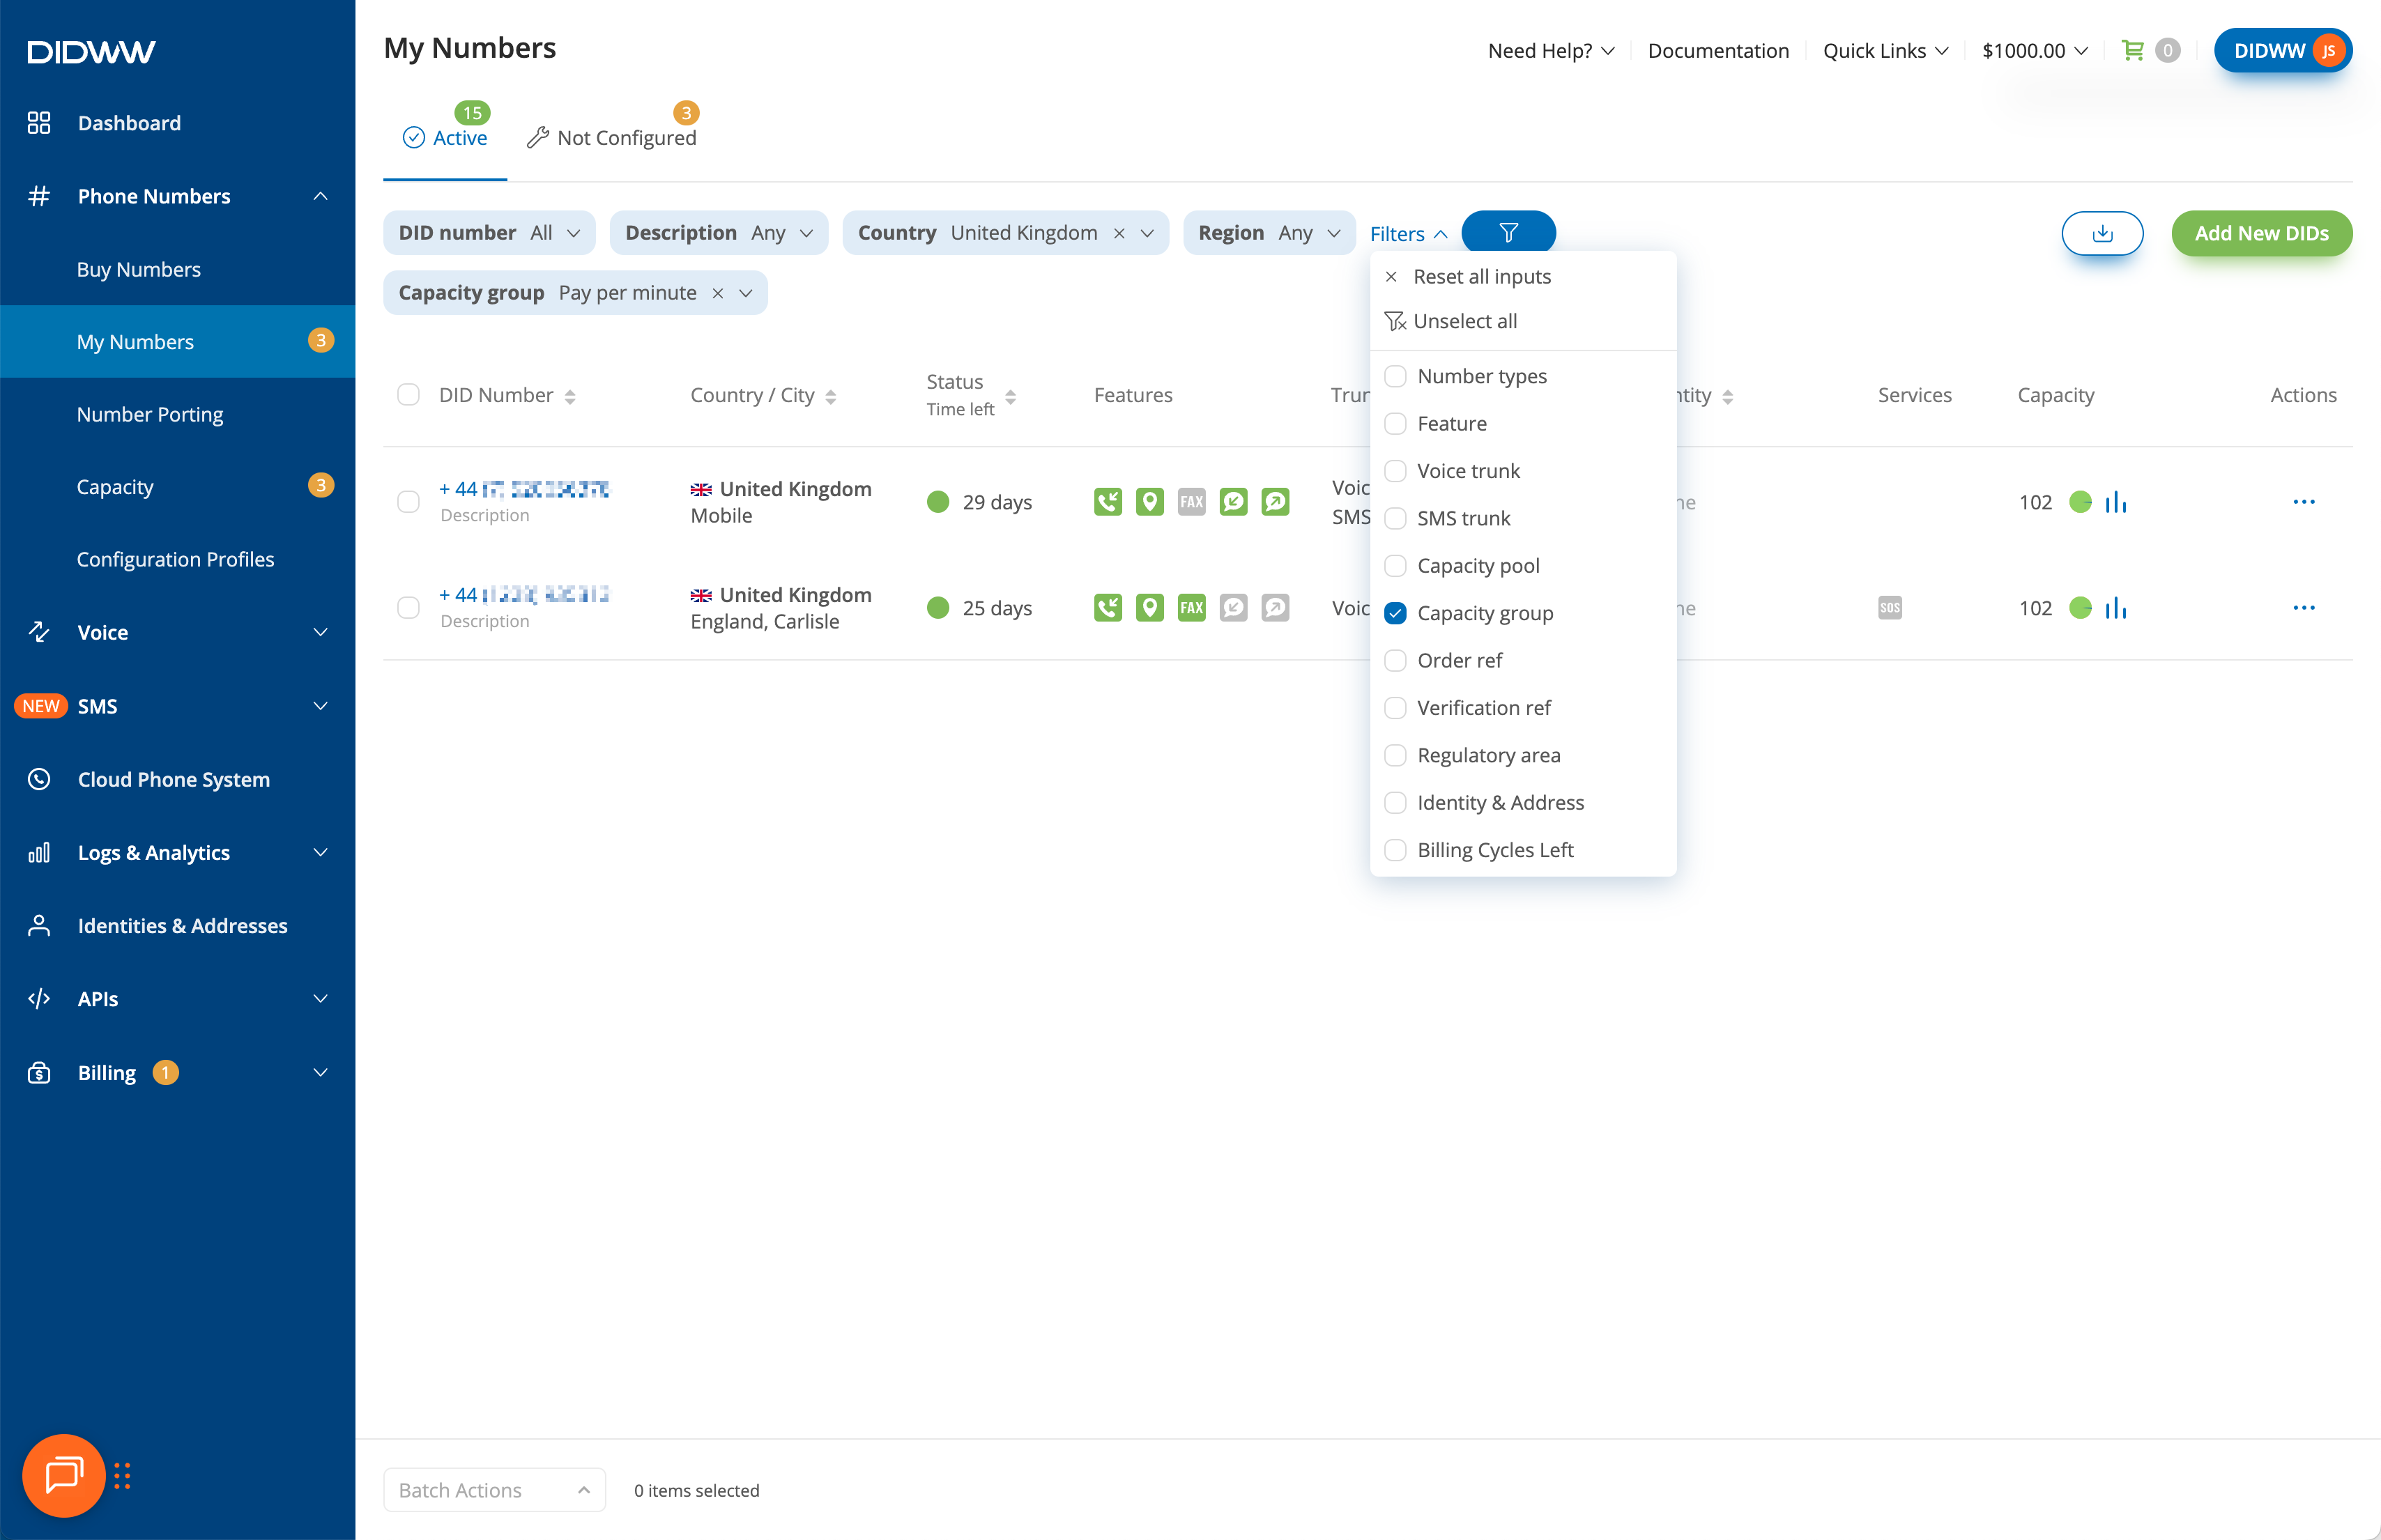
Fig. 6. DID numbers filtered by Capacity Group with metered (pay-per-minute) channels
Step 2: Check the Capacity Column
To confirm you are unassigning the correct numbers, check the Capacity column for details about the assigned metered capacity.
Locate your DID number in the table.
Hover over the Capacity column to see capacity details. A pie chart will display the pool name and the number of dedicated channels assigned.
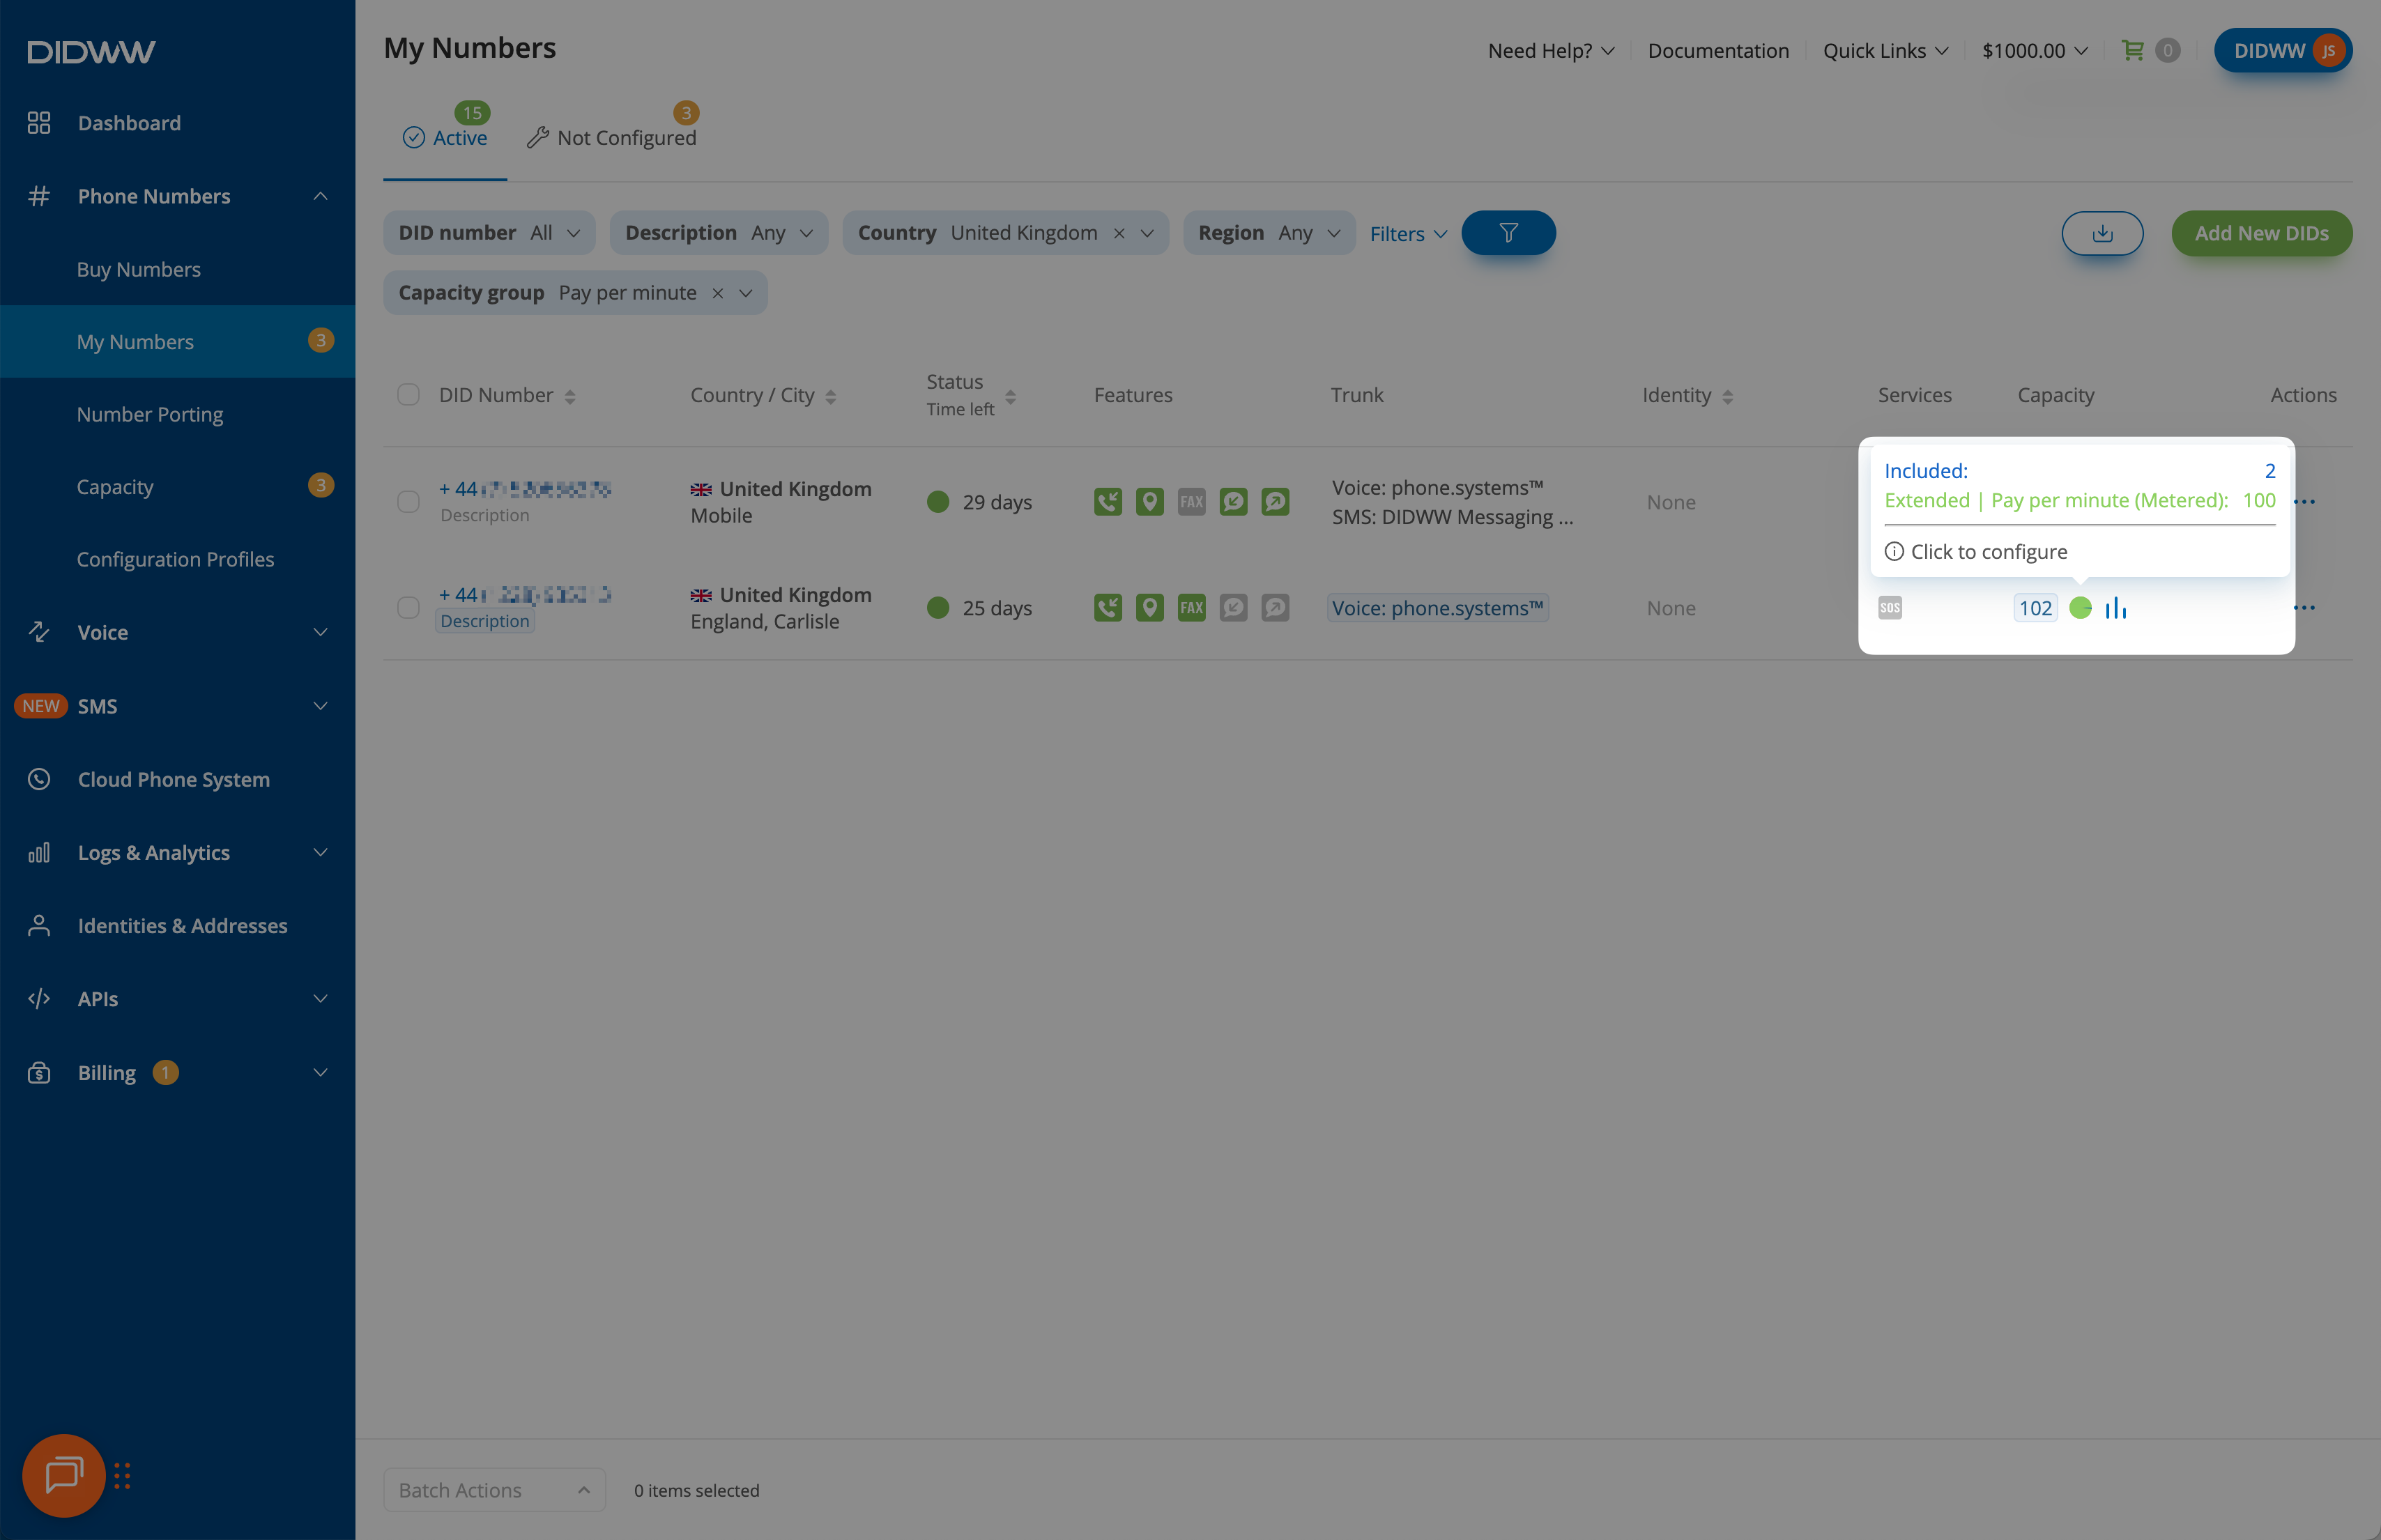
Fig. 7. Capacity allocation showing metered (pay-per-minute) channels
Step 3: Select DID(s) and Open Batch Actions
Select the DID numbers.
At the bottom of the page, click Batch Actions and choose Update Capacity Group.
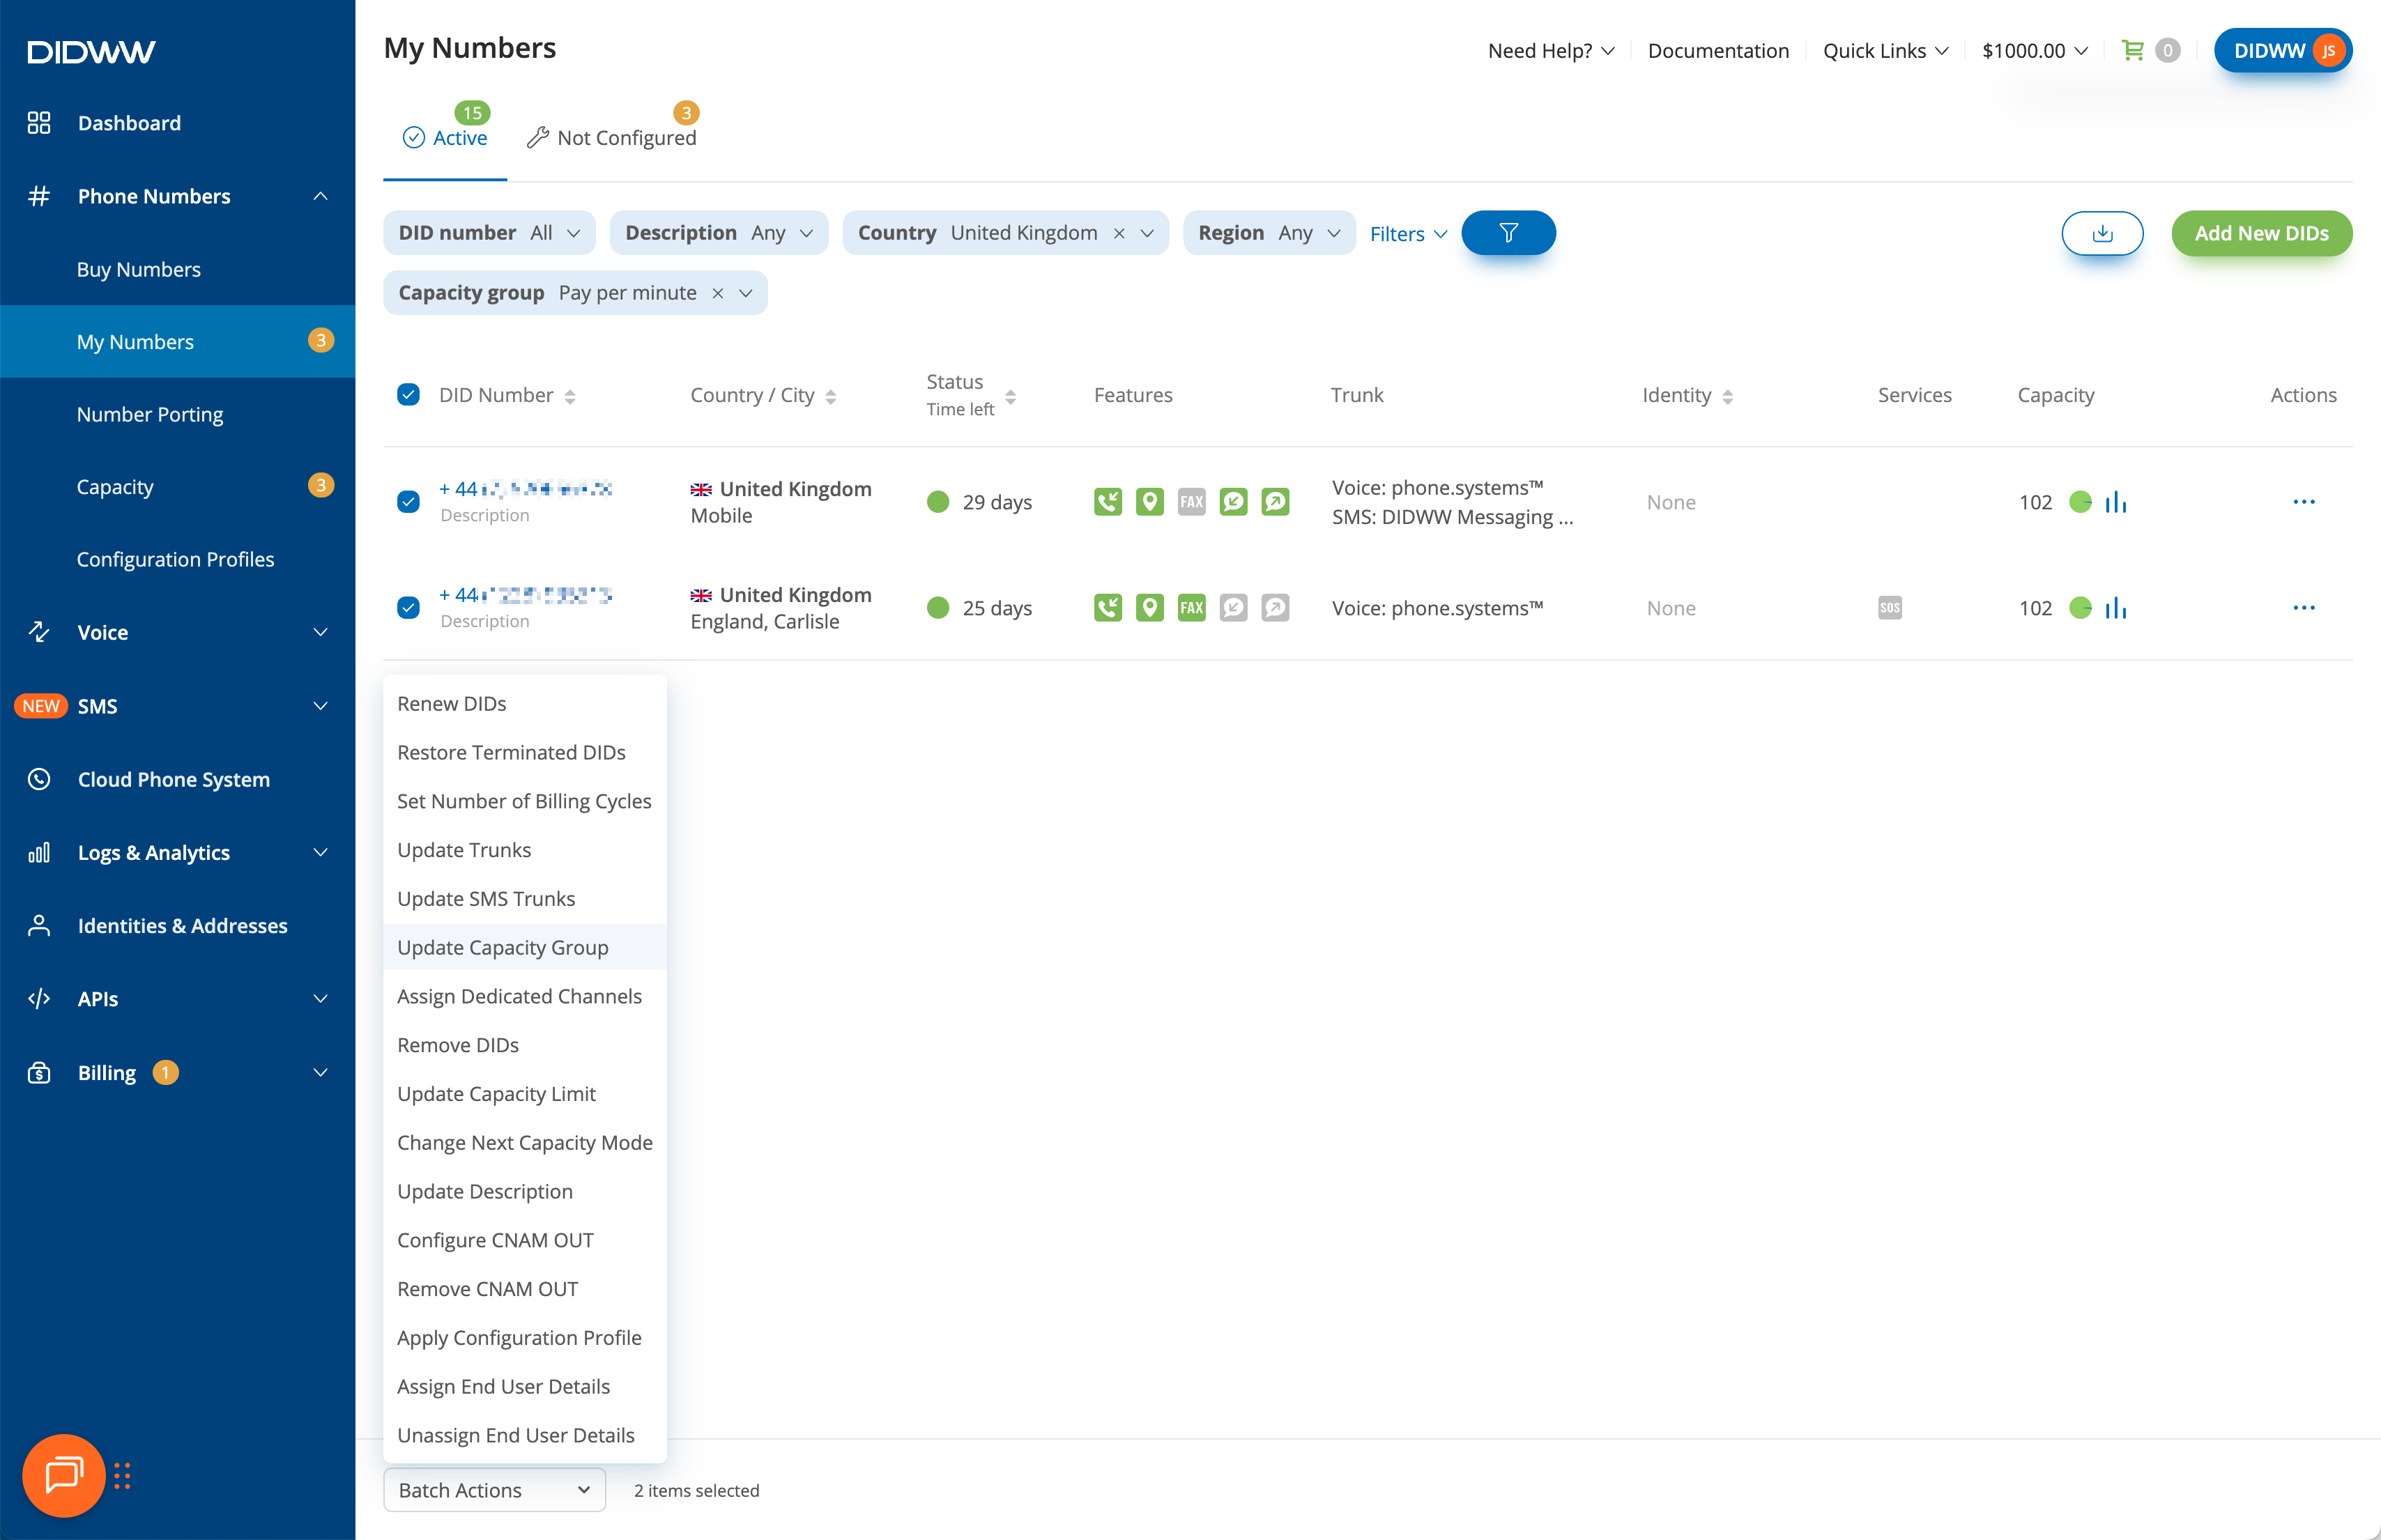
Fig. 8. Selecting DID numbers and opening Batch Actions to update Capacity Group
Step 4: Unassign Capacity Group
In the Update Capacity Group window, open the Capacity group dropdown and select Unassign Capacity Group.
Click Confirm.
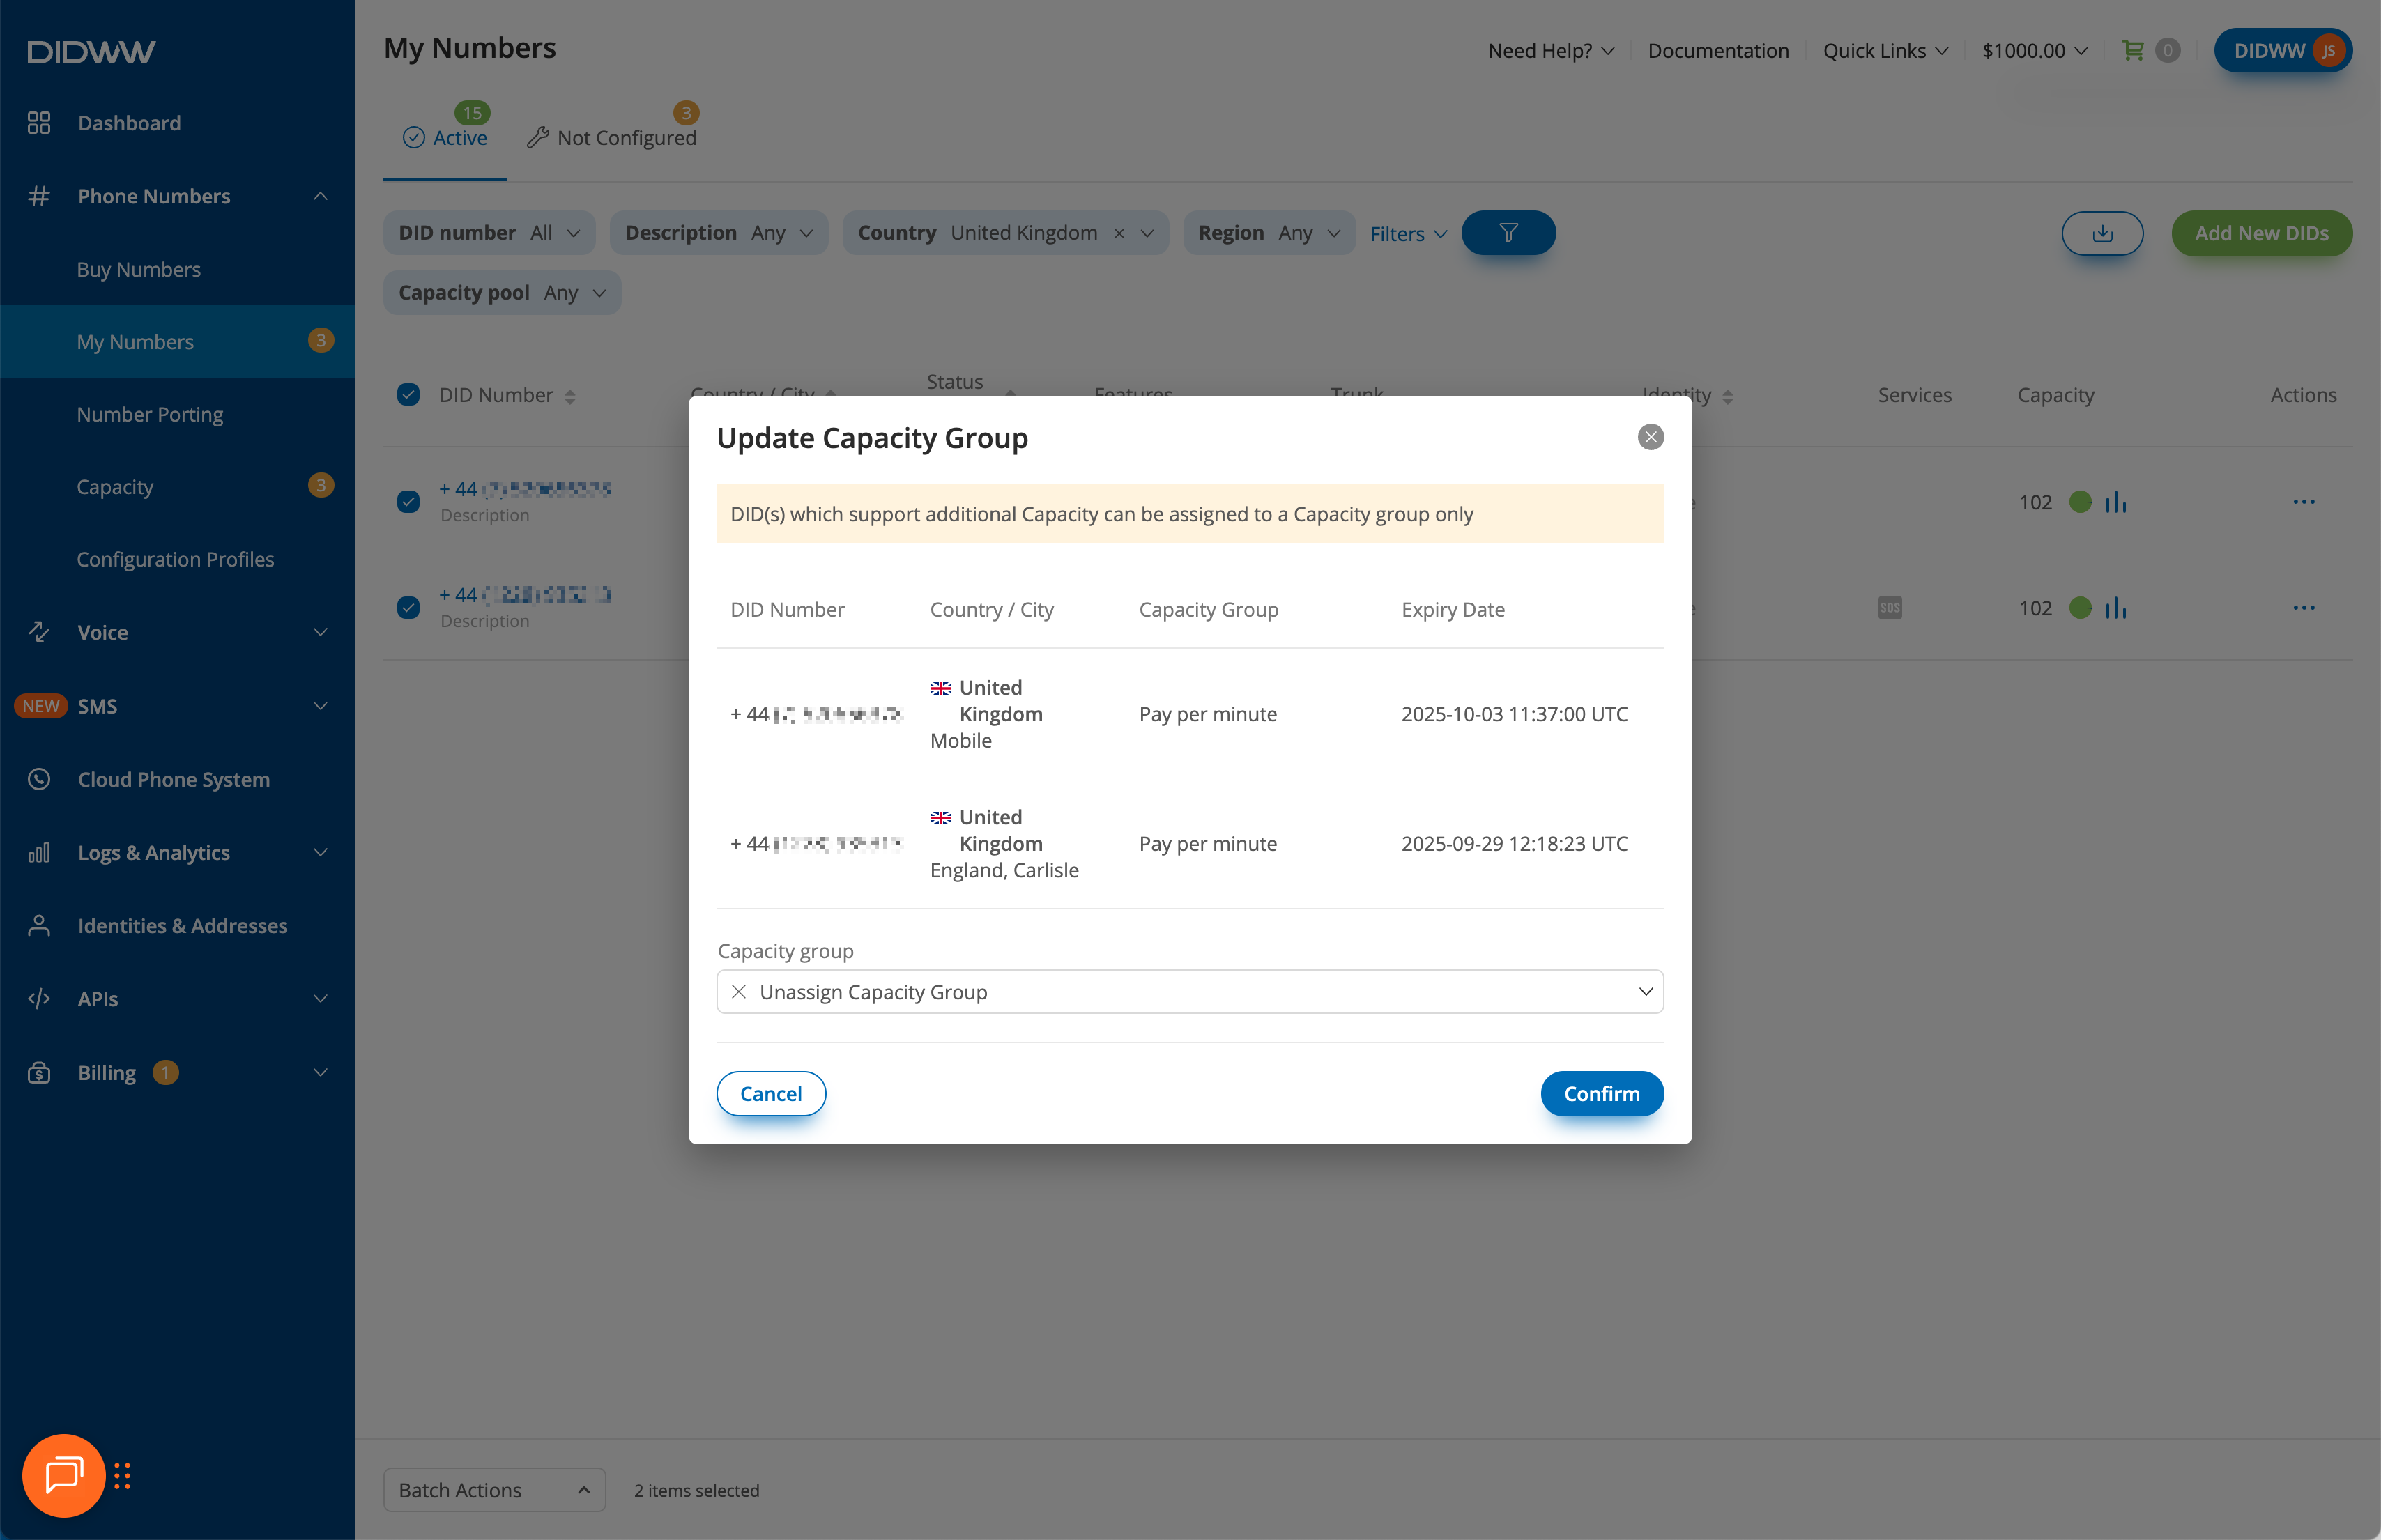
Fig. 9. Unassigning a DID from its Capacity Group in the Update Capacity Group window