Flat-rate Channels
Channels define the inbound voice capacity and determine how many concurrent calls your DID numbers can handle. When a number reaches its channel limit, or if you are using a DID+0 plan with no dedicated channels included, you can add flat-rate voice channels, billed at a fixed monthly cost per channel.
Flat-rate channels can be assigned in two ways: either to a single DID (dedicated), or to a shared Capacity Group that multiple DIDs use together. Shared channels improve efficiency because channels are available to any DID in the group, which is especially useful when call volumes vary.
By default, two capacity plans are available, each with its own country coverage and pricing:
Standard Channels Pool – Includes a defined list of core countries.
Extended Channels Pool – Covers additional countries not available in the Standard pool.
Optionally, a Custom Channel Pool may be enabled for your account as part of a specific business agreement. If available, it will appear in the User Panel under its custom name and will have its own coverage and pricing.
Note
Countries are color-coded in the channel pool list to indicate which plan they belong to.
Standard pool countries appear in gray.
Extended pool countries appear in blue.
If a country belongs to a custom pool, it will appear under that pool with a unique color.
If your required country is not listed in either pool, or if you are unsure which pool to select, contact sales@didww.com for assistance.
Purchase Flat-rate Channels
Add new channels to your account at a fixed monthly rate.
Before You Begin
You need at least one active DID number.
Ensure that your account has a positive prepaid balance equal to or greater than the total cost of the additional channels. To add funds, go to Payment Methods and use your preferred payment option.
Verify that your DIDs are covered by the Standard or Extended Capacity Plan you intend to use, and select the correct channel pool for your country.
Note
Additional channels cannot be added to numbers that already include fixed capacity, such as toll-free numbers with 300 default channels.
Step 1. Open Capacity & Select Channel Pool
In the DIDWW User Panel, go to Phone Numbers > Capacity.
Select the channel pool (Standard or Extended) based on the country of your DID numbers.
Click Add New Channels.
Note
The monthly cost of flat-rate channels is shown in the pricing block under Channels cost.
To view the volume-based pricing details, hover your mouse over the tooltip next to Channels cost.
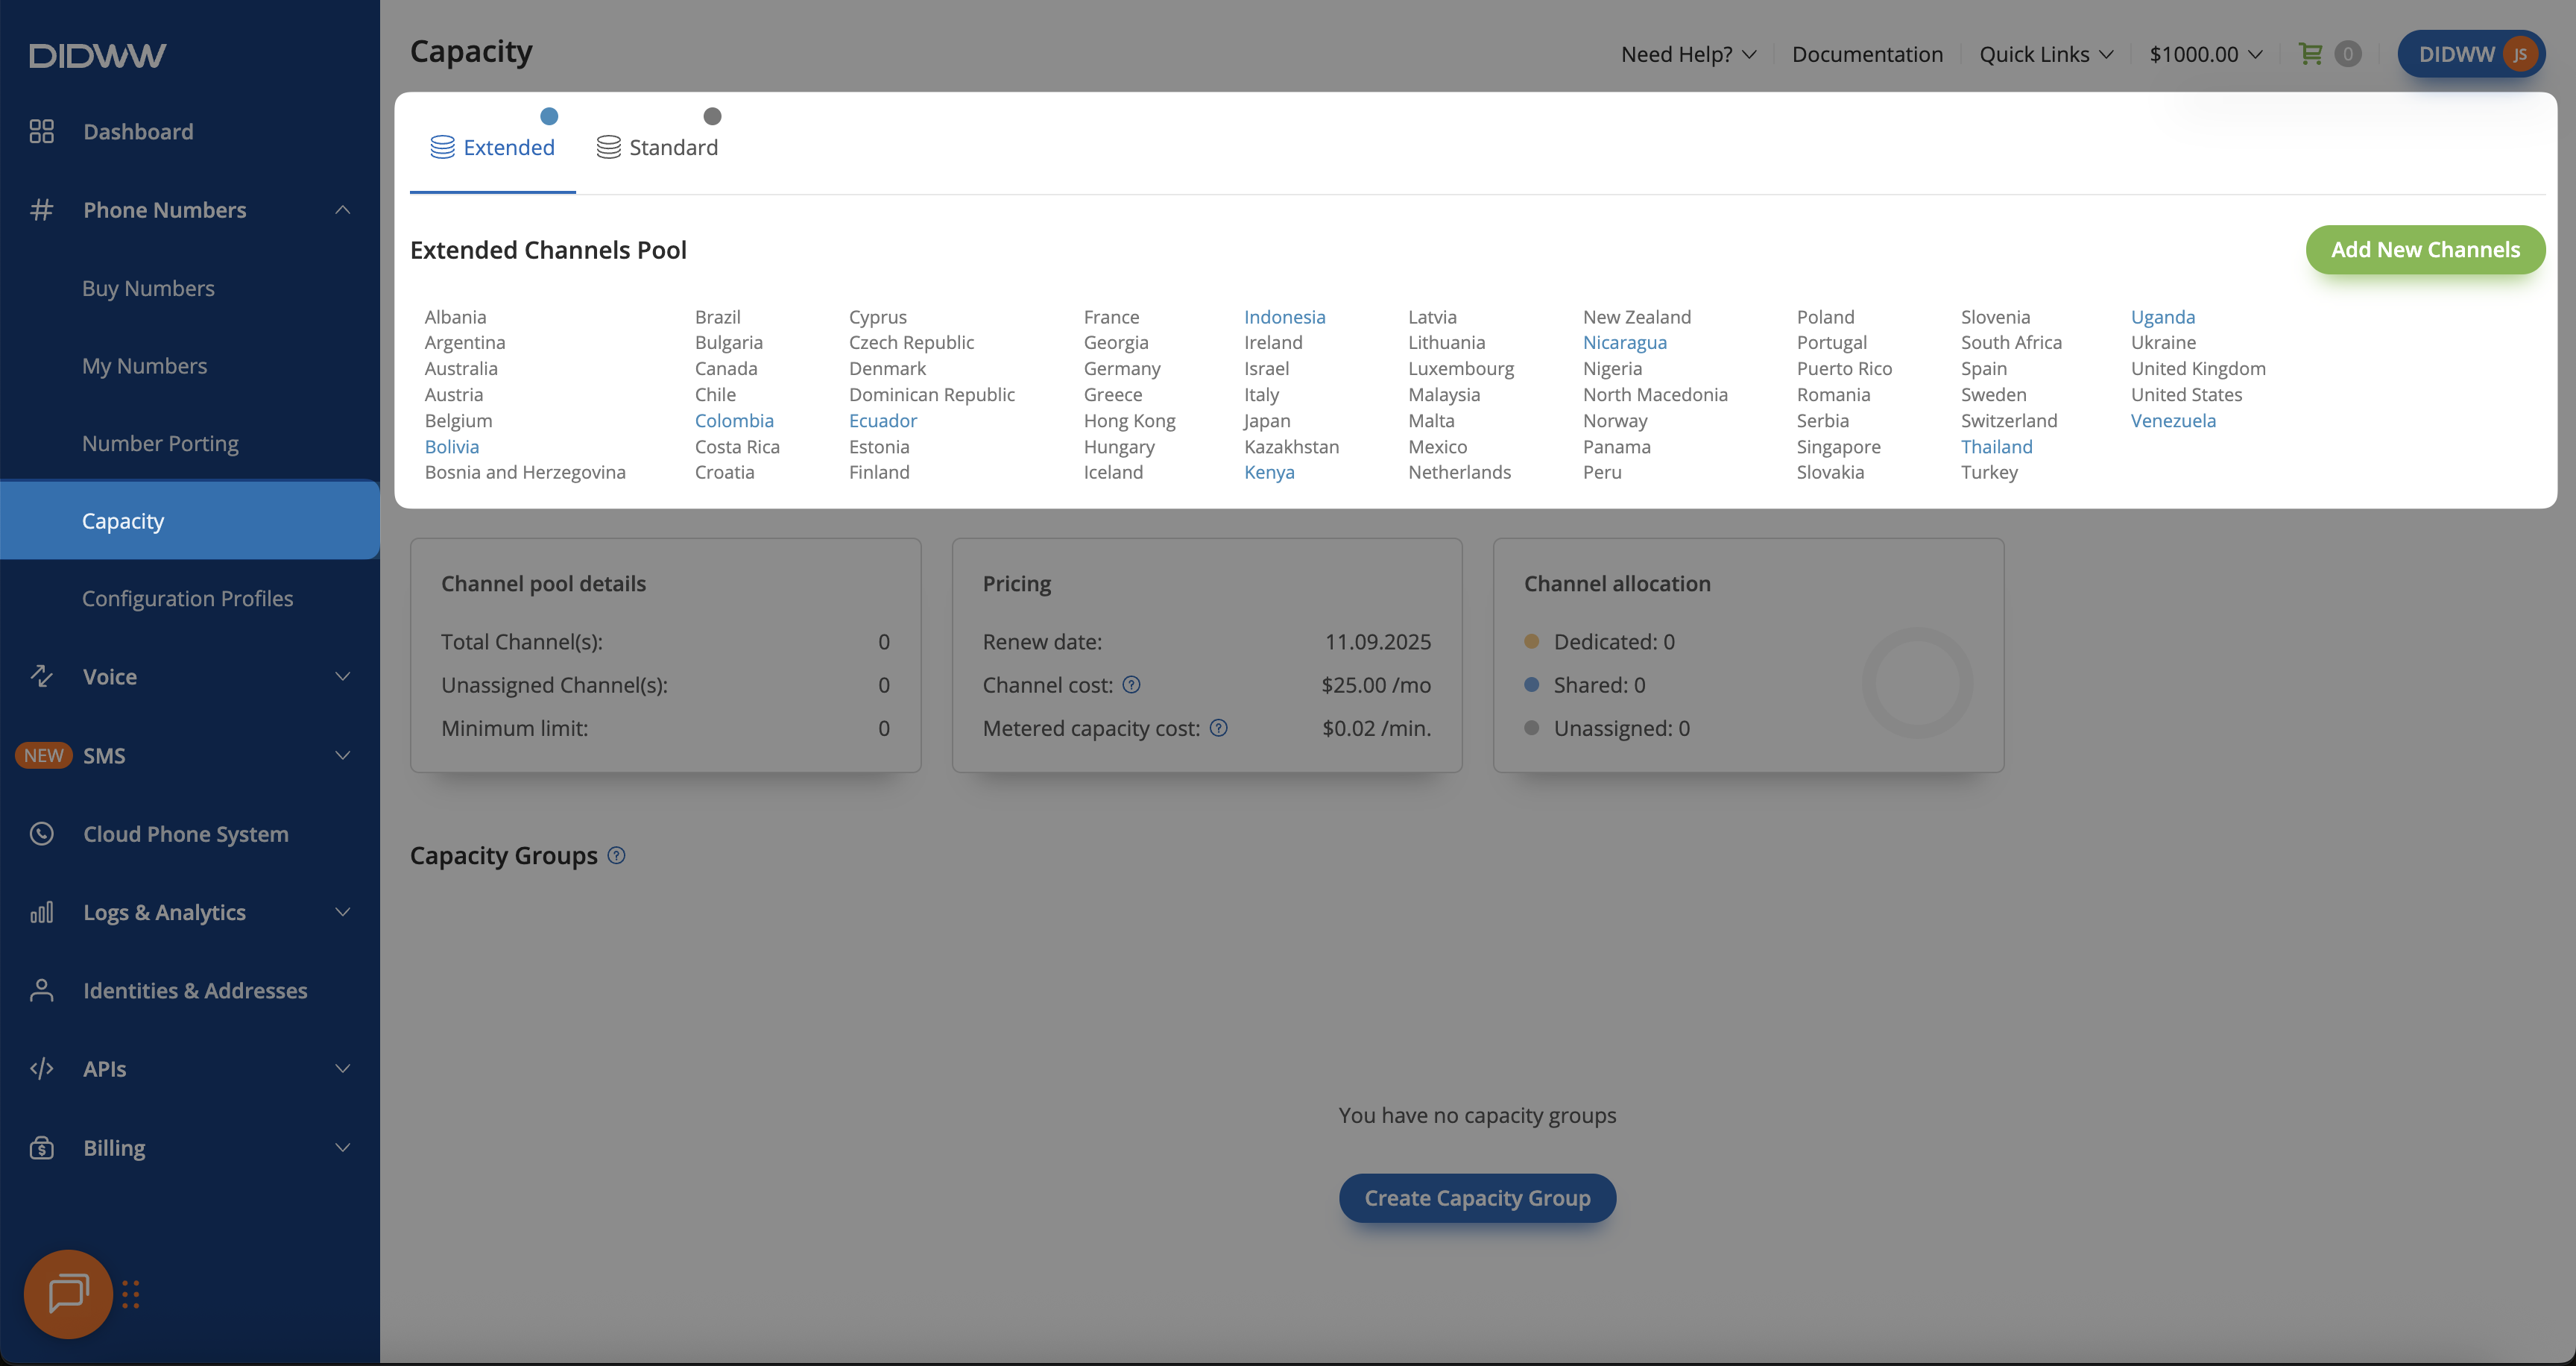
Fig. 1. Open the Capacity page and select a channel pool to purchase flat-rate channels
Step 2. Select Channel Quantity
A pop-up window will appear showing the channel setup fee, monthly fee, and the billing interval.
Enter the quantity of channels you want to order.
Review the cost summary before continuing.
Important
Pricing is volume-based: the more channels ordered, the lower the per-channel cost. Discounts are applied automatically.
If you add channels in the middle of a billing cycle, you only pay for the remaining days of that cycle (prorated amount). The full monthly fee applies starting with the next billing cycle.
A one-time setup fee is applied when capacity channels are activated. The fee is charged for each order, including any subsequent purchases of additional channels.
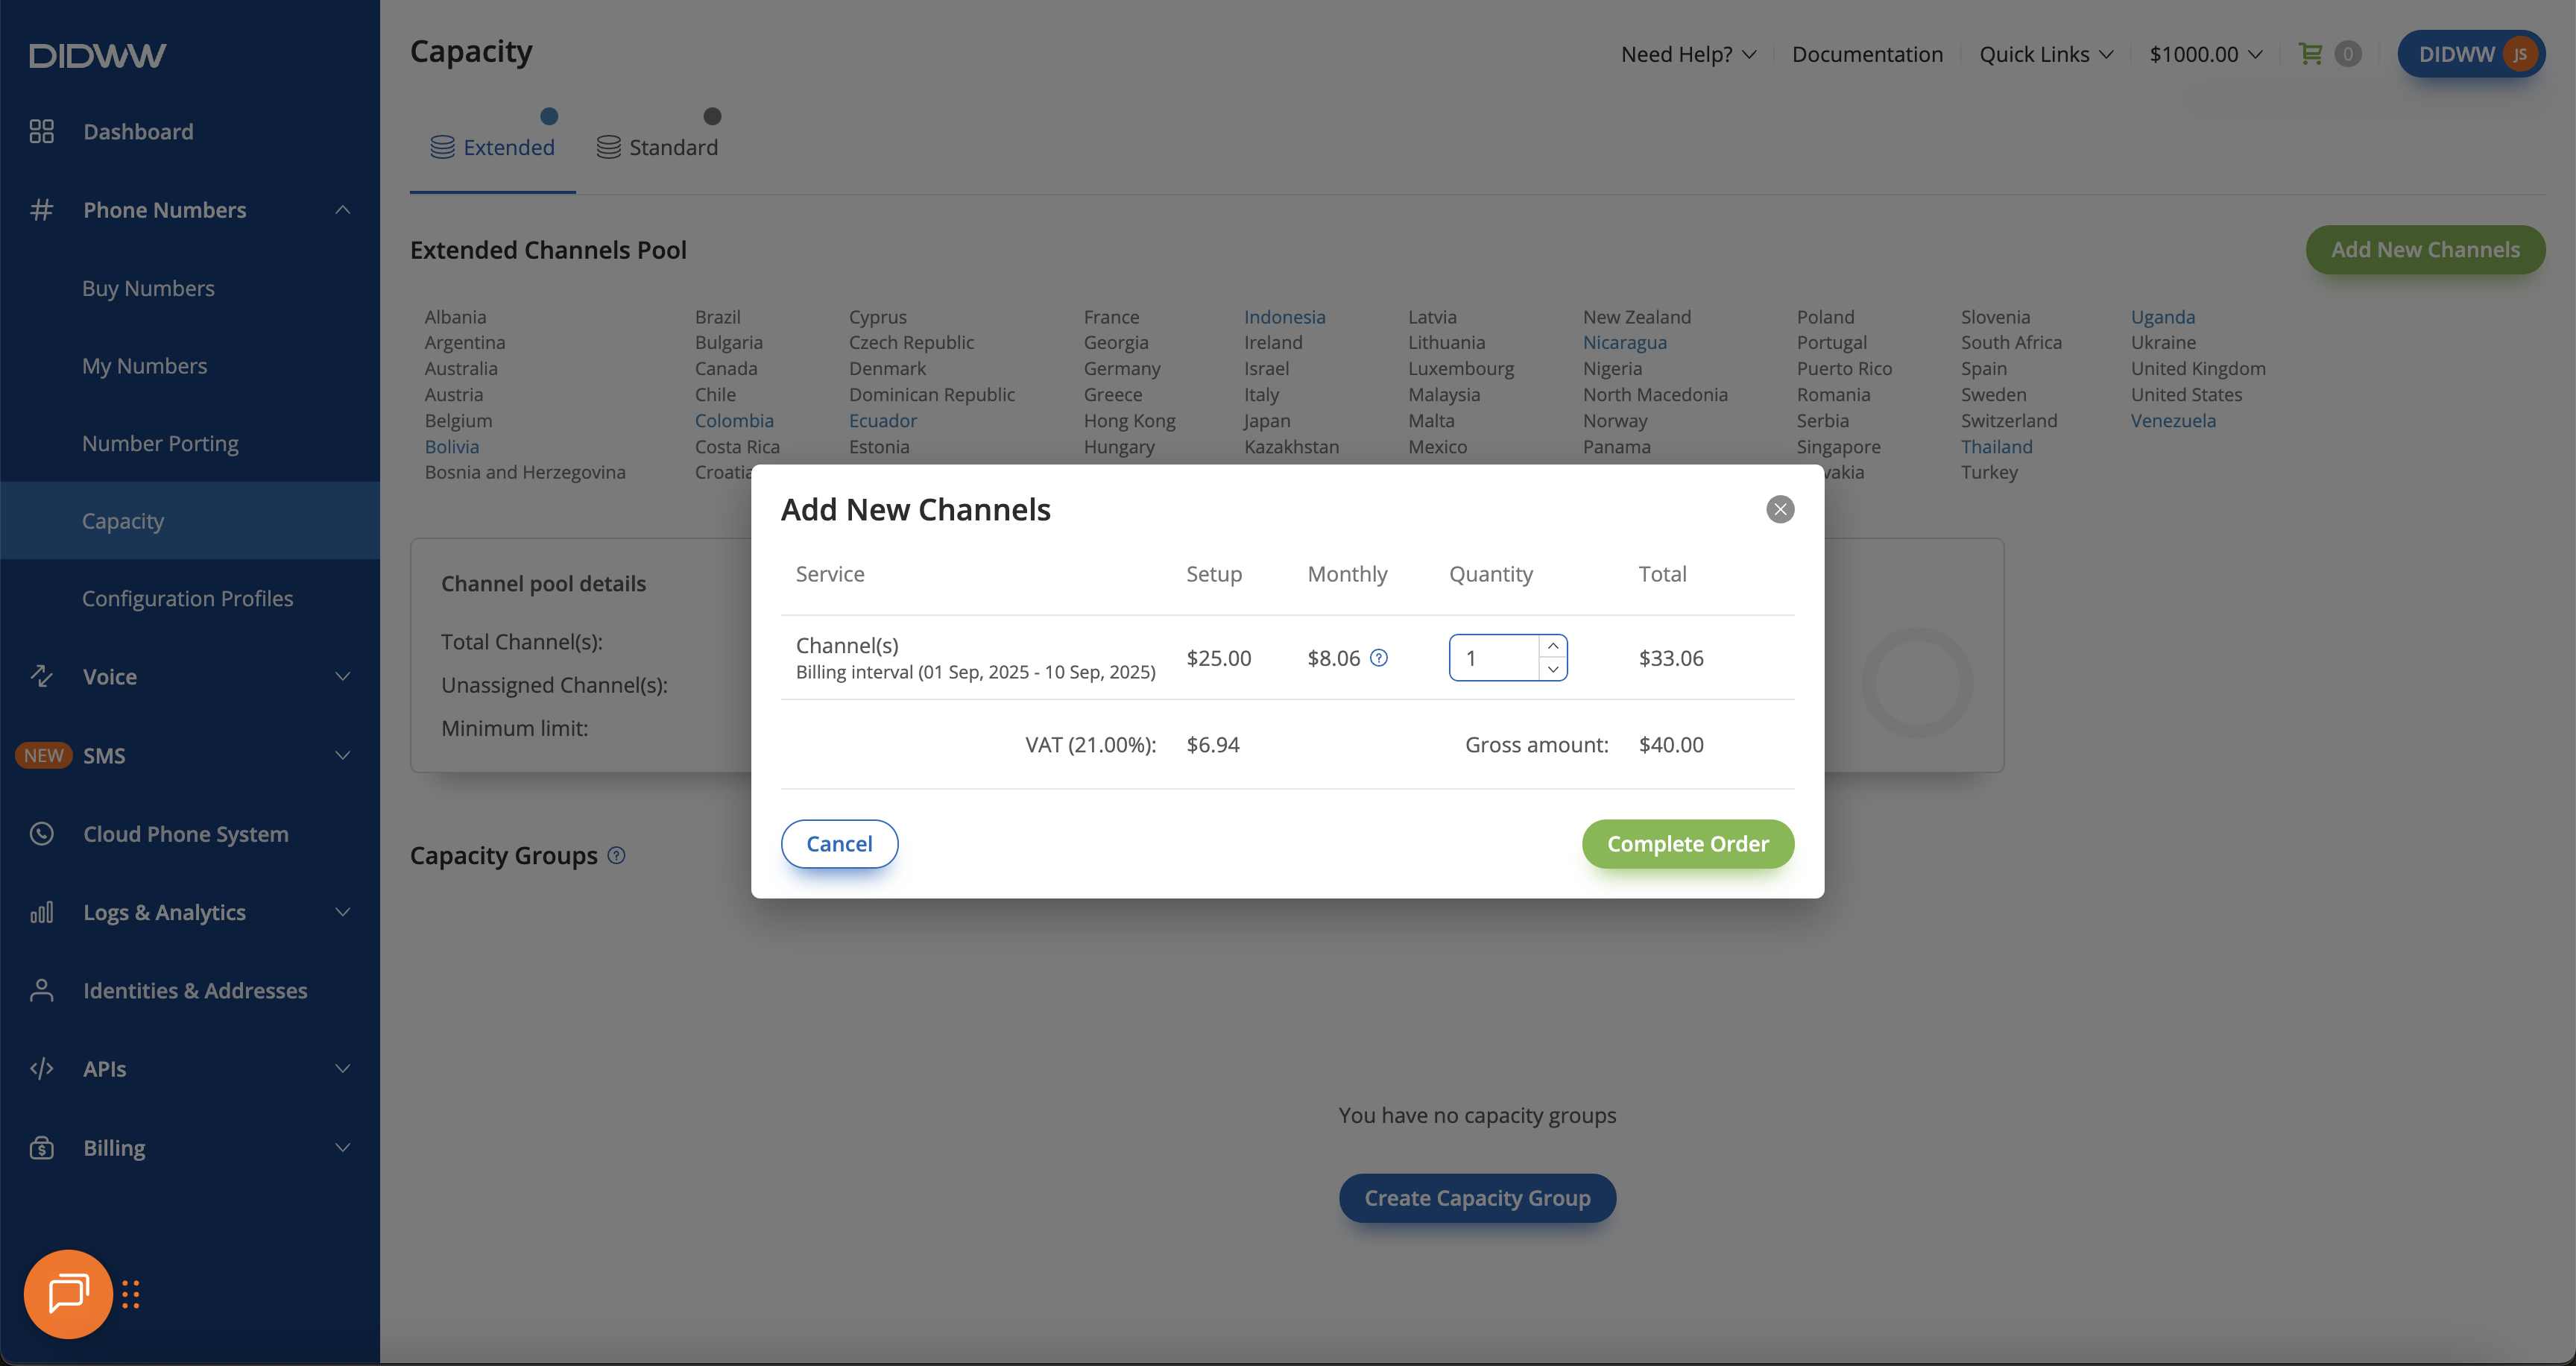
Fig. 2. Select channel quantity and purchase flat-rate channels
Step 3. Complete the Order
Click Complete Order to finalize the purchase.
The system charges your prepaid balance immediately.
Note
If your prepaid balance is insufficient, the order cannot be placed and a notification will appear.
When the order is successful, you will be redirected to order completed page with confirmation screen. The ordered channels are immediately available.
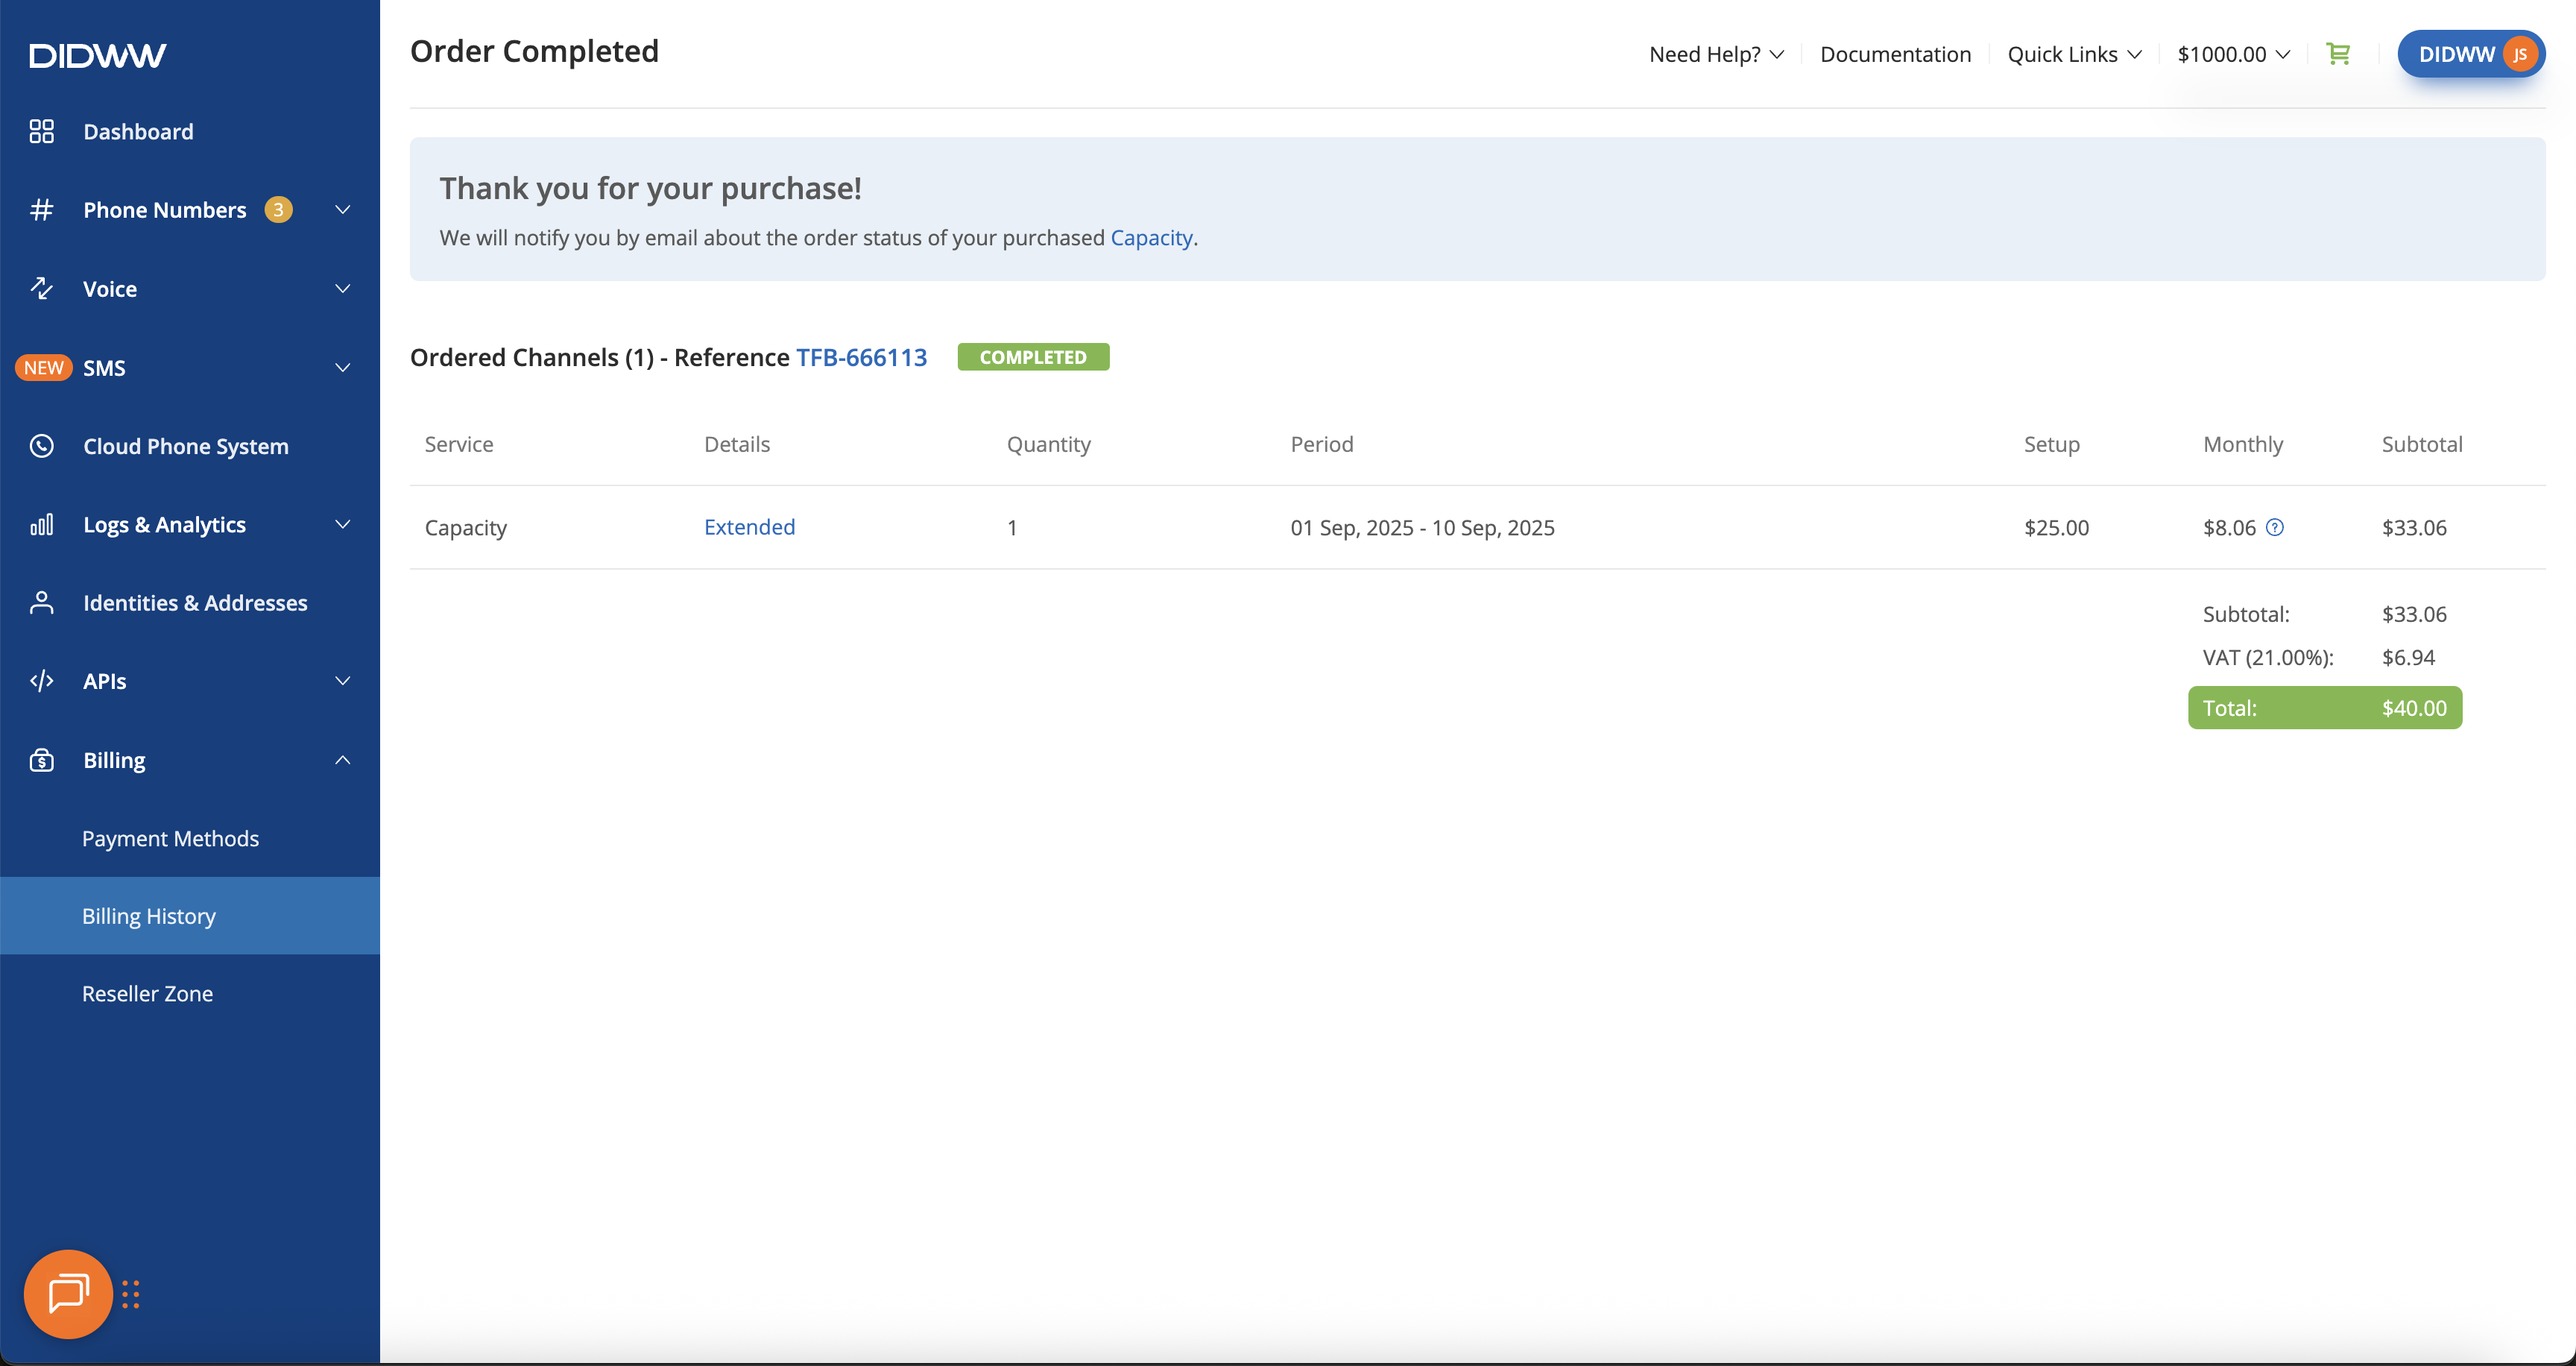
Fig. 3. Flat-rate channel order completed confirmation page
Assign Flat-rate Channels
Flat-rate channels can be assigned as dedicated channels, reserved for a single DID, or as shared channels, available to a capacity group where multiple DIDs share the same pool of channels. Follow the steps in the relevant tab below.
Step 1: Create a Capacity Group
In the DIDWW User Panel, go to Phone Numbers > Capacity.
Select the capacity pool (Standard or Extended) where you have at least one unassigned channel.
Click Create Capacity Group.
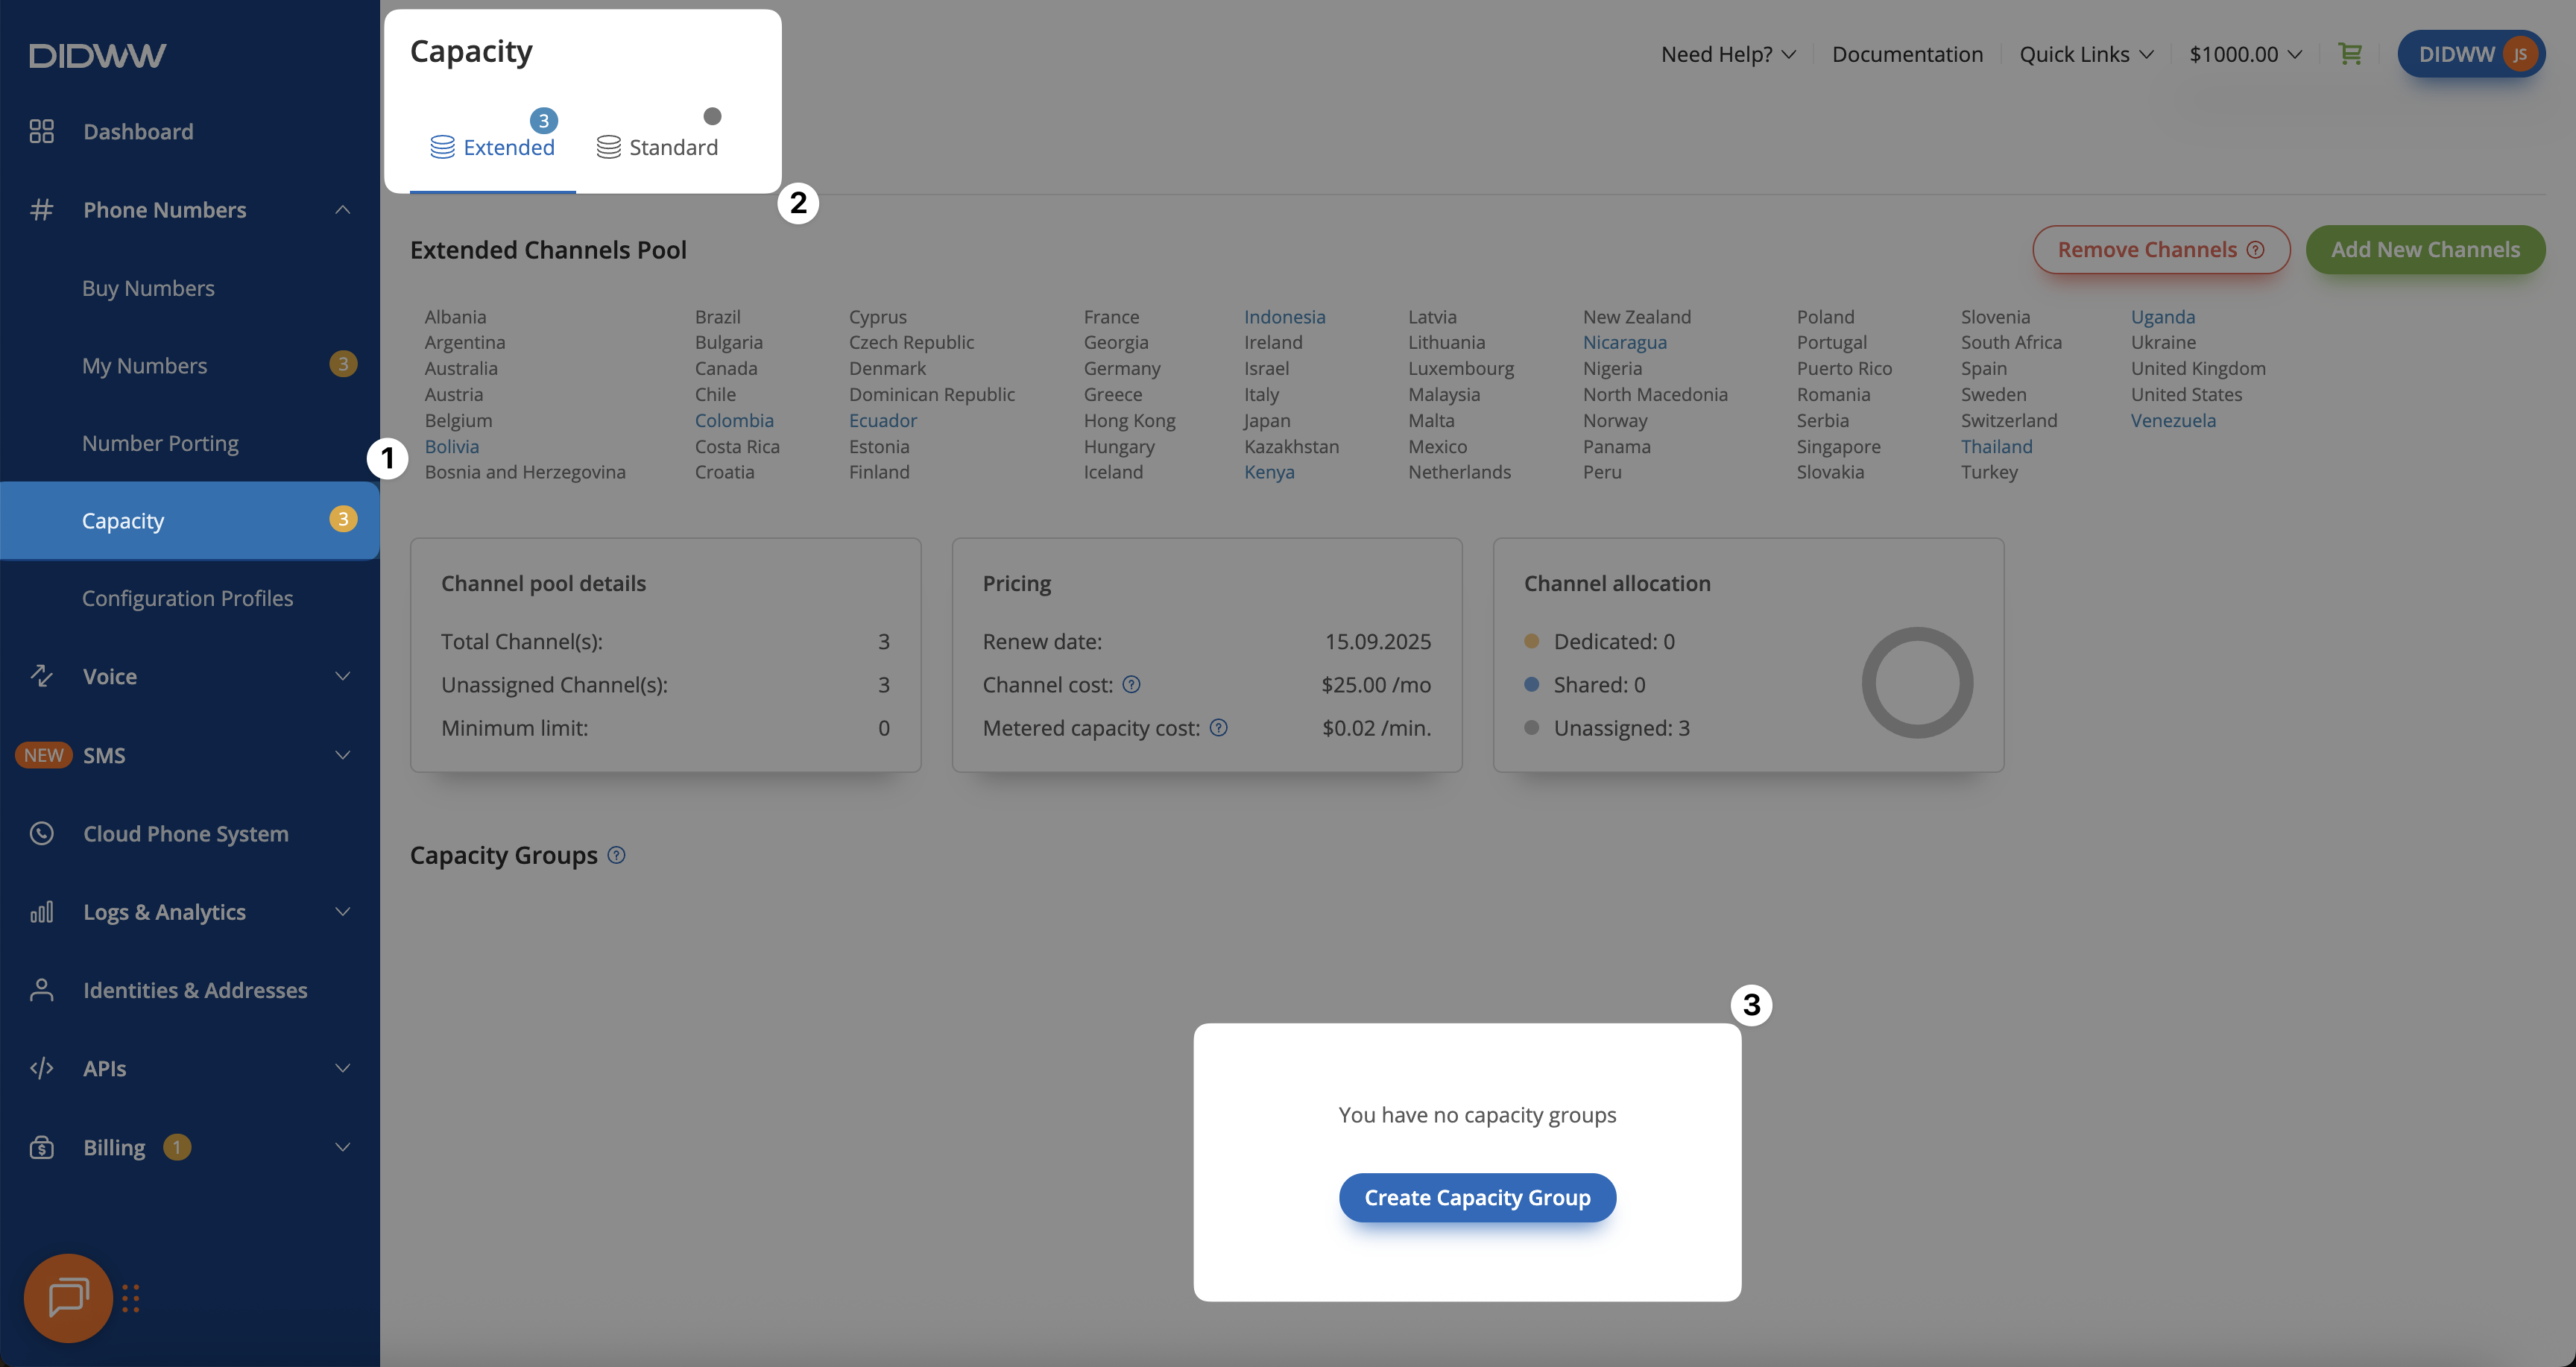
Fig. 4. Creating a Flat-rate Capacity Group
Step 2: Assign Shared Channels
In the pop-up window, enter a Group name
Specify the number of Assigned shared channels. The number of available channels is shown below, and you can assign up to that amount.
Click Create.
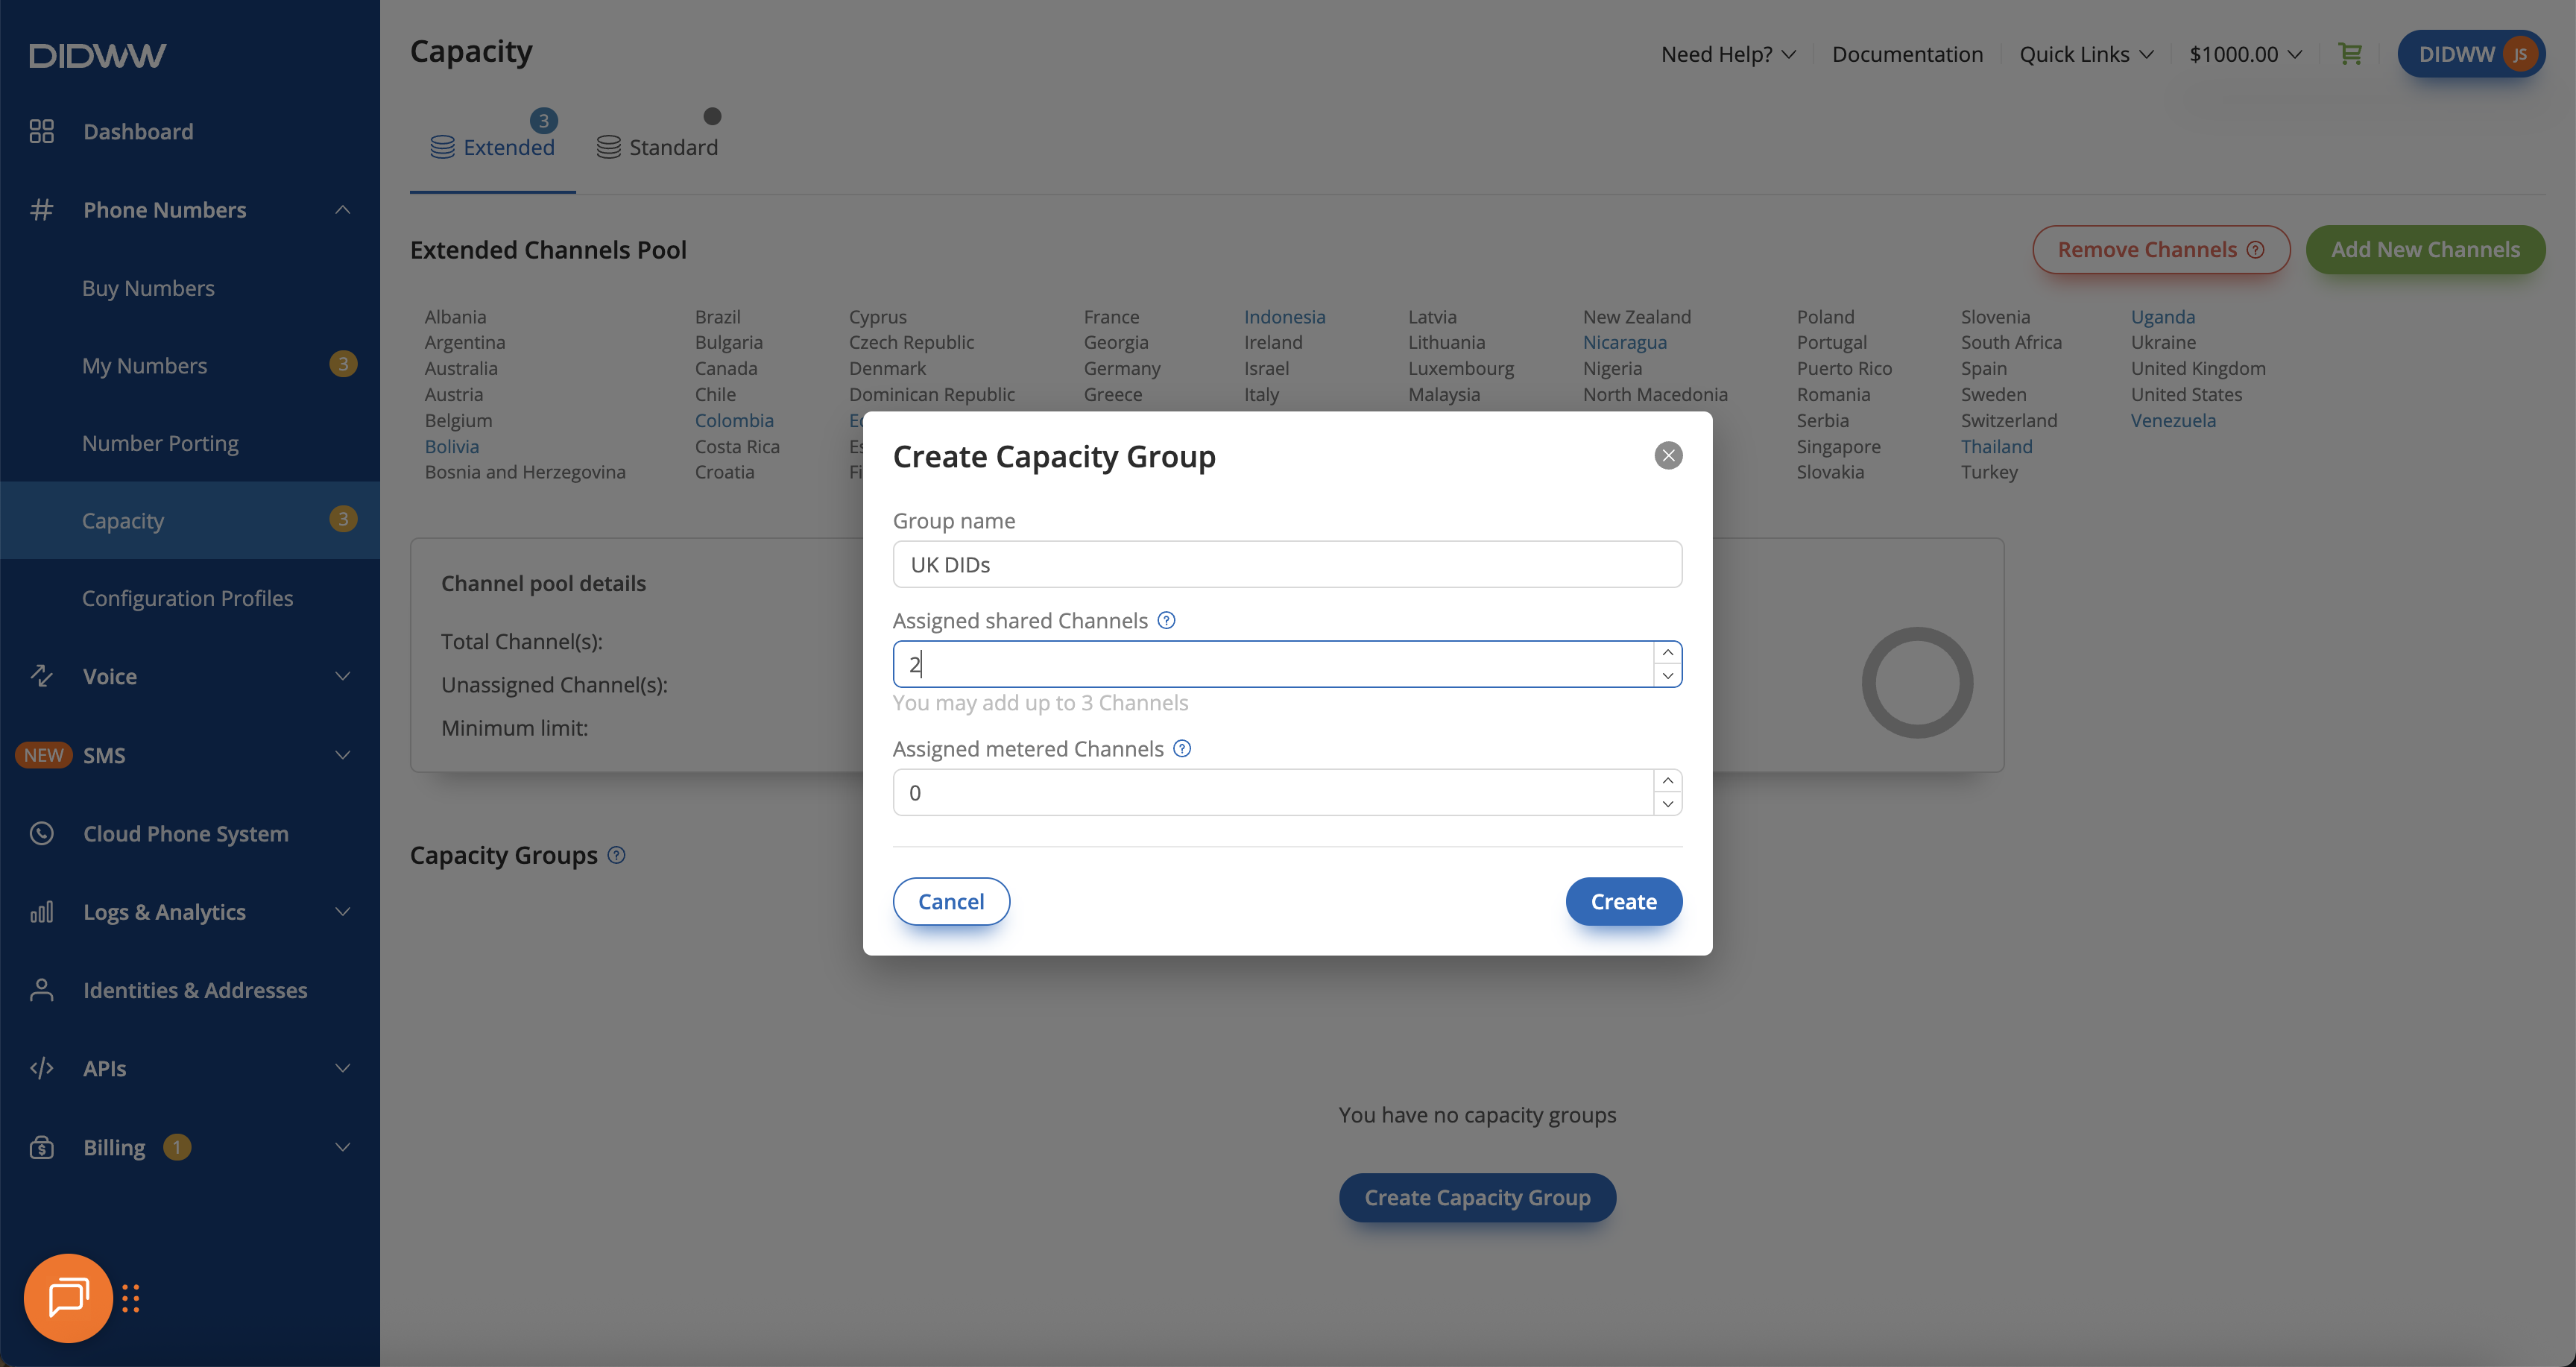
Fig. 5. Flat-rate Capacity Group created and shared channels assigned
Step 3: Select DID(s) and Open Batch Actions
After creating a Capacity Group and assigning shared channels to it, you need to Update Capacity Group and assign your DID numbers to that group.
In the DIDWW User Panel, go to Phone Numbers > My Numbers.
Use filters to quickly locate the DID number(s) you want to update, and select them.
At the bottom of the page, click Batch Actions and choose Update Capacity Group.
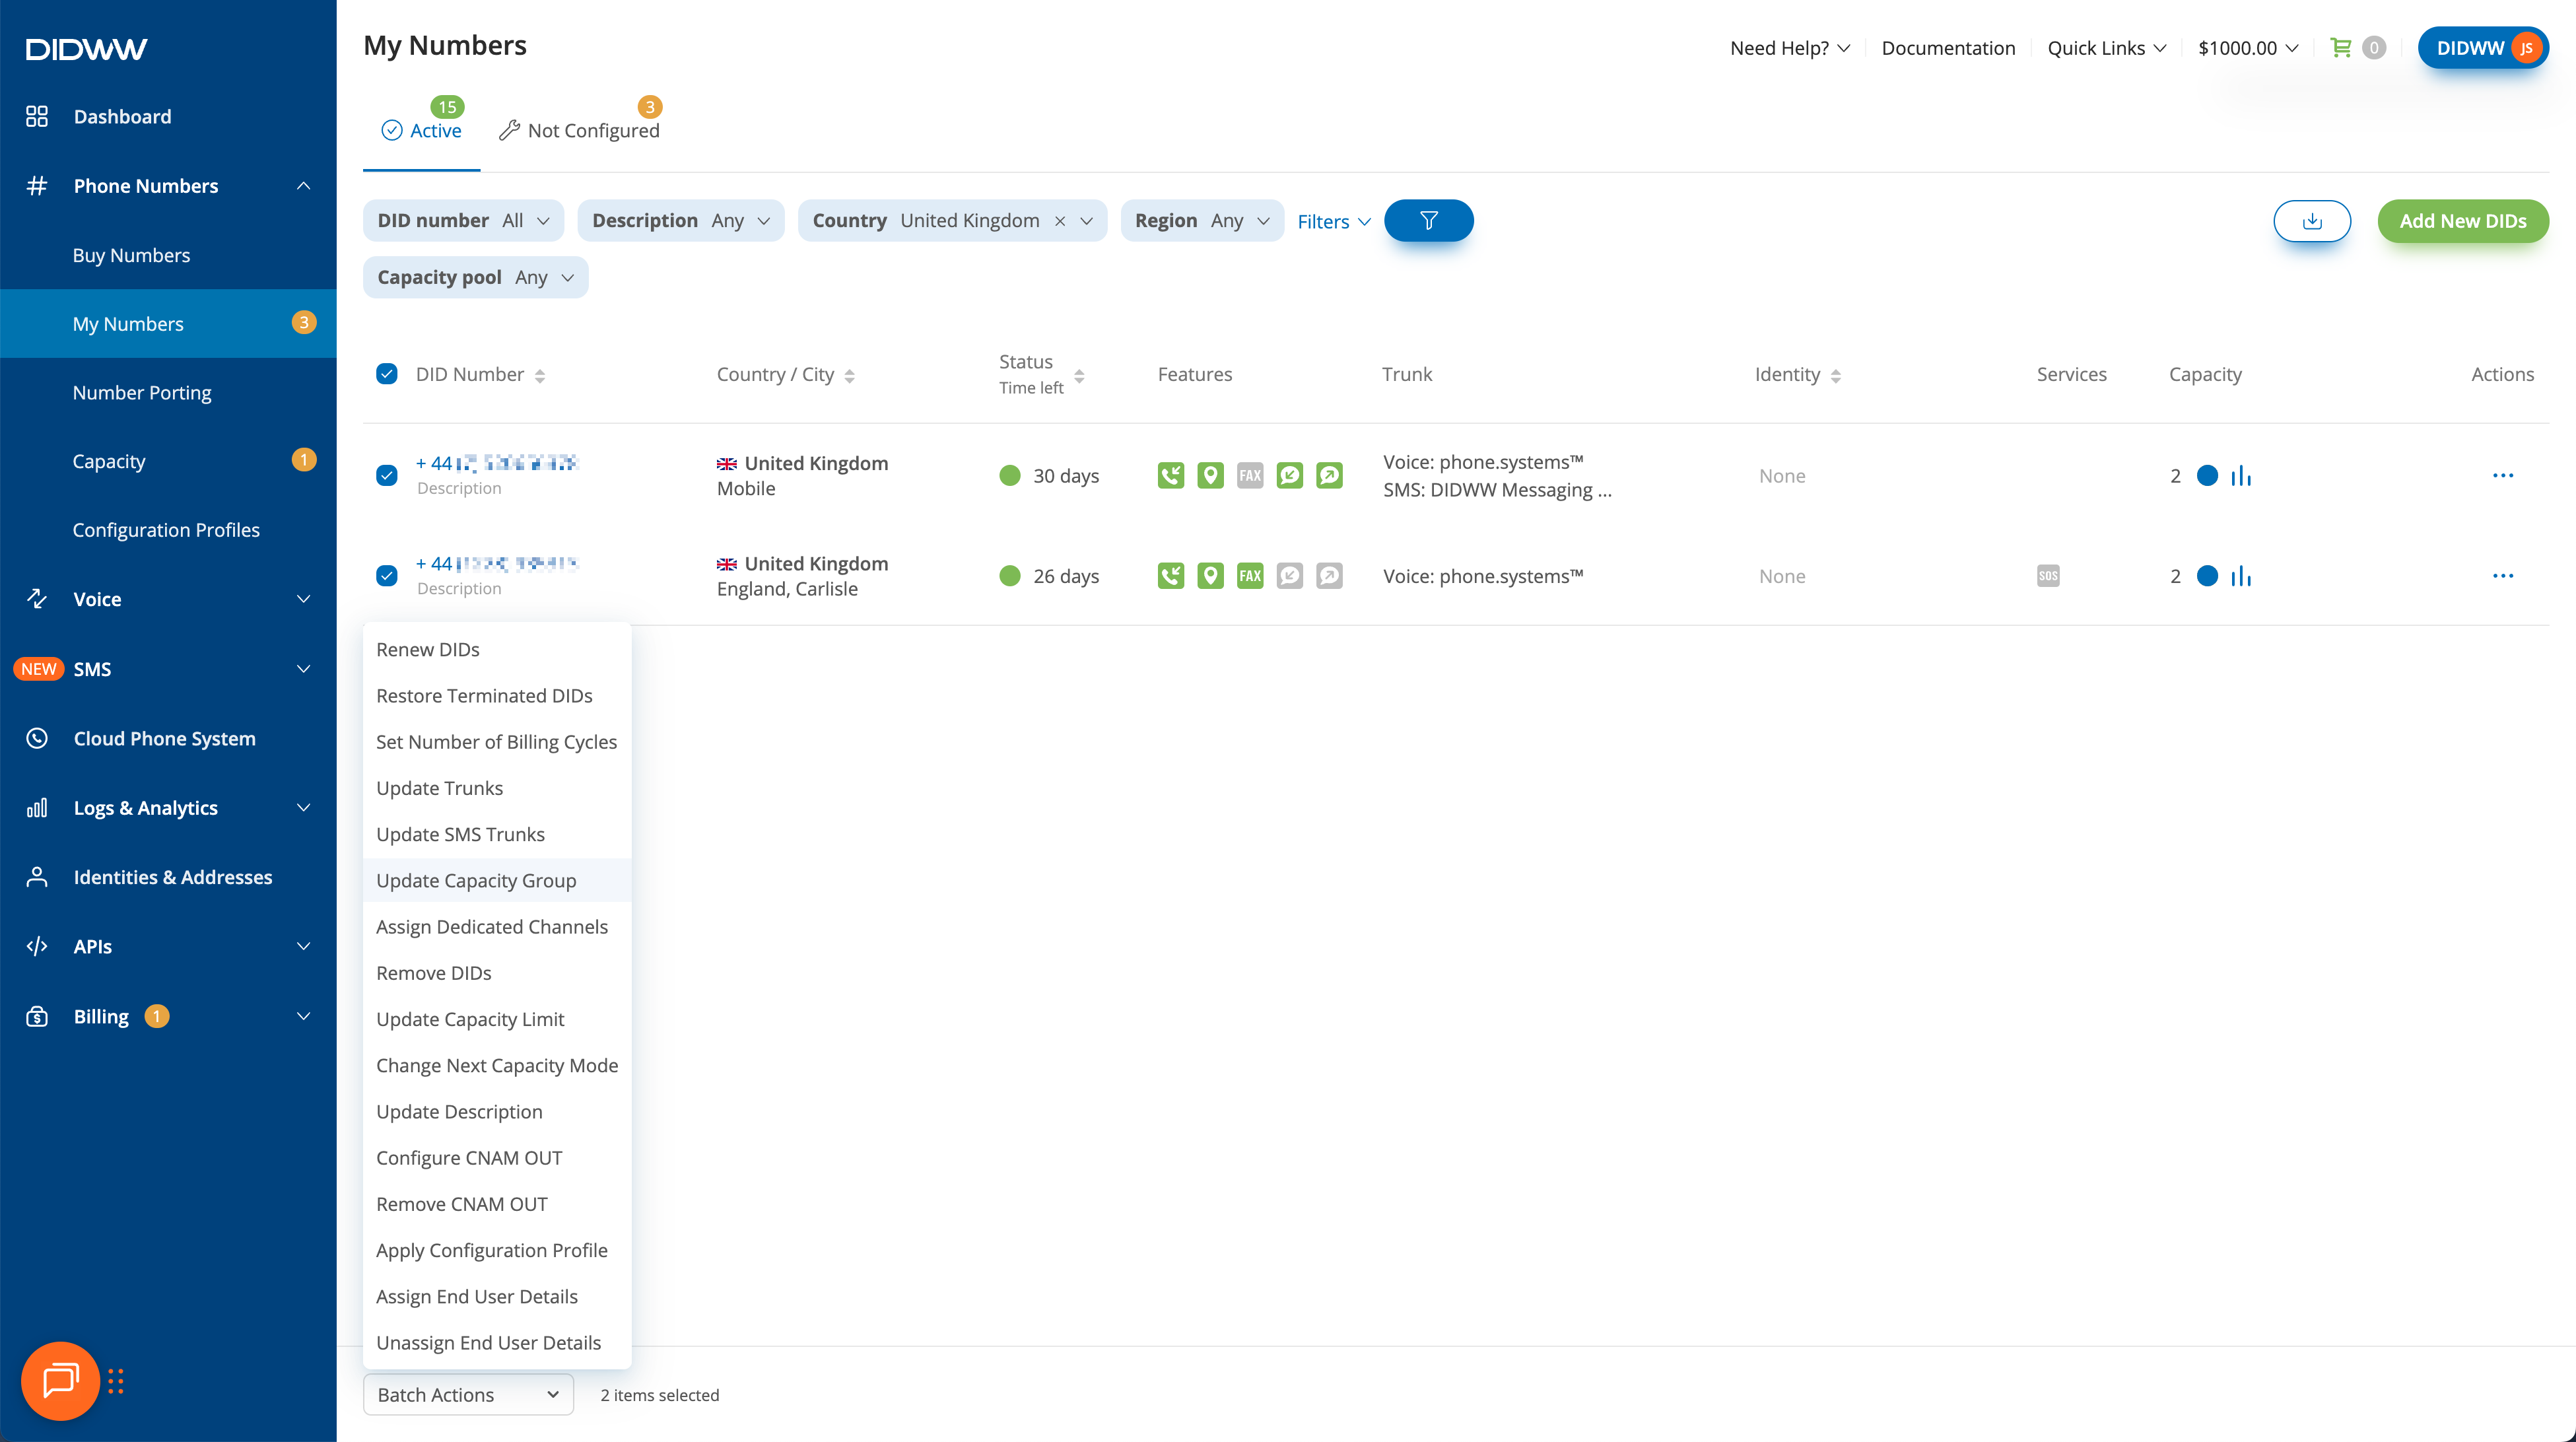
Fig. 6. Selecting DIDs to assign to a flat-rate Capacity Group with Shared Channels
Step 4: Update Capacity Group
Important
Only DIDs that support additional Capacity can be assigned to a Capacity Group.
When a DID reaches its included channel limit, any additional calls will automatically use the group’s shared channels as long as those channels are not already in use by another DID in the same group.
In the Update Capacity Group window, select a Capacity Group and choose the Group Name. You will also see which capacity pool the group belongs to and how many shared channels are currently assigned to it.
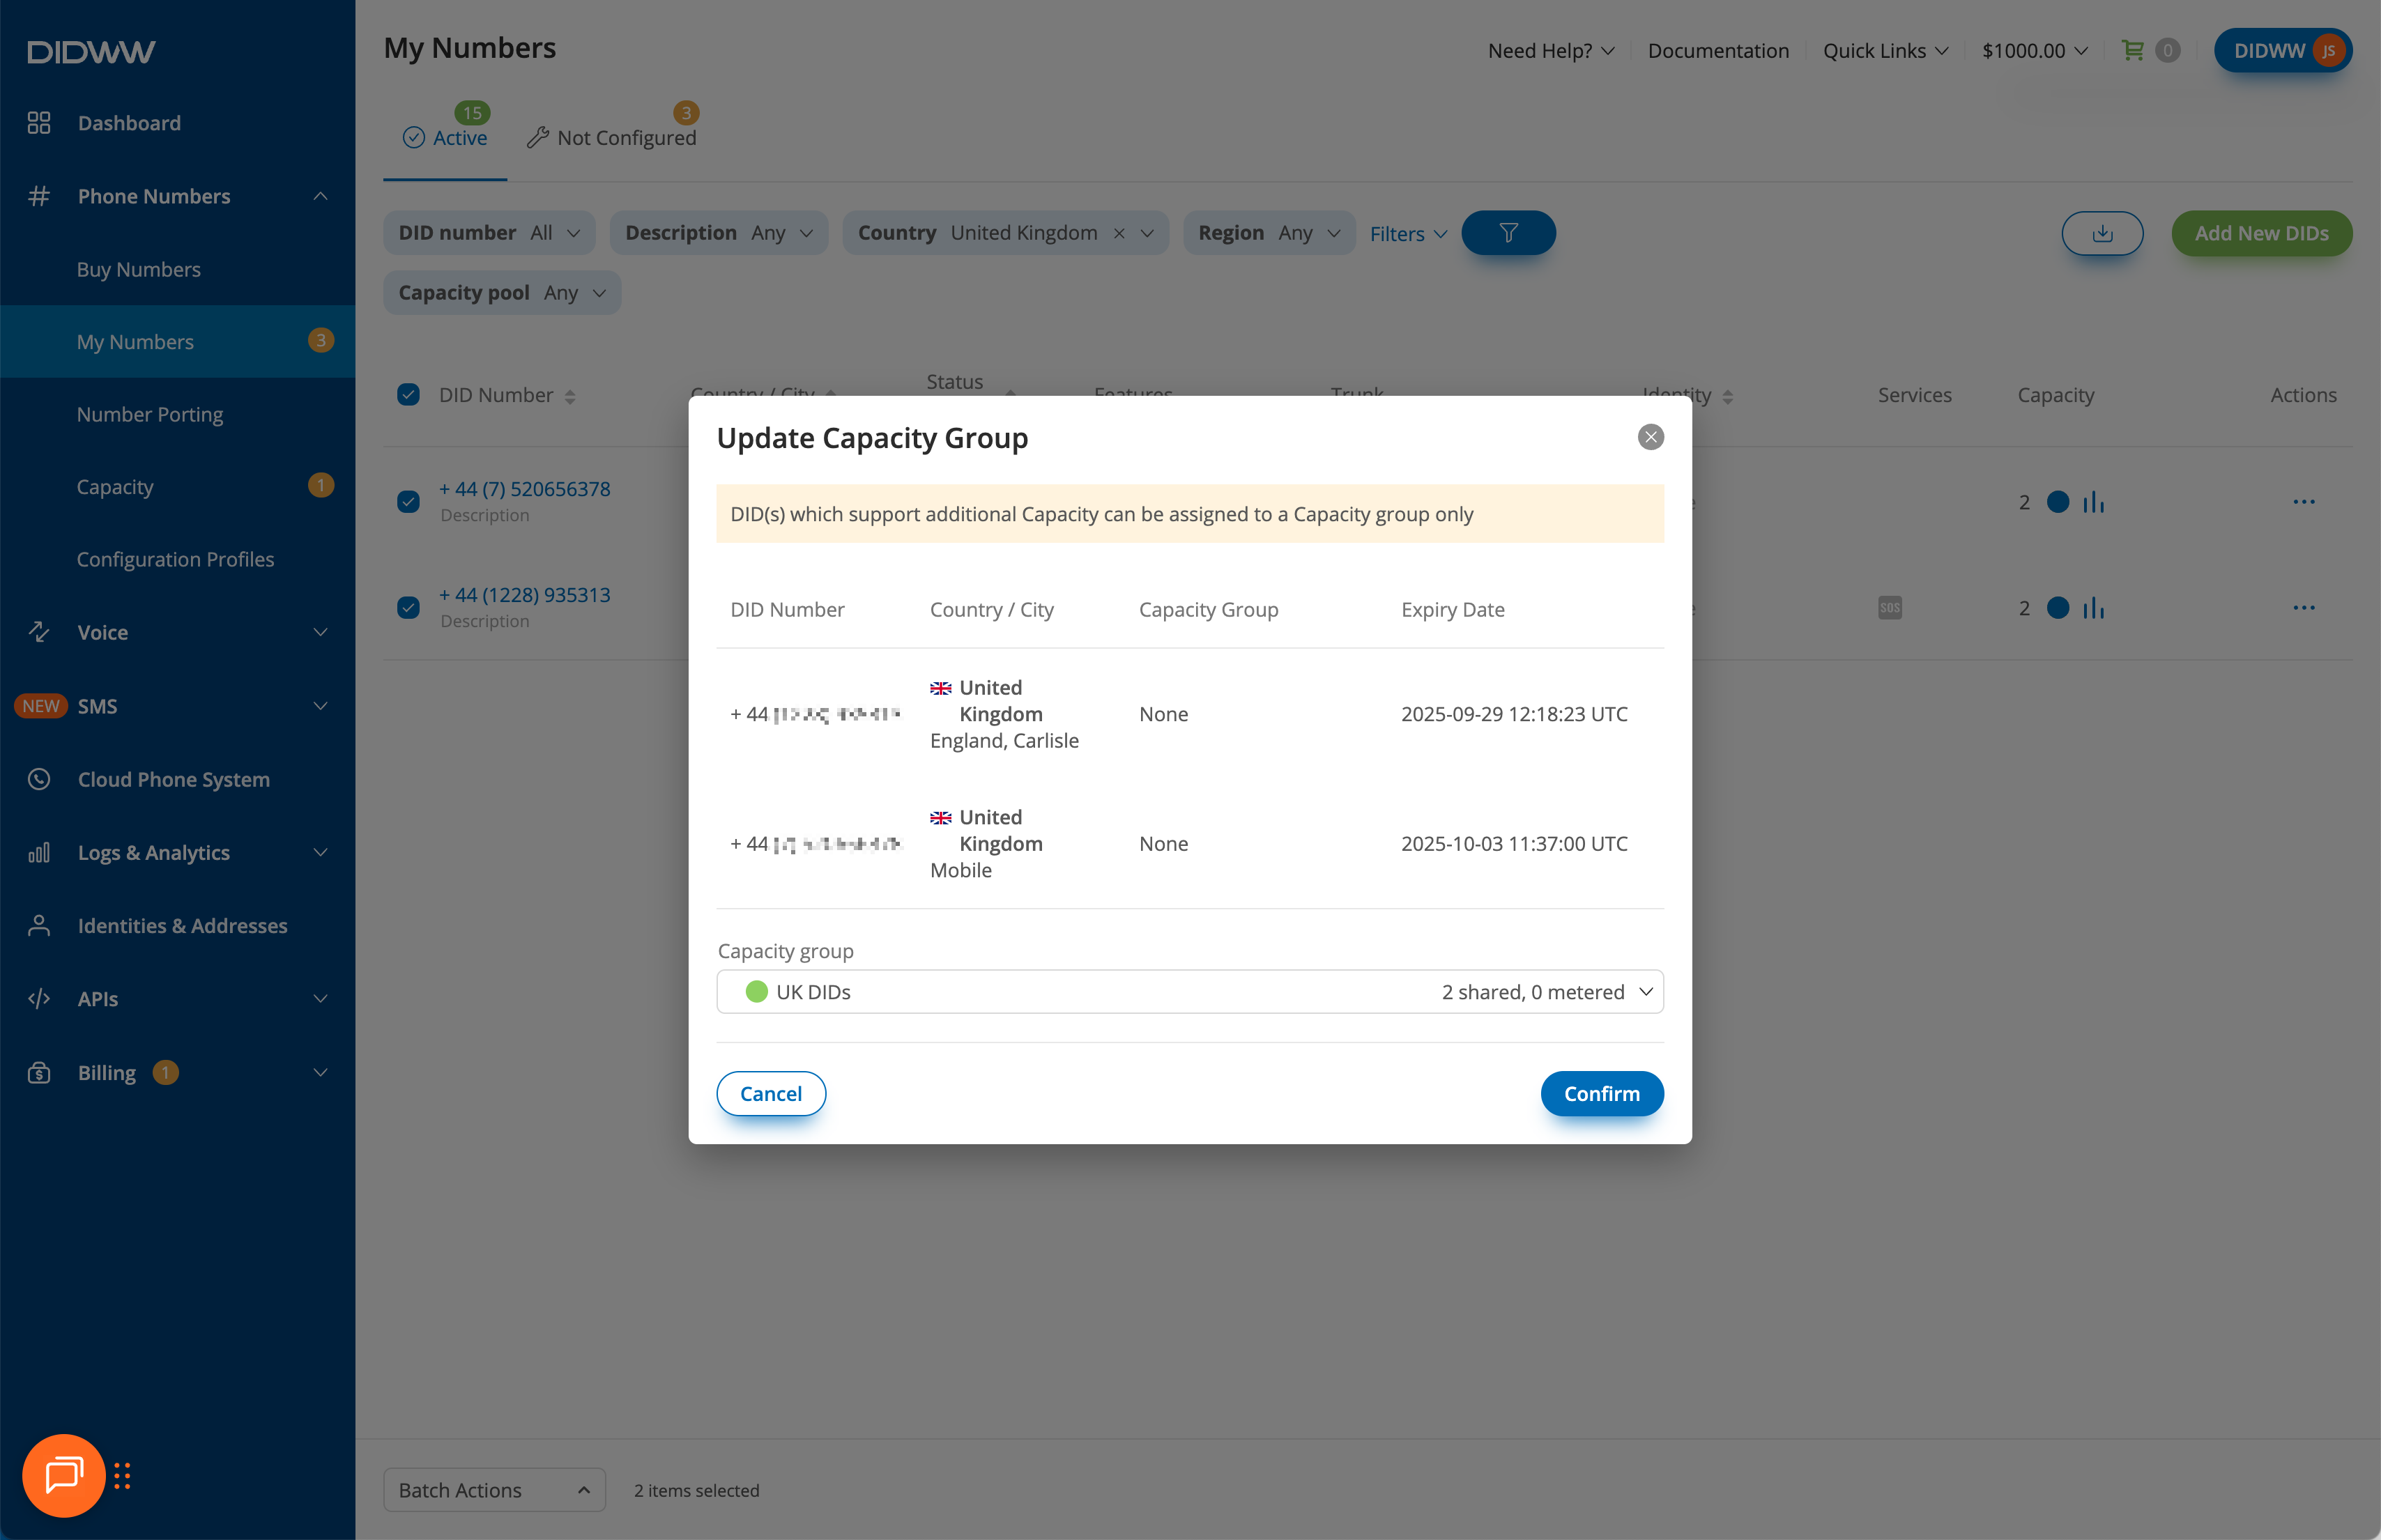
Fig. 7. Updating a Capacity Group for Selected DID(s)
Step 1: Select DID(s) and Open Batch Actions
In the Phone Numbers > My Numbers section, select the DID number(s) you want to assign dedicated channels.
At the bottom of the page, click Batch Actions and choose Assign Dedicated Channels.
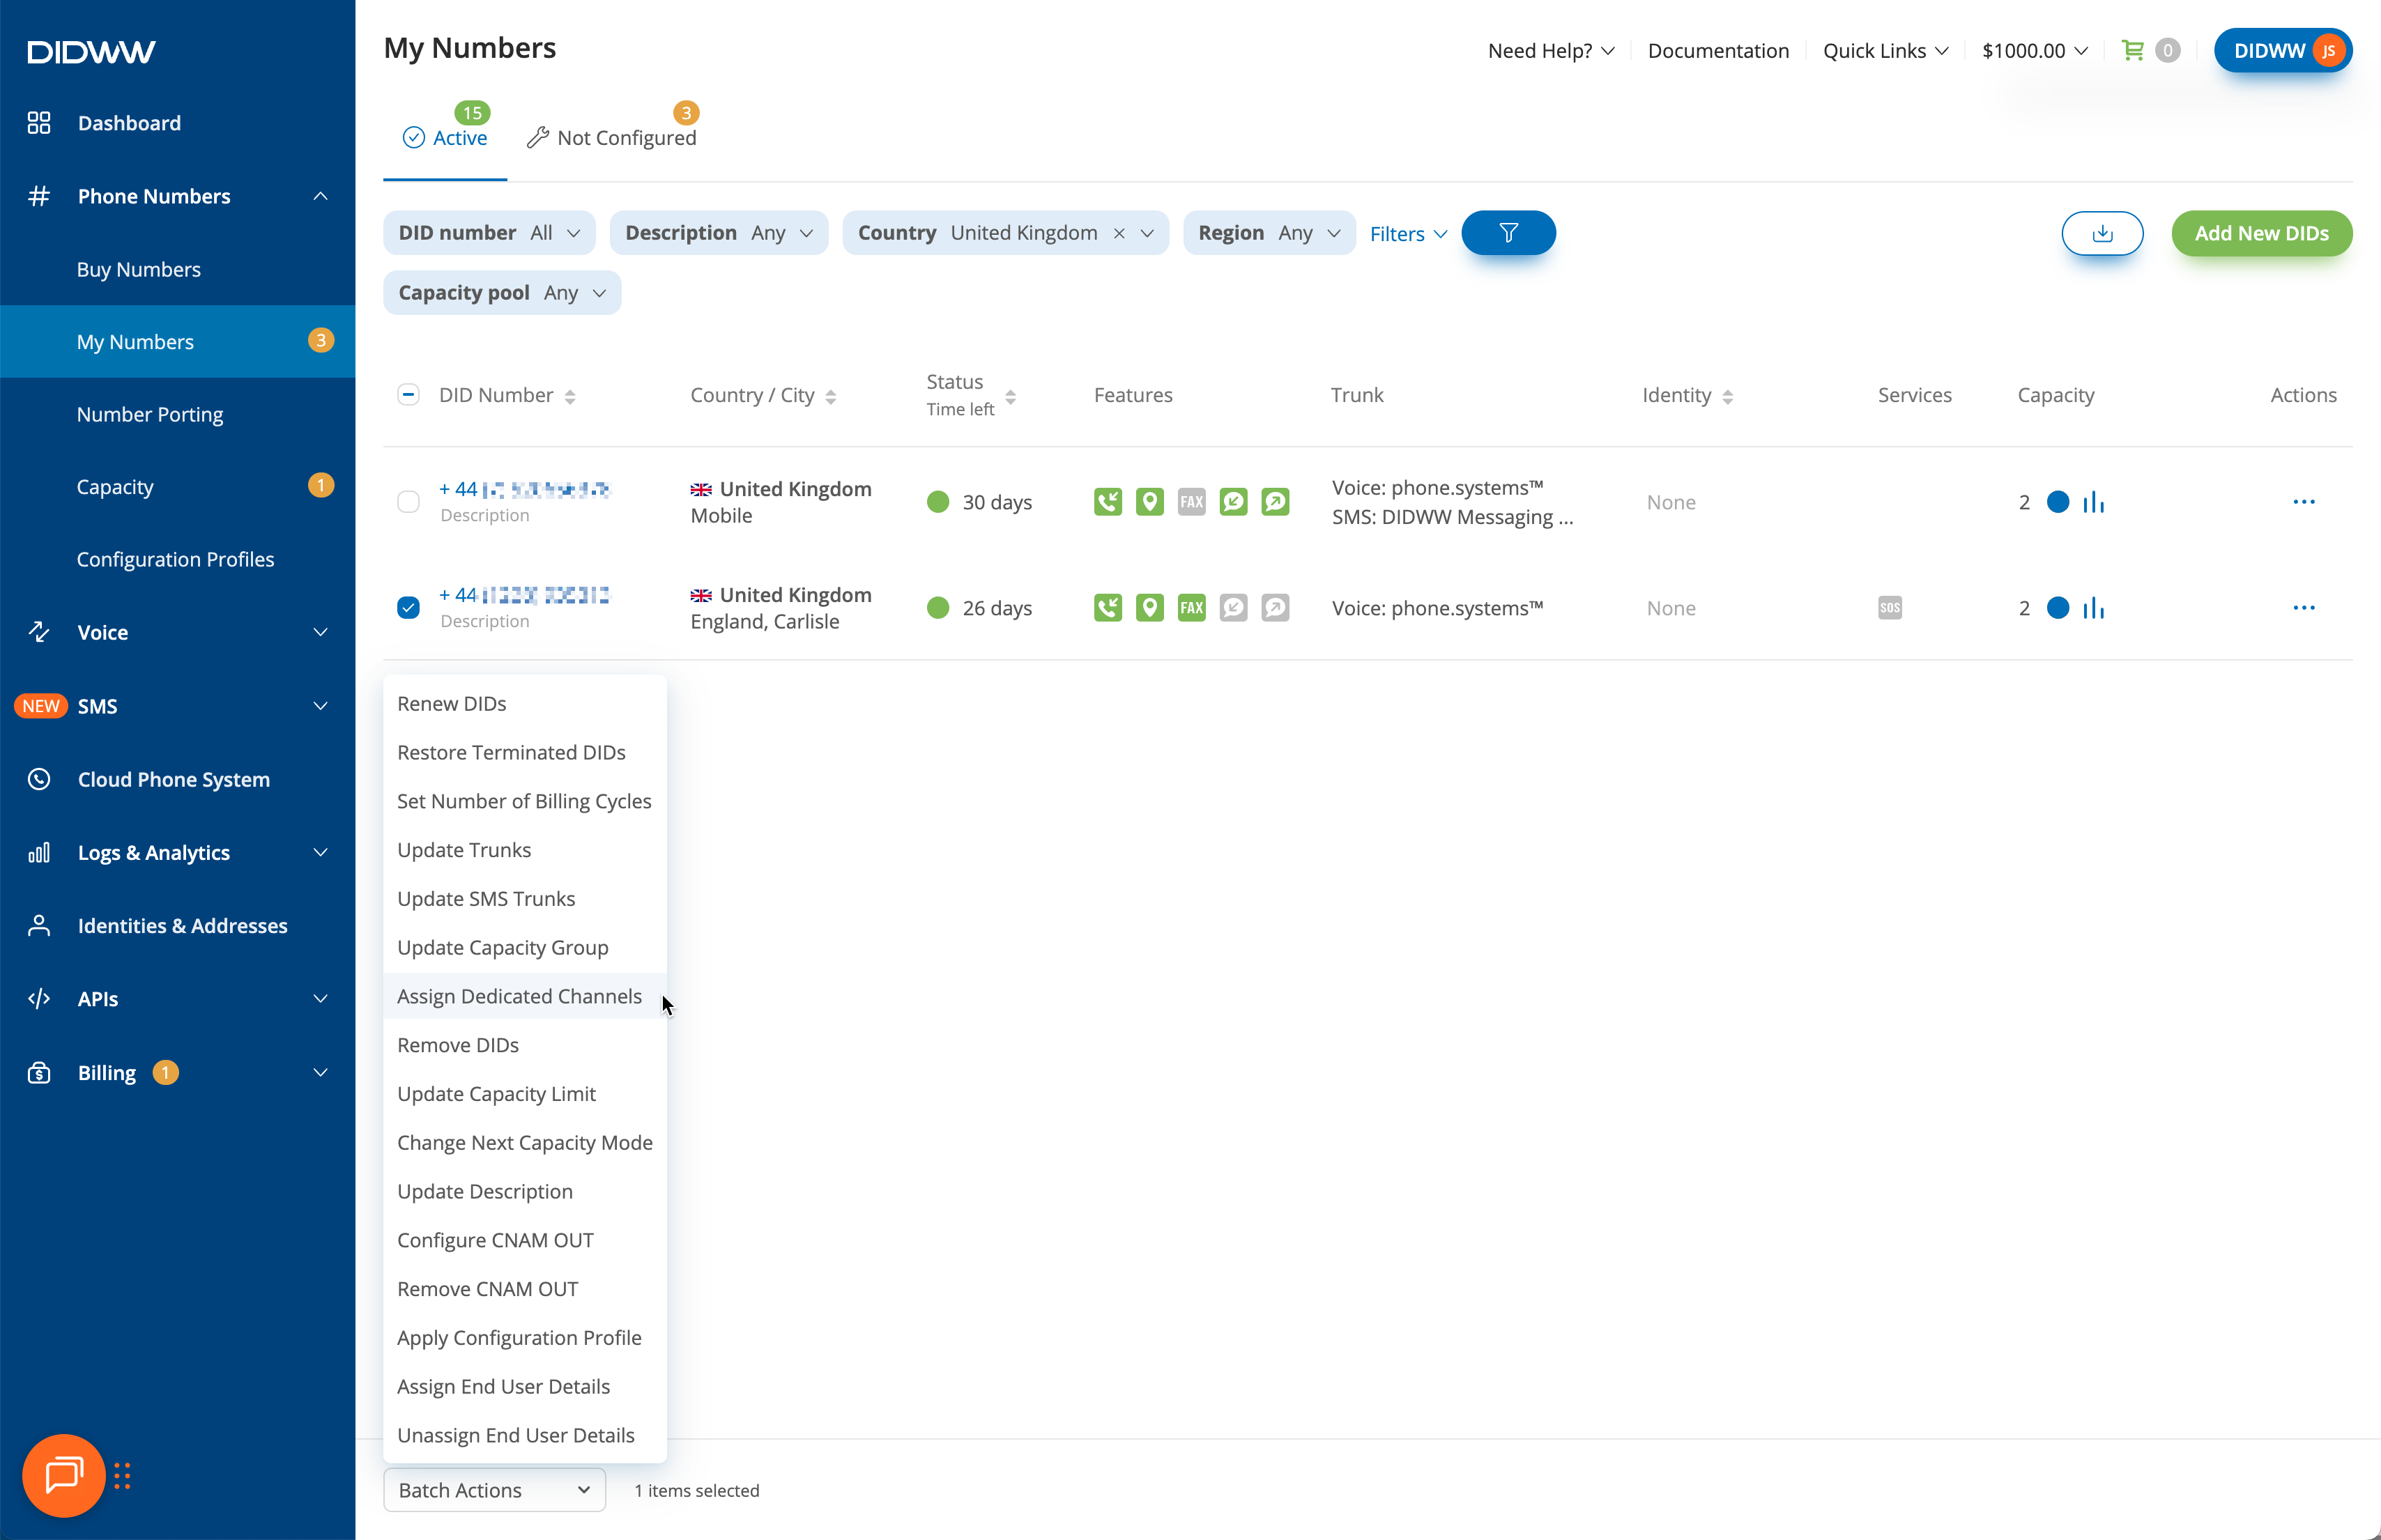
Fig. 8. Selecting DIDs to assign flat-rate dedicated channels
Step 2: Assign Dedicated Channels
In the pop-up, select the channel pool (Standard or Extended).
Enter the number of channels to assign to this DID.
Click Confirm to complete the assignment.
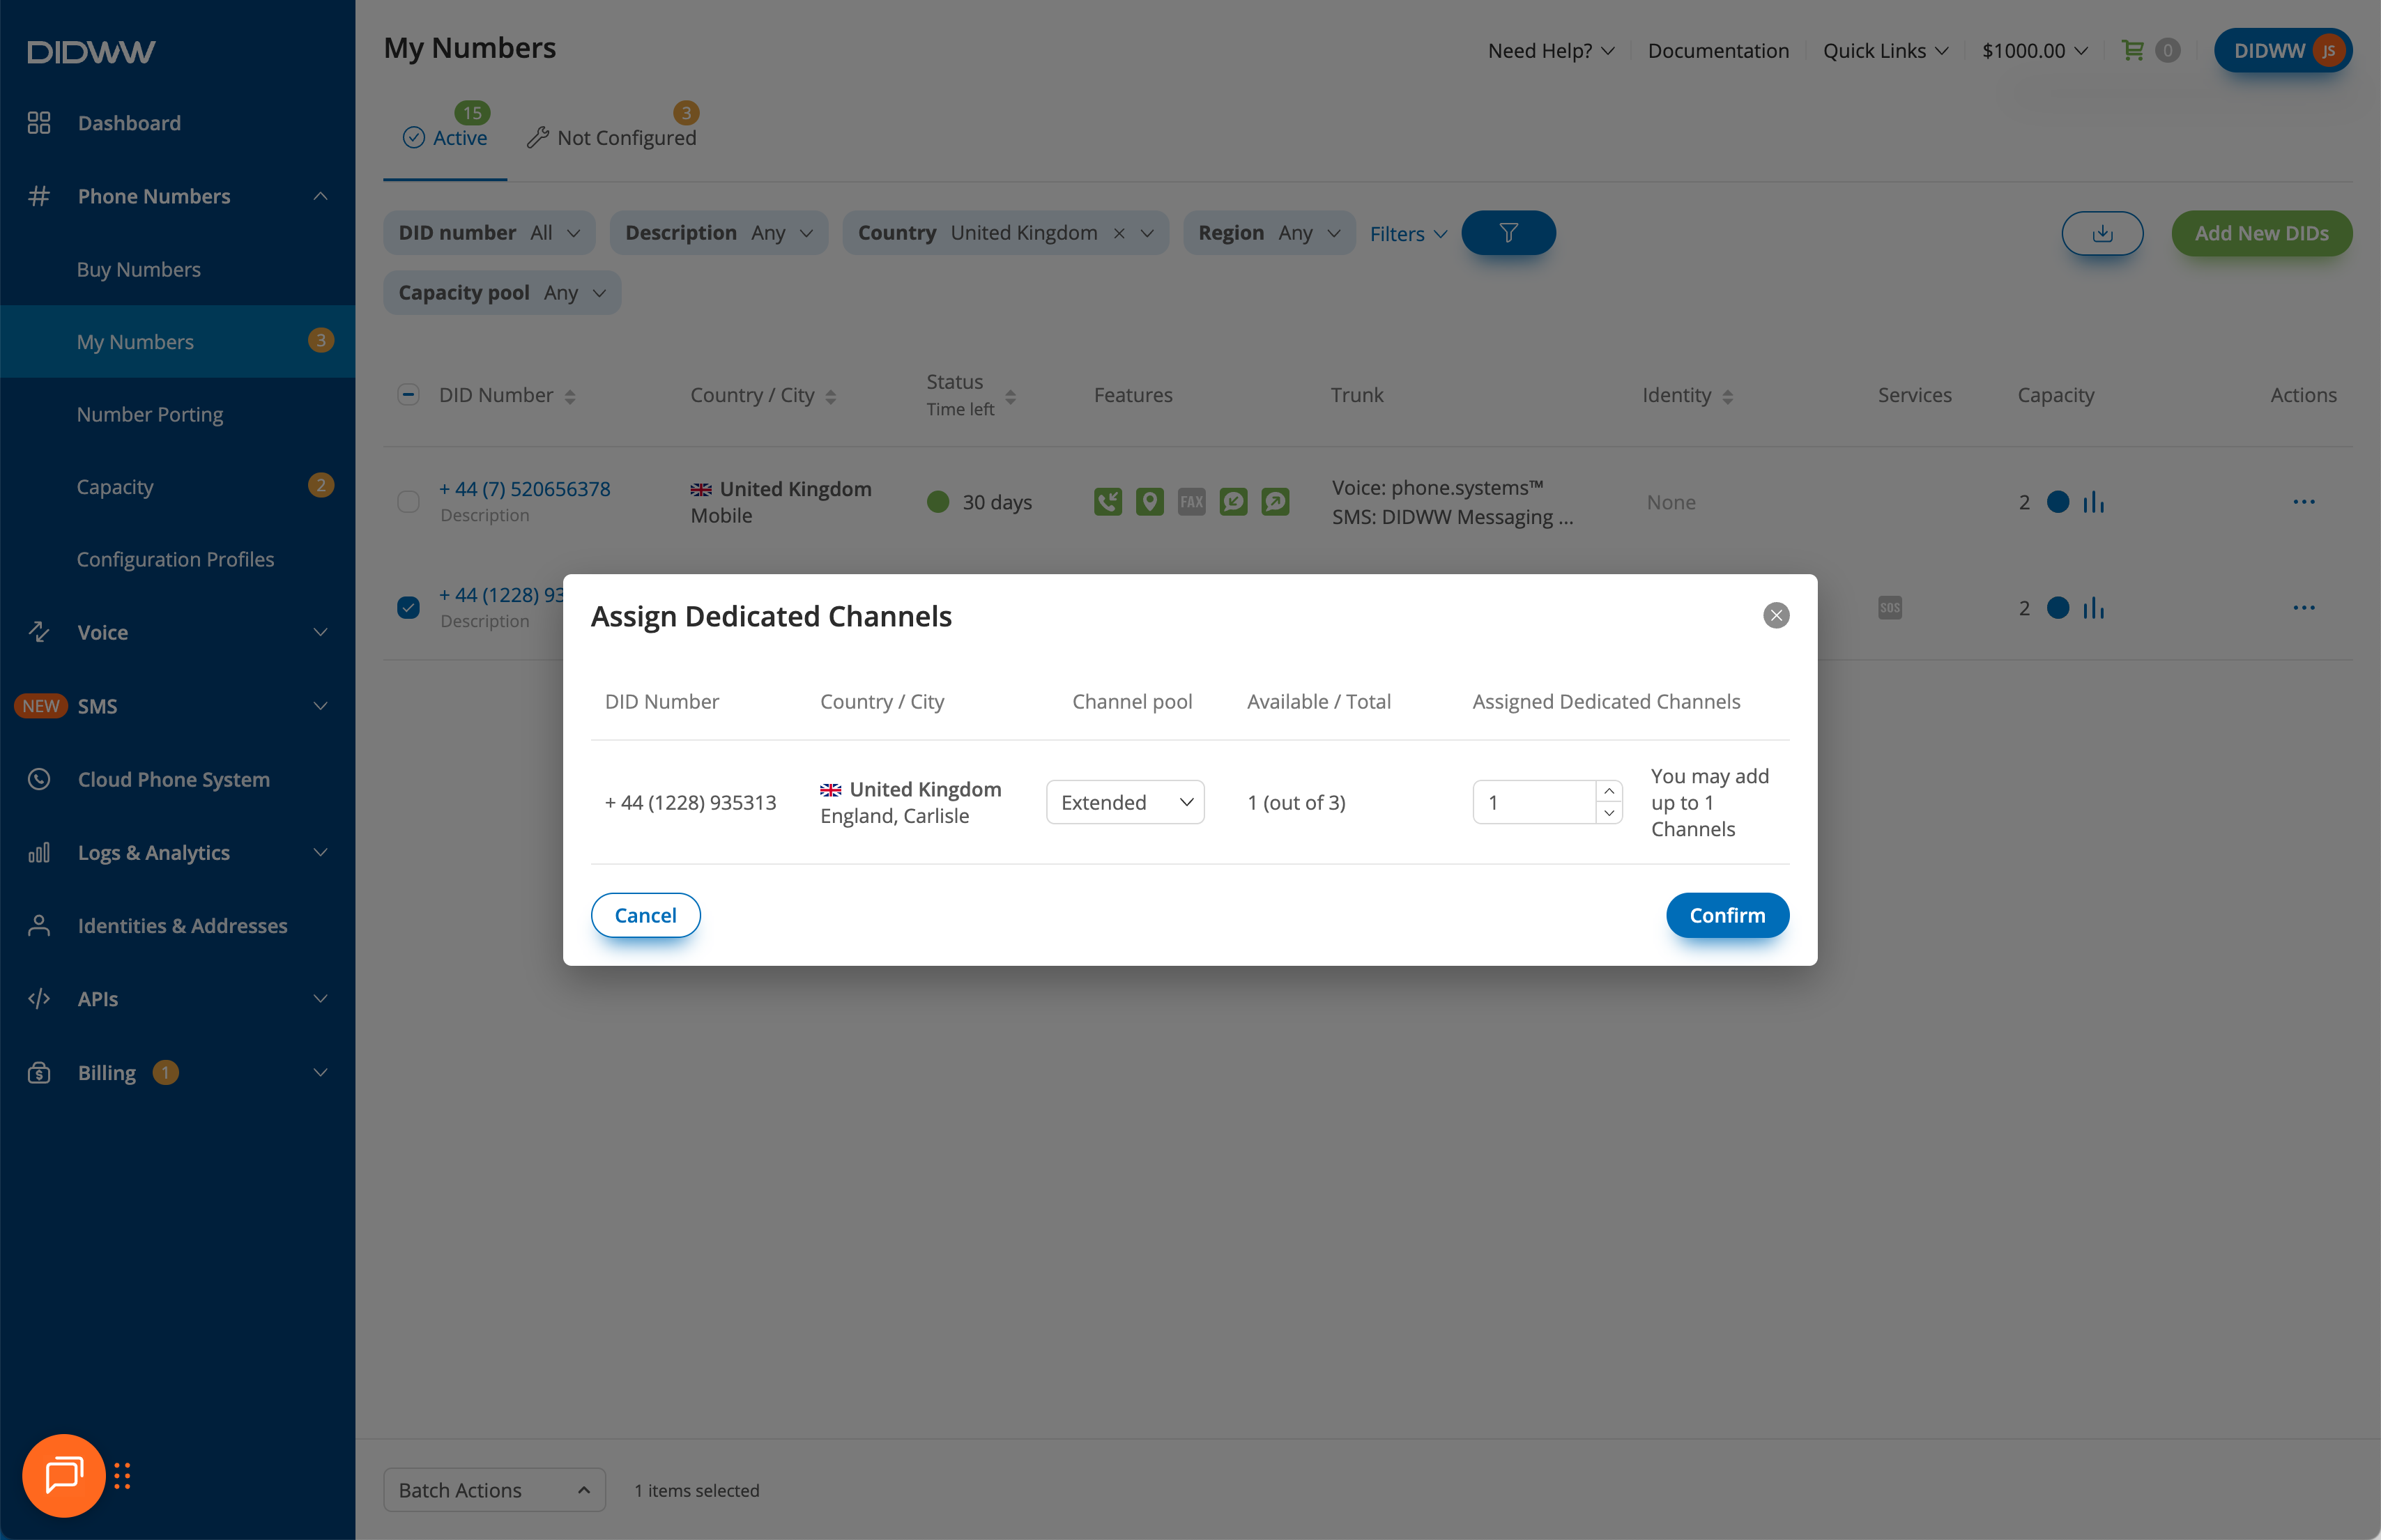
Fig. 9. Assigning flat-rate dedicated channels to a DID
Unassign Flat-rate Channels
Flat-rate channels can be assigned either as dedicated channels (to a single DID) or as shared channels (in a capacity group), follow the steps in the relevant tab below.
To unassign shared channels that are used by a group of DID numbers inside a Capacity Group, follow these steps:
Step 1: Open the Capacity Page
In the DIDWW User Panel, go to Phone Numbers > Capacity.
Select the capacity pool (Standard or Extended) where your shared channels are allocated.
In the Channel allocation block, review how many channels are assigned as shared.
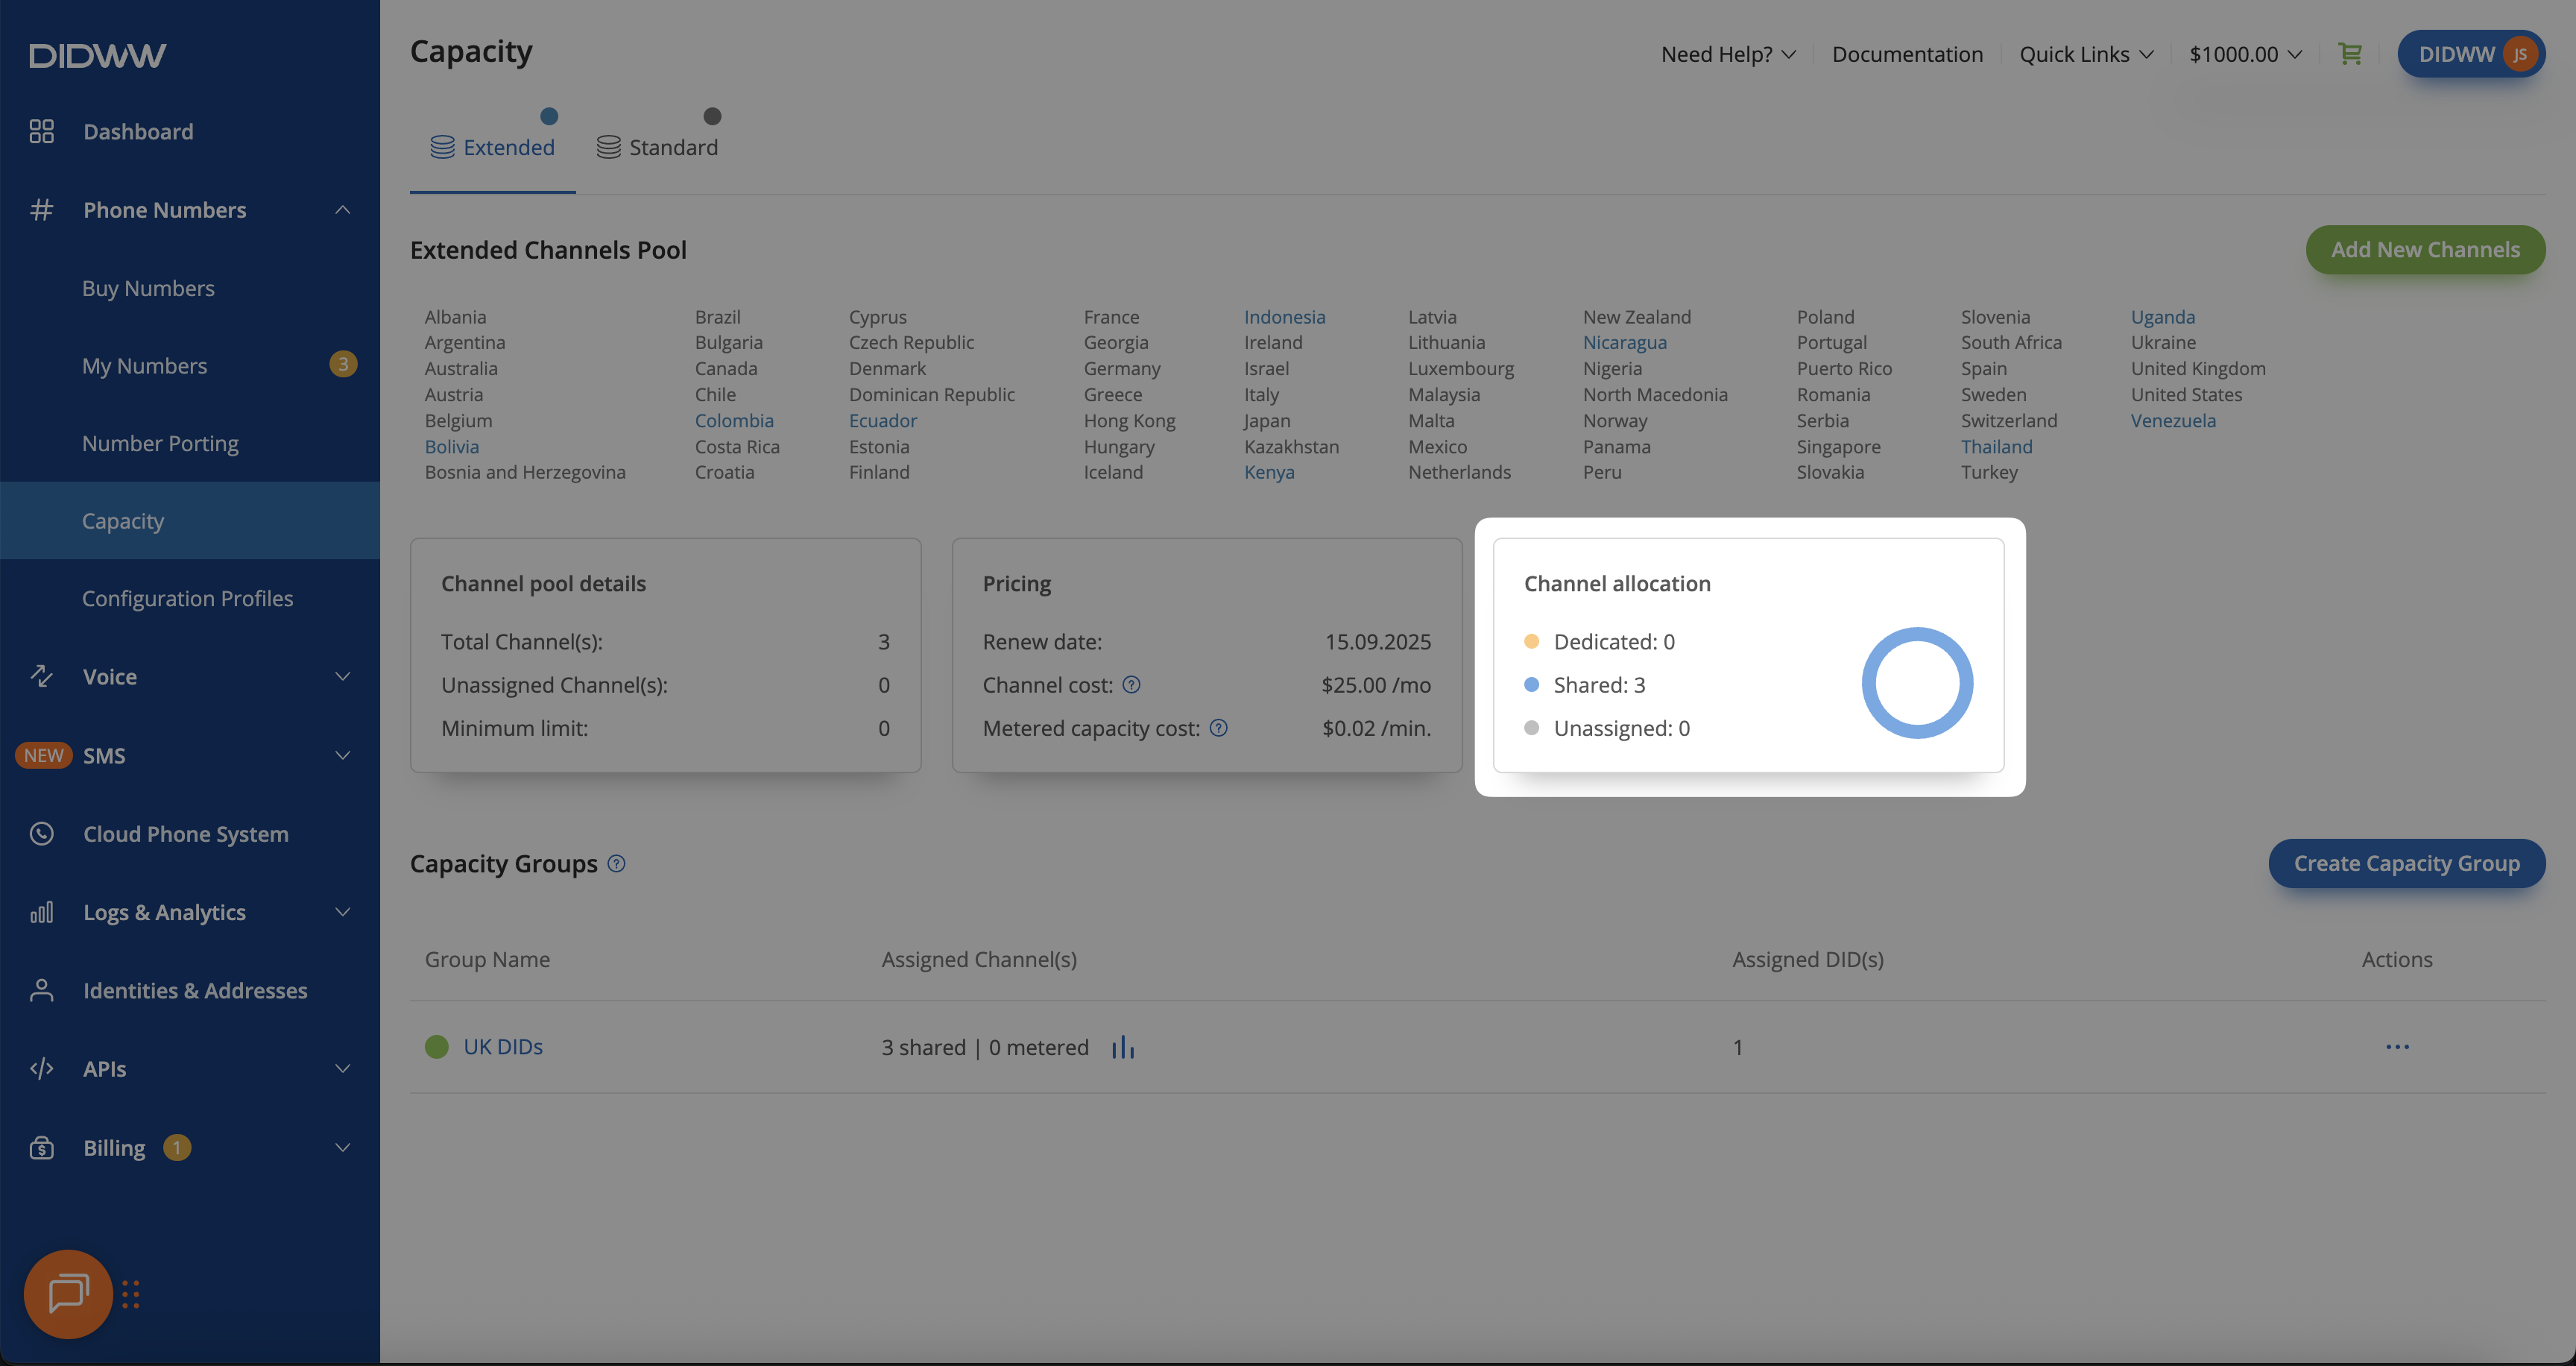
Fig. 10. View Channel Allocation
Step 2: Edit the Capacity Group
Find the Capacity Group where the Assigned Channels column shows more than 0 shared channels.
Click the Actions menu (three dots) and select Edit group.

Fig. 11. Opening the Edit Capacity Group option
Step 3: Unassign Shared Channels
Important
Before unassigning shared channels, make sure that reducing capacity will not cause call failures or traffic loss.
A capacity group cannot exist without any assigned channels. If you want to cancel all shared channels, first increase the number of metered channels to at least 1, then reduce the assigned shared channels to 0.
If you want to remove all channels from a capacity group, first unassign all DIDs from that group, then delete the capacity group.
In the Edit Capacity Group pop-up window, locate Assigned shared Channels.
Reduce the number of shared channels to the desired value.
Click Submit to confirm the changes.
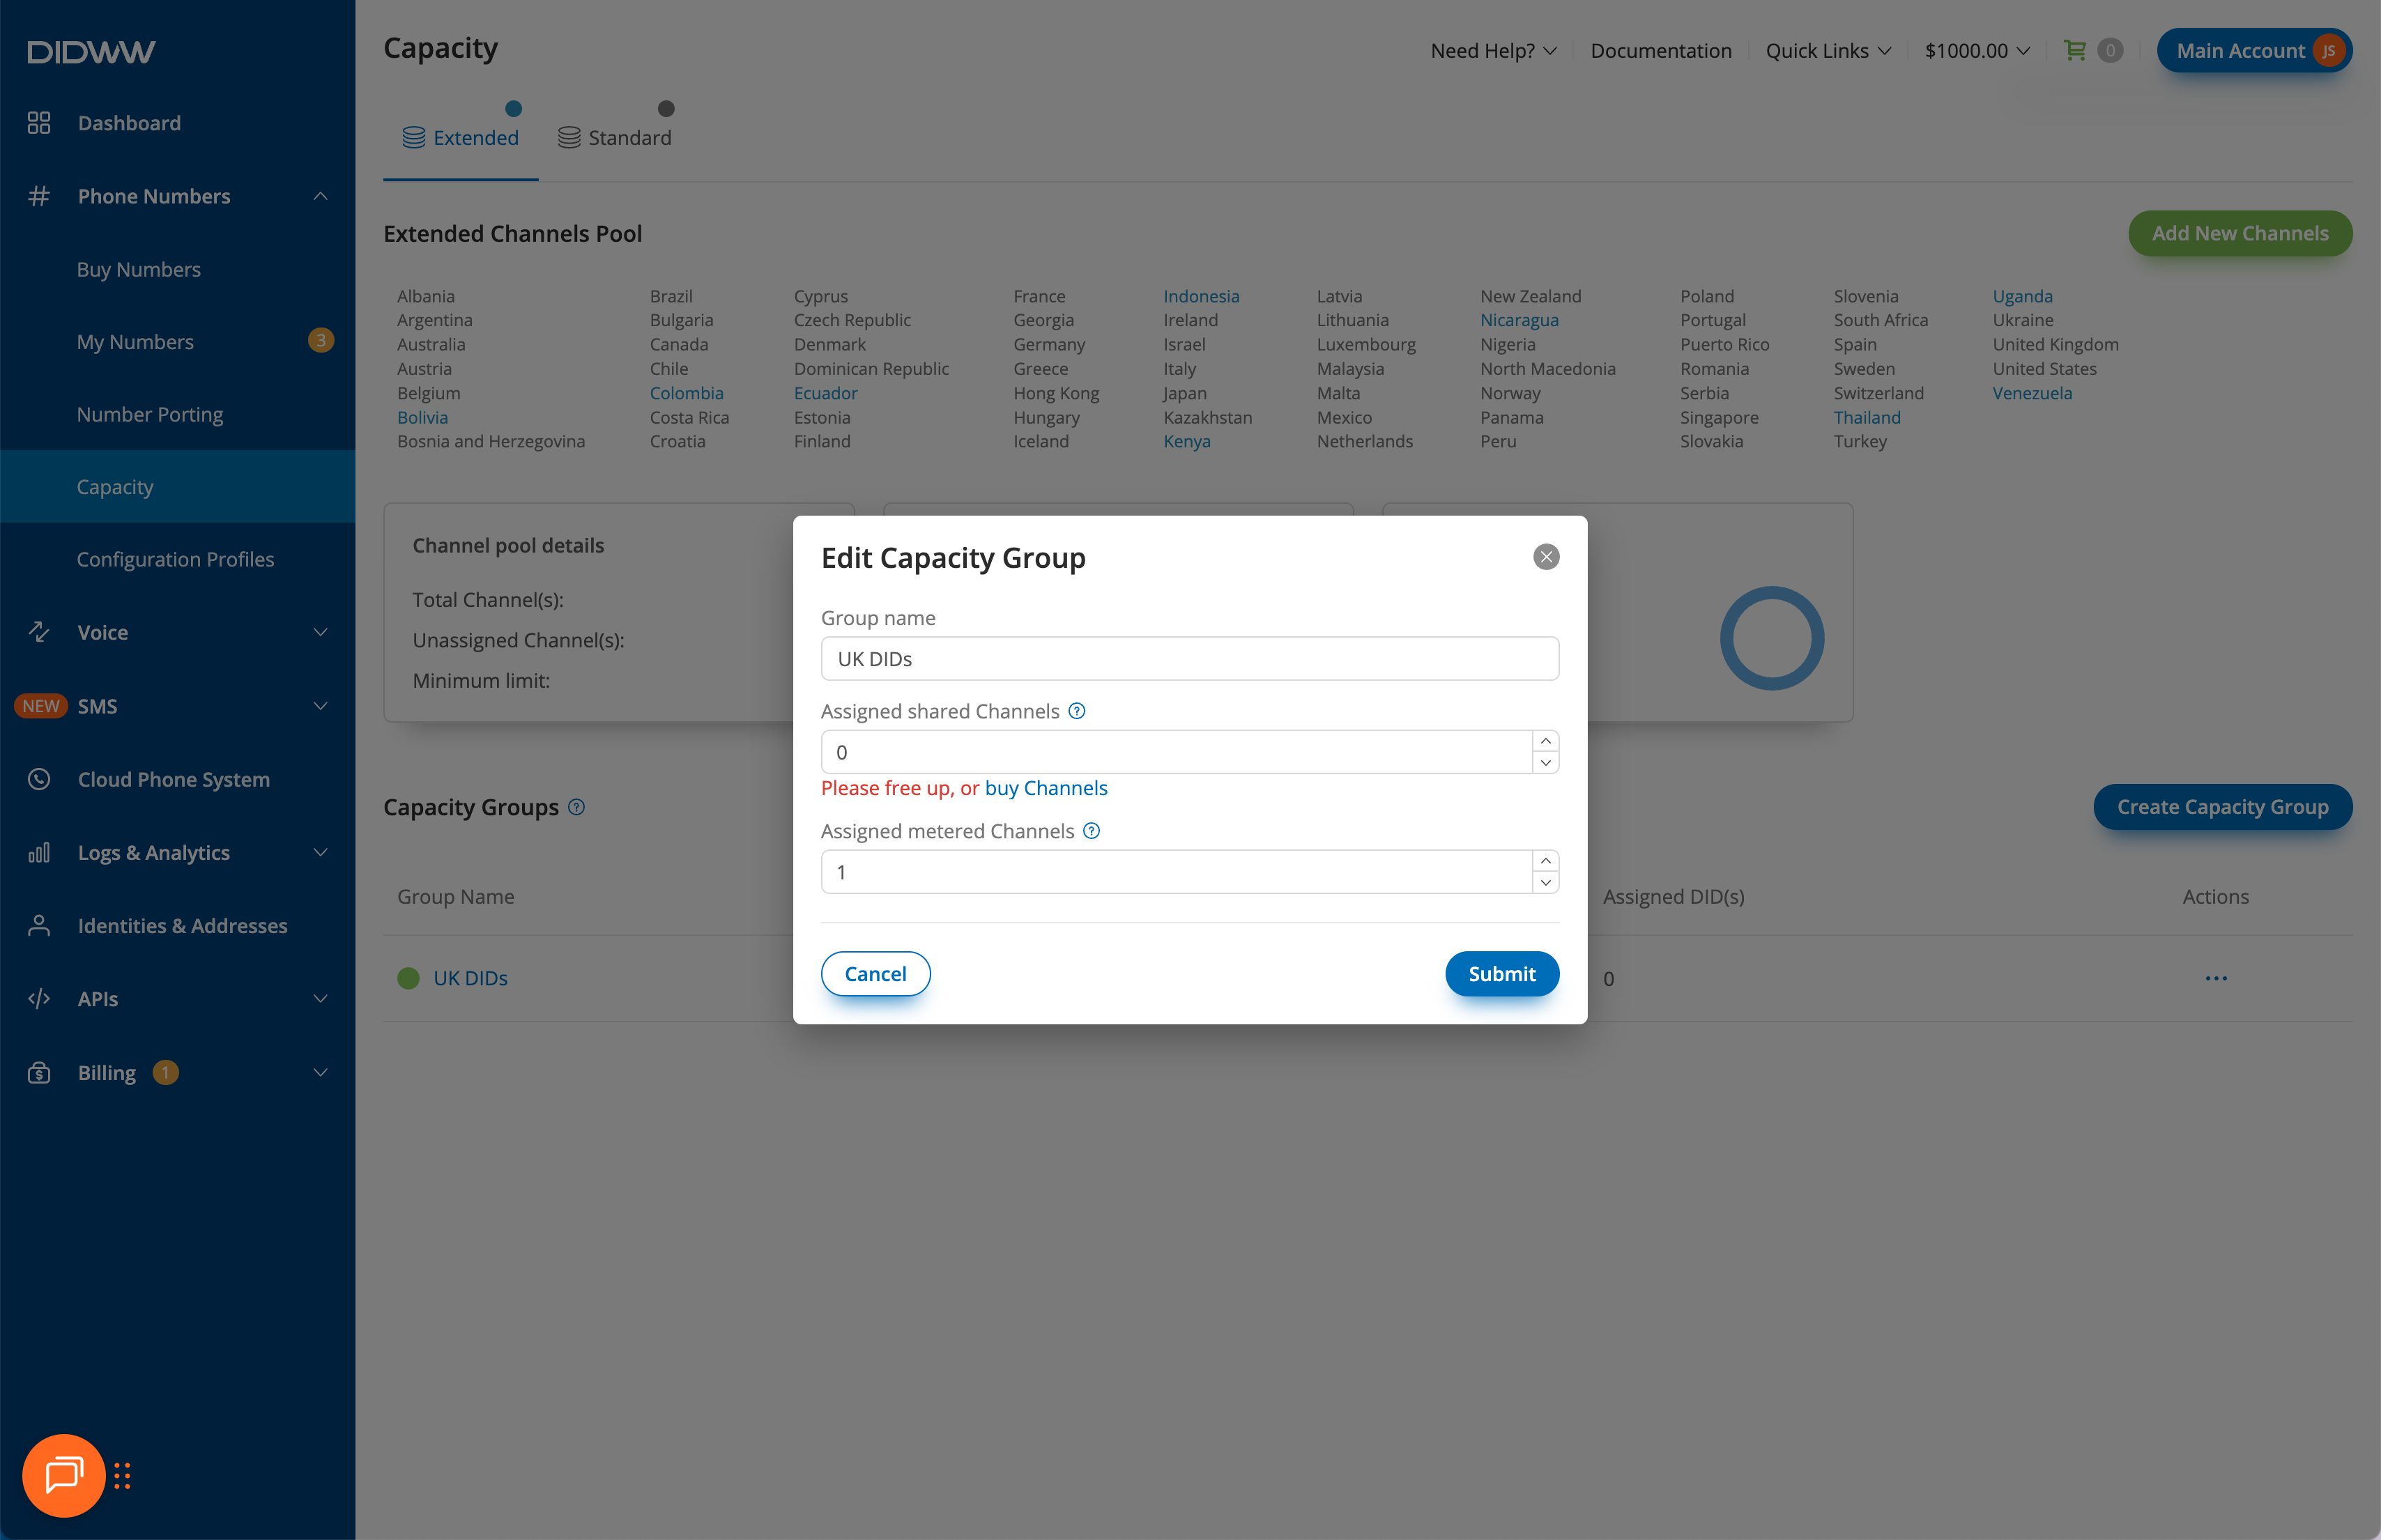
Fig. 12. Unassigning shared channels in the Edit Capacity Group pop-up
To unassign dedicated channels from a DID, follow these steps:
Step 1: Filter Numbers by Capacity Pool
In the DIDWW User Panel, go to Phone Numbers > My Numbers.
Select the Active or All Numbers tab.
To quickly locate numbers with dedicated channels, open Filters and enable the Capacity pool filter.
Choose the pool (Standard or Extended) where your dedicated channels were purchased.
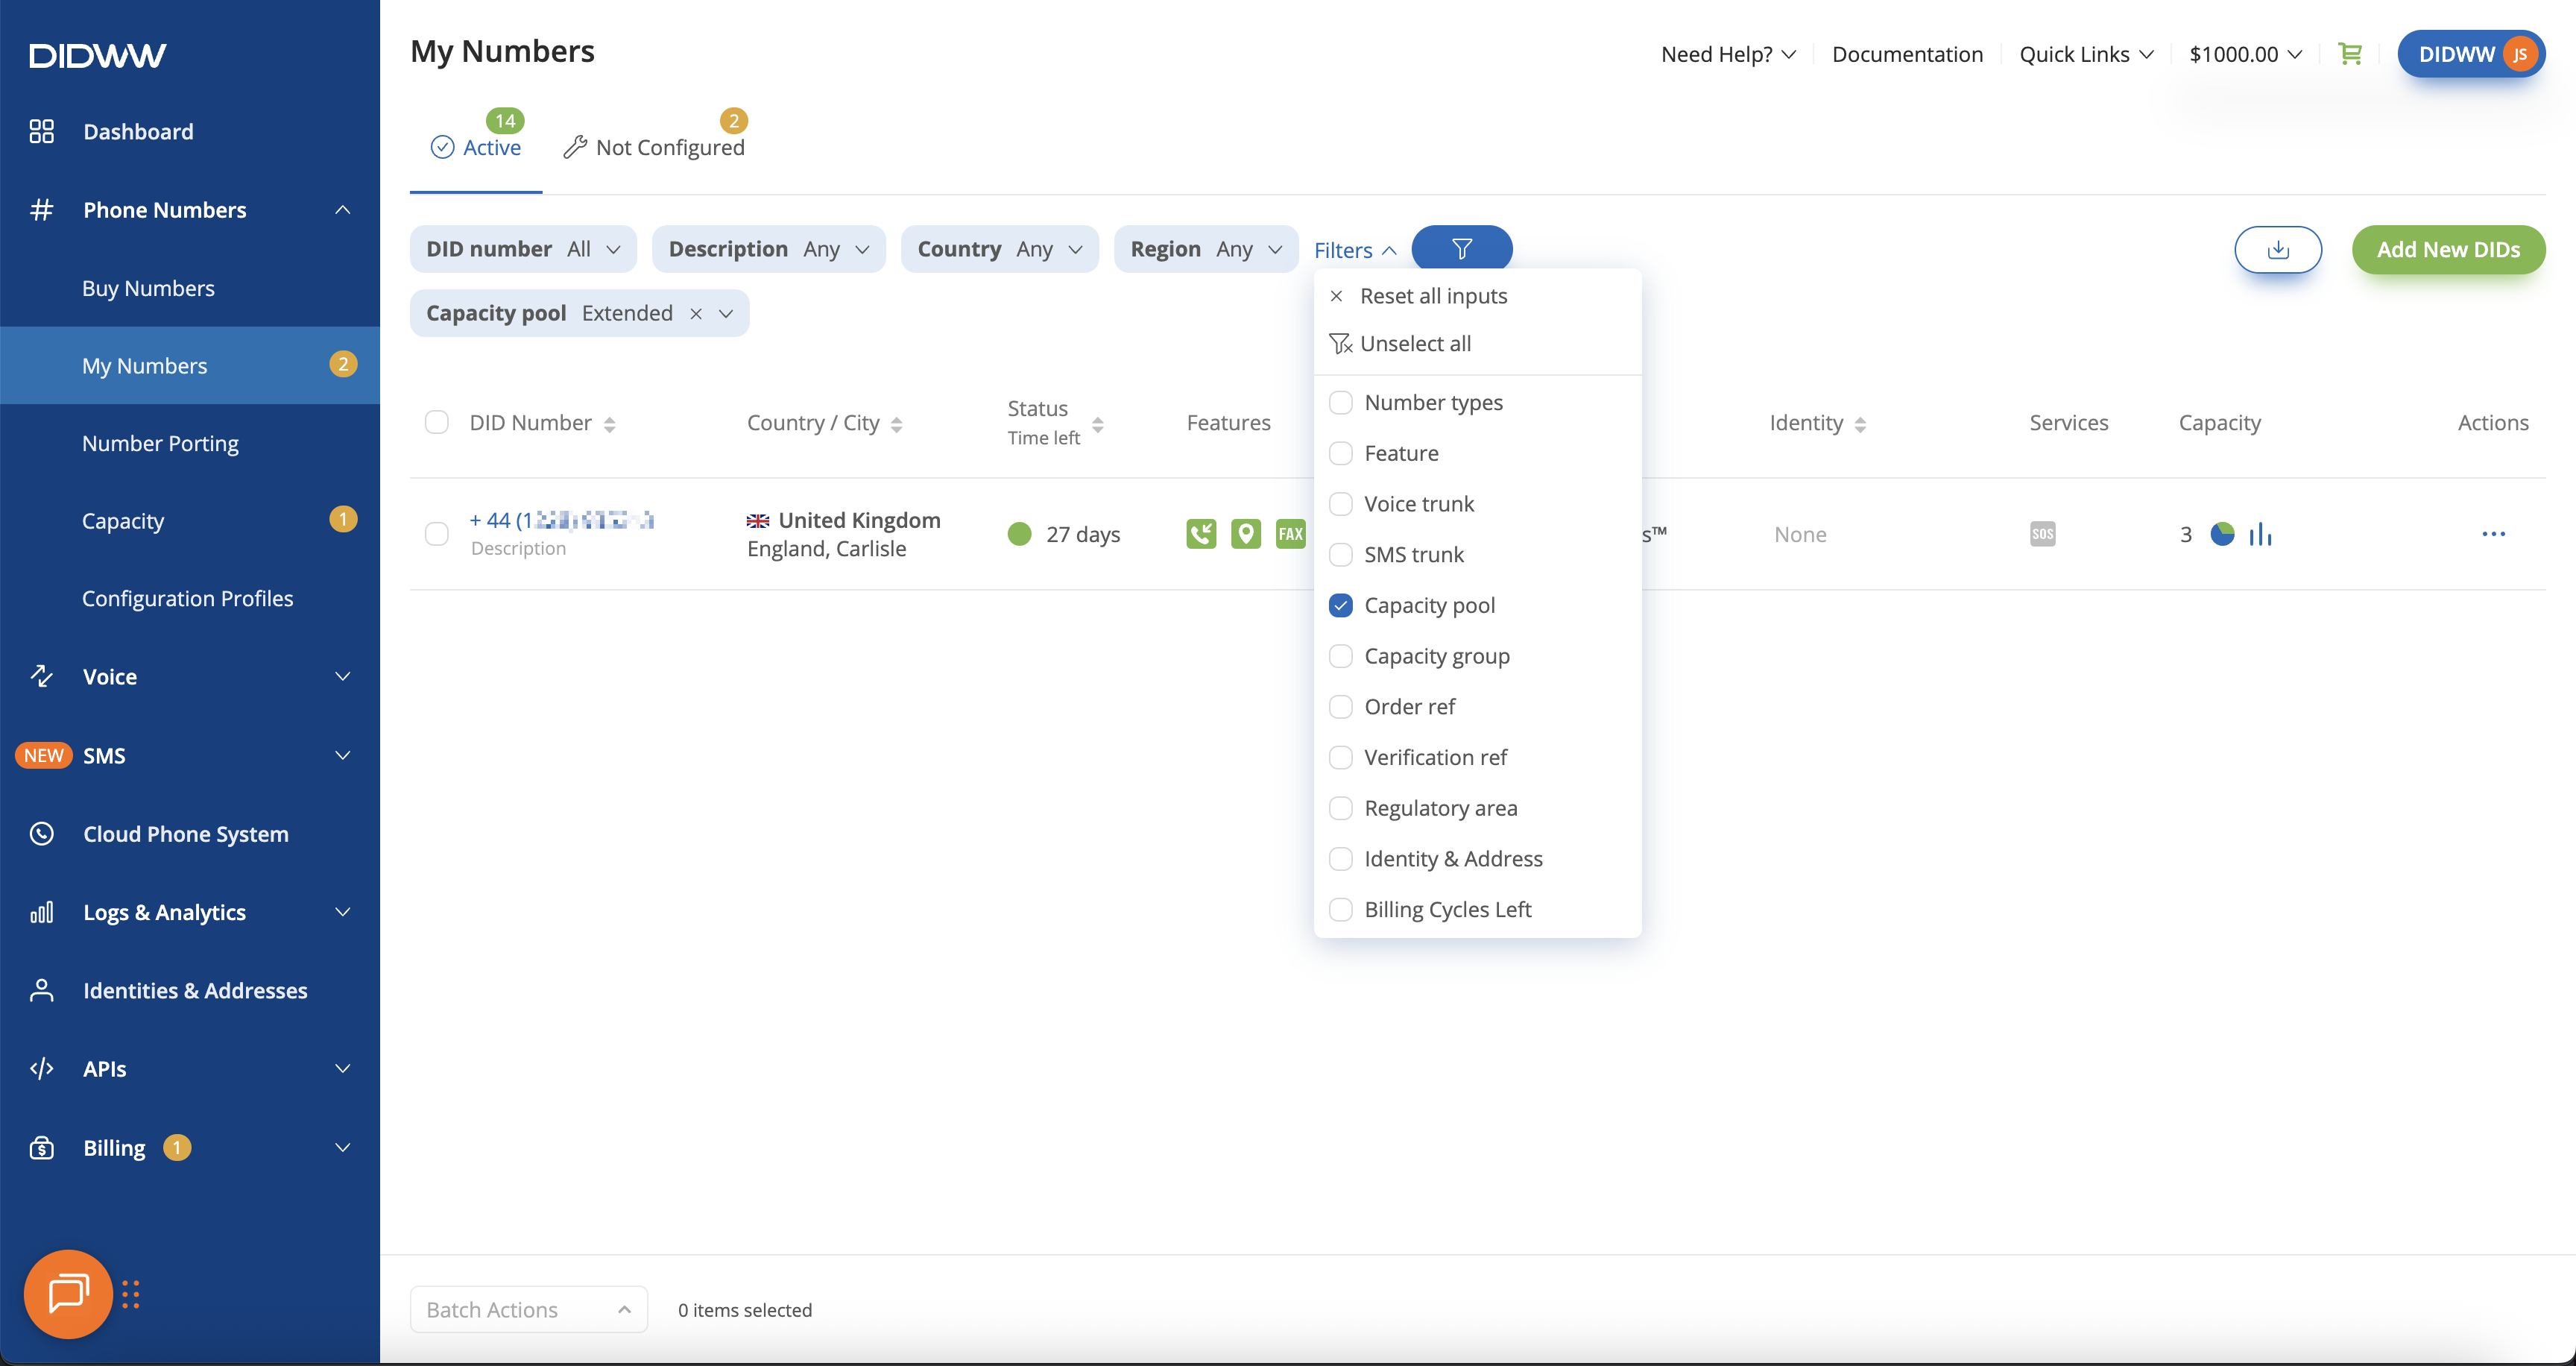
Fig. 13. DID numbers filtered by the Capacity pool
Step 2: Check the Capacity Column
Locate your DID number in the table.
Hover over the Capacity column to see details. A pie chart will display the pool name and the number of dedicated channels assigned.
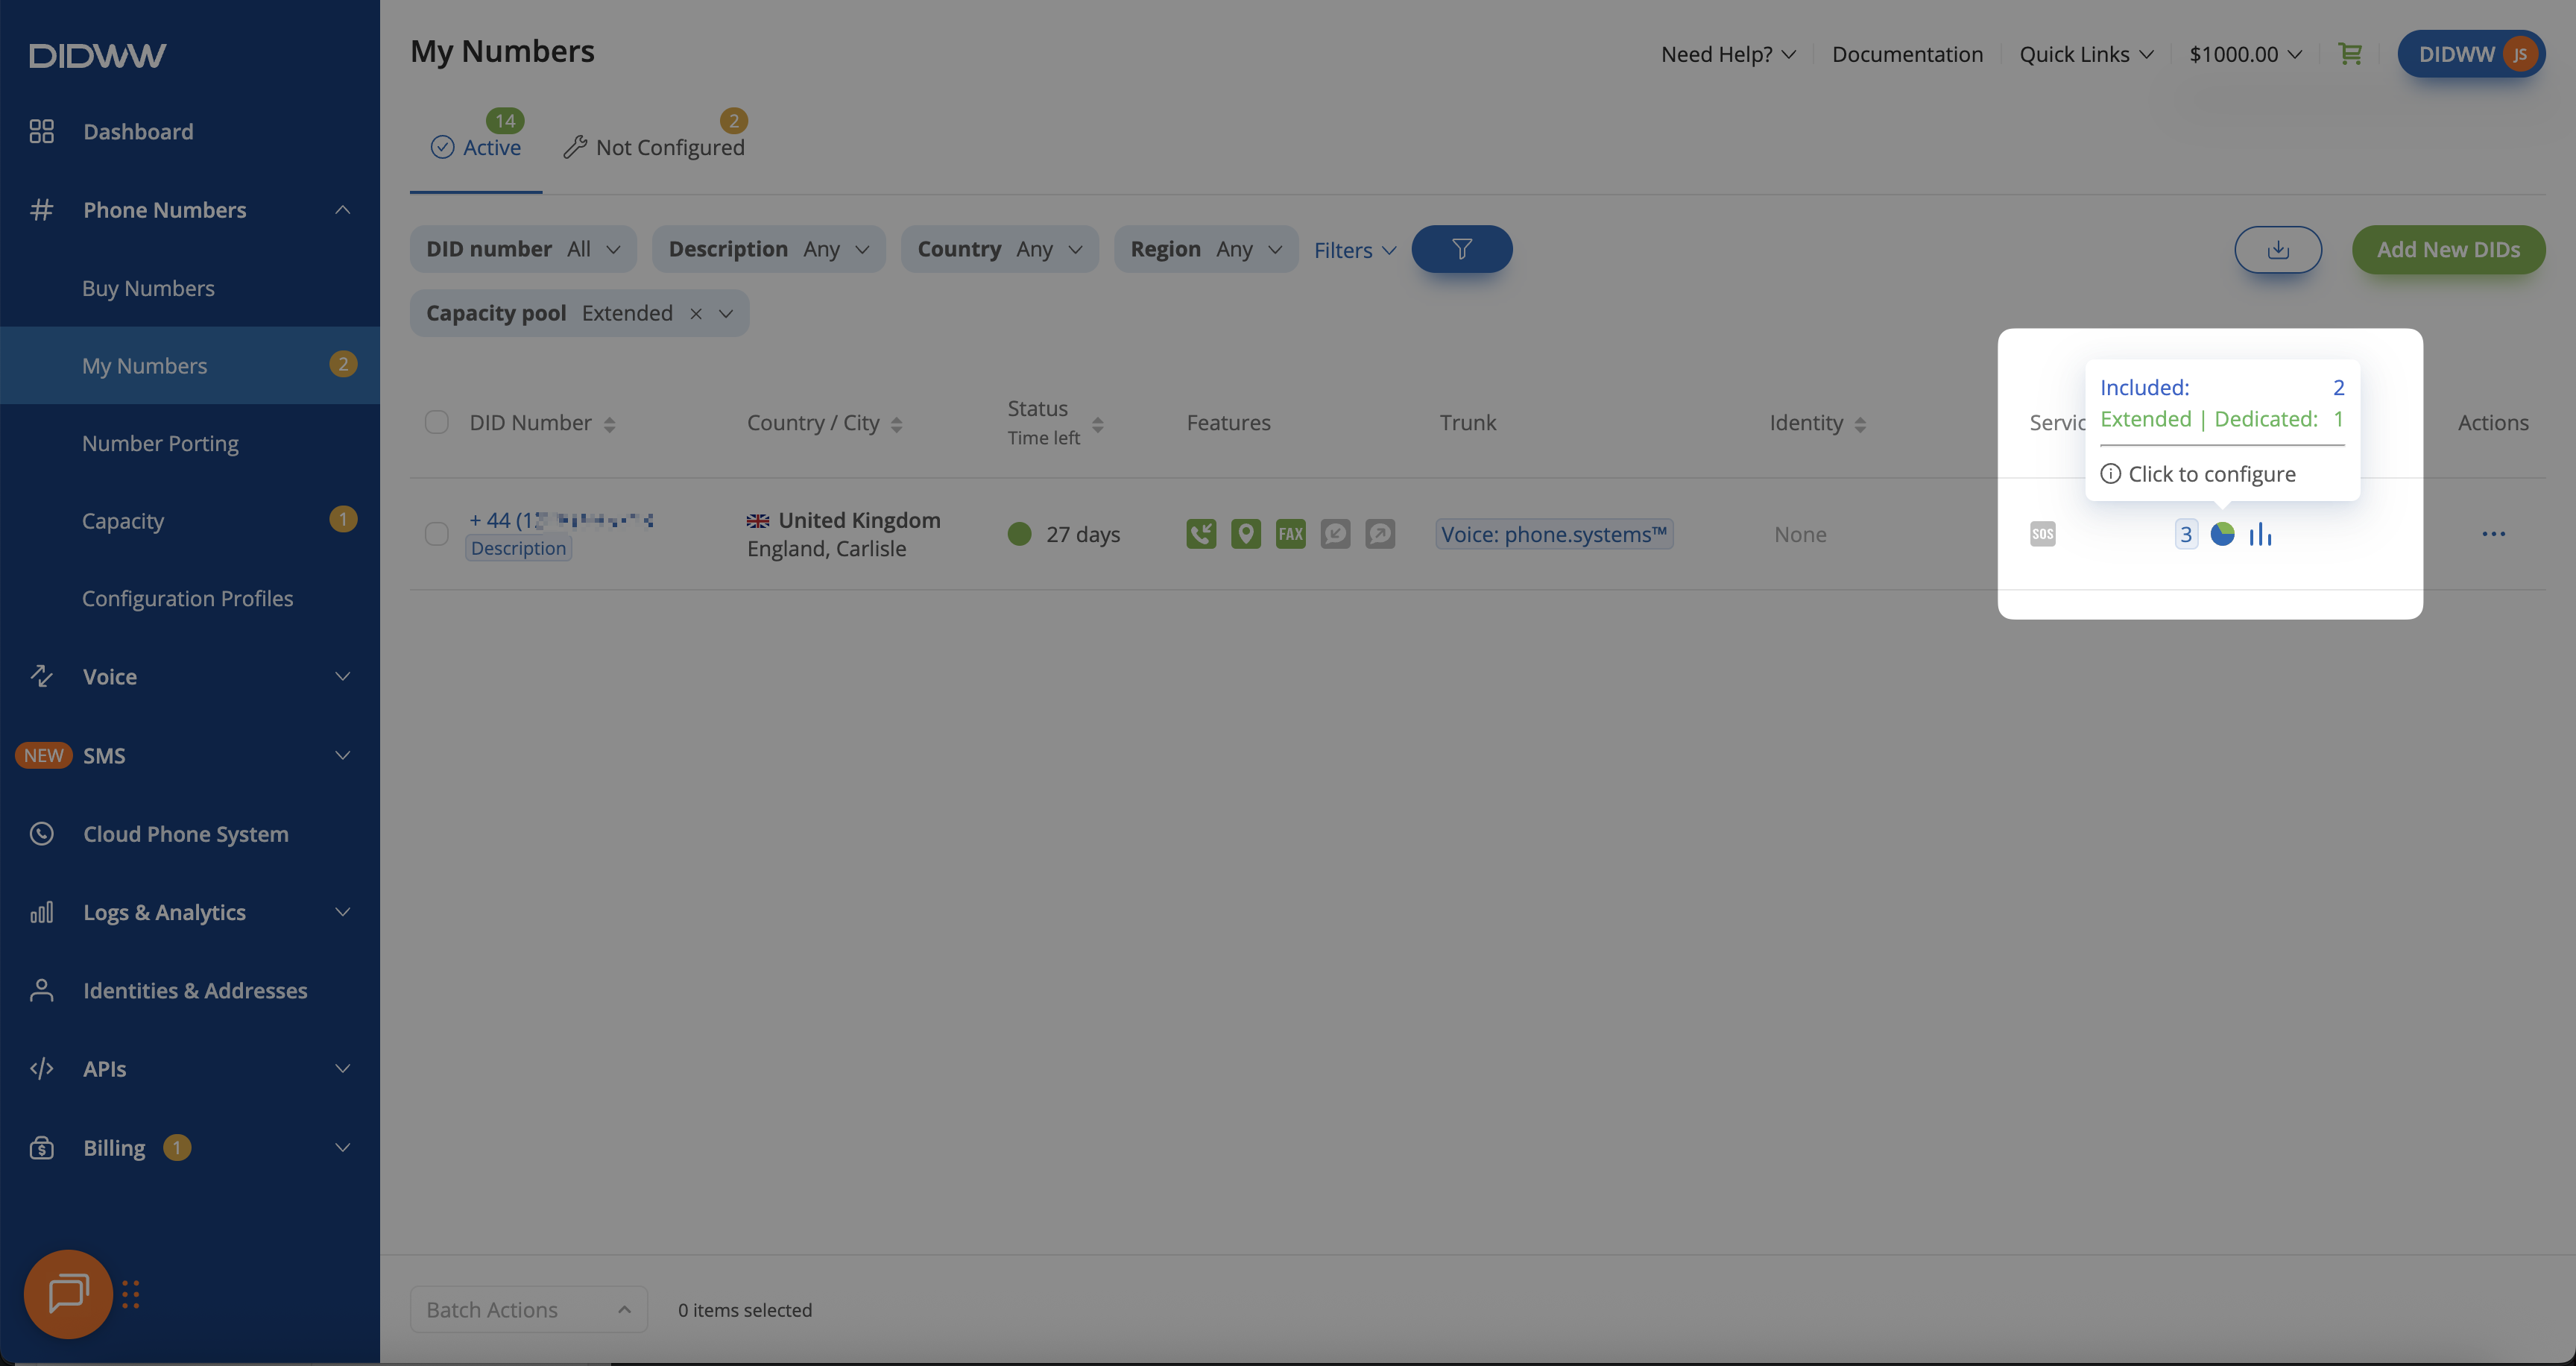
Fig. 14. Capacity column showing assigned dedicated flat-rate channels
Step 3: Unassign Dedicated Channels
Select the DID number you want to manage.
At the bottom of the page, click Batch Actions and choose Assign Dedicated Channels.
In the pop-up, select the correct channel pool.
Reduce the Assigned Dedicated Channels value to 0.
Click Confirm to unassign the channels.
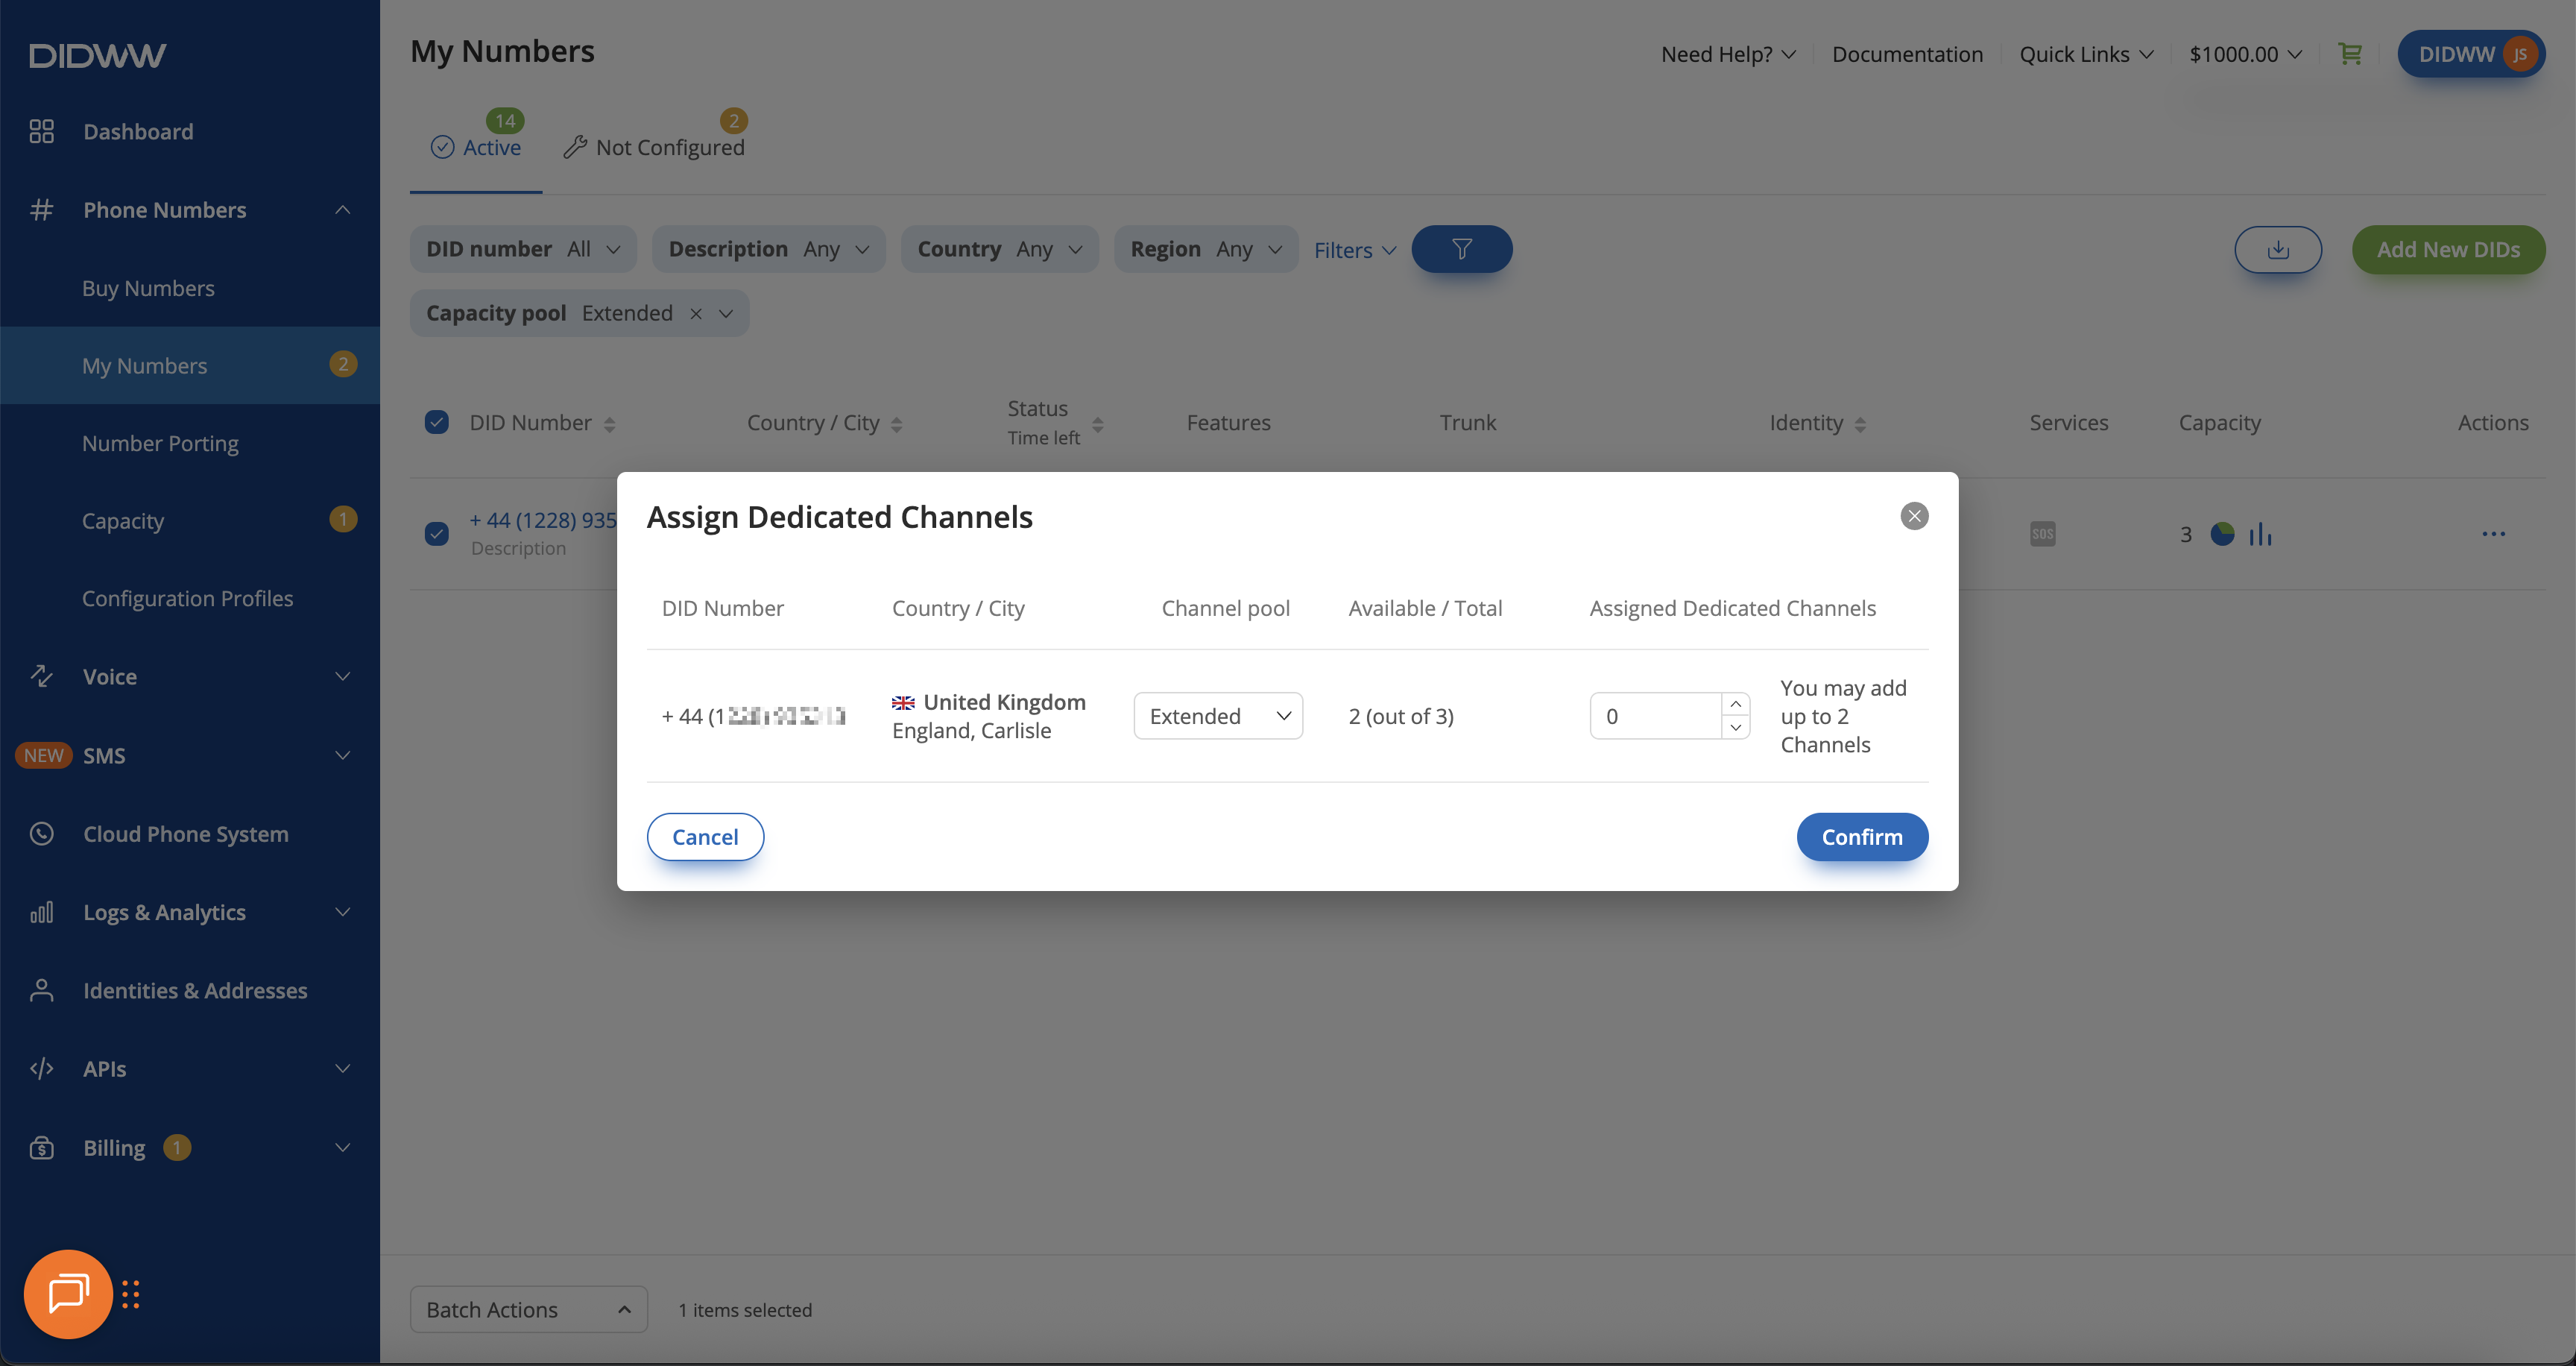
Fig. 15. Unassigning dedicated channels by setting Assigned Dedicated Channels to 0
Remove Flat-rate Channels
If additional flat-rate channels are no longer needed, you can remove and cancel them at any time. However, only unassigned channels can be removed. This means that if channels are currently assigned, you must first unassign them before they can be removed.
Important
The Remove Channels button is only visible when at least one unassigned channel is available in the selected pool.
Before You Begin
Unassign the channels in the capacity pool where you plan to remove them. For details, see the Unassign Channels guide.
Step 1: Open the Capacity Page
In the DIDWW User Panel, go to Phone Numbers > Capacity.
Select the Standard or Extended pool where you purchased the channels.
Verify in the Channel allocation block that there are unassigned channels available to remove.
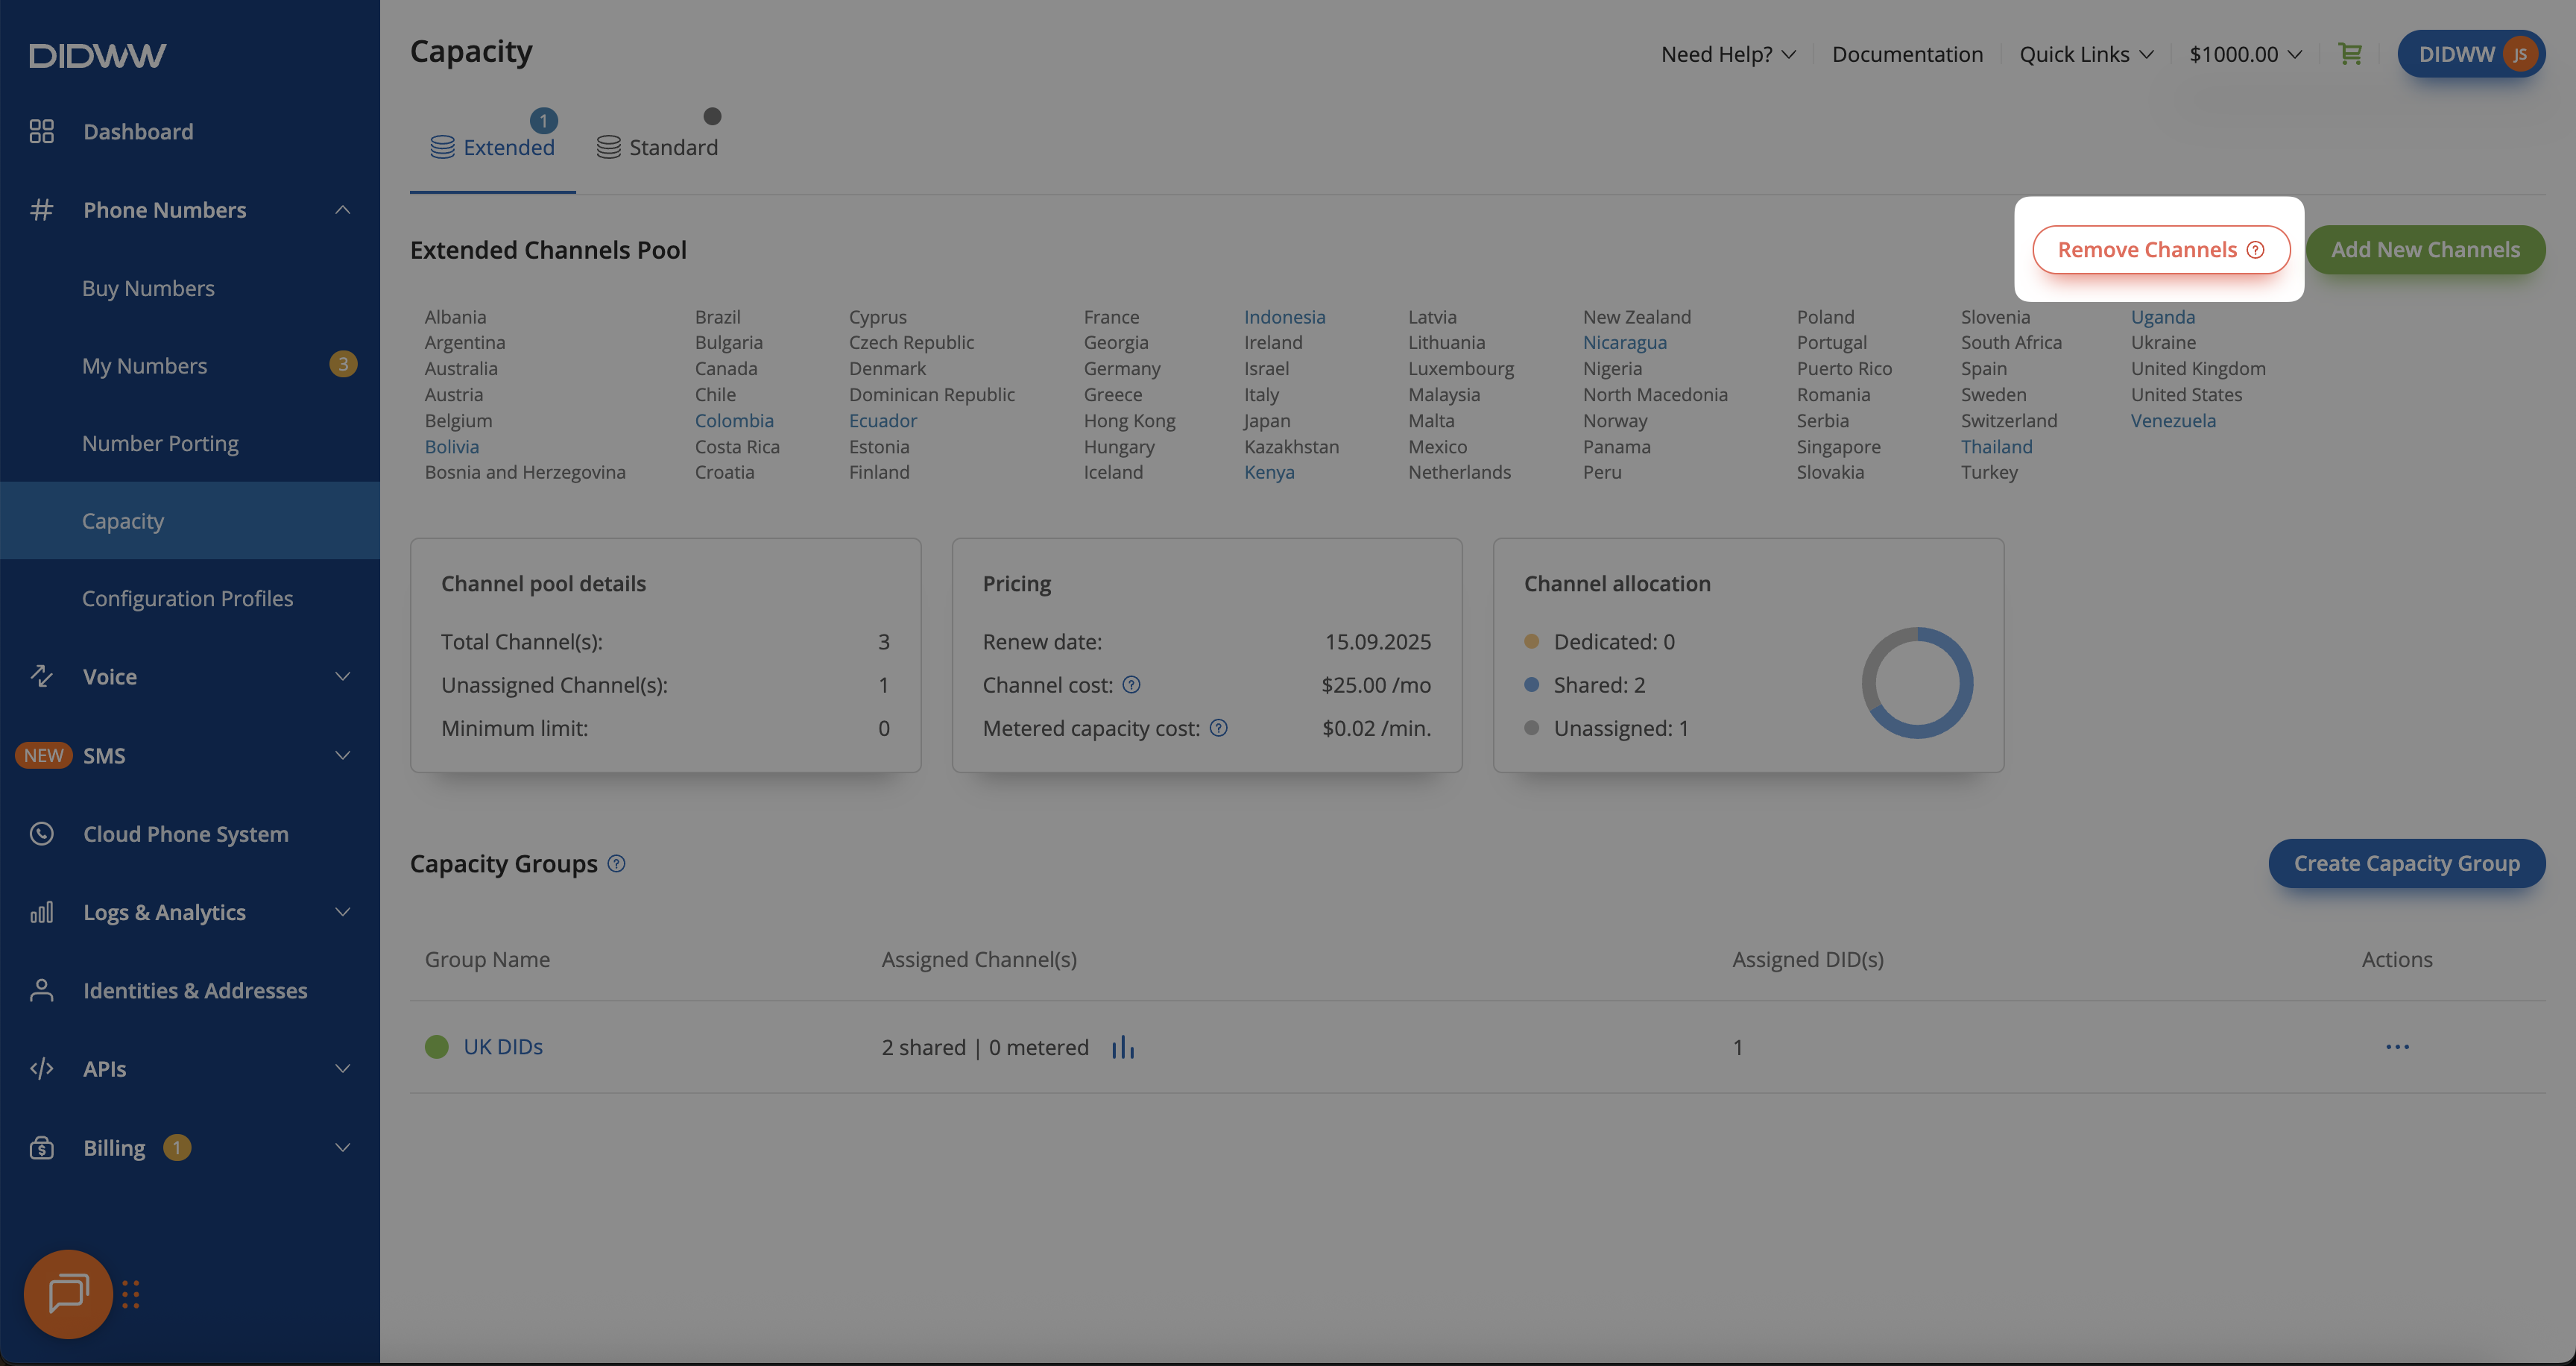
Fig. 16. Remove Channels
Step 2: Remove Channels
Click the Remove Channels button.
In the pop-up window, enter the number of unassigned channels you want to remove.
Click Remove to confirm.
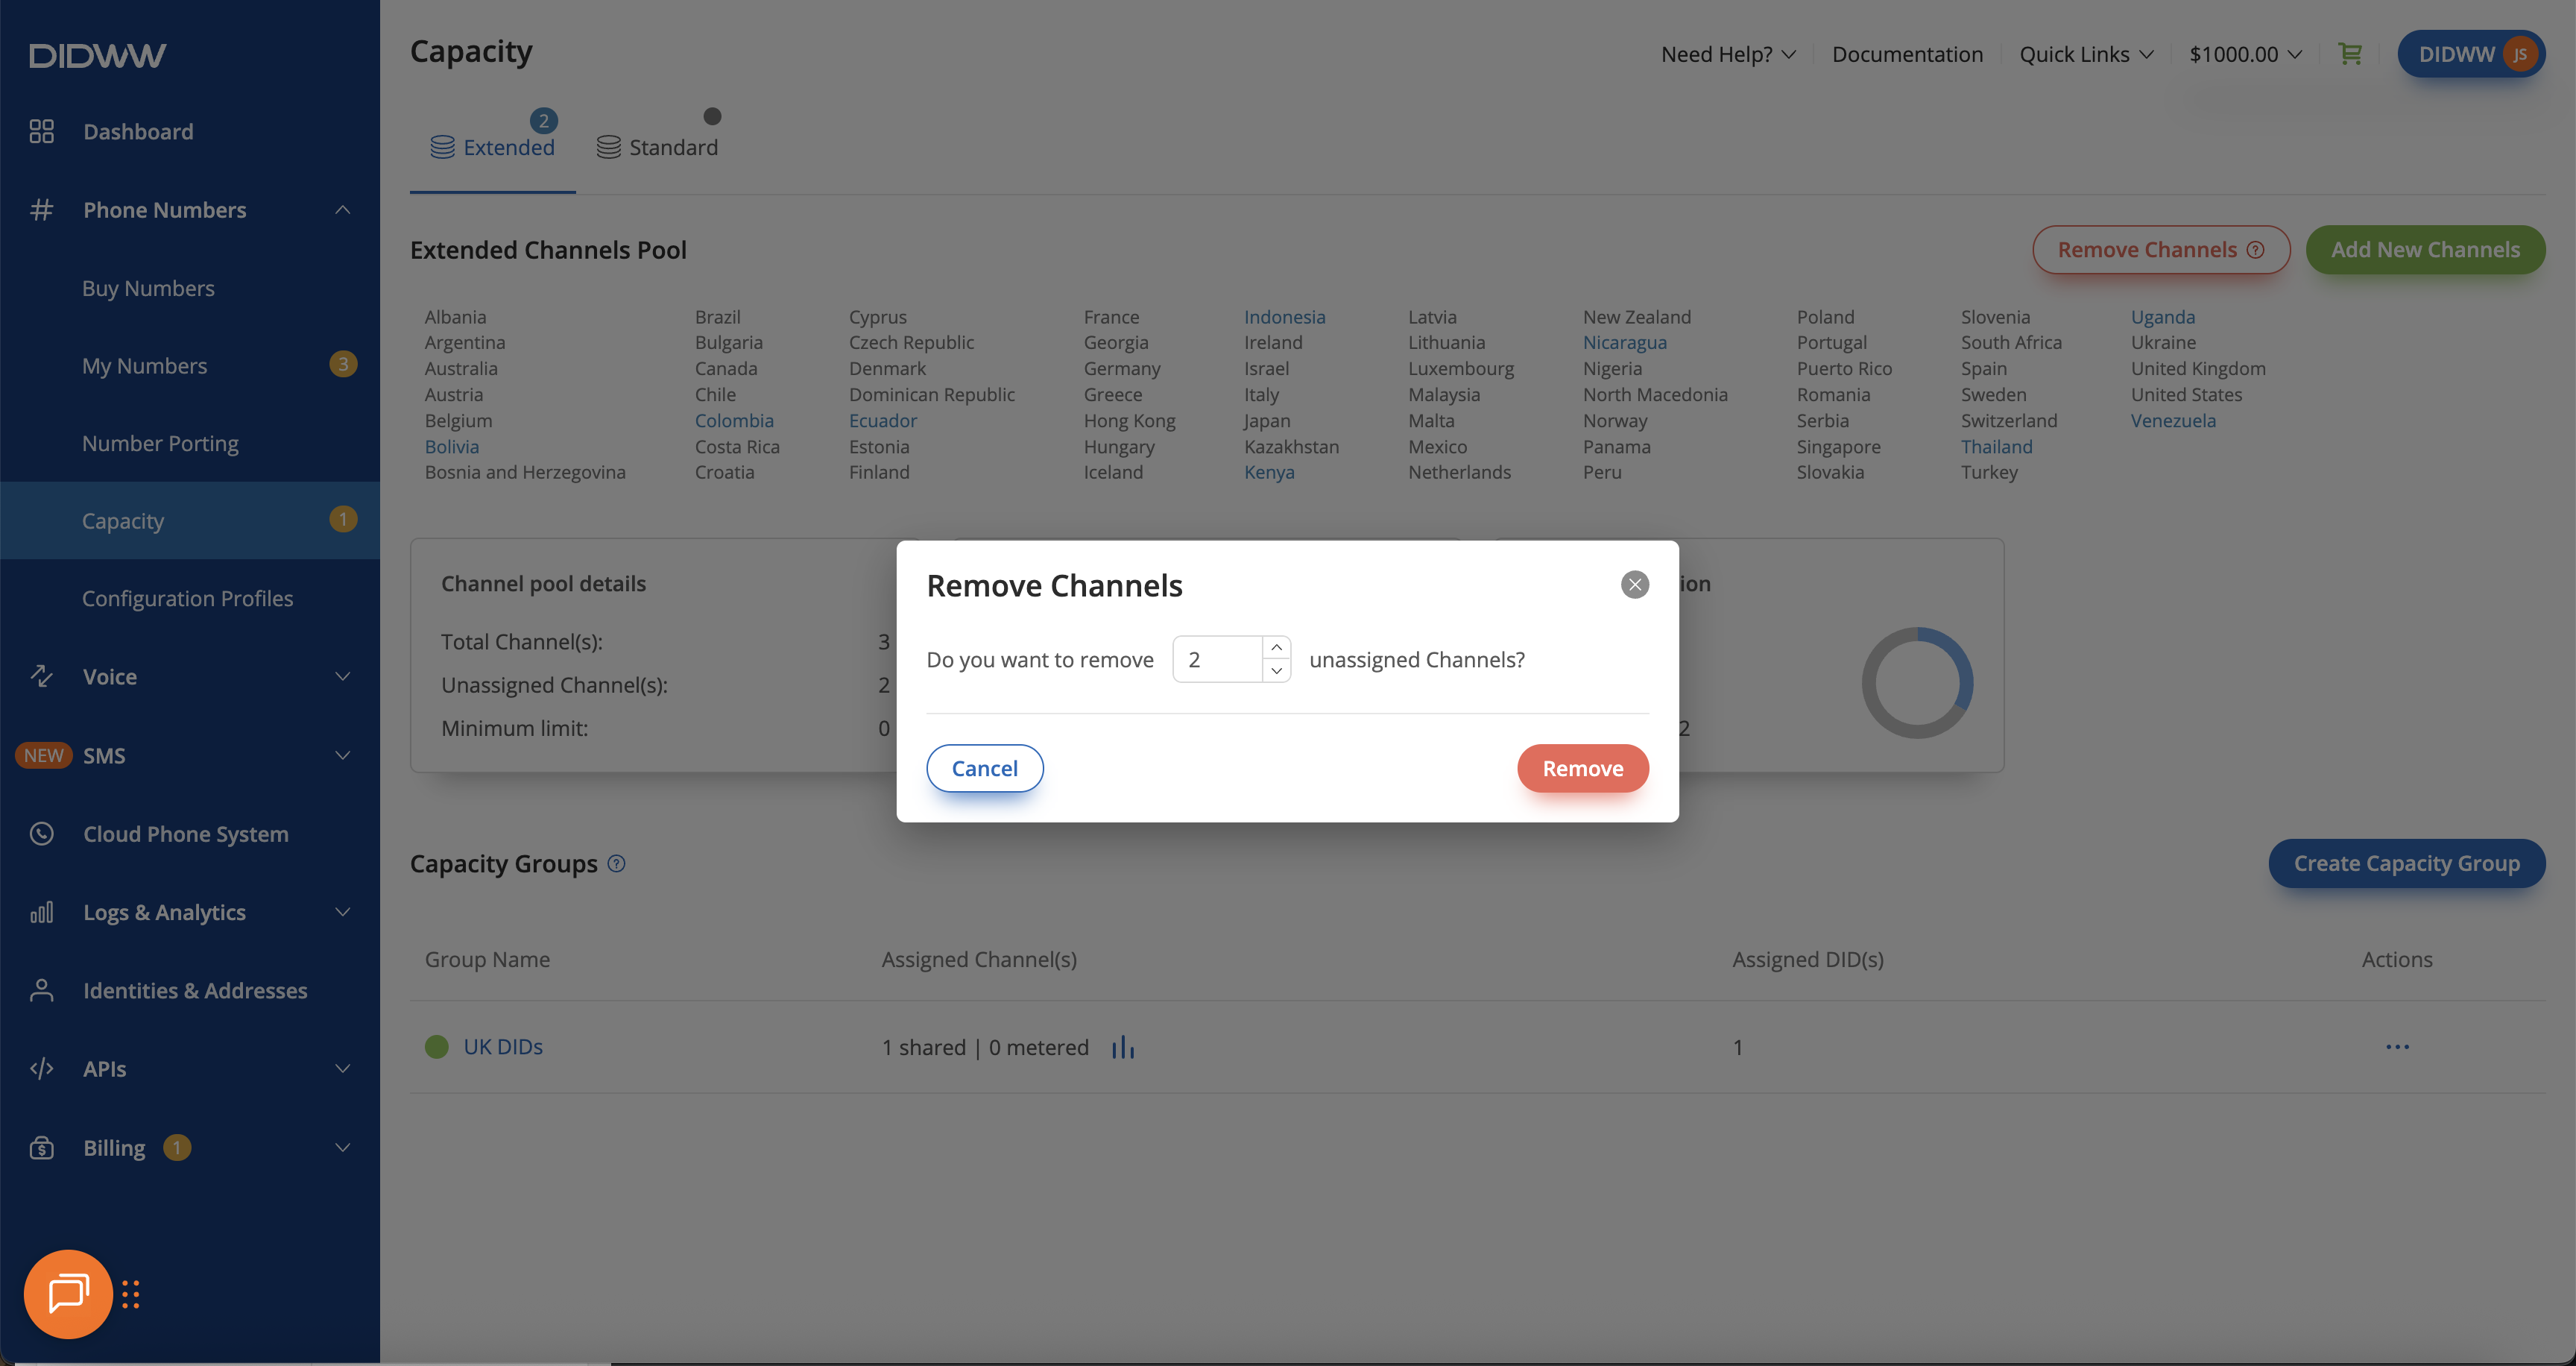
Fig. 17. Removing unassigned channels