

Configure number lists#
The Number List feature in the DIDWW user panel allows you to manage inbound call filtering by specifying which phone numbers or prefixes should be allowed or rejected. These lists can be linked to inbound SIP and PSTN trunks, ensuring that only approved calls go through while unwanted ones are rejected.
This guide walks you through the process of creating a Number List, adding numbers or prefixes, and configuring rules to either allow or reject calls. You’ll learn how to:
Create a Number List and assign it to an inbound SIP or PSTN trunk.
Define specific numbers or prefixes to allow or reject calls.
Analyze call rejection error codes to troubleshoot blocked calls and adjust settings.
To edit or delete existing Number Lists and their numbers, see Manage number lists. For example configurations, see Number List use cases.
Before you begin#
An active DIDWW account is required. Sign in to DIDWW.
An inbound SIP or PSTN trunk is required to assign the Number List to. See Create a SIP trunk or Create a PSTN trunk.
1. Create a Number List#
Before you can filter inbound calls, you need to create a Number List. This list will store numbers and prefixes that can later be assigned to a SIP or PSTN trunk for call filtering.
Follow these steps to create a Number List to filter inbound calls.
Step 1: Open the Create Inbound Number List#
Go to Voice > Inbound Trunks.
Open the Number Lists tab.
Click Create New to start the setup.
Fig. 1. Number Lists Create New Button#
Step 2: Configure the Number List#
On the Number List creation screen, configure the list based on your requirements:
Enter a Friendly name (e.g., Blocked Callers).
Select a Mode:
Full number match: The number(s) must include the exact full source calling number to apply this rule.
Prefix match: The number(s) must include a prefix. This rule applies only if the source number matches your entered prefix(s).
Set the Default action:
Allow call: All calls will be allowed if no matching numbers are found in your number list.
Reject call: All calls will be rejected if no matching numbers are found in your number list.
Fig. 2. Configure the Number List#
Step 3: Create the Number List#
Click Create to save your new Number List. It will now appear in the Number Lists section.
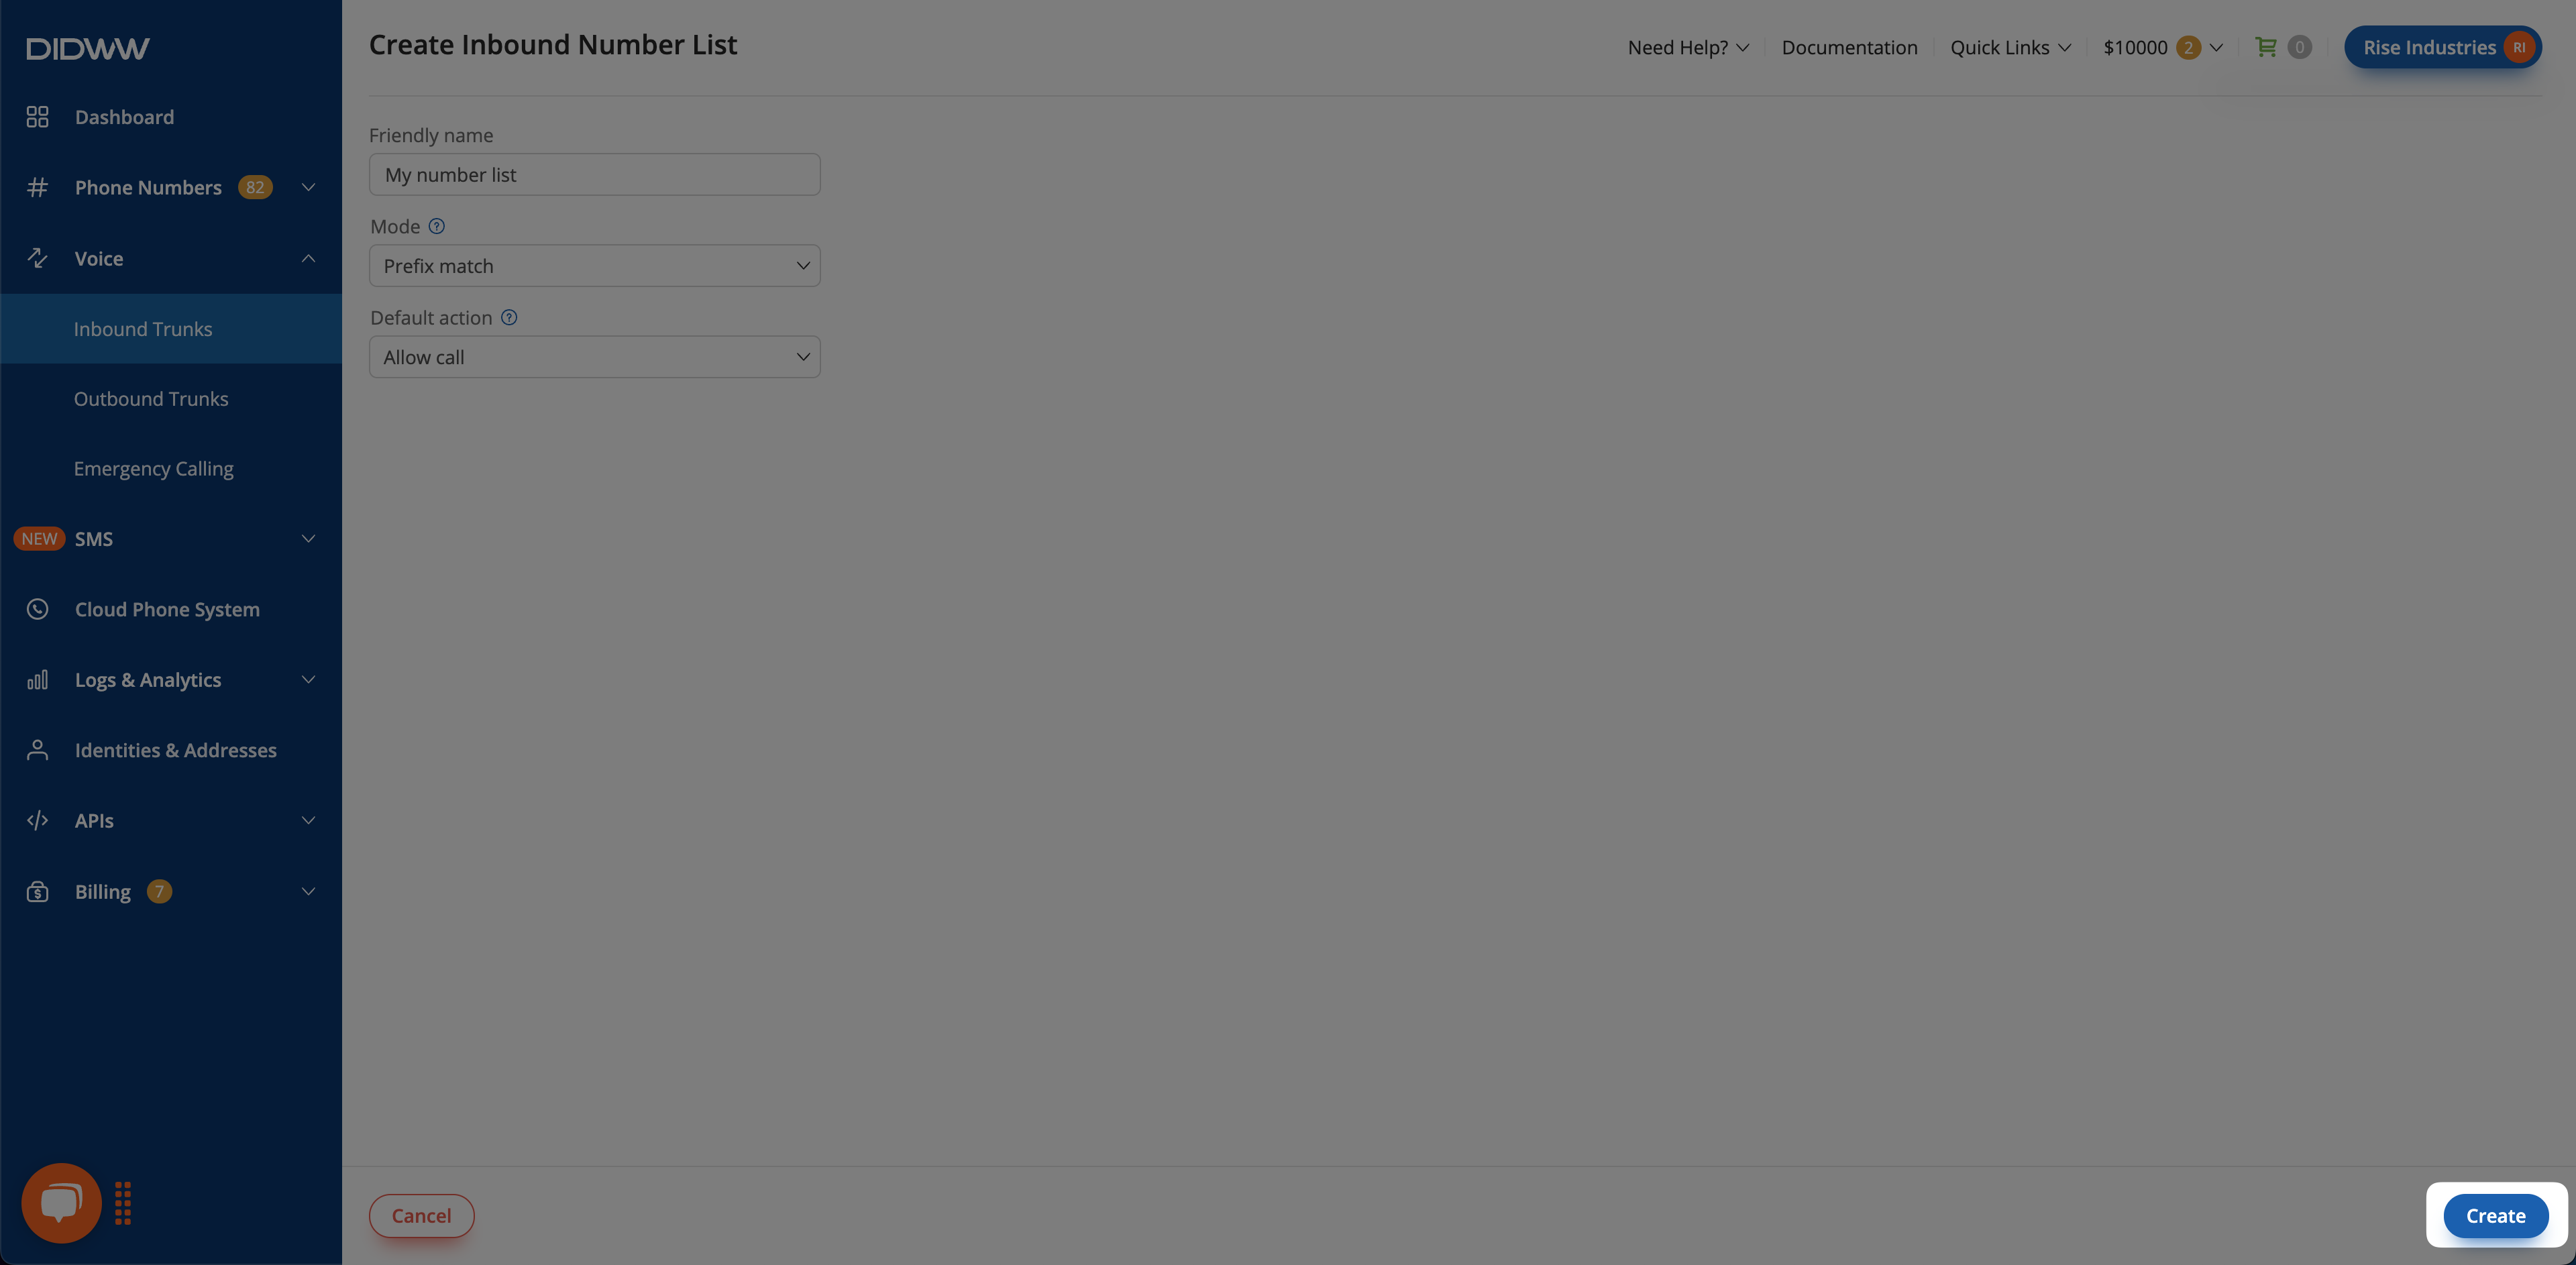
Fig. 3. Create the Number List#
2. Add and Configure Numbers in the Number List#
After creating a Number List, the next step is to configure it by adding numbers or prefixes, setting actions to allow or reject calls, and, if using prefixes, defining length limits.
Follow these steps to add numbers to an existing Number List.
Step 1: Open the Number List#
Go to Voice > Inbound Trunks.
Open the Number Lists tab.
Choose the list where you would like to add or manage numbers and click the Actions button.
Select Manage numbers or click Add numbers.
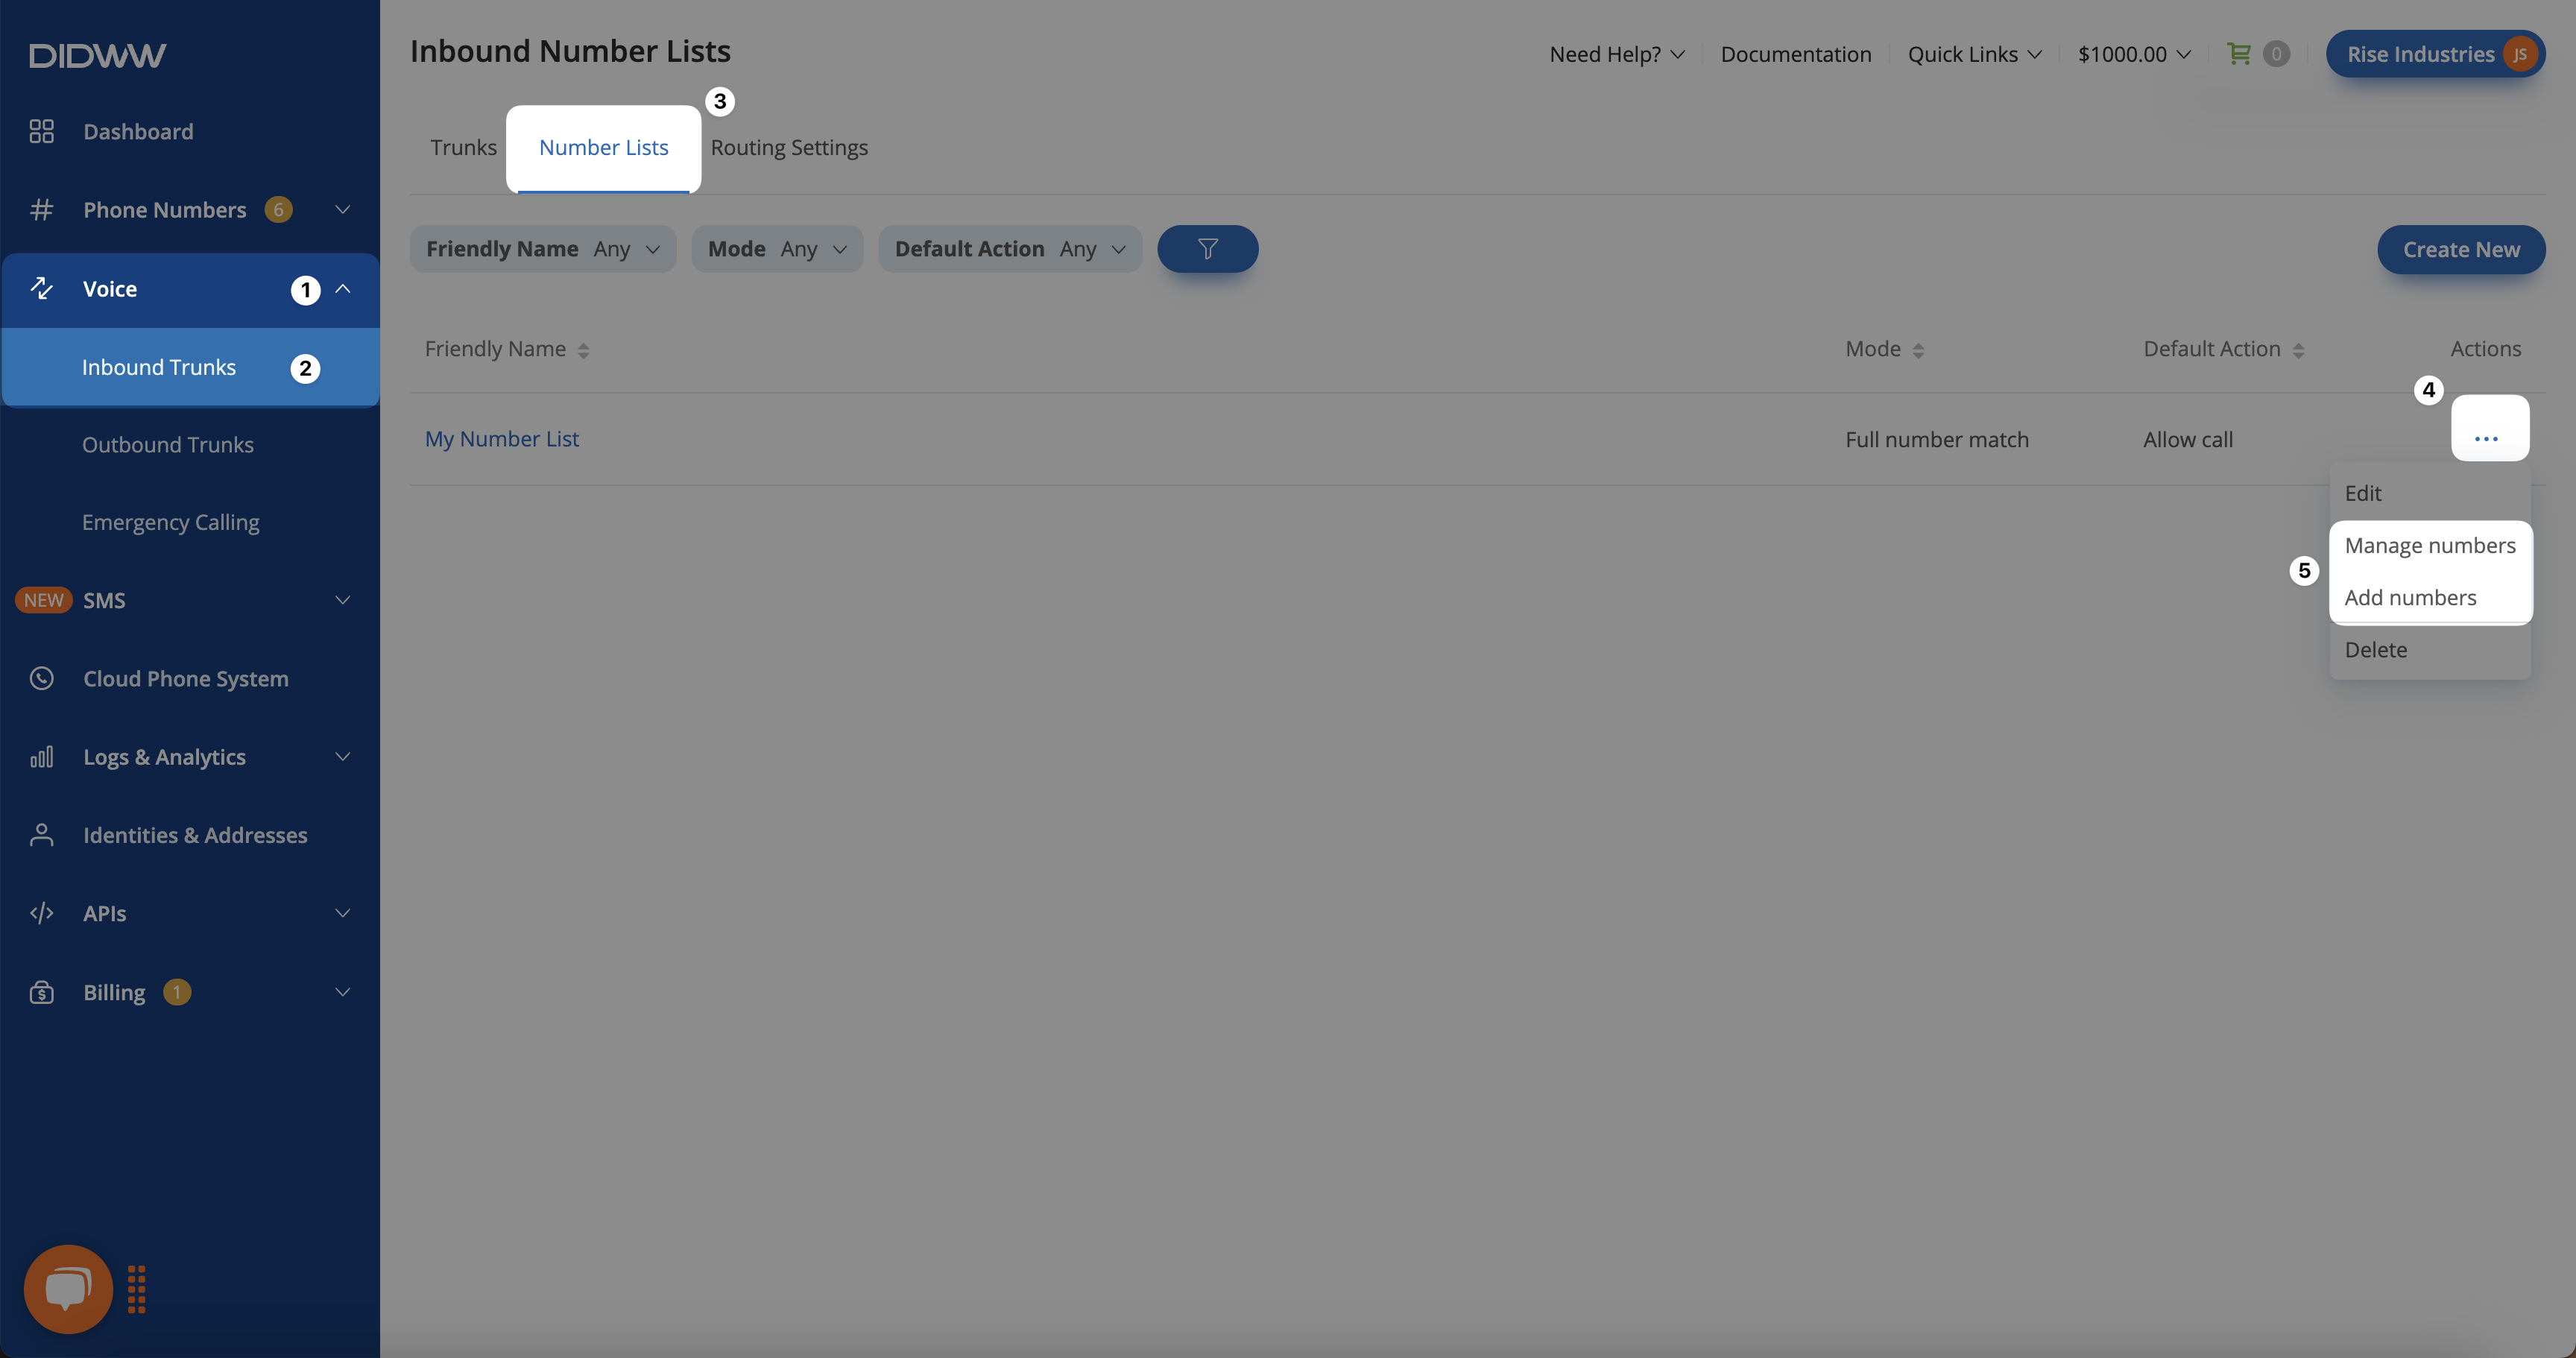
Fig. 4. Open Manage or Add Numbers.#
Step 2: Add Numbers to the Number List#
On the Manage Numbers page, you can view and modify the list of previously added numbers. You can add new numbers, remove existing ones, or adjust their settings to allow or reject calls based on your needs.
Click Add Numbers from the Manage Numbers page or within the Number List page to open the number entry dialog.
Fig. 5. Add Number Button.#
When the Add Numbers pop-up appears, enter the Numbers or prefixes to be added to the list.
Separate multiple numbers with a comma or a new line (e.g.,
15551234567, 1234567890).
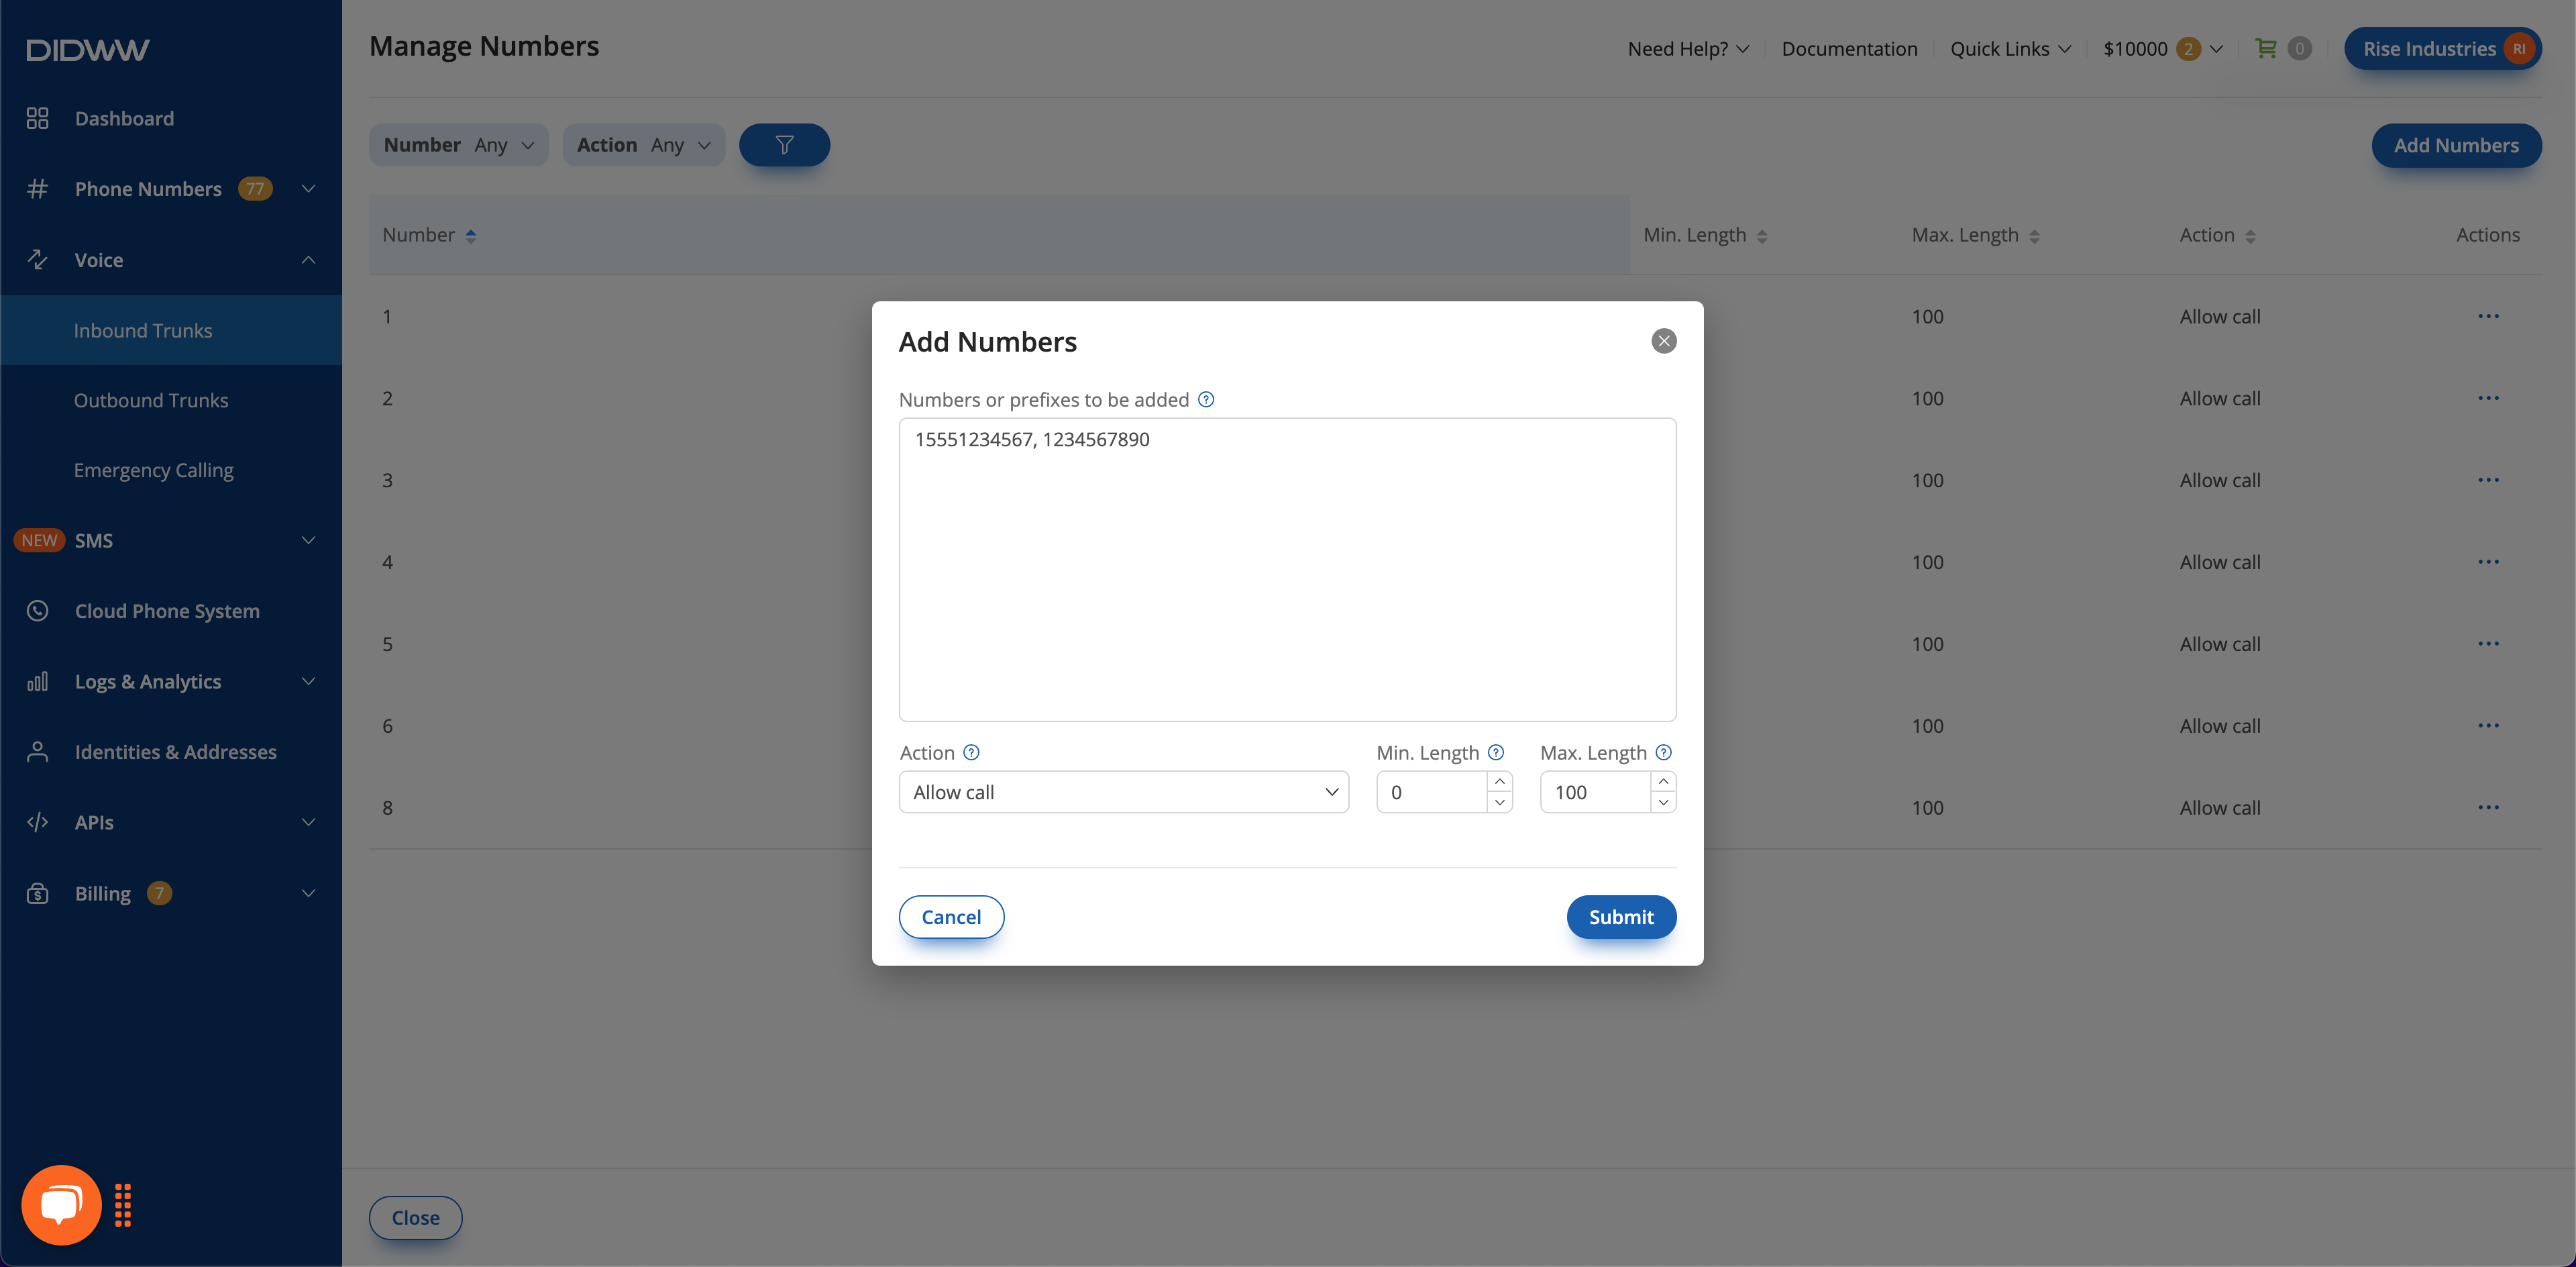
Fig. 6. Comma Separated Numbers#
Step 3: Configure Number Actions & Save Changes#
A mandatory action must be selected to either allow or reject calls for the added numbers or prefixes.
Select an Action:
Allow call: The call will be allowed if the source number matches a number or prefix in your list. This action overrides any rules set in your number list.
Reject call: The call will be rejected if the source number matches a number or prefix in your list. This action overrides any rules set in your number list.
(Optional) When using prefixes for routing, adjust the Min. Length and Max. Length fields. These settings define the range of phone numbers the rule applies to:
Min. Length: The shortest phone number that can match the prefix (default: 0).
Max. Length: The longest phone number that can match the prefix (default: 100).
Click Submit to save the changes.
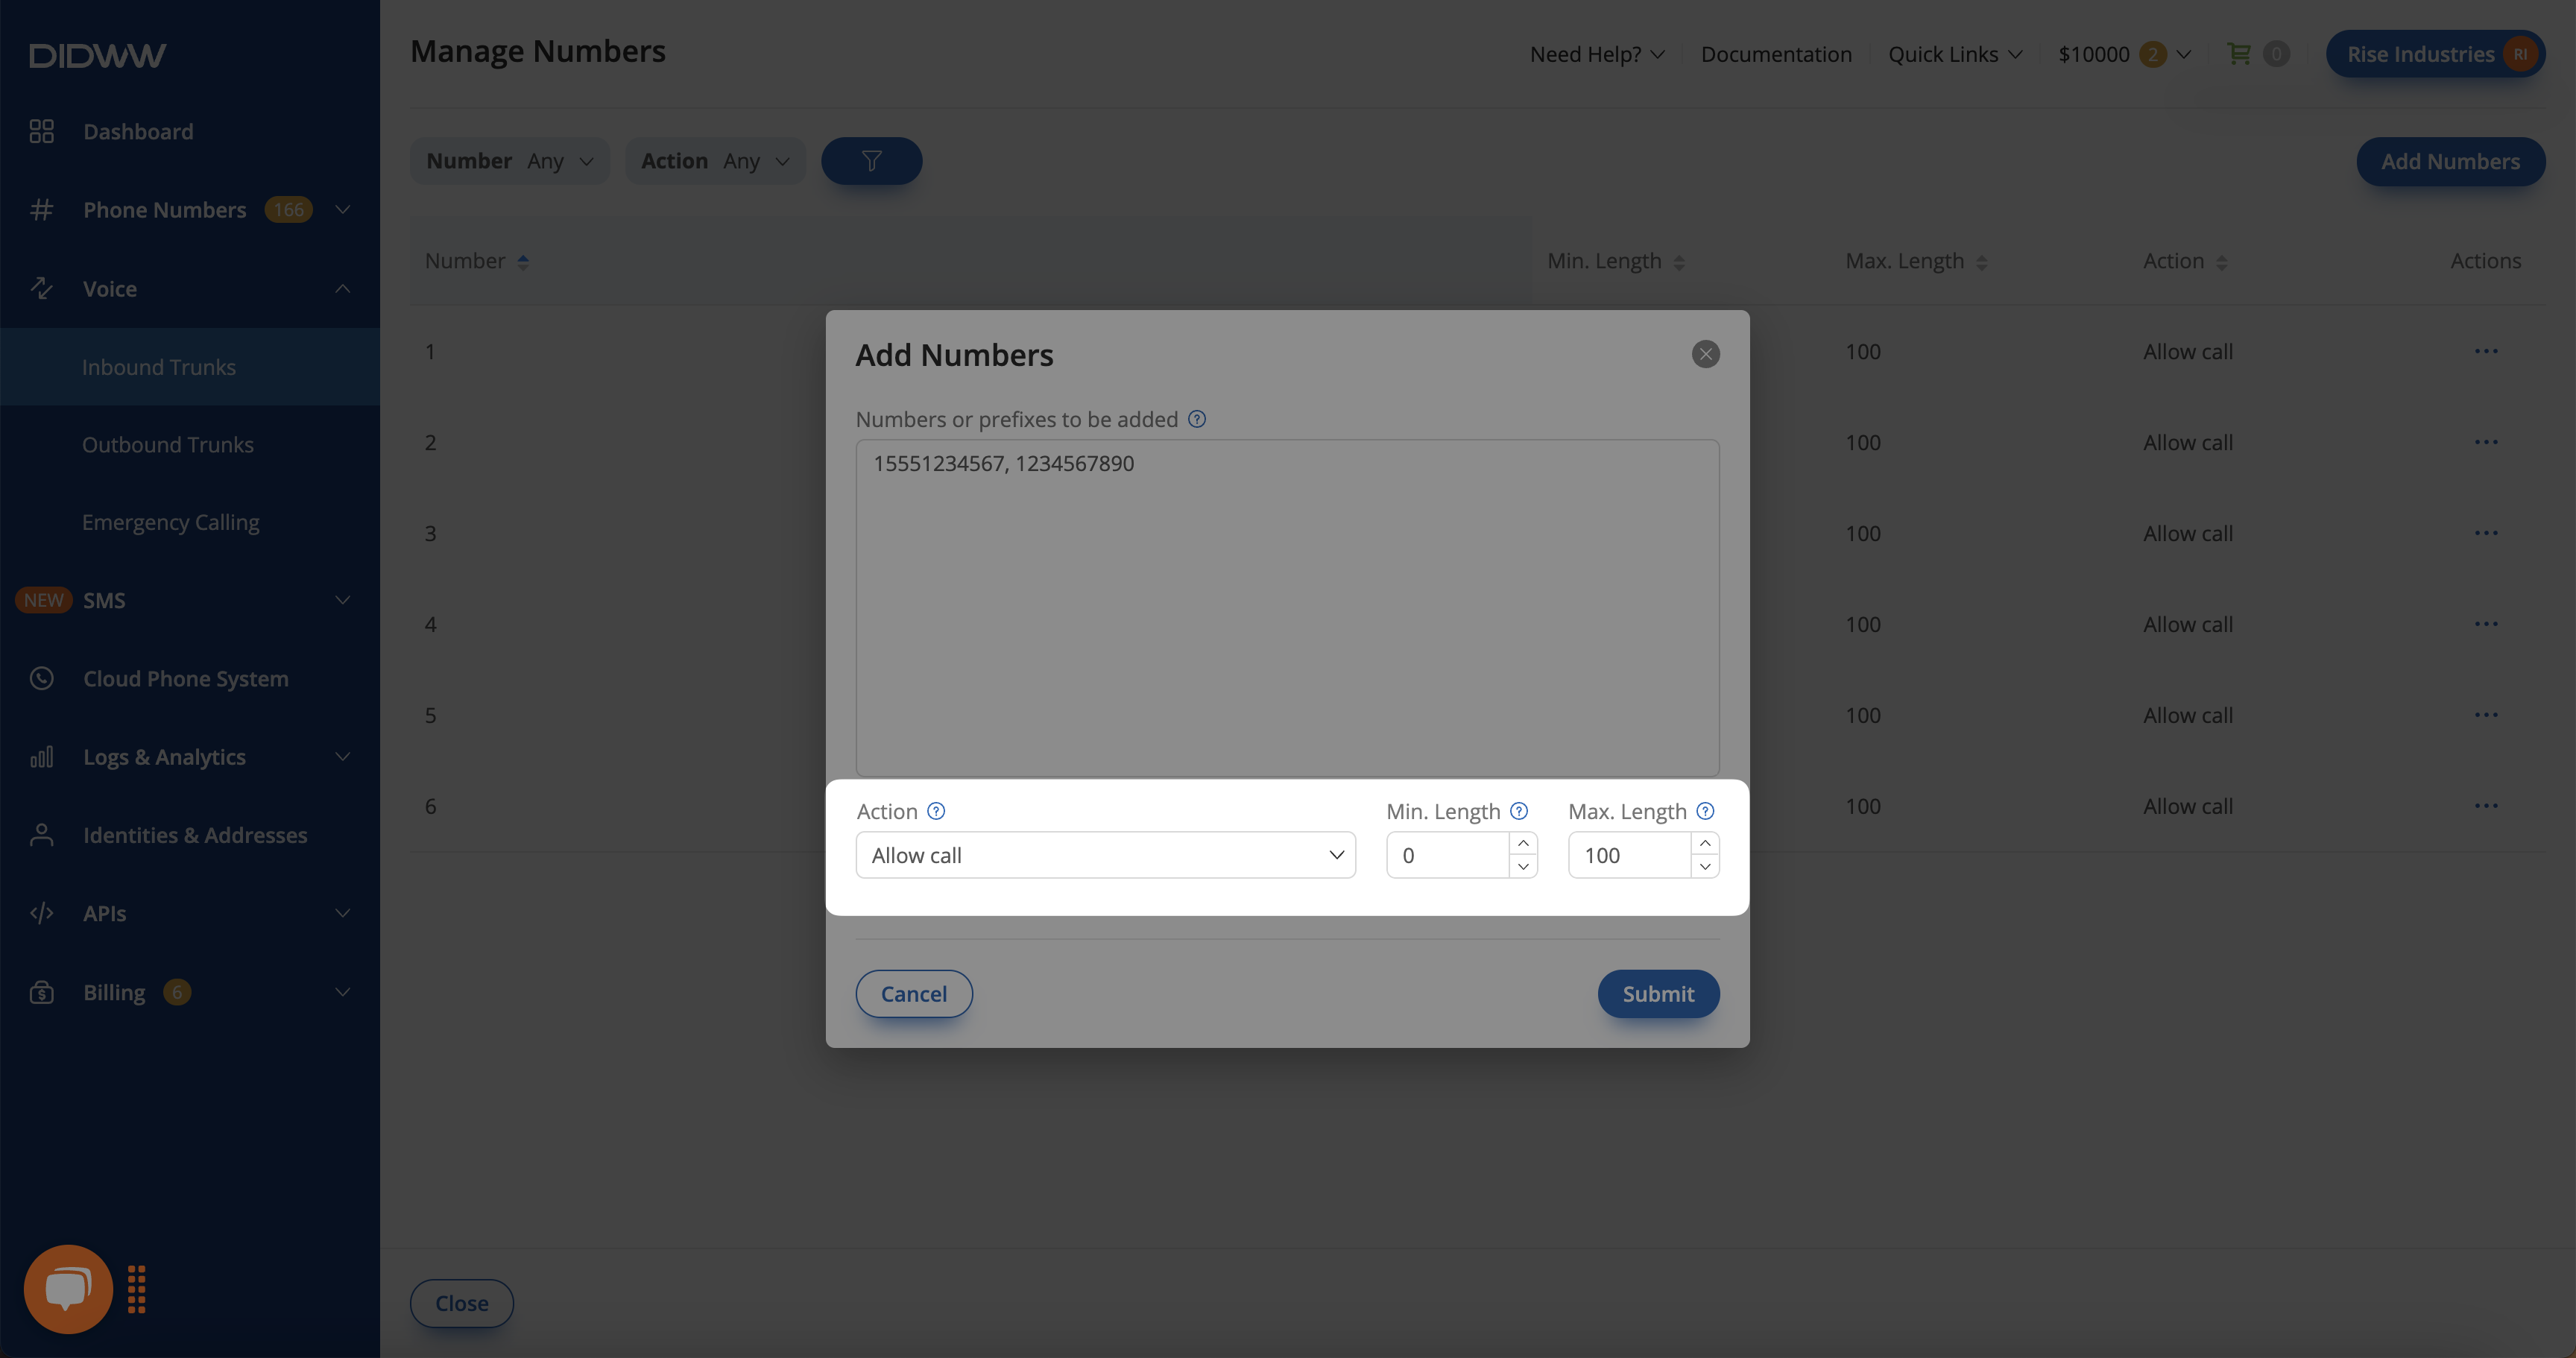
Fig. 7. Number List Settings#
3. Assign a Number List to a Trunk#
After creating and configuring your Number List, you can assign it to a trunk to apply inbound call filtering rules.
Number Lists can be assigned to either a SIP Trunk or a PSTN Trunk, depending on your routing setup.
Assign a Number List to a SIP Trunk#
Follow these steps to assign a Number List to a SIP Trunk.
Step 1: Open the SIP Trunk#
Go to Voice > Inbound Trunks.
Choose an existing SIP Trunk by clicking its name, and then click Actions > Edit on the trunk page. You can also create a new one (see Create a SIP trunk).
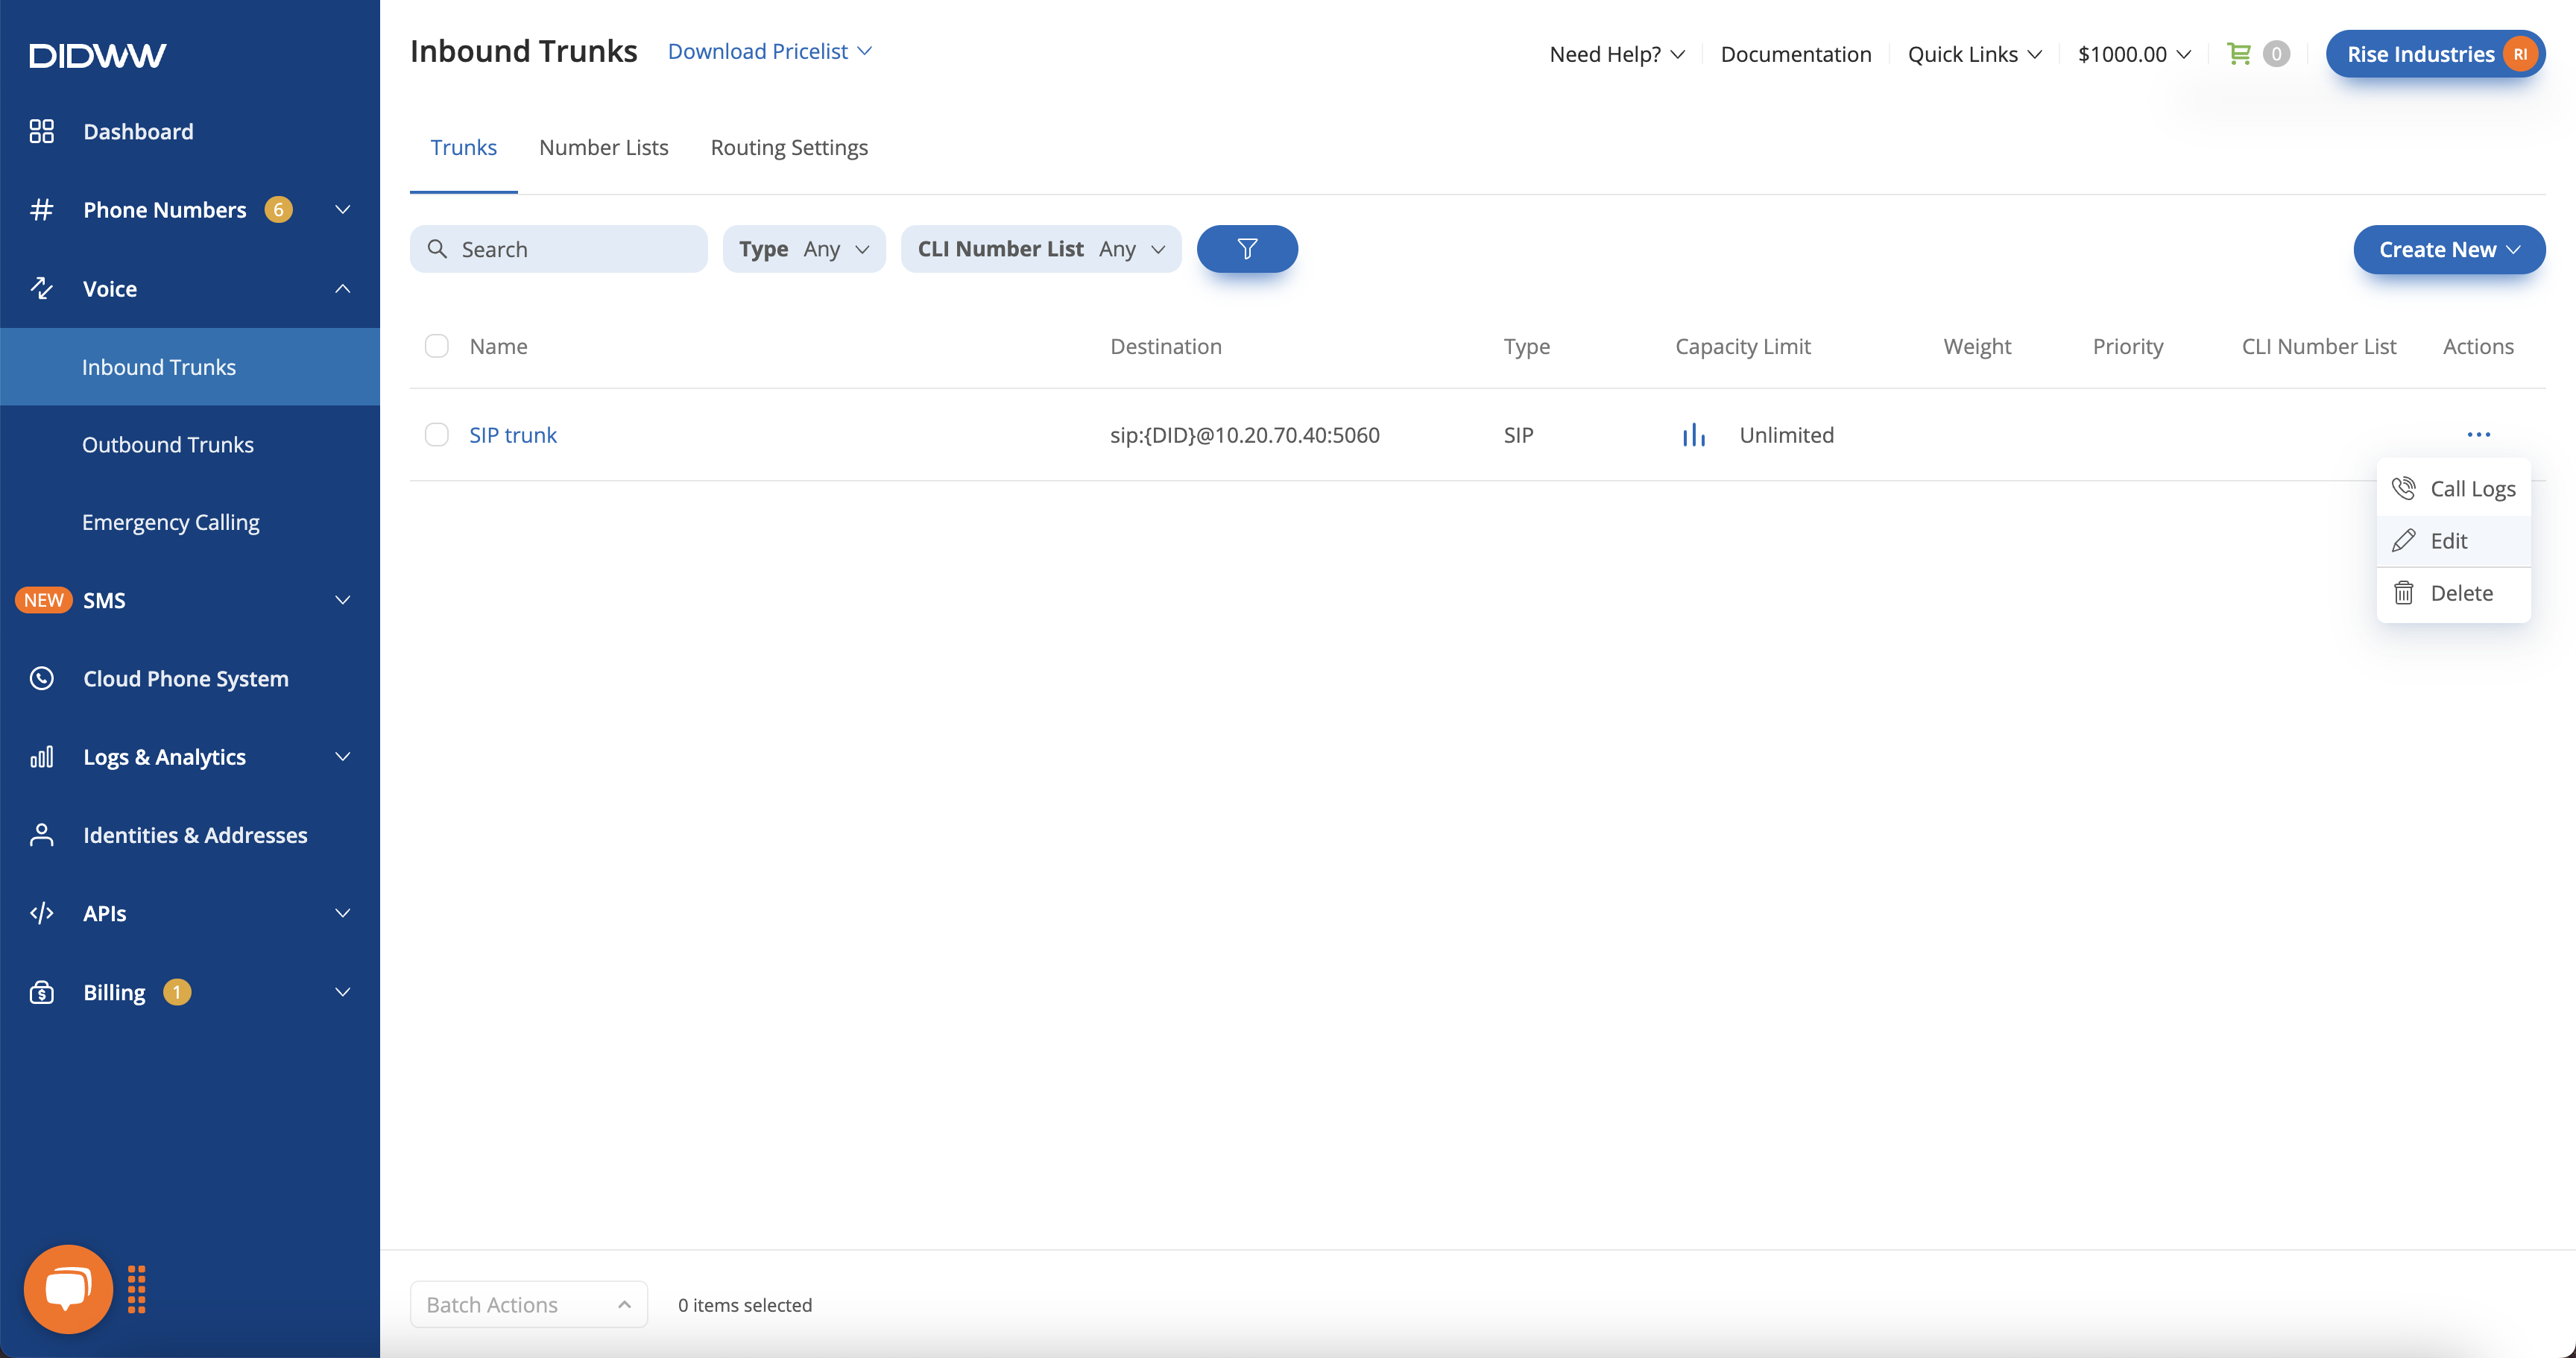
Fig. 8. Selecting an inbound SIP trunk#
Step 2: Assign the Number List#
Open the Number Translations tab, locate CLI Number List, and select the Number List you want to assign.
Click Submit to save the changes.
Warning
Number Lists match inbound caller ID (CLI). If you change the CLI format or CLI prefix in the SIP trunk settings, update your Number List entries to match the new format. CLI format conversion may not work correctly for calls originating from outside the country of the DID.

Fig. 9. Assigning a Number List to a SIP Trunk#
Assign a Number List to a PSTN Trunk#
Follow these steps to assign a Number List to a PSTN Trunk.
Step 1: Open the PSTN Trunk#
Go to Voice > Inbound Trunks.
Choose an existing PSTN Trunk by clicking its name, and then click Actions > Edit on the trunk page. You can also create a new one (see Create a PSTN trunk).
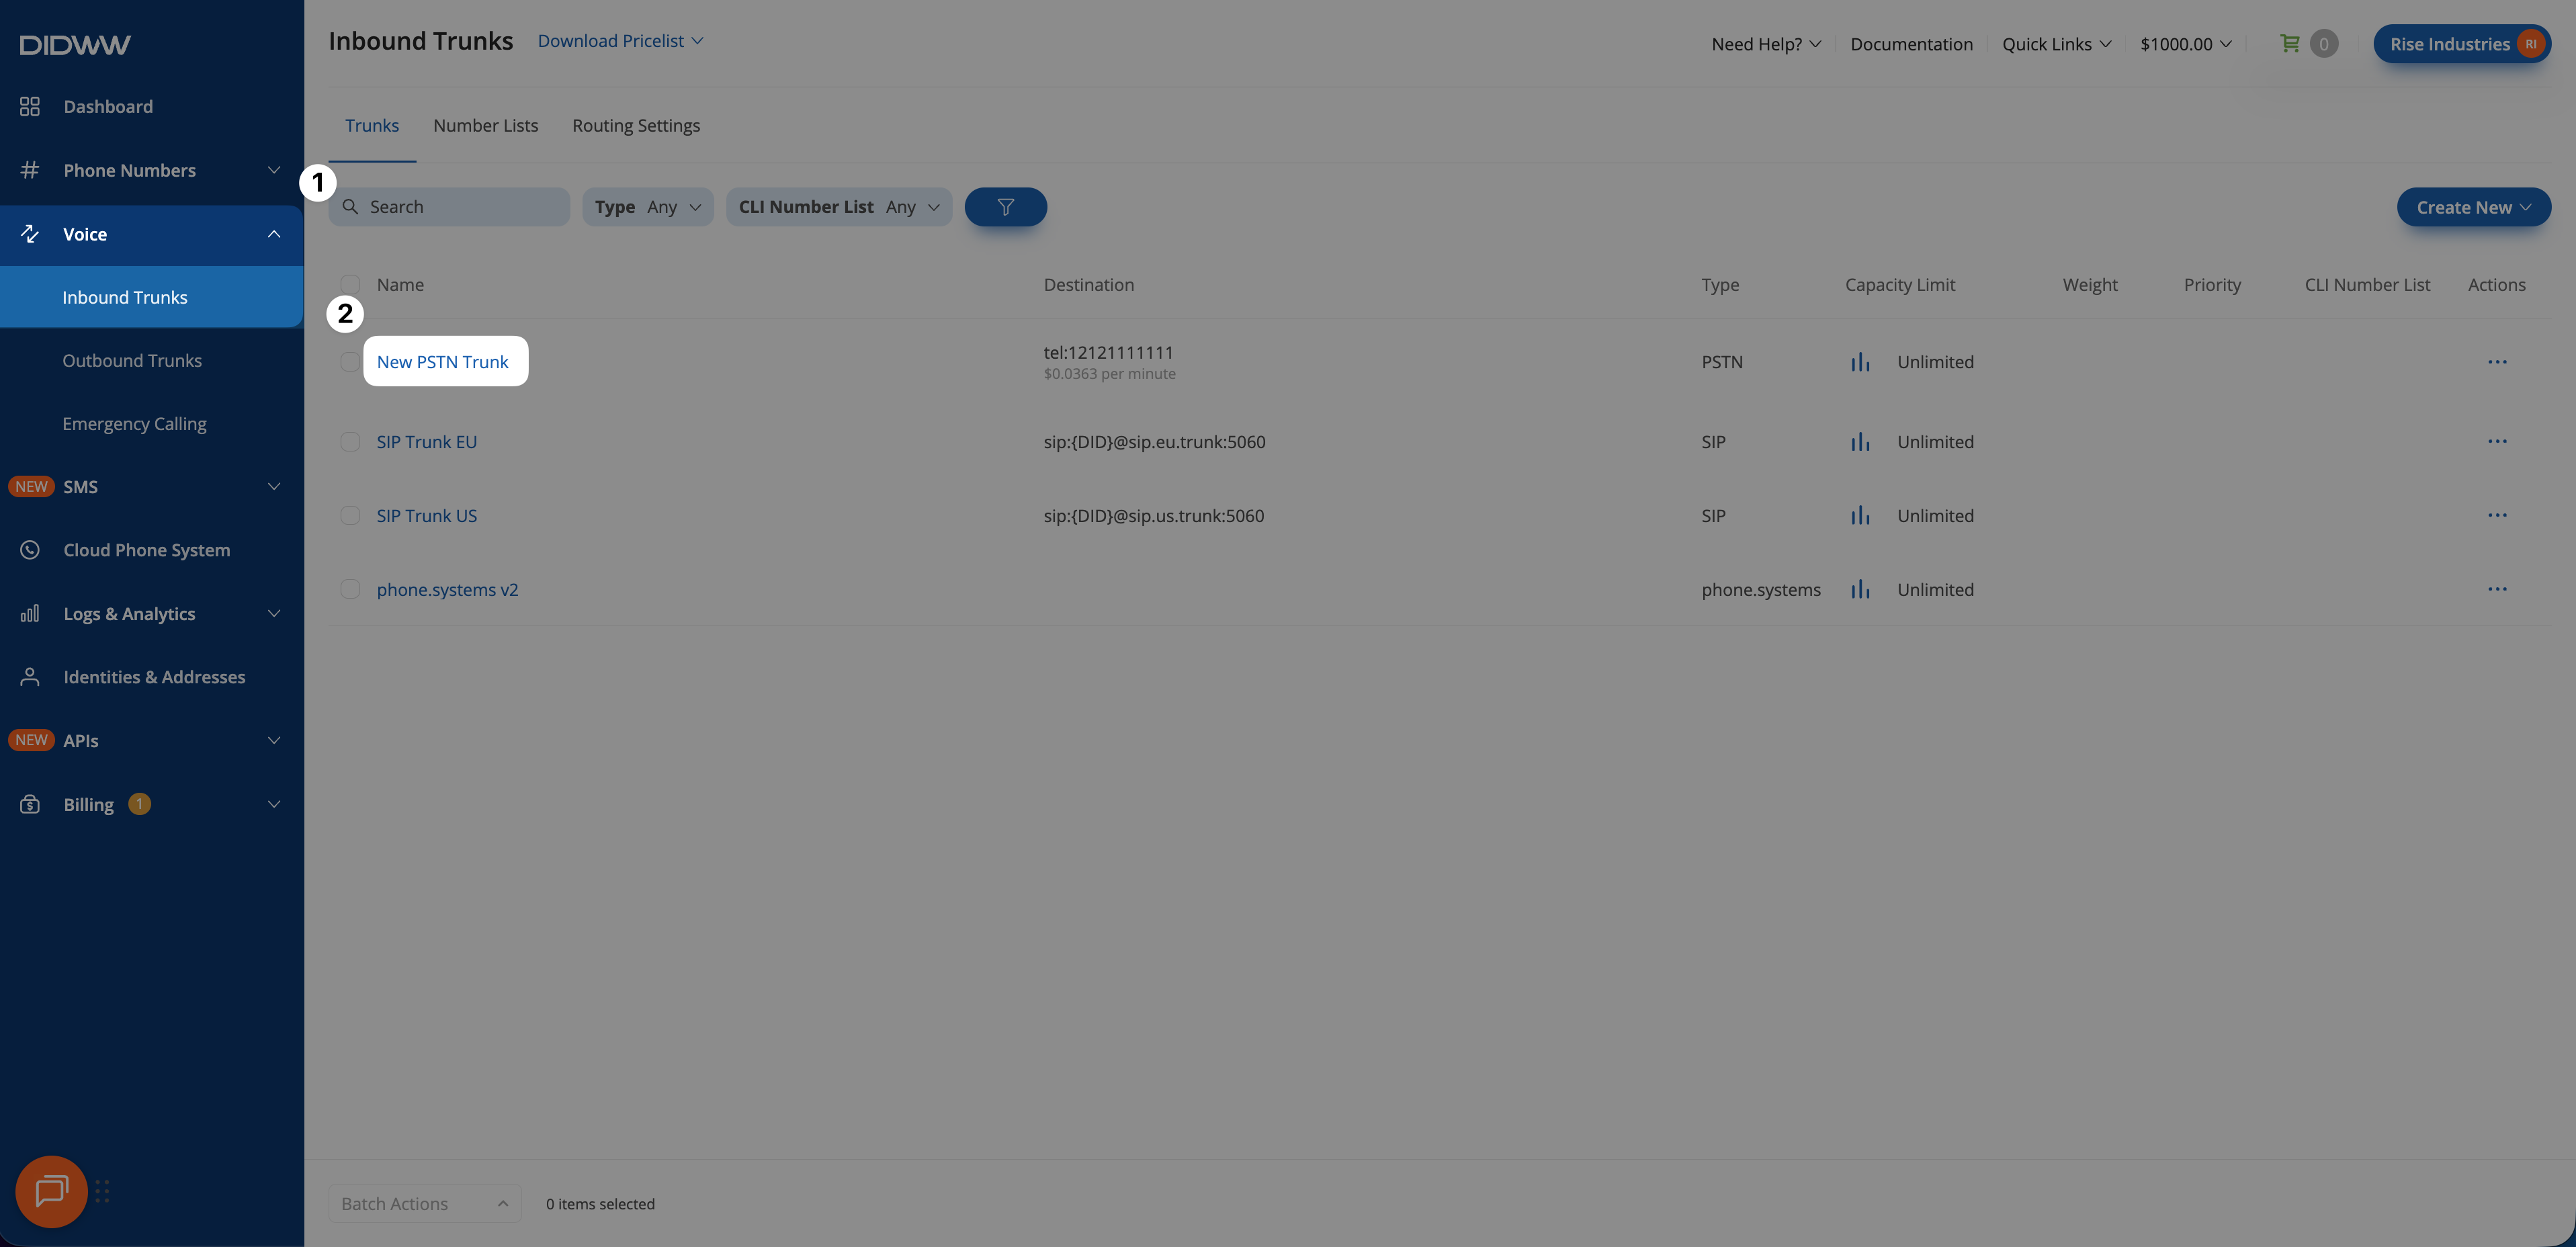
Fig. 10. Selecting an inbound PSTN trunk#
Step 2: Assign the Number List#
Open the Number Translations tab, locate CLI Number List, and select the Number List you want to assign.
Click Submit to save the changes.
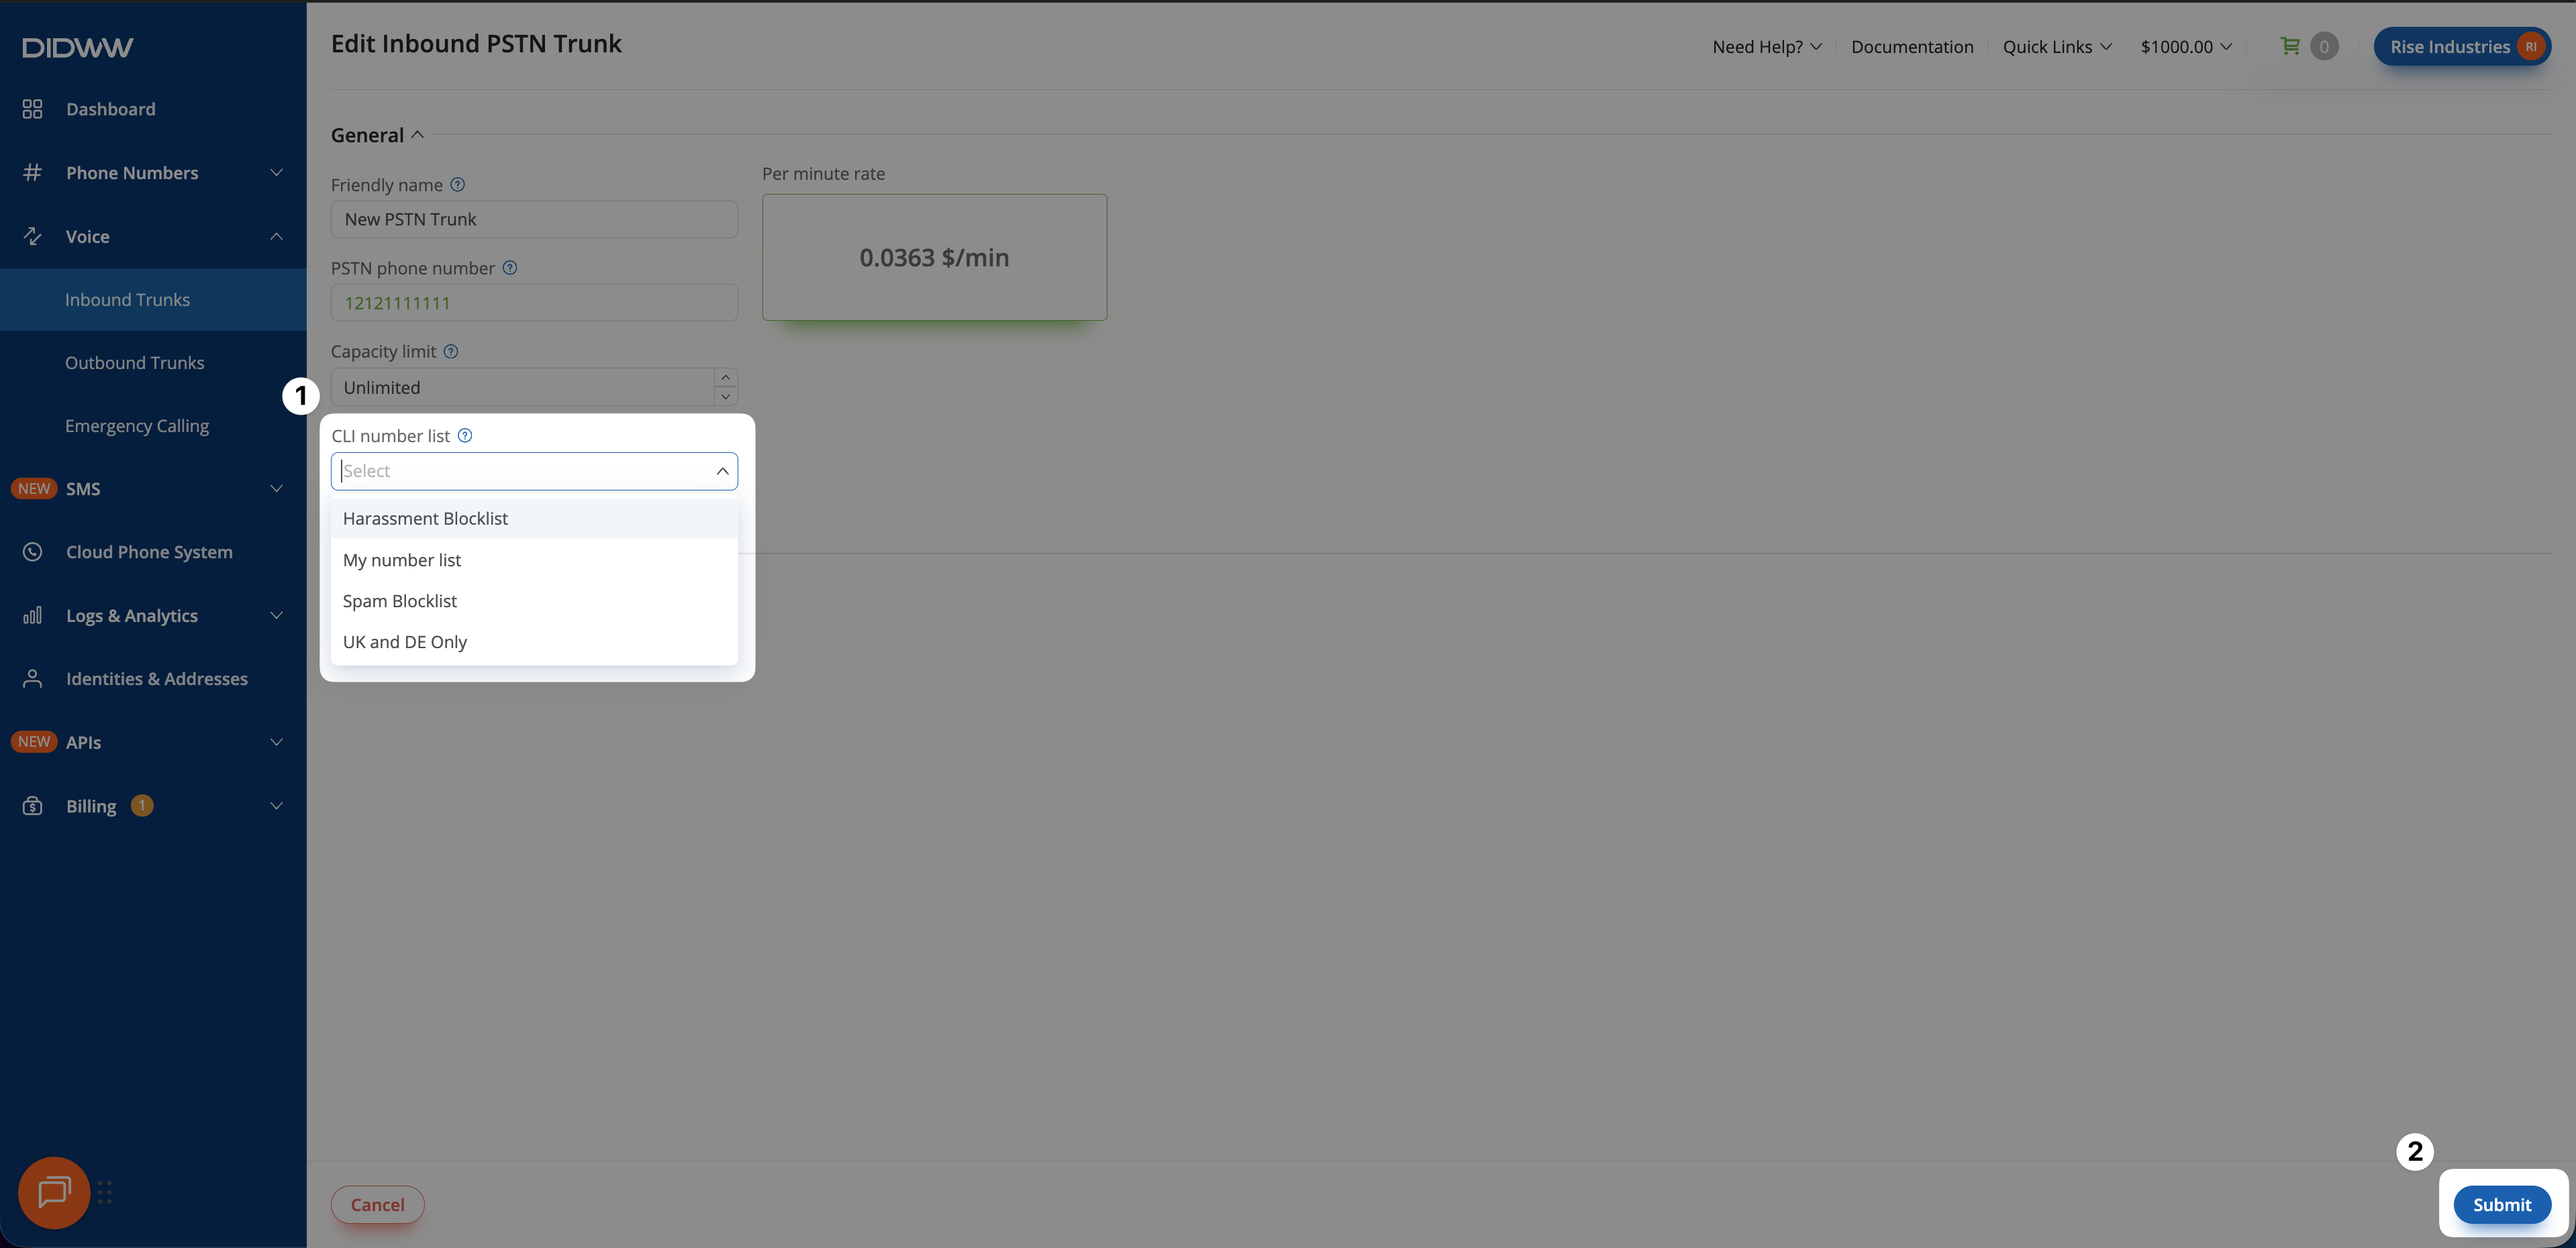
Fig. 11. Assigning a Number List to a PSTN Trunk#
Call Logs & Number List Rejection Codes#
When a call is rejected due to Number List filtering, it will appear in the Inbound Call Logs with the following error message:
Error code: 403
Response: Rejected by trunk settings
This error message in the call logs indicates that the call was blocked by Number List settings before it could reach the trunk destination.
Why does this error occur?#
If a number is included in a Number List with the action Reject call, the system blocks the call before routing it to the trunk destination. The same happens when no item matches the number and the Number List has the Default action Reject call.
This prevents further call processing, leading to the 403 error.
How can I check inbound call rejections caused by a Number List?#
Follow these steps to analyze calls rejected due to a Number List:
Navigate to Logs & Analytics > Call Logs and select the Inbound tab.
Look for calls that failed with the Rejected by trunk settings response. (You can also filter by status: Failed.)
Check if the caller’s number is listed in your Number List.
Note
If you want to allow a blocked number, go to your Number List settings and change its action to Allow call or remove it from the list.

Fig. 12. Call Rejection Error Code#