

Attio and phone.systems™ Integration#
Connecting phone.systems™ with Attio CRM allows you to manage customer calls and synchronize contact data. The integration includes the following features:
Sync contacts automatically: Keep Attio people updated in phone.systems™, including their names, phone numbers, emails, companies, and job titles.
Call journaling: Calls can be logged in Attio as notes on the related people.
Create new contacts automatically: When an unknown number calls, a new person can be created in Attio automatically.
Send call tags and notes: The tags and notes that agents add to a call can be added to the call note in Attio.
Upload AI call insights results: AI-generated call analytics can be added to call notes.
Note
Call recordings are not uploaded to Attio.
Connecting phone.systems™ with Attio#
This guide provides detailed steps on integrating phone.systems™ with Attio. Follow the instructions below to complete the setup process.
Note
To connect phone.systems™ with Attio, create an app in the Attio Developer Console and copy its Client ID and Client Secret.
Step 1: Sign in to your Attio account#
To get started, open the Attio website and sign in to your account or create a new one.
Step 2: Create an app in the Attio Developer Console#
Open the Attio Developer Console and click Sign in with Attio.
If you are using the Developer Console for the first time, enter an Account name and a Slug to create a developer account.
In the left menu, click New app.
Enter a Name for the app. The Slug is filled in automatically.
Click Create app.
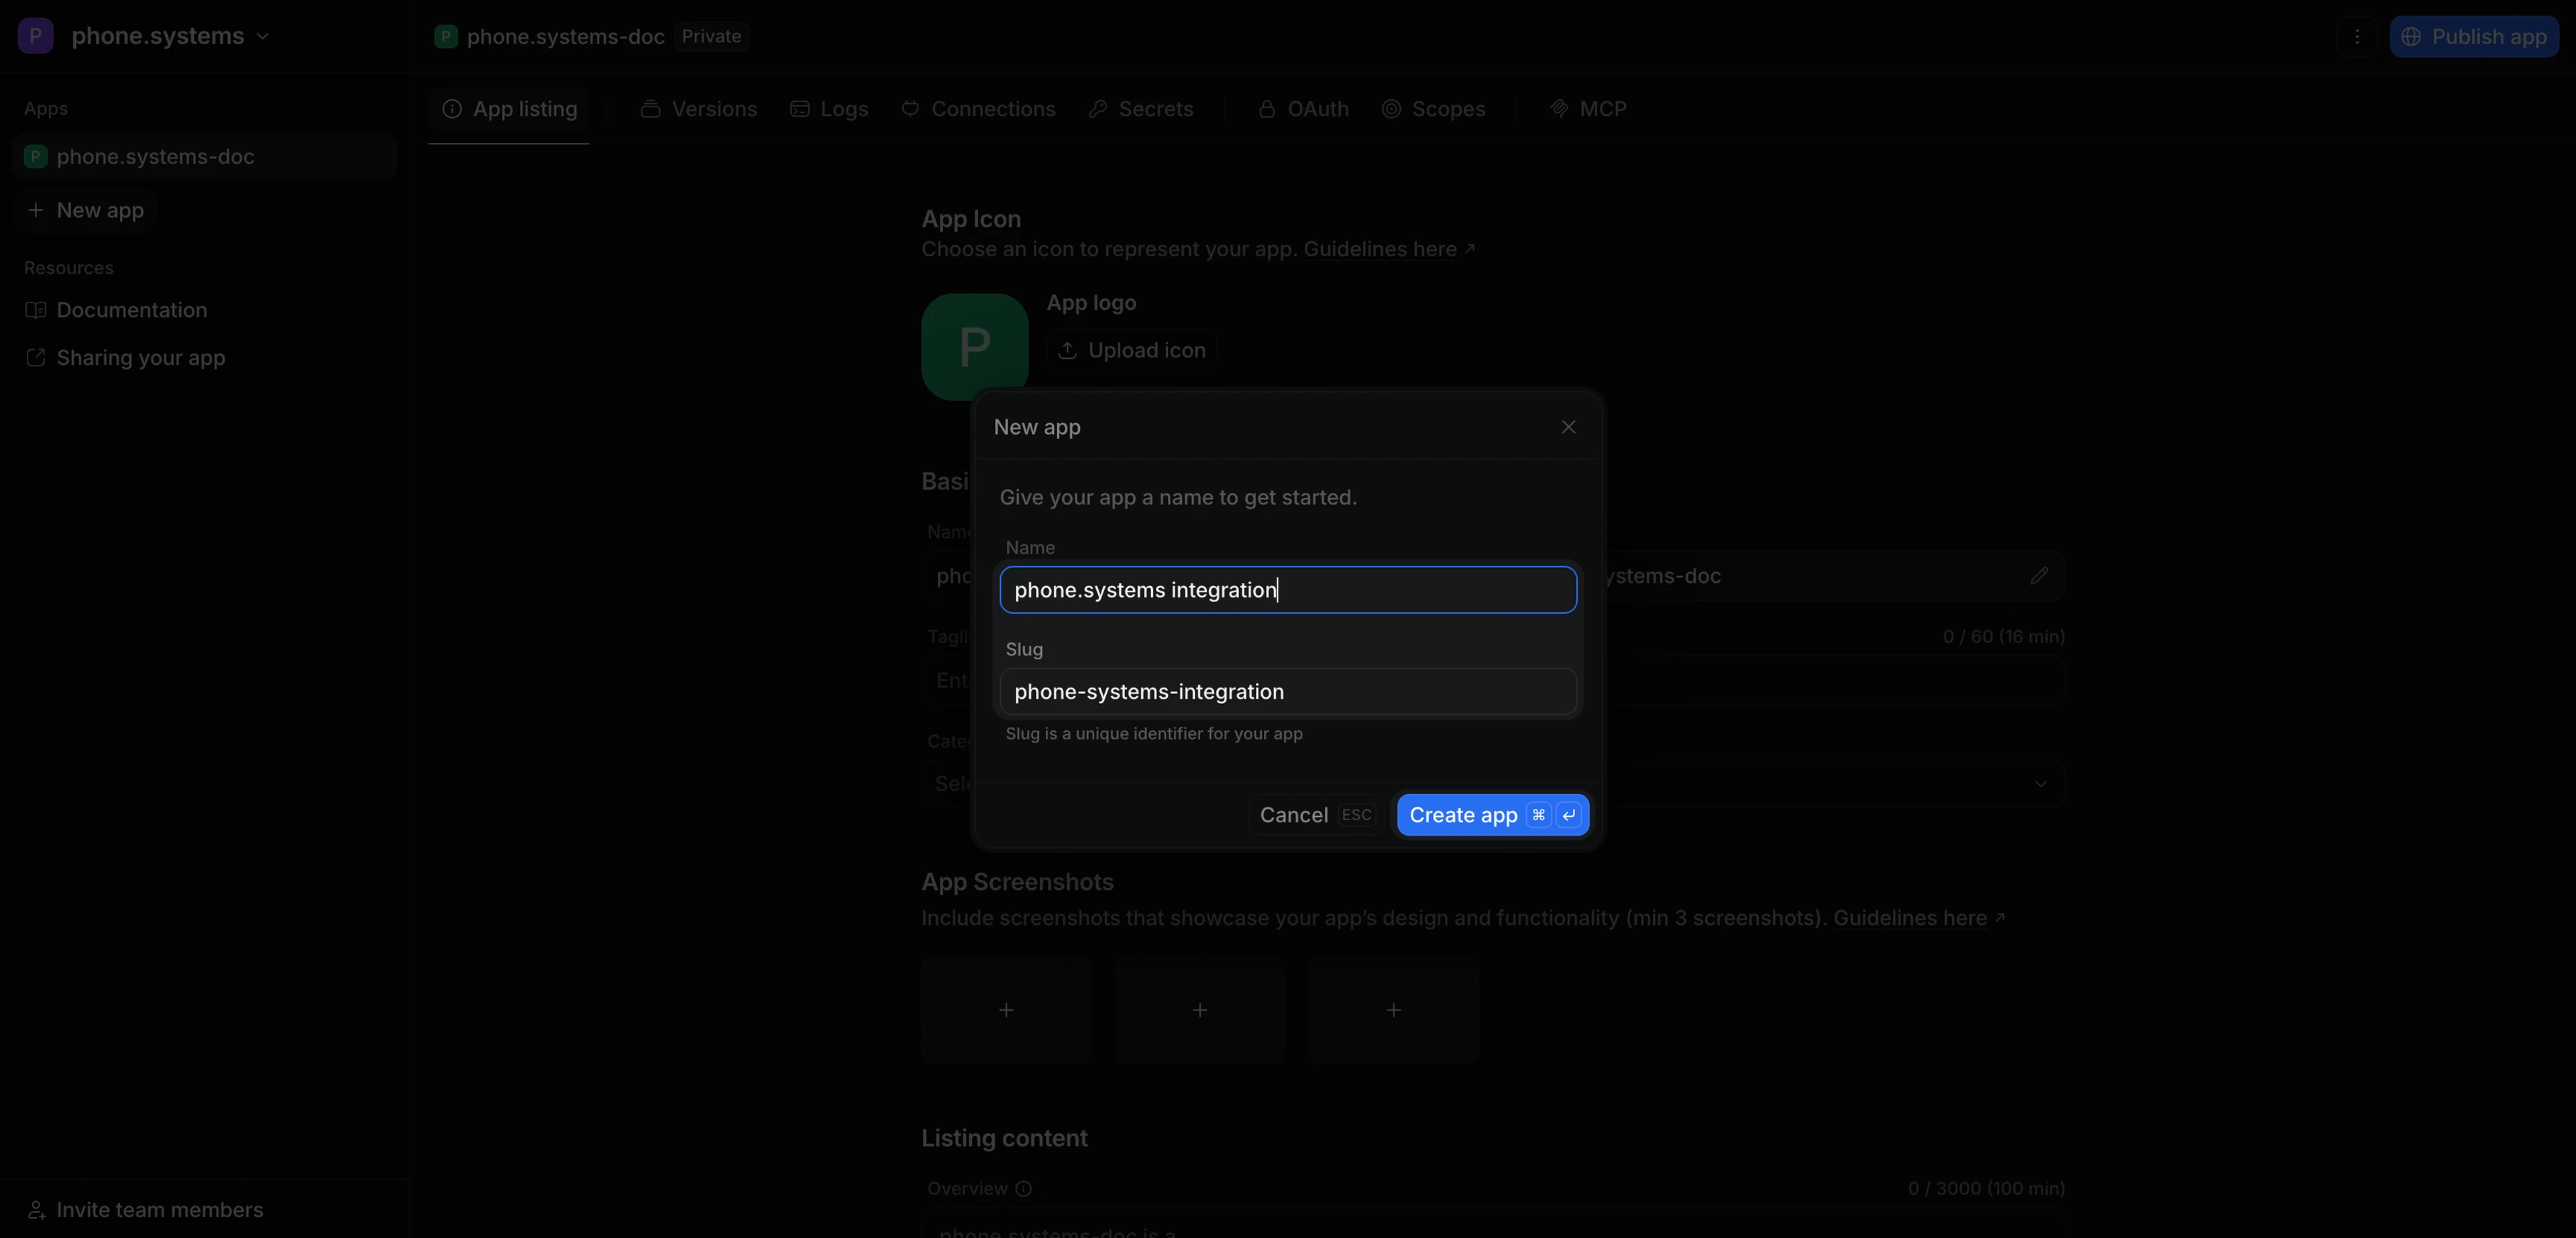
Fig. 1. Create an app in the Attio Developer Console#
Step 3: Launch phone.systems™ and connect to Attio#
In the phone.systems™ interface, click Settings.
Open the CRM Integrations tab at the top of the screen. Alternatively, use this direct link: phone.systems™ CRM Integrations
Click Connect to link your Attio with phone.systems™.
Note
Clicking Connect will open the Connect Attio form to continue the integration setup.
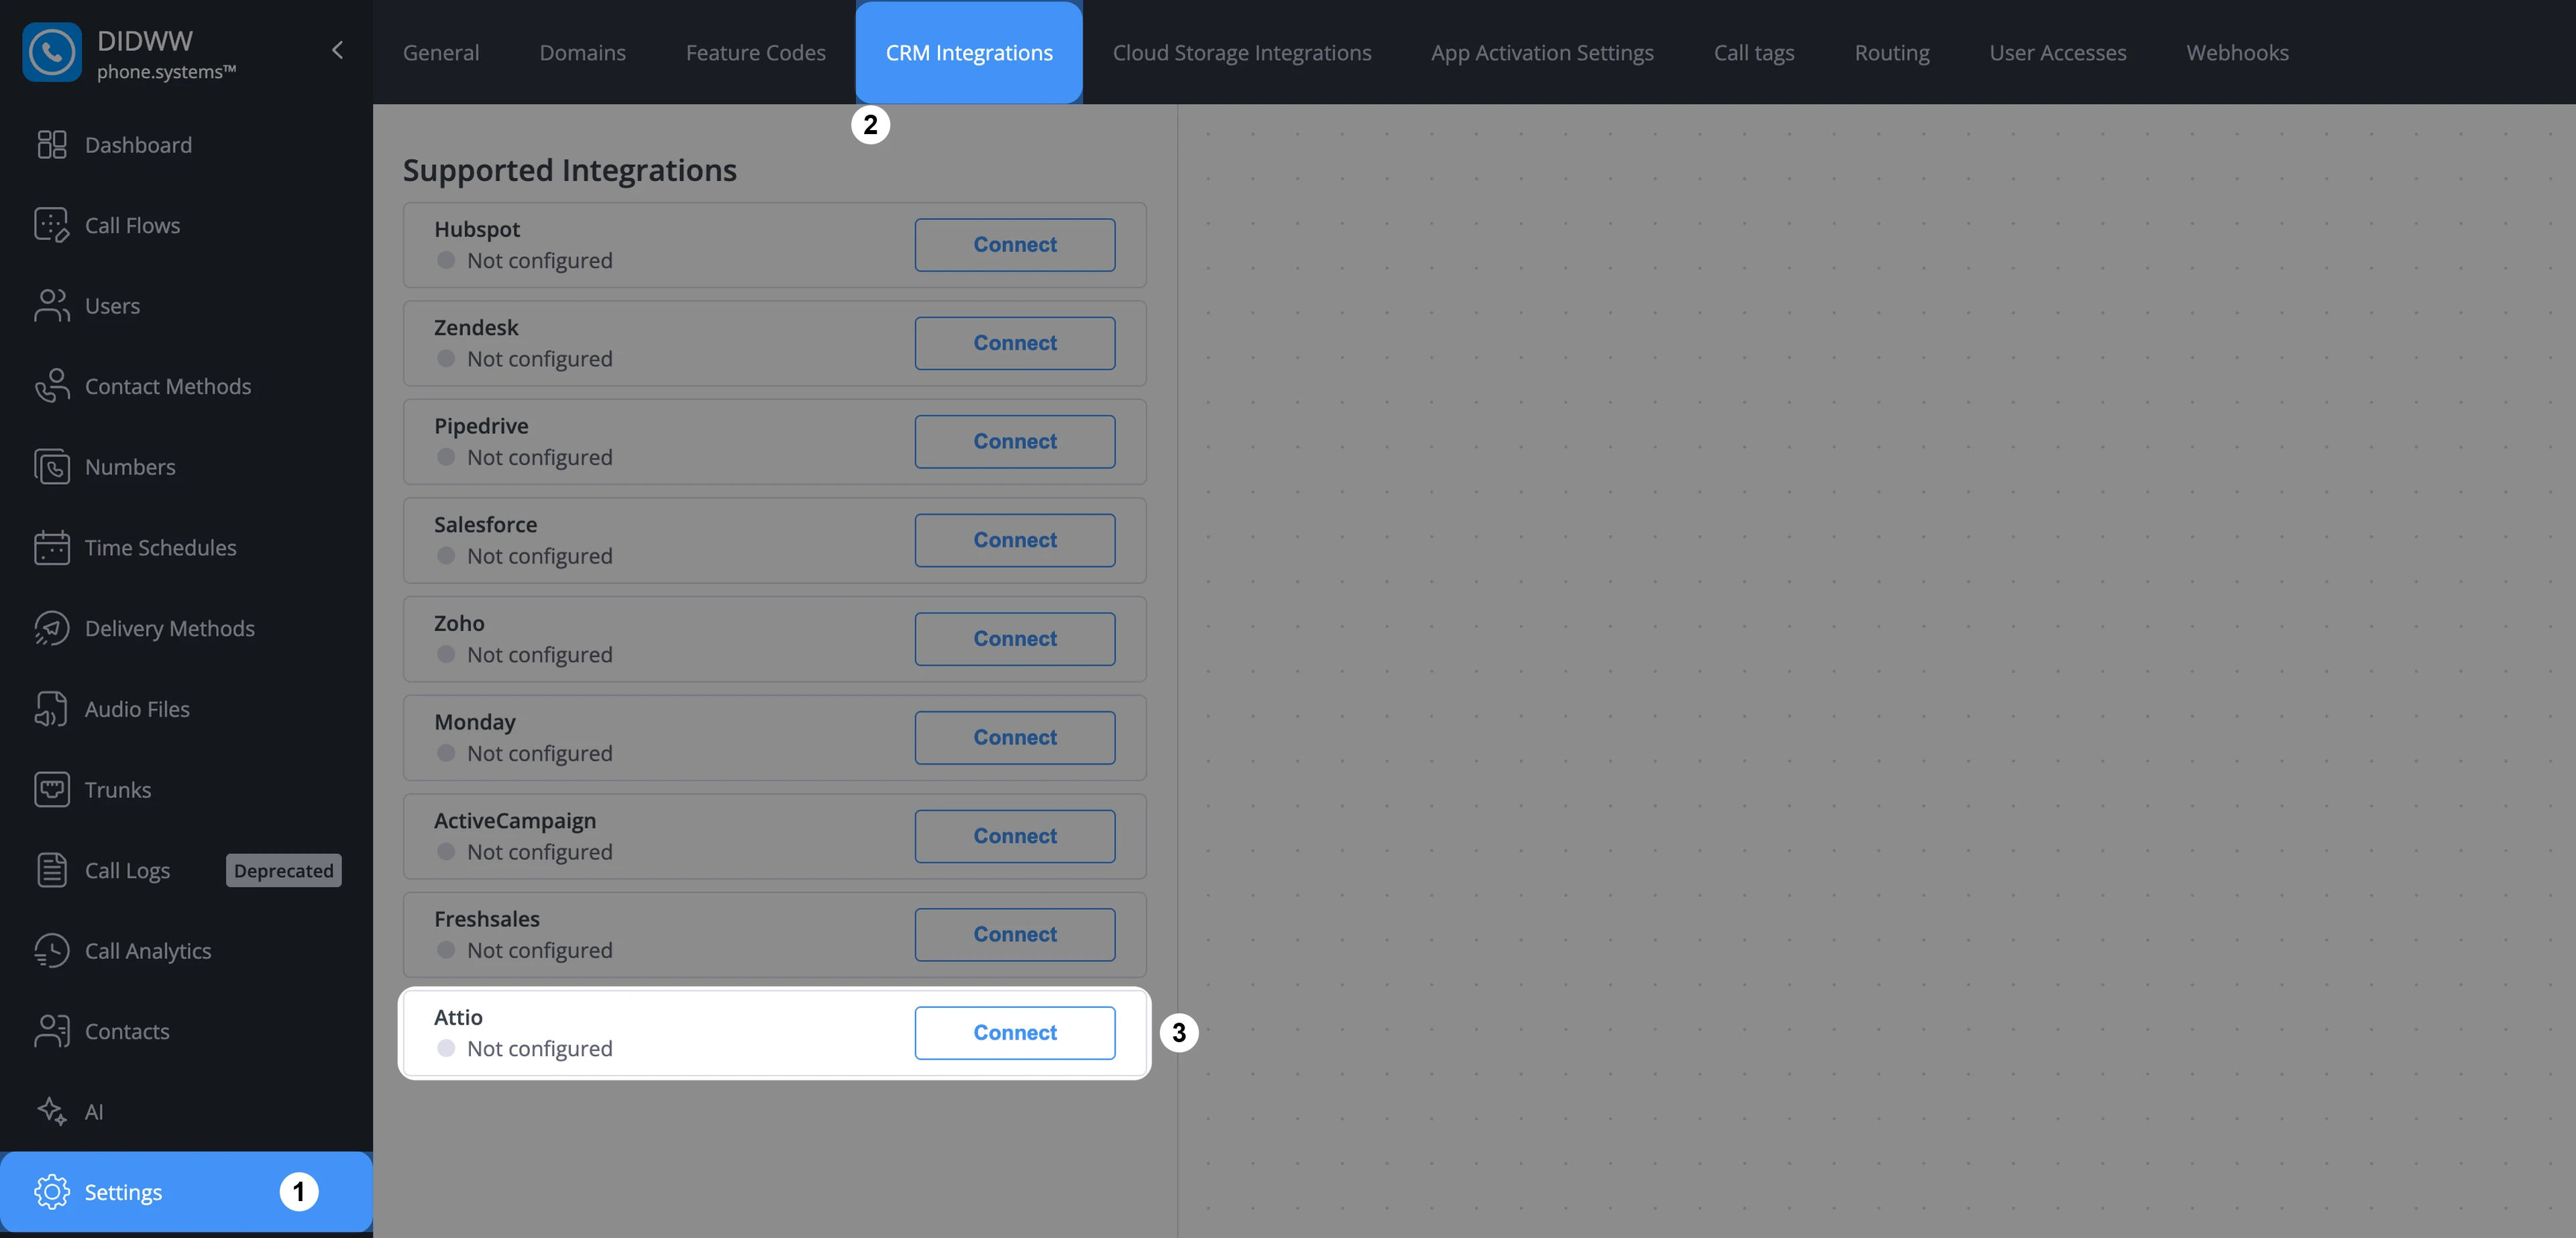
Fig. 2. Open the Connect Attio form in phone.systems™#
Step 4: Add the required scopes to your Attio app#
In the Attio Developer Console, open your app and go to the Scopes tab. On the Workspace scopes tab, set the following scopes:
Scope |
Access |
Used for |
|---|---|---|
User Management |
Read |
Listing Attio workspace members for user association |
Records |
Read-write |
Synchronizing people and creating new people |
Object Configuration |
Read |
Reading the people and company objects |
Notes |
Read-write |
Logging calls as notes |
Webhooks |
Read-write |
Receiving contact changes from Attio |
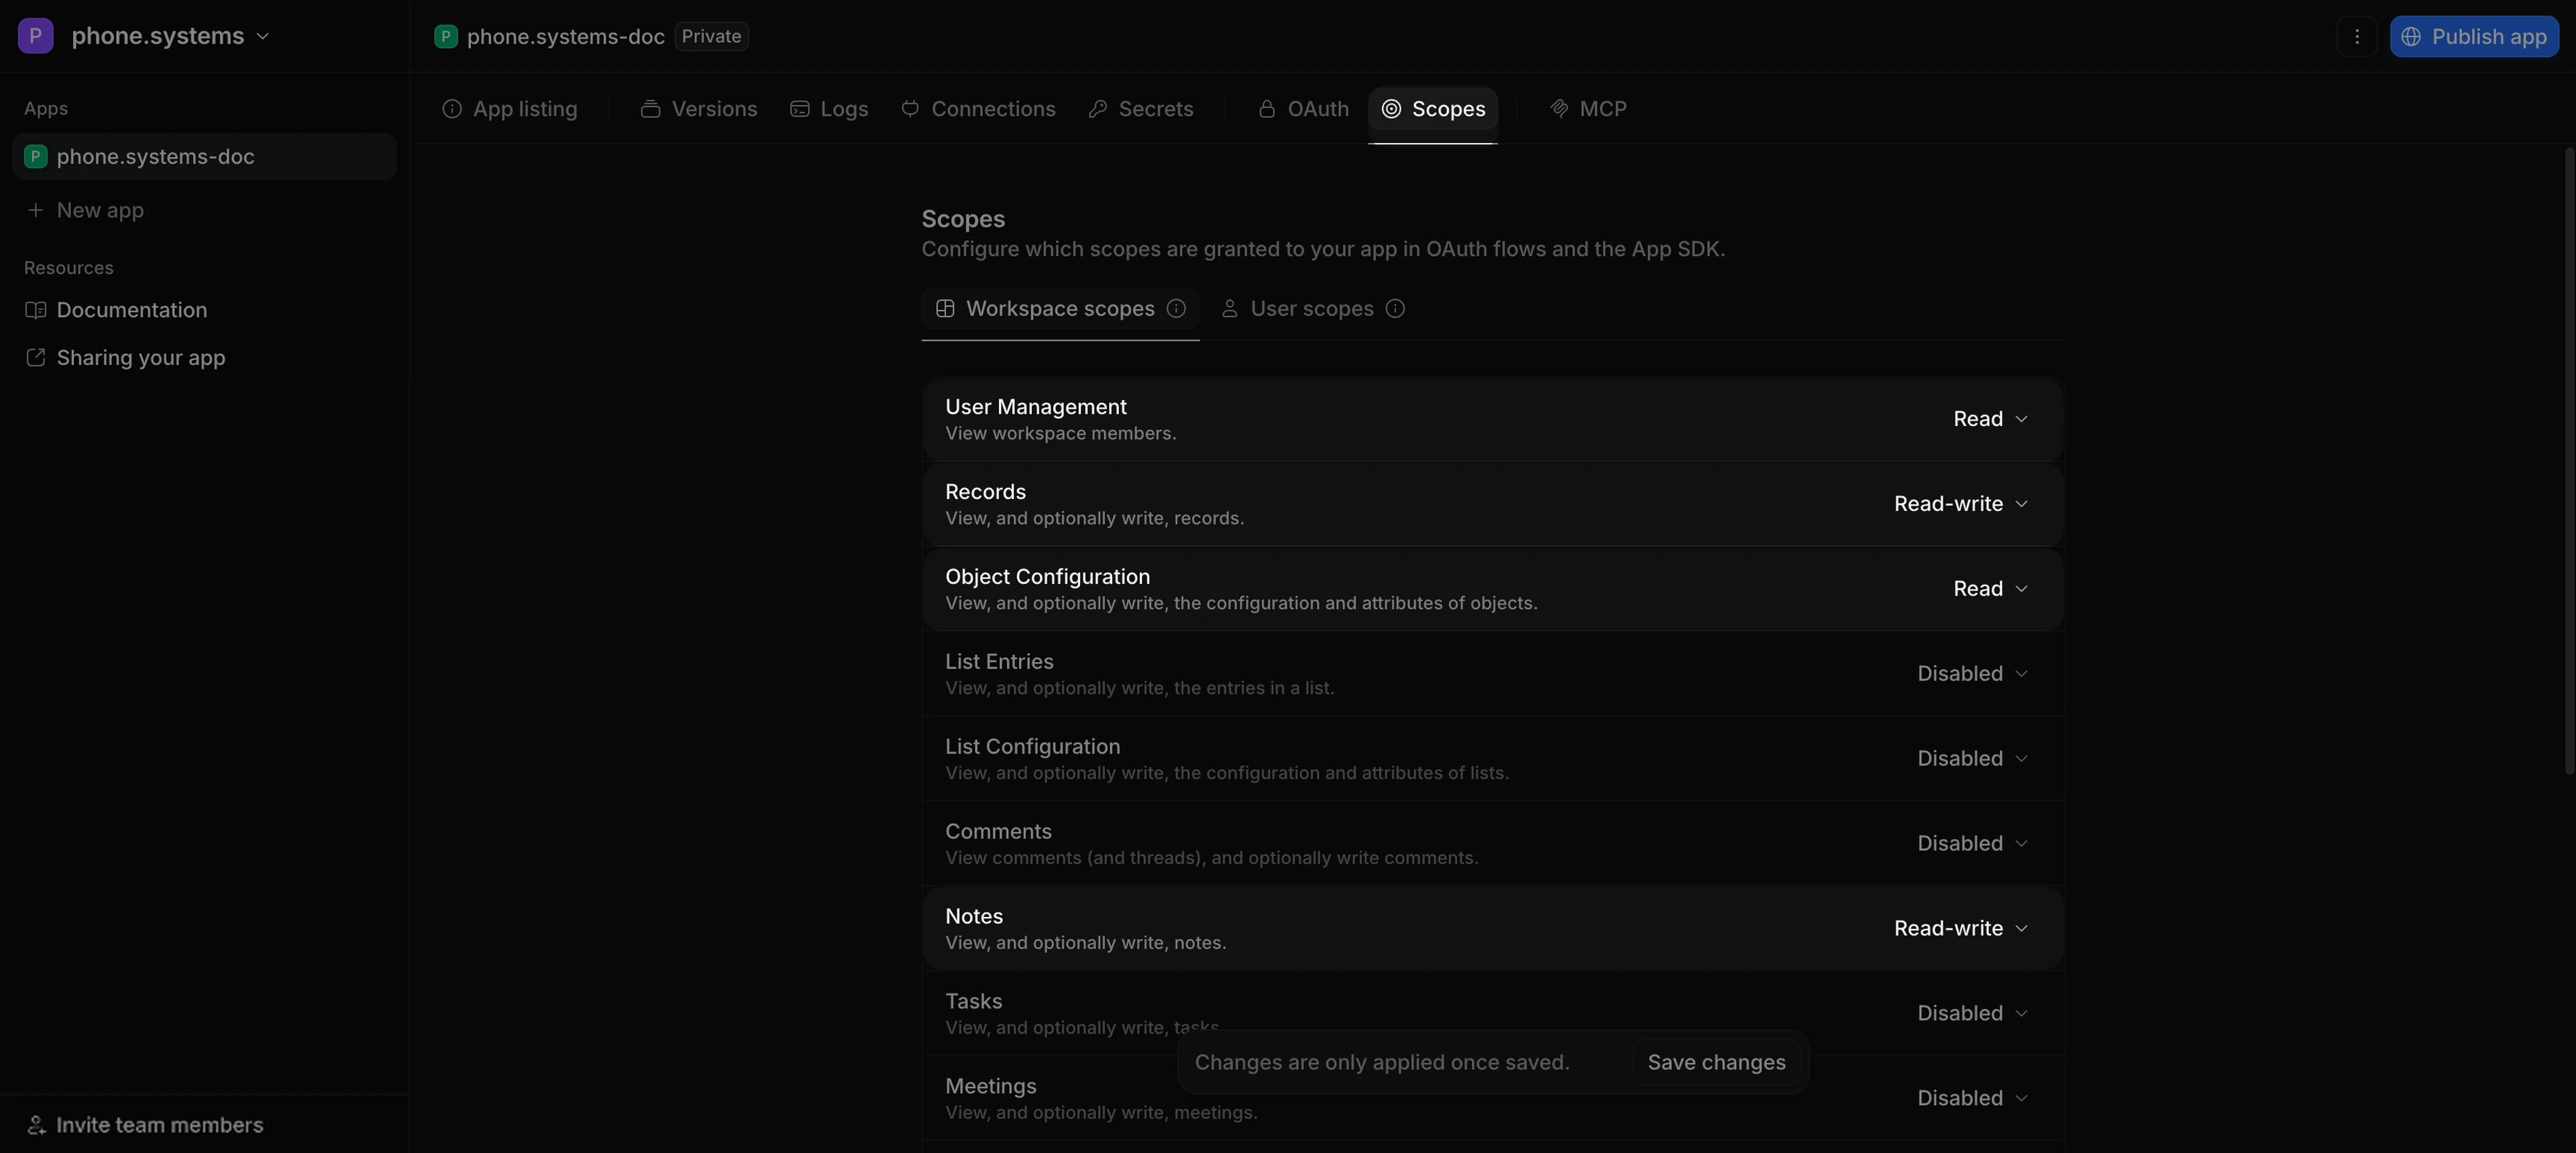
Fig. 3. Set the User Management, Records, Object Configuration, and Notes scopes#
Click Save changes to save the scopes.
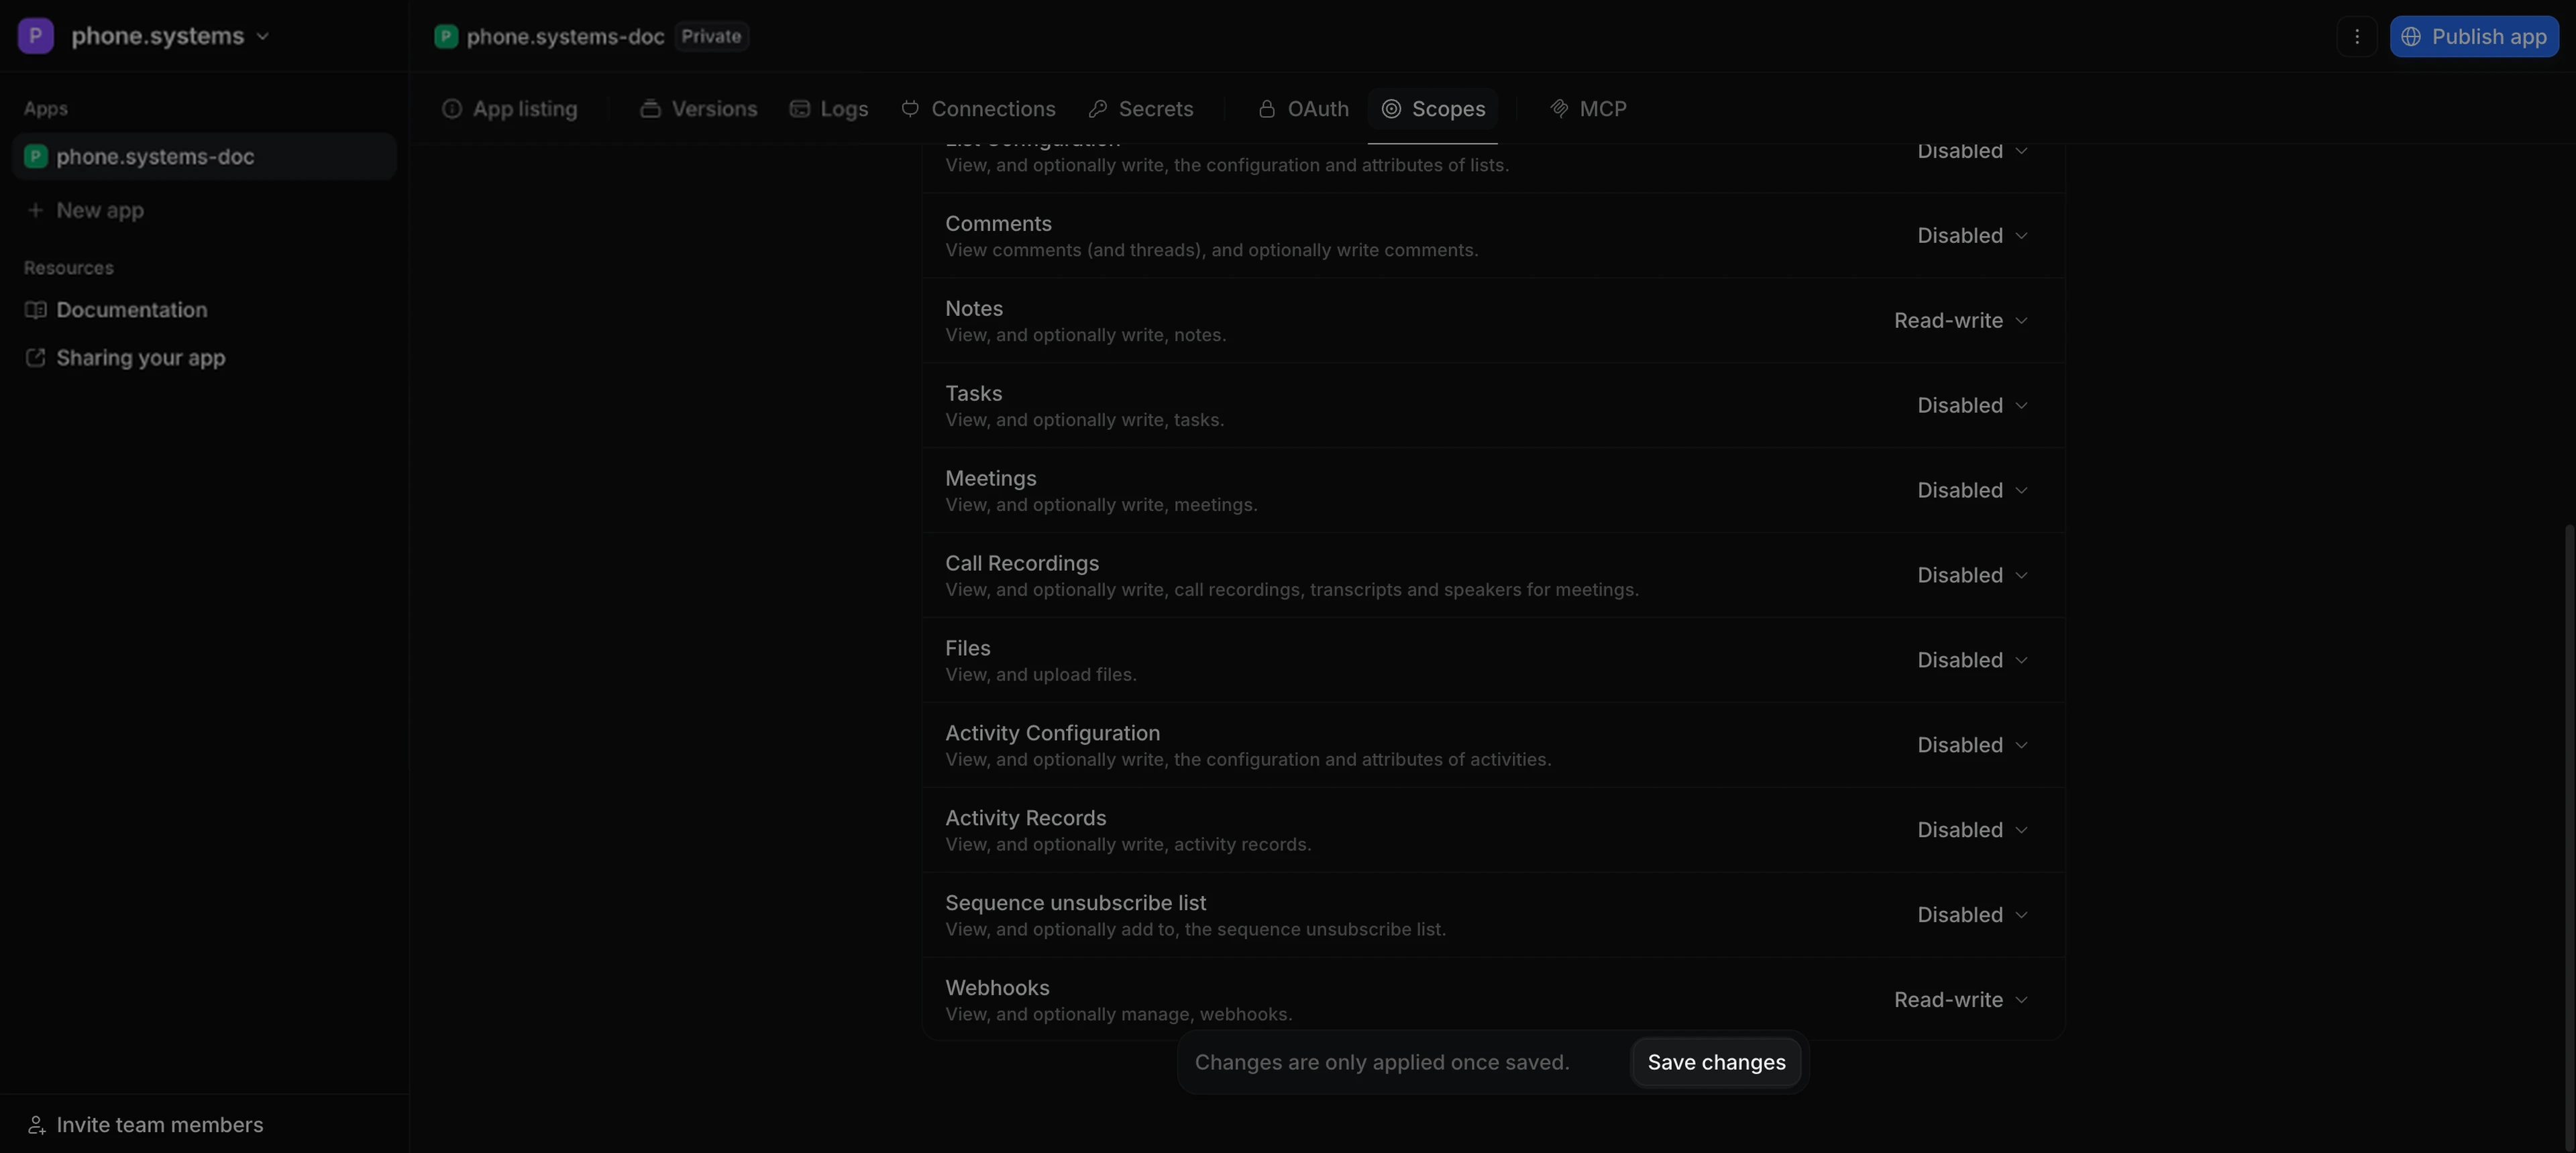
Fig. 4. Save the scopes#
Important
The connection fails if any of these scopes is missing.
Step 5: Copy the Redirect URL from phone.systems™ and paste it into your Attio app#
On the phone.systems™ Connect Attio form, copy the Redirect URL.

Fig. 5. Copy the Redirect URL#
In the Attio Developer Console, continue configuring your app:
Open the OAuth tab.
Turn on OAuth.
In Redirect URIs, click New redirect URI.
Paste the Redirect URL from phone.systems™.
In OAuth flow URL, enter the phone.systems™ CRM Integrations page:
https://phone.systems/ui/index.html#/settings/crm_integrations.Click Save changes.
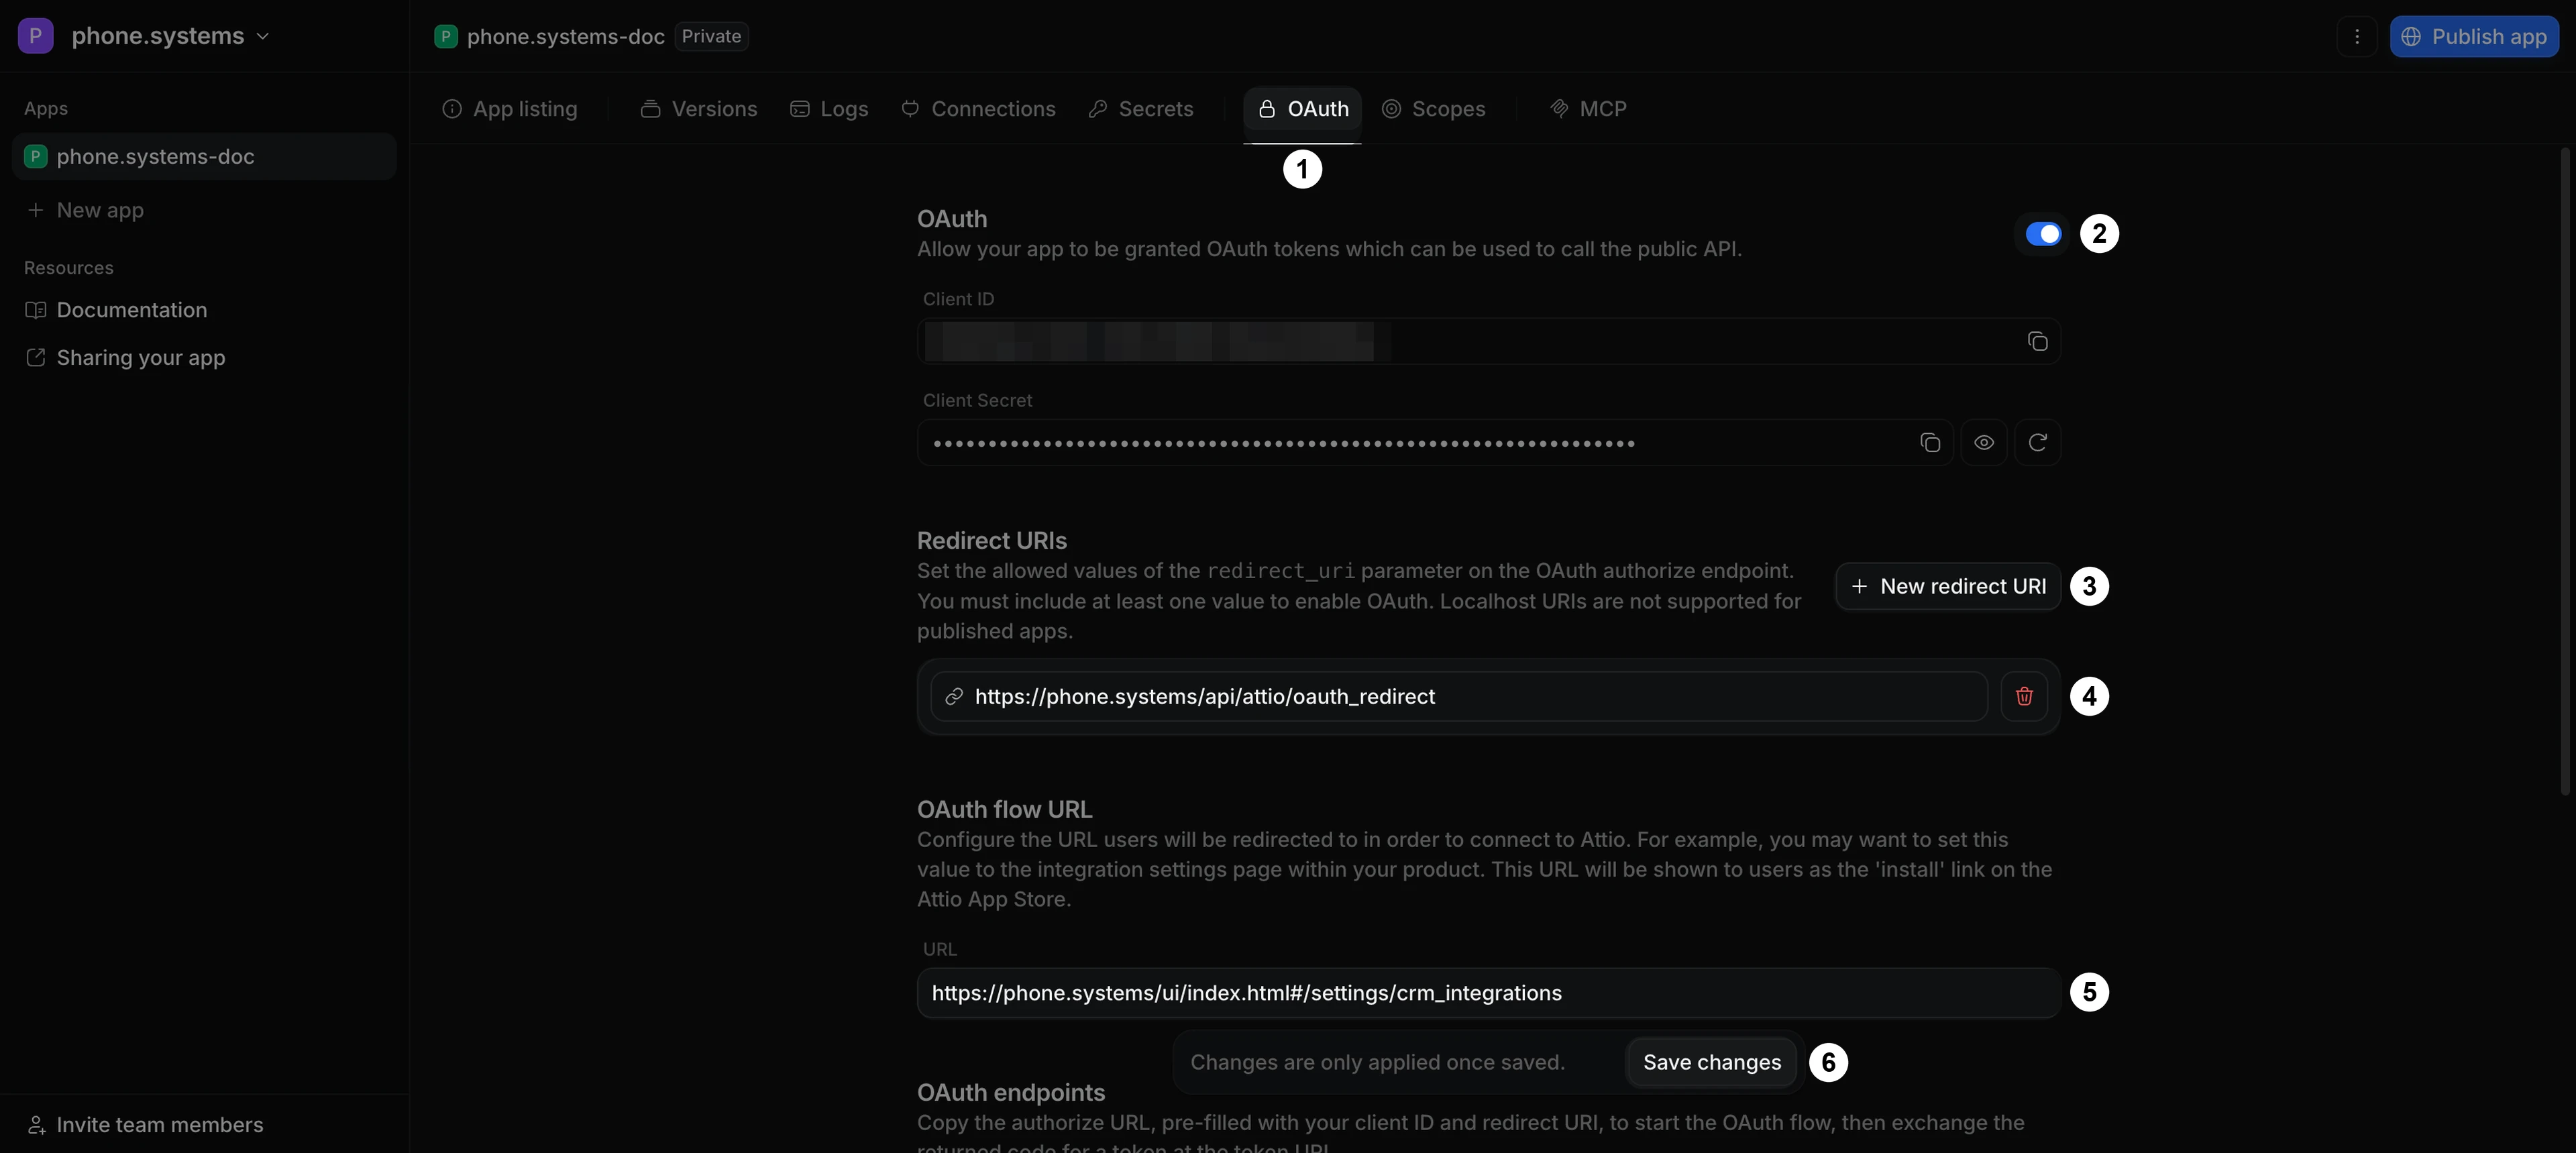
Fig. 6. Configure OAuth in your Attio app#
Step 6: Copy the Client ID and Client Secret from Attio and paste them into phone.systems™#
On the OAuth tab of your Attio app, copy the Client ID and the Client Secret.
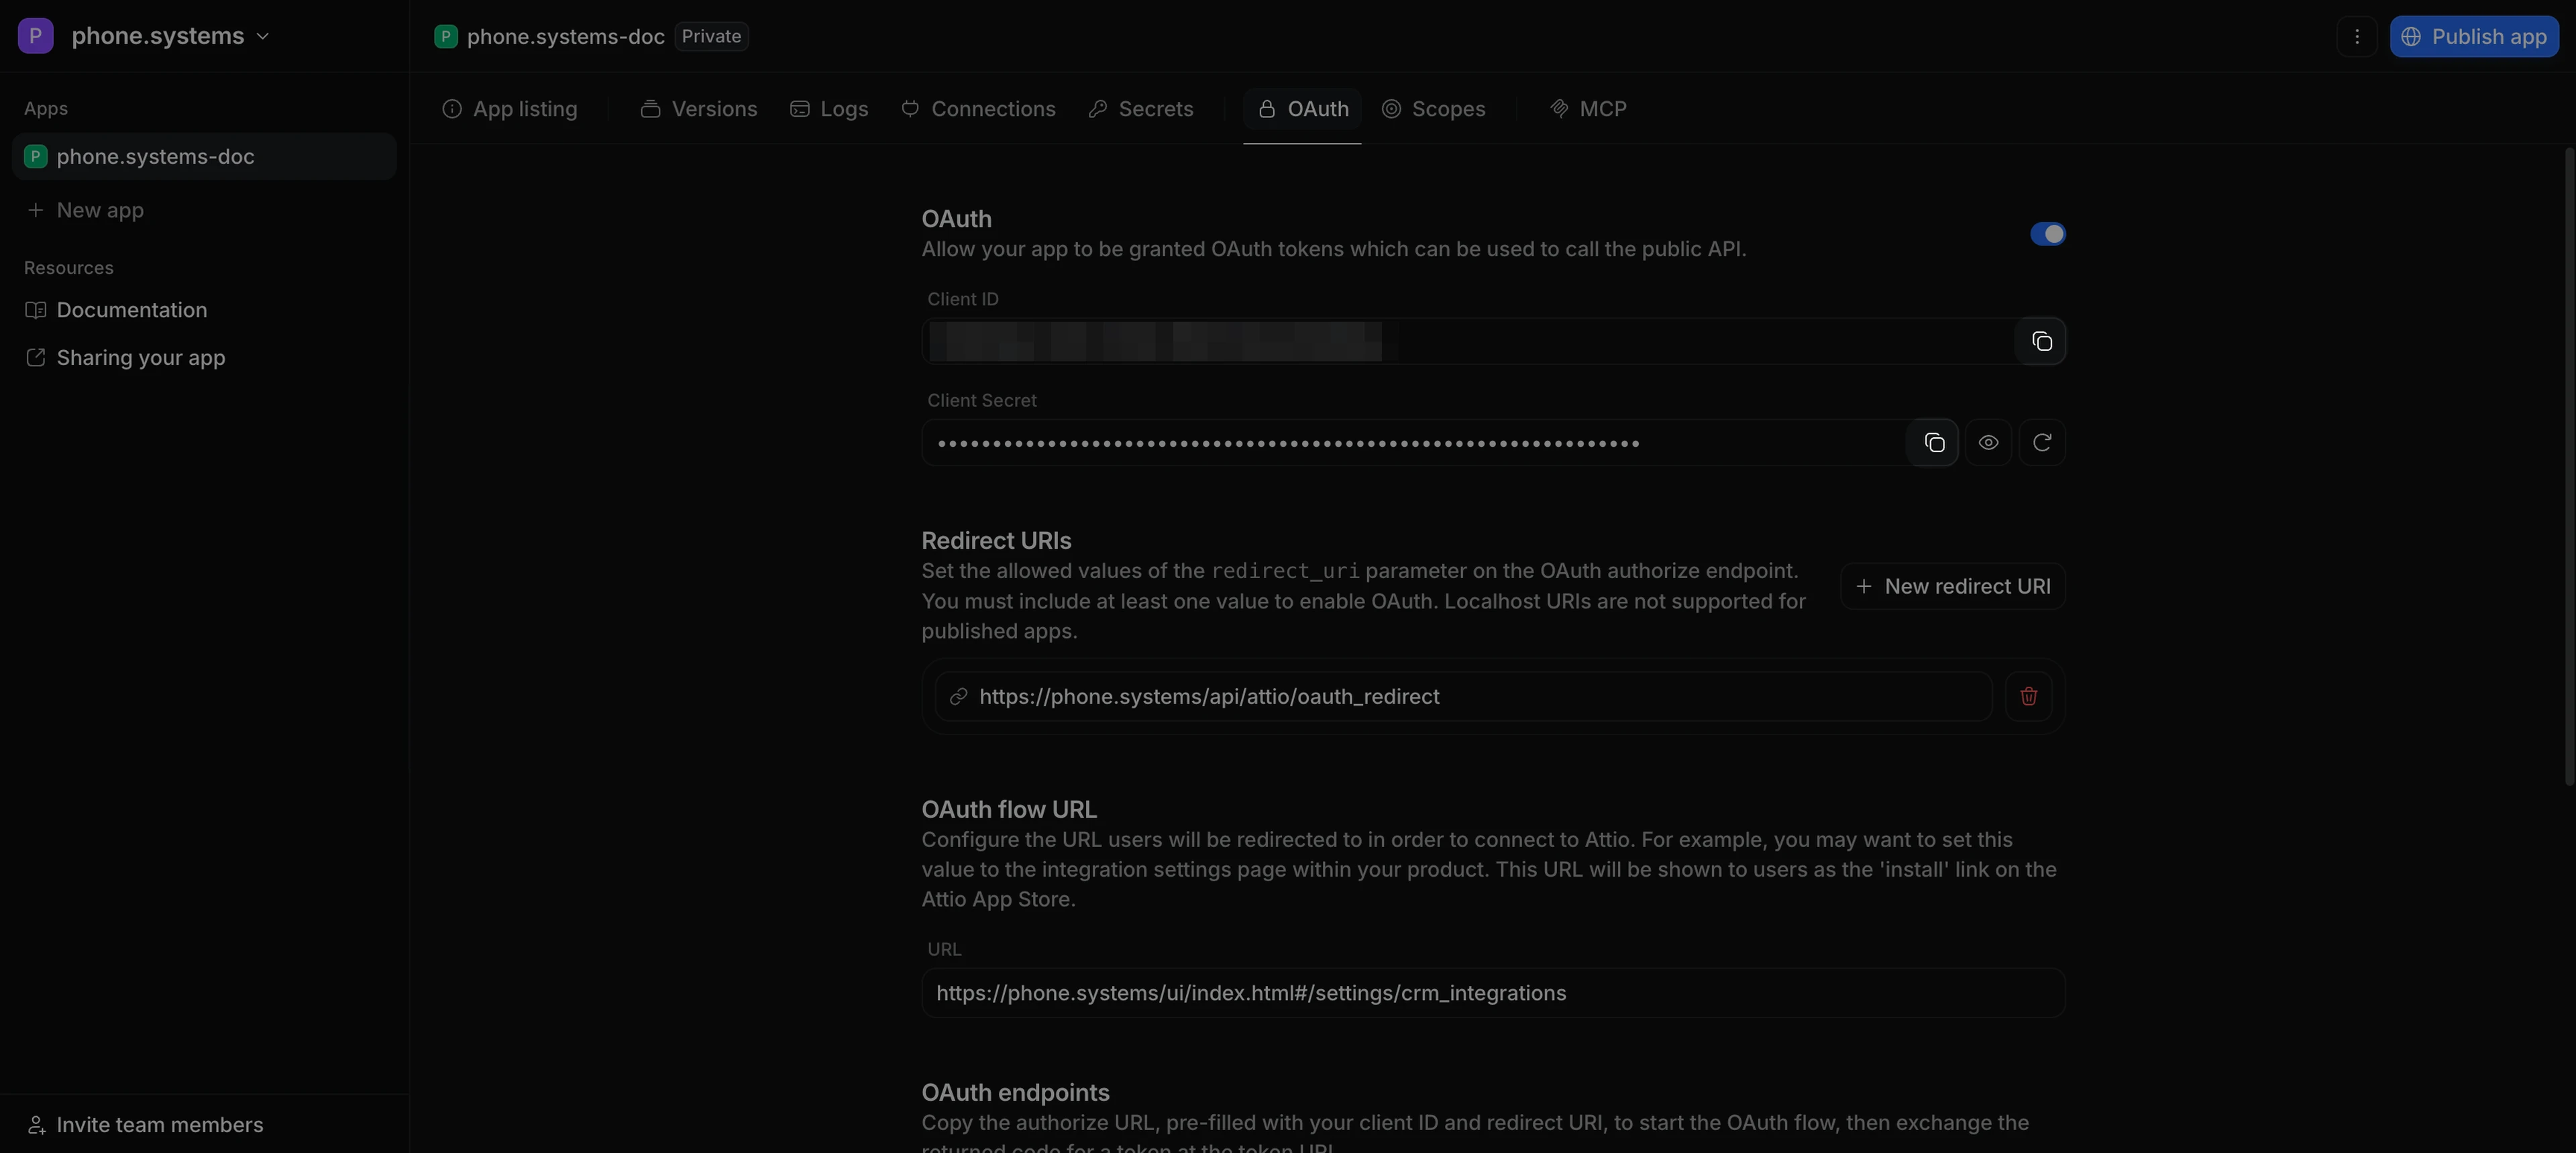
Fig. 7. Copy the Client ID and Client Secret#
Return to the Connect Attio form in phone.systems™ and fill in the following fields:
Paste the Client ID into the Client ID field.
Paste the Client Secret into the Client secret field.
Click Connect.
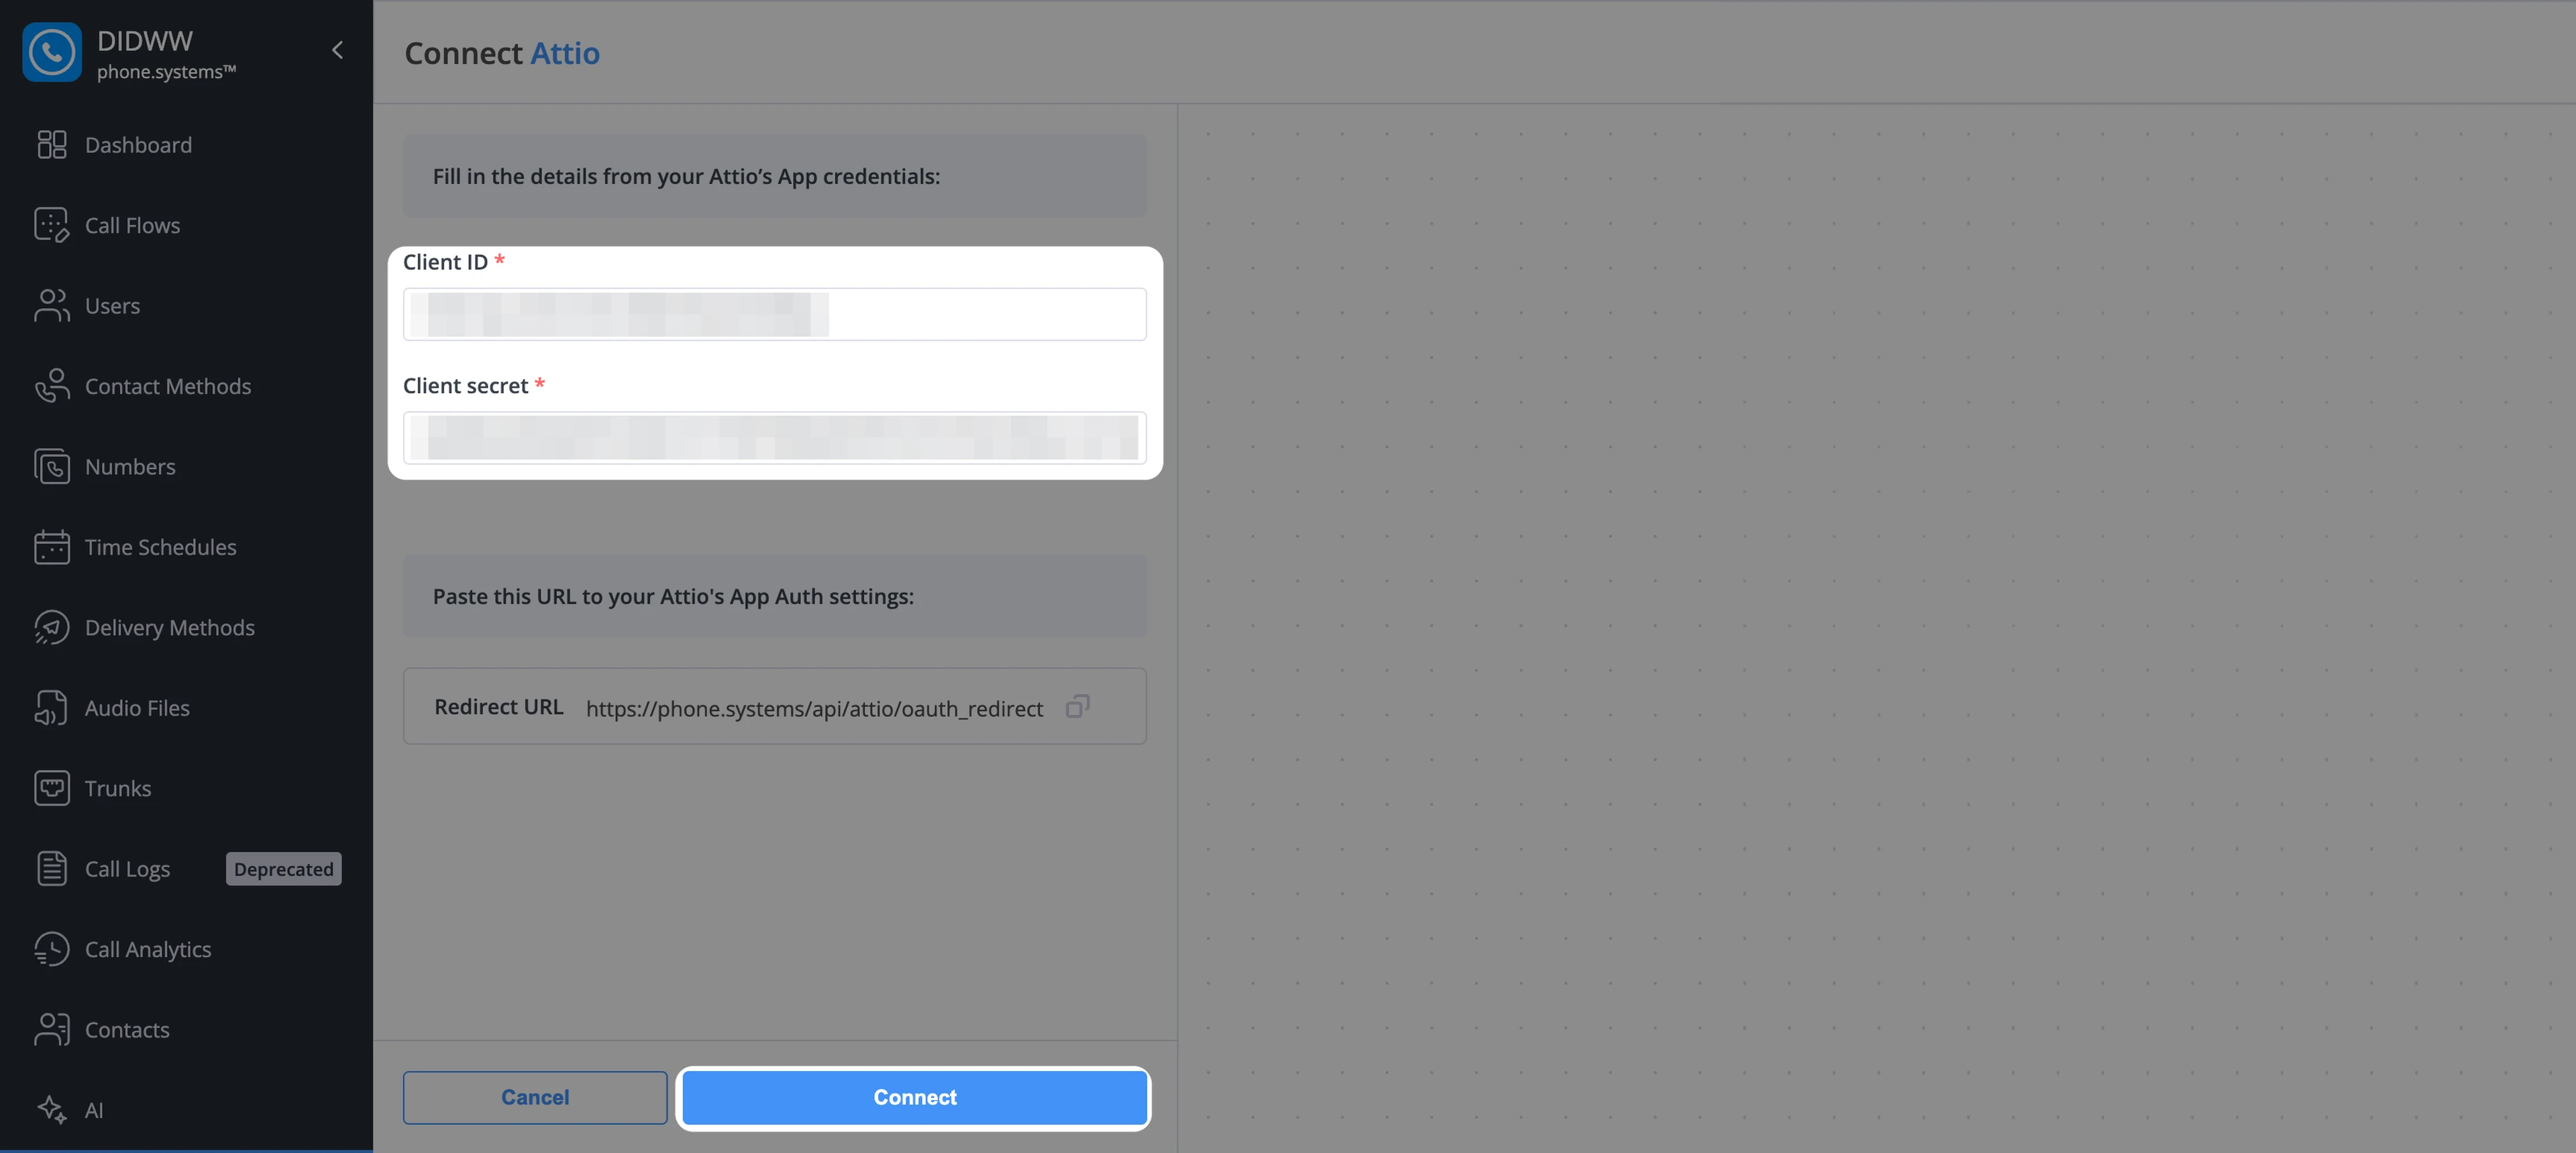
Fig. 8. Paste the Client ID and Client secret into phone.systems™#
Step 7: Authorize the connection#
After you click Connect, Attio appears under Active Integrations with the status Waiting authorization.
Click Connect on the Attio integration.
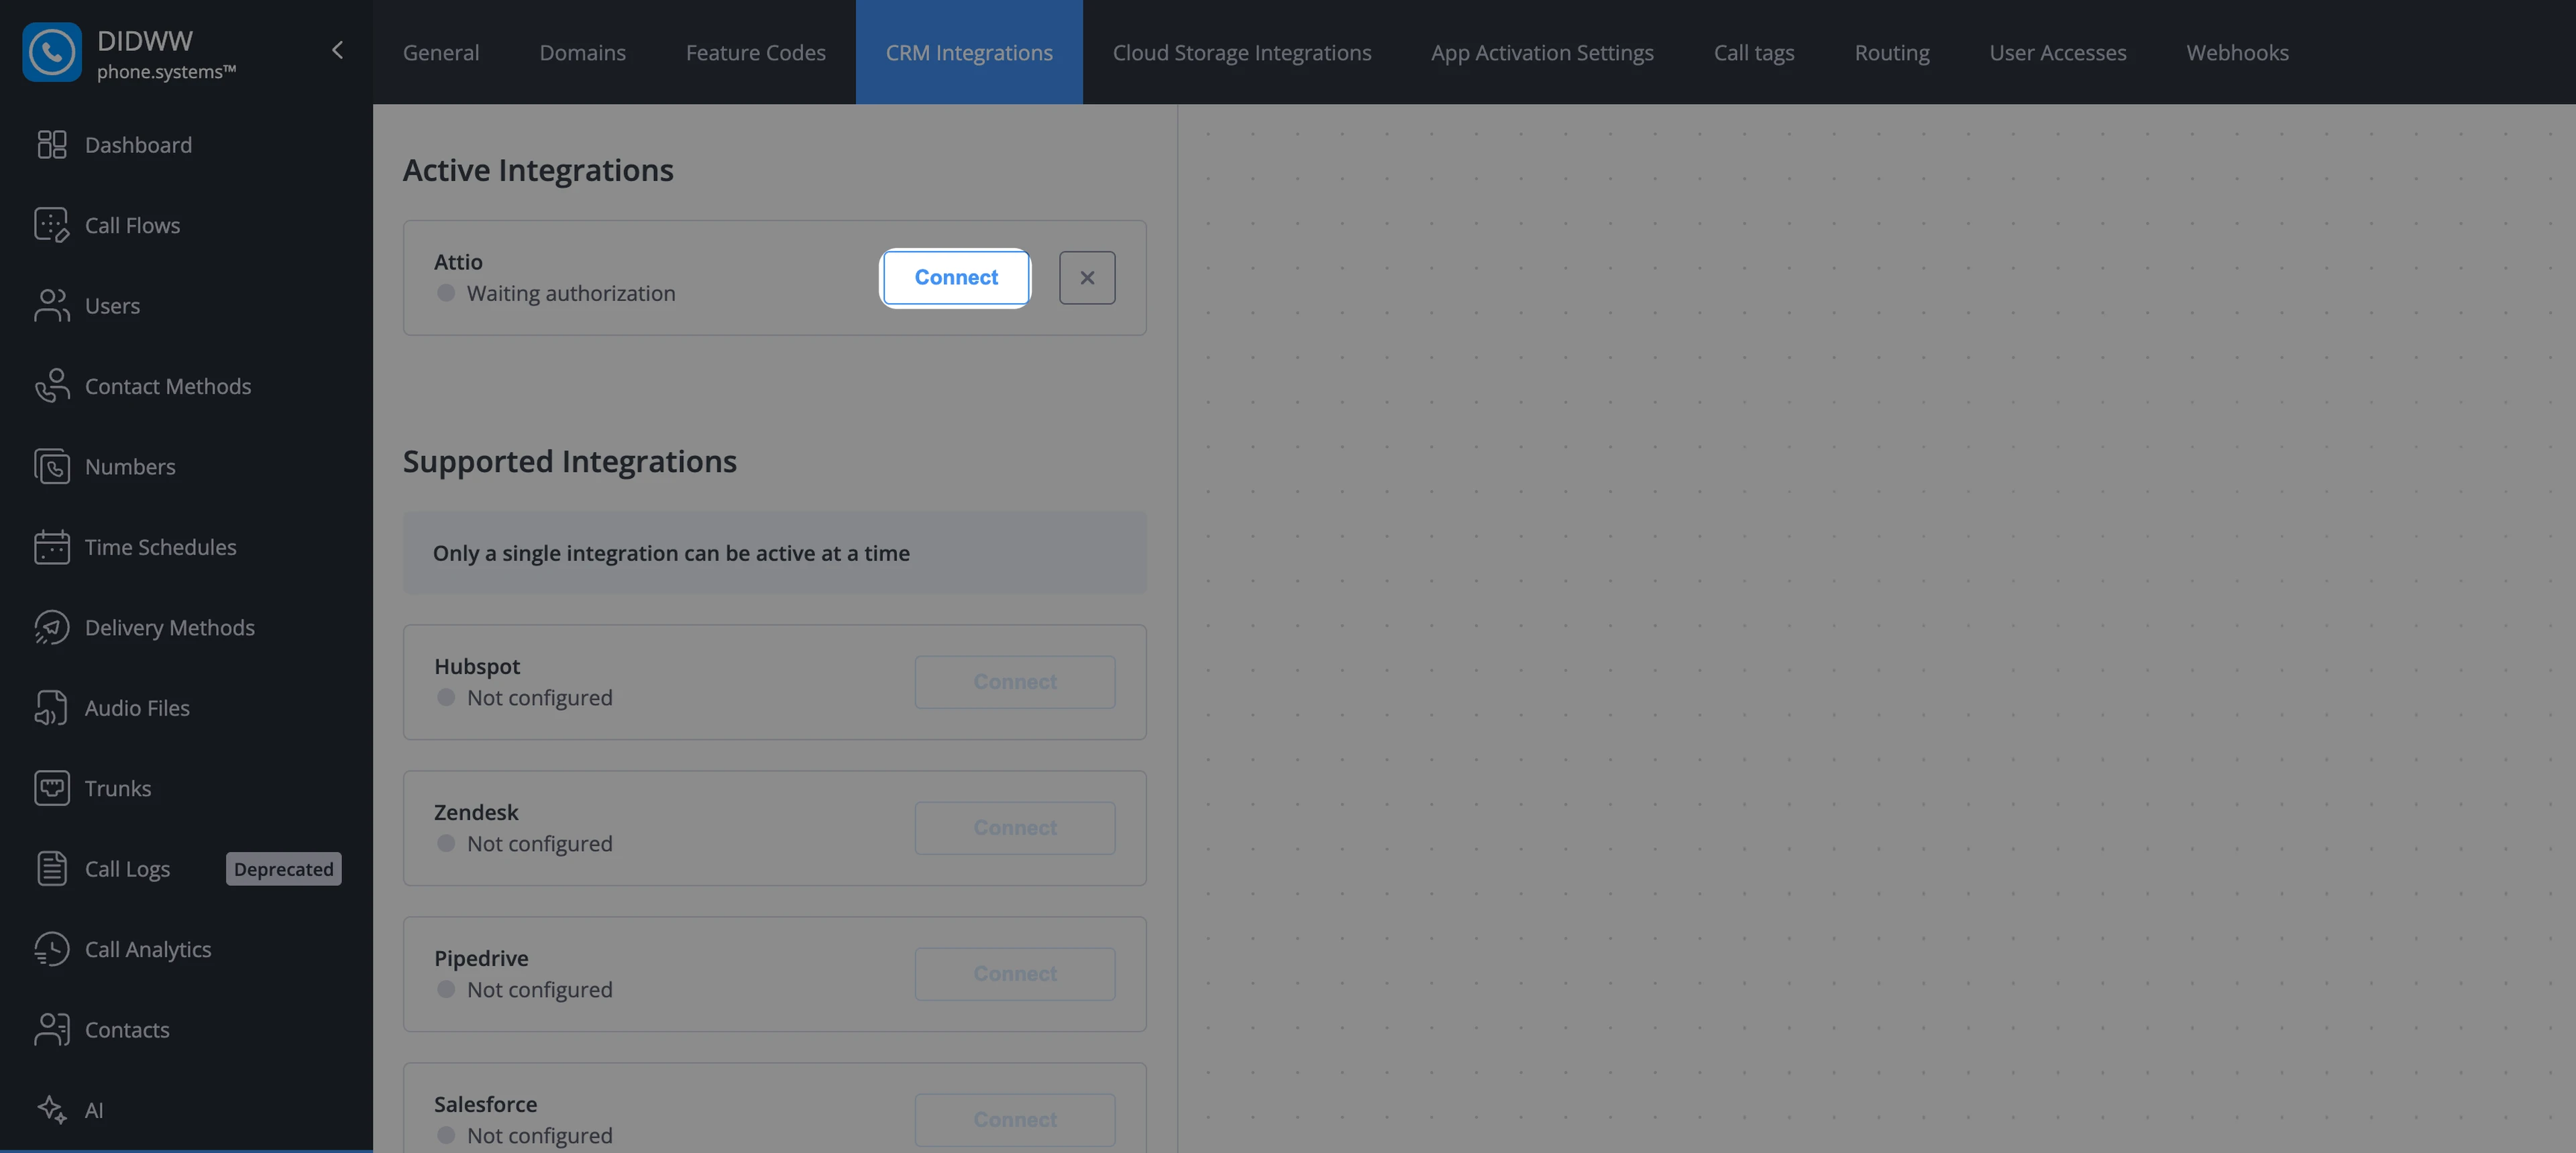
Fig. 9. Start the authorization#
Attio opens a permission window for your workspace. Review the permissions and click Allow.
Note
Attio shows a warning that the app has not been approved by Attio. This is expected for an app that you create for your own workspace.
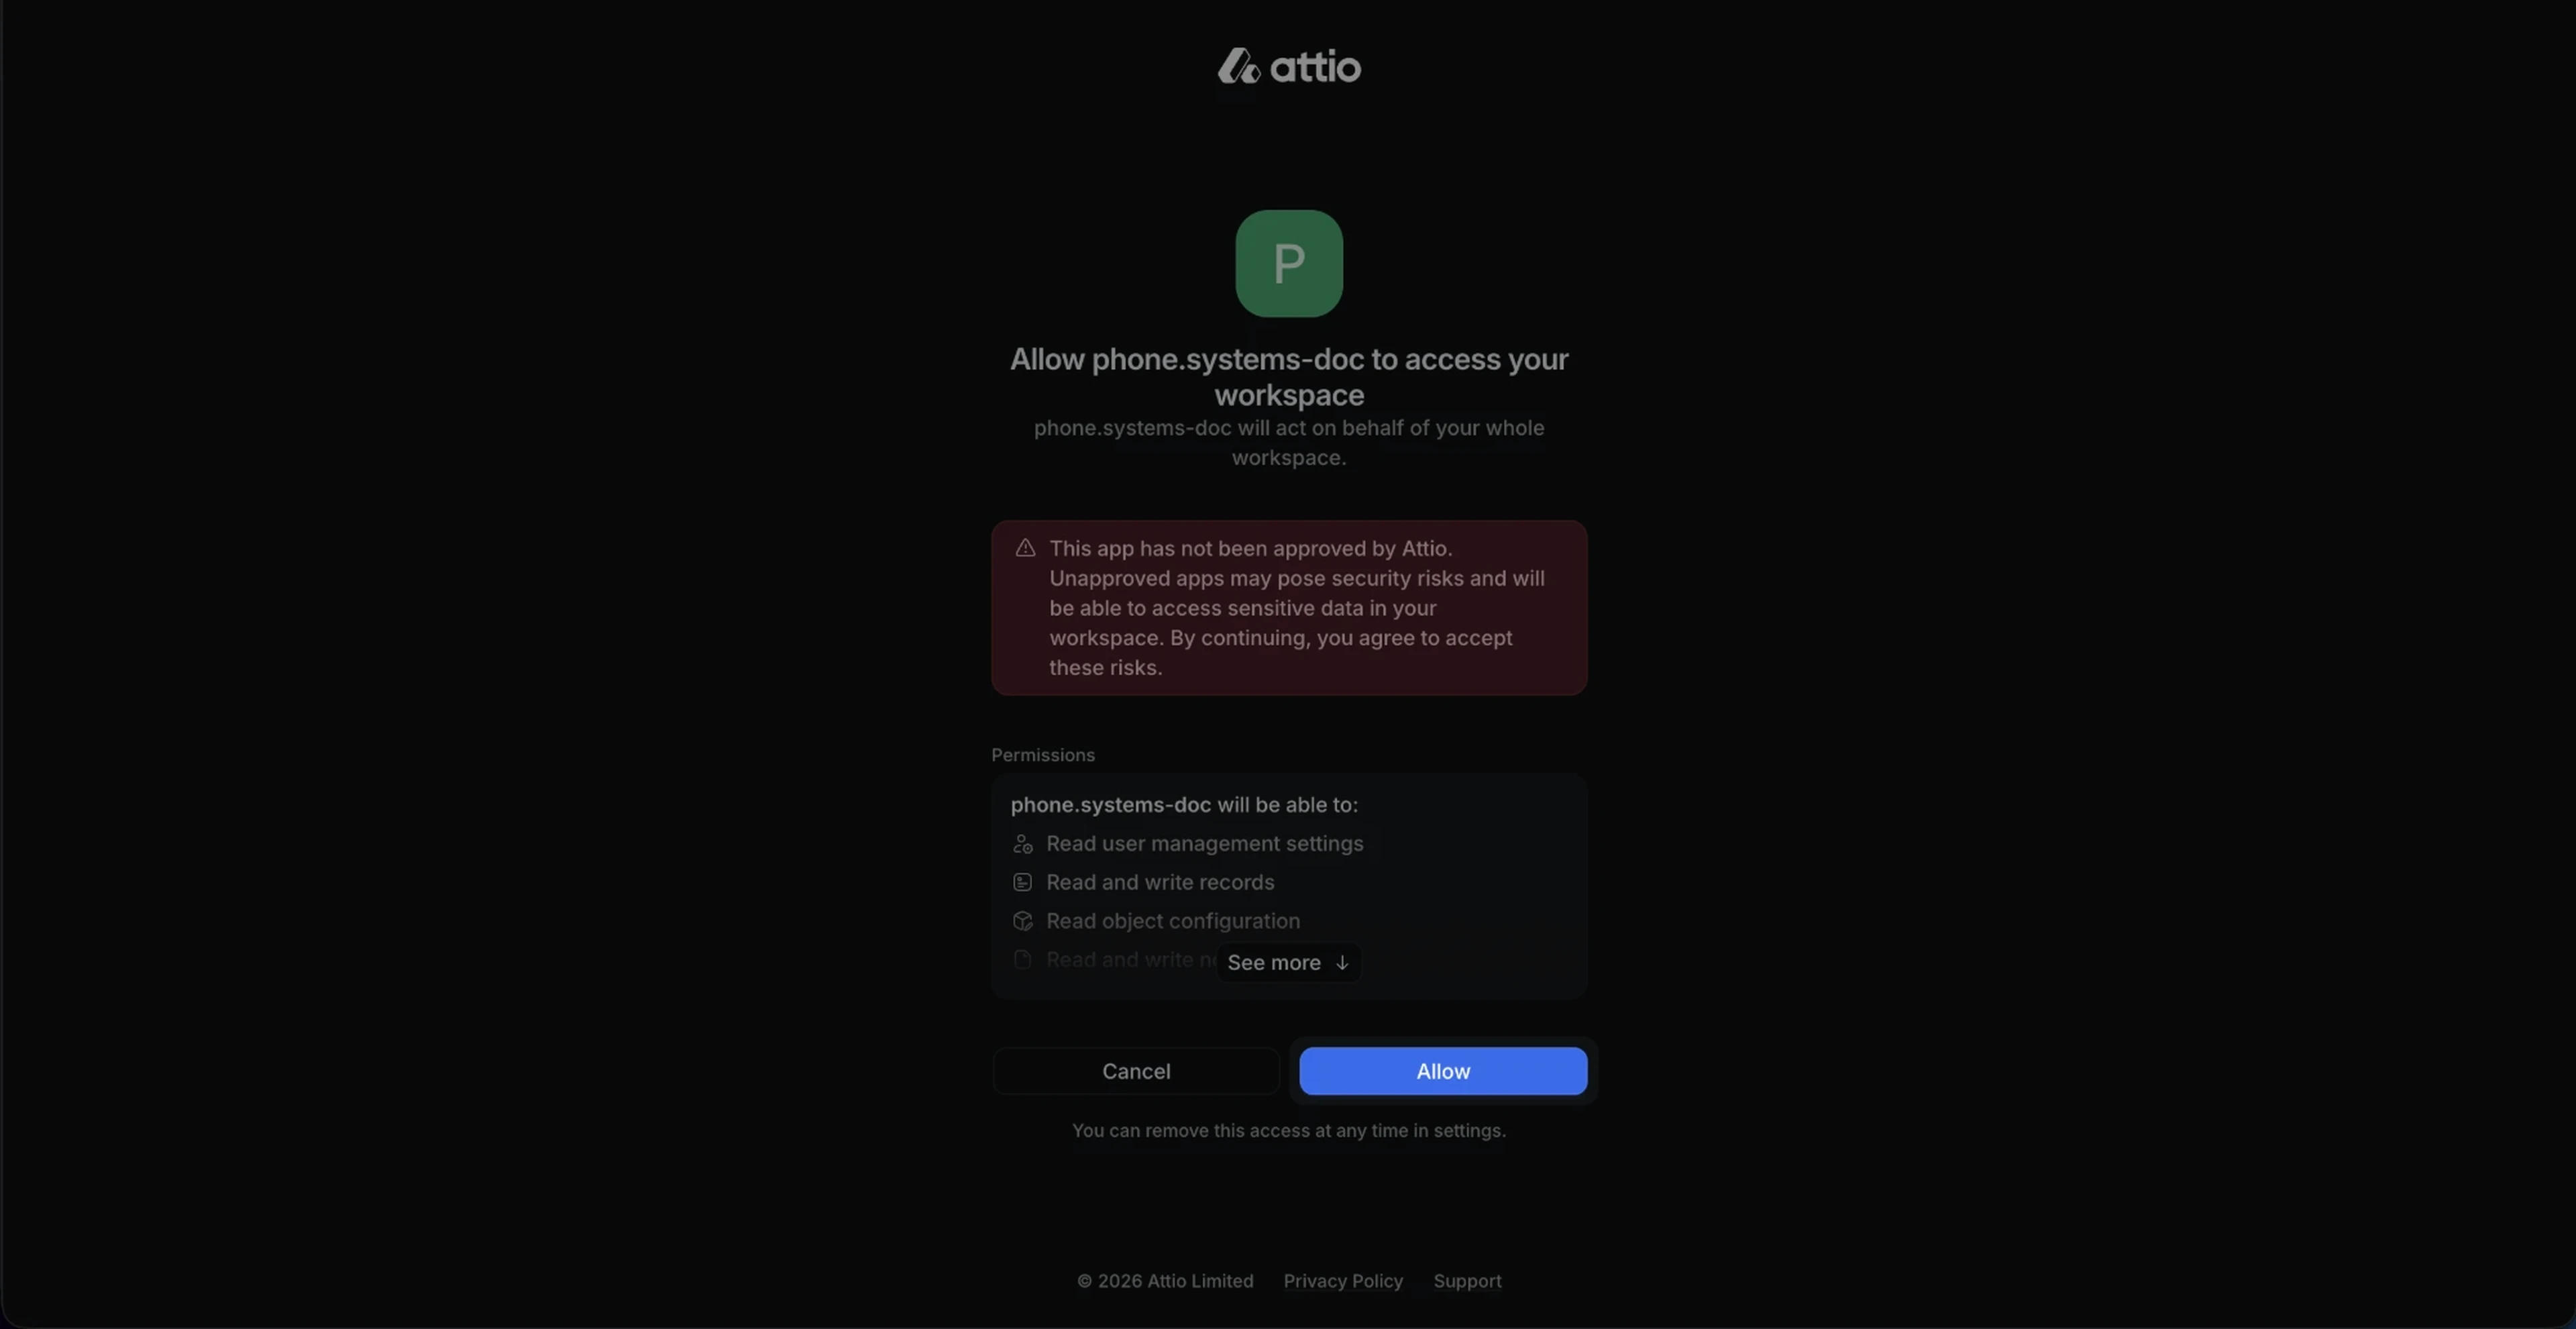
Fig. 10. Allow access to your Attio workspace#
After you click Allow, you return to the phone.systems™ CRM Integrations page, where Attio appears under Active Integrations with the status Connected.
Note
Existing people from Attio are synchronized automatically. Changes to people in Attio, including new, updated, deleted, and merged people, appear in phone.systems™ automatically.
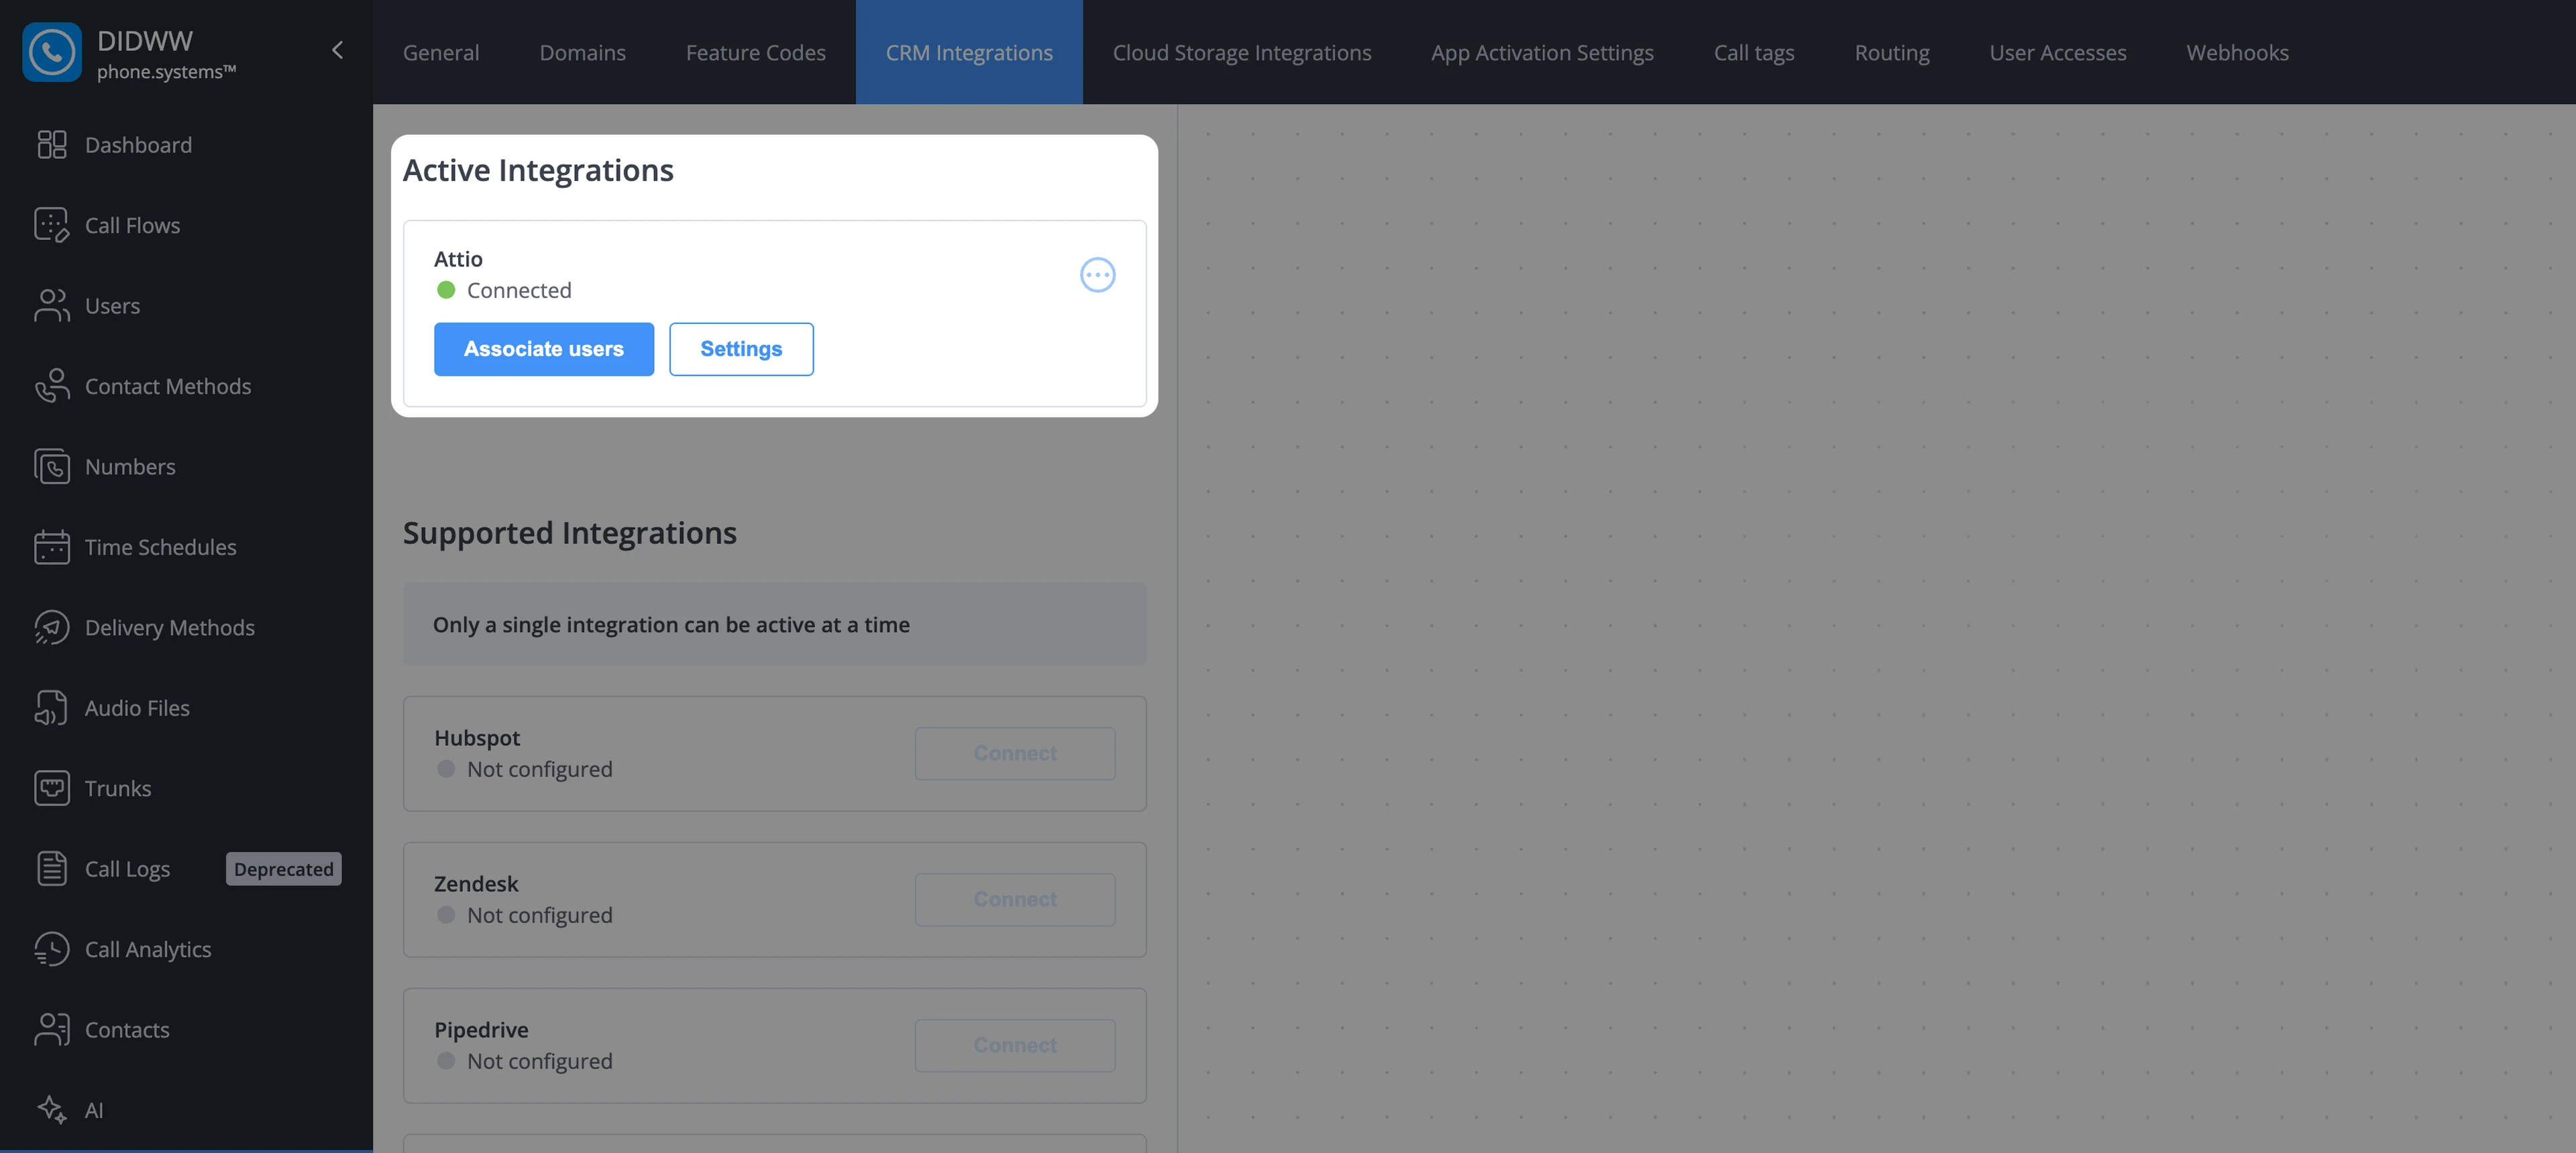
Fig. 11. Active Attio connection in phone.systems™#
Important
The integration connects to one Attio workspace. Reconnecting to a different workspace is rejected.
Links to Attio records use the workspace slug saved when you connect. If you rename the workspace slug in Attio, reconnect the integration.
Associate users for Attio#
After the Attio integration is successfully connected, you can associate Attio workspace members with their corresponding phone.systems™ users.
User association identifies the agent in the call note sent to Attio. Only calls handled by associated users are journaled. Calls handled by users who are not associated are not journaled.
Go to phone.systems™ Settings, then open CRM Integrations.
Under Active Integrations at the top of the page, you will see Attio marked as Connected.
Click Associate users.
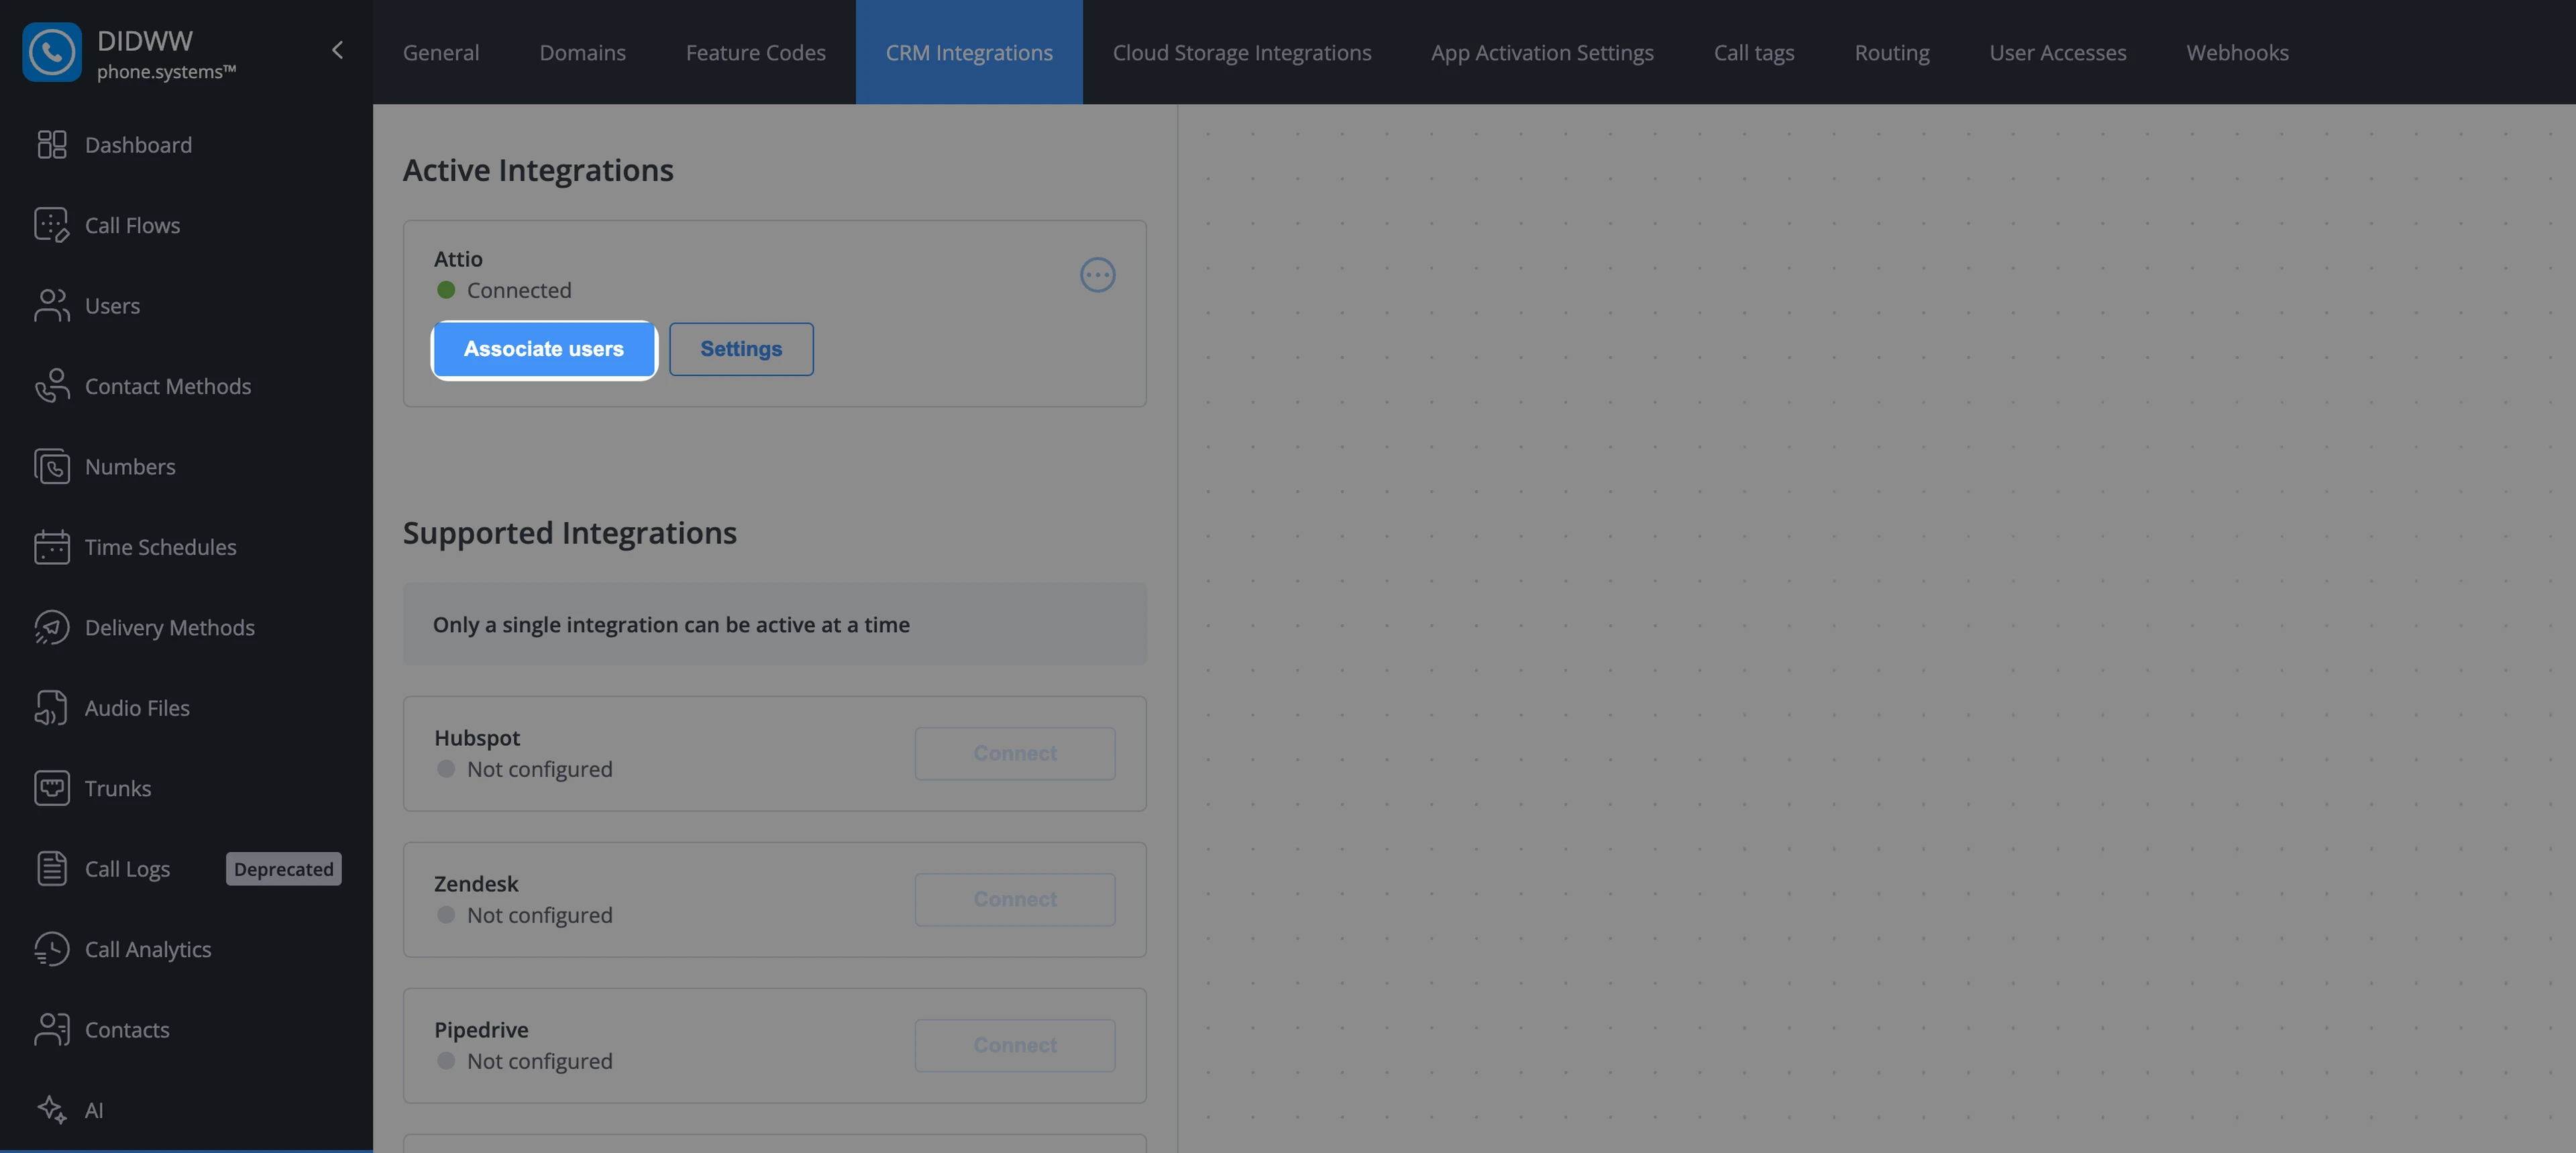
Fig. 12. Associate users button for Attio integration#
After clicking Associate users, a dialog opens where you can link Attio users with corresponding phone.systems™ users.
Match each Attio user with the appropriate phone.systems™ user.
Click Save to apply the changes.
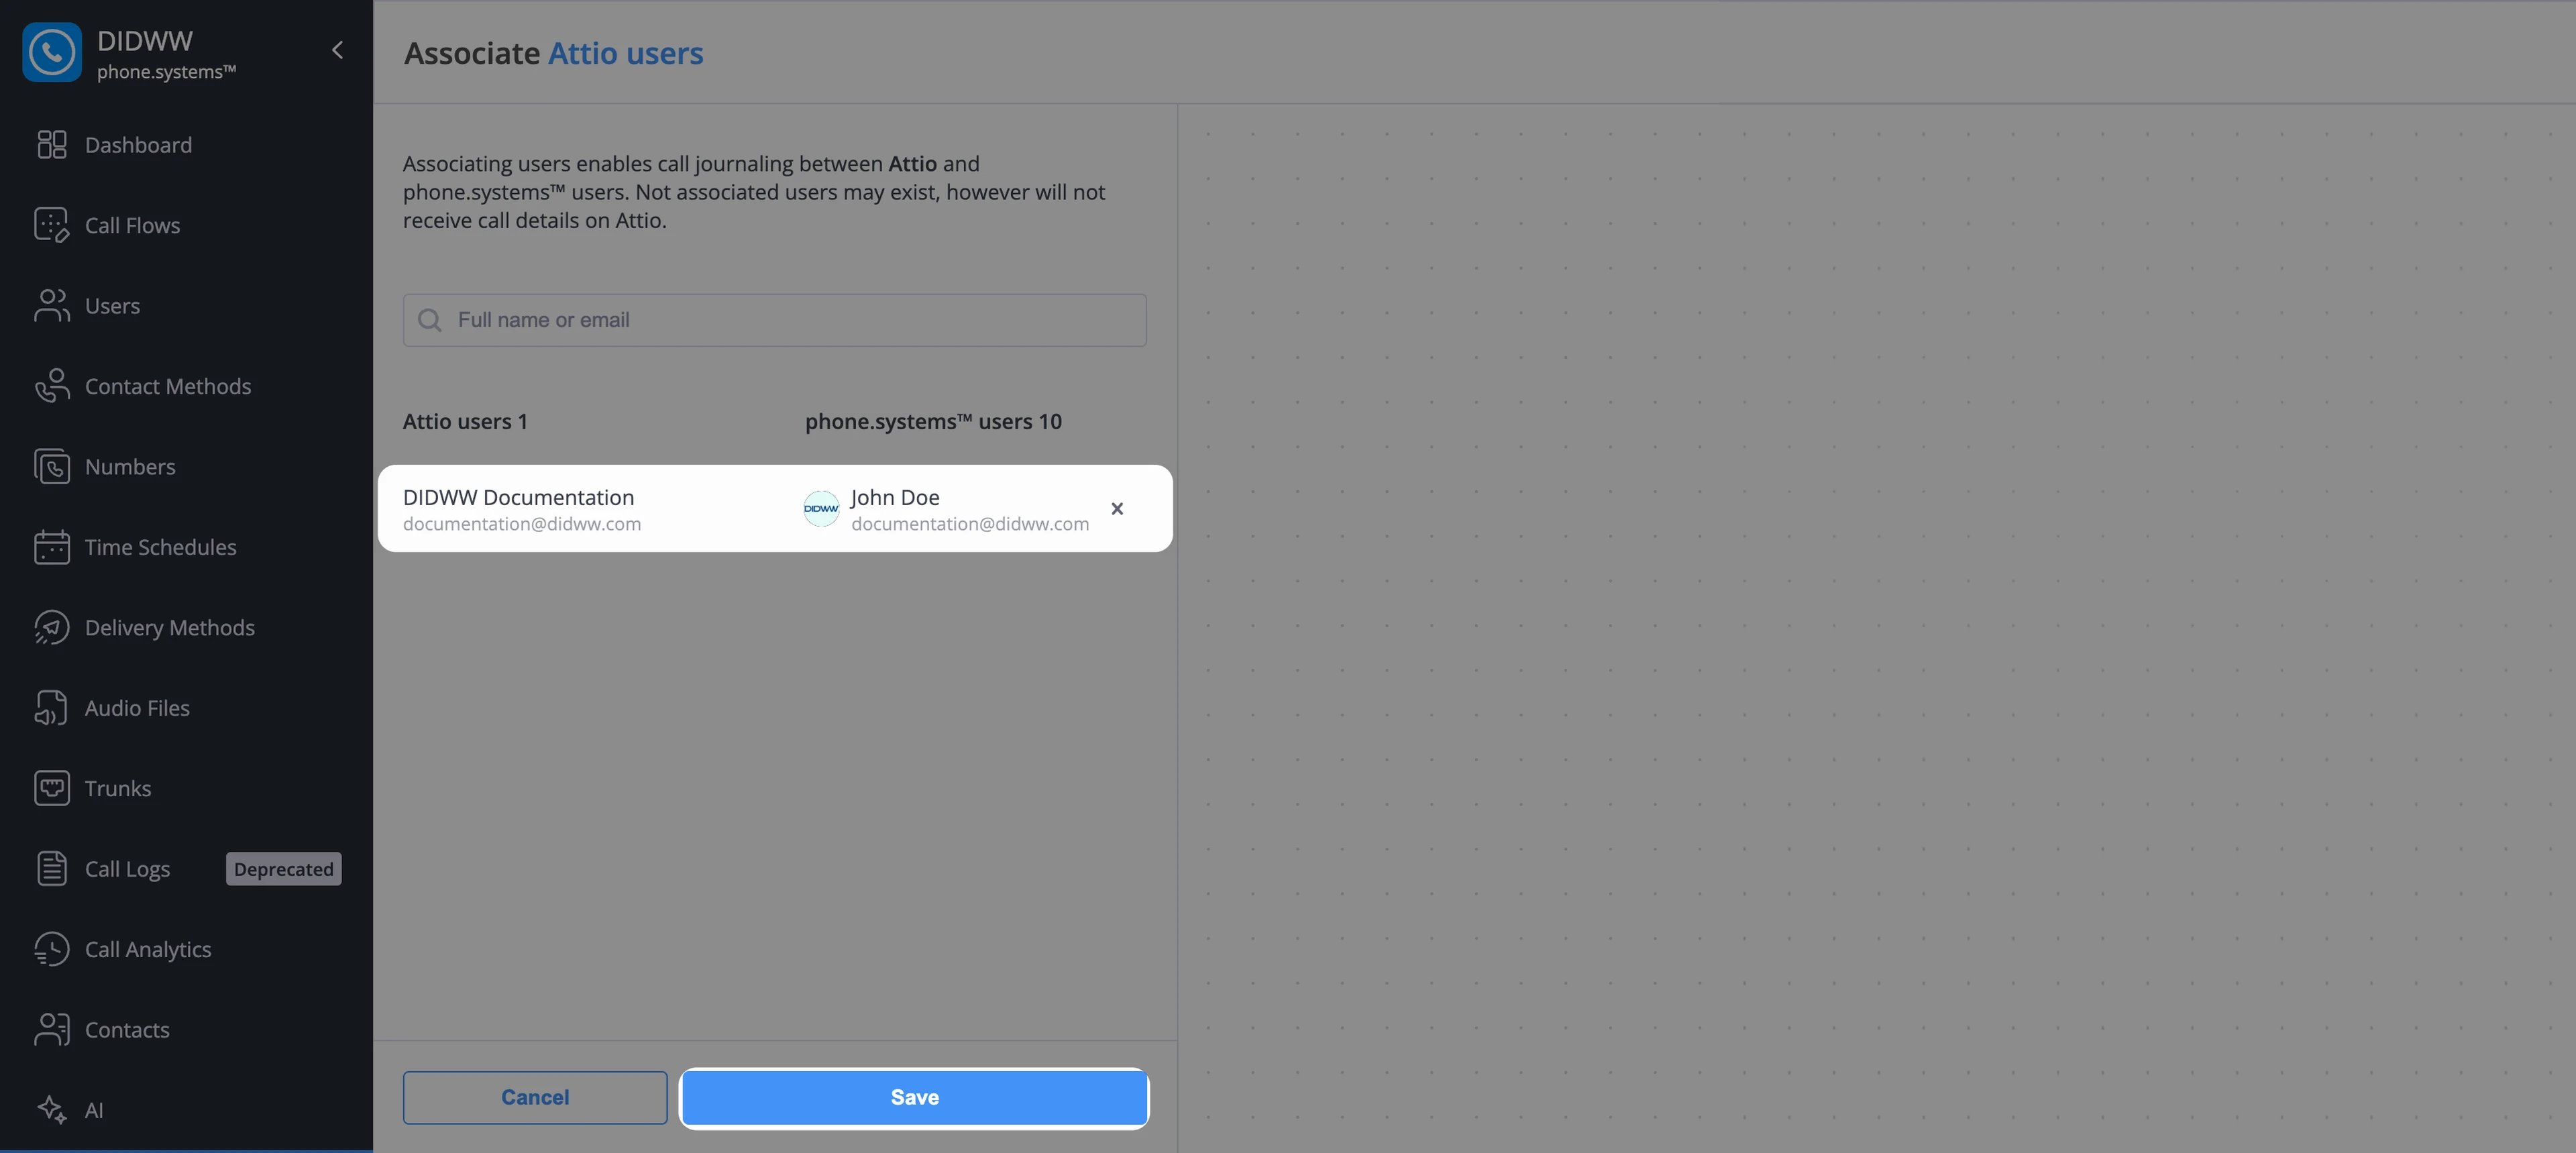
Fig. 13. Associate Attio users with phone.systems™ users#
Users who are not associated can be associated later. To add or change associations, click Associate users again. Suspended Attio workspace members are not listed.
Note
Attio notes do not have an owner. The associated agent is shown in the text of the call note.
Configuring Attio Integration Settings#
After the Attio integration is connected, you can configure how calls and contacts are synchronized between phone.systems™ and Attio.
These settings control call journaling behavior, automatic contact creation, and the upload of additional call-related data. Configuration applies only to phone numbers with call journaling enabled.
In phone.systems™ go to Settings, then open CRM Integrations.
Under Active Integrations at the top of the page, you will see Attio marked as Connected.
Click Settings.
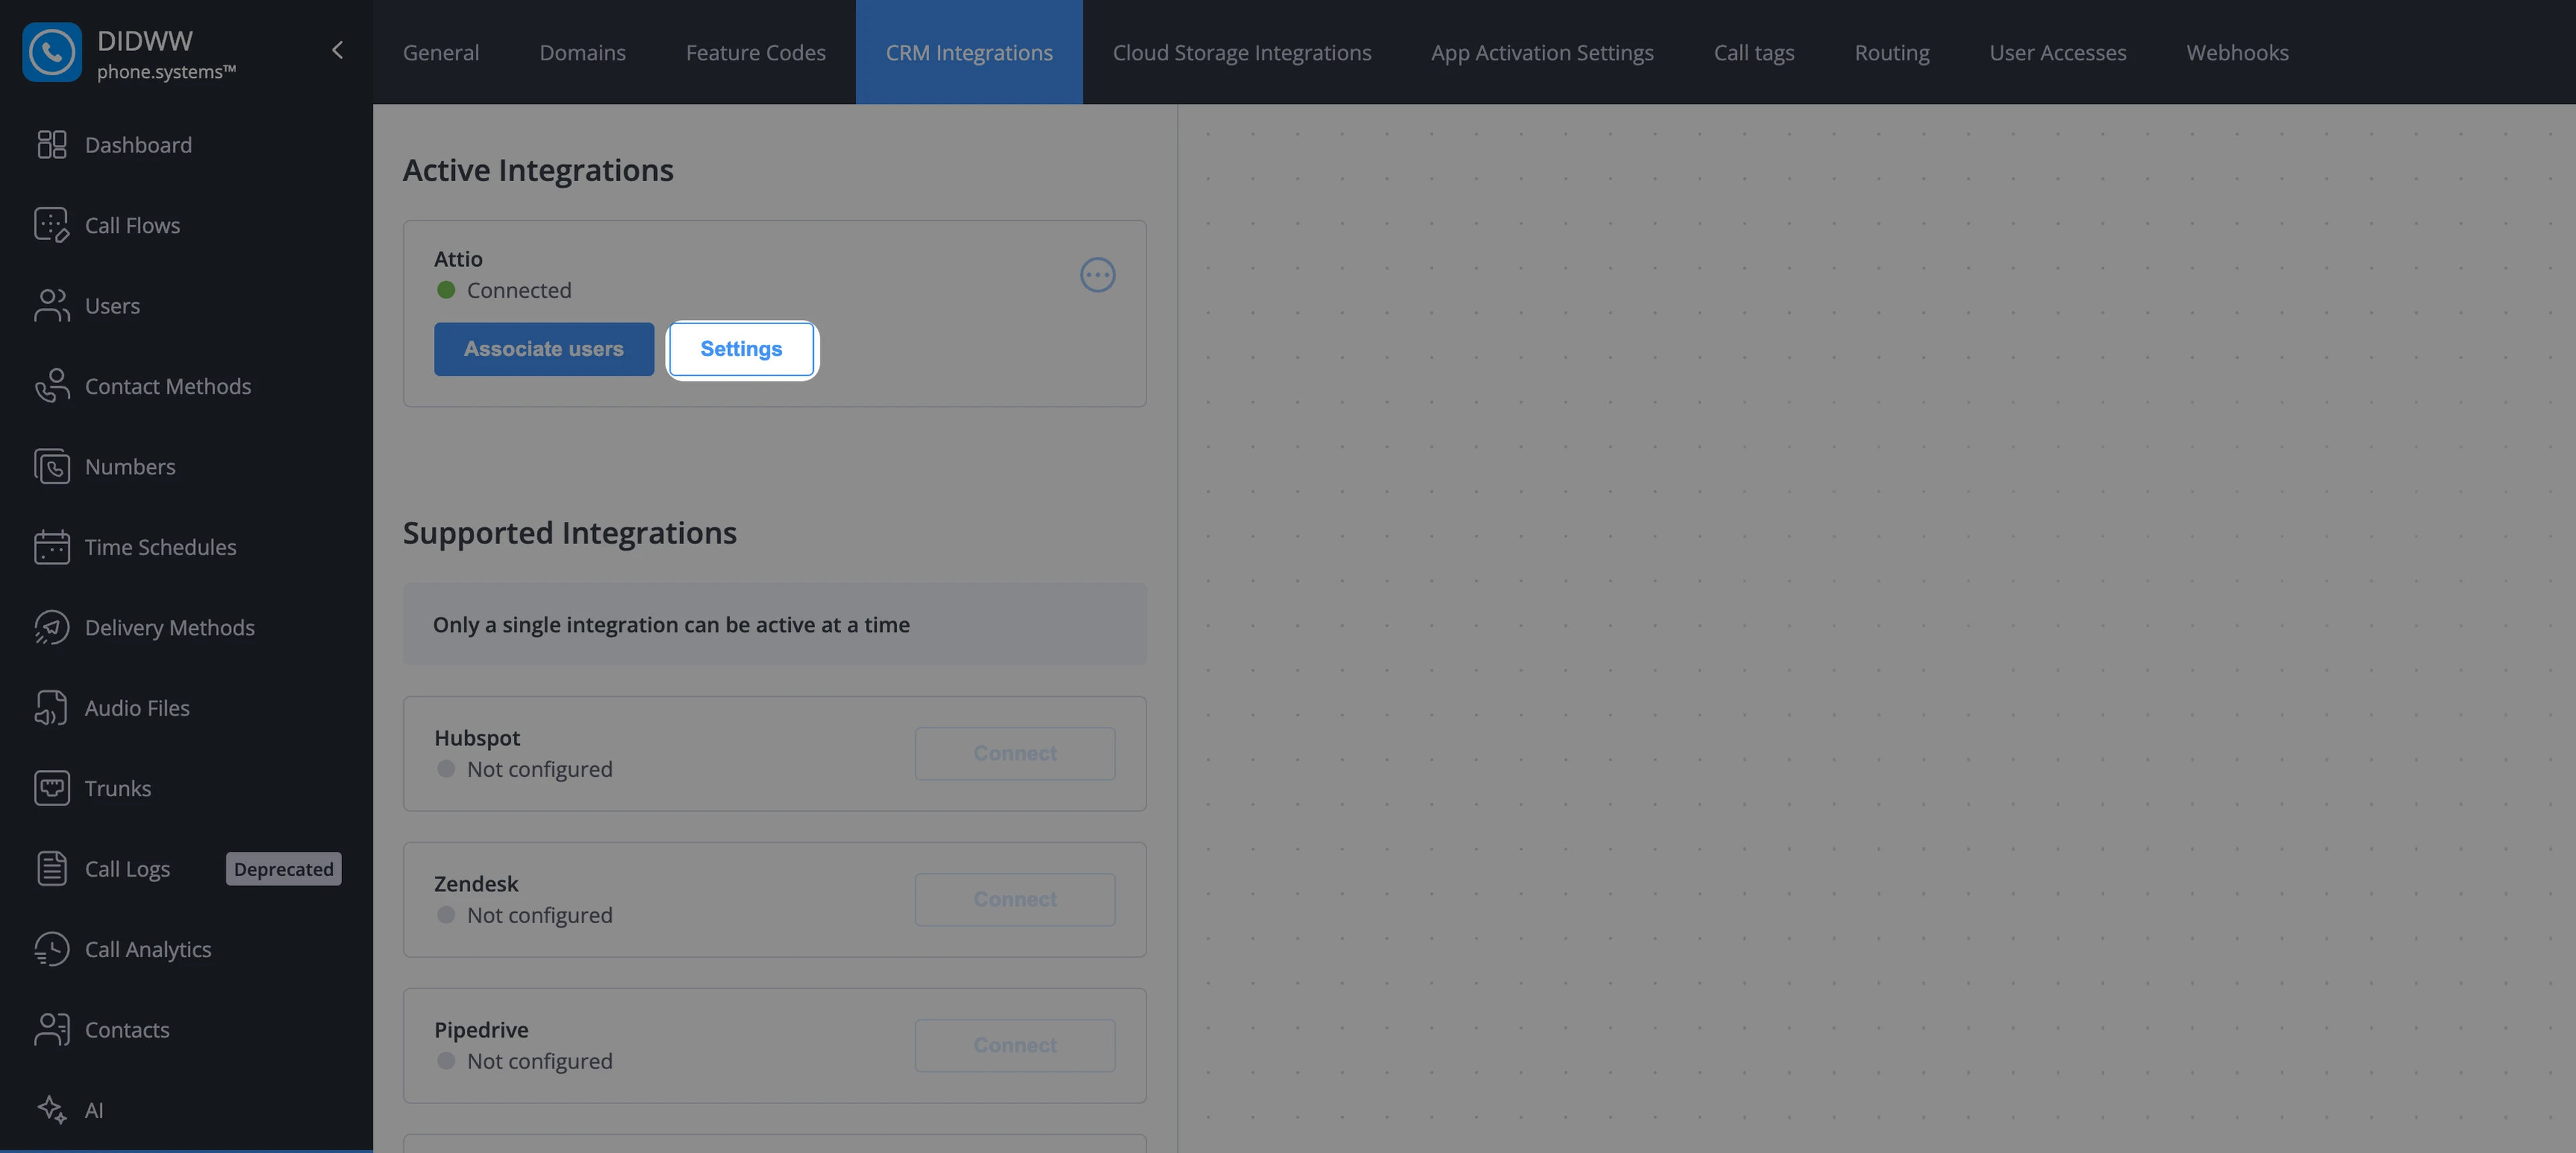
Fig. 14. Attio integration settings button#
After clicking Settings, the Attio Settings page opens.
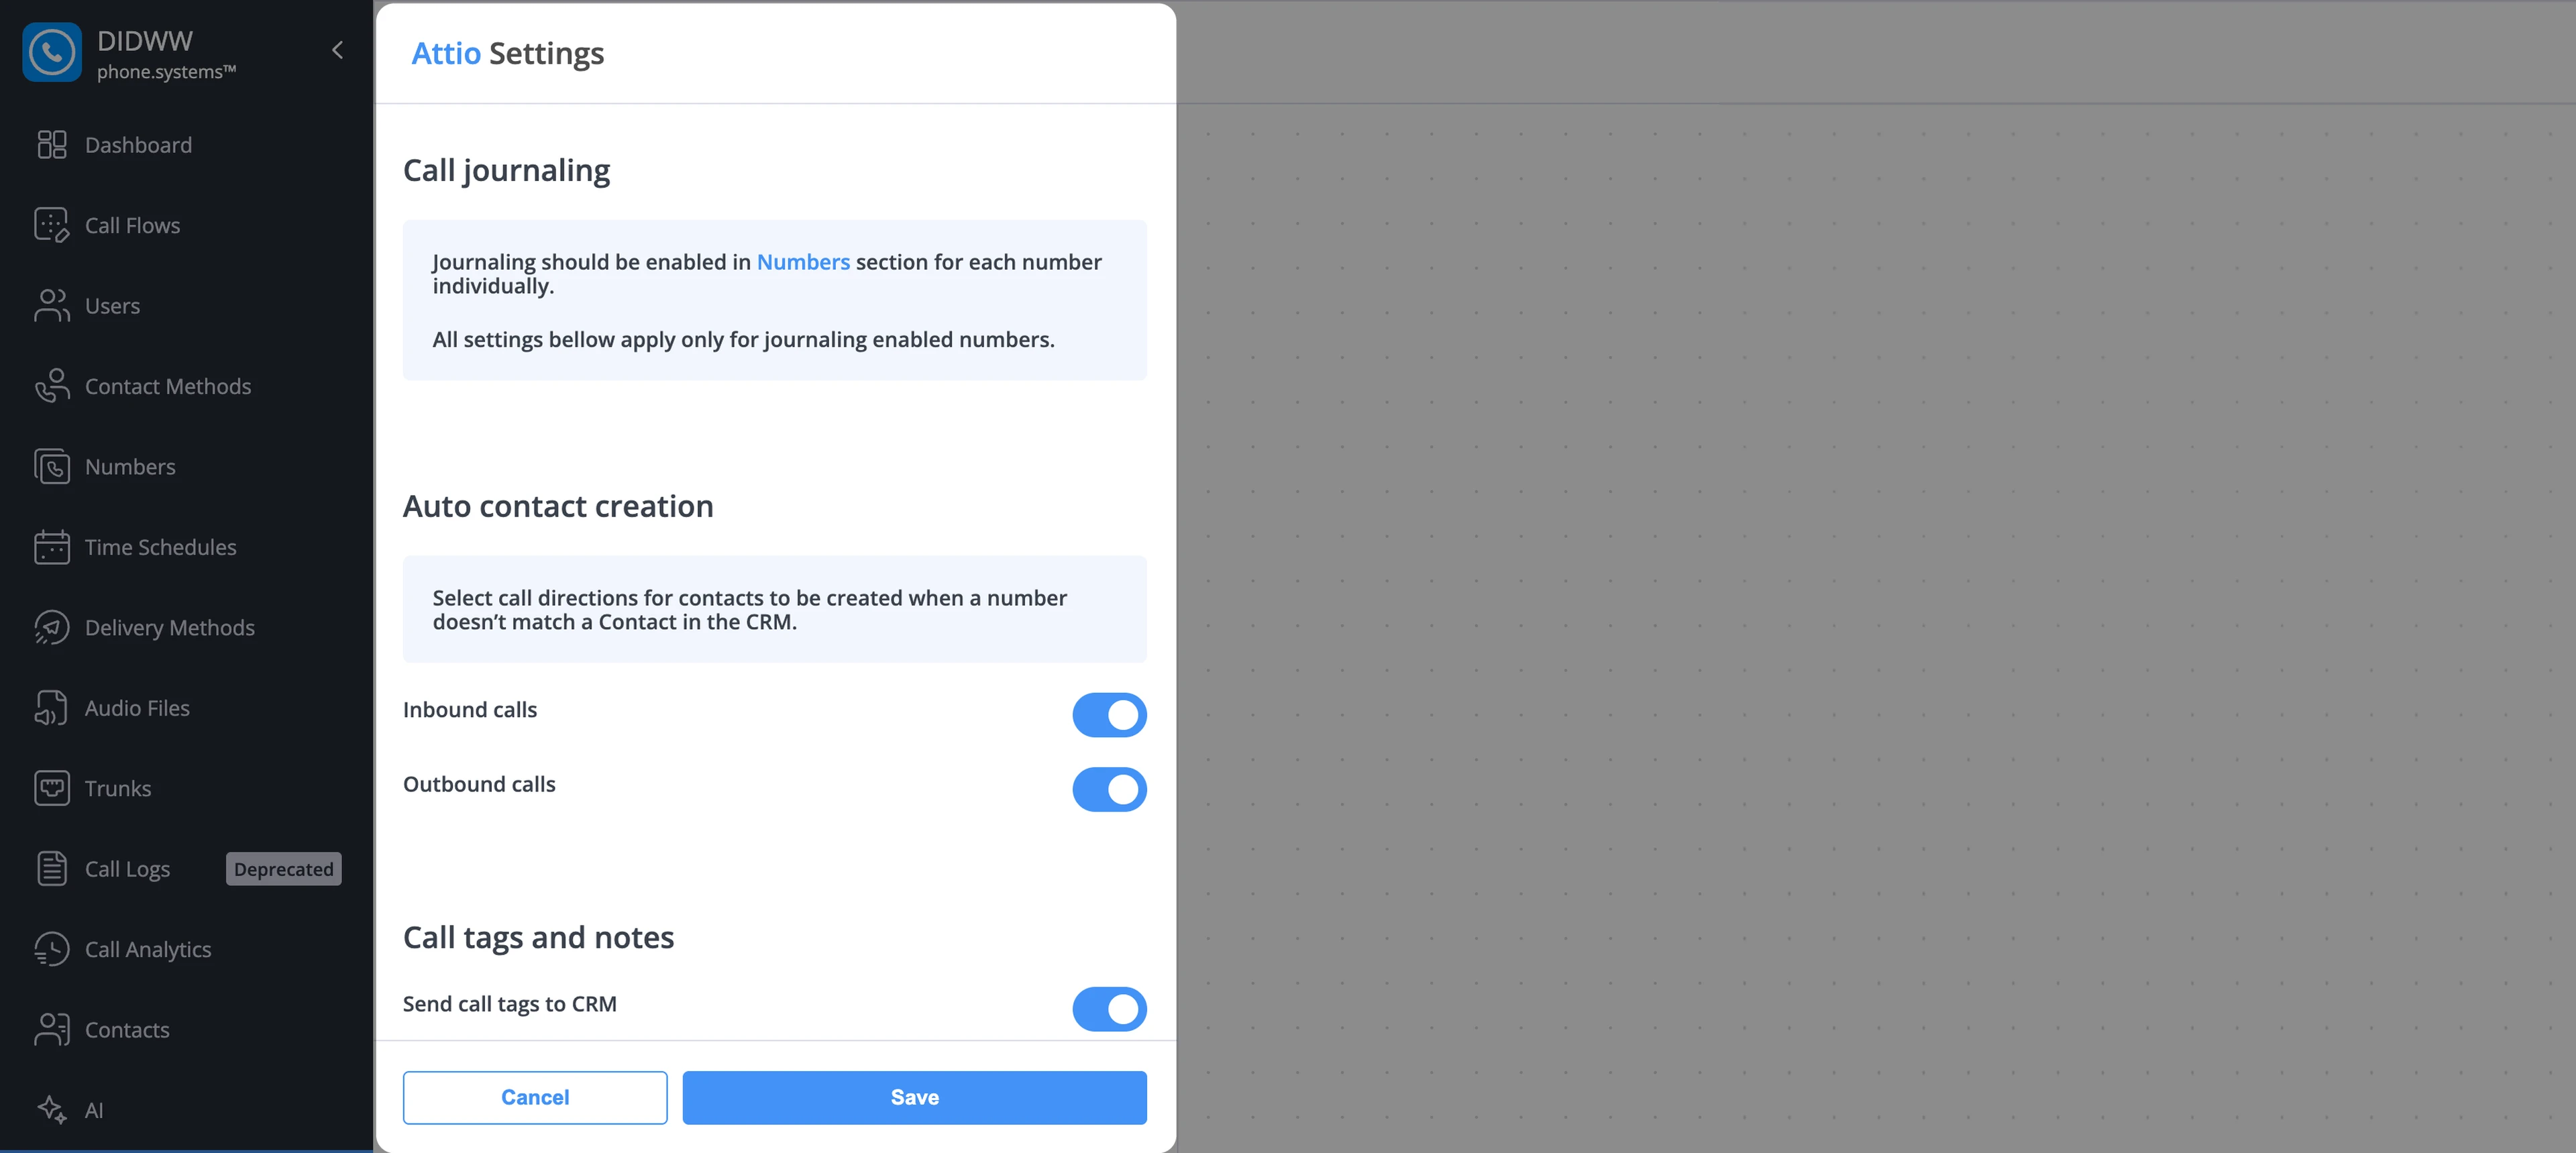
Fig. 15. Attio integration settings menu#
Call journaling#
Important
Each phone number must be configured individually for call journaling.
Auto Contact Creation, Call Tags and Notes, and Other Settings apply only for numbers with enabled call journaling.
Call journaling automatically logs inbound and outbound calls as notes on related people in Attio.
In the phone numbers menu, enable inbound and outbound call journaling separately for each required number.
Open the related person’s record in Attio to view the journaled call note. The note contains the call direction, source and destination numbers, the duration for answered calls, and the agent. The selected AI Call Insights results are included when available and enabled in the integration settings.
The call must match a person already synchronized into phone.systems™, or automatic contact creation must create a person first. The integration does not search Attio by phone number when journaling a call. A person that exists in Attio but has not yet synchronized into phone.systems™ is treated as unknown.
Auto contact creation#
This feature automatically creates a new person in Attio when a call is handled from a number that does not match an existing contact.
Both options are disabled by default. Enable each call direction for which you want new people to be created.
Setting |
Description |
|---|---|
Inbound calls |
Create a person for inbound calls from unknown numbers. |
Outbound calls |
Create a person for outbound calls to unknown numbers. |
Important
Calls are logged in Attio only on synchronized people or people created automatically for the call. For an unknown number, enable auto contact creation for the required call direction.
A person created automatically is named Automatically Created and has only the phone number. You can rename the person in Attio.
Contacts synchronized from Attio cannot be edited or deleted in phone.systems™. Make changes to these people in Attio.
Call Tags and Notes#
Send the call tags and the call note that agents add to a call to the matching call note in Attio.
Setting |
Description |
|---|---|
Send call tags to CRM |
When enabled, the call’s tags are sent to Attio. |
Send call notes to CRM |
When enabled, the call note written by the agent is sent to Attio. |
Both settings are disabled by default and work independently. They are not part of AI Call Insights and do not require an AI plan.
Tags and notes are sent when the call is logged in Attio, and the call note is updated if they change later.
phone.systems™ adds the tags and the agent’s call note to the Attio note on a Tags: line and a Notes: line. A line is added only when the call has tags or a note. Tags are sent as text because Attio call notes do not have a tag field for these labels.
Warning
The call note is free text written by the agent. It is sent to Attio exactly as written and is not covered by call recording PII redaction.
When the tags or the note change, phone.systems™ replaces the whole call note in Attio. Changes that you made to that note in Attio are overwritten.
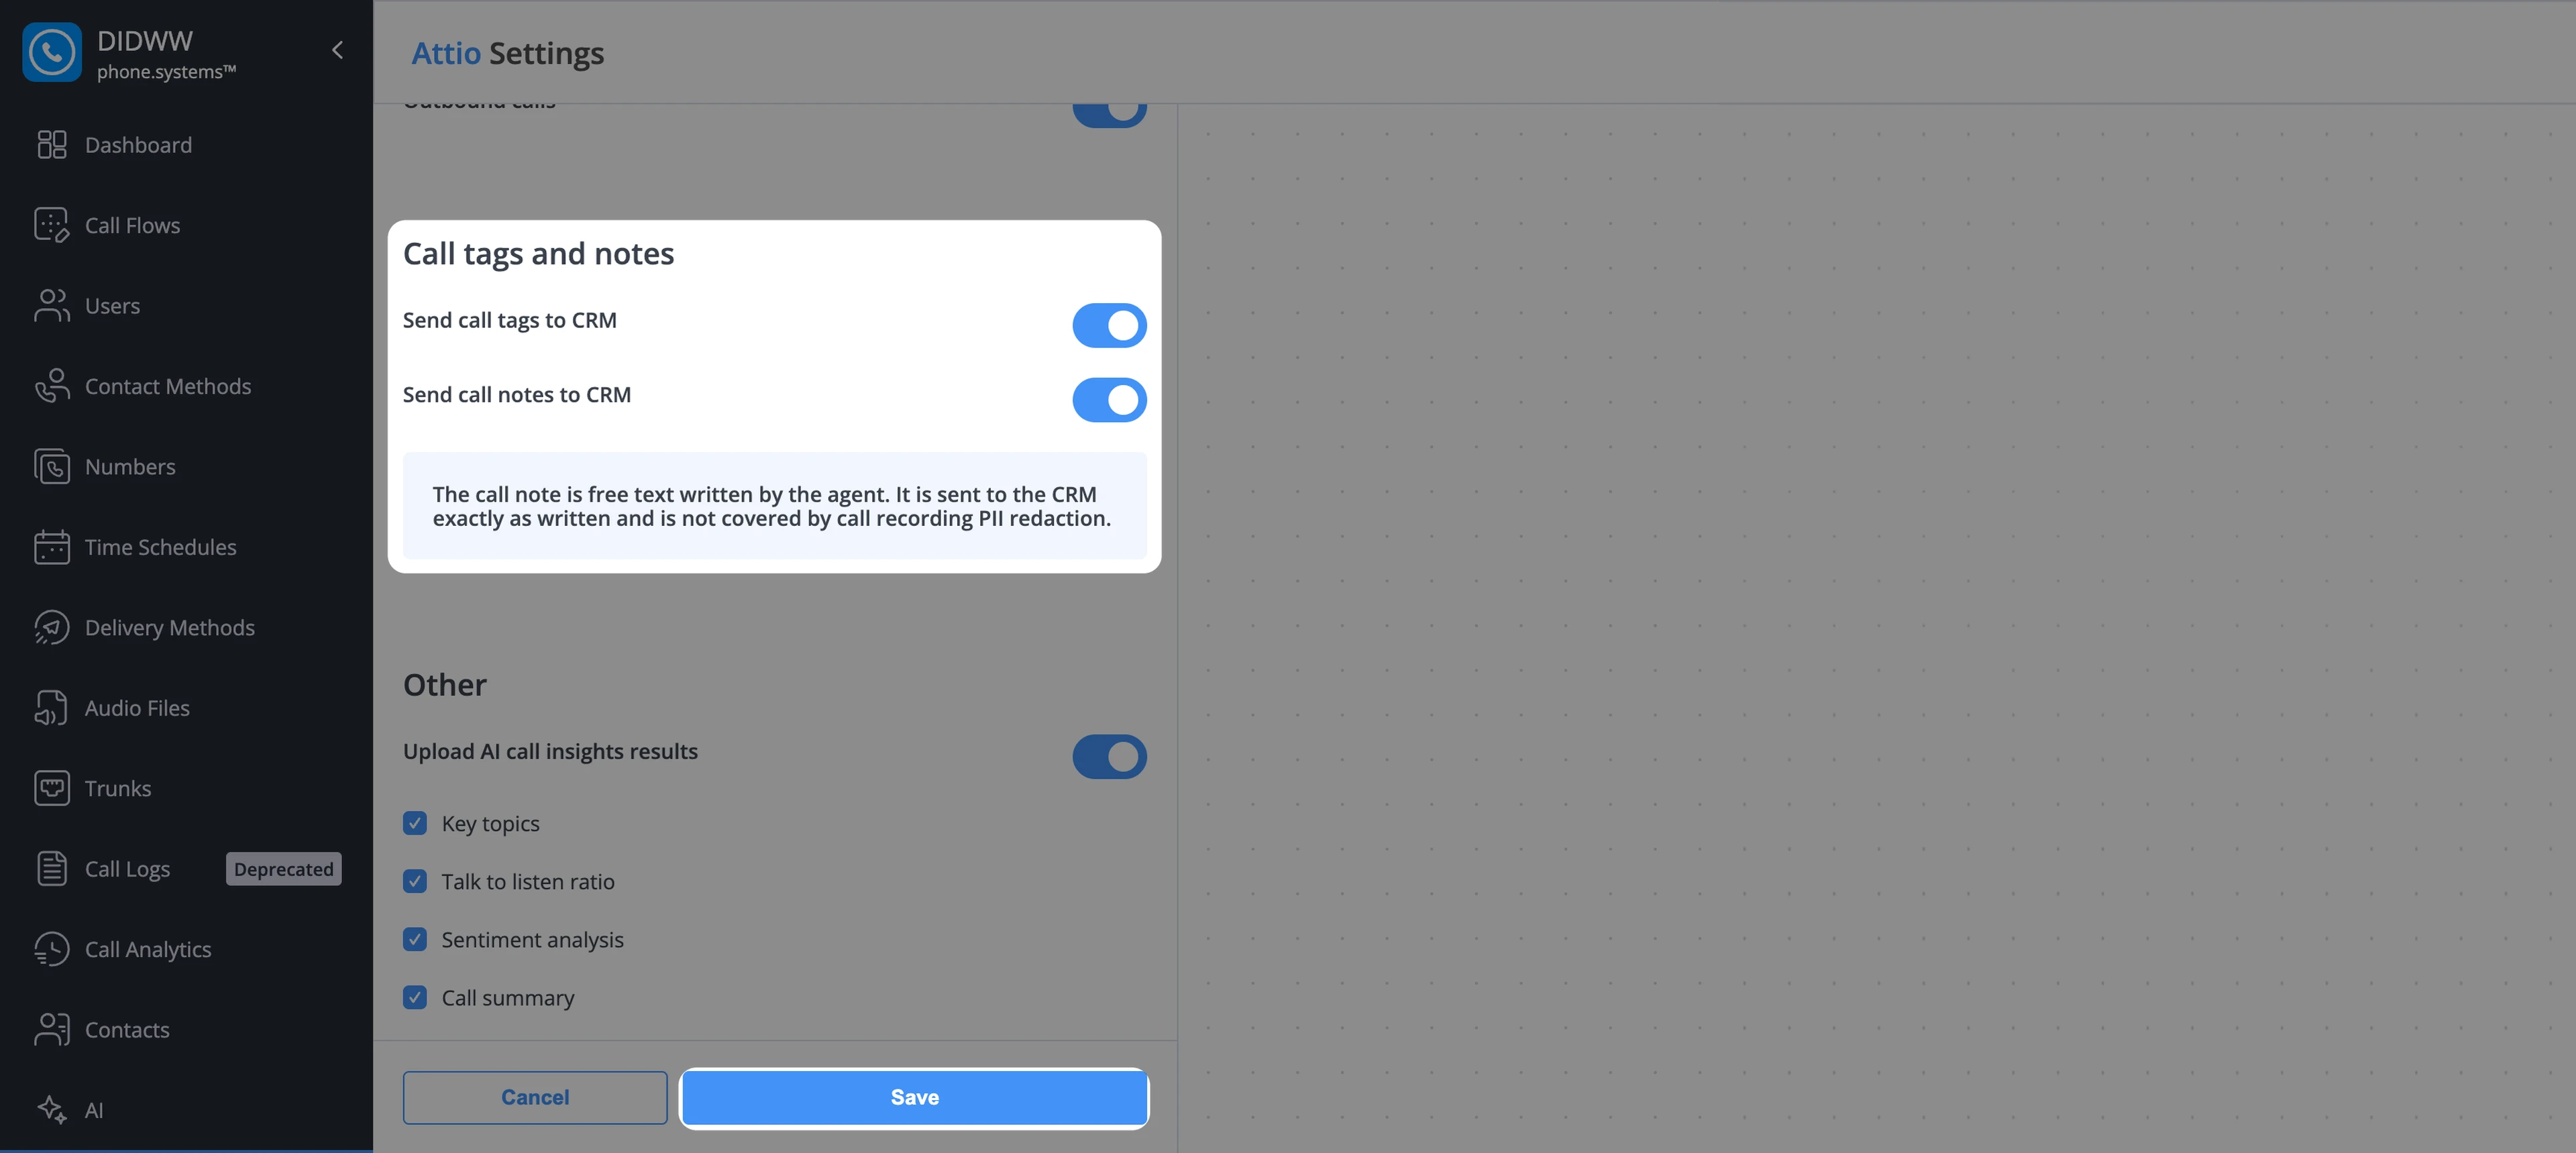
Fig. 16. Call tags and notes settings#
Other settings#
These settings control what additional call-related data is automatically uploaded to Attio.
Setting |
Description |
|---|---|
Upload AI call insights results |
When enabled, detailed analytics from our AI engine will be added to the call note. This can include:
|
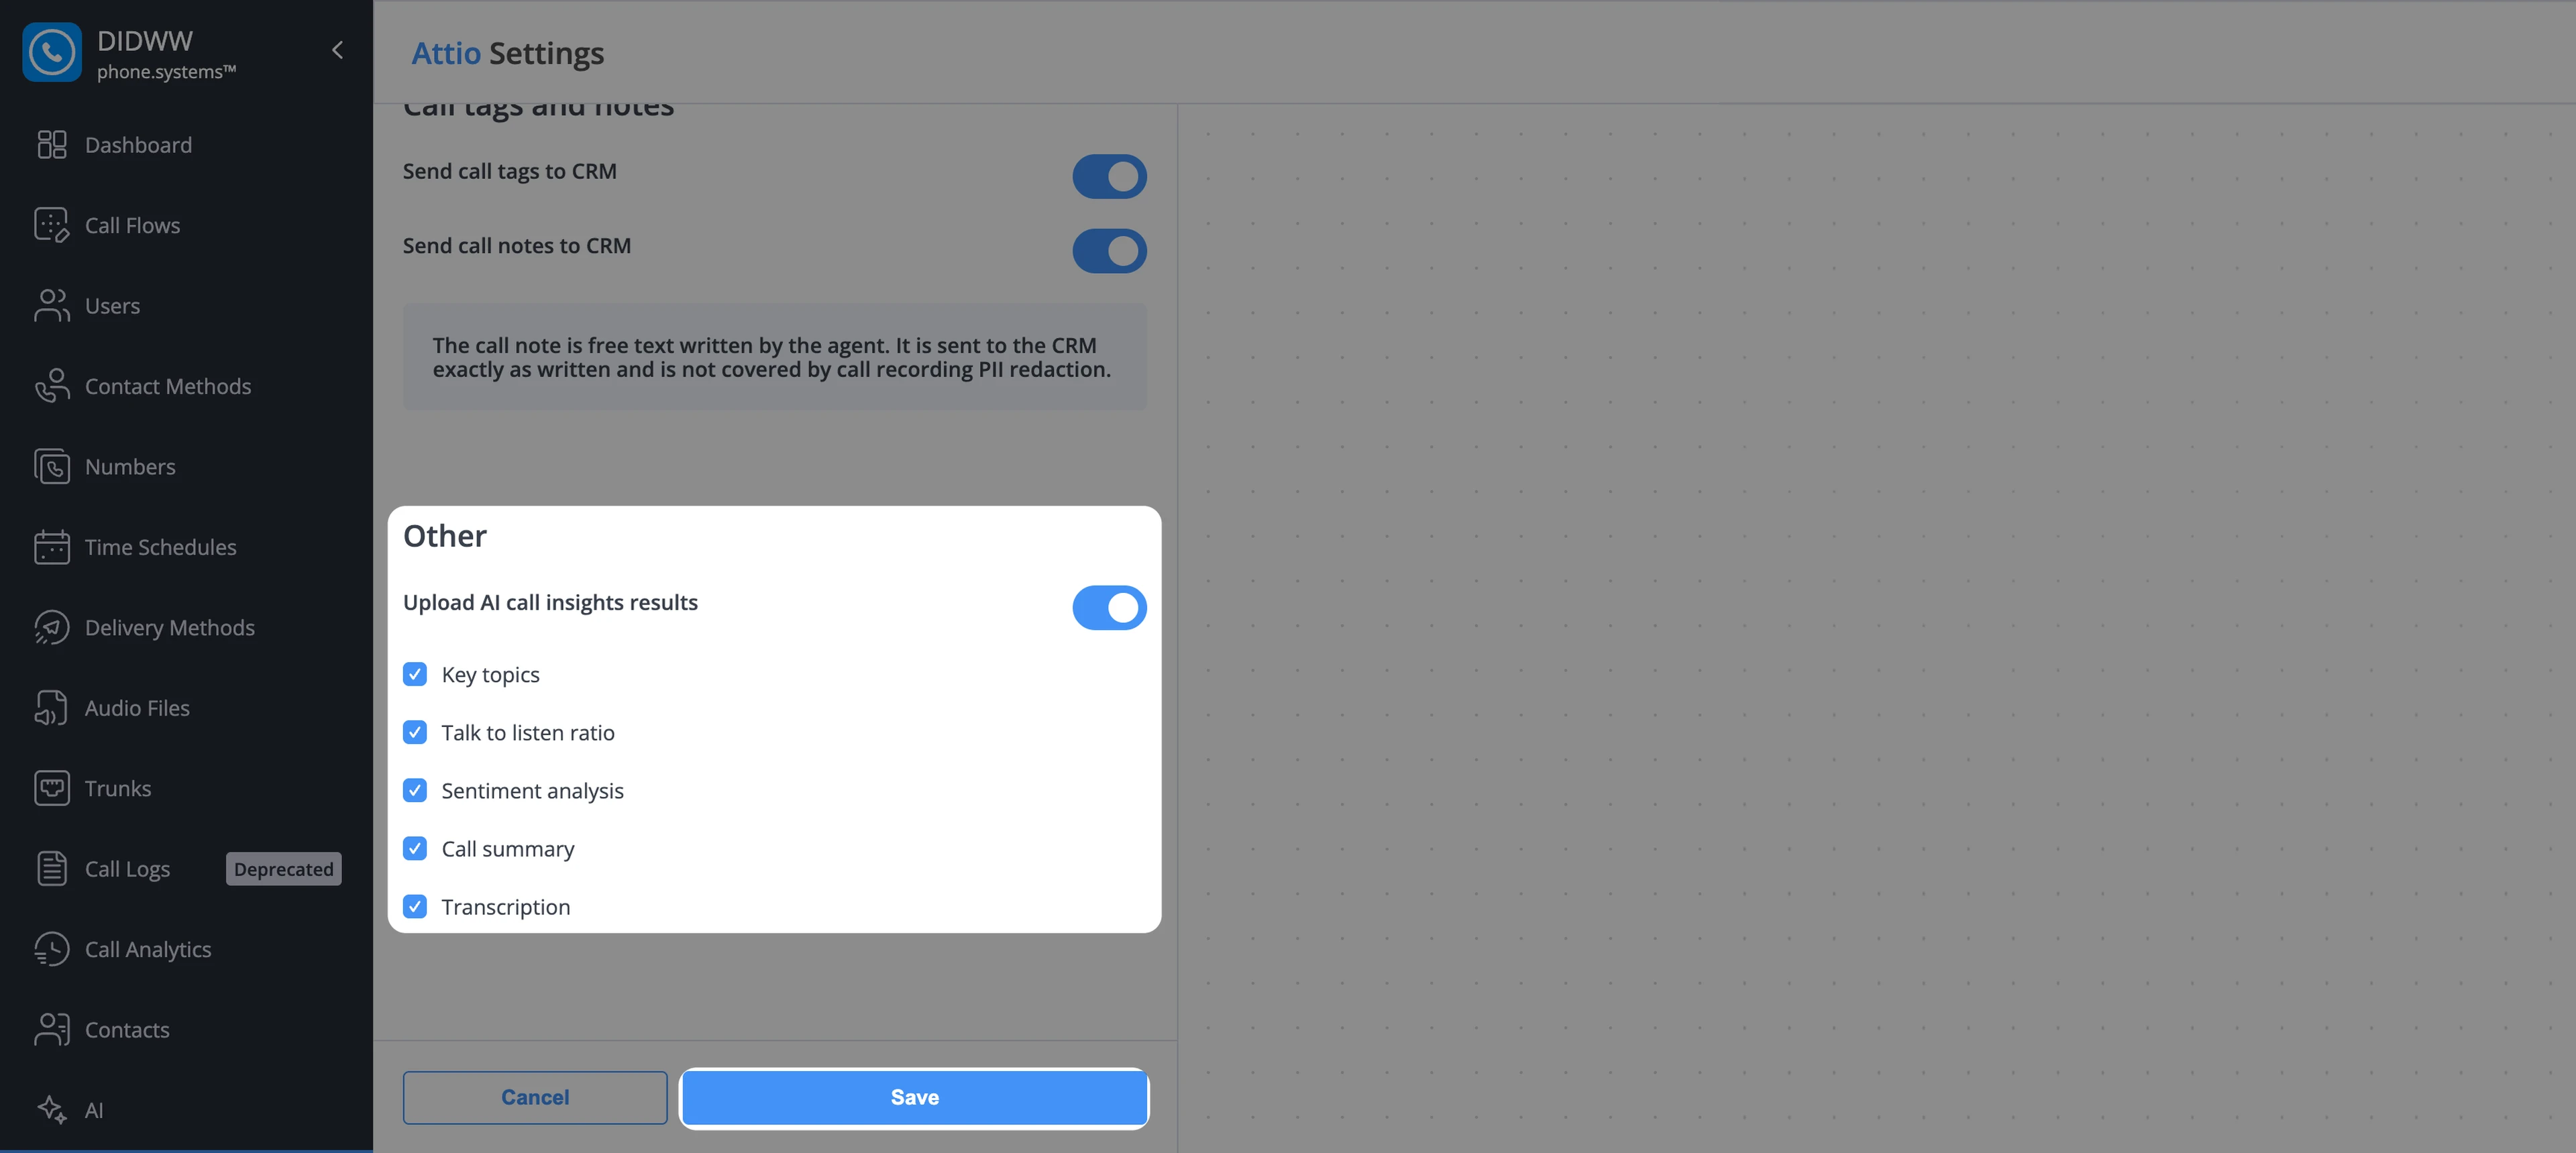
Fig. 17. Other settings#
After configuring these options, click Save to apply your changes.
Important
To utilize the AI features, AI Call Insights must be enabled.
Call recordings are not uploaded to Attio.