Control Panel
phone.systems™ is quickly and easily configured via a graphical web interface, with drag-and-drop objects being connected together to define the call flows and the functionality of the PBX.
The components used in building phone.systems™ applications are as follows:
Object - there are a number of different objects, with each object performing a specified PBX function such as voicemail, time routing or conferencing.
Object Menu - a menu listing the various objects that are used in building the call flow.
Feature Menu - a menu listing options for managing important supplementary phone.systems™ components such as phone numbers, internal numbers, contacts, media, inbound and outbound trunks, file delivery methods, feature codes, Interlinks and for accessing call logs.
Call Flows - an area where you may separate your PBX configurations based on recipients, for example - sales, support, etc.
Workspace - an area where the objects are placed and the call flows assembled.
Workspace Tab Menu - for displaying different pages of the PBX workspace.
Trash Bin - for removing objects from the workspace.
Cables - used to logically connect objects together to define call flows.
The phone.systems™ configuration screen consists of the following main components: the Feature Menu where all of the phone.systems™ features can be found, the center Workspace where the PBX logic is assembled, the Object Menu on the right-hand side of the screen, the Workspace Tab Menu along the top of the screen, and Trash Bin (when activated) in the lower right-hand corner.
Additionally, this screen includes options for managing and editing call flows.
Fig. 1. phone.systems™ Layout
Call Flows
Call Flows are used to differentiate the recipients for calls and specific configurations.
In most cases, call flows should be created based on the organizations departments, such as Sales, Support, Billing, and others.
Fig. 1. Call Flows Tab
Create Call Flows
To create a new call flow, click on the
 on the bottom right of the screen.
You will be taken to the new call flow creation screen, where you need to:
Select a Name for the call flow.
Add Users.
Finally, click Save to create the call flow.
Fig. 2. Creating Call Flows
If you have multiple call flows and would like to navigate between them quickly, click the call flow name at the top of the UI. This will reveal shortcuts for all your available call flows.
Fig. 3. Switching Between Call Flows
Edit Call Flows
To edit an existing call flow, click the
 button and select Edit.
Fig. 4. Edit Actions Button
Make the necessary changes and click Save to update your call flow.
Fig. 5. Editing a Call Flow
Delete Call Flows
To delete an exiting call flow, click on the
 button and select Delete.
Fig. 6. Delete Actions Button
Warning
Please note that once deleted, it will not be possible to restore the call flow. All associated data and settings will be lost.
Then, click the Delete button to confirm the deletion of the call flow.
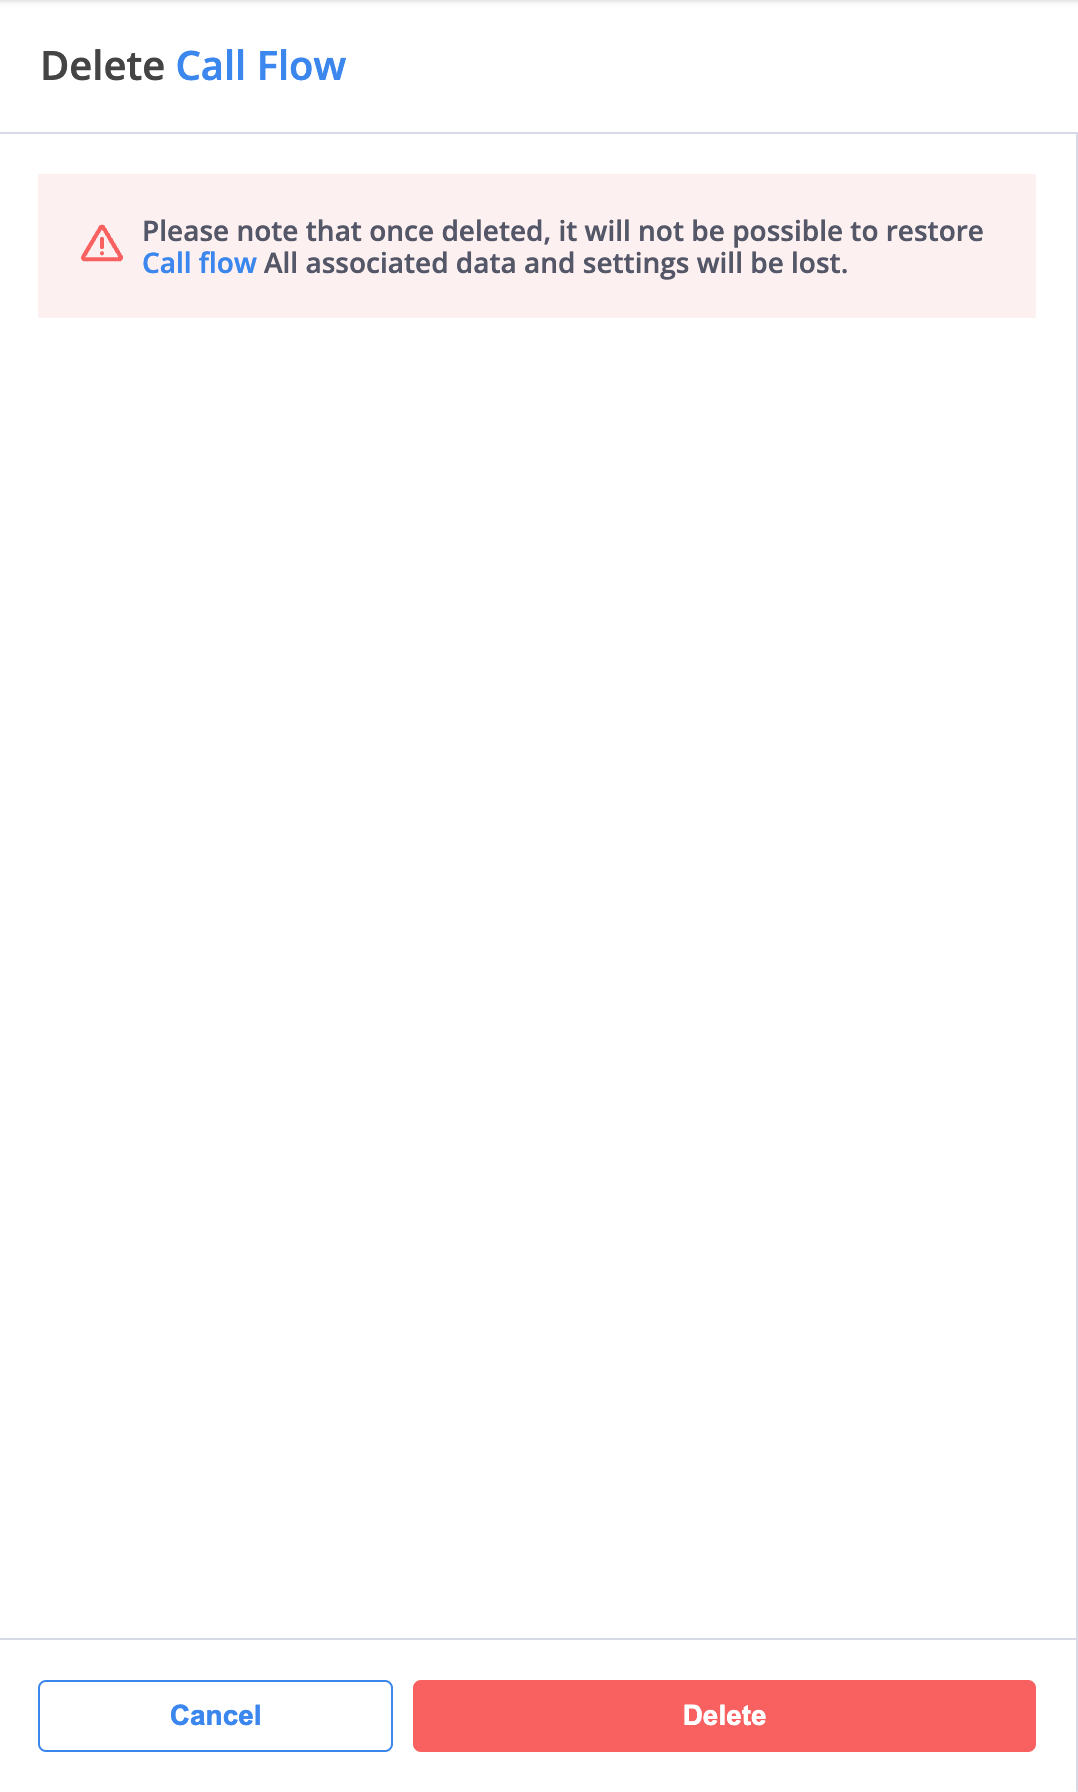
Fig. 7. Deleting a Call Flow
Manage Users for existing Call Flows
To add or remove users from your existing call flows, follow these steps:
Edit the existing call flow.
To edit an existing call flow, click the
 button and select Edit.

Fig. 8. Actions button
Add or remove users from the call flow.
Save the call flow.
Fig. 9. Managing Users
Workspace
The workspace is used to assemble call flows. Objects are dragged from the Object Menu onto the workspace, configured, and then logically connected via cables to build the required voice system.
To select an object, position the mouse over the required object in the menu. Drag that object from the menu over the workspace, and release it where required.
Fig. 1. Object On The Workplace
Once objects are positioned on the workspace, a configuration dialog box will be automatically opened on the right-hand side of the workspace. All required fields must be completed, and then the object is saved onto the workspace by pressing the Save button.
Fig. 2. Saving The Object
Objects positioned on the workspace may be dragged and repositioned as needed.
Search
The search tool is used to find related phone.systems™ resources with a single search request. It is effectively a combination of the existing search capabilities, with the addition of the ability to search for associated objects, contacts, delivery methods and phone numbers.
To begin the search, click on the
 icon in the Workspace tab menu
to activate the search window.
Fig. 1. Search Tool
In the search field, type in the name of the resource to be located and click the Search button. Once the search has been completed, all results will be displayed and grouped by resource type.
Fig. 2. Searching A Name
The
![]() and
and
![]() buttons allow you to locate the object on the workspace or access the resource’s settings window.
buttons allow you to locate the object on the workspace or access the resource’s settings window.
Objects
There are a number of different objects, each performing a specific function or set of functions. These objects may be arranged and inter-connected in a wide variety of combinations, with calls being passed from one object to another as required.
Objects are dragged from the Object Menu onto the workspace, and once an object has been added to the workspace, it must be configured. Configuration options for all objects are specified in the section Object Configuration
Each object has either one or two sockets which are shown as small protrusions on the left and/or right-hand sides of the object, and these sockets are used for connecting the objects together via cables. The left-hand socket acts as the input to an object, while the right-hand socket acts as the output from that object
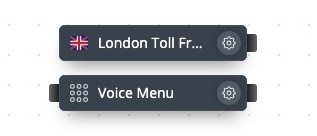
Fig. 1. Objects
Duplicating objects
phone.systems™ includes the ability for users to duplicate objects on the workspace. All configuration parameters in the original object are copied to the new object, however the name of the new object is modified to include a copy number. For example, the first duplication of a Voice Menu object named “Voicemail” will be named “Voicemail Copy 1”.
To use this copy feature:
For MacOS, hold down the Option key when dragging an object.
For Windows, hold down the Ctrl key when dragging an object.
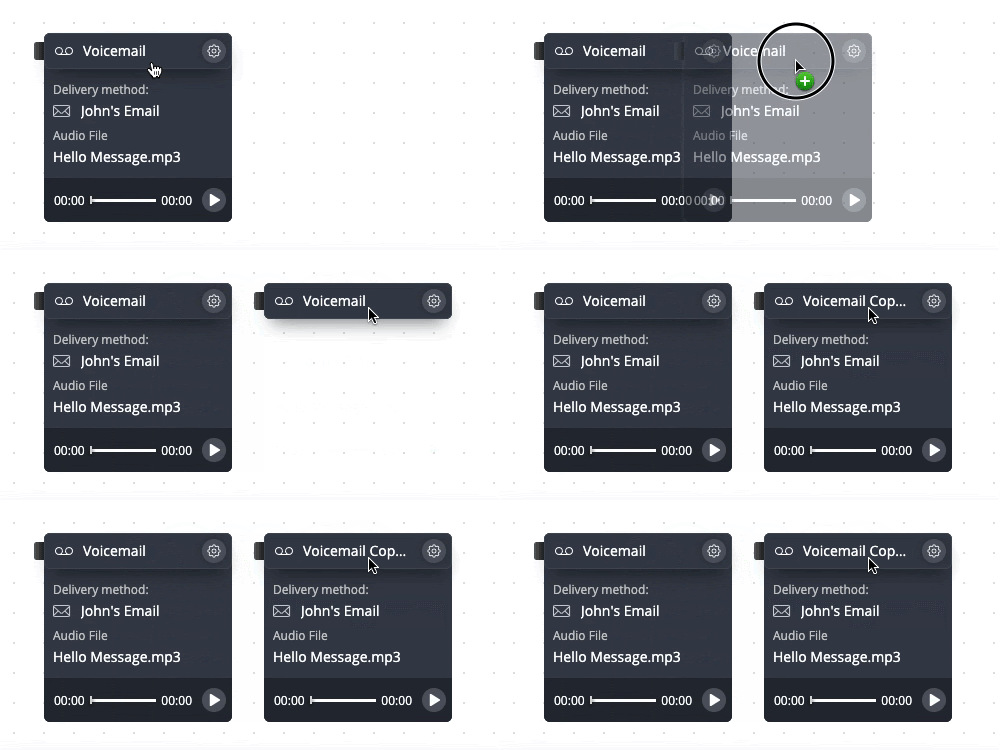
Fig. 2. Duplicating Objects
It is important to note that not all objects may be duplicated. For example, Phone Number and Internal Number objects are assigned unique phone/internal numbers and may therefore not be copied.
Selecting and moving multiple objects
phone.systems™ allows users to select multiple objects and reposition them simultaneously on the workspace, or move all of the selected objects to another tab. Once an object has been selected, it will be marked with a blue border.
To use the object selection feature:
MacOS - hold the Command key to select individual objects
MacOS - hold the Shift to select a complete object tree (objects connected by cables)
Windows - hold the Ctrl key to select individual objects
Windows - hold the Shift to select a complete object tree (objects connected by the cables)

Fig. 3. Selecting And Moving Objects
Use the same keys as listed above to deselect objects, or to exclude particular objects from the object tree selection. Clicking on an empty area on the workspace will deselect all previously selected objects or object trees. Additionally, selected object trees may be moved to the Trash Bin.
Cables
Cables are used to logically interconnect the objects that have been placed in the workspace area, thereby defining the call flows and the functionality of the PBX.
To create a cable, place the mouse over the right-hand socket of an object, and use the mouse to “drag” a cable from that socket towards the left-hand socket of the destination object.

Fig. 1. Dragging The Cable
Once the end of the cable is over the left-hand socket of the destination object, release the cable and the two objects will be logically connected as required.

Fig. 2. Connecting The Cable
Note
phone.systems™ includes an intelligent cabling configuration assistant that simplifies the connection logic between objects by highlighting possible cable attachment points. In the figure below, after a cable is generated from the Phone Number object, valid input connection options are shown by available objects with their left-hand sockets highlighted in blue. The cable can be connected to any of these sockets.
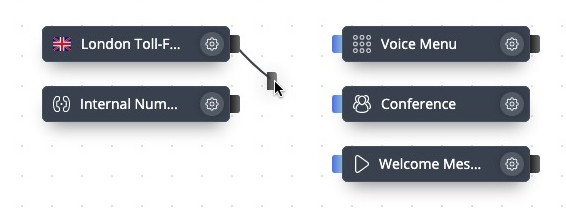
Fig. 3. Connection Options
To remove a cable and logically disconnect two objects, place the mouse
pointer over that cable until the “delete cable” icon
![]() appears.
Click on that icon to complete the removal of the cable.
appears.
Click on that icon to complete the removal of the cable.

Fig. 4. Delete Cable Icon
A “Delete Connection” window will appear, displaying the details of the object connection to be terminated. To complete the action, click the “Delete Anyway” button, or select the “Cancel” button to leave the connection unchanged.
Fig. 5. Deleting Connections
In some cases, multiple cables, each having a distinct logical function, may be generated from the exit (right-hand) socket of an object, and these cables are connected to various objects as required by the call flow. For example, when configuring a voice menu, there are three different logical options for the cables that are generated from the right-hand side of this object:
Calls are forwarded to objects according to the extension number entered by the caller.
Calls are forwarded to a specific object if the caller enters an invalid extension number.
Calls are forwarded to a specific object if the caller does not enter an extension number within a defined timeout period.
When a variety of logical functional options may be assigned to a single cable, then once the cable has been connected between two objects, a configuration window is automatically displayed that allows the user to select the required function for that cable.
The screenshot below illustrates the functionality of multiple cables exiting a Voice Menu object. After the voice message has been played to the caller, if the caller presses “100” then the call will be forwarded to the sales ring group, and if “200” is pressed, then the call will be forwarded to the support ring group. Invalid extension and timeout conditions (denoted as i and t respectively on the cables) are forwarded to specified Audio Playback objects where appropriate messages are played to the caller.

Fig. 6. Multiple Connections
Note that the allocated extension numbers may be changed by clicking on the configured number displayed on the cable. A configuration dialog window is opened, and a new extension number may be entered.
Similarly, some objects, such as Time Router or Caller Router, have two right hand (exit) sockets, which are used to implement a “Yes/No” call flow logic. For example, for a Time Routing object, a cable generated from the “Yes” (green) socket defines the routing of calls if those calls are received within the configured day/time interval, and the “No” (red socket) option defines routing in the case of a time period match failure.
In the illustration below using a Time Router object, if the incoming call is received within the configured day/time parameters, then the call will be forwarded to Sales. Otherwise, the call will be forwarded to an Audio Playback object where a pre-recorded “after-hours” message is played to the caller.

Fig. 7. Time Router Object Connections
It is important to note that if a cable is not connected from the left-hand (output) socket of an object to the right-hand (input) socket of another object, then a call will be terminated if the PBX logic attempts to pass that call to adjacent objects. For example, in the illustration below, an incoming call is forwarded to an Audio Playback object where a message is played to the caller. Because the right-hand side of the Audio Playback object does not have a cable connected to another object, the call will be terminated as soon as that message has been played.

Fig. 8. Audio Playback Object Connections
Trash Bin
The Trash Bin allows the user to delete objects that have been
previously placed on the workspace. To delete an object, drag that
object towards the
![]() or
or
![]() icon at the bottom right-hand
corner of the workspace. This icon will be replaced by the Trash Bin
icon
icon at the bottom right-hand
corner of the workspace. This icon will be replaced by the Trash Bin
icon
![]() , and the object to be deleted should be dragged and
dropped over the Trash Bin.
, and the object to be deleted should be dragged and
dropped over the Trash Bin.
Note that the Trash Bin does not have a recycling facility, and trashed items may not be recovered.


