monday and phone.systems™ Integration#
Connecting phone.systems™ with monday CRM allows you to manage customer calls and track important information. The integration includes the following features:
Sync contacts automatically: Keep contacts updated between phone.systems™ and monday CRM.
Call journaling: Calls are automatically logged in the monday CRM workspace (phone.systems™ board). You can also manually select a different board for journaling.
Auto contact creation: New contacts can be created in the monday CRM workspace when a number doesn’t match an existing contact (for inbound, outbound, or both call directions). You can choose which directions trigger contact creation.
Call recording uploads: Call recordings can be automatically added to the call entry in monday CRM.
Flexible synchronization options: Select a contact board and assign its columns in monday CRM to control how data is synchronized.
Connecting phone.systems™ with monday CRM#
This guide provides detailed steps on integrating phone.systems™ with monday CRM. Follow the instructions below to complete the setup process.
Note
To connect phone.systems™ with monday, generate the Client ID, Client Secret, and Signing Secret in your monday developer account.
Step 1: Sign in to your monday account#
To get started, go to the monday page and Log in to access an existing account or create a new one.
Step 2: Open monday Developers page and create an app#
Click on your user icon in the top right corner.
In the Account section, click Developers.
On the My Apps page of the monday Developer Center, click the Build app button to create a new app.

Fig. 1. Developers Account Section#
Step 3: Launch phone.systems™ and connect to monday CRM#
In the phone.systems™ interface, click Settings.
Open the CRM Integrations tab at the top of the screen. Alternatively, use this direct link: phone.systems™ monday CRM Integration
Click Connect to link your monday CRM app with phone.systems™.
Note
Clicking Connect will open the Connect monday form to continue the integration setup.
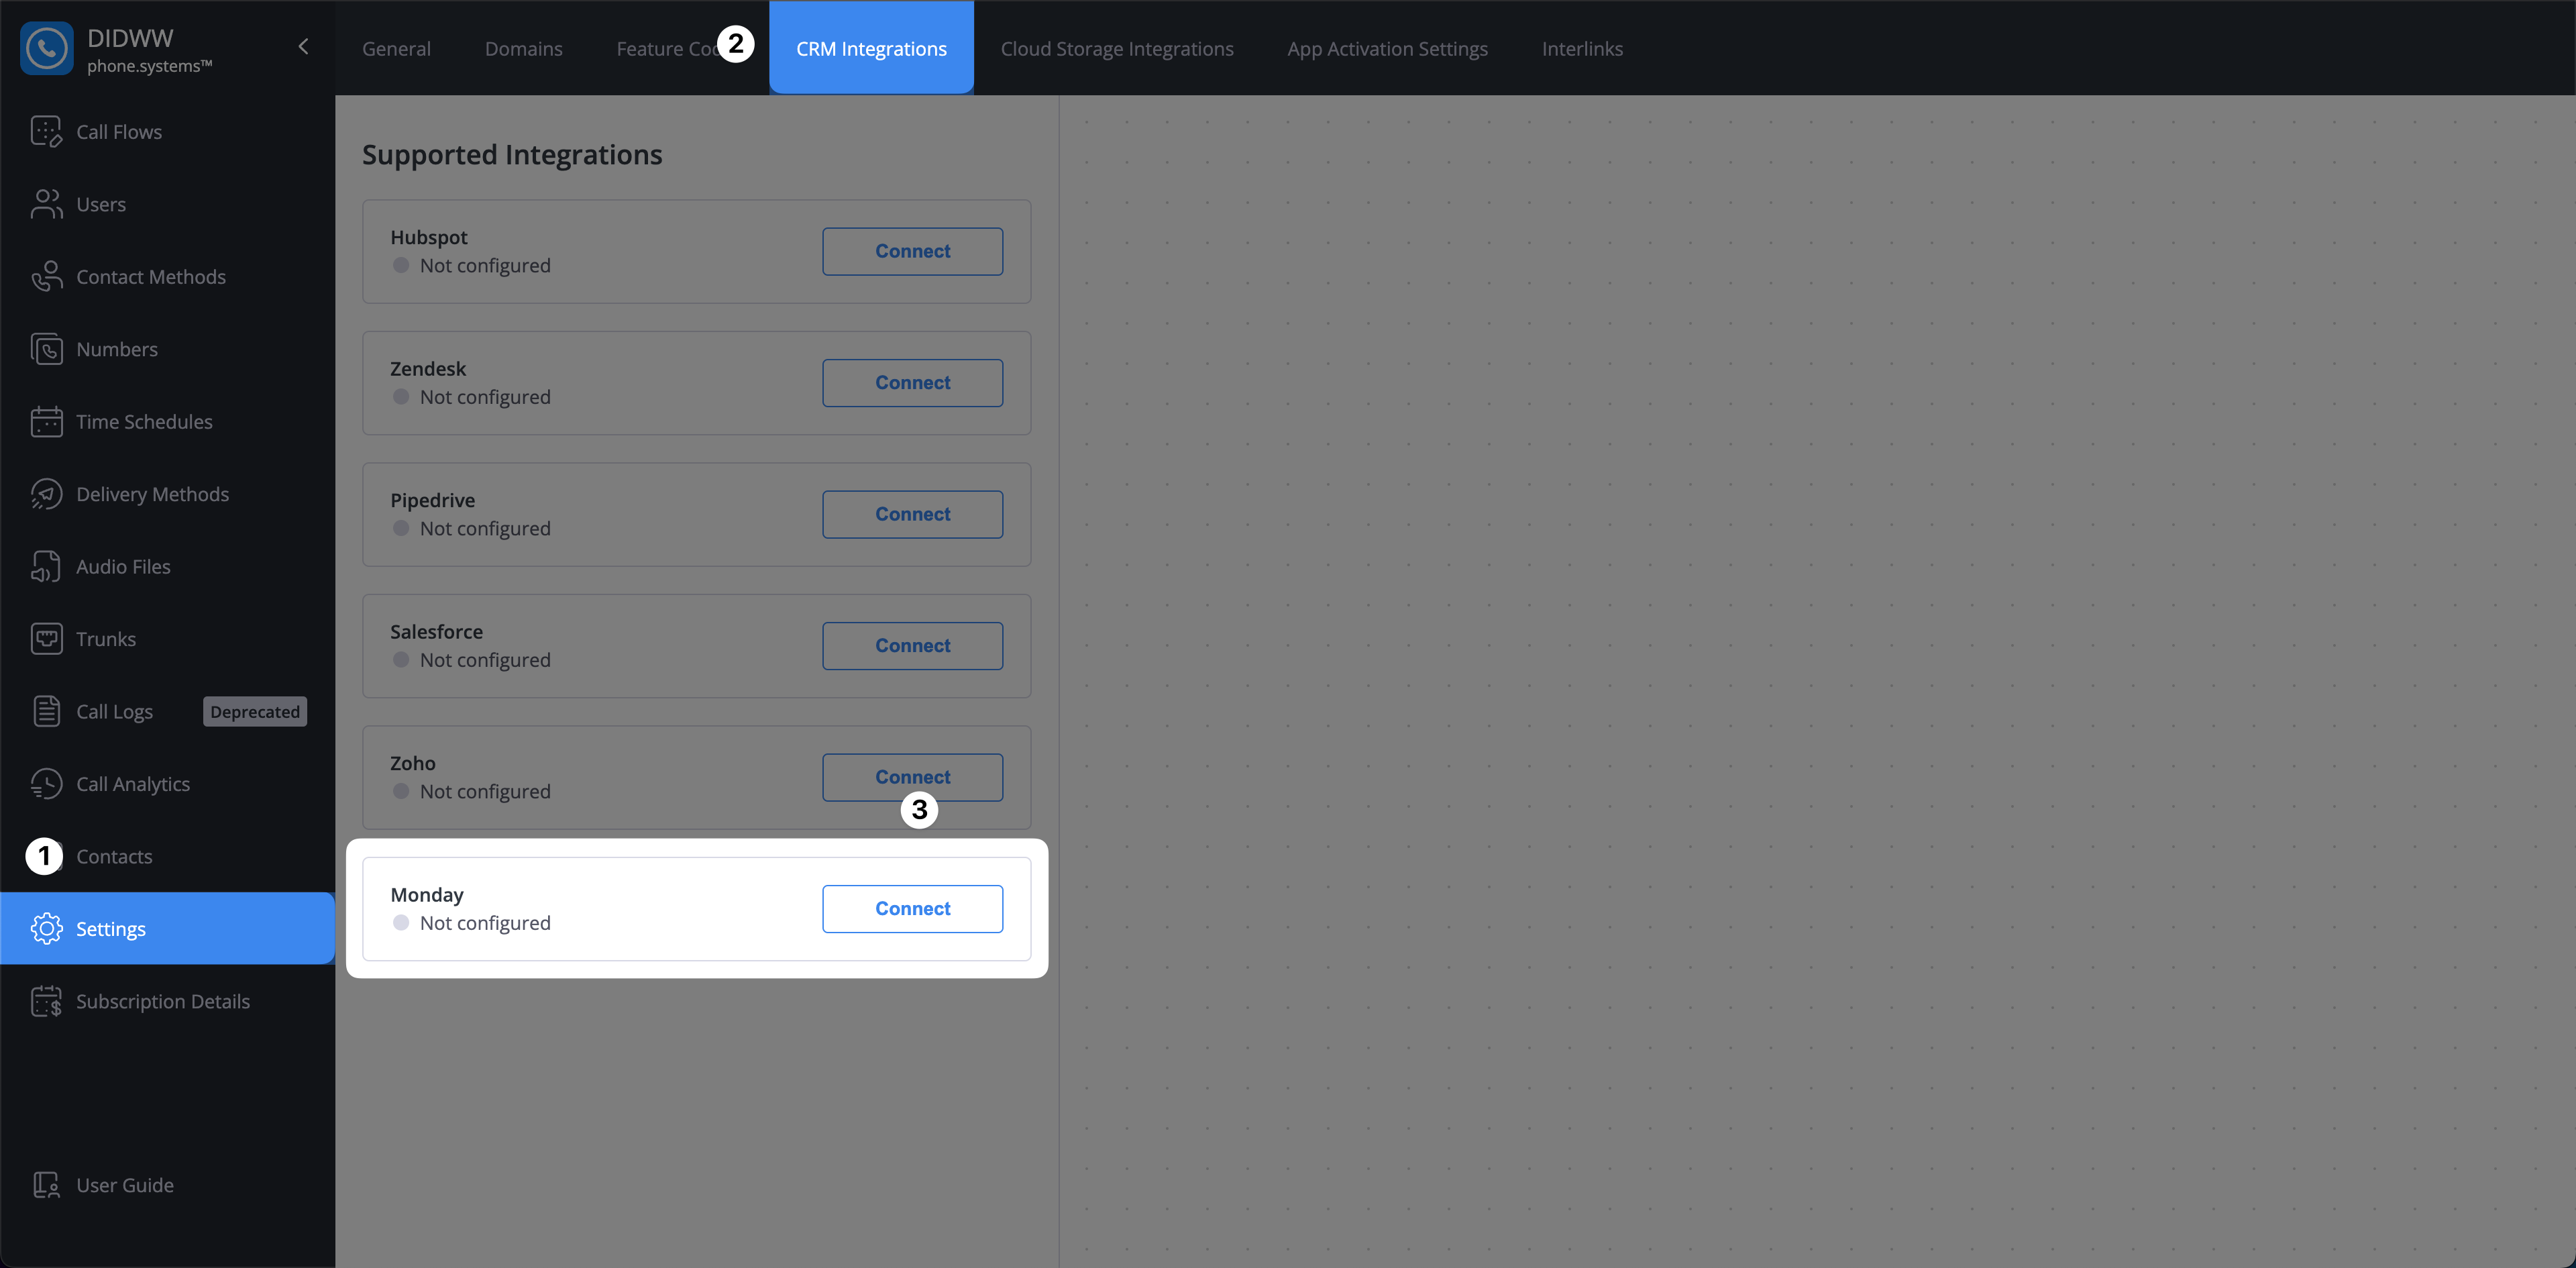
Fig. 3. Connect monday in phone.systems™#
Step 4: Copy app credentials from monday Developer Center and paste them into the phone.systems™#
Continue configuring the new app in the monday Developer Center. Navigate to the General settings section, click Show, and then copy the Client ID, Client Secret, and Signing Secret.
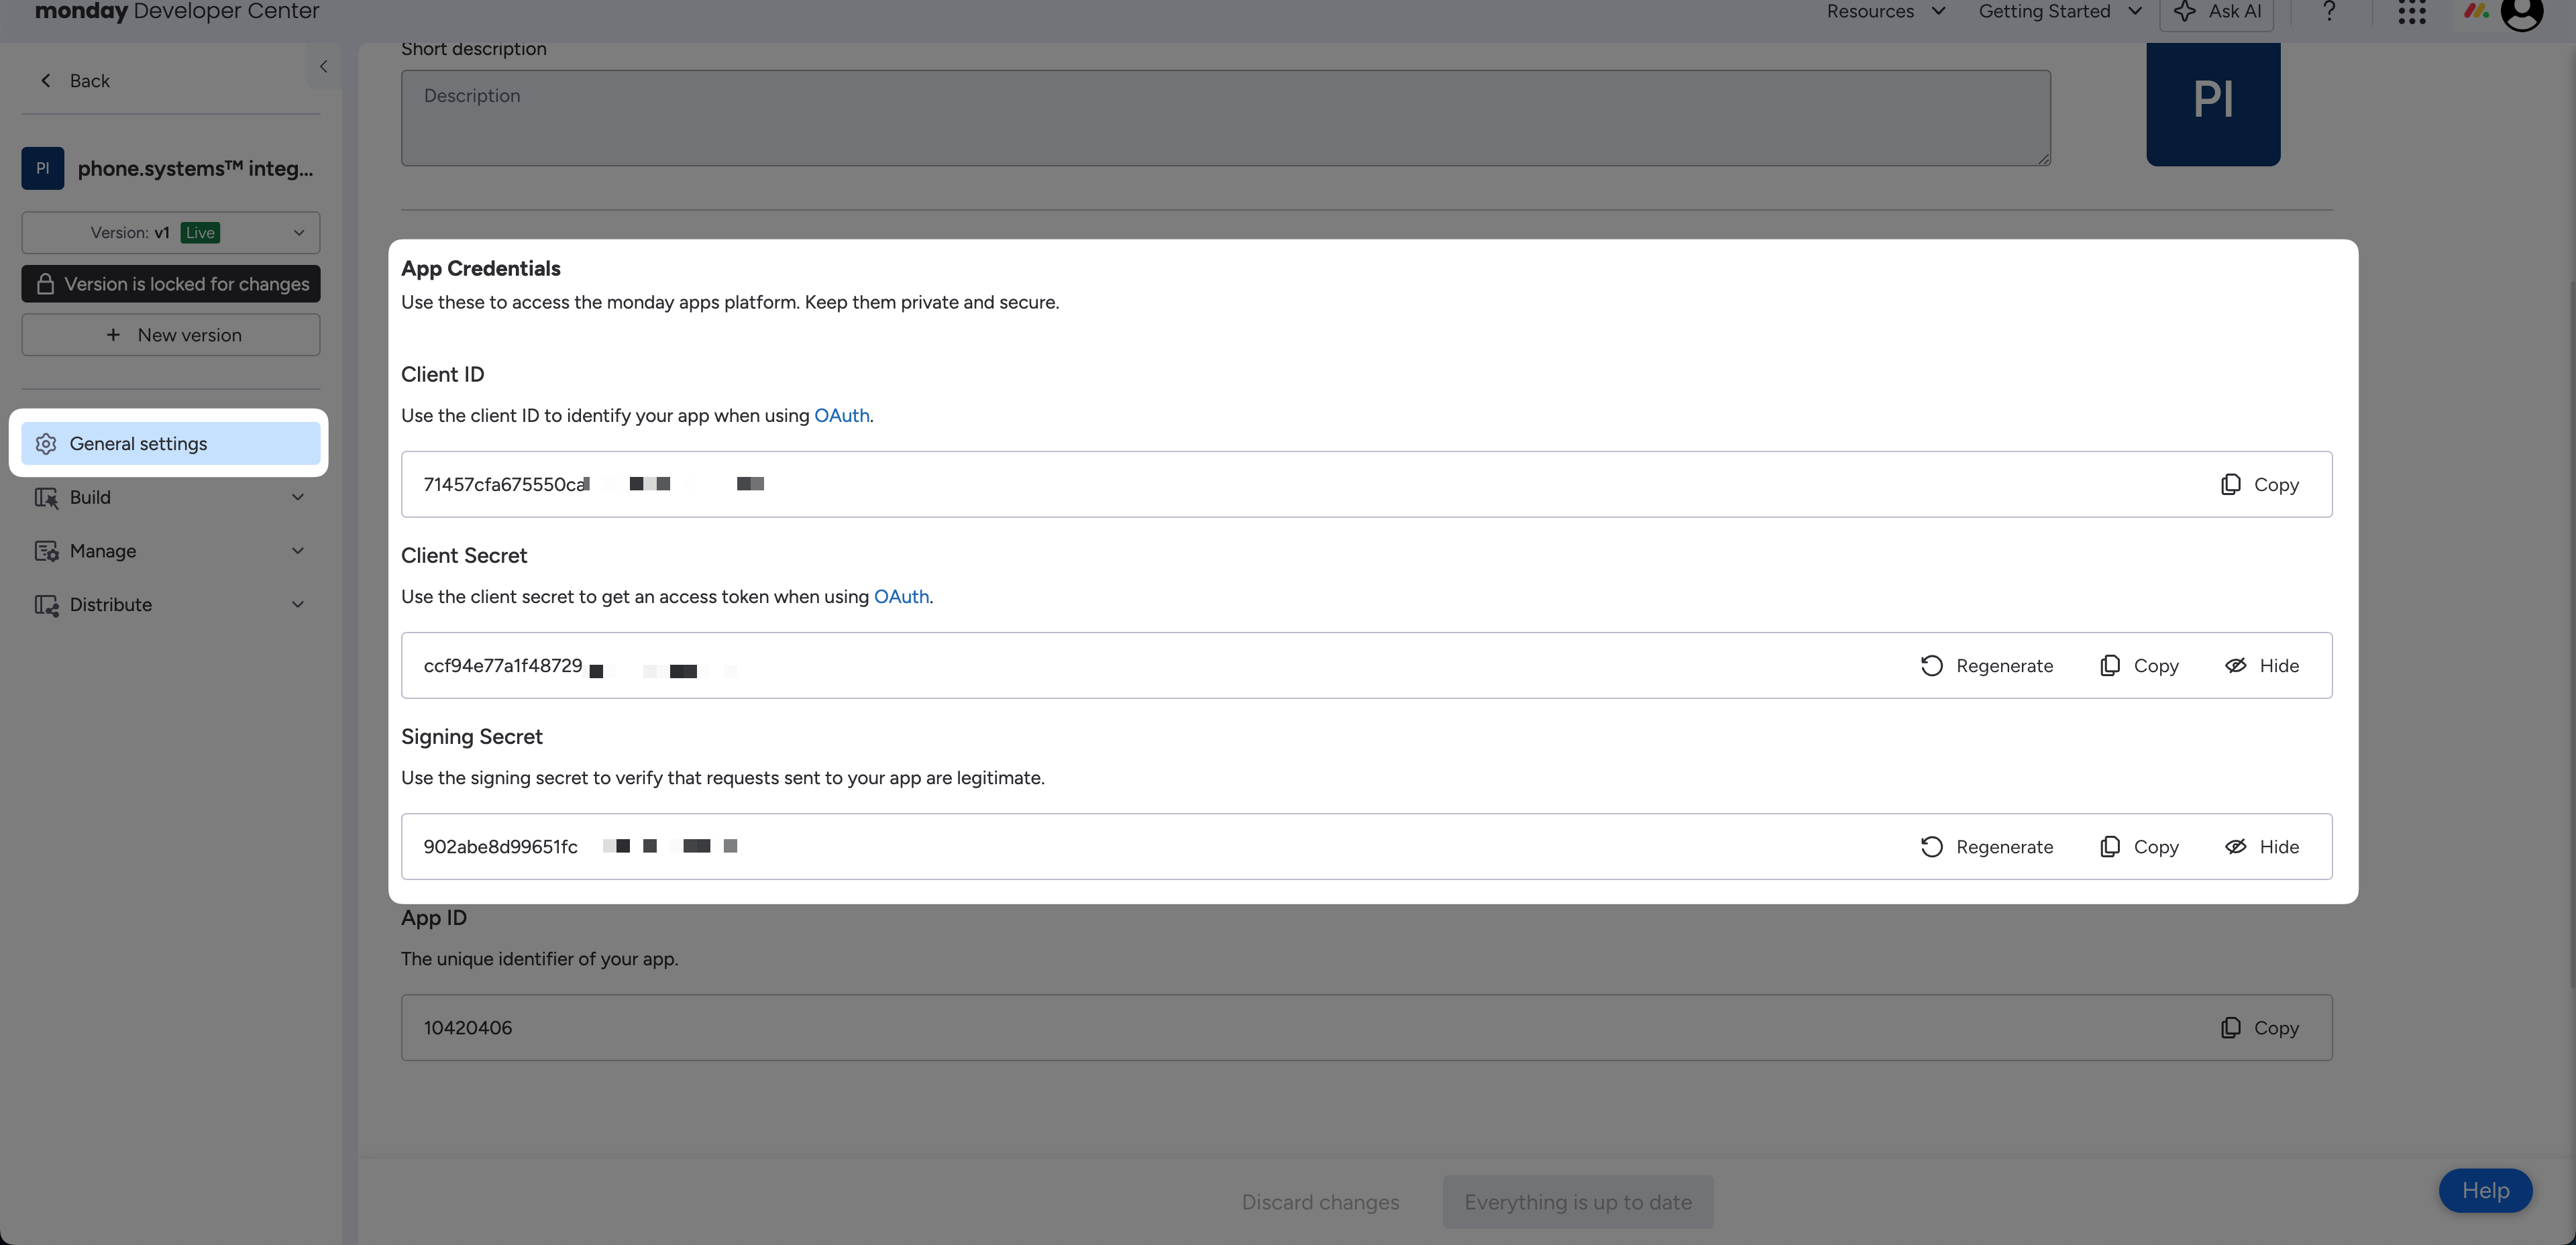
Fig. 8. Copy Client ID, Client Secret, and Signing Secret#
Open the phone.systems™ monday connection form , and paste the Client ID, Client Secret, and Signing Secret from the monday Developer Center into the corresponding fields.
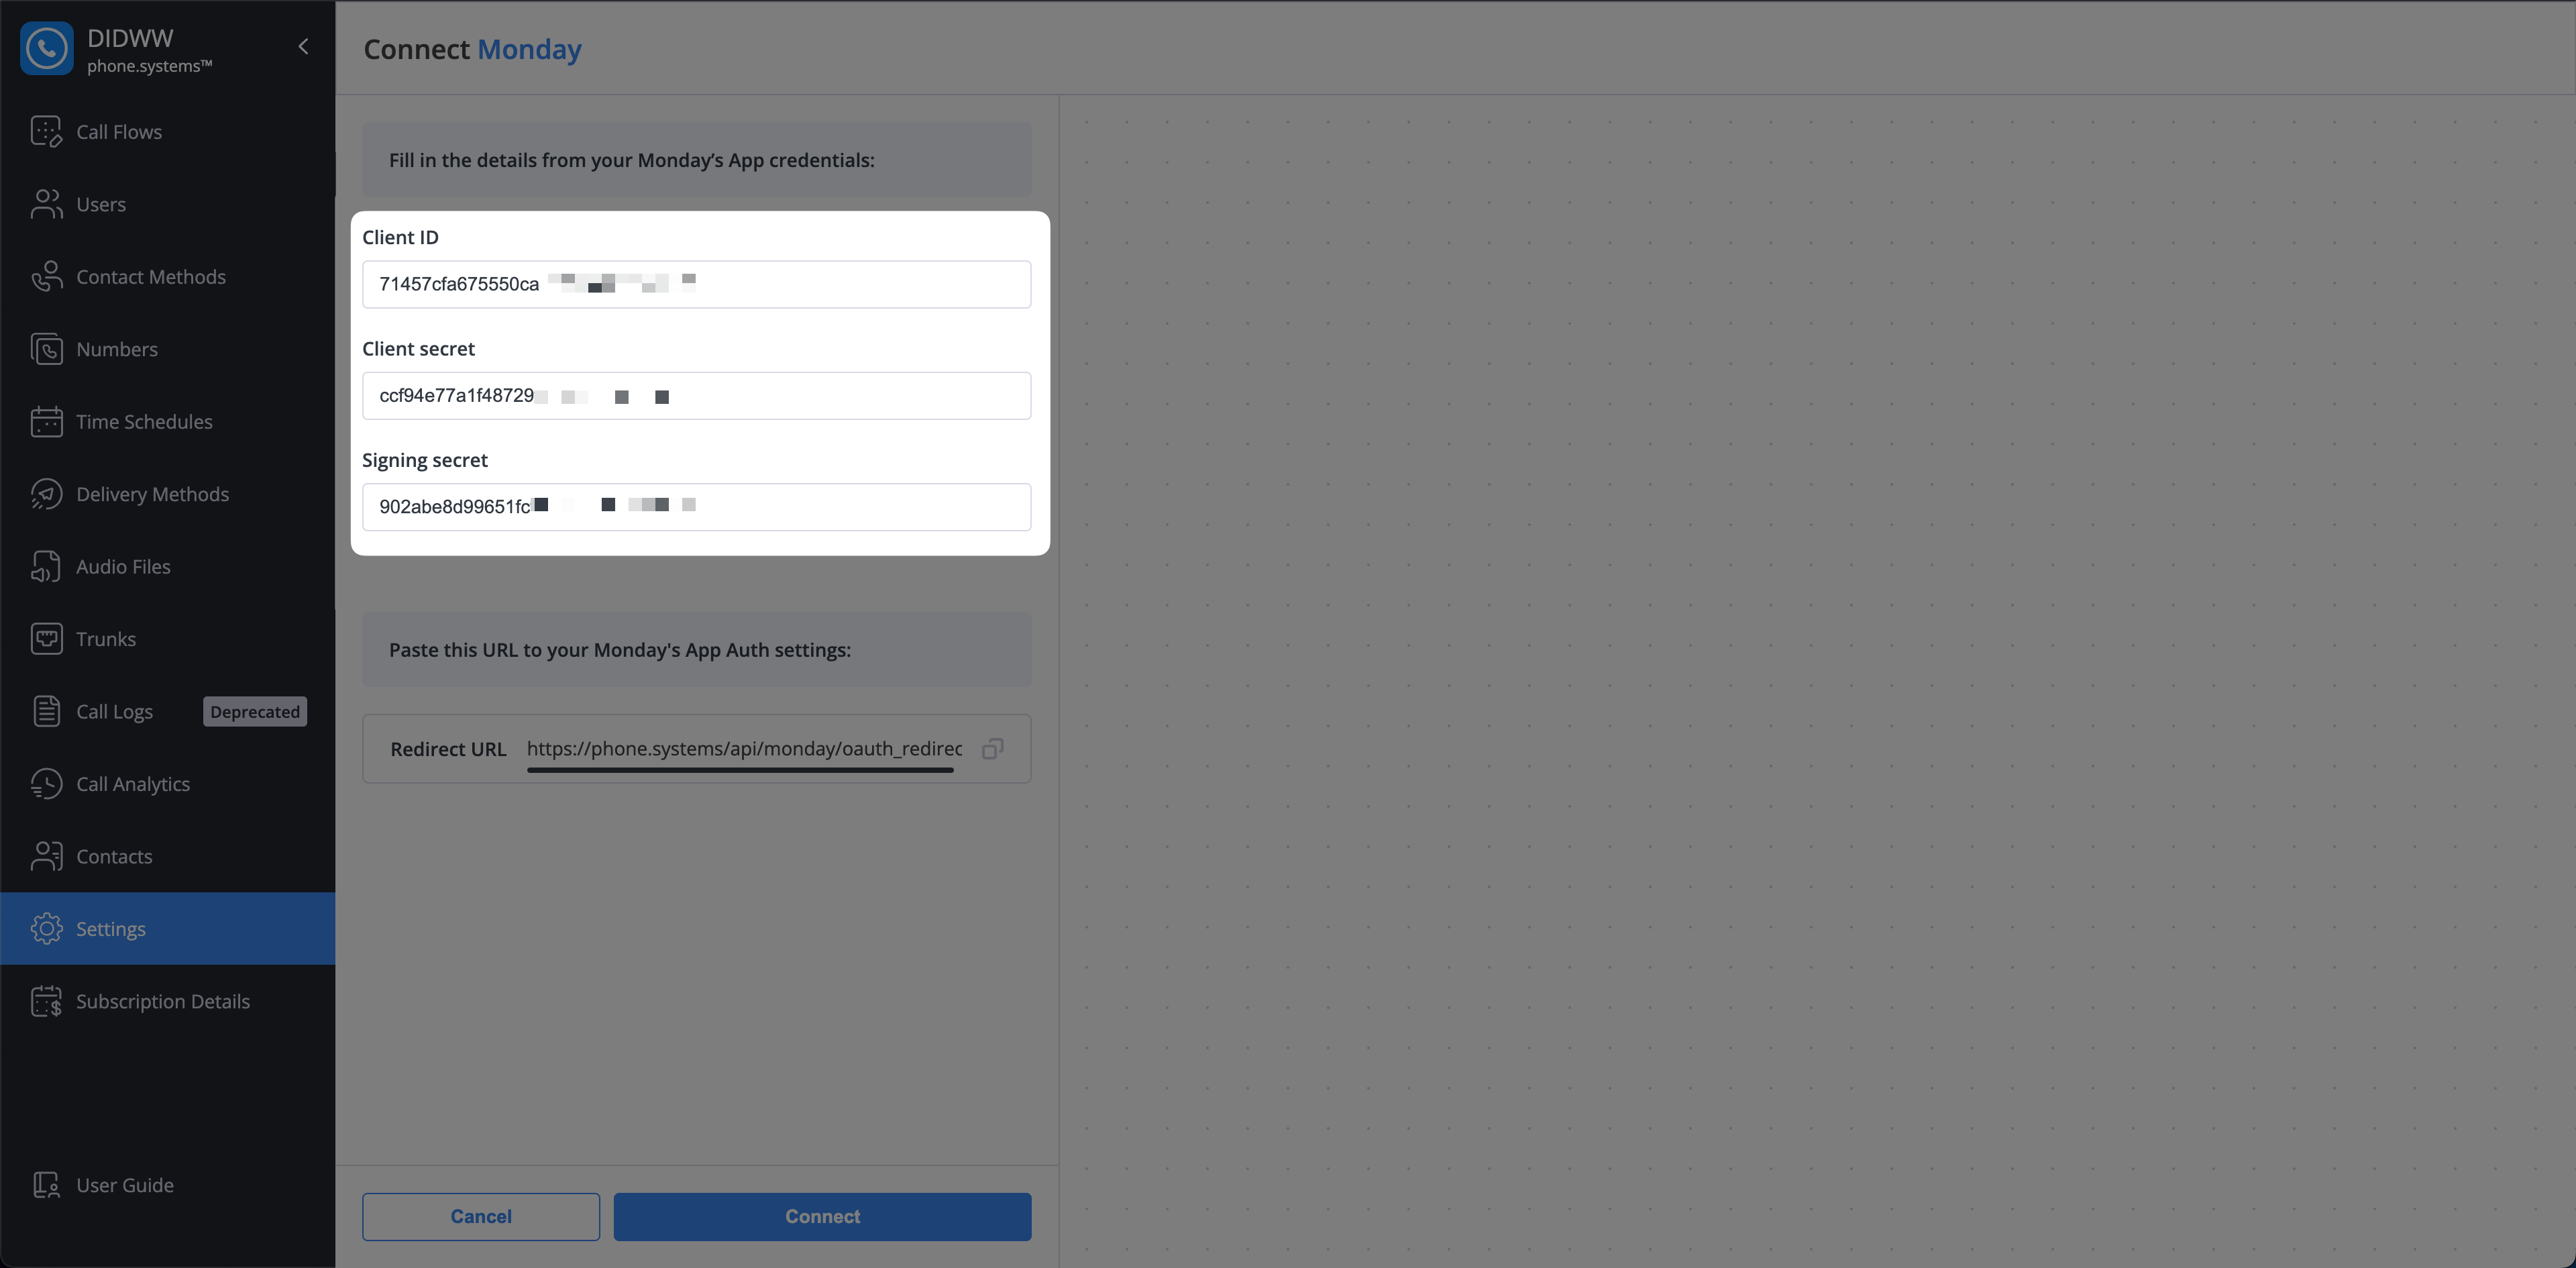
Fig. 9. Paste Client ID, Client Secret, and Signing Secret#
Step 5: Copy the Redirect URL from phone.systems™ and paste it into monday Developer Center#
Continue in the phone.systems™ monday CRM connection page , copy the Redirect URL.
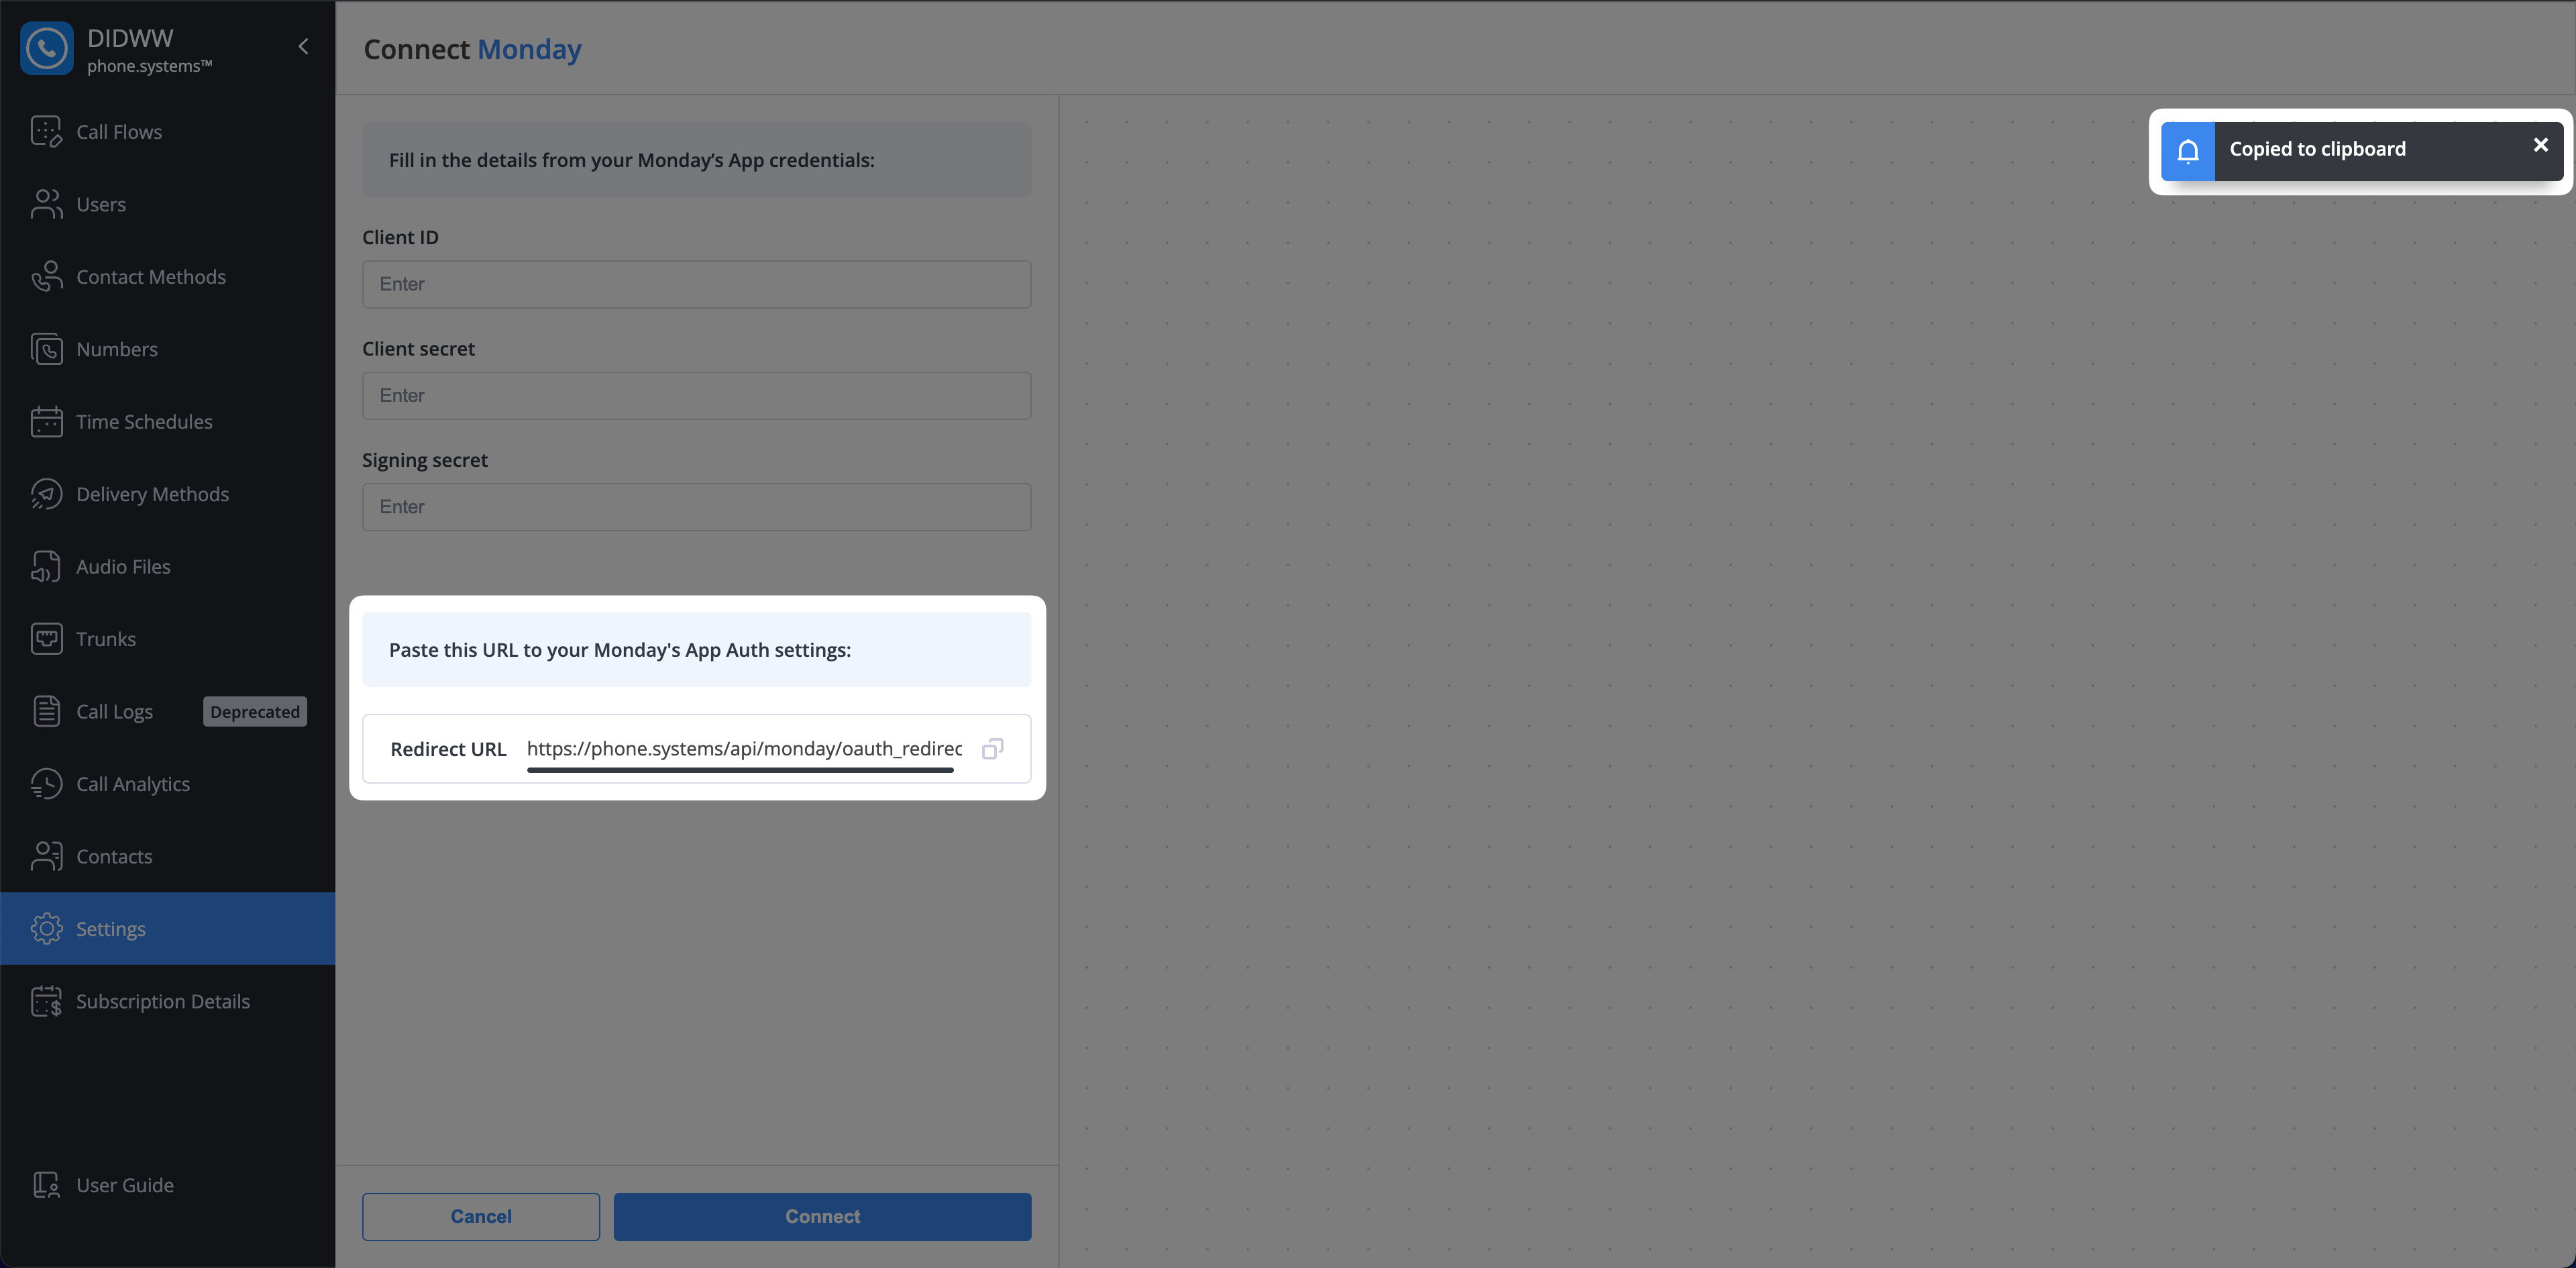
Fig. 4. Copy the Redirect URL#
Open the app creation page on the monday Developer Center and access your app configuration. Then follow these steps:
In the left sidebar, expand the Build section.
Click on OAuth & permissions.
Navigate to the Redirect URLs tab.
Paste the Redirect URL in to the corresponding input field.
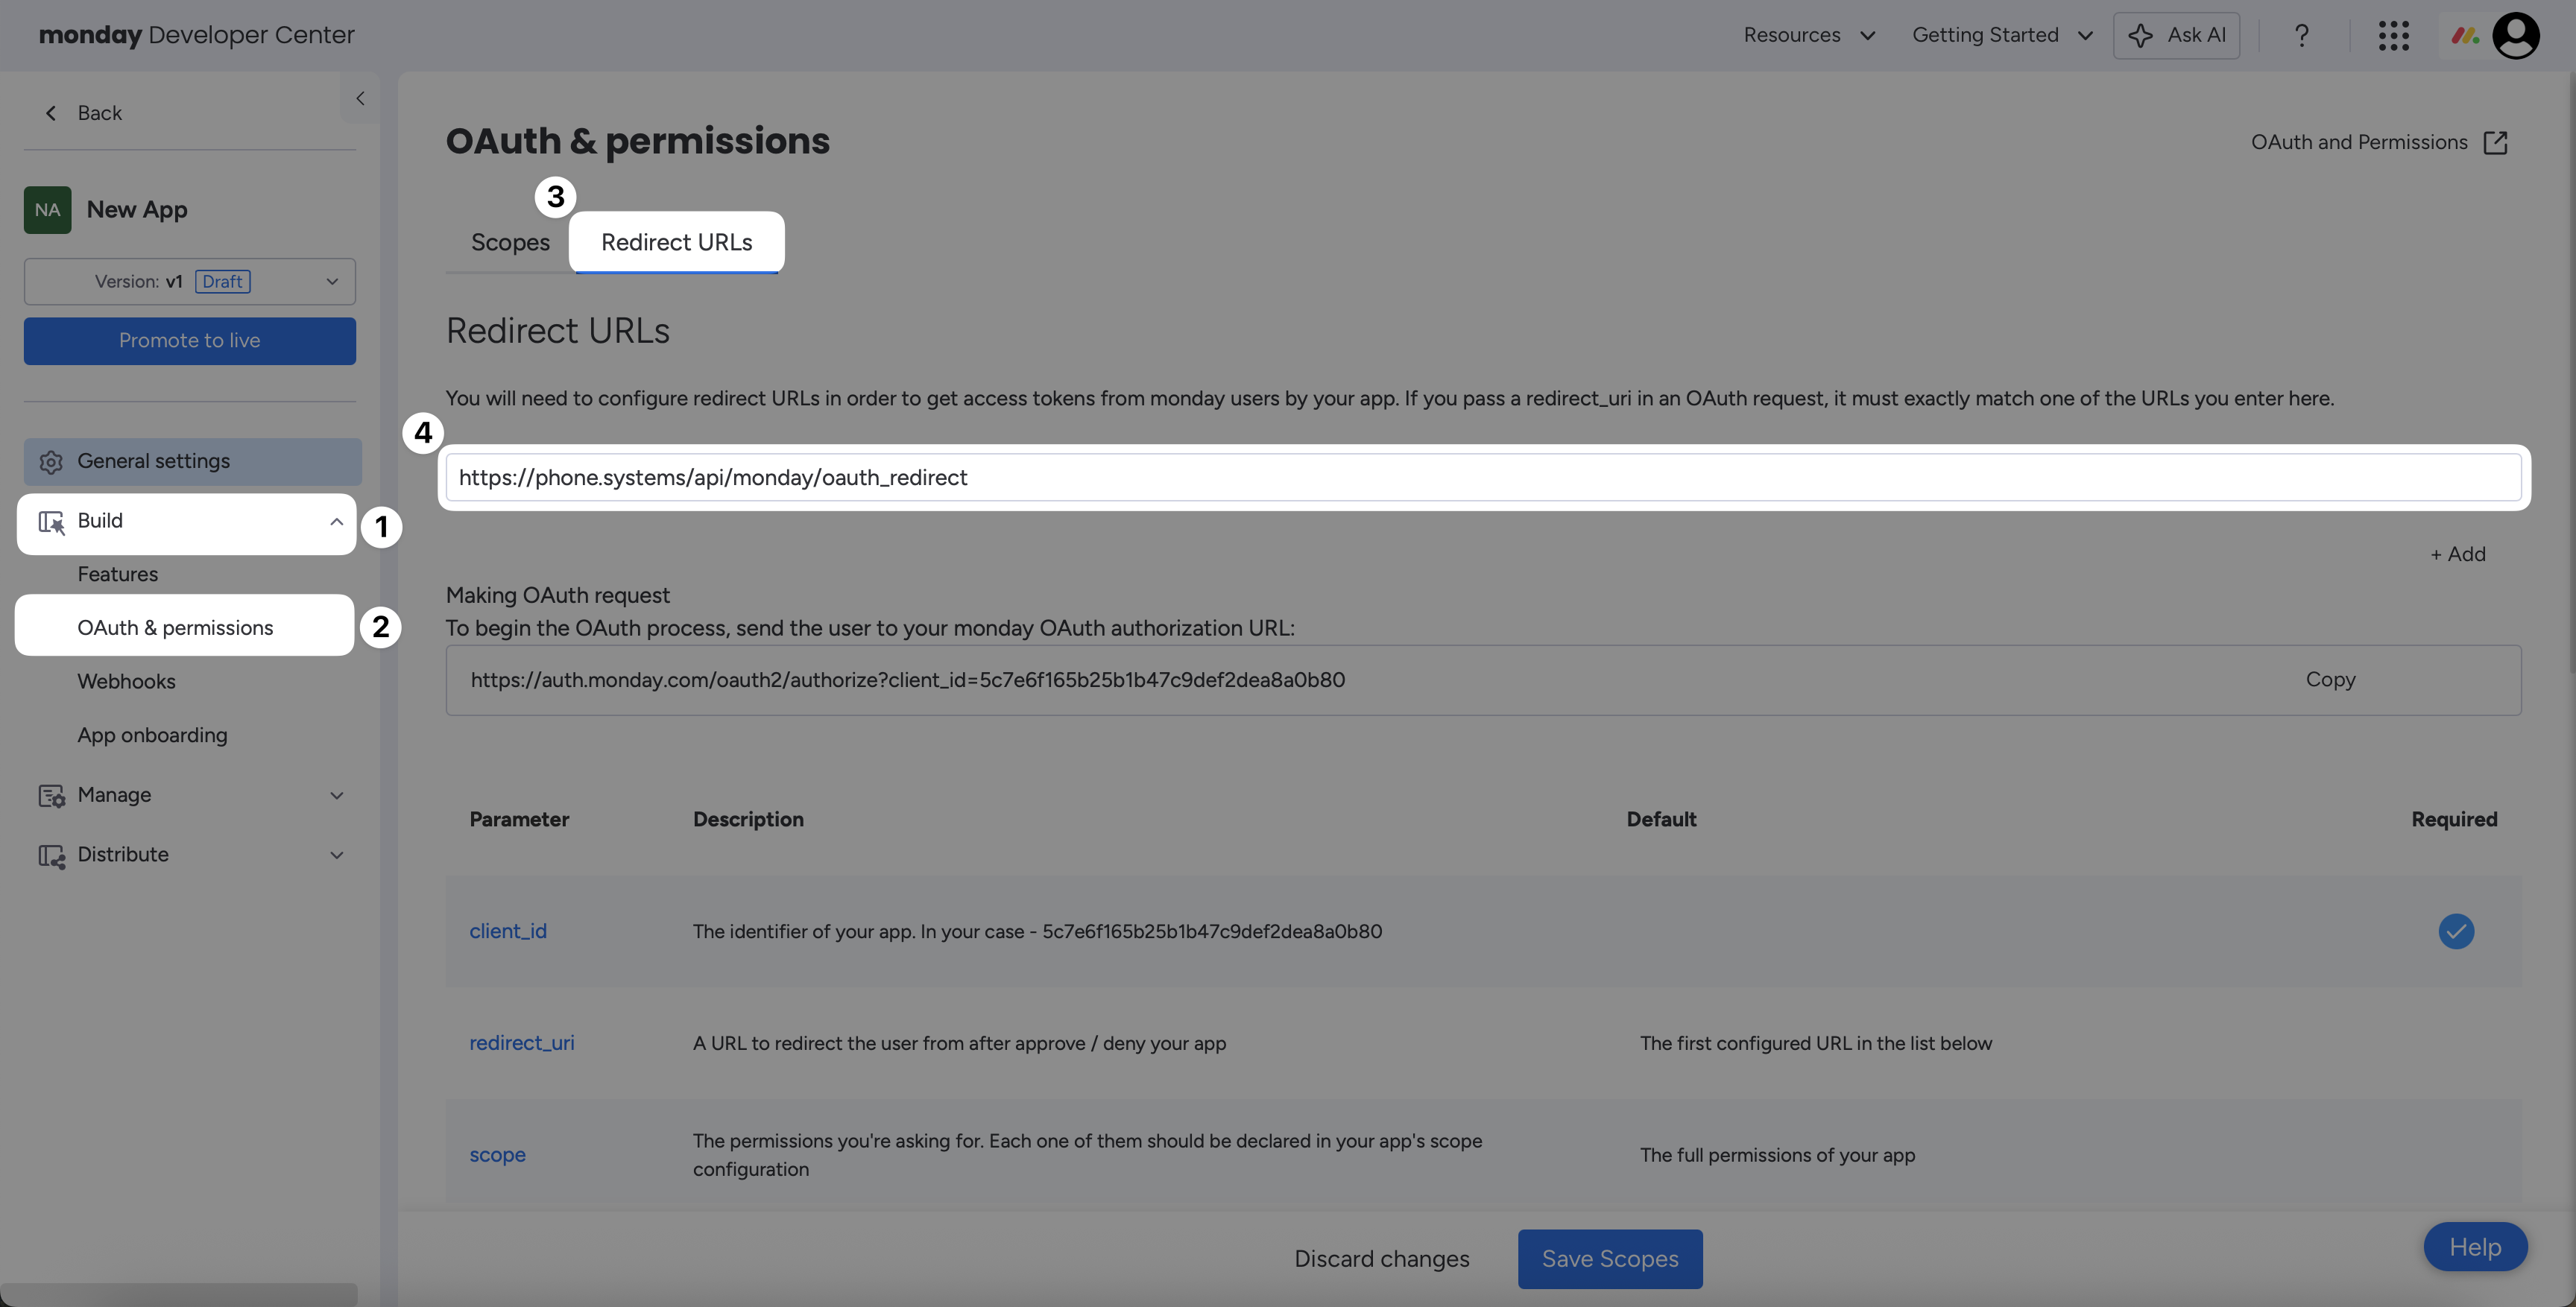
Fig. 5. Paste the Redirect URL#
Step 6: Define app permissions with OAuth scopes#
Continue in the monday Developers Center to configure your app permissions.
Open the Scopes tab in the OAuth & permissions section.
Locate and enable the following OAuth scopes:
OAuth Scope
Description
me:read
Read a user’s profile information
boards:read
Read user’s boards data
boards:write
Modify user’s boards data
users:read
Read the profile information of the users on the account
account:read
Read general information about the account
workspaces:read
Read user’s workspaces data
workspaces:write
Modify user’s workspaces data
webhooks:write
Create and modify webhooks
webhooks:read
Read existing webhooks configuration
Once all scopes are selected, click Save Scopes at the bottom of the page.
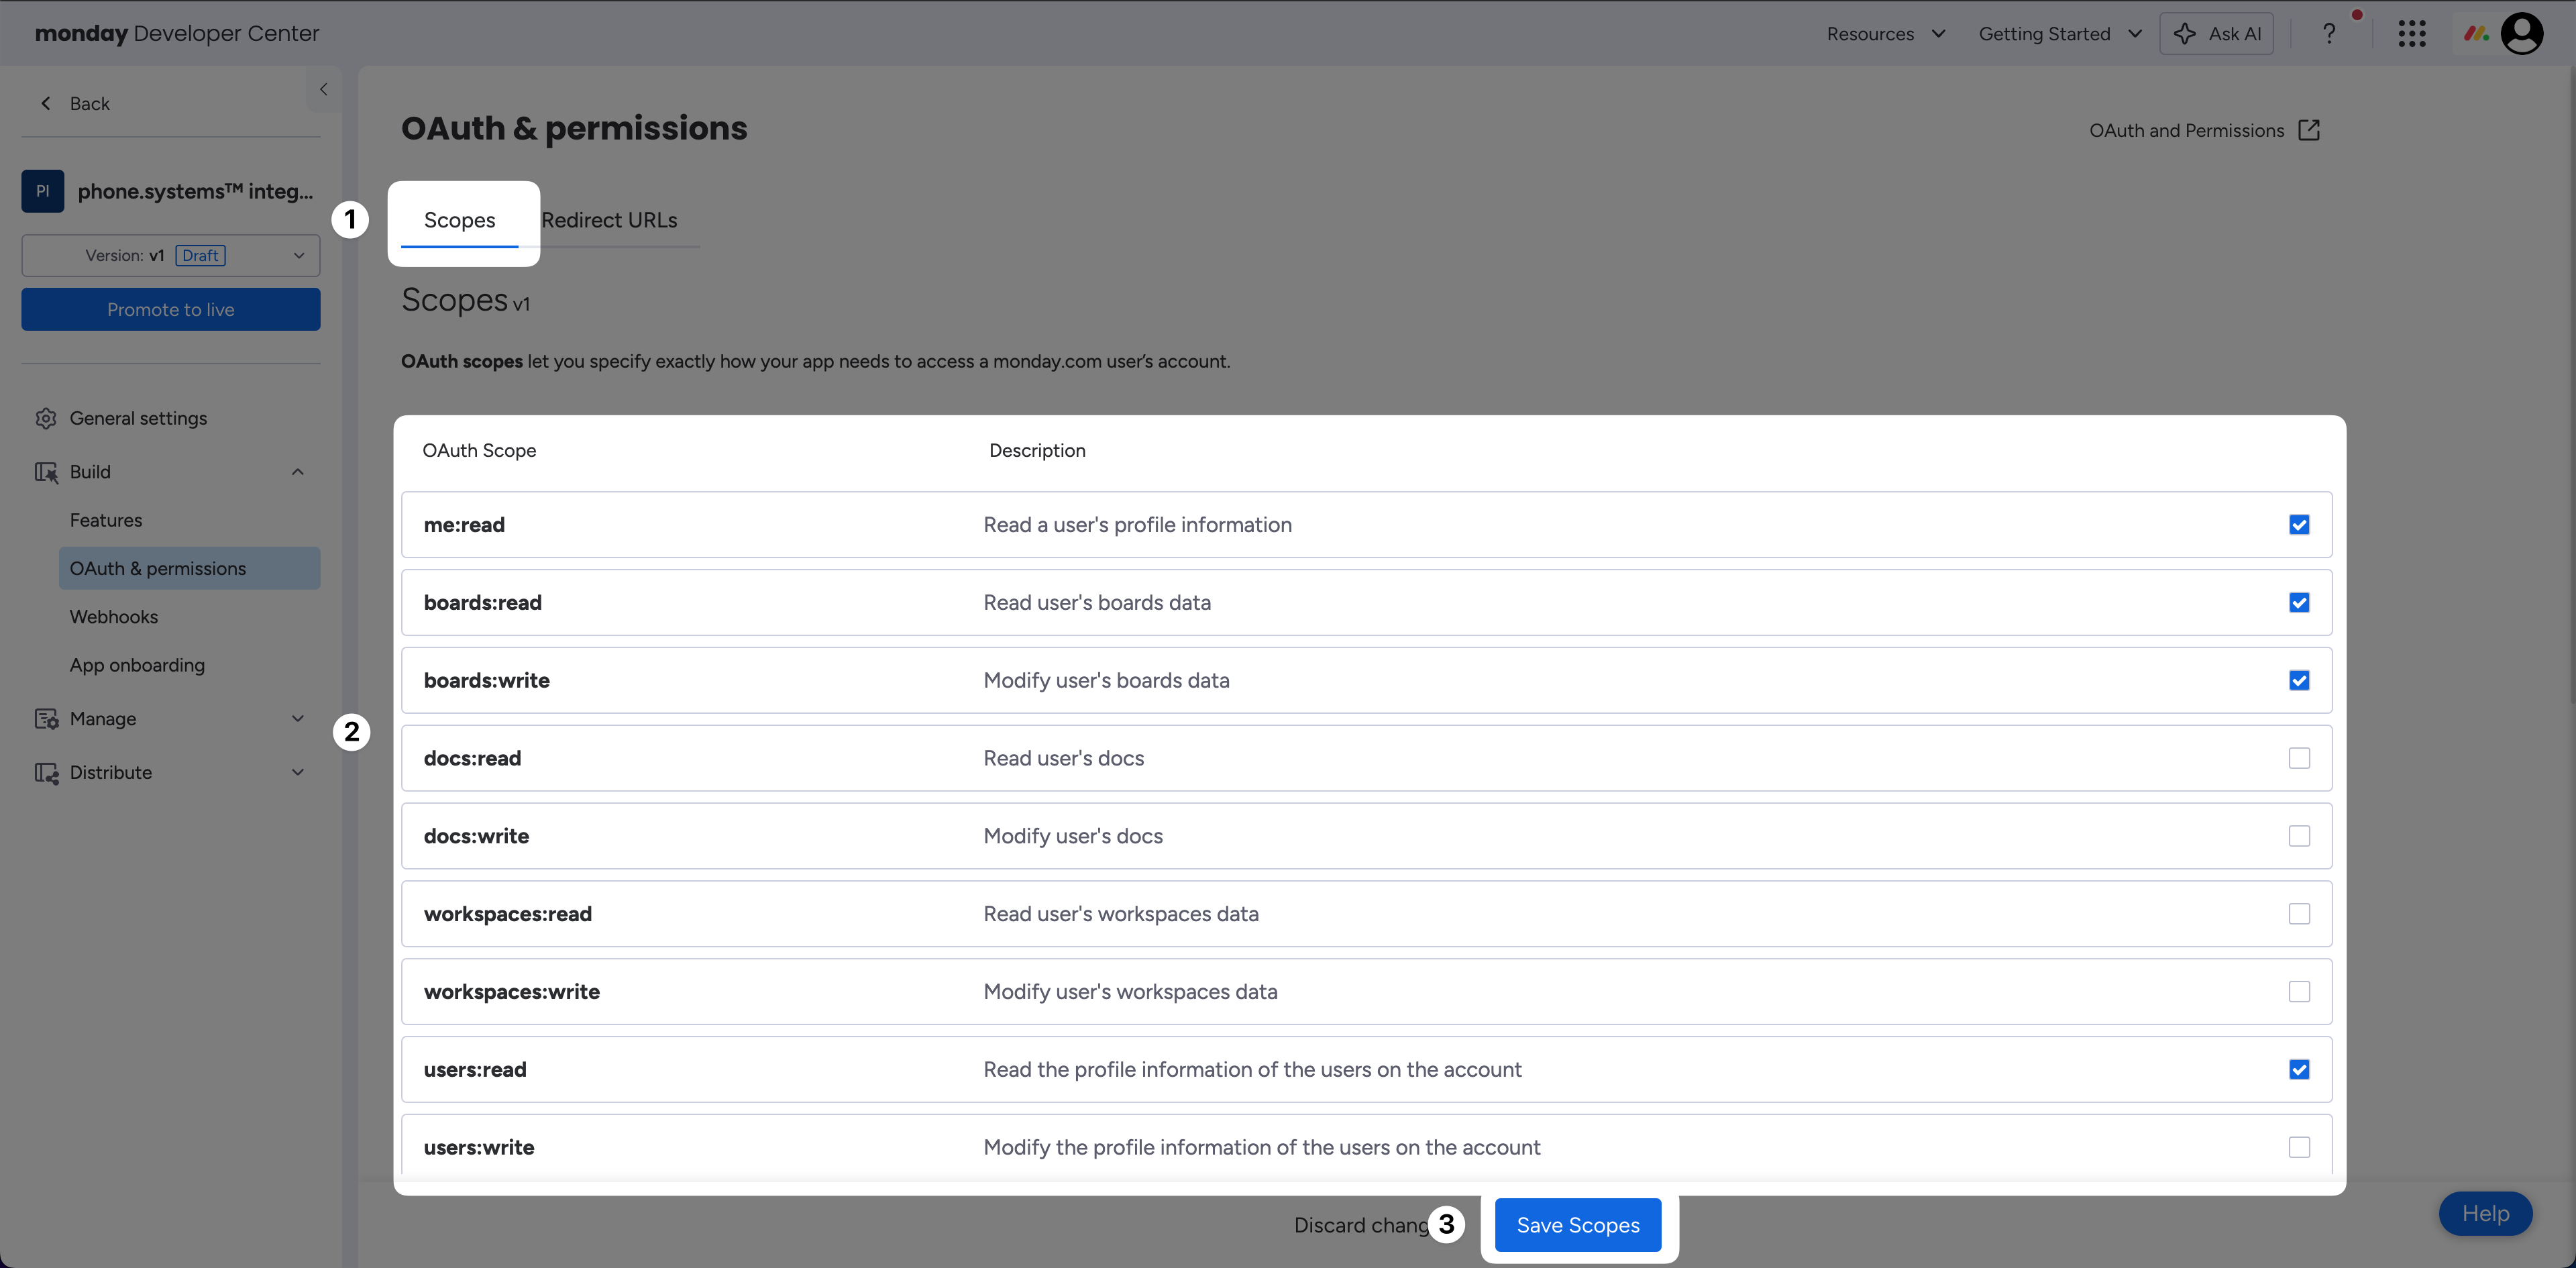
Fig. 6. Add required OAuth scopes#
Step 7: Publish app and authorize connection#
In the monday Developer Center, click the Promote to live button to publish your app.
Return to phone.systems™ and click Connect.
A permission authorization window will appear. Click Authorize to approve the integration.
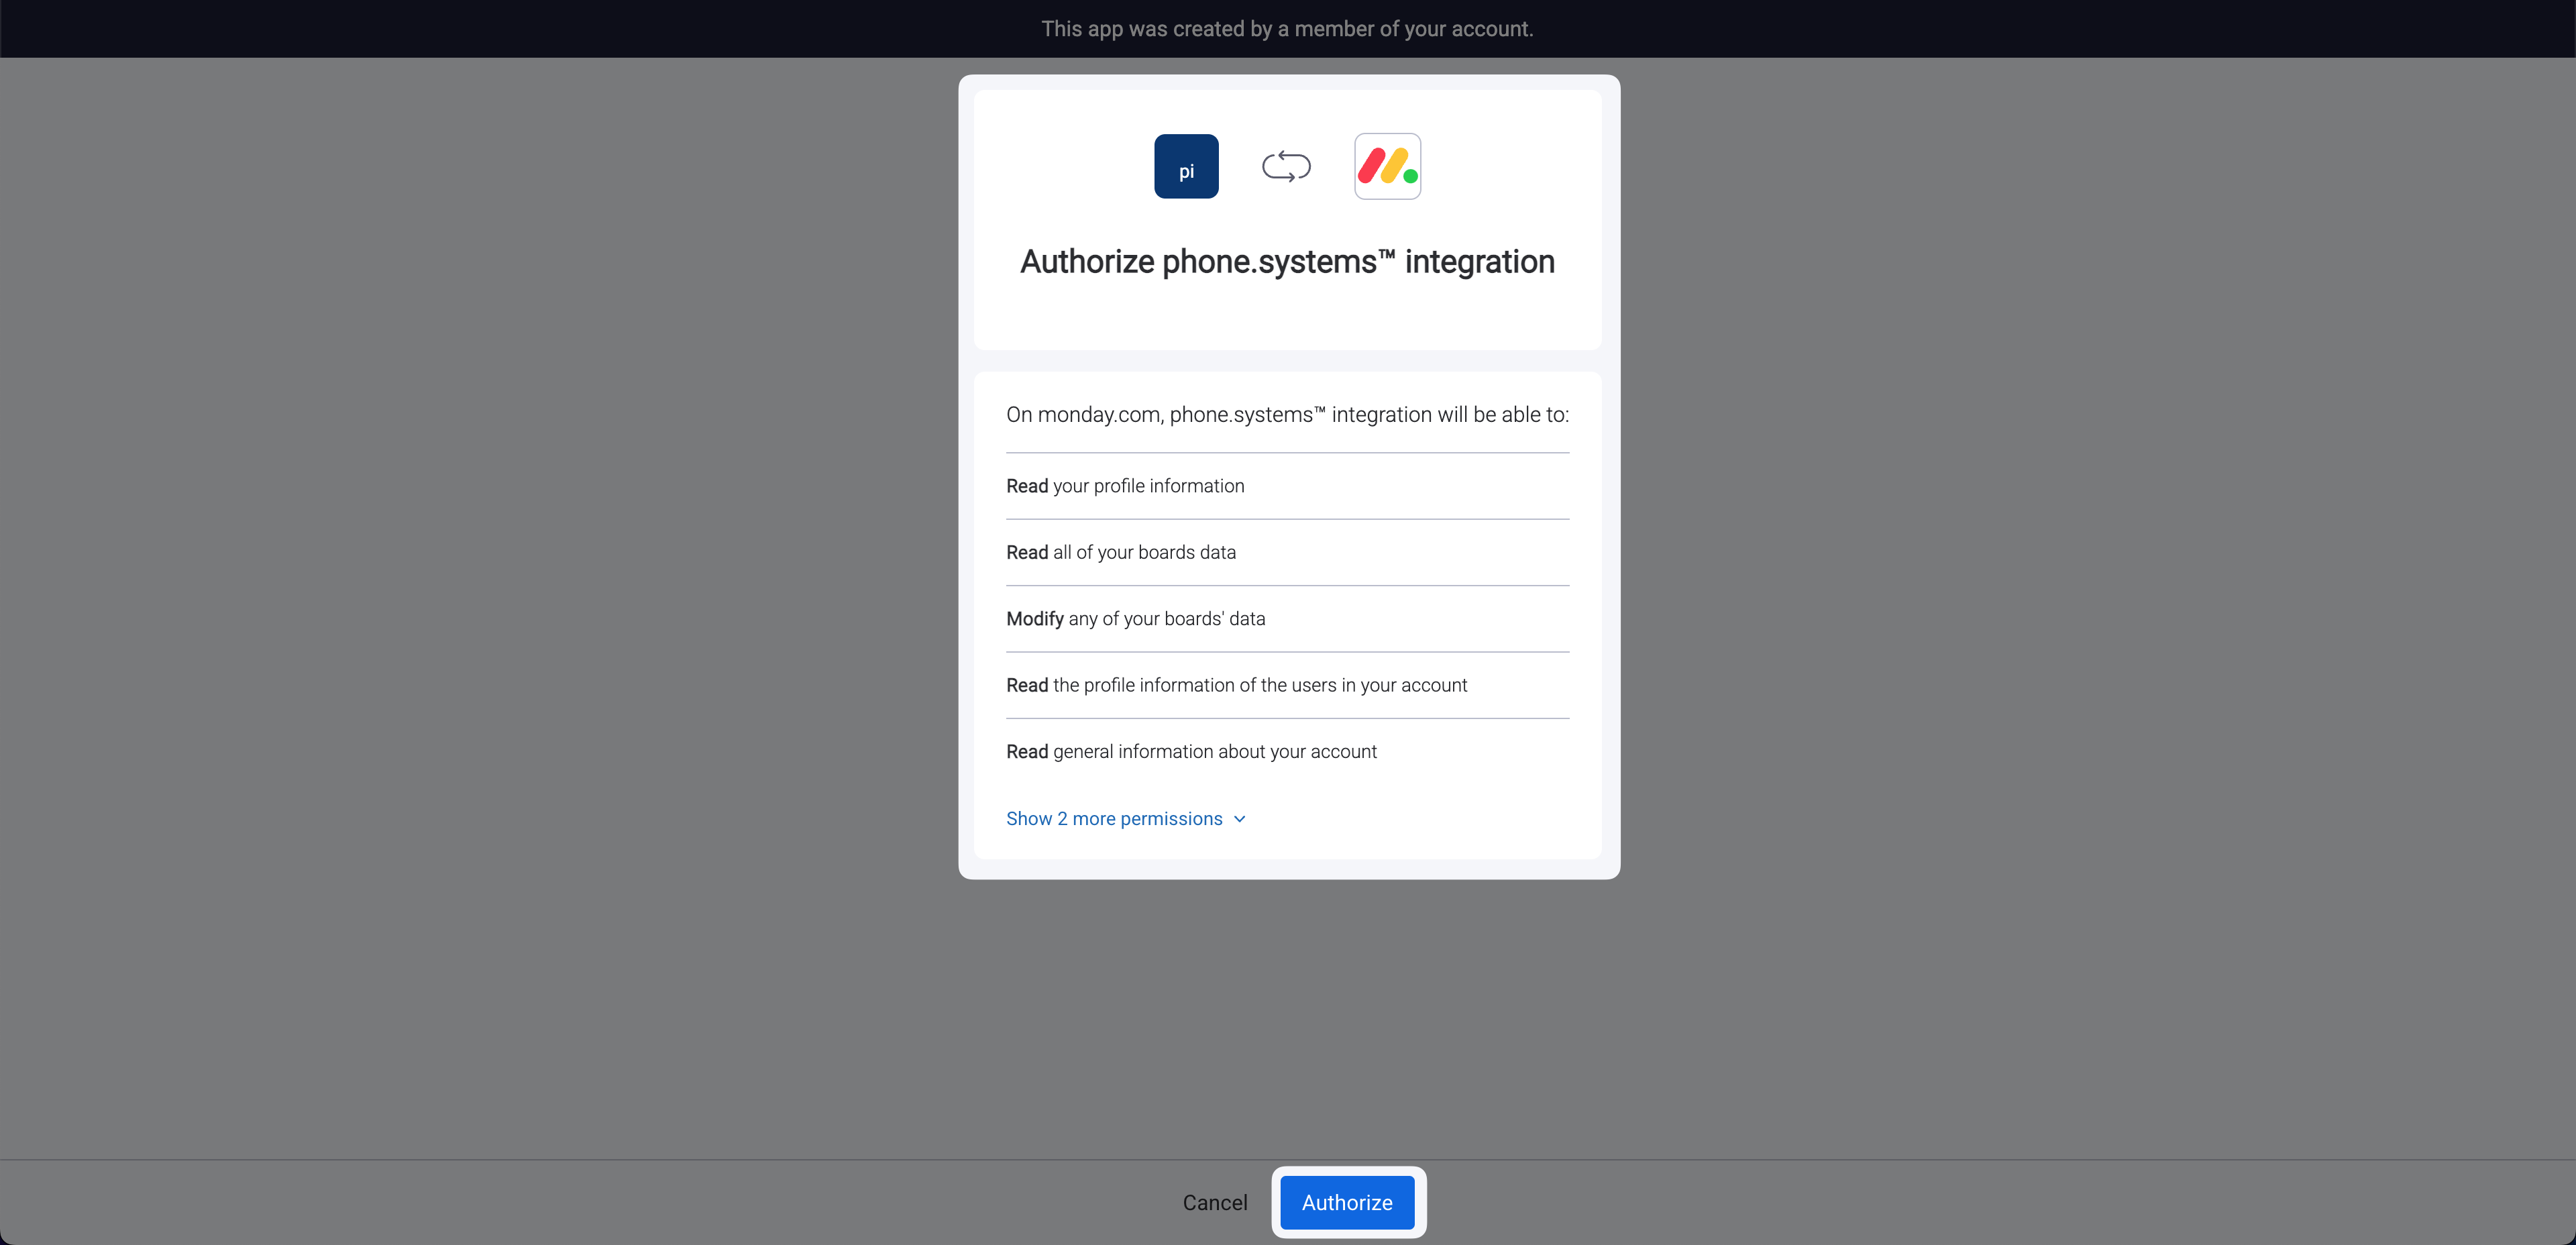
Fig. 7. Authorize the connection#
After you click Authorize, the CRM status will change to Synchronizing, and then to Connected once the initial synchronization is complete.
Important
After the connection is established, make sure to configure synchronization with your appropriate monday board. You can follow the steps described in Synchronizing Contacts.
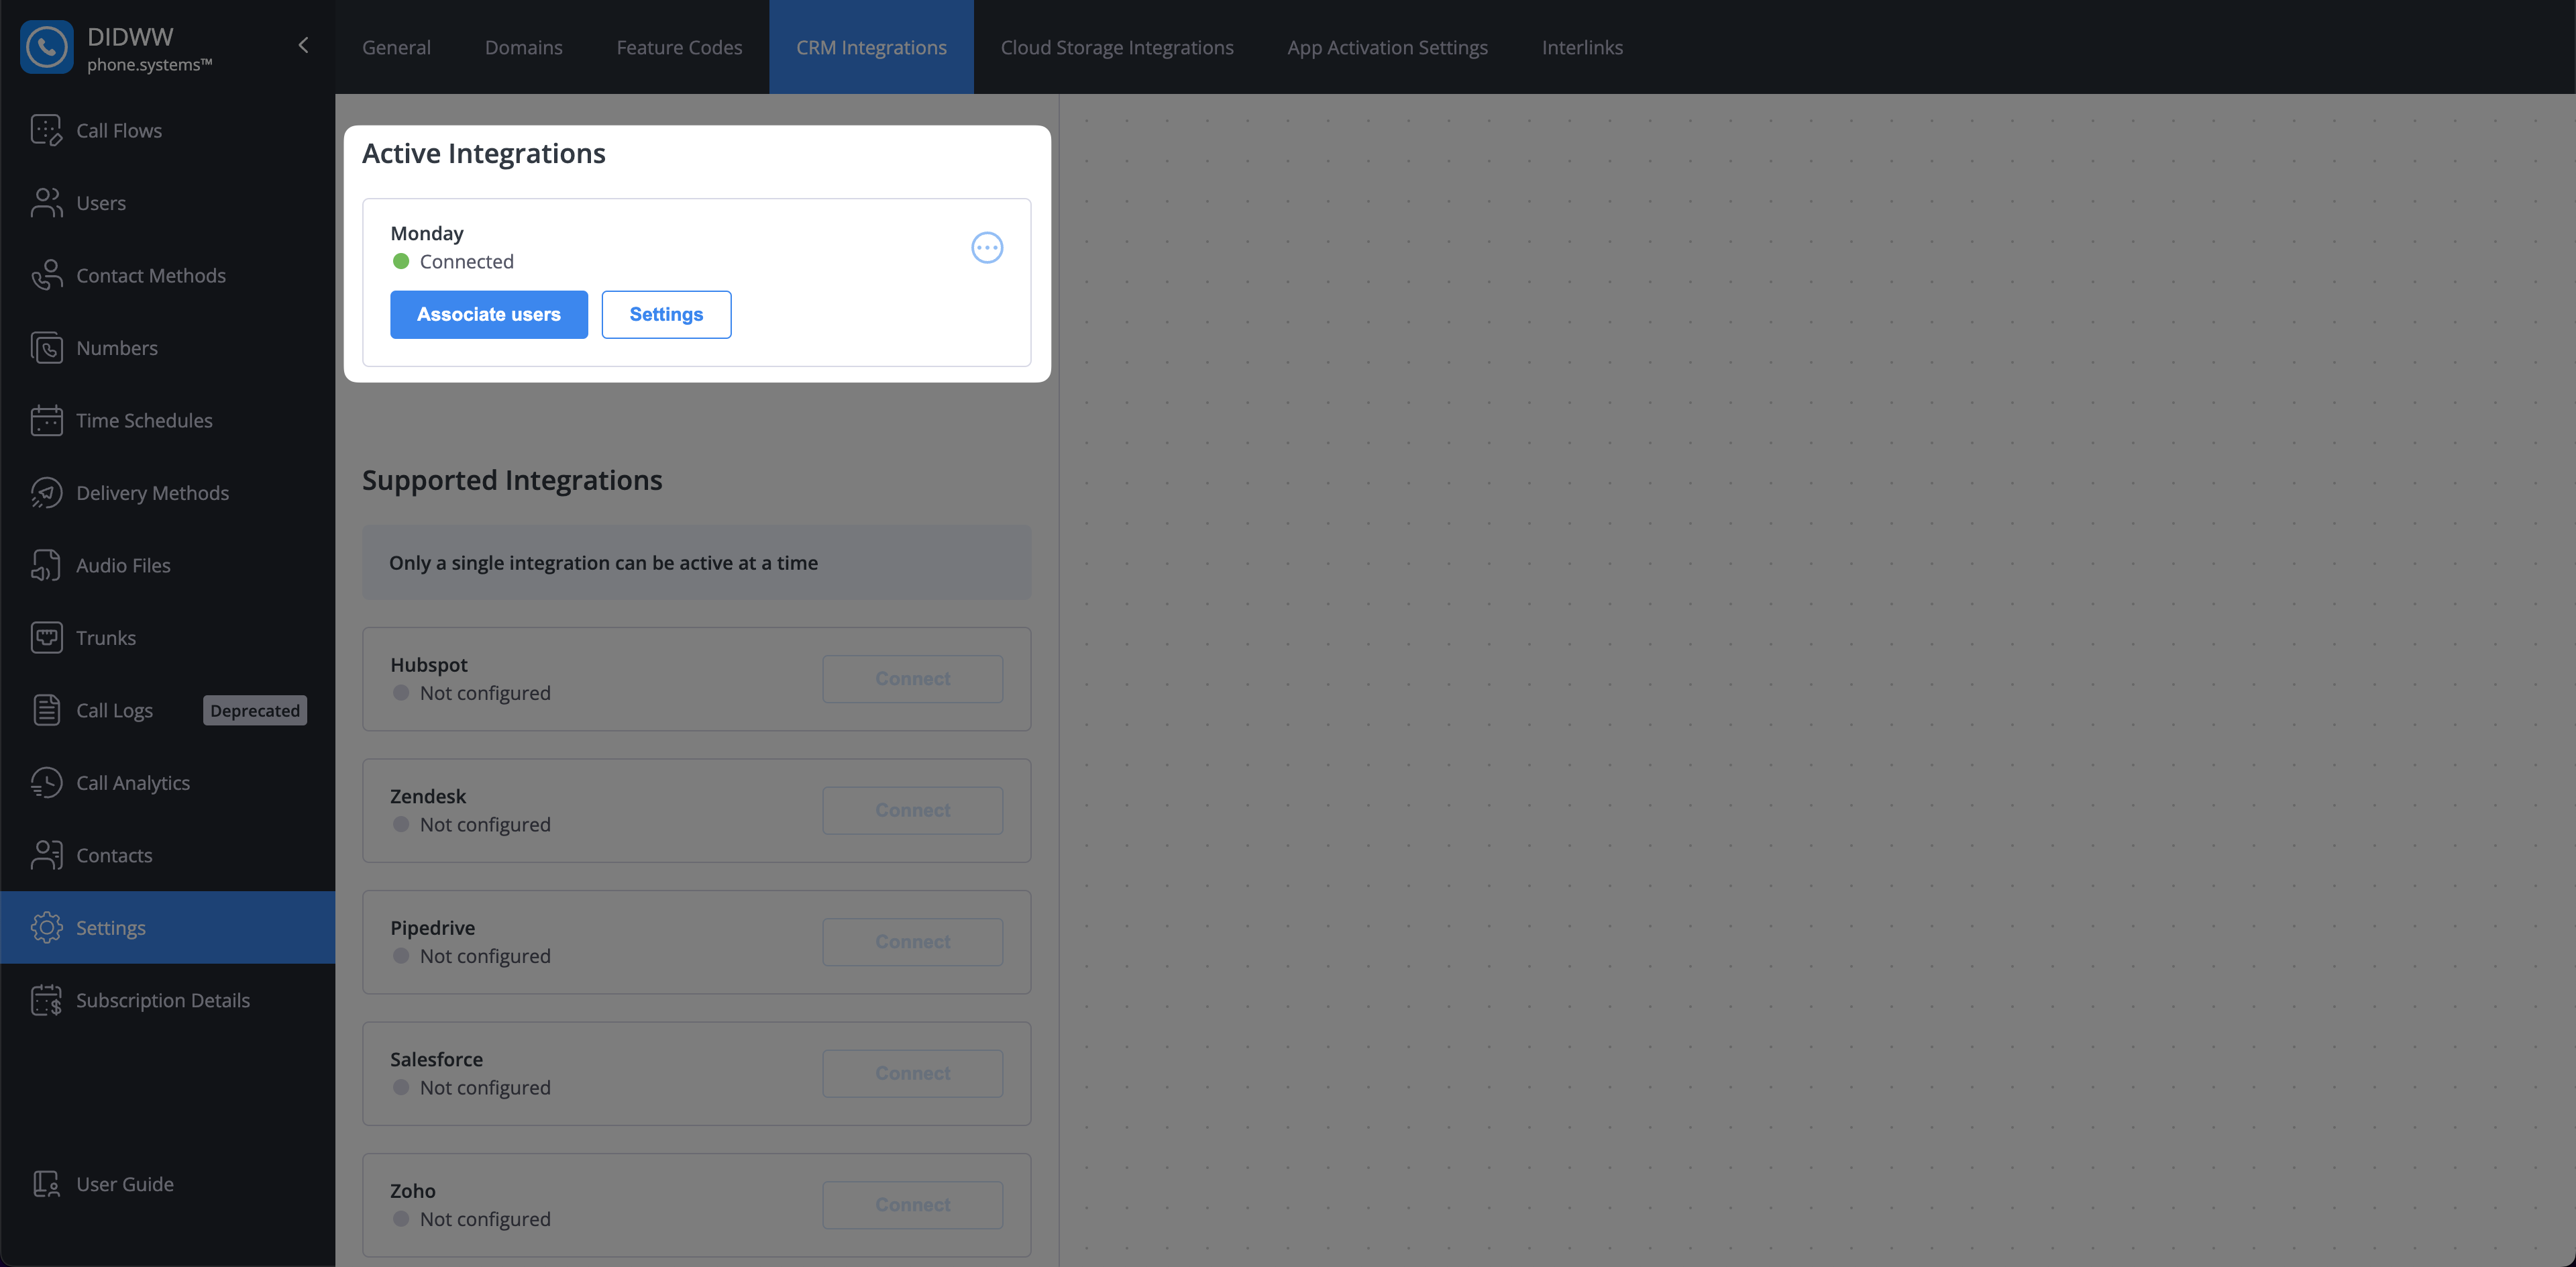
Fig. 8. Connected status in phone.systems™#
Synchronizing Contacts#
Once the integration is connected, you must configure the synchronization options to map your monday.com board columns to phone.systems™ contact fields.
Navigate to Settings > CRM Integrations.
Locate the active monday.com integration and click the three-dots menu icon.
Select Change synchronization options from the dropdown menu.
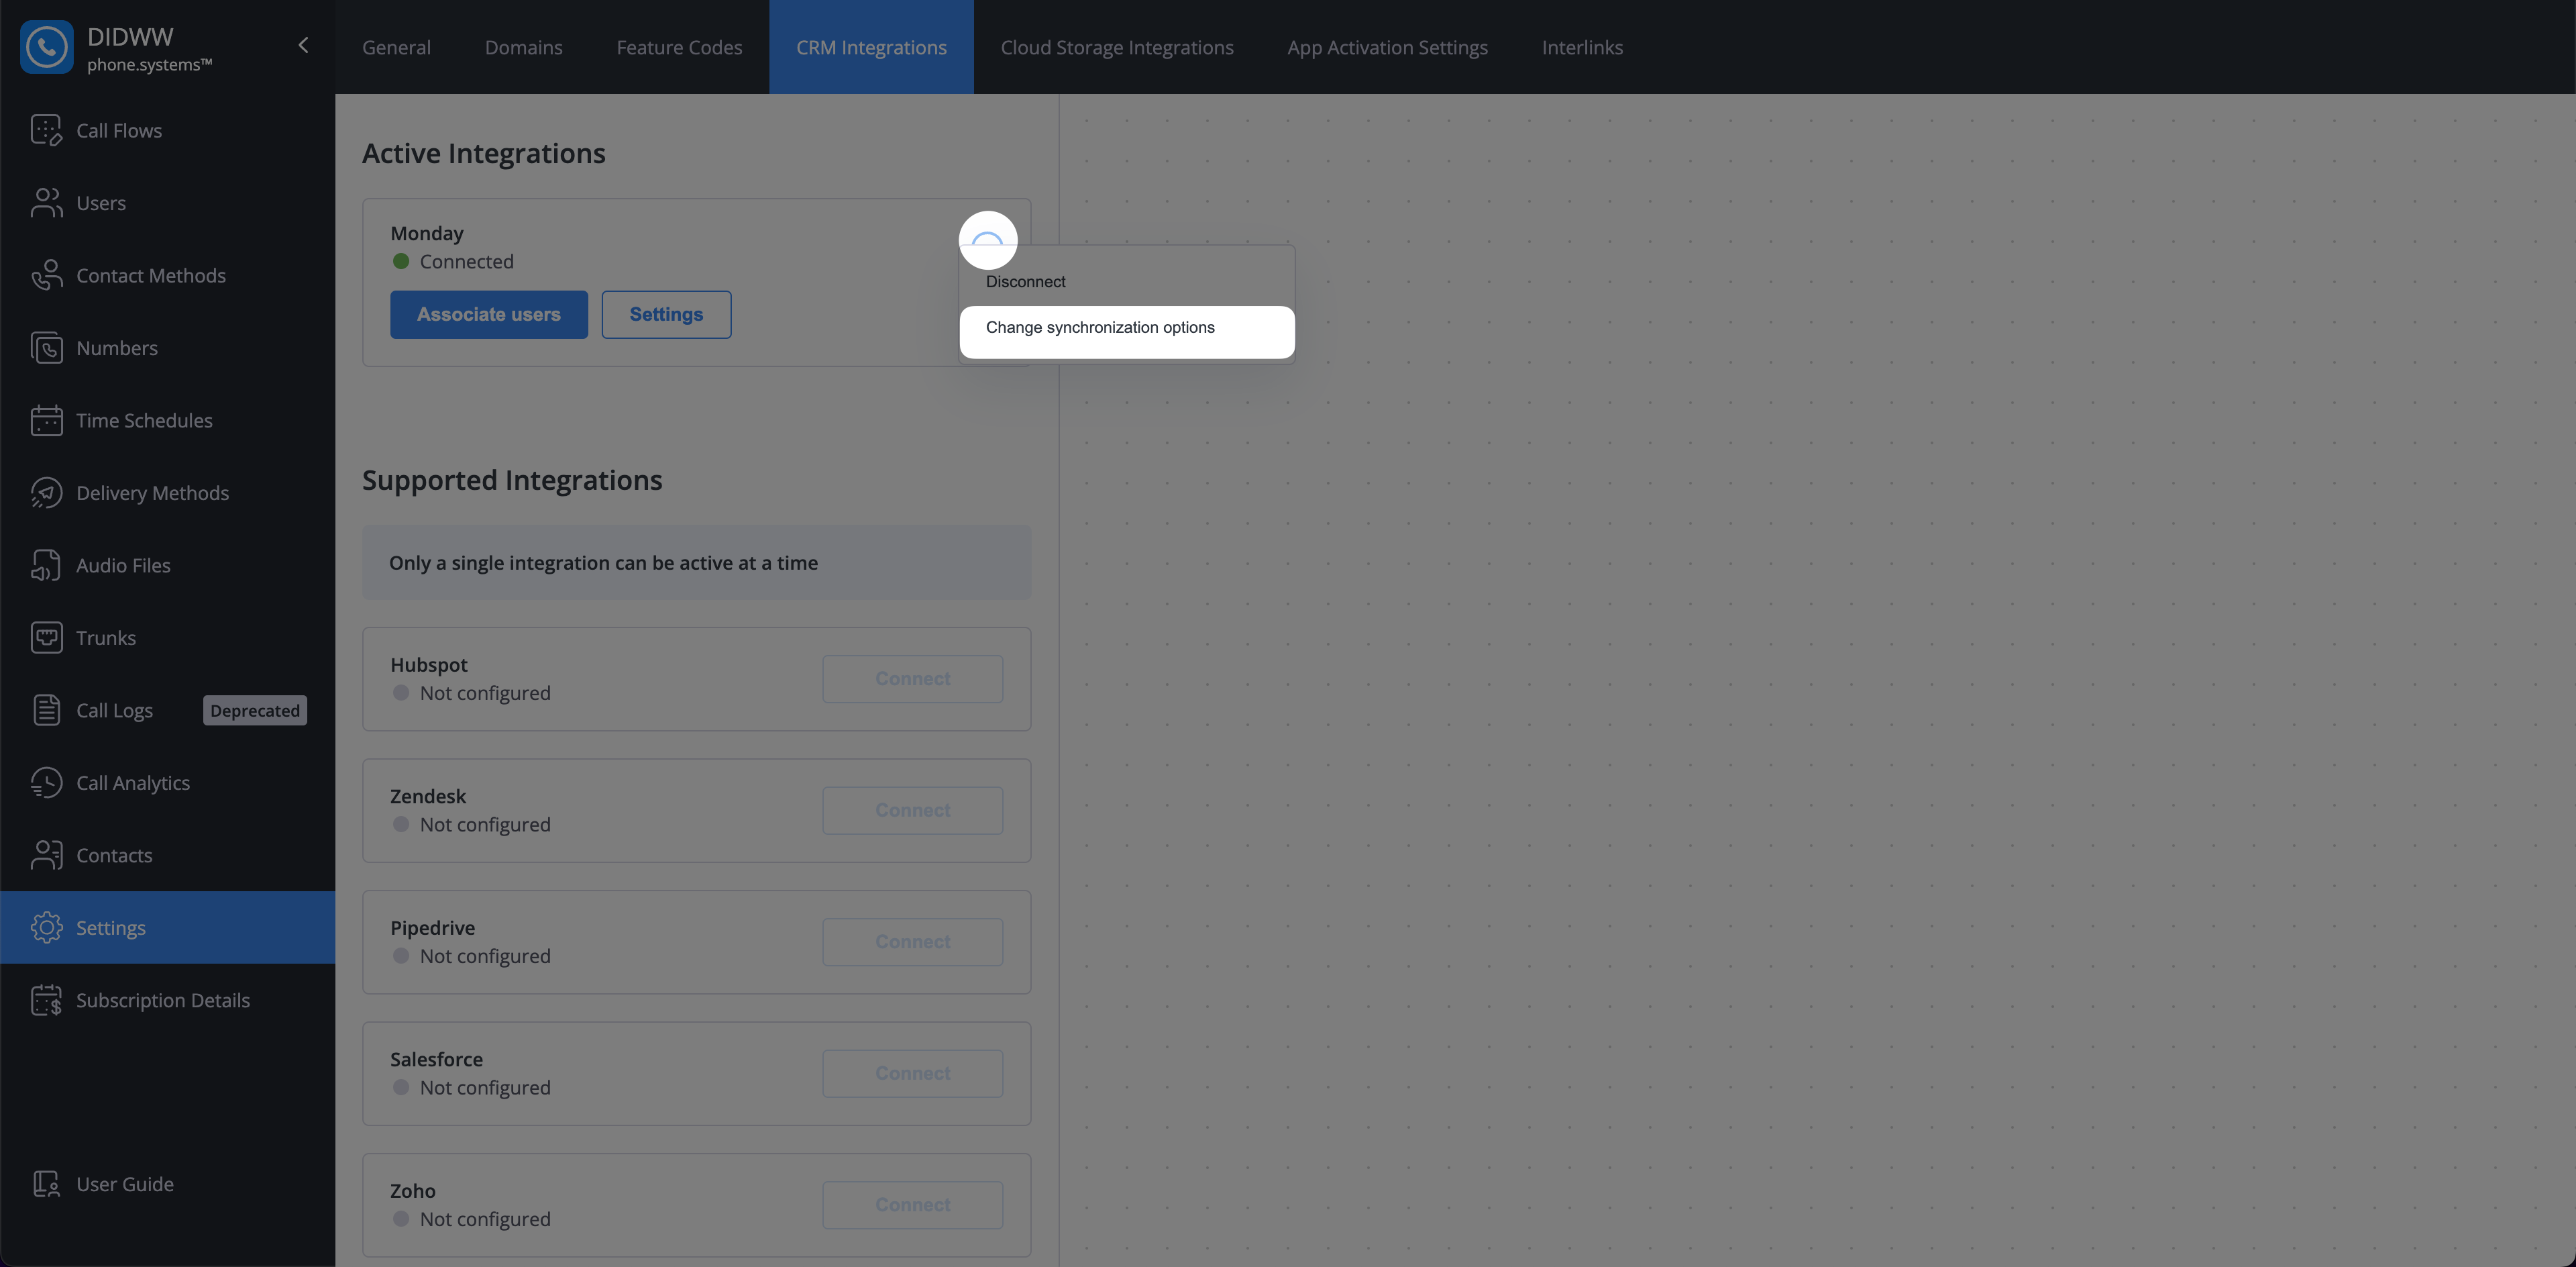
Fig. 9. Synchronization options menu.#
In the Synchronization options window, assign the columns from your monday.com board to the corresponding fields:
Board: Select the monday.com board where your contacts are stored.
Name: Assign the column that contains the contact’s full name.
Phone Numbers: Assign the column that contains phone numbers.
Emails: Assign the column that contains email addresses.
Company Name: Assign the column that contains company names.
Job Title: Assign the column that contains job titles.
Click Save to apply the configuration.
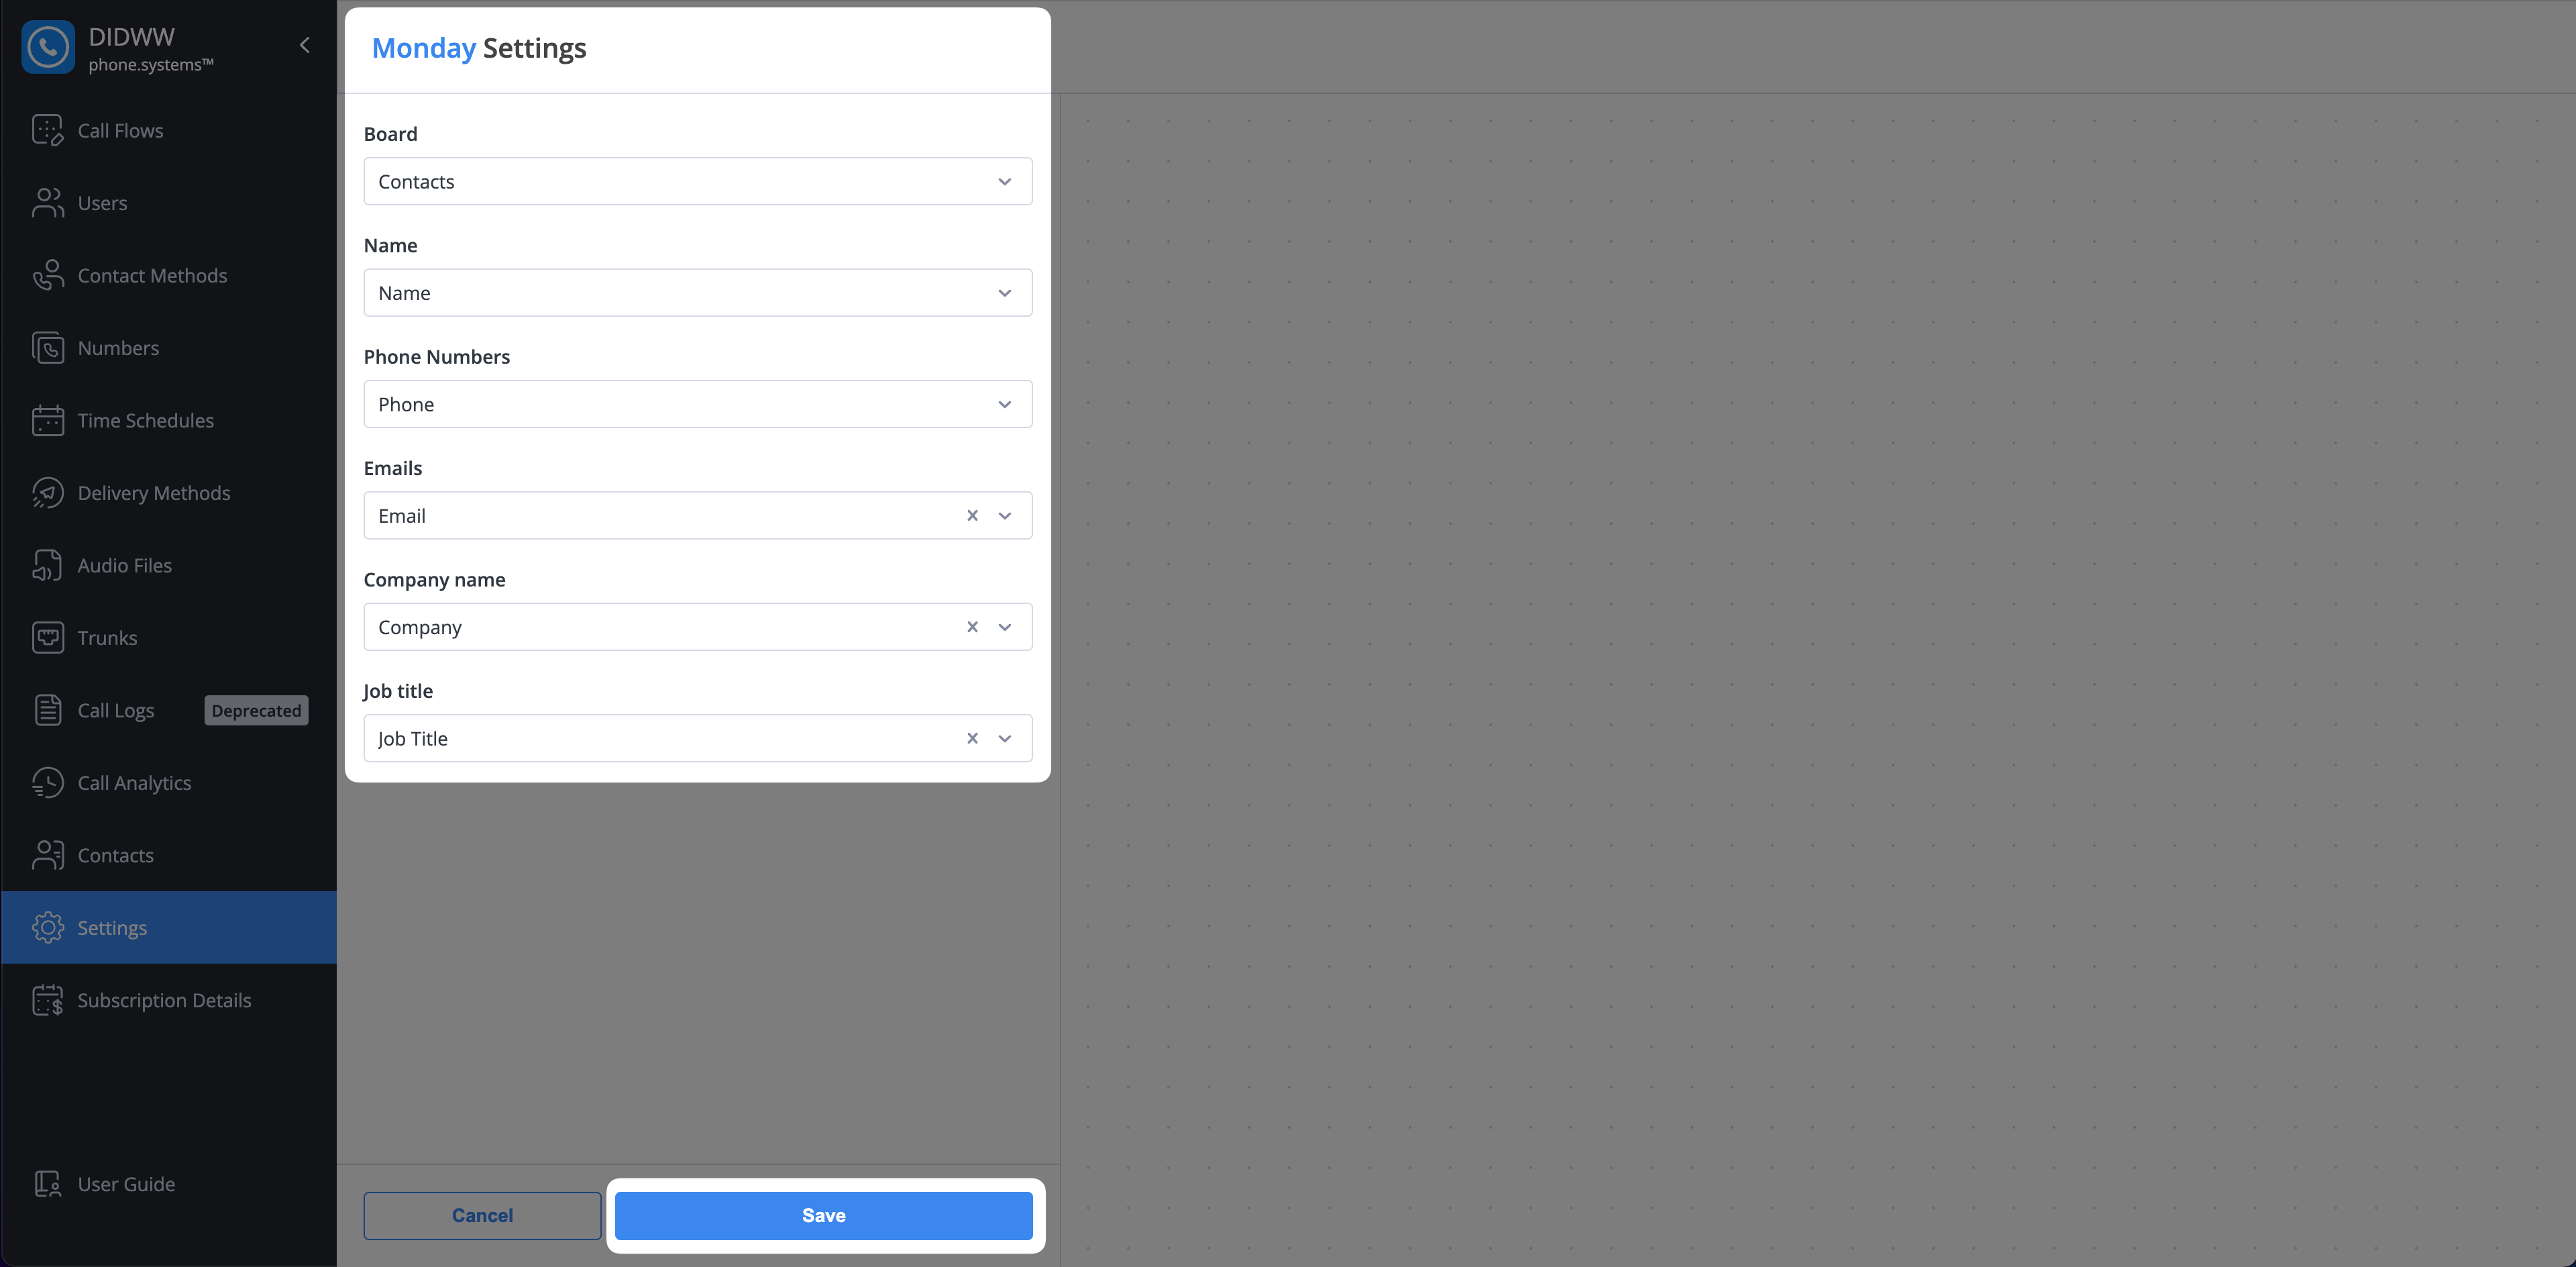
Fig. 10. Synchronization options window.#
Configuring monday CRM Integration Settings#
Once the integration is active and synchronized, you can customize its behavior. To access these options, navigate to Settings > CRM Integrations and click the Settings icon next to your monday.com connection.
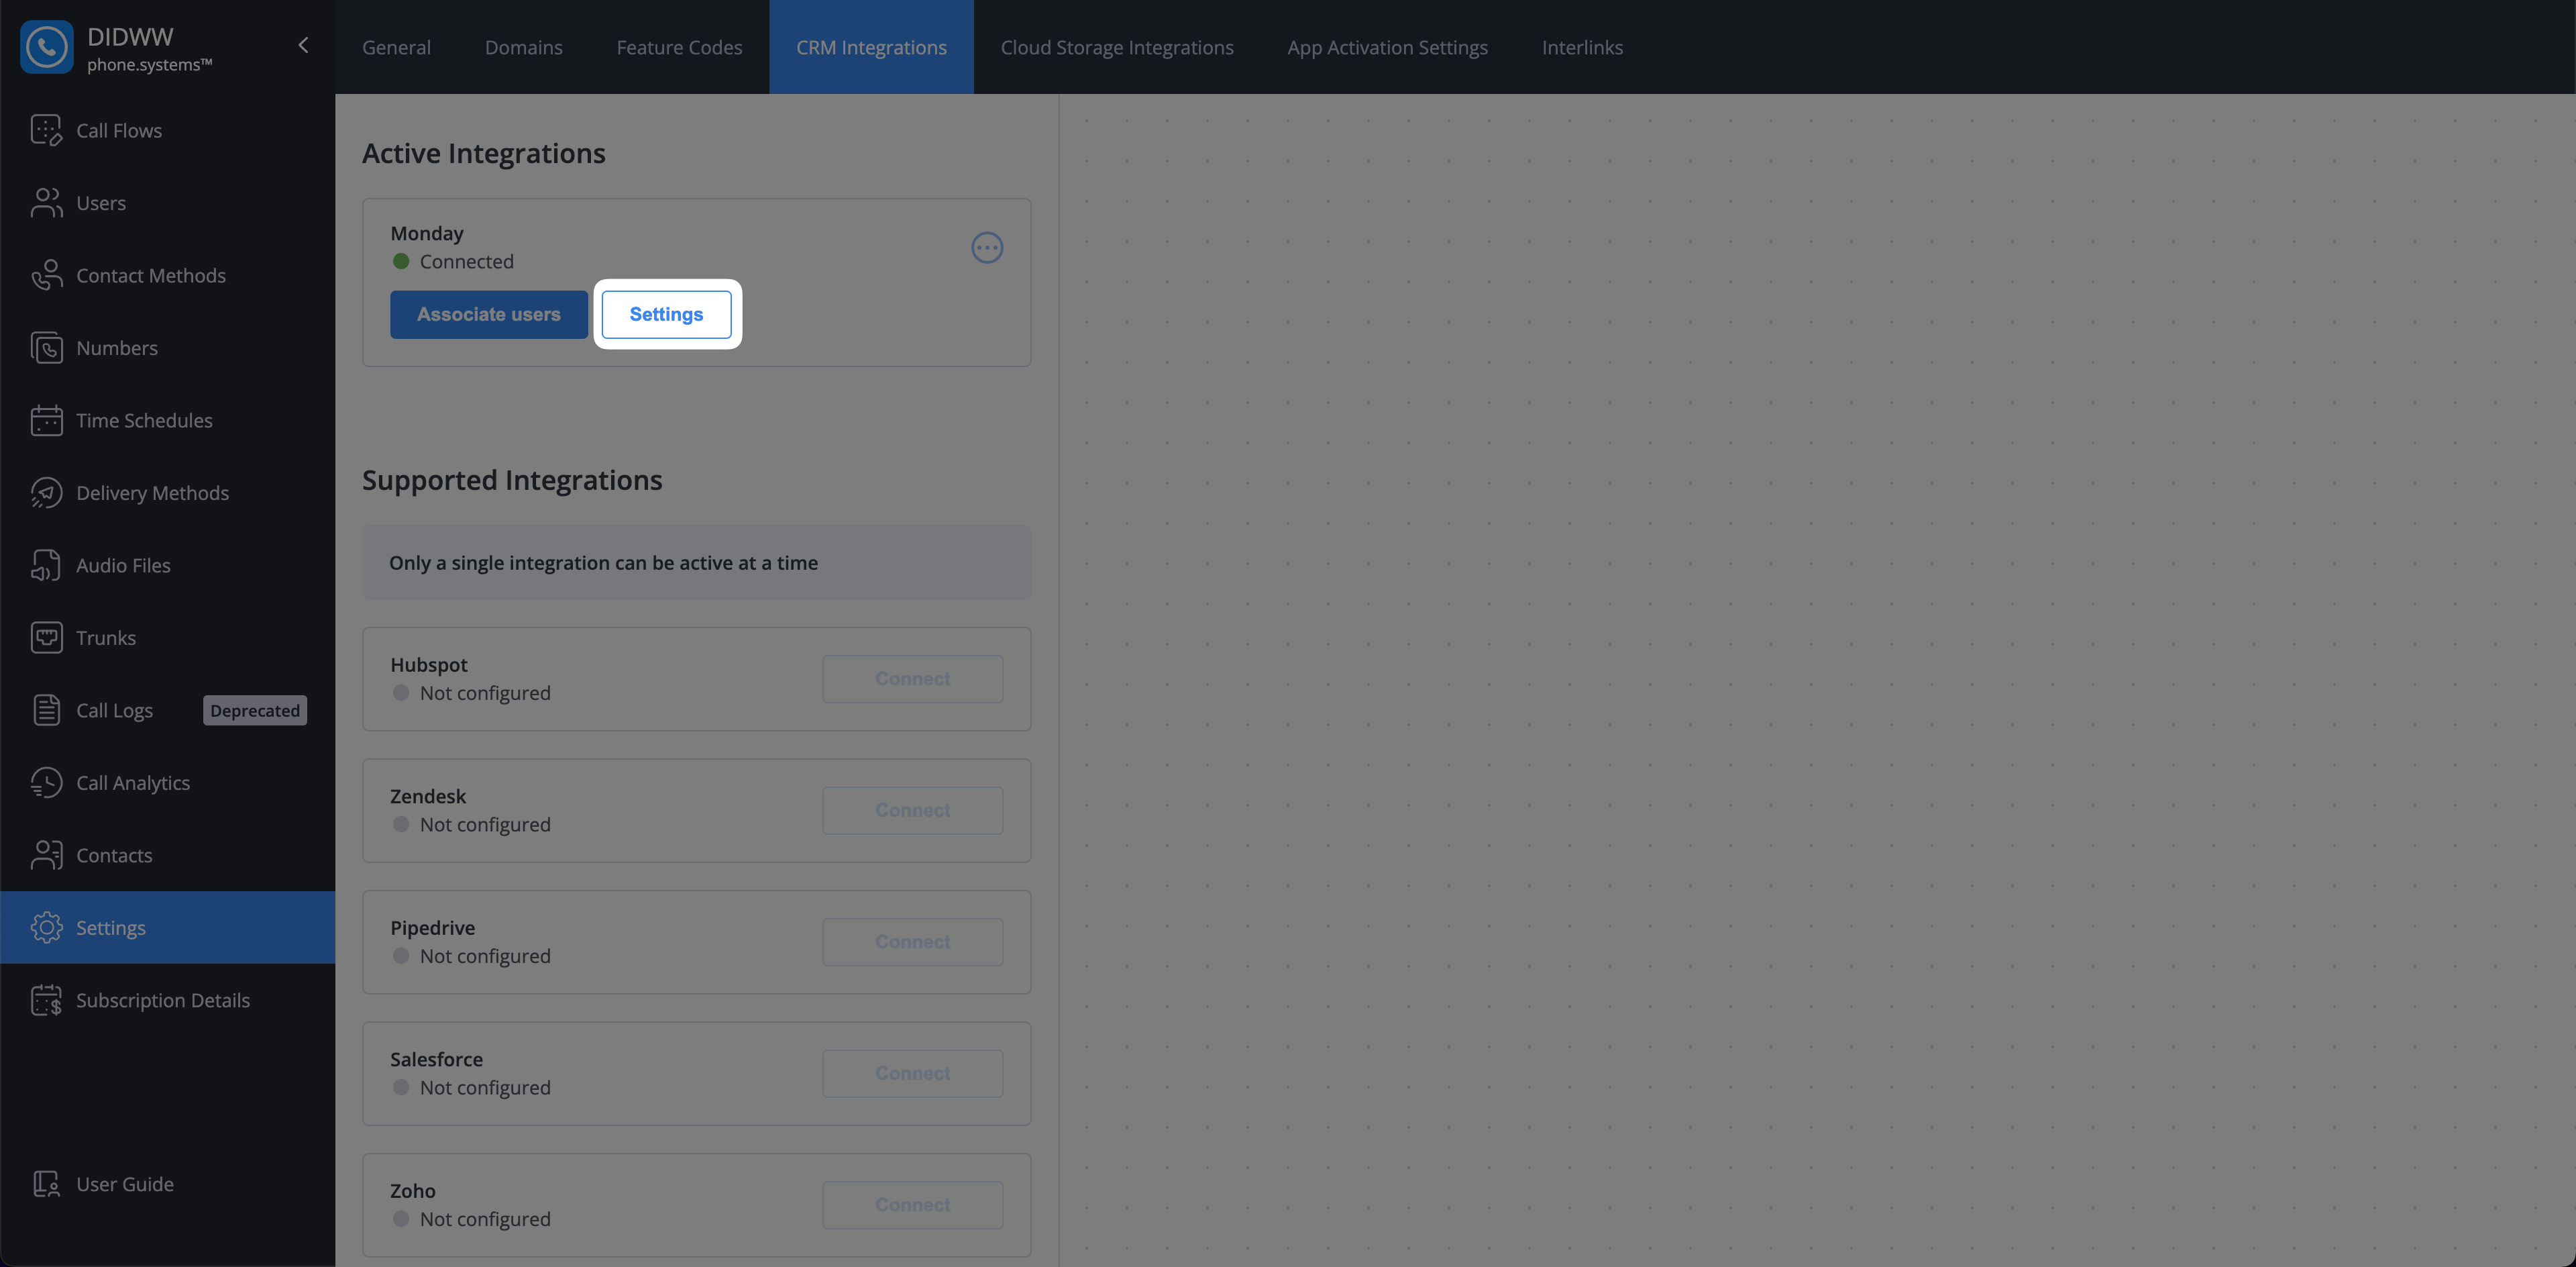
Fig. 11. monday.com integration settings button.#
Configuring the Call Journaling Board#
Important
The call journaling configuration below applies only to phone numbers that have Call journaling enabled. Enable journaling per number in the phone numbers menu.
To configure the board used for call journaling:
Navigate to Settings > CRM Integrations.
Locate your active monday integration and click the Settings icon.
On the integration settings page, click the Call journaling board should be configured link to open the configuration screen.
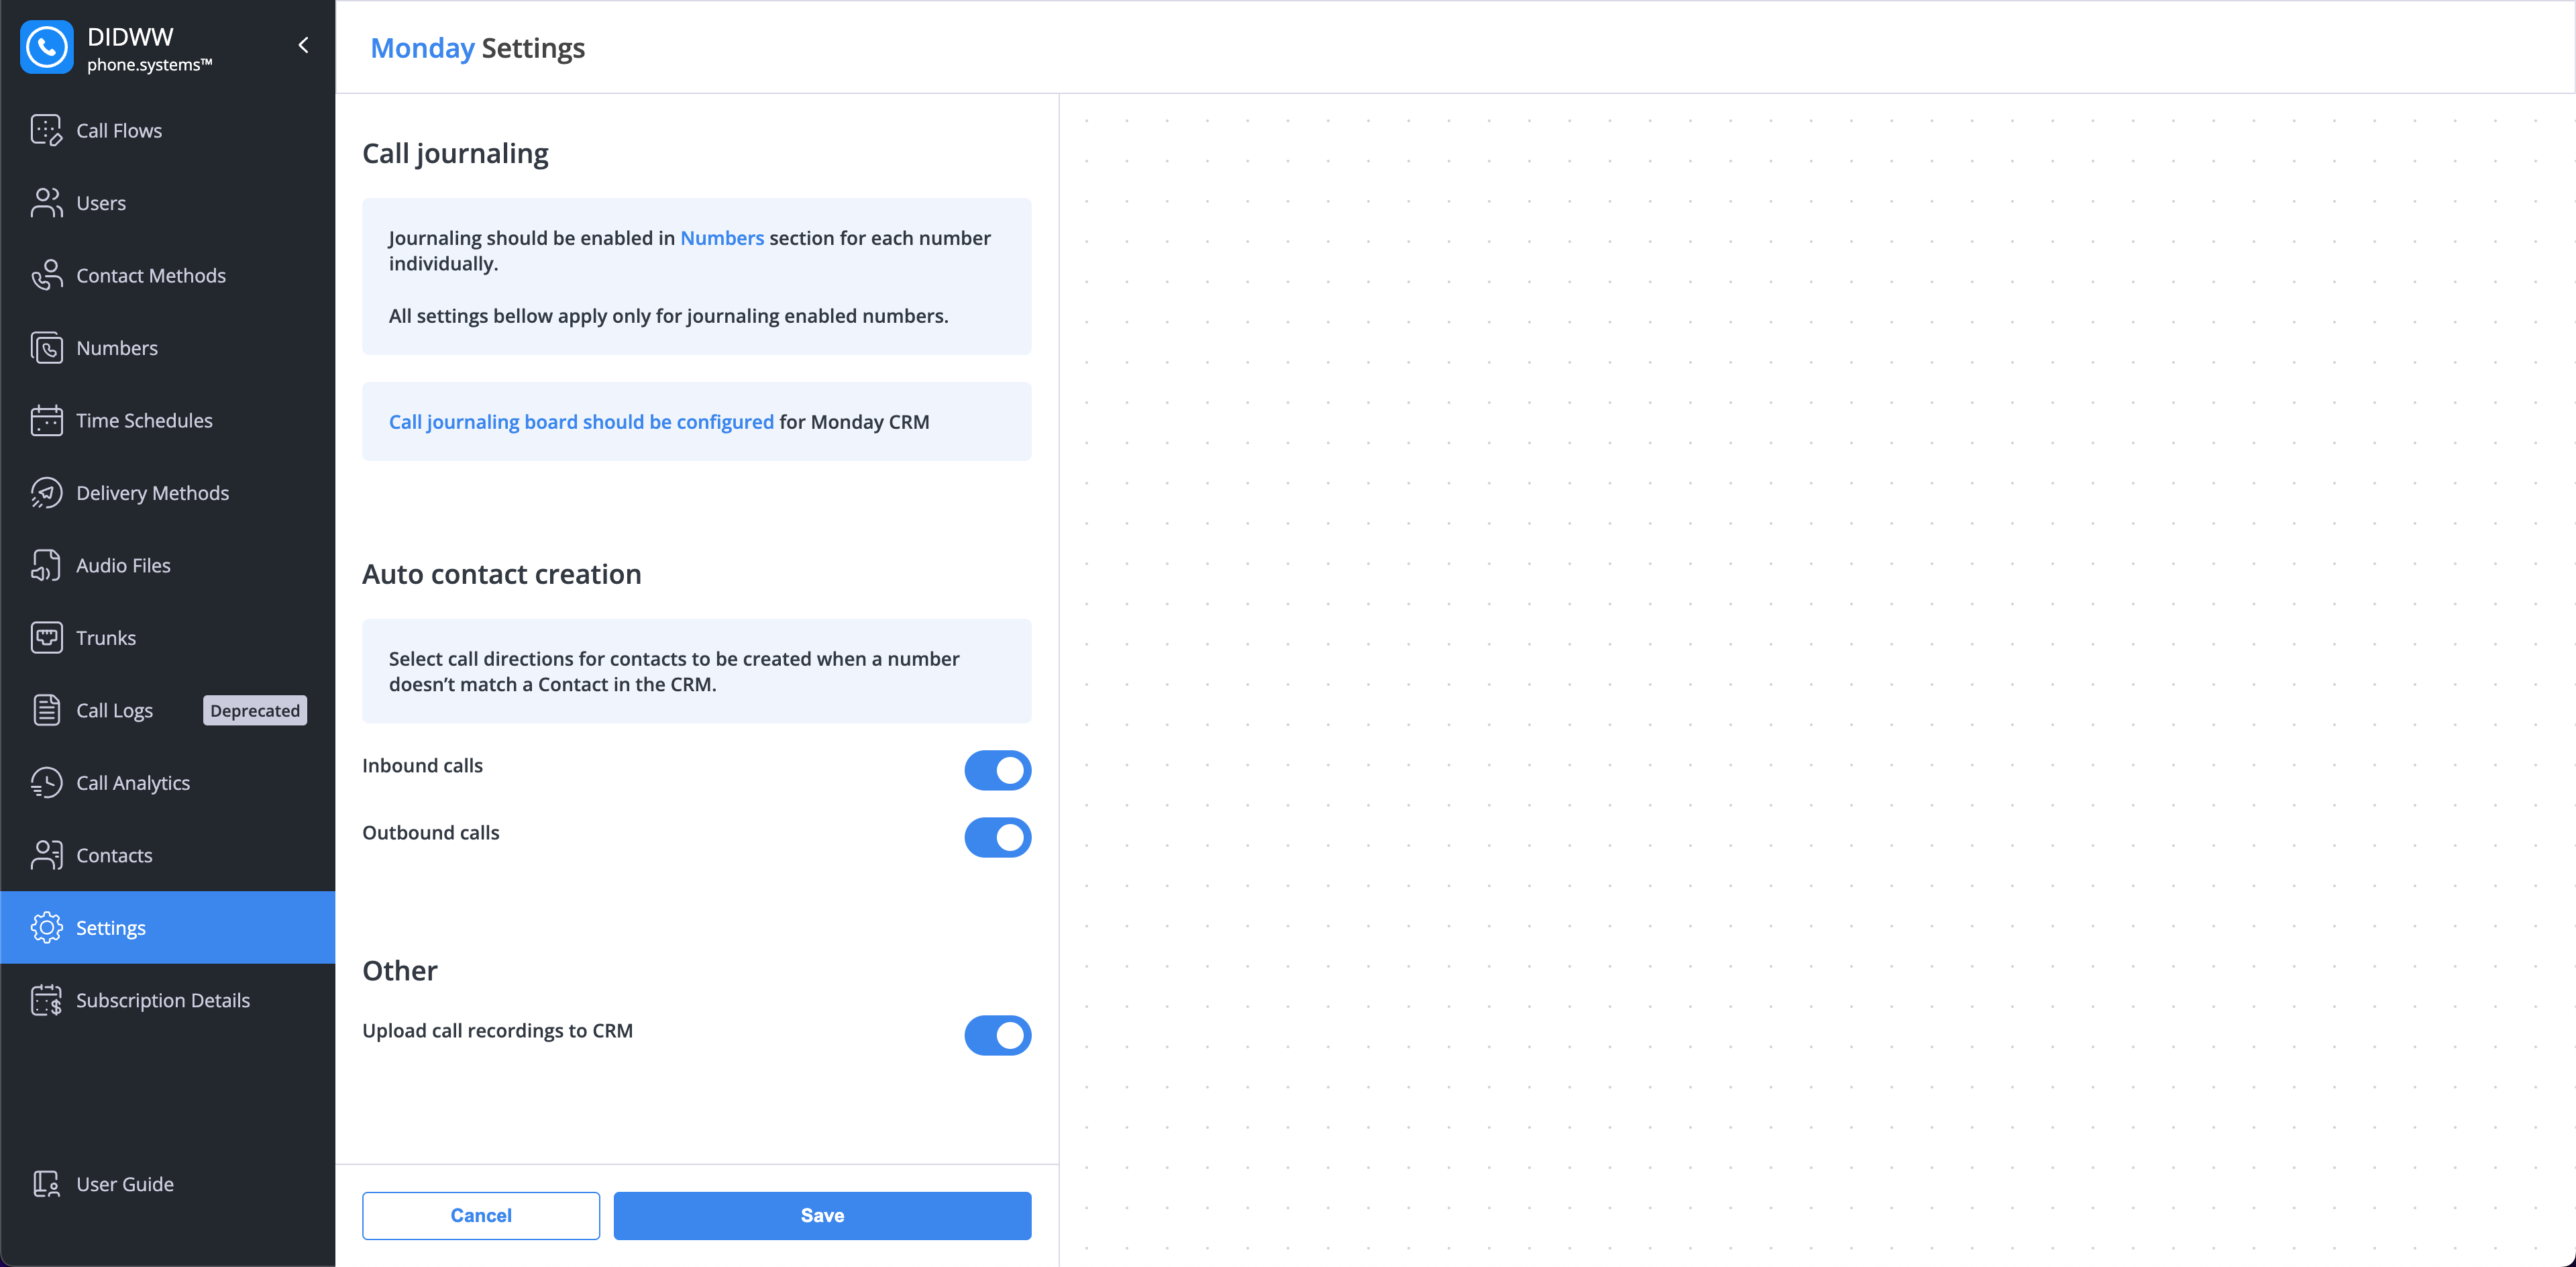
Fig. 12. Integration settings page.#
On this screen, you must configure the Call Journaling Board. At a minimum, map the Board and Contacts fields. All other fields are optional but recommended, as they enrich call logs with additional context.
Field |
Description |
|---|---|
Board |
Select the monday board where calls will be logged (for example, Calls). |
Owner |
Assigns ownership of the logged call item. |
Contact |
Connects the call entry to the Contacts column of your main table. This mapping is essential to ensure call journaling links to the appropriate contact. |
Status |
Maps the status field of the call (e.g., completed, missed). |
Call Direction |
Identifies whether the call was inbound or outbound. |
Date Connected |
Logs the date when the call was connected. |
Source Number |
The originating phone number of the call. |
Destination Number |
The called phone number. |
Call Duration |
The length of the call in seconds or minutes. |
Call Notes |
Free-text notes associated with the call. |
Call Recording |
If enabled, attaches the recording link to the logged call entry. |
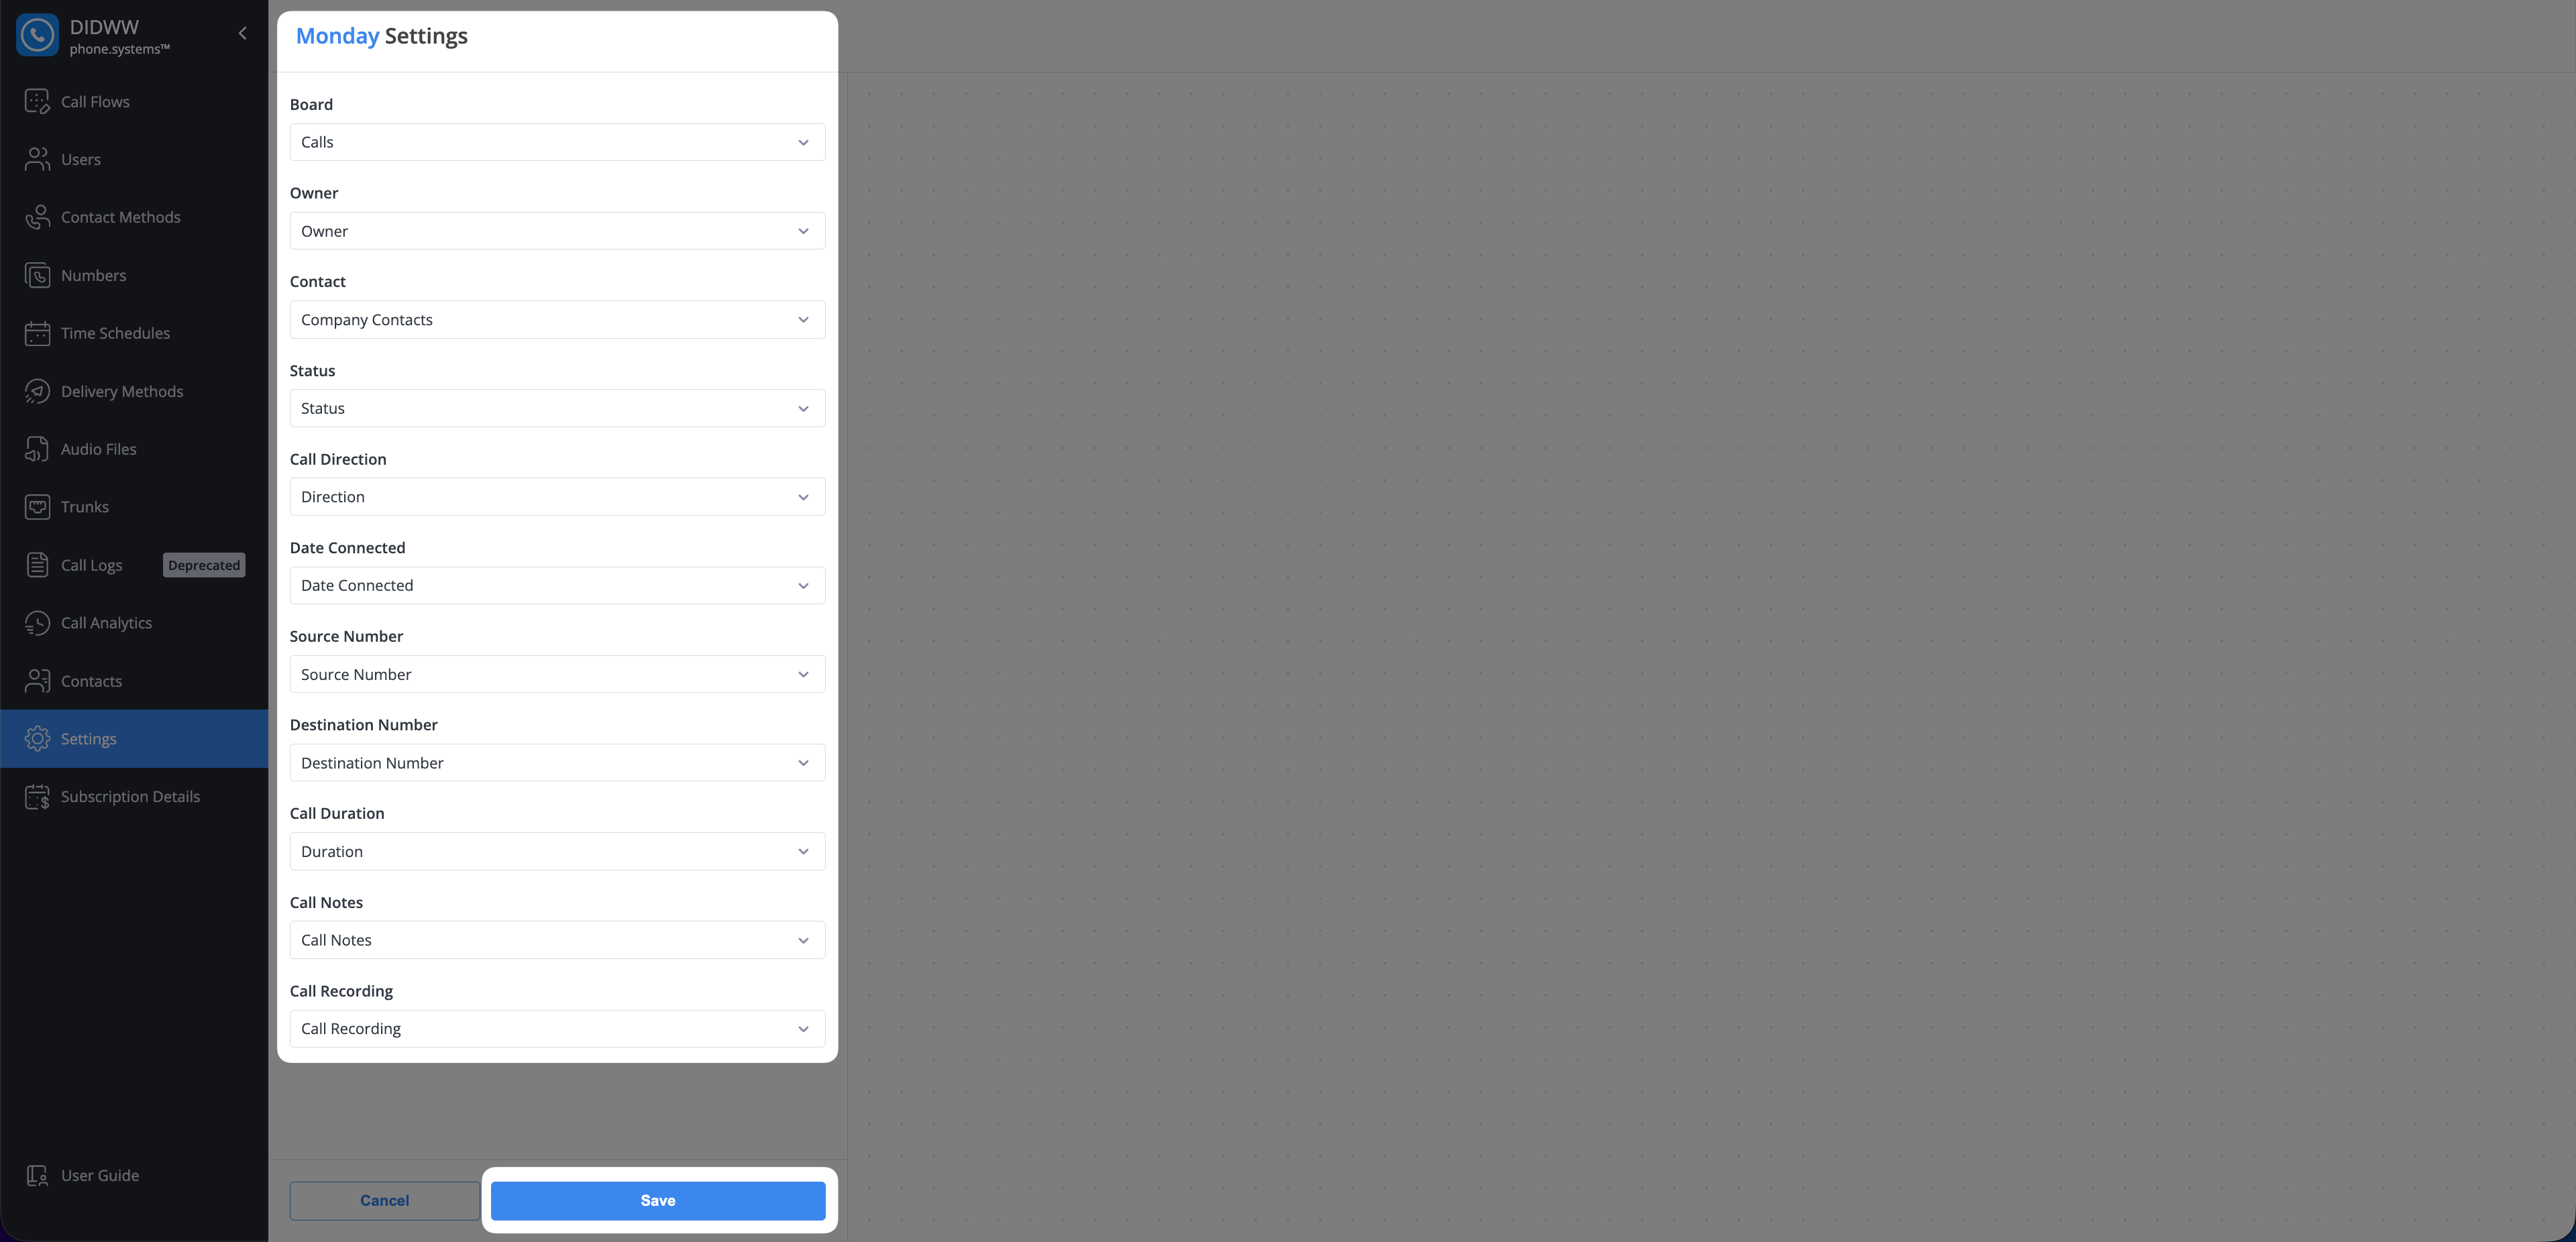
Fig. 13. Call journaling board configuration in monday CRM.#
Auto Contact Creation#
This feature automatically creates a new item in your selected monday board when a call is handled from a number that does not match an existing contact.
Setting |
Description |
|---|---|
Inbound calls |
Creates a new contact for all inbound calls from numbers not already in your contacts. |
Outbound calls |
Creates a new contact for all outbound calls to numbers not already in your contacts. |
Other Settings#
These settings control what additional call-related data is automatically uploaded to monday CRM.
Setting |
Description |
|---|---|
Upload call recordings to CRM |
When enabled, a link to the call recording will be automatically added to the call log in monday CRM. Note To utilize this feature, call recording must be enabled for your contact method. |
Upload AI call insights results |
When enabled, detailed analytics from our AI engine will be added to the call log. This can include:
Note To utilize the AI features, AI Call Insights must be enabled. |