Call History#
Review and manage call detail records (CDRs) for calls handled by phone.systems™.
Call History shows call direction, endpoints, timing, and outcome for each record. Use it to find calls by time range, status, or numbers, then open a record to confirm what happened (for example, why a call was lost or how it ended). It also shows assigned call tags and available attachments such as notes, recordings, voicemail, fax, and AI insights. You can also download filtered CDRs for reporting and resolve lost calls when required.
Important
The date and time displayed in Call History are based on the time zone settings of the device in use. For example, if the device is set to UTC+1, the CDRs will appear in the UTC+1 time zone.
Filters#
Filter |
Description |
|---|---|
Time range |
Filter records by a predefined or custom date and time range. |
Status |
Filter by call status (Answered, Lost, or Resolved). |
Type |
Filter by call direction (Inbound, Outbound, or Internal). |
Source |
Filter by the source type and value (for example, User or Incoming trunk). |
Source number |
Filter by the caller phone number. |
Destination |
Filter by the destination type and value (for example, User, Call Flow, PSTN, or Call Pick-Up). |
Destination number |
Filter by the dialed (destination) phone number. |
Source contact method |
Filter by the source-side contact method (for example, Application, SIP Account, SIP Forwarding, or PSTN Forwarding). |
Global tag |
Filter by the selected global tag. |
Tags |
Filter by one or more call tags assigned to the call. |
Has note |
Show only records with a saved call note. |
Has recording |
Show only records with a call recording. |
Has voicemail |
Show only records with a voicemail message. |
Has fax |
Show only records with a fax attachment. |
Has AI call insights |
Show only records with AI call insights. |
Note
Filters can be used individually or in combination. When multiple filters are applied, only call records that match all selected criteria are shown.
If you do not see all available filters, click More filters and add the filters you need.
Filters that accept free-text input (such as phone numbers) support multiple values separated by commas or spaces (for example,
123, 456or123 456).The Source and Destination filters display additional fields based on the selected type:
Selecting Source: User shows the Source user filter.
Selecting Source: Incoming trunk shows the Inbound trunk filter.
Selecting Destination: User shows the Destination user filter.
Selecting Destination: Call Flow shows the Call Flow filter.
Use these additional filters to select a specific user, inbound trunk, or call flow.
Call History Table#
The Call History table displays one record per call detail record (CDR) processed by phone.systems™.
Column |
Description |
|---|---|
Type |
Icon that indicates the call direction. Learn more about Call Direction. |
Time start |
The date and time when the call was initiated. |
Wait time |
The duration between call initiation and connection. |
Talk time |
The duration of the call after it was connected. |
Source |
The call origin displayed as a single cell with stacked details. Learn more about Source. |
Source number |
The phone number from which the call originated. |
Destination number |
The phone number the call was routed to. |
Destination |
The call destination displayed as a single cell with stacked details. Learn more about Destination. |
End code |
The reason the call ended. Learn more about End codes. |
Status |
The current or final call status. Learn more about Status. |
Resolved by |
Resolution details for lost or resolved calls. Learn how to resolve lost calls. |
Tags |
Assigned call tags displayed for the call record Learn more about tags. |
Attachments |
Indicators for available notes, AI insights, or media files. Learn more about Call attachments. |
Routing attempt |
The number of routing attempts made for the call. |
Call ID |
The unique identifier of the call record. |
Note
Some columns display icons and stacked labels to show related information in a single cell, such as Source, Destination, Tags, and Attachments.
Call History Table Column Details#
The Call History table includes several columns that use labels, icons, or stacked values to represent call direction, endpoints, outcomes, and available attachments. Use these definitions when you need to interpret a record accurately for example, to confirm who initiated the call, where it was routed, why it ended, or whether recordings and other media are available.
Type: Call Direction#
Call direction explains what kind of call the record represents: inbound to your organization, outbound from a user, or internal between users. Use it when filtering call records, investigating missed calls, or confirming whether a call came from outside the organization or was placed by a user.
The Type column indicates the call direction from the system perspective, based on how the call enters and exits phone.systems™.
Inbound - A call received by a phone.systems™ user.
Outbound - A call initiated by a phone.systems™ user.
Internal - A call between users using internal numbers.
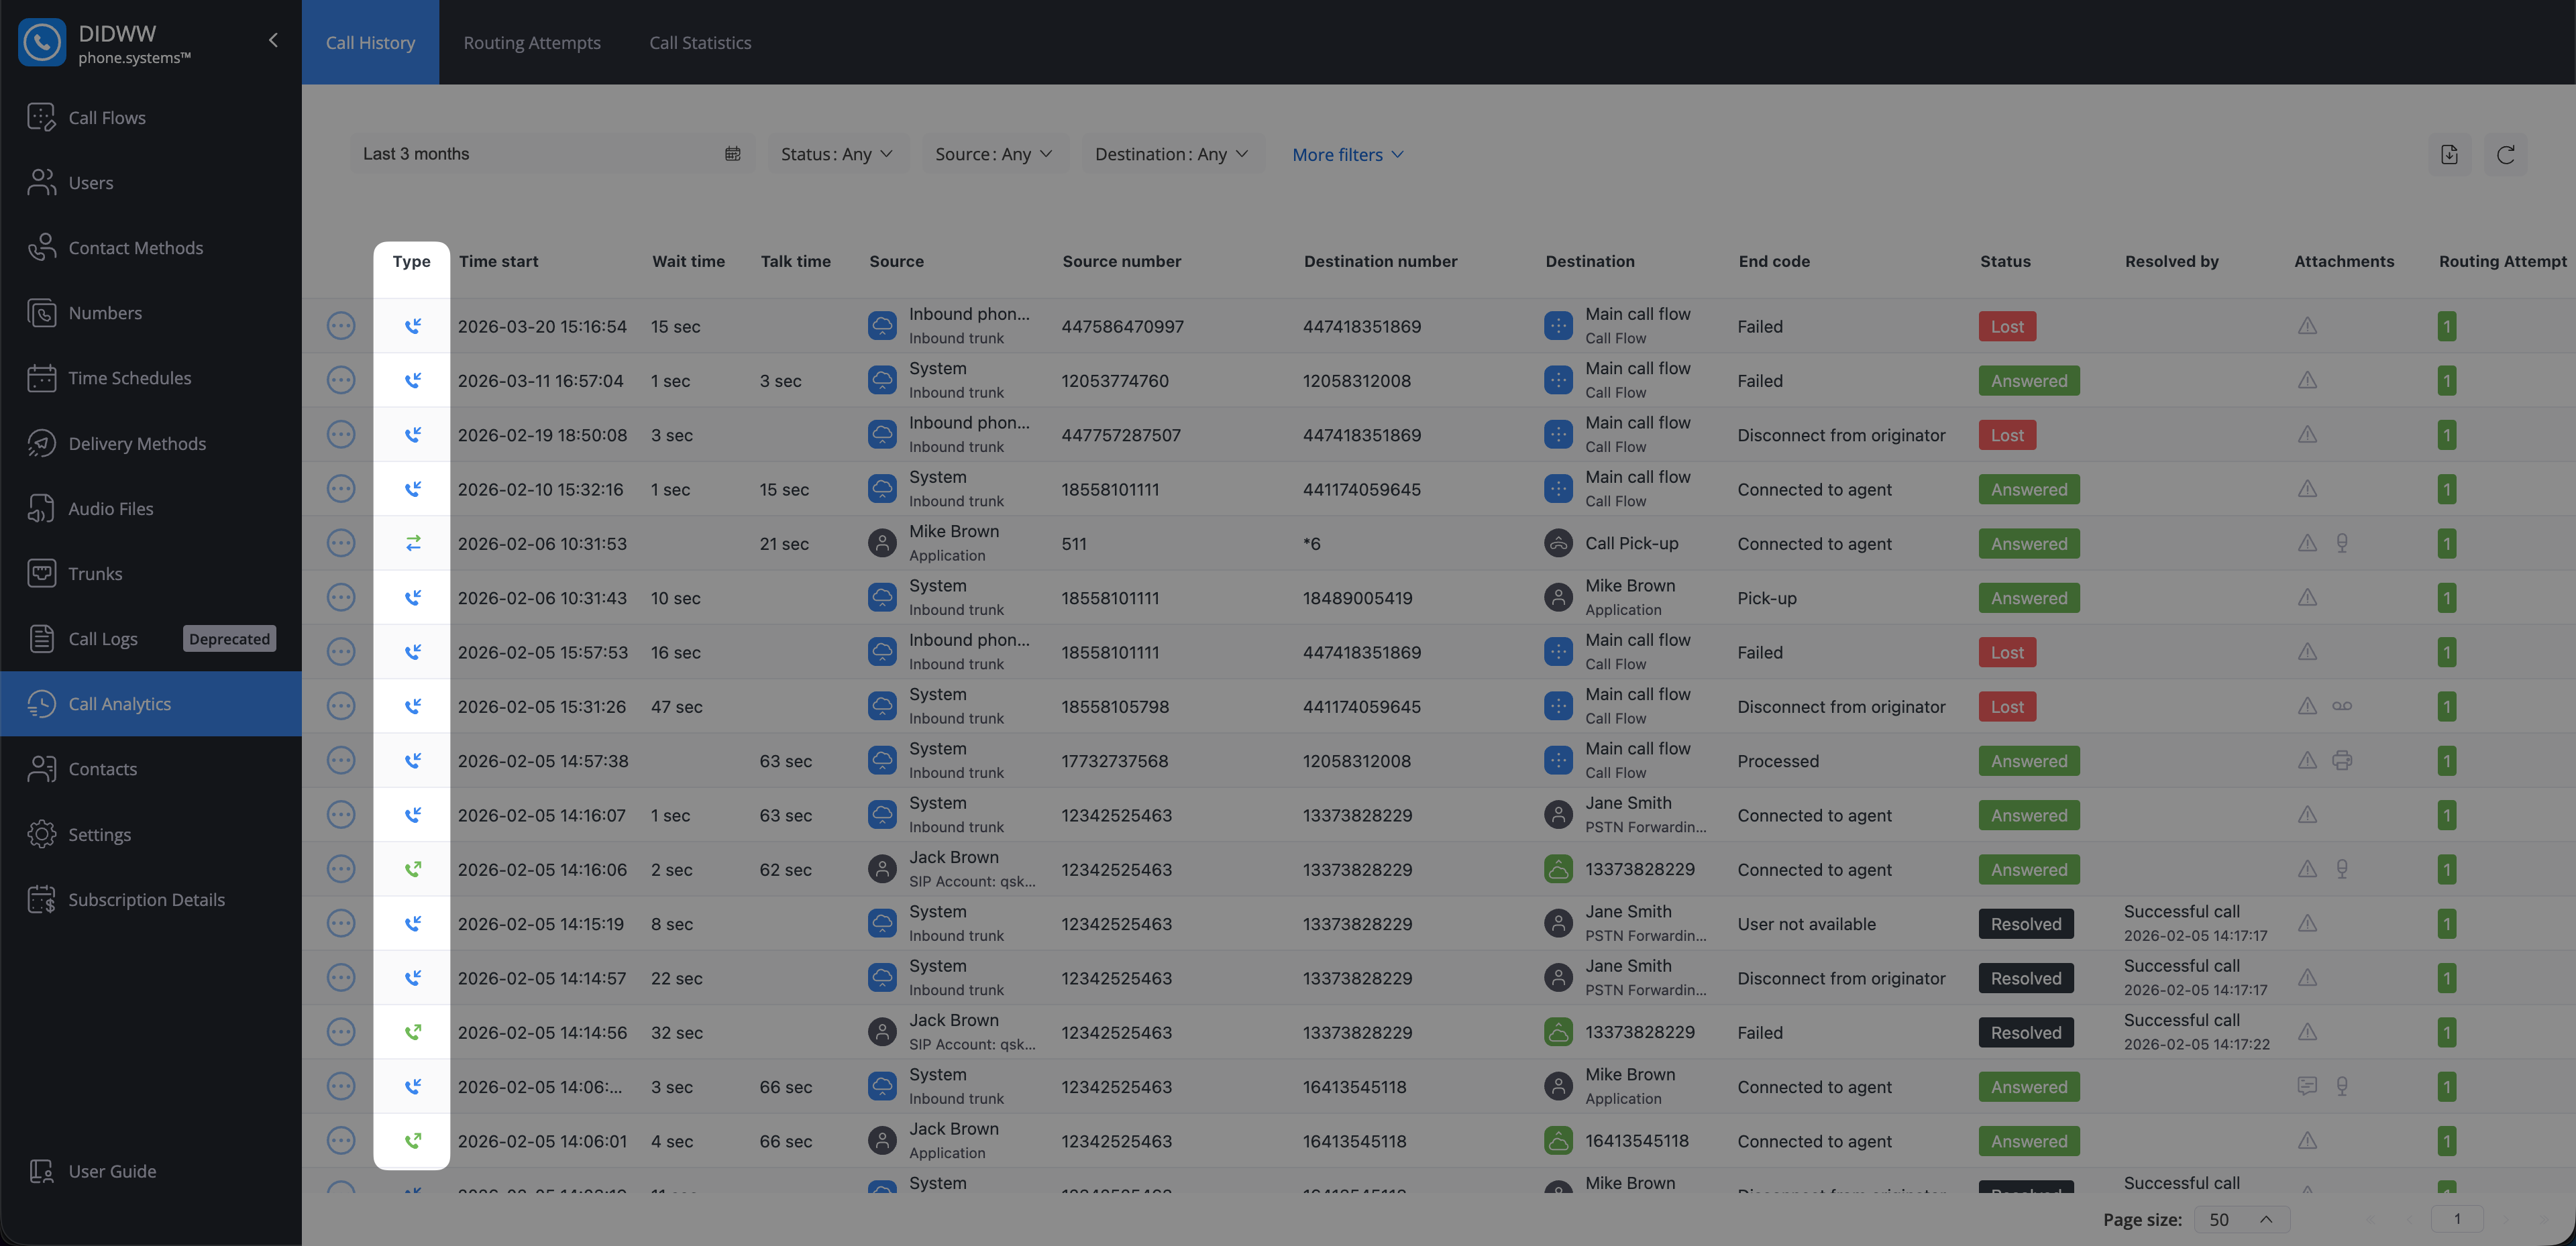
Fig. 1. Type column showing call direction#
Source#
Source shows where the call came from and how it entered phone.systems™. Use it to confirm whether the call was initiated by an internal user or received through an inbound trunk, especially when troubleshooting call issues or validating call origin.
The Source value is displayed differently depending on its type.
User source type means the call was initiated by a user in your organization using a configured contact method.
The source cell is displayed as a stacked value:
The top line shows the user name.
The second line shows the contact method used to place the call (for example, Application or SIP Account).
Note
If a user no longer exists, the user is shown as Deleted.
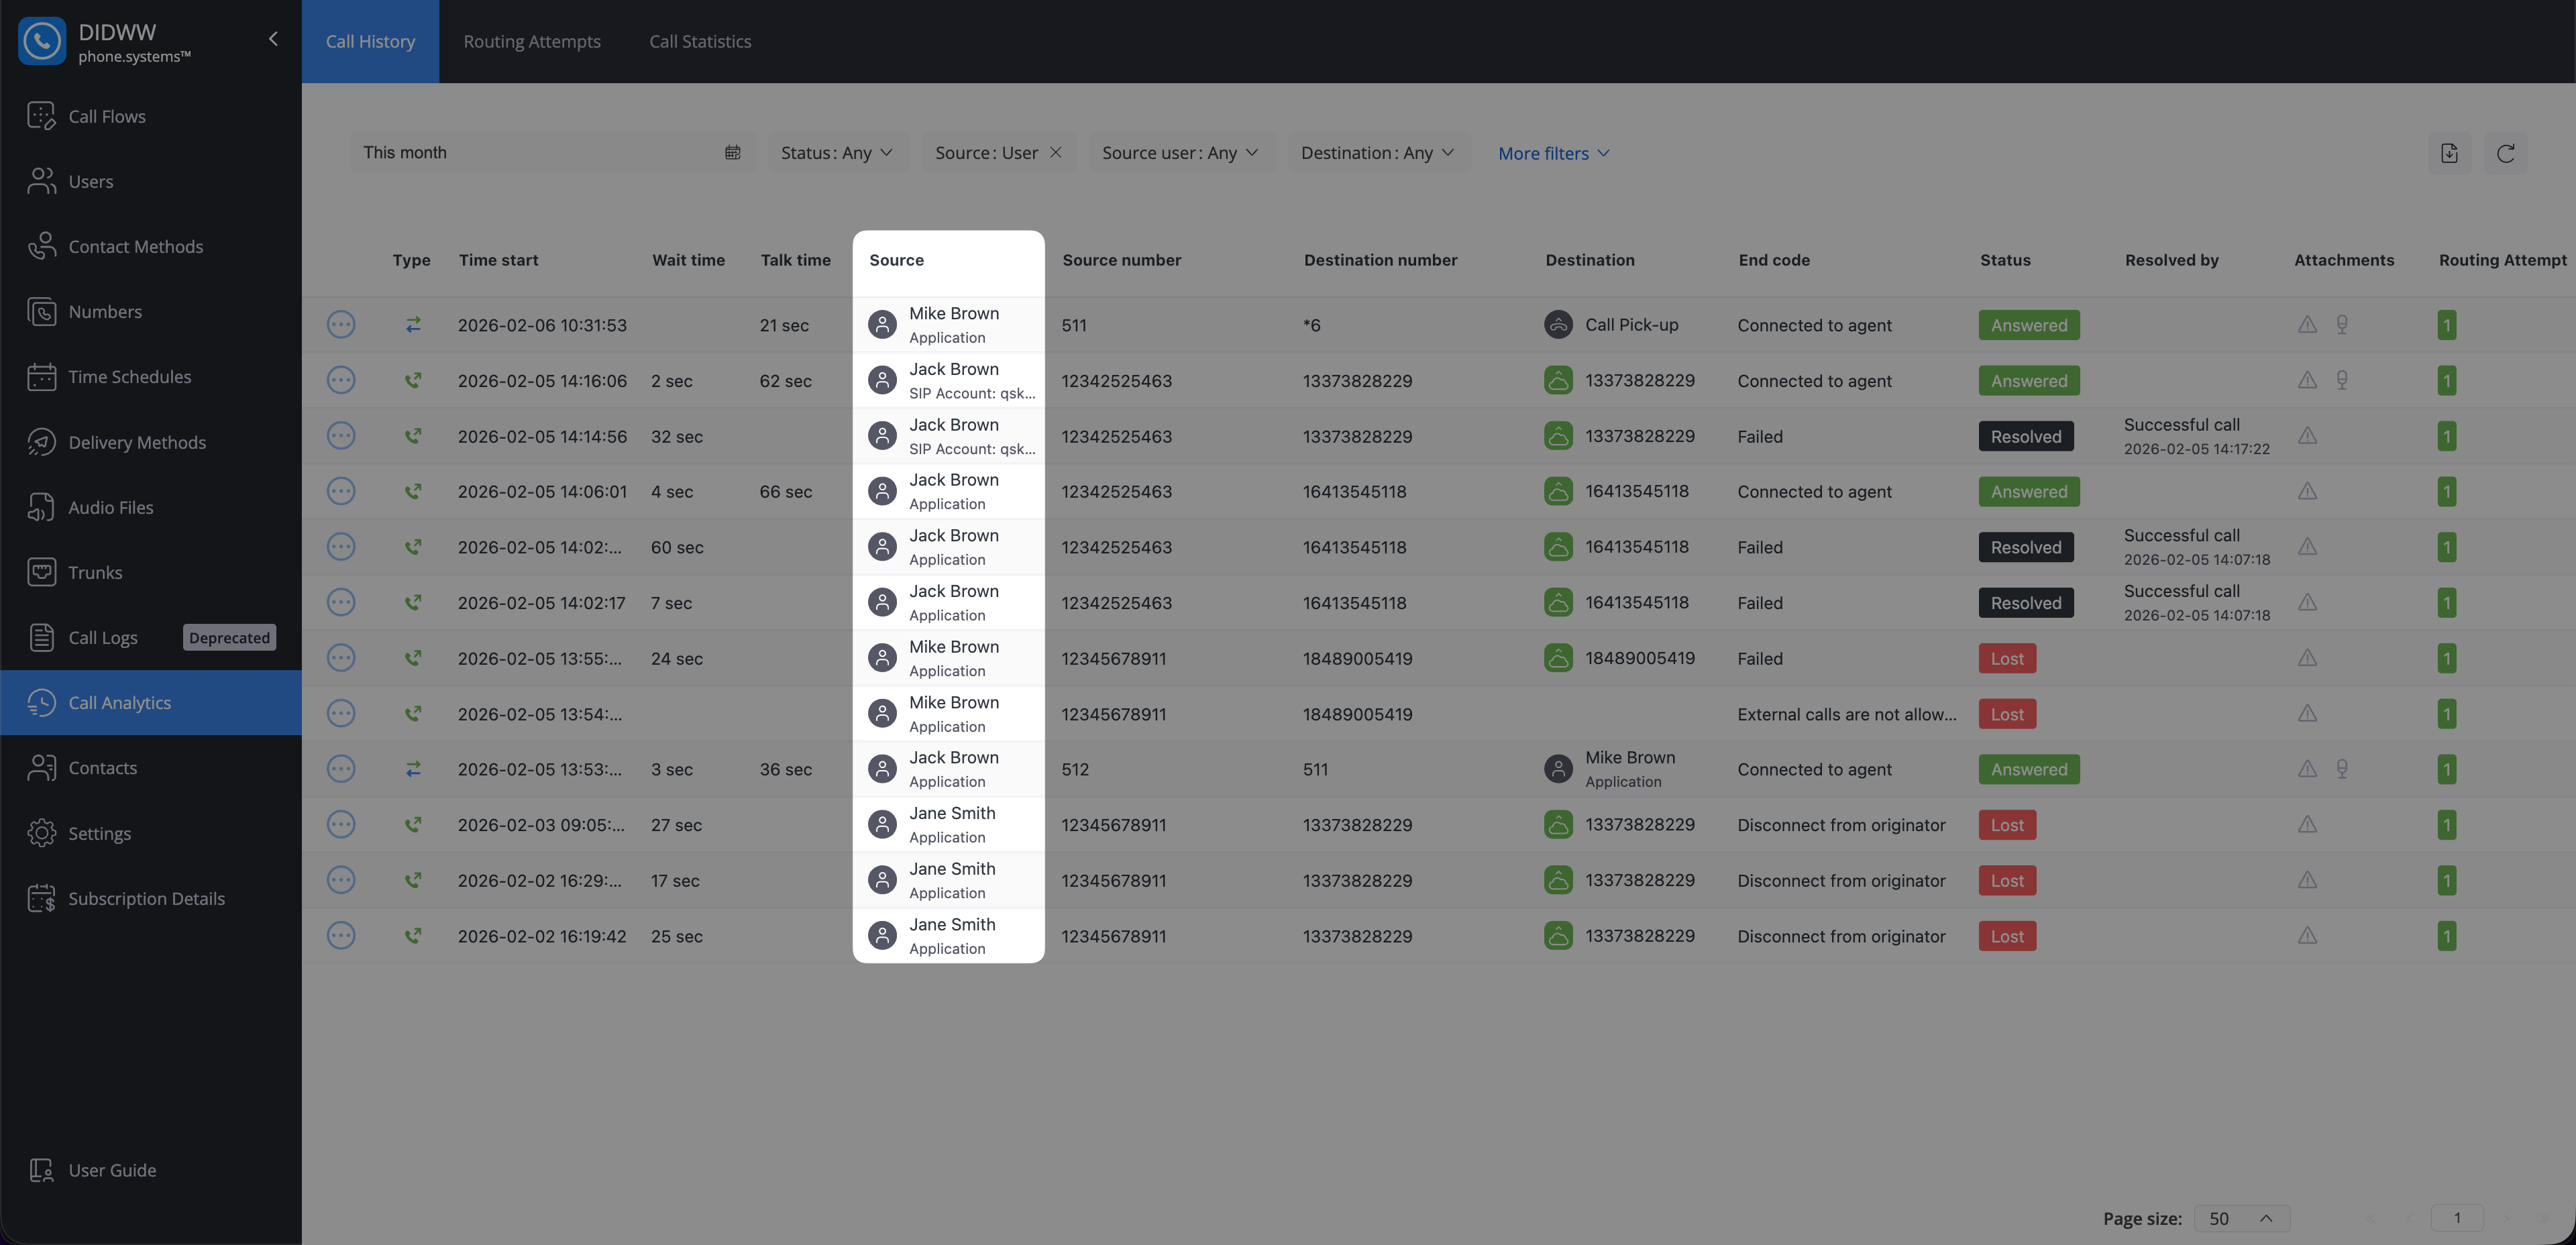
Fig. 2. Source column for a user-originated call#
Incoming trunk source type means the call entered phone.systems™ from the PSTN through an inbound trunk.
The source cell is displayed as a stacked value:
The top line shows the inbound trunk name.
The second line shows the source type (for example, Inbound trunk).
This source type indicates that the call was received from the PSTN, either through a DIDWW-managed trunk or a third-party trunk connected to phone.systems™.
Note
The default DIDWW-managed phone.systems™ trunk is shown as System.
If an inbound trunk no longer exists, the trunk is also shown as Deleted.
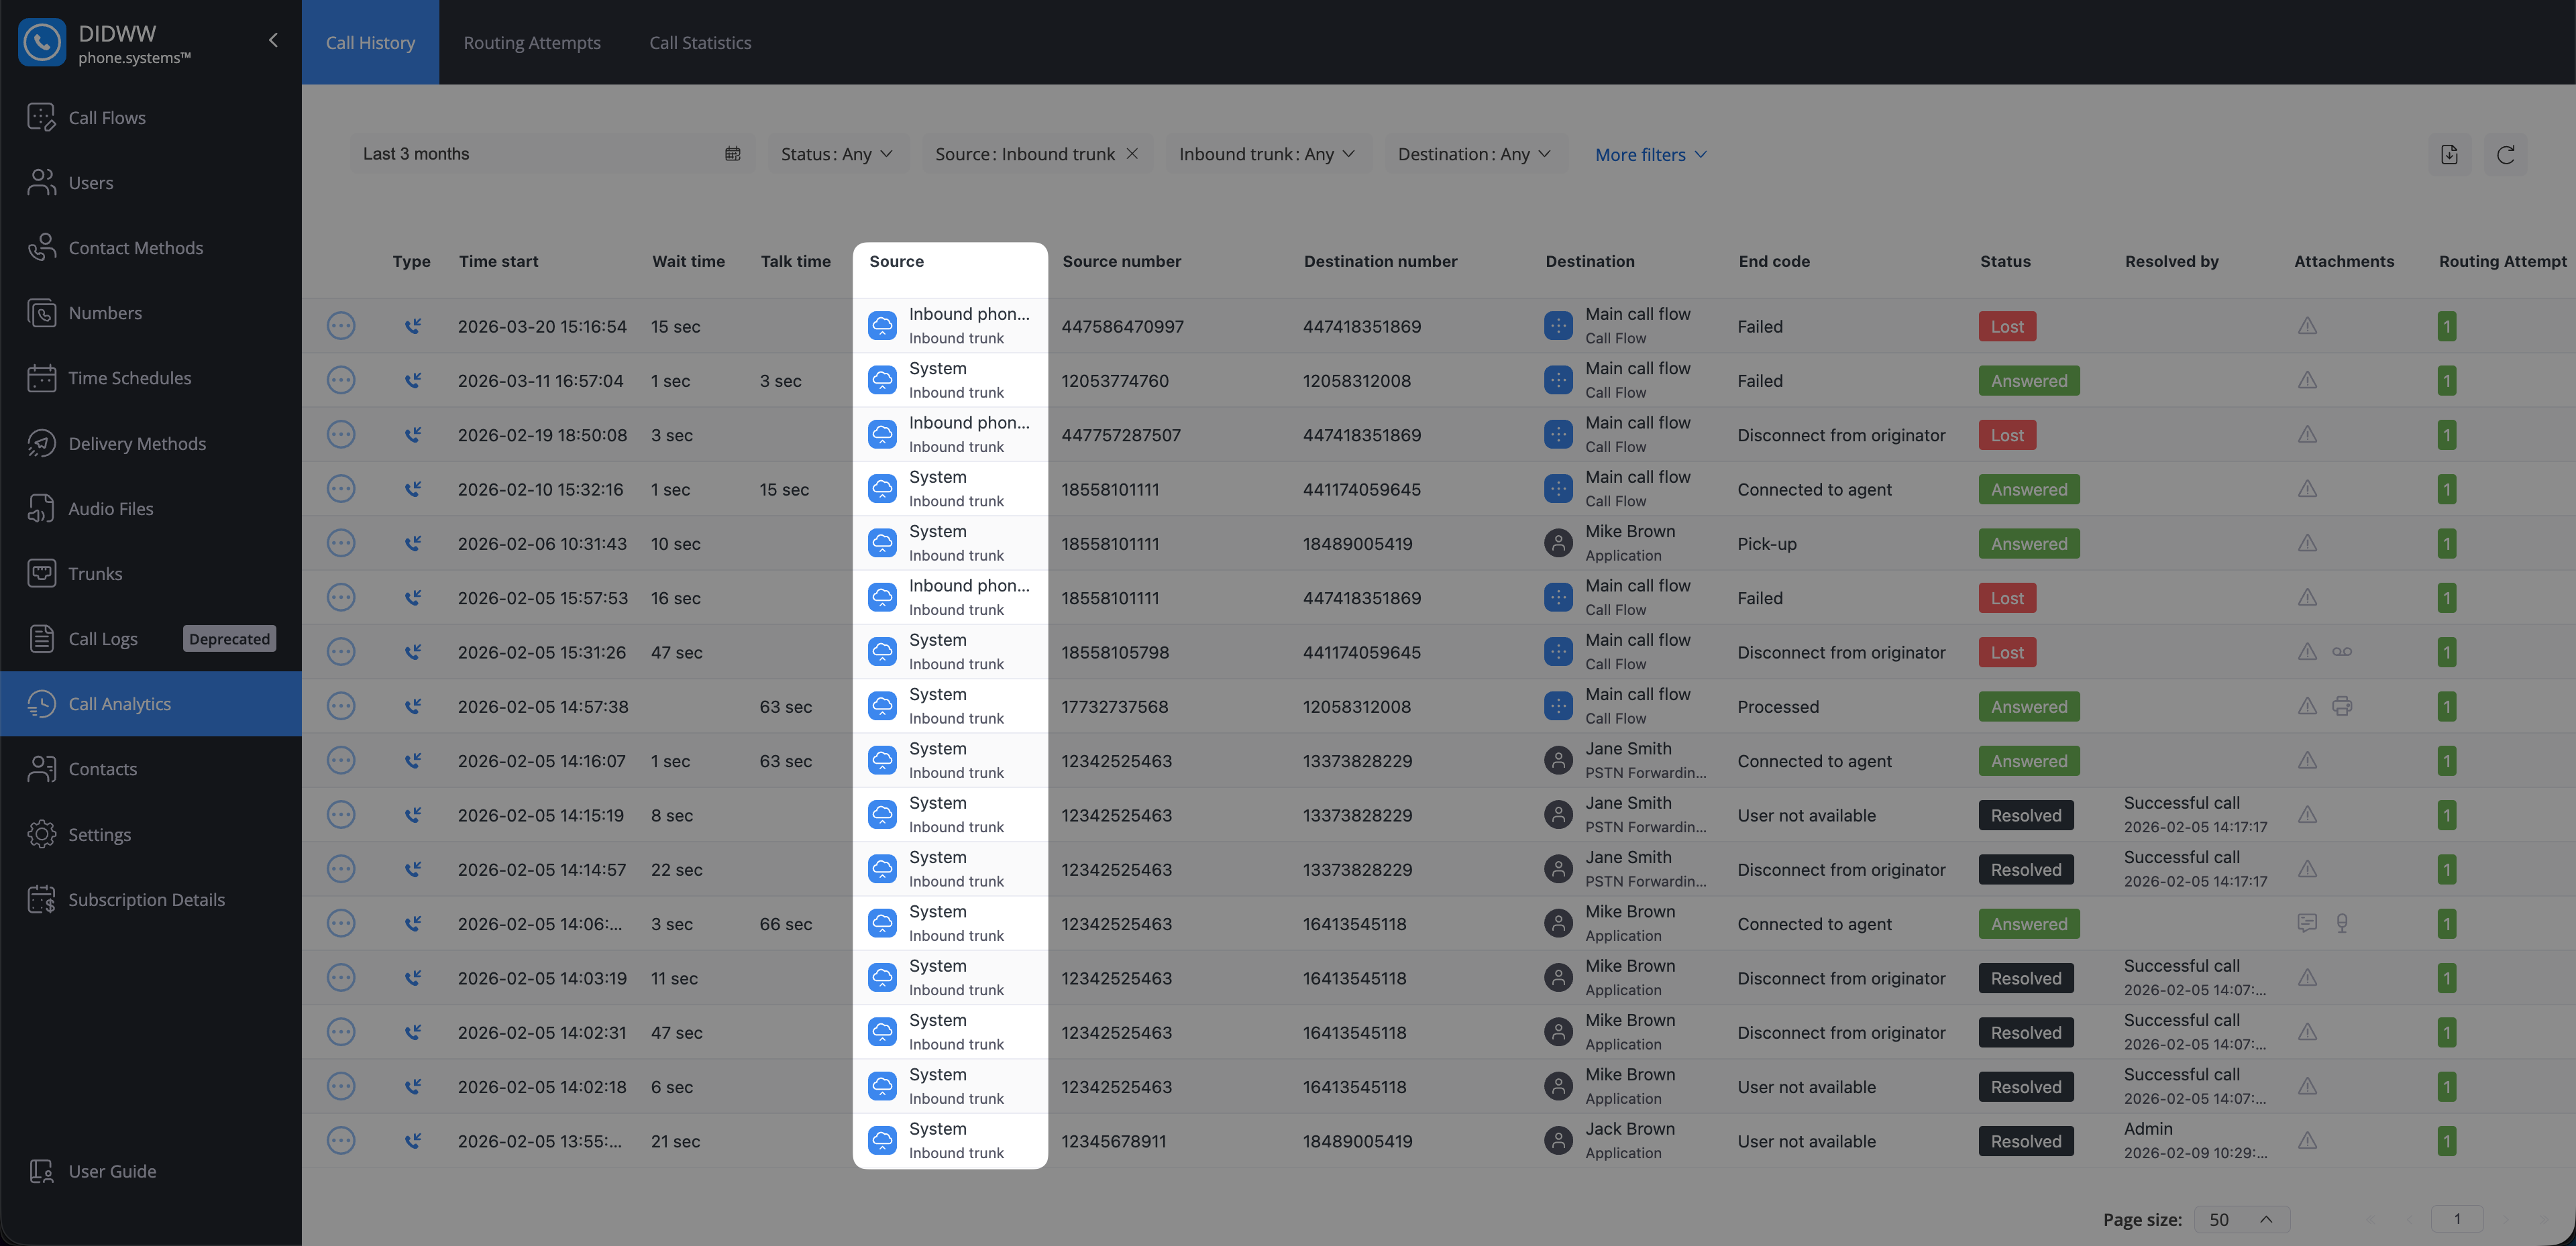
Fig. 3. Source column for a call received via an incoming trunk#
Destination#
Destination shows where the call was routed by phone.systems™. Use it to confirm which user, number, or routing component received the call—for example, when troubleshooting missed calls, validating call flow behavior, or checking where an inbound call was forwarded.
The Destination value is displayed differently depending on its type.
Note
Destination may be empty if the call is rejected by the system (for example, when calling a non-existing number).
If the referenced user, call flow, or contact method no longer exists, the value is shown as unknown.
User destination type means the call was routed to a user in your organization.
The destination cell is displayed as a stacked value:
The top line shows the user name.
The second line shows the destination contact method (for example, Application or PSTN Forwarding).
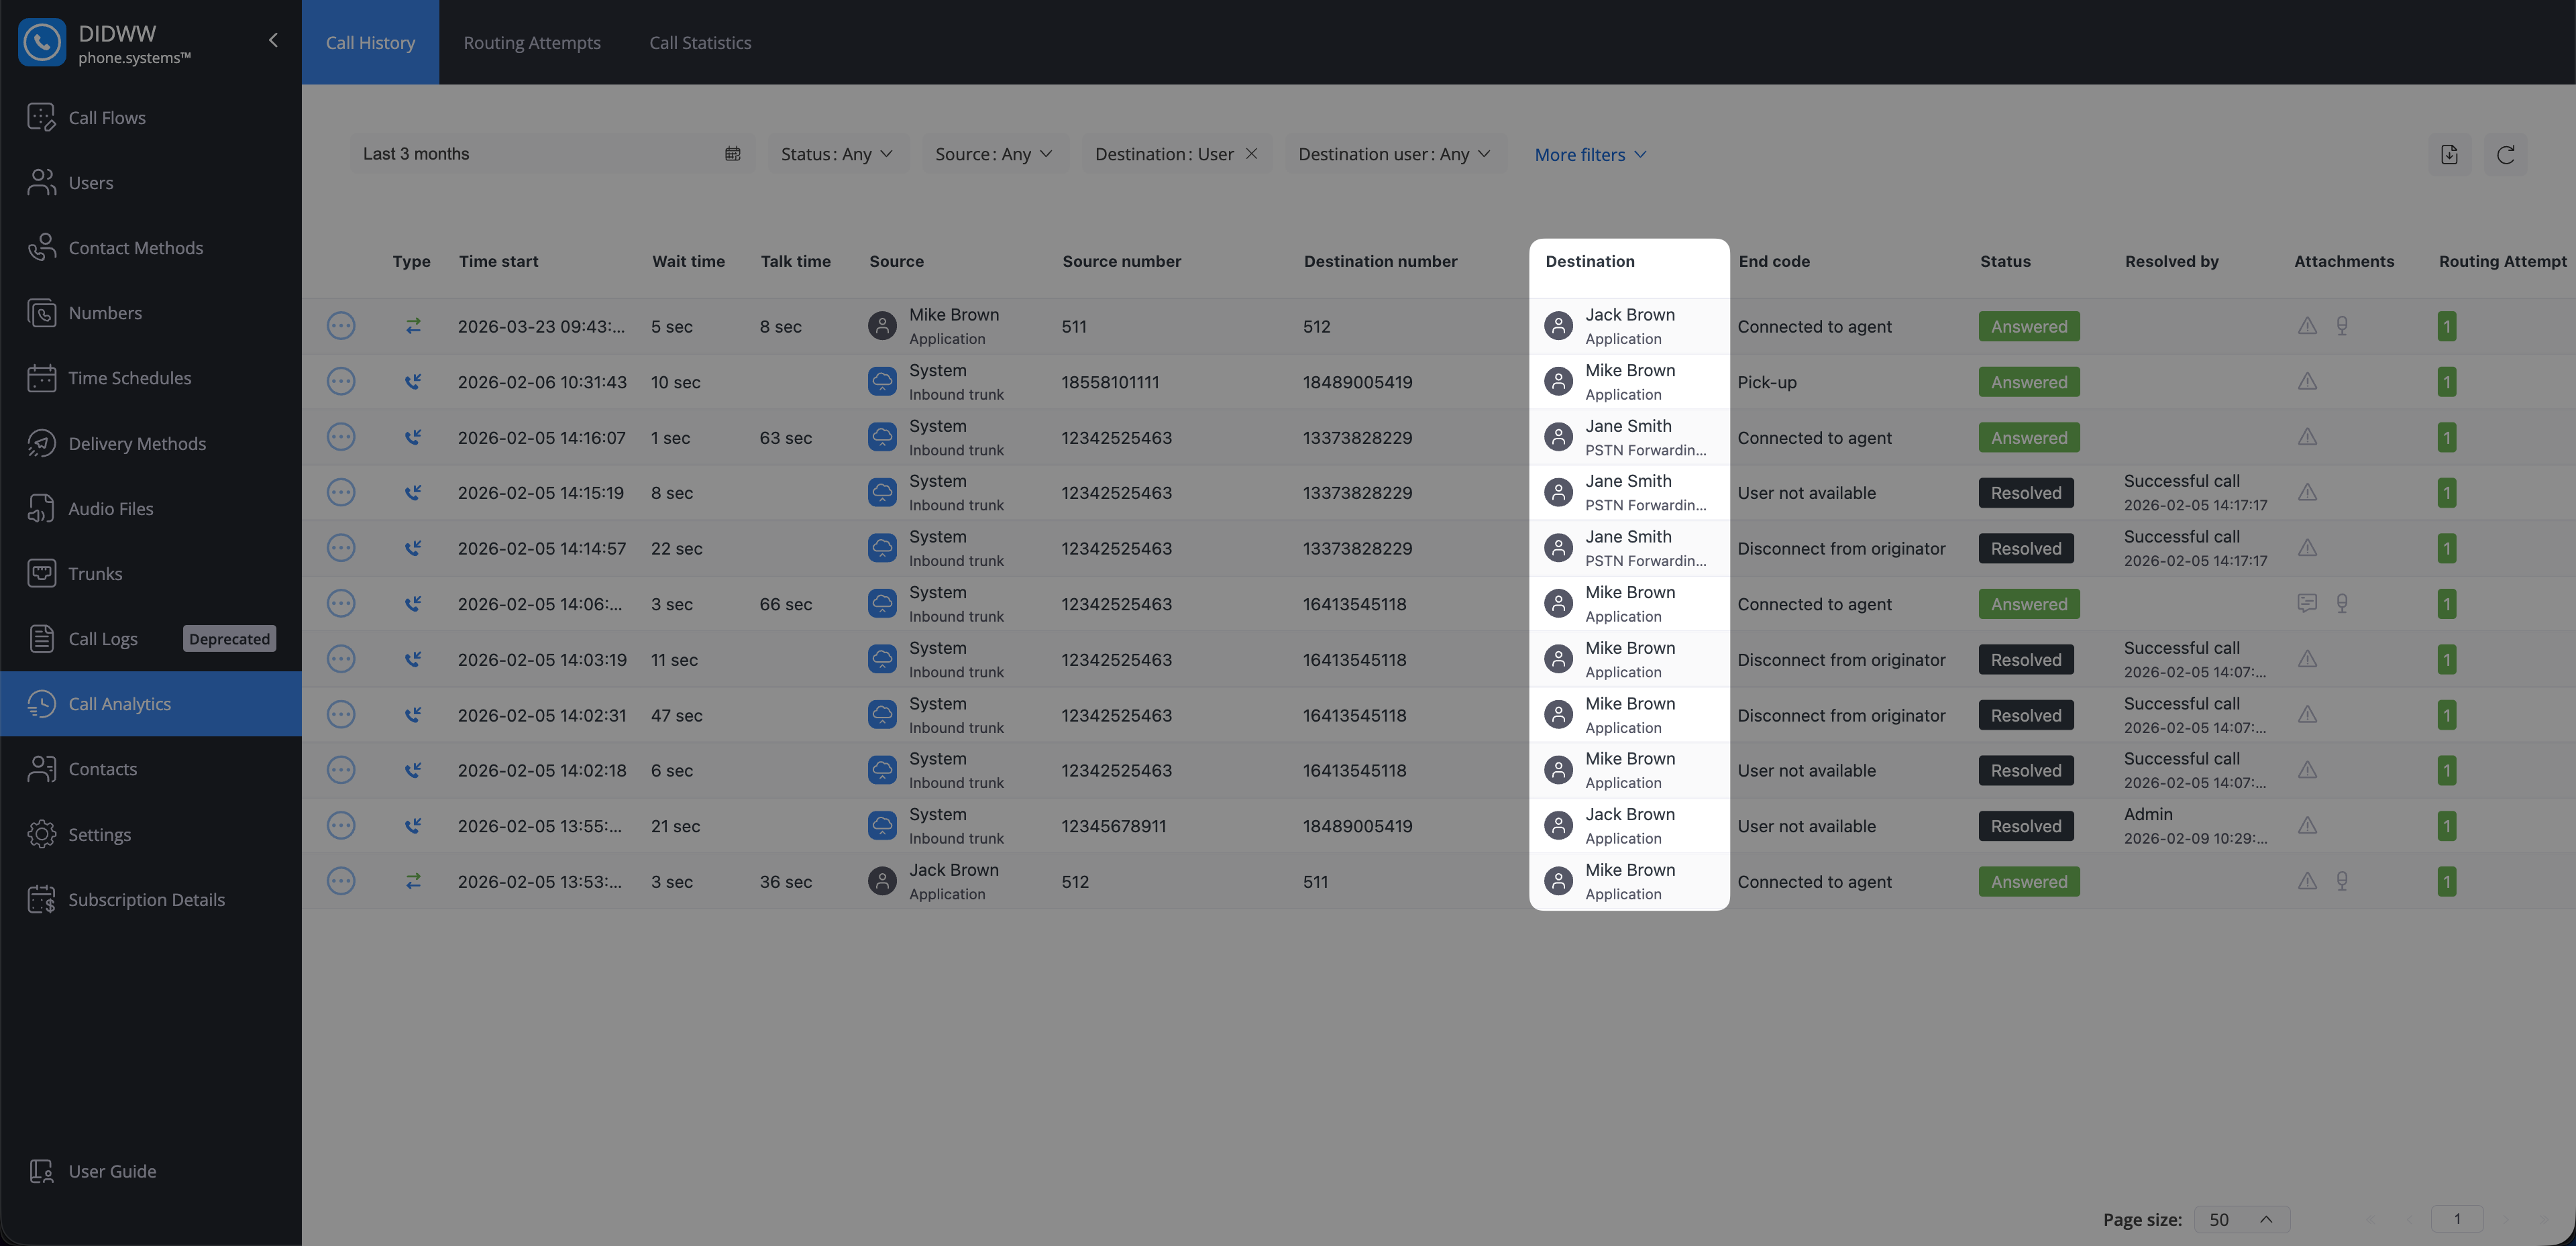
Fig. 4. Destination column for a user#
PSTN destination type means the call was routed to a public phone number.
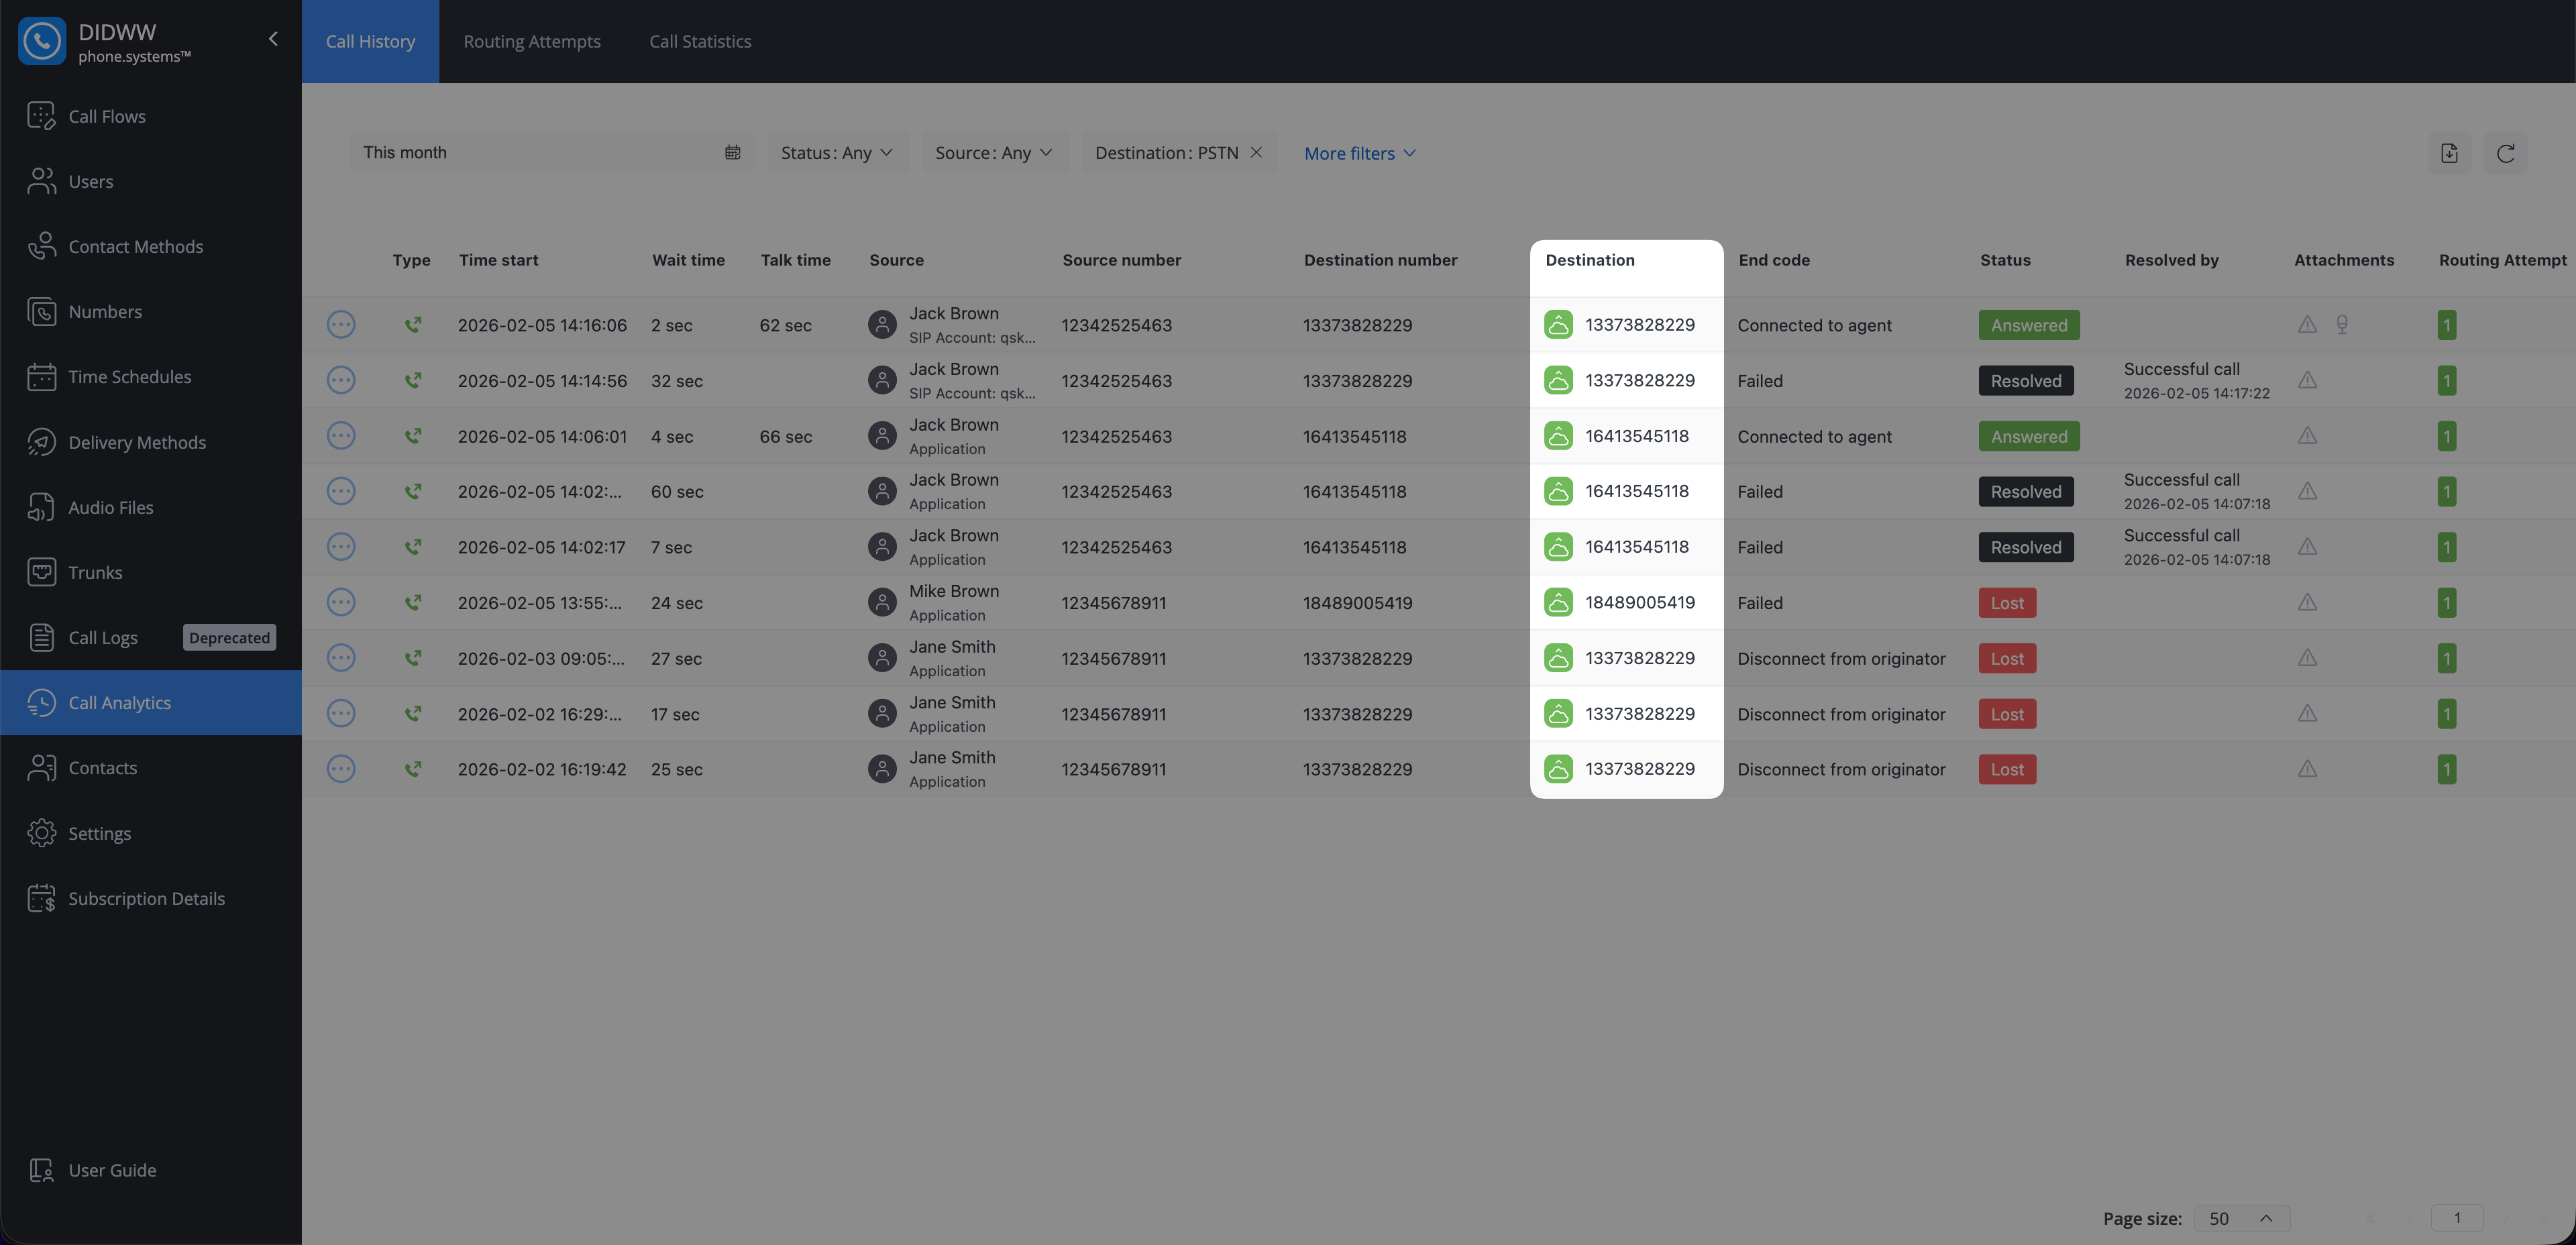
Fig. 5. Destination column for a PSTN destination#
Call Flow destination type means the call was routed to a call flow.
The destination cell is displayed as a stacked value:
The top line shows the call flow name.
The second line shows the destination type (Call Flow).
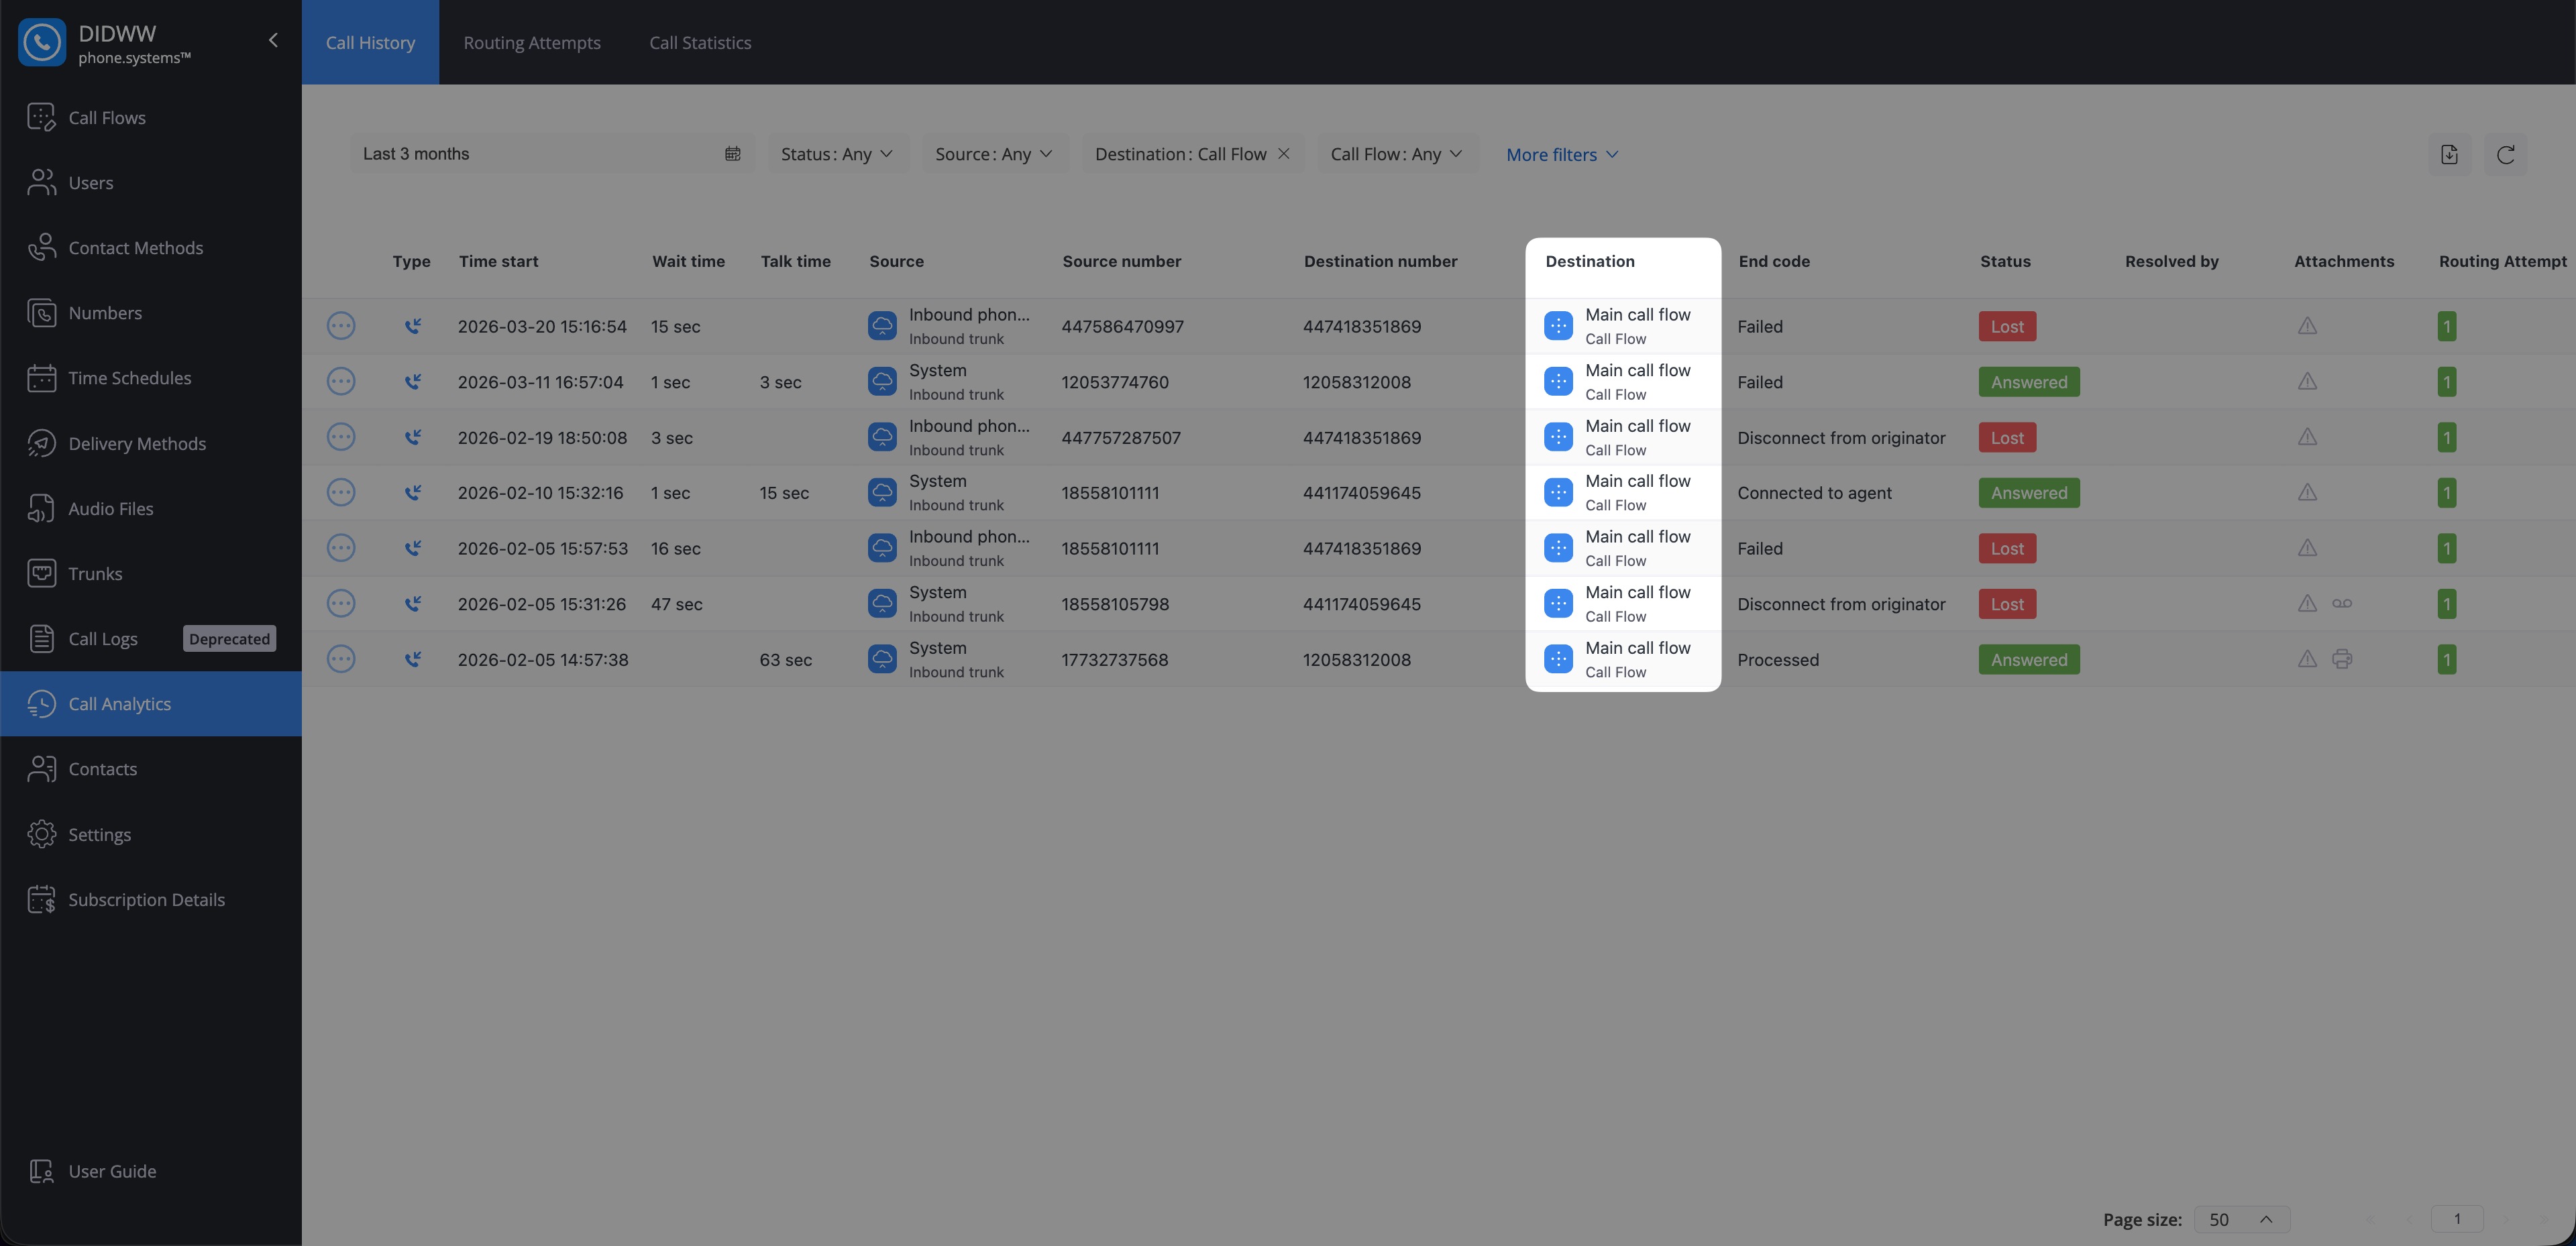
Fig. 6. Destination column for a call flow#
Call Pick-Up destination type means the call was handled through a call pick-up configuration and it is triggered using a feature code. For configuration and usage details, see Call Pickup feature code.
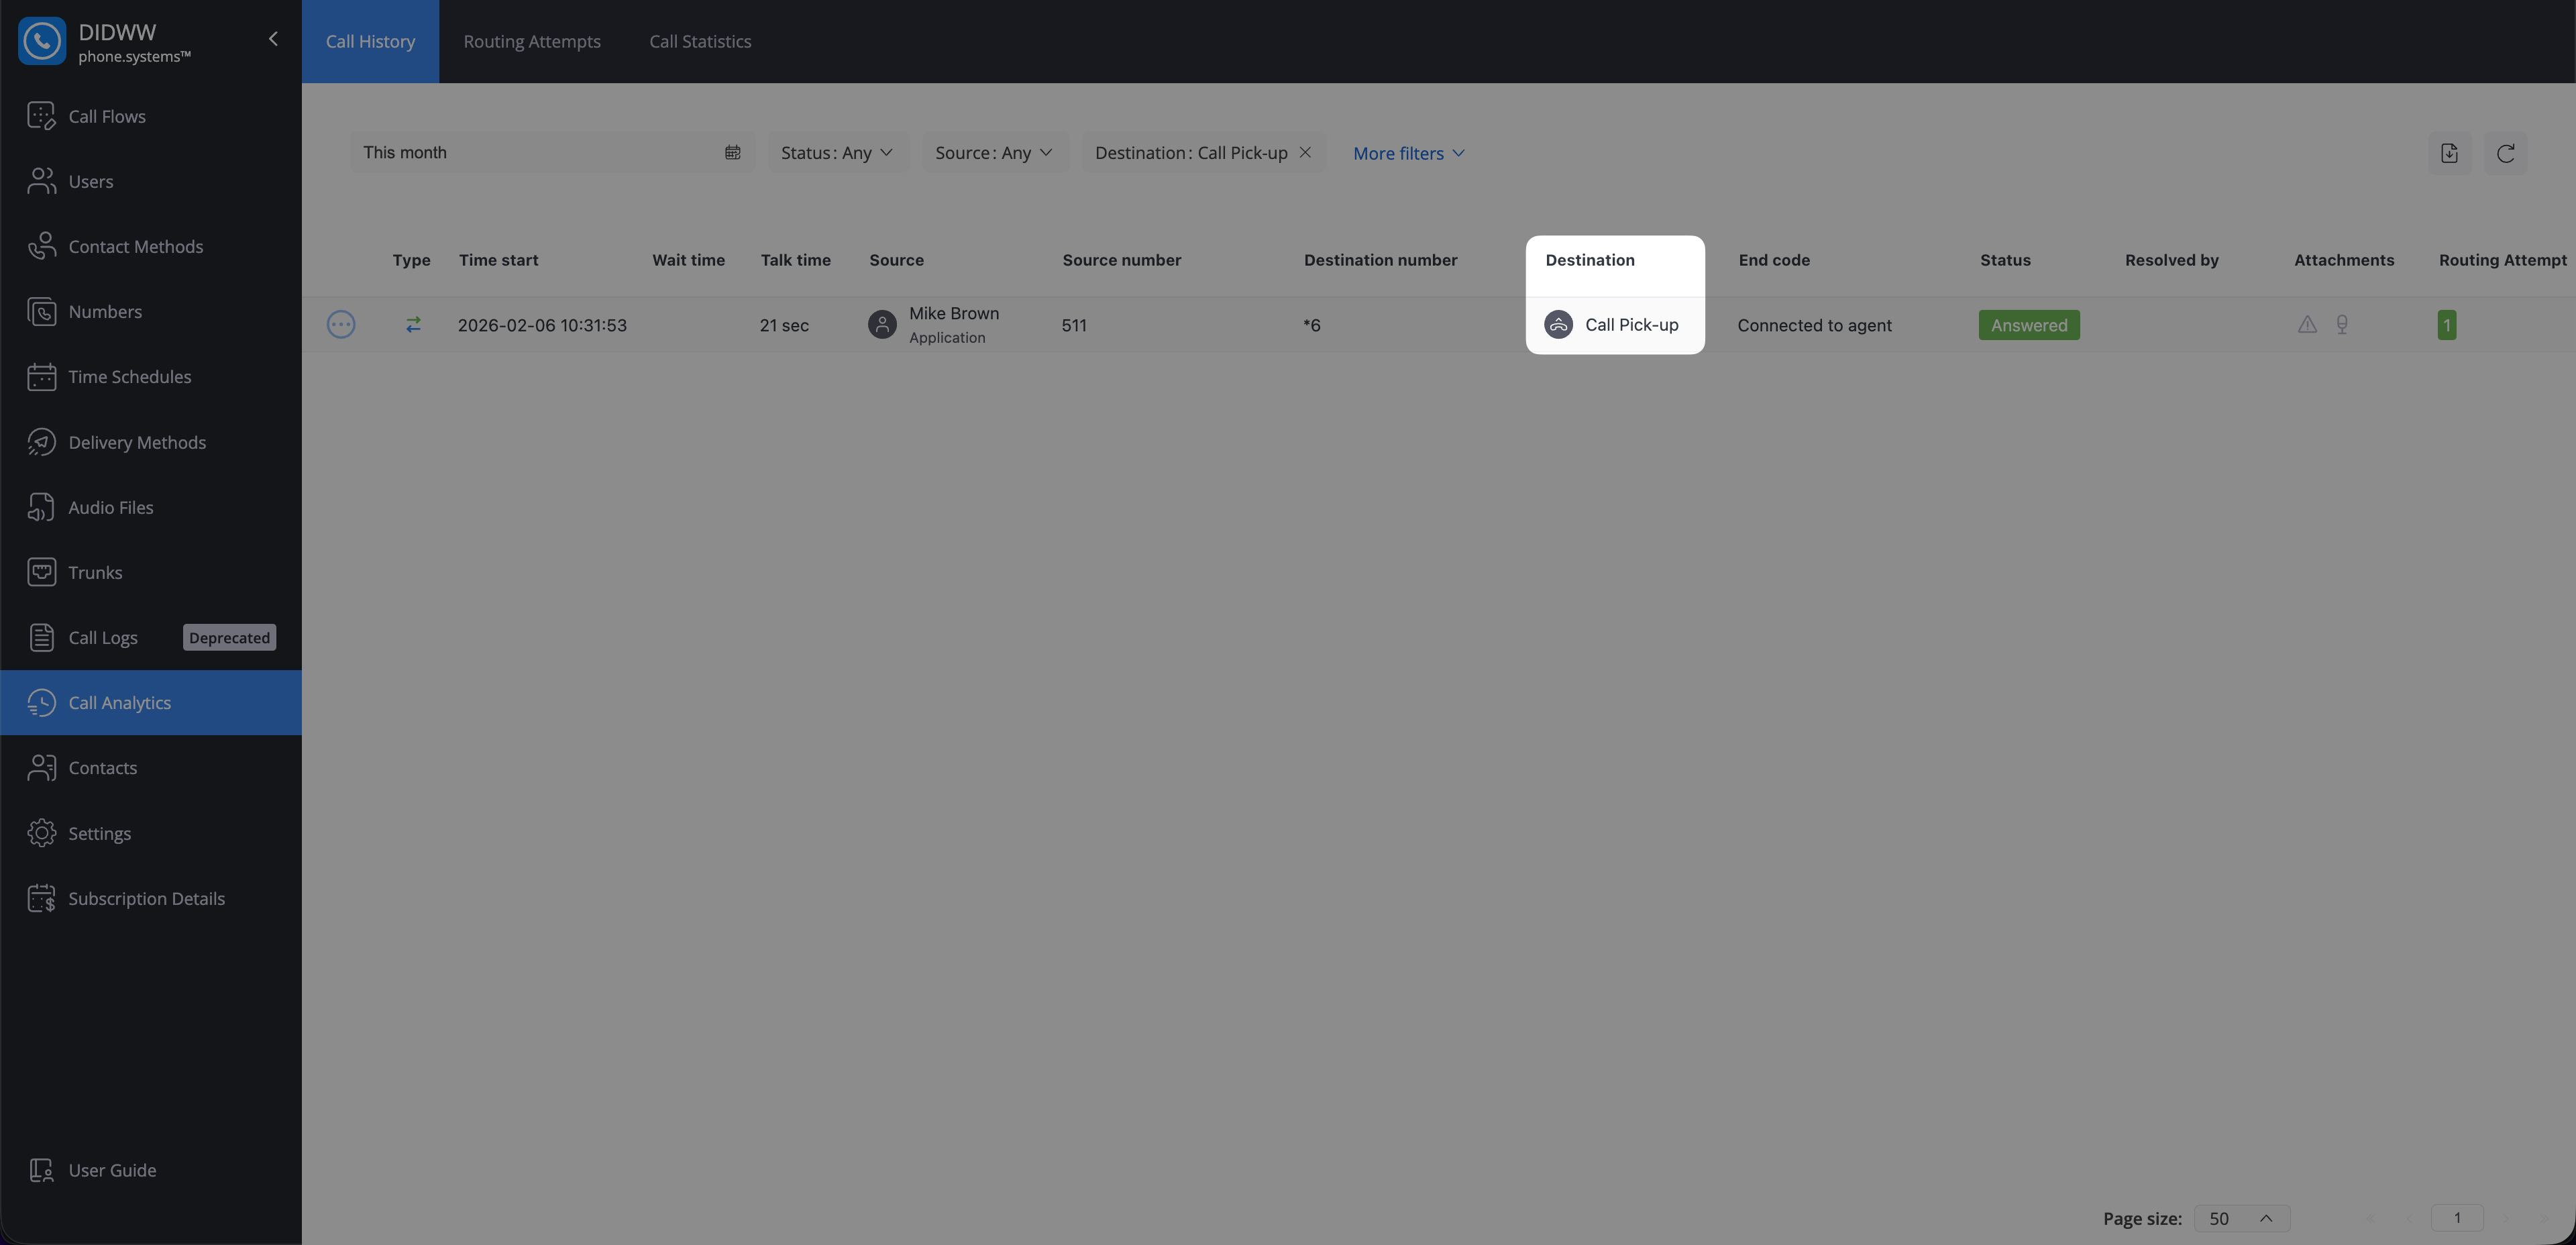
Fig. 7. Destination column for a call pick-up destination#
End Codes#
End codes explain why a call ended in phone.systems™. Use them to troubleshoot call issues and understand the final result of a call—for example, whether the caller hung up, the call timed out, a redirect failed, or routing was blocked.
Reason |
Description |
|---|---|
Connected to agent |
The call was successfully connected to a live agent. |
Waiting timeout |
The caller waited too long without being connected and timed out. |
Disconnect from originator |
The caller disconnected before the call was picked up. |
Pick-up |
The call was picked up by the recipient. |
Redirect |
The call was redirected to another destination. |
Redirect Failed |
The call could not be redirected to the intended destination. |
Not allowed by scheduler |
Call redirected to voicemail by the scheduler due to restrictions. |
User not available |
Destination contact method not registered, no response, or error. |
Too many redirects |
The call was redirected too many times, causing a failure. |
Failed |
Generic failure without a detailed error code. |
Channels Overload |
Too many concurrent calls, resulting in a channel capacity issue. |
Account blocked |
The account is blocked. |
PSTN termination blocked |
PSTN termination is blocked. |
External calls not allowed |
Outbound number not set for the calling device, blocking the call. |
PSTN Termination error |
Call failed due to a disconnect reason from PSTN forwarding. |
PSTN Termination billing error |
Call failed due to a billing issue from PSTN services. |
Wrong Number |
The number is incorrect, causing routing to fail. |
Status#
Status shows the current or final outcome of a call in Call History. Use it to quickly identify answered calls, missed calls that require follow-up (Lost), and calls that have already been handled (Resolved), especially when filtering records or tracking missed-call resolution.
Each call in Call History is assigned a status that reflects its current or final outcome.
Answered - The call was successfully connected, and media was exchanged between the caller and the destination.
Lost - The call was not answered by the destination. This status remains until the call is resolved automatically (for example, after a successful callback) or manually by a user. Learn how to resolve lost calls.
Resolved - A call that was previously Lost and later resolved, either automatically or manually.
Processing - A temporary state while the system determines the final outcome of the call.
Attachments#
The Attachments column provides access to additional data associated with a call, such as notes, AI analysis, recordings, voicemail messages, and fax files.
Note
Media attachments such as AI insights, recordings, voicemail, and fax are shown in Call History only when cloud storage is enabled.
AI Call Insights provide automated analysis for recorded calls, including summaries, sentiment analysis, key topics, and full transcripts. Use them to quickly review what was discussed on a call without listening to the entire recording.
Note
AI Call Insights are available only when they are enabled in AI Settings.
AI processing is skipped if the call recording duration is less than 1 minute or the audio file size exceeds 25 MB.
To view AI insights for a call:
In Call Analytics → Call History, locate a call record with the AI icon.
Click the AI icon in the Attachments column.
The AI Call Insights view opens and displays the analysis results for that call.
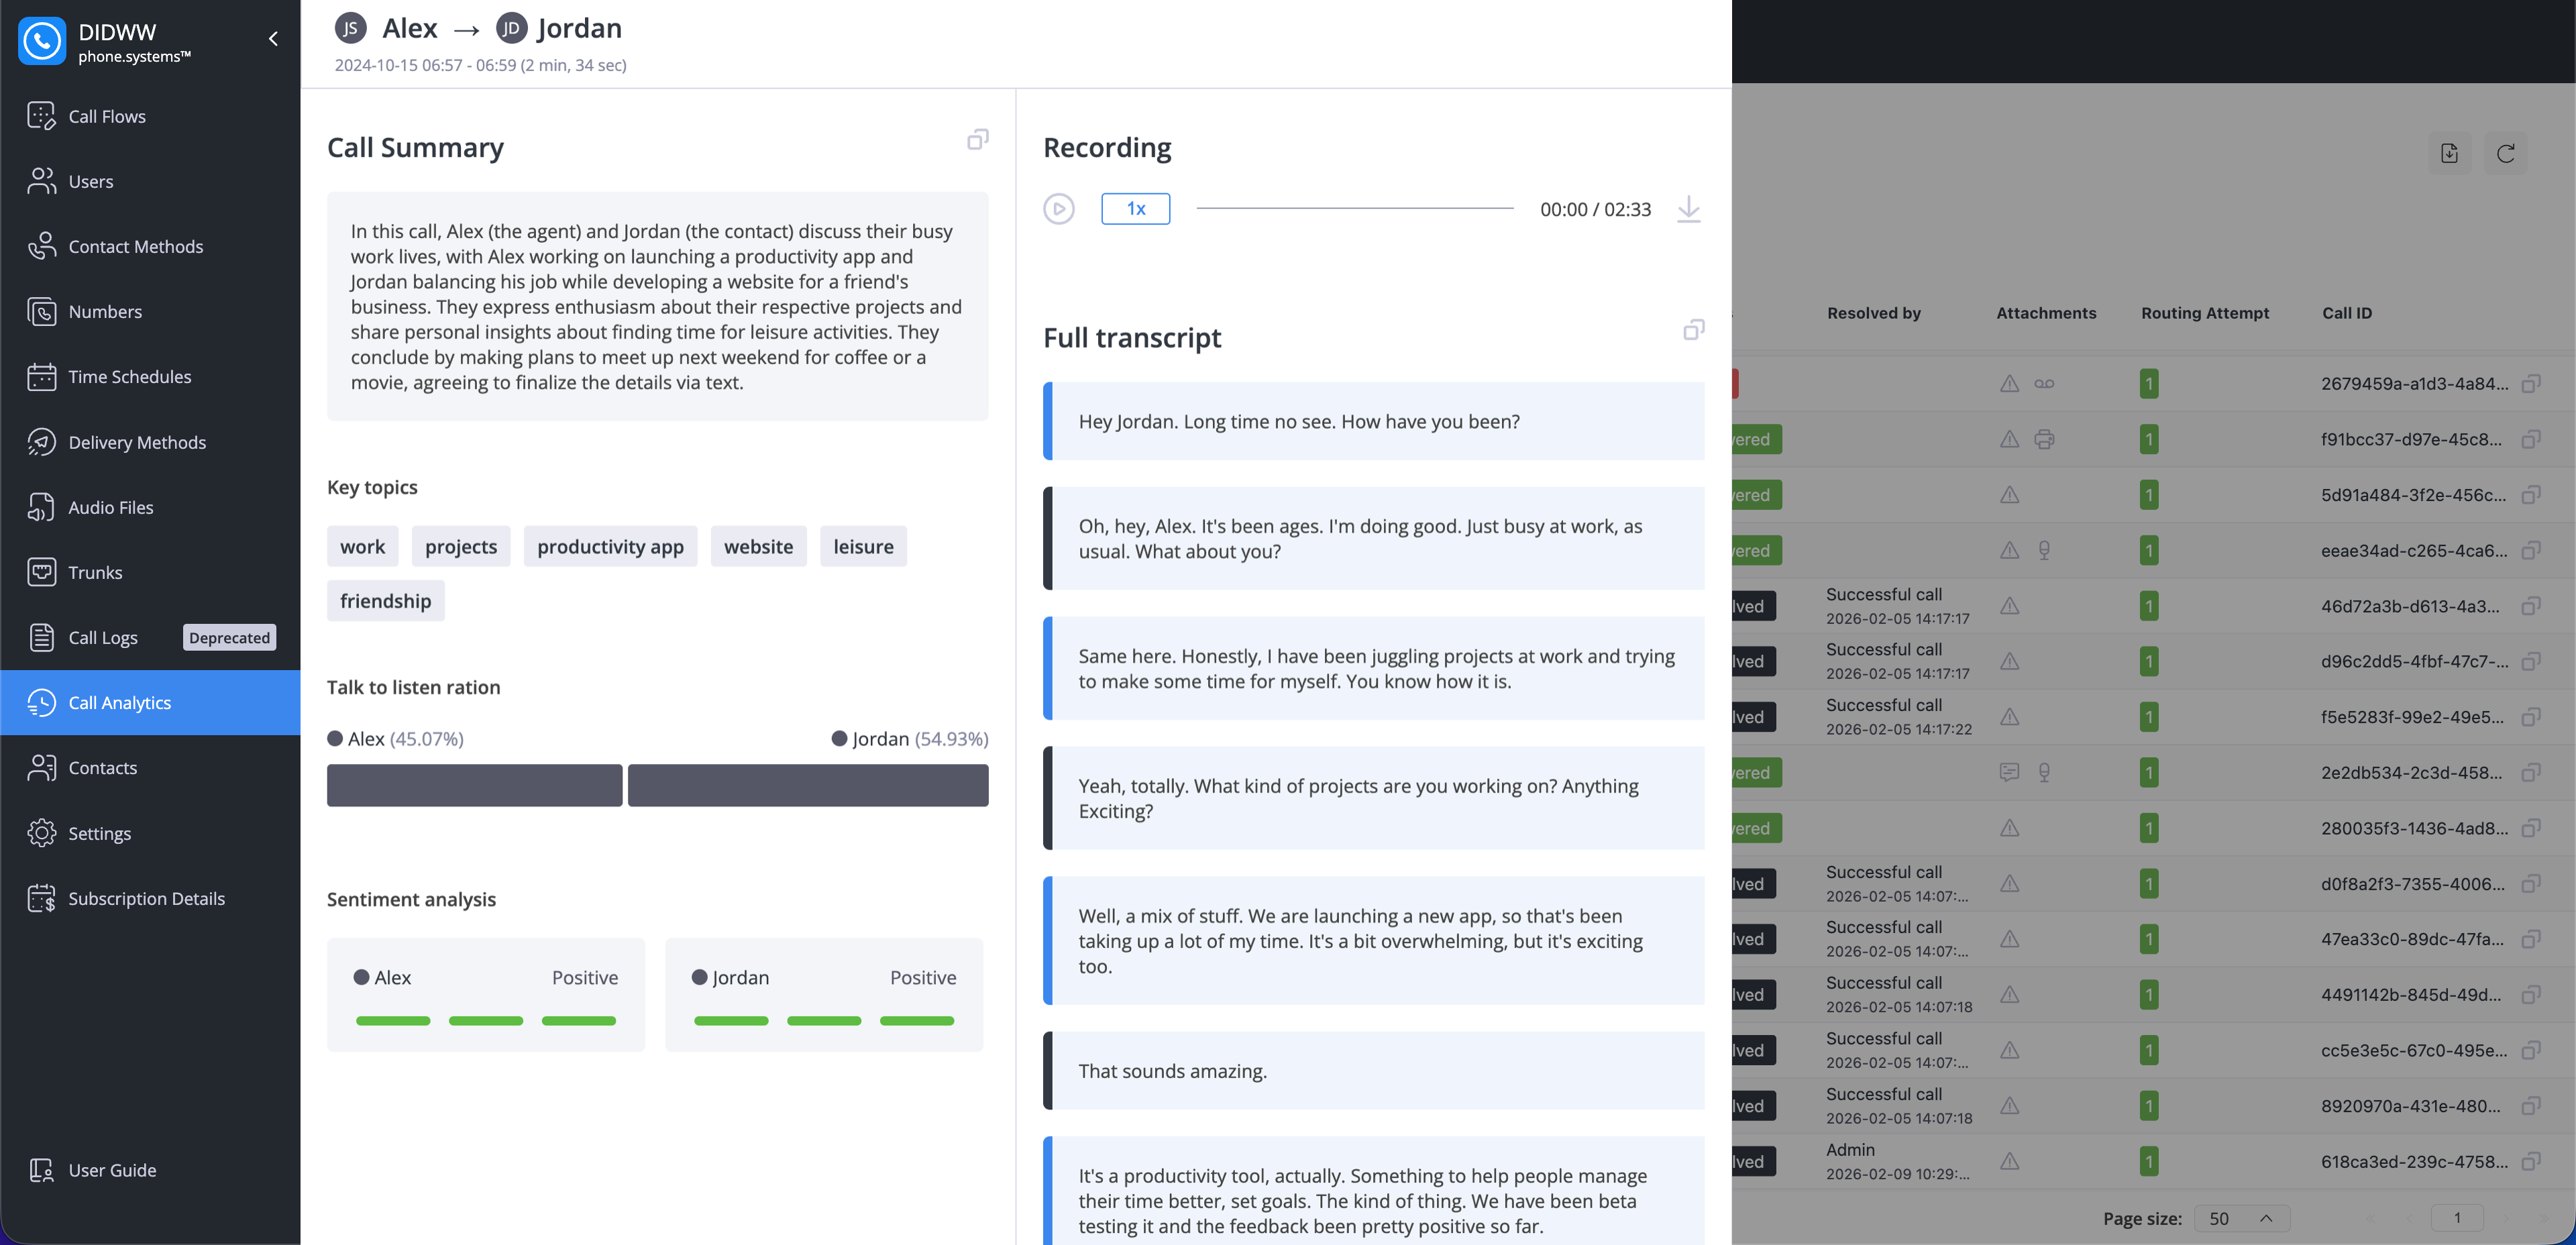
Fig. 8. AI Call Insights overview#
Call recordings let you review the audio of a call directly from Call History. Use them to verify what was said, confirm call handling, or support troubleshooting and quality checks.
Note
Call recordings are shown in Call History only when cloud storage is enabled.
To listen to a call recording:
In Call Analytics → Call History, locate a call record that has a recording available.
Click the Recording (microphone) icon in the Attachments column.
The Call Recording window opens, where you can play the recording and download the file.

Fig. 9. Call Recording window with playback and download controls#
Voicemail messages let you review missed-call messages directly from Call History. Use them to capture caller information and follow up without returning the call immediately.
Note
Voicemails are shown in Call History only when cloud storage is enabled.
To listen to a voicemail message:
In Call Analytics → Call History, locate a call record that has a voicemail available.
Click the Voicemail icon in the Attachments column.
The Voicemail window opens, where you can play the message and download the file.
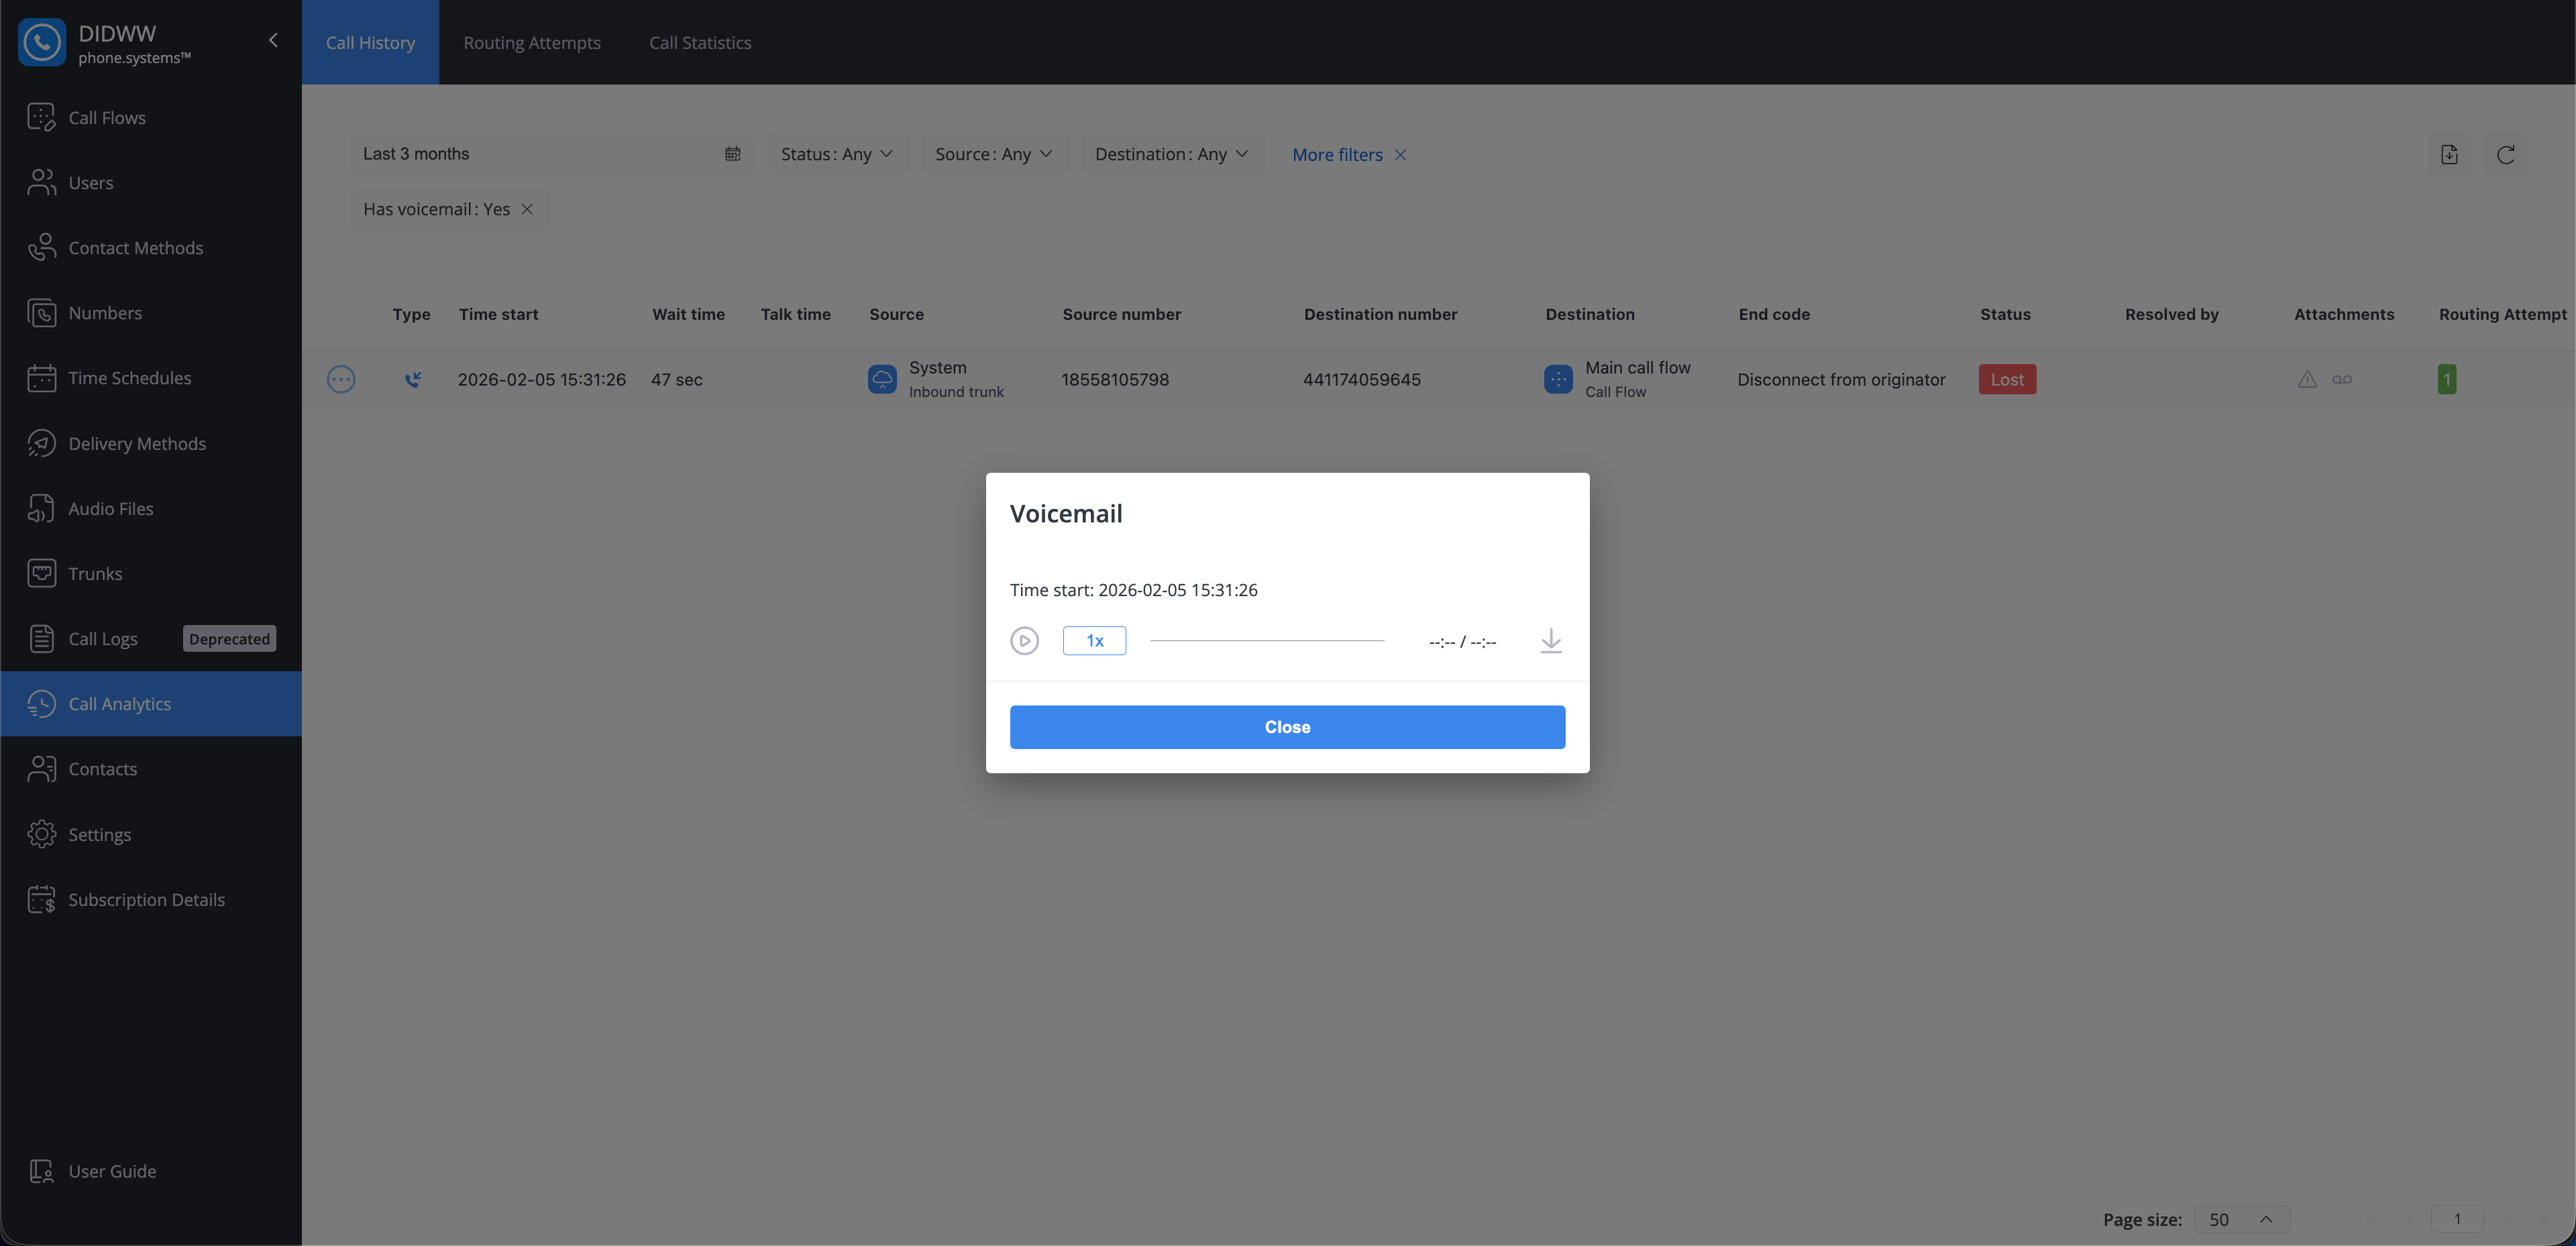
Fig. 10. Voicemail playback window with controls#
Fax attachments let you download fax documents as part of a call record. Use them when you need to retrieve the original fax file for processing, storage, or follow-up.
To download a fax document:
In Call Analytics → Call History, locate a call record that has a fax available.
Click the Fax icon in the Attachments column.
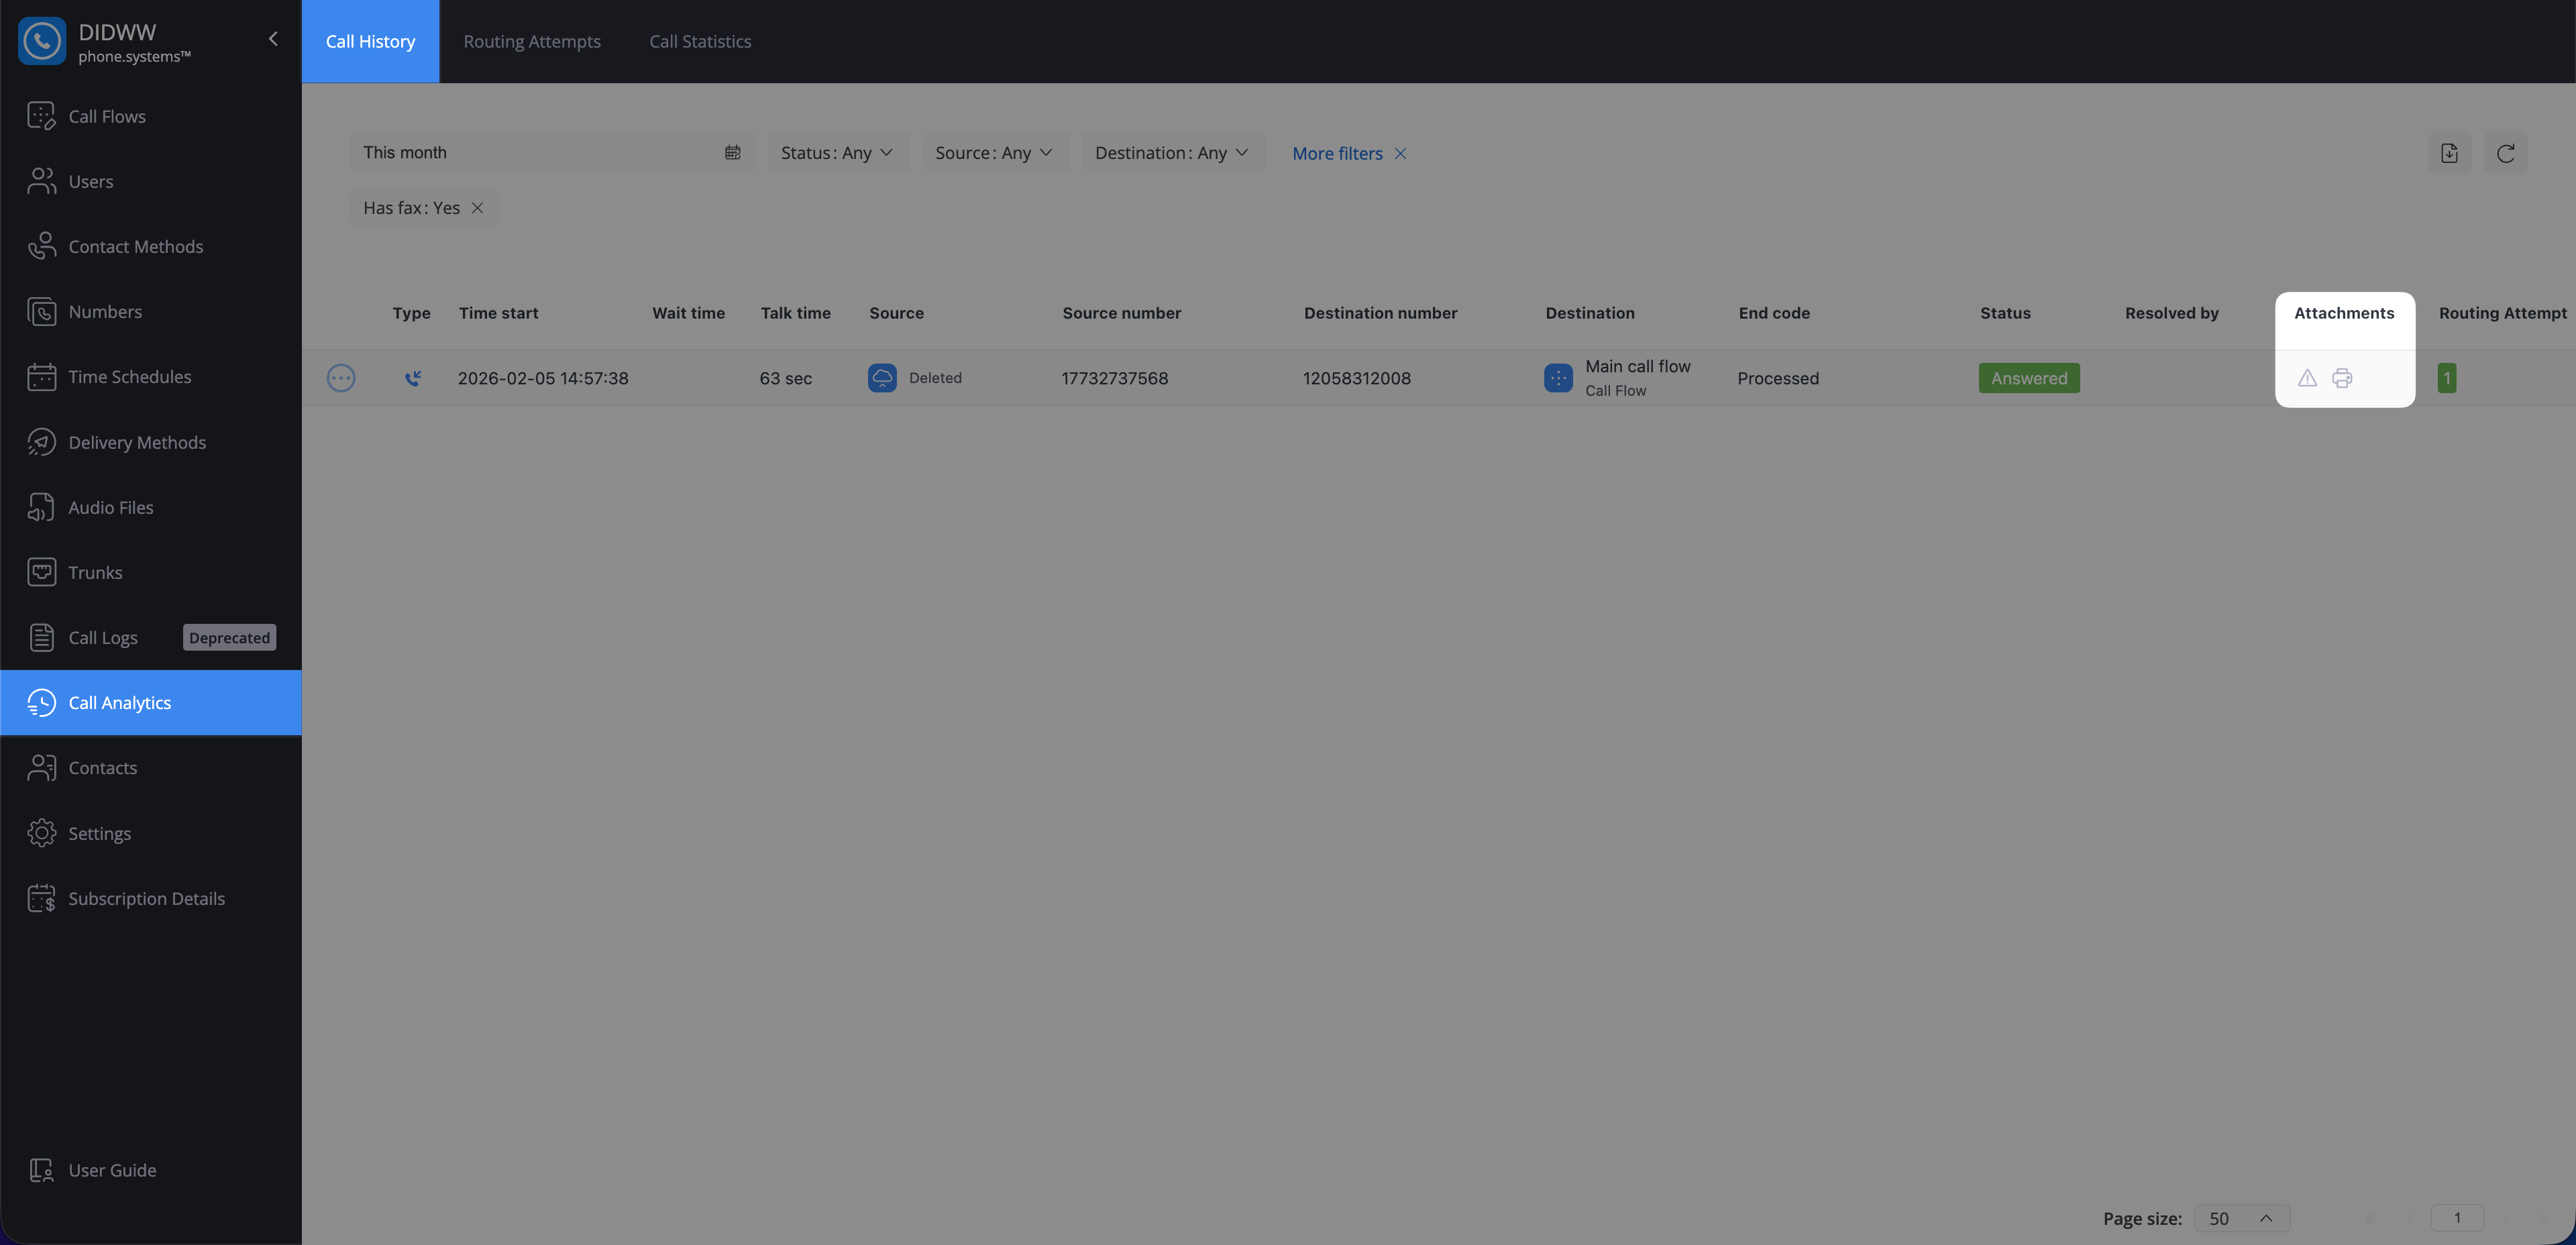
Fig. 11. Fax indicator in the Attachments column#
Notes let you add and review text details associated with a call directly from Call History. Use notes to store conversation summaries, follow-up reminders, or other context that is not captured in call metadata.
To view a call note:
In Call Analytics → Call History, locate a call record with the Note icon in the Attachments column.
Click the Note icon to open the saved note for that call.
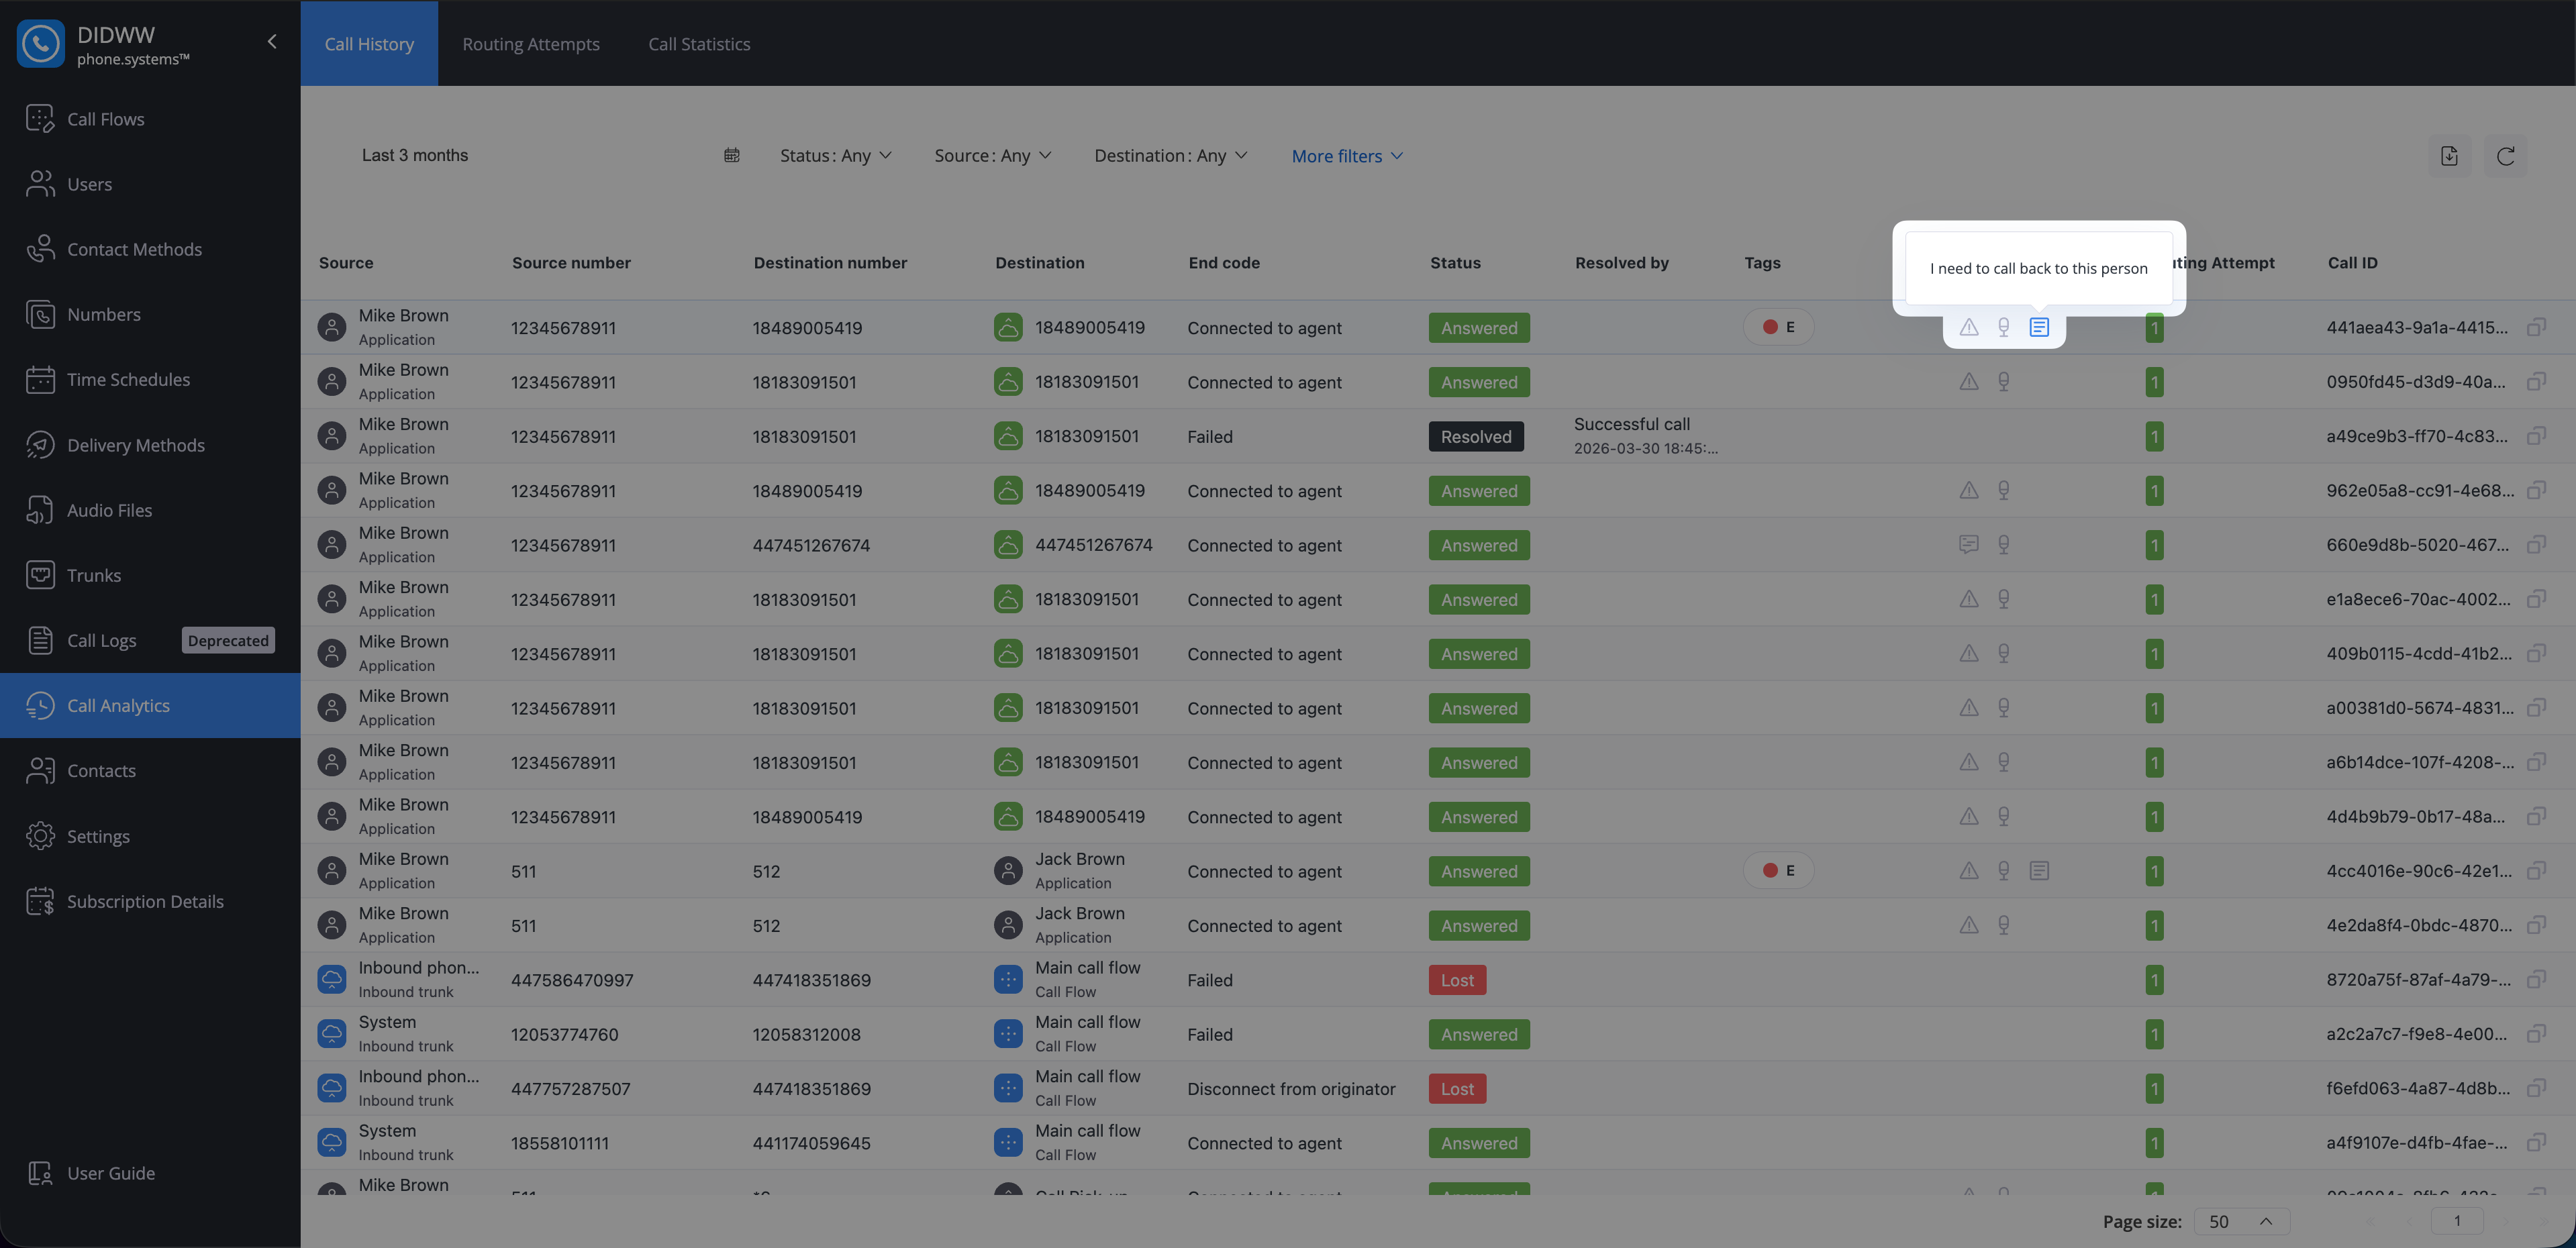
Fig. 12. Note in the Attachments column#
View Call Detail Record Details#
Viewing a single call record allows you to inspect its call detail record (CDR) in a dedicated details view.
Use this view when you need to investigate a specific call in more detail for example, to confirm who called whom, when the call started, how it ended, which tags are assigned, and whether any attachments are available. It helps you validate the call outcome, review timing and endpoints, and access related data such as notes, recordings, voicemail, fax, or AI insights.
To view a call detail record:
Go to Call Analytics → Call History.
Locate the required call in the table.
Click Actions → View.
The call detail record (CDR) displays the same call direction, timing, endpoints, outcome, tags, and attachments described in the Call History Table section.
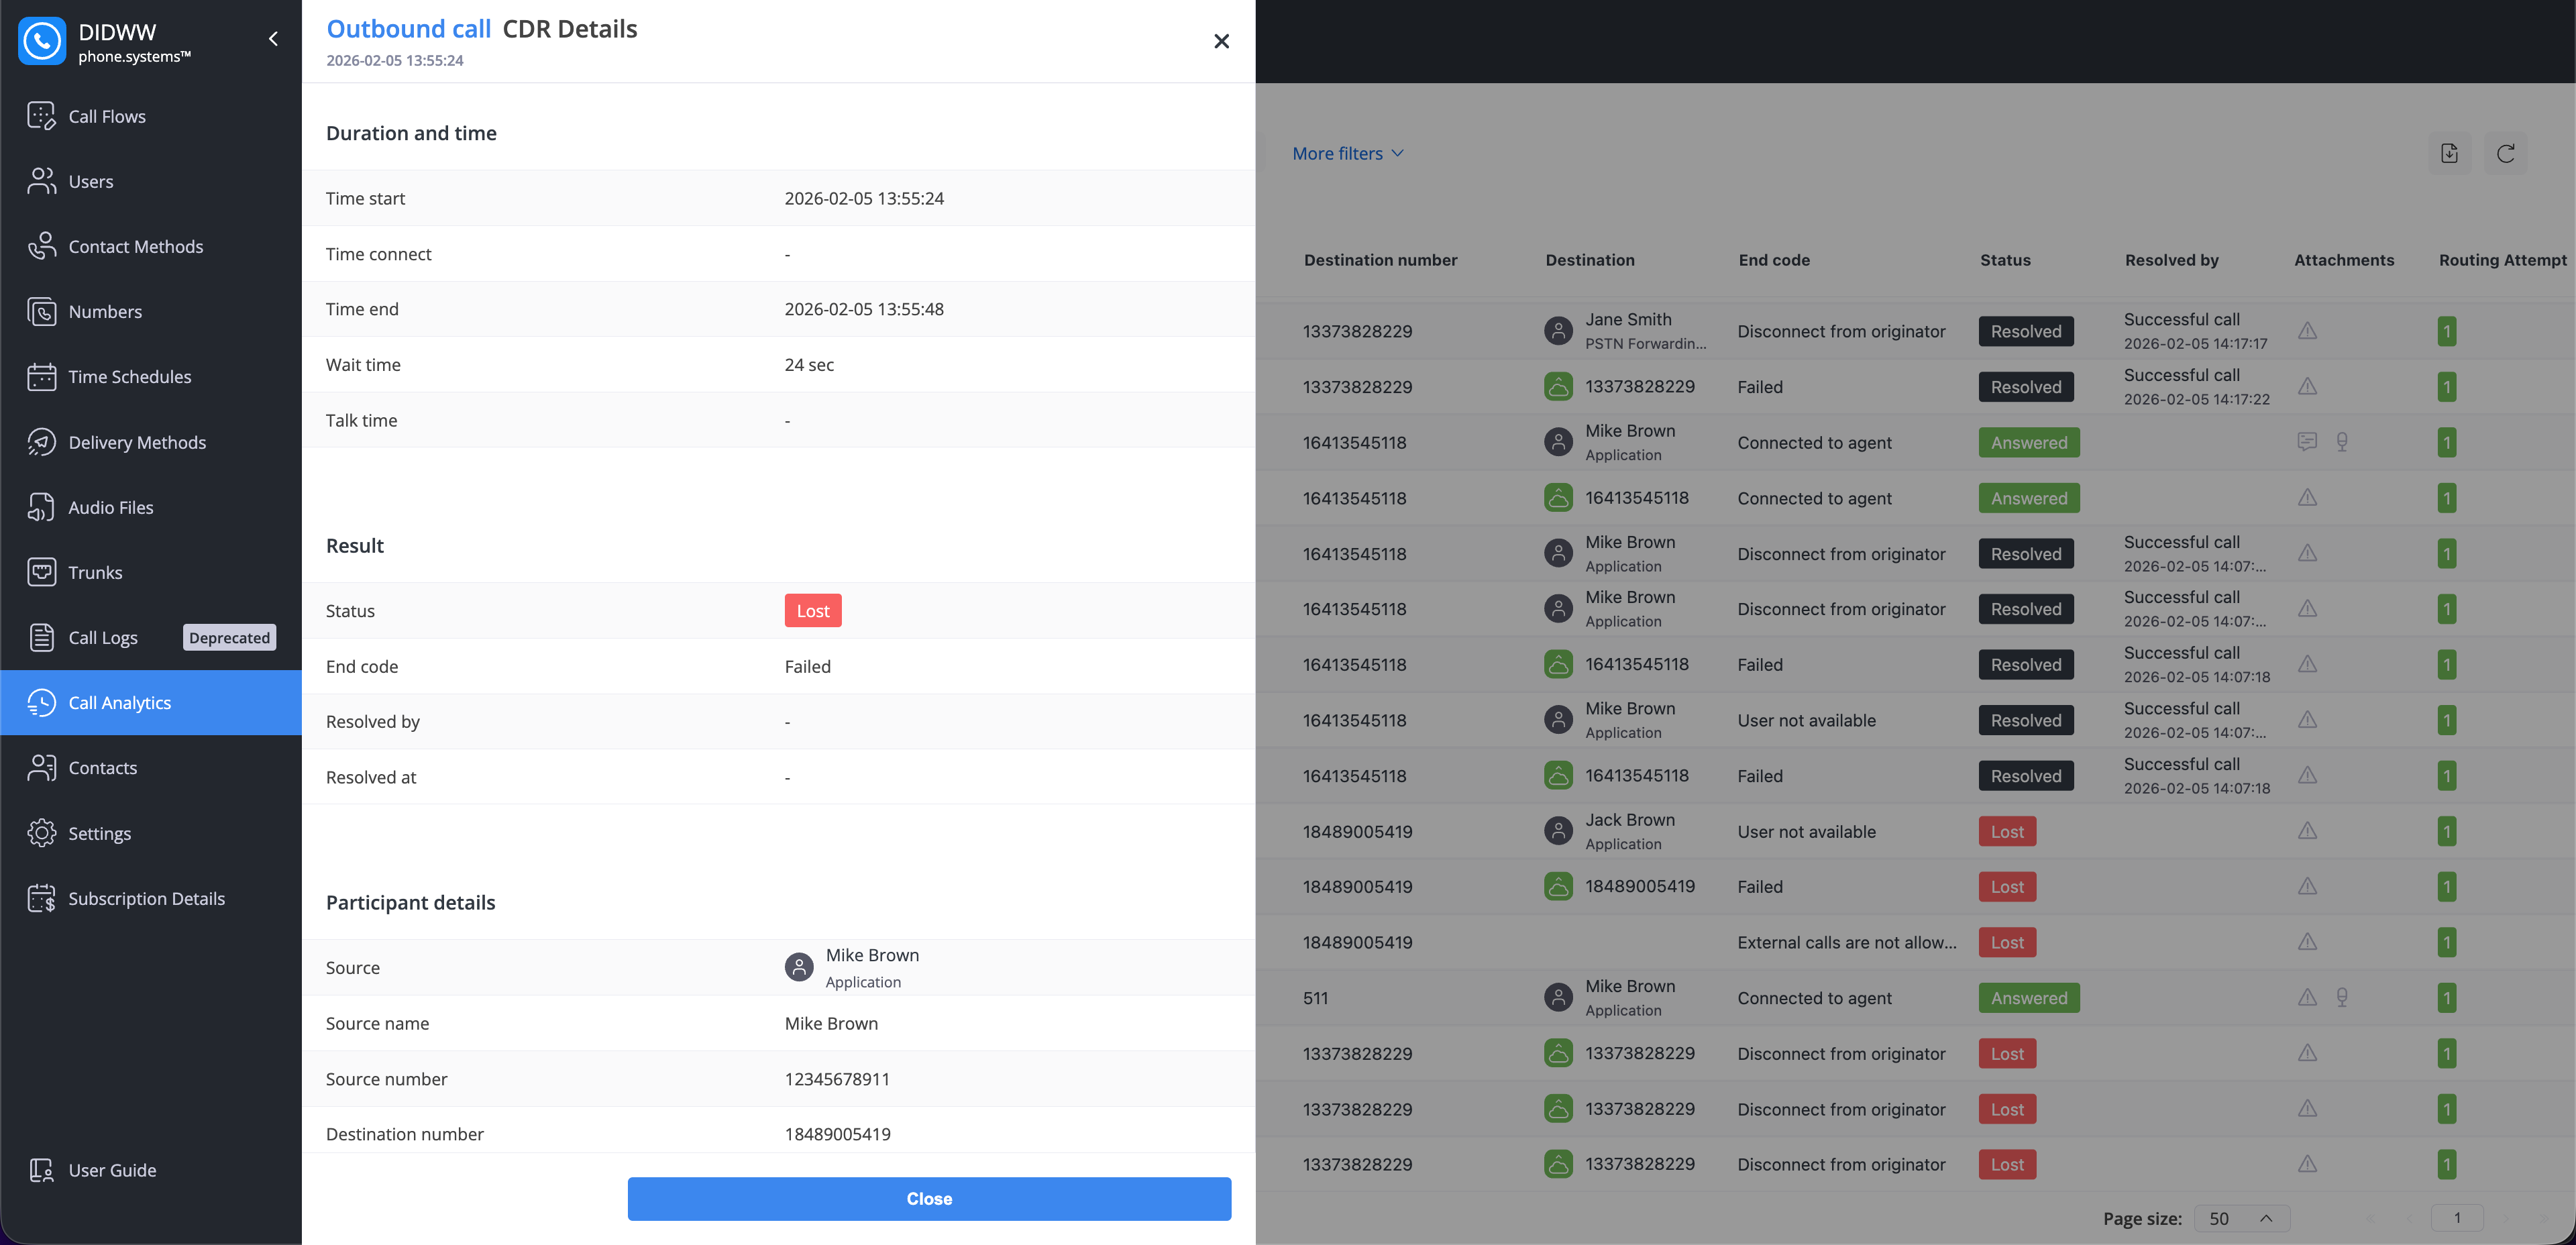
Fig. 13. Call detail record window#
Resolve Lost Calls#
A call is marked as Lost when it is not answered by the destination (for example, the user did not pick up, rejected the call, or the call timed out while ringing). To resolve a lost call, choose one of the options below to update the status in Call History.
A lost call is resolved automatically when a successful callback is made to the number associated with the lost call.
Note
The callback must successfully connect to an agent.
After a successful callback, the lost call is resolved within 72 hours.
Resolve a lost call manually when the missed call was handled outside the automatic callback flow (for example, the caller was contacted through another channel or the issue was already addressed).
To resolve a lost call manually:
In Call Analytics → Call History, locate the call record with the Lost status.
Click the Actions button for that call record.
Select Resolve.
In the confirmation pop-up, click Confirm.
Note
This action cannot be undone and will apply to all related lost calls.
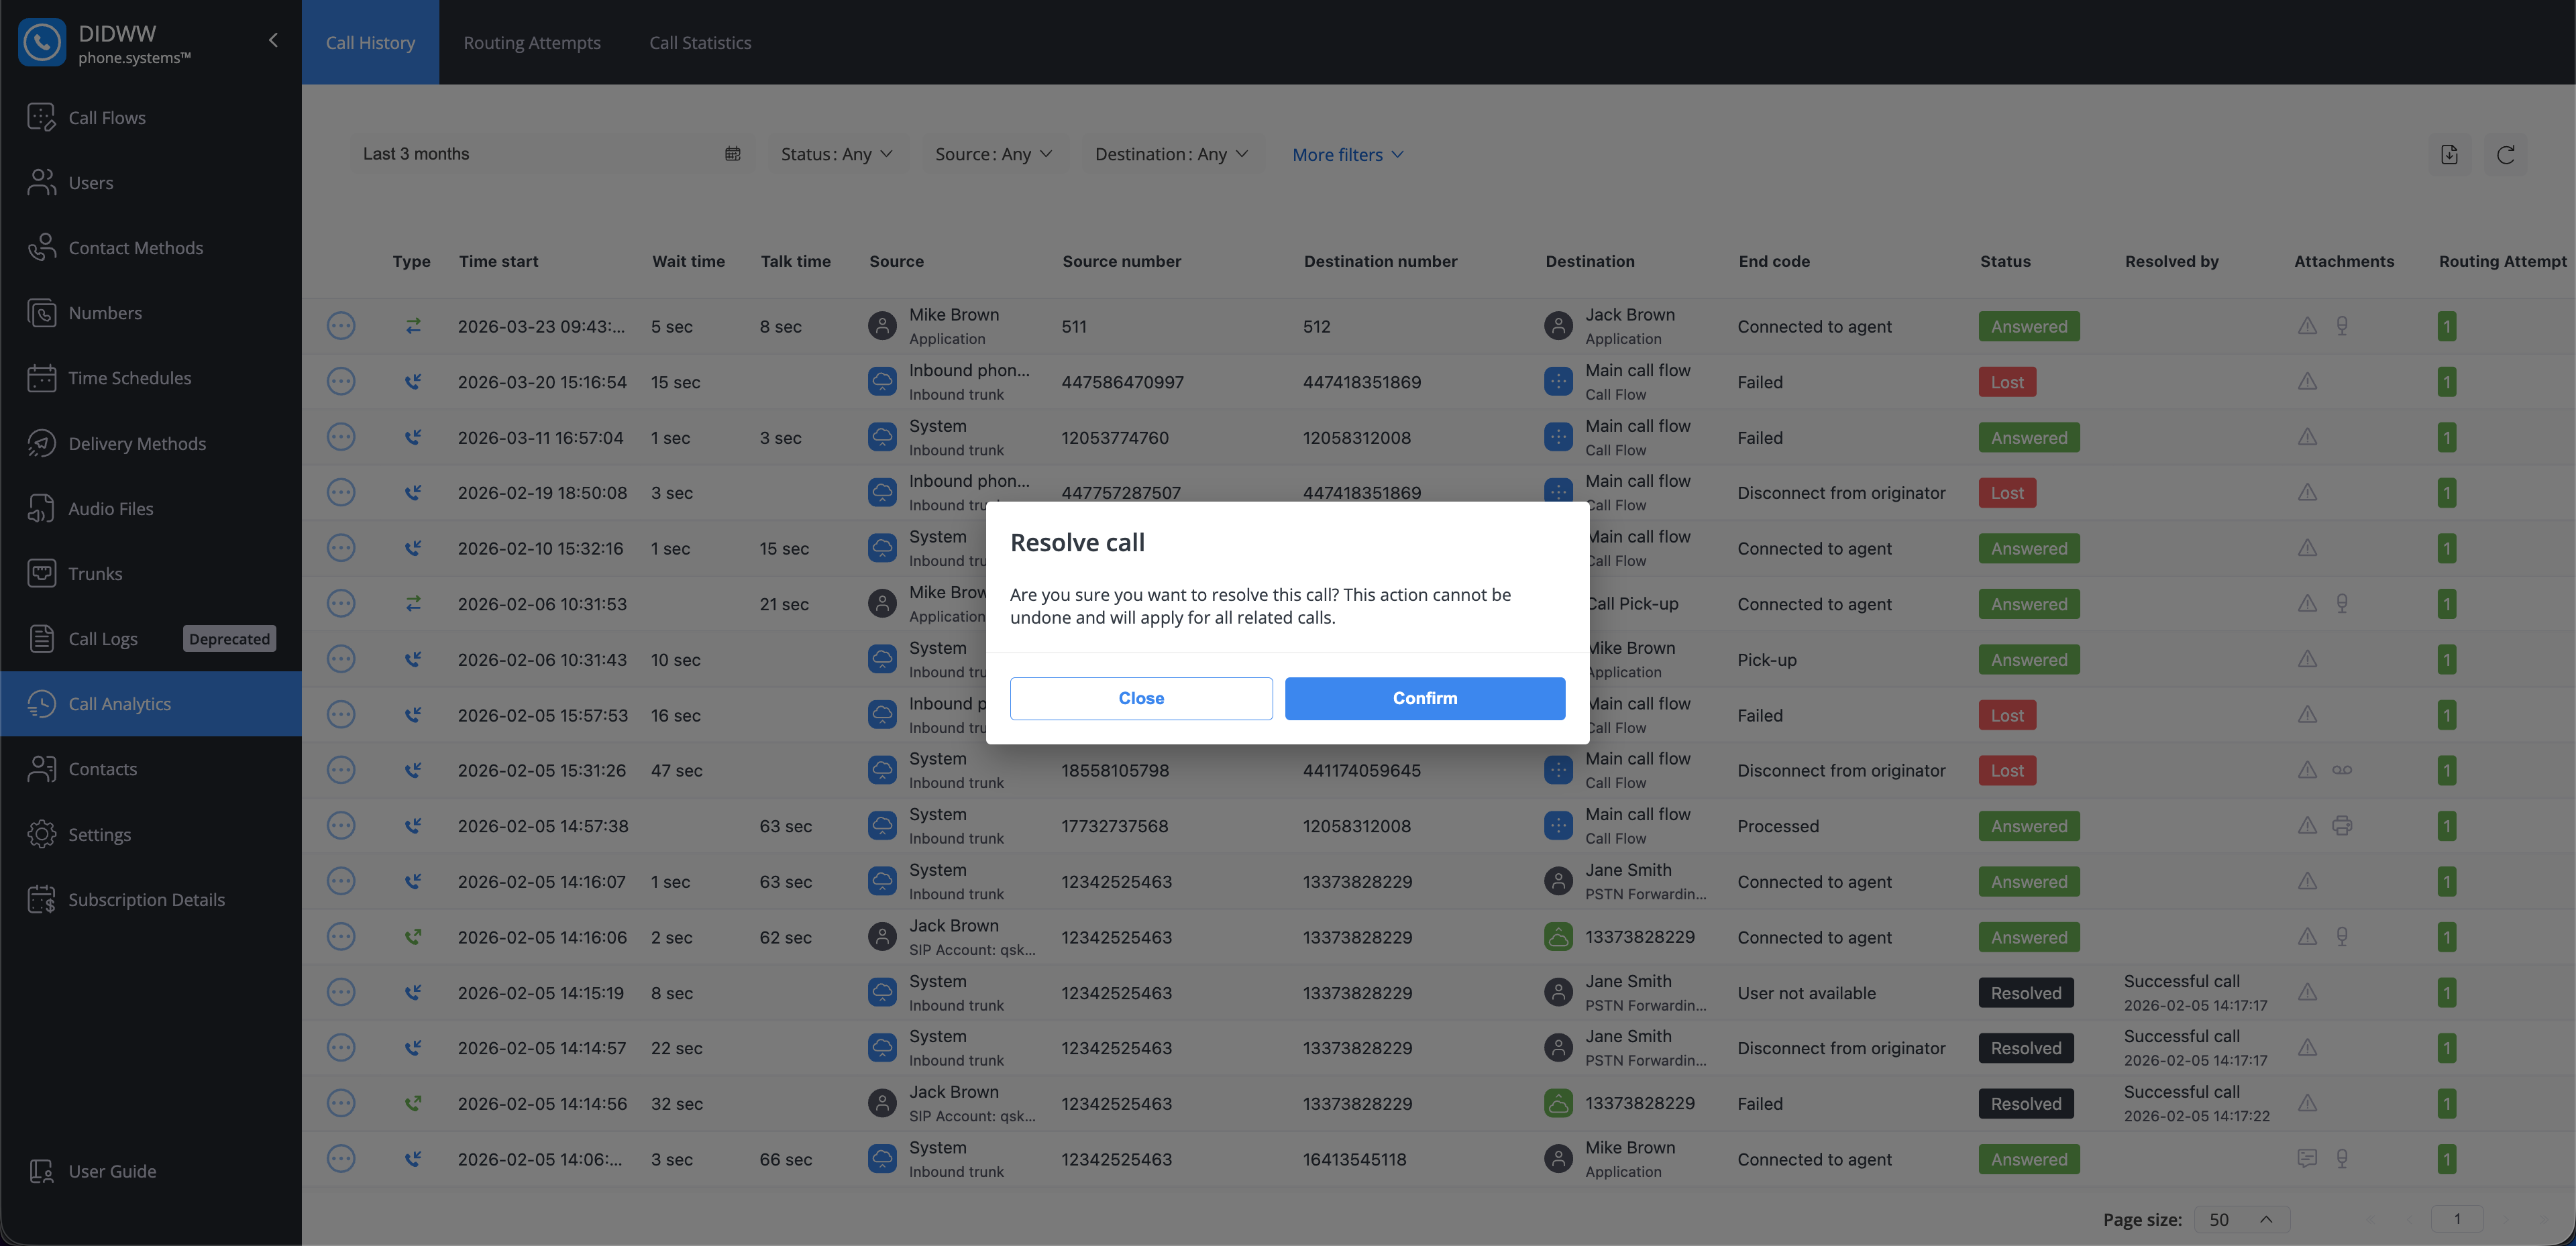
Fig. 14. Resolve confirmation#
Call History Page Actions#
Use the actions in Call History to download records, reload the view, and navigate through pages.
Download the currently filtered Call History records as a CSV file.
Apply the required filters to narrow down the records.
Click the Download icon in the top-right corner of the table.
Choose a destination on your device and confirm the download.
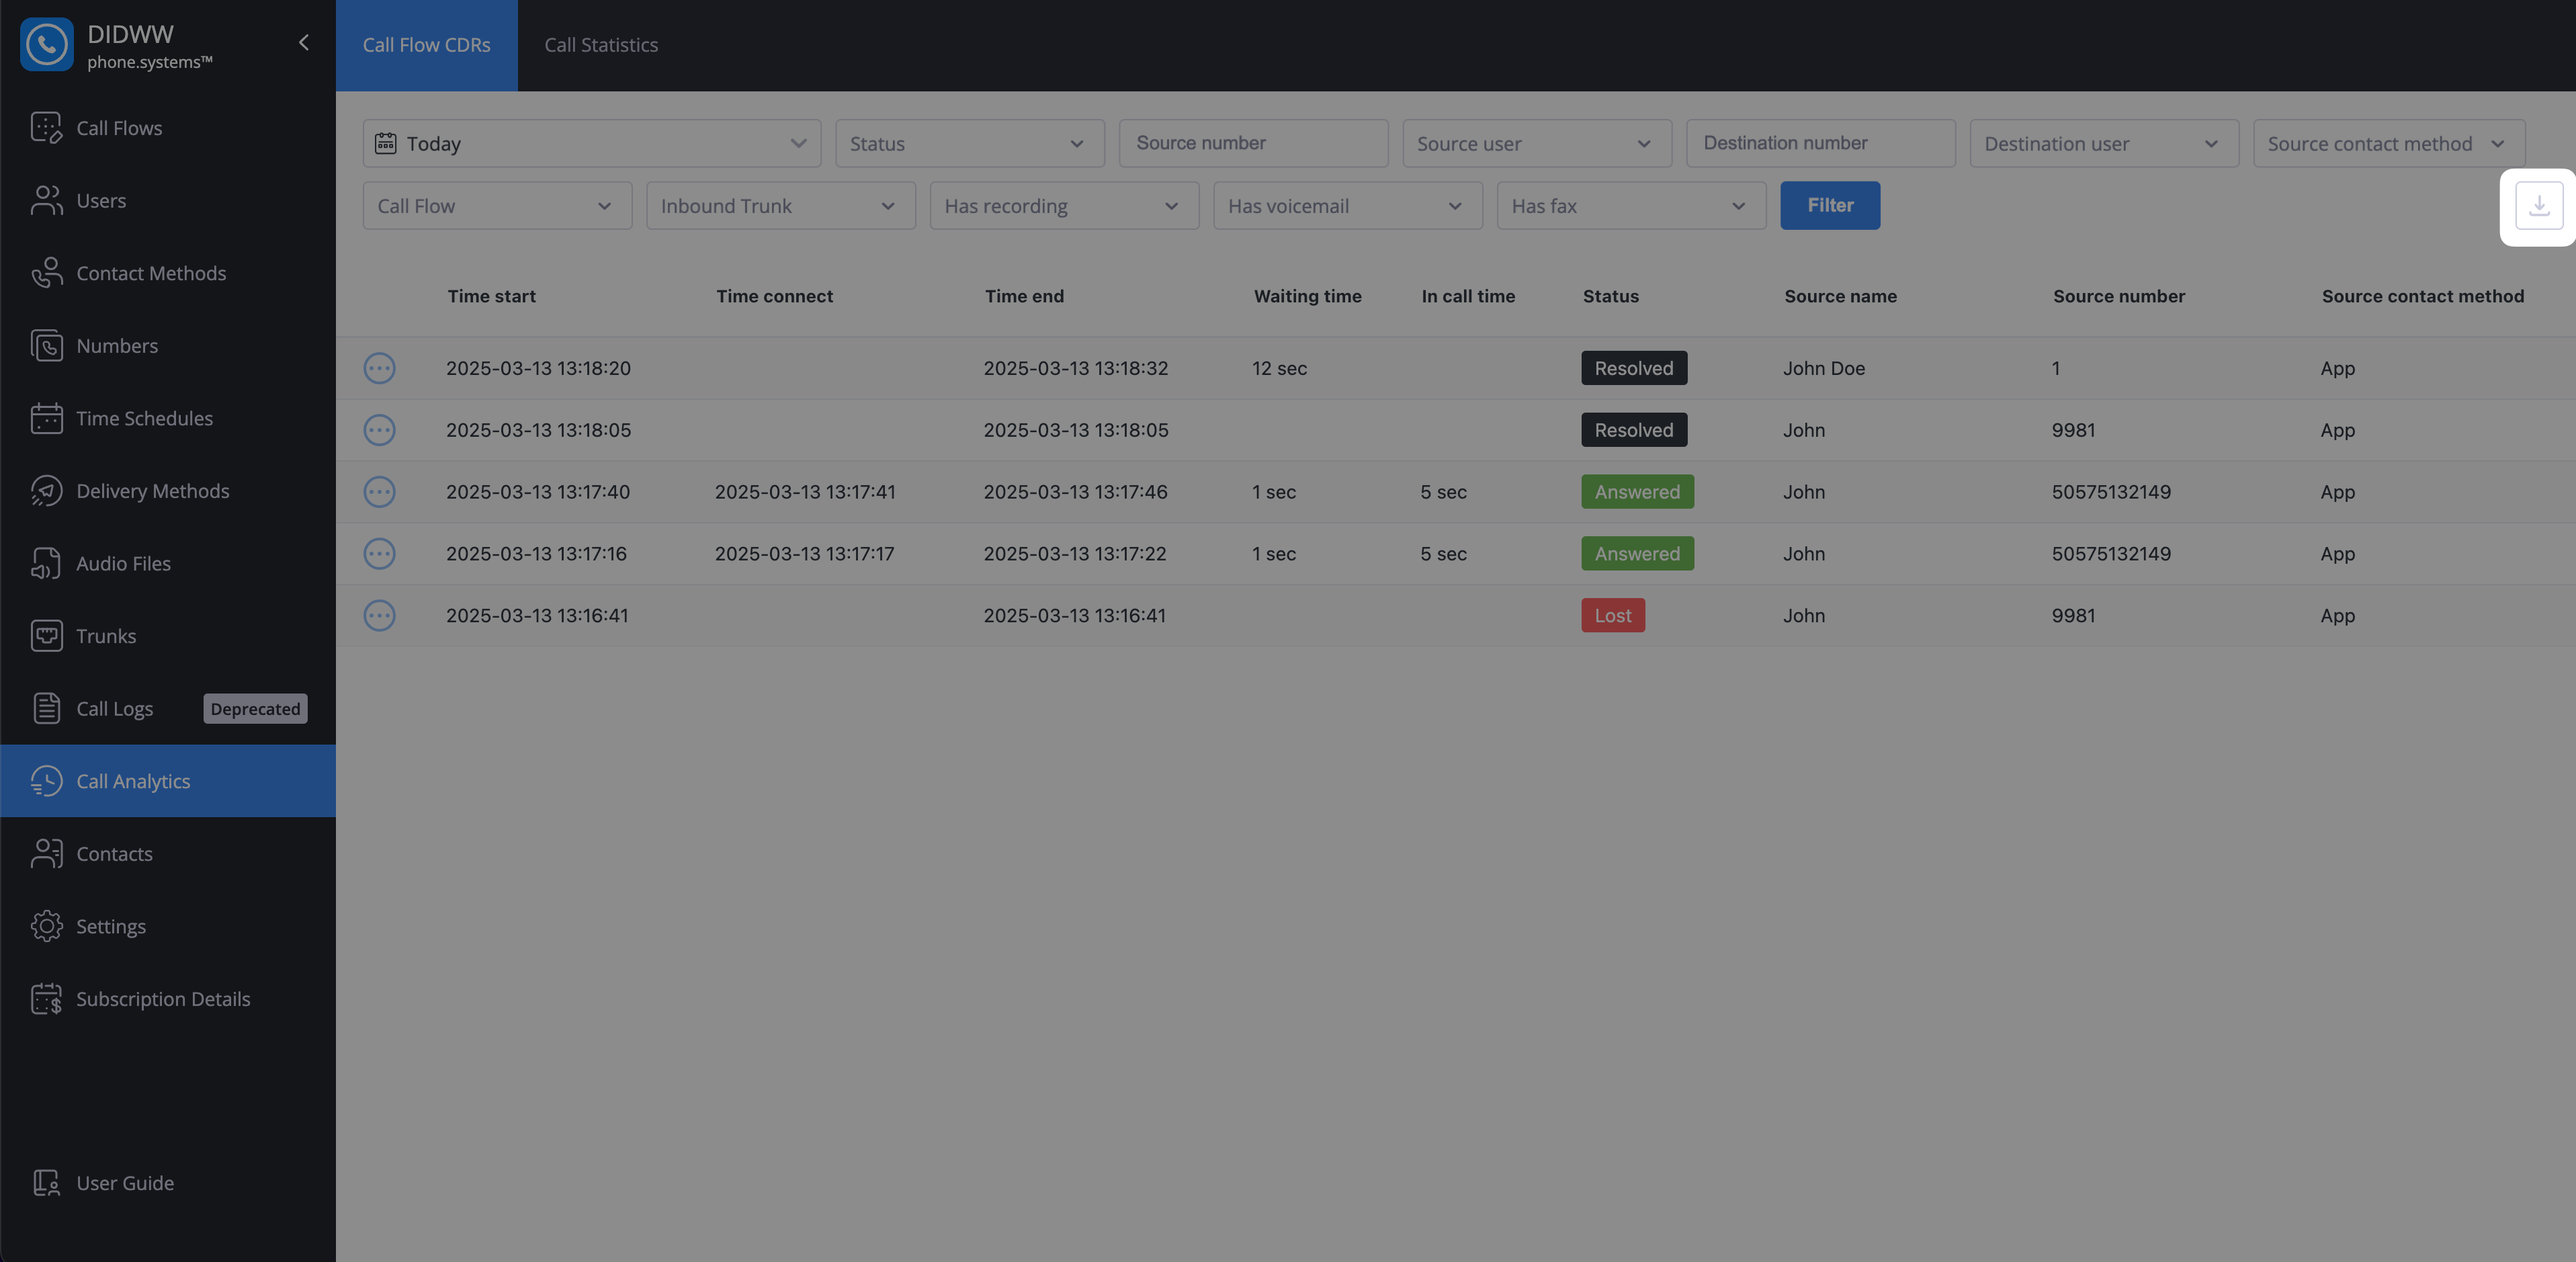
Fig. 15. Download Call History#
Refresh the current view without changing your filters.
To reload the Call History page, click the reload icon in the top-right corner of the page.
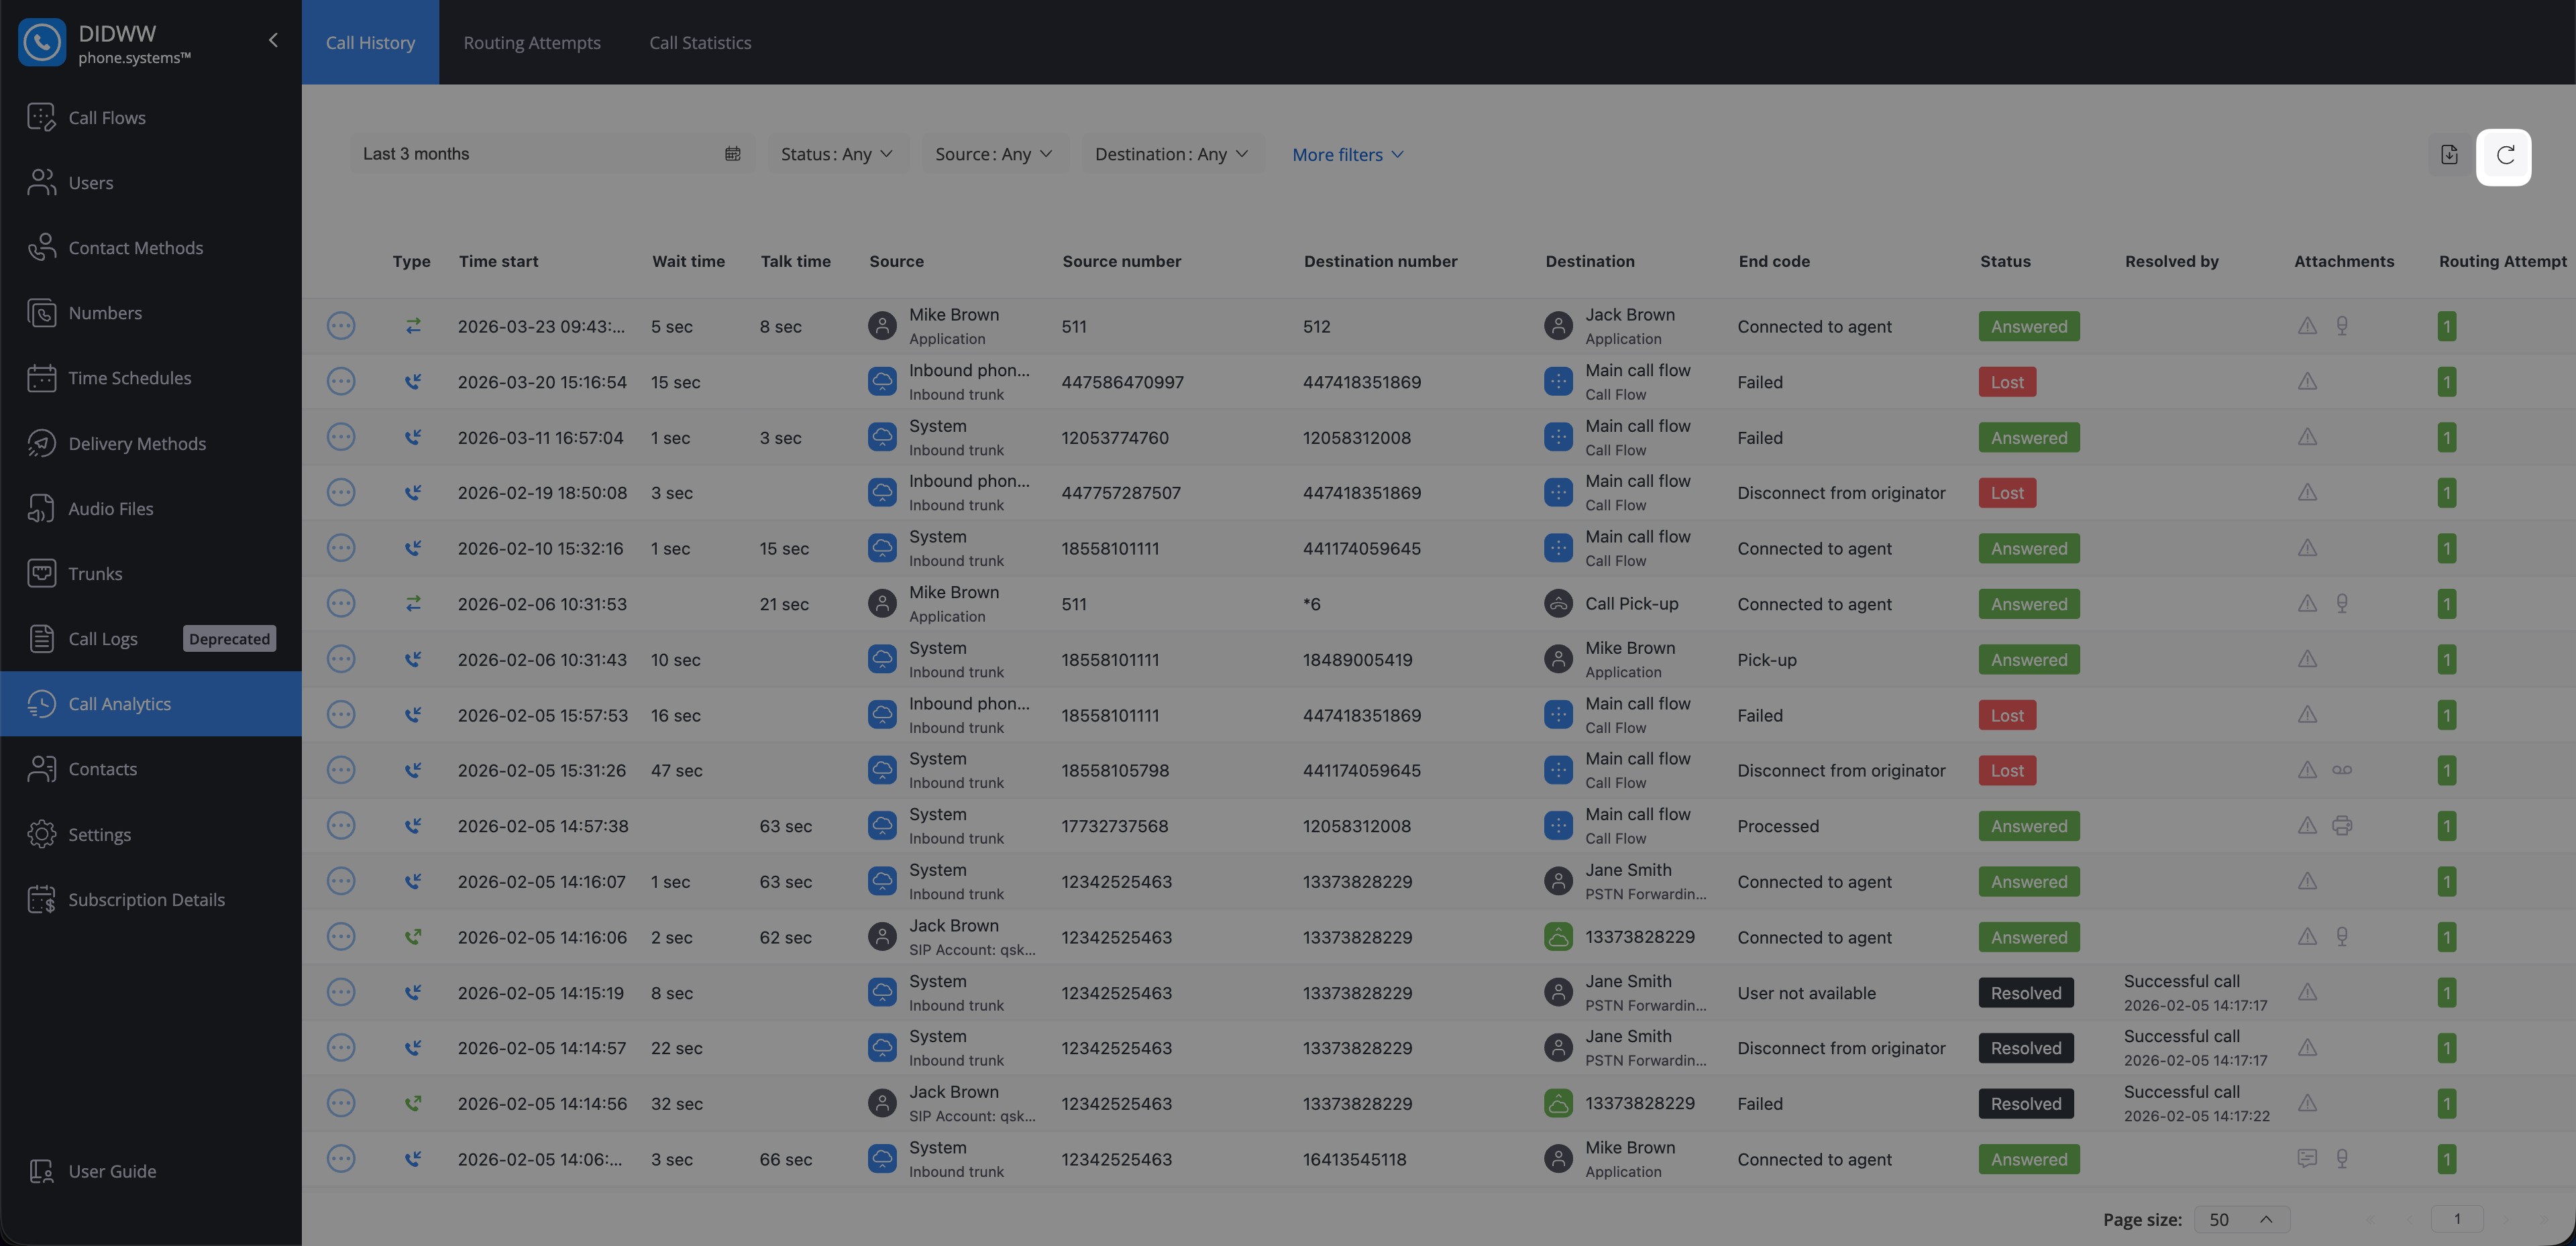
Fig. 16. Reload Call History view#
Call History displays results across multiple pages. By default, each page shows 50 records. If you want to see more results at once, increase the page size up to 100. Use the pagination controls to move to the next or previous page.
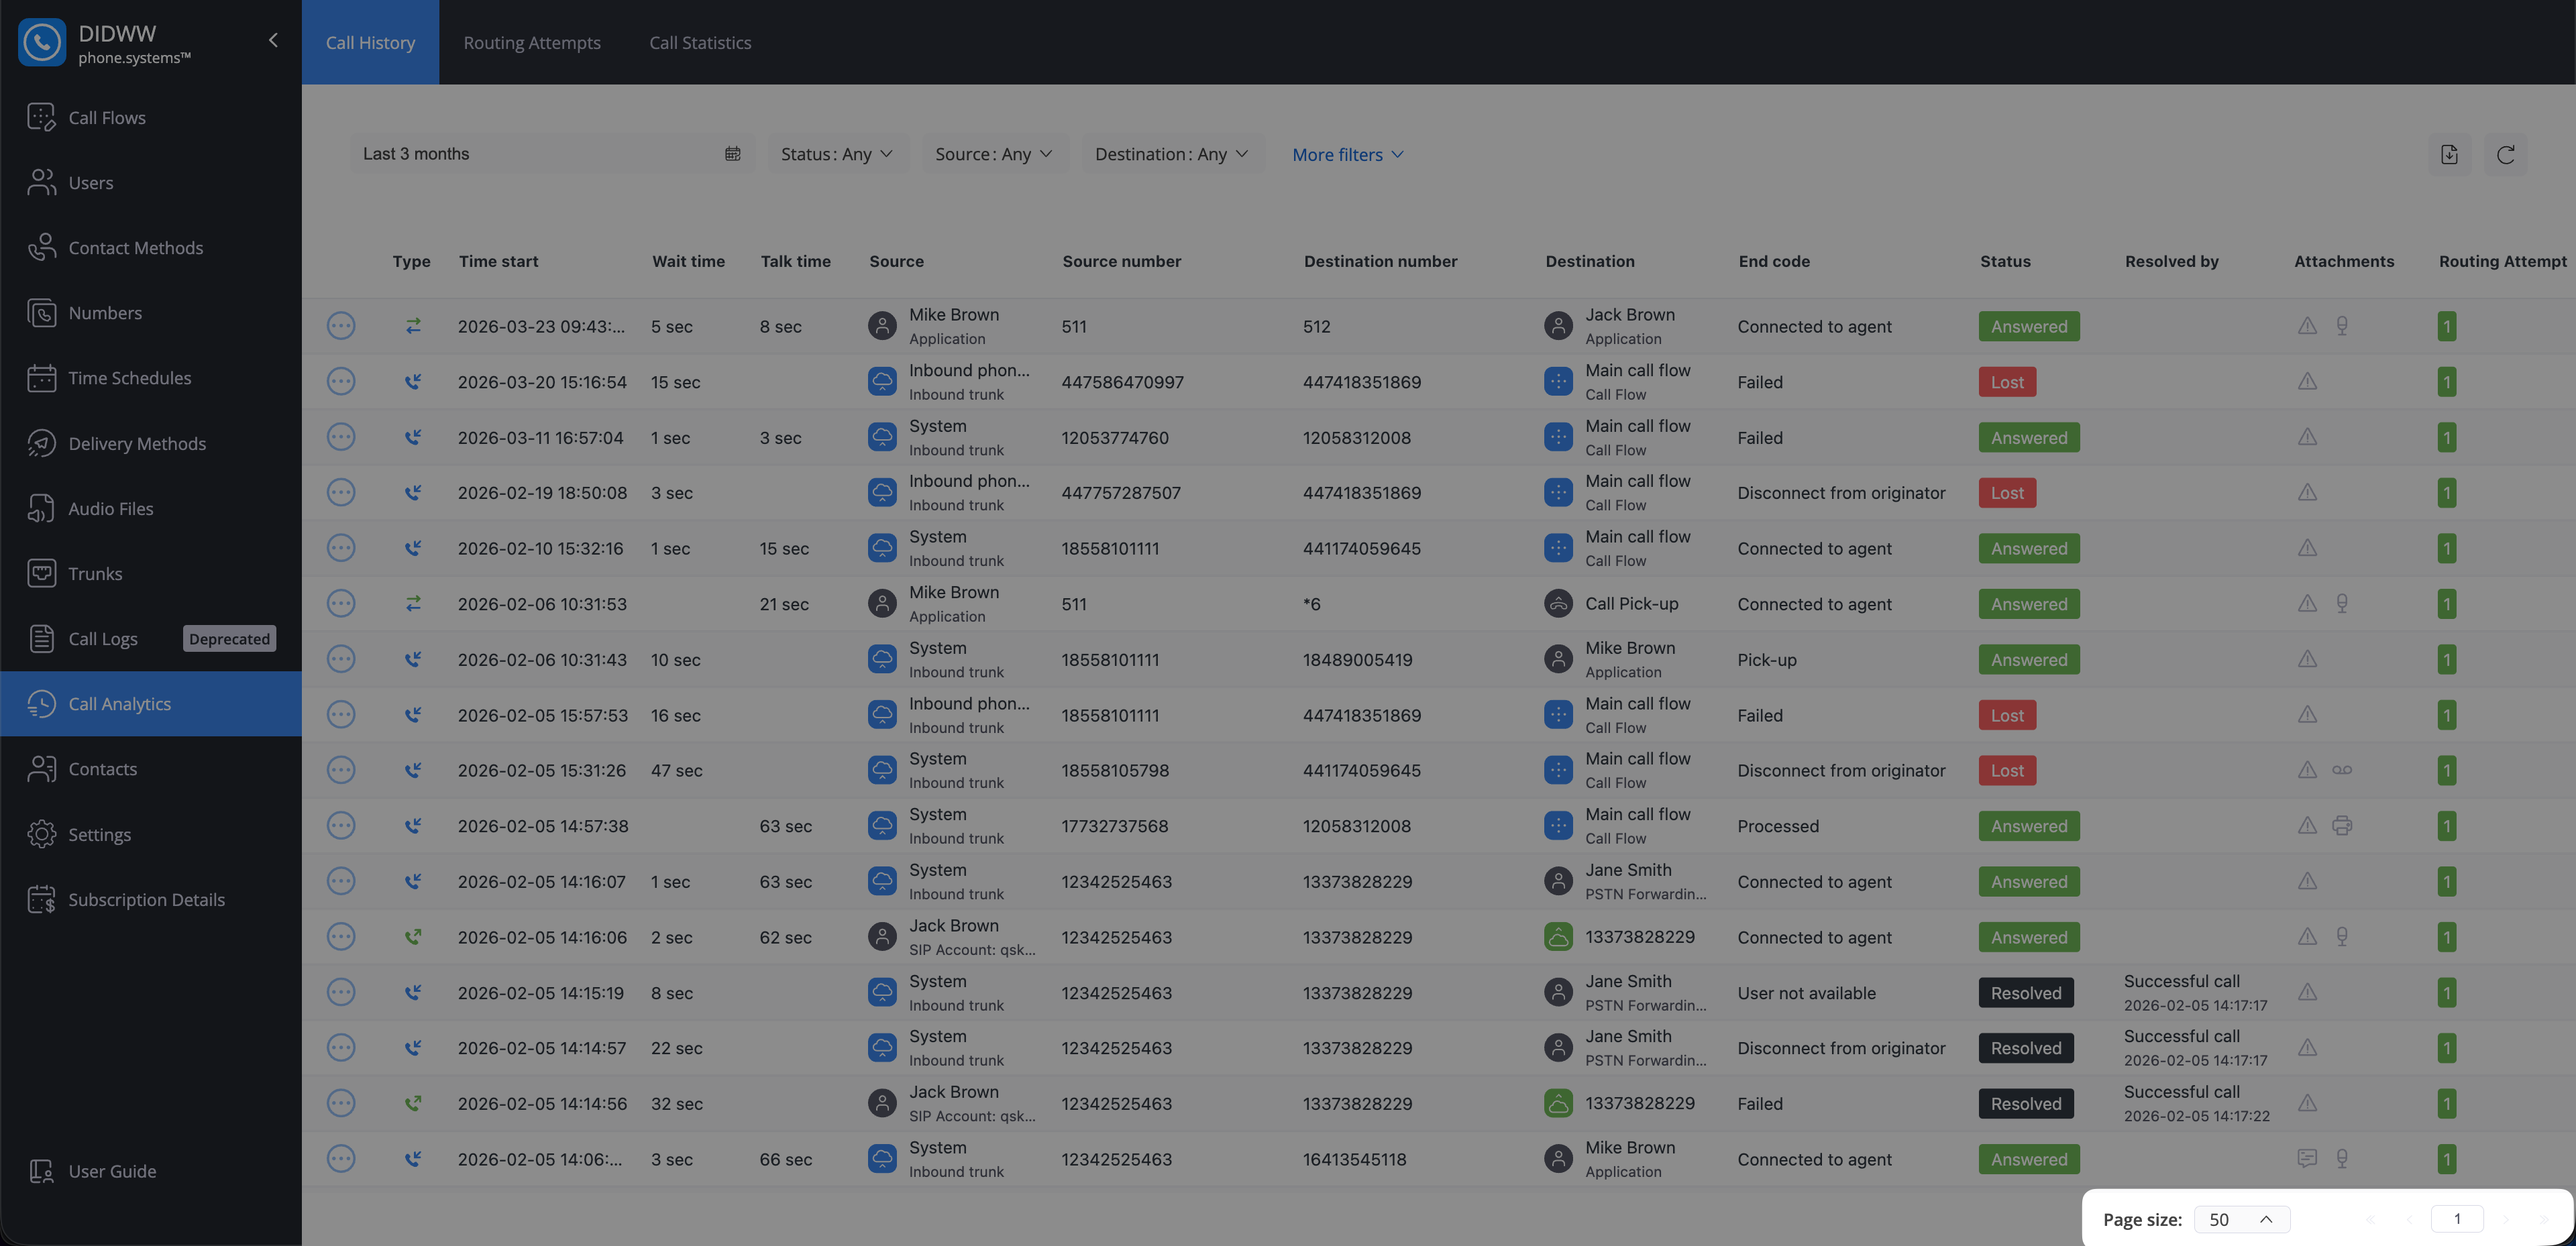
Fig. 17. Pagination controls#