

AI Voice Connector#
Use the OpenSIPS AI Voice Connector with DIDWW SIP Trunking to answer calls to your DIDWW numbers with voice AI. Run the connector on your own server, choose the AI integration for each number, and transfer incoming callers to a live person through DIDWW.
Bring voice AI to your existing phone numbers over SIP.
Route different phone numbers to different AI services.
Run the connector on infrastructure you control.
Add business tools with Python or MCP.
Transfer incoming callers from the AI agent to a live person.
Change AI services without changing your phone numbers.
The connector integrates with OpenAI Realtime, Deepgram, Deepgram Voice Agent, Azure Speech, and Pipecat. The OpenAI, Deepgram, and Azure integrations use provider-hosted APIs. Pipecat can use cloud or local components, depending on your configuration. This guide uses OpenAI Realtime for the example configuration.
Important
This connector example answers incoming calls and does not originate outbound calls. For call transfers, DIDWW places the new call through your outbound trunk. The connector runs as a separate deployment from the SIP proxy described in Voice over SIP.
1. Route Incoming Calls to the AI Voice Connector#
Configure an Inbound SIP Trunk in the DIDWW User Panel to send calls from your DIDWW numbers to your connector server.
Before You Begin#
An active DIDWW account is required. Sign in to DIDWW or Create DIDWW account.
At least one active DID number with capacity to receive incoming calls is required. See How to buy numbers.
The public IPv4 address of your connector server is required (e.g.,
203.0.113.10). Use the same address when you deploy the connector in section 2.
Step 1: Create New SIP Trunk#
In the DIDWW User Panel, go to Voice > Inbound Trunks.
Click Create New > SIP Trunk.
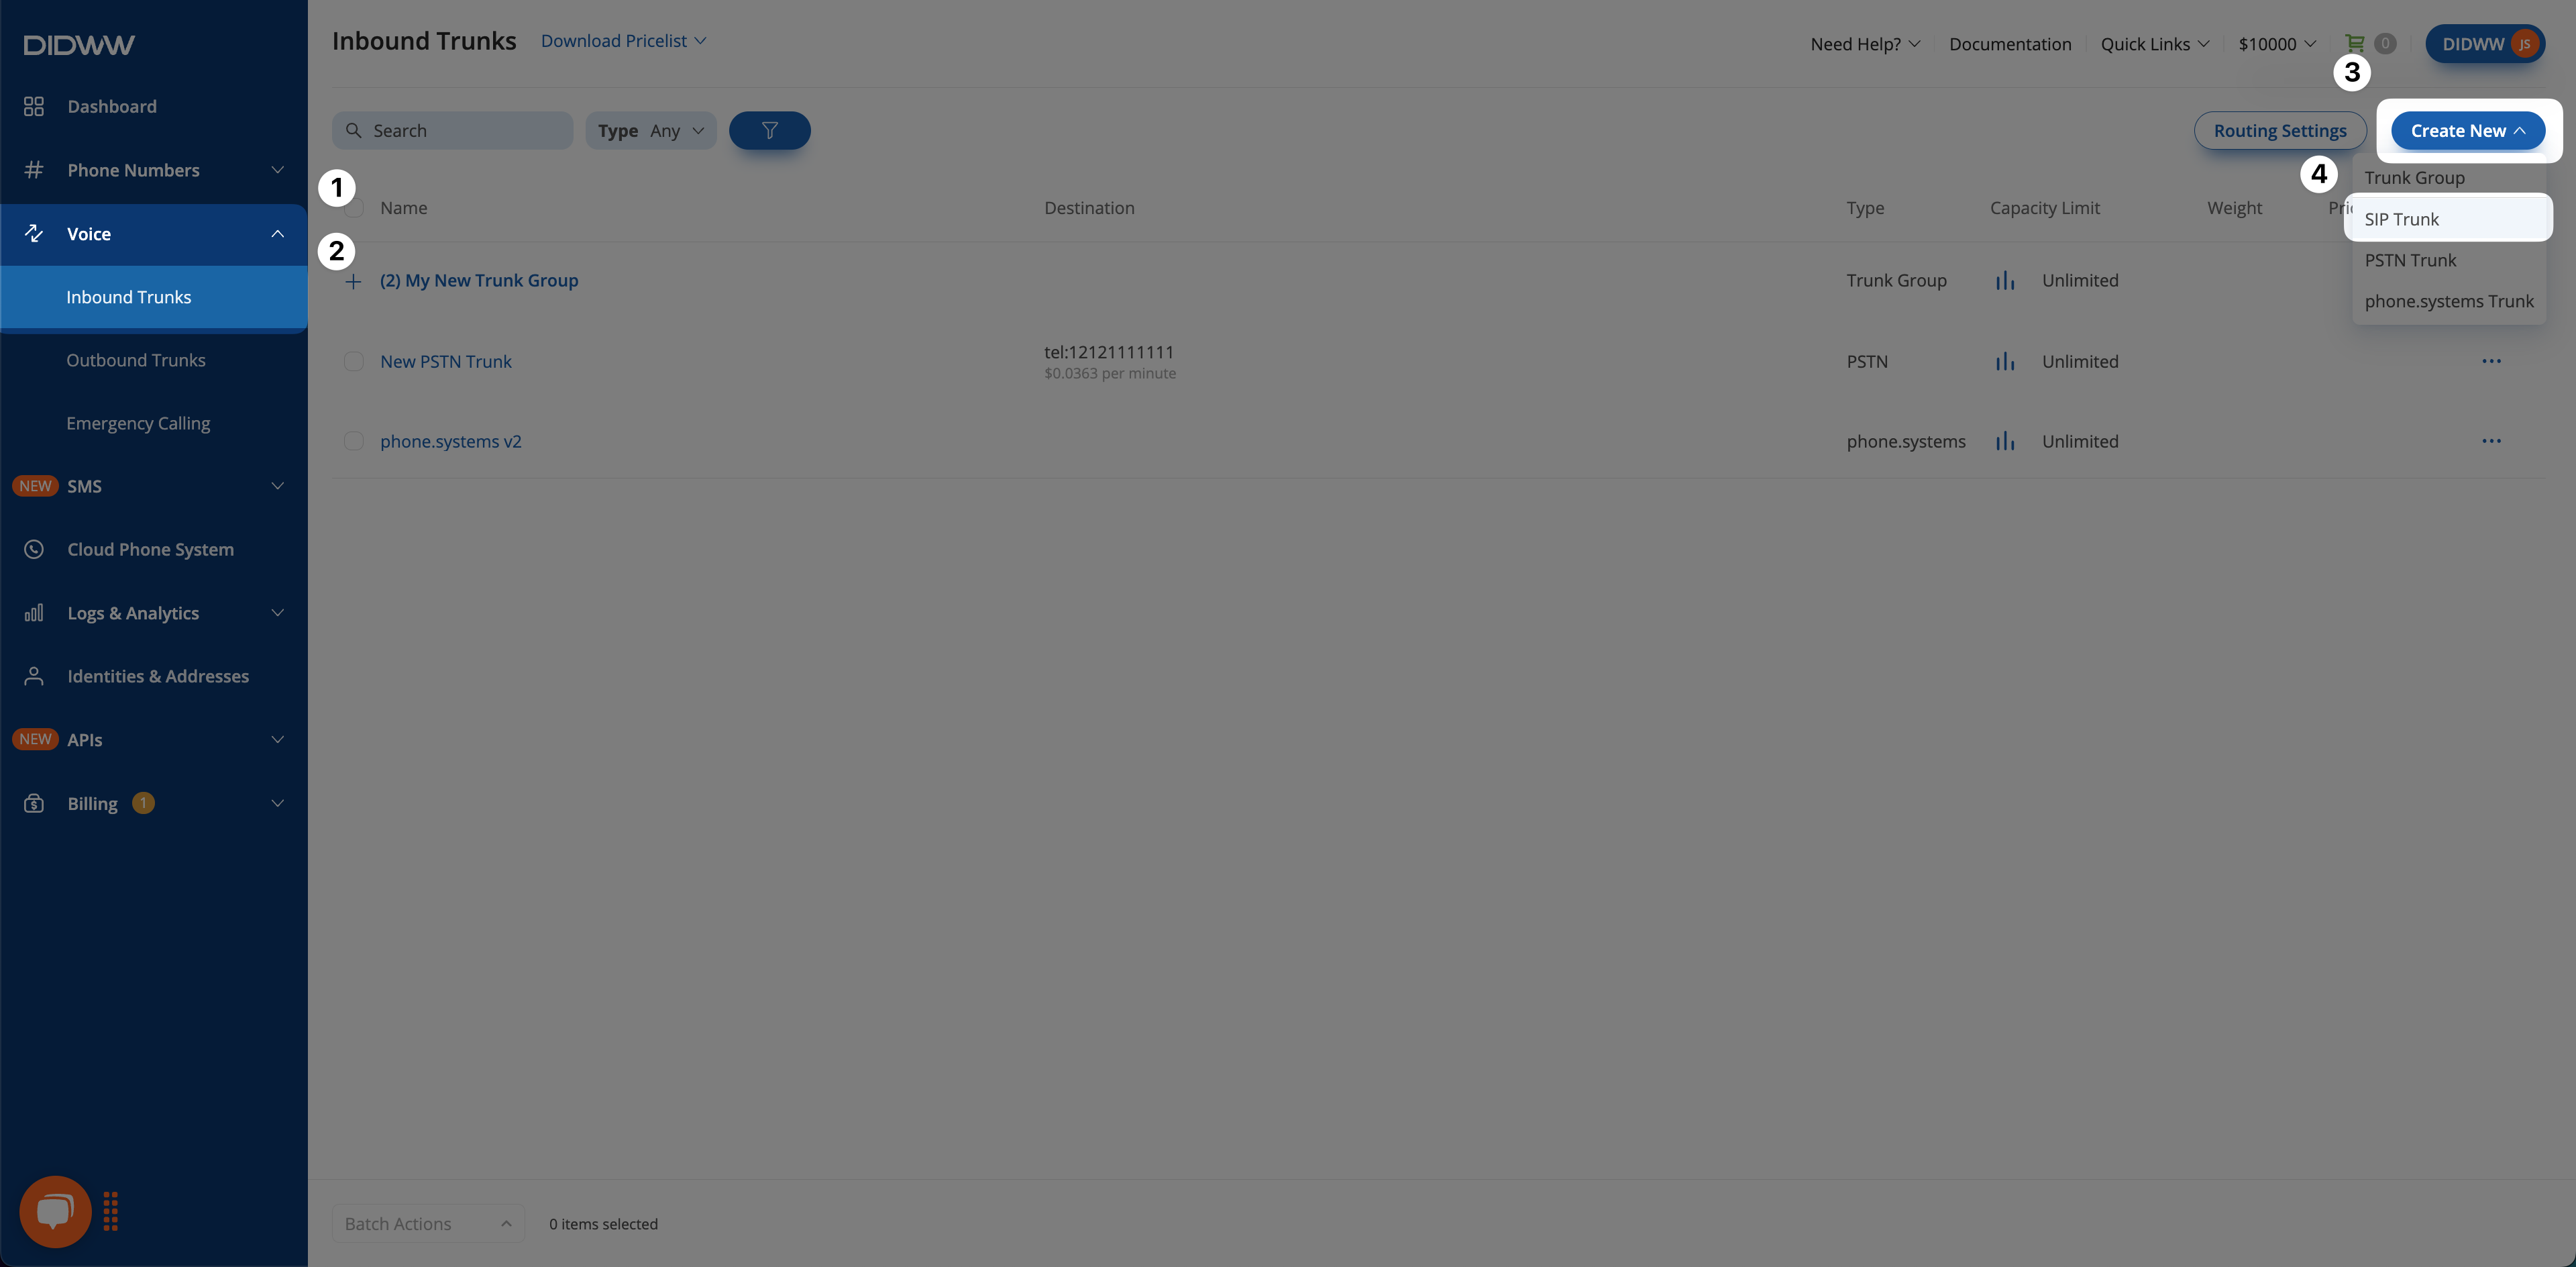
Fig. 1. Creating a new inbound SIP trunk#
Step 2: Configure General SIP Trunk Settings#
In the General tab, configure the endpoint used to deliver calls to your server.
Enter a descriptive Name for the trunk (e.g.,
AI Voice Connector).Keep Static Endpoint selected.
In User Part of R-URI, keep the default
{DID}. The connector uses the called number to select an AI service.In Host, enter the public IPv4 address of your server (e.g.,
203.0.113.10).In Port, enter
5060.In Transport, keep UDP selected.
Keep the remaining General settings at their defaults.
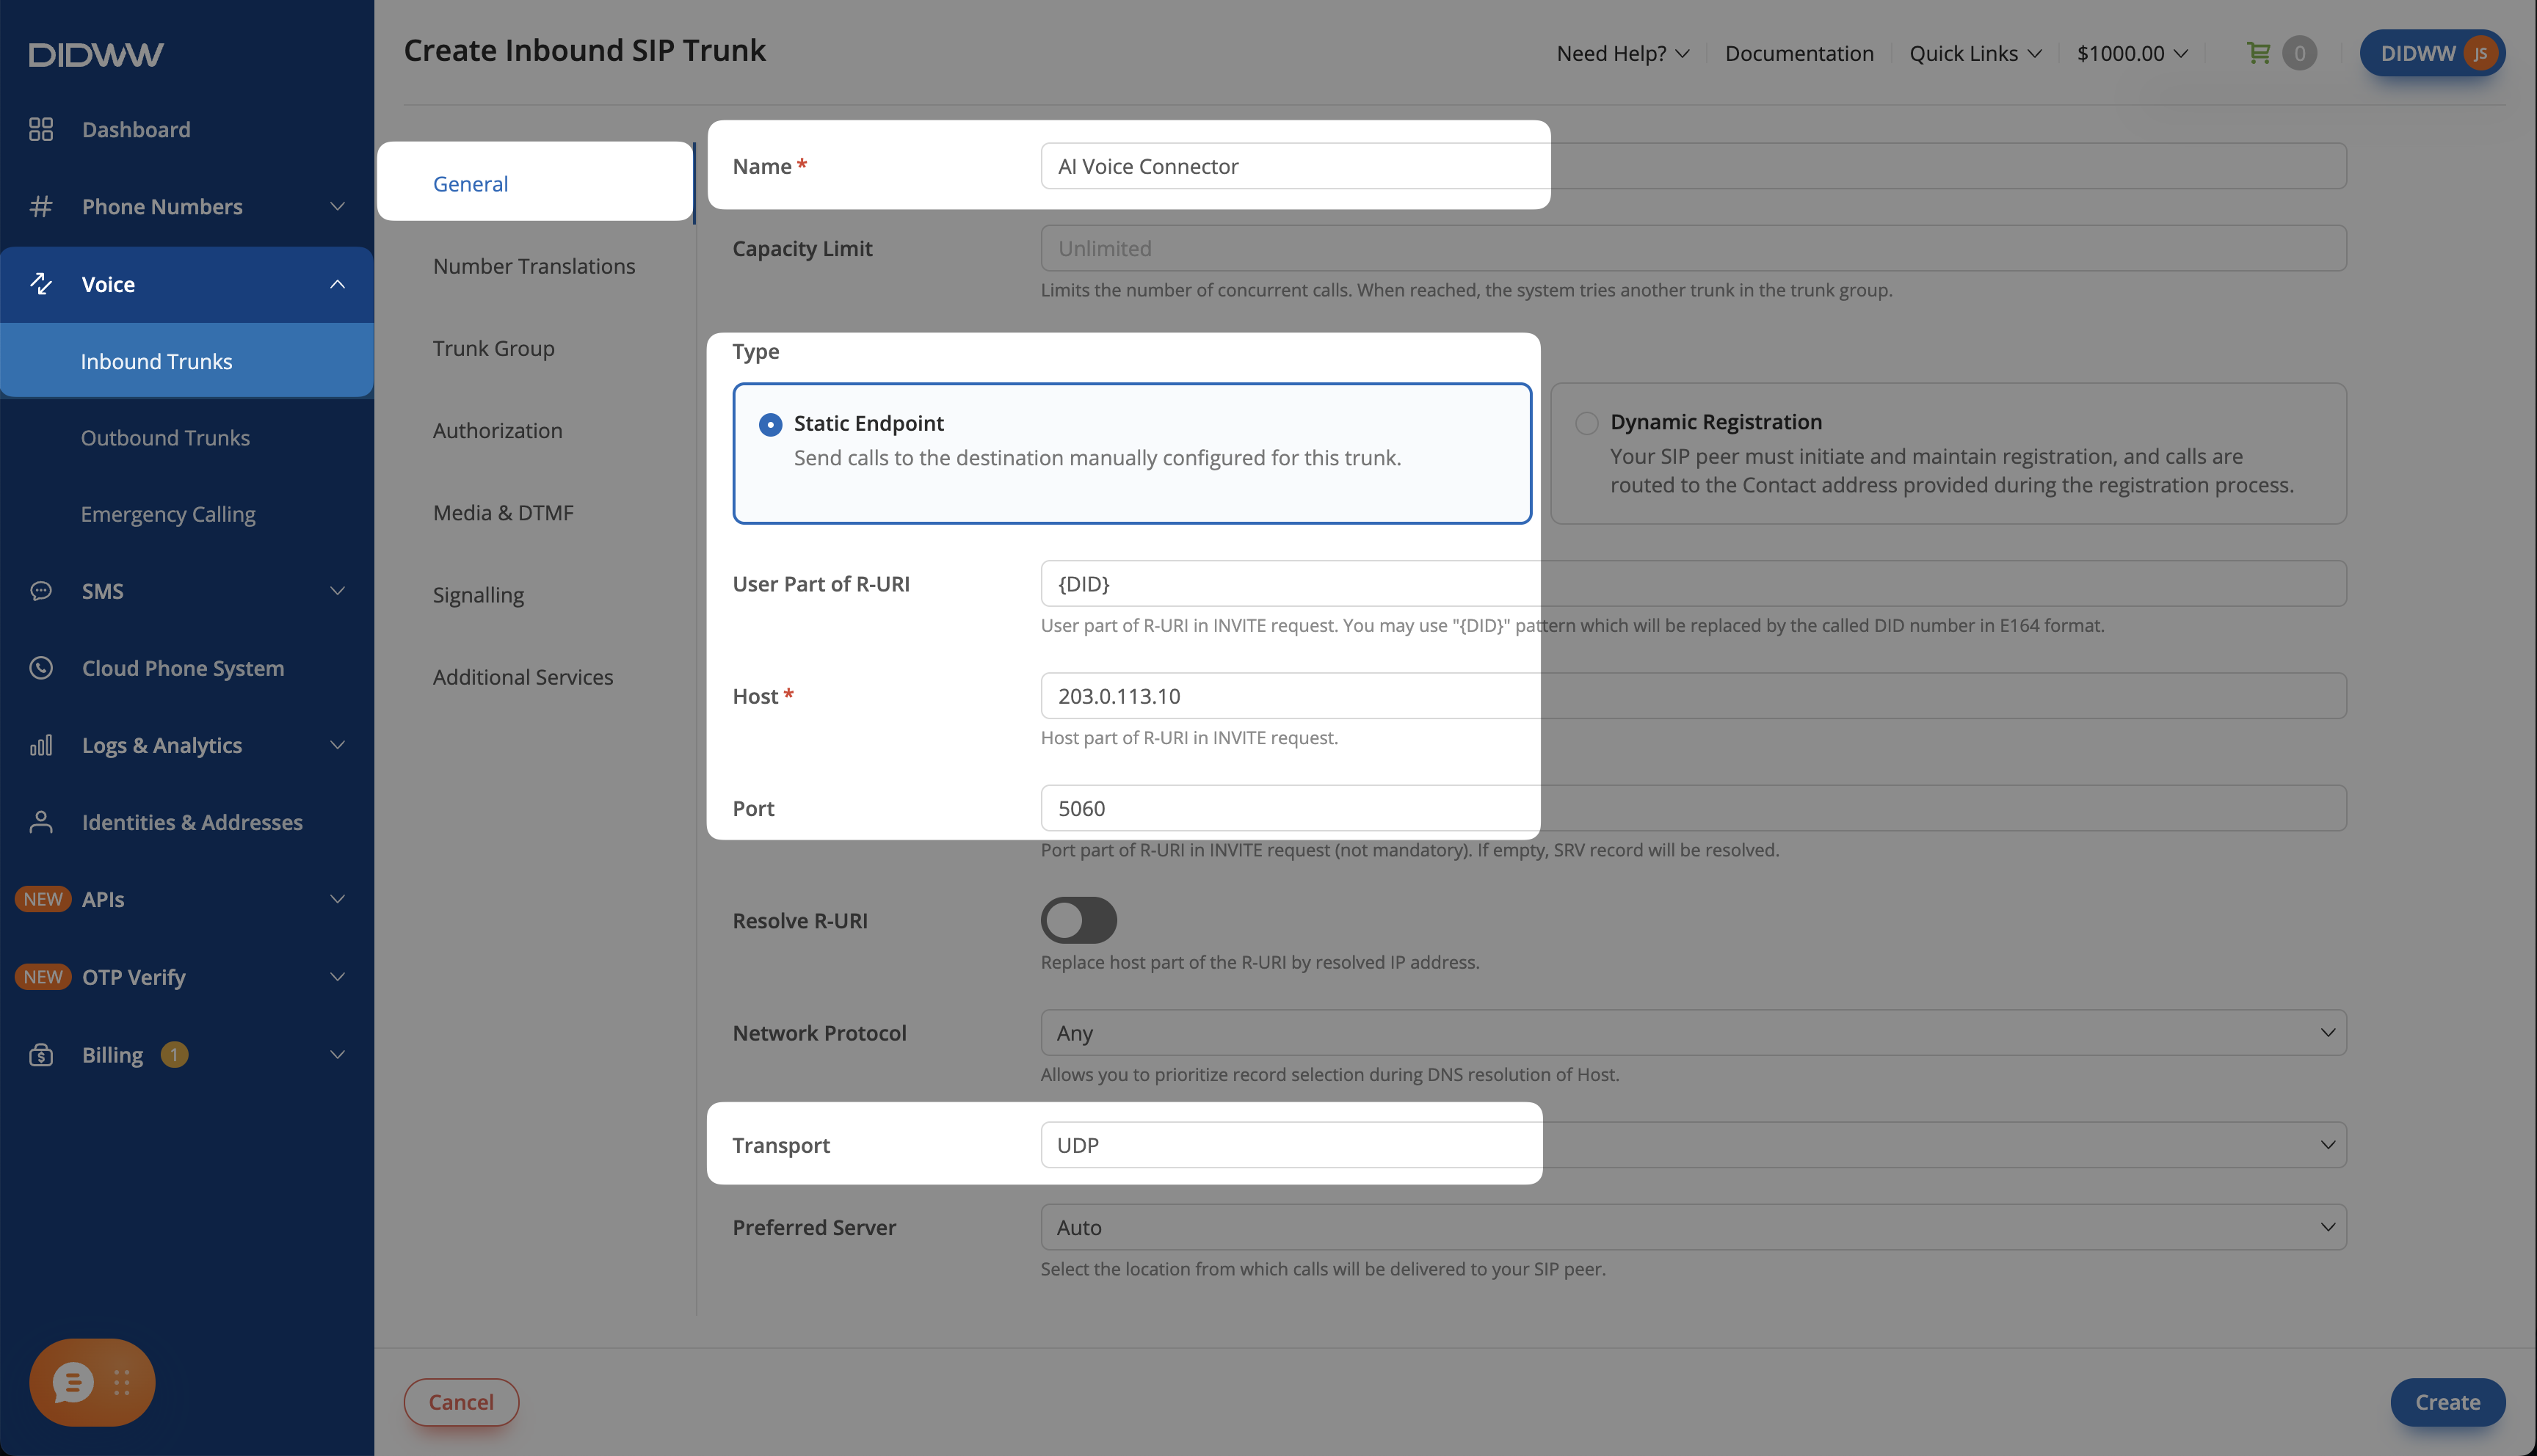
Fig. 2. Inbound SIP trunk configured for the AI Voice Connector#
Step 3: Configure Media & DTMF#
Open the Media & DTMF tab.
In Codecs, keep PCMA and PCMU for call audio and telephone-event for DTMF. Remove the other entries.
In Allowed RTP IP Addresses, enter your server’s public IPv4 address. If you will transfer calls to a person, leave this field empty.
Keep SRTP Mode at its default, Disabled. This example uses unencrypted SIP signaling and RTP between DIDWW and your server.
Turn on Force Symmetric RTP.
Turn on RTP Ping.
Important
Keep RTP Ping enabled. The connector starts sending audio after it receives the first RTP packet. RTP Ping makes DIDWW send that packet first, allowing the agent’s greeting to play.
Note
Allowed RTP IP Addresses restricts the media sources DIDWW accepts. A transfer can change the media source, so restricting this field to the connector server can prevent audio after transfer. An empty field allows media from any address. See Media & DTMF settings.
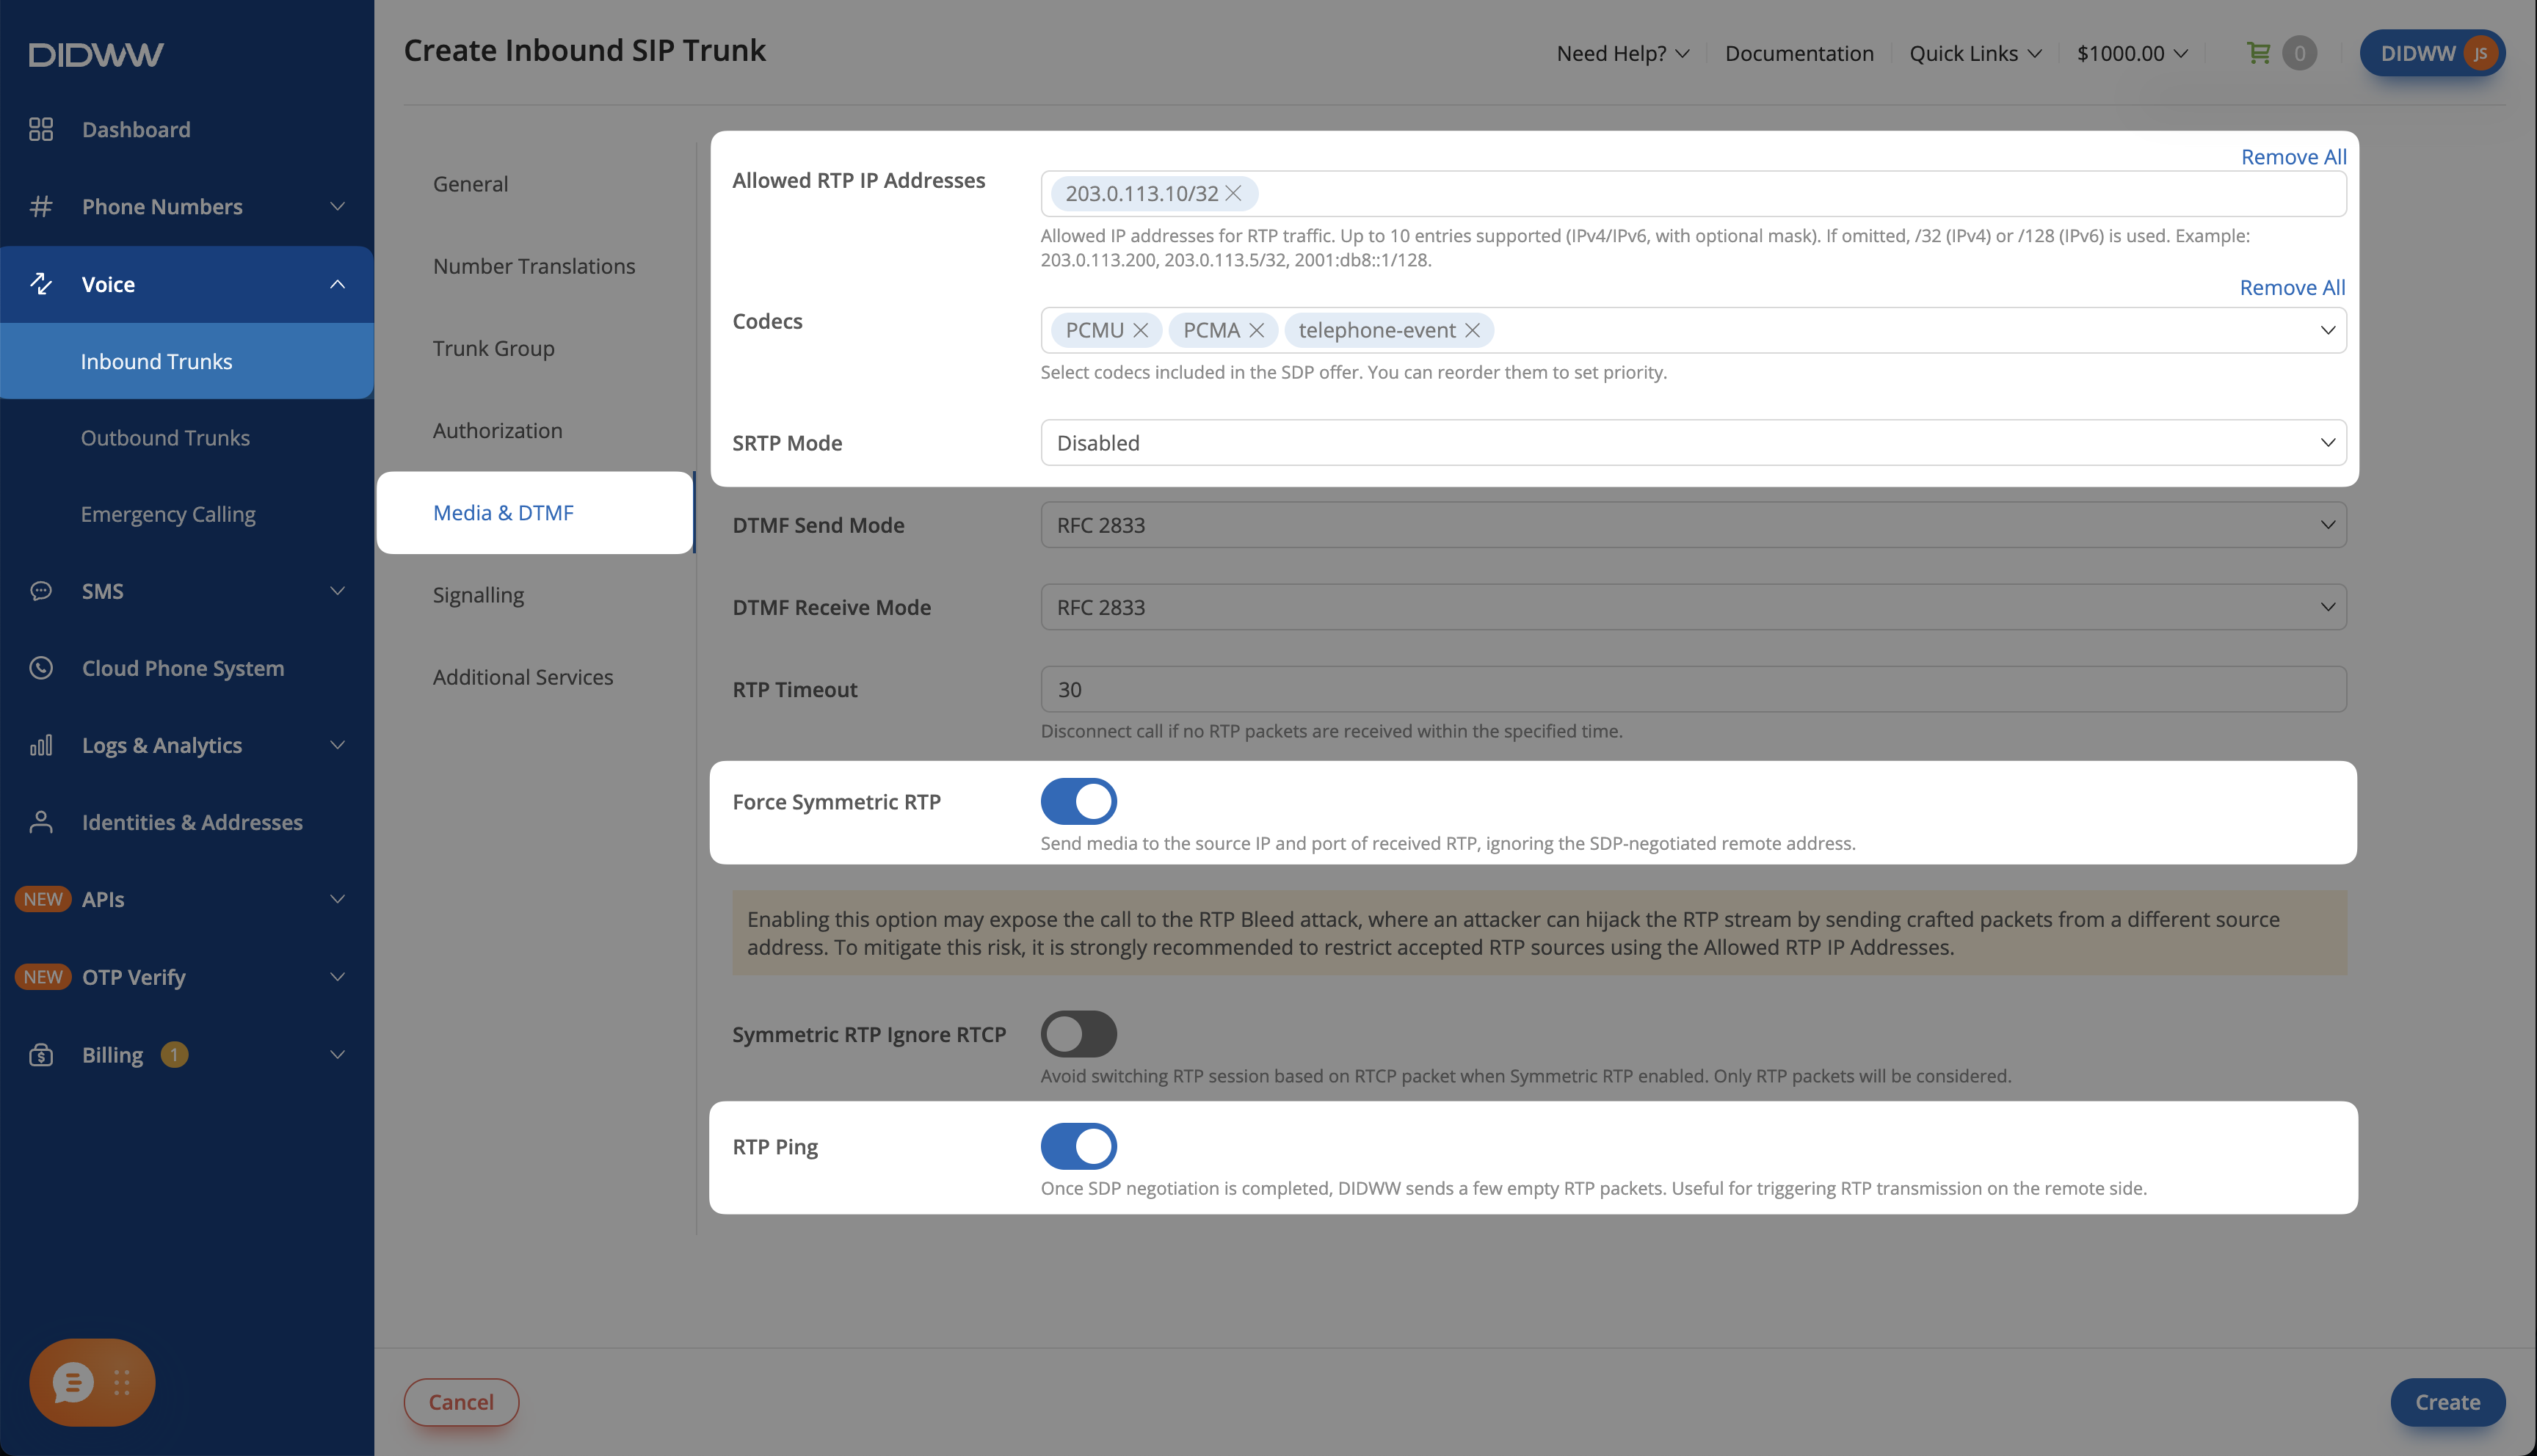
Fig. 3. Media and DTMF settings for the AI Voice Connector#
Step 4: Save the Inbound SIP Trunk#
Click Create to save the inbound SIP trunk.
Note
For advanced SIP trunk configuration, see SIP trunk settings reference.
Step 5: Assign the Trunk to Your DID Numbers#
In the DIDWW User Panel, go to Phone Numbers > My Numbers.
Select the DID number(s) that will deliver calls to your agent.
At the bottom of the page, click Batch Actions > Update Trunks.
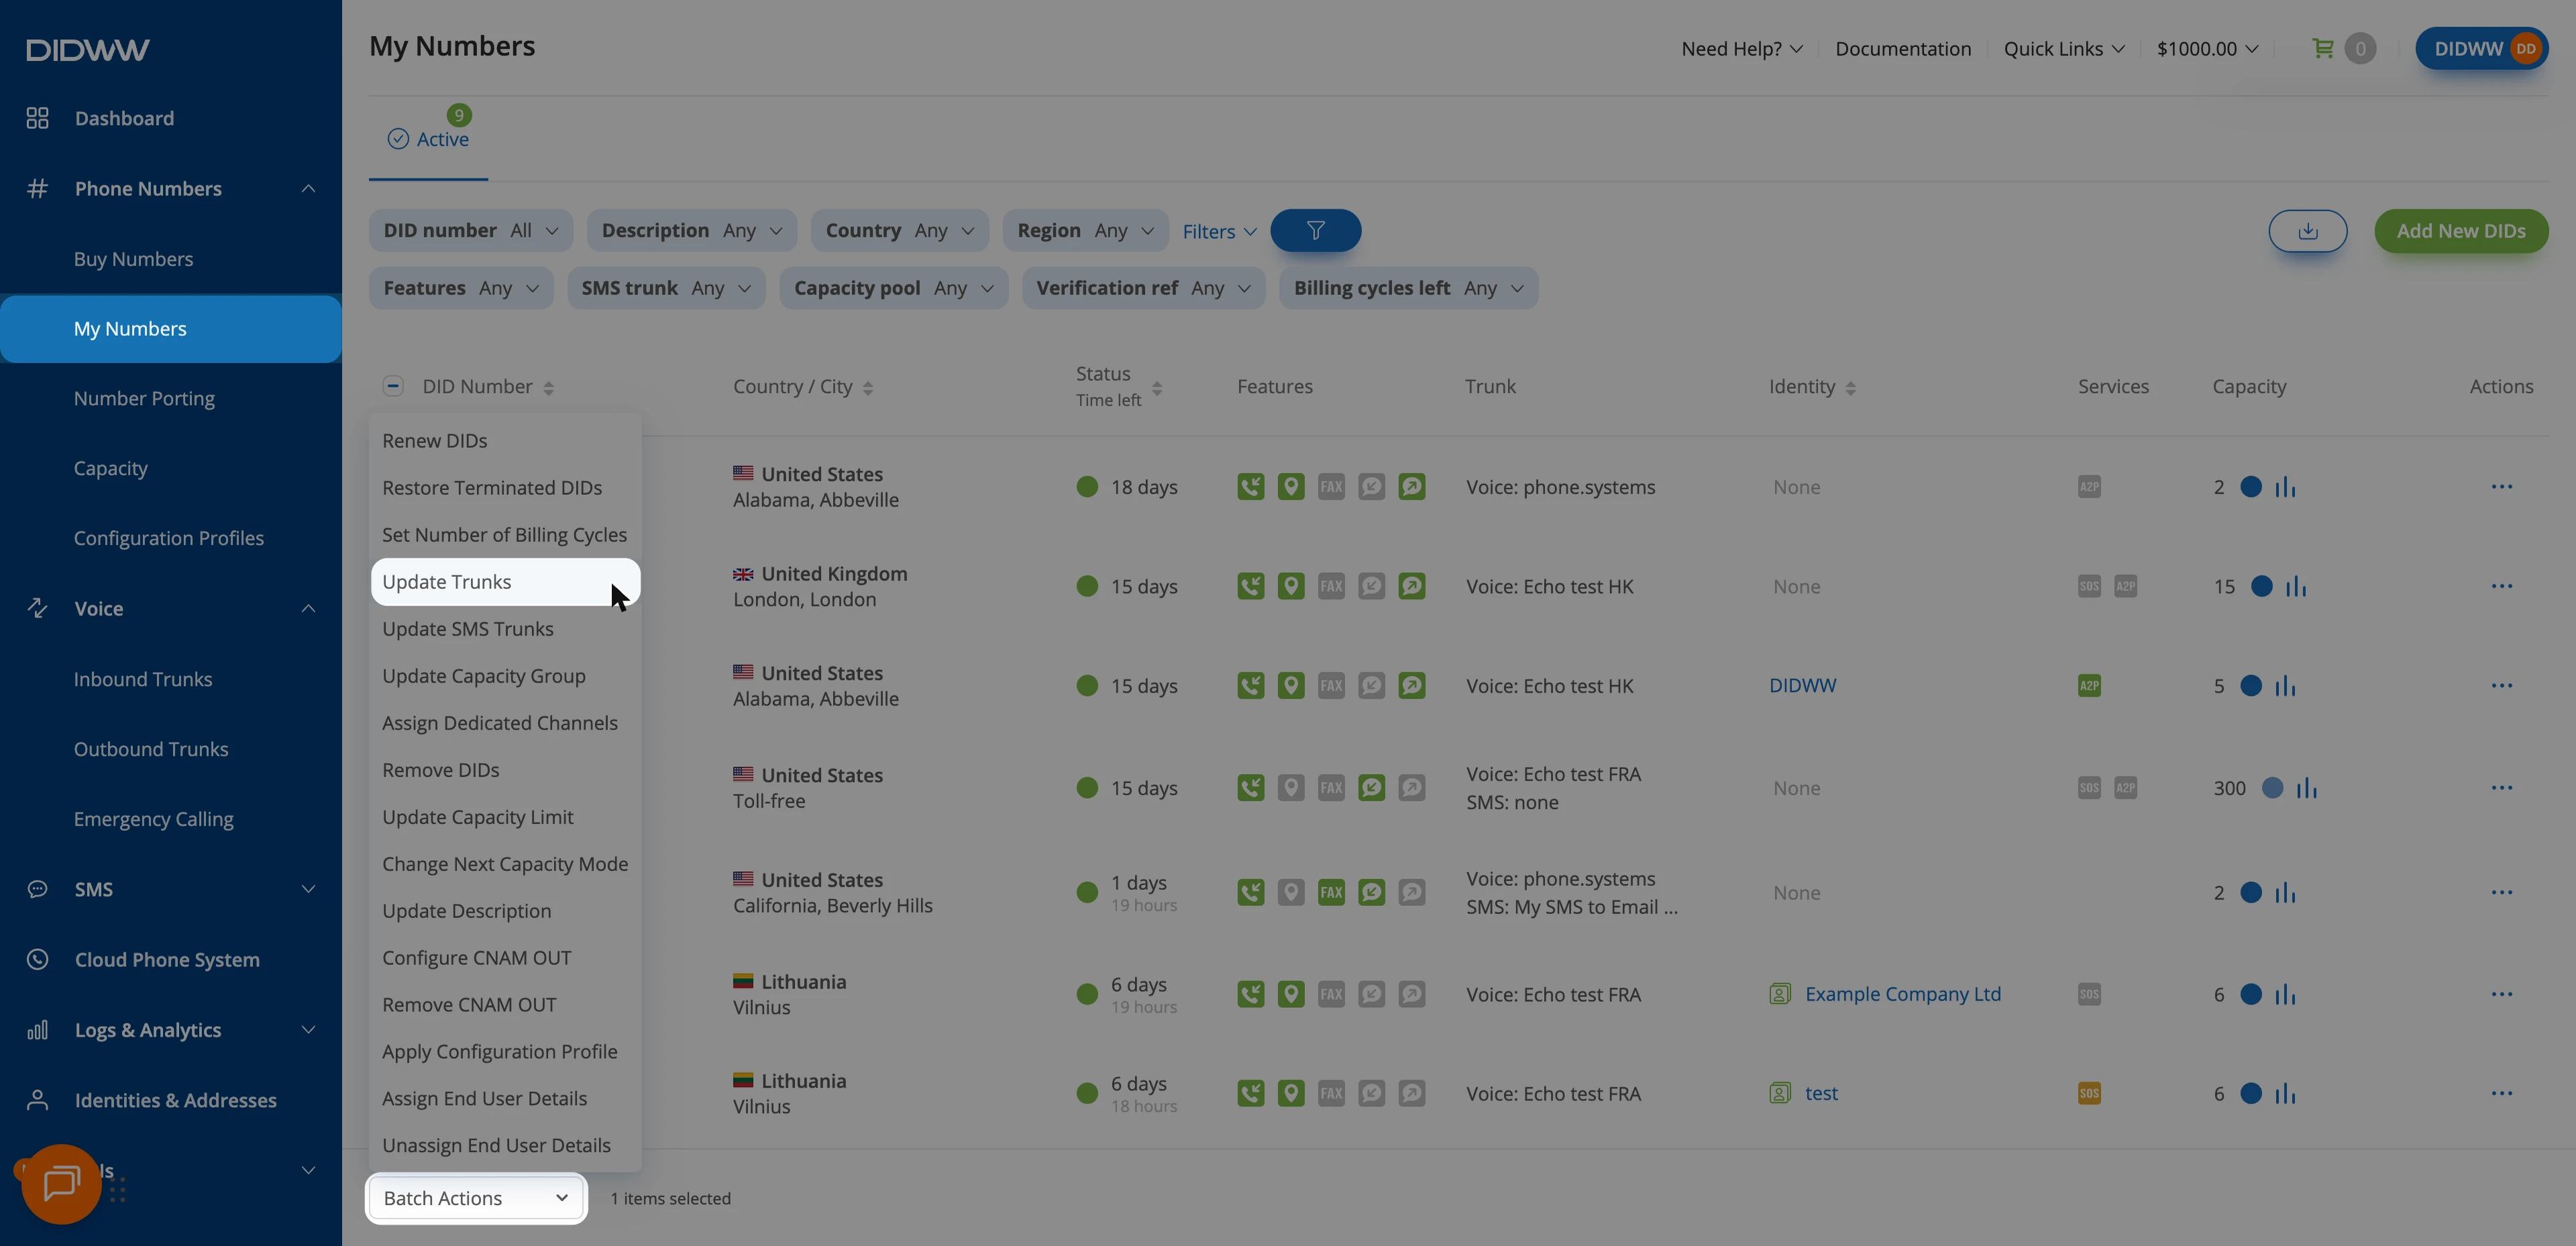
Fig. 4. Selecting Update Trunks from the Batch Actions menu#
Choose the AI Voice Connector trunk you created earlier.
Click Confirm to apply the changes.
2. Deploy the AI Voice Connector#
Run the connector on your server with Docker Compose using the
examples/simple configuration from the connector repository.
The example runs two containers. OpenSIPS handles SIP signaling, and
the engine exchanges call audio with the AI service.
Before You Begin#
A Linux x86-64 server with a public IPv4 address assigned to its network interface is required. This procedure covers that topology. The example loads modules from
/usr/lib/x86_64-linux-gnu/opensips/modules/.Docker Engine with the Docker Compose plugin and
gitmust be installed on the server.An OpenAI API key with access to the Realtime API and available API credit is required. Keep the key on your server.
Your server must be able to make outbound HTTPS and WebSocket connections to OpenAI on TCP port
443.
Note
The Compose example uses the OpenSIPS 4.0 image and
network_mode: host for both containers. SIP and RTP use the server’s
network directly. Use a server where port 5060 and the RTP range
below are available. Do not run this example alongside the SIP proxy
guide on the same ports.
Step 1: Allow DIDWW Traffic#
In your server and hosting-provider firewalls, allow incoming UDP traffic from the DIDWW IPv4 subnets to the following destination ports:
Source subnets |
Protocol |
Destination ports |
Purpose |
|---|---|---|---|
|
UDP |
|
SIP signaling |
|
UDP |
|
RTP media |
These RTP source subnets also contain
the DIDWW Static Endpoint signaling addresses. Restrict access to these sources
and allow return traffic. The connector’s management interface on UDP
8080 and its event listener are local to the server and do not need
public firewall rules.
Step 2: Download the Connector#
Clone the connector repository and open the example directory:
1git clone https://github.com/OpenSIPS/opensips-ai-voice-connector-ce.git
2cd opensips-ai-voice-connector-ce/examples/simple
Step 3: Configure the Environment#
Replace the contents of .env in examples/simple with the following:
1MI_PORT=8080
2B2B_SIP_PORT=5060
3OPENAI_API_KEY=YOUR_OPENAI_API_KEY
4RTP_IP=203.0.113.10
5RTP_MIN_PORT=35000
6RTP_MAX_PORT=35100
Replace
YOUR_OPENAI_API_KEYwith your OpenAI API key.Set
RTP_IPto your server’s public IPv4 address. The connector advertises this address to DIDWW for call media.Keep
RTP_MIN_PORTandRTP_MAX_PORTwithin the range allowed in Step 1.
Step 4: Route Your Numbers to OpenAI#
In conn/simple.ini, update the existing [openai] section:
Delete the
keyline so that the connector usesOPENAI_API_KEYfrom.env.Add
match = .*to route all called numbers to OpenAI.Keep the
[openai]section before other AI service sections.
1[openai]
2match = .*
3voice = alloy
4instructions = You are a helpful assistant.
5welcome_message = Hello! How can I help you?
6tools=/app/cfg/functions.py
7mcp_servers = shop
Update this section only. Keep the other sections, including
[mcp:shop], in the example file.
Important
Configuration values in simple.ini take precedence over environment
variables. Leaving the example key placeholder in [openai]
prevents the connector from using your key from .env.
Note
match is a regular expression checked against the called number.
match = .* sends all numbers to OpenAI. If no expression matches,
the connector tries the service name, then selects an enabled service
using a hash of the called number. Configure explicit matches when
using other AI services.
The tools and mcp_servers entries load the repository’s demo
functions and shop data. You can use them to test tool calls. Before
using the agent for your business, remove these entries or replace them
with your own tools. See Customize Your Voice Agent.
Step 5: Accept SIP from DIDWW Only#
In b2b/opensips.cfg, add the source-address check at the start of the
existing route block. The complete block becomes:
route {
    if ($si !~ "^(46[.]19[.](20[89]|21[0-5])|185[.]238[.]17[2-5])[.]") {
        xlog("dropped $rm from $si\n");
        exit;
    }
    if (!is_method("INVITE") || has_totag()) {
        send_reply(405, "Method not allowed!\n");
        exit;
    }
    ua_session_server_init($var(b2b_key), "drbh");
    xlog("Started new call for $var(b2b_key)\n");
    exit;
}
The expression matches 46.19.208.0/21 and 185.238.172.0/22.
Requests from other source addresses are dropped before a new call session
is created. Keep the rest of opensips.cfg unchanged.
Step 6: Start the Connector#
From examples/simple, build and start the containers:
1docker compose up -d --build
Check their status:
1docker compose ps
The ai-voice-connector-opensips container should show Up and
(healthy). The ai-voice-connector-engine container should show Up.
Step 7: Test Incoming Calls and Audio#
Follow the connector logs:
1docker compose logs -f
Call a DIDWW number assigned to the inbound trunk.
Check for
Started new call for B2B...in the OpenSIPS logs andhandling B2B... using openai AIin the engine logs.Listen for the configured
welcome_message. Ask a question and confirm that the agent hears you and you can hear its reply.End the call and confirm that the connector closes the call session.
If you route several numbers to different AI services, call each number and check the selected service in the engine logs. For failed calls or missing audio, see Troubleshooting.
3. Transfer Incoming Calls to a Live Person (Optional)#
Note
Configure this section if the agent will transfer answered incoming calls to a person or team. Skip it if you only need the AI agent to answer calls.
The connector sends an in-dialog SIP REFER request to DIDWW. DIDWW places a new call to the transfer destination through your outbound trunk and connects the caller to the recipient. The new call is charged at DIDWW outbound rates. See SIP REFER transfer.
Before You Begin#
Access to DIDWW Outbound Trunks is required. See Get Access to DIDWW Outbound Termination.
A destination phone number where a person can answer is required.
Incoming calls and two-way audio must work as described in section 2.
Step 1: Create an Outbound SIP Trunk#
In the DIDWW User Panel, go to Voice > Outbound Trunks and click Create New.
Enter a descriptive Friendly name (e.g.,
AI Voice Connector).Keep Credentials & IP-Based as the Authentication method.
In Allowed SIP IP addresses, add the DIDWW inbound SIP addresses used to place transferred calls:
New York:
46.19.209.14Frankfurt:
46.19.210.14Los Angeles:
46.19.212.14Miami:
46.19.213.14Singapore:
46.19.214.14Hong Kong:
46.19.215.14Amsterdam:
185.238.173.14
Expand Media and keep Media encryption mode set to Disabled.
Click Create to save the trunk.
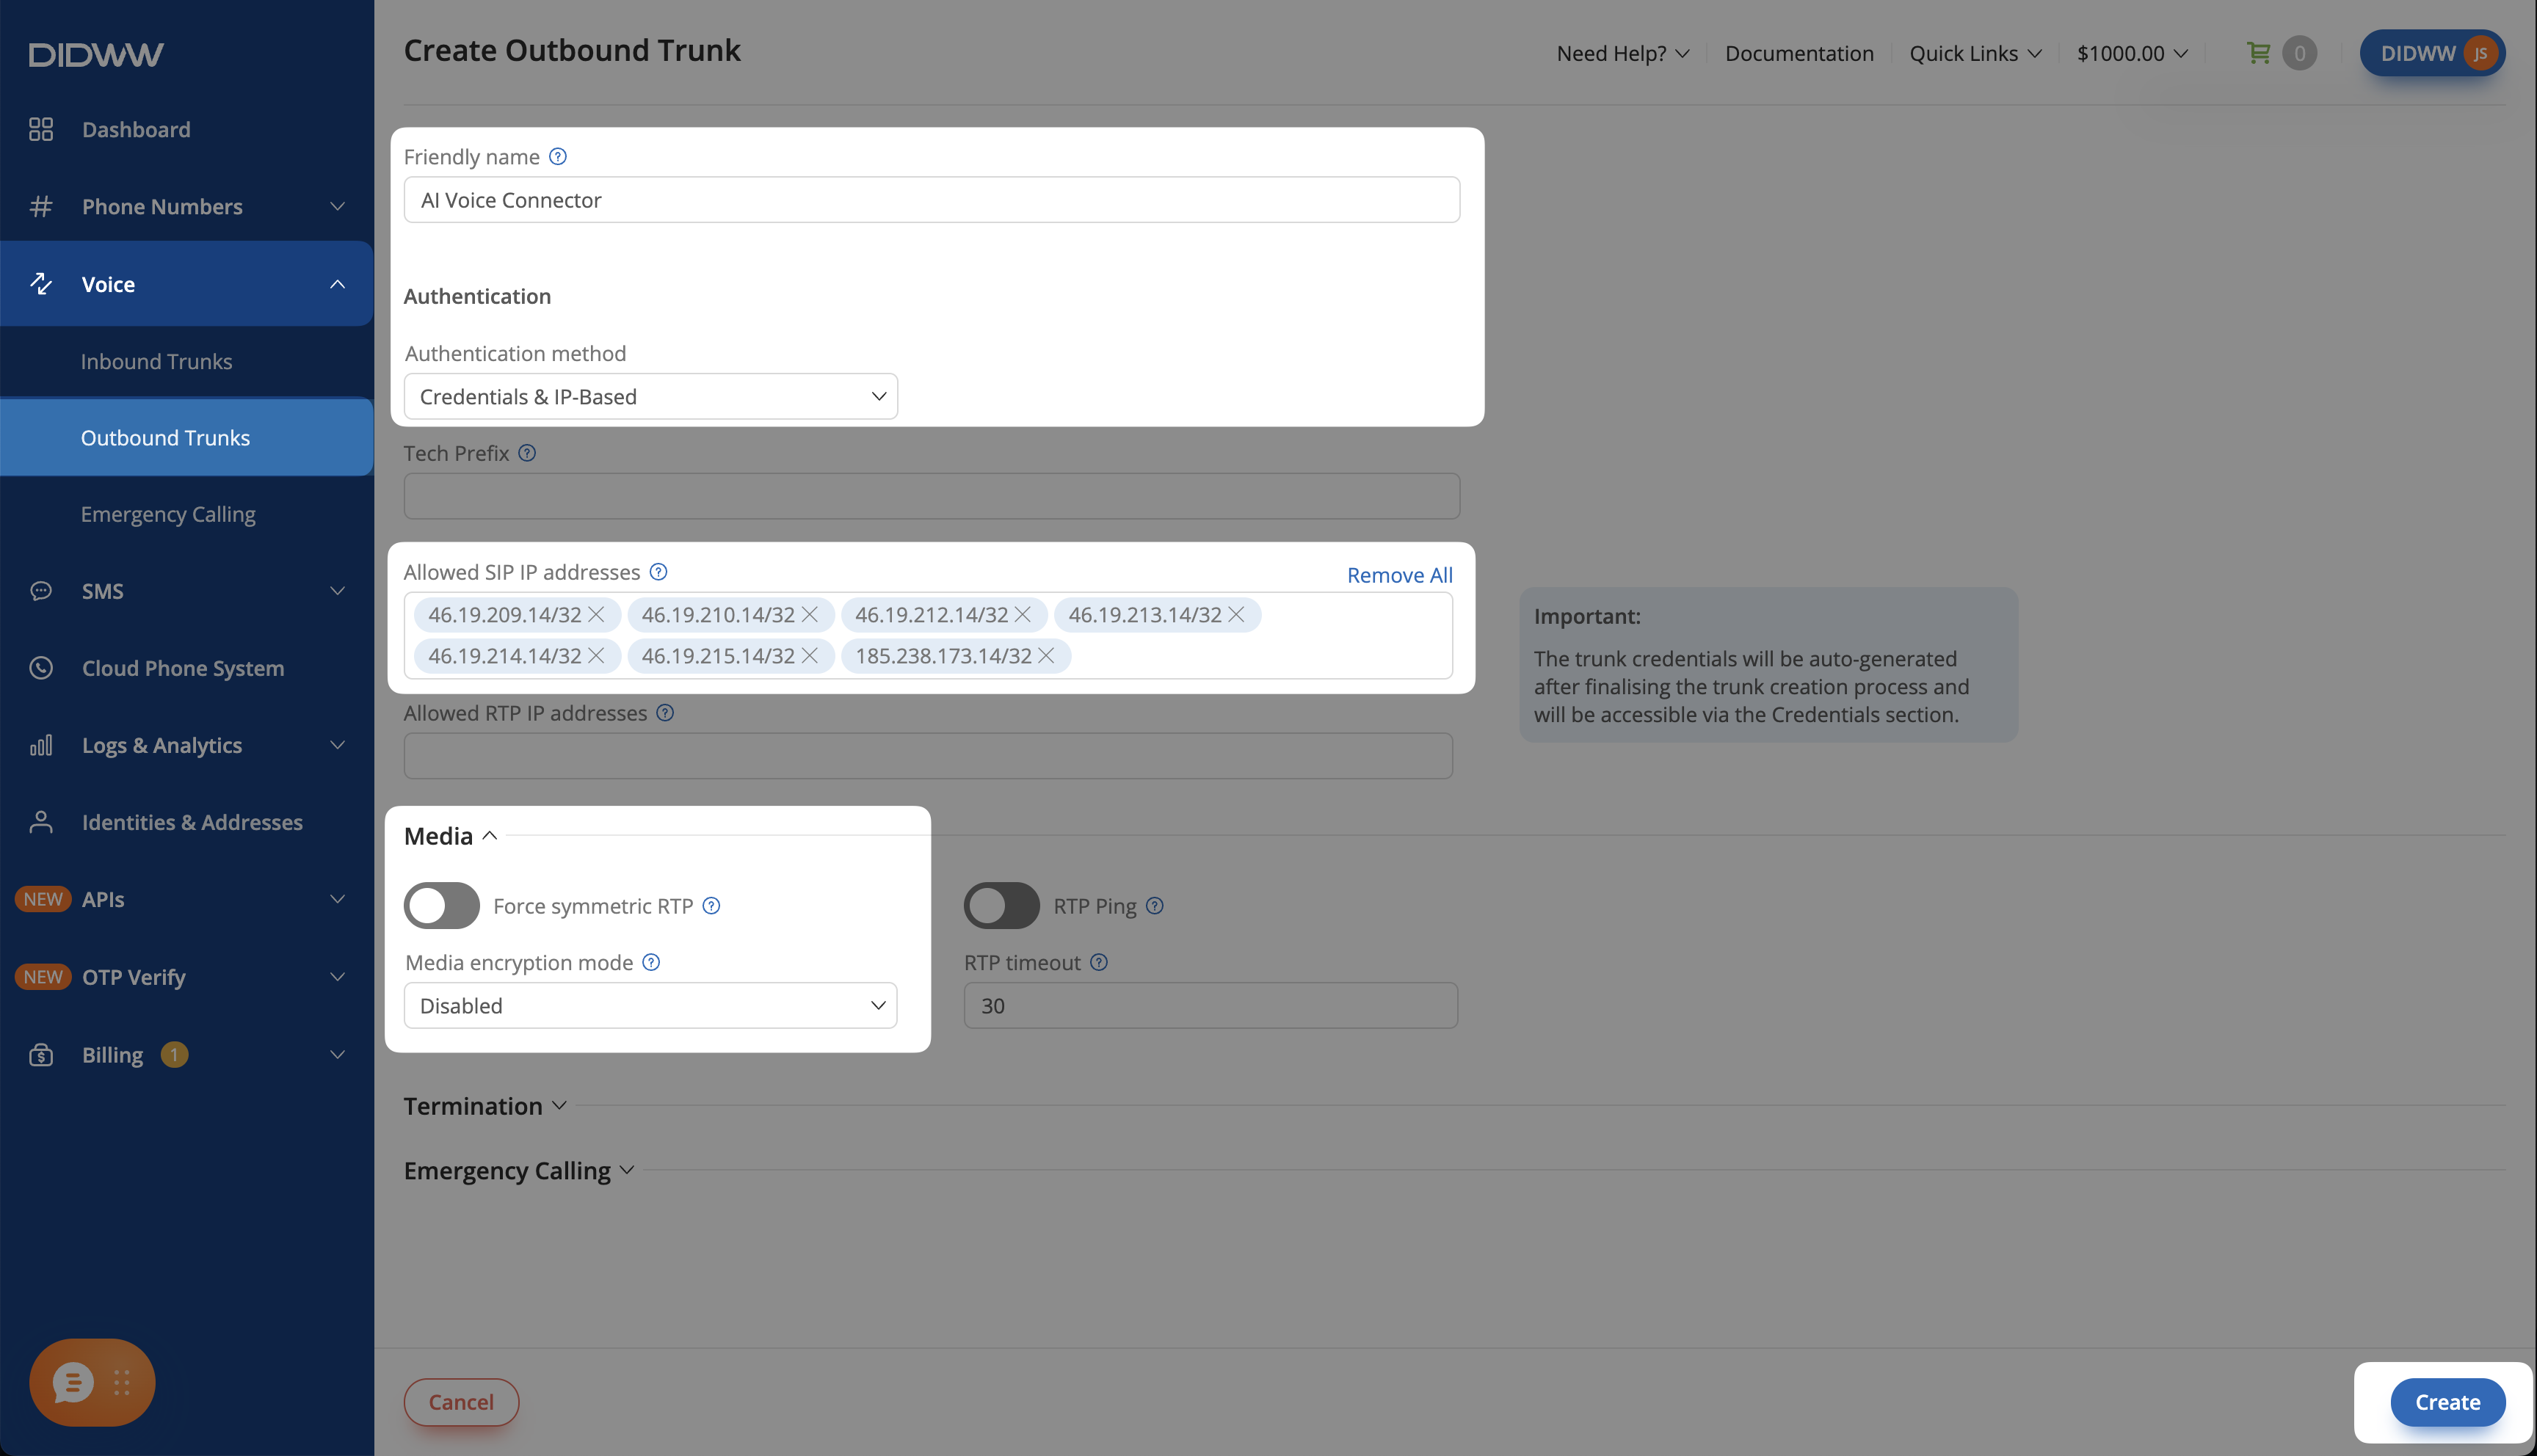
Fig. 5. Outbound SIP trunk configured for call transfers#
On Outbound Trunks, click the key icon in the trunk’s Credentials column, then the eye icon. Copy the Username and Password for the next step.
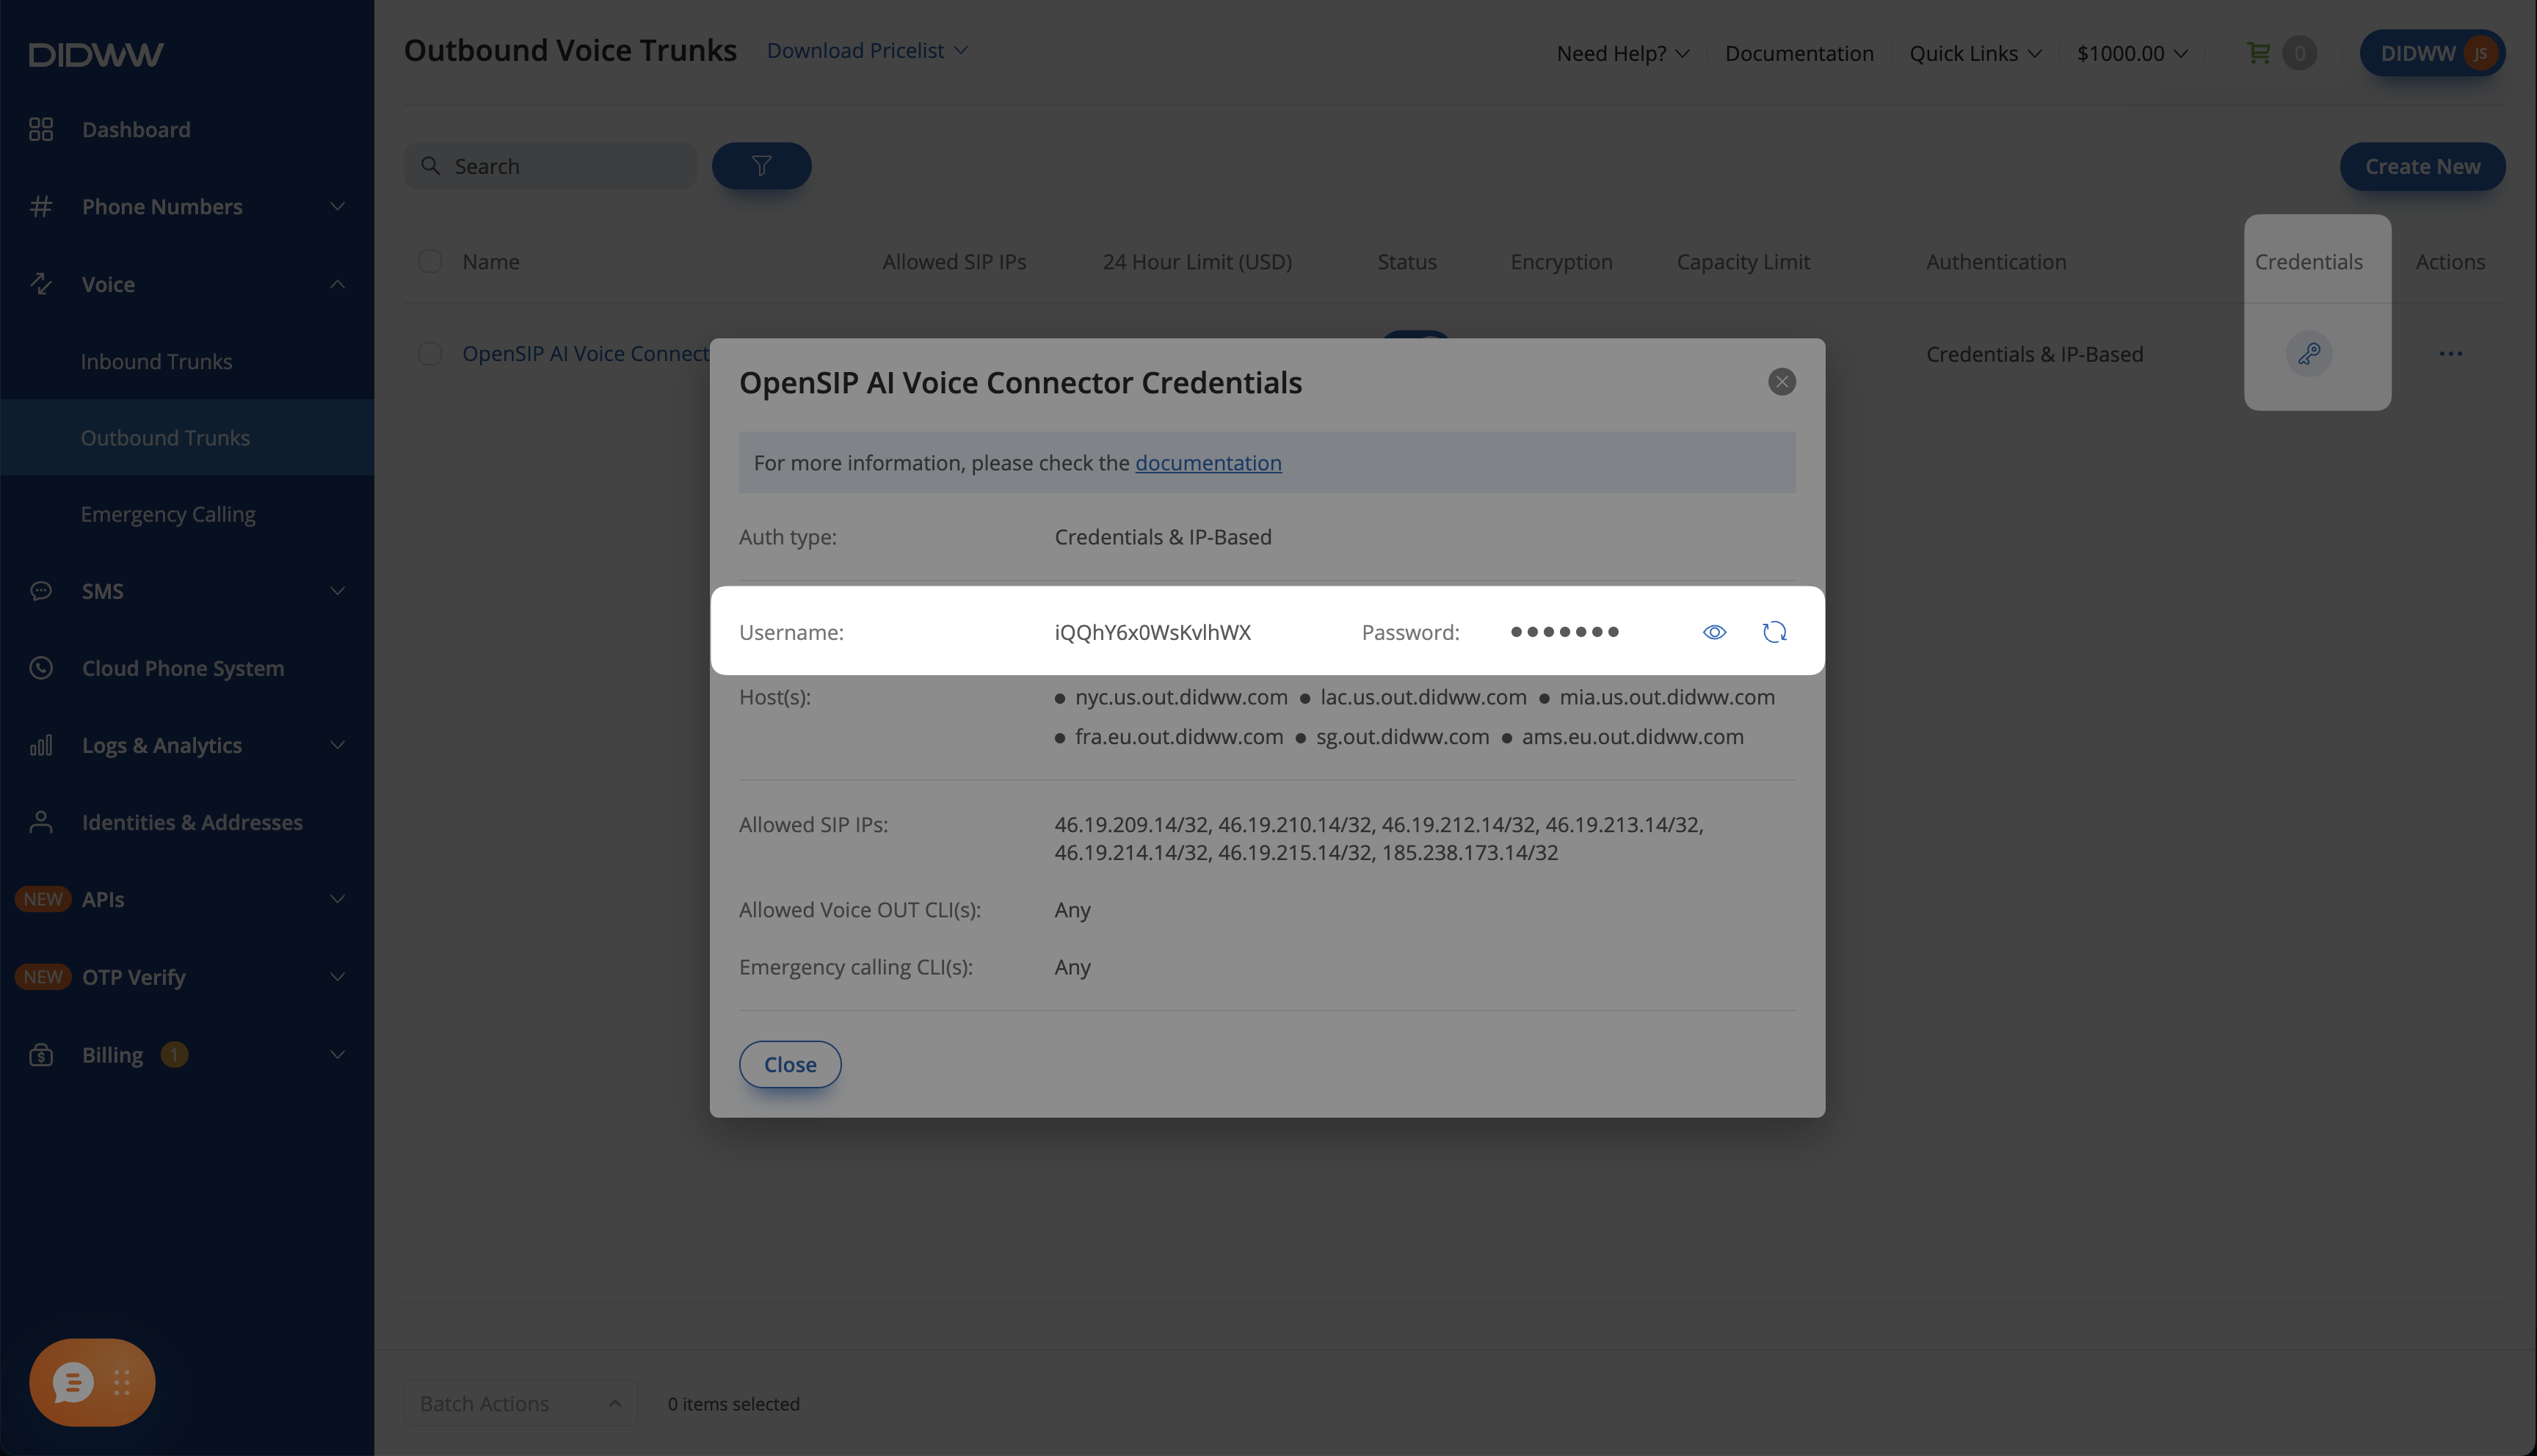
Fig. 6. Viewing the outbound trunk credentials#
Note
The transferred call is placed by DIDWW, so these are DIDWW’s Static Endpoint signaling addresses. Your connector server does not originate this outbound call. For all trunk settings, see Create an outbound trunk and View outbound trunk credentials.
Step 2: Update the Inbound SIP Trunk#
Go to Voice > Inbound Trunks and open the AI Voice Connector trunk.
On the General tab, set Network Protocol to IPv4 only.
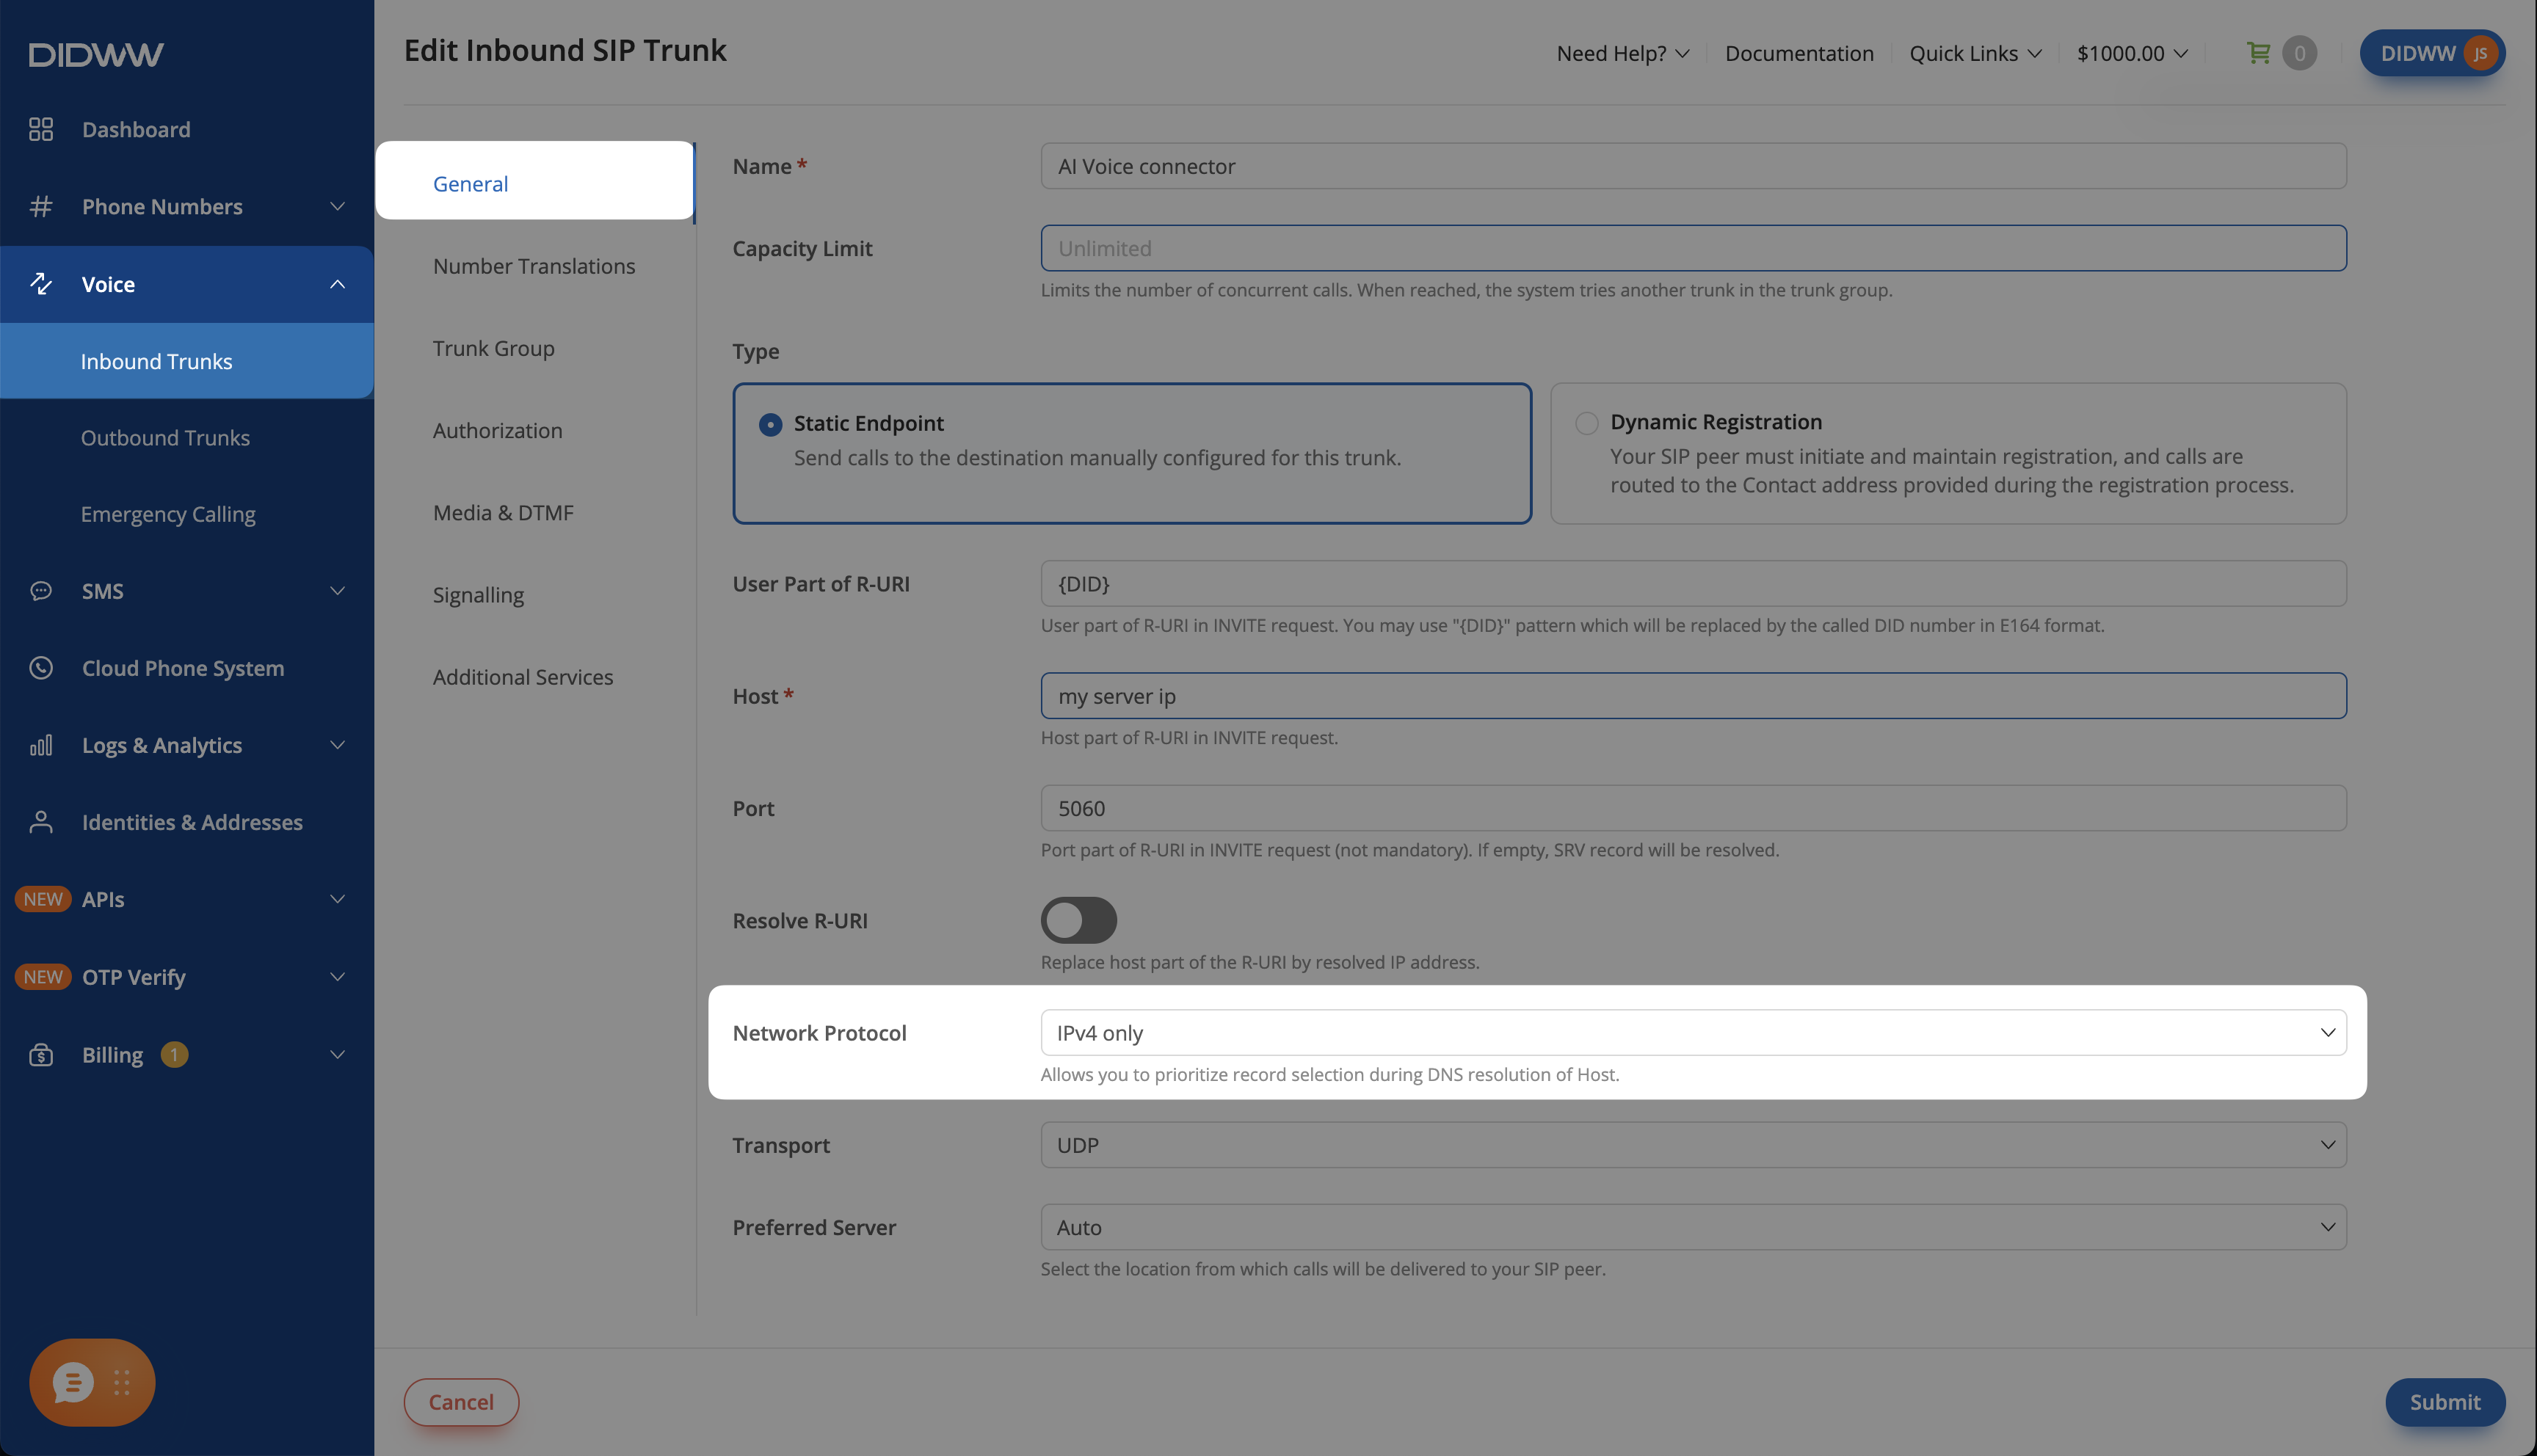
Fig. 7. IPv4 only selected for the inbound SIP trunk#
On the Media & DTMF tab, clear Allowed RTP IP Addresses so that DIDWW can accept media after the transfer changes the media source. Keep Force Symmetric RTP and RTP Ping enabled.
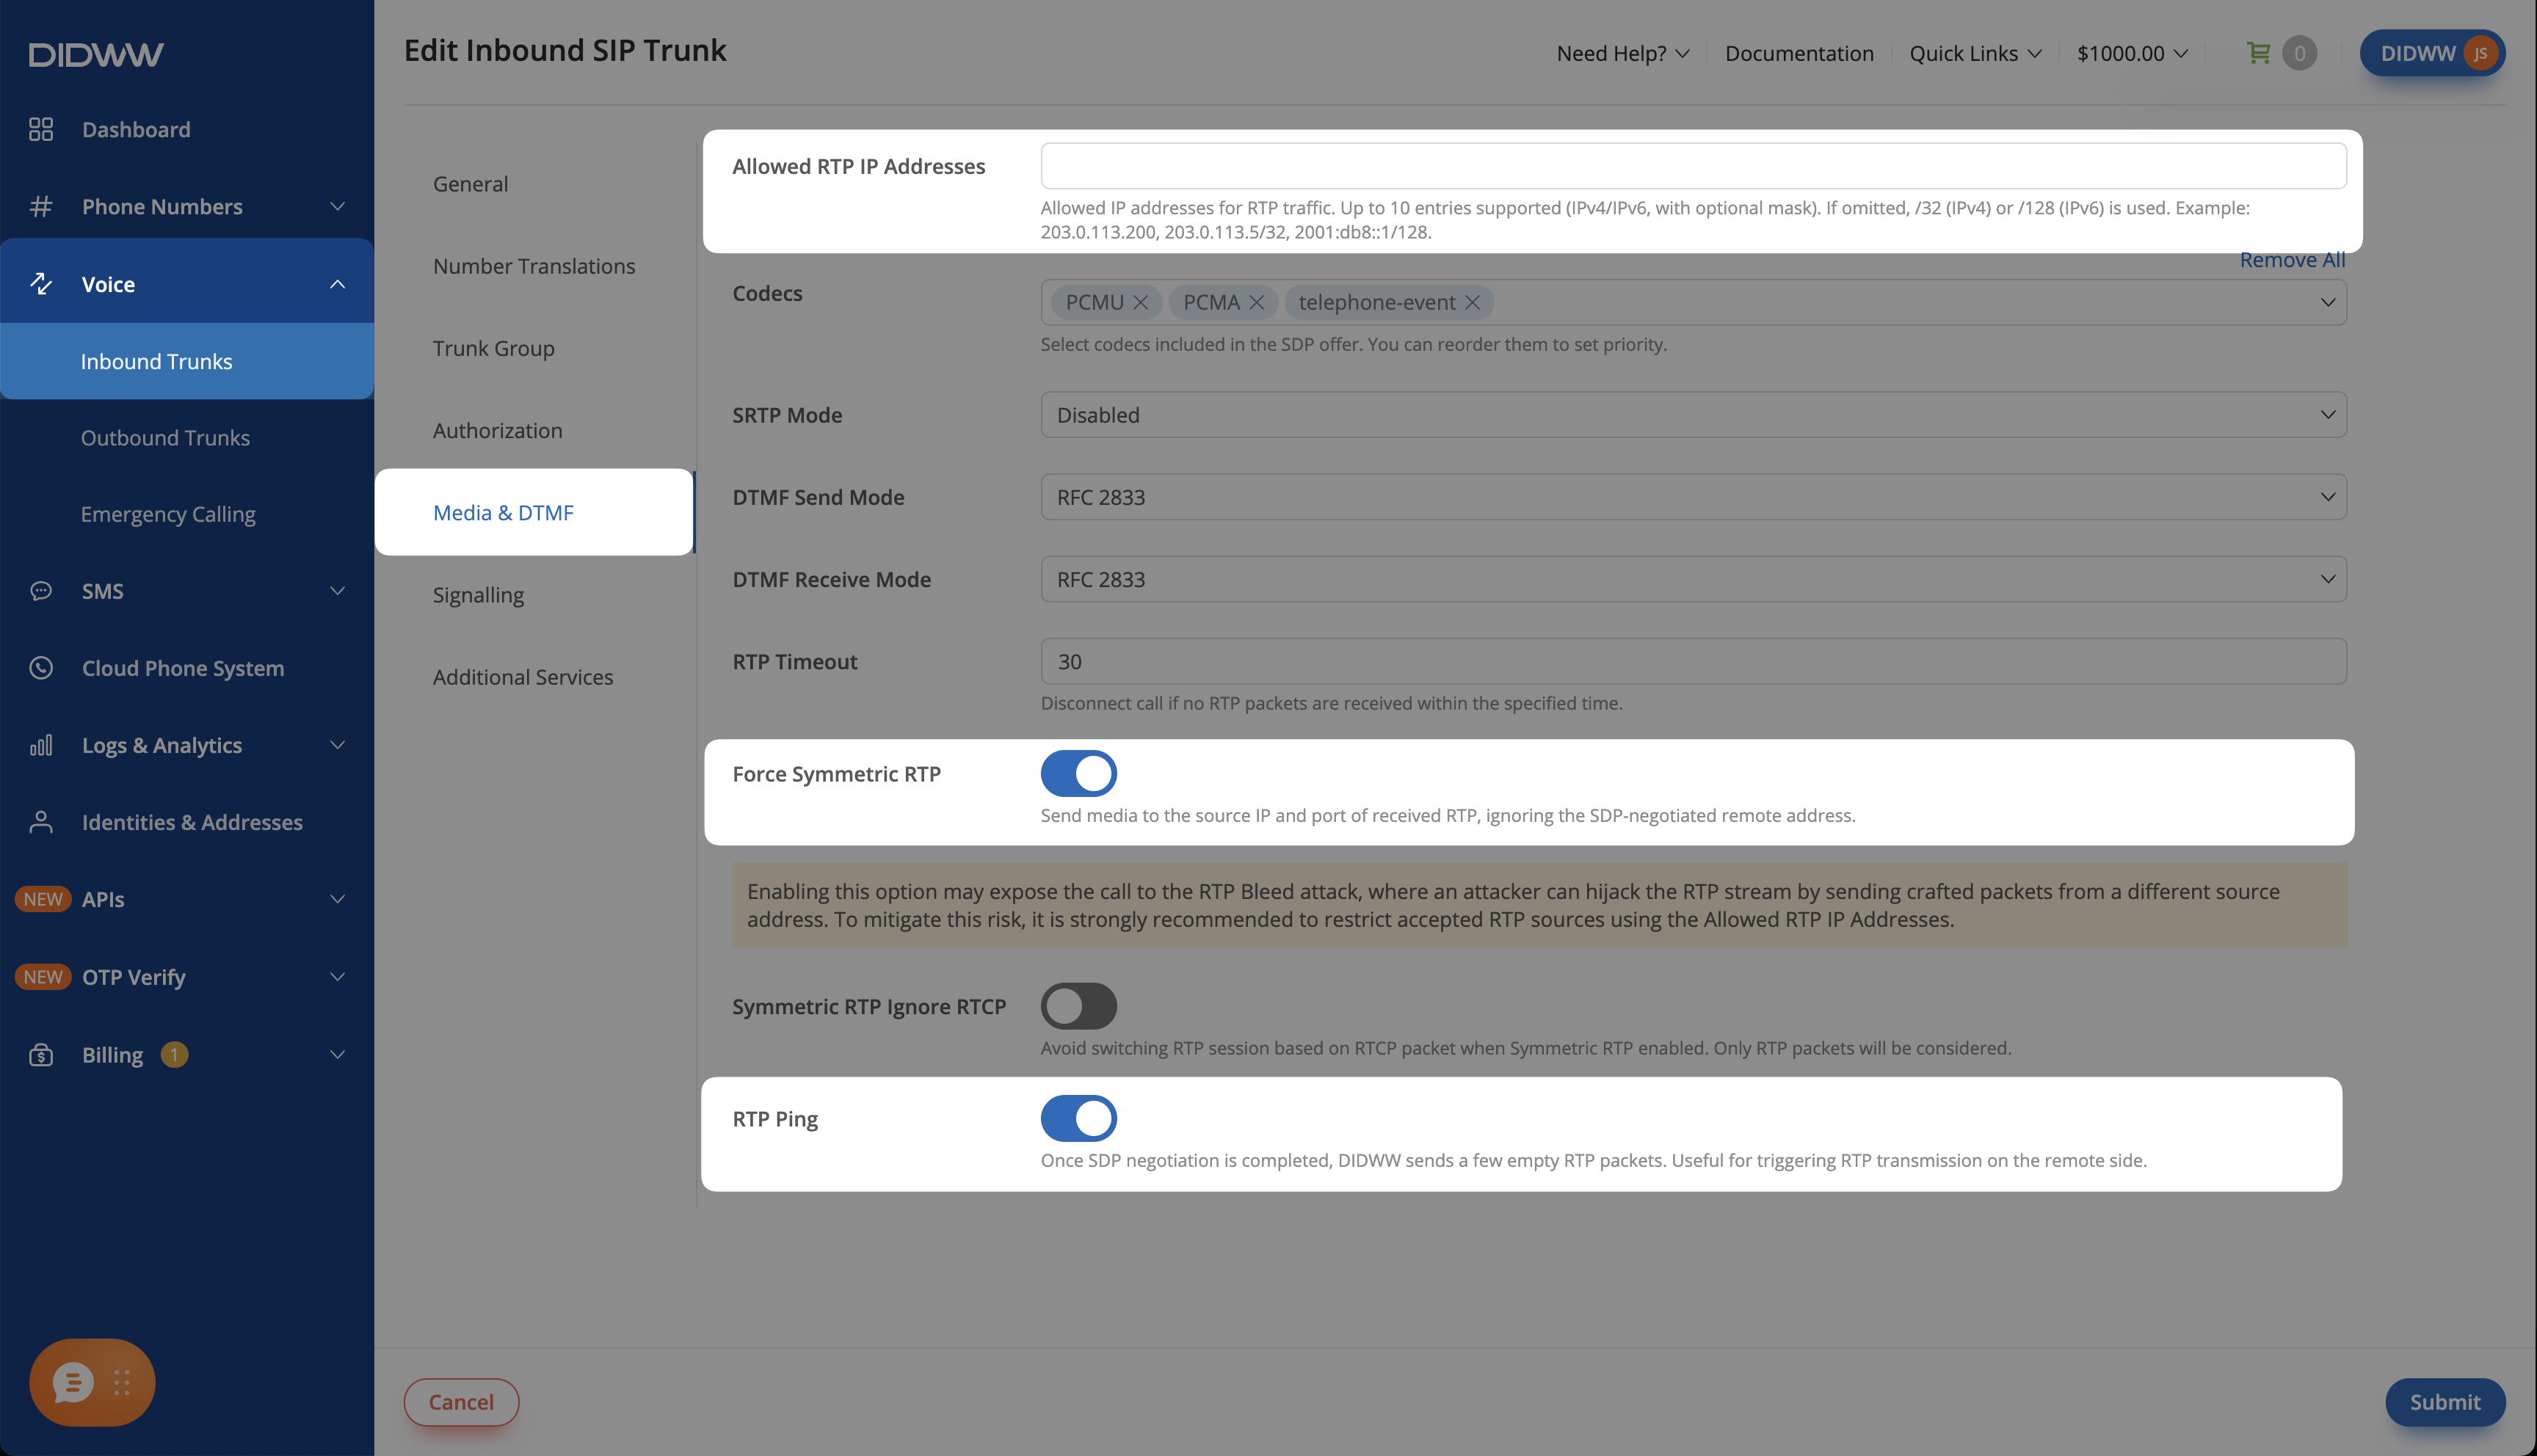
Fig. 8. Inbound trunk media settings for call transfers#
On the Authorization tab, turn on Enable Authorization. Set Auth User and Auth Password to the outbound trunk Username and Password from Step 1. DIDWW uses these credentials to place the transferred call through your outbound trunk.
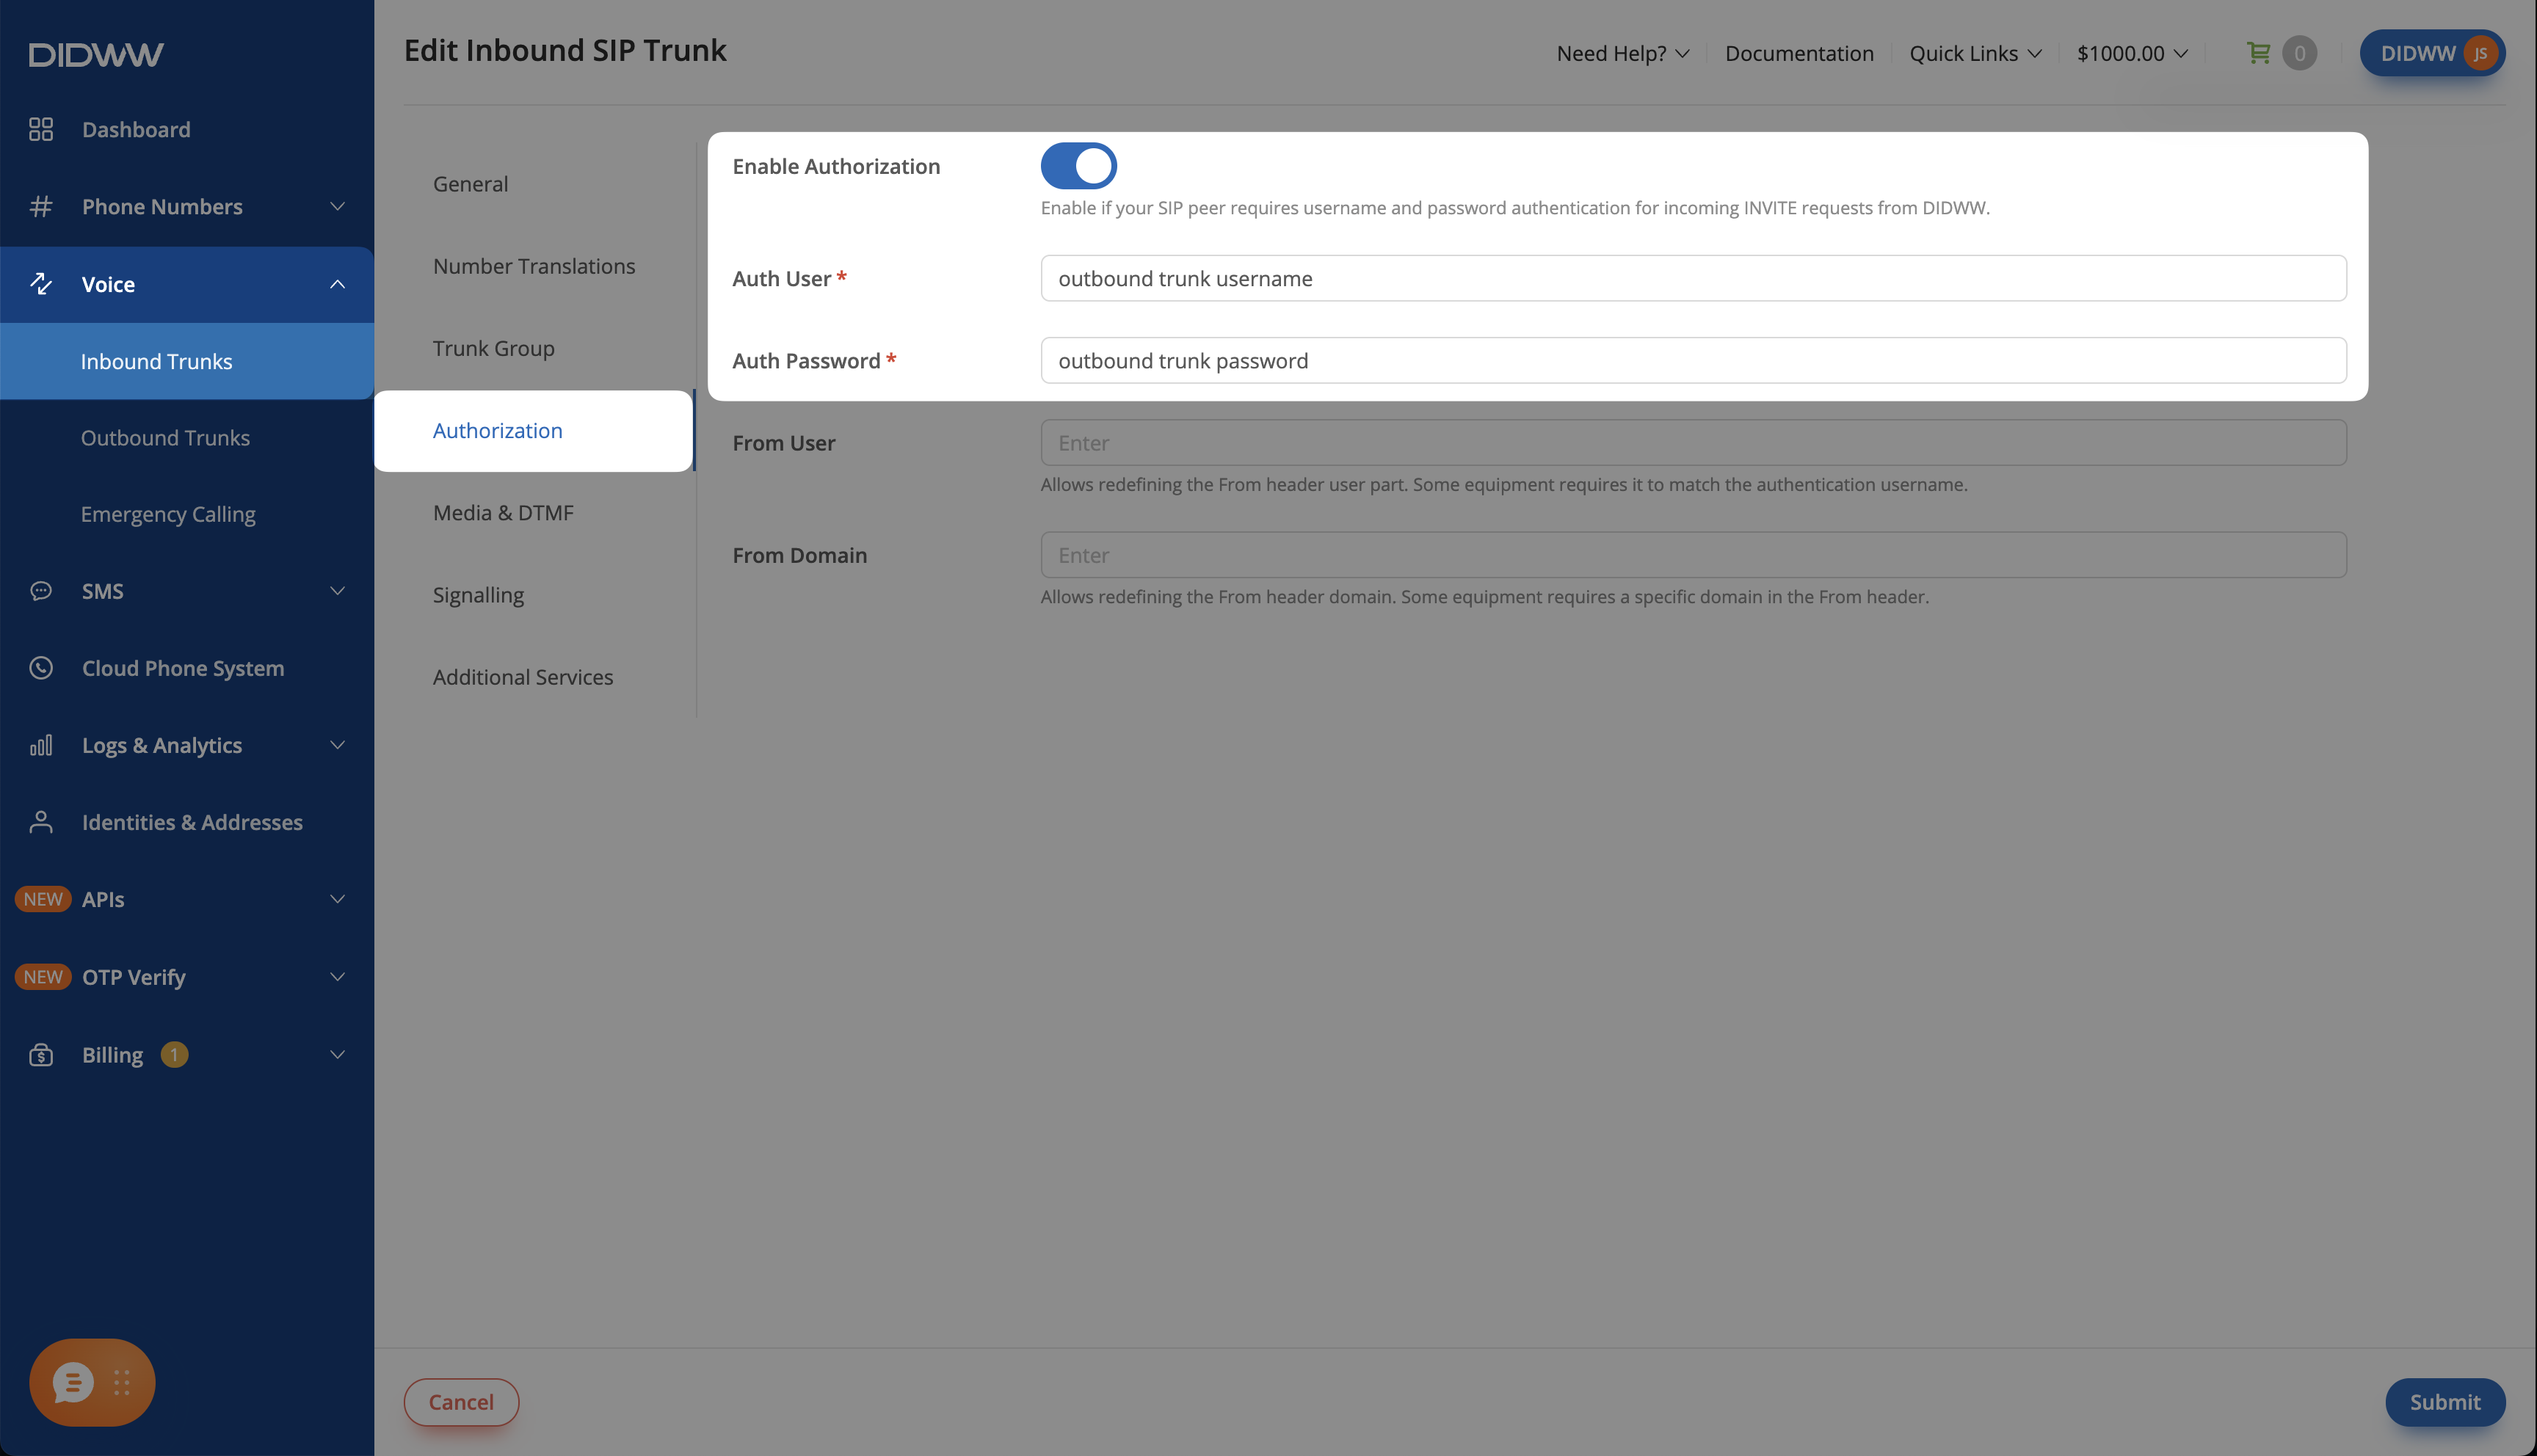
Fig. 9. Adding outbound trunk credentials to the inbound SIP trunk#
On the Signalling tab, set Max Transfers to
1or higher.Click Submit to save the changes.
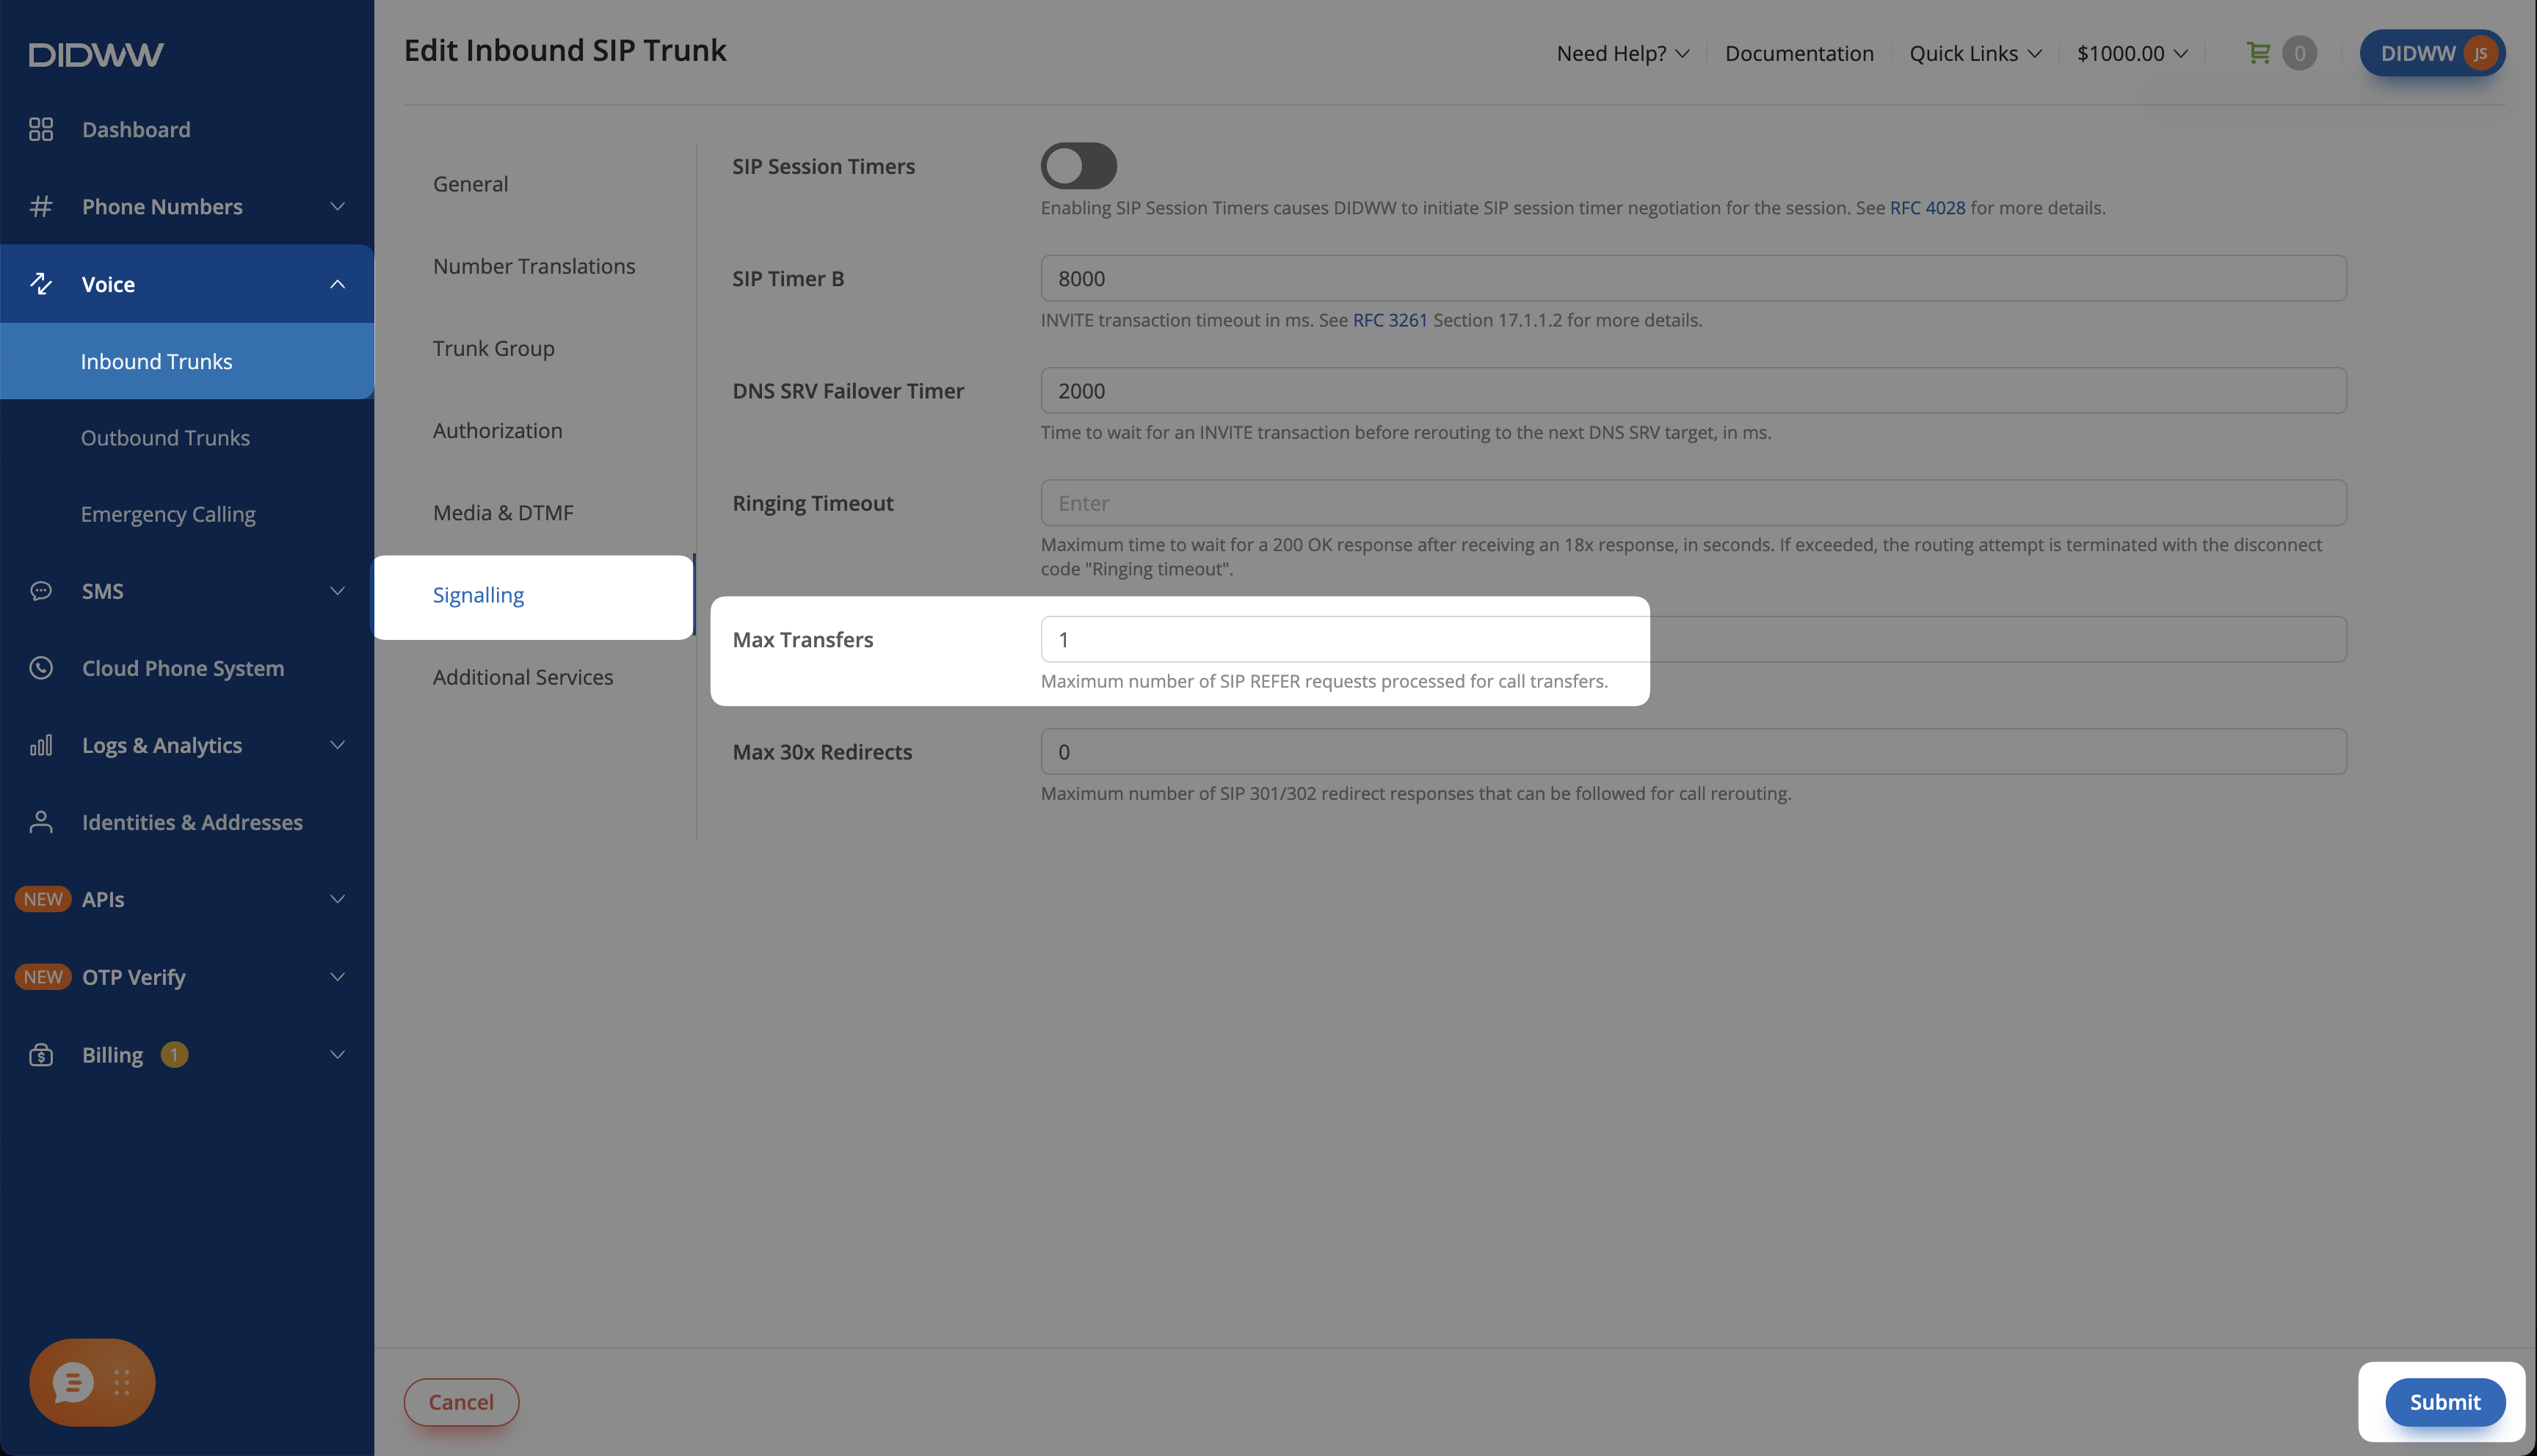
Fig. 10. Enabling call transfers and saving the inbound SIP trunk#
Note
Max Transfers is 0 by default. DIDWW rejects transfers until
you increase it. Clearing Allowed RTP IP Addresses allows media
from any address. See Media & DTMF settings for the media restriction.
Step 3: Configure the Transfer Destination#
In conn/simple.ini, add transfer_to to the existing [openai]
section. Update instructions to tell the agent when to use the
transfer_call tool:
1transfer_to = sip:+15105550199@fra.eu.out.didww.com
2instructions = You are a helpful assistant. If the caller asks for a person, an operator or a live agent, call transfer_call.
Replace +15105550199 with your destination in E.164 format, including
+ and without spaces. Choose the DIDWW outbound signaling
endpoint closest to your server in place
of fra.eu.out.didww.com.
Use a sip: destination URI. DIDWW does not support the tel: format
for these transfers. The destination can be a phone number on another
provider. It does not need to be a DIDWW number.
Restart the engine to apply the change:
1docker compose restart engine
Warning
Do not use a transfer destination that routes back to the number answered by the agent. This can create a call loop.
Step 4: Test a Call Transfer#
Call your DIDWW number and wait for the AI agent to answer.
Ask to speak with a person.
Answer the call at the transfer destination. Confirm that the caller and recipient can hear each other.
Check the connector logs and Logs & Analytics > Call Logs in the DIDWW User Panel. Confirm that the transferred call uses your outbound trunk and that the connector’s call session closes after transfer.
Customize Your Voice Agent#
Configure your agent in the [openai] section of conn/simple.ini.
Set its instructions, greeting, and voice, then connect tools for the
business data and actions your service needs.
Agent configuration reference
Parameter |
What to configure |
|---|---|
|
The agent’s role, conversation flow, and rules for using tools. |
|
The opening message the agent speaks when the call starts. |
|
The Realtime voice
used for replies. The example uses |
|
Files containing Python functions the agent can call, such as a database lookup or booking action. See the connector’s Tools guide. |
|
MCP servers that provide tools to the agent. See the connector’s MCP Servers guide. |
|
The destination for the built-in |
The connector reads simple.ini at startup. After changing this file,
restart the engine from examples/simple:
1docker compose restart engine
Changes to .env require container recreation instead:
1docker compose up -d
Important
The example’s functions.py provides the current time and a welcome
message. The shop MCP server provides sample opening hours and
order status. These tools do not connect to your business systems.
Remove the tools and mcp_servers entries or replace them with
your own tools before handling customer calls. Instructions alone do
not give the agent access to a database or the ability to perform an
action.
Note
% is a special character in simple.ini. Use %% when you
need a literal percent sign in a value.
For the complete configuration, see the connector’s OpenAI integration reference.
Use Different AI Services for Different Numbers
Add a match regular expression to each AI service section in
conn/simple.ini. For example, route 15105550100 to OpenAI and
15105550101 to Deepgram Voice Agent:
1[openai]
2match = ^15105550100$
3
4[deepgram_native]
5match = ^15105550101$
These lines show the number matches only. Retain each service’s
required credentials and settings. Replace the numbers with your
DIDWW numbers in the format delivered by {DID}.
The connector checks service sections in file order and uses the first
match. A catch-all match = .* in an earlier section takes priority
over later sections. Disable unused services with disabled = true
and restart the engine after changing the file.
Each integration has its own configuration. Configure credentials for any provider-hosted services you use. See the official connector references for OpenAI, Deepgram, Deepgram Voice Agent, Azure Speech, or Pipecat. For the selection rules, see Flavor Selection.
Troubleshooting#
Calls do not reach the connector
If the OpenSIPS logs show no Started new call for B2B... line,
check that:
The server firewall allows UDP port
5060from46.19.208.0/21and185.238.172.0/22.The inbound trunk Host is your server’s public IPv4 address and Port is
5060.Your DID number is assigned to the inbound trunk.
Both containers are running and OpenSIPS is healthy.
A dropped INVITE from ... line means the SIP source check rejected
the request. Review Step 5 of section 2 and the current DIDWW signaling addresses.
The engine selects another AI service
If the engine logs a service other than openai, check that:
The
[openai]section containsmatch = .*.No earlier service section matches the same called number.
The OpenAI service is not disabled.
You restarted the engine after changing
simple.ini.
The call connects, but there is no audio
Check that:
RTP Ping and Force Symmetric RTP are enabled on the inbound trunk.
The server firewall allows UDP ports
35000–35100from the DIDWW RTP subnets.RTP_IPis your server’s public IPv4 address, assigned to its network interface.Allowed RTP IP Addresses is empty or contains the connector server’s public IPv4 address.
PCMA and PCMU are selected and SRTP Mode is Disabled.
The call connects, but the agent does not speak
For an invalid_request_error.invalid_api_key error, remove the
key placeholder from [openai] and check OPENAI_API_KEY in
.env. Recreate the containers with docker compose up -d after
changing .env.
Also check the engine logs for model-access or billing errors and
confirm that the server can connect to OpenAI over TCP port 443.
The transfer fails or the call ends before a person answers
Review the SIP response and transfer result in the connector logs and DIDWW Logs & Analytics > Call Logs. Check that:
Max Transfers on the inbound trunk is
1or higher.Auth User and Auth Password match the outbound trunk’s credentials.
Allowed SIP IP addresses on the outbound trunk includes the DIDWW inbound SIP addresses.
Network Protocol on the inbound trunk is IPv4 only.
transfer_tois asip:URI with the full destination number and a DIDWW outbound gateway.The outbound trunk permits the caller ID and destination and your account has sufficient balance and capacity.
A rejected transfer may not create an outbound call-log entry. Review the inbound call and connector logs as well.
After a transfer, the caller cannot hear the recipient
Clear Allowed RTP IP Addresses on the inbound trunk. A restriction to the connector server can block media after transfer. Repeat the call and confirm audio in both directions.