3CX#
Use 3CX with DIDWW SIP Trunking to deliver inbound and outbound voice services over the public telephone network. DIDWW SIP trunks integrate with 3CX to bring calls from your DIDs into the PBX, apply 3CX call handling features, and route outbound calls through DIDWW termination.
Receive inbound calls from DIDWW in 3CX.
Route calls to users, groups, queues, or digital receptionists.
Use 3CX features such as office hours, voicemail, and call recording.
Use DIDWW SIP trunks for local and international outbound calls.
Show DIDWW DIDs as caller ID based on 3CX rules and user settings.
Use DIDWW trunks with 3CX routing and extension permissions.
Note
This guide is intended for 3CX Version 20.
DIDWW SIP trunk configuration is supported with 3CX PRO (Professional) and 3CX ENT (Enterprise) licenses.
1. Create Inbound SIP Trunk#
To begin connecting your DIDWW account with 3CX, first create an Inbound SIP Trunk. This trunk will establish the path for incoming calls from your DIDWW numbers to reach 3CX.
Choose how 3CX will receive inbound calls from DIDWW:
SIP URI - DIDWW sends calls directly to your 3CX IP or domain.
SIP Registration - 3CX registers to DIDWW using SIP credentials.
Before You Begin#
An active DIDWW account is required. Sign in to DIDWW or Create DIDWW account .
At least one active DID number with capacity to receive incoming calls is required. Buy Numbers .
A public IP address or FQDN for your 3CX system is required if your deployment is self-hosted.
Step 1: Create New SIP Trunk#
In the DIDWW User Panel , go to Voice > Inbound Trunks.
Click Create New > SIP Trunk.
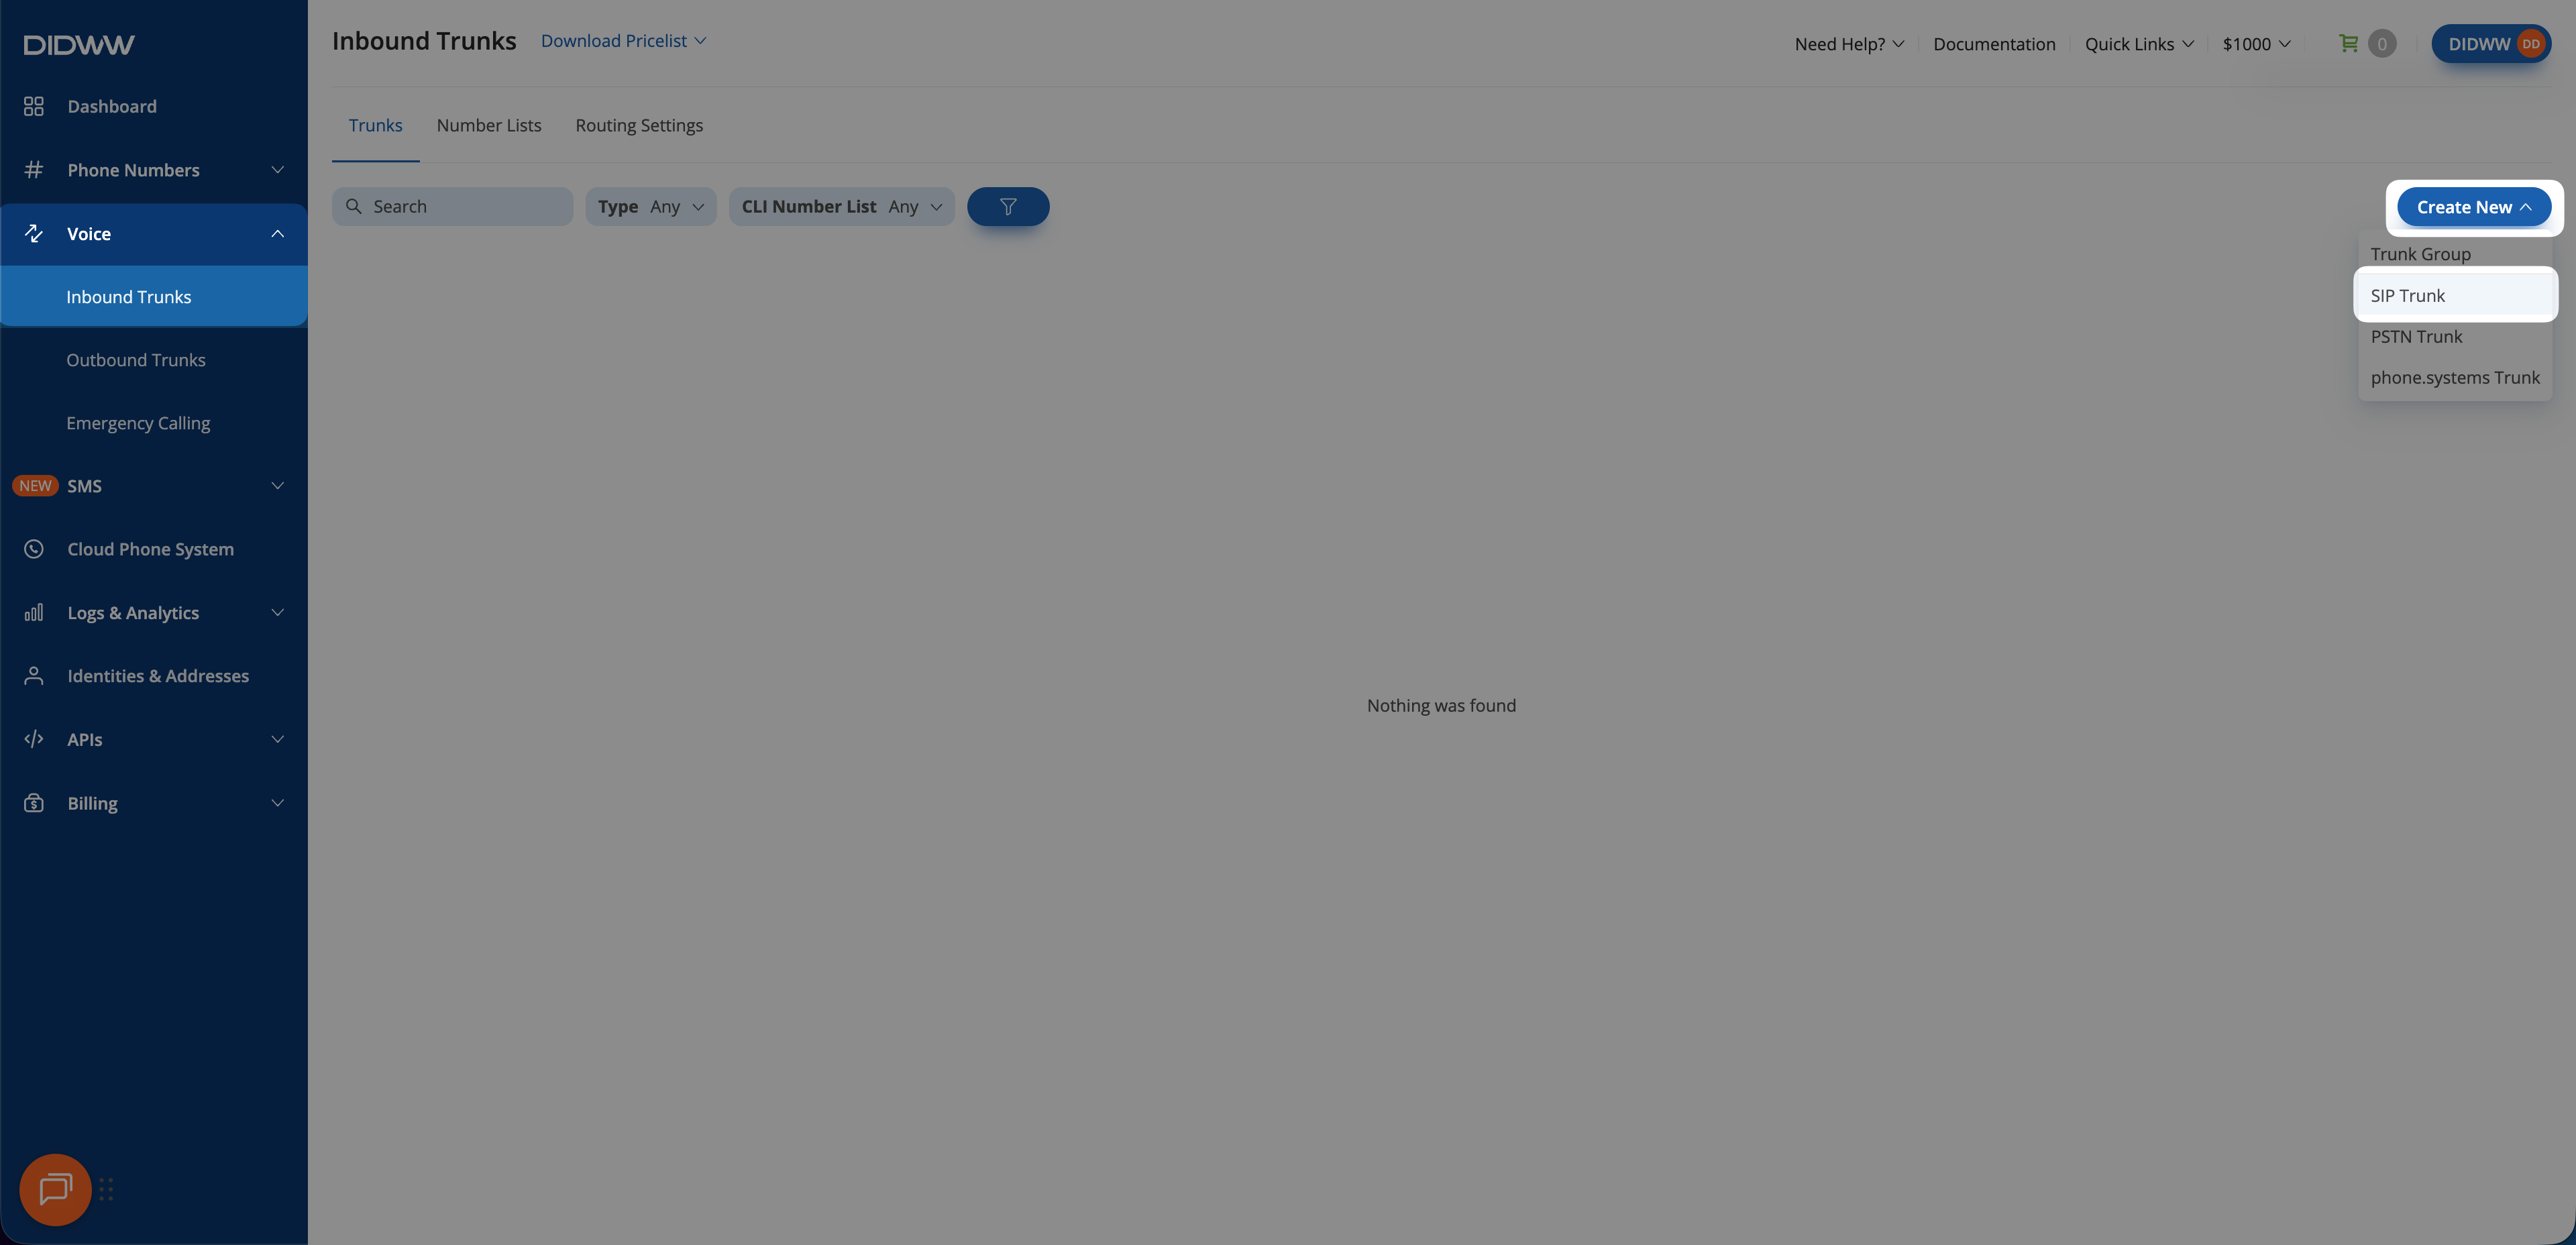
Fig. 1. Creating a new inbound SIP trunk#
Step 2: Configure SIP Trunk Settings#
Depending on whether you plan to use SIP URI or SIP Registration, the configuration differs slightly.
In the Create Inbound SIP Trunk form, enter the main requirements to route the calls to your 3CX PBX.
Enter a descriptive Friendly Name for the trunk (for example,
3CX Inbound Trunk).In Host, enter the public IP address or FQDN of your 3CX PBX.
Note
If you are using a cloud-hosted 3CX, enter a placeholder IP address (for example, 198.51.100.0). The actual IP address will be retrieved later when you configure the inbound SIP trunk in 3CX.
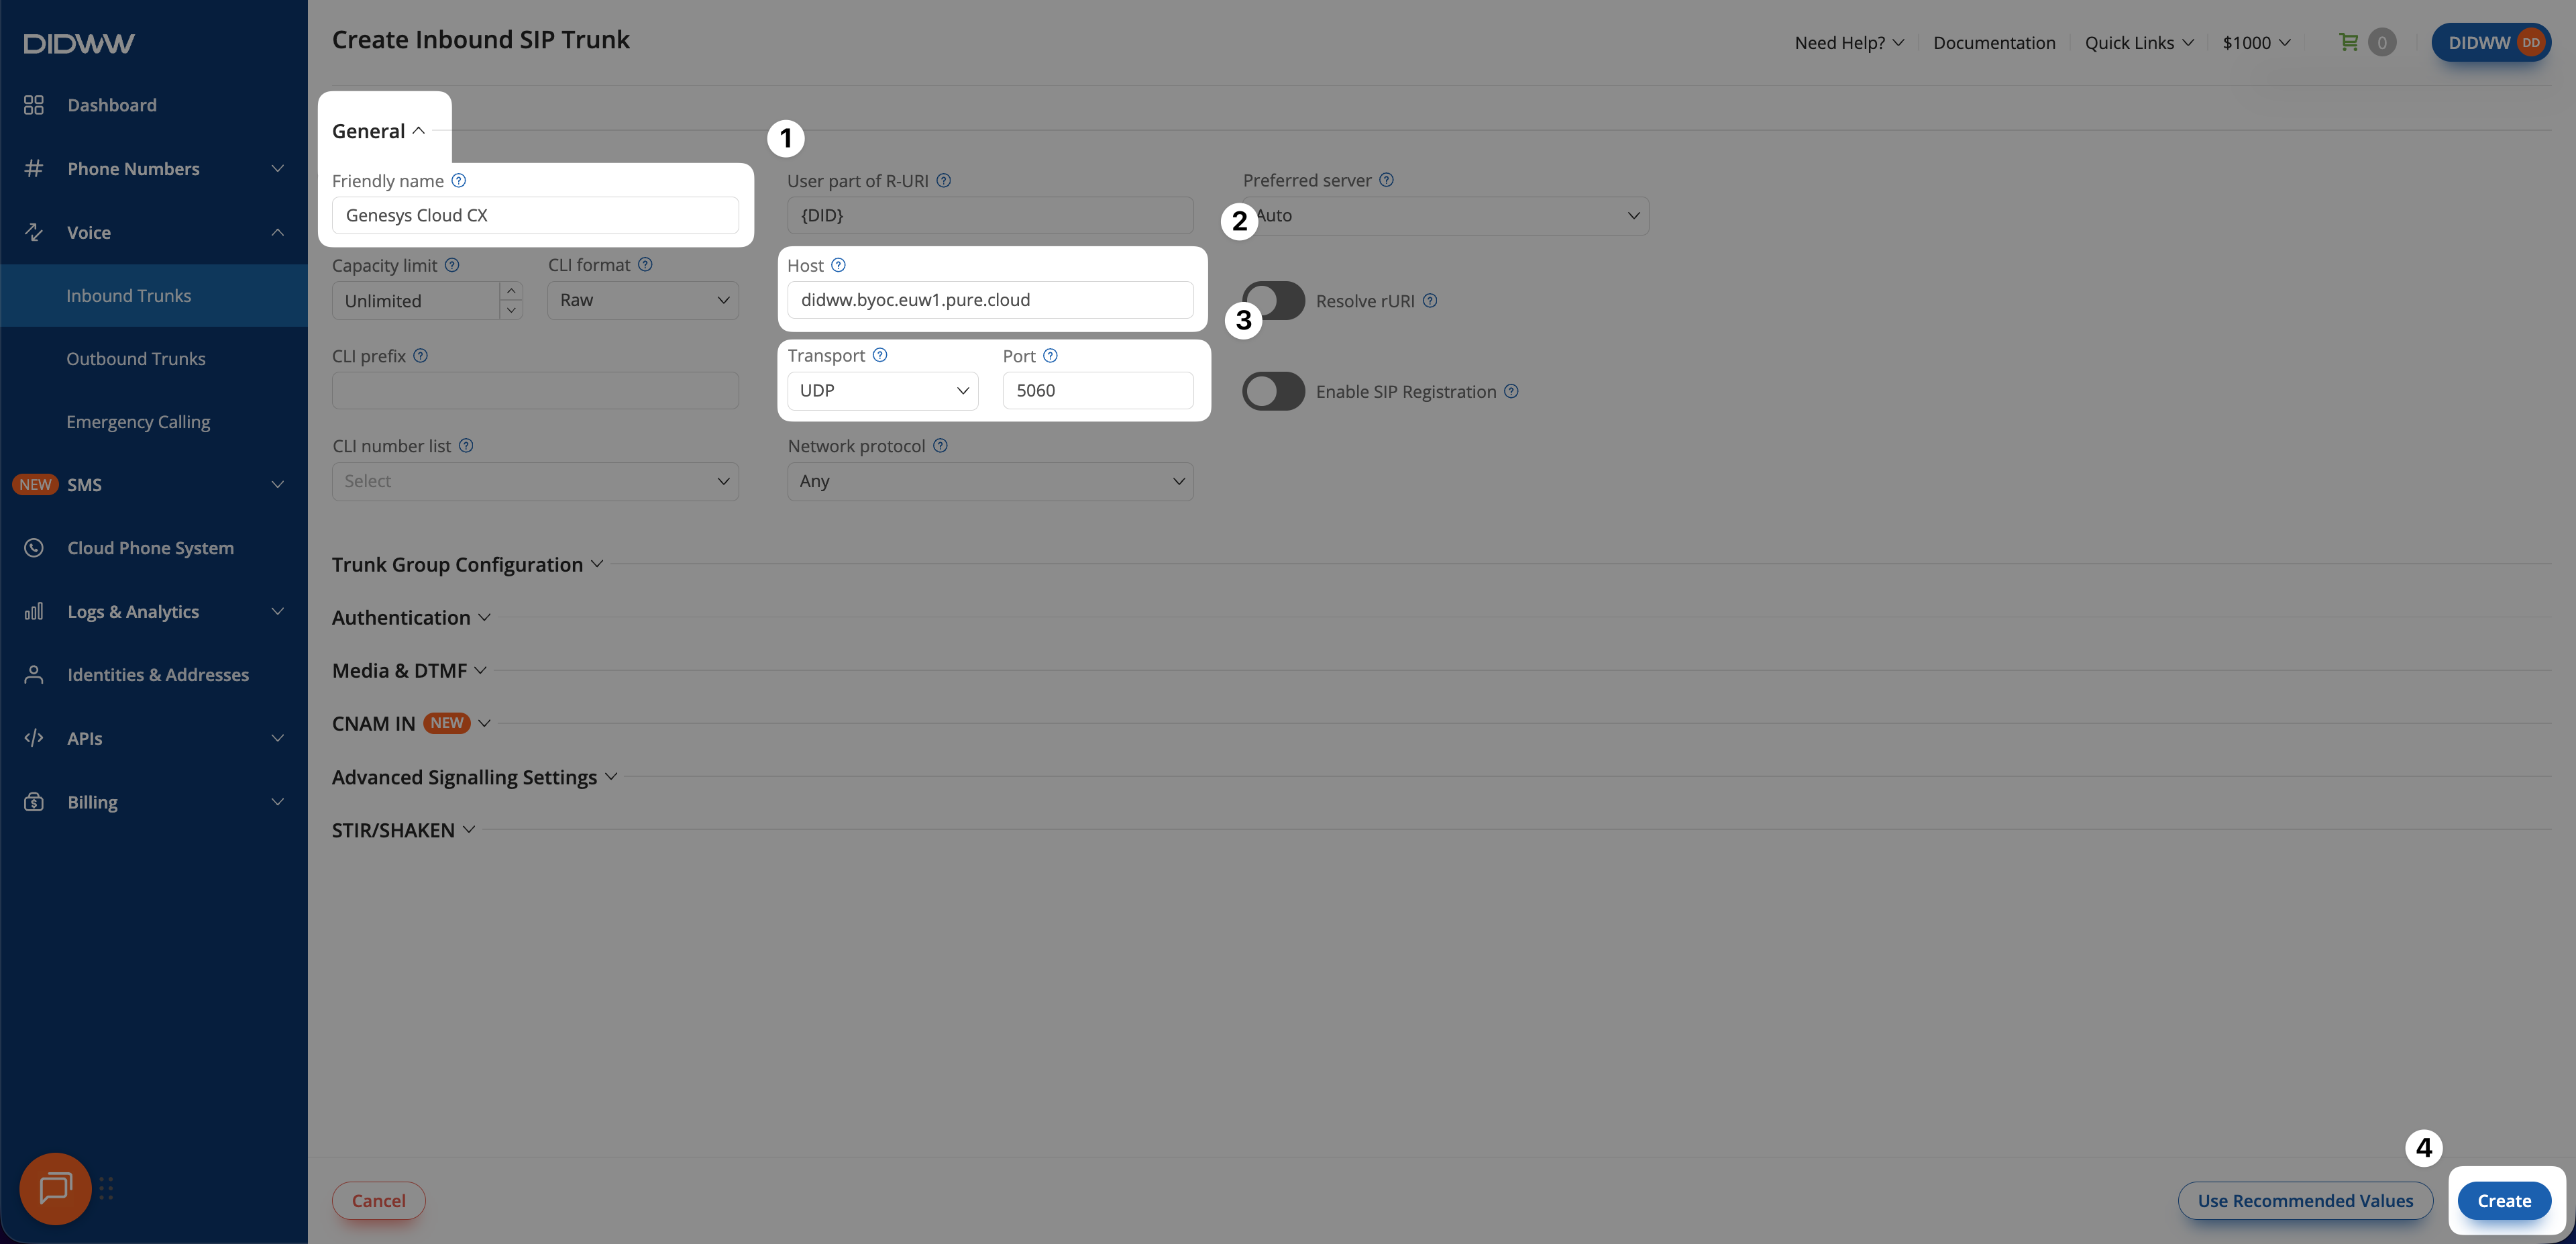
Fig. 2. SIP URI inbound trunk configured to send calls to 3CX#
In the Create Inbound SIP Trunk form, configure the trunk for registration-based inbound calling.
Enter a descriptive Friendly Name for the trunk (for example,
3CX Registration).Keep User part of R-URI, Host, and Port fields empty.
Enable SIP Registration.
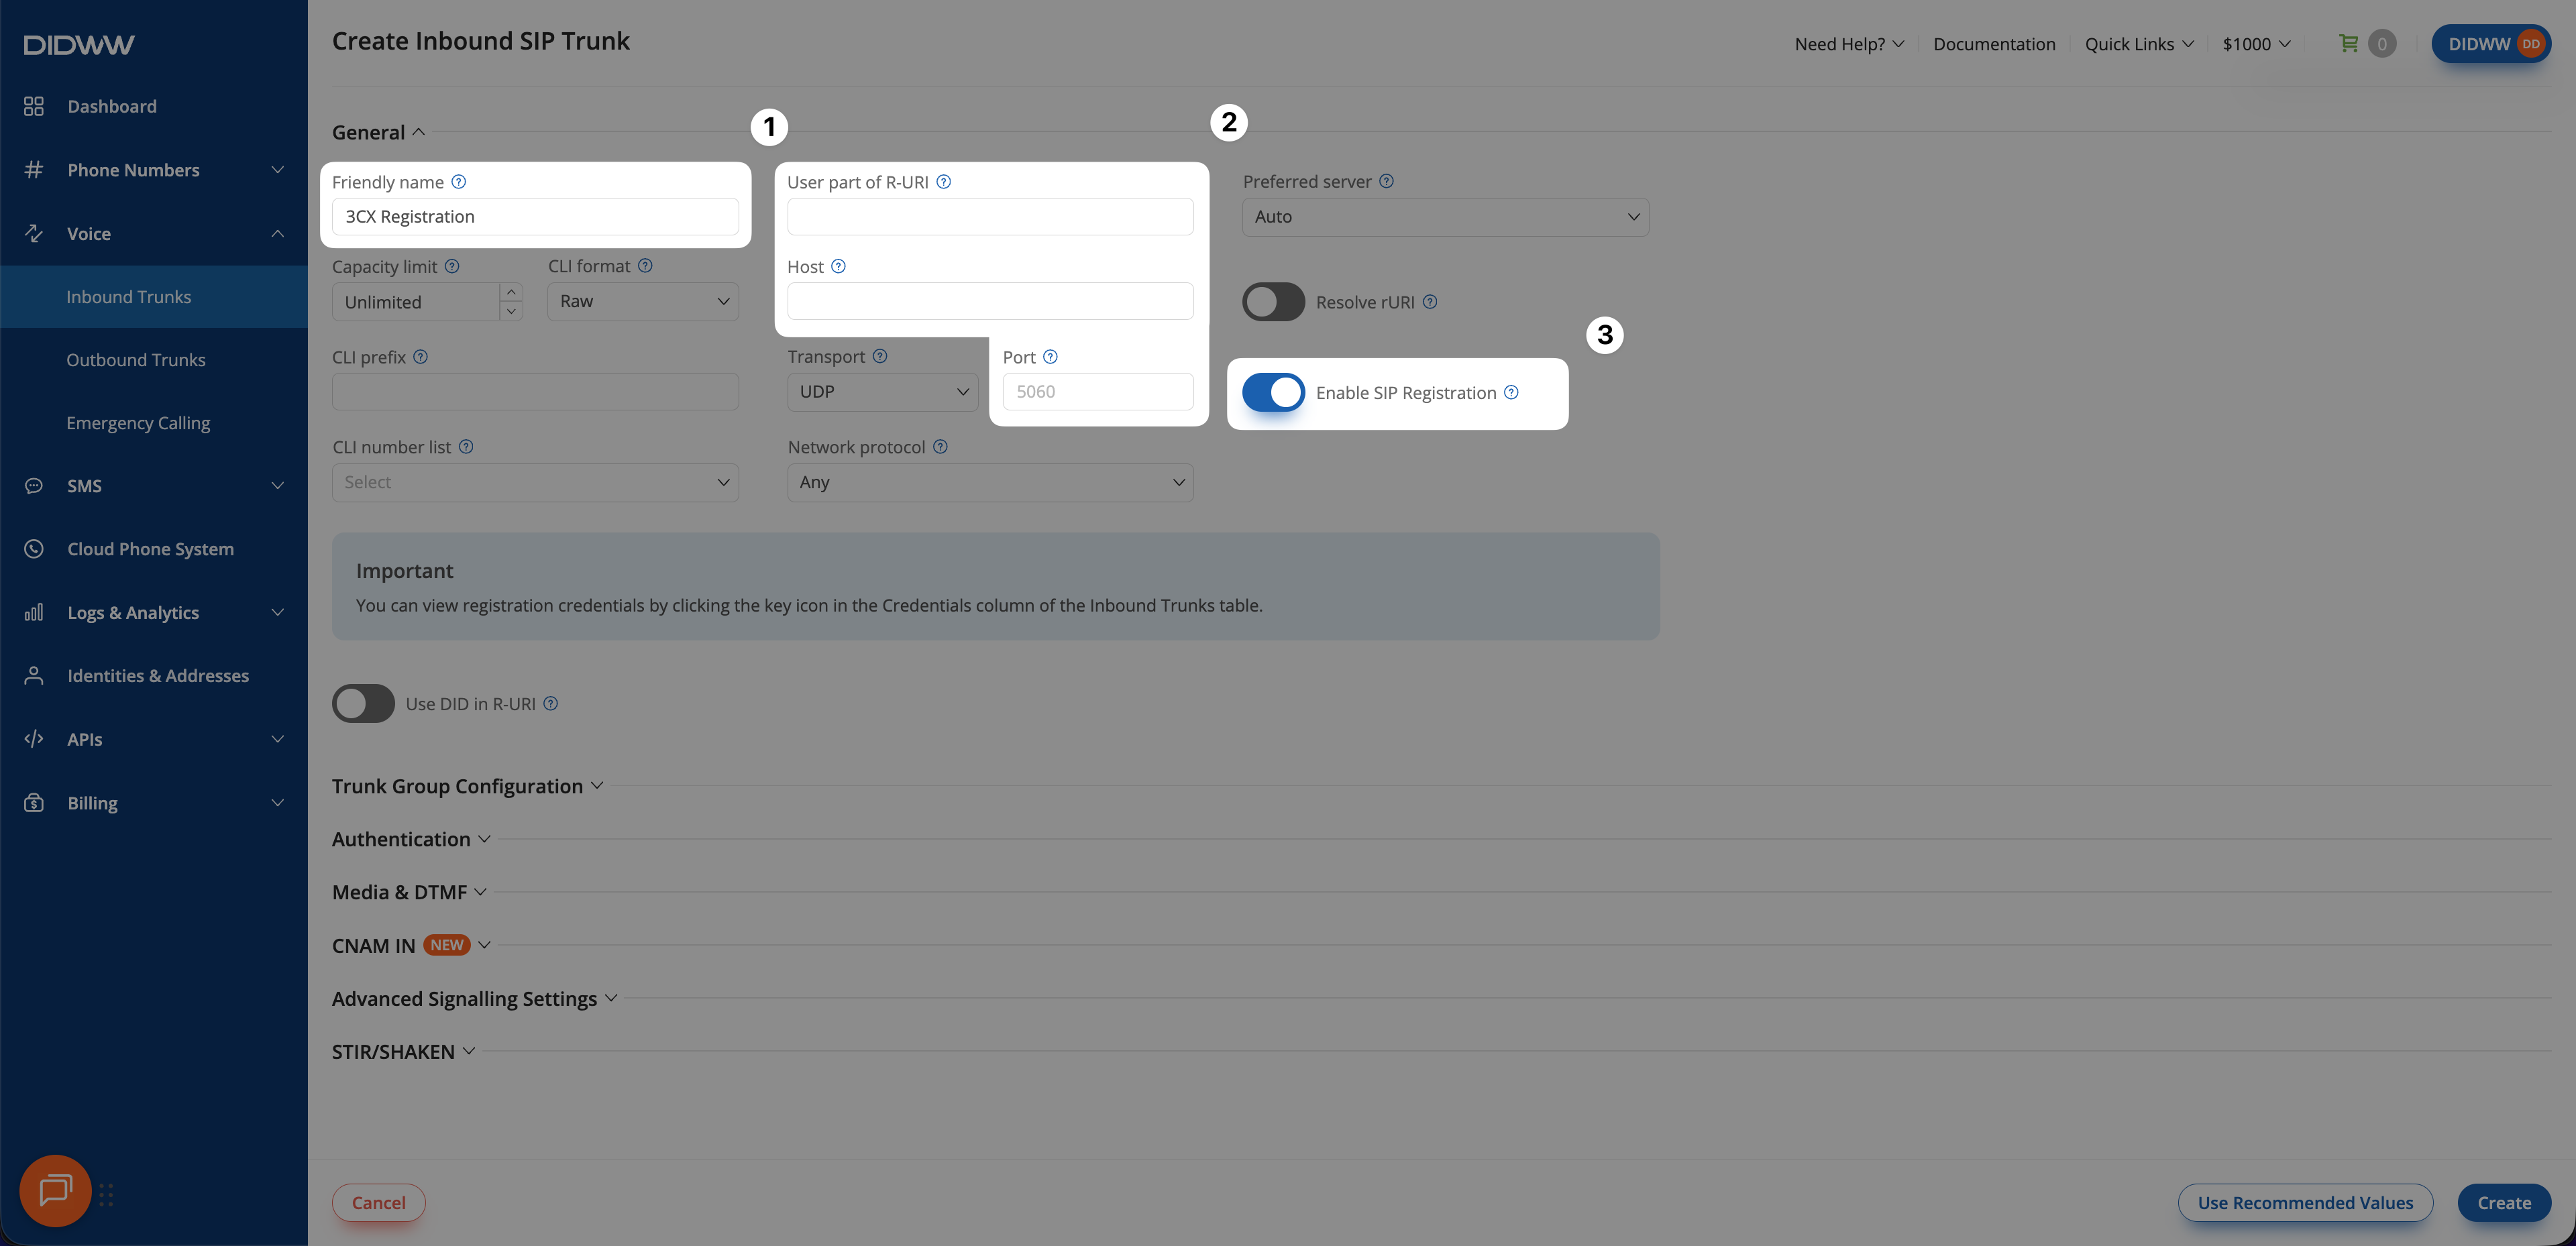
Fig. 3. SIP Registration inbound trunk configured for 3CX#
Step 3: Click Create and Save Inbound SIP Trunk Configuration#
When the required fields in the Create Inbound SIP Trunk form are filled, click Create to save your inbound SIP trunk.
Note
If your deployment requires additional features, see Advanced Inbound SIP Trunk documentation.
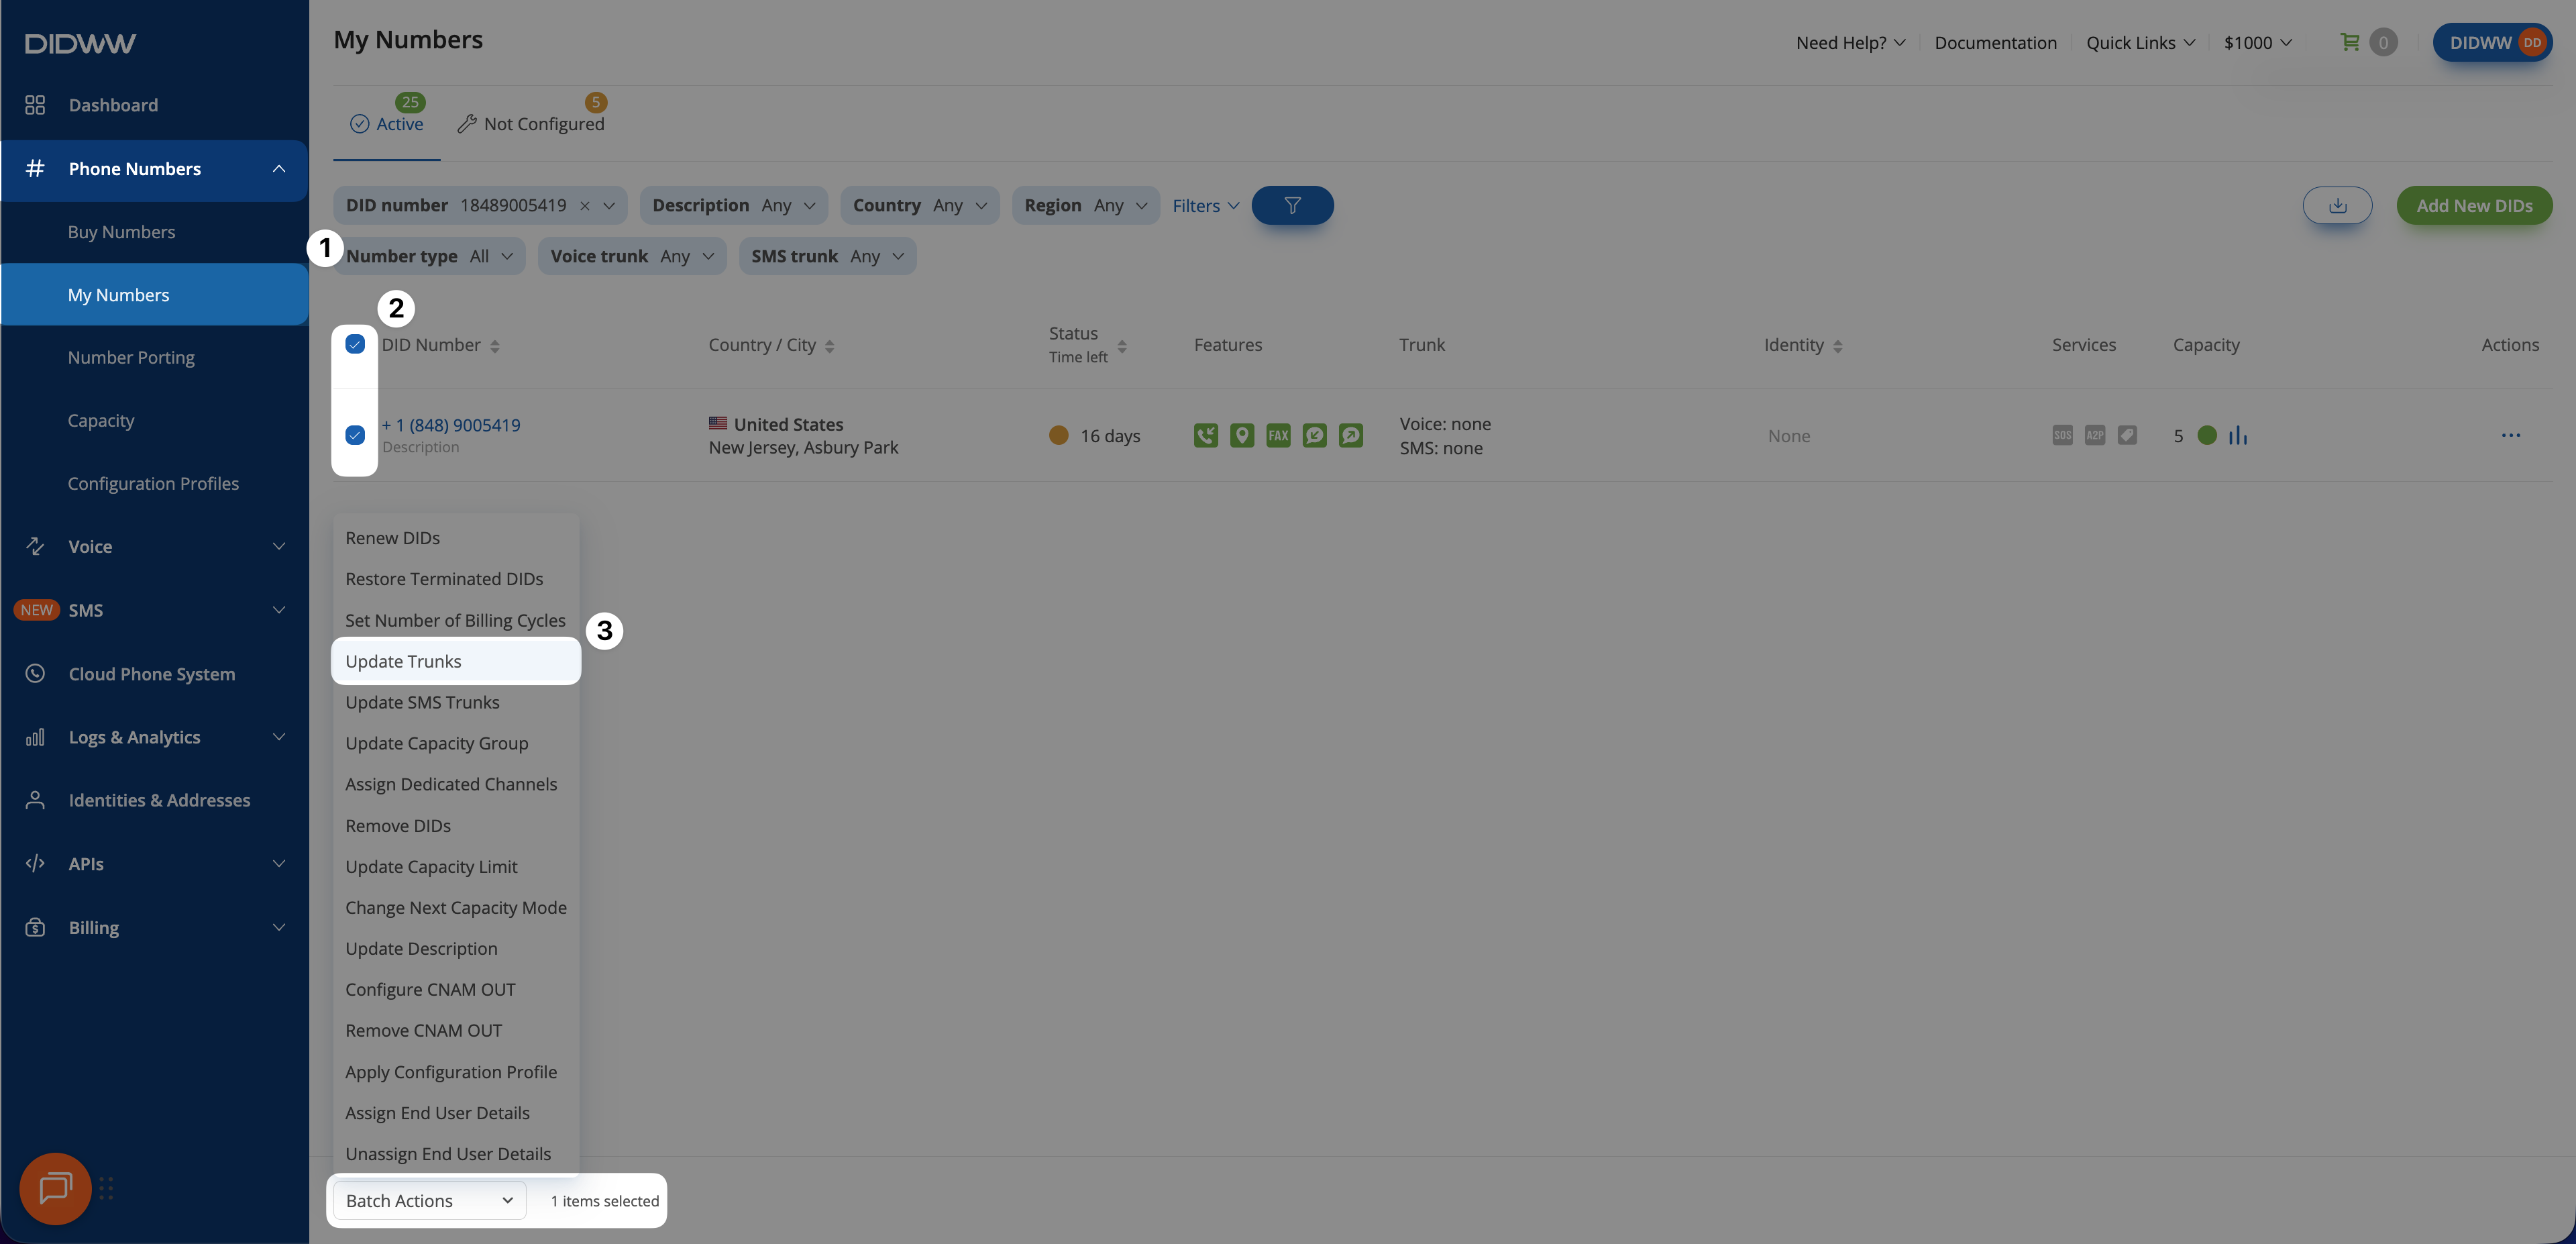
Fig. 4. Create the Inbound SIP Trunk#
Step 4: View Inbound Trunk Credentials (SIP Registration Only)#
If you are using SIP Registration, open the inbound trunk credentials and save them for later use in 3CX.
Go to Voice > Inbound Trunks.
Locate your inbound trunk and click the key icon in the Credentials column.
Copy the Username and Password.
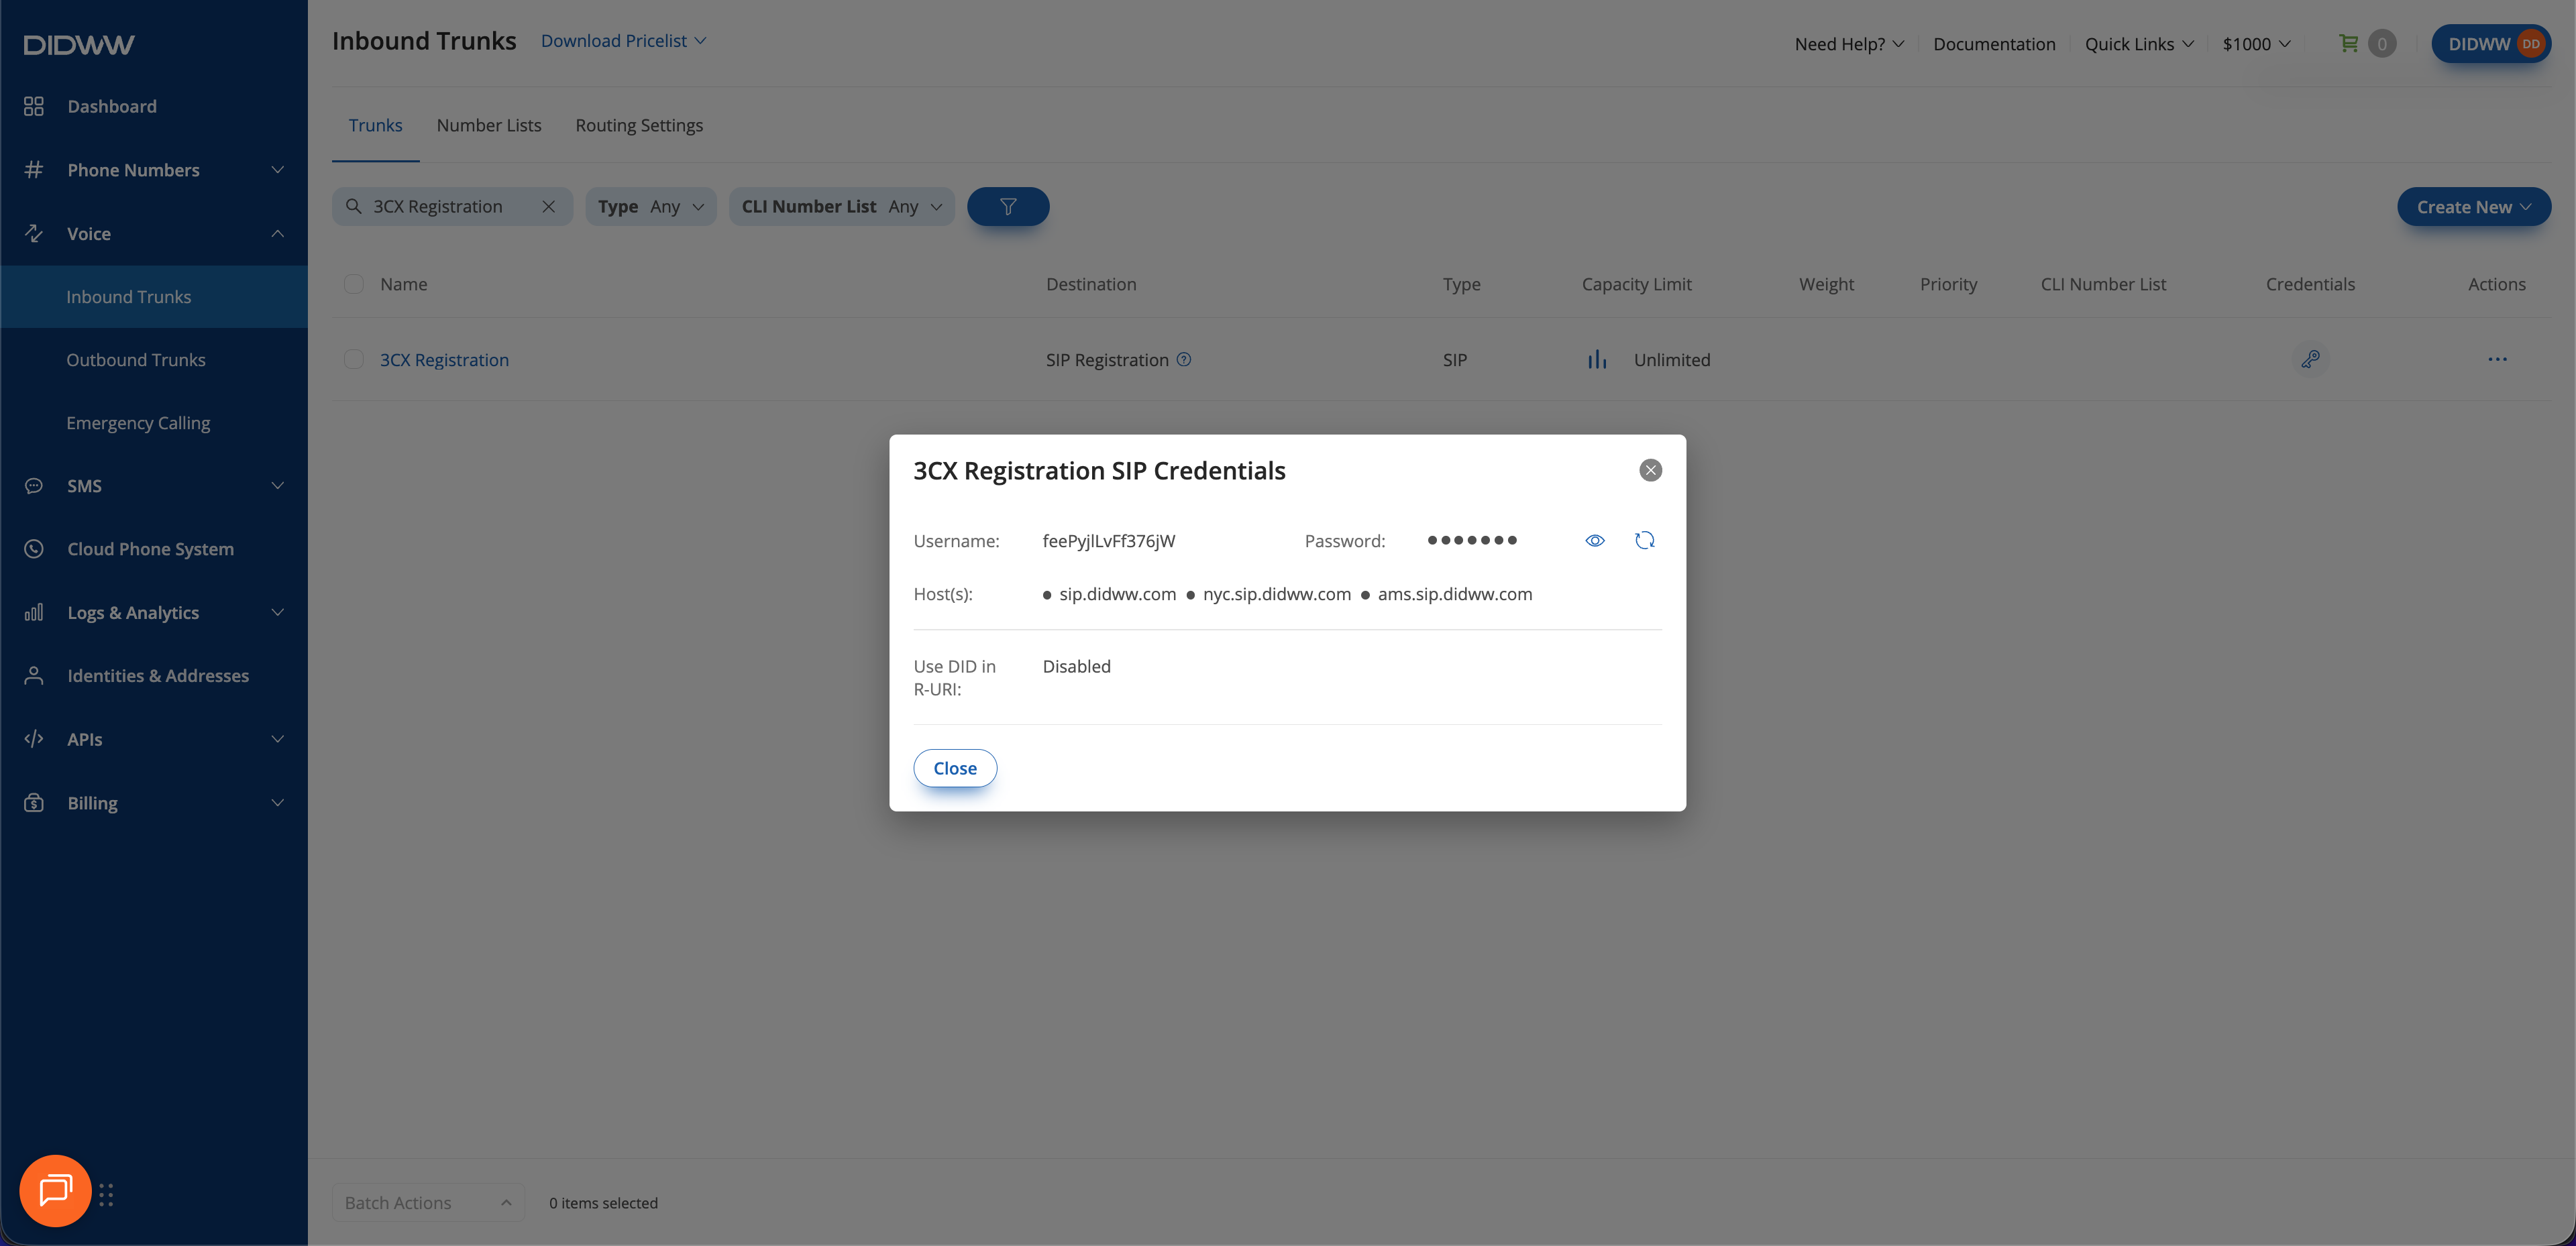
Fig. 5. Viewing inbound trunk credentials for SIP Registration#
Step 5: Assign Inbound SIP Trunk to Your DID Numbers#
After creating the Inbound SIP Trunk for 3CX, assign it to the DID number or numbers that will deliver incoming calls to your 3CX PBX.
In the DIDWW User Panel, go to Phone Numbers > My Numbers.
Select the DID number or numbers you want to assign to the inbound SIP trunk.
At the bottom of the page, click Batch Actions > Update Trunks.

Fig. 6. Selecting Update Trunks from the Batch Actions menu#
From the dropdown menu, choose the 3CX Inbound Trunk you created earlier.
Click Confirm to apply the changes.
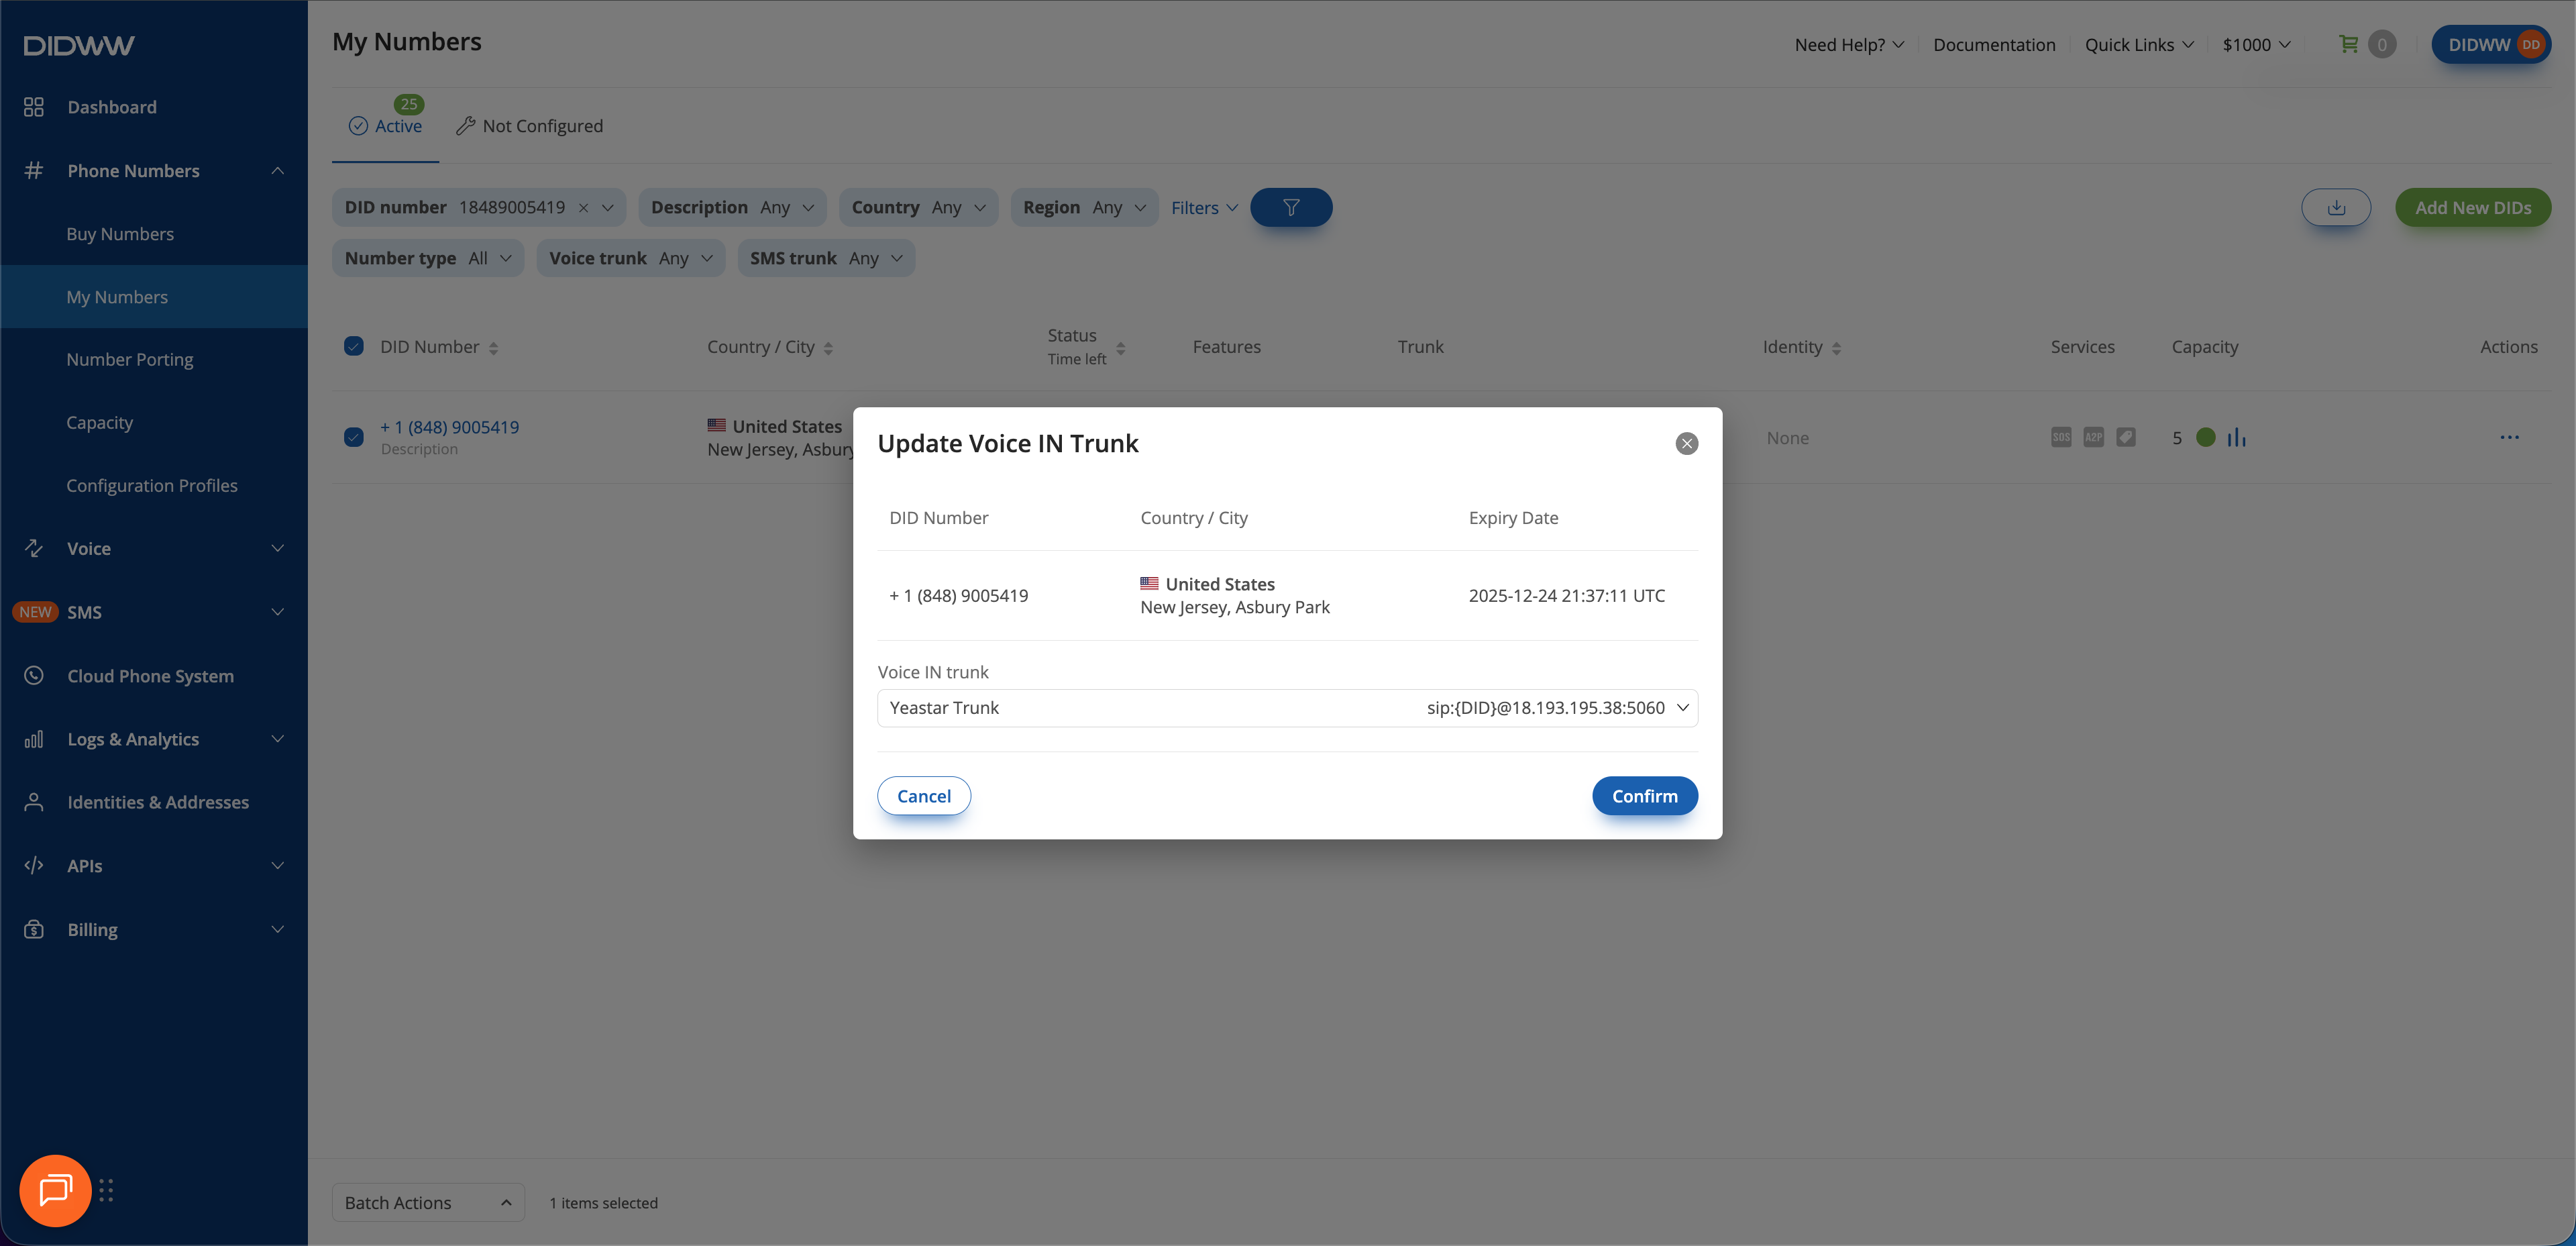
Fig. 7. Assigning the newly created SIP trunk to the selected DID(s)#
2. Create Outbound SIP Trunk#
To configure outbound calling from your 3CX PBX, create an Outbound SIP Trunk in the DIDWW User Panel. This setup enables you to use 3CX to place outbound calls through DIDWW termination routes.
Before You Begin#
Access to DIDWW Outbound Trunks is required for making outbound calls. See Get Access to DIDWW Outbound Termination.
Step 1: Create New Outbound Voice Trunk#
In the DIDWW User Panel , go to Voice > Outbound Trunks.
Click Create New.
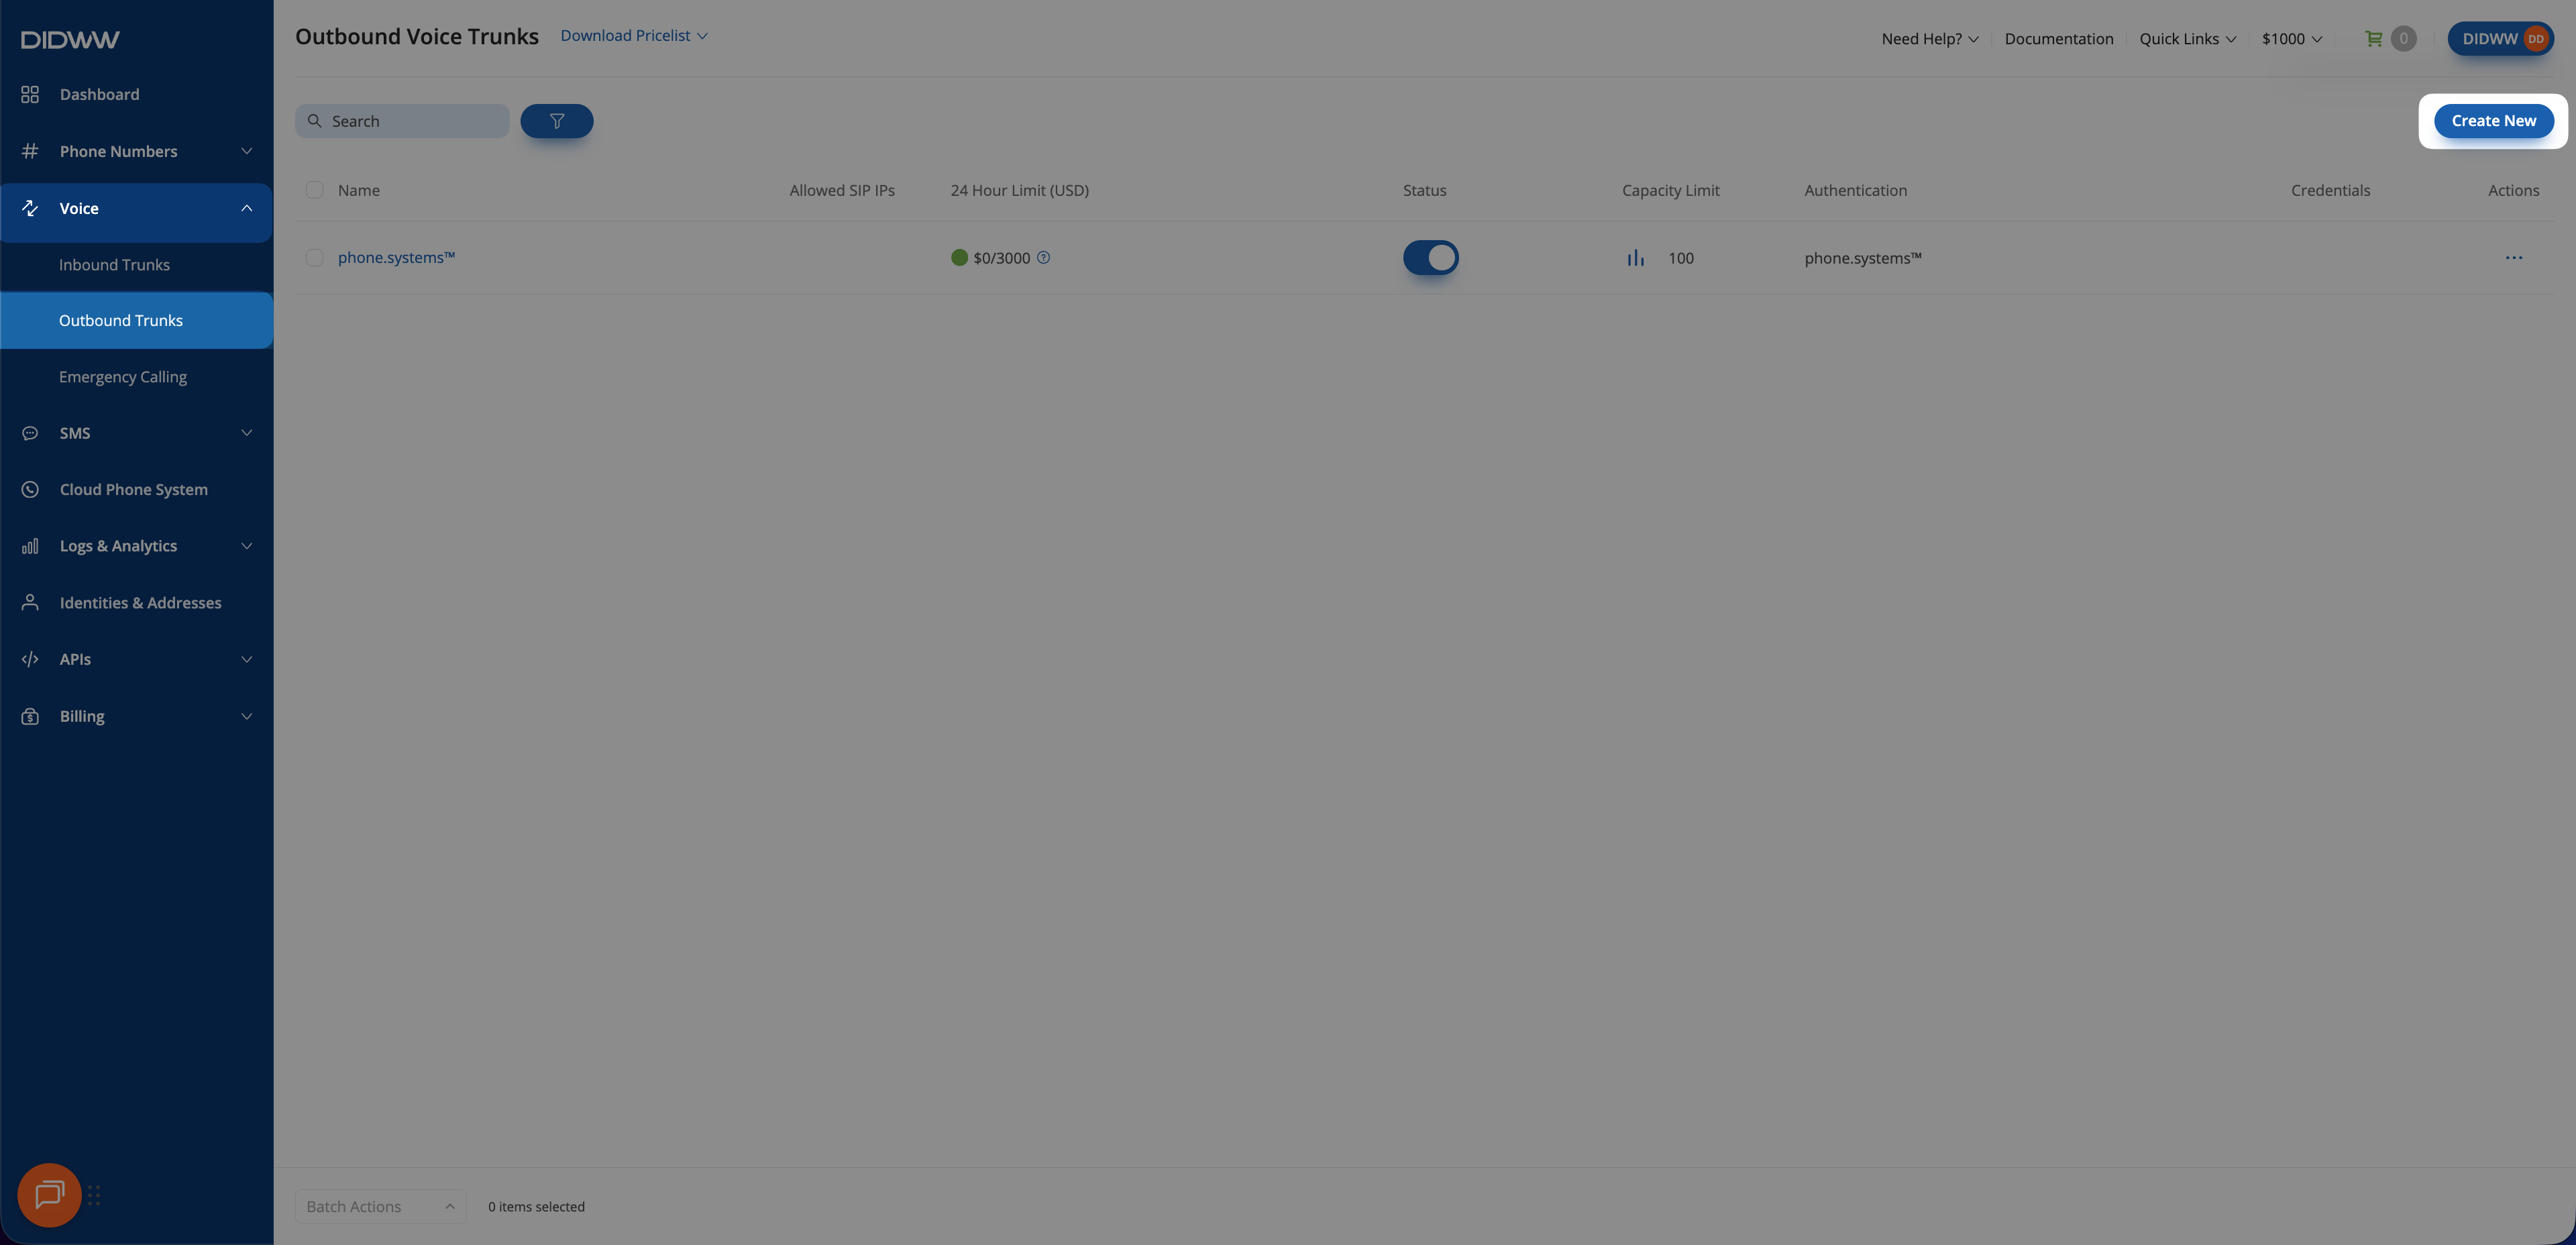
Fig. 8. Creating a new outbound SIP trunk#
Step 2: Configure SIP Trunk Settings#
Update the Friendly Name (for example,
3CX Outbound Trunk).Keep the default Credentials & IP-based authentication method selected. The SIP digest credentials (username and password) will be accessible after the trunk is created.
In Allowed SIP IP addresses, enter the public IP address or subnet from which your 3CX PBX will send outbound SIP traffic.
Note
Enter the correct IP address or subnet so that outbound calls are accepted by DIDWW. If you are using a cloud-hosted 3CX, enter a placeholder IP address (for example, 198.51.100.0). The actual IP address will be retrieved later when you configure the outbound SIP trunk in 3CX.
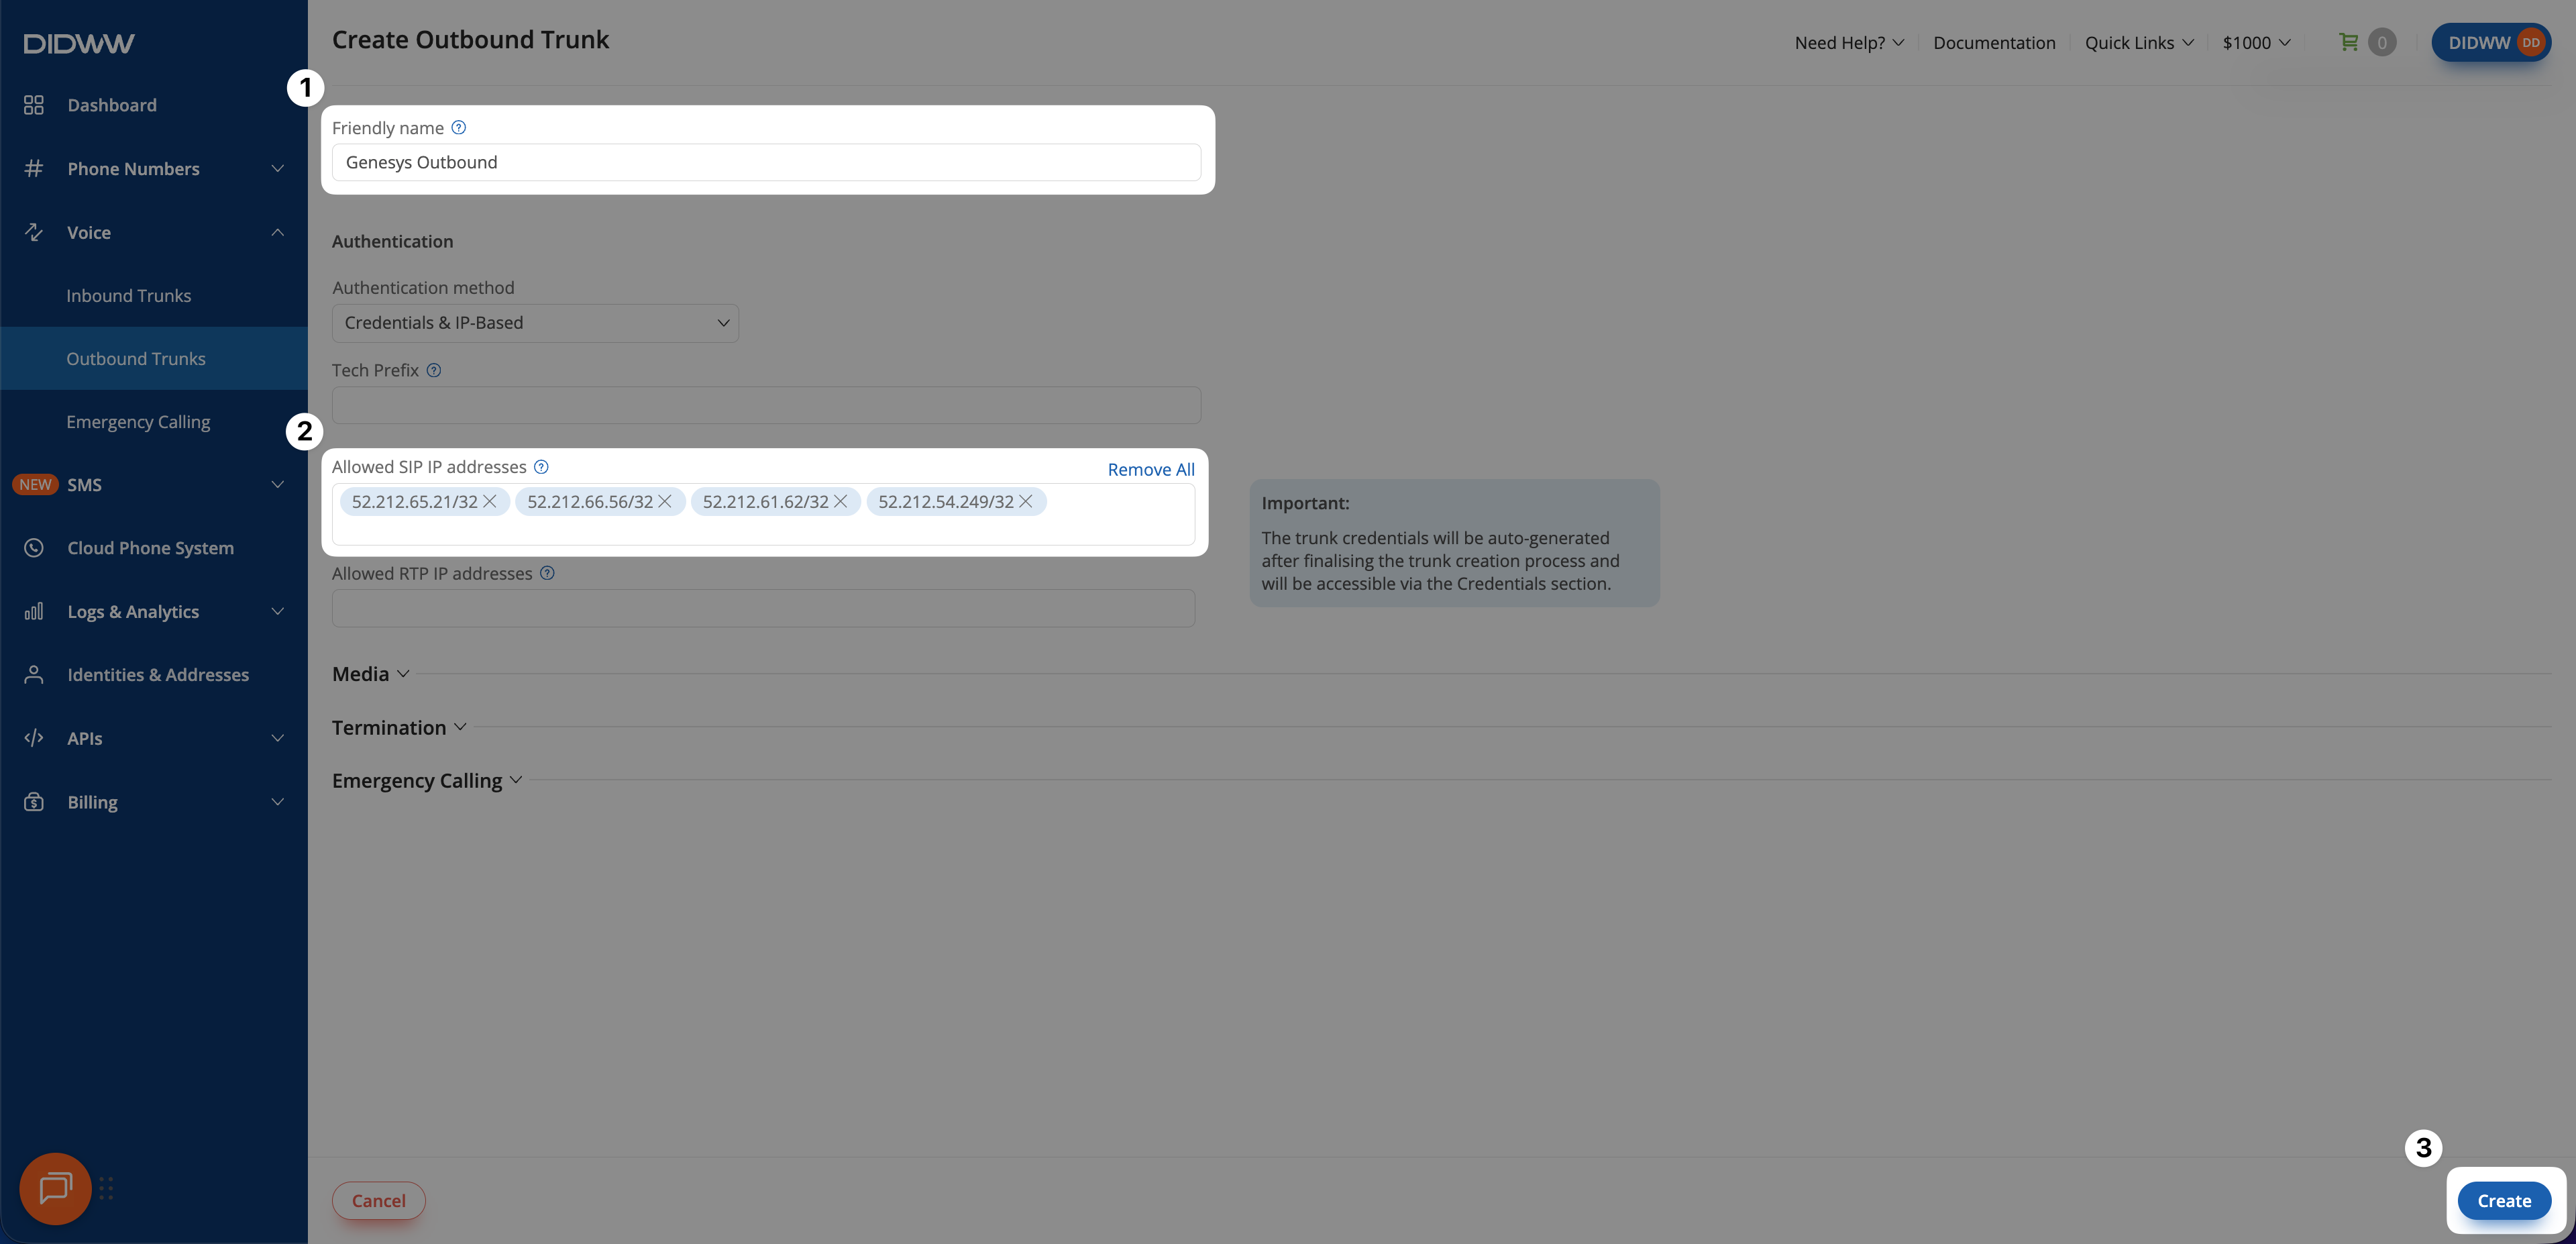
Fig. 9. Outbound SIP Trunk configuration for 3CX#
Step 3: Click Create and Save Outbound SIP Trunk Configuration#
When all required fields in the Create Outbound SIP Trunk form are filled, click Create to save your outbound SIP trunk.
Note
For advanced outbound SIP trunk configuration, see Outbound SIP Trunk Guide.
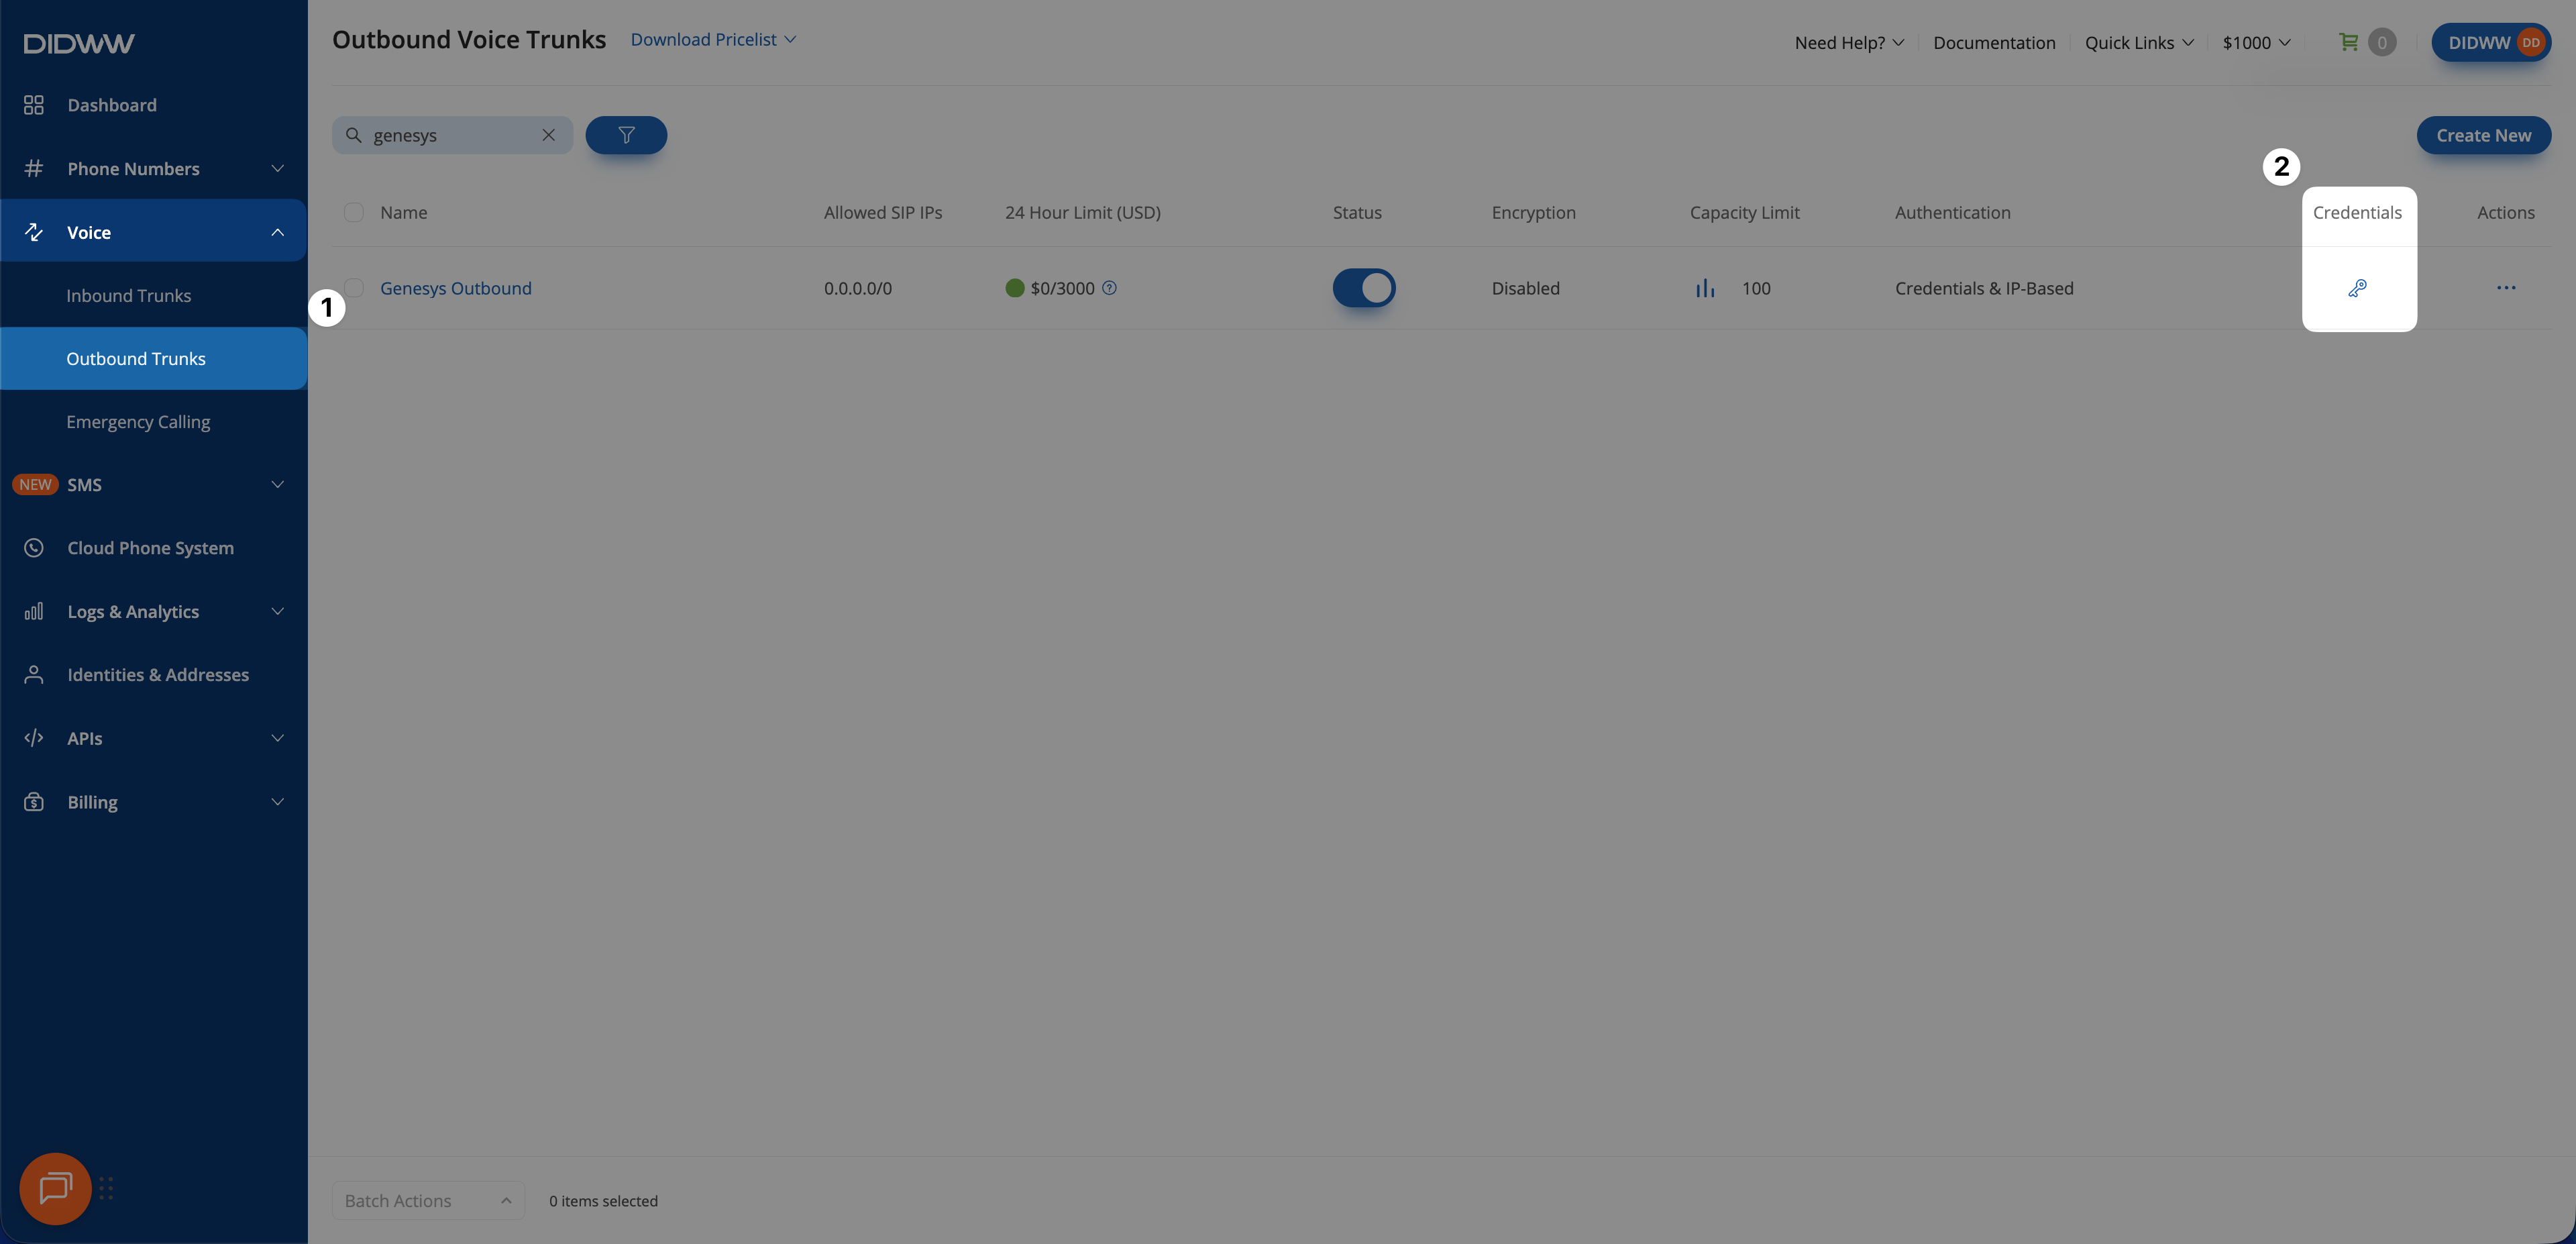
Fig. 10. Outbound SIP trunk created and ready for use#
Step 4: View Outbound Trunk Credentials#
When the outbound trunk is created, you can view its credentials by selecting the key icon in the Credentials column on the Outbound Trunks page.
Go to Voice > Outbound Trunks.
Locate your outbound trunk and click the key icon in the Credentials column.
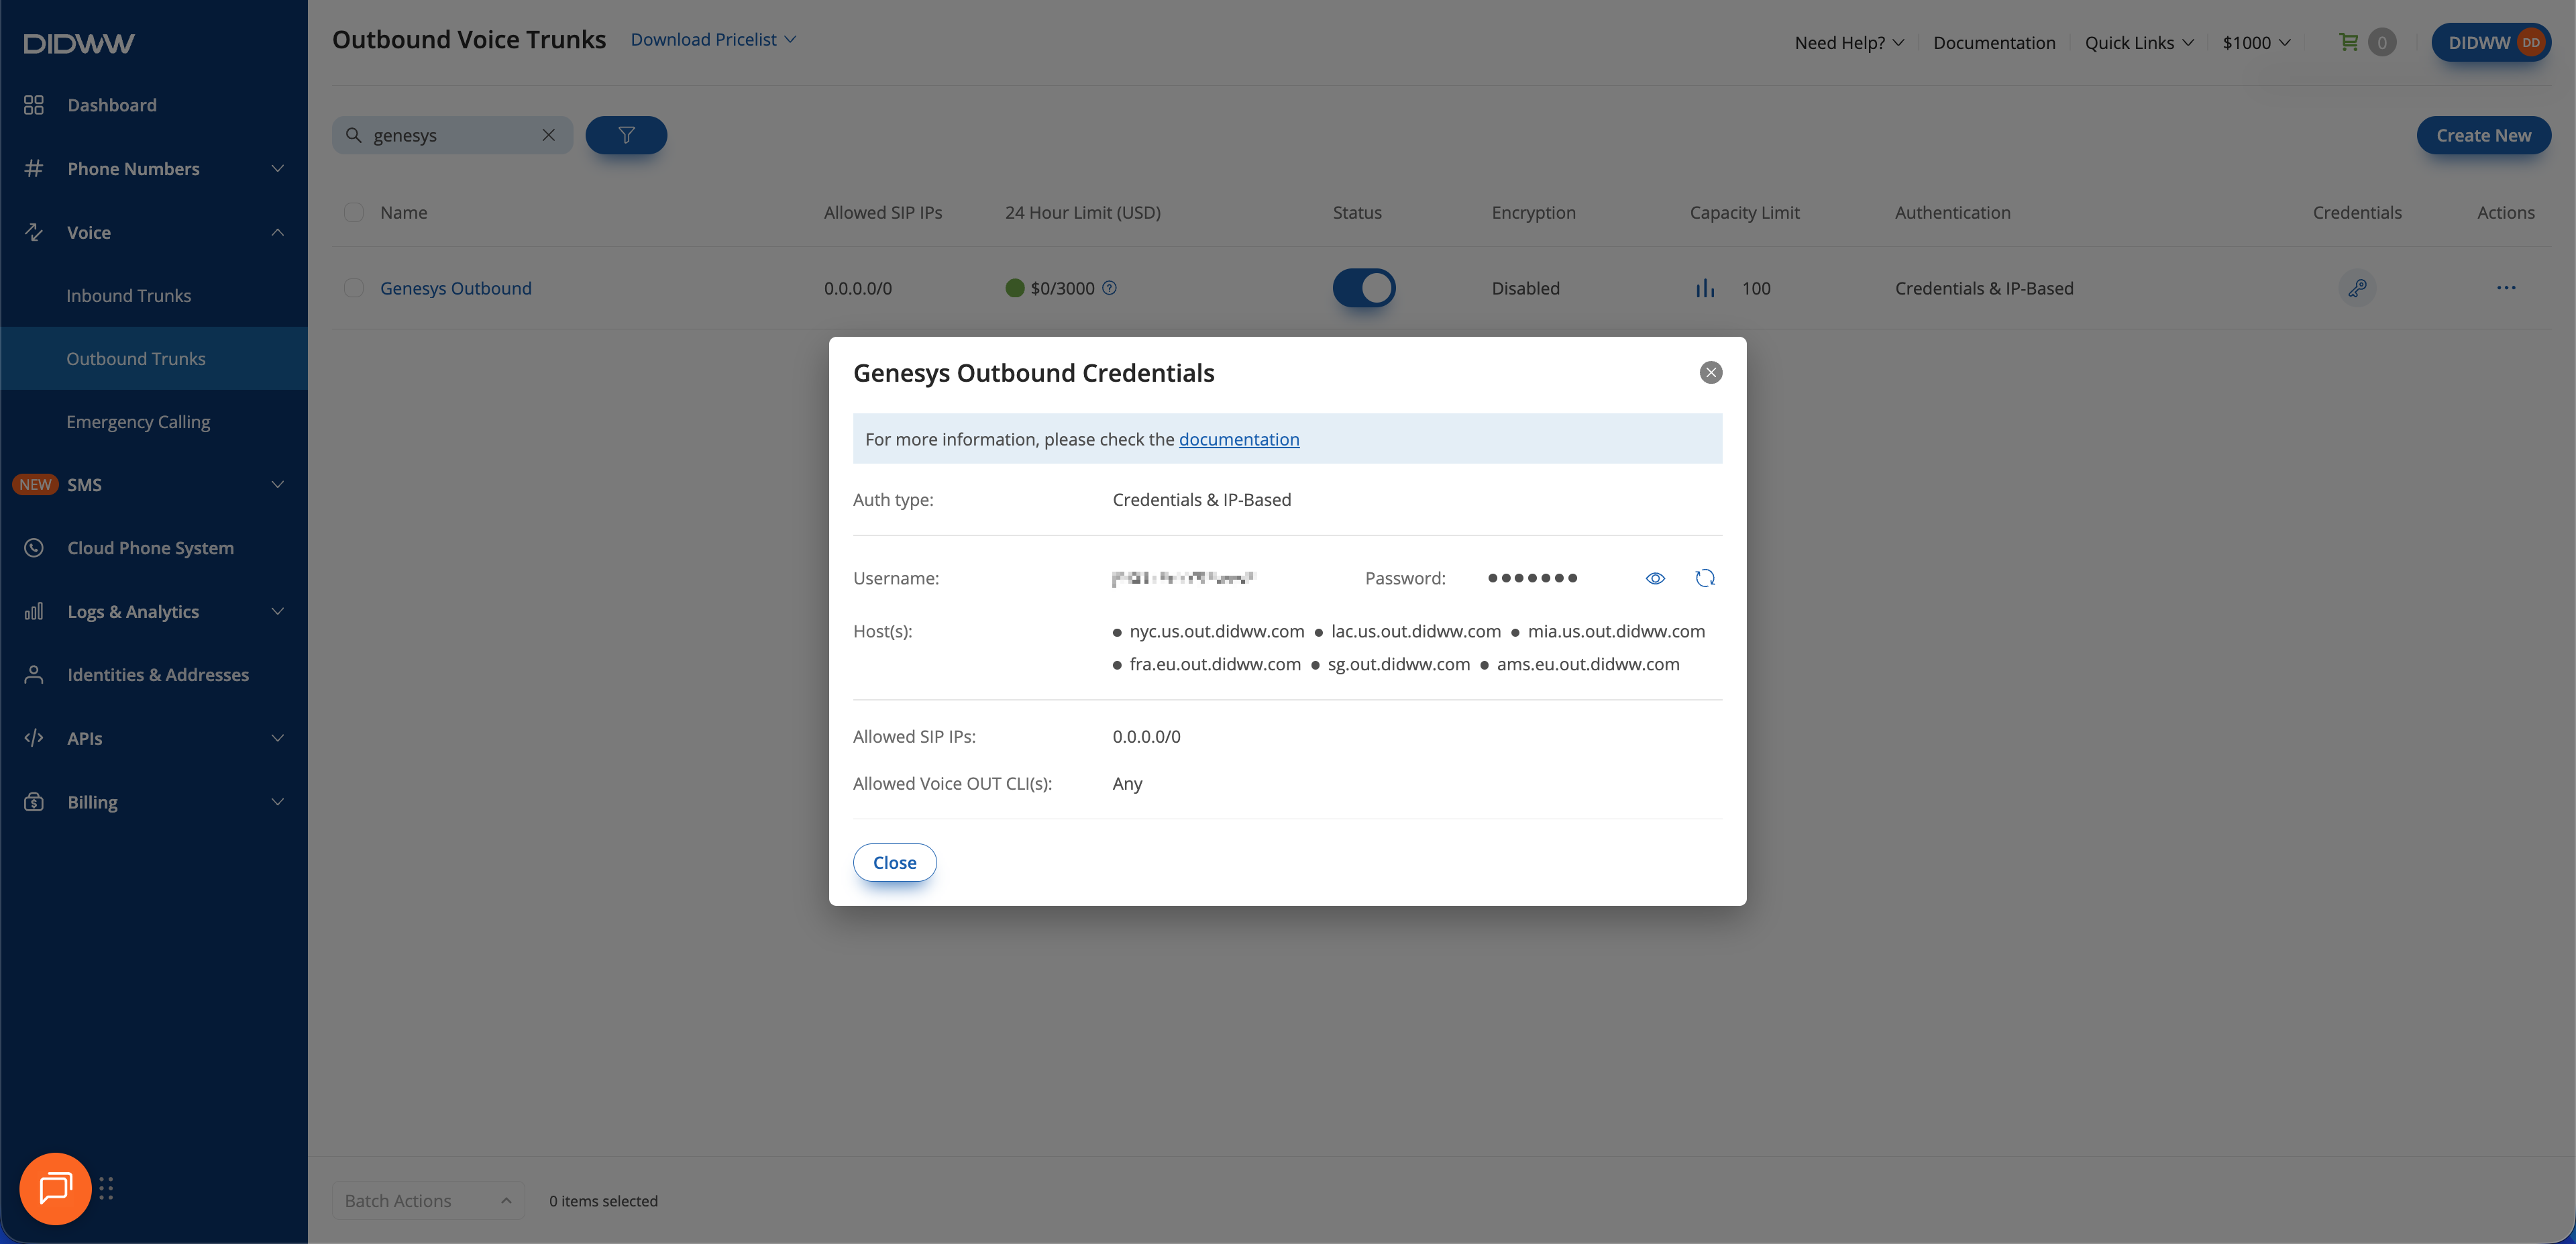
Fig. 11. Opening the outbound trunk credentials view#
The trunk credentials will appear, showing the Username and Password. Click the eye icon to reveal the password.
Copy and save these credentials for the next steps when configuring the outbound SIP trunk on 3CX.
Warning
If the credentials become exposed to unauthorized parties, rotate them immediately in the DIDWW User Panel.
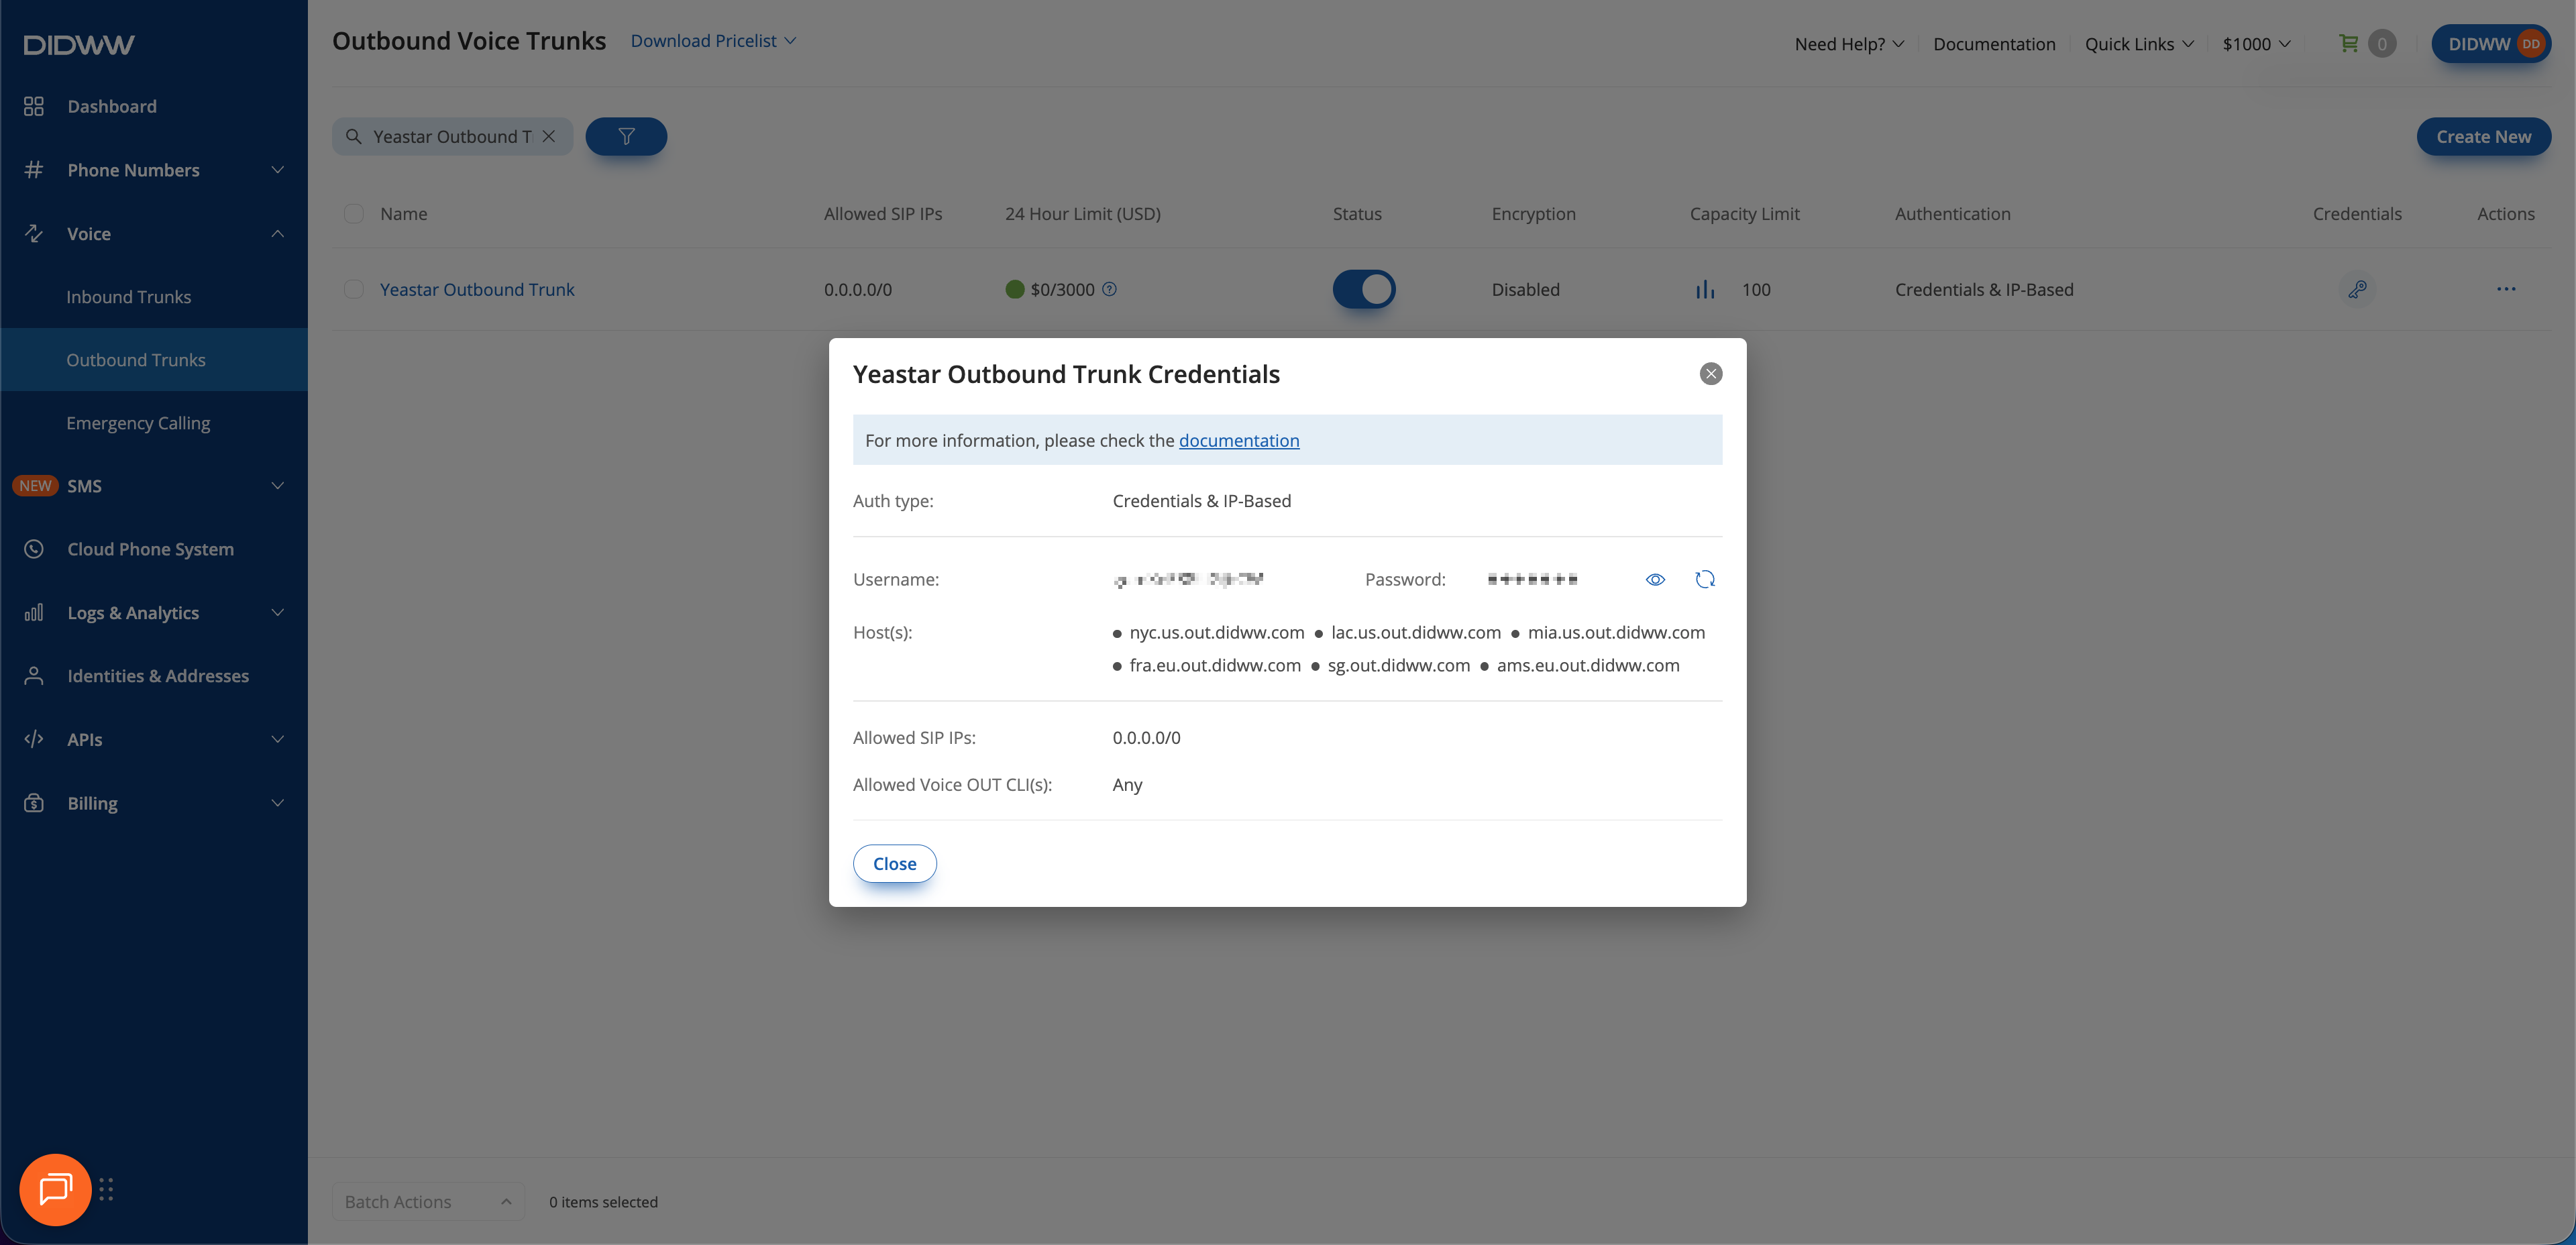
Fig. 12. Viewing the outbound trunk credentials#
3. Configure 3CX#
To complete your integration, configure the DIDWW SIP trunking settings inside 3CX. This setup links your DIDWW Inbound and Outbound SIP Trunks to 3CX, allowing the PBX to manage call routing, features, and call handling for both inbound and outbound traffic.
Before You Begin#
Administrator access to the 3CX Management Console is required.
A configured DIDWW Inbound SIP Trunk and DIDWW Outbound SIP Trunk is required before proceeding.
A 3CX PRO (Professional) or 3CX ENT (Enterprise) license is required to configure a custom or generic SIP trunk.
At least one 3CX user, extension, queue, ring group, or digital receptionist should exist before assigning call routes.
Step 1: Configure the DIDWW Inbound SIP Trunk#
This trunk allows 3CX to receive inbound calls from your DIDWW DID numbers.
Add the Inbound Trunk in 3CX#
In the 3CX Management Console, go to Admin > Voice & Chat.
Click Add Trunk.
Select any country and Generic SIP Trunk (IP Based) in the provider field.
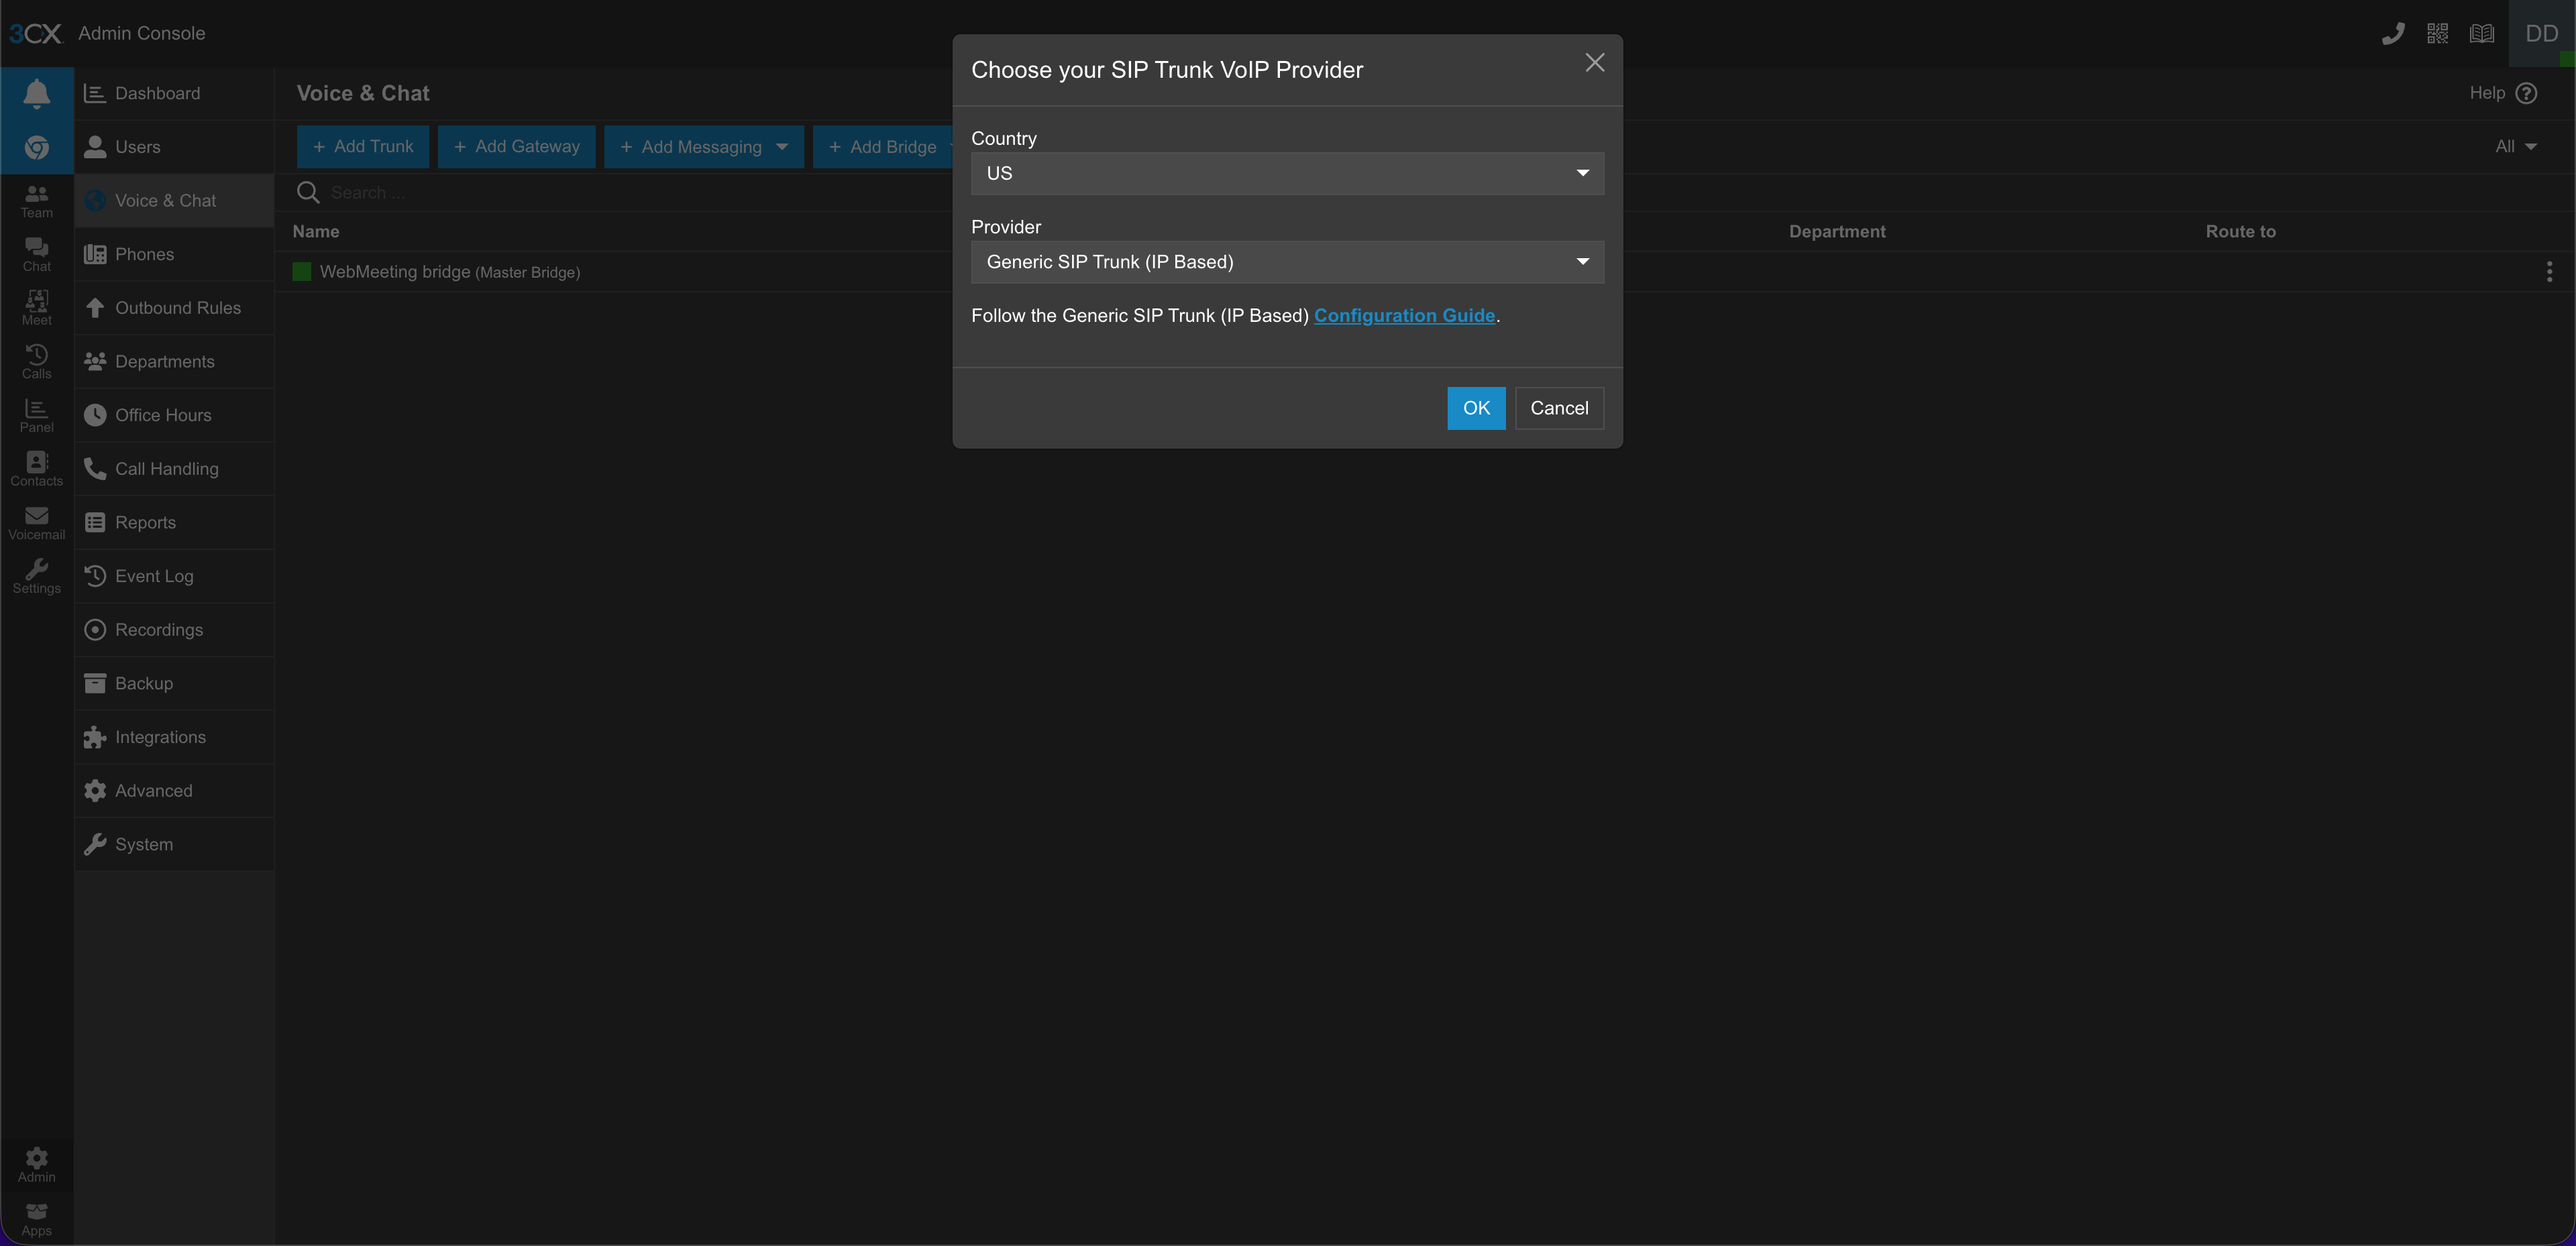
Fig. 13. Add a new SIP URI inbound trunk in 3CX#
In the 3CX Management Console, go to Admin > Voice & Chat.
Click Add Trunk.
Select any country and Generic VoIP Provider (Registration) in the provider field.
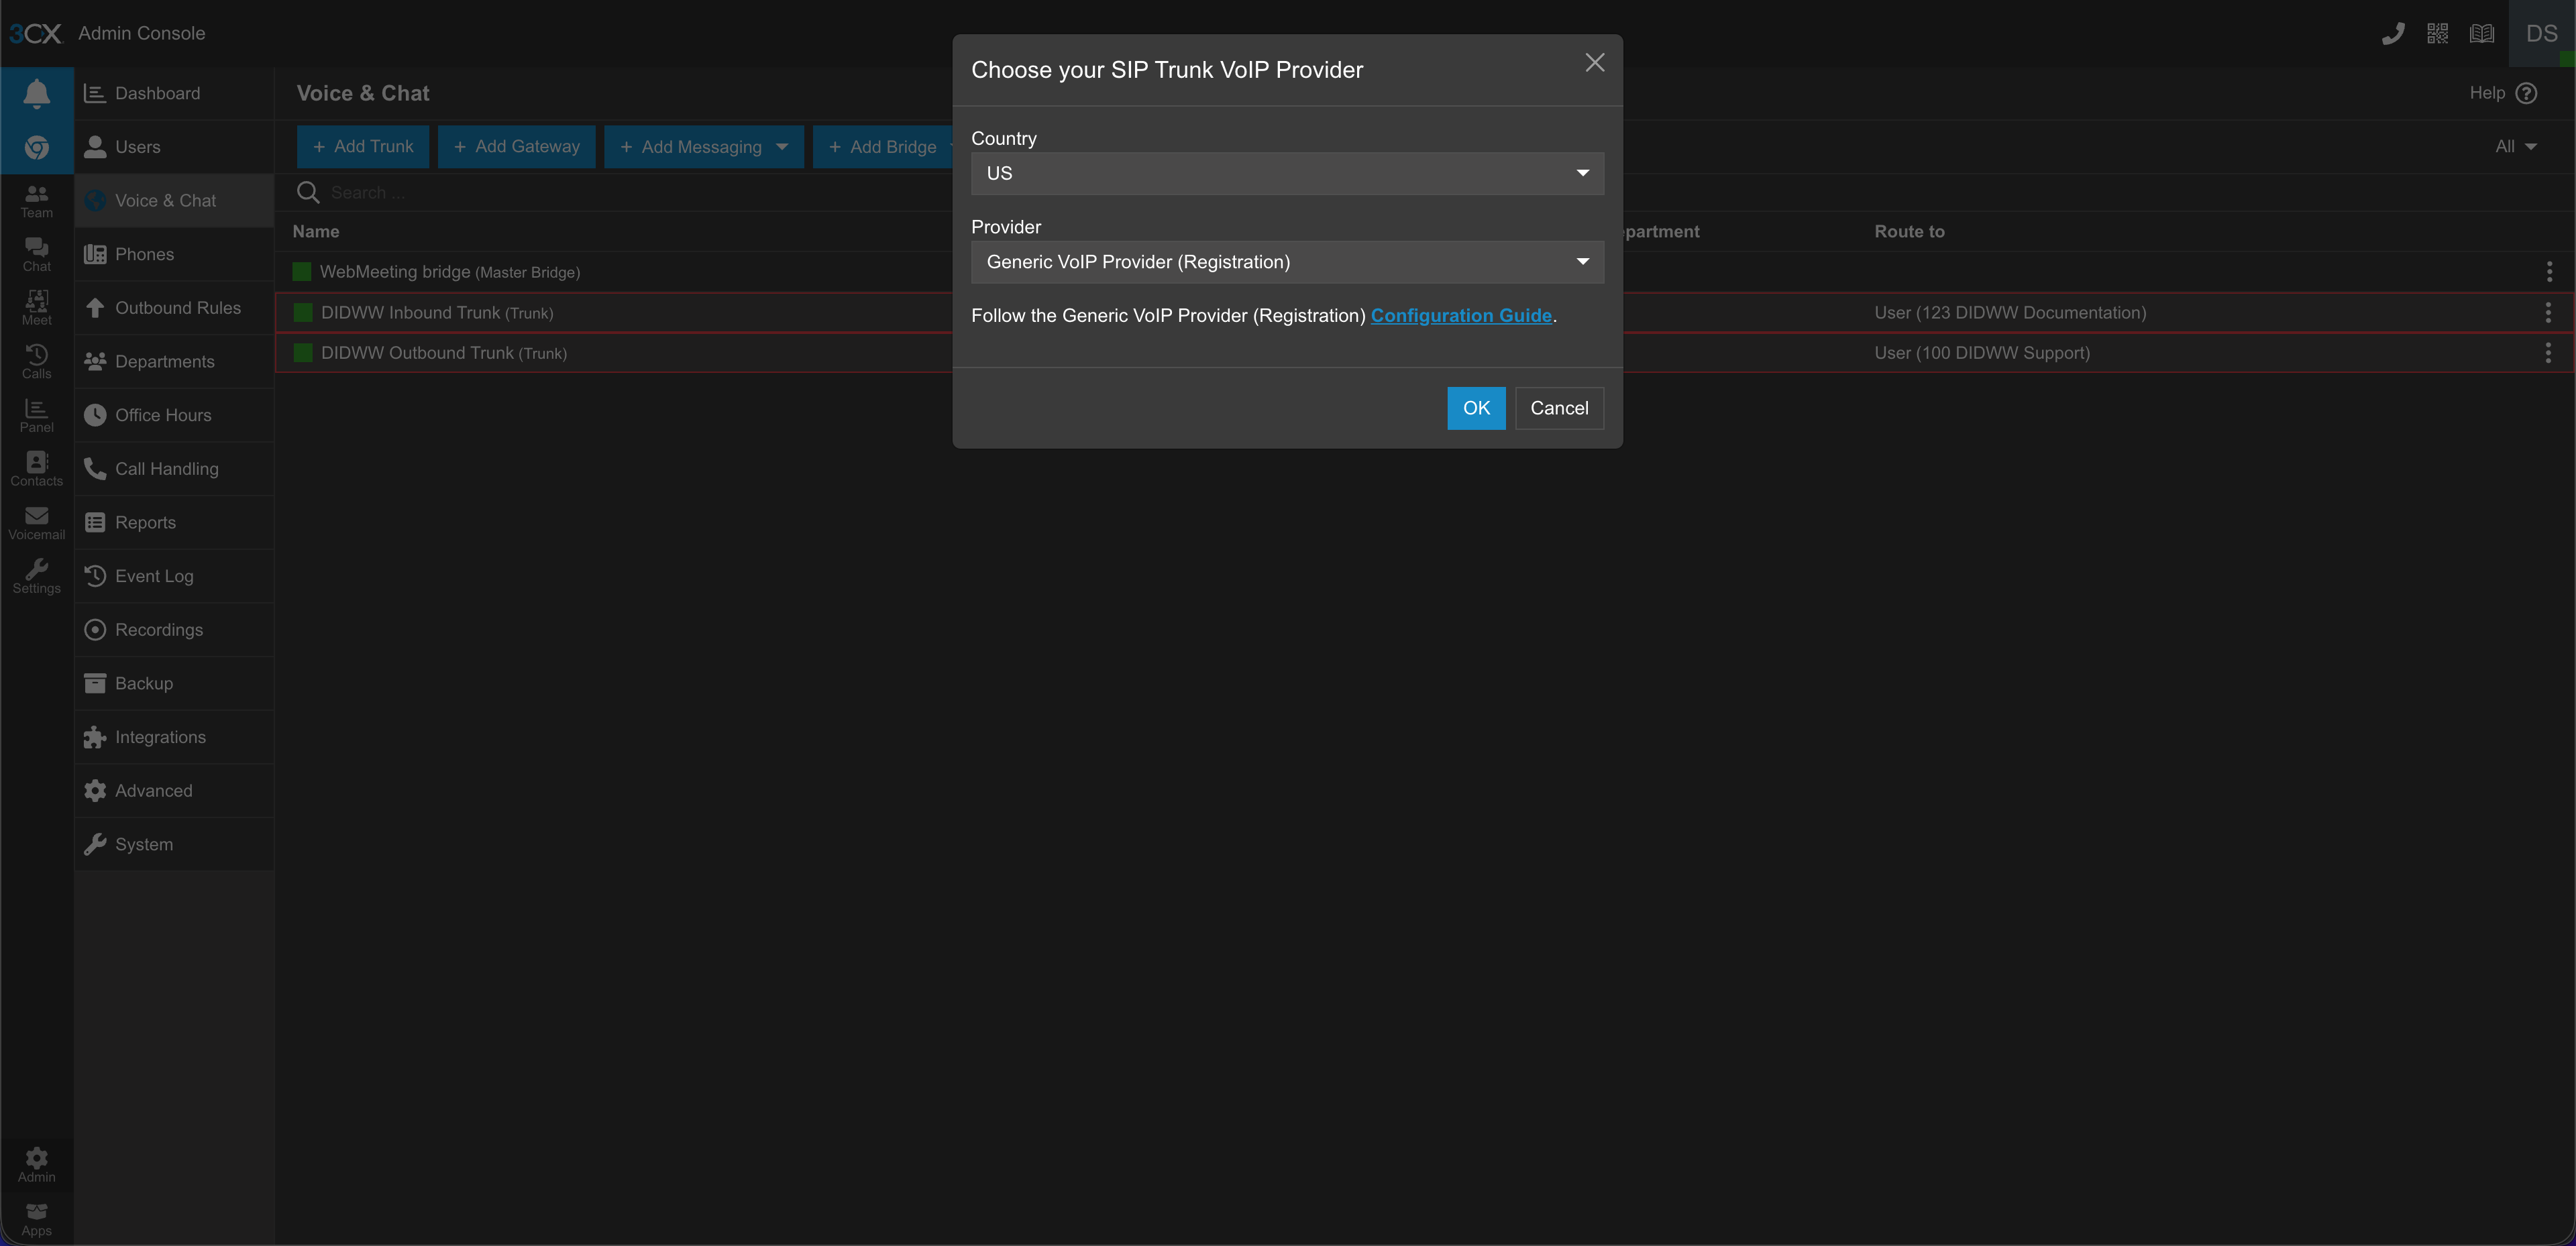
Fig. 14. Add a new SIP Registration inbound trunk in 3CX#
Configure Trunk Settings#
Enter a Name for the trunk (for example,
DIDWW Inbound Trunk).Clear the Create an outbound rule for this SIP Trunk checkbox.
Enter your DID number in the Main Trunk Number field in E.164 format without the plus sign (for example,
18489005419).Select Type of authentication as
Do not require - IP based.In the Registrar/Server field, enter
46.19.208.0/21. In the Port field, enter5060.
Note
If you plan to use the AMS DIDWW PoP, enter 185.238.172.0/22 instead of 46.19.208.0/21 in the Registrar/Server field. For more information, see DIDWW SIP Inbound Technical Data.

Fig. 15. SIP URI trunk settings for the DIDWW inbound SIP trunk in 3CX#
Enter a Name for the trunk (for example,
DIDWW Registration).Clear the Create an outbound rule for this SIP Trunk checkbox.
Enter your DID number in the Main Trunk Number field in E.164 format without the plus sign (for example,
18489005419).Enter the DIDWW inbound trunk credentials in the Authentication ID (SIP User ID) and Authentication password fields.
Make sure the Type of authentication is
Register/Account based.In the Registrar/Server field, enter
sip.didww.com. In the Port field, enter5060.
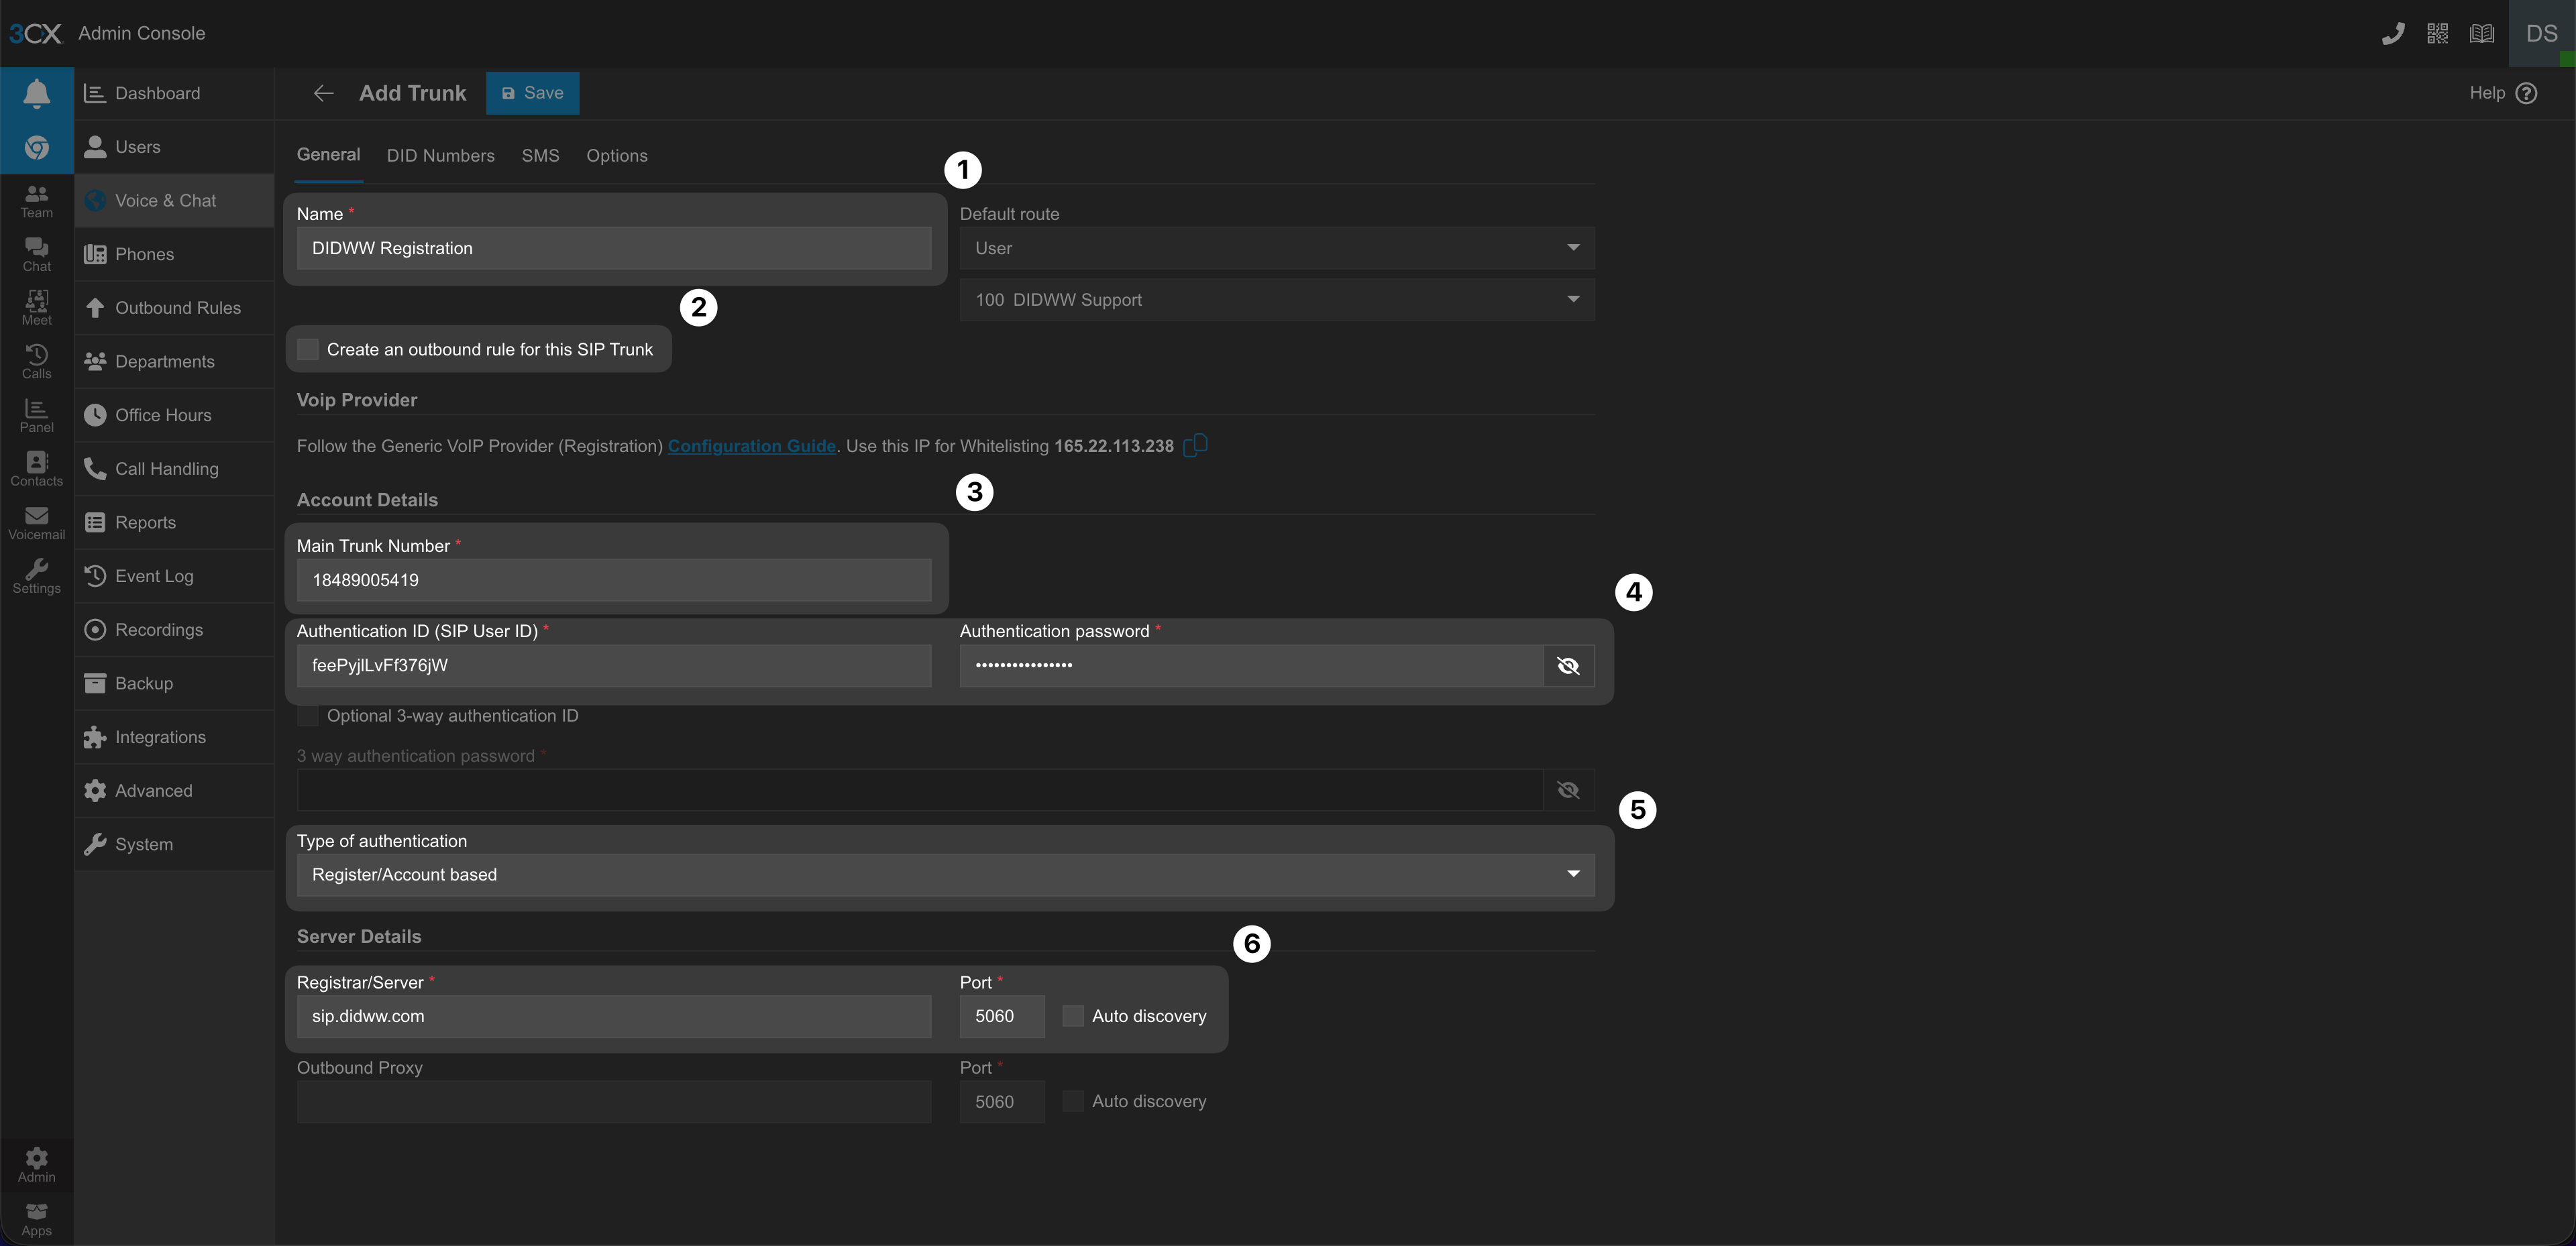
Fig. 16. SIP Registration trunk settings for the DIDWW inbound SIP trunk in 3CX#
Configure Routing#
During trunk creation, configure the default destination for inbound calls.
In the Default route section, select the destination type from the first dropdown (for example, User, Ring Group, Queue, or Digital Receptionist).
Depending on the selected type, configure the destination in the second field (for example, select a specific user, group, or queue).
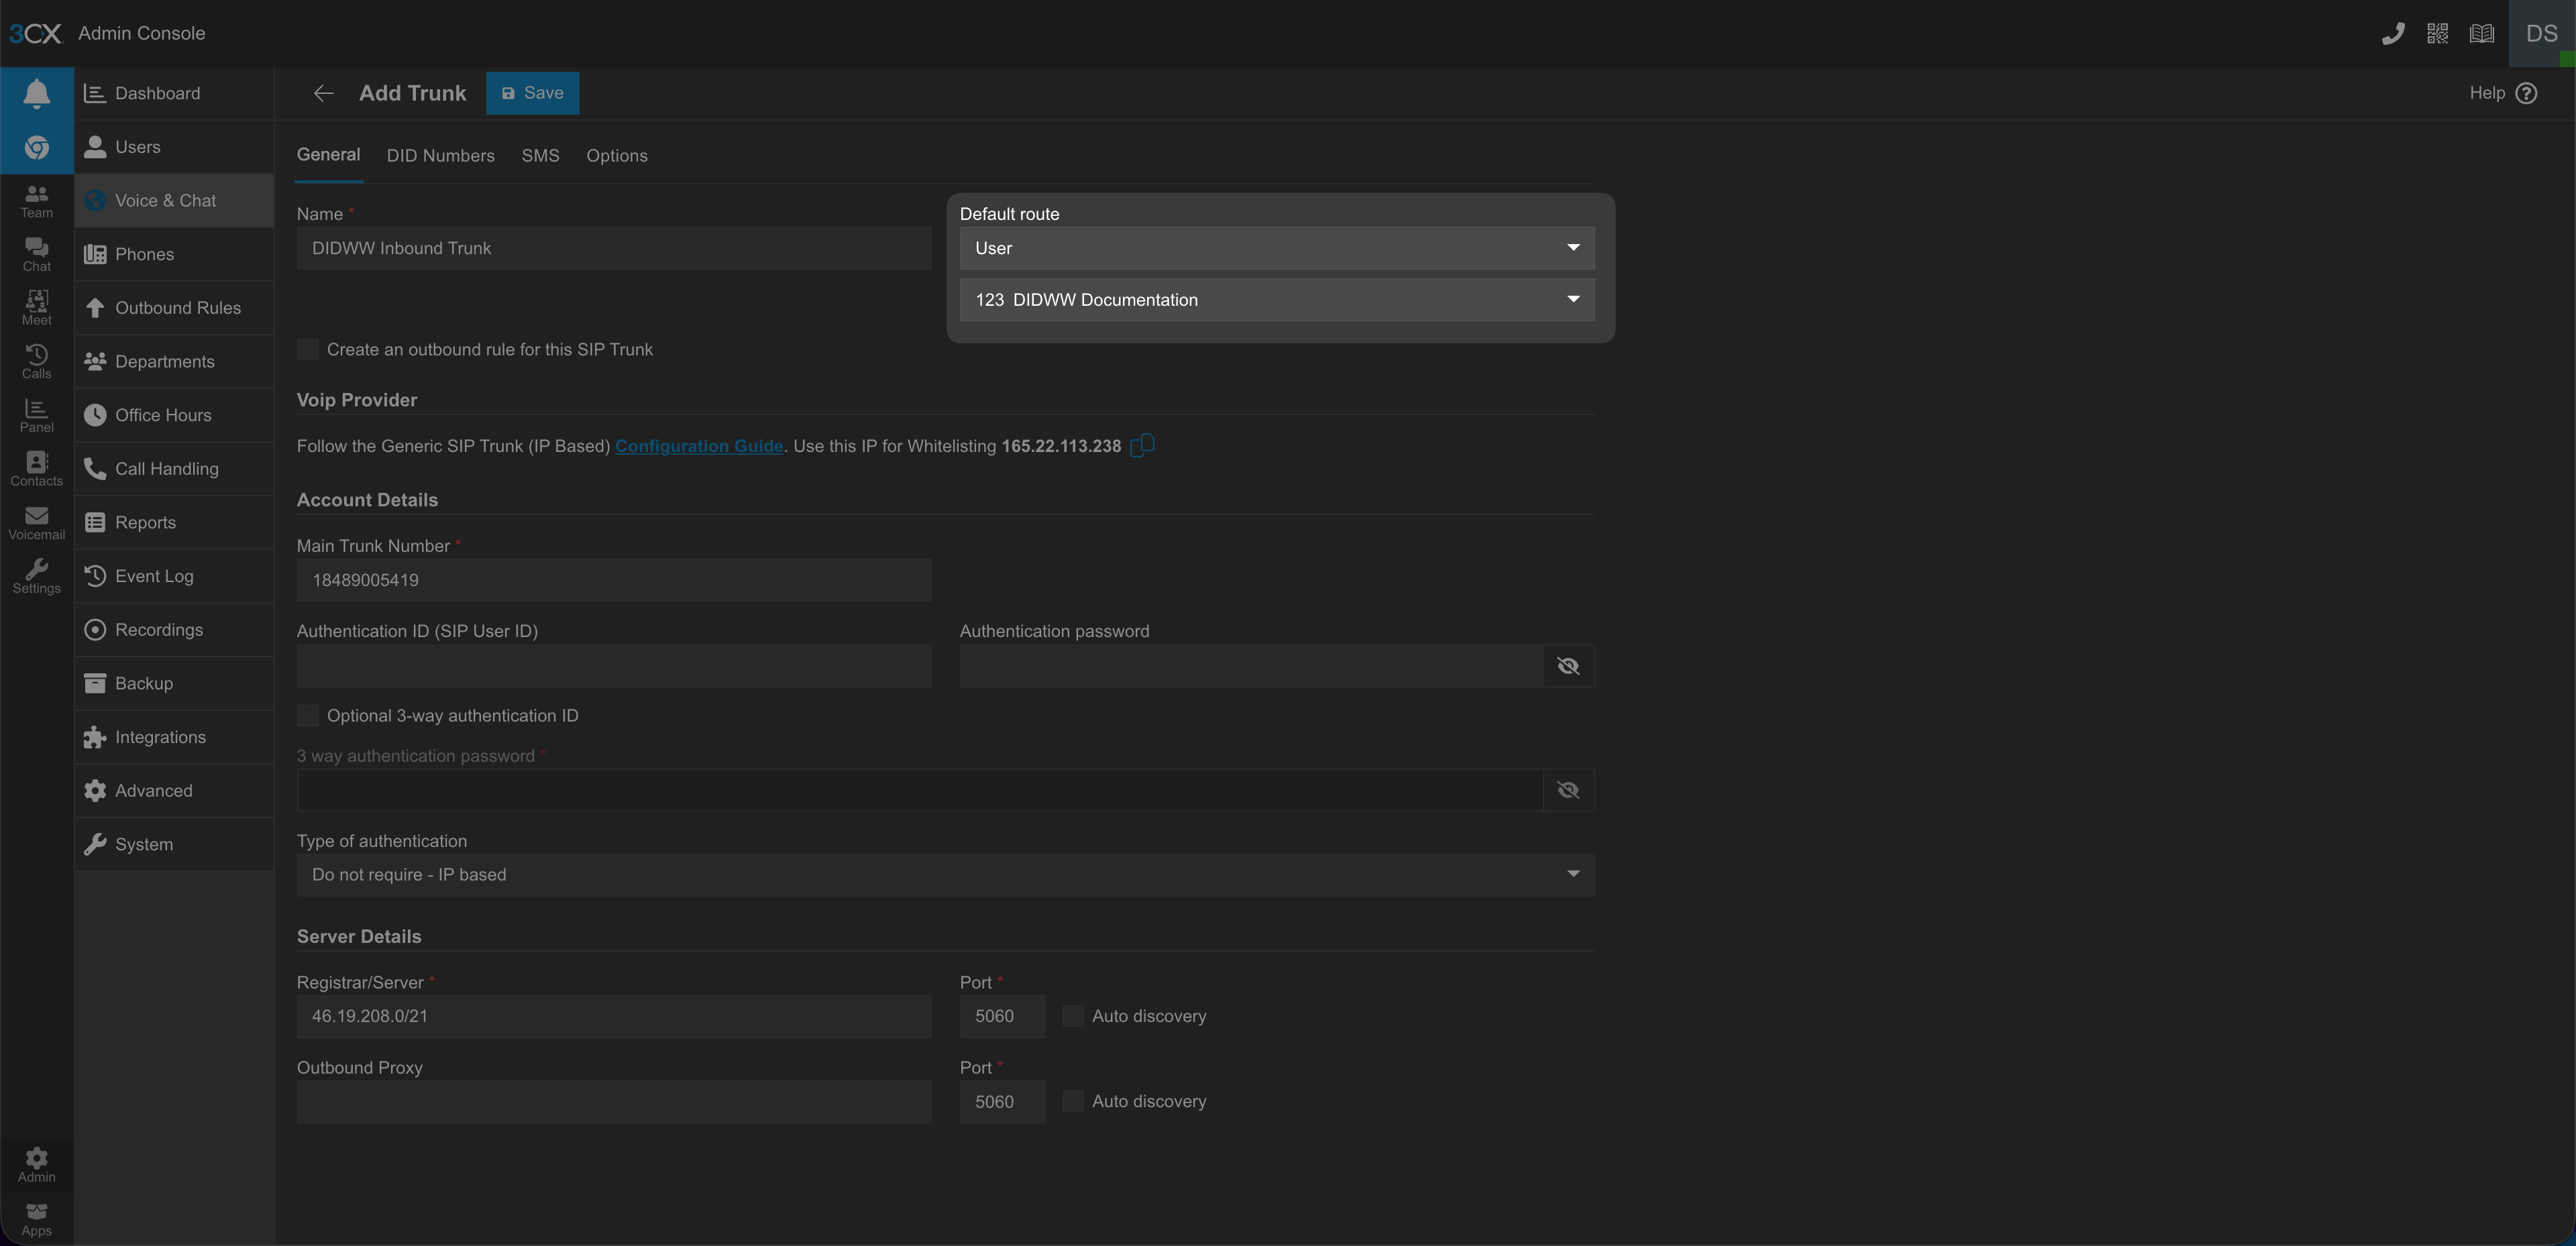
Fig. 17. Configuring the default destination for inbound calls#
Configure Additional DID Numbers (Optional)#
If you have multiple DID numbers, configure them on the trunk:
Open the DID numbers tab for the newly created trunk.
Click Add and enter your DID number or numbers in E.164 format without the plus sign (for example,
16413545118).

Fig. 18. Adding DID numbers to the DIDWW Inbound SIP Trunk#
Save the Inbound Trunk#
Click Save to create the trunk.
Note
After the trunk is created, confirm that the DID numbers are listed correctly. 3CX may display an Untested provider warning. This warning indicates that the trunk uses a generic or custom provider profile and can be safely ignored.
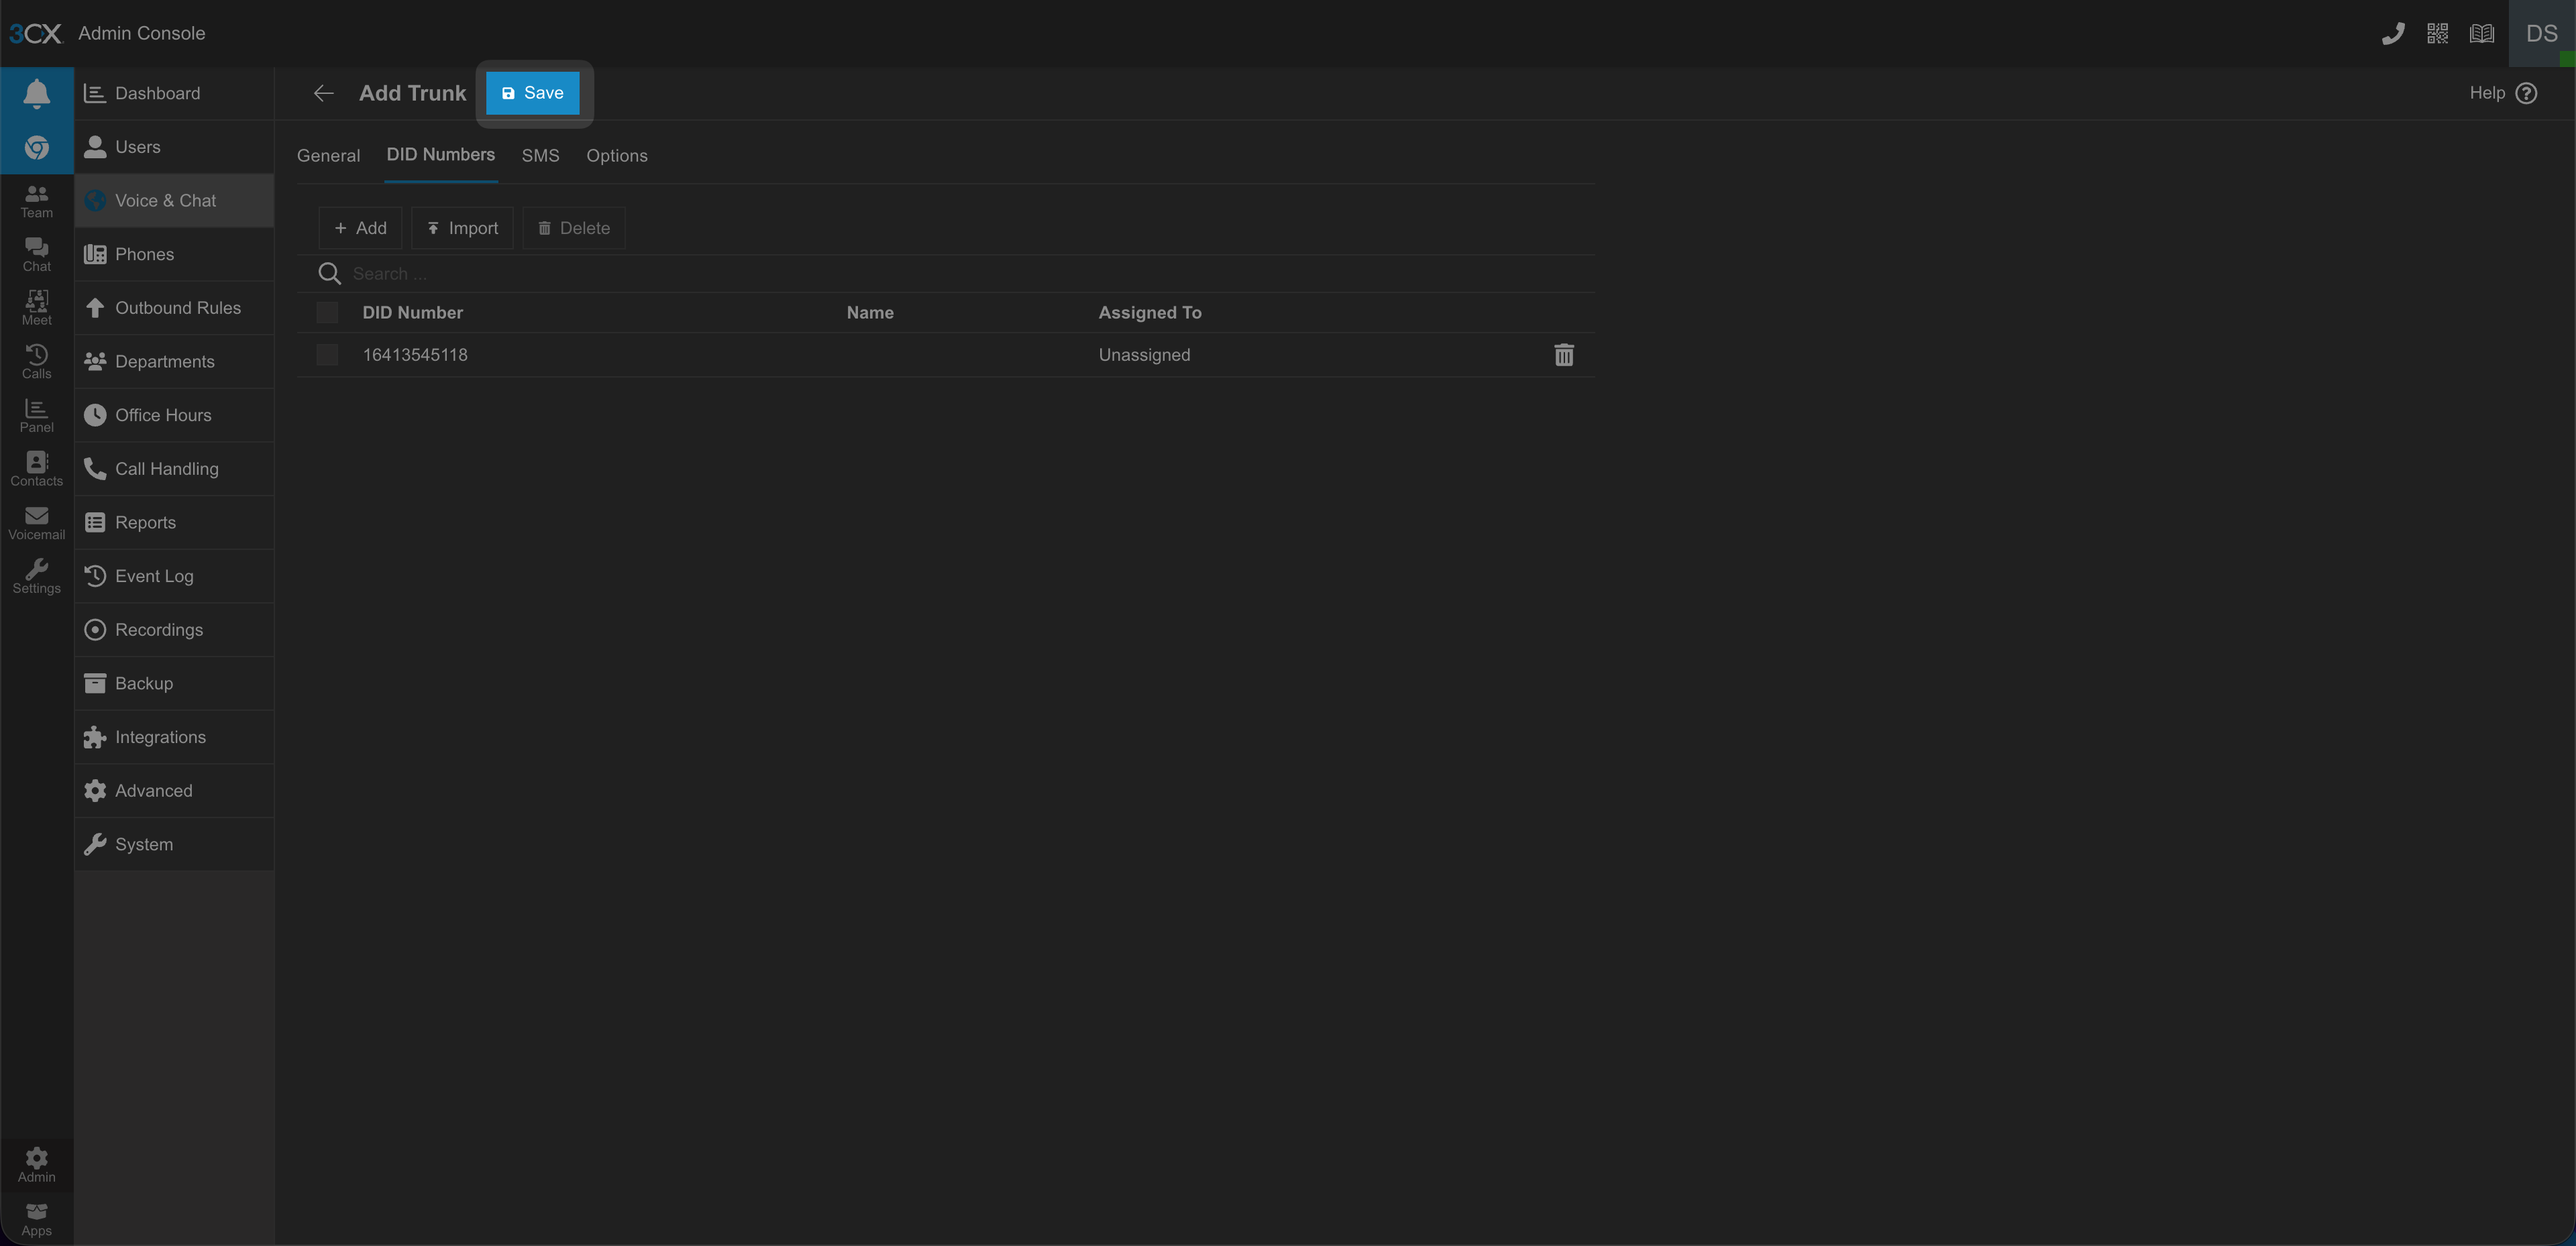
Fig. 19. DIDWW Inbound SIP Trunk successfully configured on 3CX#
Assign DIDs to Users or Destinations (Optional)#
By default, inbound calls are routed according to the Default route configured during trunk creation.
If you have multiple DID numbers or require different routing per number, assign specific DIDs to users or other destinations.
In the 3CX Management Console, go to Admin > Users.
Create a new user or edit an existing one.
In Assigned DID number(s), select the DID number that should route calls to this user.
Click Save.
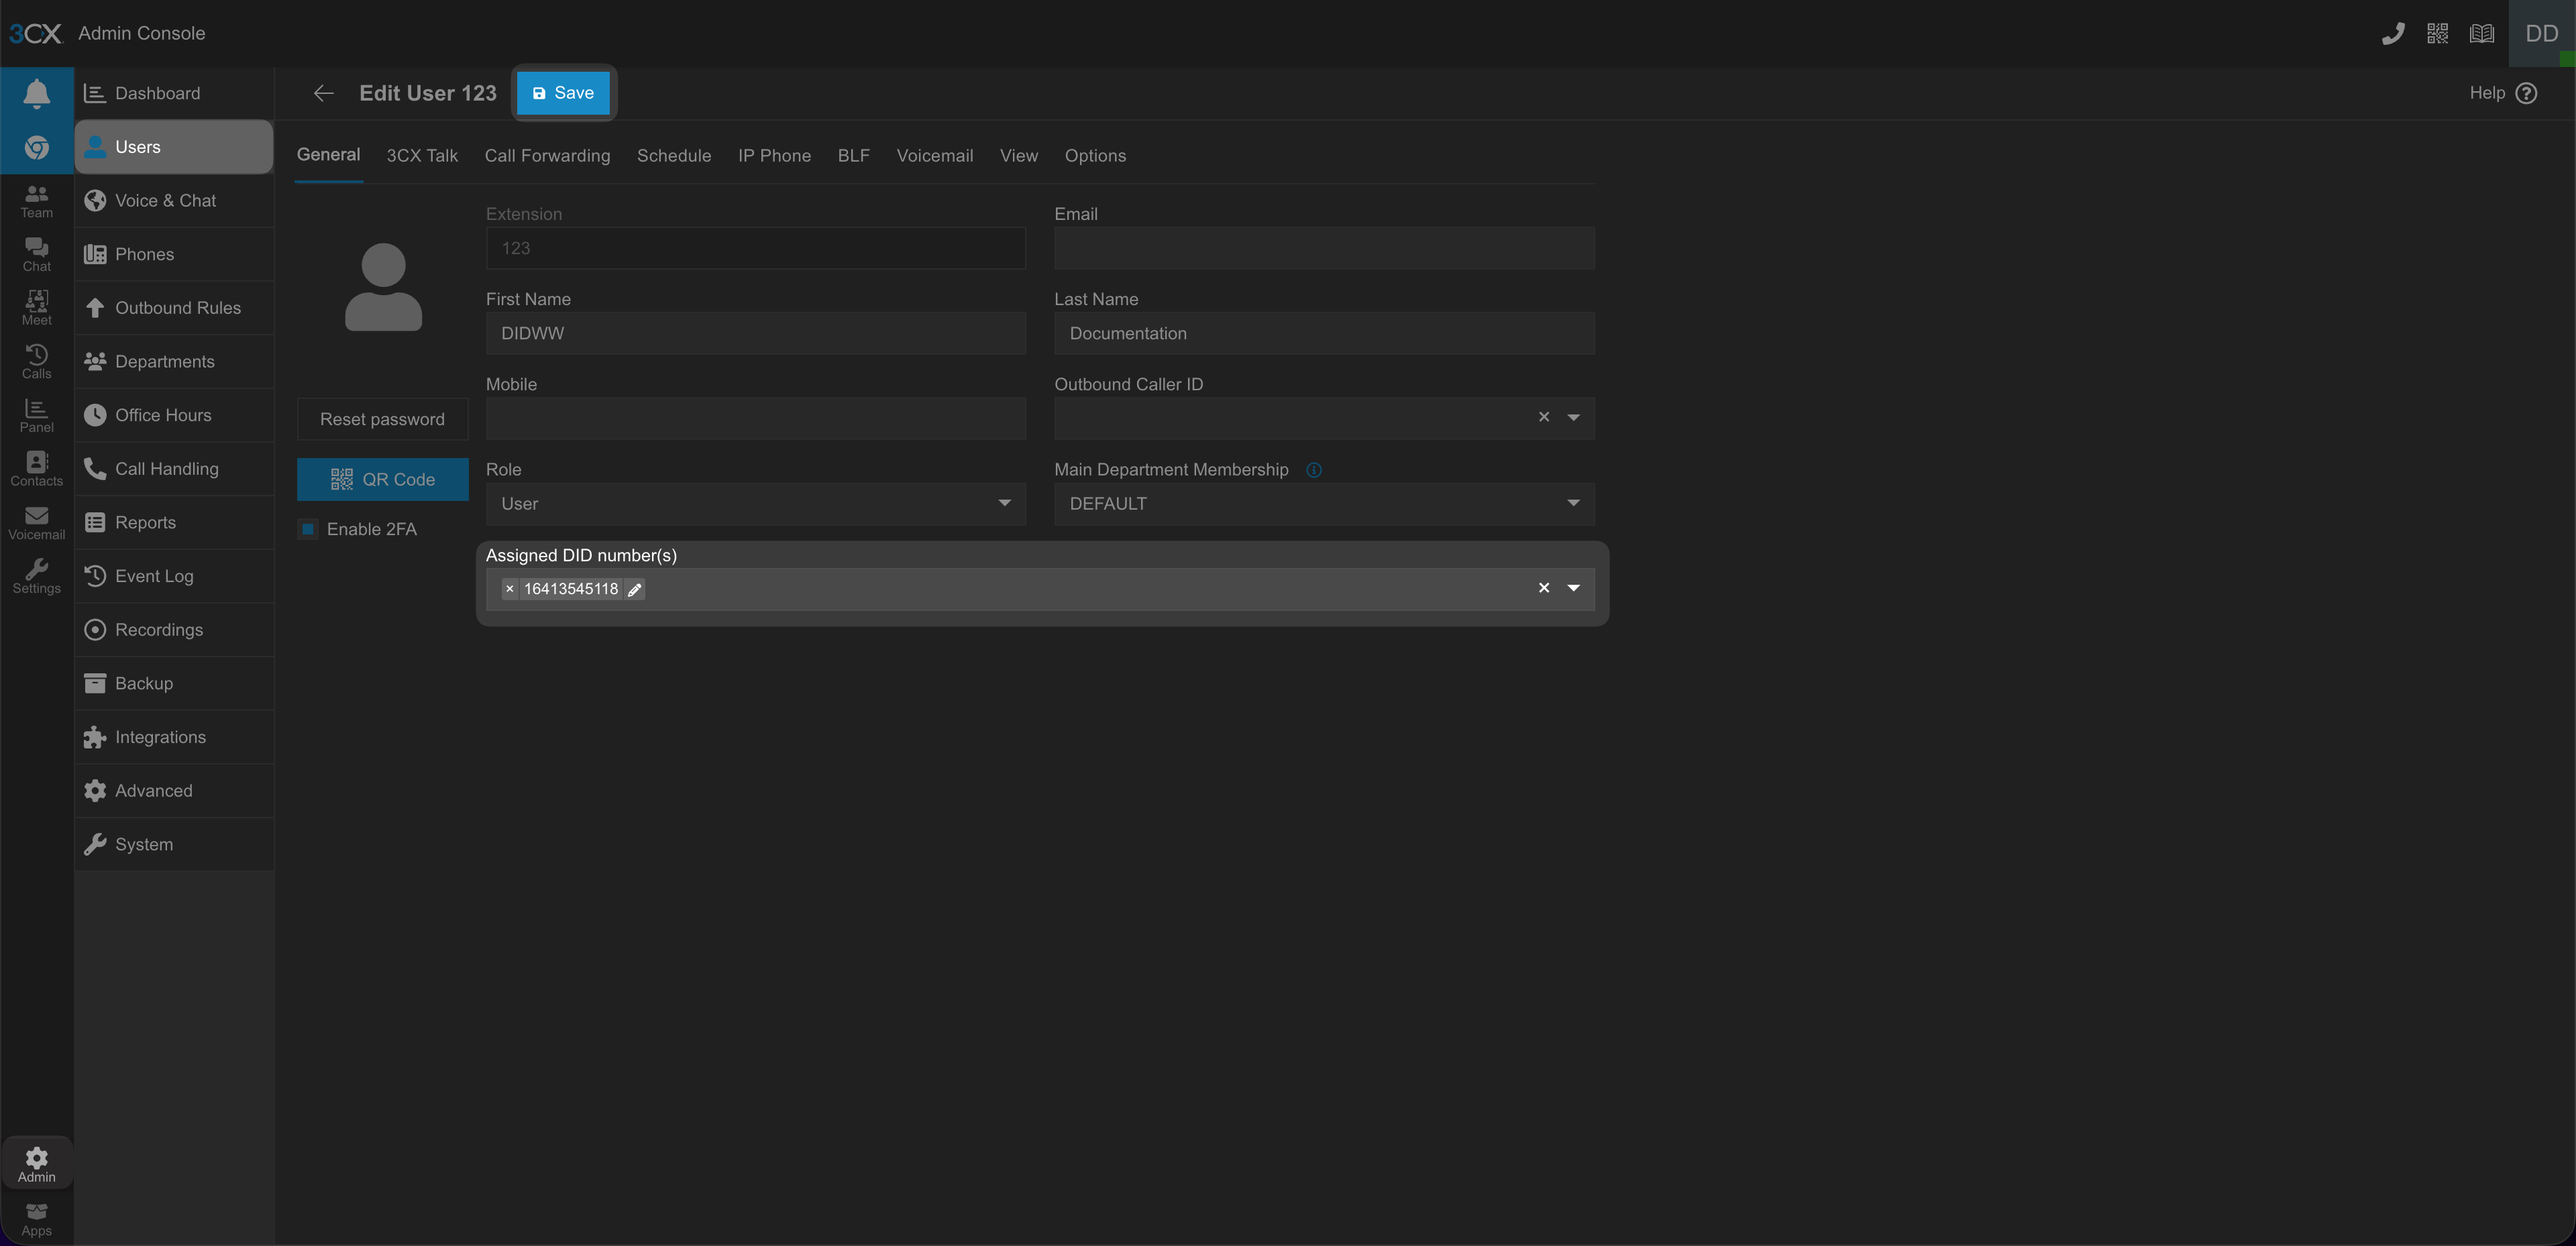
Fig. 20. Assigning a DID number to a user in 3CX#
In the 3CX Management Console, go to Admin > Call Handling.
Create a new destination or edit an existing one, such as a Ring Group, Queue, or Digital Receptionist.
Assign the DID number to the selected destination.
Click Save.
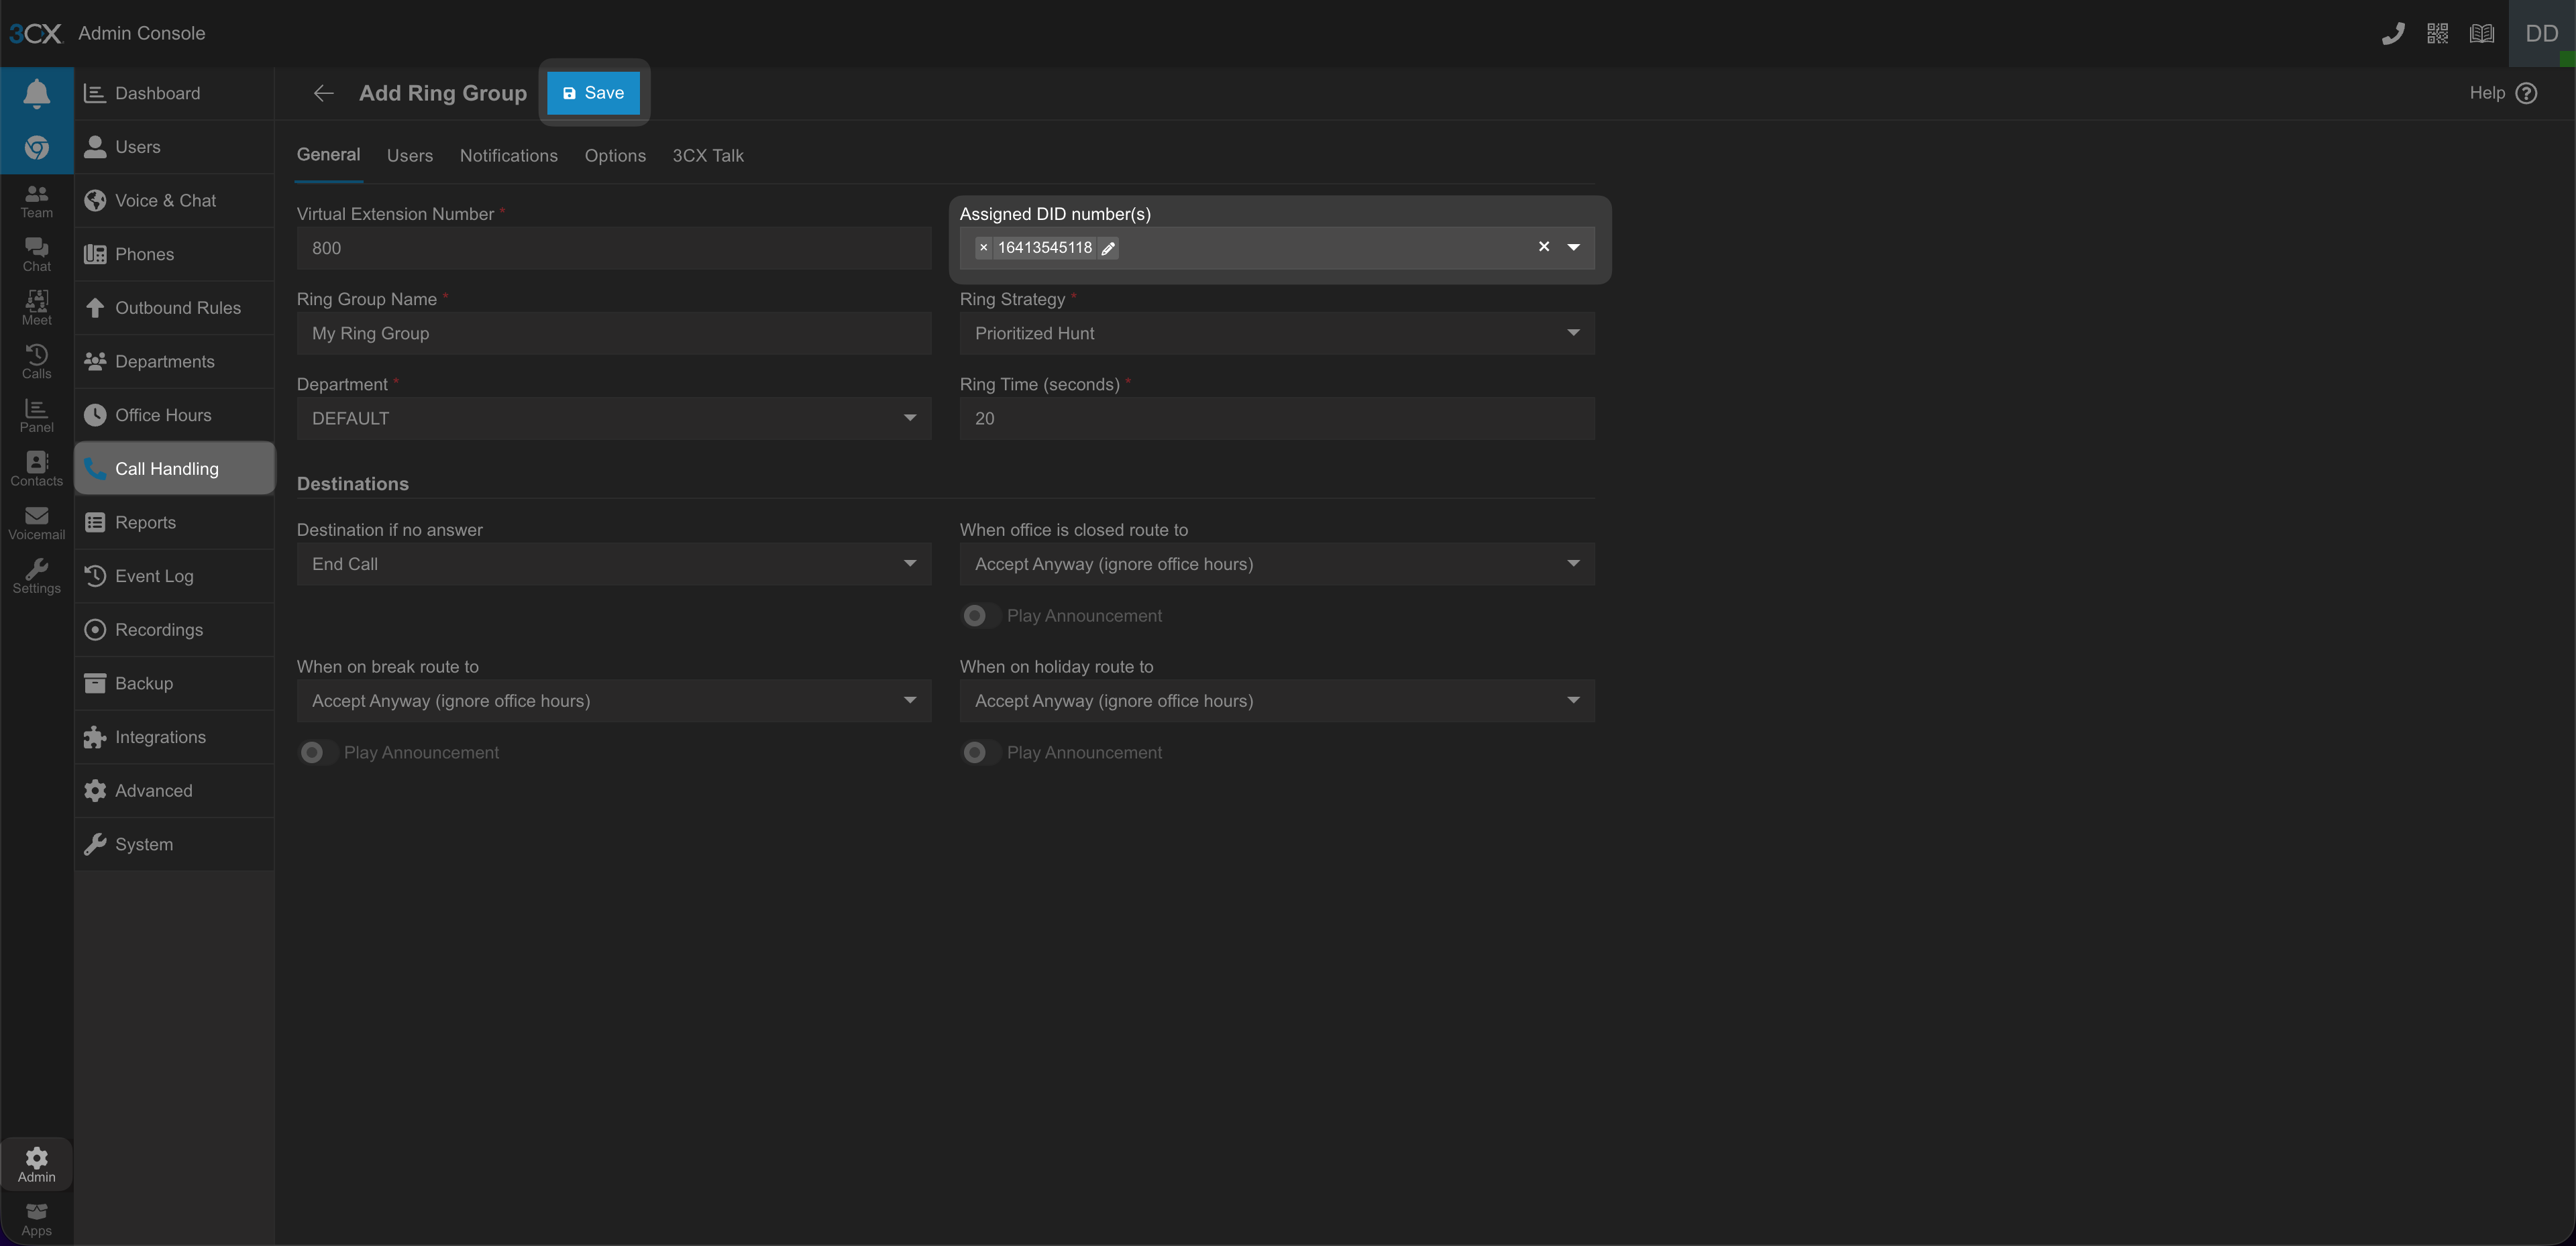
Fig. 21. Assigning a DID number in 3CX Call Handling#
Step 2: Configure the DIDWW Outbound SIP Trunk#
This trunk is used when 3CX places outbound calls to external phone numbers through DIDWW termination routes.
Add the Outbound Trunk in 3CX#
In the 3CX Management Console, go to Admin > Voice & Chat.
Click Add Trunk.
Select any country and Generic SIP Trunk (IP Based) in the provider field.

Fig. 22. Add a new outbound SIP trunk in 3CX#
Configure Trunk Settings#
Enter a Name for the trunk (for example,
DIDWW Outbound Trunk).Ensure that Create an outbound rule for this SIP Trunk is selected.
Enter your DID number in the Main Trunk Number field in E.164 format without the plus sign (e.g.,
18489005419).Enter your DIDWW Outbound Trunk Credentials in the Authentication ID (SIP User ID) and Authentication password fields.
Select Type of authentication as
Outbound - outbound only.In the Registrar/Server field, enter the DIDWW outbound SIP server (for example,
out.didww.com) or any other DIDWW outbound signaling domain. In the Port field, enter5060.
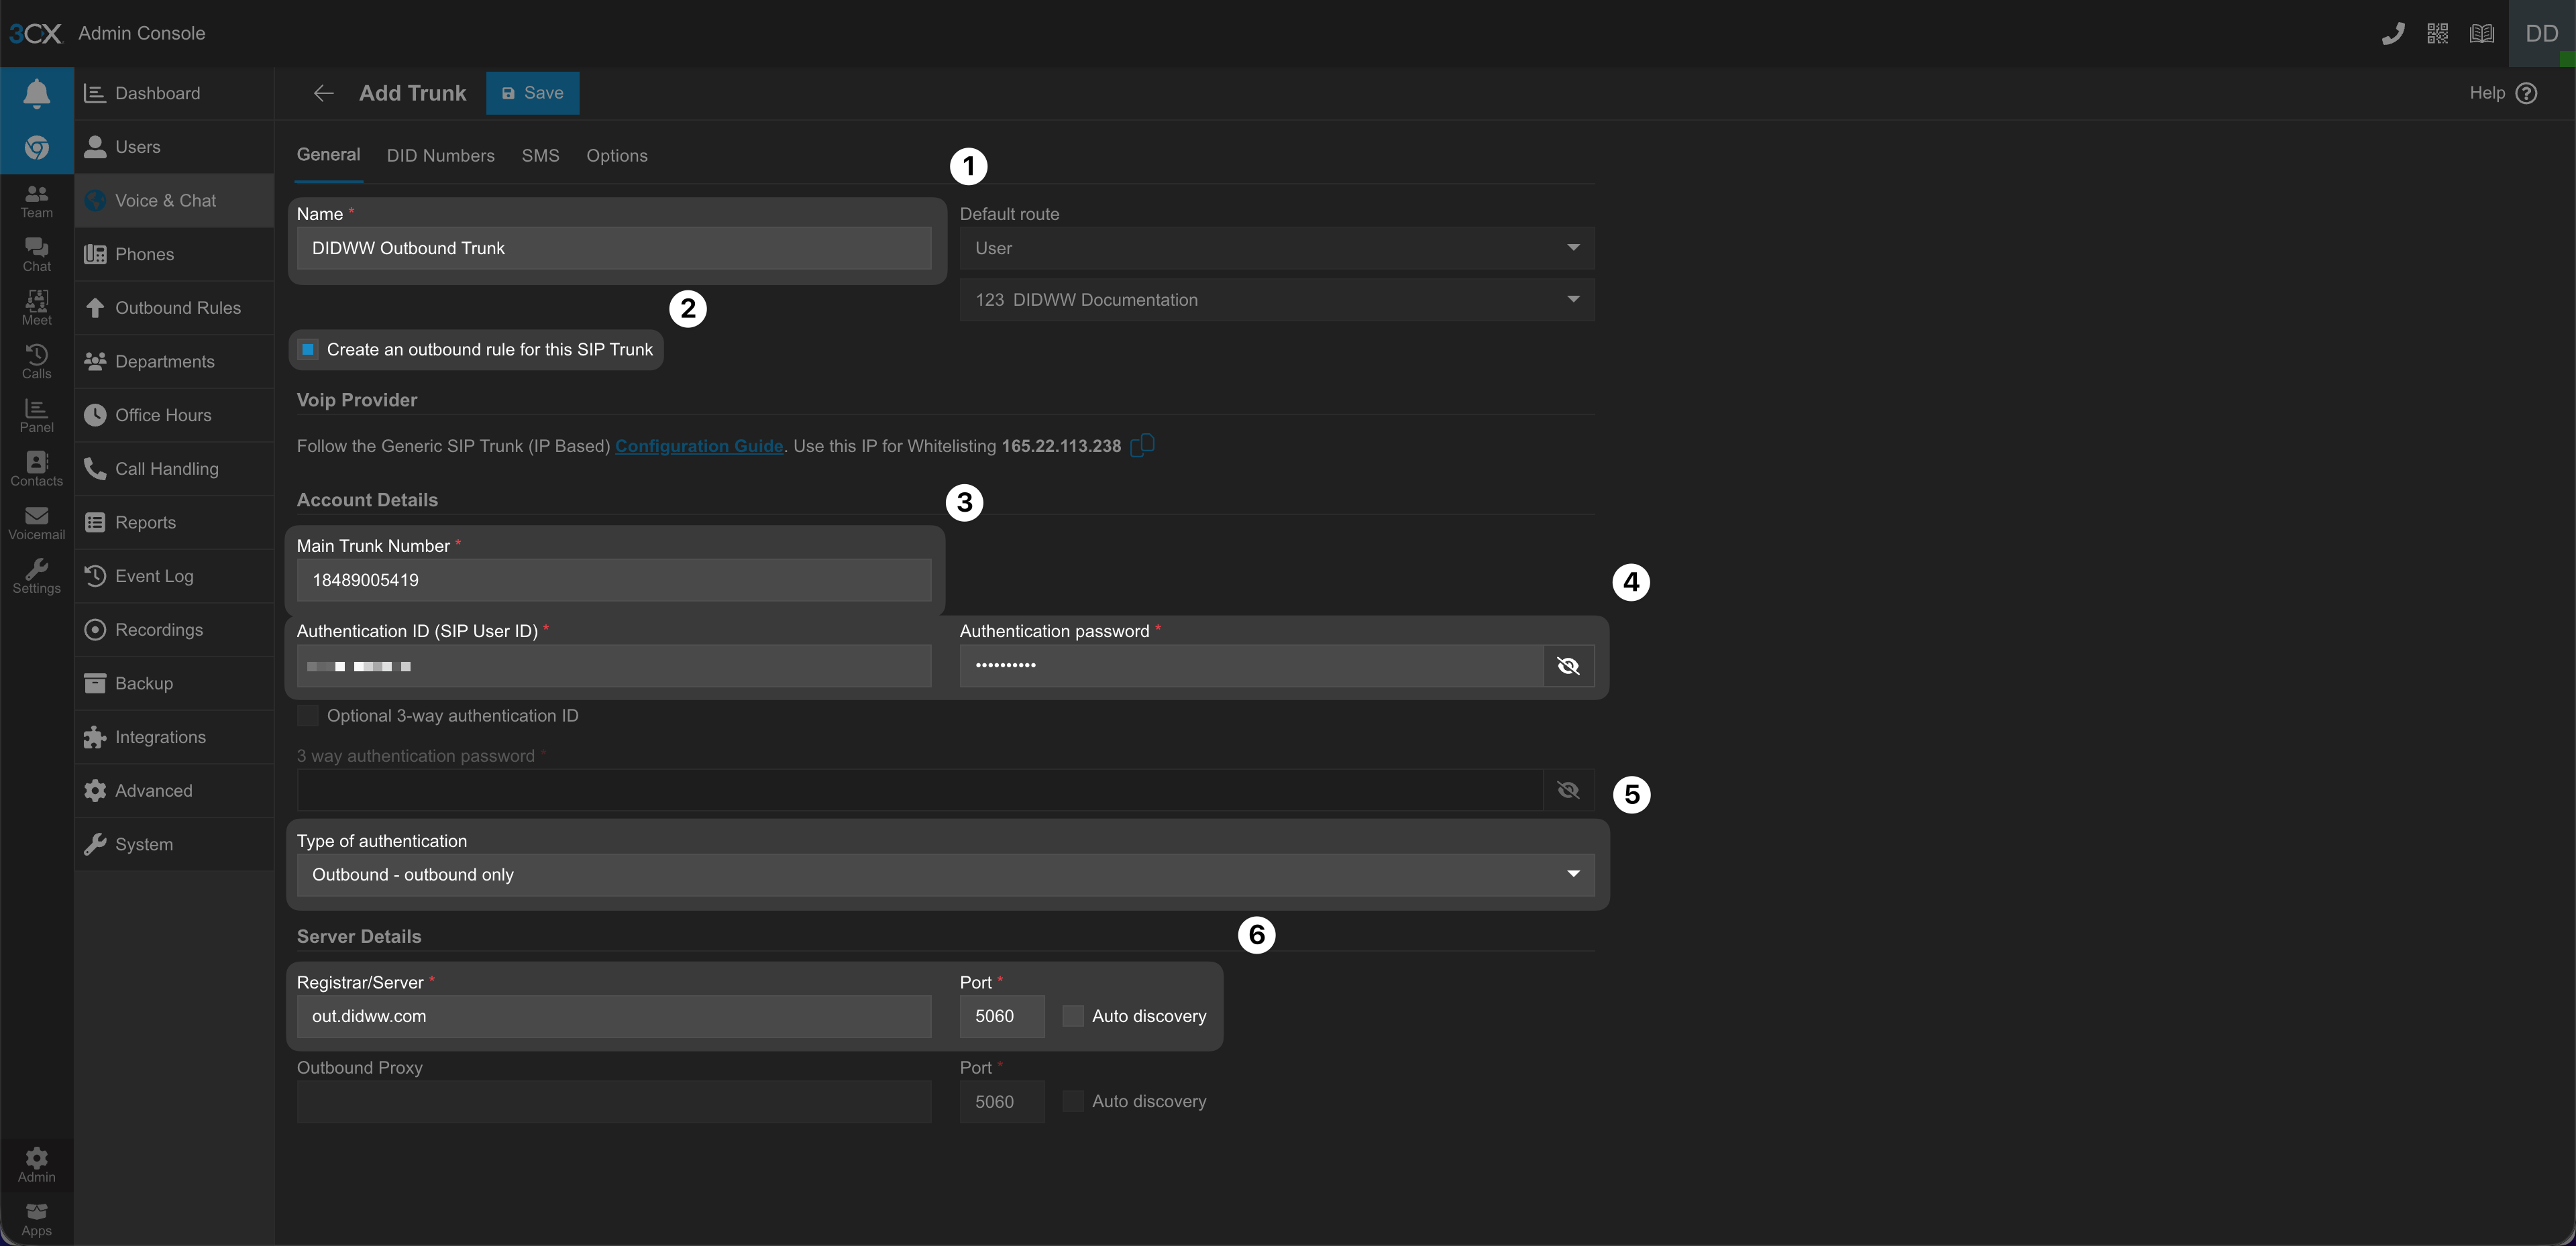
Fig. 23. Trunk settings for the DIDWW Outbound SIP Trunk#
Configure Additional DID Numbers (Optional)#
If you have multiple DID numbers, configure them on the trunk:
Open the DID numbers tab for the newly created trunk.
Add your DID number or numbers in E.164 format without the plus sign (e.g.,
16413545118).
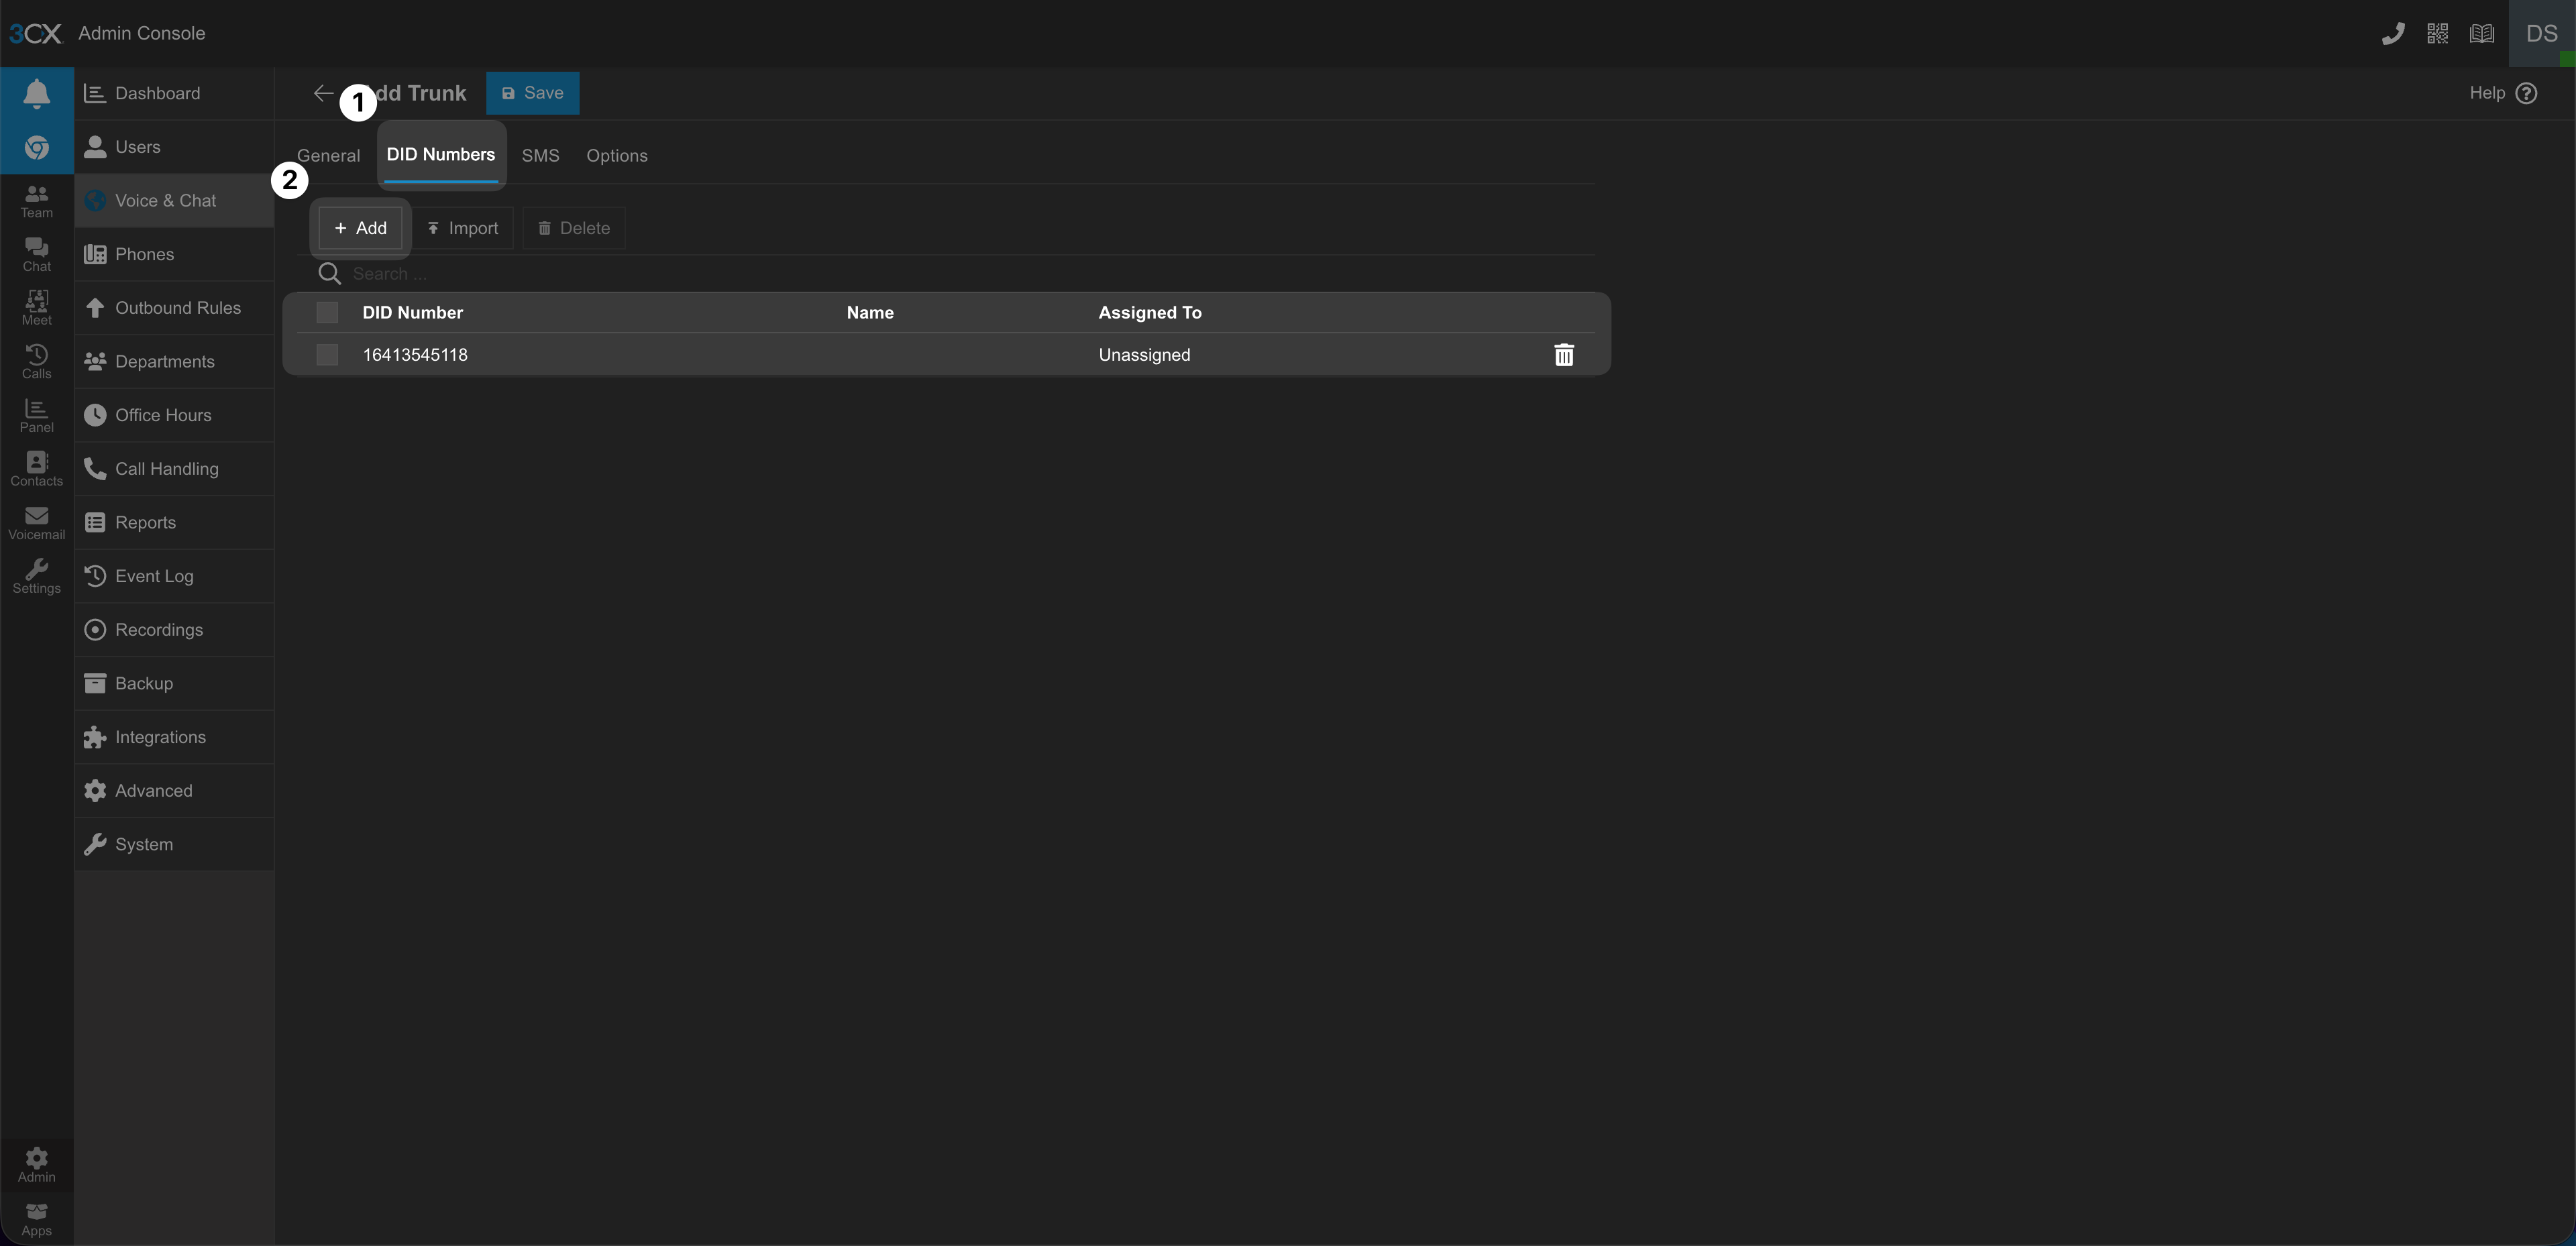
Fig. 24. Adding DID numbers to the DIDWW Outbound SIP Trunk#
Save the Outbound Trunk#
Click Save to create the trunk.
Because Create an outbound rule for this SIP Trunk was selected during trunk configuration, 3CX opens the outbound rule configuration screen automatically.
Note
After the trunk is created, confirm that the DID numbers are listed correctly. 3CX may display an Untested provider warning. This warning indicates that the trunk uses a generic or custom provider profile and can be safely ignored.
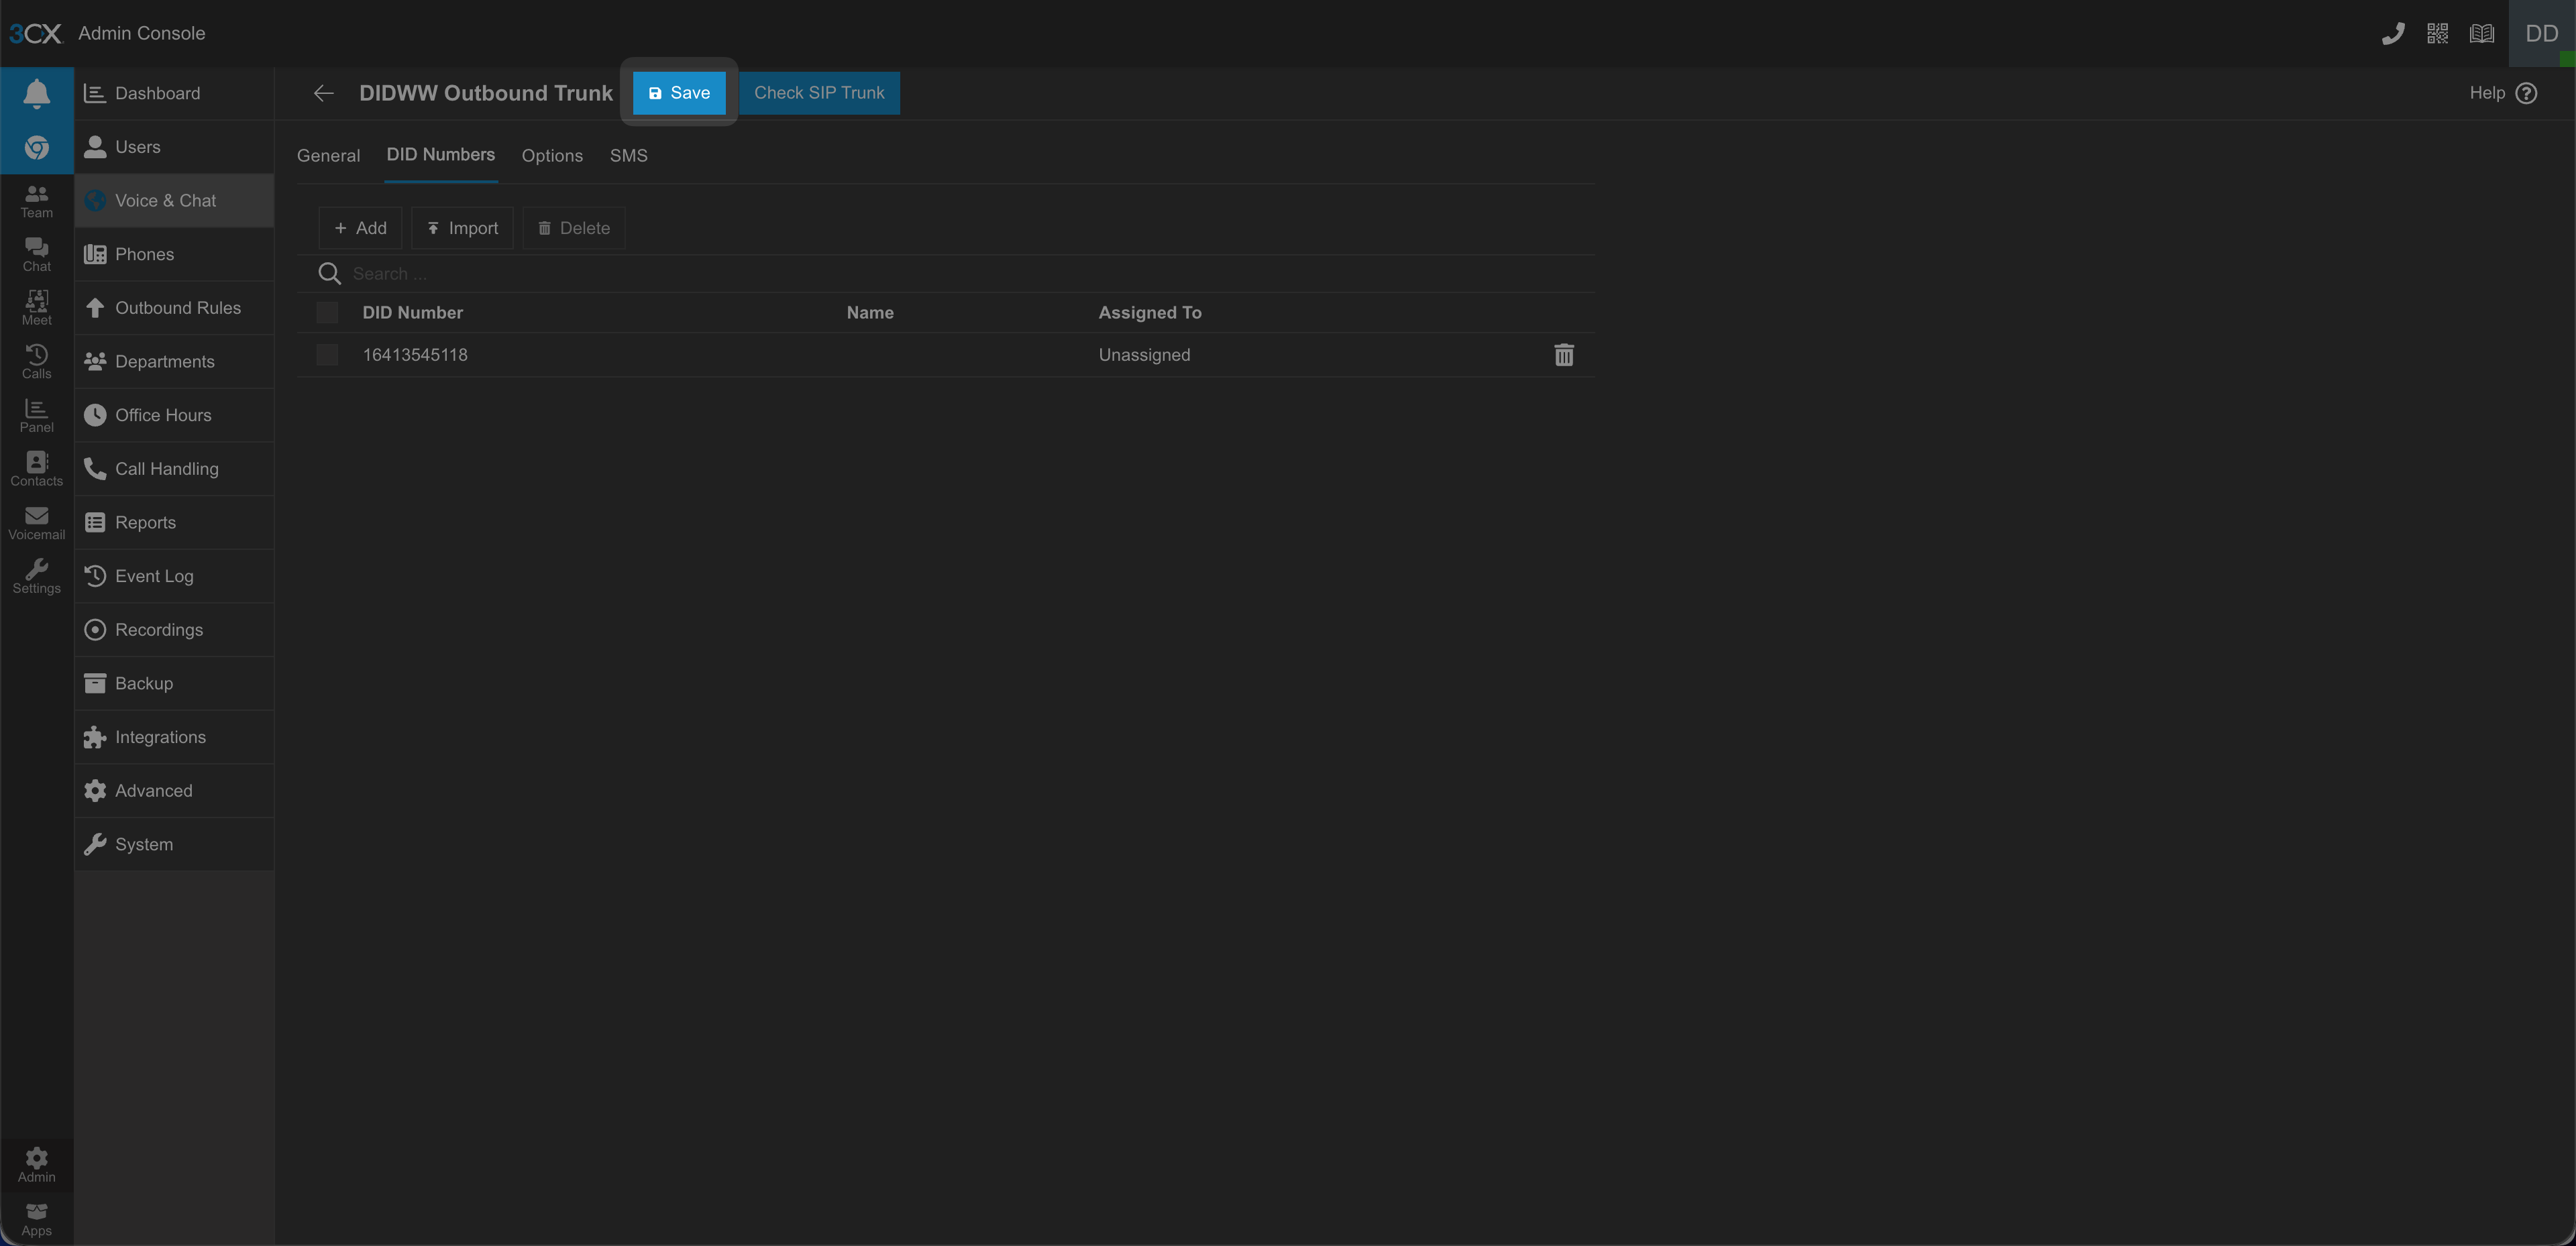
Fig. 25. DIDWW Outbound SIP Trunk successfully configured on 3CX#
Configure Outbound Routing#
In Rule Name, enter a name for the rule (for example,
Outbound rule for DIDWW Outbound Trunk).In Calls from Departments, select at least one department that should be allowed to use this rule (for example,
DEFAULT).In Route 1, select the DIDWW Outbound Trunk.
Save the outbound rule.
Note
Leave the remaining fields empty unless you want to restrict outbound calls by prefix, extension, or number length.
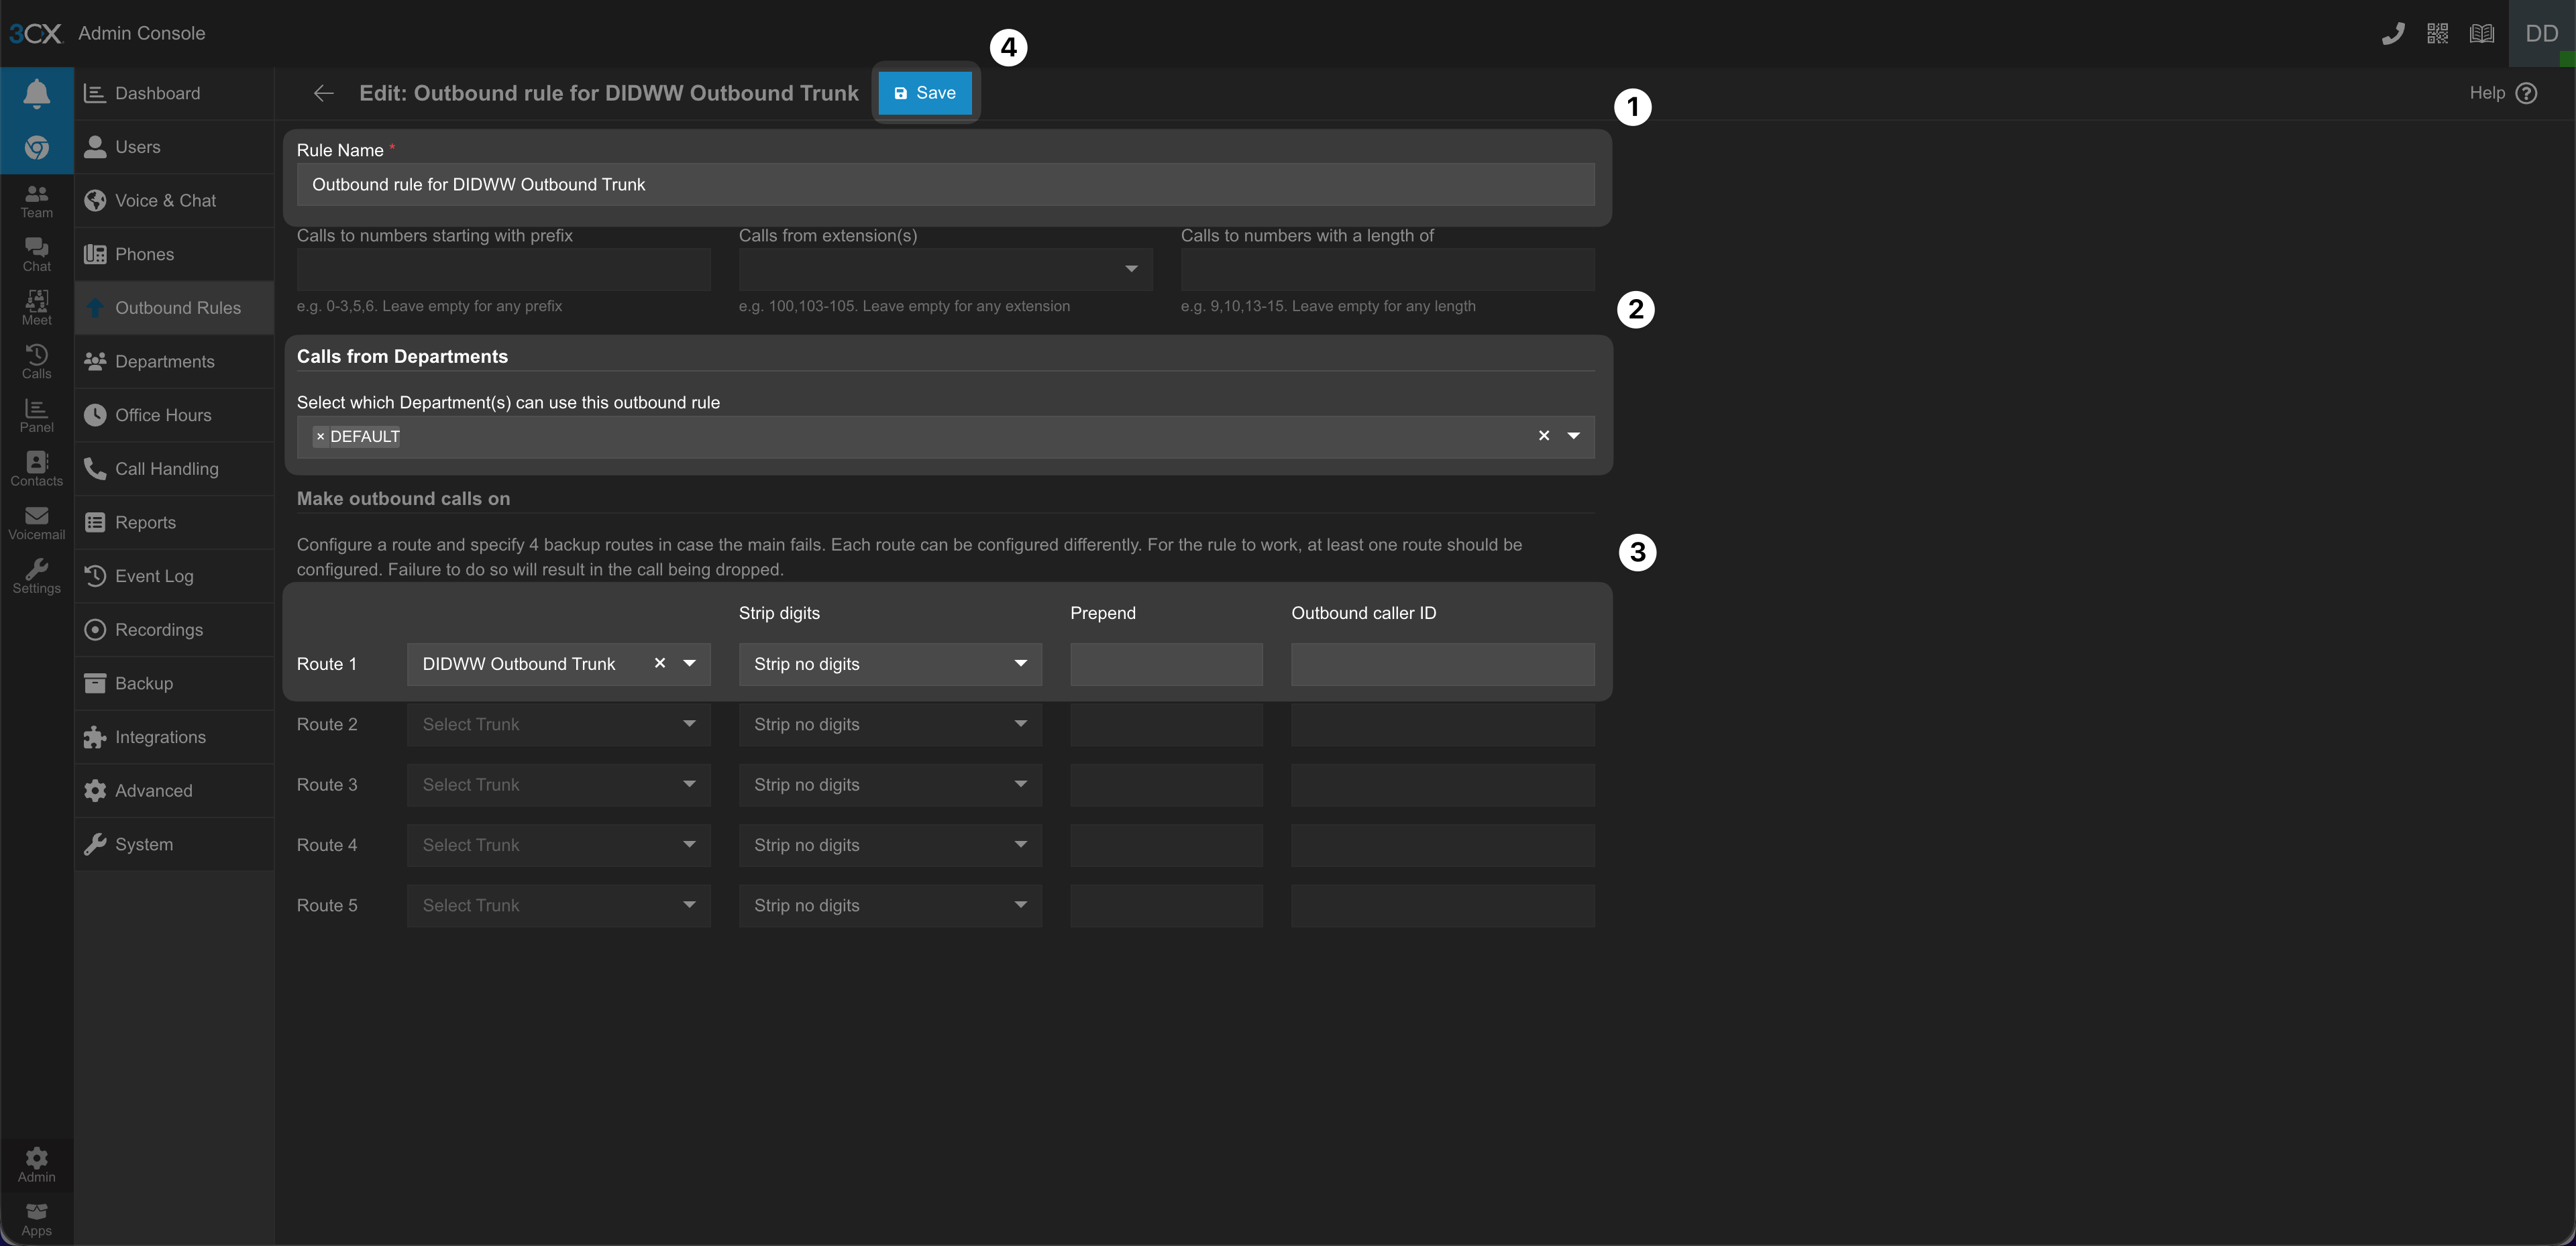
Fig. 26. Configuring outbound routing for DIDWW#
Configure Caller ID (Optional)#
By default, outbound calls use the caller ID defined by the trunk.
To control which DID number is presented for outbound calls, configure the caller ID on a per-user basis:
In the 3CX Management Console, go to Admin > Users.
Create a new user or edit an existing one.
In Assigned DID number(s), select the DID number.
In Outbound Caller ID, select the DID number that should be presented for outbound calls.
Click Save.
Note
The Outbound Caller ID field is available only when at least one DID number is assigned to the user.
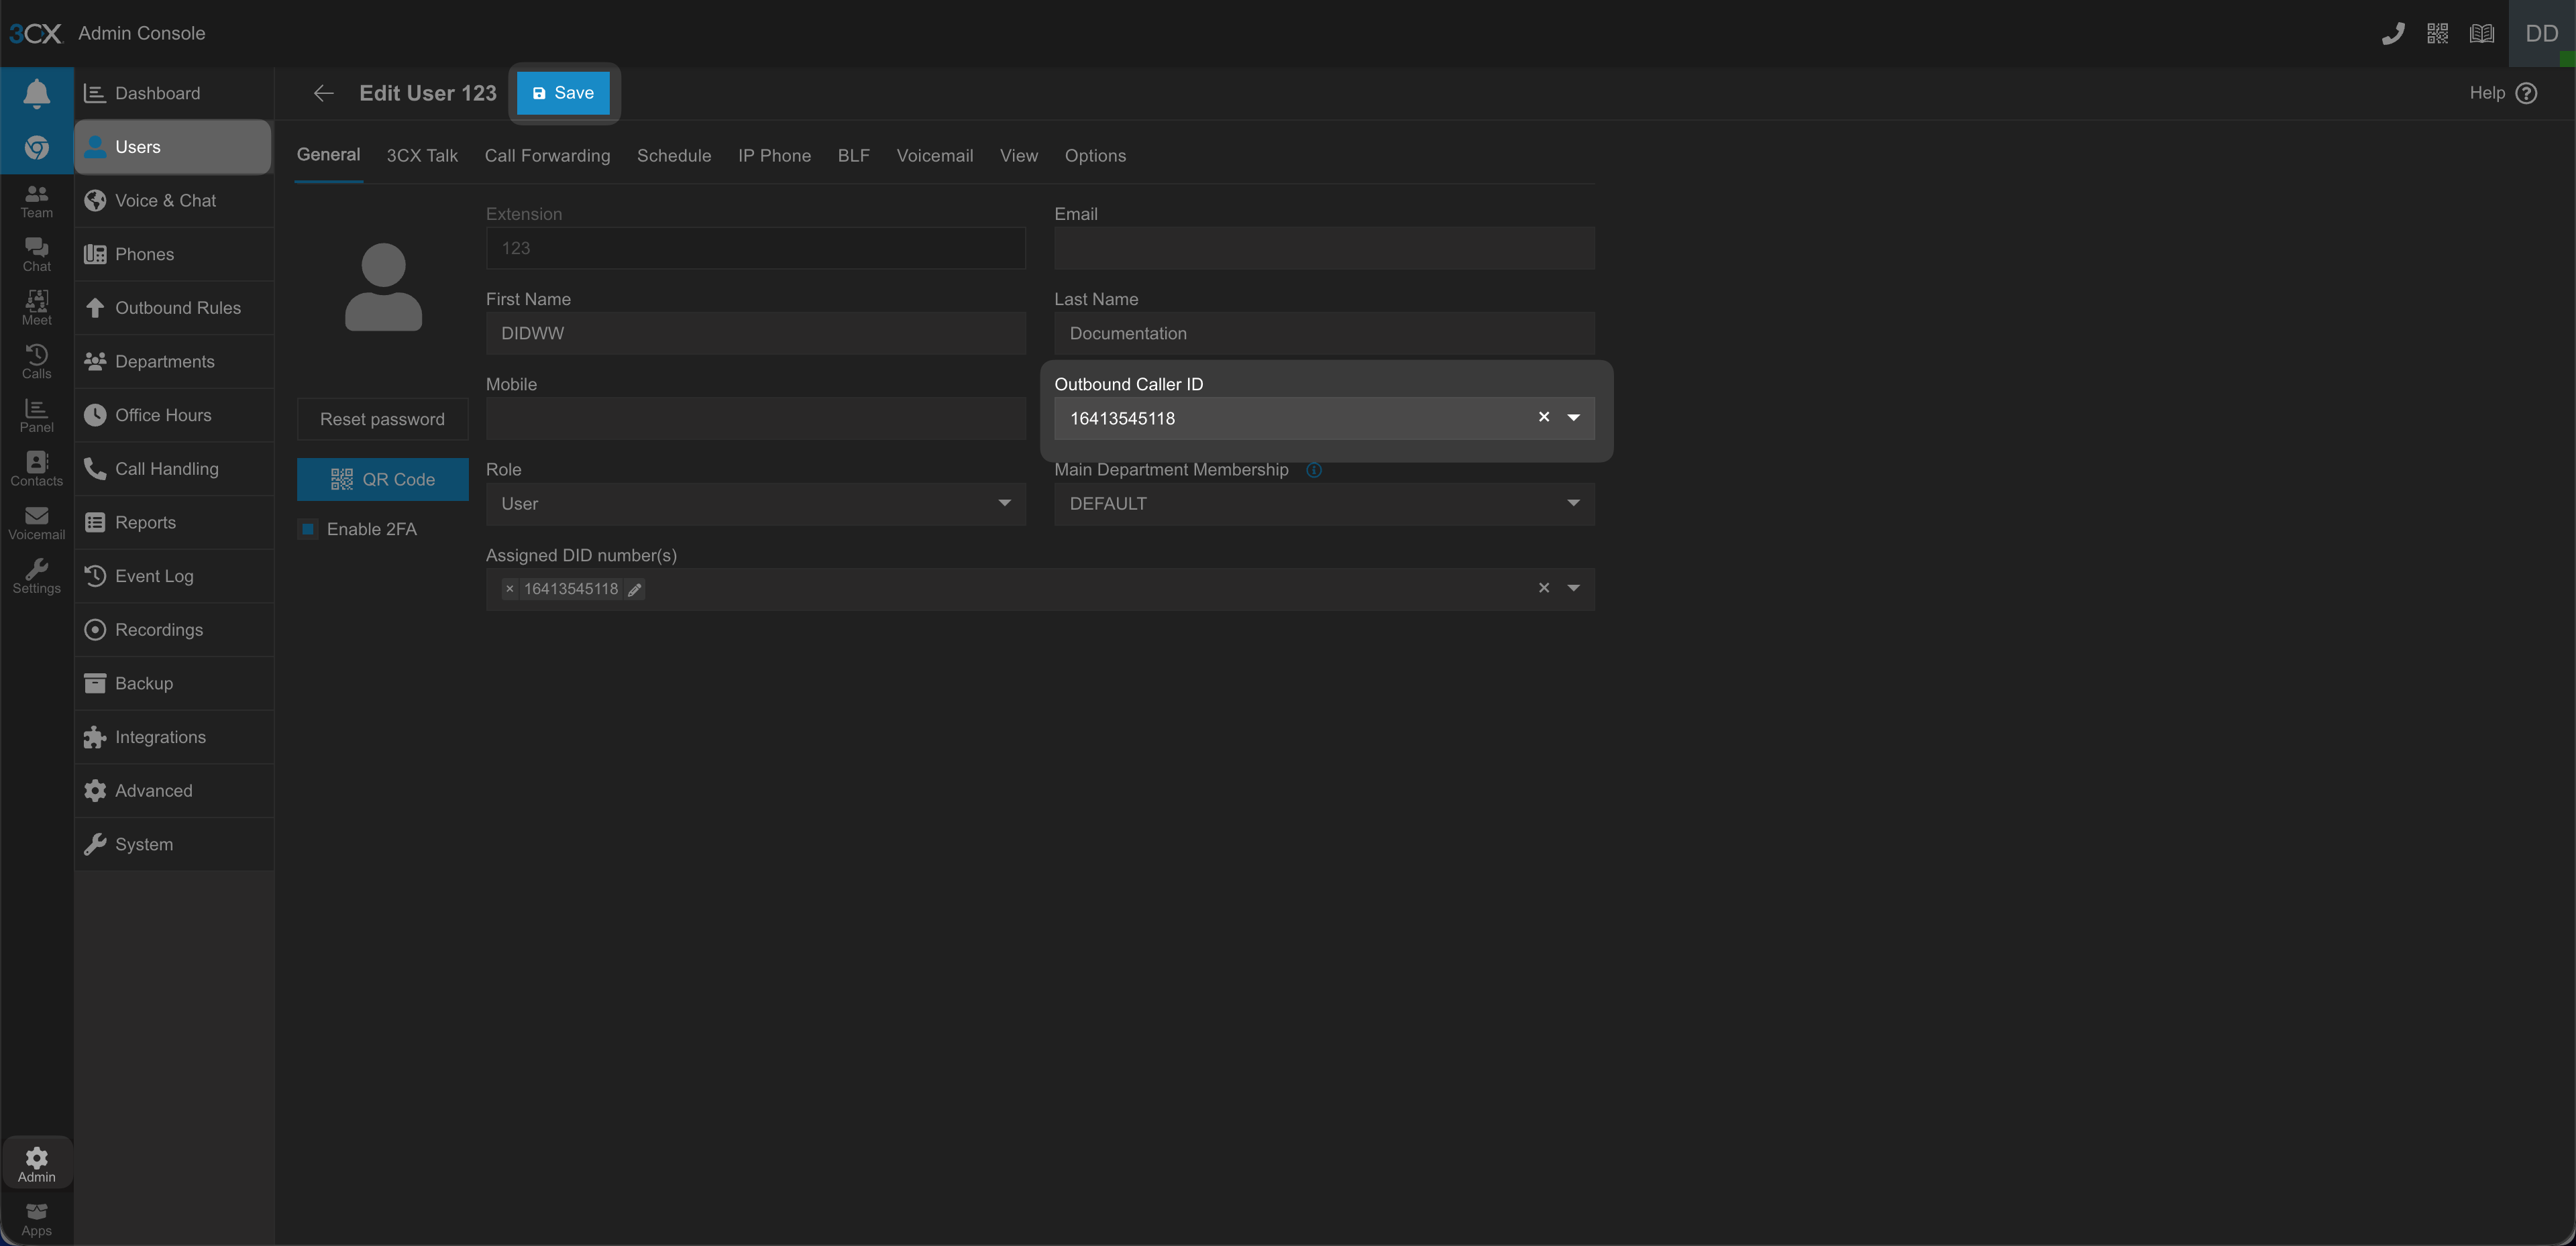
Fig. 27. Configuring additional outbound caller ID in 3CX#
Step 3: Test Inbound and Outbound Calls#
Before testing calls, ensure that at least one 3CX extension or client is registered.
Test Inbound Calls#
Verify that incoming calls from DIDWW numbers correctly reach your 3CX PBX.
From an external phone, call your DIDWW number.
Confirm that the call is delivered to 3CX and routed according to the configured inbound destination.
Answer the call and verify two-way audio.
If the call does not arrive, check the trunk settings, DID assignment, and firewall configuration.
Test Outbound Calls#
Verify that outbound calls from 3CX are sent through the DIDWW Outbound Trunk.
From a registered 3CX extension, dial an external number.
Confirm that the call is routed through your DIDWW Outbound Trunk.
Verify two-way audio.
If the call fails, review outbound trunk registration, outbound rules, and caller ID settings.
Note
To troubleshoot, check the DIDWW Inbound Call Logs and Outbound Call Logs for response codes or call errors.
Additional Information#
For more details on configuring and managing your 3CX system, refer to the official 3CX documentation:
Access the official 3CX documentation covering system configuration, SIP trunks, users, and call handling.
Review the latest 3CX updates, feature releases, and improvements.
Explore additional SIP trunk configuration examples and best practices.