

Ultravox#
Use Ultravox voice AI agents with DIDWW SIP Trunking to answer incoming calls, place outbound calls, and transfer callers to a live person.
Connect your DIDWW numbers to an Ultravox agent.
Route different DIDWW numbers to dedicated Ultravox agents.
Receive calls to your DIDWW numbers in Ultravox without importing the numbers.
Transfer incoming callers from your Ultravox agent to a live person.
Place outbound calls through DIDWW Outbound Trunks using the Ultravox API.
Show your DIDWW number as caller ID on outbound calls from Ultravox.
Note
Connect your DIDWW numbers to Ultravox without importing them or running a separate call-control server. Once your numbers are assigned to a DIDWW inbound trunk, calls reach your Ultravox SIP domain and are routed to the right agent using the number patterns configured in Ultravox.
1. Route Incoming Calls to Ultravox#
Configure an Inbound SIP Trunk in the DIDWW User Panel to send incoming calls from your DIDWW numbers to your Ultravox account’s SIP domain. Ultravox matches each call to an agent by its called number, as configured in 3. Connect DIDWW in Ultravox.
Before You Begin#
An active DIDWW account is required. Sign in to DIDWW or Create DIDWW account.
At least one active DID number with capacity to receive incoming calls is required. Buy Numbers.
An Ultravox account is required. If you do not have an agent yet, create one in Step 1 of section 3.
Your Ultravox SIP domain is required. In Ultravox, go to Settings > Telephony. Under SIP, the IP allowlisting item shows the Domain (e.g.,
ultravox.uvx-abcd1234.voximplant.com). This domain is unique to your account. See the Ultravox SIP guide for manual SIP configuration.
Note
ultravox.uvx-abcd1234.voximplant.com is a fictional SIP domain used only as an example. Replace it with the domain shown in your Ultravox account.
Step 1: Create New SIP Trunk#
In the DIDWW User Panel, go to Voice > Inbound Trunks.
Click Create New > SIP Trunk.
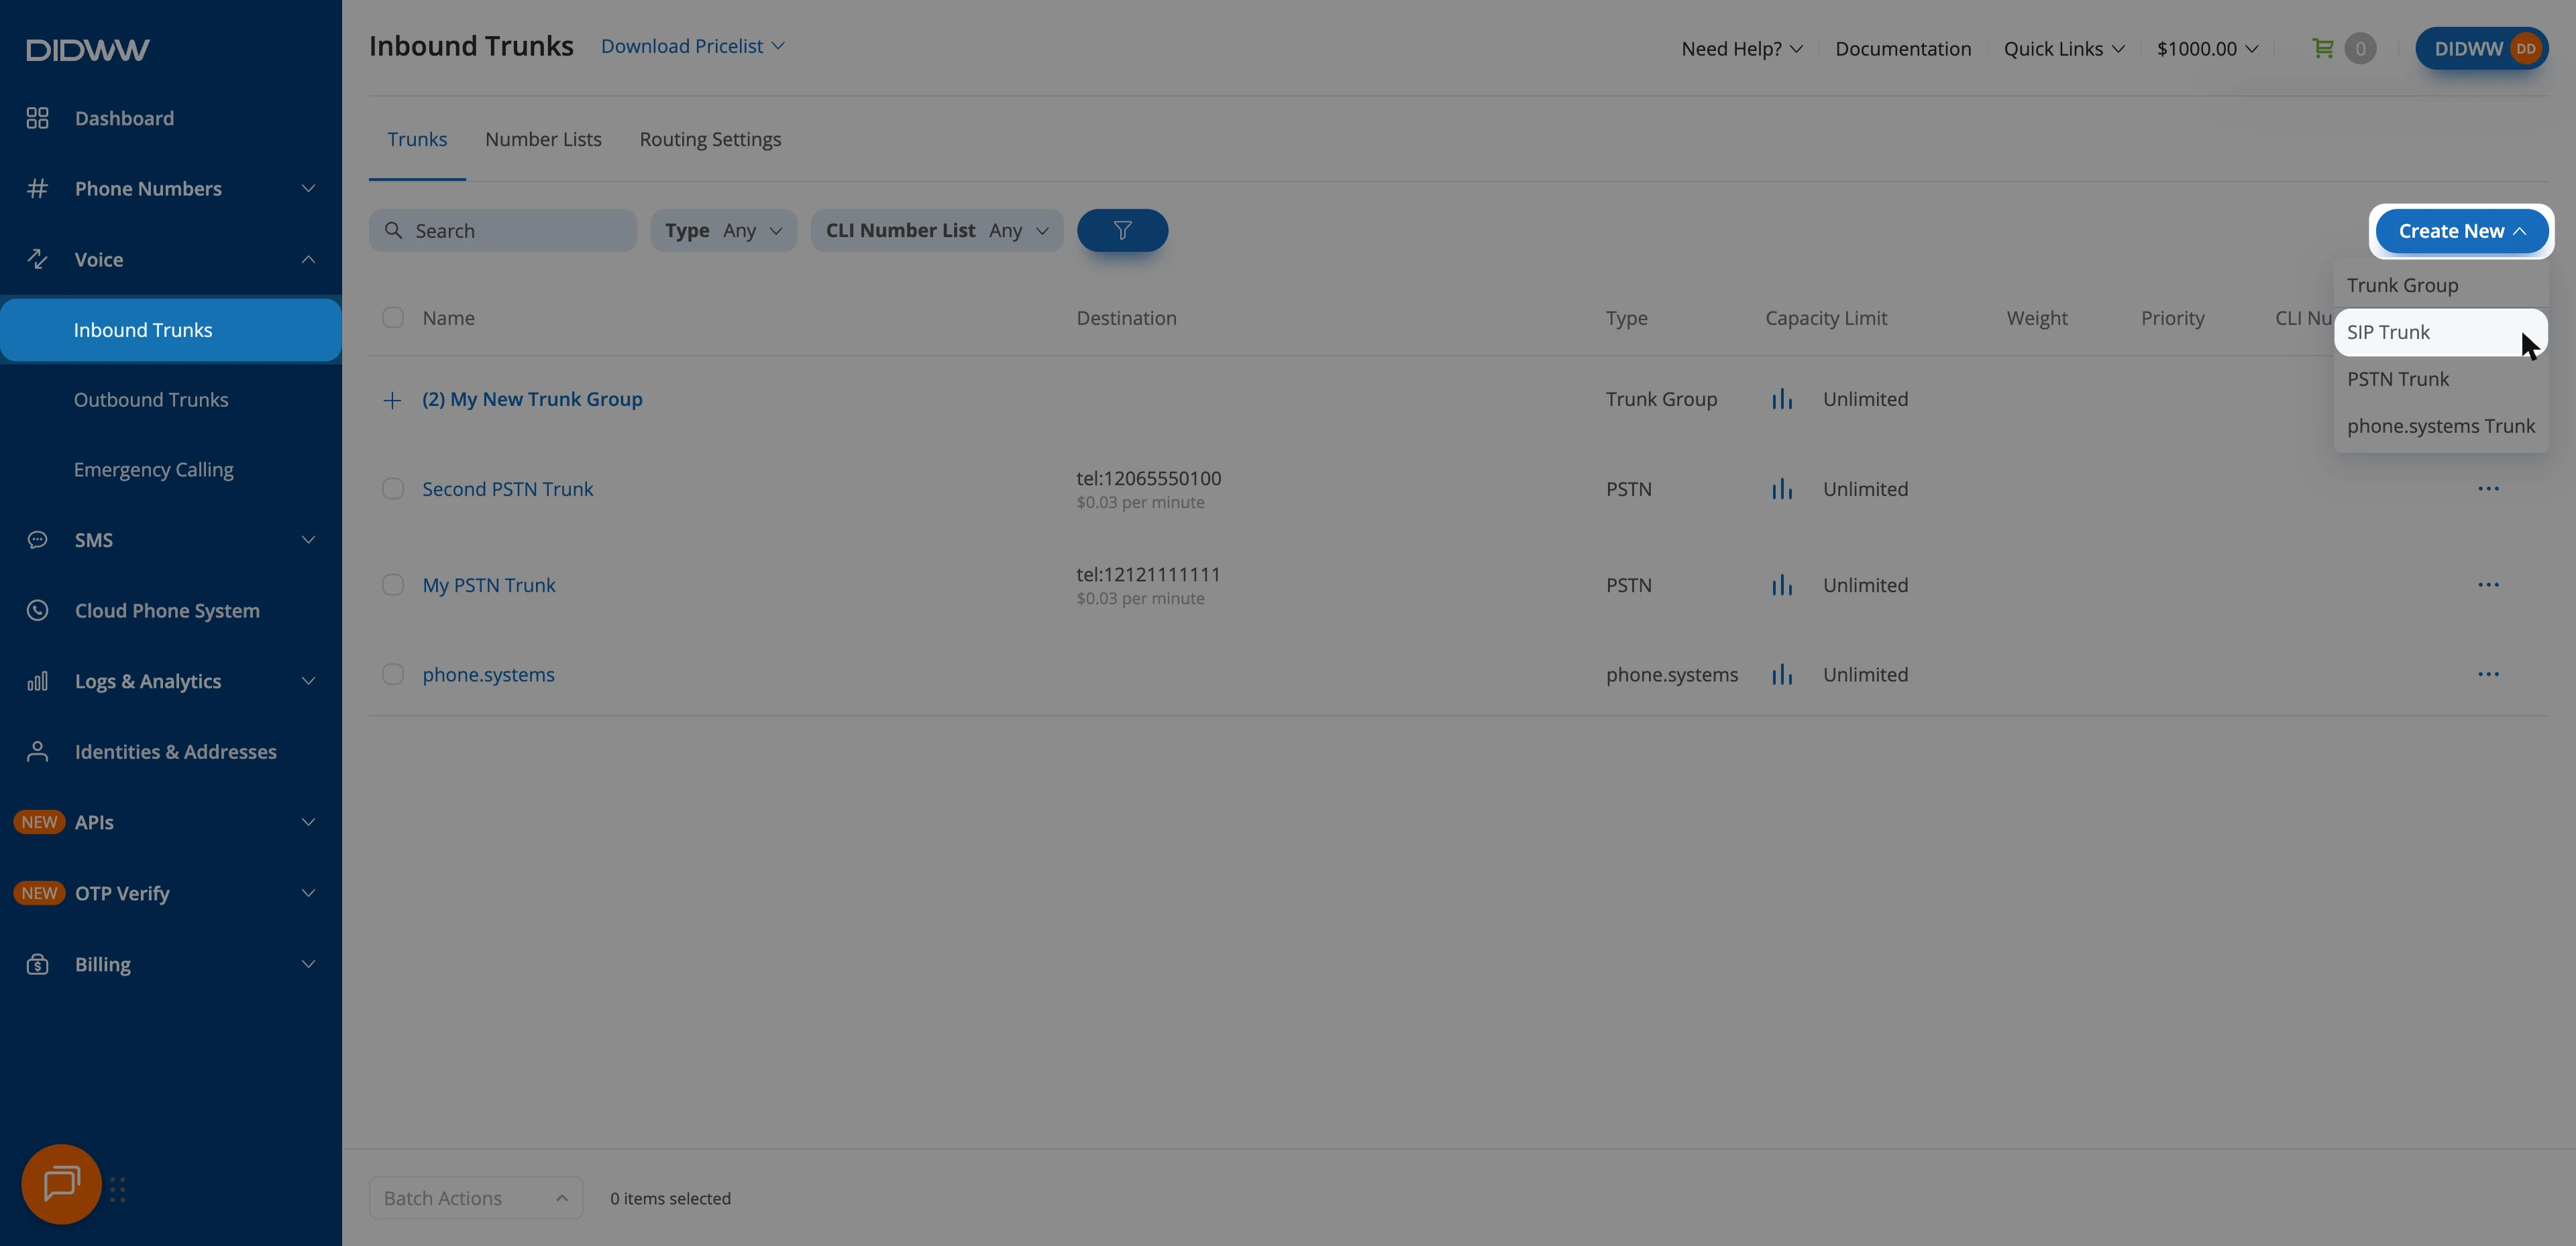
Fig. 1. Inbound Trunks: Create New > SIP Trunk#
Step 2: Configure General SIP Trunk Settings#
In the General tab, configure your Ultravox SIP domain and keep the default settings where indicated.
Enter a descriptive Name for the trunk (e.g.,
Ultravox).Keep Static Endpoint selected.
In User Part of R-URI, keep the default
{DID}. Ultravox matches the called number with the pattern you set in Step 2 of section 3.In Host, enter the Domain shown in Ultravox under Settings > Telephony > SIP > IP allowlisting (e.g.,
ultravox.uvx-abcd1234.voximplant.com). This domain is unique to your account. See the Ultravox SIP guide for manual SIP configuration.In Port, enter
5060.In Transport, keep UDP selected.
In Network Protocol, select IPv4 only to match the IPv4 allowlist configured in Ultravox.
Keep the remaining General settings at their defaults.
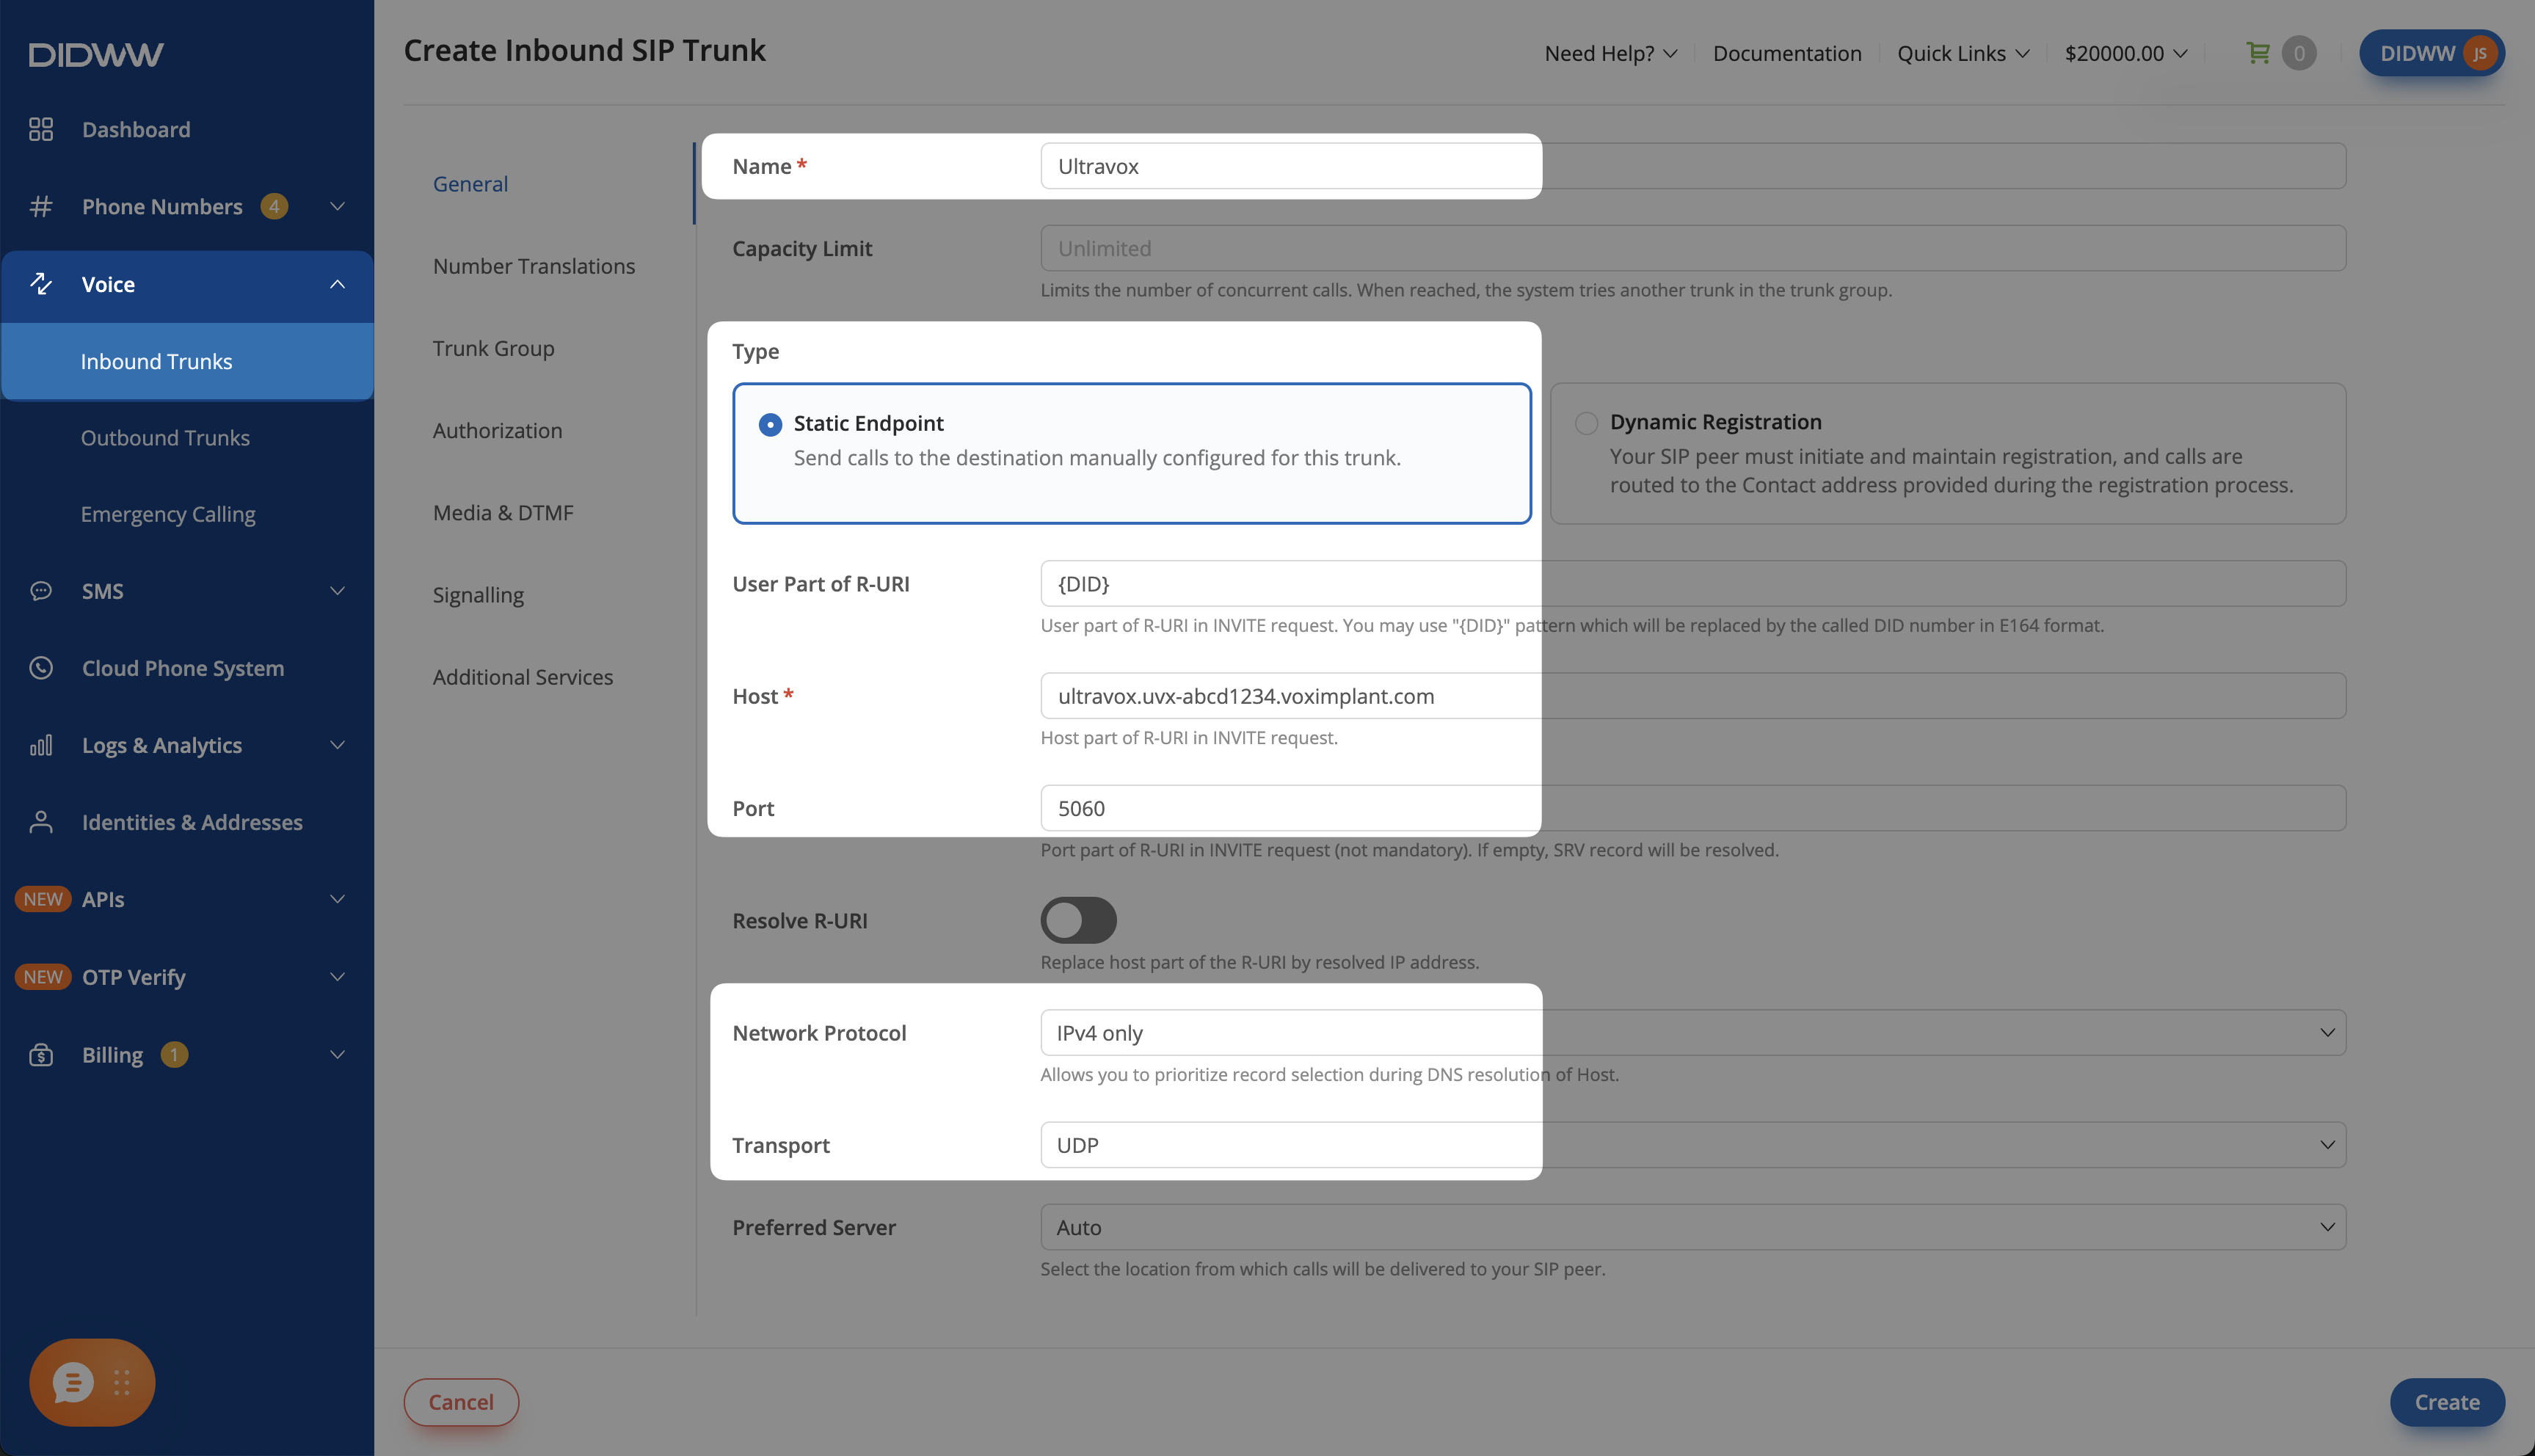
Fig. 2. Inbound SIP trunk General tab configured for Ultravox#
Step 3: Configure Media & DTMF#
Use PCMU and PCMA for call audio and telephone-event for DTMF in this setup. See Ultravox supported codecs for other supported audio codecs.
Open the Media & DTMF tab.
In Codecs, keep only PCMU, PCMA, and telephone-event, and remove the other codecs.
Keep SRTP Mode at its default, Disabled. This guide uses unencrypted media.
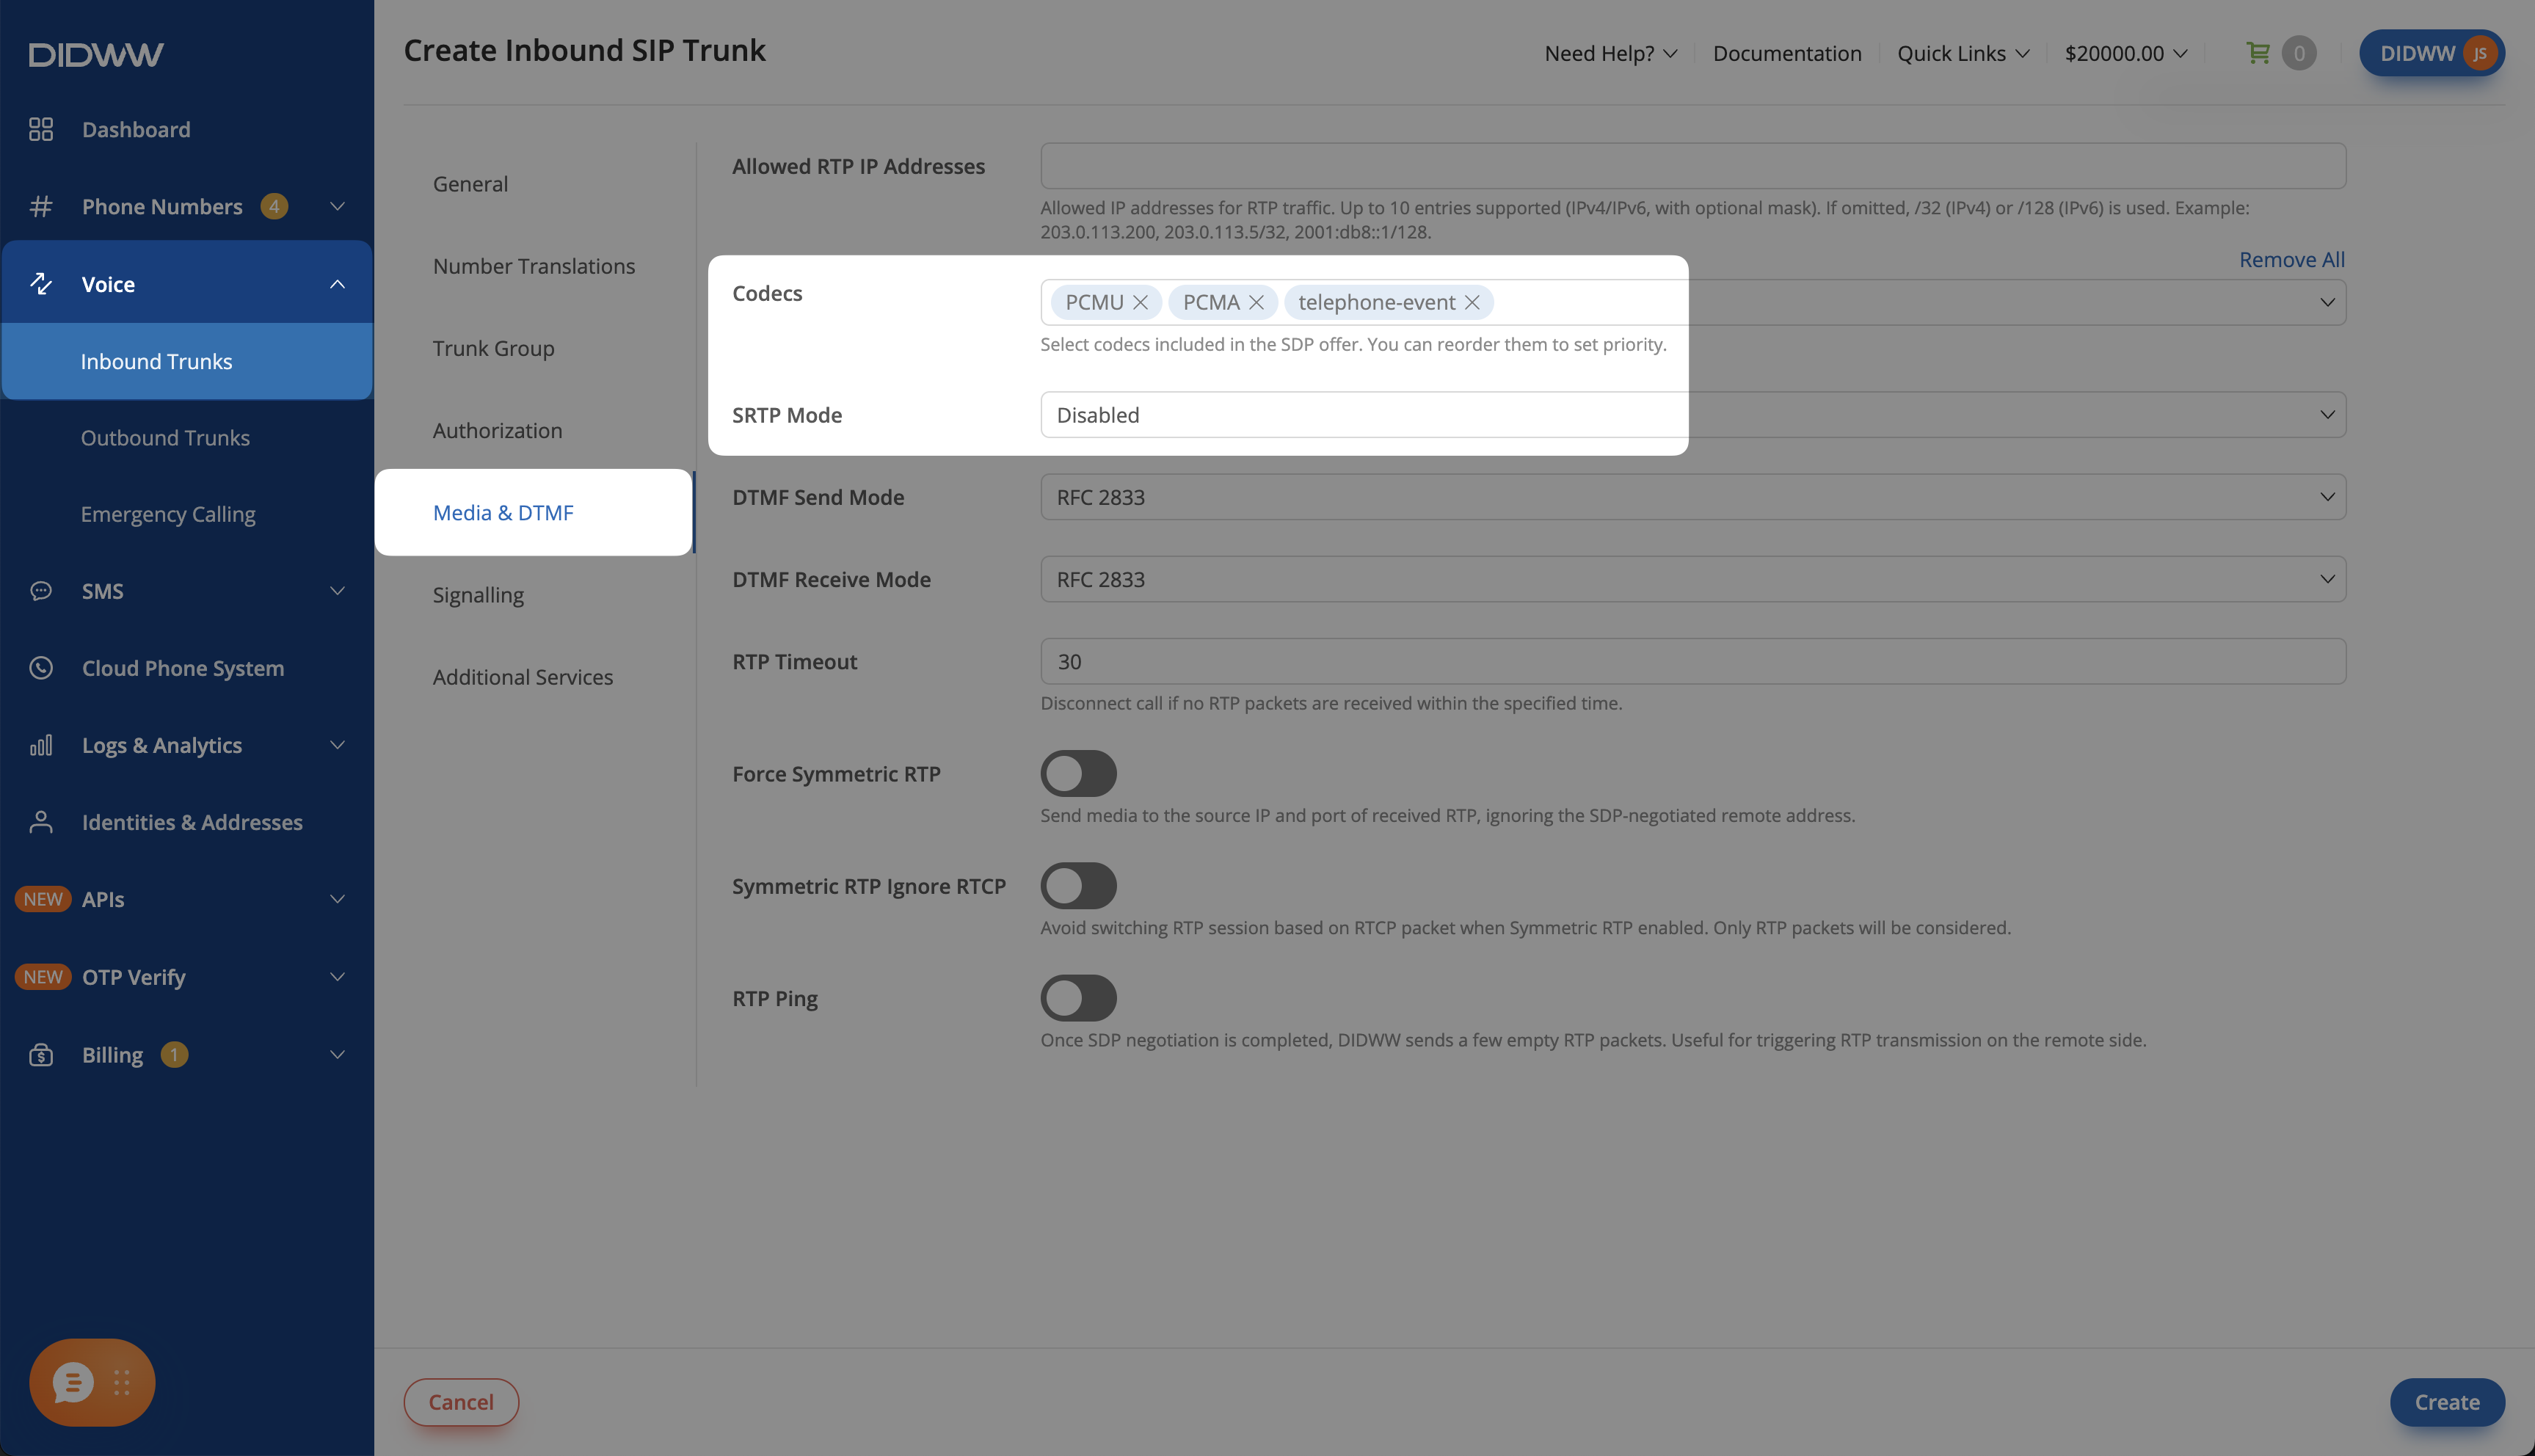
Fig. 3. Codecs on the Media & DTMF tab#
Step 4: Enable Call Transfer Signaling#
Note
Skip this step if your agent will not transfer incoming calls.
To support call transfers to a live person, configure the inbound trunk to allow in-dialog SIP REFER requests.
Open the Signalling tab.
Set Max Transfers to
1or higher.
Note
Max Transfers is 0 by default. DIDWW rejects SIP REFER transfers until you increase it.
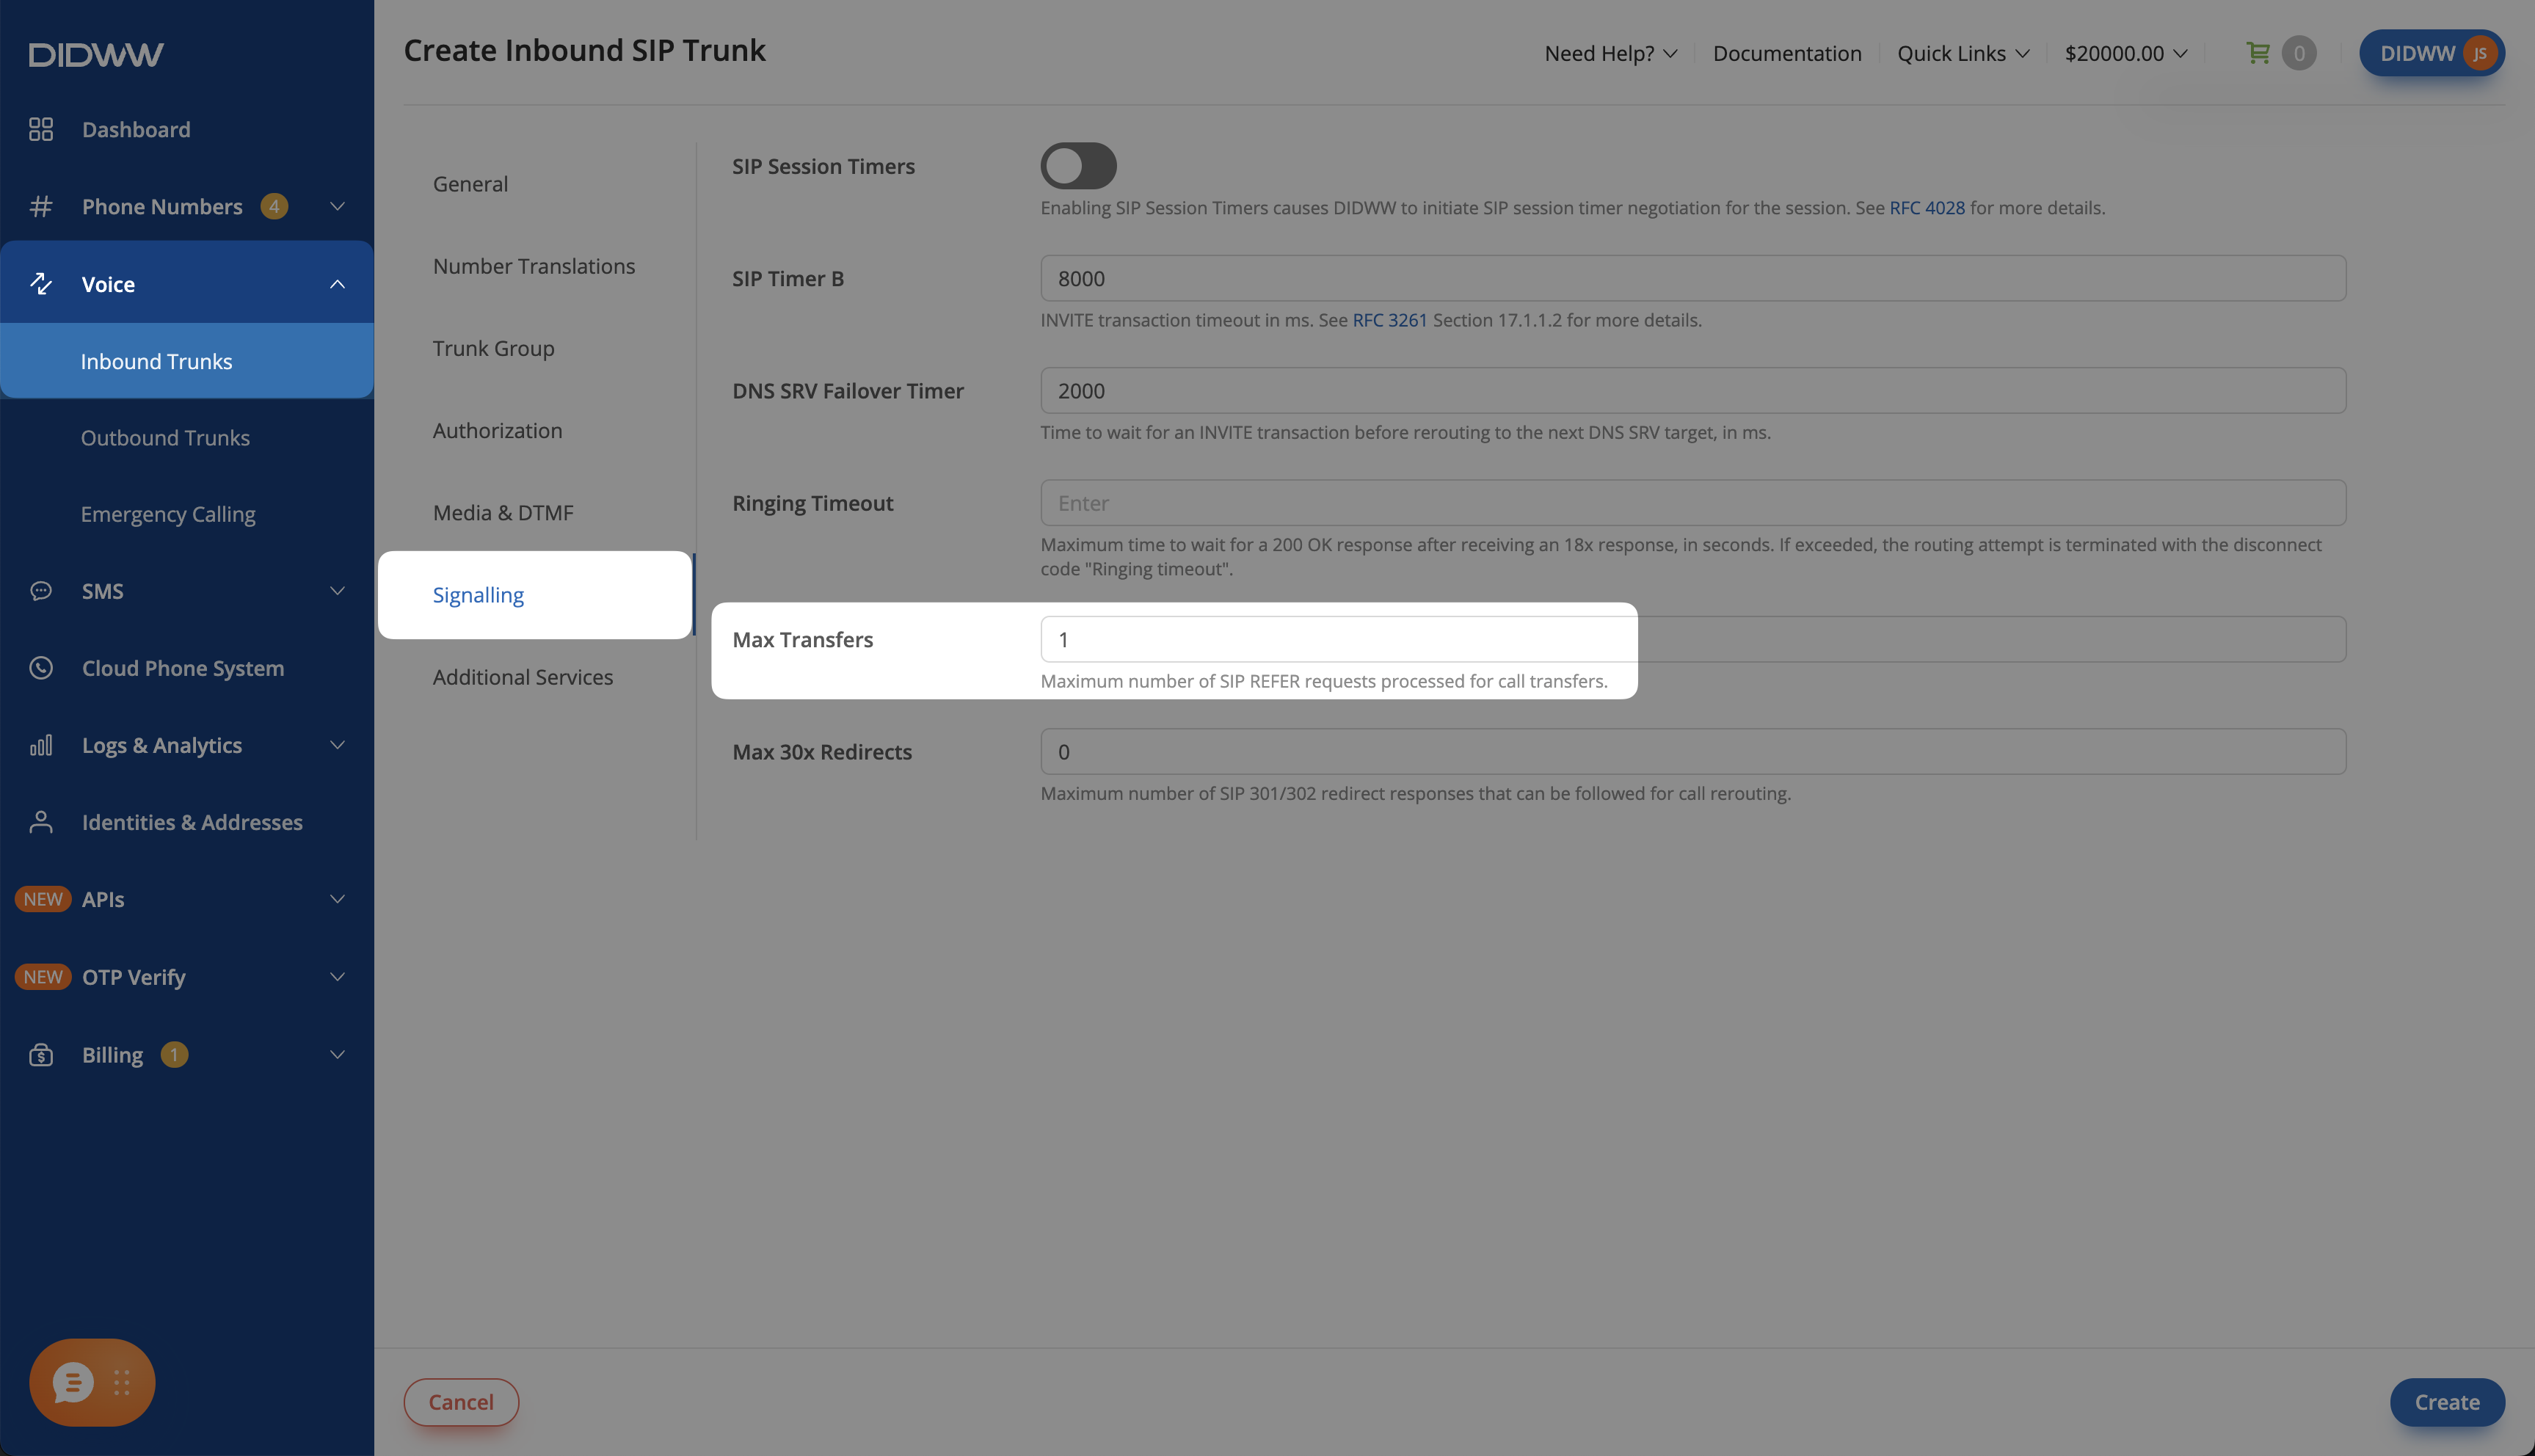
Fig. 4. Enabling call transfer signaling#
Step 5: Save the Inbound SIP Trunk#
Click Create to save the inbound SIP trunk.
Note
For advanced SIP trunk configuration, see Advanced Inbound SIP Trunk documentation.
Step 6: Assign Inbound SIP Trunk to Your DID Numbers#
After creating the Inbound SIP Trunk for Ultravox, assign it to the DID number(s) that will deliver incoming calls to your Ultravox agent.
In the DIDWW User Panel, go to Phone Numbers > My Numbers.
Select the DID number(s) you want to assign to the inbound SIP trunk.
At the bottom of the page, click Batch Actions > Update Trunks.
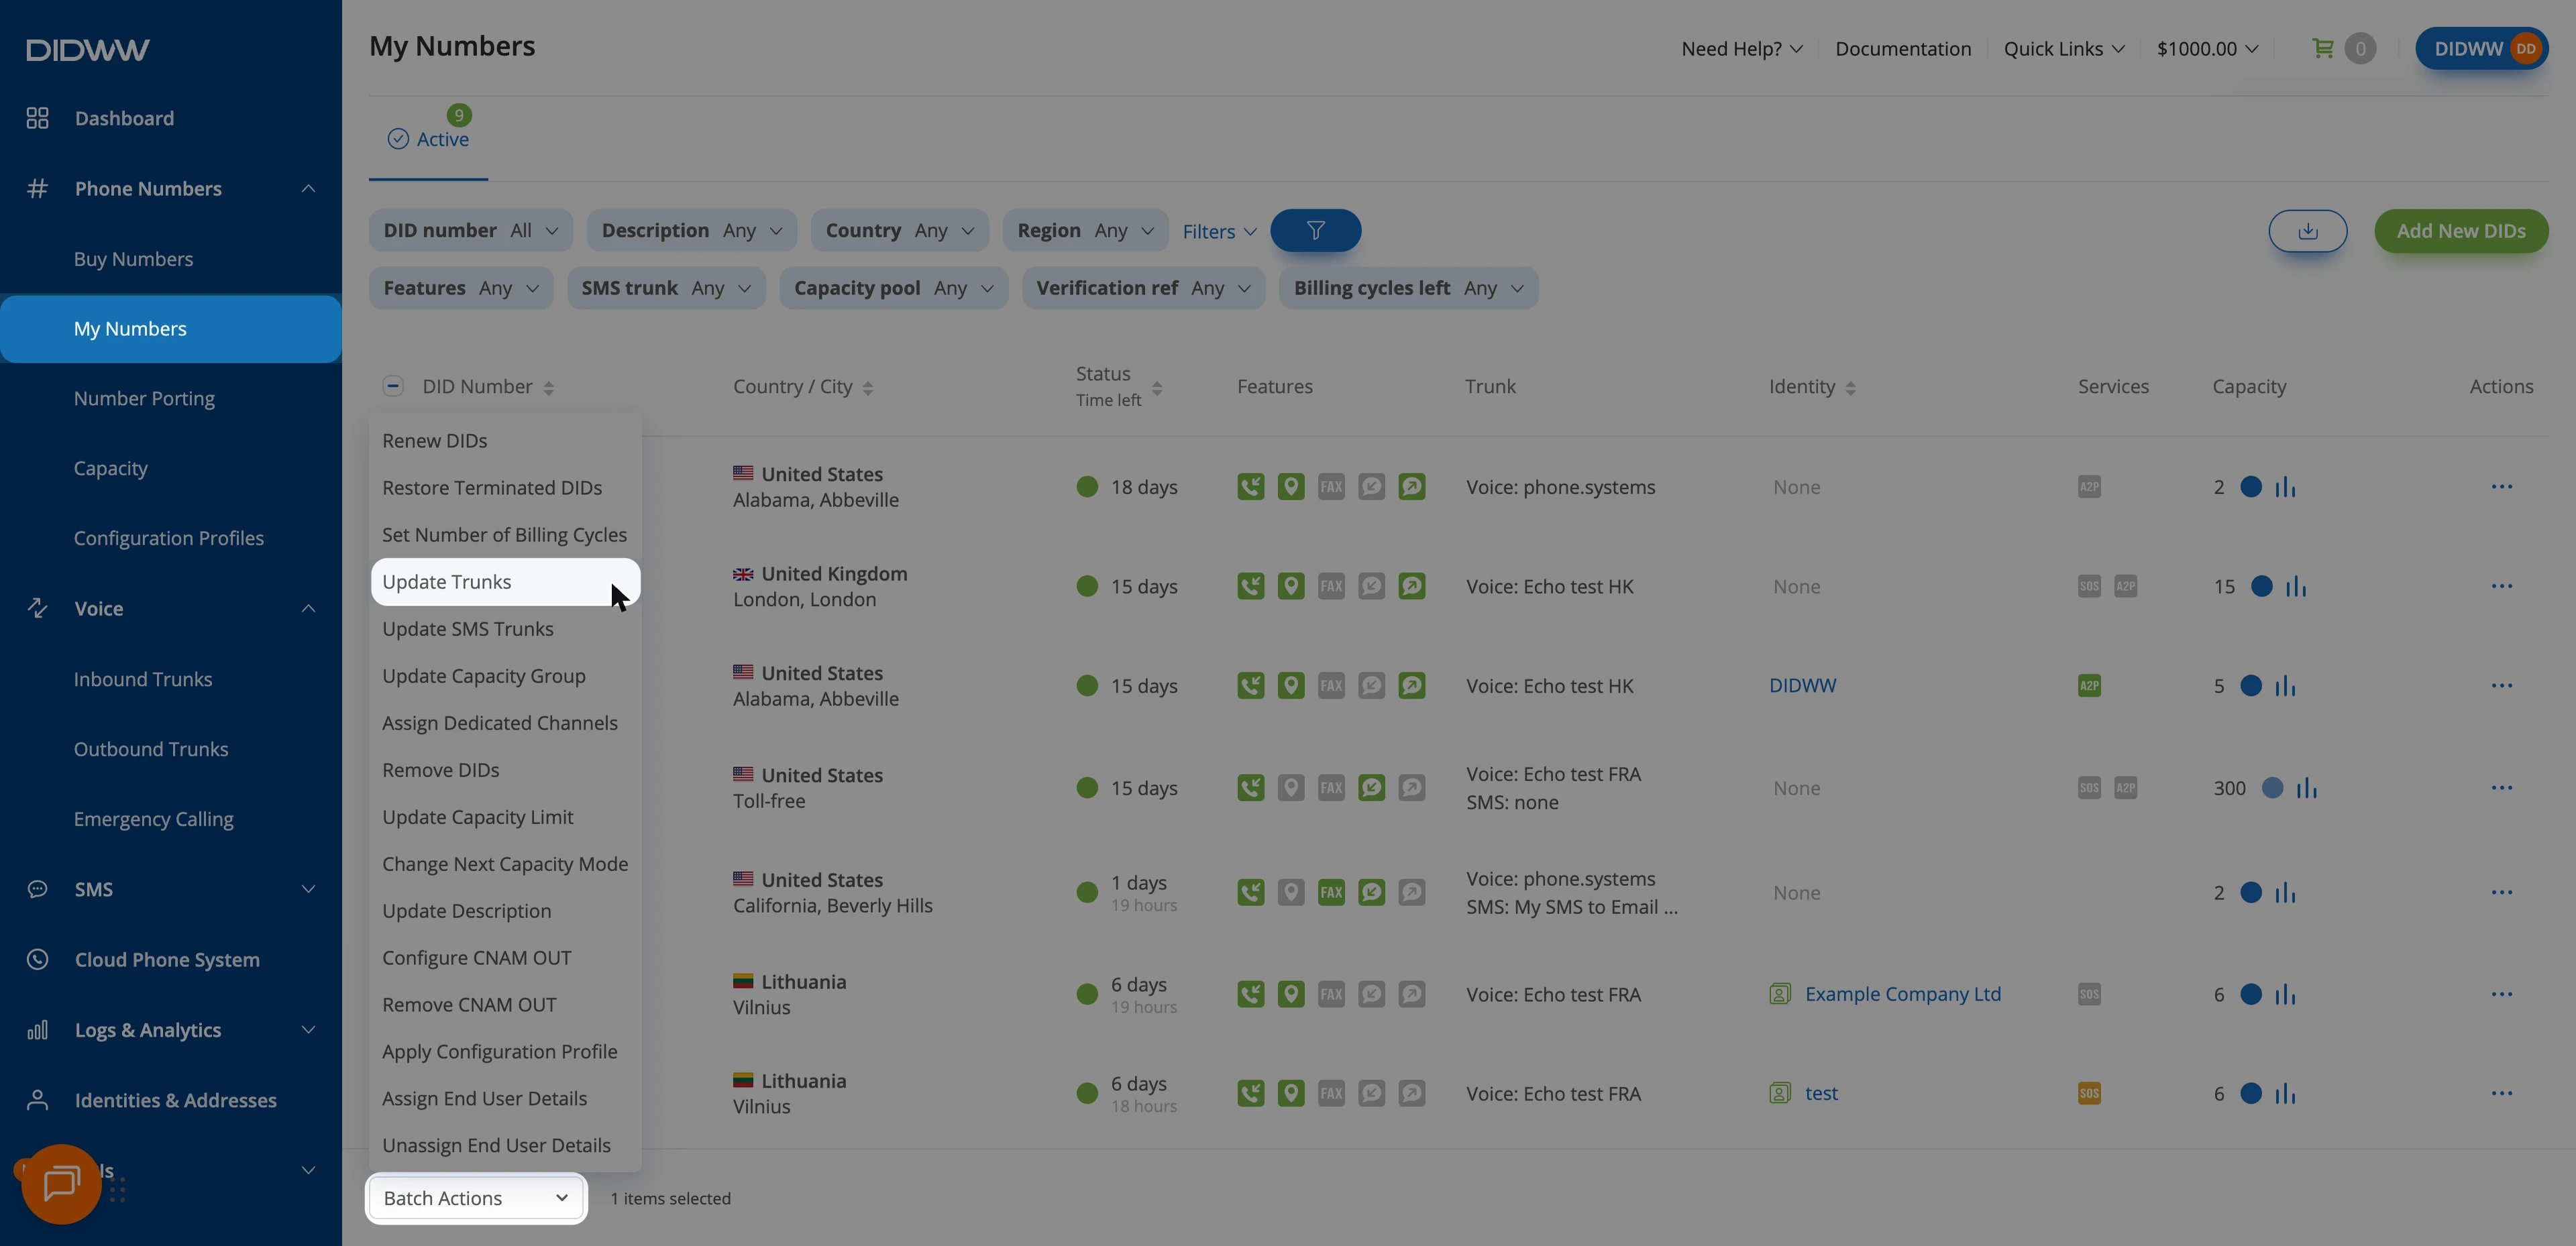
Fig. 5. Selecting Update Trunks from the Batch Actions menu#
From the dropdown menu, choose the Ultravox SIP trunk you created earlier.
Click Confirm to apply the changes.
2. Configure a DIDWW Outbound SIP Trunk#
Configure an Outbound SIP Trunk in the DIDWW User Panel for outbound calls from Ultravox and for calls that DIDWW places when your agent transfers an incoming caller to a live person. The trunk provides the SIP credentials used for both call types.
Note
Skip this section if you only receive calls and do not use call transfers.
Before You Begin#
Access to DIDWW Outbound Trunks is required for outbound calls and call transfers. See Get Access to DIDWW Outbound Termination.
Step 1: Create New Outbound Voice Trunk#
In the DIDWW User Panel, go to Voice > Outbound Trunks.
Click Create New.
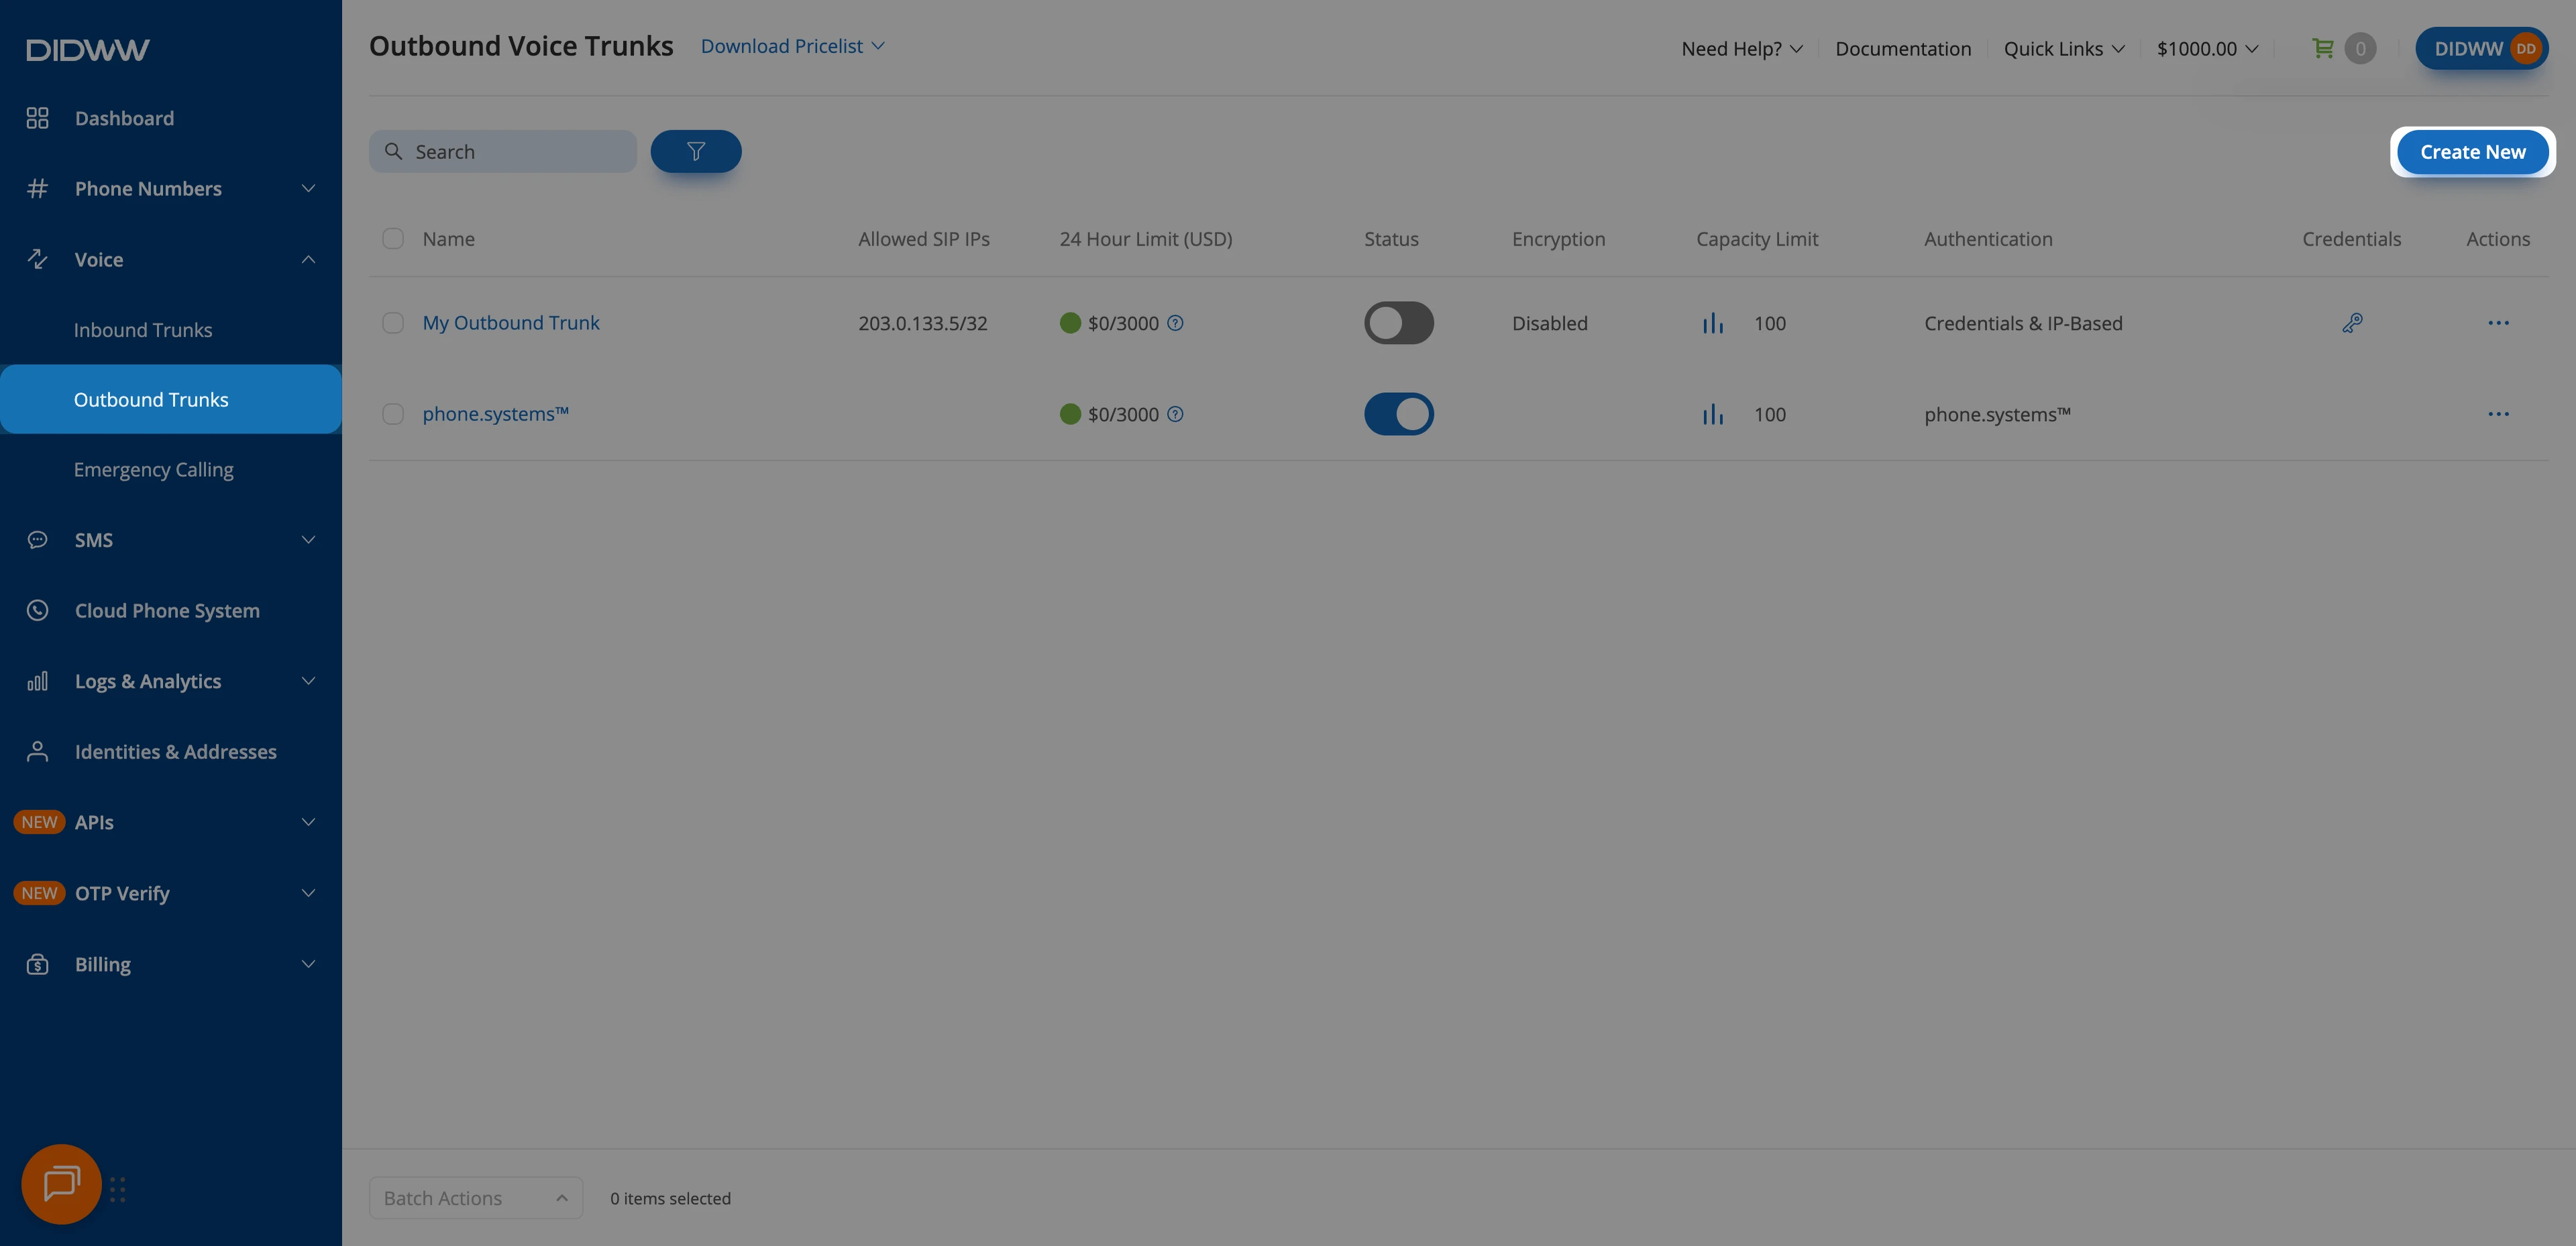
Fig. 7. Outbound Trunks: Create New#
Step 2: Configure and Create the Outbound SIP Trunk#
Update the Friendly name (e.g.,
Ultravox).Keep the default Credentials & IP-based authentication method selected. DIDWW provides the SIP digest Username and Password after the trunk is created.
For call transfers, add the following DIDWW inbound SIP addresses in Allowed SIP IP addresses:
46.19.209.14 46.19.210.14 46.19.212.14 46.19.213.14 46.19.214.14 46.19.215.14 185.238.173.14
DIDWW uses these signaling addresses to place transferred calls. See Static Endpoint signaling addresses.
For outbound calls from Ultravox, also add the SIP source addresses used by your Ultravox account. Ultravox uses Voximplant for SIP calls. The following addresses are Voximplant’s published US and EU SIP servers:
69.167.178.6 69.167.178.14 3.147.160.14 78.13.219.90 3.123.246.217 143.244.45.166
Note
Confirm the source addresses and region used by your account with Ultravox. Check Voximplant’s current SIP server addresses before configuring the allowlist. Accounts using other regions may need different addresses.
In Media, keep Media encryption mode at its default, Disabled. This setup uses unencrypted media for outbound calls and call transfers.
Click Submit to save the outbound SIP trunk.
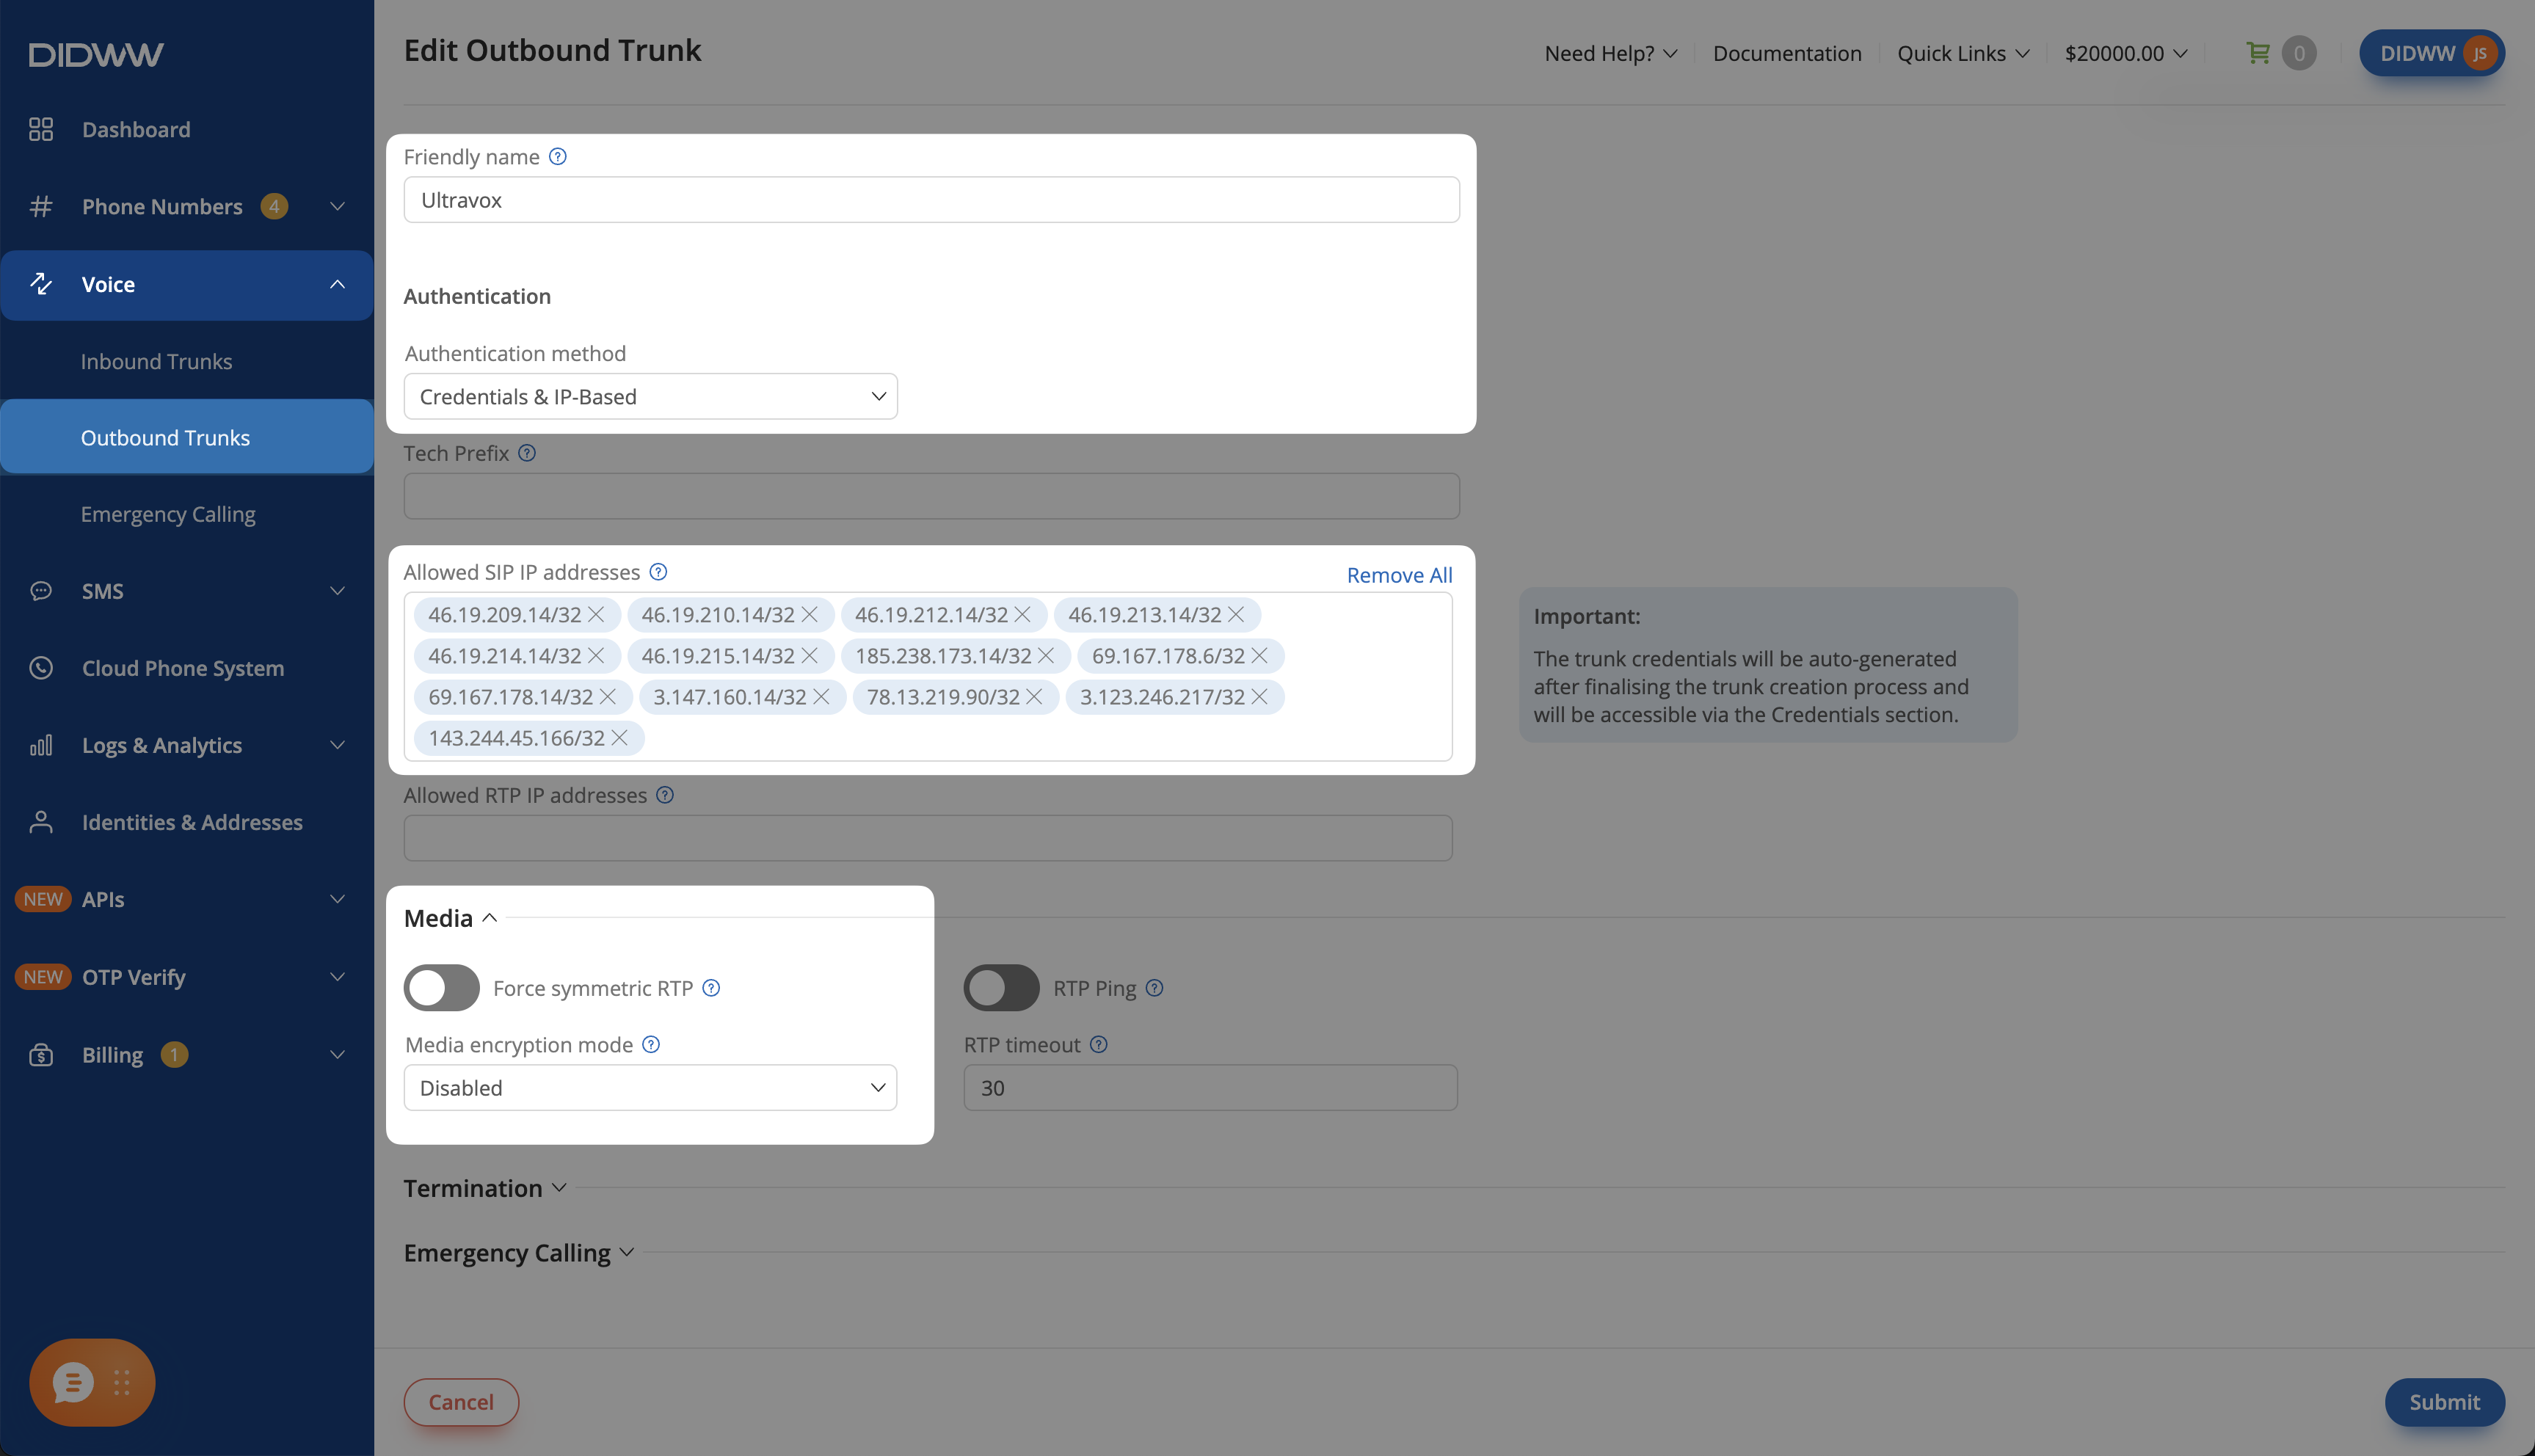
Fig. 8. Configuring and creating the Ultravox outbound SIP trunk#
Note
Keep Credentials & IP-based authentication enabled. Voximplant SIP addresses may be shared by multiple customers, so requests must also authenticate with your trunk credentials.
In Termination, set a 24 hour limit (USD) and allow the destination prefixes your agent calls or transfers to.
For advanced outbound SIP trunk configuration, see Outbound SIP Trunk Guide.
Step 3: View and Copy Outbound Trunk Credentials#
Go to Voice > Outbound Trunks.
Locate your outbound trunk and click the key icon in the Credentials column.
View and copy the Username and Password for the next steps.
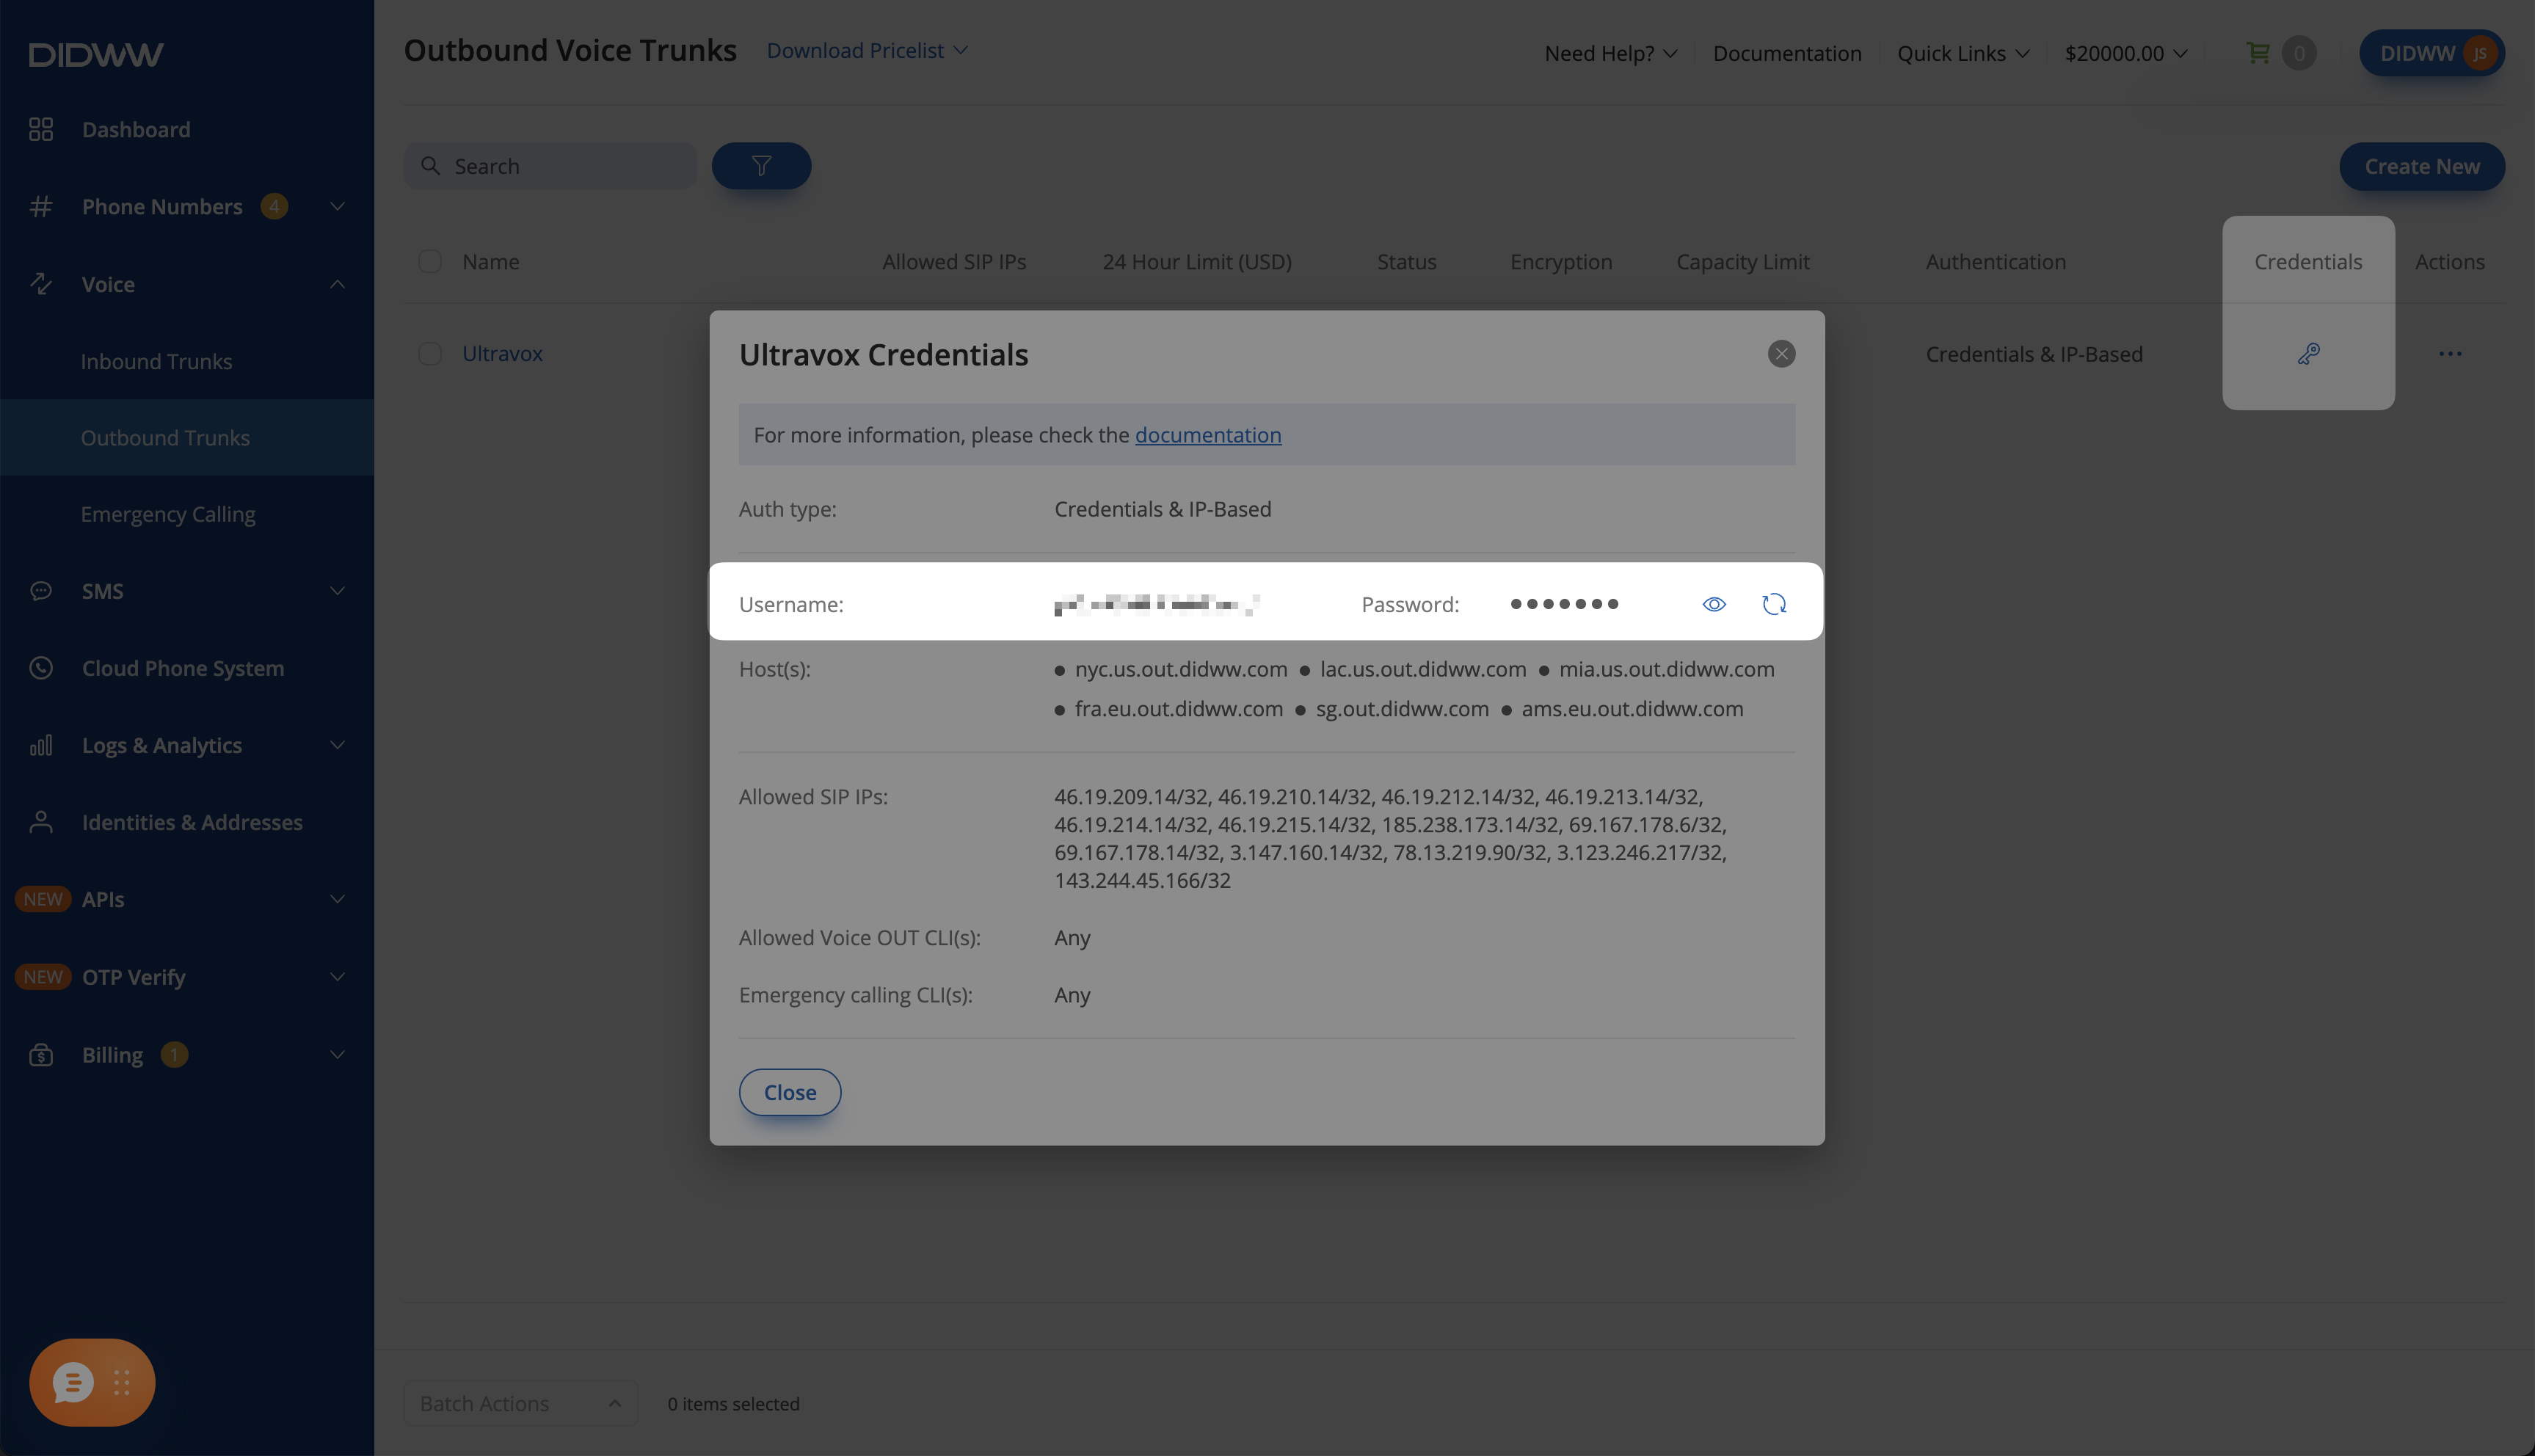
Fig. 9. Opening the outbound trunk credentials view#
Step 4: Add Outbound Credentials to the Inbound Trunk#
Note
This step is required to transfer answered incoming calls to a designated number so a live person can take over. Skip this step if you only receive calls without transfers or only place outbound calls.
DIDWW uses the credentials on your inbound trunk to place transferred calls through your outbound trunk. Enter the credentials from Step 3 on the Ultravox inbound trunk.
Go to Voice > Inbound Trunks and locate the Ultravox inbound trunk.
Click Actions, then select Edit.
Open the Authorization tab.
Turn on Enable Authorization.
In Auth User, paste the outbound trunk Username.
In Auth Password, paste the outbound trunk Password.
Click Submit.
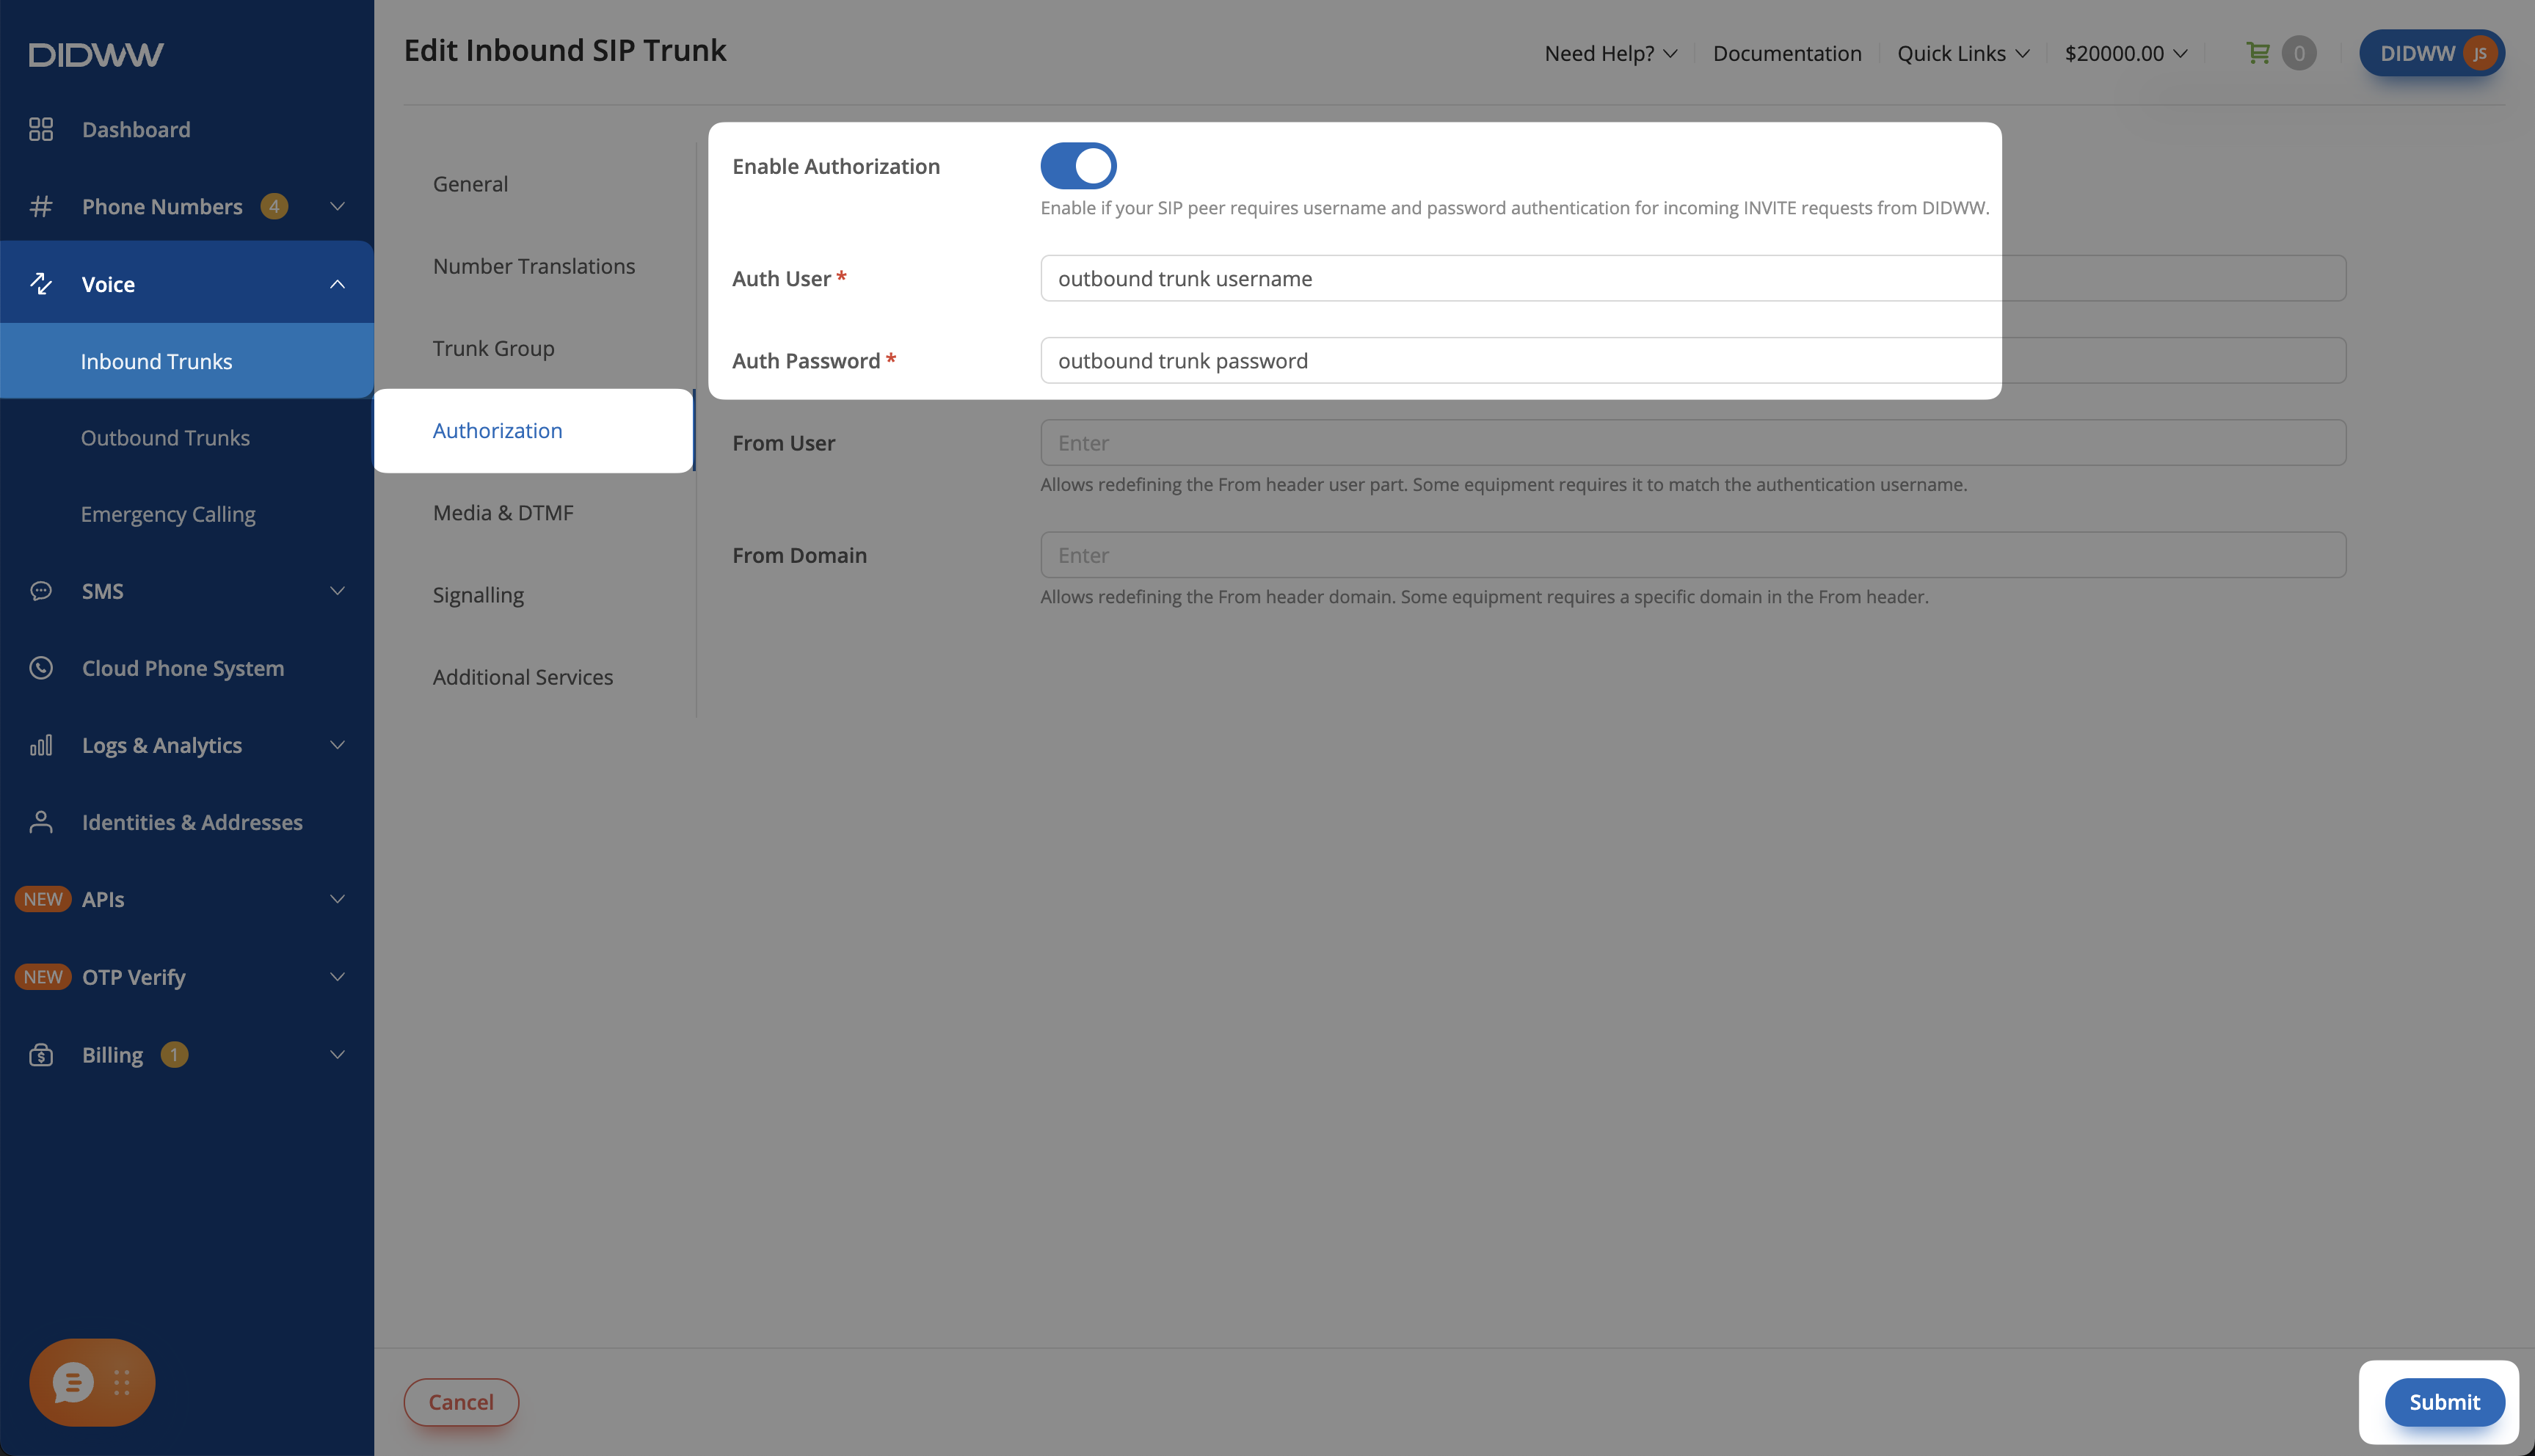
Fig. 10. Adding outbound trunk credentials to the inbound trunk#
Note
Ultravox accepts the incoming call using its IP allowlist, rather than these credentials. DIDWW requires these credentials to authenticate SIP REFER transfers through your outbound trunk.
3. Connect DIDWW in Ultravox#
Configure your Ultravox account to accept calls from DIDWW and route your number to an agent, then add call transfers and outbound calls.
Before You Begin#
An Ultravox account is required.
To use the API examples, an Ultravox API key is required. In Ultravox, go to Settings > API Keys and create a key. Keep it on your server, for example in the
ULTRAVOX_API_KEYenvironment variable. The examples send it in theX-API-Keyheader.To place outbound calls using the Ultravox API, you need the DIDWW outbound trunk Username and Password from Step 3 of section 2.
Step 1: Create an Agent#
Create the agent that will answer calls to your DIDWW number. If you already have an agent, continue to Step 2.
In Ultravox, go to Agents and click Create.
Enter a descriptive name for your agent (e.g.,
didww-and-ultravox).In the Prompt tab, describe the agent’s role and how it should respond. For example:
You are a friendly phone receptionist for Example Corp.
Welcome the caller and ask how you can help.
Keep answers brief and ask one question at a time.
Use only the company information provided in this prompt.
If you do not know an answer, say so. Do not invent prices, policies, or availability.
Only offer to transfer calls or perform other actions when the required tool is configured.
Click Voice if you want to change the voice, or keep the default.
Click Save.
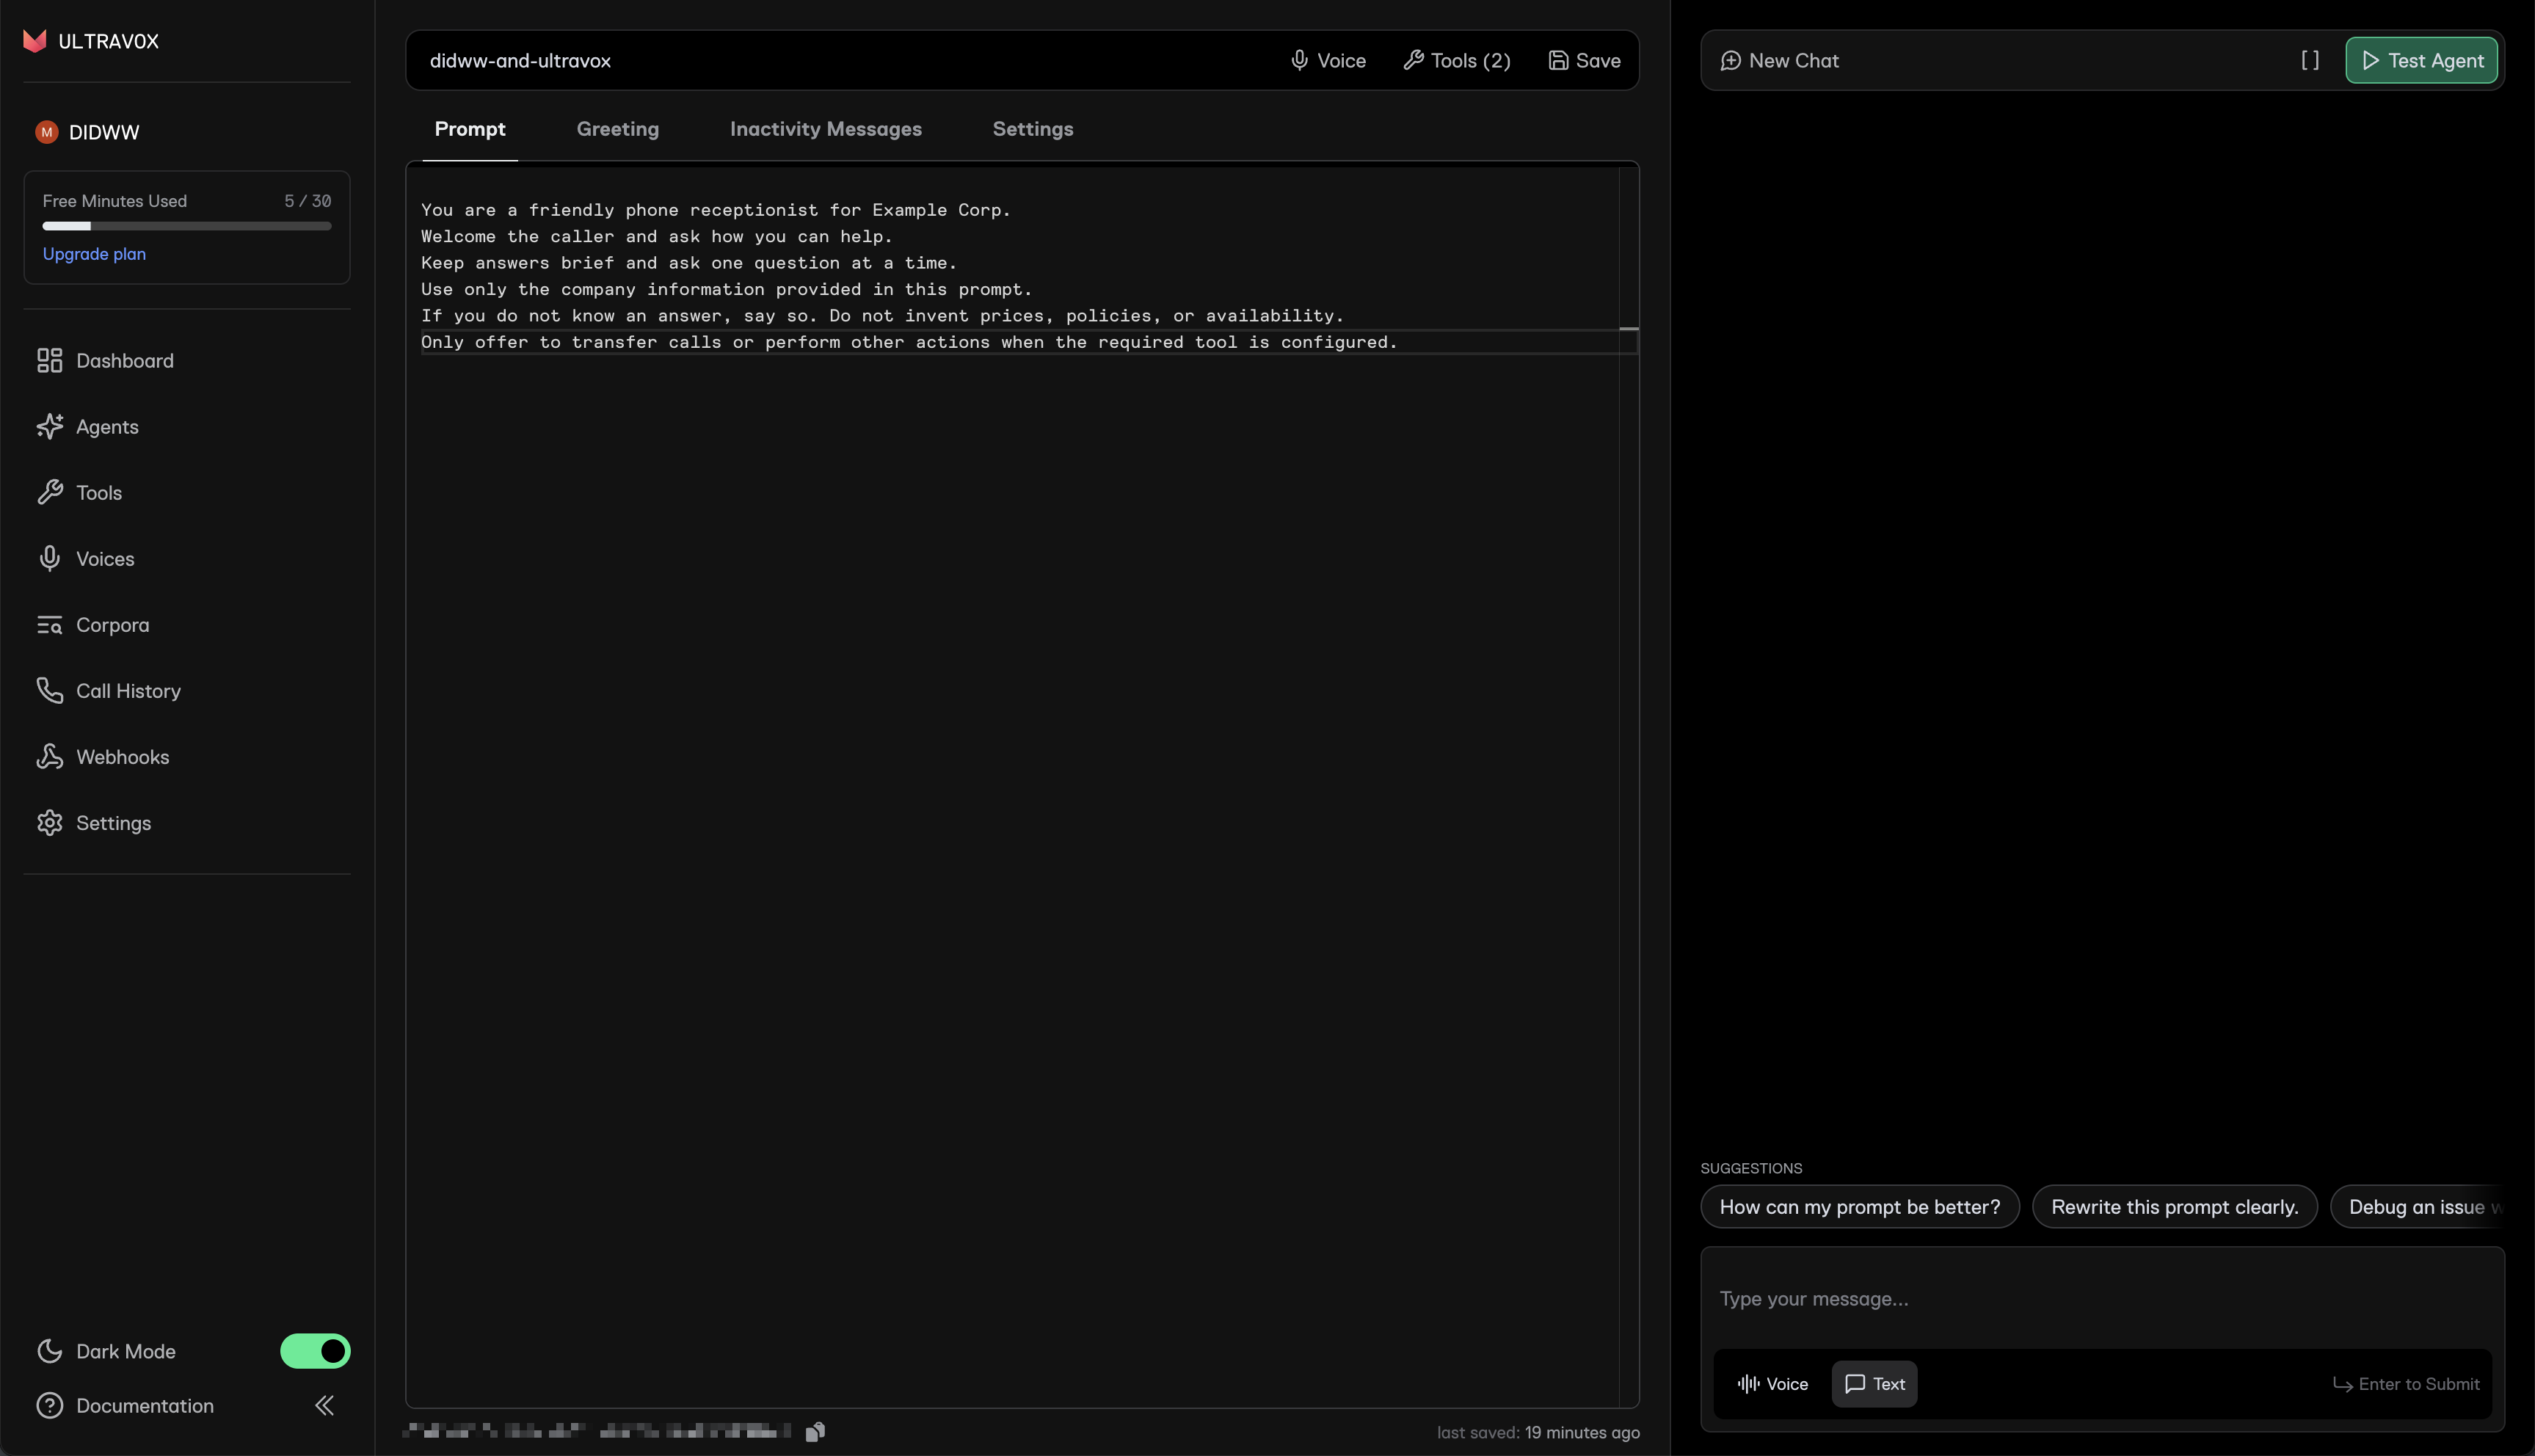
Fig. 12. Naming the agent and adding its prompt#
Note
You can check the agent’s voice and responses with Test Agent before connecting your phone number. For more options, see the Ultravox agent guide.
Create the agent with the Ultravox API
You can also create the agent using the Create Agent API. The following request uses the example name and prompt above. Replace them with the name and instructions for your agent.
1curl -X POST https://api.ultravox.ai/api/agents \
2  -H "X-API-Key: $ULTRAVOX_API_KEY" \
3  -H "Content-Type: application/json" \
4  -d '{
5    "name": "didww-and-ultravox",
6    "callTemplate": {
7      "systemPrompt": "You are a friendly phone receptionist for Example Corp.\nWelcome the caller and ask how you can help.\nKeep answers brief and ask one question at a time.\nUse only the company information provided in this prompt.\nIf you do not know an answer, say so. Do not invent prices, policies, or availability.\nOnly offer to transfer calls or perform other actions when the required tool is configured."
8    }
9  }'
A successful request returns 201 Created with the new agent’s agentId.
Use this ID in allowedAgents when configuring SIP routing in Step 2.
Step 2: Allow DIDWW and Route Your Number to an Agent#
With IP allowlisting, Ultravox accepts calls from the configured IPv4 ranges and uses the called number to select an agent. The first matching entry in Allowed agents receives the call.
In Ultravox, go to Settings > Telephony.
Under SIP, click the key icon in the IP allowlisting block to edit the SIP configuration.
In Allowed CIDR ranges, click Add range and add DIDWW’s ranges, one per row:
46.19.208.0/21
185.238.172.0/22
In Allowed agents, click Add agent, select the agent from Step 1, and enter a pattern for your DIDWW number. For example,
^\+?15105550100$matches15105550100and+15105550100.Keep Allow all agents turned off.
Click Save.
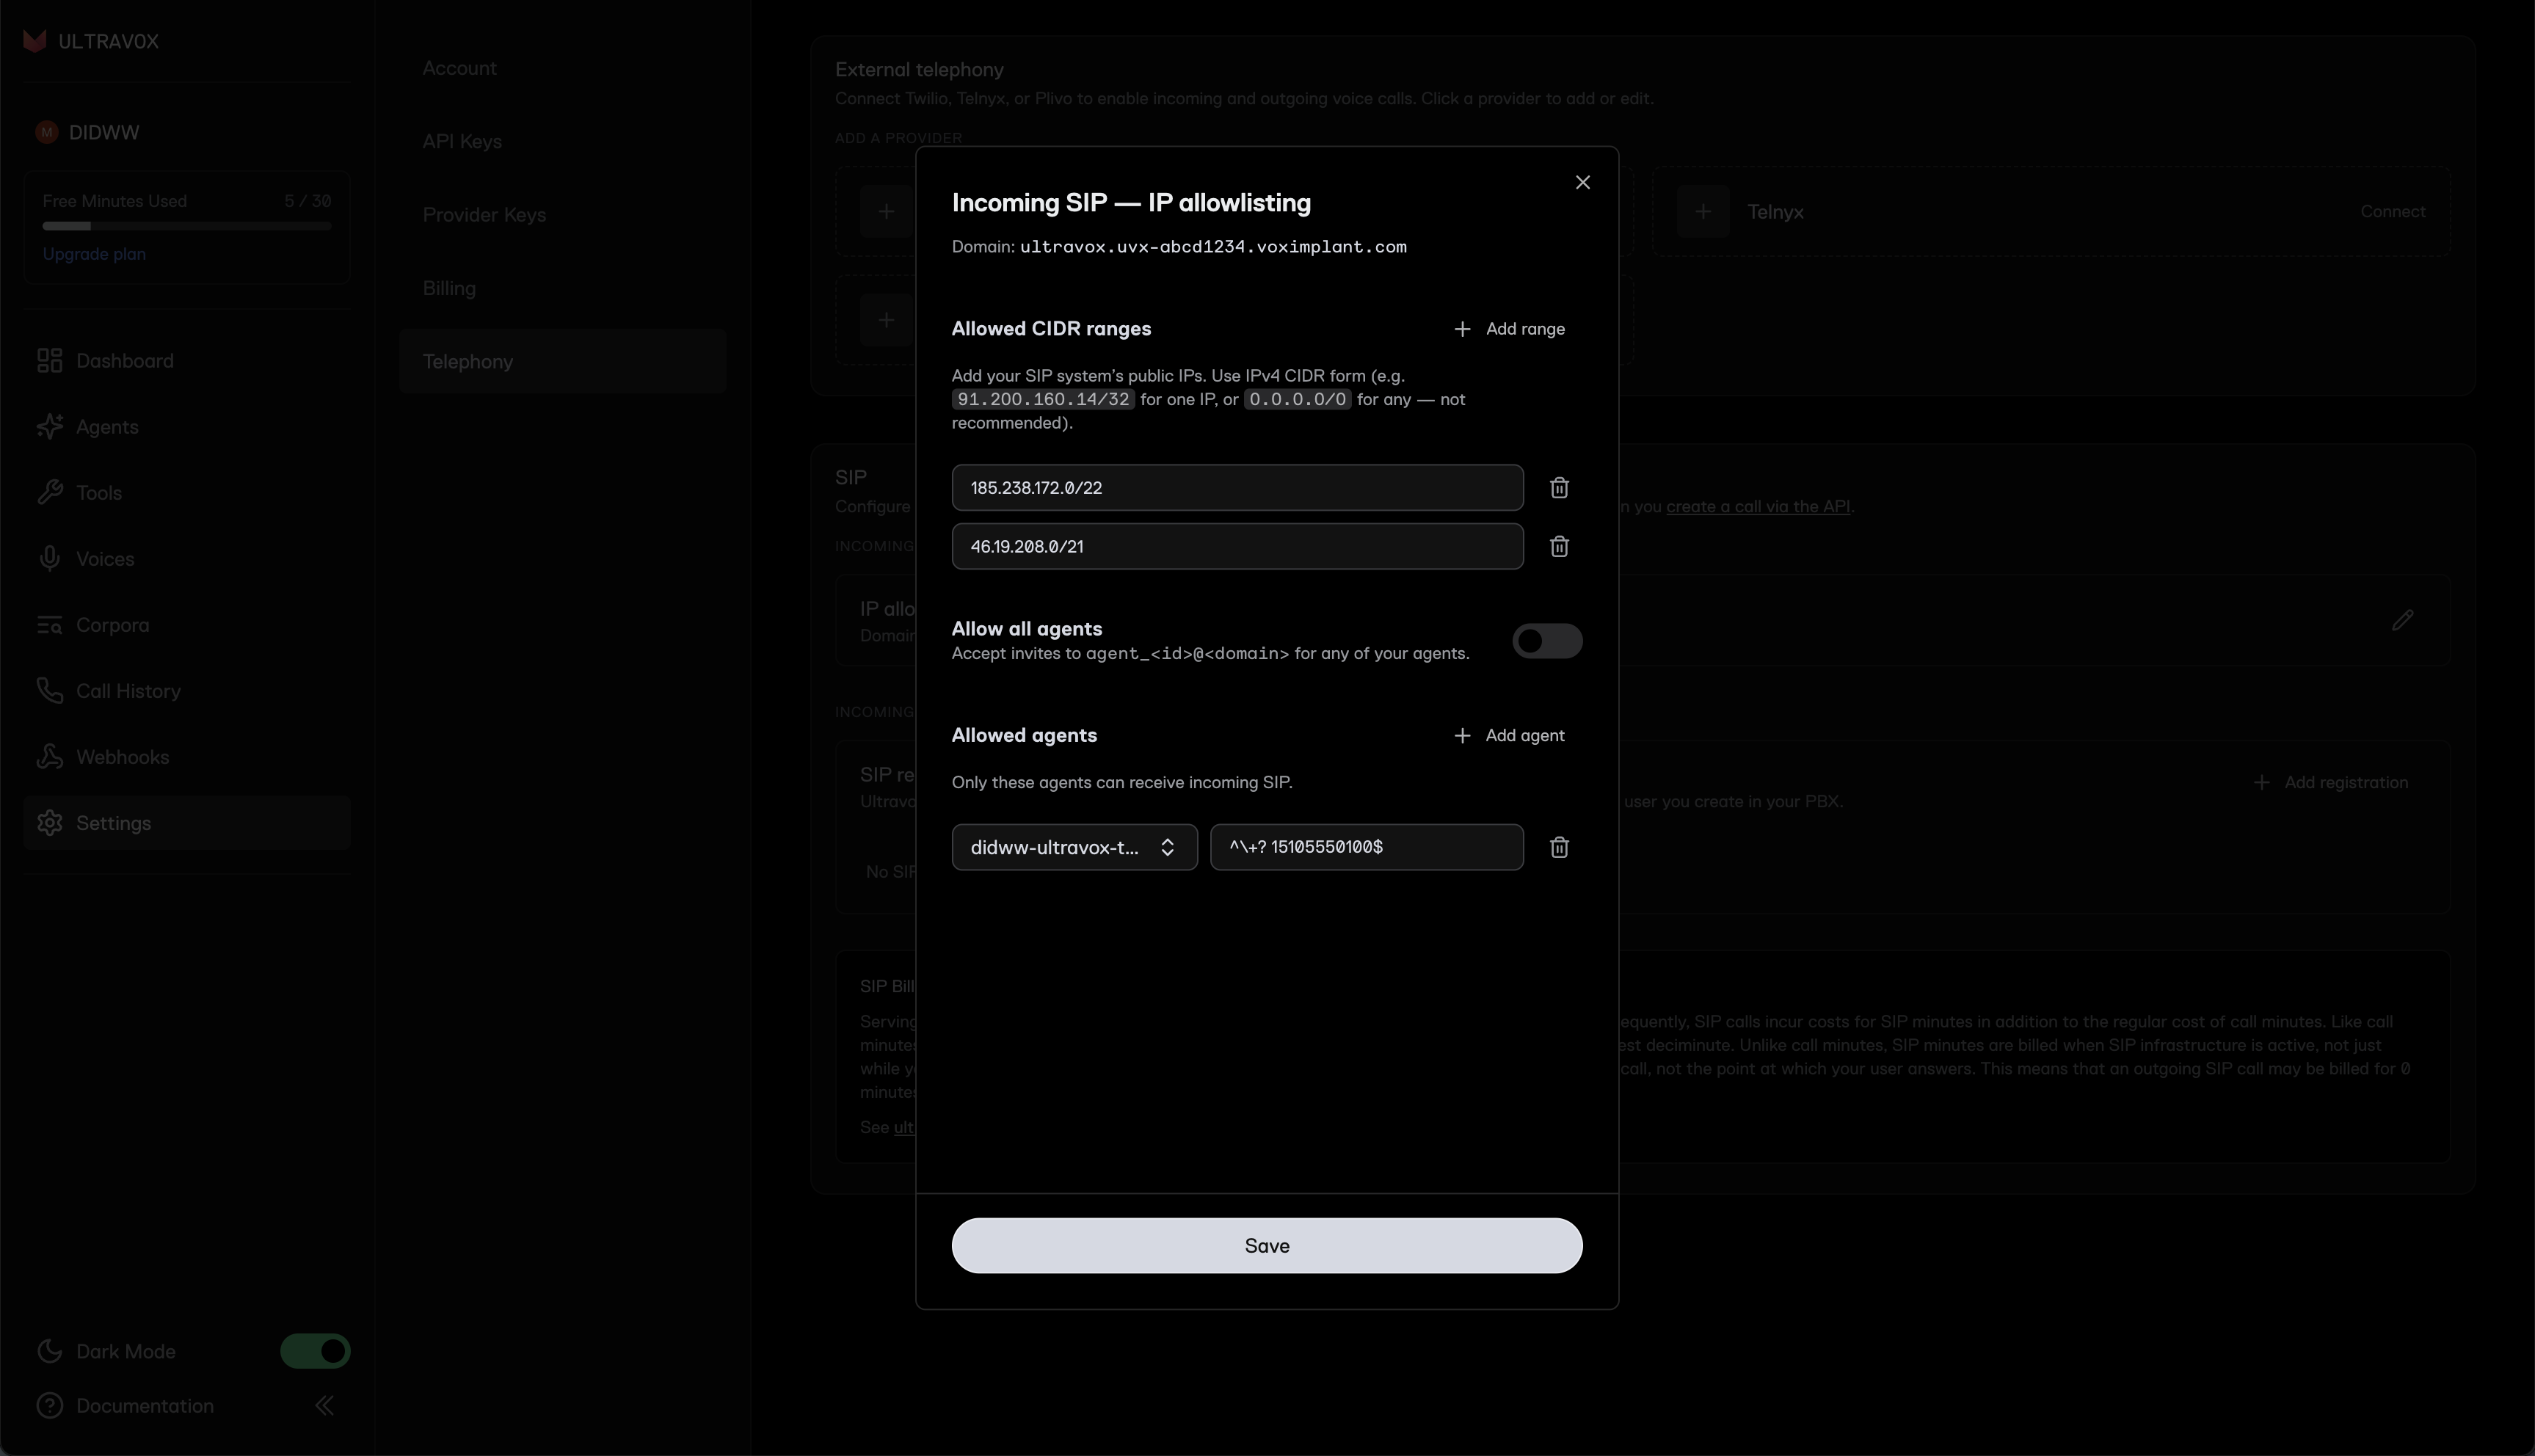
Fig. 13. DIDWW ranges and the number pattern in Ultravox SIP settings#
Important
Use only the DIDWW ranges for this connection. They identify the SIP systems allowed to send calls to your Ultravox account.
Note
+15105550100 is a fictional number used only as an example. Replace it with your DIDWW number.
To route several numbers, add one entry per agent with a pattern that lists the numbers, for example ^\+?(15105550100|15105550101)$. Ultravox allows up to 20 entries.
Configure the SIP settings with the Ultravox API
To read your SIP domain and apply the same settings with the Ultravox API, send the following requests. Replace the agent ID and the number with your values.
1curl https://api.ultravox.ai/api/sip \
2  -H "X-API-Key: $ULTRAVOX_API_KEY"
 1curl -X PATCH https://api.ultravox.ai/api/sip \
 2  -H "X-API-Key: $ULTRAVOX_API_KEY" \
 3  -H "Content-Type: application/json" \
 4  -d '{
 5    "allowedCidrRanges": ["46.19.208.0/21", "185.238.172.0/22"],
 6    "allowAllAgents": false,
 7    "allowedAgents": [
 8      { "agentId": "<ultravox-agent-id>", "toUserPattern": "^\\+?15105550100$" }
 9    ]
10  }'
The domain field in the response is your SIP domain. Review the existing settings before sending the PATCH request because allowedCidrRanges and allowedAgents replace their current lists.
See the Ultravox SIP configuration API.
Step 3: Set the Agent’s Greeting (optional)#
By default, the agent generates its greeting from its prompt. Set a fixed greeting to use the same opening words on every call.
In Ultravox, go to Agents and open your agent.
Click Edit agent in the upper-right corner.
Open the Greeting tab, keep Agent as the first speaker, and enter your greeting (e.g.,
Hello, thank you for calling Example Corp. How can I help you?).Click Save.
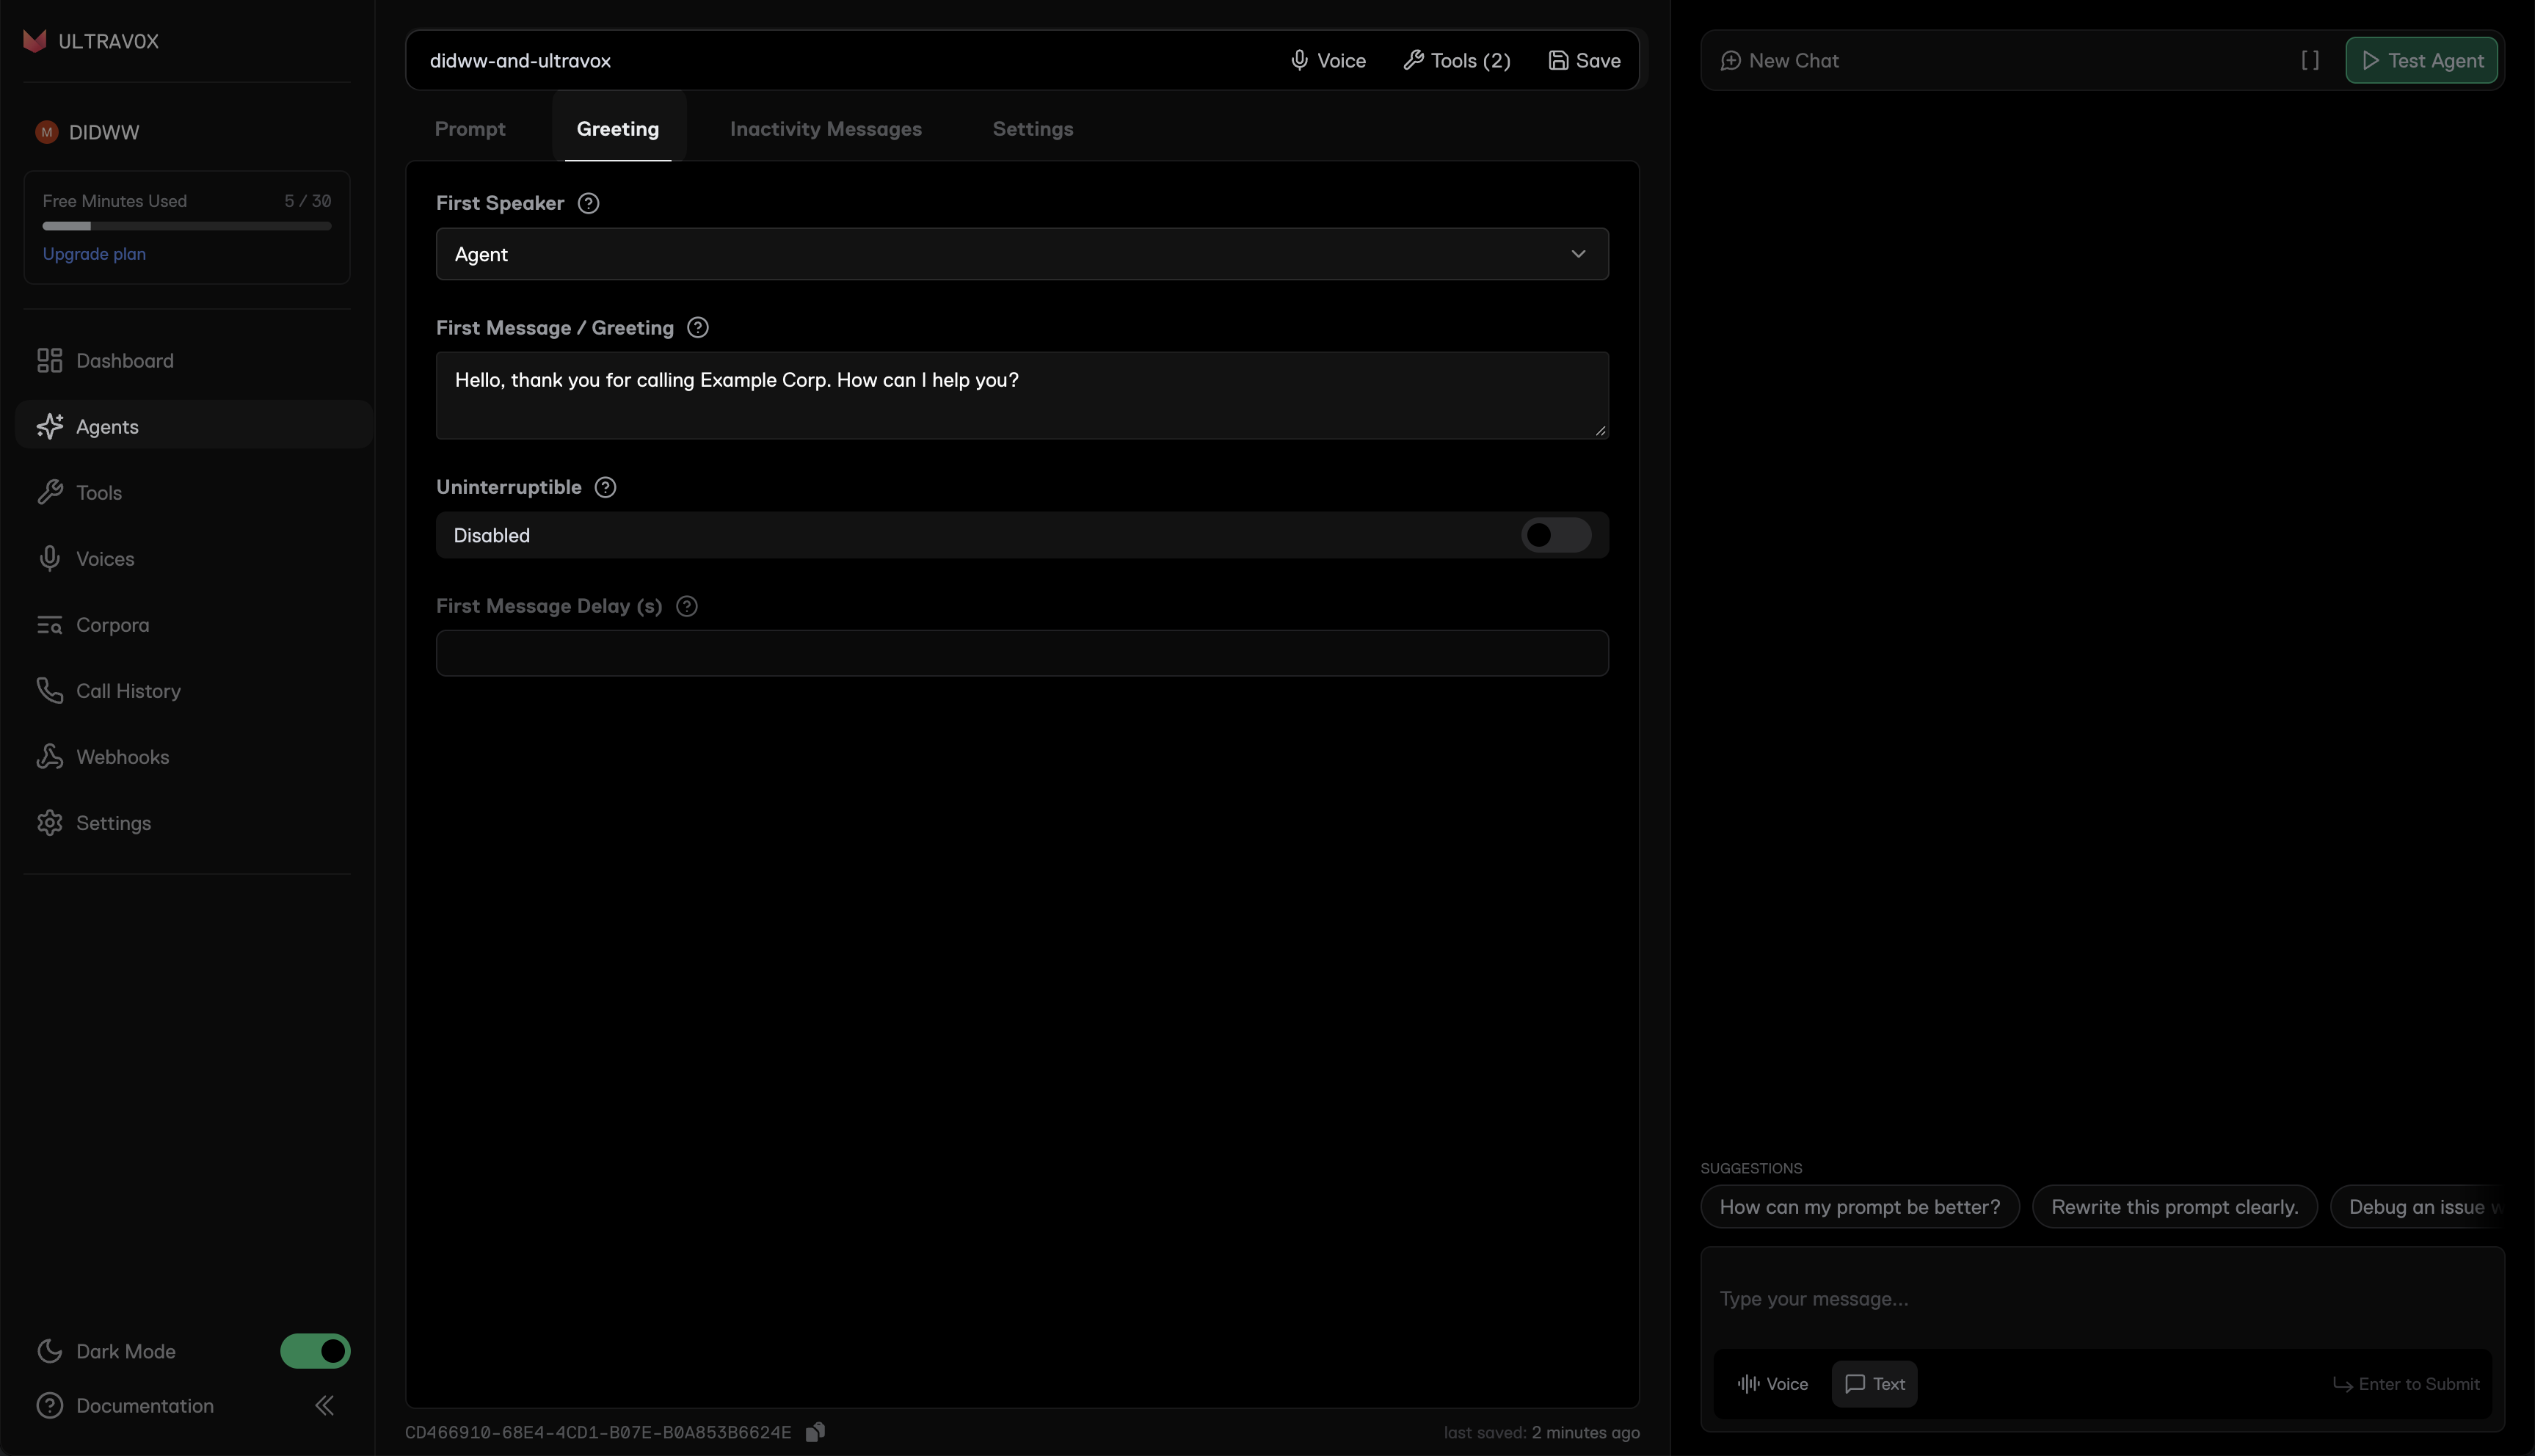
Fig. 14. Agent greeting in the Ultravox agent editor#
Set the greeting with the Ultravox API
You can also set the greeting using the Update Agent API.
Replace <ultravox-agent-id> with your agent’s ID and change the greeting as needed.
 1curl -X PATCH "https://api.ultravox.ai/api/agents/<ultravox-agent-id>" \
 2  -H "X-API-Key: $ULTRAVOX_API_KEY" \
 3  -H "Content-Type: application/json" \
 4  -d '{
 5    "callTemplate": {
 6      "firstSpeakerSettings": {
 7        "agent": {
 8          "text": "Hello, thank you for calling Example Corp. How can I help you?"
 9        }
10      }
11    }
12  }'
firstSpeakerSettings.agent makes the agent speak first. Its text field sets the fixed greeting.
The change applies to new calls. Active calls keep their existing configuration.
Step 4: Add Call Transfers to Your Agent#
The built-in coldTransfer tool transfers incoming calls to a live person. When the agent calls the tool, Ultravox sends a SIP REFER request to DIDWW, and DIDWW places a new call to the transfer destination through your DIDWW outbound trunk.
After a successful transfer, the agent leaves the call.
Call transfer at a glance
        %%{init: {
  "theme": "base",
  "themeVariables": {
    "fontSize": "14px",
    "primaryColor": "#e0f2fe",
    "primaryBorderColor": "#38bdf8",
    "primaryTextColor": "#1f2d3d",
    "secondaryColor": "#ccfbf1",
    "secondaryBorderColor": "#2dd4bf",
    "secondaryTextColor": "#1f2d3d",
    "lineColor": "#0066cc",
    "textColor": "#1f2d3d",
    "nodeTextColor": "#1f2d3d",
    "edgeLabelBackground": "#ffffff"
  }
}}%%

flowchart LR
    caller["Caller"] -->|"1. Dials your DID number"| didww["DIDWW"]
    didww -->|"2. Inbound SIP trunk"| ultravox["Ultravox<br/>AI agent"]
    ultravox -.->|"3. SIP REFER<br/>Transfer request"| didww
    didww -->|"4. New outbound call"| recipient["Person / team<br/>Transfer recipient"]

    classDef endpoint fill:#e0f2fe,stroke:#0066cc,color:#1f2d3d,stroke-width:1.5px
    classDef process fill:#ccfbf1,stroke:#2dd4bf,color:#1f2d3d,stroke-width:1.5px
    class caller,recipient endpoint
    class didww,ultravox process
    linkStyle default stroke:#0066cc,stroke-width:1.5px
Note
Each transfer places a new outbound call through your DIDWW outbound trunk. This call is charged per minute at the outbound rate for the transfer destination, in addition to the original inbound call.
1. Add the call transfer tool to your agent
In Ultravox, go to Agents, open your agent, and click Edit agent.
Click Tools (the wrench icon) to open the tools panel, then click + to add a tool.
Find and select the built-in
coldTransfertool.Expand the tool and open the Overrides tab. In target (required), enter a SIP URI in the format
sip:+[phone number]@[DIDWW outbound gateway](e.g.,sip:+15105550199@fra.eu.out.didww.com). Choose a gateway from the DIDWW outbound signaling endpoints.Keep sipVerb set to
REFER.Open the Info tab. In Tool Name, enter
transferToColleague. In Description, enter when the agent should transfer (e.g.,Transfer the caller to a human colleague only after they explicitly ask to speak to a person, a human, a live agent or an operator.).Click Save.
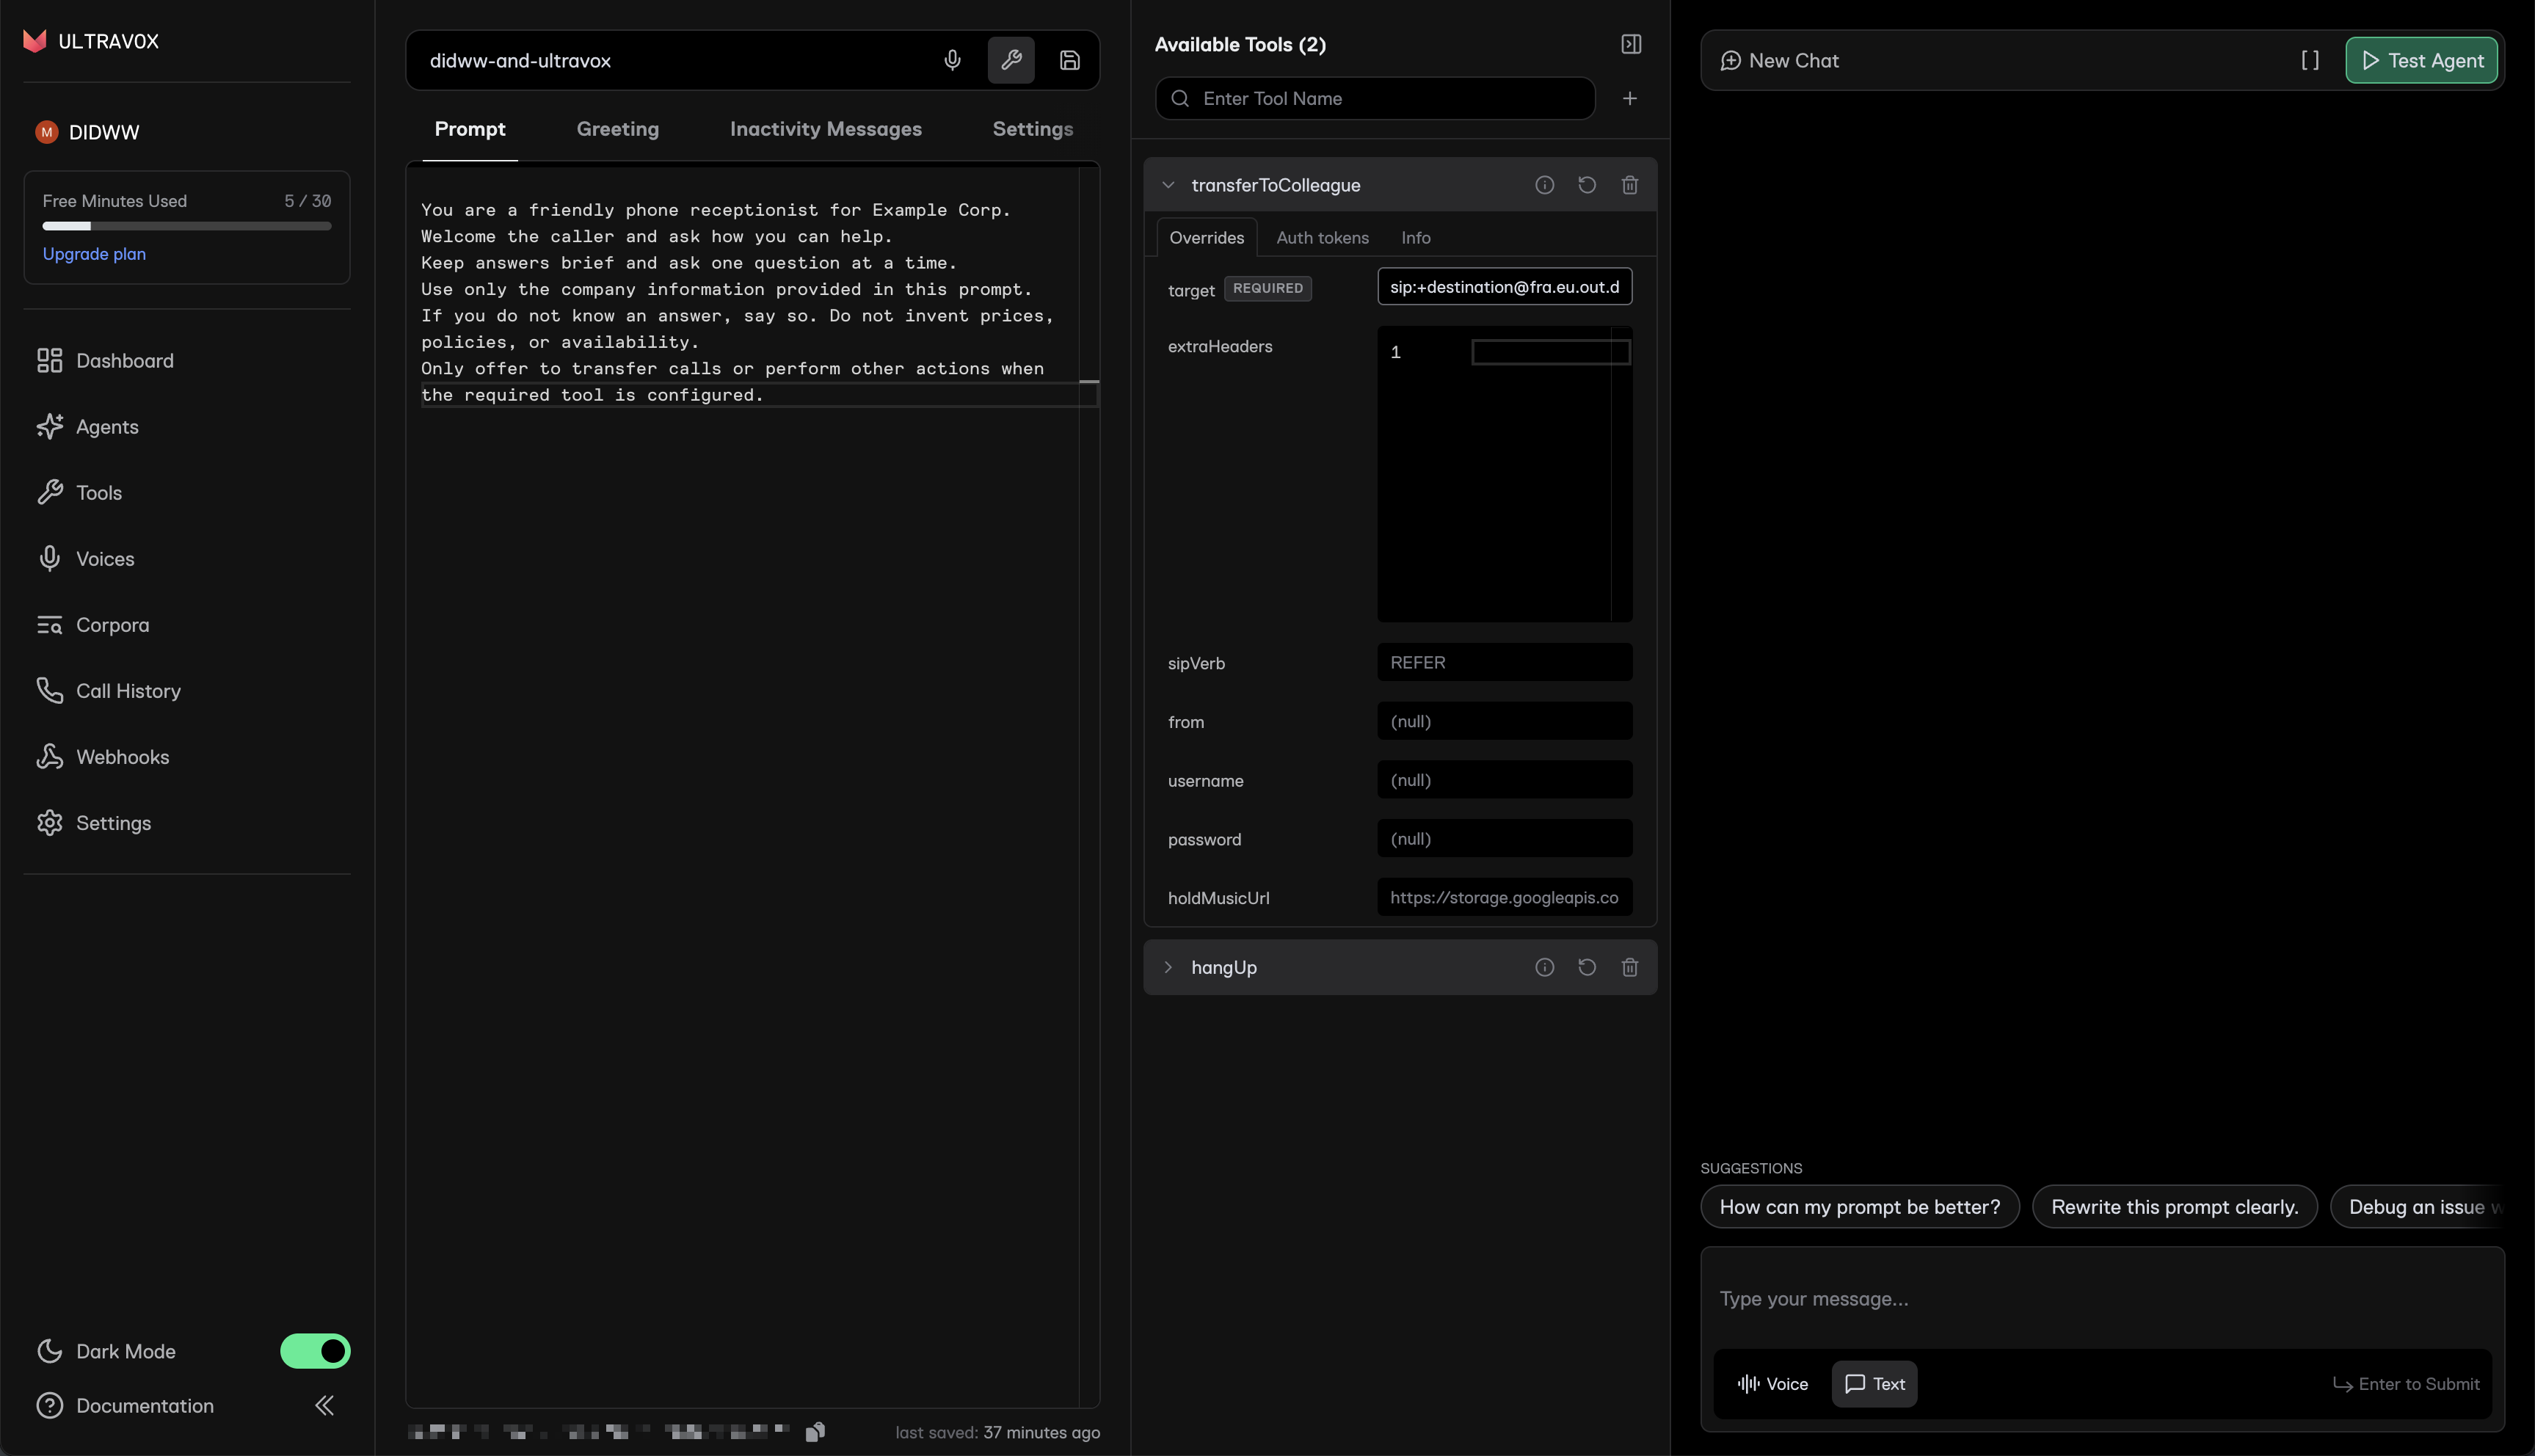
Fig. 15. Transfer target on the coldTransfer tool#
Note
[phone number]: the number of the live person or team that takes transferred calls, in E.164 format.Call transfers require a
sip:destination URI. Atel:URI or a plain phone number is not supported by DIDWW.
2. Tell the agent when to transfer
On the Prompt tab, add an instruction that uses the Tool Name from the Info tab. For example:
If the caller asks to speak to a real person, a human, a live agent or an operator,
tell them you will connect them to a colleague, then use the transferToColleague tool.
Never transfer on your own initiative.
Click Save.
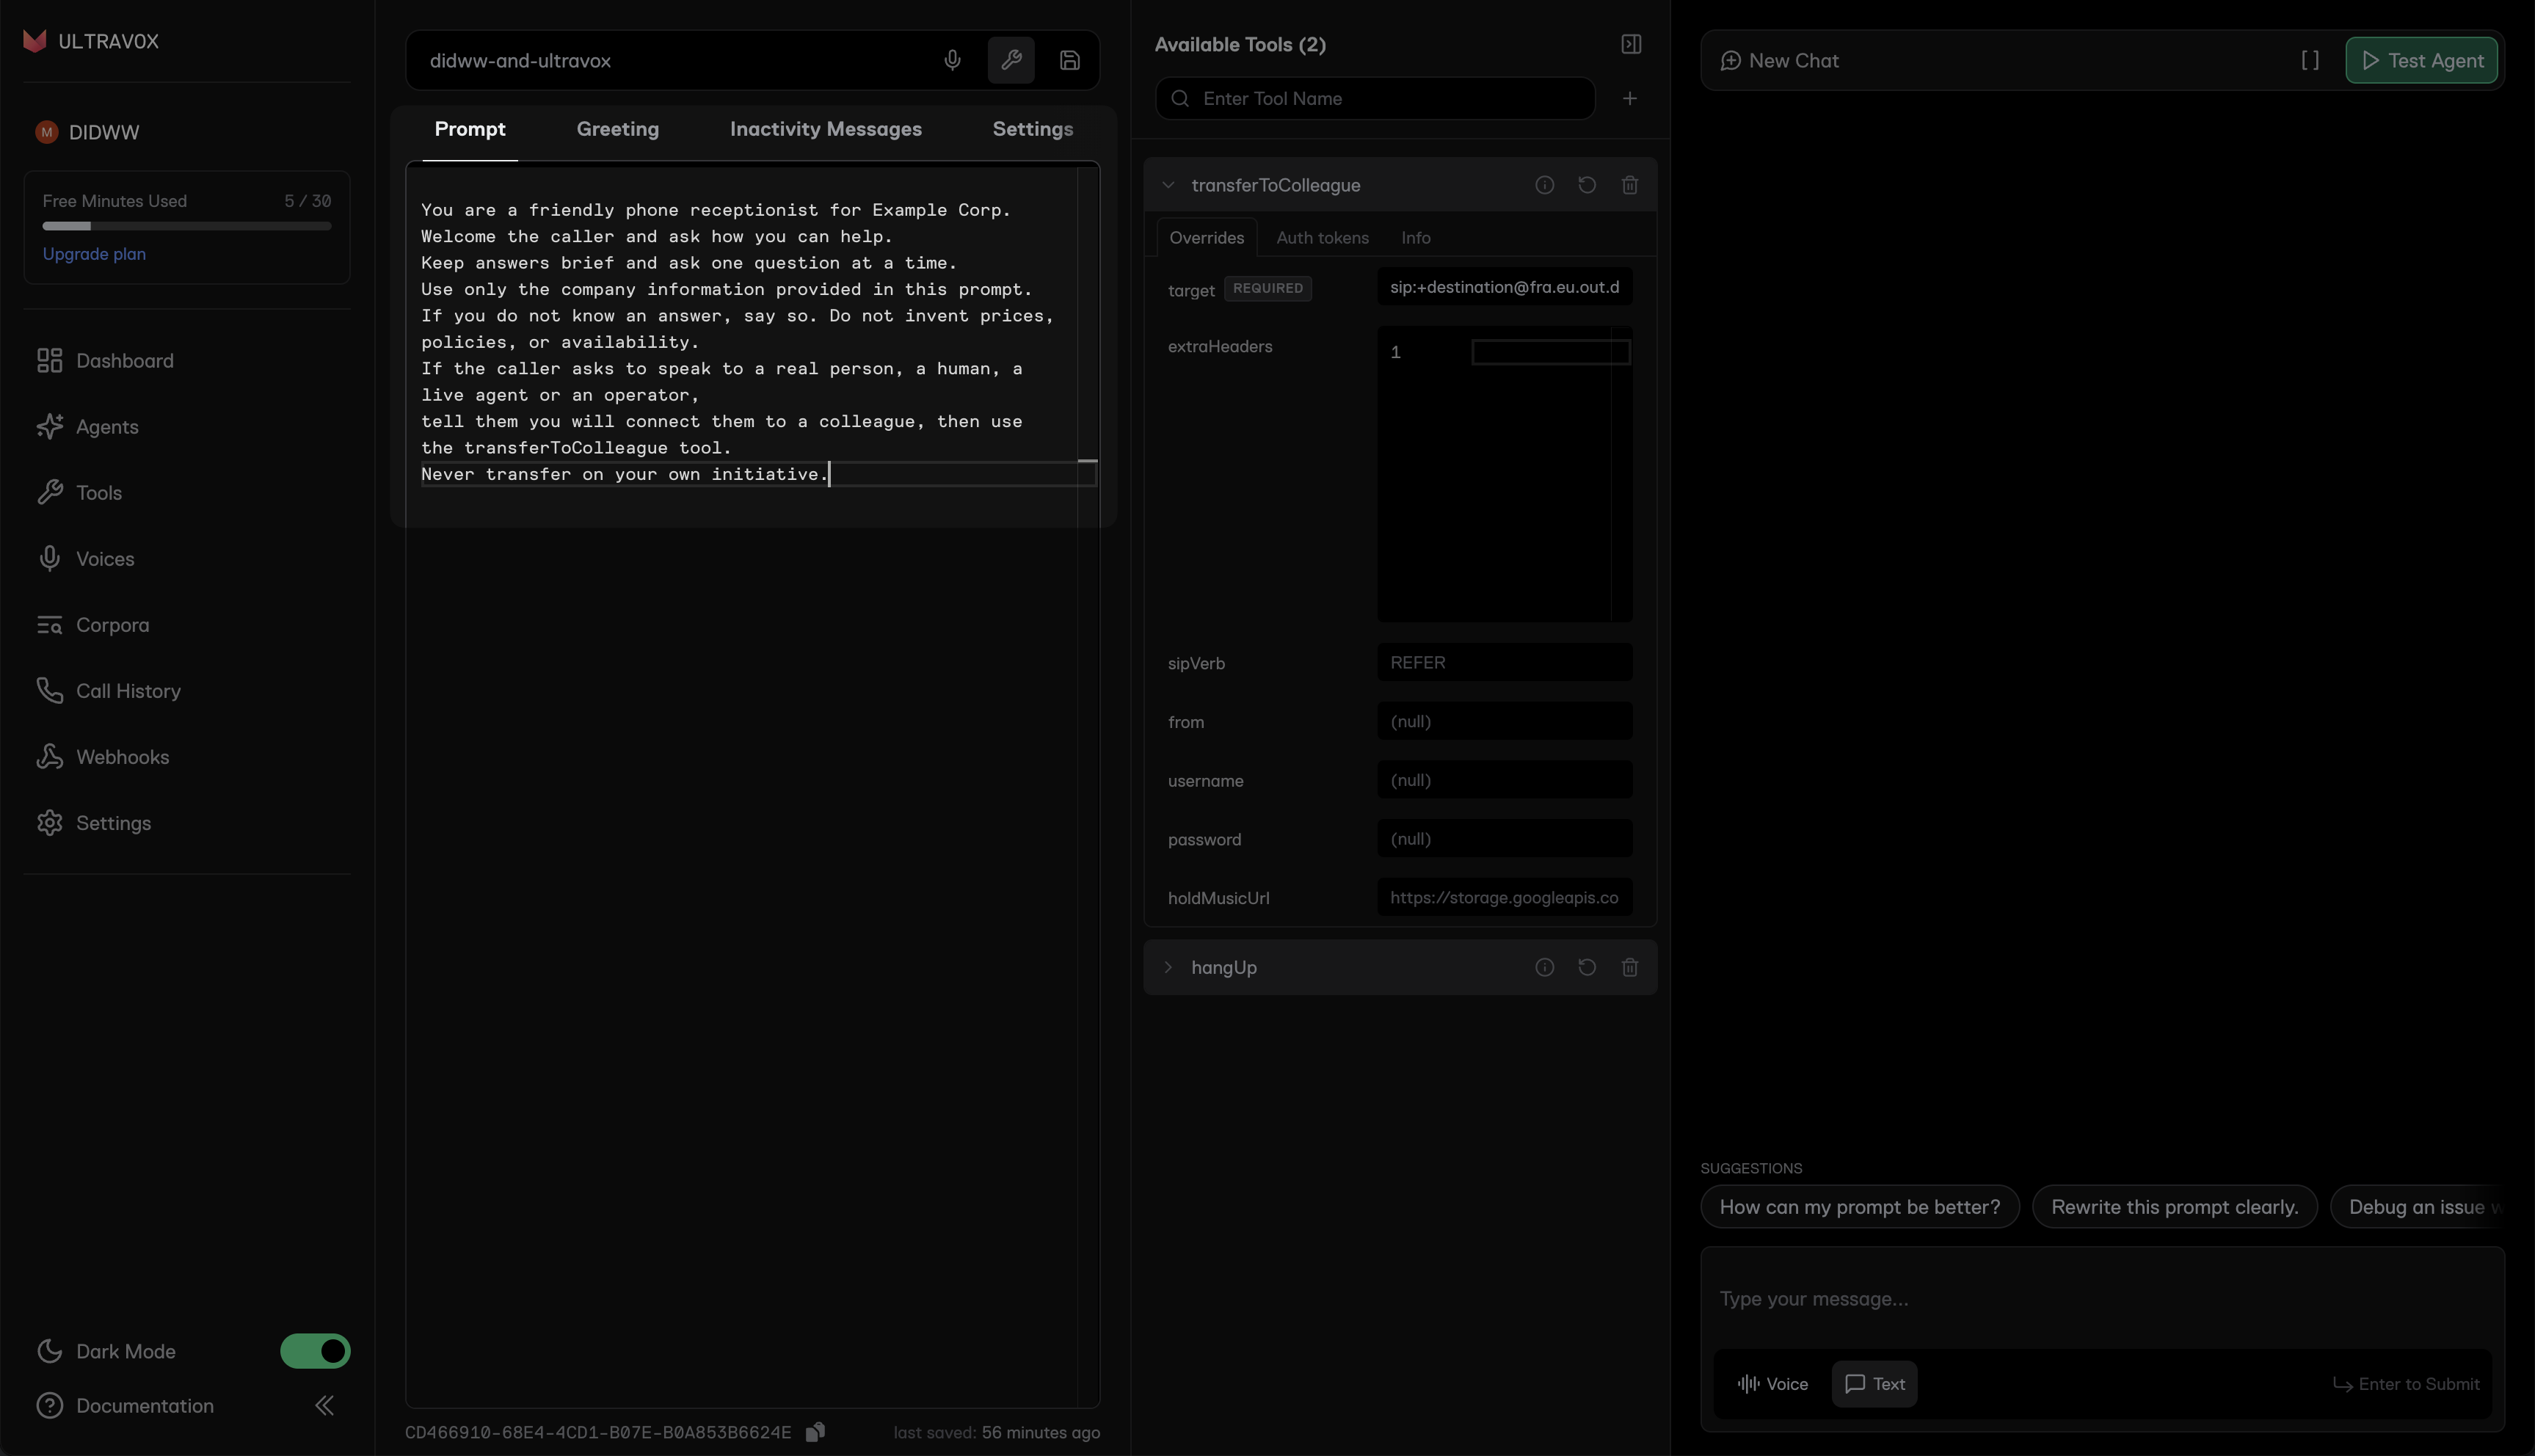
Fig. 16. Telling the agent when to transfer a caller#
Note
Describe exactly when the agent may transfer. Without a clear rule, the agent can transfer callers who did not ask for it.
Create an agent with the transfer tool with the Ultravox API
To create an agent with a greeting and the transfer tool, send the following request.
 1curl -X POST https://api.ultravox.ai/api/agents \
 2  -H "X-API-Key: $ULTRAVOX_API_KEY" \
 3  -H "Content-Type: application/json" \
 4  -d '{
 5    "name": "example-corp-receptionist",
 6    "callTemplate": {
 7      "systemPrompt": "You are the receptionist for Example Corp. Keep answers short. If the caller asks to speak to a person, say you will connect them, then use the transferToColleague tool. Never transfer on your own initiative.",
 8      "firstSpeakerSettings": { "agent": { "text": "Hello, thank you for calling Example Corp. How can I help you?" } },
 9      "selectedTools": [
10        {
11          "toolName": "coldTransfer",
12          "nameOverride": "transferToColleague",
13          "descriptionOverride": "Transfer the caller to a human colleague only after they explicitly ask to speak to a person, a human, a live agent or an operator.",
14          "parameterOverrides": {
15            "target": "sip:+15105550199@fra.eu.out.didww.com",
16            "sipVerb": "REFER"
17          }
18        },
19        { "toolName": "hangUp" }
20      ]
21    }
22  }'
The response contains the agent’s agentId. Use it in the SIP settings in Step 2.
Step 5: Place Outbound Calls#
Use the Ultravox API to place an outbound SIP call through your DIDWW outbound trunk. Each request creates one call and supplies the trunk credentials used to authenticate it.
 1curl -X POST "https://api.ultravox.ai/api/agents/<ultravox-agent-id>/calls" \
 2  -H "X-API-Key: $ULTRAVOX_API_KEY" \
 3  -H "Content-Type: application/json" \
 4  -d '{
 5    "medium": {
 6      "sip": {
 7        "outgoing": {
 8          "to": "sip:+15105550199@fra.eu.out.didww.com",
 9          "from": "+15105550100",
10          "username": "<didww-outbound-username>",
11          "password": "<didww-outbound-password>"
12        }
13      }
14    },
15    "firstSpeakerSettings": { "agent": { "text": "Hello, this is Example Corp calling. Is now a good time?" } }
16  }'
to: the number to call, as a SIP URI at a DIDWW outbound signaling endpoint. Plain phone numbers are not accepted.from: the DIDWW number to show as the caller ID, in E.164 format. Check that it is allowed by the outbound trunk’s CLI Settings.usernameandpassword: the outbound trunk credentials from Step 3 of section 2.
A successful request returns 201 Created with the new call’s callId. The destination may still be ringing when the response arrives.
Important
Each request places a new call. Do not retry automatically after a timeout or connection error, or the destination can receive a second call. Keep your Ultravox API key and DIDWW trunk credentials on your server.
Step 6: Test the Configuration#
Verify that inbound calling, call transfers, and outbound calling are working as expected.
Inbound calls
Call the DIDWW number assigned to the inbound trunk.
Check that the agent greets you and that both parties can hear each other.
In Ultravox, open Call History and check that the call appears.
Call transfers
Call the DIDWW number and wait for the agent to greet you.
Have a short conversation without asking for a person, and check that the agent does not transfer the call.
Ask the agent to transfer you to a live person.
Answer the call at the transfer destination and check that both parties can hear each other.
In Ultravox, open the call in Call History and check that the transfer tool result is Transfer succeeded.
Outbound calls
Place a call to a phone you can answer, as described in Step 5.
Answer the call and check that the agent speaks and that the destination sees your DIDWW number as the caller ID.
Note
After a call ends,
GET https://api.ultravox.ai/api/calls/<call-id>/sip_logsreturns a link to its SIP log. The log shows the SIP messages exchanged with DIDWW, including the Voximplant address that sent an outbound call and DIDWW’s responses.You can review call activity and verify call status or error codes in the DIDWW Inbound and Outbound Call Logs. A transfer or an outbound call appears in the Outbound Call Logs as a call through your Ultravox outbound trunk. See Inbound Call Logs and Outbound Call Logs for more details.
Customize Your Voice Agent#
Use the agent’s prompt to define how it answers callers and when it uses tools. Connect custom tools when the agent needs current business data or needs to perform actions for your service. The guides below apply to both incoming and outbound calls.
Agent configuration reference
Setup task |
Configuration |
|---|---|
Write the instructions |
Define the agent’s role, allowed topics, questions, and rules for using tools. Explain what to do when an answer is unavailable, such as offering a transfer. See the Ultravox Prompting Guide. |
Connect tools and business data |
Create custom tools for database lookups, availability checks, bookings, or other actions. With HTTP tools, Ultravox calls your server, which performs the task and returns the result. See Custom Tools and HTTP vs. Client Tools. |
Guide the conversation |
For a structured workflow, return guidance with tool results to tell the agent which question or step comes next. See Guiding Agents. |
Instructions guide the conversation. Your tool handlers must enforce business rules and access permissions. For example, check availability in your database before confirming a booking, and have the agent use the tool result in its answer.
To create and add a tool in the Ultravox dashboard, follow the Tools Quickstart.
Troubleshooting#
Ultravox rejects the call with 603 Decline
The called number may not match an allowed agent. Check that:
The pattern in Allowed agents matches the number DIDWW sends. With User Part of R-URI set to
{DID}, DIDWW sends the number without the+sign. The pattern^\+?15105550100$matches both forms.The DIDWW inbound trunk is assigned to the DID number.
The call does not reach Ultravox
Check that Allowed CIDR ranges in Ultravox contains 46.19.208.0/21 and 185.238.172.0/22,
and that Host on the DIDWW inbound trunk is your Ultravox SIP domain. See Step 2 of section 3.
The call fails right after it connects, or there is no audio
The call may use a codec that Ultravox does not support. On the DIDWW inbound trunk, keep only PCMU, PCMA, and telephone-event. See Step 3.
The transfer fails with 10020 error - Unauthorized
DIDWW could not authenticate the transferred call. On the DIDWW inbound trunk, check that Authorization is enabled and that Auth User and Auth Password match the outbound trunk credentials. See Step 4 of section 2.
The call transfer is rejected
Check the following:
Max Transfers on the DIDWW inbound trunk is
1or higher.The transfer target is a
sip:URI at a DIDWW outbound gateway. Atel:URI is rejected with 603 Unconfigured xfer for tel URIs.Allowed SIP IP addresses on the DIDWW outbound trunk includes all DIDWW inbound SIP addresses used for transfers.
Media encryption mode on the DIDWW outbound trunk is Disabled. A mismatch can cause 500 No suitable media.
The agent transfers callers who did not ask for a person
Add a clear rule to the agent’s prompt that the agent may transfer only after the caller explicitly asks for a person. See Step 4.
An outbound call request returns 400 Bad Request
Check that to is a SIP URI, for example sip:+15105550199@fra.eu.out.didww.com, and not a plain phone number.
If the error concerns a different field, check the response details against the Create Agent Call API.
An outbound call fails with 403 Forbidden and does not appear in the Outbound Call Logs
The source address may not be allowed on your outbound trunk. Open the call’s SIP log
(GET /api/calls/<call-id>/sip_logs) and check which Voximplant address sent the call,
then compare it with Allowed SIP IP addresses. See Step 2 of section 2.
The outbound call or transfer is rejected after authentication
Check the following on your DIDWW account and outbound trunk:
The caller ID is permitted by CLI Settings. For transfers, check whether the original caller’s number is permitted by the trunk’s CLI Settings.
Calls to the destination are allowed.
The trunk has not reached its 24 hour limit (USD) or Capacity limit.
Your account balance is sufficient.