

OpenAI#
Route incoming calls from your DIDWW numbers directly to the OpenAI Realtime API over encrypted SIP, and place outbound calls with GPT-Live through a DIDWW Outbound SIP Trunk. Use a server-side WebSocket connection (sideband) to control sessions, handle tool requests, and transfer incoming callers to a live person.
Give callers a natural, conversational experience.
Protect call audio and signaling with encryption.
Tailor your agent’s responses to your business.
Reach customers with AI-powered outbound calls.
Hand callers over to your team when they need a person.
Connect your own tools, data, and workflows.
Note
This guide uses the OpenAI Realtime API for incoming calls and the Live API for outbound calls. Each API has its own event names, identifiers, endpoints, and request formats; follow the examples for that call flow.
This direct SIP setup requires your own application server. For incoming calls, the server must receive webhooks over public HTTPS and accept or reject each call. For other setup options, browse the AI voice agent integrations.
1. Route Incoming Calls to OpenAI Realtime#
Configure an Inbound SIP Trunk in the DIDWW User Panel to send incoming calls from your DIDWW numbers to the OpenAI SIP endpoint. This trunk delivers calls to your OpenAI project, where OpenAI announces each call to your webhook server, and is configured to support SIP REFER call transfers.
Before You Begin#
An active DIDWW account is required. Sign in to DIDWW or Create DIDWW account.
At least one active DID number with capacity to receive incoming calls is required. Buy Numbers.
An OpenAI platform project with API billing and access to the Realtime API is required.
Your OpenAI project ID is required. Open OpenAI settings. Project settings opens on the General tab, where you can copy the Project ID (it starts with
proj_). Use the same project for the API key and webhook in 3. Handle Incoming Calls with OpenAI Realtime.
Important
The project ID in the SIP address and the webhook must belong to the same OpenAI project. If they do not, your server will not receive the incoming-call event for that project and the call can fail.
Step 1: Create New SIP Trunk#
In the DIDWW User Panel, go to Voice > Inbound Trunks.
Click Create New > SIP Trunk.
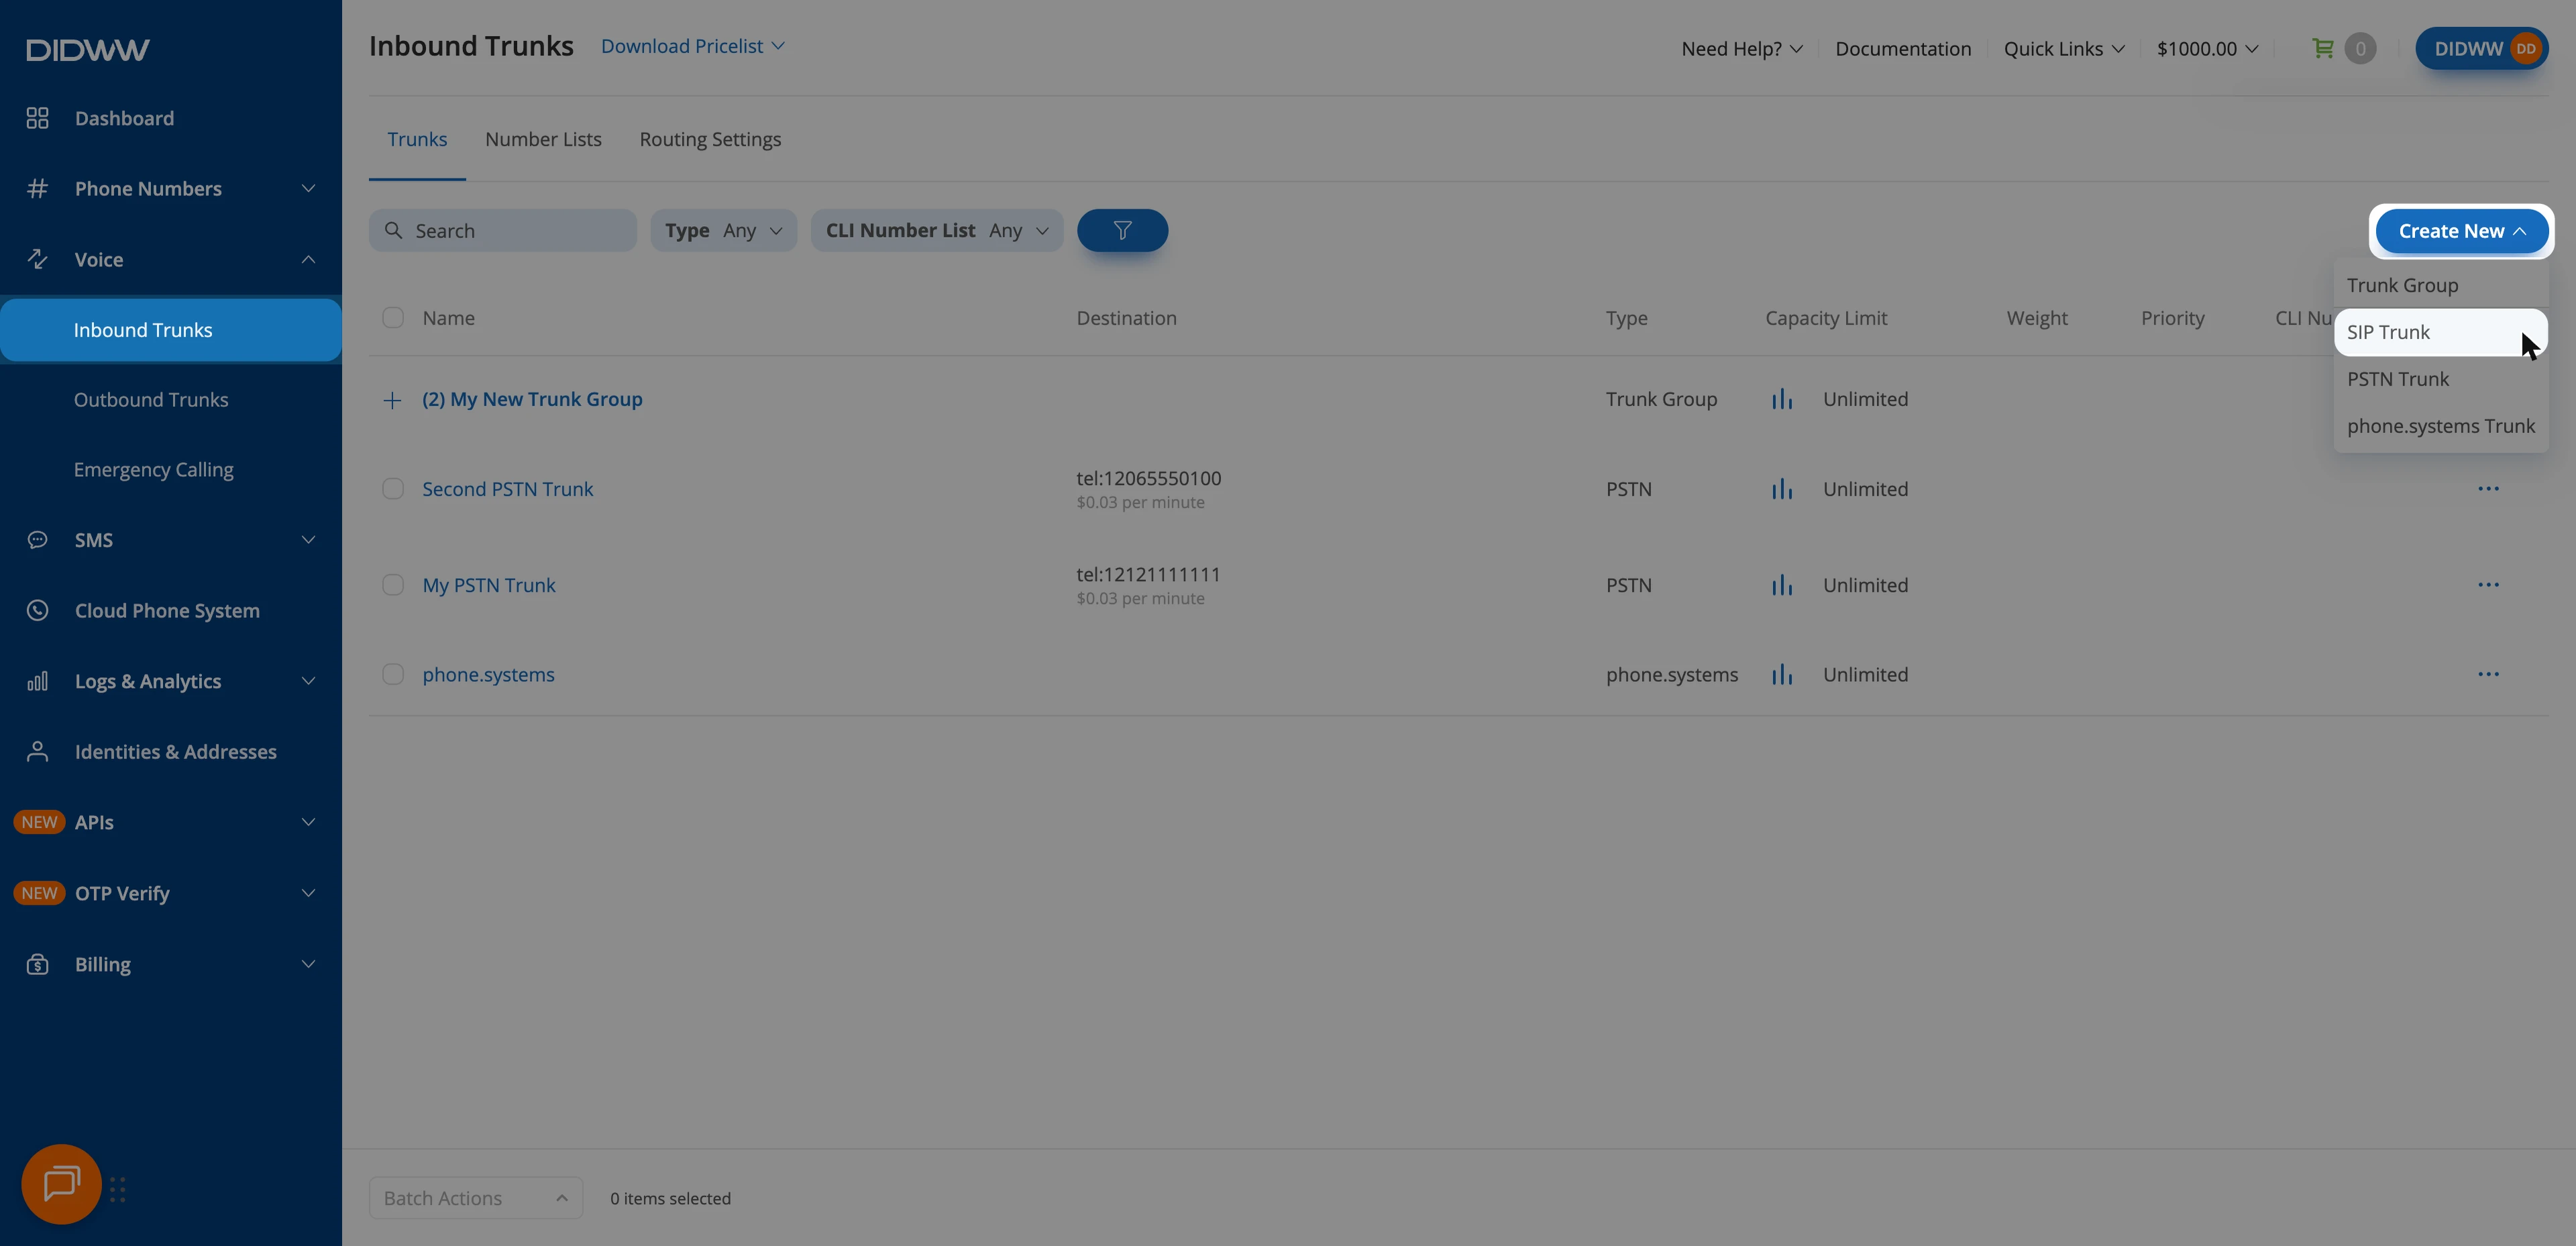
Fig. 1. Inbound Trunks: Create New > SIP Trunk#
Step 2: Configure General SIP Trunk Settings#
In the General tab, configure the OpenAI SIP endpoint.
Enter a descriptive Name for the trunk (e.g.,
OpenAI Realtime).Keep Static Endpoint selected.
In User Part of R-URI, enter your OpenAI project ID (e.g.,
proj_AbC123dEf456GhI789jKl0). To find it, open OpenAI settings. Project settings opens on the General tab, where the Project ID is shown. Use the same project when creating the API key and webhook.In Host, enter
sip.api.openai.com. For projects with European data residency, entersip-eu.api.openai.com.In Port, enter
5061.In Transport, select TLS. OpenAI requires TLS signaling.
In Network Protocol, select IPv4 only so call transfers use the IPv4 signaling addresses allowed on the outbound trunk.
Keep the remaining General settings at their defaults.
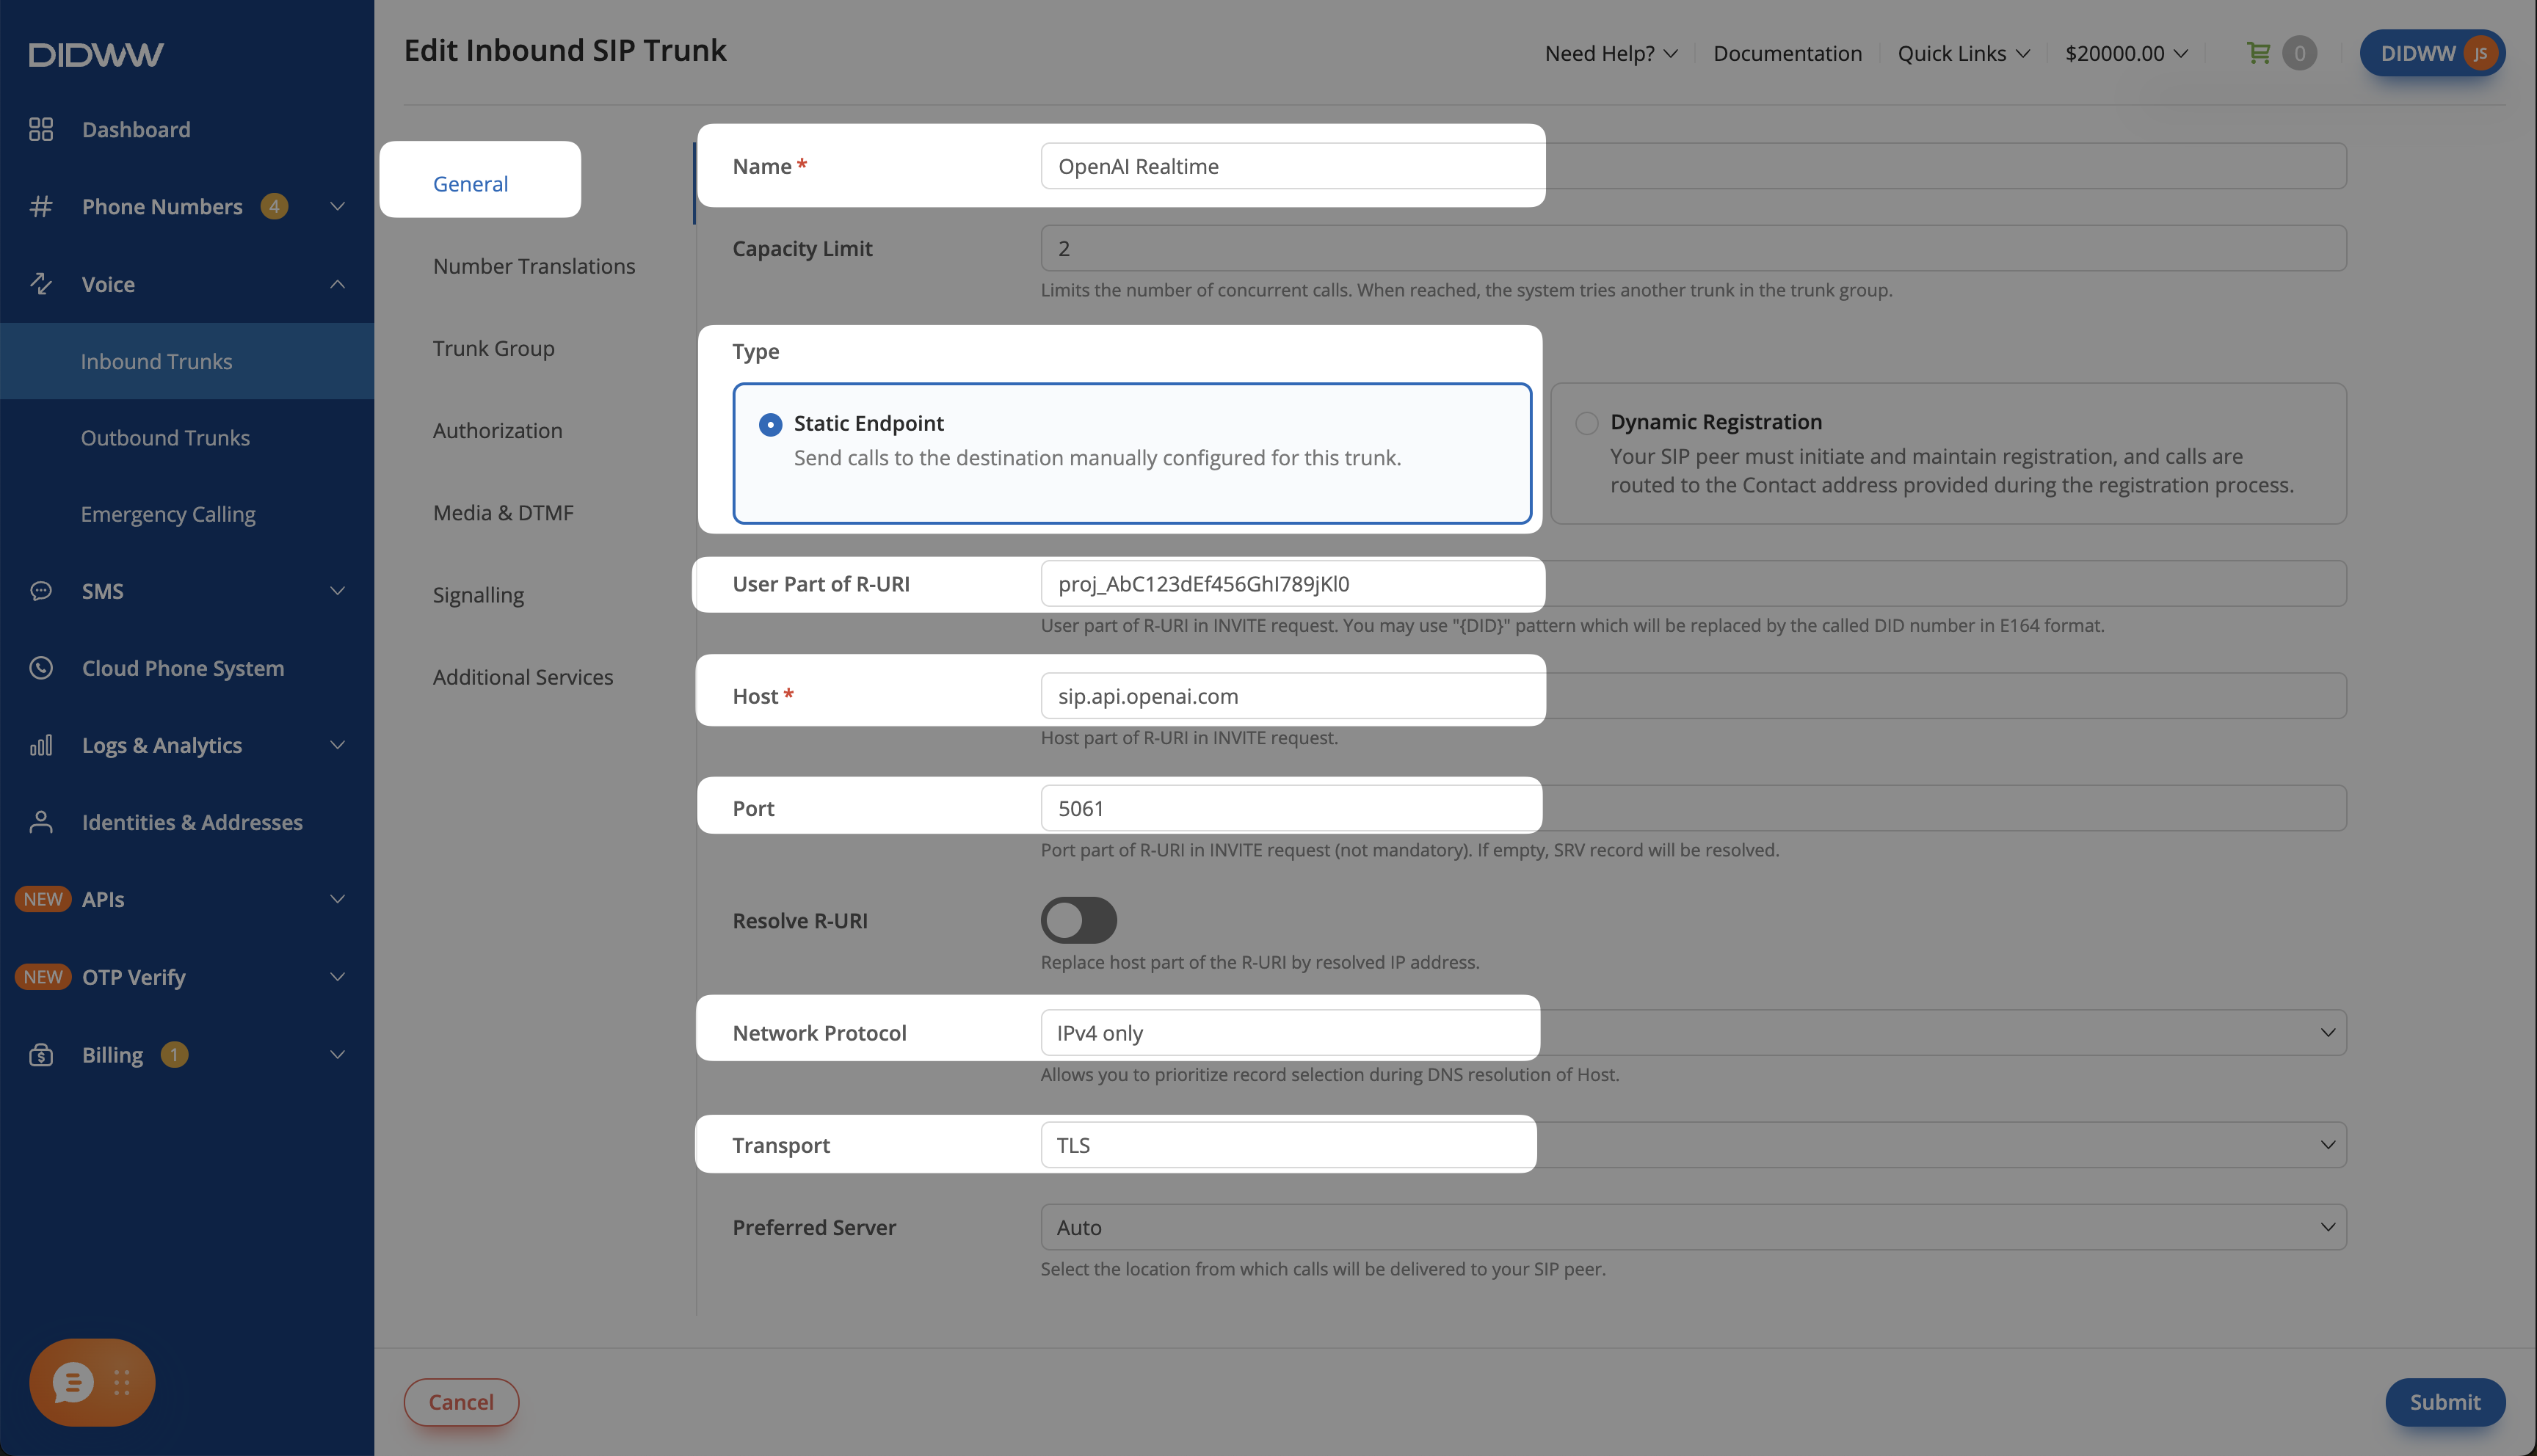
Fig. 2. Inbound SIP trunk General tab configured for OpenAI Realtime#
Note
proj_AbC123dEf456GhI789jKl0 is a fictional project ID used only as an example. Replace it with your own project ID.
Step 3: Configure Media & DTMF#
Use SRTP SDES for encrypted media in this setup.
Open the Media & DTMF tab.
In SRTP Mode, select SRTP SDES.
In Codecs, keep only PCMU, PCMA, and telephone-event, and remove the other codecs.
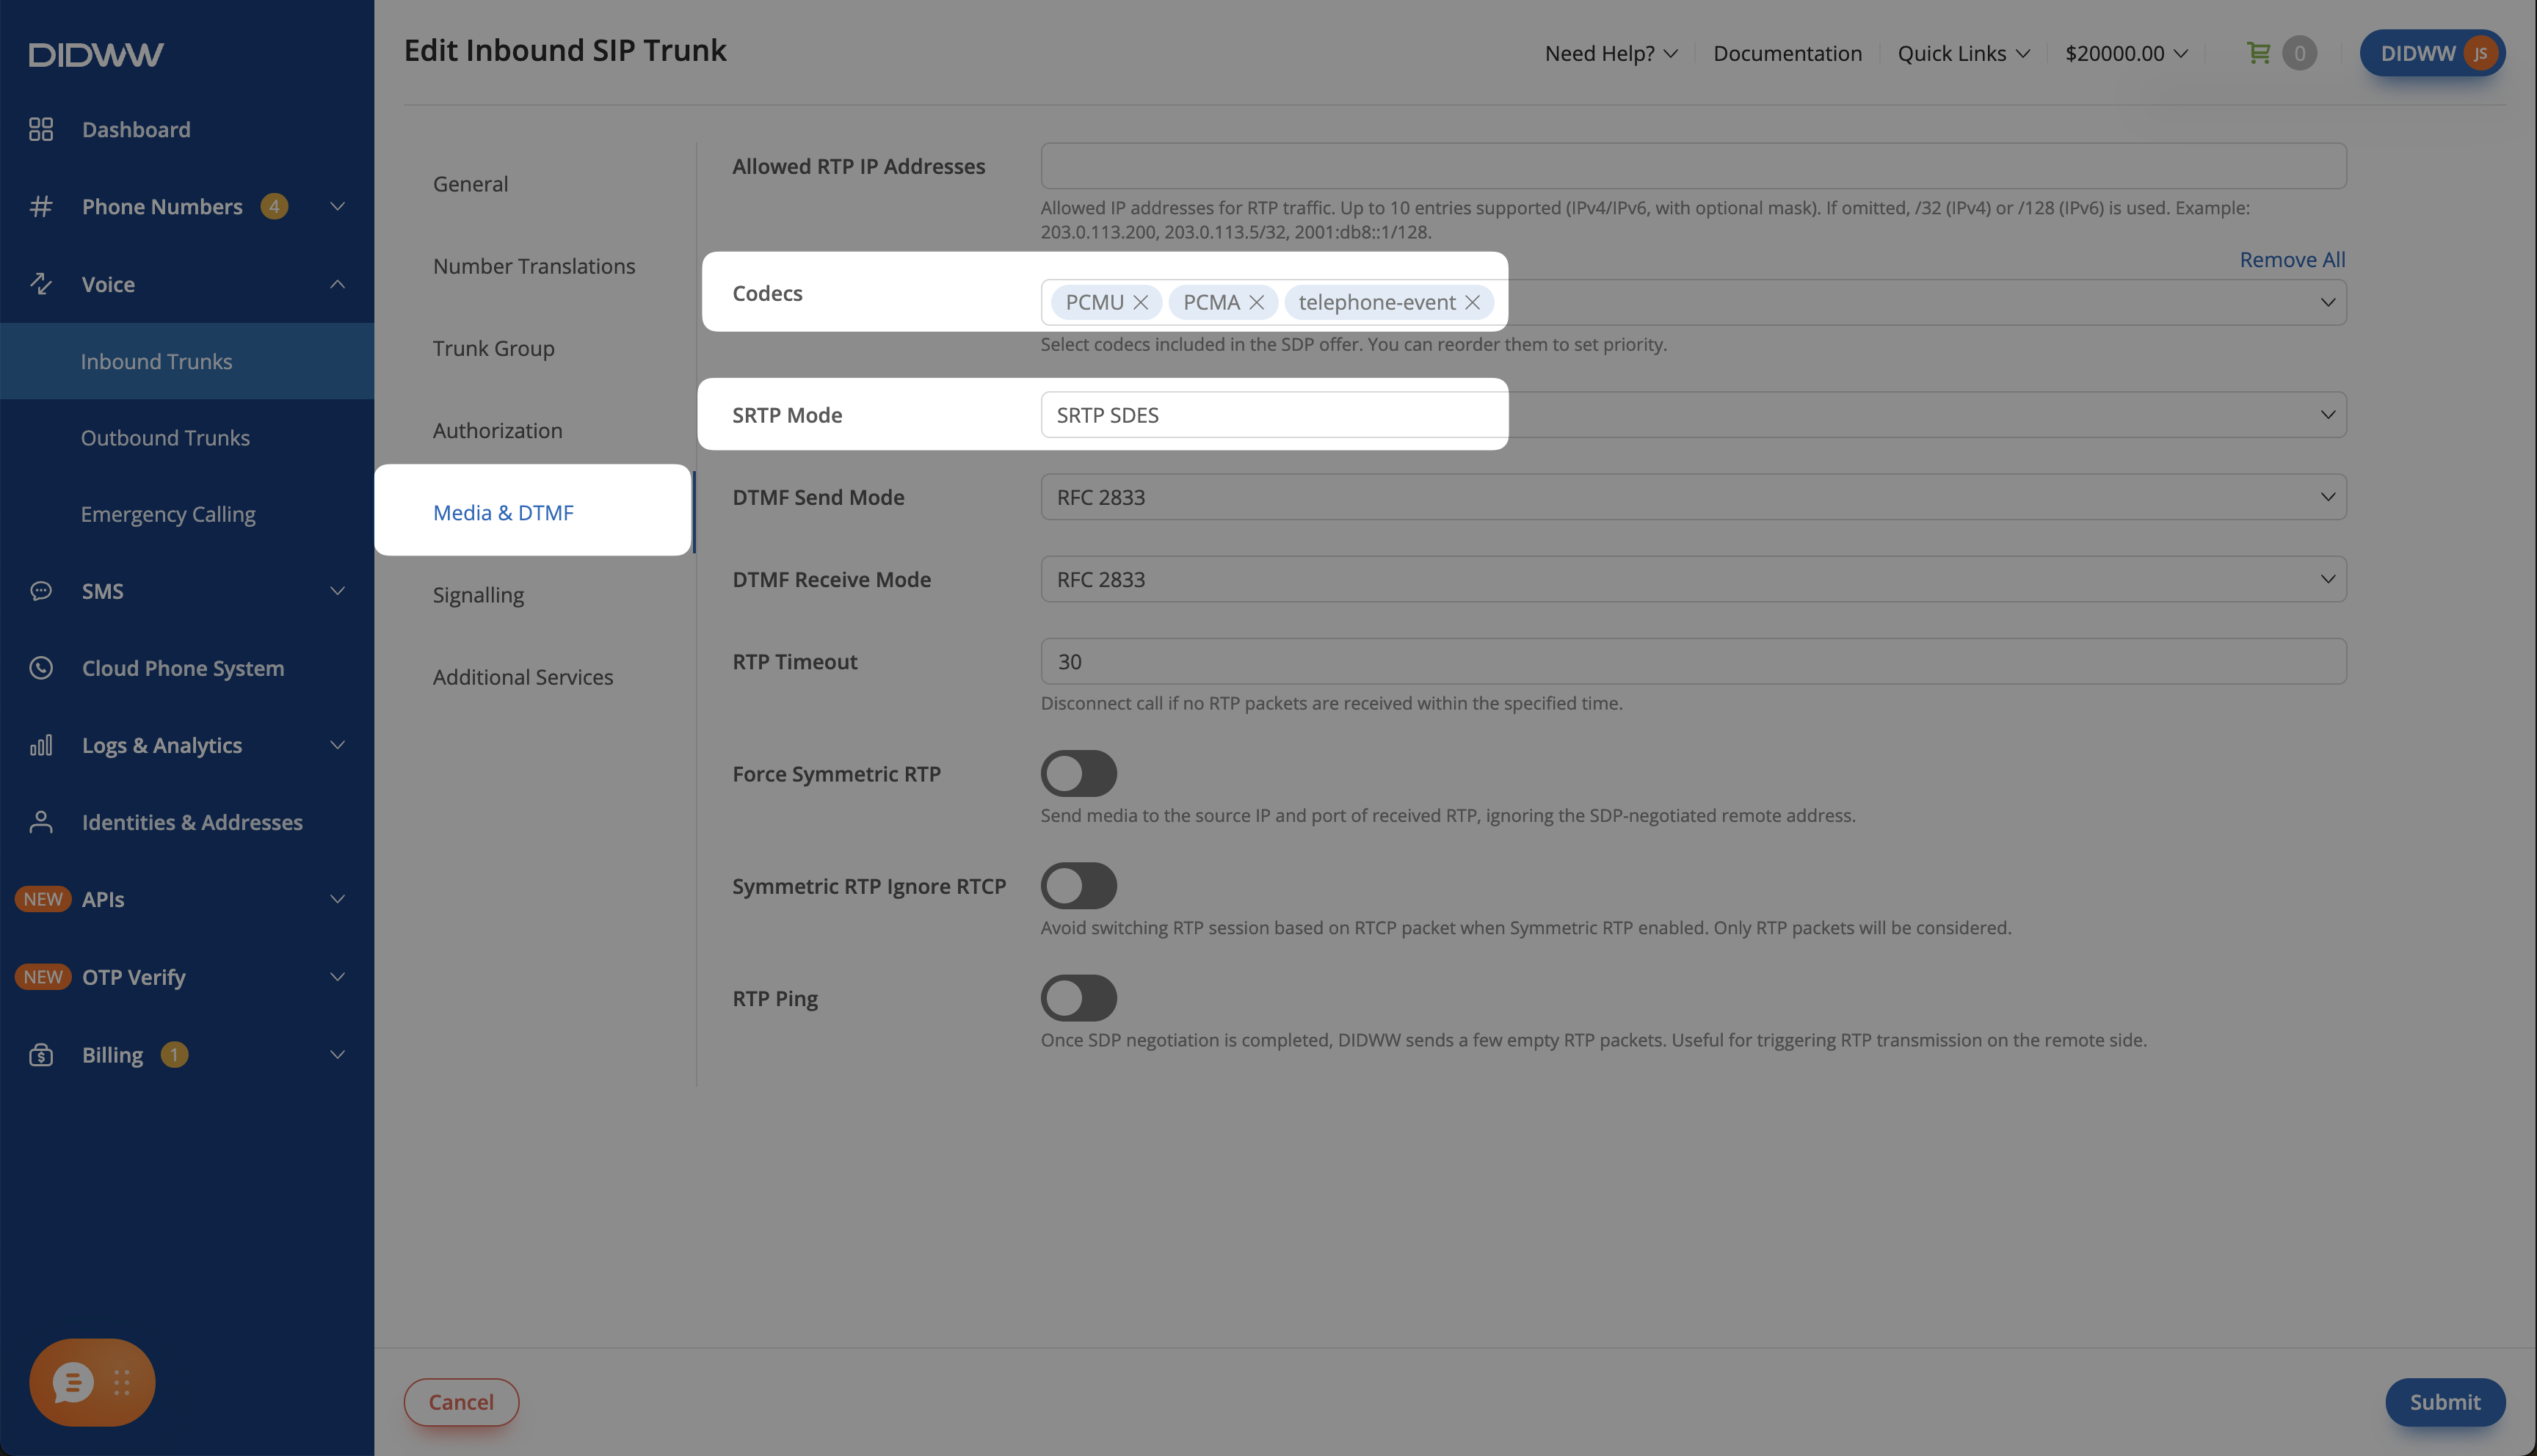
Fig. 3. SRTP SDES and codecs on the Media & DTMF tab#
Step 4: Enable Call Transfer Signaling#
To support call transfers, configure the inbound trunk to allow in-dialog SIP REFER requests.
Open the Signalling tab.
Set Max Transfers to
1or higher.
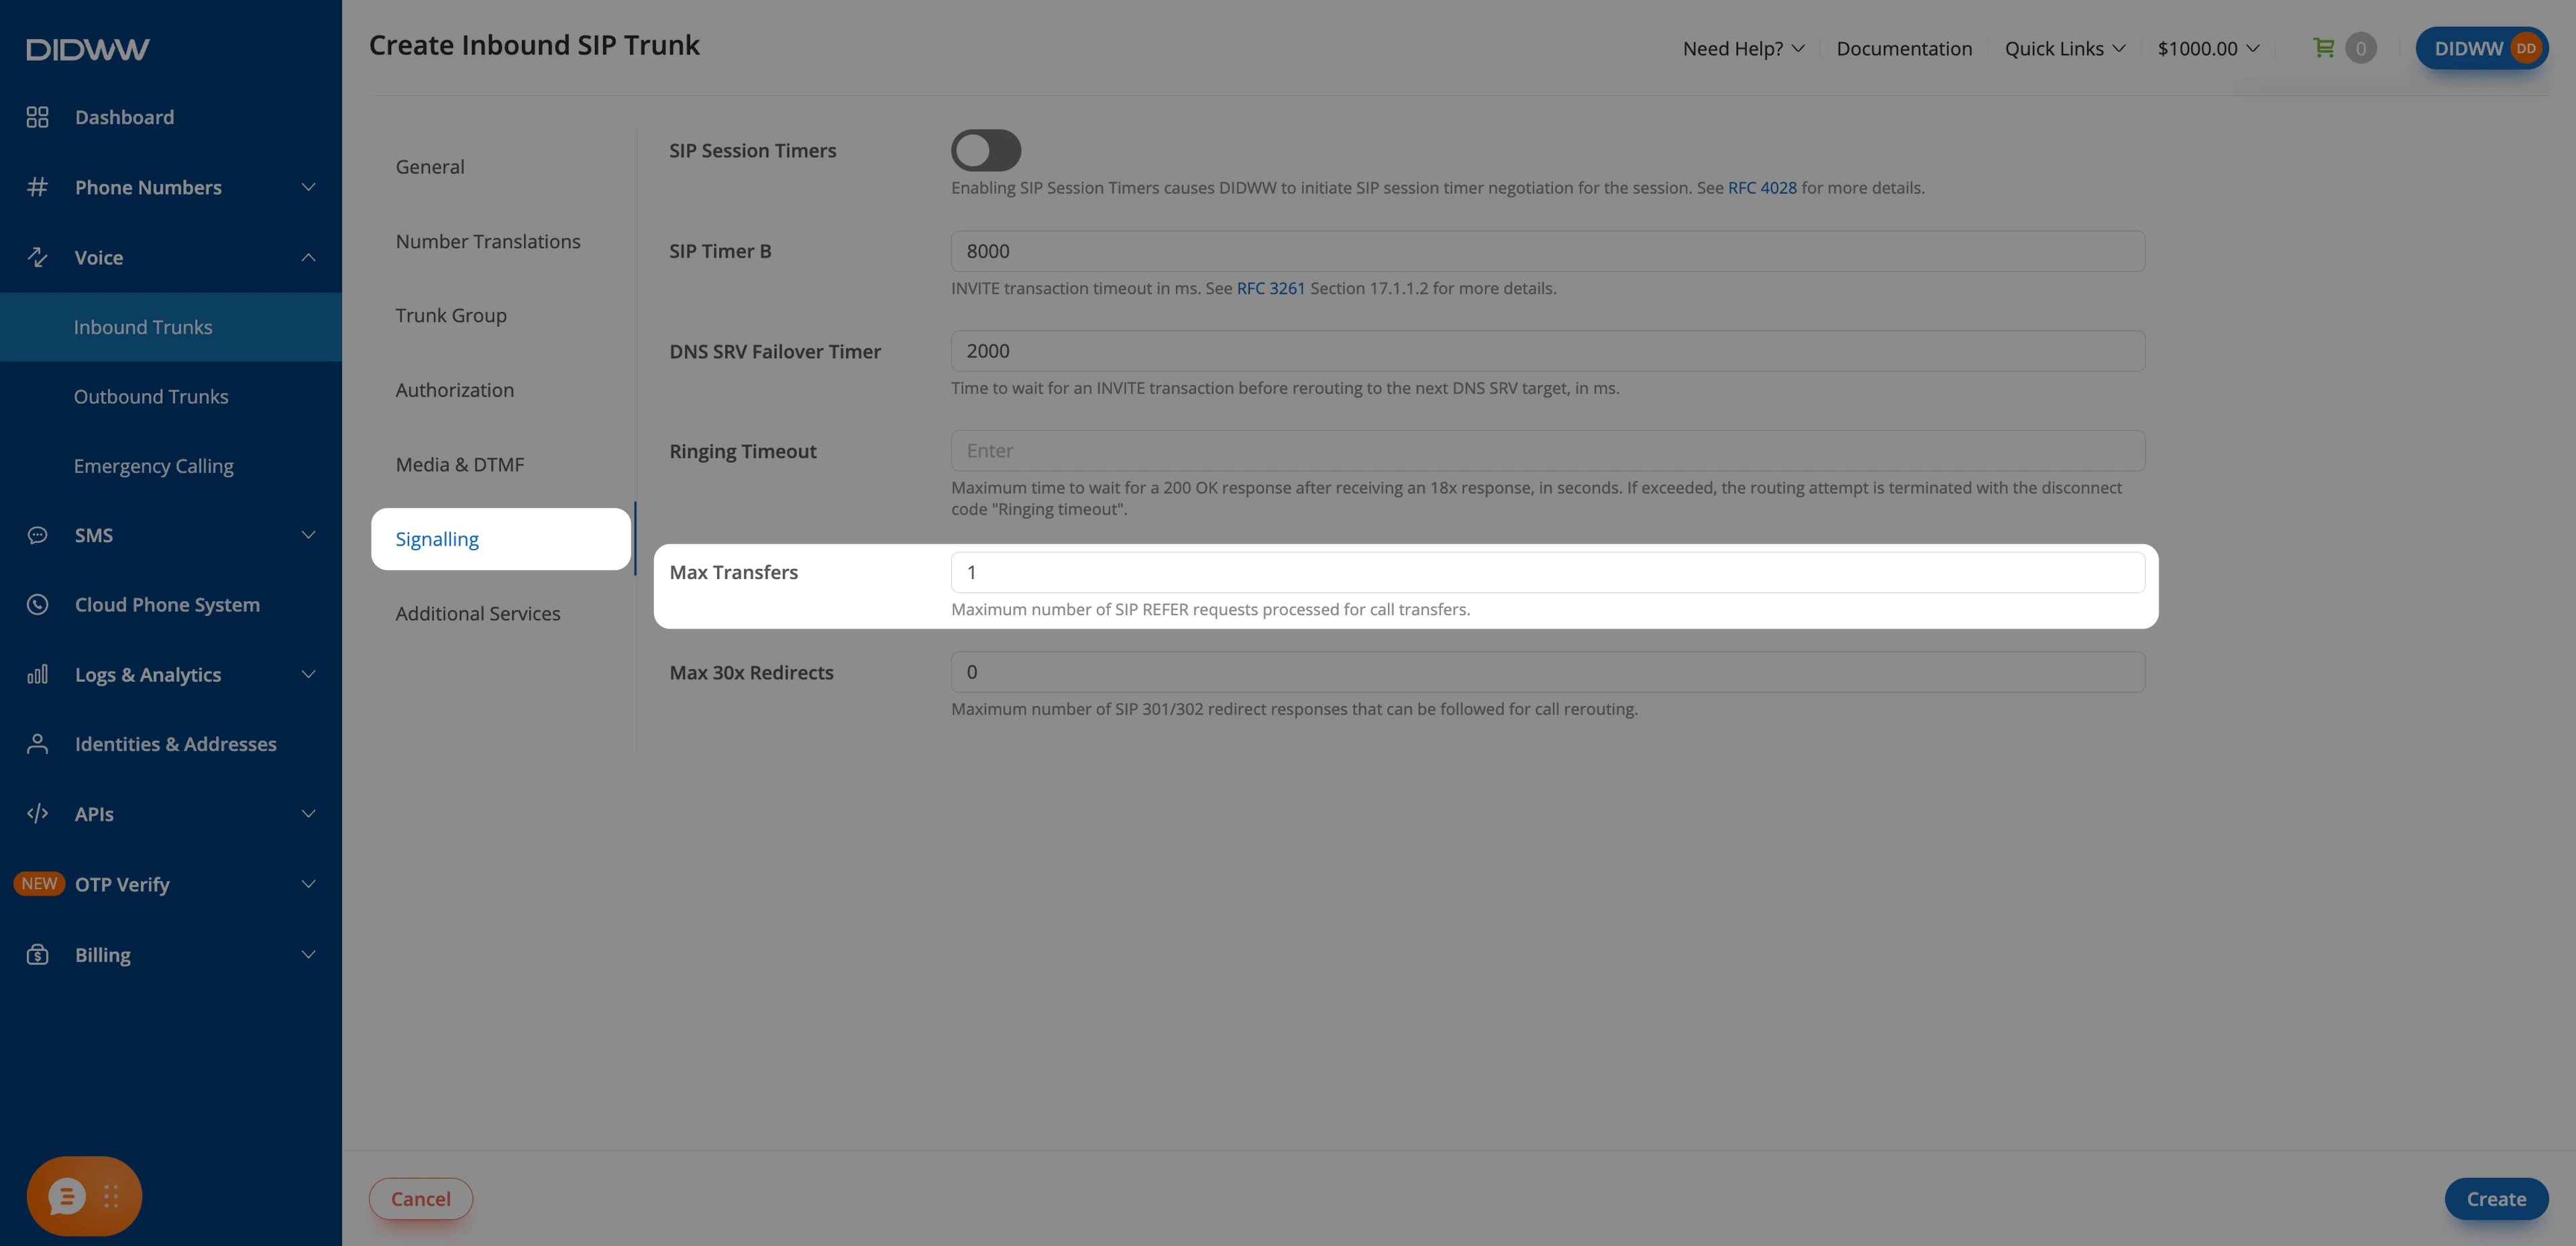
Fig. 4. Enabling call transfer signaling#
Step 5: Save the Inbound SIP Trunk#
When all required fields in the Create Inbound SIP Trunk are filled, click Create to save your inbound SIP trunk.
Note
For advanced SIP trunk configuration, see Advanced Inbound SIP Trunk documentation.
Note
DIDWW sends the called DID number to OpenAI in the SIP Diversion header (e.g., <sip:+15105550100@sip.didww.com>;reason=unconditional), while the To header contains your project ID.
Keep the default Diversion setting on the trunk, which adds the called number as +DID. Your server uses this header to recognize which DIDWW number was called. See Step 3.
Step 6: Assign Inbound SIP Trunk to Your DID Numbers#
After creating the Inbound SIP Trunk for OpenAI Realtime, assign it to the DID number(s) that will deliver incoming calls to your agent.
In the DIDWW User Panel, go to Phone Numbers > My Numbers.
Select the DID number(s) you want to assign to the inbound SIP trunk.
At the bottom of the page, click Batch Actions > Update Trunks.
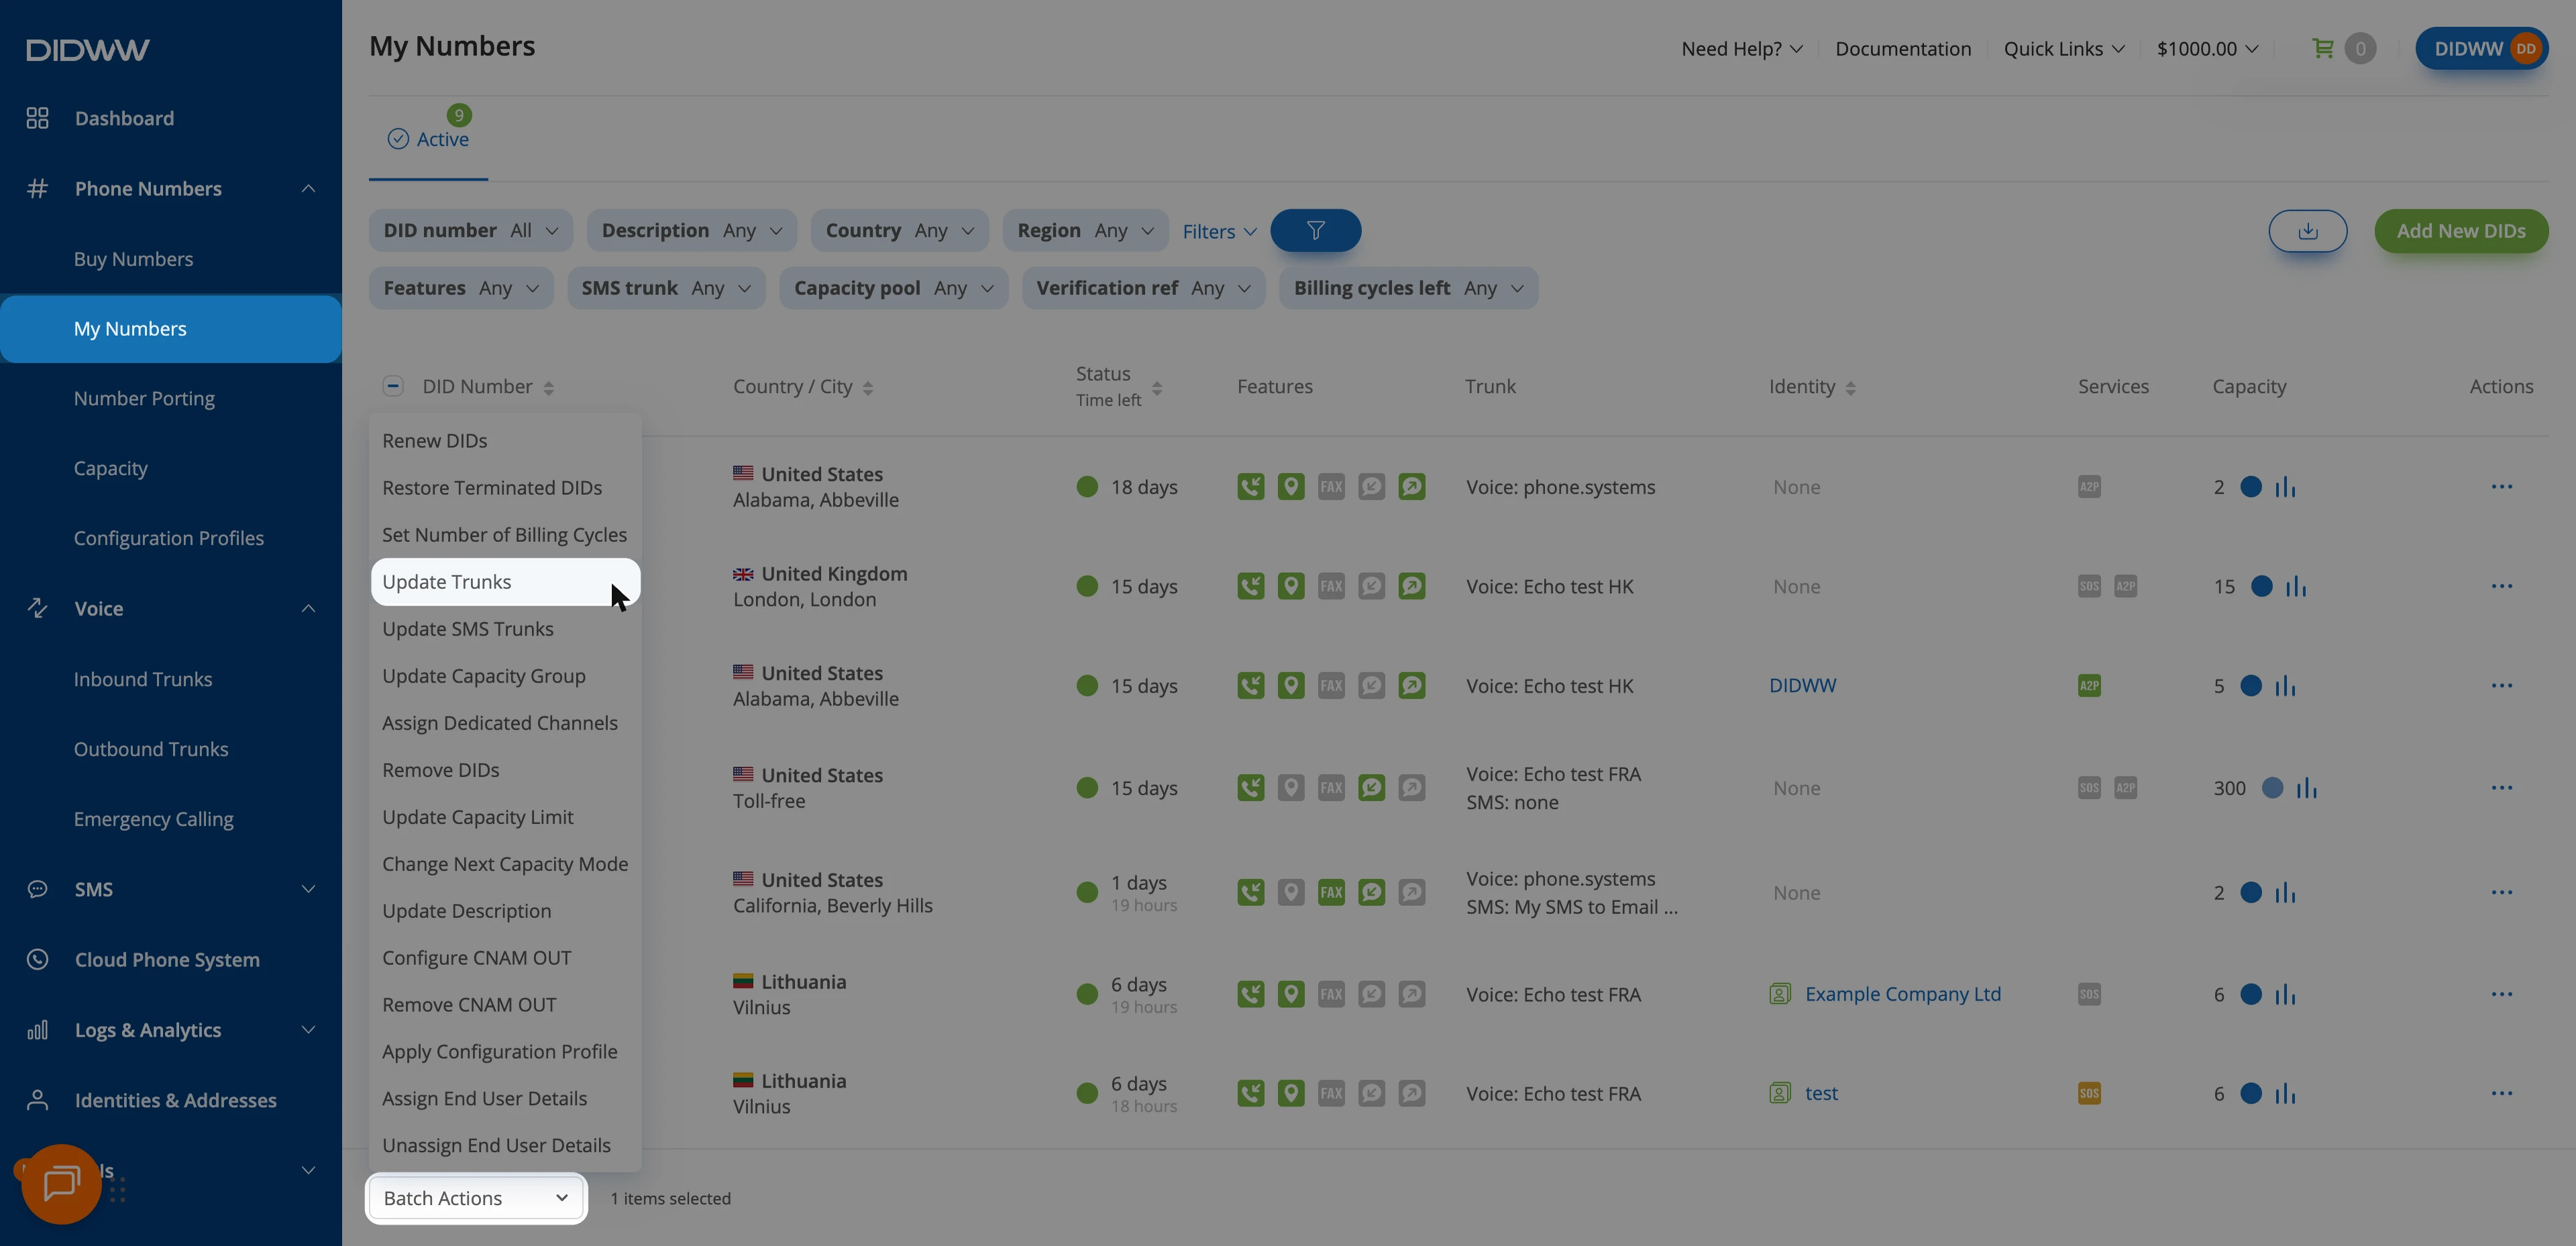
Fig. 5. Selecting Update Trunks from the Batch Actions menu#
From the dropdown menu, choose the OpenAI Realtime SIP trunk you created earlier.
Click Confirm to apply the changes.
2. Configure a DIDWW Outbound SIP Trunk#
Configure an Outbound SIP Trunk in the DIDWW User Panel for GPT-Live outbound calls and for calls that DIDWW places when your Realtime agent transfers a caller to a live person. The trunk provides the SIP credentials used for both call types.
Note
Skip this section if you only receive calls and do not use call transfers.
Before You Begin#
Access to DIDWW Outbound Trunks is required for outbound calls and call transfers. See Get Access to DIDWW Outbound Termination.
Step 1: Create New Outbound Voice Trunk#
In the DIDWW User Panel, go to Voice > Outbound Trunks.
Click Create New.
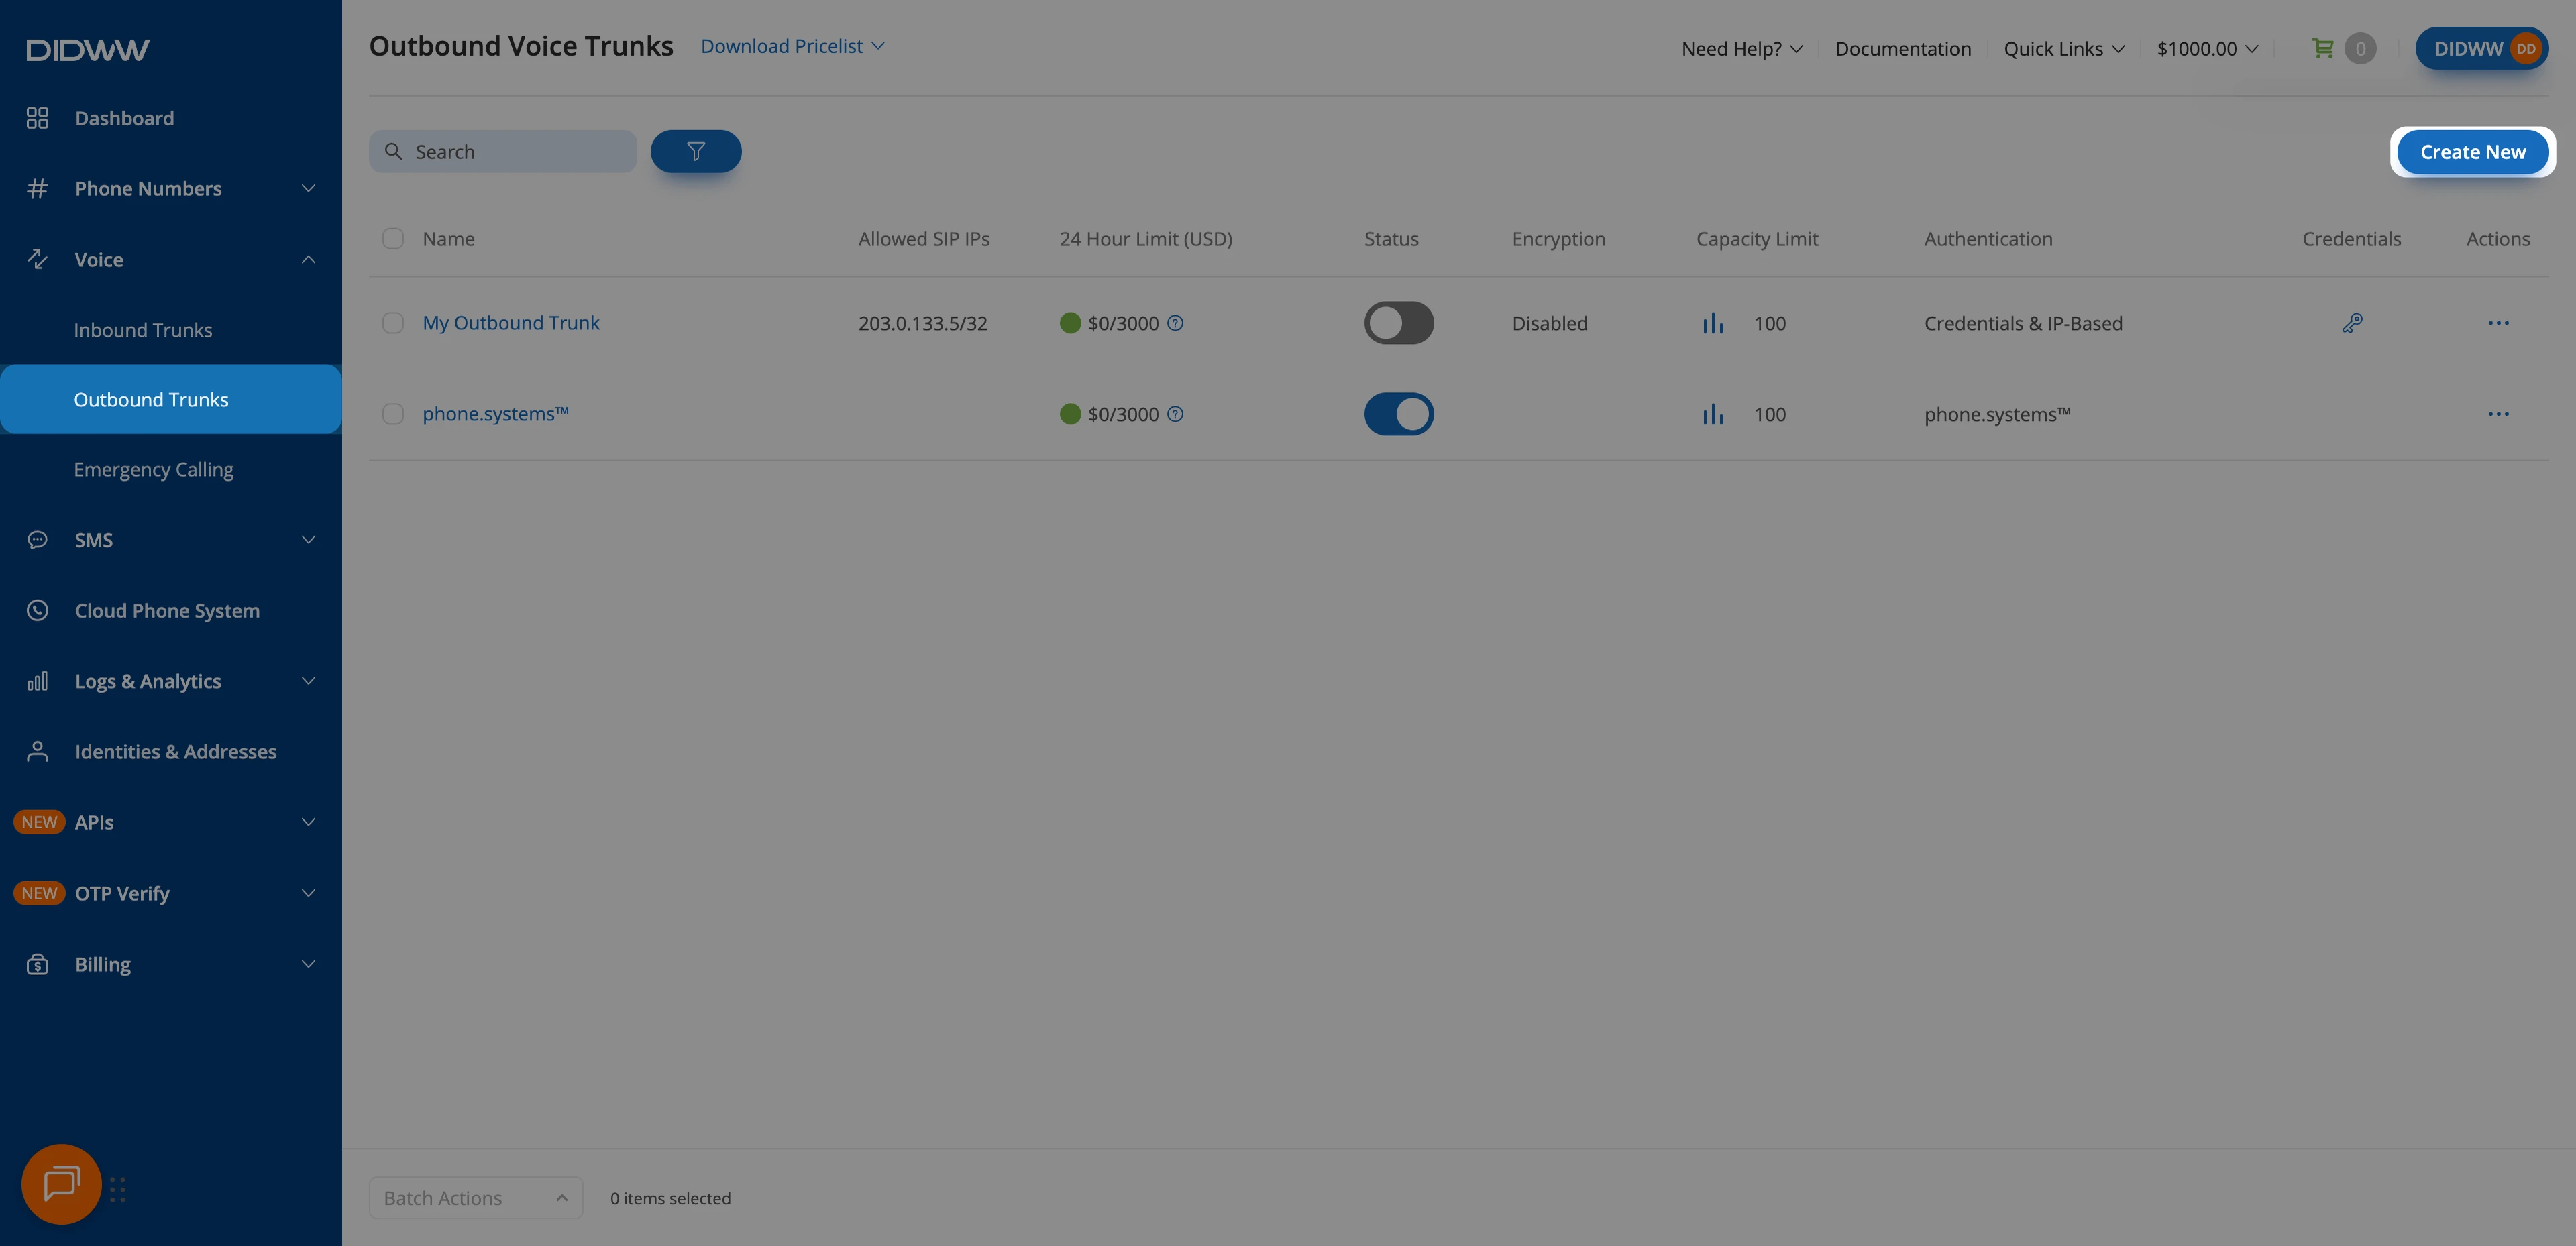
Fig. 6. Outbound Trunks: Create New#
Step 2: Configure Authentication#
Update the Friendly name (e.g.,
OpenAI Realtime).Keep the default Credentials & IP-based authentication method selected. The SIP digest credentials (username and password) will be provided after the trunk is created.
For call transfers, add the following DIDWW inbound SIP addresses in Allowed SIP IP addresses:
46.19.209.14 46.19.210.14 46.19.212.14 46.19.213.14 46.19.214.14 46.19.215.14 185.238.173.14
DIDWW uses these signaling addresses to place transferred calls. See Static Endpoint signaling addresses.
For GPT-Live outbound calls, keep the DIDWW addresses used for call transfers and add the following OpenAI ranges in Allowed SIP IP addresses:
13.79.45.80/28 23.98.140.64/28 40.67.149.176/28 40.83.204.240/28
Note
Add the four OpenAI ranges above to the outbound trunk’s Allowed SIP IP addresses. They were required for successful GPT-Live outbound calls in the tested setup. OpenAI publishes these ranges under SRTP media in its SIP signaling and media IP ranges documentation.
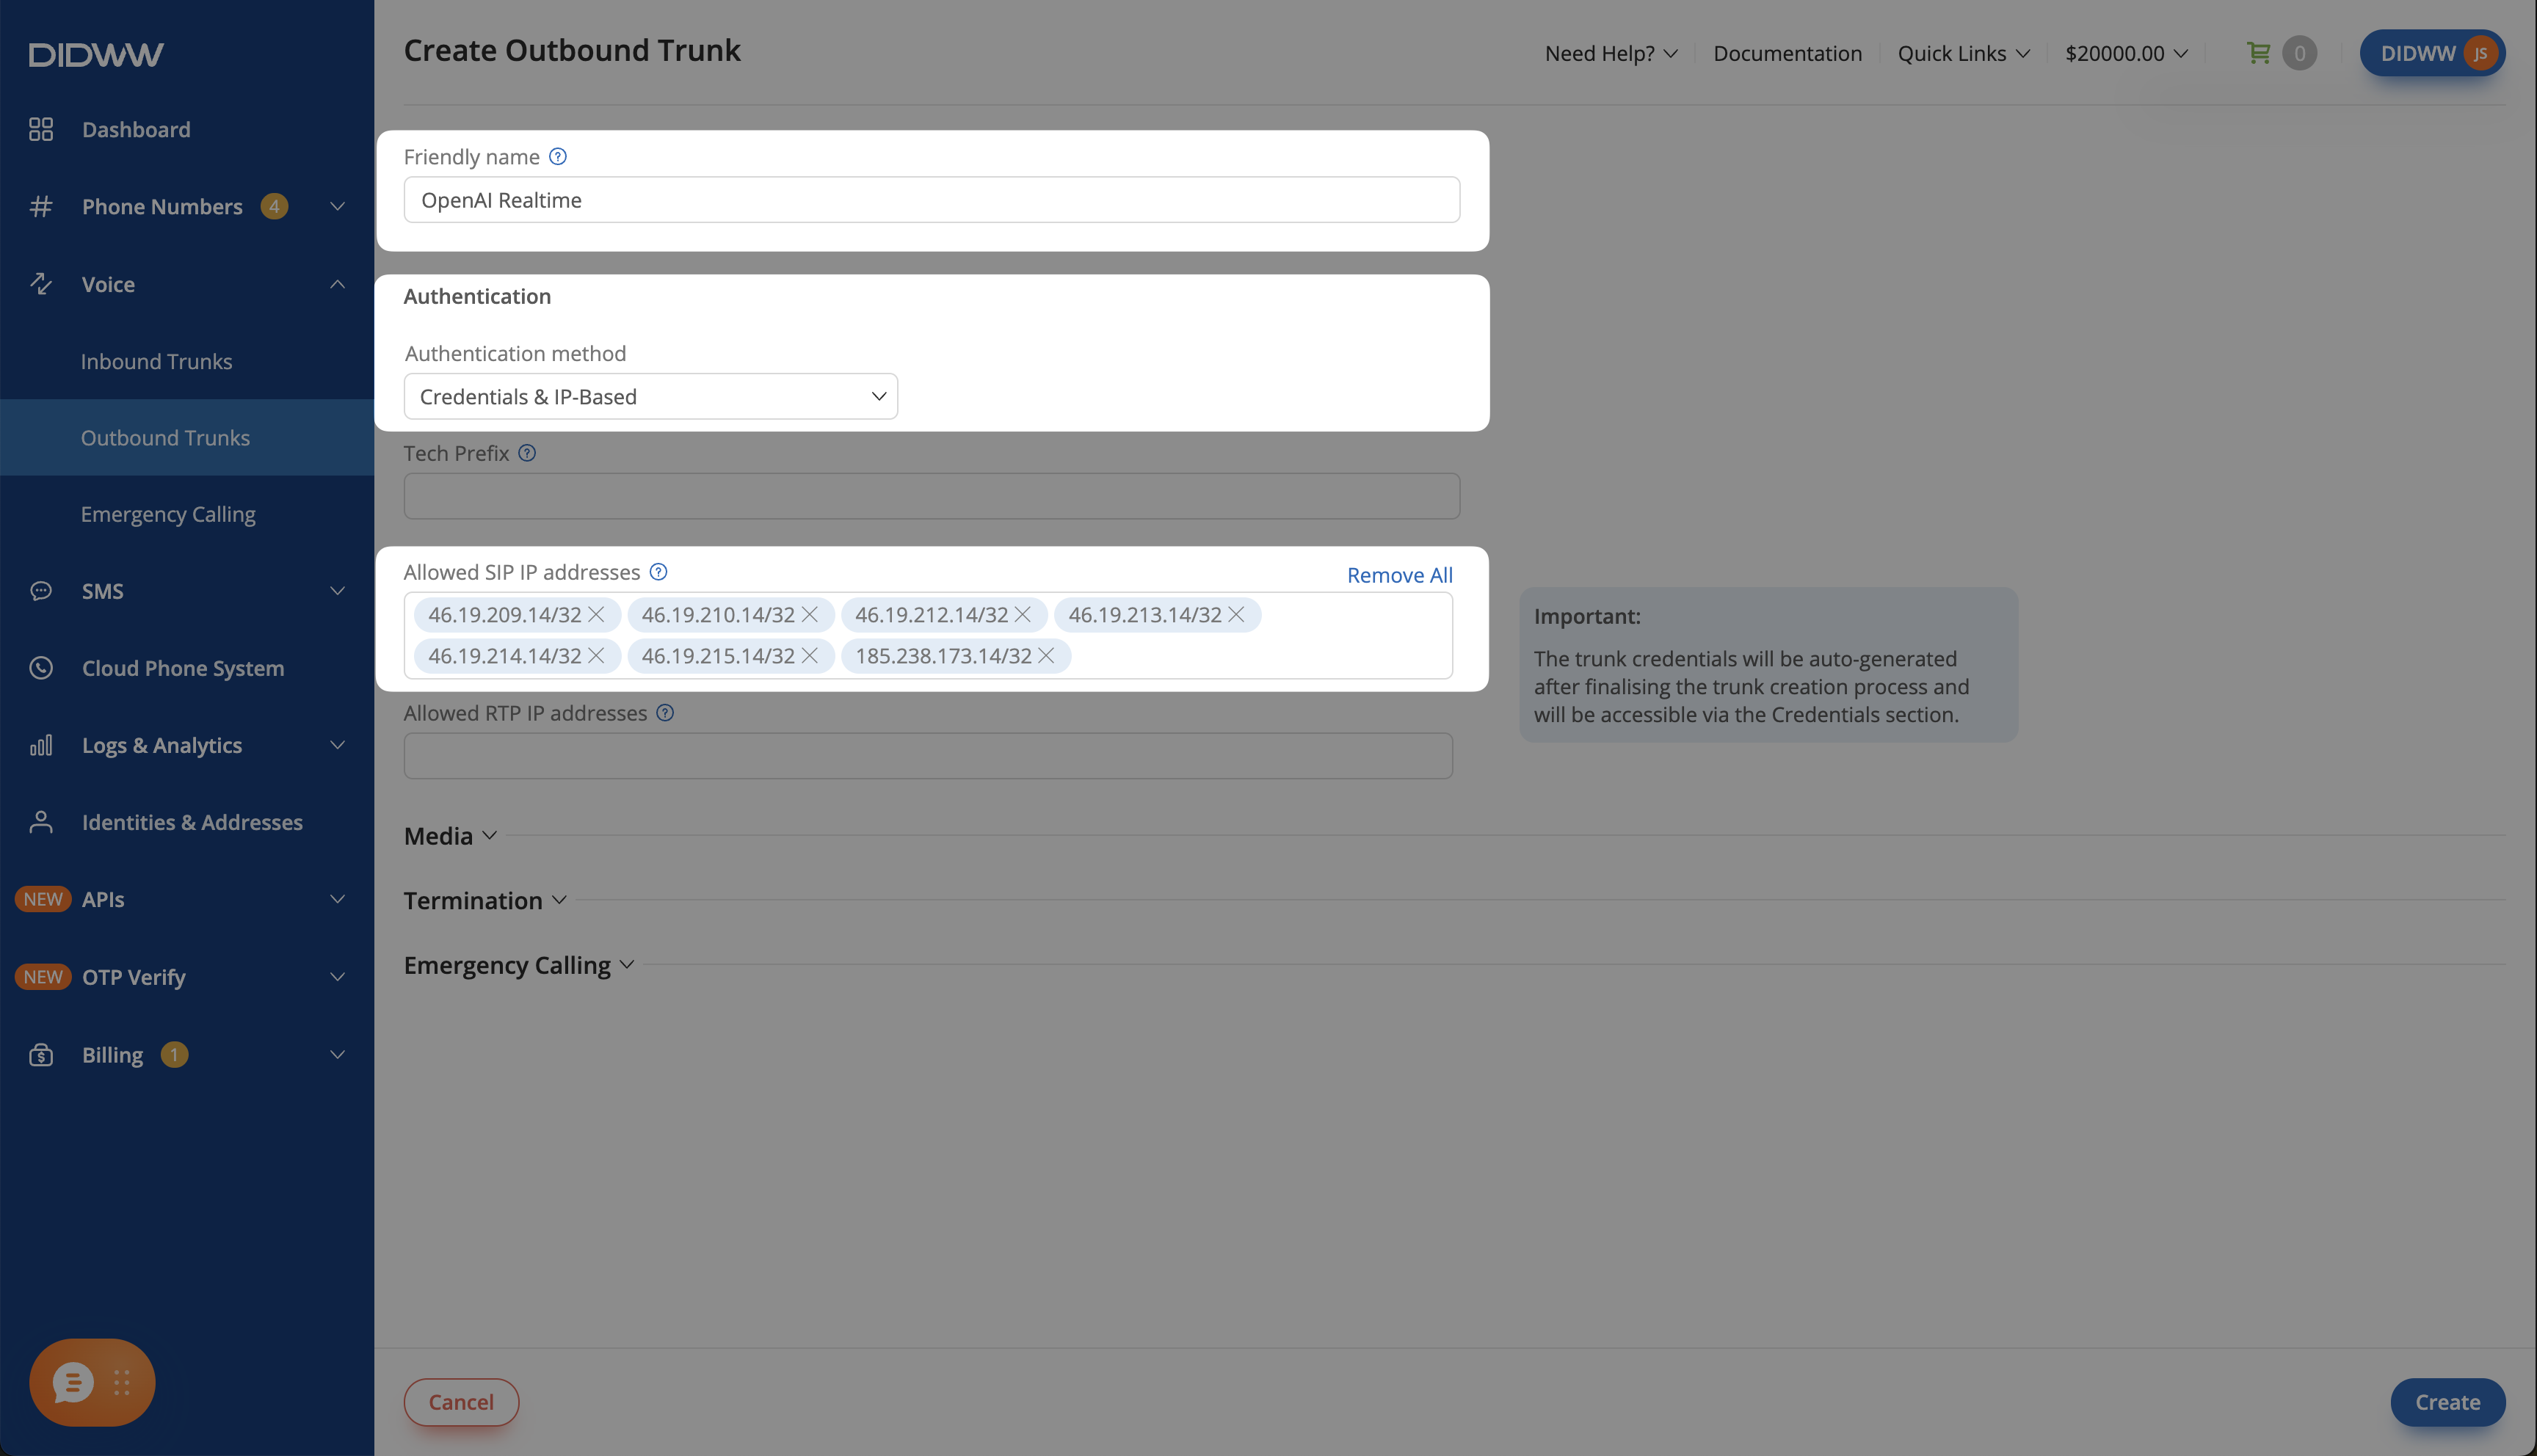
Fig. 7. Entering the DIDWW inbound SIP addresses for outbound authentication#
Step 3: Configure Media Encryption#
Use SRTP SDES on the outbound trunk for encrypted media on outbound calls and call transfers.
Expand Media.
In Media encryption mode, select SRTP SDES.
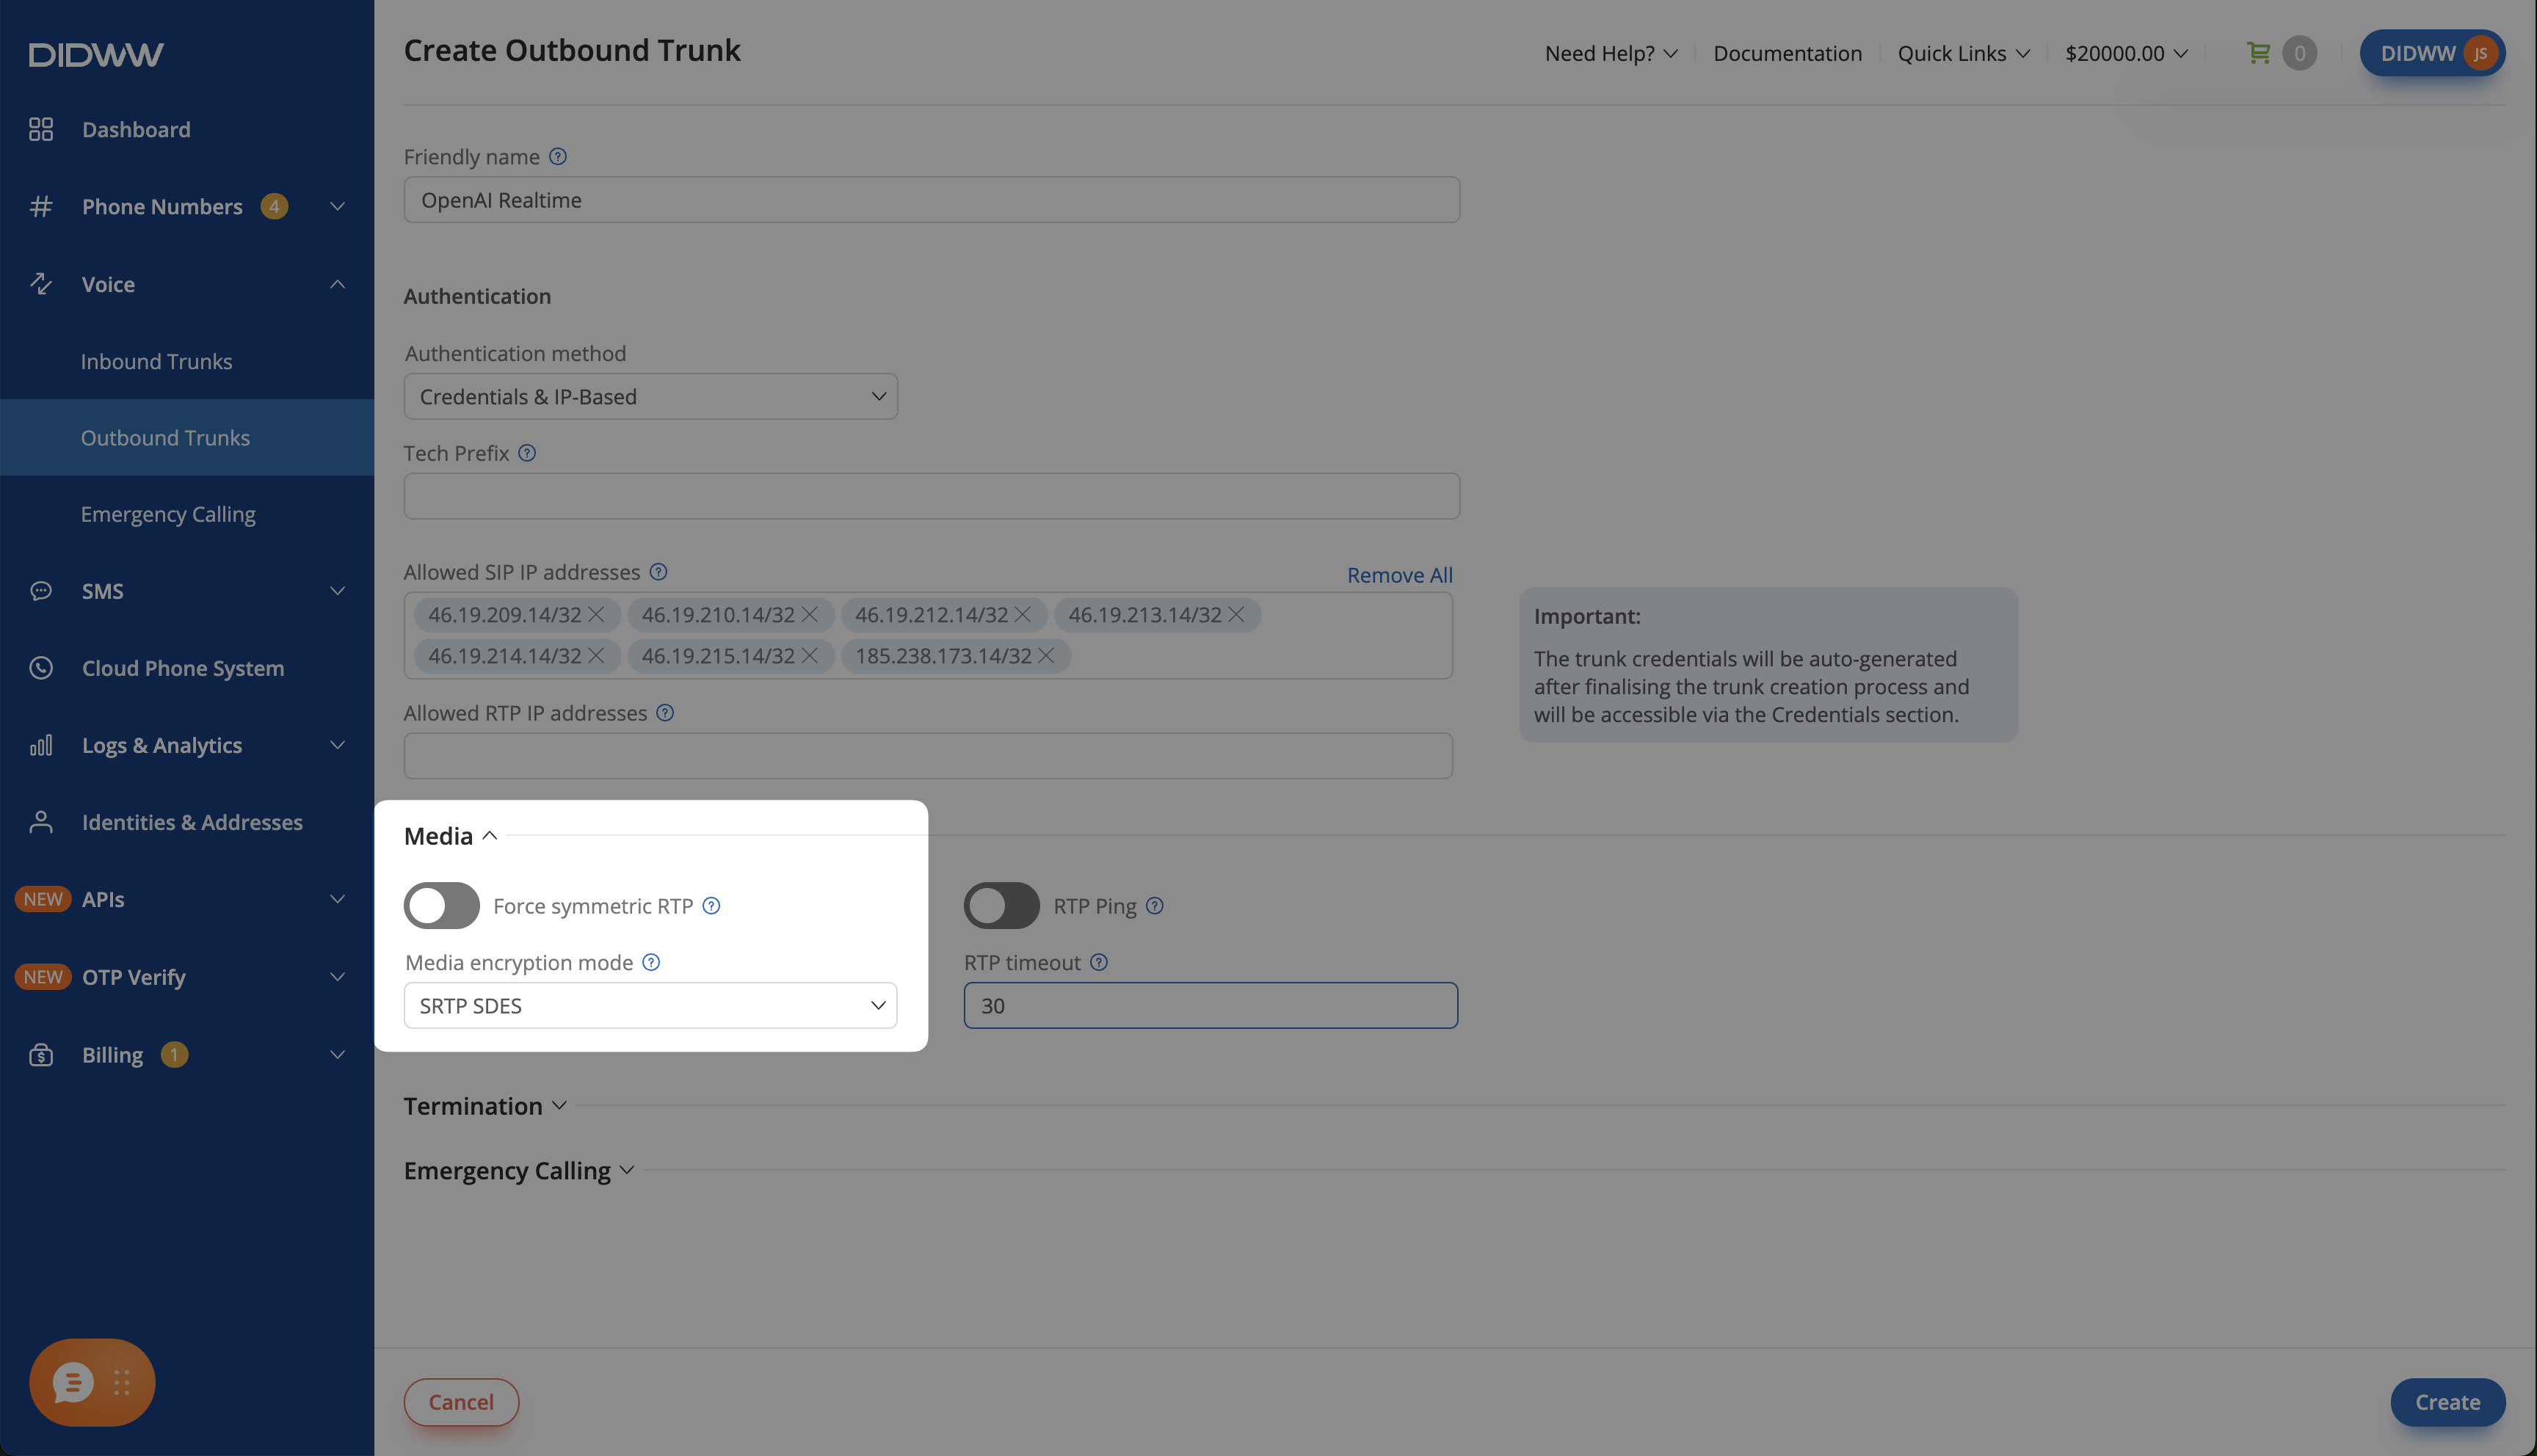
Fig. 8. Media encryption mode set to SRTP SDES#
Important
A mismatched Media encryption mode can cause an outbound call or transfer to fail with 500 No suitable media. Use a separate outbound trunk for OpenAI if another integration on your account needs unencrypted media.
Step 4: Save the Outbound SIP Trunk#
When all required fields in the Create Outbound SIP Trunk are filled, click Create to save your outbound SIP trunk.
Note
Outbound calls and transferred calls are charged at the outbound rate for the destination. To limit spending, set a low 24 hour limit (USD) in the Termination section, and allow only the destinations you call or transfer to.
For advanced outbound SIP trunk configuration, see Outbound SIP Trunk Guide.
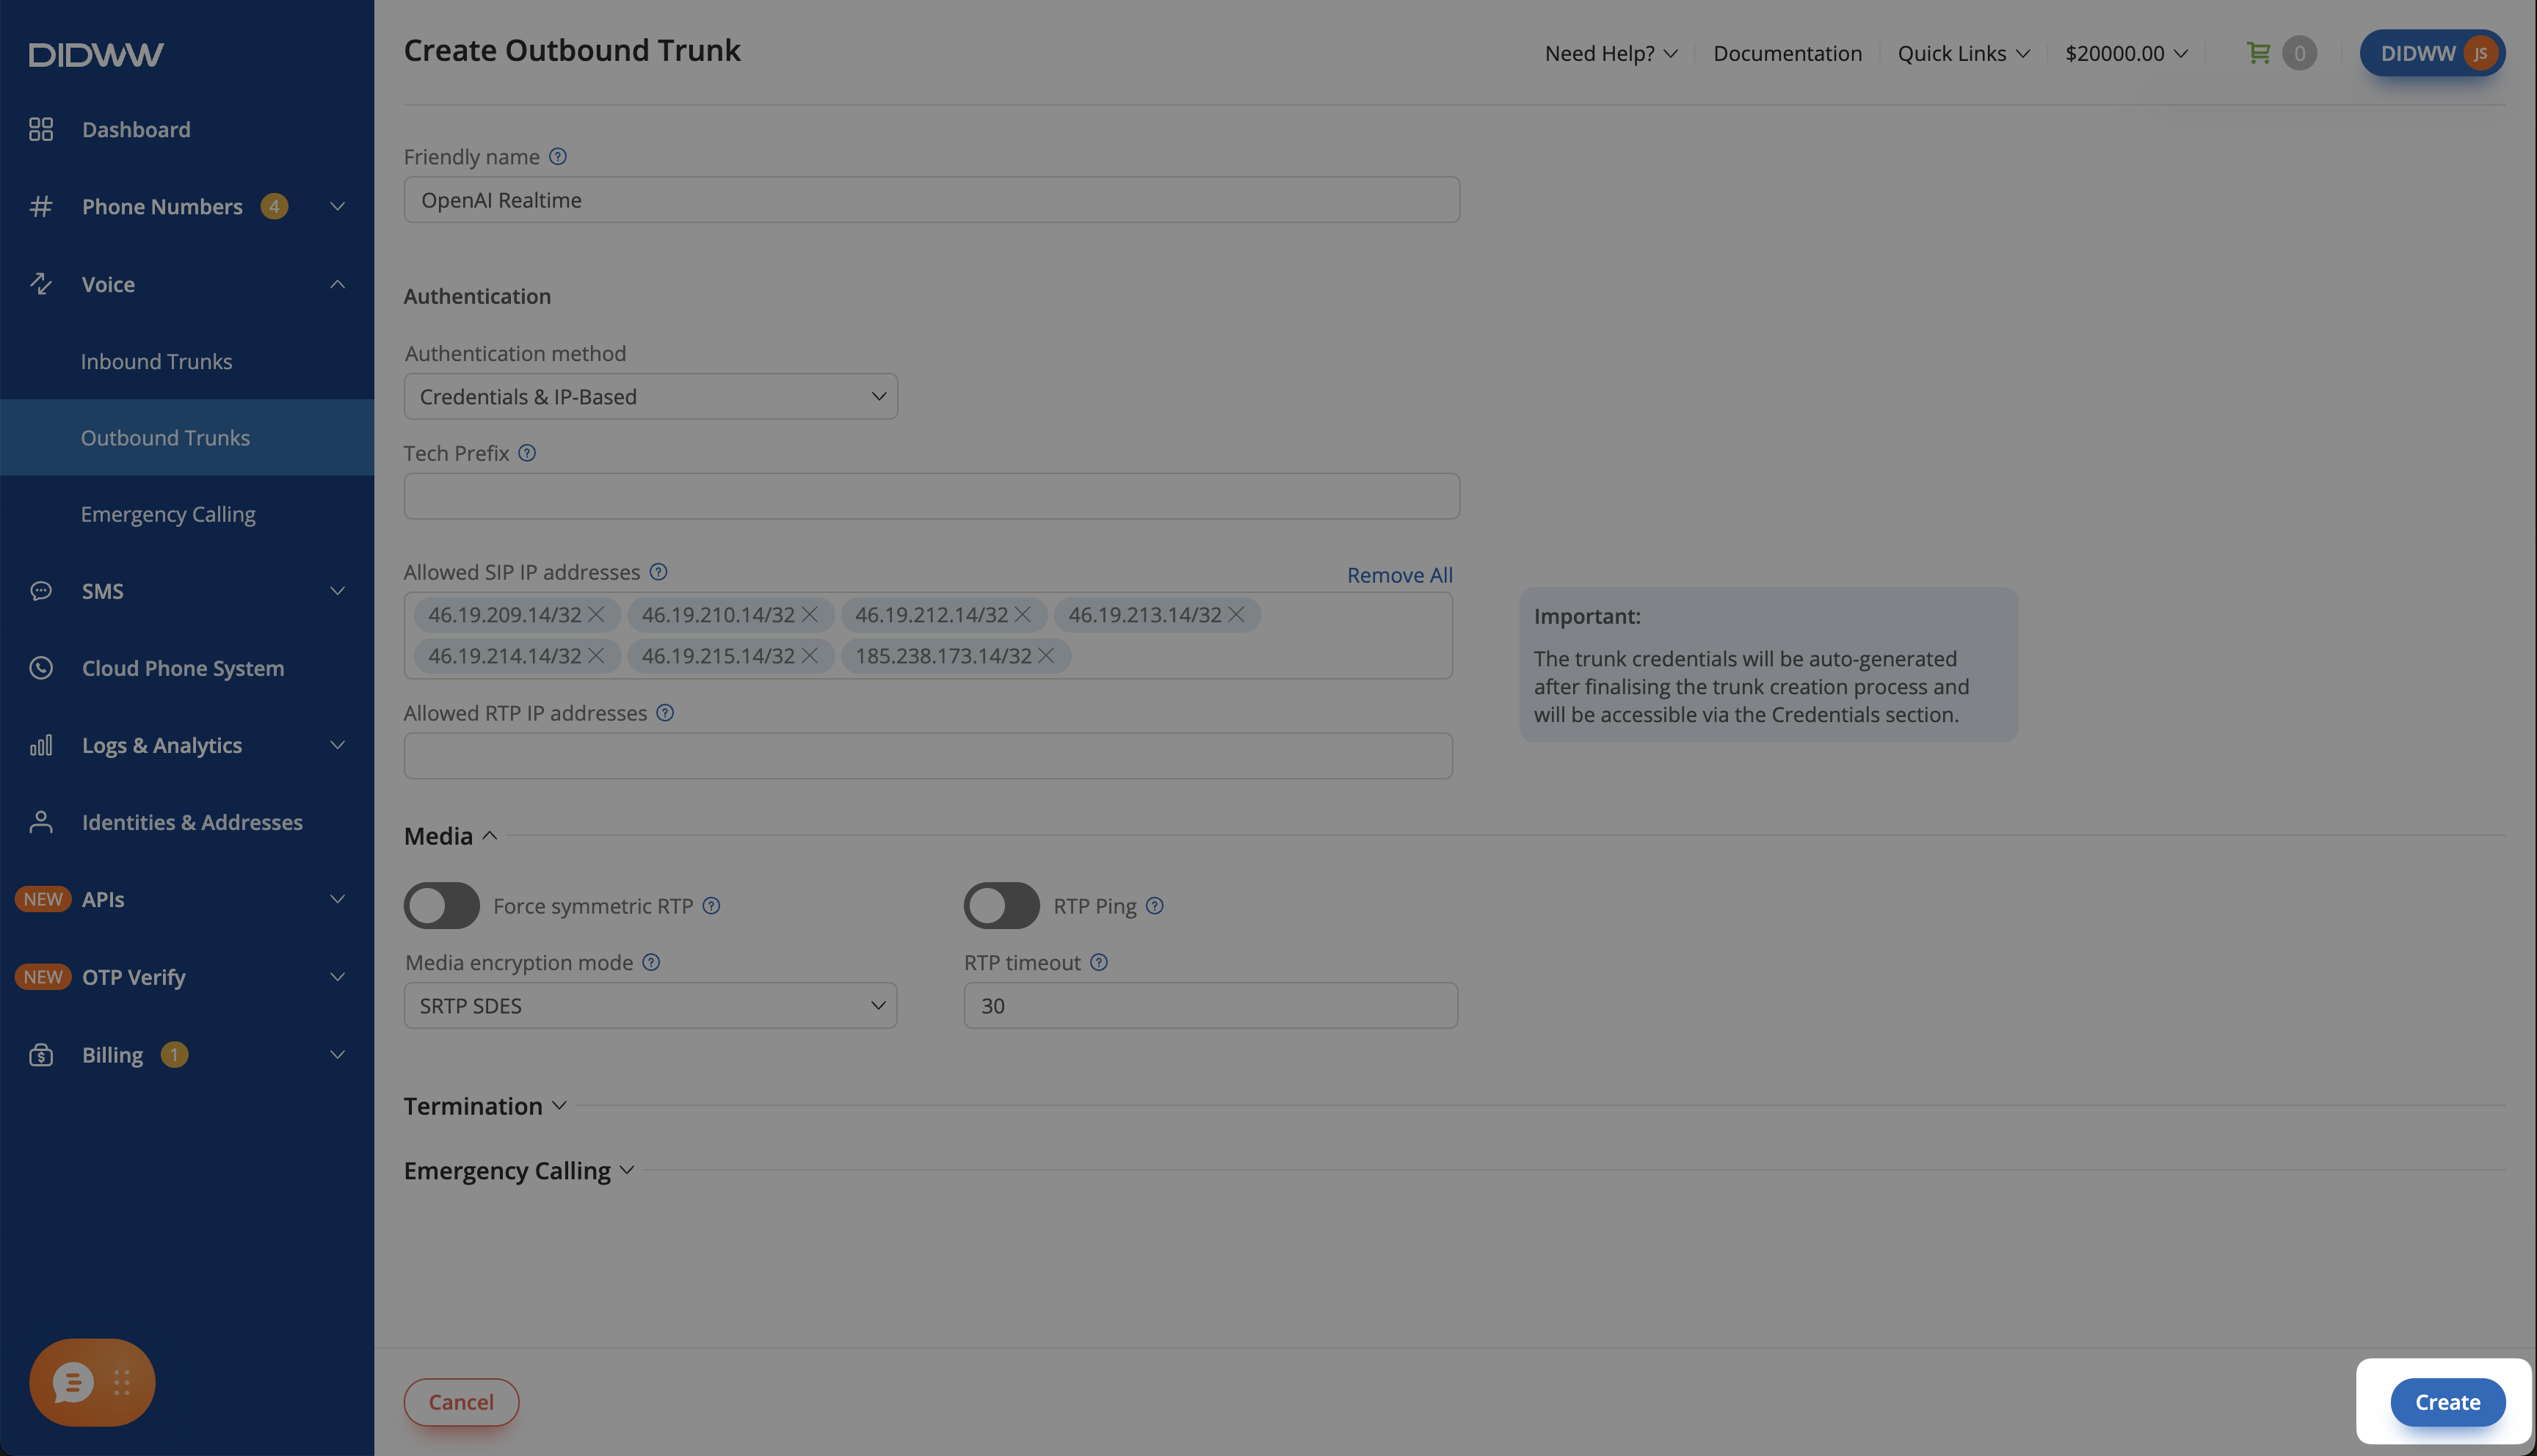
Fig. 9. Create the Outbound SIP Trunk#
Step 5: View and Copy Outbound Trunk Credentials#
When the outbound trunk is created, you can view and copy its credentials by selecting the key icon in the credentials column on the Outbound Trunks page.
Go to Voice > Outbound Trunks.
Locate your outbound trunk and click the key icon in the Credentials column.
View the trunk Username and Password.
Copy these credentials for Step 6 if you use call transfers, and for section 4, Step 2 when placing GPT-Live outbound calls.
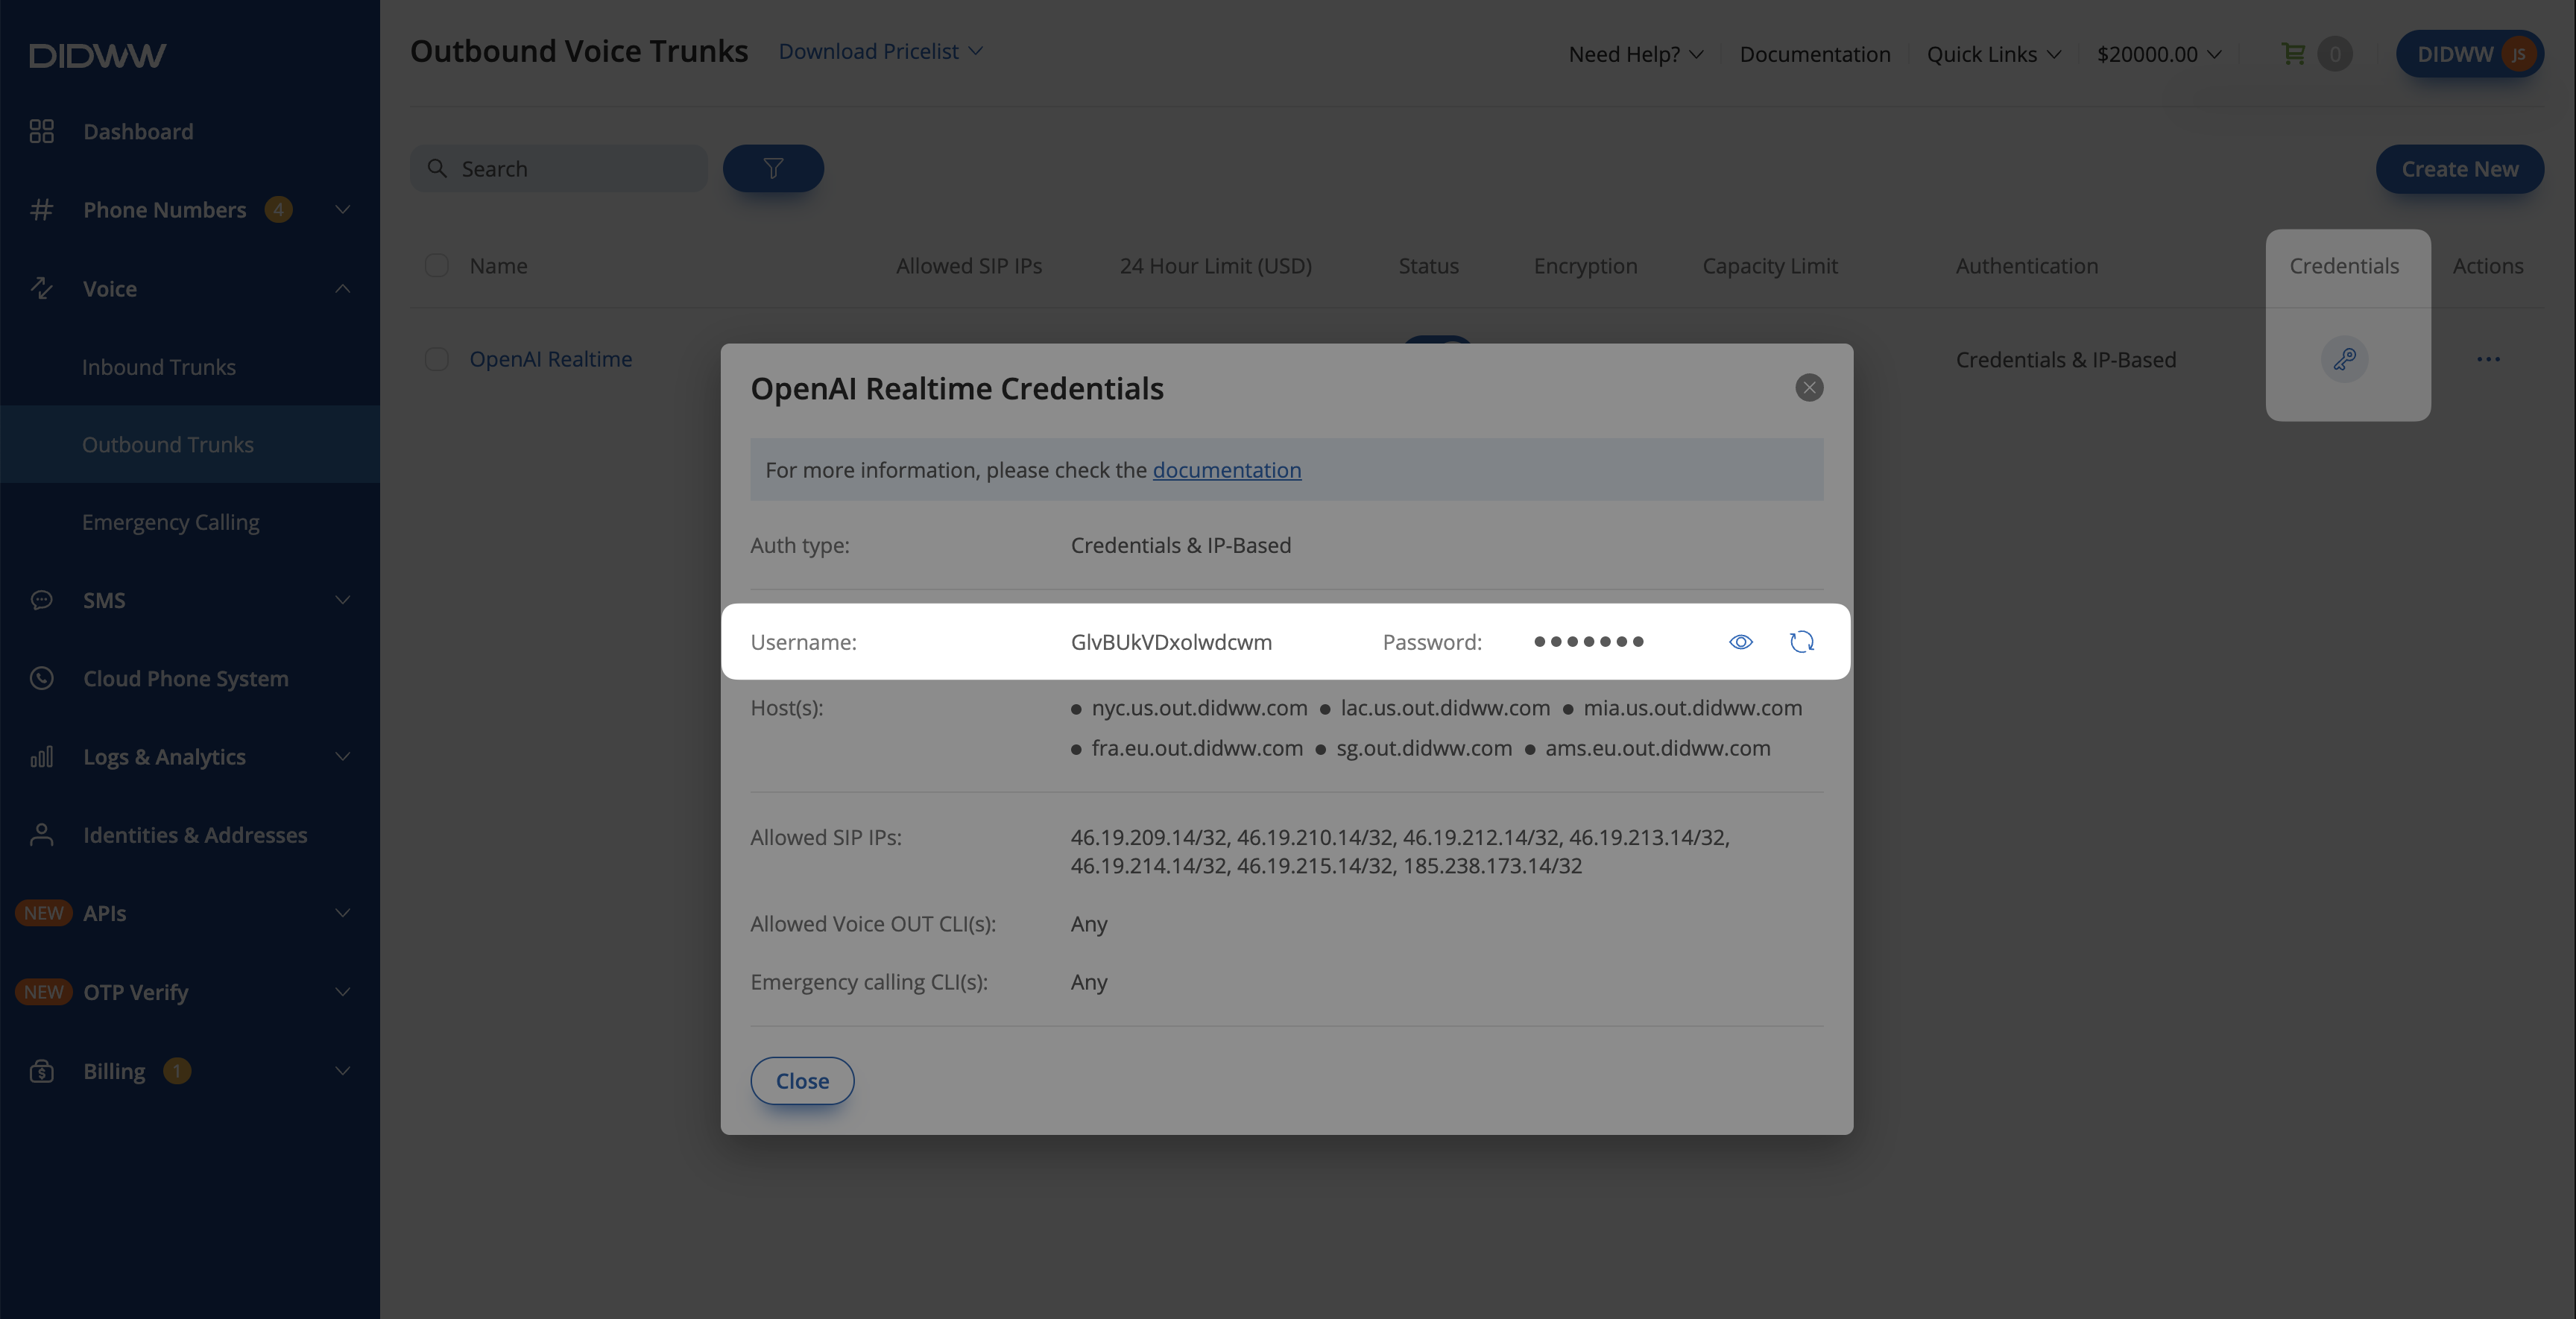
Fig. 10. Opening the outbound trunk credentials view#
Step 6: Add Outbound Credentials to the Inbound Trunk#
Note
This step is required only for transfers of incoming calls. Skip it if you only place outbound calls with GPT-Live.
DIDWW places each transferred call through your outbound trunk using the credentials on your inbound trunk. Configure the OpenAI inbound trunk with the outbound trunk credentials copied in Step 5.
Go to Voice > Inbound Trunks and locate the OpenAI Realtime inbound trunk.
Click Actions, then select Edit.
Open the Authorization tab.
Turn on Enable Authorization.
In Auth User, paste the outbound trunk Username.
In Auth Password, paste the outbound trunk Password.
Click Submit.
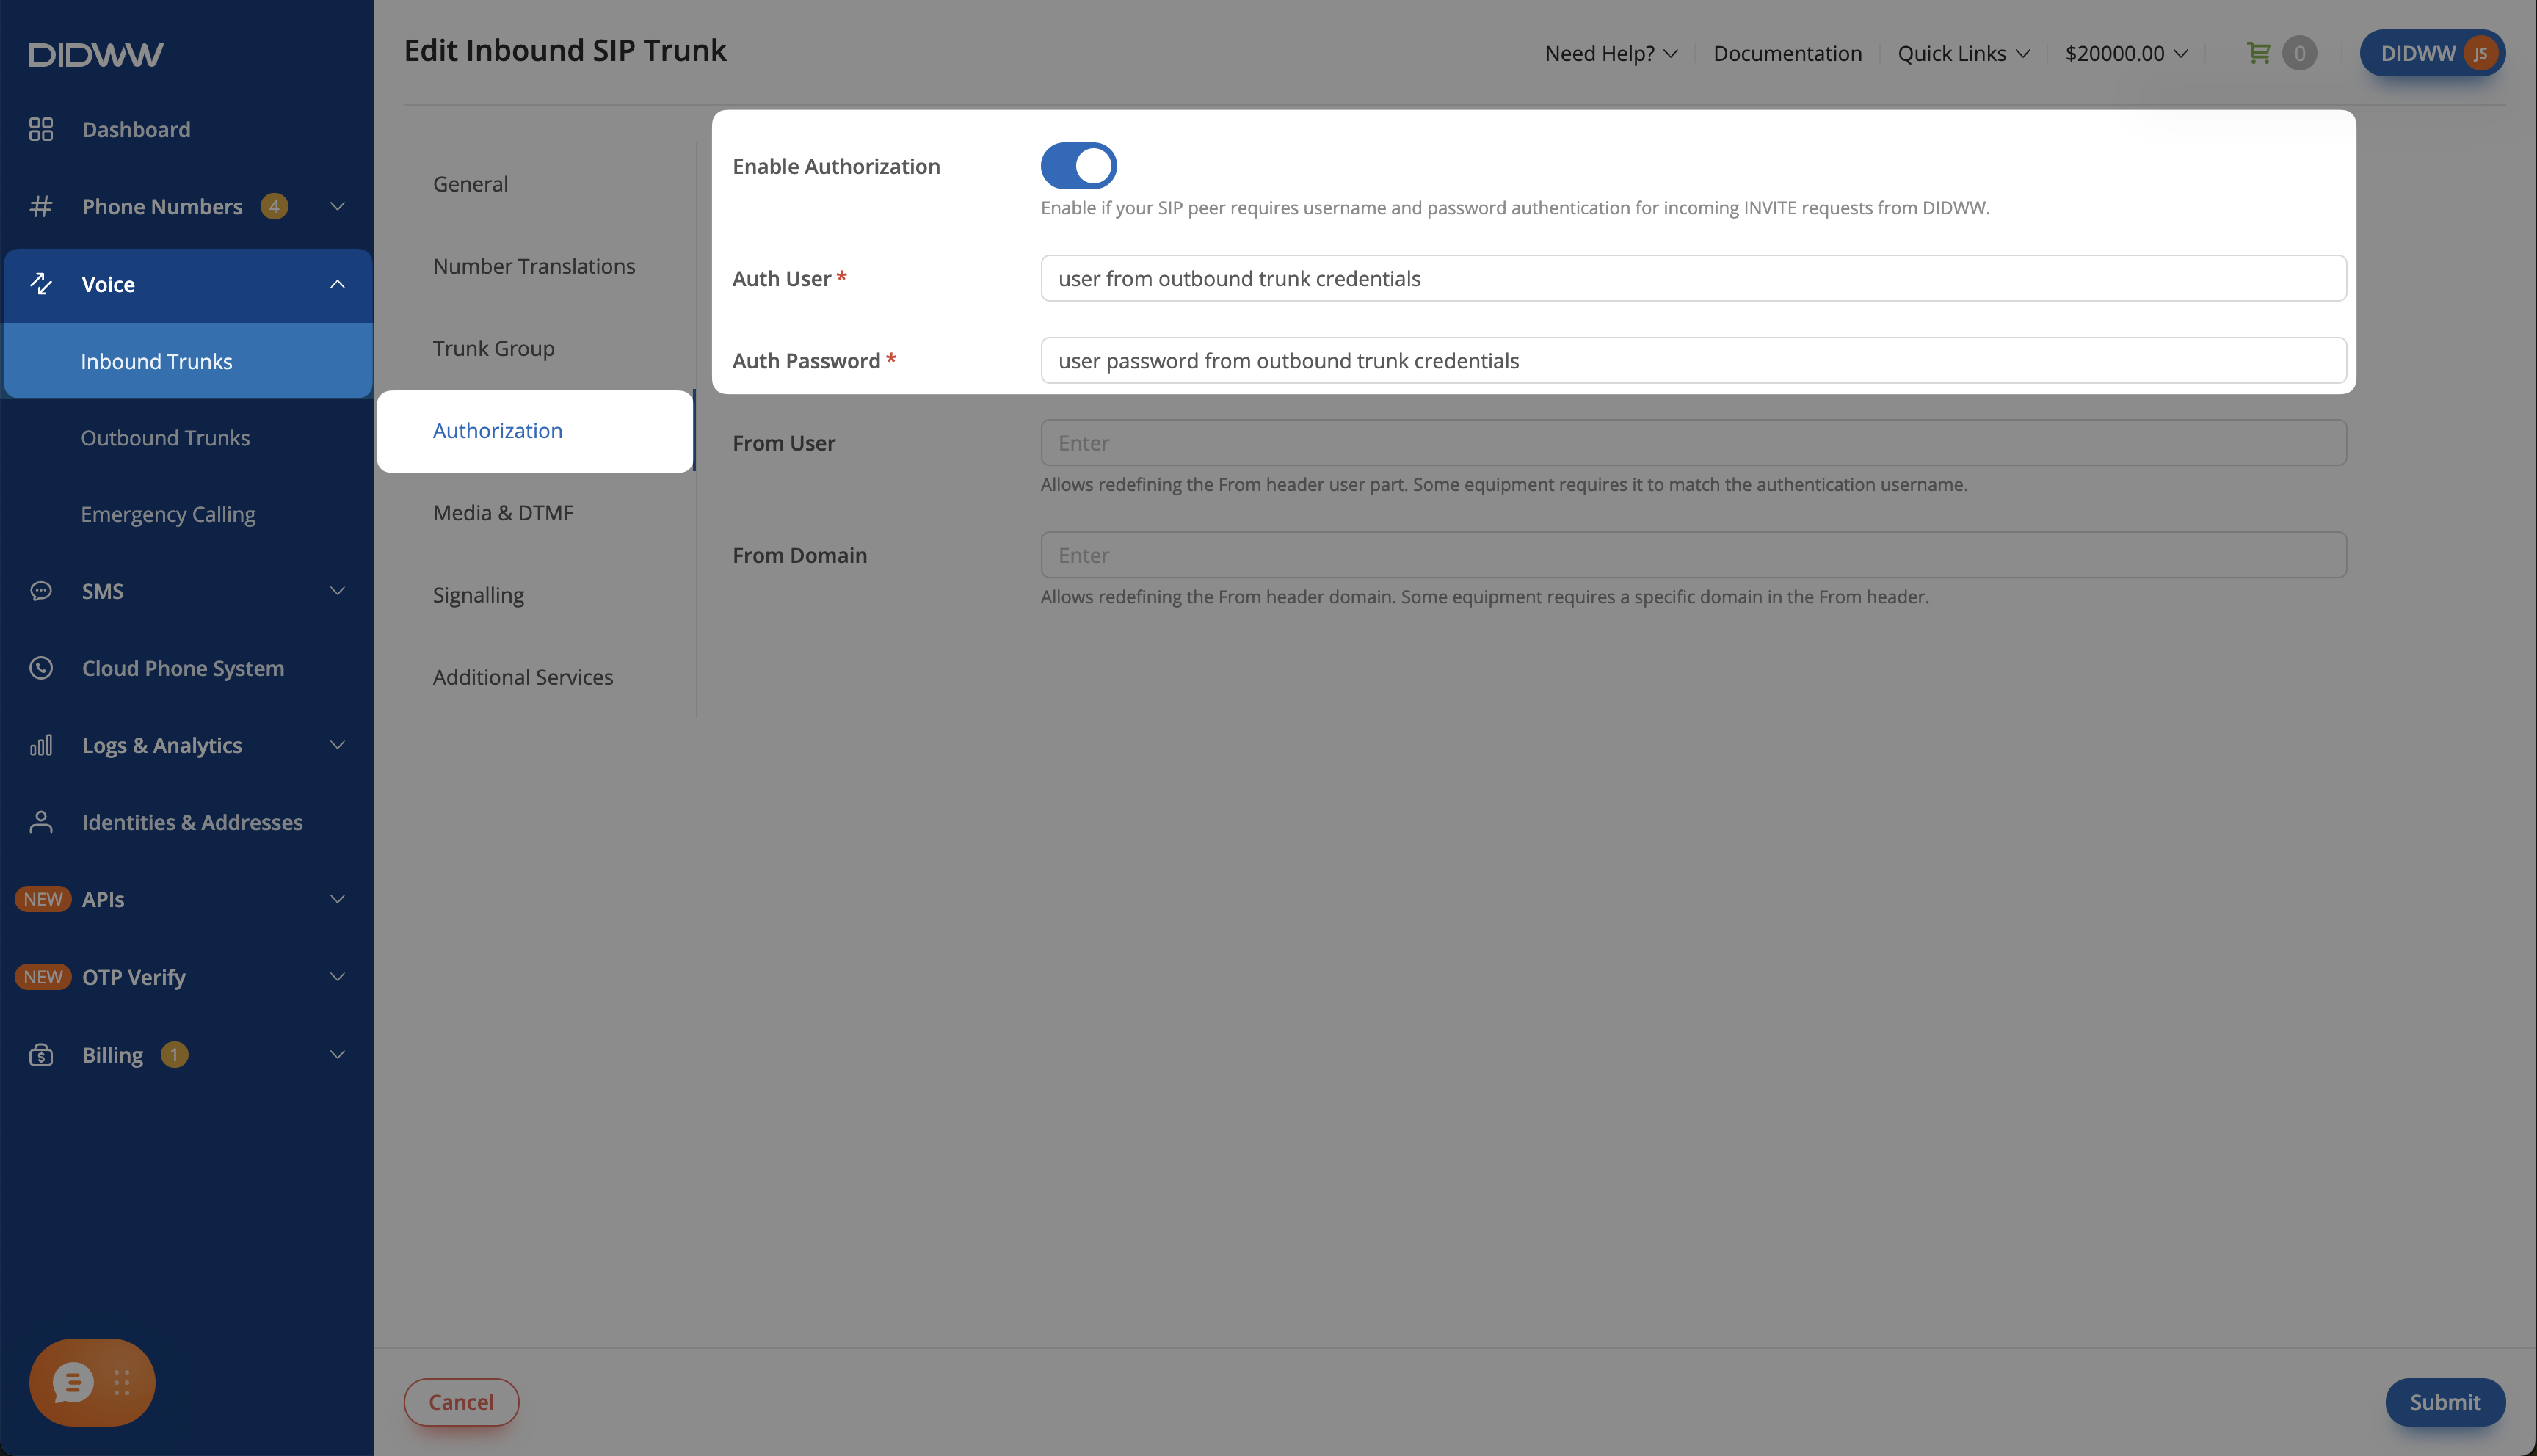
Fig. 11. Adding outbound trunk credentials to the OpenAI inbound trunk#
Note
OpenAI does not authenticate incoming calls from DIDWW, so these credentials do not affect how calls reach OpenAI. Missing or incorrect credentials can cause Transfer Failed: 401/Unauthorized.
3. Handle Incoming Calls with OpenAI Realtime API#
Configure your OpenAI project to announce incoming calls to your server, and set up your server to accept the calls, greet callers, and transfer them to a live person.
Note
DIDWW does not host or provide this server. The examples below show the parts of the call flow that depend on DIDWW. For complete server examples, see the OpenAI Telephony and SIP guide. For guidance on the agent’s instructions and available actions, see Customize Your Voice Agent.
Important
Before testing incoming calls, check OpenAI Billing for the organization that owns your project. Prepaid accounts require a positive API credit balance. If credits run out, API requests fail and the incoming call may not connect to your agent.
Before You Begin#
The OpenAI project from 1. Route Incoming Calls to OpenAI Realtime is required.
Read and Write permissions for both Project API Keys and Webhooks are required in that OpenAI project. Ask your OpenAI organization or project owner to grant these permissions if you cannot create API keys or webhooks. See OpenAI project permissions.
A server that receives webhooks over public HTTPS is required. It must be reachable from the internet and answer within a few seconds, for example a small virtual server, a container service, or a serverless platform that supports long-lived WebSocket connections.
Step 1: Create an API Key#
Your server uses an OpenAI API key to accept, control, and transfer incoming calls, and to place GPT-Live outbound calls.
In the OpenAI platform, go to API keys and click Create new secret key.
In Owned by, keep You selected.
In Name, enter a descriptive name (e.g.,
DIDWW).In Project, select the project for your calls. If you also receive calls, use the project whose ID you entered on the DIDWW inbound trunk.
In Expiration, choose how long the key should remain valid (e.g., 30 days).
In Permissions, select All or Restricted, depending on your application’s needs.
For the Restricted setup shown below, expand Model capabilities and set Realtime (/v1/realtime) to Request. This is sufficient to receive incoming calls in this example. Leave the other permissions set to None.
Click Create secret key and copy the key. OpenAI shows it only once.
Store the key on your server, for example in an environment variable such as
OPENAI_API_KEY. Never add it to client code or a public repository.
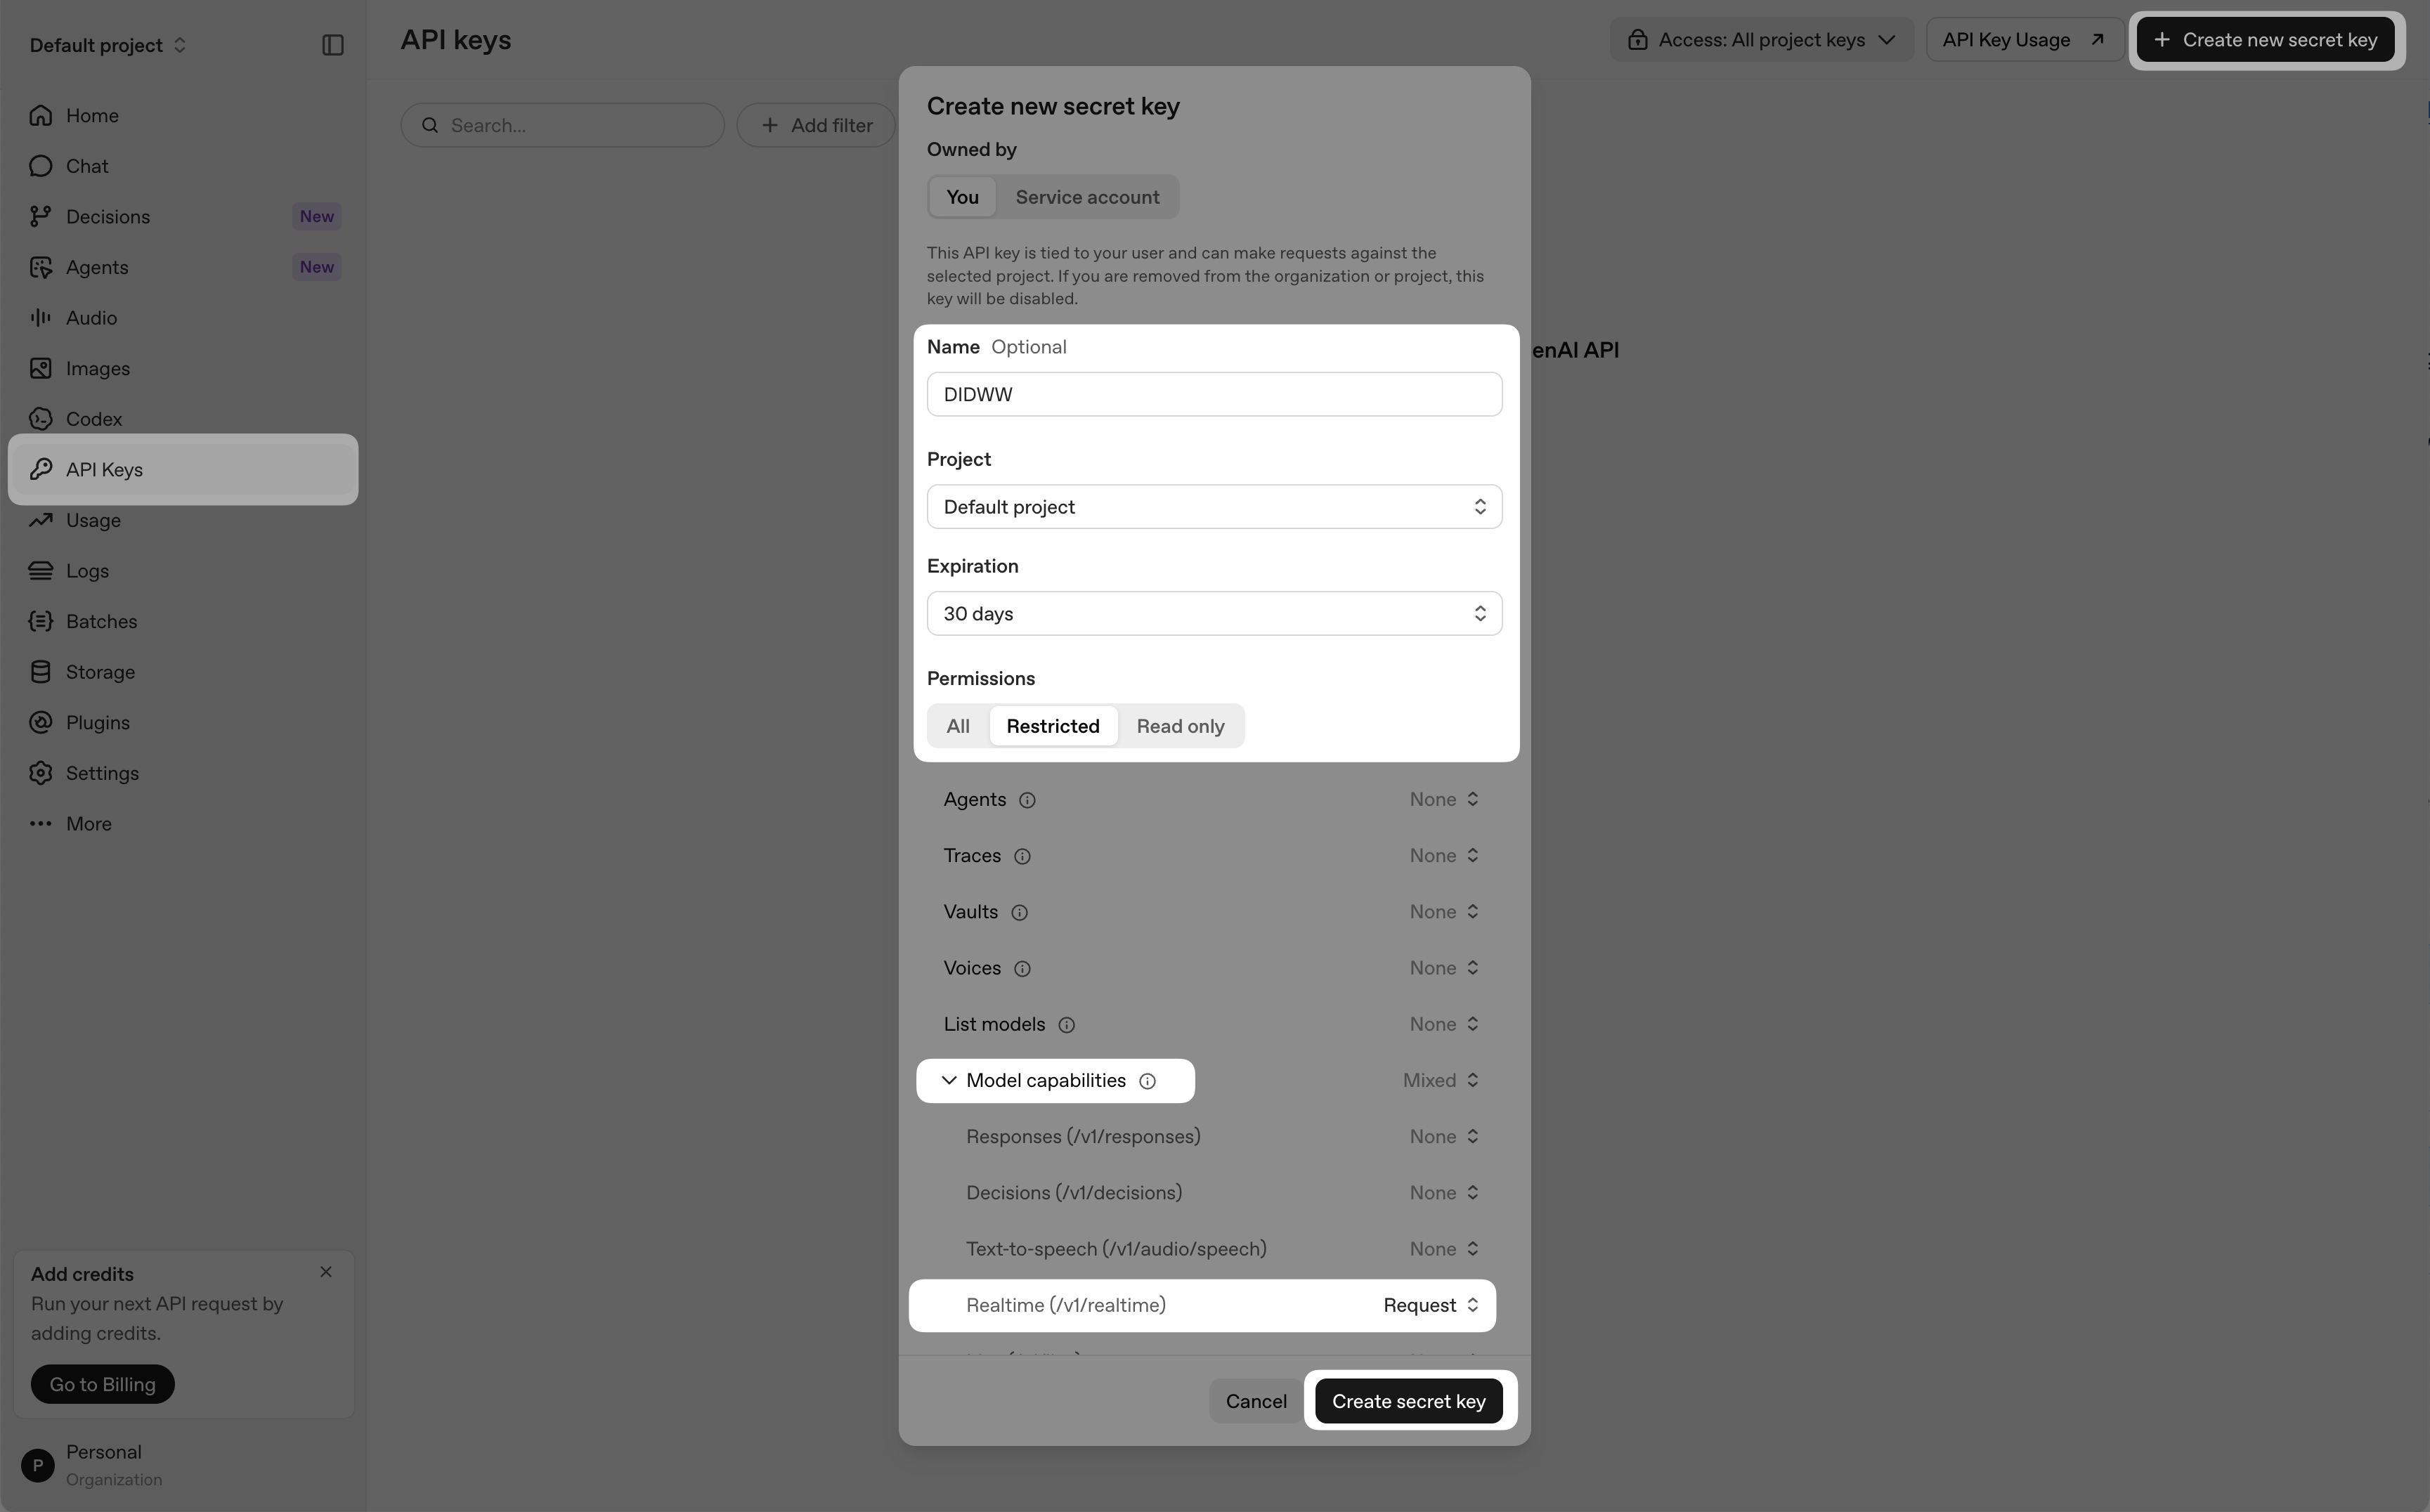
Fig. 12. Creating a restricted API key with Realtime Request permission#
Note
Incoming calls and GPT-Live outbound calls were tested with the same Restricted key, with only Model capabilities > Realtime (/v1/realtime) set to Request. No additional API key permissions or webhook changes were needed for the outbound call. Read only keys cannot accept calls.
Step 2: Create the Webhook#
Important
Start your server before you create the webhook, and enter its complete HTTPS endpoint, including the handler path (for example, /webhook). See Step 3 for the handler requirements.
OpenAI announces each incoming call with a realtime.call.incoming event sent to your webhook URL.
Open Webhooks in Project settings. Check that the project selector shows the same project as your API key.
Click Create.
In Name, enter a name (e.g.,
DIDWW incoming calls).In URL, enter the public HTTPS address of your server’s webhook endpoint (e.g.,
https://voice.example.com/webhook).In Event types, select
realtime.call.incoming.Click Create and copy the Signing secret (it starts with
whsec_). OpenAI shows it only once.Store the secret on your server, for example in an environment variable such as
OPENAI_WEBHOOK_SECRET.
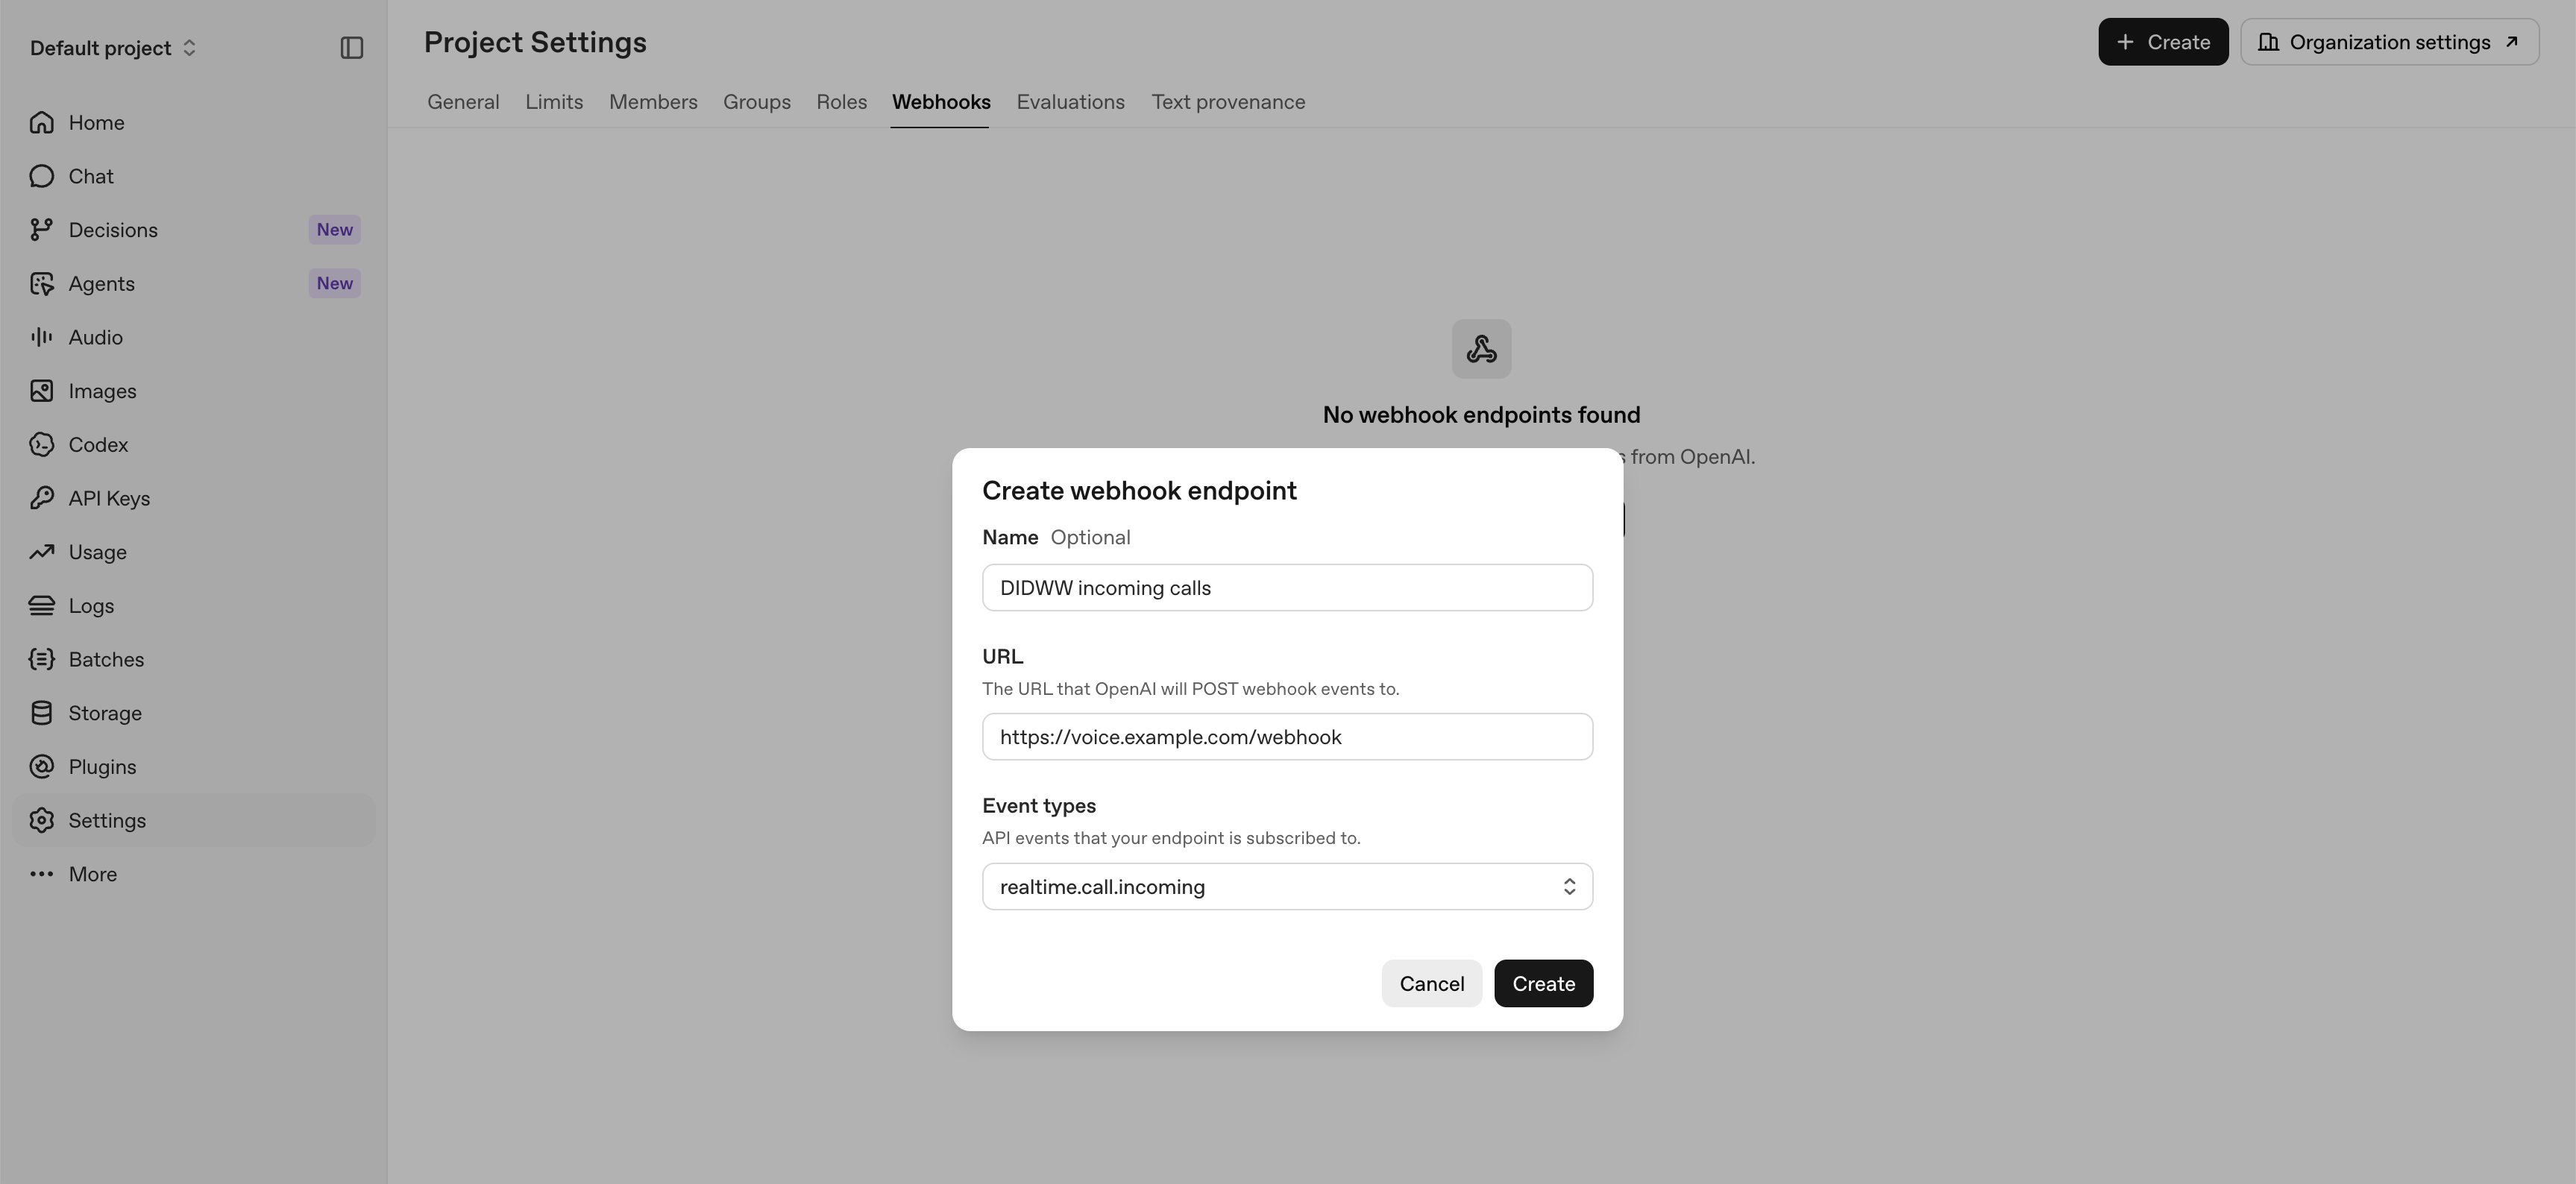
Fig. 13. Creating the webhook for incoming calls#
Step 3: Accept Incoming Calls on Your Server#
When a call arrives, your server receives the realtime.call.incoming event and must accept or reject the call.
Verify the webhook signature with your signing secret, for example with
client.webhooks.unwrap()in the OpenAI SDK. Reject requests that fail verification.Deduplicate the event using its event ID or
webhook-idbefore processing the call. Repeated deliveries must not accept or reject the same call again.Find the called DIDWW number in the
Diversionheader ofdata.sip_headers. With this DIDWW configuration, theToheader contains your project ID.Accept calls to your numbers with the model and instructions, and reject all other calls.
Example
realtime.call.incomingevent from a DIDWW call (shortened):1{ 2 "type": "realtime.call.incoming", 3 "data": { 4 "call_id": "rtc_u1_...", 5 "sip_headers": [ 6 { "name": "From", "value": "<sip:+447700900123@...>" }, 7 { "name": "To", "value": "<sip:proj_AbC123dEf456GhI789jKl0@sip.api.openai.com:5061>;tag=..." }, 8 { "name": "Diversion", "value": "<sip:+15105550100@sip.didww.com>;reason=unconditional" } 9 ] 10 } 11}
Accept the call. Replace
<call-id>withdata.call_id:1curl -X POST "https://api.openai.com/v1/realtime/calls/<call-id>/accept" \ 2 -H "Authorization: Bearer $OPENAI_API_KEY" \ 3 -H "Content-Type: application/json" \ 4 -d '{ 5 "type": "realtime", 6 "model": "gpt-realtime", 7 "instructions": "You are the receptionist for Example Corp. Keep answers short." 8 }'
Reject calls to other numbers:
1curl -X POST "https://api.openai.com/v1/realtime/calls/<call-id>/reject" \
2  -H "Authorization: Bearer $OPENAI_API_KEY" \
3  -H "Content-Type: application/json" \
4  -d '{"status_code": 603}'
Note
Treat
sip_headersas caller-supplied data used for routing, not as authentication. Anyone who knows your project ID can send a call to it. Keep your project ID private and reject calls to numbers you do not serve.Use the realtime model names, voices, and session options listed in the OpenAI Telephony and SIP guide.
View a minimal Python example
This example uses Flask and the OpenAI Python SDK. It verifies the webhook, reads the called number from Diversion, and accepts or rejects the call.
It only accepts or rejects calls; add the WebSocket greeting and transfer handlers from the next steps separately. Replace +15105550100 with your DIDWW number in E.164 format.
Install flask, openai, and requests, and set OPENAI_API_KEY and OPENAI_WEBHOOK_SECRET in the server environment. The in-memory event cache below is for a single-process example. Use a shared durable event/action store for deployments with multiple workers or restarts. See OpenAI webhook delivery and retries.
 1import os
 2import re
 3import time
 4from threading import Lock
 5
 6import requests
 7from flask import Flask, request, Response
 8from openai import OpenAI, InvalidWebhookSignatureError
 9
10app = Flask(__name__)
11client = OpenAI(webhook_secret=os.environ["OPENAI_WEBHOOK_SECRET"])
12AUTH = {"Authorization": "Bearer " + os.environ["OPENAI_API_KEY"]}
13MY_NUMBERS = {"+15105550100"}
14events = {}
15event_lock = Lock()
16
17@app.route("/webhook", methods=["POST"])
18def webhook():
19    try:
20        event = client.webhooks.unwrap(request.data, request.headers)
21    except (InvalidWebhookSignatureError, ValueError):
22        return Response(status=400)
23    if event.type != "realtime.call.incoming":
24        return Response(status=200)
25
26    with event_lock:
27        cutoff = time.monotonic() - 72 * 60 * 60
28        for key, (_, created) in list(events.items()):
29            if created < cutoff:
30                del events[key]
31        if event.id in events:
32            status, _ = events[event.id]
33            return Response(status=200 if status == "done" else 503)
34        events[event.id] = ("processing", time.monotonic())
35
36    headers = {}
37    for header in event.data.sip_headers:
38        headers.setdefault(header.name.lower(), []).append(header.value)
39    called_numbers = {
40        "+" + number
41        for value in headers.get("diversion", [])
42        for number in re.findall(r"sips?:\+?(\d+)@", value, re.I)
43    }
44    base = f"https://api.openai.com/v1/realtime/calls/{event.data.call_id}"
45    try:
46        if len(called_numbers) == 1 and called_numbers <= MY_NUMBERS:
47            result = requests.post(base + "/accept", headers=AUTH, json={
48                "type": "realtime",
49                "model": "gpt-realtime",
50                "instructions": "You are the receptionist for Example Corp.",
51            }, timeout=10)
52        else:
53            result = requests.post(base + "/reject", headers=AUTH,
54                                   json={"status_code": 603}, timeout=10)
55        result.raise_for_status()
56    except requests.RequestException:
57        app.logger.exception("OpenAI call-control request failed")
58        with event_lock:
59            events.pop(event.id, None)
60        return Response(status=502)
61    with event_lock:
62        events[event.id] = ("done", time.monotonic())
63    return Response(status=200)
Step 4: Greet the Caller#
Accepting the call alone does not request an opening response. To make your agent greet the caller, open a WebSocket connection to the call and request a response.
Connect to
wss://api.openai.com/v1/realtime?call_id=<call-id>with theAuthorization: Bearerheader and your API key.Send a
response.createevent with the greeting:1{ 2 "type": "response.create", 3 "response": { 4 "tool_choice": "none", 5 "instructions": "Greet the caller with: Hello, thank you for calling Example Corp. How can I help you?" 6 } 7}
"tool_choice": "none"prevents the model from calling a tool, such as a transfer, during the greeting.
Note
The greeting and receptionist instructions in this guide are examples. Customize the greeting, language, and tone for your service.
Set the agent’s overall role, the questions it should handle, and when it should transfer callers in instructions when accepting the call in Step 3. You can also choose a supported voice and provide tools implemented by your server.
The response.create settings here apply only to the opening response. They do not change the agent’s instructions or disable tools for the rest of the call.
For more about configuring conversations and handling callers, see OpenAI Realtime conversations and the OpenAI Telephony and SIP guide.
Keep the WebSocket open for the whole call if your agent transfers calls. Your server receives the model’s tool calls on this connection in Step 5.
Step 5: Add Call Transfers to Your Agent#
Call transfers are not configured in the OpenAI dashboard.
Your server gives the model a transfer tool when it accepts the call, and transfers the call with the OpenAI refer endpoint when the model calls that tool.
DIDWW supports cold call transfers using the SIP REFER method for inbound calls. When your server transfers a caller, OpenAI sends a SIP REFER request to DIDWW, and DIDWW places a new call to the transfer destination through your DIDWW outbound trunk. After a successful transfer, the OpenAI session ends and the agent is no longer part of the call.
Call transfer at a glance
        %%{init: {
  "theme": "base",
  "themeVariables": {
    "fontSize": "14px",
    "primaryColor": "#e0f2fe",
    "primaryBorderColor": "#38bdf8",
    "primaryTextColor": "#1f2d3d",
    "secondaryColor": "#ccfbf1",
    "secondaryBorderColor": "#2dd4bf",
    "secondaryTextColor": "#1f2d3d",
    "lineColor": "#0066cc",
    "textColor": "#1f2d3d",
    "nodeTextColor": "#1f2d3d",
    "edgeLabelBackground": "#ffffff"
  }
}}%%

flowchart LR
    caller["Caller"] -->|"1. Dials your DID number"| didww["DIDWW"]
    didww -->|"2. Inbound SIP trunk"| openai["OpenAI Realtime<br/>AI agent"]
    openai -.->|"3. SIP REFER<br/>Transfer request"| didww
    didww -->|"4. New outbound call"| recipient["Person / team<br/>Transfer recipient"]

    classDef endpoint fill:#e0f2fe,stroke:#0066cc,color:#1f2d3d,stroke-width:1.5px
    classDef process fill:#ccfbf1,stroke:#2dd4bf,color:#1f2d3d,stroke-width:1.5px
    class caller,recipient endpoint
    class didww,openai process
    linkStyle default stroke:#0066cc,stroke-width:1.5px
The dashed arrow is the SIP REFER request from OpenAI to DIDWW. Your server starts this
request by calling the OpenAI refer endpoint. DIDWW places the new outbound call.
After a successful transfer: Caller → DIDWW → person or team. The original inbound call continues, while the OpenAI session and AI agent are no longer part of the call.
View the transfer sequence: webhook, tool call, and SIP REFER
This simplified sequence shows a successful transfer. Routine SIP responses and media negotiation are omitted.
        %%{init: {
  "theme": "base",
  "themeVariables": {
    "fontSize": "14px",
    "actorBkg": "#e0f2fe",
    "actorBorder": "#38bdf8",
    "actorTextColor": "#1f2d3d",
    "actorLineColor": "#38bdf8",
    "signalColor": "#0066cc",
    "signalTextColor": "#1f2d3d",
    "noteBkgColor": "#fef3c7",
    "noteBorderColor": "#facc15",
    "noteTextColor": "#1f2d3d",
    "labelBoxBkgColor": "#ccfbf1",
    "labelBoxBorderColor": "#2dd4bf",
    "labelTextColor": "#1f2d3d",
    "loopTextColor": "#1f2d3d",
    "sequenceNumberColor": "#ffffff"
  }
}}%%

sequenceDiagram
    participant C as Caller
    participant D as DIDWW
    participant O as OpenAI Realtime
    participant S as Your server
    participant R as Person / team

    rect rgb(224, 242, 254)
        Note over C,S: 1. Original inbound call
        C->>D: Dial your DIDWW number
        D->>O: Deliver call through inbound trunk (TLS, SRTP)
        O->>S: Webhook realtime.call.incoming
        S->>O: Accept call with instructions and transfer tool
        S->>O: WebSocket: response.create (greeting)
    end
    rect rgb(204, 251, 241)
        Note over O,S: 2. Request a cold transfer
        O-->>S: WebSocket: model calls transfer_call
        S->>O: POST /v1/realtime/calls/{call_id}/refer<br/>target_uri: sip:+number@outbound-gateway
        O->>D: SIP REFER<br/>Refer-To: sip:+number@outbound-gateway
    end
    rect rgb(224, 242, 254)
        Note over D,R: 3. Place the new outbound call
        D->>R: Call recipient through outbound trunk (SRTP)
        R-->>D: Recipient answers
    end
    rect rgb(204, 251, 241)
        Note over O,S: 4. Transfer complete<br/>The OpenAI session ends
        Note over C,R: Caller and recipient talk through DIDWW<br/>Original inbound call + new outbound call
    end
Note
Each transfer places a new outbound call through your DIDWW outbound trunk. This call is charged per minute at the outbound rate for the transfer destination, in addition to the original inbound call.
Give the model a transfer tool
Add a function tool to the
toolslist of the accept request in Step 3:1{ 2 "type": "function", 3 "name": "transfer_call", 4 "description": "Transfer the caller to a human colleague. Call this only after the caller has explicitly asked to speak to a person, a human, a live agent, or an operator.", 5 "parameters": { "type": "object", "properties": {} } 6}
Describe in the tool and in the instructions exactly when the model may transfer. Without a clear rule, the model can transfer callers who did not ask for it.
Transfer the call when the model calls the tool
On the call WebSocket from Step 4, watch for a
response.doneevent whoseresponse.outputcontains afunction_callitem namedtransfer_call. Record each function call’scall_idbefore handling it so duplicate events cannot trigger the same transfer twice. Then call thereferendpoint once for that tool call.Set
target_urito a SIP URI at your DIDWW outbound gateway, in the formatsip:+[phone number]@[DIDWW outbound gateway]:[phone number]: the number of the live person or team that takes transferred calls, in E.164 format. Do not use a DIDWW number assigned to your OpenAI inbound trunk, or the transferred call returns to your agent.[DIDWW outbound gateway]: one of the DIDWW outbound signaling endpoints, for examplefra.eu.out.didww.com.
1curl -X POST "https://api.openai.com/v1/realtime/calls/<call-id>/refer" \
2  -H "Authorization: Bearer $OPENAI_API_KEY" \
3  -H "Content-Type: application/json" \
4  -d '{"target_uri": "sip:+15105550199@fra.eu.out.didww.com"}'
Note
Call transfers require a
sip:destination URI. Thetel:URI format shown in the OpenAI examples is not supported by DIDWW.A
200 OKresponse from OpenAI confirms that the REFER request was relayed. It does not confirm that the destination answered. Check the destination and the DIDWW call logs.The transfer destination sees the original caller’s phone number, subject to your DIDWW outbound trunk CLI Settings.
Step 6: Test the Configuration#
Verify that inbound calling and call transfers are working as expected.
Inbound calls
Make sure your server is running and reachable at the webhook URL.
Call the DIDWW number assigned to the inbound trunk.
Check that your server receives the
realtime.call.incomingevent and accepts the call.Check that the agent greets you and that both parties can hear each other.
Call transfers
Call the DIDWW number assigned to the inbound trunk and wait for the agent to greet you.
Have a short conversation without asking for a person, and check that the agent does not transfer the call.
Ask the agent to transfer you to a live person.
Answer the call at the transfer destination.
Check that both parties can hear each other and that the destination shows the original caller’s number as the caller ID.
Note
You can review call activity and verify call status or error codes in the DIDWW Inbound and Outbound Call Logs. A failed transfer appears on the inbound call with a Transfer Failed response, such as Transfer Failed: 401/Unauthorized. A successful transfer appears in the Outbound Call Logs as a call through your OpenAI Realtime outbound trunk. See Inbound Call Logs and Outbound Call Logs for more details.
For testing, you can run your server on your own computer and expose it with a temporary HTTPS tunnel. Temporary tunnel addresses usually change on every restart, so update the webhook URL each time, and move to a permanent address before taking real calls.
4. Place Outbound Calls with GPT-Live#
Use GPT-Live through the OpenAI Live API to call phone numbers through your DIDWW outbound trunk. Your server creates each call with the OpenAI API. OpenAI sends the call to a DIDWW outbound gateway, and DIDWW connects it to the destination number. Outbound calls do not require an incoming-call webhook or an accept request.
Note
Skip this section if you only receive calls.
Before You Begin#
A DIDWW outbound trunk with SRTP SDES media encryption is required. Complete Steps 1–5 in section 2. You can use the same trunk for outbound calls and call transfers.
An OpenAI project with API billing, access to
gpt-live-1, and outbound SIP calling enabled is required. If outbound SIP calling is not enabled for your organization, OpenAI rejects the request with403andoutbound_sip_not_enabled.An OpenAI API key for your project is required. Create or reuse a key as described in section 3, Step 1.
A DIDWW number to show as the caller ID is required, in E.164 format.
Step 1: Allow OpenAI on the Outbound Trunk#
GPT-Live outbound calls reach DIDWW from OpenAI’s SIP servers, so your outbound trunk must allow OpenAI’s addresses.
Go to Voice > Outbound Trunks and click the name of your outbound trunk to open Edit Outbound Trunk.
In Allowed SIP IP addresses, keep the DIDWW addresses used for call transfers and add the following OpenAI ranges for GPT-Live outbound calls:
13.79.45.80/28 23.98.140.64/28 40.67.149.176/28 40.83.204.240/28
Click Submit.
Note
OpenAI publishes these CIDRs as SRTP media ranges in SIP signaling and media IP ranges, rather than as a dedicated outbound SIP signaling list. The tested call originated from 40.67.149.189, within 40.67.149.176/28.
Confirm the current outbound SIP source ranges with OpenAI before production use. An unlisted source IP can cause 403 Forbidden before the call appears in the DIDWW Outbound Call Logs.
Important
These ranges are shared across OpenAI projects. Keep Credentials & IP-based authentication enabled and keep the trunk Username and Password on your server. The IP list does not identify your project.
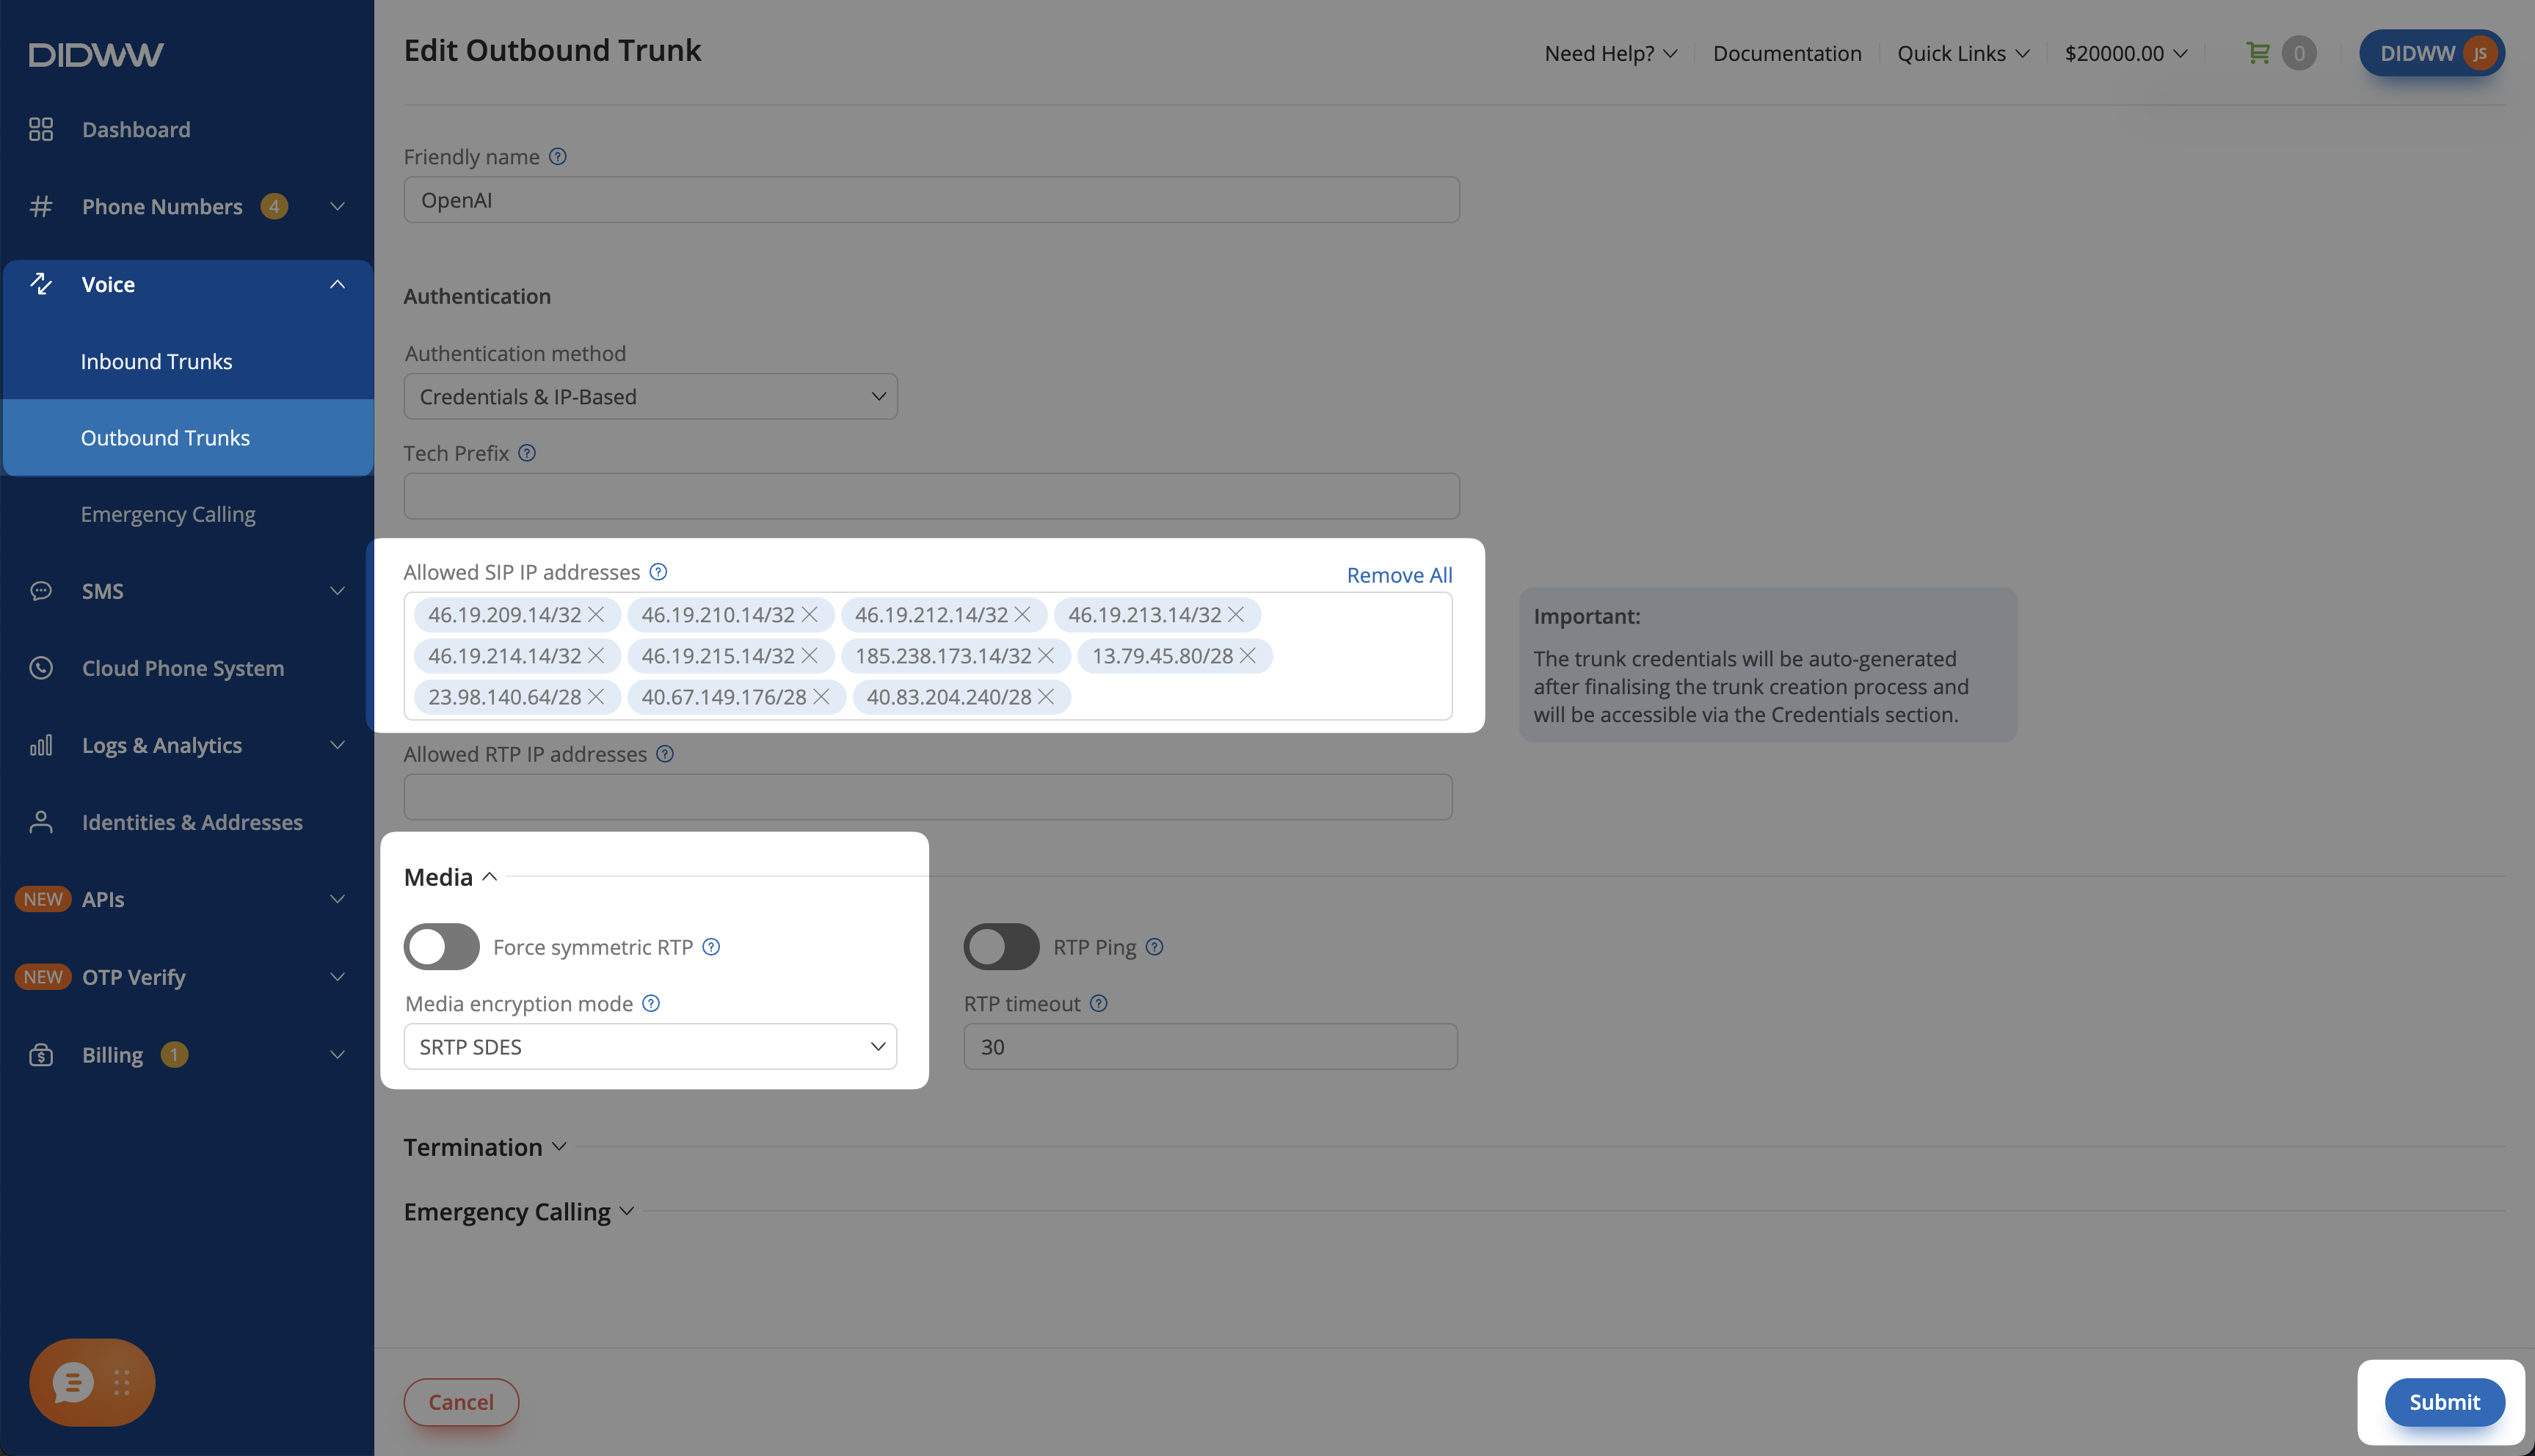
Fig. 14. Allowed SIP IP addresses for GPT-Live outbound calls and call transfers#
Step 2: Place an Outbound Call#
Your server places each call with a POST /v1/live/sessions request that contains the agent settings and your DIDWW trunk details. See the OpenAI Create session API.
This example uses curl and jq. Set OPENAI_API_KEY in your server environment.
Note
In your server environment, set DIDWW_SIP_USERNAME to the outbound trunk Username and DIDWW_SIP_PASSWORD to its Password. Copy them from Step 5: View and Copy Outbound Trunk Credentials.
 1jq -n \
 2  --arg username "$DIDWW_SIP_USERNAME" \
 3  --arg password "$DIDWW_SIP_PASSWORD" \
 4  '{
 5    "session": {
 6      "model": "gpt-live-1",
 7      "instructions": "You are calling on behalf of Example Corp. Introduce yourself when the person answers. Keep answers short.",
 8      "audio": { "output": { "voice": "marin" } },
 9      "delegation": { "type": "client" }
10    },
11    "transport": {
12      "type": "sip",
13      "destination": "+15105550199",
14      "trunk": {
15        "provider_url": "sips:fra.eu.out.didww.com:5061",
16        "auth": { "type": "digest", "username": $username, "password": $password },
17        "caller_number": "+15105550100"
18      }
19    }
20  }' | curl https://api.openai.com/v1/live/sessions \
21    -H "Authorization: Bearer $OPENAI_API_KEY" \
22    -H "Content-Type: application/json" \
23    --data-binary @-
destination: the phone number to call, in E.164 format. SIP URIs are not supported here.provider_url: a DIDWW outbound signaling endpoint with thesips:prefix and port5061, for examplesips:fra.eu.out.didww.com:5061. OpenAI requires TLS signaling.auth: the outbound trunk Username and Password from Step 5 of section 2.caller_number: the DIDWW number to show as the caller ID, in E.164 format. Check that it is allowed by the outbound trunk CLI Settings.
A successful request returns 201 Created with the new session ID in session.id (e.g., live_...). Preserve this ID unchanged when monitoring or ending the call. The destination may still be ringing when this response arrives.
Important
Each request places a new call. Do not retry automatically after a timeout or connection error, or the destination can receive a second call. Keep your OpenAI API key and DIDWW trunk credentials on your server.
Note
Customize the agent’s behavior and backend for your service as described in Customize Your Voice Agent. This example uses client delegation, so your server must handle delegated requests and return results as described in Step 3.
Step 3: Monitor and End the Call#
Connect your server to the call right after creating the session.
Open a WebSocket to
wss://api.openai.com/v1/live/sessions/<session-id>/attachwith theAuthorization: Bearerheader and your API key. Connect immediately so you receive call progress events; the connection replays only the preceding 3 seconds. Deduplicate events byevent_id.Watch the call progress events:
transport.ringing: the provider reports ringing or early media.transport.answered: the call was answered and audio is connected.transport.failed: the call could not be set up.error.messagecontains the SIP response from DIDWW, for exampleInvite failed with response: SIP/2.0 403 Forbidden.
Handle
session.delegation.createdevents for the client delegation configured above. Use transcripts and your application state to prepare the task, run the work on your server, and return the result to GPT-Live. See OpenAI delegation and tools for the event handling and response format.To end the call, send
POST /v1/live/sessions/<session-id>/hangupwith the same API key. Keep the WebSocket open untilsession.closedreports the final usage.
Note
Each outbound call is charged per minute at the DIDWW outbound rate for the destination, in addition to your OpenAI usage. To limit spending, set a low 24 hour limit (USD) on the outbound trunk.
OpenAI limits ringing to 3 minutes and a connected call to 2 hours.
Step 4: Test Outbound Calls#
Place a call to a phone you can answer.
Check that your server receives
transport.ringing.Answer the call and check that your server receives
transport.answered.Check that both parties can hear each other and that the destination sees your DIDWW number as the caller ID.
In the DIDWW Outbound Call Logs, check that the call appears with Success status on your outbound trunk.
Customize Your Voice Agent#
With Realtime API, the voice model handles the conversation and selects tools. With GPT-Live, the voice model handles the conversation and requests task work from a separate backend. Use the guides below to configure the instructions and tools for your service.
Agent configuration reference
Setup task |
Realtime API |
GPT-Live |
|---|---|---|
Write the instructions |
Set the agent’s role, questions, and rules for using tools. See Realtime prompting. |
Set the agent’s role, speaking style, and when to request backend help. See GPT-Live prompting. |
Connect tools and business data |
Define function tools and implement them on your server. See Realtime function calling. |
Configure a backend model or workflow to handle tasks and return results. See Delegation and tools. |
The outbound example uses client delegation: your server handles tasks requested by GPT-Live and returns the results. Implement the backend functions needed for database lookups, bookings, or other actions.
For other audio workflows, see the OpenAI Audio and voice overview.
Troubleshooting#
The call rings and then fails with 400 Bad Request
A project or webhook configuration mismatch can cause this symptom. Check that:
User Part of R-URI on the DIDWW inbound trunk is the project ID of the project that contains your webhook. Compare it with the project selector on the Webhooks page.
The webhook has the
realtime.call.incomingevent type selected.Your server logs a webhook for the call. If it logs nothing, also check the webhook URL, public reachability, and delivery logs.
Your server rejects every call as an unknown number
With DIDWW, the To header contains your project ID, not the called number.
Read the called number from the Diversion header. See Step 3.
The call connects, but the agent does not speak
Open the call WebSocket and send
response.create after accepting the call. See Step 4.
If the agent never answers at all, check your server logs for an error from the accept request, such as a missing permission on the API key.
OpenAI shows bad url when you create the webhook
Check that your server is running and reachable over public HTTPS before you create the webhook,
and that the URL includes the path of your webhook endpoint, for example https://voice.example.com/webhook.
The Webhooks page says that you need the api.webhooks.write permission
Your role in the OpenAI project cannot create webhooks. Ask your OpenAI organization owner to grant the required webhook permission, or to create the webhook for you and share the signing secret securely.
The OpenAI API returns insufficient permissions or Missing scopes
Check that the API key belongs to the correct project and can send requests to the Realtime call-control endpoints. For a restricted key, review its Realtime request permission. See Step 1.
The agent transfers callers who did not ask for a person
Send the greeting with "tool_choice": "none", and describe in the transfer tool and in the
instructions that the model may transfer only after the caller explicitly asks for a person.
See Step 5.
Transfer Failed: 401/Unauthorized on a call transfer
DIDWW could not authenticate the transferred call on your outbound trunk. On the DIDWW inbound trunk, check that Authorization is enabled and that Auth User and Auth Password match the outbound trunk credentials. See Step 6.
A rejected transfer does not appear in the DIDWW Outbound Call Logs.
Transfer Failed: 500/No suitable media on a call transfer
The media settings may not match. Set Media encryption mode on the DIDWW outbound trunk to SRTP SDES. See Step 3.
403 Forbidden on a call transfer, followed by a dropped call
The transferred call could not be placed through your outbound trunk. Check that:
Allowed SIP IP addresses on the DIDWW outbound trunk includes all DIDWW inbound SIP addresses used for transfers.
The DIDWW inbound trunk uses the same credentials as the DIDWW outbound trunk.
The call transfer is rejected
On the DIDWW inbound trunk, check that:
Max Transfers is
1or higher.Network Protocol matches the IP version of the addresses allowed on the DIDWW outbound trunk.
603 Unconfigured xfer for tel URIs on a call transfer
The transfer destination uses a tel: URI, which is not supported. Use a SIP URI in
this format instead: sip:+[phone number]@[DIDWW outbound gateway].
The outbound call for a transfer is rejected after authentication
Check the following on your DIDWW account and outbound trunk:
The caller ID is permitted by CLI Settings. Transferred calls keep the original caller’s number.
Calls to the destination are allowed.
The trunk has not reached its 24 hour limit (USD) or Capacity limit.
Your account balance is sufficient.
A GPT-Live outbound call fails with 403 Forbidden and does not appear in the Outbound Call Logs
The source IP may not be allowed on your outbound trunk. Check Allowed SIP IP addresses against the OpenAI source address for the call. See section 4, Step 1.
A GPT-Live outbound call fails with 500 No suitable media
Check that Media encryption mode on the DIDWW outbound trunk is SRTP SDES. See section 2, Step 3.
The supplied test recorded multiple call attempts after this error. Check the call logs before retrying.
OpenAI rejects an outbound call request with outbound_sip_not_enabled
Outbound SIP calling is not enabled for your OpenAI organization. Contact OpenAI to request access.
The GPT-Live call WebSocket returns 404 or session_id_not_found
The session may have closed after a failed call. Use the session ID returned by the creation request unchanged, connect immediately, and check your server logs and the DIDWW Outbound Call Logs.
A GPT-Live agent says it needs a moment, then stays silent
With client delegation, your server must handle each session.delegation.created event.
If no result is returned, the agent may remain waiting. Return the result with
session.commentary.append and the same delegation_id, or configure Responses delegation.
See section 4, Step 3.
The agent promises an action but does not complete it
Check that your server implements the action requested in the instructions. Add a tool or a delegation handler for the action, or remove the action from the instructions. See Customize Your Voice Agent.