Amazon Chime SDK#
Introduction#
Amazon Chime SDK is the underlying platform provided by Amazon Web Services (AWS) that enables businesses to receive phone calls over the internet with the help of Amazon Chime Voice Connector.
With Amazon Chime Voice Connector and DIDWW SIP Trunks, businesses can use their own telephone numbers to receive phone calls. This allows businesses to maintain a consistent communication experience with their customers.
Amazon Chime Voice Connector is designed to be simple to set up and manage, and can be integrated with other AWS services, for example such as Amazon S3 and Amazon Lambda, for more advanced use cases.
This configuration guide describes how to setup Amazon Chime Voice Connector using SIP Media Application with basic Amazon Lambda sample code to interwork with DIDWW inbound SIP trunk services (Fig. 1).
If all required services are already active, the expected amount of time to complete this deployment/integration is 15-30 minutes.
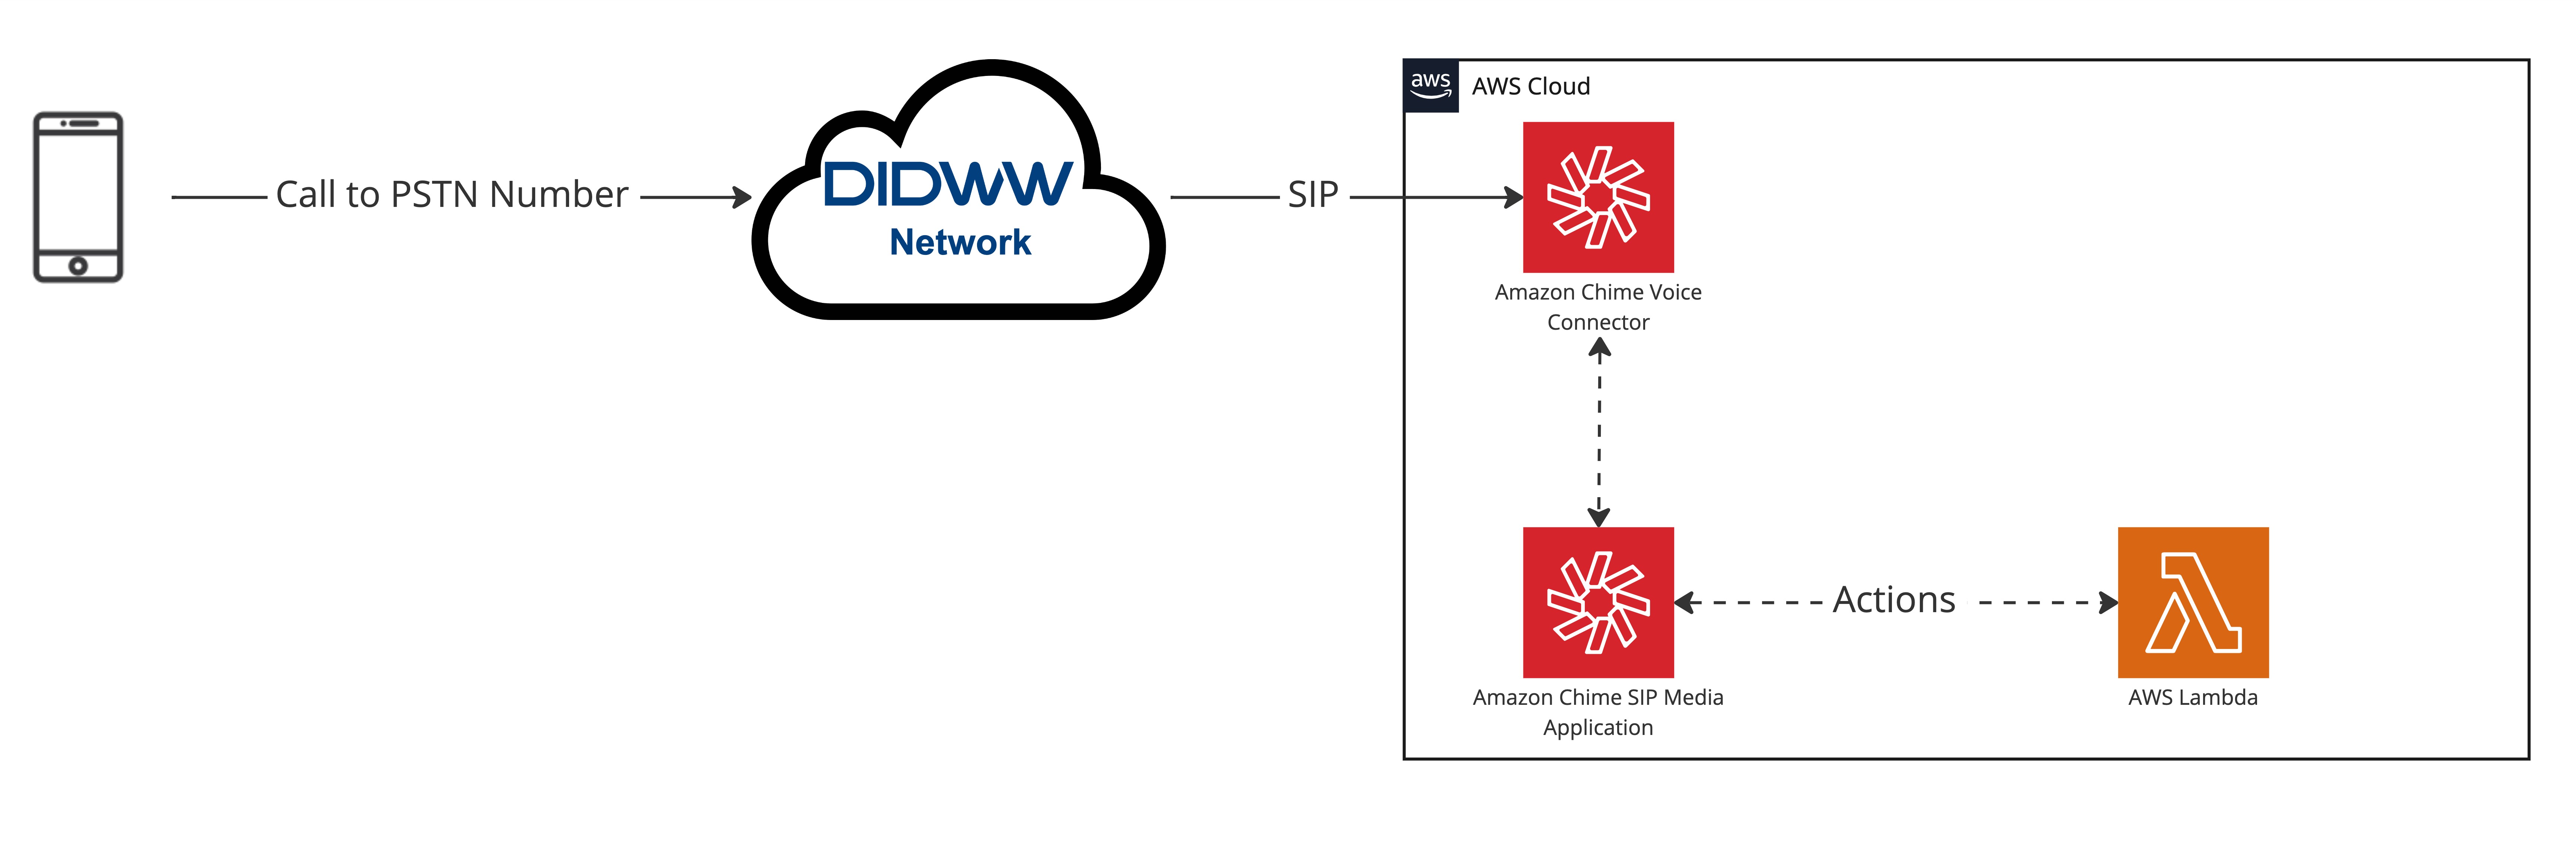
Fig. 1. Basic flow diagram.#
Getting started#
What you need to get started:
AWS Requirements#
This integration guide requires familiarity with AWS IAM - (Identity and Access Management), AWS Chime SDK and AWS Lambda node.js scripting.
Billable AWS services will be required
Amazon Chime SDK SIP Trunking: Depends on the region selected and operates on a pay-per-use billing model. No specific resource size allocation is needed. More details can be found here .
AWS Lambda: Depends on the region selected and is based on a pay-per-use billing model. No specific resource size allocation is needed. More details can be found here .
AWS S3 Bucket: The billing rate depends on object size, how long objects are stored during the month, and the storage class. In this guide, we will use the S3 Standard storage class. More details can be found here .
AWS Regions
AWS regions are designed to be isolated from other regions to achieve the greatest possible fault tolerance and stability. By using regions, you can place resources, such as compute and storage, in multiple locations closer to your equipment, interconnection partners, or users.
This integration can be deployed in any of Amazon Web Services’ (AWS) regions, provided that the selected region supports Amazon Chime SDK, AWS Lambda, and AWS S3 Bucket.
AWS Security and backups
No public access will be required for any of the AWS resources mentioned in this guide. Additionally, IAM or ROOT access key creation will not be necessary, as no programmatic calls to AWS will be used. Sensitive users data will not be stored in any of these resources, and no proprietary data stores will be in use. Therefore, there are no specific recommendations for data backups. If you plan to use such types of storage in your own implementation, please consider AWS backup recommendations here .
AWS root privileges are not required for this deployment/integration. The following IAM (Identity and Access Management) permission policies are required:
{
    "Version": "2012-10-17",
    "Statement": [
        {
            "Sid": "VisualEditor0",
            "Effect": "Allow",
            "Action": [
                "logs:CreateLogDelivery",
                "logs:DeleteLogDelivery",
                "logs:GetLogDelivery",
                "logs:ListLogDeliveries",
                "logs:DescribeLogGroups",
                "logs:DescribeLogStreams"
            ],
            "Resource": "*"
        }
    ]
}
{
    "Version": "2012-10-17",
    "Statement": [
        {
            "Sid": "VisualEditor0",
            "Effect": "Allow",
            "Action": [
                "s3:ListAllMyBuckets",
                "s3:ListBucket",
                "s3:ListBucketVersions",
                "s3:ListBucketMultipartUploads",
                "s3:ListAccessPointsForObjectLambda",
                "s3:ListAccessPoints",
                "s3:ListMultipartUploadParts"
            ],
            "Resource": "*"
        }
    ]
}
{
    "Version": "2012-10-17",
    "Statement": [
        {
            "Sid": "VisualEditor0",
            "Effect": "Allow",
            "Action": "chime:*",
            "Resource": "*"
        }
    ]
}
{
    "Version": "2012-10-17",
    "Statement": [
        {
            "Sid": "VisualEditor0",
            "Effect": "Allow",
            "Action": "lambda:*",
            "Resource": "*"
        }
    ]
}
Routine Maintenance
As no programmatic calls to AWS are required for this integration, there are no specific guidelines for managing IAM or ROOT access keys. However, if you do use access keys, it is recommended as a best practice to regularly rotate them. More details can be found here . There are no specific recommendations for software patches, updates, or license management, as this guide does not include any software. If you decide to include additional software in your integration, guidance for recommendations can be found here and here . To ensure a proper functionality of the described integration, you can review your DIDWW Call Logs and Dashboard charts. It is also recommended to review AWS CloudWatch logs and monitoring options, as described here .
Emergency maintenance
For handling fault conditions, a trouble ticket needs to be opened via email at support@didww.com . The ticket should include a fault description, information on affected services, account details, and sample call specifics if possible. The Technical Support team will investigate the reported fault and provide an update with a solution or advise on further actions that can be taken. Regarding software recovery, this integration example does not necessitate specialized software. Therefore, you can simply recover it by following the configuration steps outlined in this guide. If you have incorporated any additional software, it falls under your responsibility to maintain backups for emergency recovery scenarios.
Creating Amazon Chime Voice Connector#
Step 1.
Select Voice connector in the Chime SDK menu.
Click Create new voice connector button. (Fig. 2).
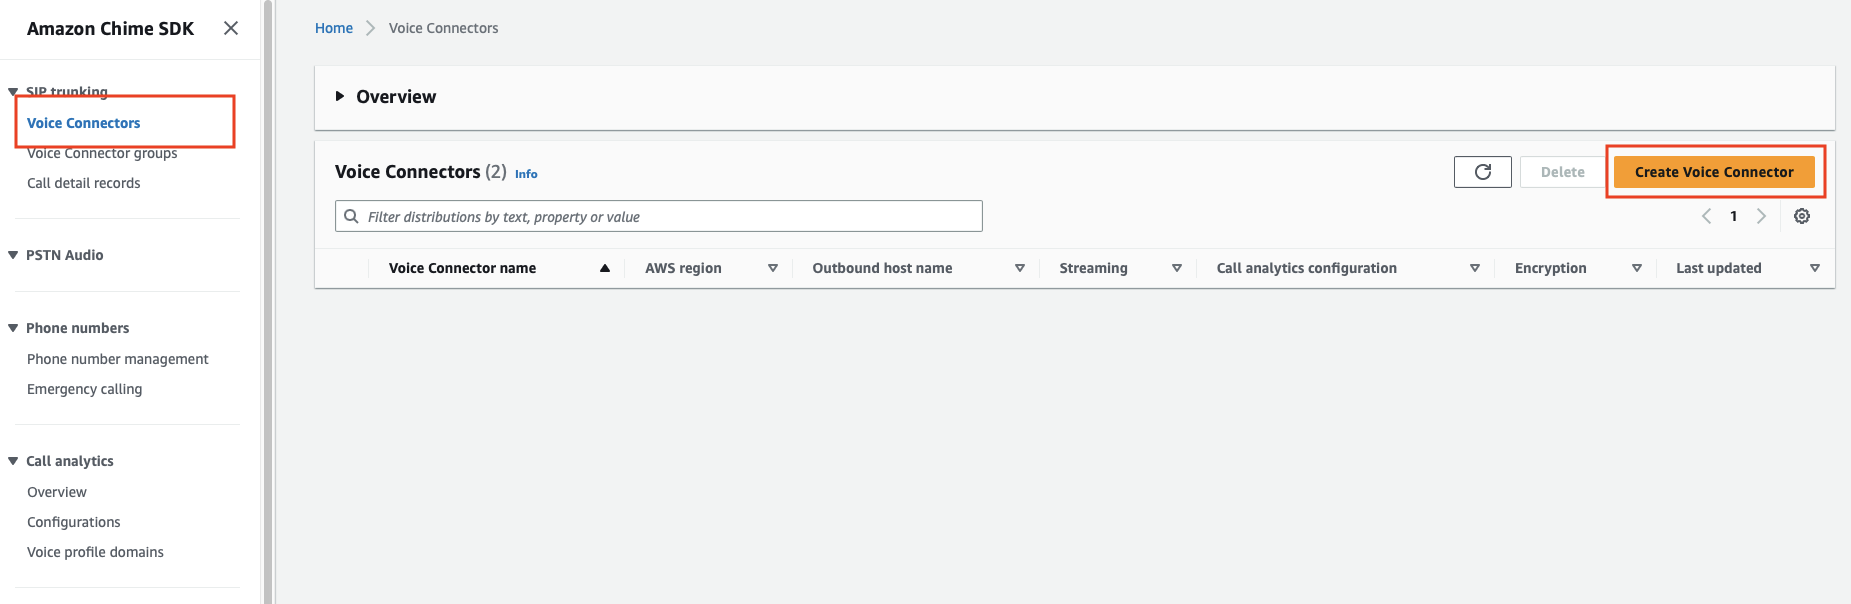
Fig. 2. Creating a new voice connector.#
Step 2.
Enter Voice connector name.
For Encryption (TLS) select Enabled or Disabled for UDP (Fig. 3).
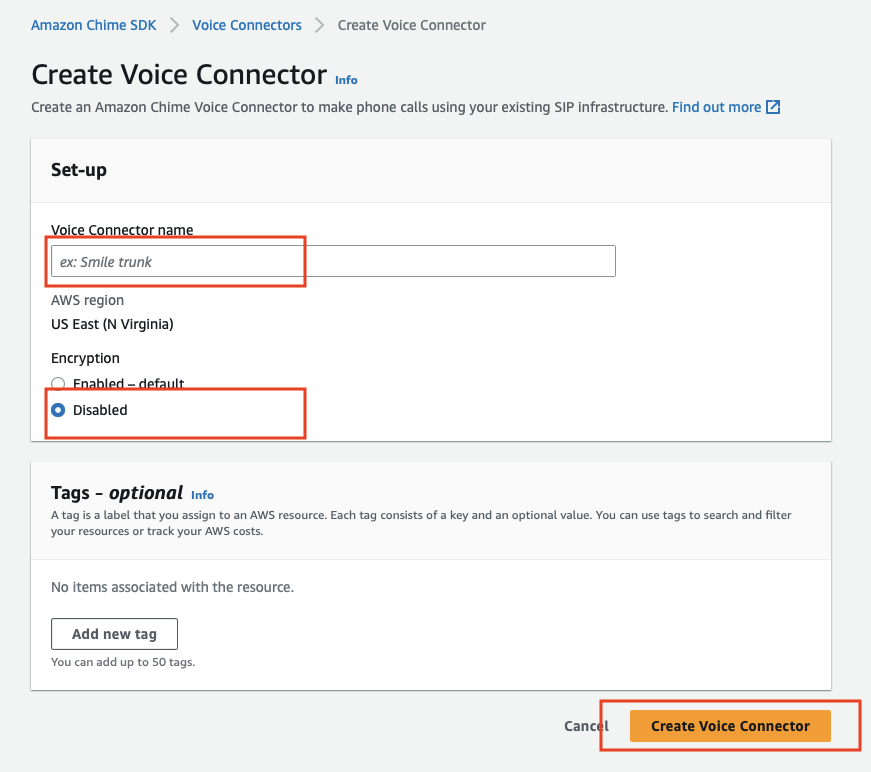
Fig. 3. Voice connector configuration.#
Step 3.
In the Voice connector select tab Termination.
Set Termination status to Enabled.
Copy/note Outbound host name. (Fig. 4). (Outbound host name will be used later when configuring DIDWW SIP inbound trunk.)
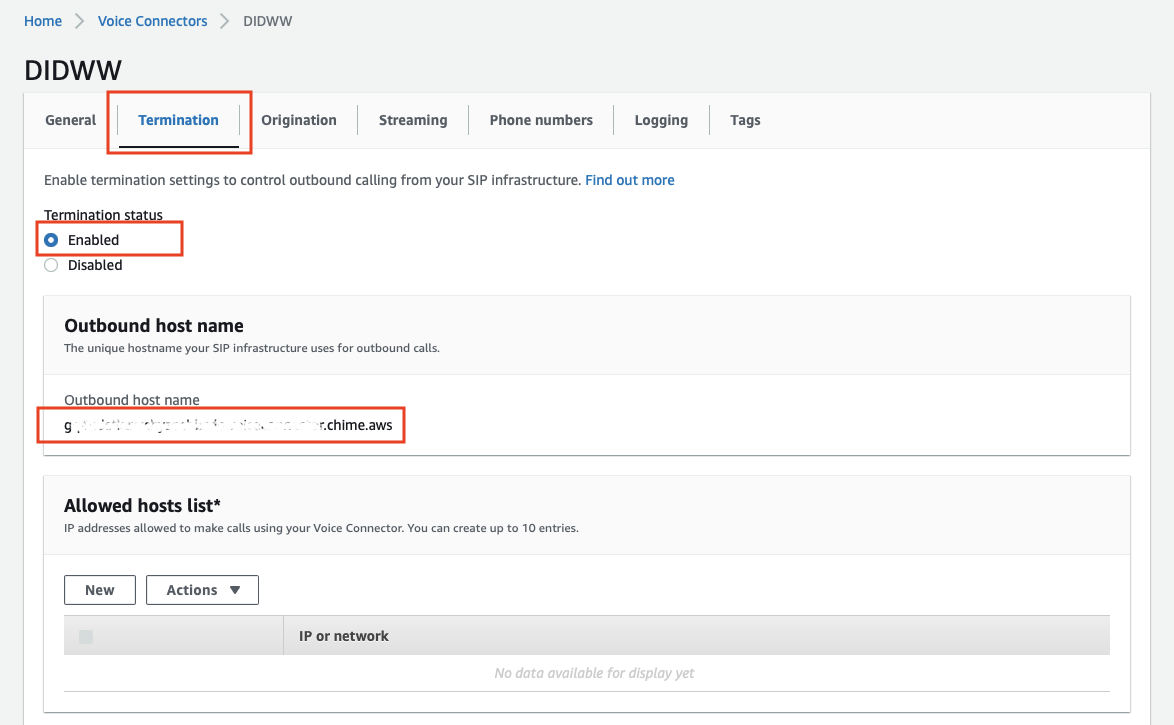
Fig. 4. Termination tab configuration.#
Step 4.
Add DIDWW inbound signaling IP addresses to the Amazon Chime SDK voice connector Allowed hosts list tab, as shown in the example below (Fig. 5).
46.19.209.14 (for New York POP)
46.19.210.14 (for Frankfurt POP)
46.19.212.14 (for Los Angeles POP)
46.19.213.14 (for Miami POP)
46.19.214.14 (for Singapore POP)
46.19.215.14 (for Hong Kong POP)
185.238.173.14 (for Amsterdam POP)
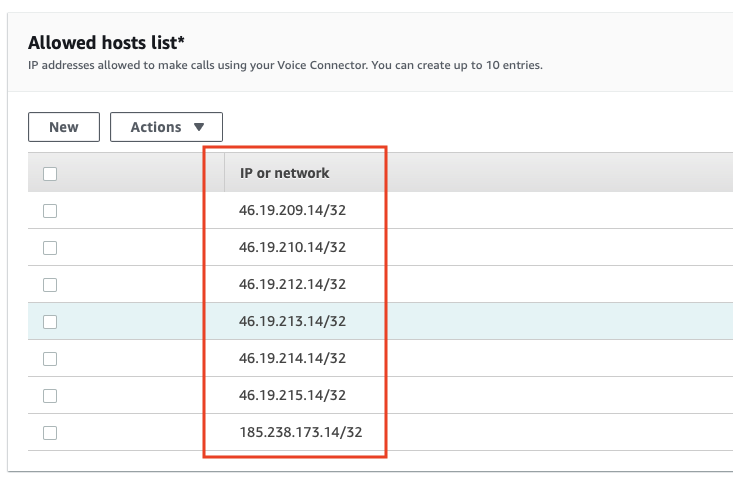
Fig. 5. Adding DIDWW inbound signalling IPs.#
Creating Amazon Lambda function#
Step 1.
In the AWS Lambda menu choose Functions.
Click Create function. (Fig. 6).
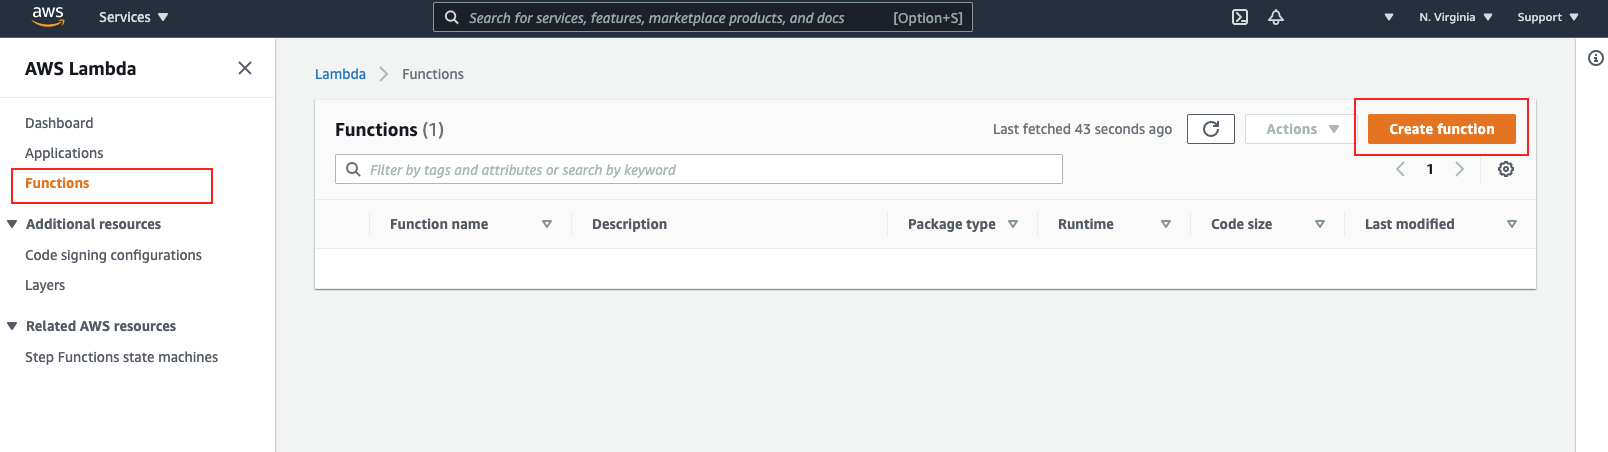
Fig. 6. Creating AWS Lambda function.#
Step 2.
Choose to use code from available blueprints.
Select “Hello world function”.
In the “Function” name field enter the function name of your choice.
For the “Execution role” leave the default selection (“Create a new role with basic Lambda permissions”) (Fig. 7).
Click the “Create” button at the bottom of the page.
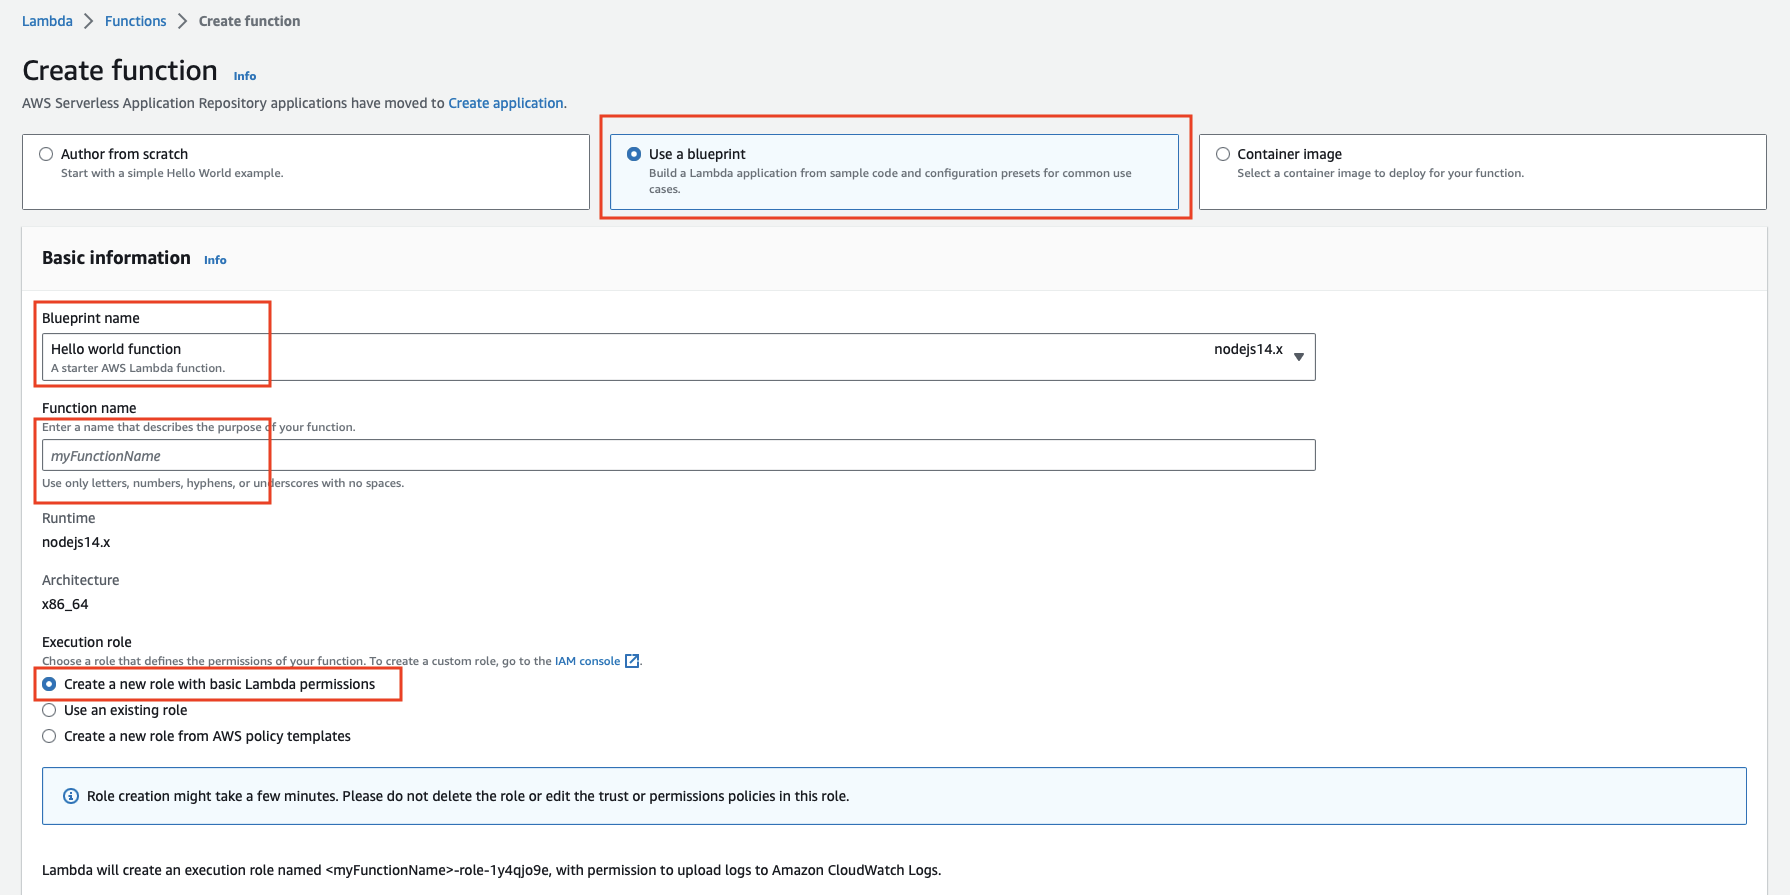
Fig. 7. Creating AWS Lambda function.#
Step 3.
The next window allows you to write, deploy, and test your Lambda code.
Copy/note Function ARN name (Fig. 8). (It will be used in the next step.)
A basic example of Lambda node.js code that passes Source and Destination Number to an external URL.
    const https = require('https');
exports.handler = async (event) => {
   let dataString = '';
   var source='';
   source=event.CallDetails?.Participants[0].From;
   var destination='';
   destination=event.CallDetails?.Participants[0].To;

   const response = await new Promise((resolve, reject) => {
       const req = https.get(`https://example.com/?source=${source}&destination=${destination}`, function(res) {
         res.on('data', chunk => {
           dataString += chunk;
         });
         res.on('end', () => {
           resolve({
               statusCode: 200,
                body: (dataString),
           });
         });
       });
       req.on('error', (e) => {
         reject({
             statusCode: 500,
             body: 'Something went wrong!'
         });
       });
   });
   return response;
 };
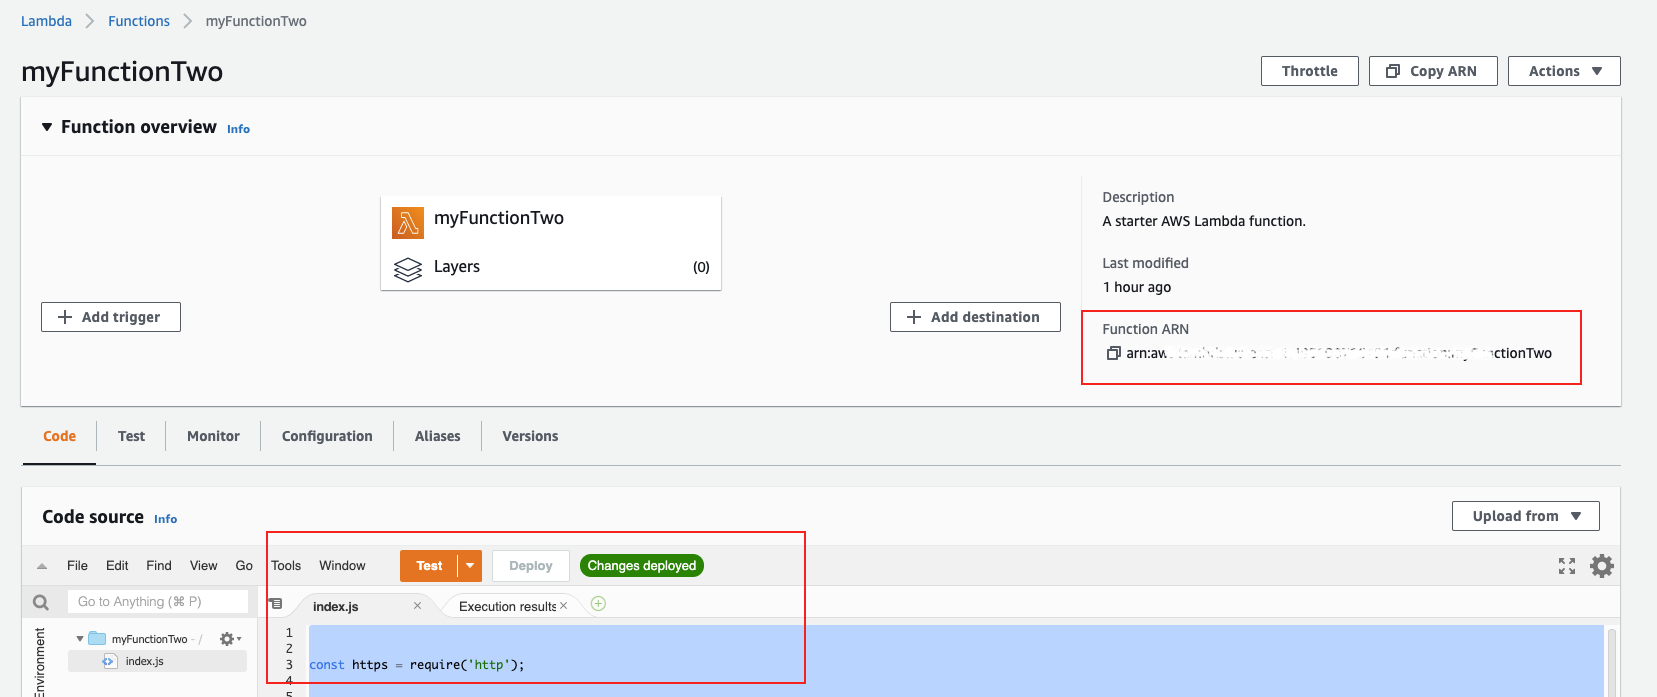
Fig. 8. Function overview.#
Creating Amazon Chime SIP Media Application#
Step 1.
Choose SIP media applications in your Chime SDK menu.
Click Create (Fig. 9).
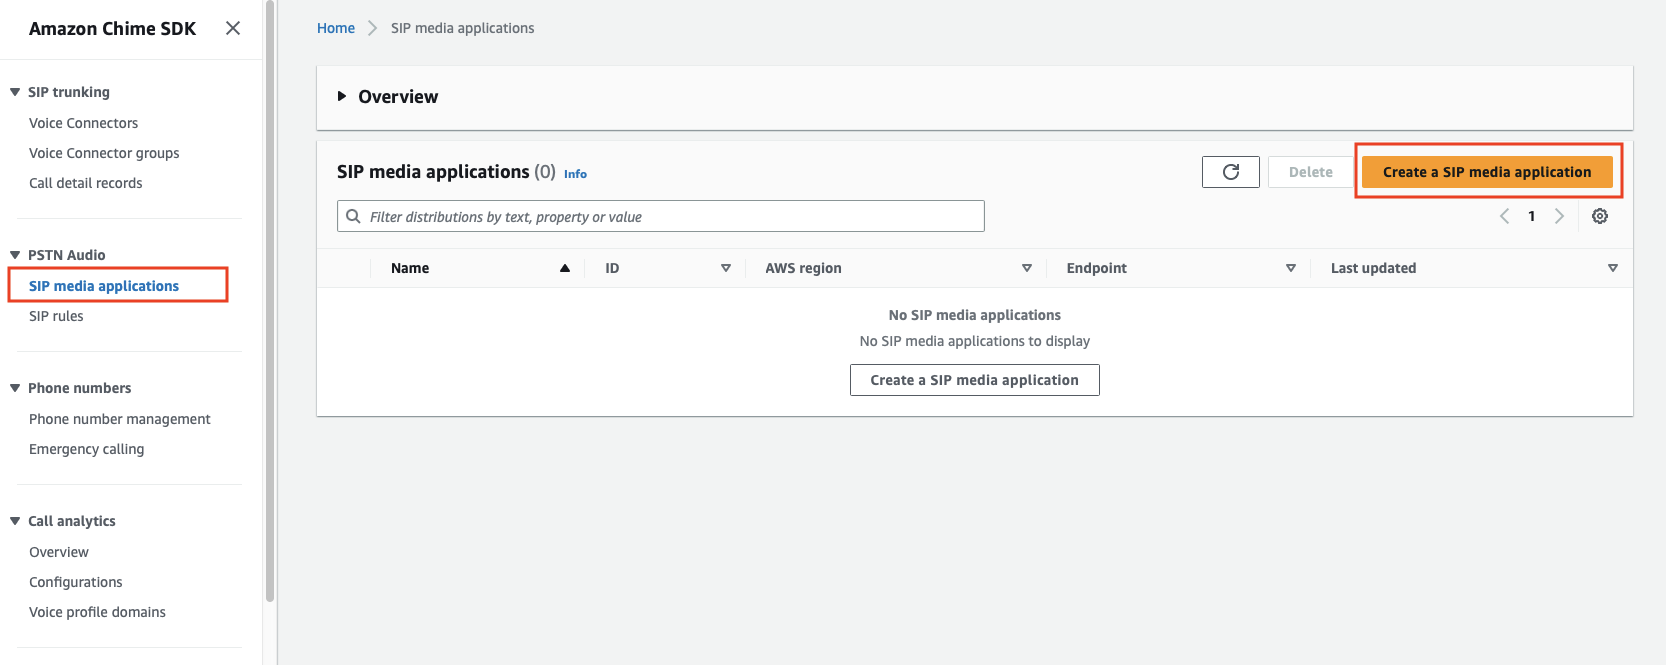
Fig. 9. Creating SIP media application.#
Step 2.
Enter a SIP media application name of your choice.
Paste the previously copied Lambda Function ARN name (Fig. 8).
Click “Create a SIP media application” (Fig 9).

Fig. 10. Filling in the required data.#
Creating Amazon Chime SIP rule#
Step 1.
Choose SIP rules in your Chime menu.
Click Create SIP rule (Fig. 11).
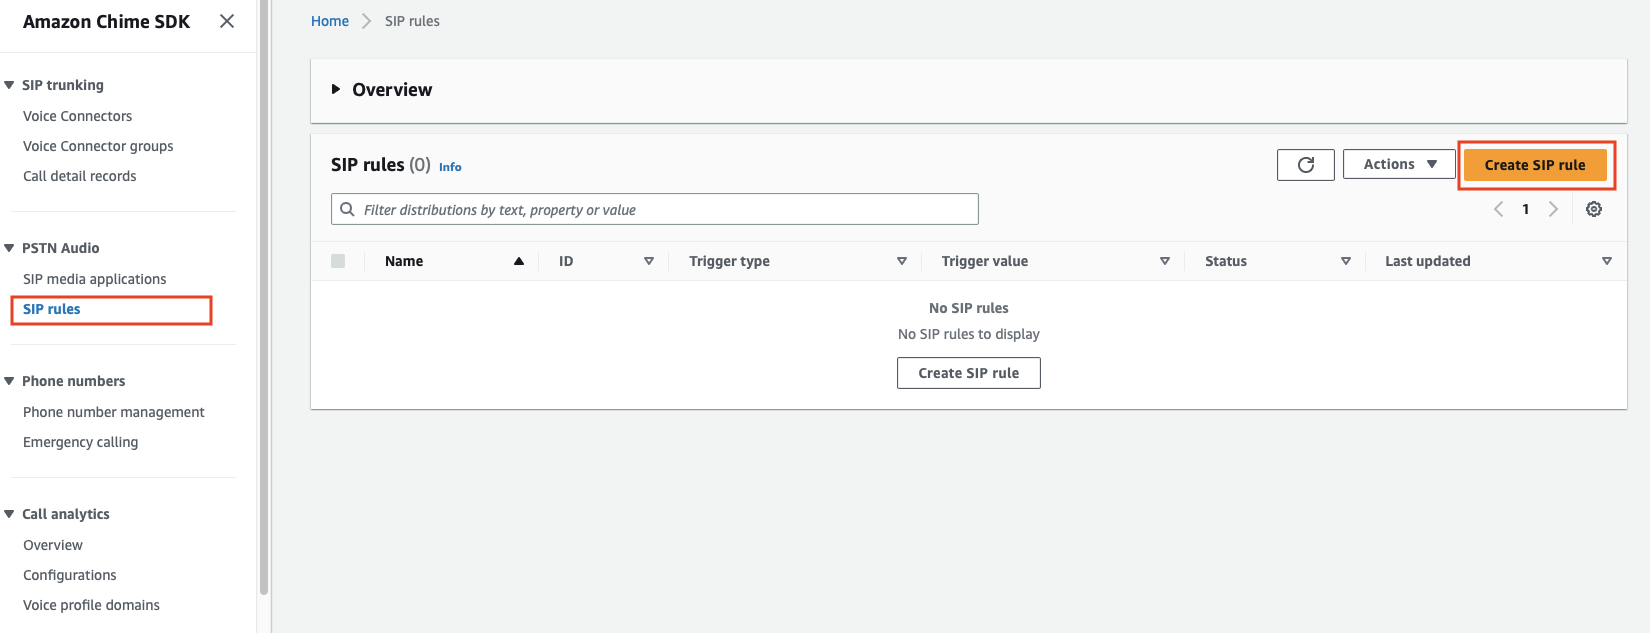
Fig. 11. Creating SIP rule.#
Step 2.
Enter a rule name of your choice.
In the Trigger type dropdown menu select Request URI hostname.
In the Request URI hostname select the previously created Amazon Chime Voice Connector hostname (Fig. 4).
In the SIP media applications add previously created SIP media application (Fig. 10).
Click Create SIP rule (Fig. 12).
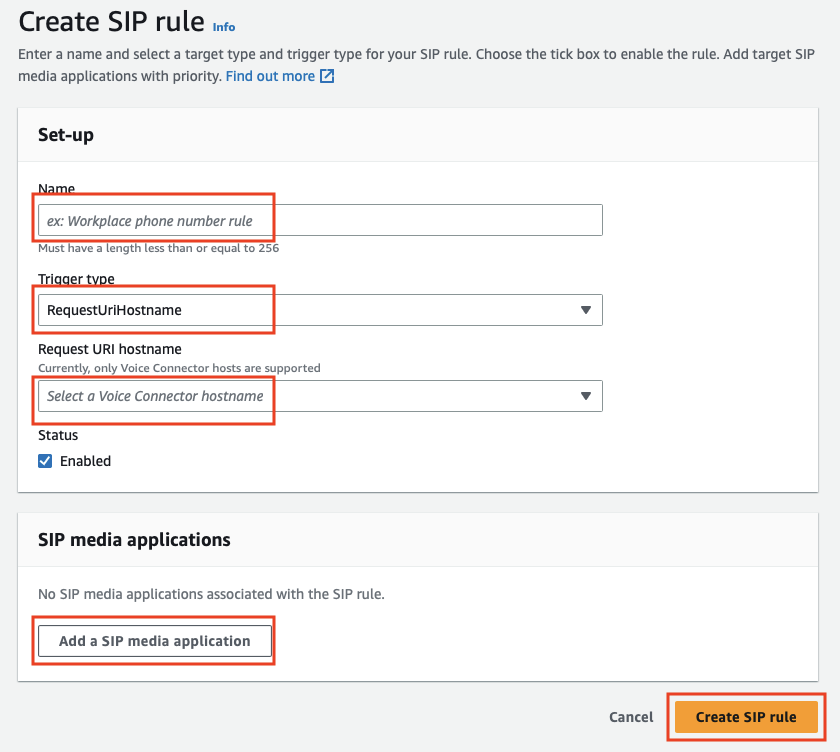
Fig. 12. Selecting fields.#
Creating DIDWW SIP trunk#
Step 1.
Log in to the DIDWW self-service portal ( https://my.didww.com/users/sign_in ).
On the left-hand menu select Voice, then select Inbound Trunks.
Click Create New, then select SIP Trunk from the dropdown list (Fig. 13).
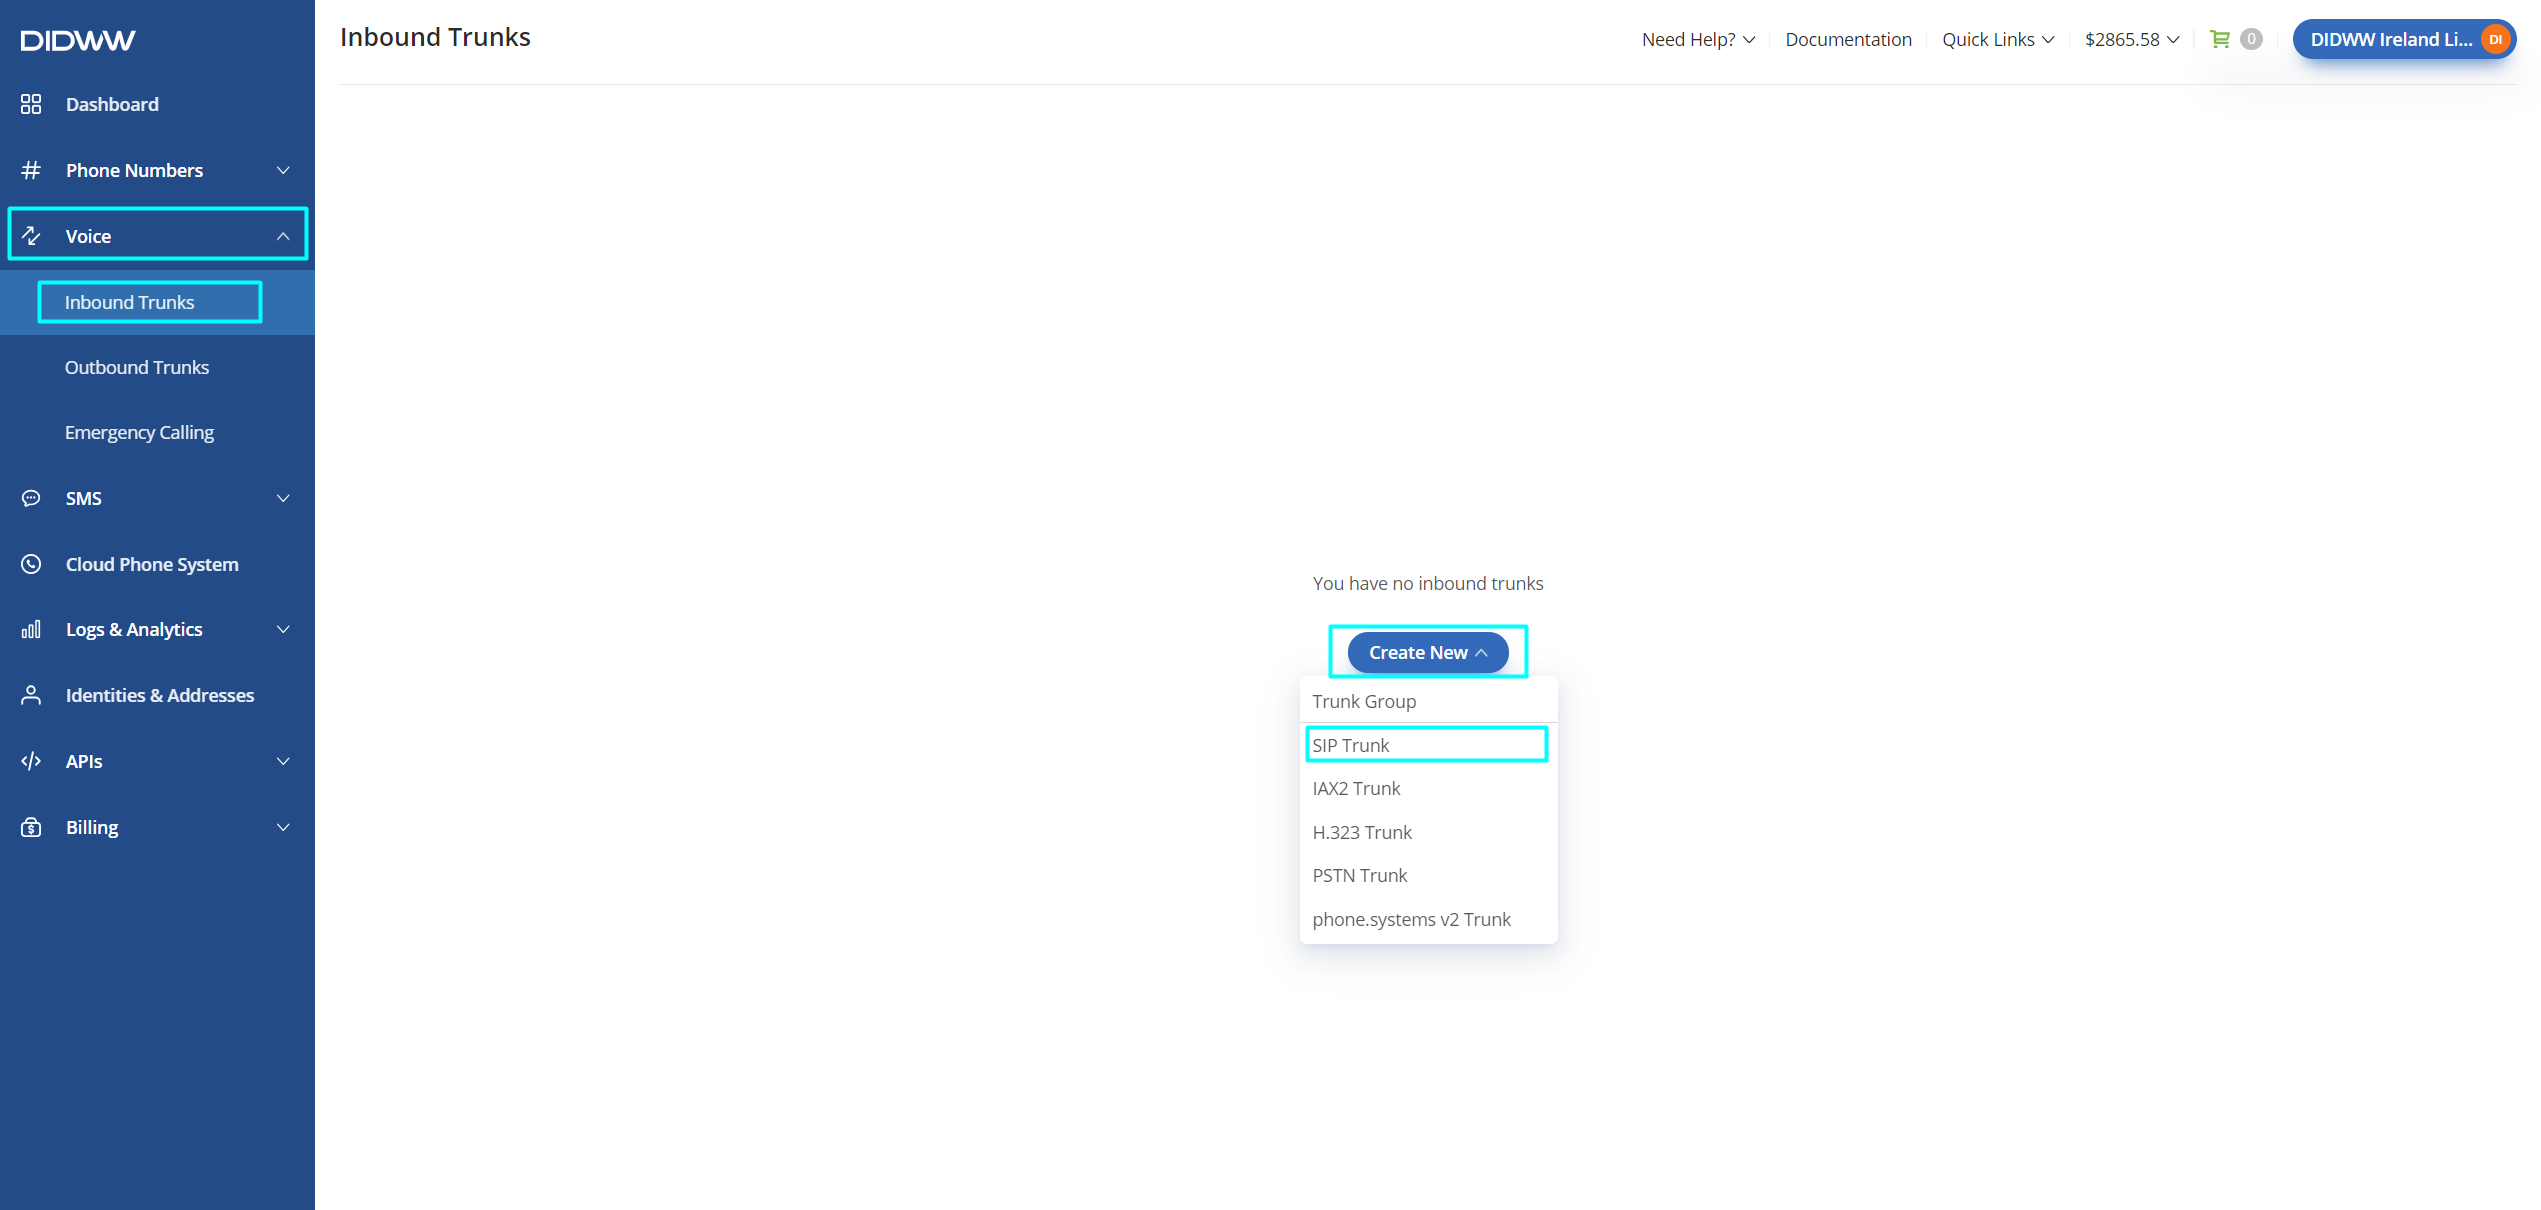
Fig. 13. Creating a new SIP trunk.#
Step 2.
Add a name of your choice for your trunk.
Add “+{DID}“ (no commas) in the Username section.
Select e164 as CLI Format.
Enter “+” (no commas) in the CLI Prefix section.
Protocol UDP (TLS is available as well if encryption is preferred).
Port 5060 for UDP (5061 for TLS).
Add your Amazon SIP connector host name in the Host field from the previous step of this guide . (Fig 4).
Click Create (Fig. 14).

Fig. 14. Editing SIP trunk.#
Assigning SIP trunk to your number at DIDWW#
Step 1.
In the DIDWW self-service portal, select Phone Numbers.
Select My Numbers
Click on “Voice” in the “Trunk” column (Fig. 15).
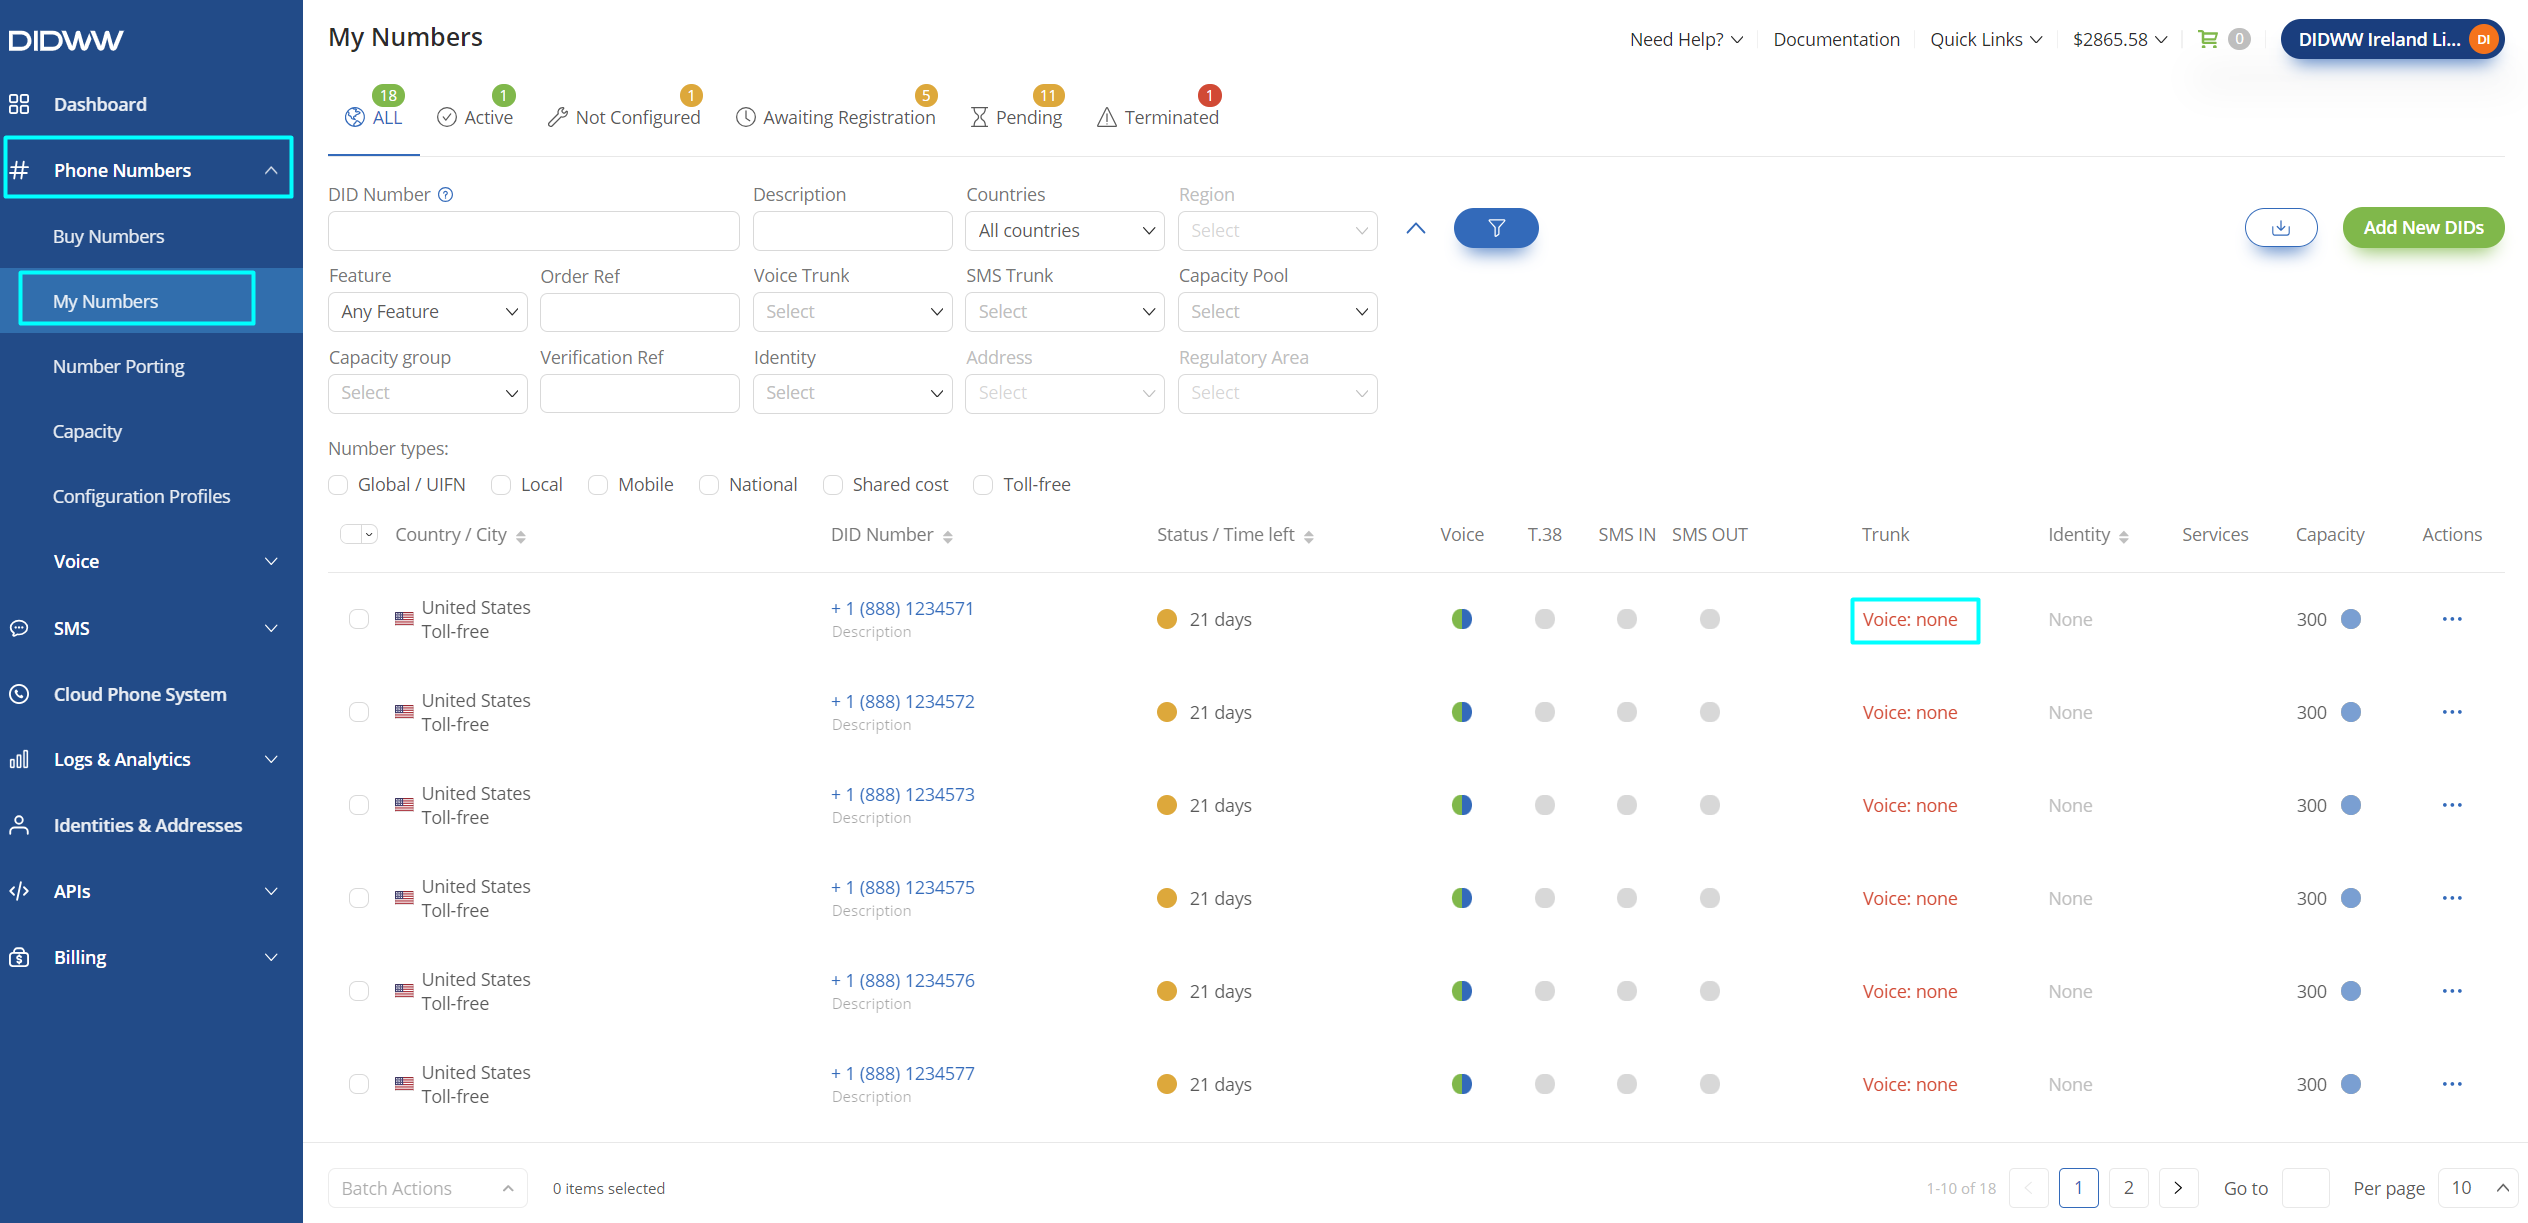
Fig. 15. Editing DID number voice trunk.#
Step 2.
Select the previously created voice trunk.
Click Confirm (Fig. 16).
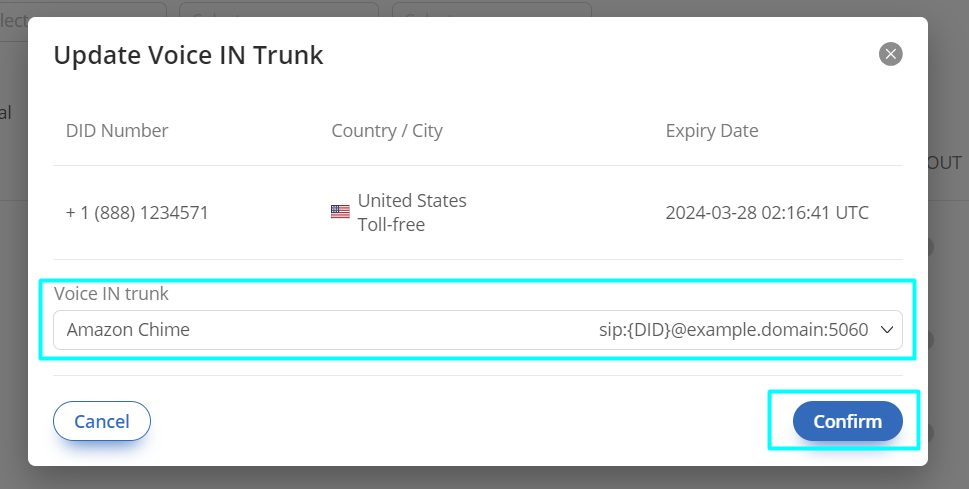
Fig. 16. Assigning voice trunk.#
Testing and Troubleshooting#
Testing and troubleshooting can be performed by following these steps:
• Place a test call to DIDWW DID number;
• Check Call Logs in your DIDWW account to determine if the test call reached your DIDWW DID number;
• By using AWS CloudWatch or directly via AWS S3 storage check Chime Voice Connector and Lambda Function logs to see if both were executed successfully;
• Validate if request from AWS Lambda Function was successfully received on your external URL/HTTP server.
Support and Additional Resources#
For additional information, please review Amazon Chime SDK documentation .
For more information or additional troubleshooting please contact DIDWW Technical Support Team at support@didww.com . Support is available 24/7/365 for all current customers. We do not utilize a Support Tiers system. Service Level Agreements (SLAs) are provided in accordance with our general terms and agreements.