

xAI#
Use xAI Grok Voice agents with DIDWW Inbound SIP Trunks to answer calls on your DIDWW numbers and transfer incoming callers to a live person. Create and manage your agent in the xAI console.
Connect your existing DIDWW numbers to Grok Voice agents.
Choose which agent answers each DIDWW number.
Set the agent’s greeting and answers in the xAI console.
Transfer incoming callers from the AI agent to your team.
Authenticate incoming calls with SIP credentials.
Handle calls without running a separate call-control server.
Note
This setup supports incoming calls and call transfers. Agent-initiated outbound calls through DIDWW are not supported. The DIDWW outbound trunk in this guide is used to connect transferred callers to the destination number.
1. Route Incoming Calls to xAI#
Configure an Inbound SIP Trunk in the DIDWW User Panel to send incoming calls from your DIDWW numbers to xAI. xAI routes each call to the agent associated with the called number in 3. Connect DIDWW in xAI.
Before You Begin#
An active DIDWW account is required. Sign in to DIDWW or Create DIDWW account.
At least one active DID number with capacity to receive incoming calls is required. Buy Numbers.
An xAI console account is required.
Step 1: Create New SIP Trunk#
In the DIDWW User Panel, go to Voice > Inbound Trunks.
Click Create New > SIP Trunk.
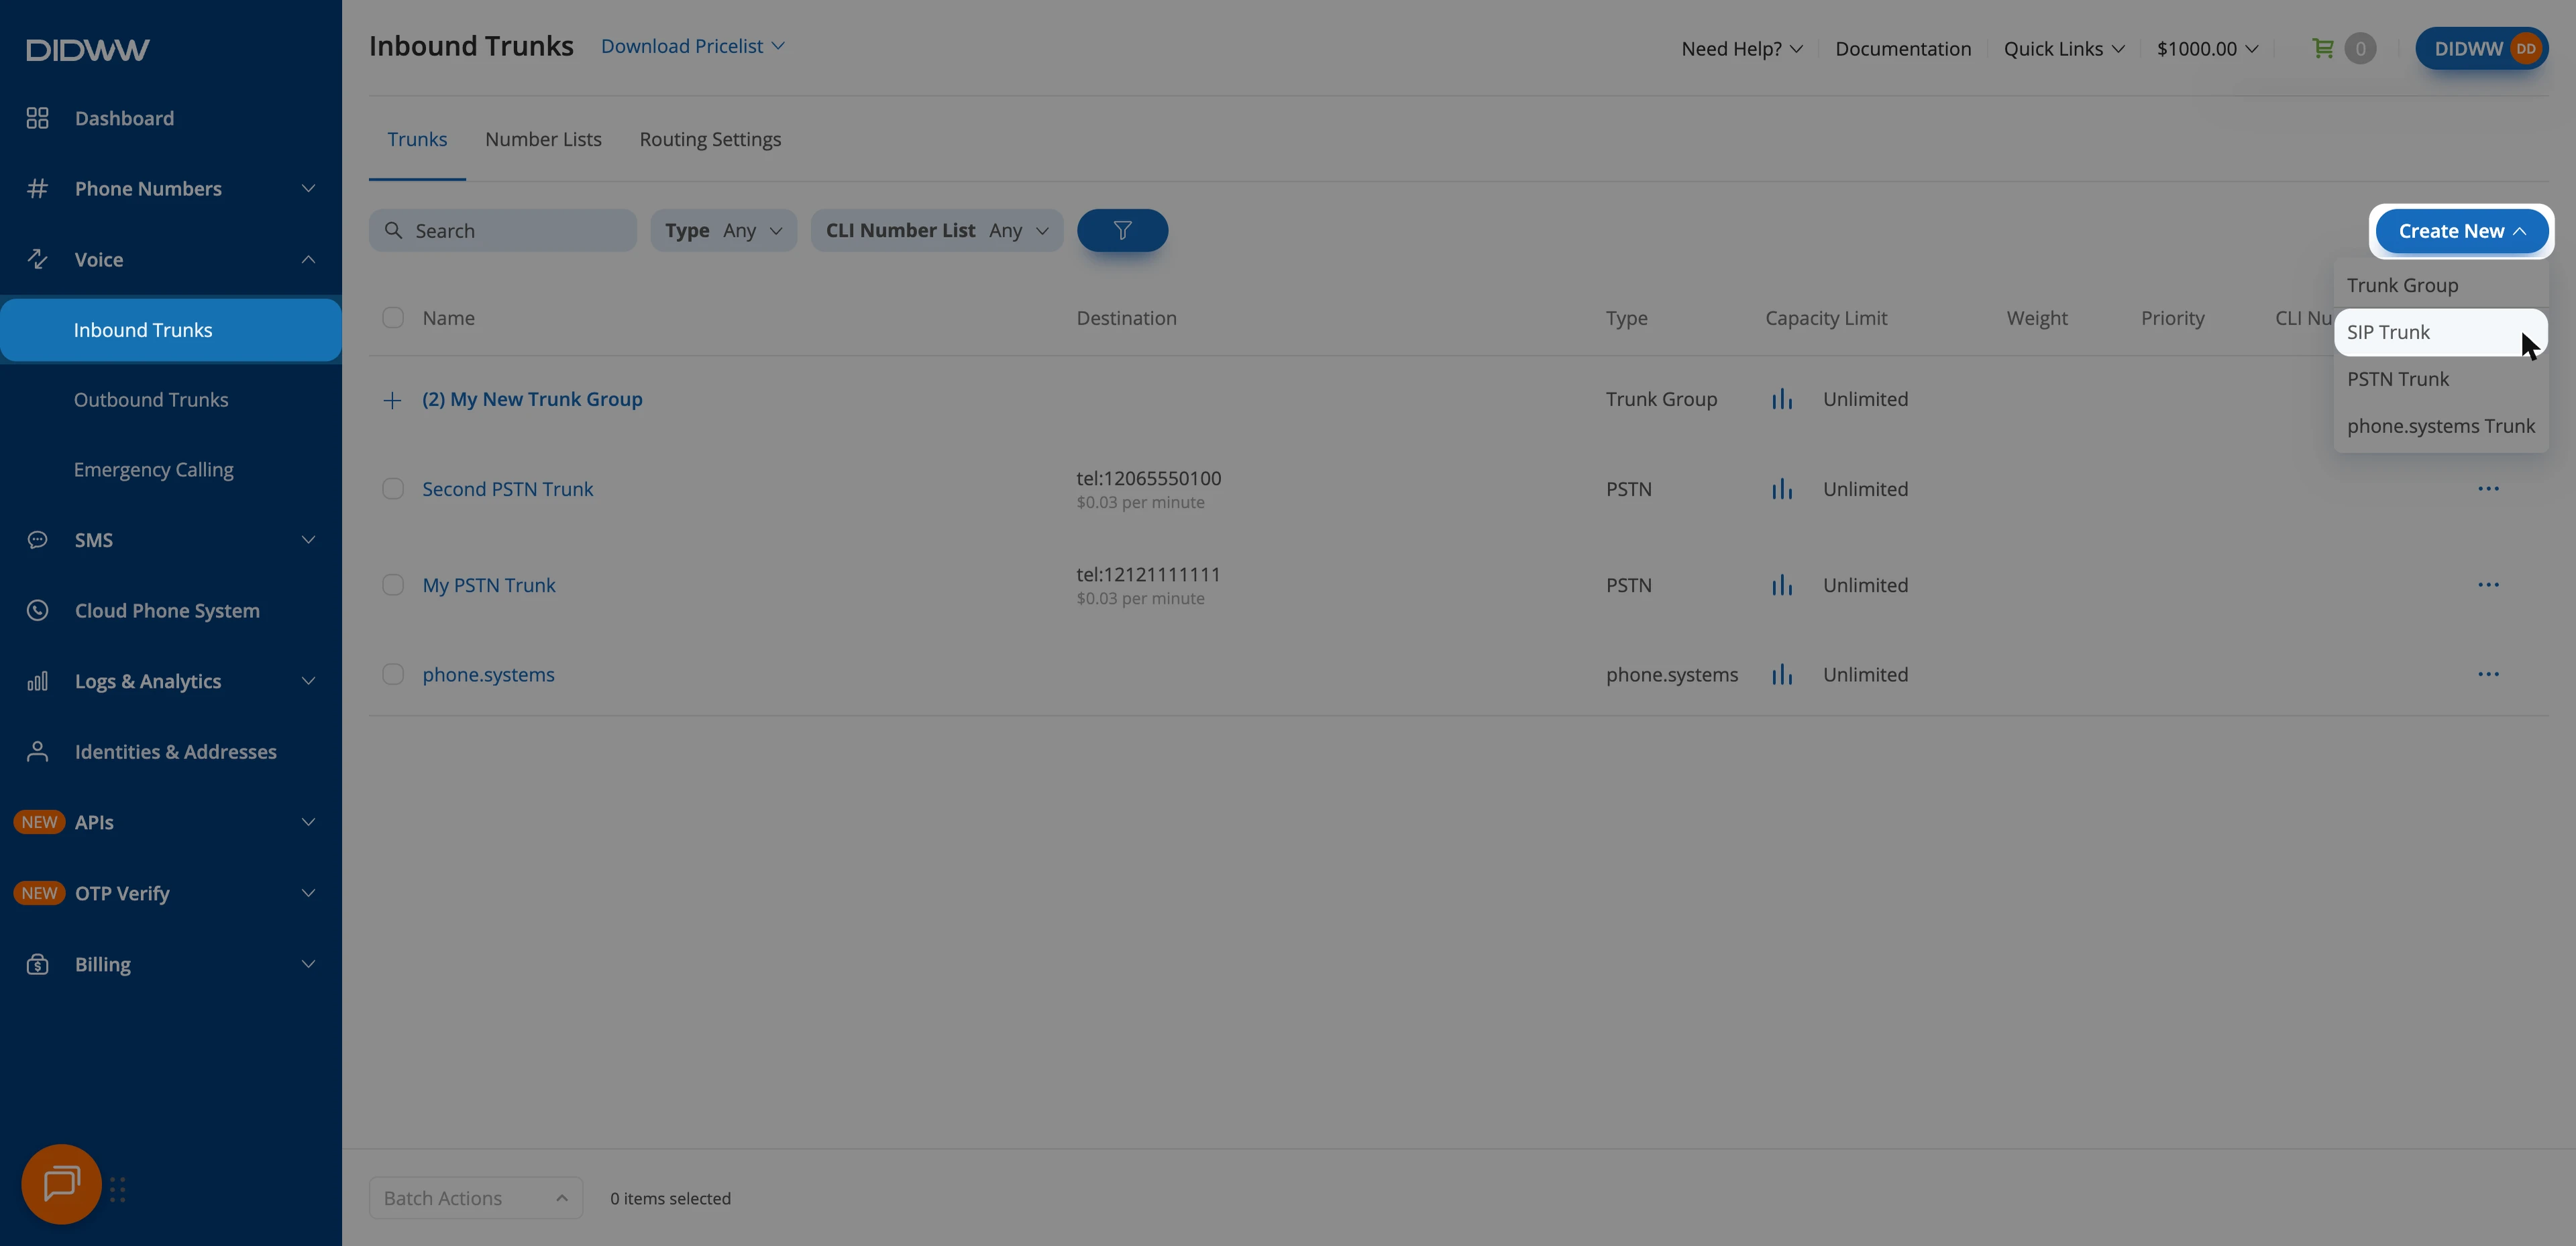
Fig. 1. Inbound Trunks: Create New > SIP Trunk#
Step 2: Configure General SIP Trunk Settings#
In the General tab, configure the xAI endpoint and keep the default settings where indicated.
Enter a descriptive Name for the trunk (e.g.,
xAI).Keep Static Endpoint selected.
In User Part of R-URI, enter
+{DID}. This sends the called number with the+sign to match the number you add in Step 3 of section 3.In Host, enter
sip.voice.x.ai.In Port, enter
5061.In Transport, select TLS.
In Network Protocol, select IPv4 only to match the IPv4 signaling addresses allowed on your DIDWW outbound trunk for call transfers.
Keep the remaining General settings at their defaults.
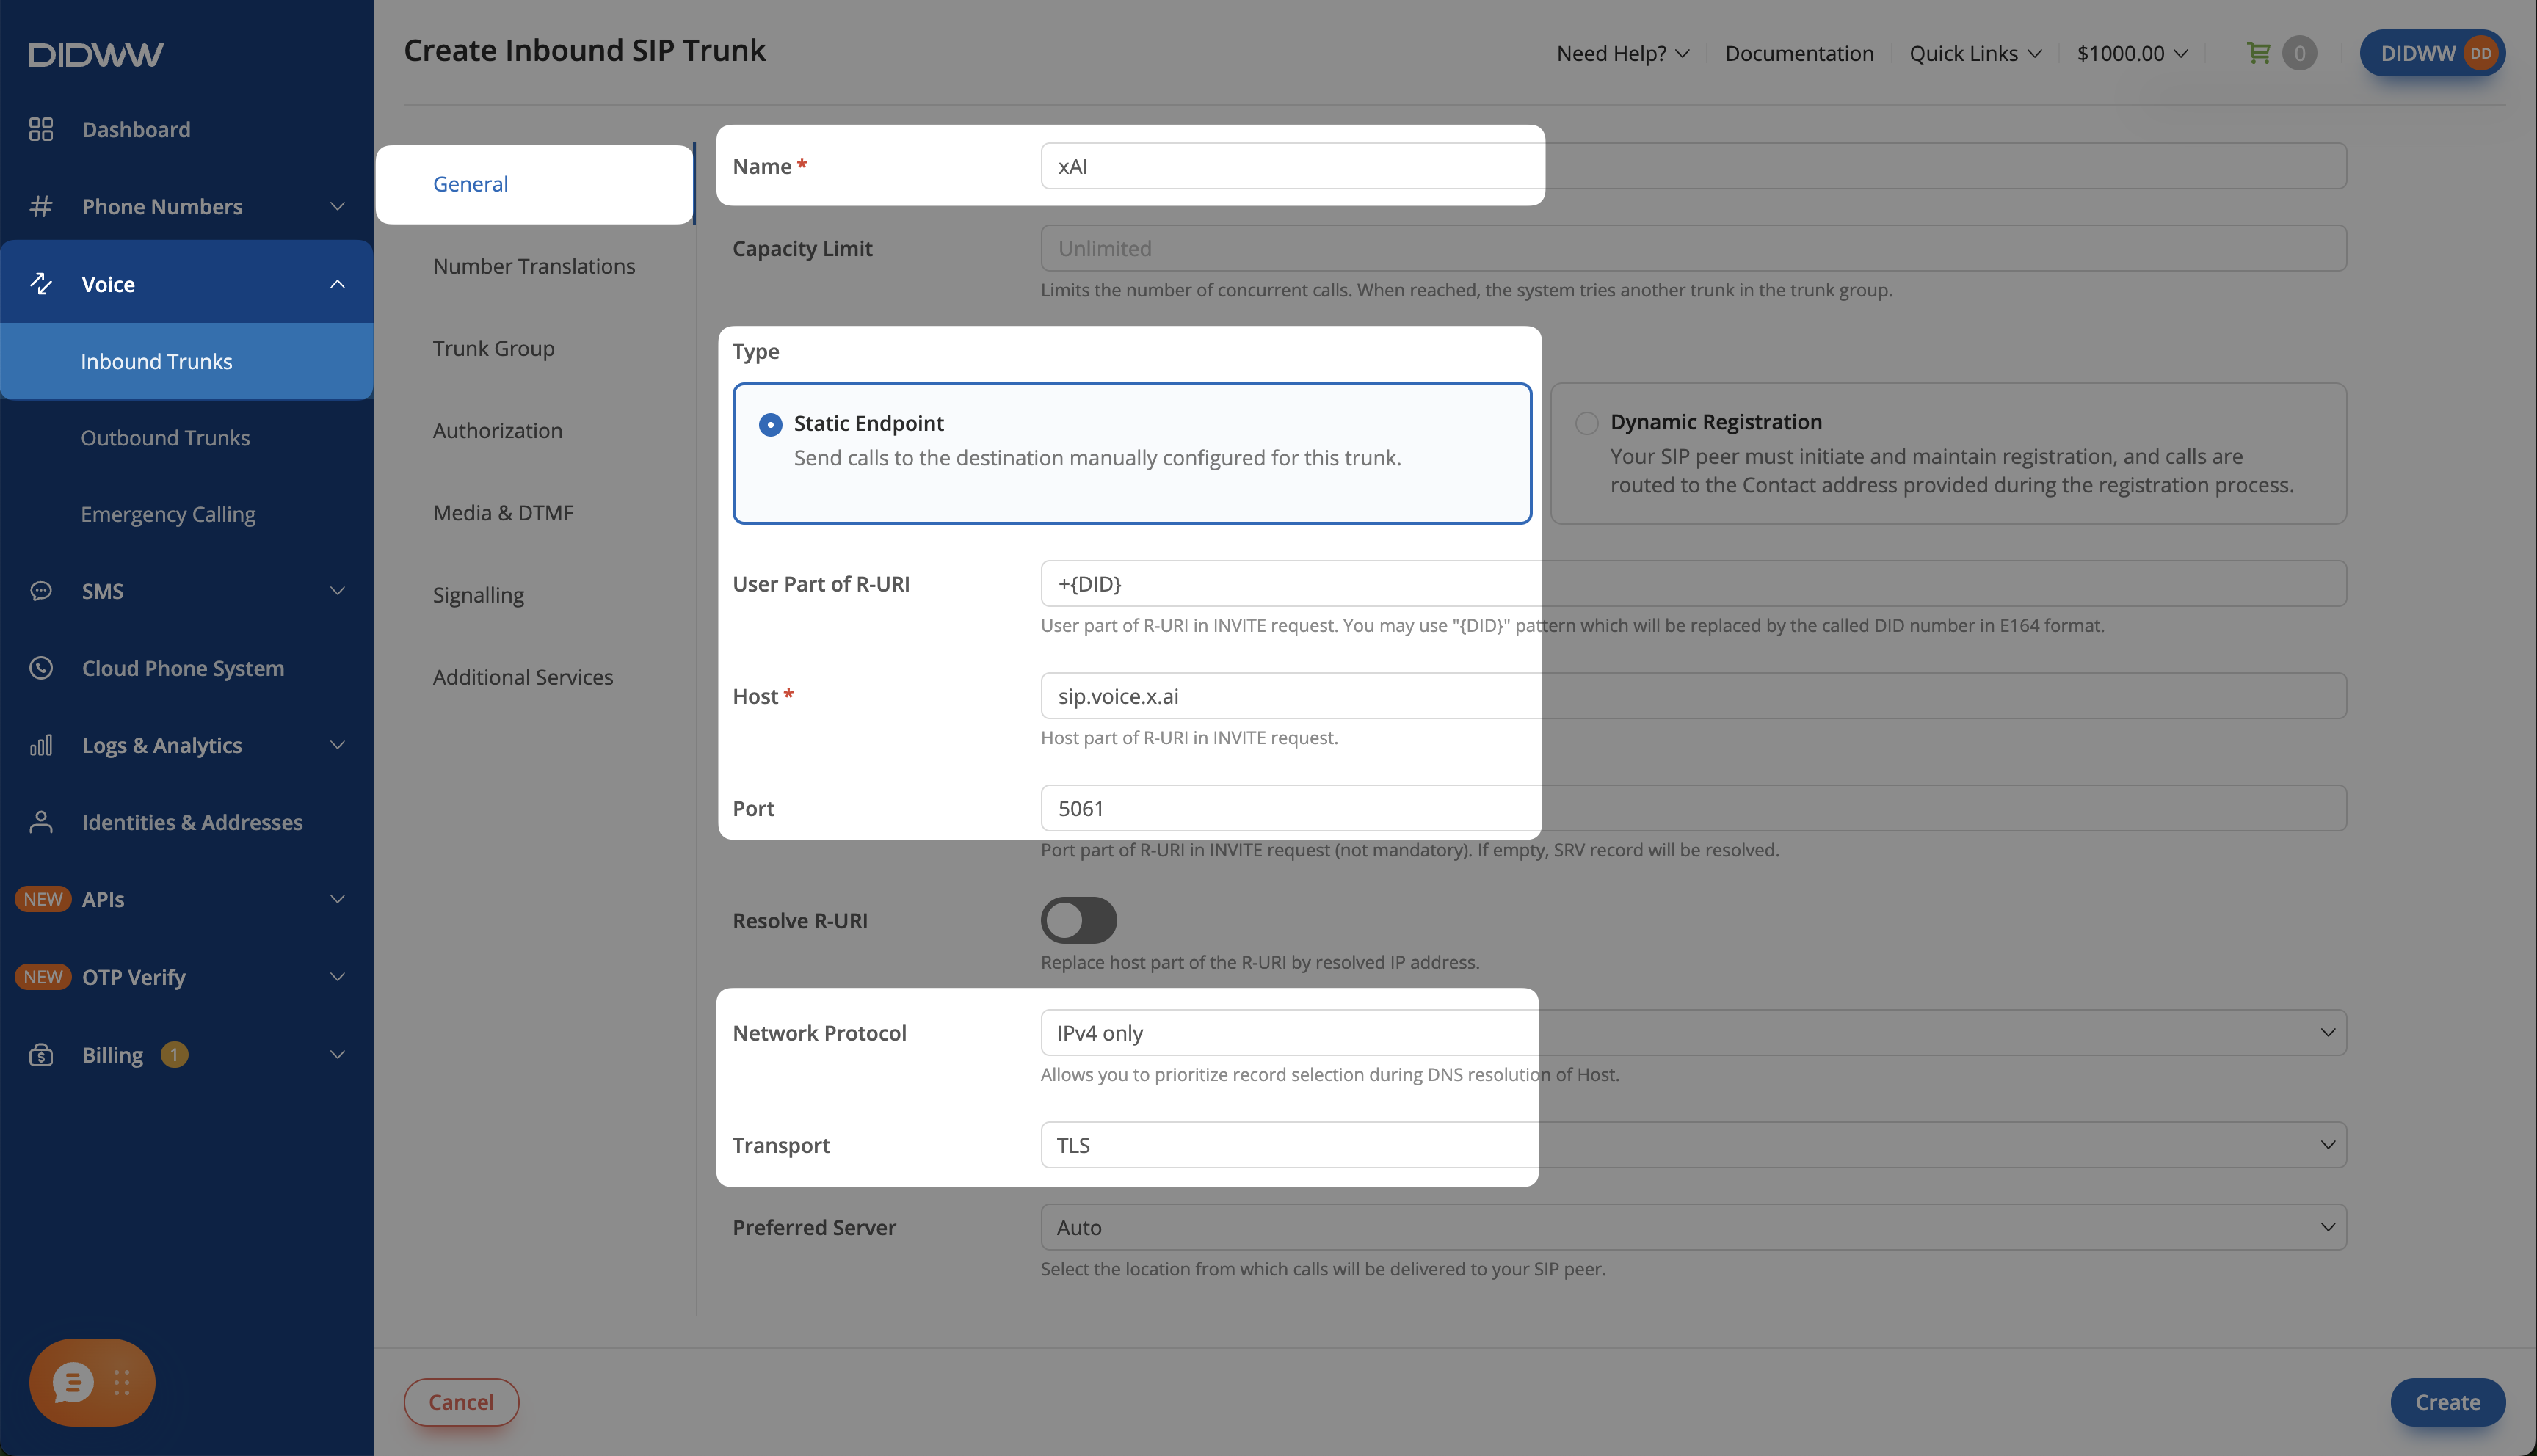
Fig. 2. Inbound SIP trunk General tab configured for xAI#
Step 3: Configure Media & DTMF#
Use PCMU and PCMA for call audio and telephone-event for DTMF in this setup.
Open the Media & DTMF tab.
In Codecs, keep only PCMU, PCMA, and telephone-event, and remove the other codecs.
Keep SRTP Mode at its default, Disabled.
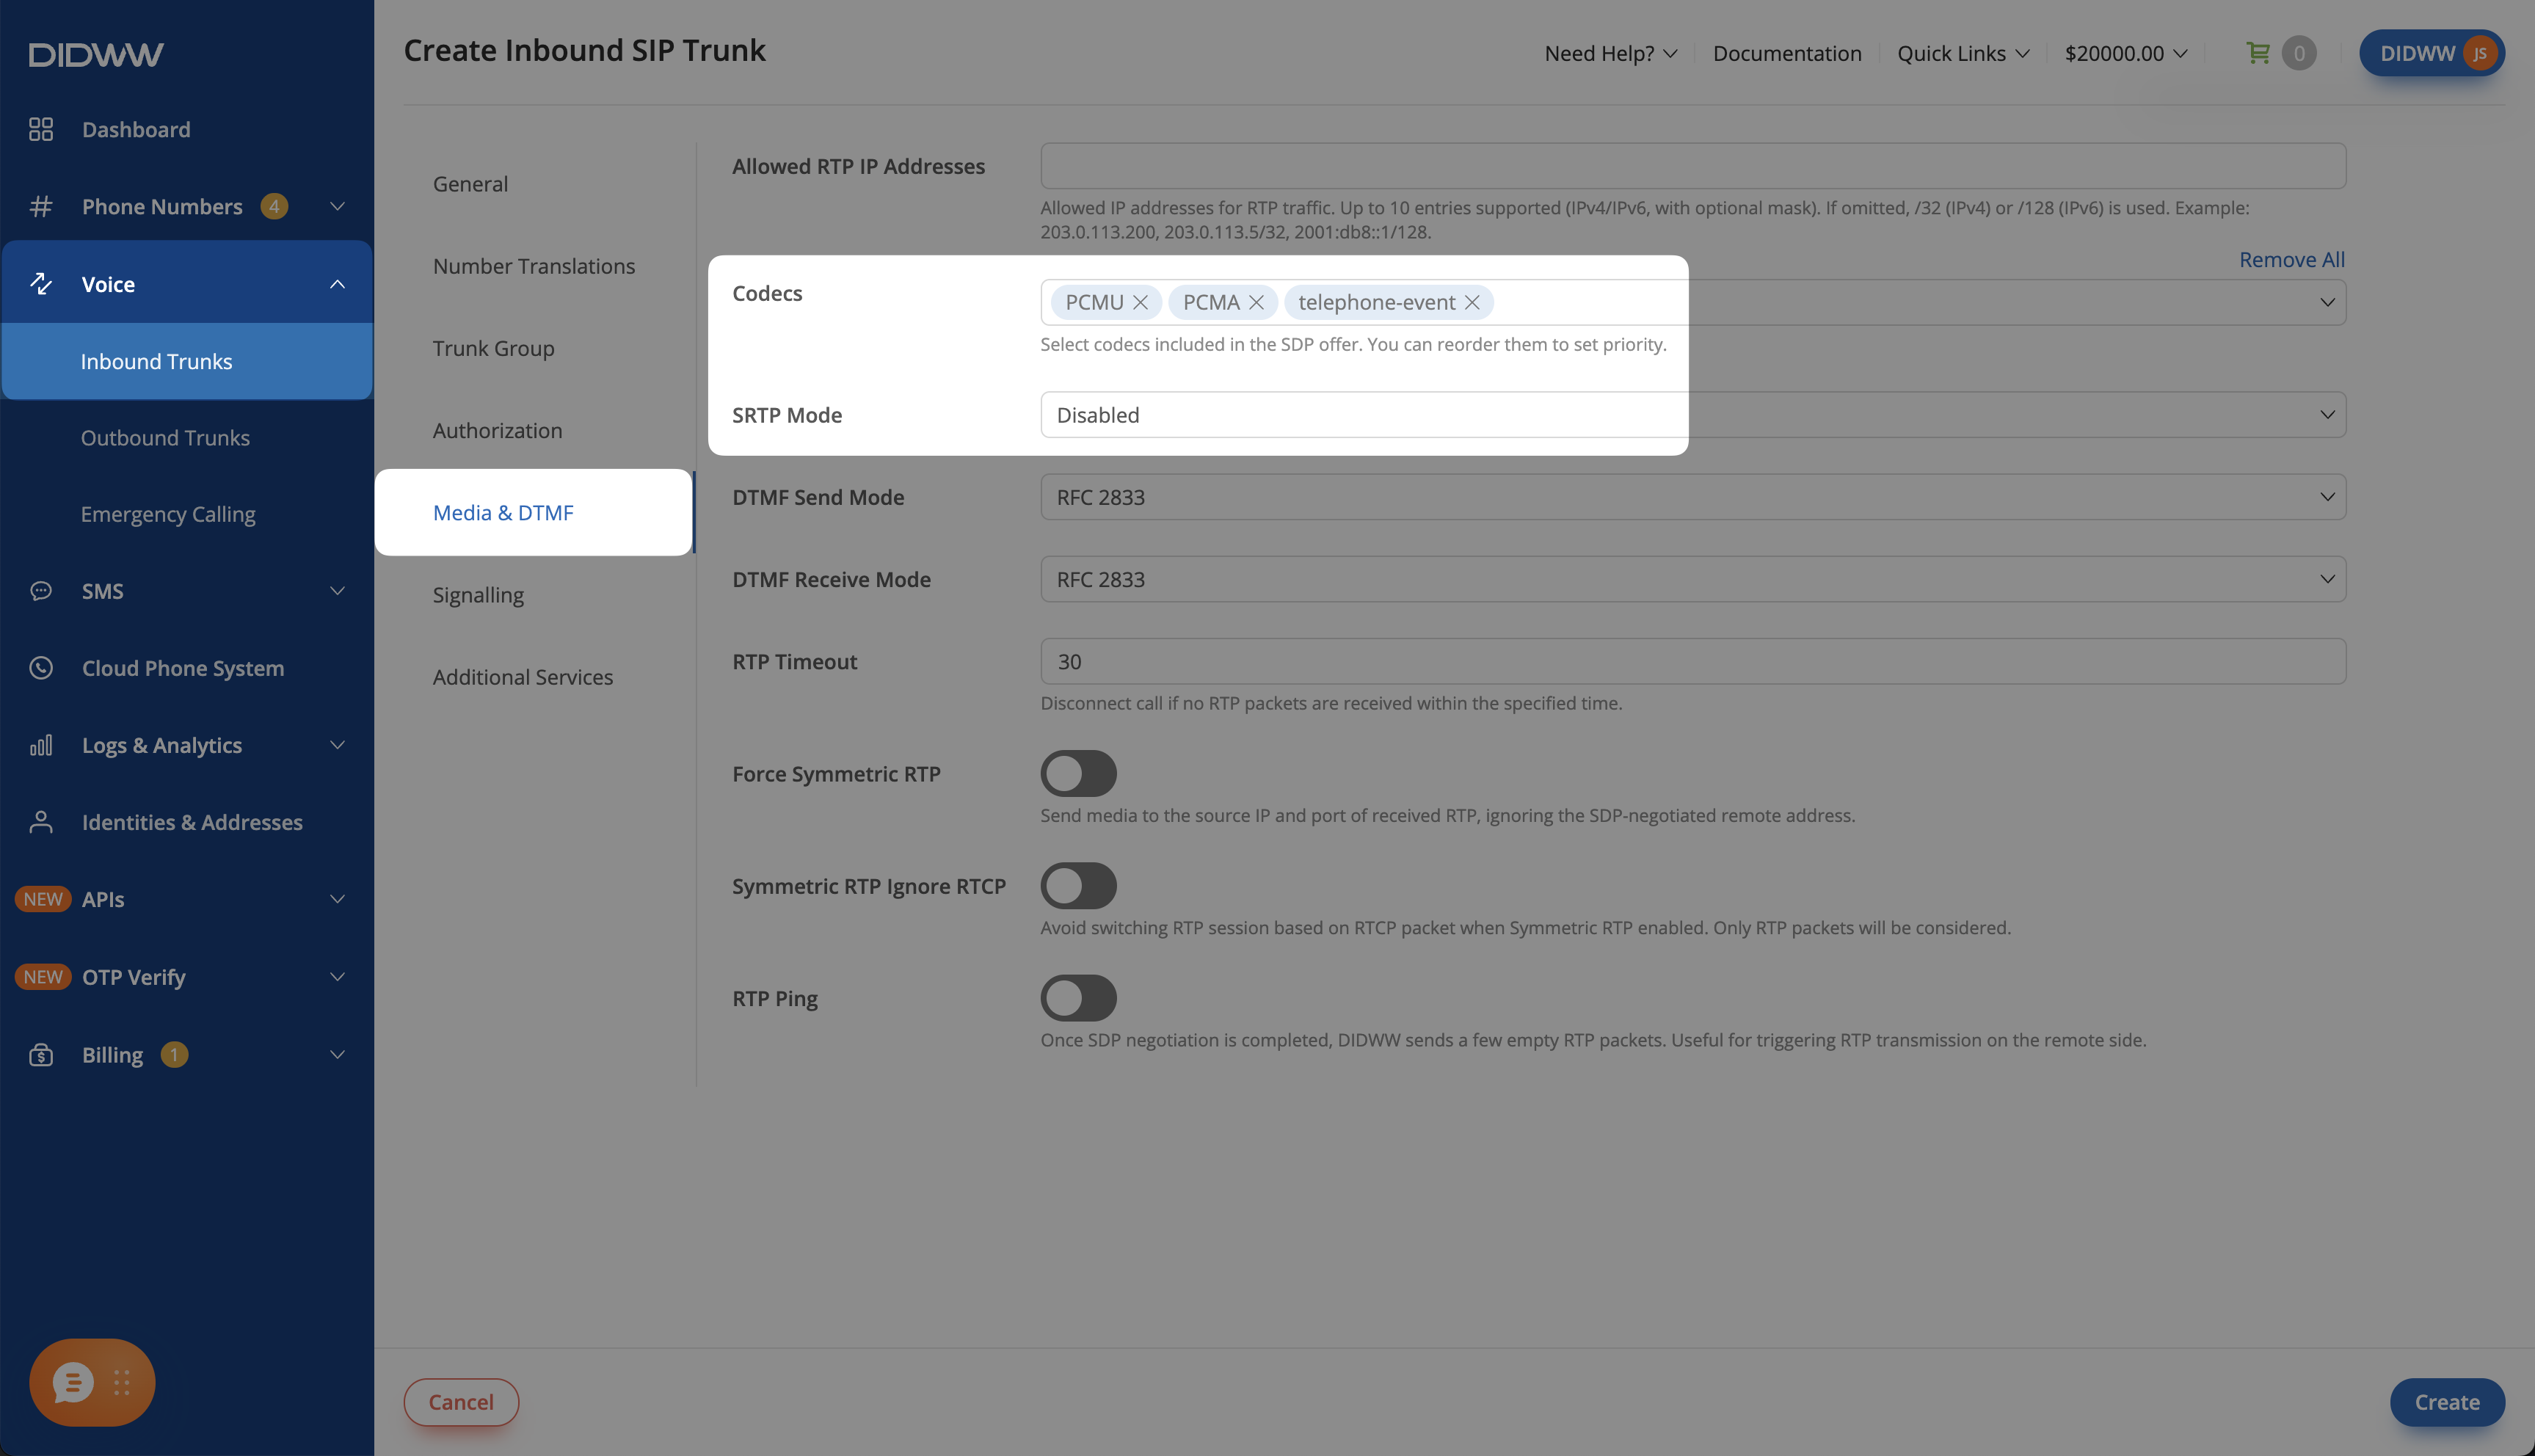
Fig. 3. Media and DTMF settings for the inbound SIP trunk#
Note
TLS encrypts SIP signaling. Call media is unencrypted in this setup.
Step 4: Enable Call Transfer Signaling#
To let the agent transfer an answered incoming call to a live person, allow in-dialog SIP REFER requests on the inbound trunk. Skip this step if you do not need call transfers.
Open the Signalling tab.
Set Max Transfers to
1or higher.
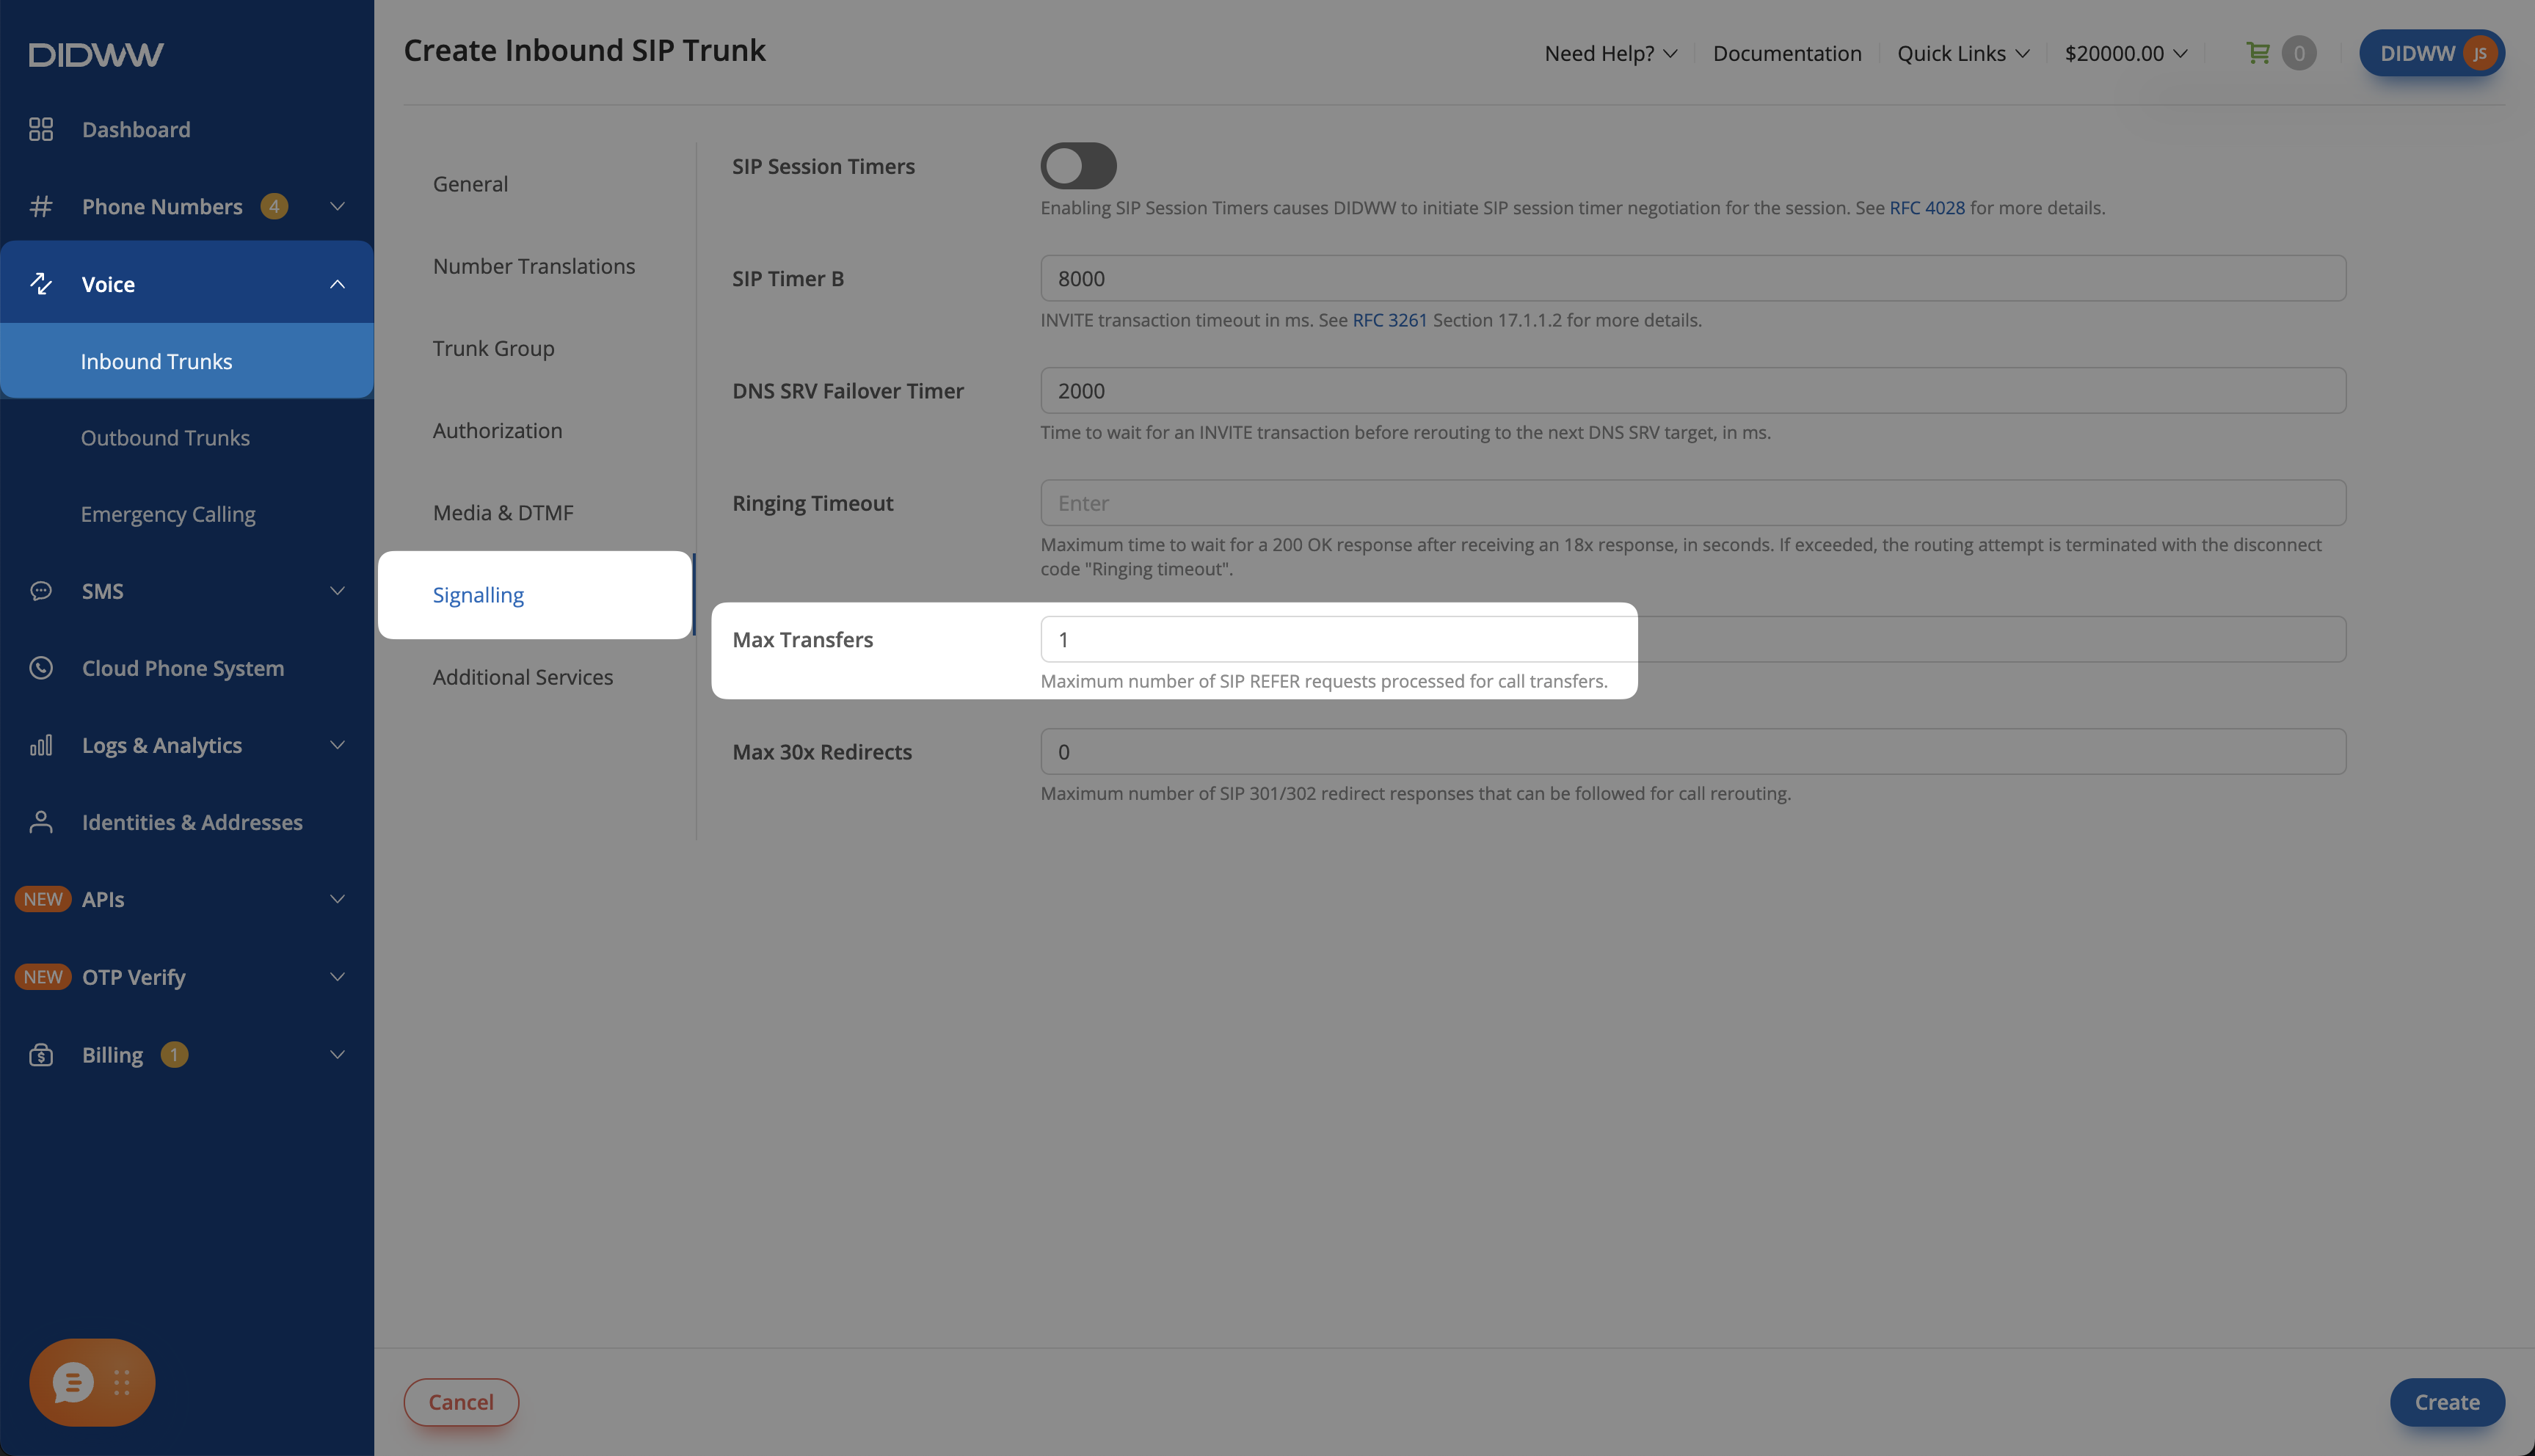
Fig. 4. Enabling call transfer signaling#
Note
Max Transfers is 0 by default. DIDWW rejects SIP REFER transfers until you increase it.
Step 5: Save the Inbound SIP Trunk#
Click Create to save the inbound SIP trunk. For call transfers or optional SIP digest authentication, configure its credentials in Step 1 of section 3.
Note
For advanced SIP trunk configuration, see Advanced Inbound SIP Trunk documentation.
Step 6: Assign Inbound SIP Trunk to Your DID Numbers#
Assign the inbound trunk to the DID number(s) that will deliver incoming calls to your xAI agent.
In the DIDWW User Panel, go to Phone Numbers > My Numbers.
Select the DID number(s) you want to assign to the inbound SIP trunk.
At the bottom of the page, click Batch Actions > Update Trunks.
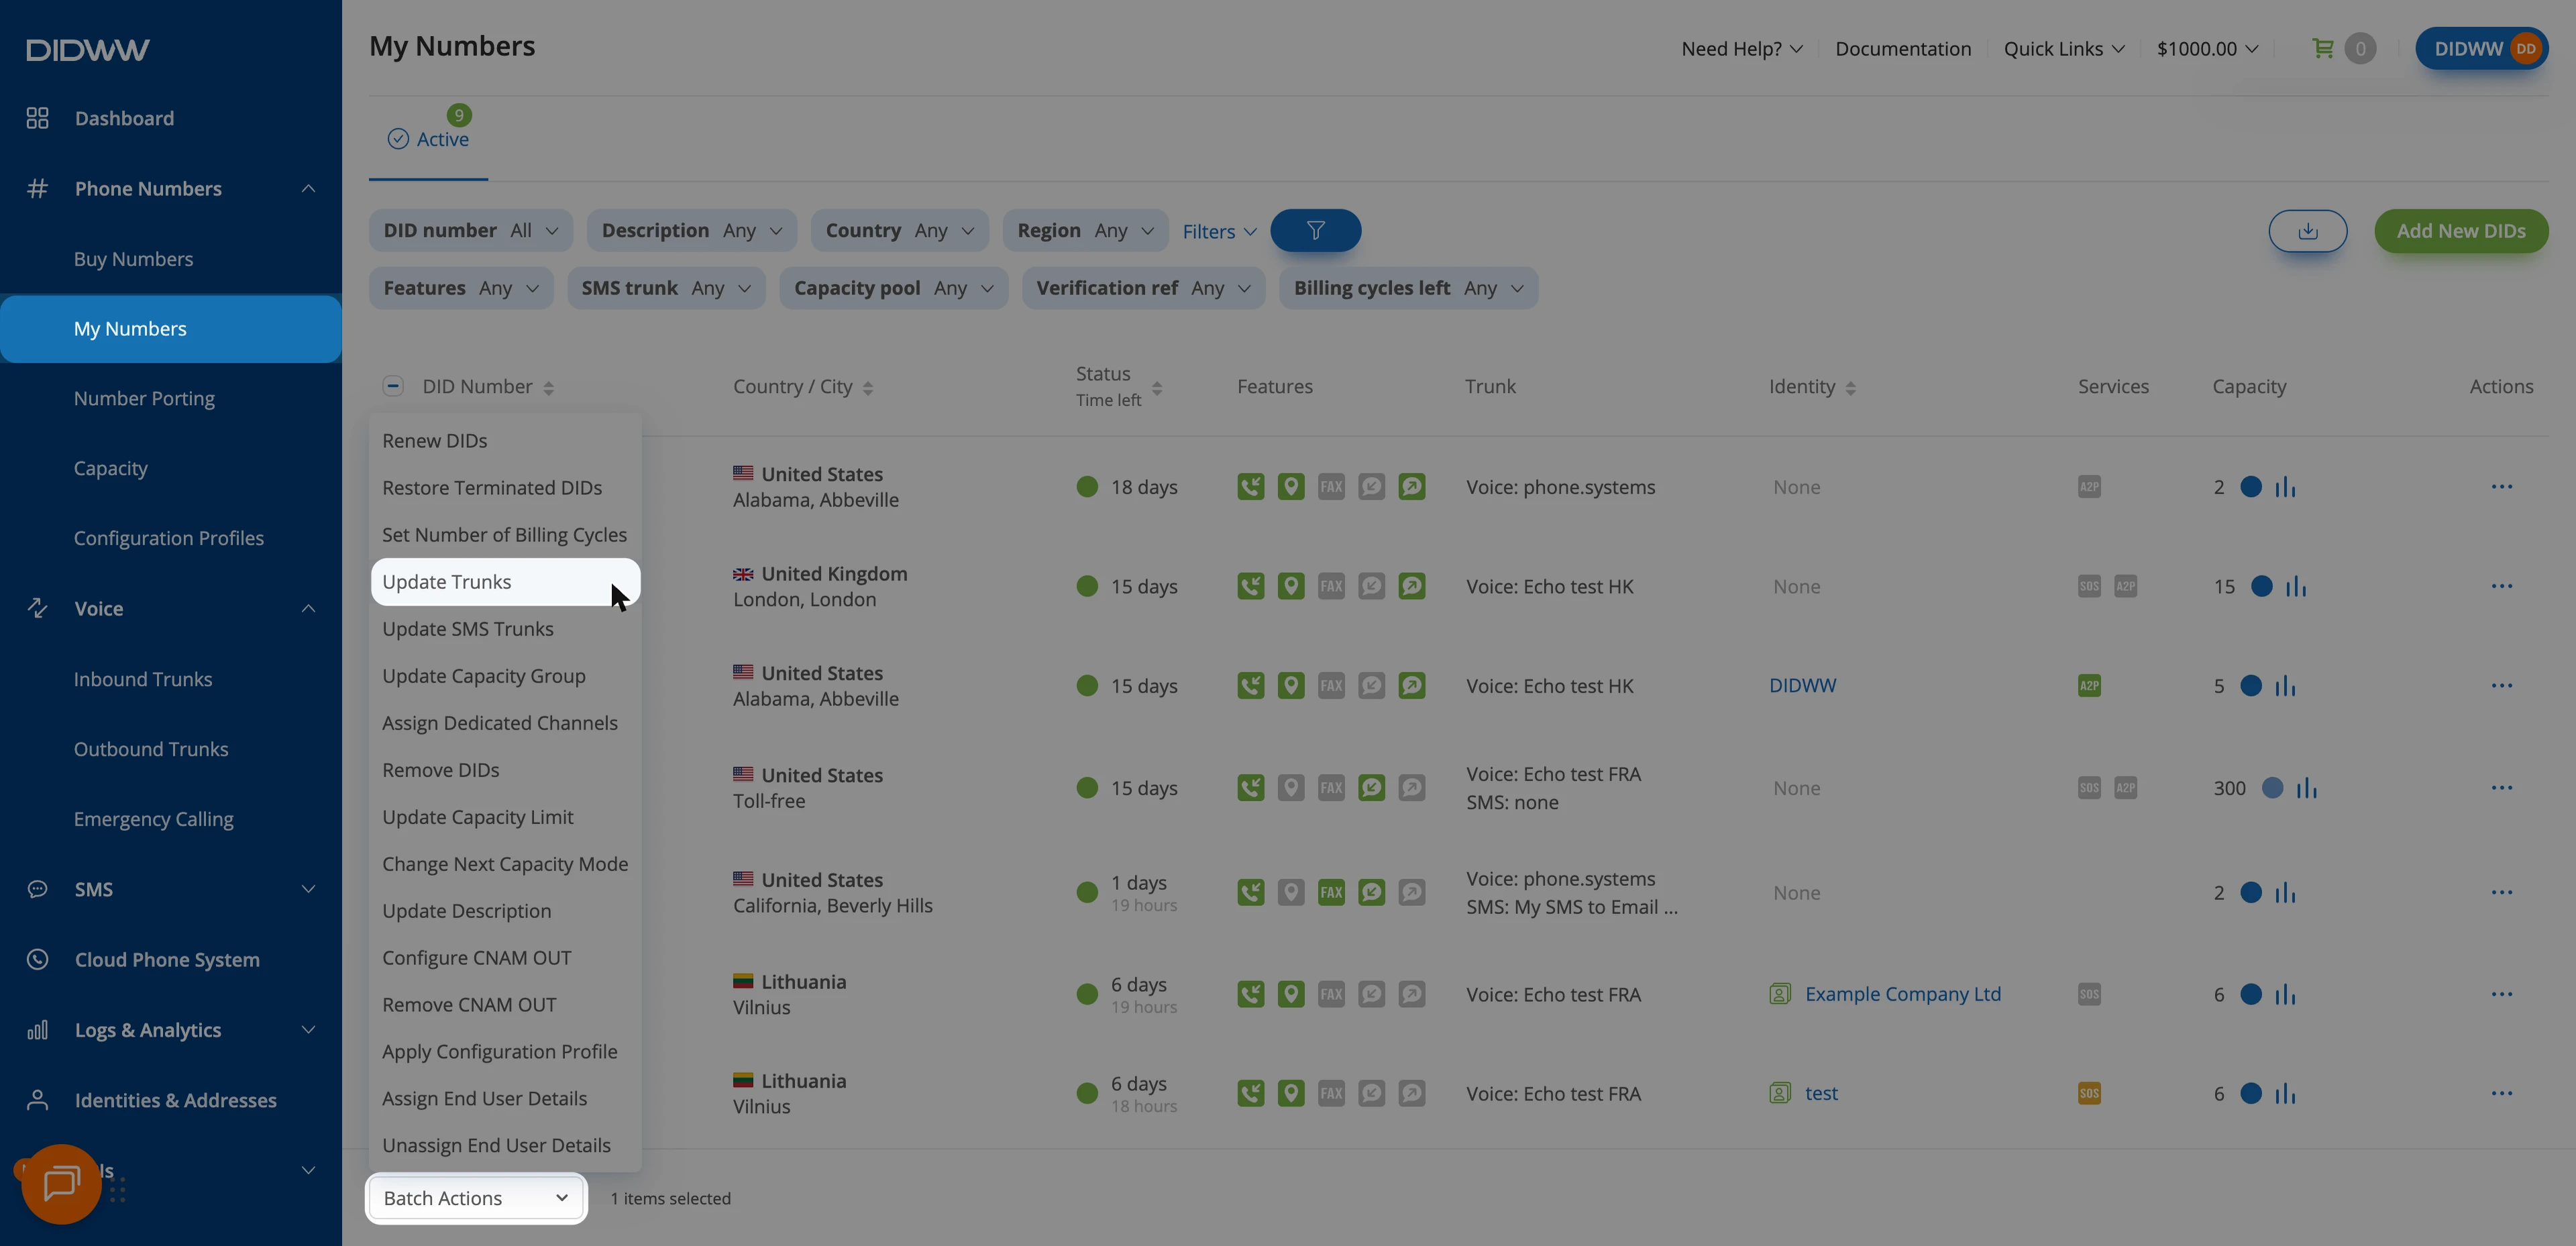
Fig. 5. Selecting Update Trunks from the Batch Actions menu#
From the dropdown menu, choose the xAI SIP trunk you created earlier.
Click Confirm to apply the changes.
2. Configure a DIDWW Outbound SIP Trunk for Call Transfers#
Configure an Outbound SIP Trunk in the DIDWW User Panel for the calls that DIDWW places when your agent transfers an incoming caller to a live person. The trunk provides the SIP credentials used to authenticate transferred calls.
Note
Skip this section if you only receive calls and do not use call transfers.
Before You Begin#
Access to DIDWW Outbound Trunks is required for call transfers. See Get Access to DIDWW Outbound Termination.
Step 1: Create New Outbound Voice Trunk#
In the DIDWW User Panel, go to Voice > Outbound Trunks.
Click Create New.
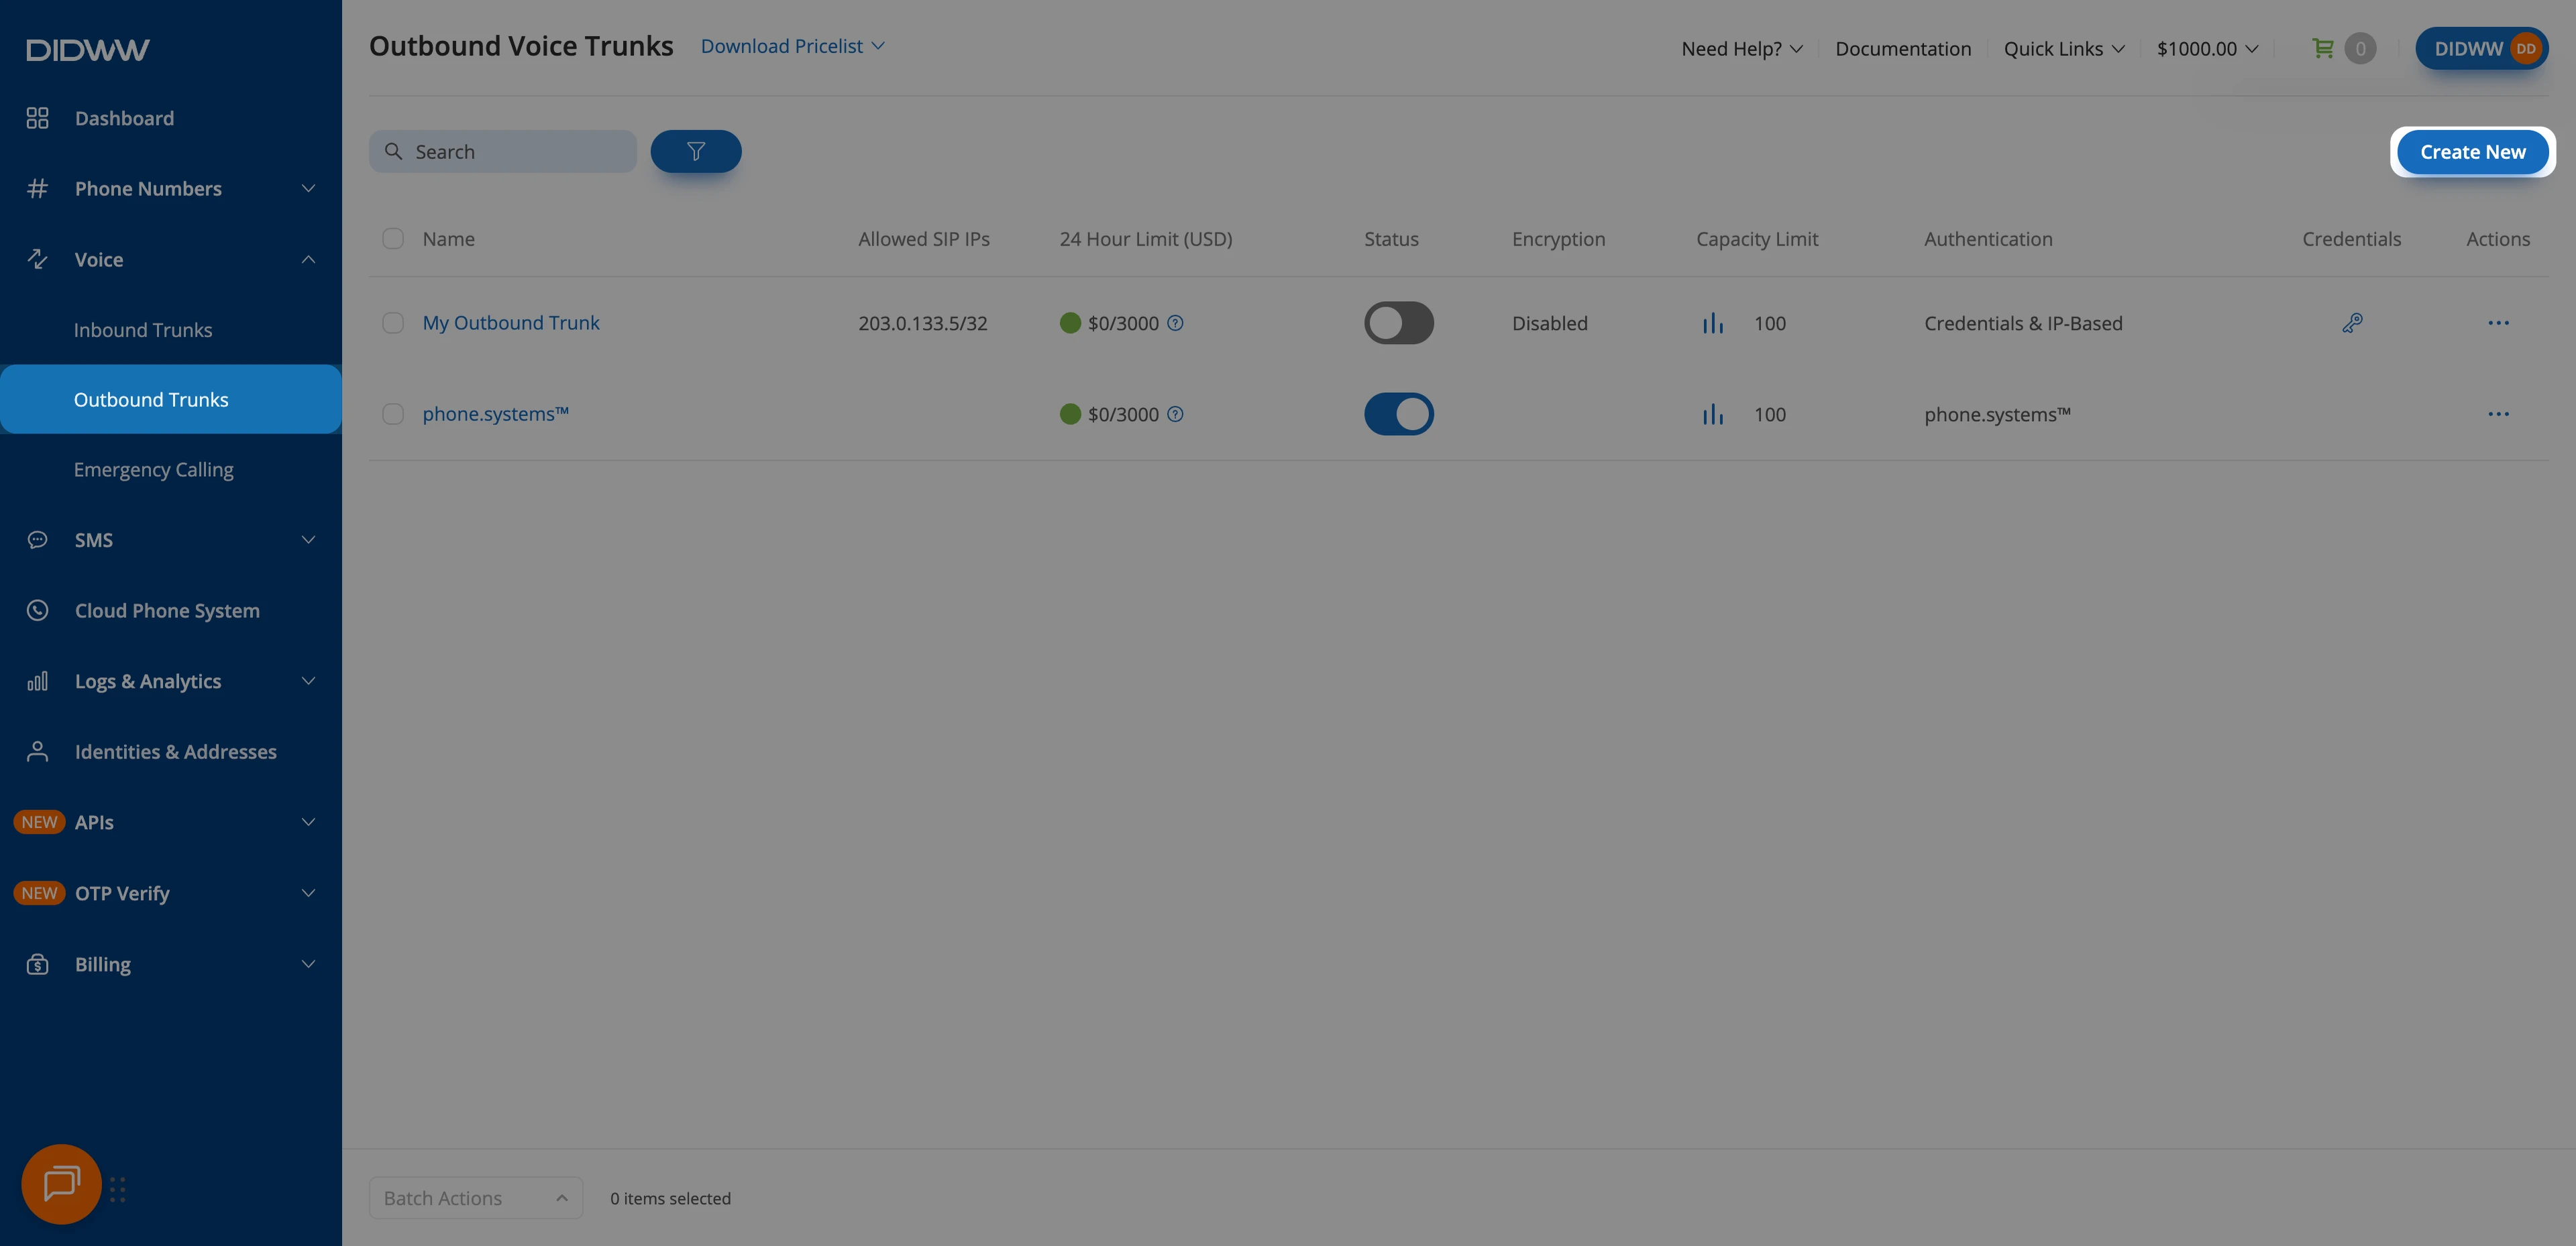
Fig. 6. Outbound Trunks: Create New#
Step 2: Configure and Create the Outbound SIP Trunk#
Update the Friendly name (e.g.,
xAI).Keep the default Credentials & IP-based authentication method selected. DIDWW provides the Username and Password after the trunk is created.
In Allowed SIP IP addresses, add the DIDWW inbound SIP addresses used for call transfers:
46.19.209.14 46.19.210.14 46.19.212.14 46.19.213.14 46.19.214.14 46.19.215.14 185.238.173.14
DIDWW uses these signaling addresses to place the transferred call. See Static Endpoint signaling addresses.
Expand Media and keep Media encryption mode at Disabled.
Click Create to save the outbound SIP trunk.
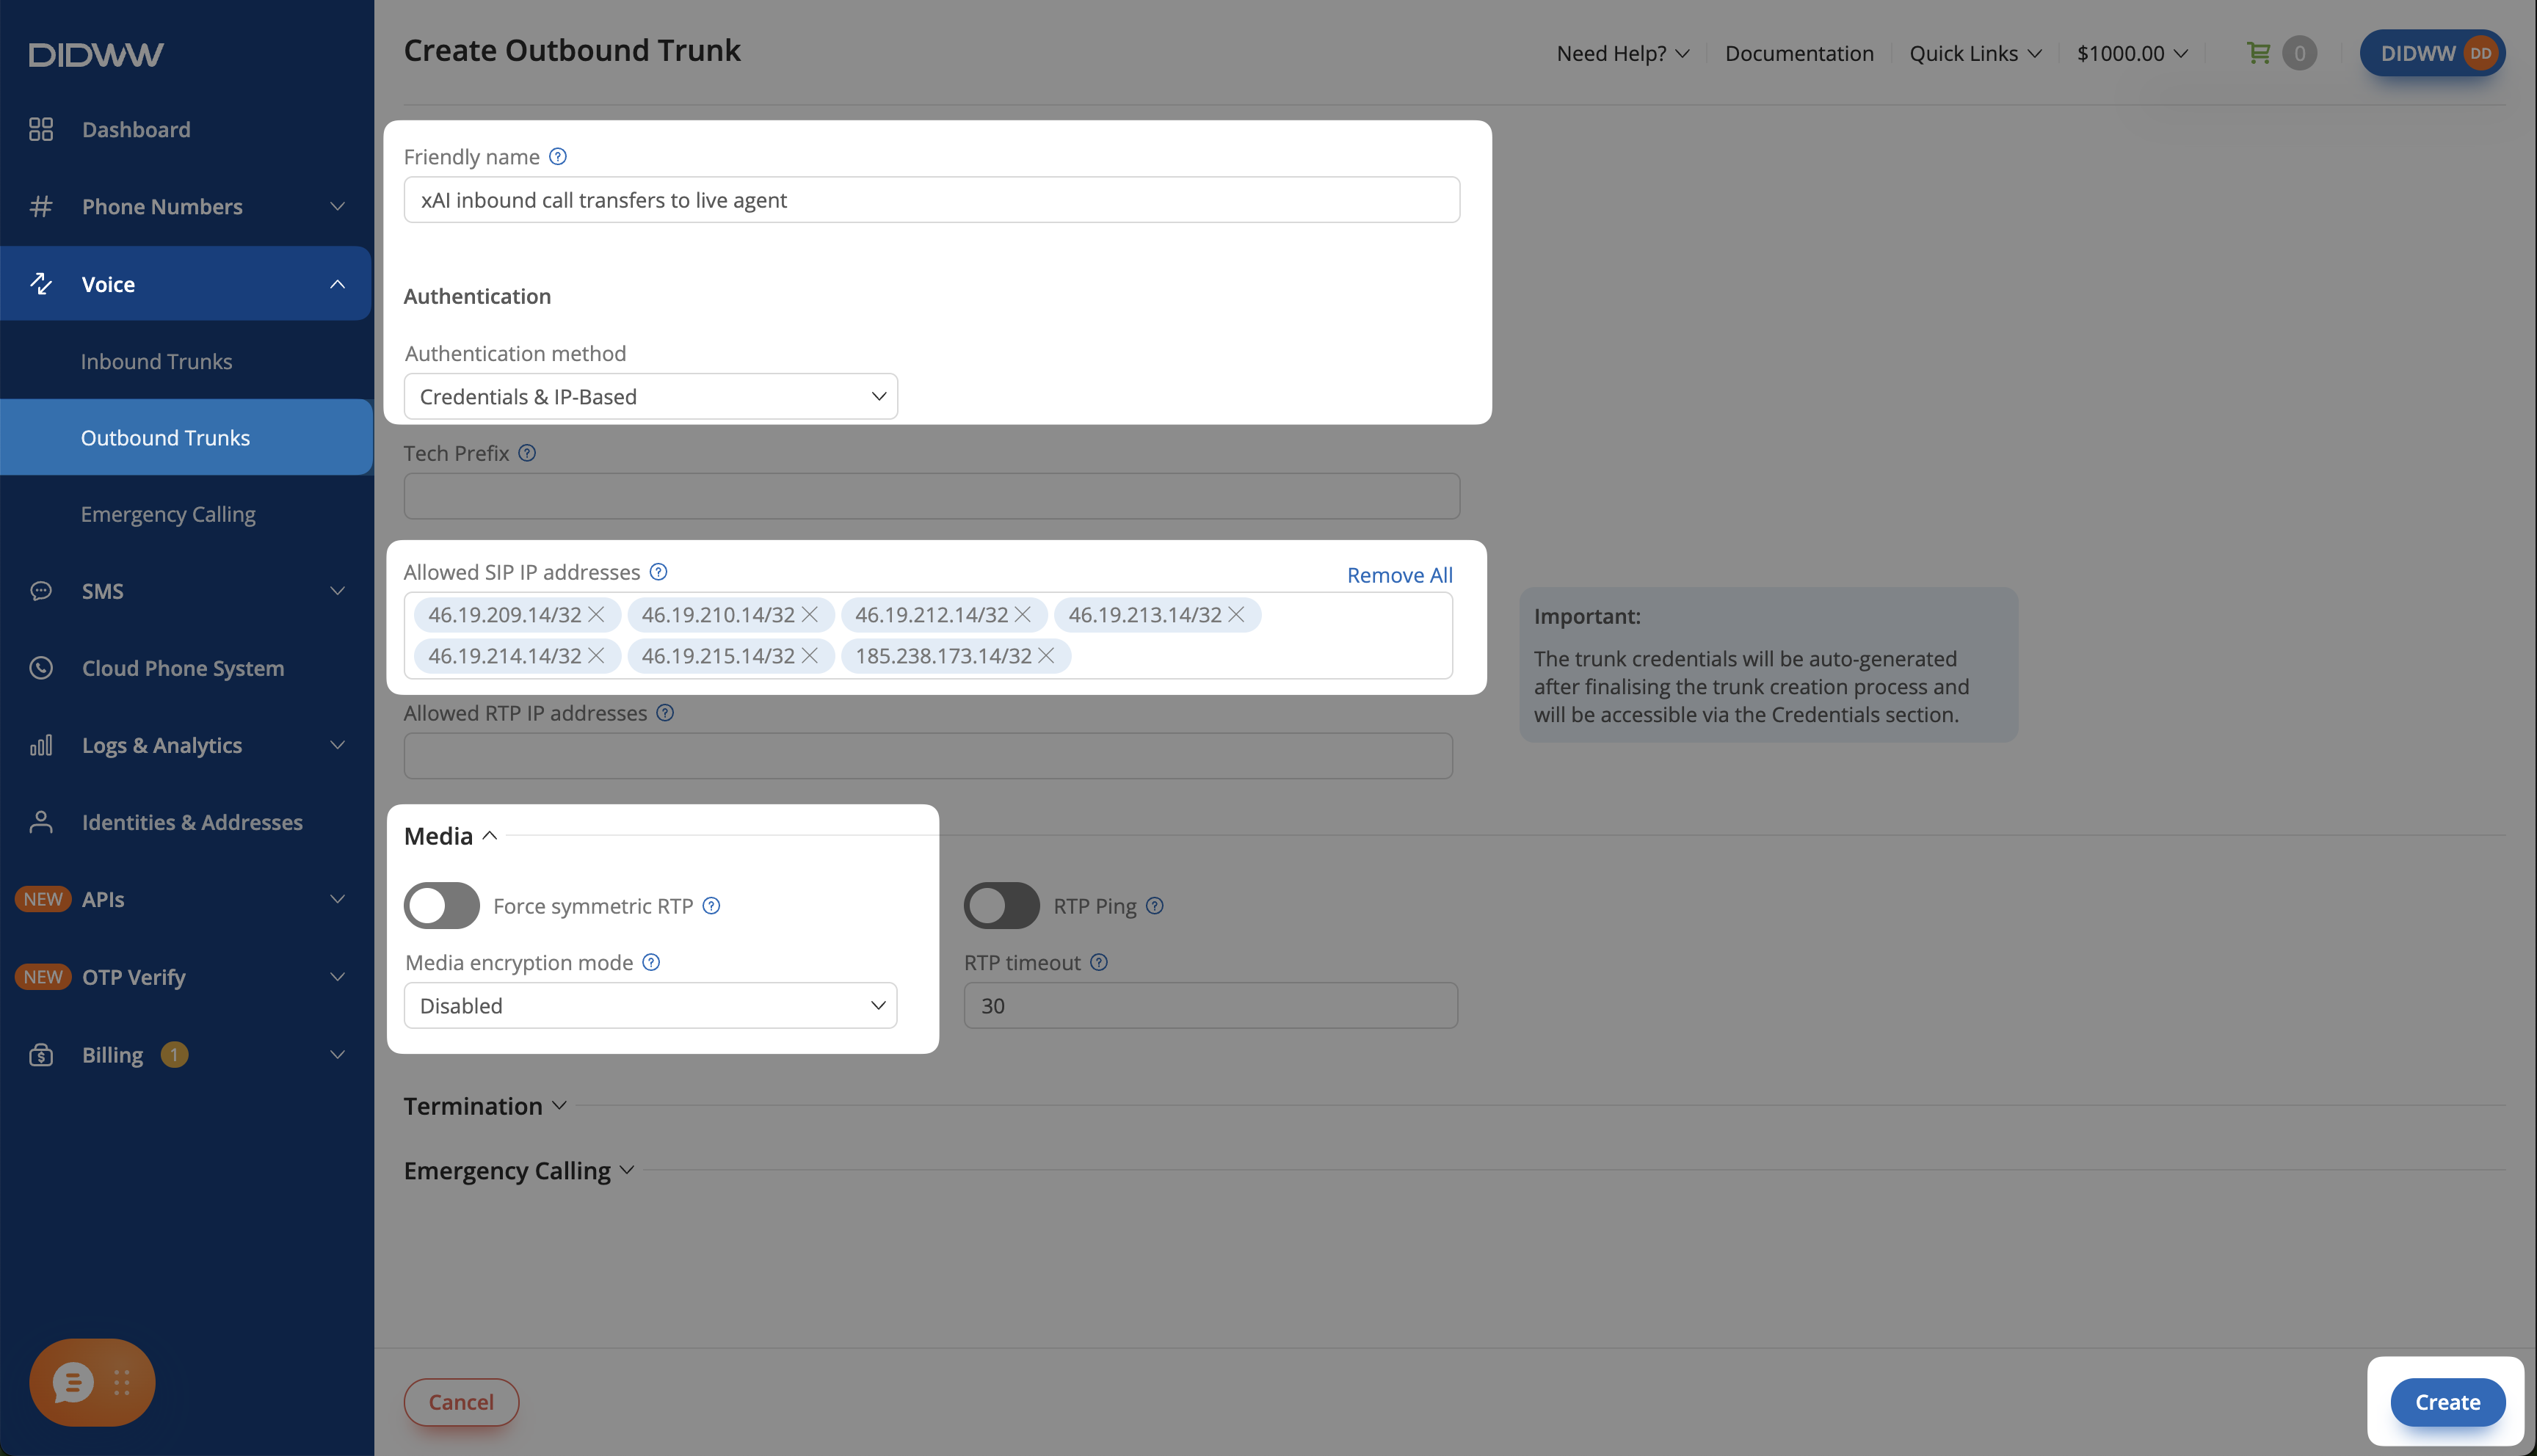
Fig. 7. Configuring the outbound trunk for call transfers#
Note
In Termination, allow calls to the transfer destination and set spending and capacity limits appropriate for your service.
The original caller’s number must be permitted by the trunk’s CLI Settings.
For advanced configuration, see Outbound SIP Trunk Guide.
Step 3: View and Copy Outbound Trunk Credentials#
Go to Voice > Outbound Trunks.
Locate your outbound trunk and click the key icon in the Credentials column.
Copy and securely store the Username and Password. You will use them on the DIDWW inbound trunk and in xAI in section 3.
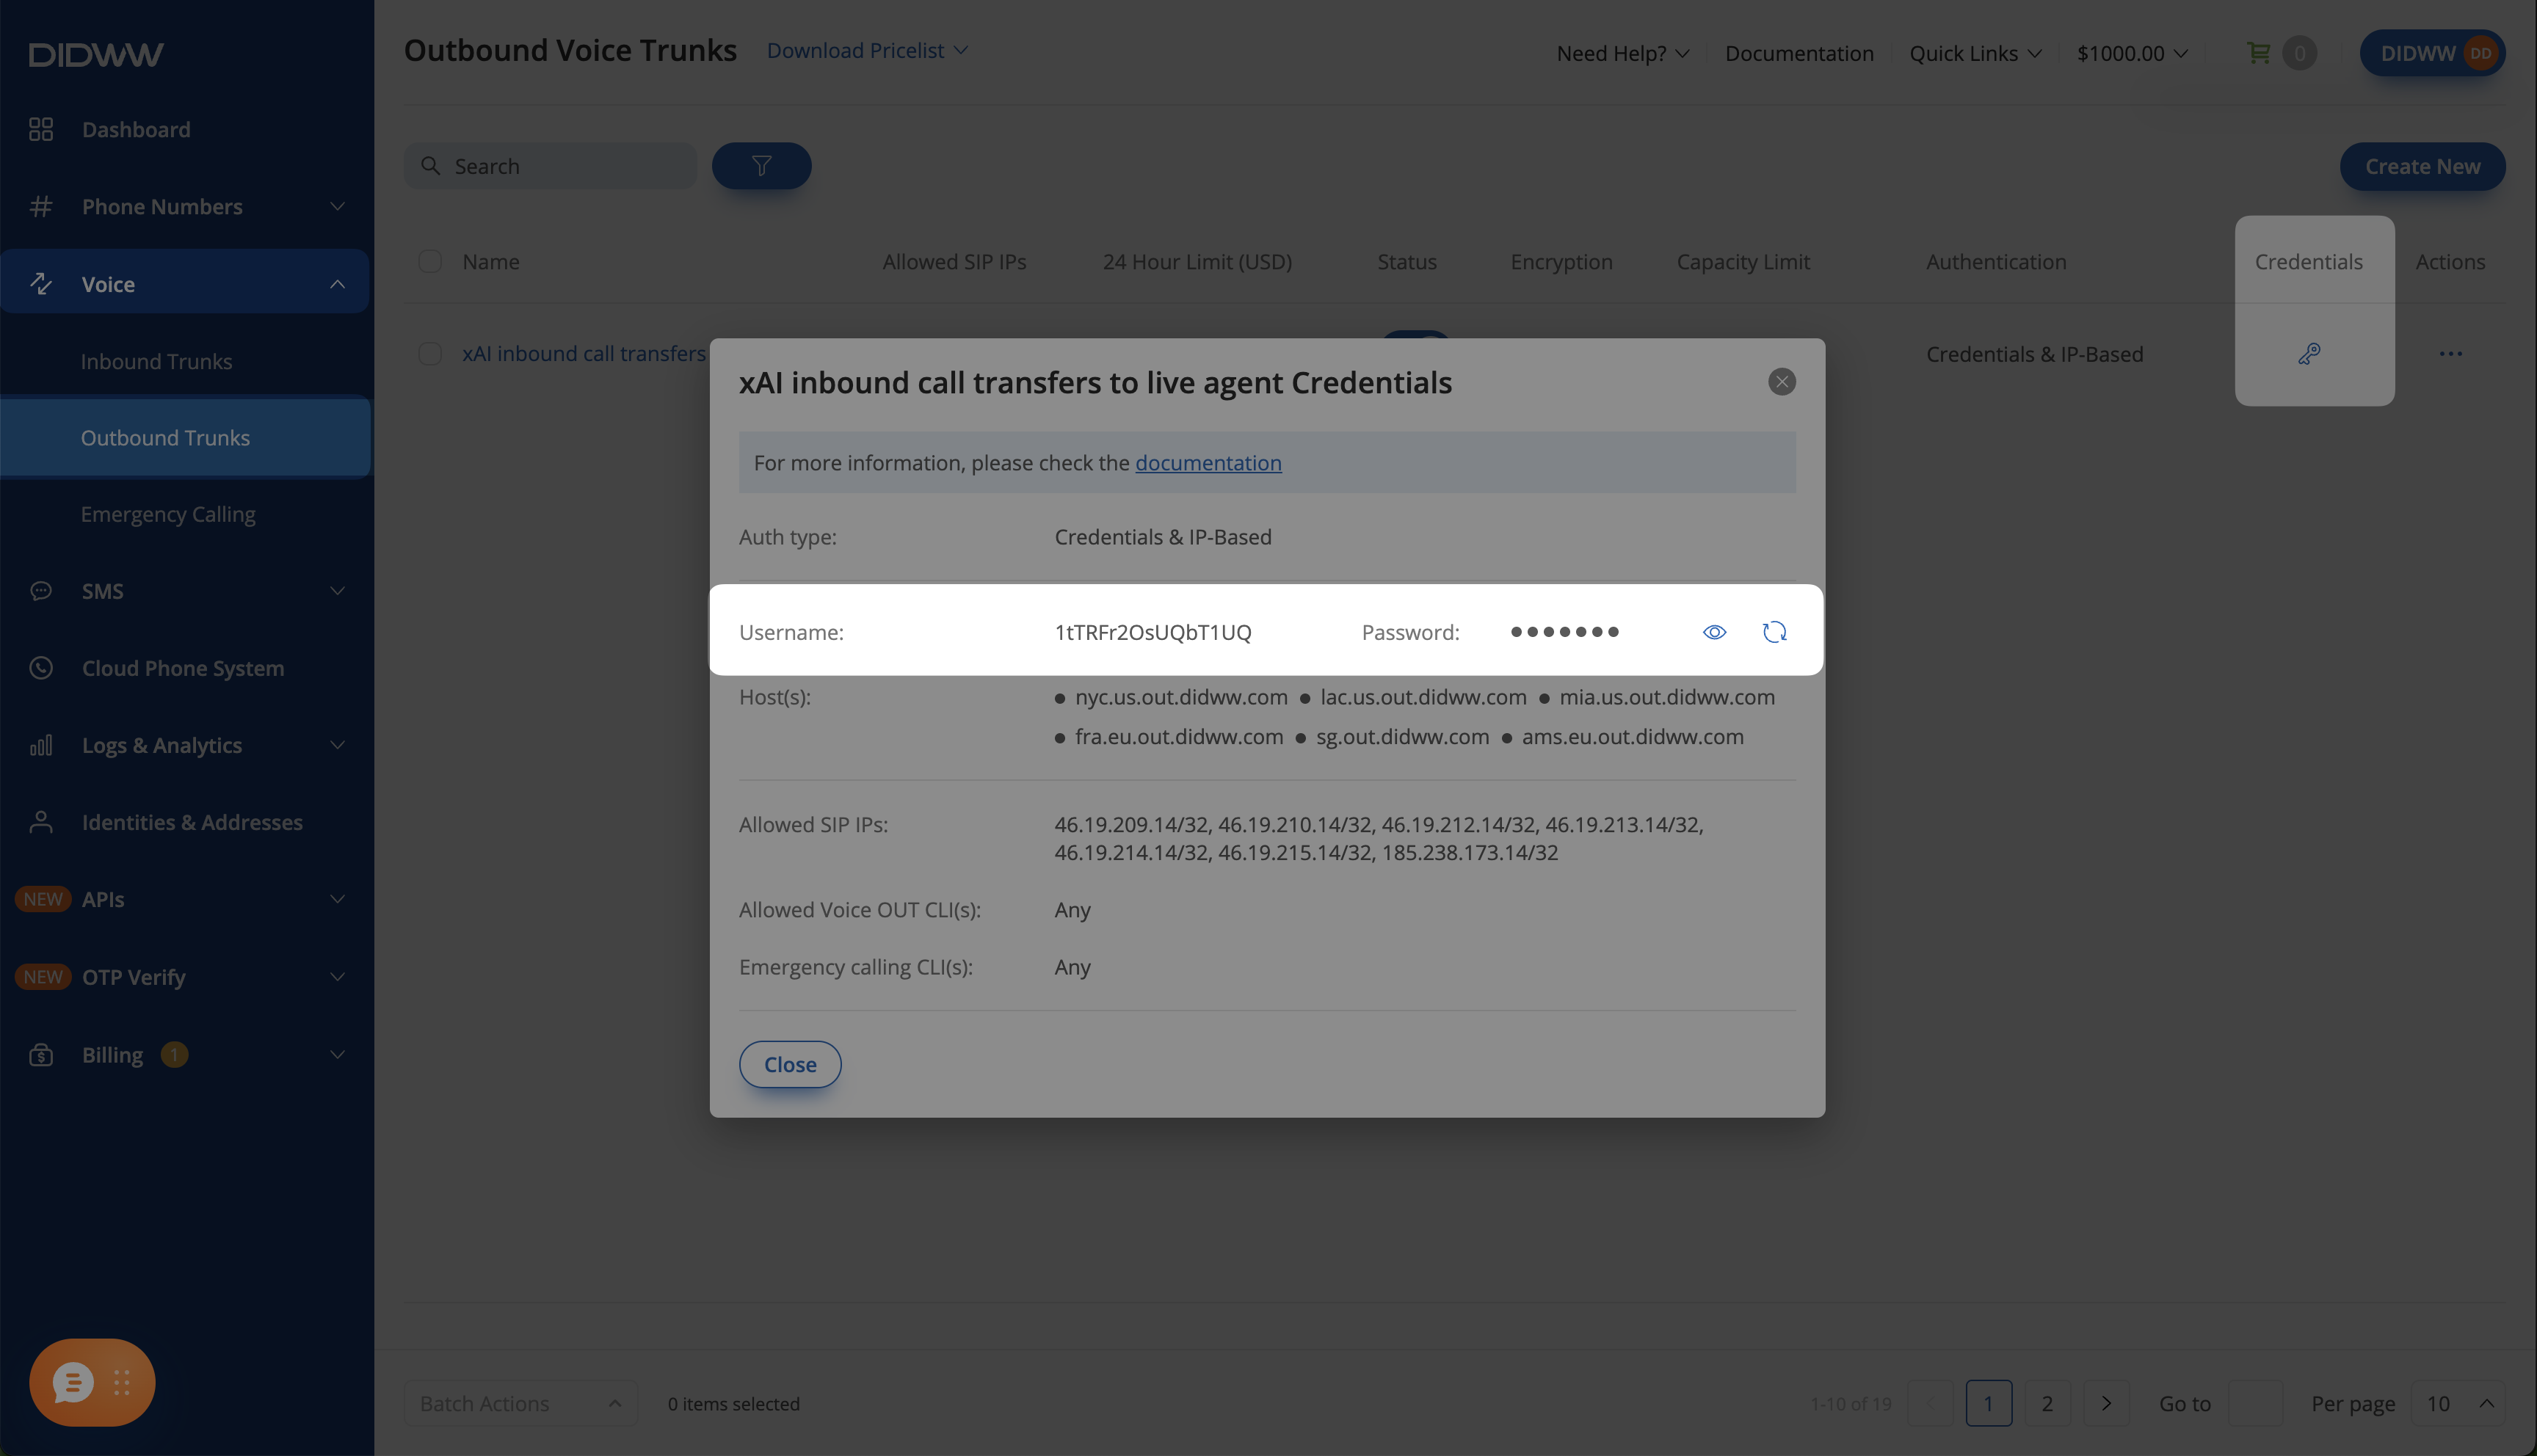
Fig. 8. Accessing outbound trunk credentials#
Step 4: Configure SIP Authentication on the DIDWW Inbound Trunk#
Complete this step for call transfers or if you choose SIP digest authentication in xAI. For call transfers, use your DIDWW outbound trunk credentials. For incoming calls with SIP digest authentication only, choose a username and a strong password. Skip this step if you only receive calls and do not use SIP digest authentication.
In the DIDWW User Panel, go to Voice > Inbound Trunks and locate your xAI inbound trunk.
Click Actions, then select Edit.
Open the Authorization tab.
Turn on Enable Authorization.
In Auth User, enter the username.
In Auth Password, enter the password.
Click Submit.
If you configure SIP digest authentication in xAI in Step 3, use these same credentials. For call transfers, DIDWW uses the credentials on the inbound trunk to authenticate through your outbound trunk, independently of the authentication settings in xAI.
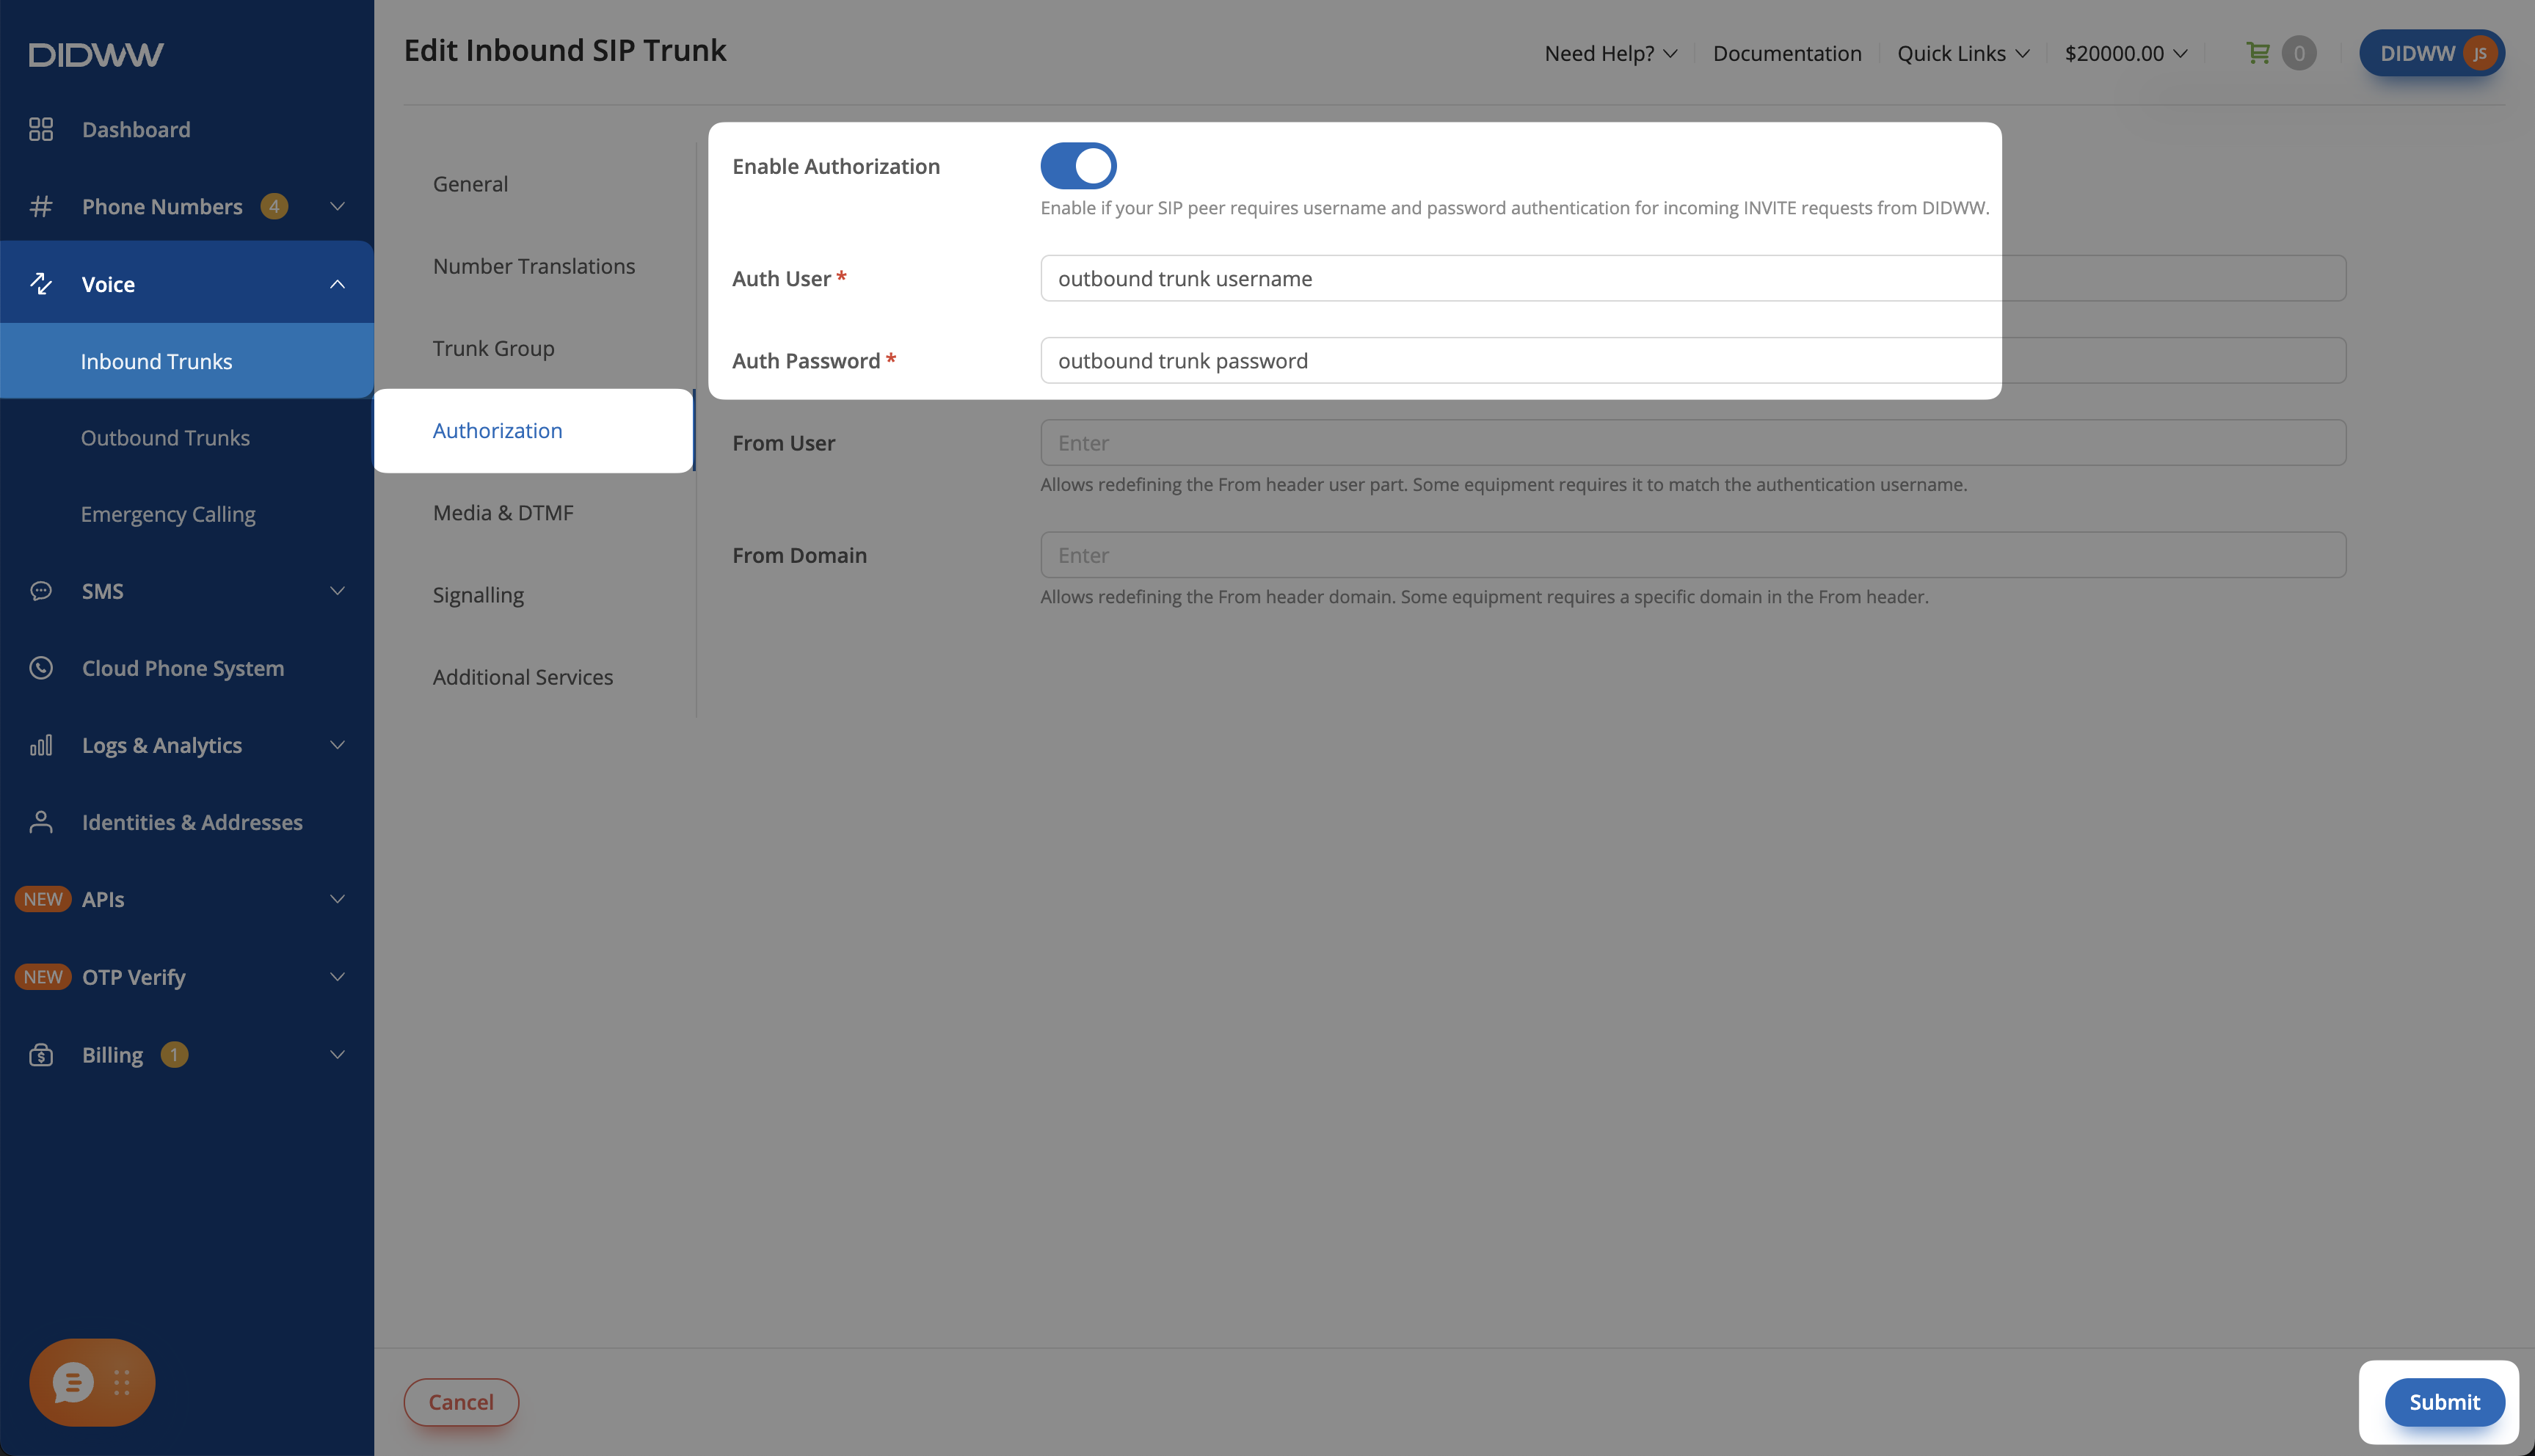
Fig. 9. Configuring SIP authentication on the inbound trunk#
3. Connect DIDWW in xAI#
Configure SIP authentication, create your Grok Voice agent, and connect your DIDWW number in the xAI console. Add the transfer tool if callers need to speak to a live person.
Before You Begin#
An xAI console account with available API credits or active invoiced billing is required. See xAI billing.
For call transfers, the outbound trunk Username and Password from Step 3 of section 2 are required.
To use the optional API example, an xAI API key is required. Create a key from API Keys in the xAI console and store it on your server in
XAI_API_KEY.
Note
If you use prepaid billing, keep a positive xAI credit balance so incoming calls can connect. You can purchase credits in Billing > API spend management. See xAI billing and pricing.
Step 1: Create a Voice Agent#
Create the agent that will answer calls to your DIDWW number. If you already have an agent, continue to Step 3.
In the xAI console, go to Voice Agents and click Create agent. Choose a template or select Start from scratch.
On the Configuration tab, review the Instructions provided by your template and update them if needed. If you selected Start from scratch, enter your own instructions. For example:
## Role & Persona
You are a friendly phone receptionist for Example Corp.

## Objective
Help incoming callers with questions about Example Corp.

## Conversation Flow
Ask how you can help. Ask one question at a time.

## Guardrails & Escalation
Answer only from the company information provided to you.
If an answer is unavailable, say so. Do not invent prices,
policies, or availability. Offer only actions supported by your tools.

## Voice & Communication Style
Keep answers brief and use clear, natural language.
Turn on Welcome message and enter a Greeting (e.g.,
Hello, thank you for calling Example Corp. How can I help you?). When Welcome message is off, the agent waits for the caller to speak.Click Publish.
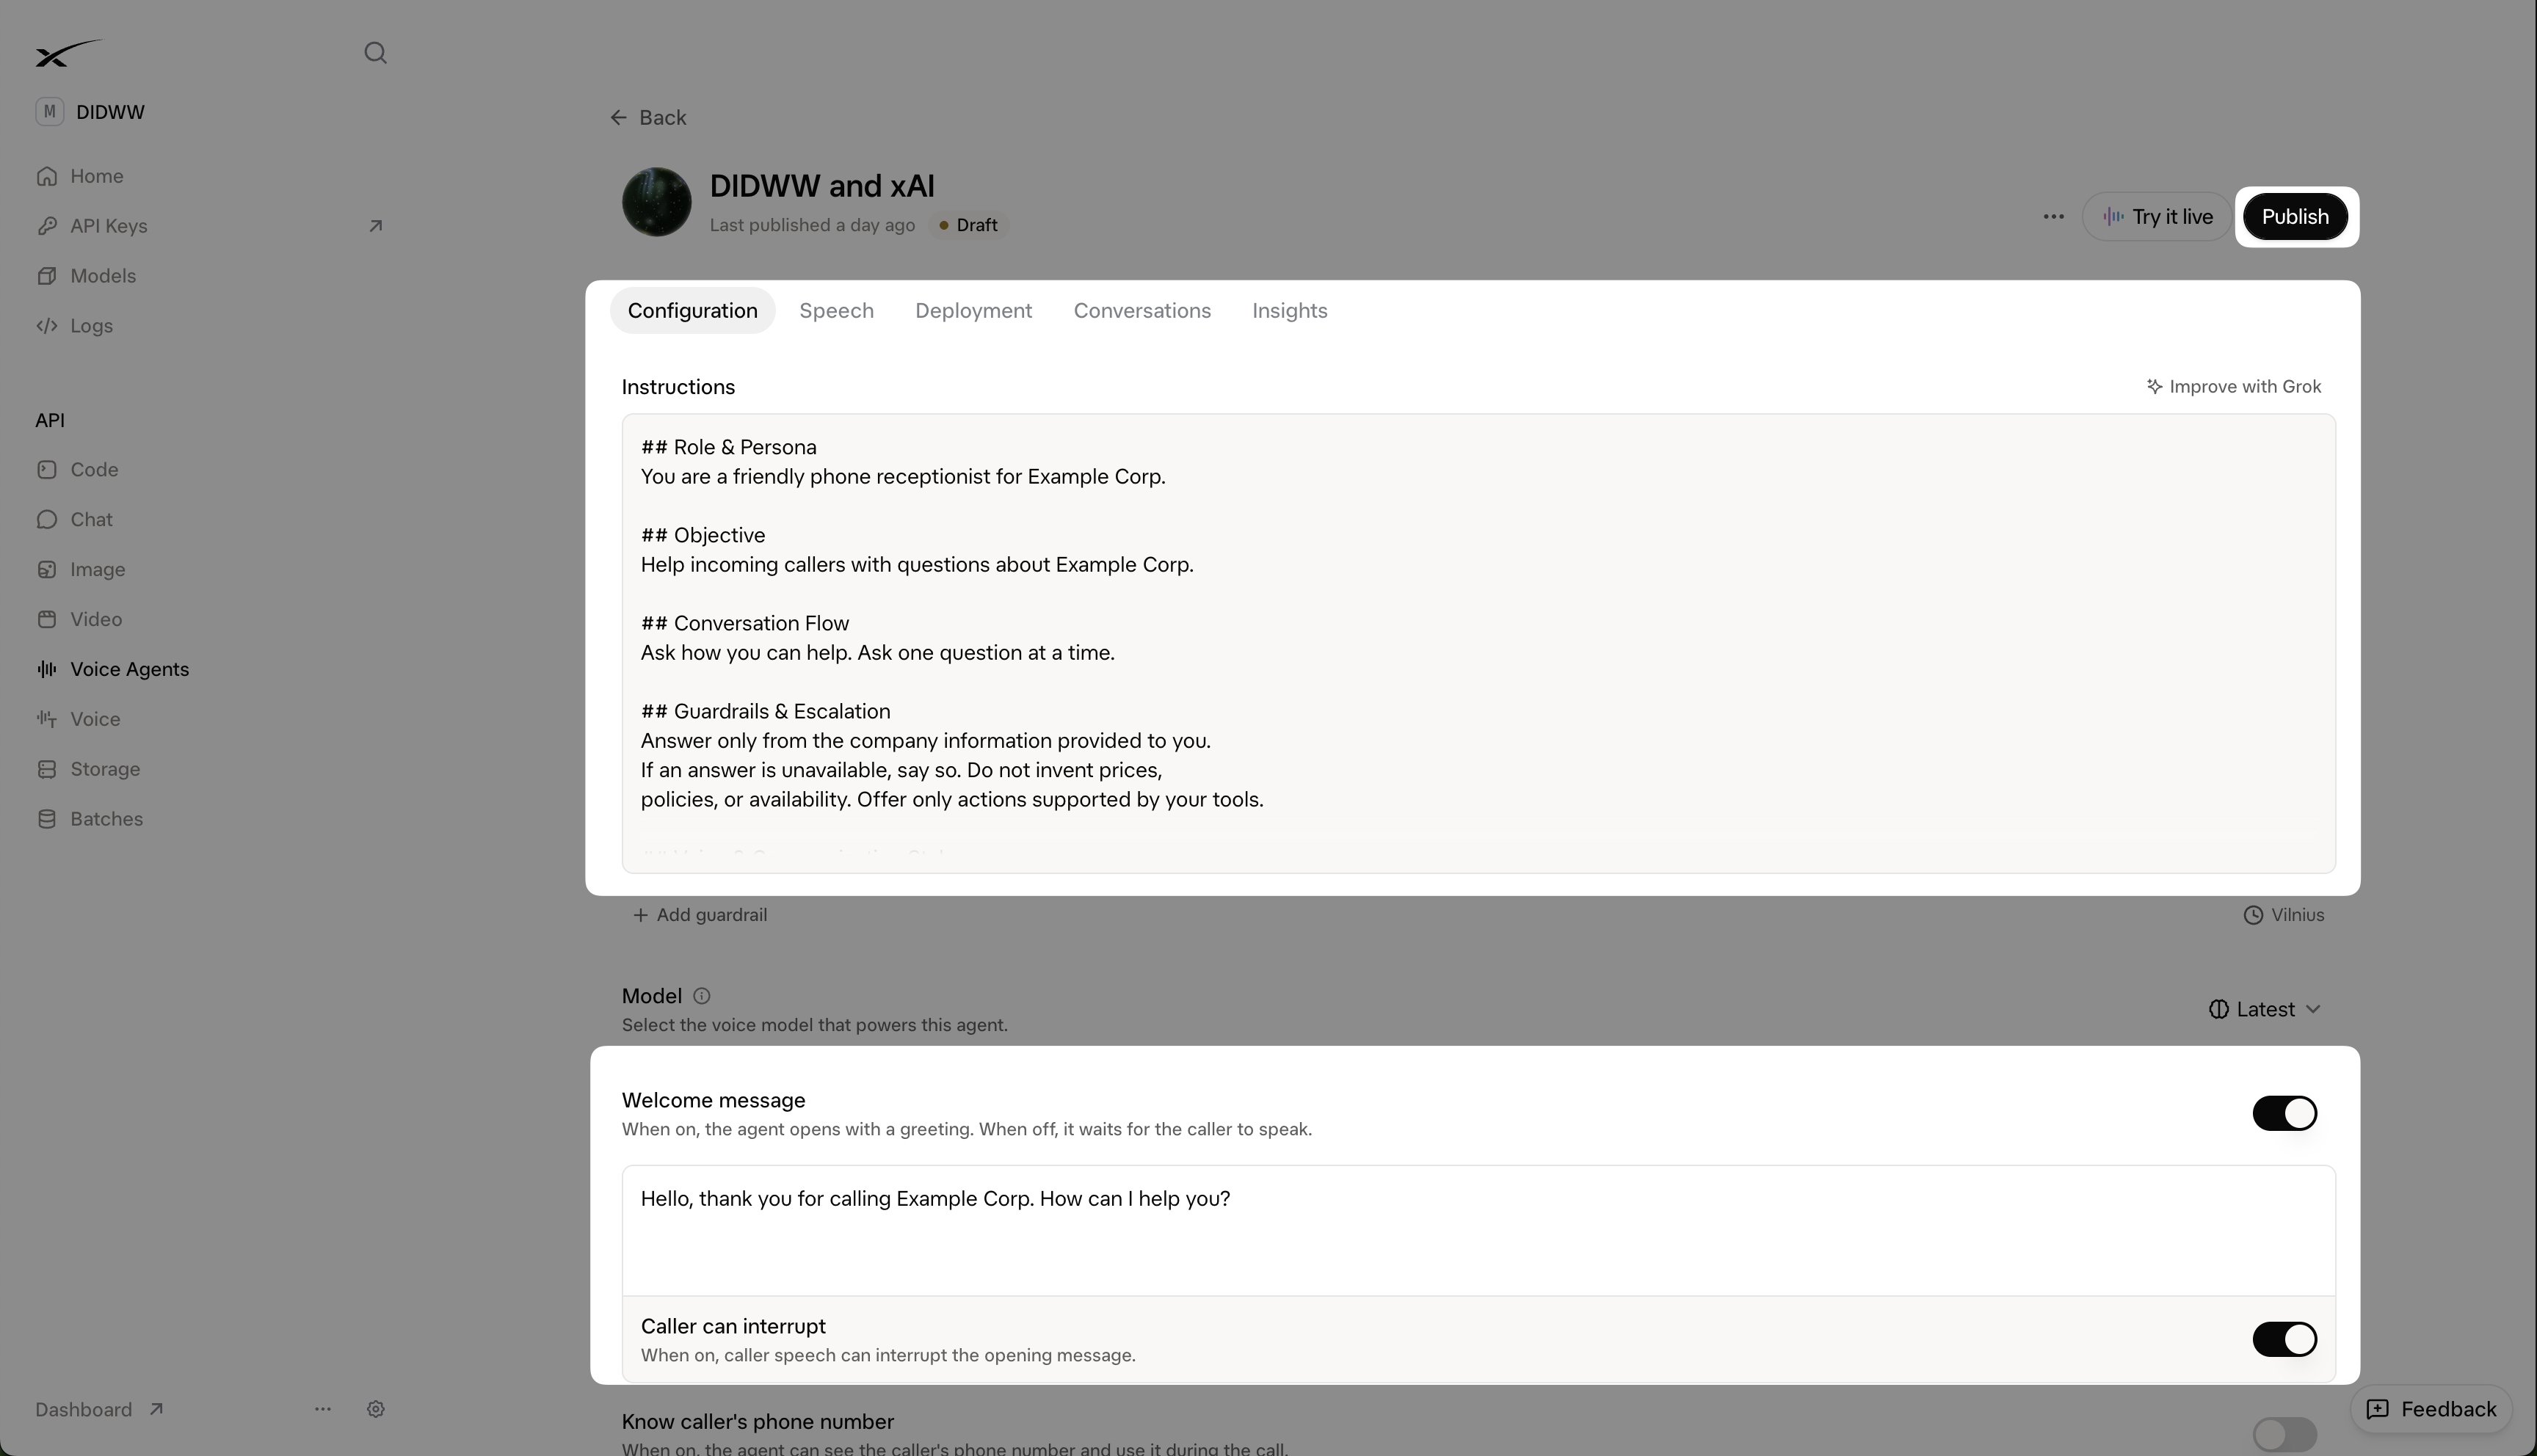
Fig. 10. Configuring the agent’s instructions and greeting#
Note
You can use Try it live to check the agent’s responses in your browser. Test call transfers by calling your DIDWW number.
Step 2: Add Your DIDWW Number to the Agent#
Add your DIDWW number as a Direct SIP number and associate it with your agent. The Authentication fields are optional. You can restrict incoming SIP calls using an IP allowlist or SIP digest credentials.
Open your agent and go to the Deployment tab.
Under Phone numbers, click Add number.
Select Direct SIP.
Enter a Name for the number (e.g.,
DIDWW).In Phone number, enter your DIDWW number in E.164 format with the
+sign (e.g.,+15105550100).Check that SIP URI shows
sip:{number}@sip.voice.x.ai;transport=tls. The DIDWW inbound trunk sends calls to this endpoint.Optional: In Allowed addresses, add the DIDWW inbound SIP signaling addresses to restrict calls by source IP address.
Optional: To use SIP digest authentication instead, leave Allowed addresses empty. Expand Authentication and enter the DIDWW inbound trunk’s Auth User and Auth Password from Step 1 as Username and Password.
Click Add number.
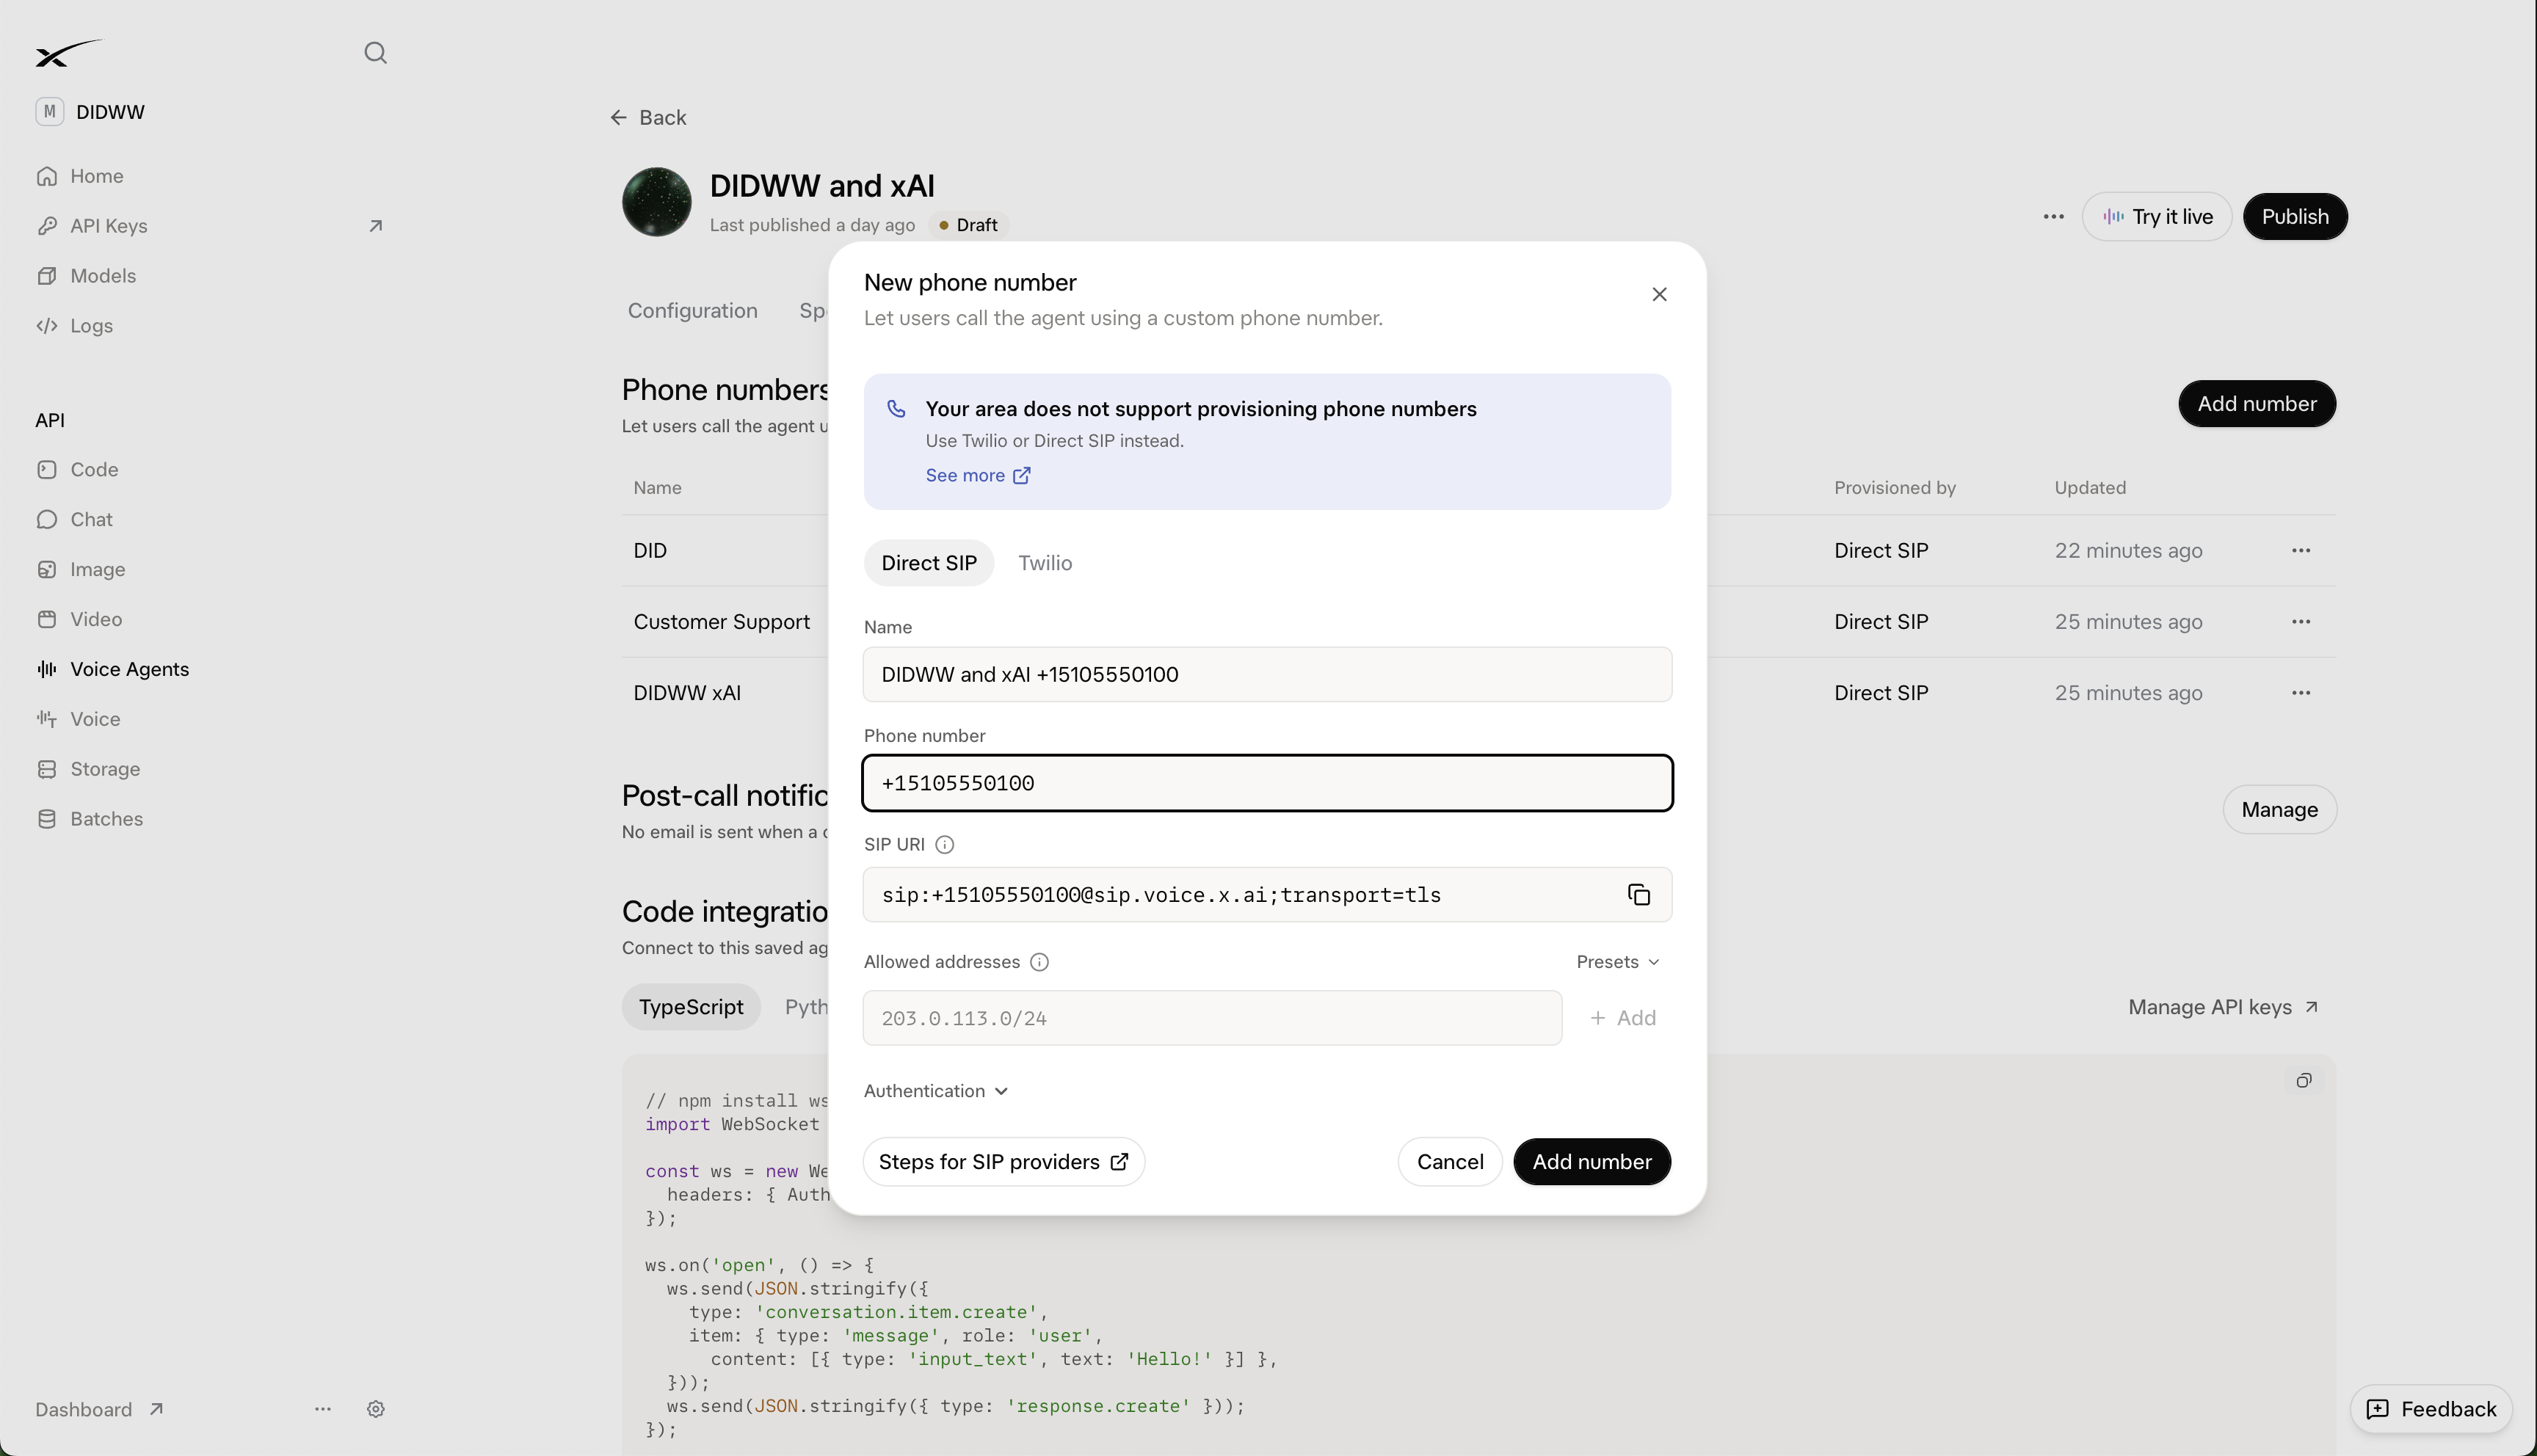
Fig. 11. Connecting a DIDWW number to the voice agent#
Important
If you configure SIP digest authentication, xAI does not show the saved SIP password again. Keep the credentials in xAI and on the DIDWW inbound trunk matching. For call transfers, the DIDWW inbound trunk credentials must match your outbound trunk credentials, even if you leave Authentication empty in xAI.
Add the number with the xAI API
You can add the number with an API request instead of the console dialog. This example configures SIP digest authentication. Replace the number, agent ID, and SIP credentials with your values.
 1curl -X POST https://api.x.ai/v2/phone-numbers \
 2  -H "Authorization: Bearer $XAI_API_KEY" \
 3  -H "Content-Type: application/json" \
 4  -d '{
 5    "origin": "byo_trunk",
 6    "name": "DIDWW",
 7    "phone_number": "+15105550100",
 8    "agent_id": "<xai-agent-id>",
 9    "sip_auth": {
10      "auth_username": "<didww-auth-user>",
11      "auth_password": "<didww-auth-password>"
12    }
13  }'
agent_id: the ID of your console agent, starting withagent_. You can find it in the console address bar when the agent is open or in Code integration on the Deployment tab.sip_auth: the credentials configured on your DIDWW inbound trunk.
Using agent_id connects the number to the hosted agent. You do not need to provide an incoming-call webhook.
A successful request returns 201 Created with the registration under phone_number, including its phone_number_id and sip_host.
See the xAI voice API reference.
Step 3: Add Call Transfers to Your Agent#
The agent’s Transfer call tool connects an incoming caller to a live person. xAI sends a SIP REFER request to DIDWW, which places a new call to the destination through your DIDWW outbound trunk. After a successful transfer, the caller and recipient talk through DIDWW and the AI agent is no longer part of the call.
Note
Skip this step if you do not need call transfers.
Call transfer at a glance
        %%{init: {
  "theme": "base",
  "themeVariables": {
    "fontSize": "14px",
    "primaryColor": "#e0f2fe",
    "primaryBorderColor": "#38bdf8",
    "primaryTextColor": "#1f2d3d",
    "secondaryColor": "#ccfbf1",
    "secondaryBorderColor": "#2dd4bf",
    "secondaryTextColor": "#1f2d3d",
    "lineColor": "#0066cc",
    "textColor": "#1f2d3d",
    "nodeTextColor": "#1f2d3d",
    "edgeLabelBackground": "#ffffff"
  }
}}%%

flowchart LR
    caller["Caller"] -->|"1. Dials your DID number"| didww["DIDWW"]
    didww -->|"2. Inbound SIP trunk"| xai["xAI<br/>Voice agent"]
    xai -.->|"3. SIP REFER<br/>Transfer request"| didww
    didww -->|"4. New outbound call"| recipient["Person / team<br/>Transfer recipient"]

    classDef endpoint fill:#e0f2fe,stroke:#0066cc,color:#1f2d3d,stroke-width:1.5px
    classDef process fill:#ccfbf1,stroke:#2dd4bf,color:#1f2d3d,stroke-width:1.5px
    class caller,recipient endpoint
    class didww,xai process
    linkStyle default stroke:#0066cc,stroke-width:1.5px
Note
Each transfer places a new outbound call through your DIDWW outbound trunk. This call is charged per minute at the outbound rate for the transfer destination, in addition to the original inbound call.
1. Configure the Transfer call tool
Open your agent’s Configuration tab.
Under Tools, click Add tool and select Transfer call. If a
transfer_calltool already exists, click it to edit it.In Tool name, keep
transfer_call.In Description, explain when the agent should transfer. For example,
Transfer the caller to a human colleague only after they explicitly ask to speak to a person, a human, a live agent, or an operator.Under Destinations, select Custom and enter a Label (e.g.,
Support).In Destination, enter a SIP URI in the format
sip:+[phone number]@[DIDWW outbound gateway](e.g.,sip:+15105550199@fra.eu.out.didww.com).Click Publish to save your changes.
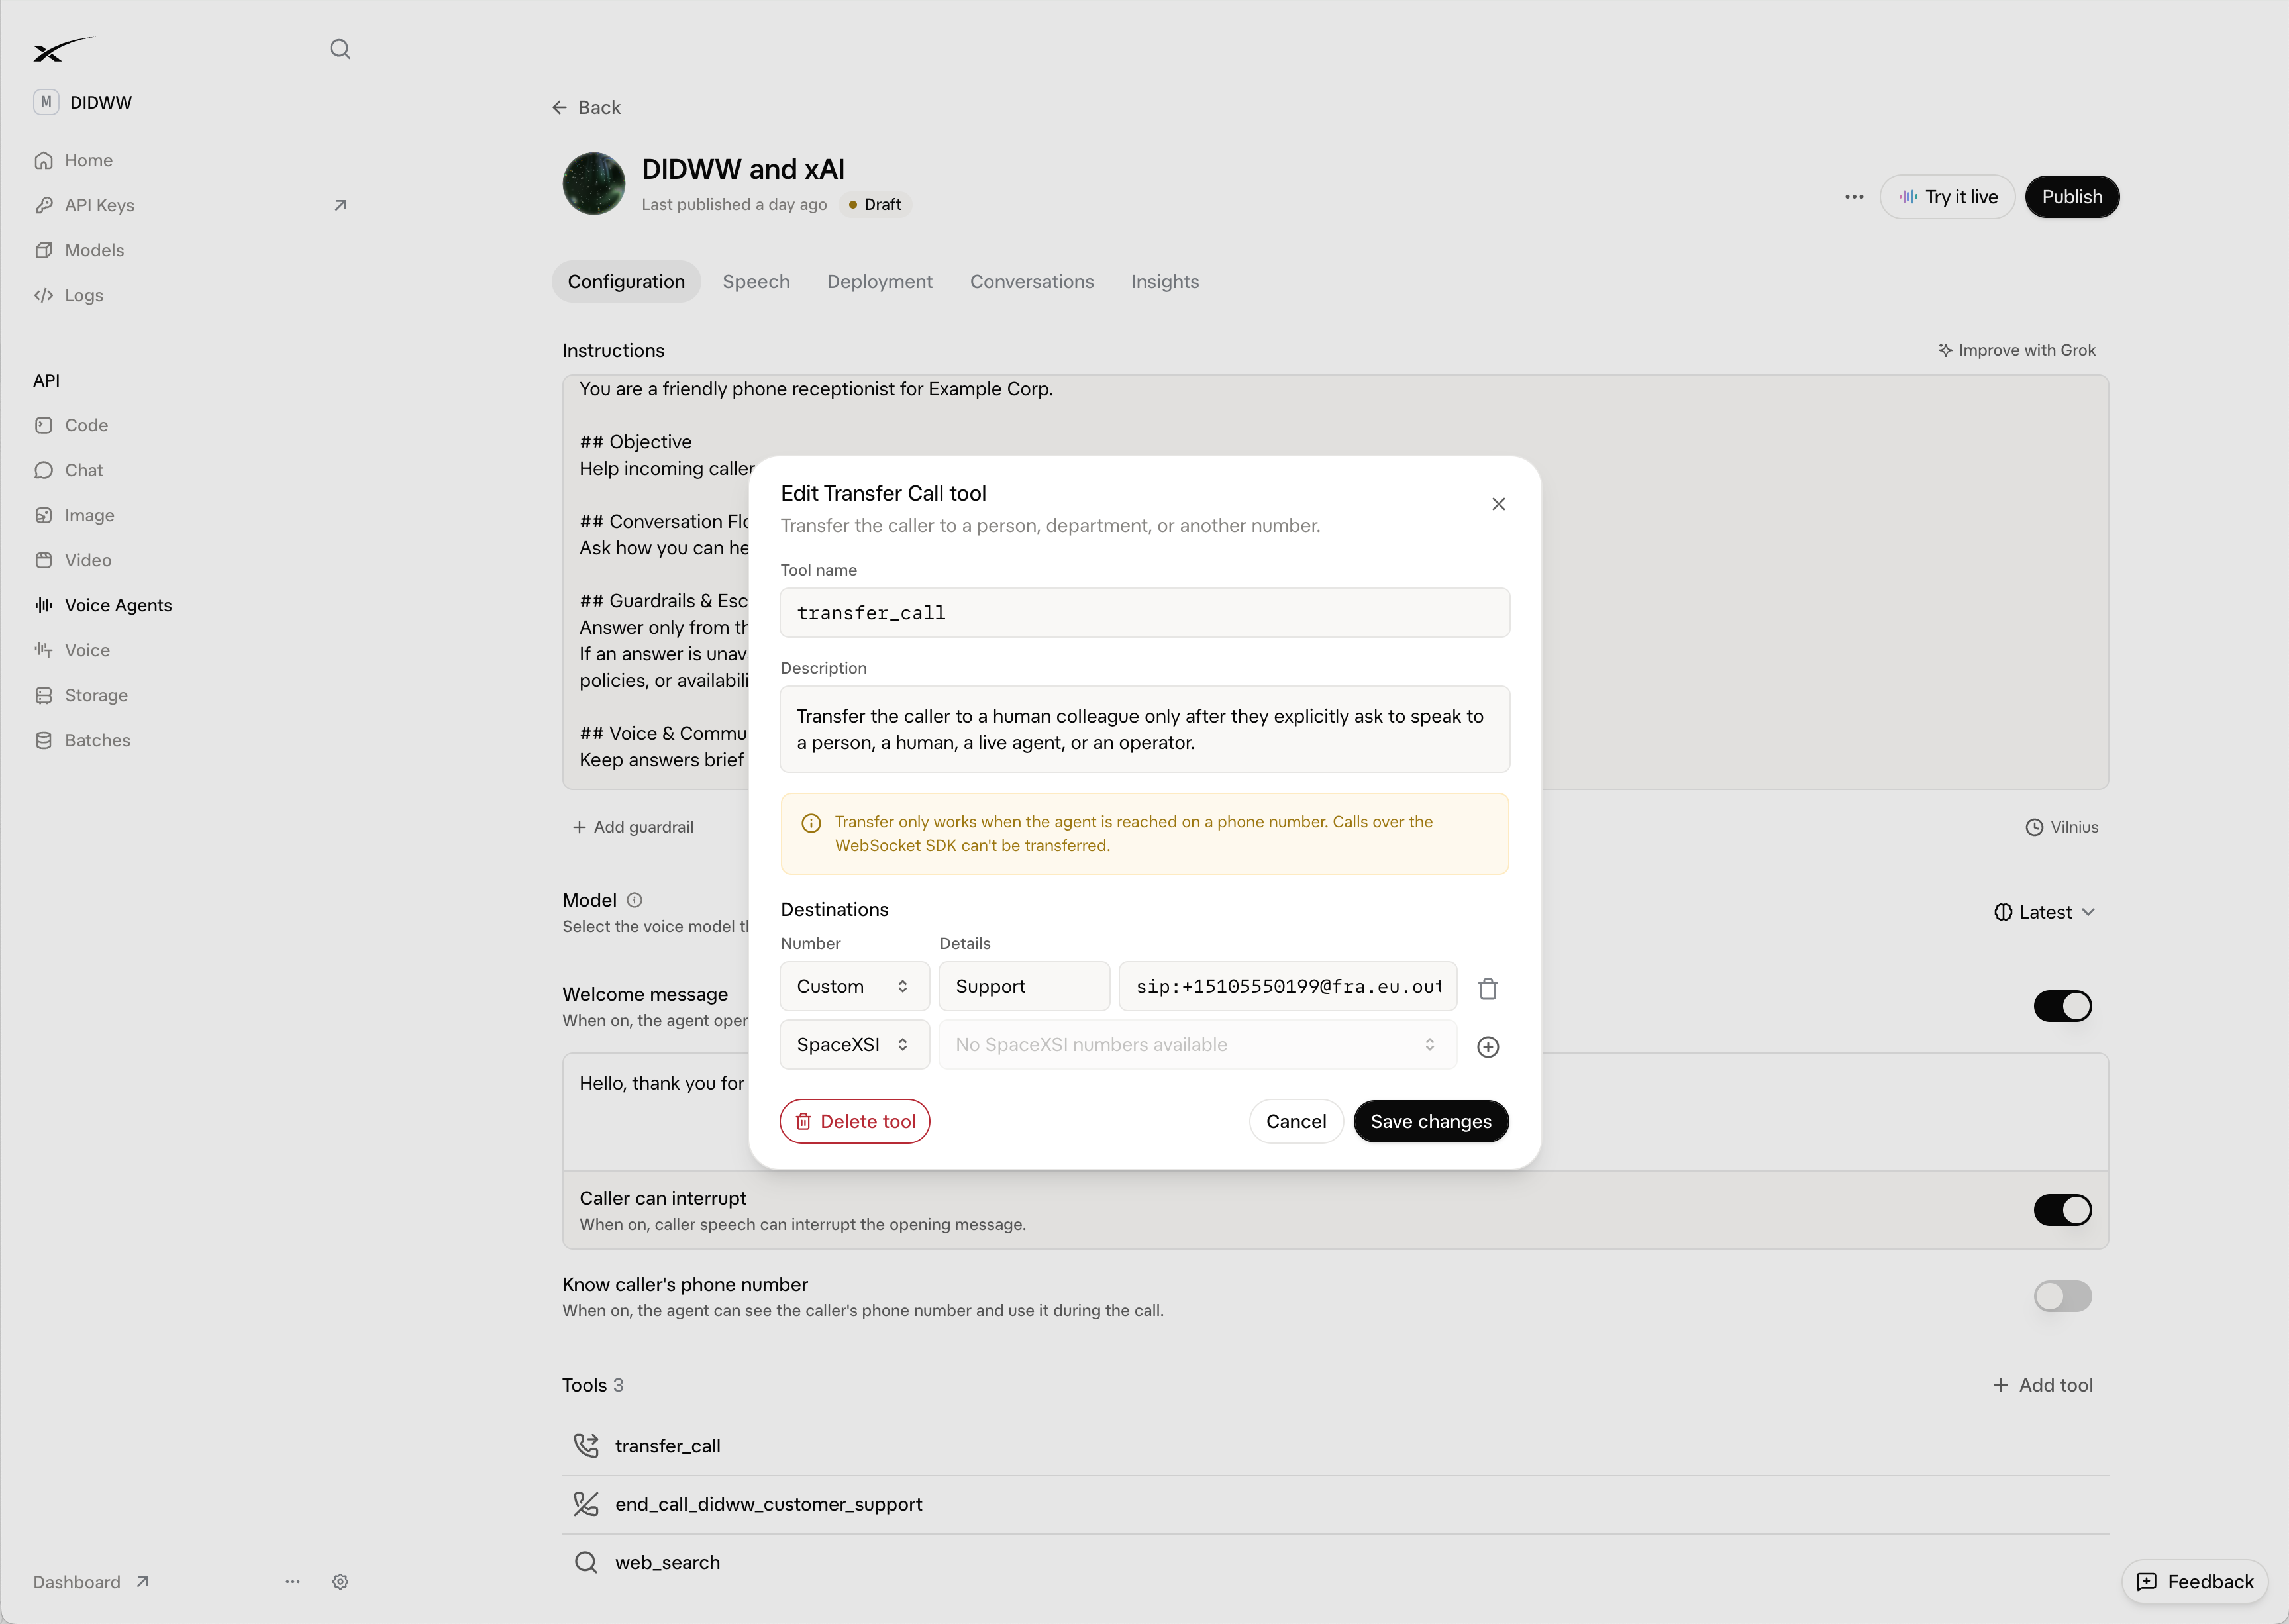
Fig. 12. Configuring the transfer destination#
[phone number]: the destination number of the person or team, in E.164 format. Do not use a number assigned to your xAI inbound trunk, or the call returns to the agent.[DIDWW outbound gateway]: one of the DIDWW outbound signaling endpoints, for examplefra.eu.out.didww.com.
Note
DIDWW requires a sip: destination URI for call transfers. The tel: URI format is not supported.
The destination sees the original caller’s number, subject to your outbound trunk’s CLI Settings.
2. Tell the agent when to transfer
In Instructions, add a rule that names the tool. For example:
If the caller asks to speak to a real person, a human, a live agent,
or an operator, tell them you will connect them to a colleague.
Then use the transfer_call tool with the Support destination.
Do not transfer unless the caller asks for a person.
Click Publish to apply the updated instructions.
Step 4: Test the Configuration#
Verify incoming calls and, if configured, call transfers using your DIDWW number.
Inbound calls
Call the DIDWW number assigned to the inbound trunk.
Check that the agent greets you and that you can hear each other.
In the xAI console, open the agent’s Conversations tab. Check that the call shows the original caller’s number as Caller and your DIDWW number as Destination.
Call transfers
Call the DIDWW number and wait for the agent to greet you.
Have a short conversation without asking for a person. Check that the agent does not transfer the call.
Ask to speak to a live person.
Answer at the transfer destination and check that you can hear each other.
Check the call and its
transfer_callresult on the agent’s Conversations tab.
Note
Call transfers require an incoming phone call. They cannot be tested with Try it live in the browser or a direct WebSocket session.
Review call status and error codes in the DIDWW Inbound Call Logs and Outbound Call Logs. A transferred call placed through your outbound trunk appears in the outbound logs.
Customize Your Voice Agent#
Use the agent’s instructions to define how it answers callers and when it uses tools. Connect business information and services when the agent needs to look up data or perform actions.
Agent configuration reference
Setup task |
Configuration |
|---|---|
Write the instructions |
On Configuration, define the agent’s role, allowed topics, and when to use tools or offer a transfer. Explain what to do when an answer is unavailable. See the xAI voice prompting guide. |
Set the greeting and voice |
Set the opening line with Welcome message on Configuration. Choose the voice, language, and speech settings on Speech. |
Provide business information |
Add approved company information to the instructions or connect File collections on Configuration for knowledge retrieval. See the Voice Agent Builder overview. |
Connect actions and live data |
Add an API request tool, a connector, or a Custom MCP server on Configuration for your business services. Describe when each tool should be used and test its results before taking live calls. |
Instructions guide the conversation. Database lookups, bookings, and other external actions require working tools or connected services. Enforce access permissions and business rules in those services. DIDWW carries the call and does not control the agent’s answers or actions.
Troubleshooting#
Calls to the DIDWW number do not reach the agent
Check that:
The DIDWW number is assigned to the xAI inbound trunk.
Host is
sip.voice.x.ai, Port is5061, and Transport is TLS.User Part of R-URI is
+{DID}.The same DIDWW number is added to the agent as Direct SIP, in E.164 format with the
+sign.If SIP digest authentication is configured in xAI, its Username and Password match the DIDWW inbound trunk’s Auth User and Auth Password.
If you use Allowed addresses in xAI, the list includes the DIDWW inbound SIP signaling addresses.
Your xAI account has available credits or active invoiced billing.
The call connects, but the agent does not greet the caller
Turn on Welcome message, enter a Greeting, and click Publish. When Welcome message is off, the agent waits for the caller to speak. See Step 2 of section 3.
The call connects, but there is no audio
On the DIDWW inbound trunk, keep only PCMU, PCMA, and telephone-event, and set SRTP Mode to Disabled. See Step 3 of section 1.
The transfer fails with the call was declined
A failed transfer can show {"status": "failed", "reason": "the call was declined"} in the tool result.
Check that:
Max Transfers on the DIDWW inbound trunk is
1or higher.Auth User and Auth Password on the DIDWW inbound trunk match your DIDWW outbound trunk credentials.
The destination is a
sip:URI at a DIDWW outbound gateway.Allowed SIP IP addresses on the outbound trunk include the seven DIDWW addresses from Step 2 of section 2.
Calls to the destination are allowed by the outbound trunk’s termination settings.
The original caller’s number is permitted by the outbound trunk’s CLI Settings.
The outbound trunk has not reached its 24 hour limit (USD) or Capacity limit, and your DIDWW balance is sufficient.
Transfers do not work in the browser test
Call the DIDWW number to test a transfer. The Transfer call tool requires an incoming phone call and does not transfer a browser test session.
The transfer reaches voicemail
The destination’s voicemail may answer instead of a live person. Check availability, forwarding, and voicemail settings at the transfer destination.
The transferred call returns to the agent
The destination is a DIDWW number assigned to your xAI inbound trunk. Use the number of the live person or team that should receive the transfer. See Step 4 of section 3.
The agent transfers callers who did not ask for a person
Set the same transfer rule in the agent’s Instructions and the tool’s Description. For the example in this guide, transfer only after the caller explicitly asks for a person. Publish the updated instructions and test both a normal conversation and a transfer request. See Step 4 of section 3.