Twilio BYOC#
The following guide will explain the steps necessary to configure the Twilio Console with DIDWW SIP trunks.
Getting started#
What you need to get started:
For Termination (Inbound):
Access to DIDWW self-service portal to create Inbound SIP trunk and assign it to the preferred DID number.
Access to Twilio Console .
For Origination (Outbound):
Access to DIDWW self-service portal to create Outbound SIP trunk.
Access to Twilio Console and Account SID.
Termination (Inbound)#
To configure the DIDWW Inbound SIP Trunk using the Twilio Console, follow these steps:
Step 1. In the Twilio Console, expand the “Voice” section, then “Manage”, and select “IP access control lists” (Fig. 1).
Fig. 1. Twilio Console window.#
Step 2. In the IP / CIDR Access Control Lists window, click “Create new Access Control List” (Fig. 2).
Fig. 2. IP / CIDR Access Control Lists window.#
Step 3. In the window that opens, enter an “ACL friendly name” and, optionally, the “IP range friendly name”. Then, input the “CIDR Network Address” (IP address) of DIDWW POPs, and select the range (Fig. 3).
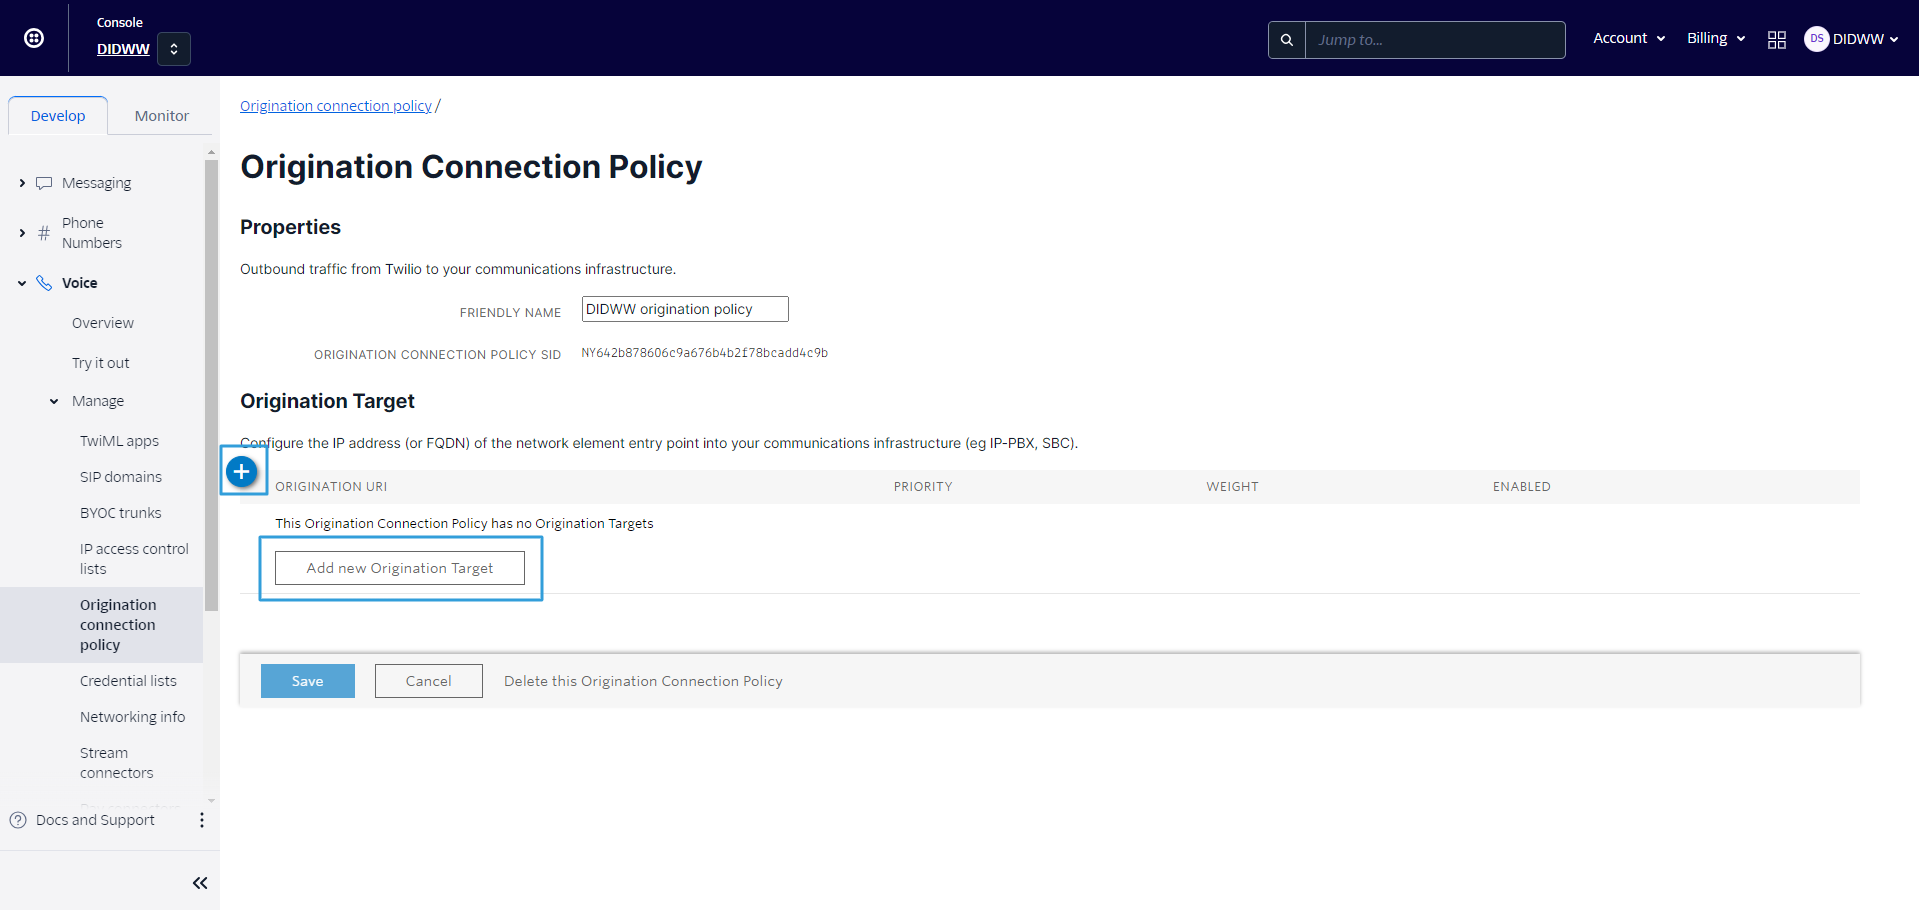
Fig. 3. Create new Access Control List window.#
Note
If you would like to add only a few IPs, they can all be added under one control list. Once the ACL is created, you can add them by selecting “Create New IP Address Range” in the window (Fig. 4).
Fig. 4. ACL list edit window.#
Step 4. After the ACL list is created, select “SIP Domains” in the sidebar and click on the blue plus icon (Fig. 5).
Fig. 5. SIP domains window.#
Step 5. In the “New SIP Domain” window, enter the Friendly Name and SIP URI. In the “Voice Authentication” section, select the access control list you created, and in the “Call Control Configuration” section, choose the BYOC Trunk (Fig. 6).
Fig. 6. New SIP Domain window.#
Note
Do not forget the SIP URI (companydomain.sip.twilio.com). It will be your host while creating the DIDWW Inbound SIP trunk.
Step 6. After the SIP domain is created, select “BYOC Trunks”. In the window that opens, click the blue plus icon. In the new window, enter the trunk name and click “Create BYOC Trunk” (Fig. 7).
Fig. 7. BYOC Trunks window.#
Step 7. In the “General Settings” window, select the SIP domain you created in Step 5. for the “From Domain” field. Make sure that you select the same SIP domain (Fig. 8).
Fig. 8. BYOC Trunk, General Settings window.#
Step 8. In the “Application Configuration” section, enter your system URLs for handling incoming calls. Three URLs are required: a Primary URL, a Failover URL, and a URL for call status changes. Once completed, click “Save” to apply the changes (Fig. 9).
Note
Examples about handling incoming calls from Twilio and more can be found in Twilio Docs
Fig. 9. BYOC Trunk, Application Configuration section.#
Your BYOC trunk is ready to accept calls from DIDWW Inbound SIP Trunk.
Origination (Outbound)#
To configure the DIDWW Outbound SIP trunk with the Twilio Console, proceed with the following steps:
Step 1. In the Twilio Console, expand the “Voice”, and then “Manage” sections, and select “Origination connection policy” (Fig. 1).
Fig. 1. Twilio Console window.#
Step 2. Once the Origination Connection Policy window opens, click the blue plus icon, enter a friendly name, and then click “Create” (Fig. 2).

Fig. 2. Origination Connection Policy window.#
Step 3. In the same window, click on the connection policy you created. In the window that opens, select “Add New Origination Target” or click the blue plus icon (Fig. 3).
Fig. 3. Origination Connection Policy window.#
Step 4. When a new window opens, enter the origination SIP URI in the following format: “sip:domain.com ”. The domain.com is one of DIDWW Outbound Endpoints or use out.didww.com. Finally, click “Save” to add a target (Fig. 4).
Fig. 4. Create Origination Target window.#
After this, you can either create a new BYOC (Bring Your Own Carrier) trunk or add the Connection Policy to an existing trunk. The following sections will explain both scenarios:
Creating BYOC Trunk with Connection Policy#
Step 1. Select “BYOC Trunks.” In the window that opens, click the blue plus icon. In the new window, enter the trunk name and click “Create BYOC Trunk” (Fig. 1).
Fig. 1. BYOC Trunks window.#
Step 2. In the General Settings, go to the “Origination Connection Policy (to your Carrier)” section. Under “Destination”, select the Connection Policy you created, then click “Save” to apply the changes (Fig. 2).
Fig. 2. General Settings window.#
Add Policy to existing BYOC Trunk#
Step 1. Select “BYOC Trunks.” In the window that opens, choose your trunk name (Fig. 1).
Fig. 1. BYOC Trunks window.#
Step 2. In the General Settings, go to the “Origination Connection Policy (to your Carrier)” section. Under “Destination”, select the Connection Policy you created, then click “Save” to apply the changes (Fig. 2).

Fig. 2. General Settings window.#
Now, an Outbound SIP Trunk can be created by selecting the “Twilio Account SID” as the authentication method and entering your account SID, which can be found in main Console window.
Your BYOC trunk is ready to originate calls via DIDWW Outbound Trunk.