Microsoft Teams Direct Routing#
Microsoft Teams Direct Routing allows your organization to use DIDWW as a SIP trunk provider for inbound and outbound voice services within Microsoft Teams. With this integration, you can retain your existing DIDWW phone numbers, take advantage of cost-effective calling rates, and leverage the full capabilities of the Microsoft Teams Phone System.
Integration benefits:
Retain existing phone numbers: Continue using your current DIDWW numbers within Microsoft Teams.
Cost efficiency: Take advantage of competitive DIDWW calling rates.
Enhanced communication: Fully leverage Microsoft Teams phone system features.
Prerequisites#
Before setting up Microsoft Teams Direct Routing with DIDWW, make sure you have the following:
An active DIDWW account .
A DIDWW Microsoft Teams SBC domain. Contact sales@didww.com for details.
Access to outbound trunks (required only for outbound calling).
A Microsoft Phone System license with Direct Routing enabled. For details, see the official Microsoft documentation .
Connect DIDWW Trunks with MS Teams#
This guide provides detailed steps on integrating DIDWW Trunks with MS Teams. Follow the instructions below to complete the setup process.
Step 1: Set up and verify the domain#
Complete the following steps to set up and verify your DIDWW domain in Microsoft Teams.
Add the domain in Microsoft 365#
Sign in to the Microsoft 365 admin center .
Select Settings > Domains.
Click Add domain and enter your domain which was provided to you by DIDWW.
Fig. 1. Adding a domain in Microsoft 365#
Verify the domain#
Click Use this domain.
Select Add a TXT record and save the provided TXT value (e.g.,
MS=ms83401203).
Fig. 2. Verifying your domain#
Complete domain verification#
Share the TXT record value with DIDWW sales team at sales@didww.com .
After confirmation from DIDWW, return to Microsoft 365 and select Verify.
Choose More Options, then Skip and do this later, and click Continue.
Note
Microsoft DNS records aren’t needed for Direct Routing.
Fig. 3. Domain verification complete#
Step 2: Activate the domain#
After your domain is verified, activate it by creating a user with the domain and assigning a Microsoft license.
Add a user with the verified domain#
Sign in to the Microsoft 365 admin center .
Go to Users > Active users, and select Add a user.
In the Username field, enter a user ID that includes your verified DIDWW domain.
Example:
DIDWW@0232-40e6-a468-38a329debdd7.teams.didww.com
Fig. 4. Activating the domain#
Assign a Microsoft license to the user#
Assign a Microsoft 365 Business license with the Phone System add-on, or an E5 license.
Note
For license requirements, refer to the Direct Routing planning documentation .
After you add the domain and user, it may take up to 24 hours for the domain to be fully provisioned in your tenant.
Fig. 5. Assigning license to the user#
Step 3: Configure Direct Routing#
You can configure Direct Routing via the Microsoft Teams Admin Center or PowerShell.
Sign in to the Teams Admin Center#
Click the link to open the Teams Admin Center .
Sign in using Tenant Administrator credentials.
Fig. 6. Teams Admin Center#
Add the SBC#
In the Teams Admin Center, follow these steps to add the SBC:
Click the Voice Menu.
Click the Direct Routing sub-menu.
Click Add under the SBCs tab.

Fig. 7. Adding SBC to Direct Routing#
In the Add SBC window, configure the following settings:
SBC name – Enter the SBC name provided by DIDWW.
Description (optional) – Enter a description to identify the purpose of this SBC.
Enabled – Turn on the toggle to enable the SBC.
SIP signaling port – Enter
5061.Send SIP options – Turn on the toggle to enable SIP OPTIONS for activity monitoring.
Leave all other settings at their default values. Scroll down and click Save to create the SBC.
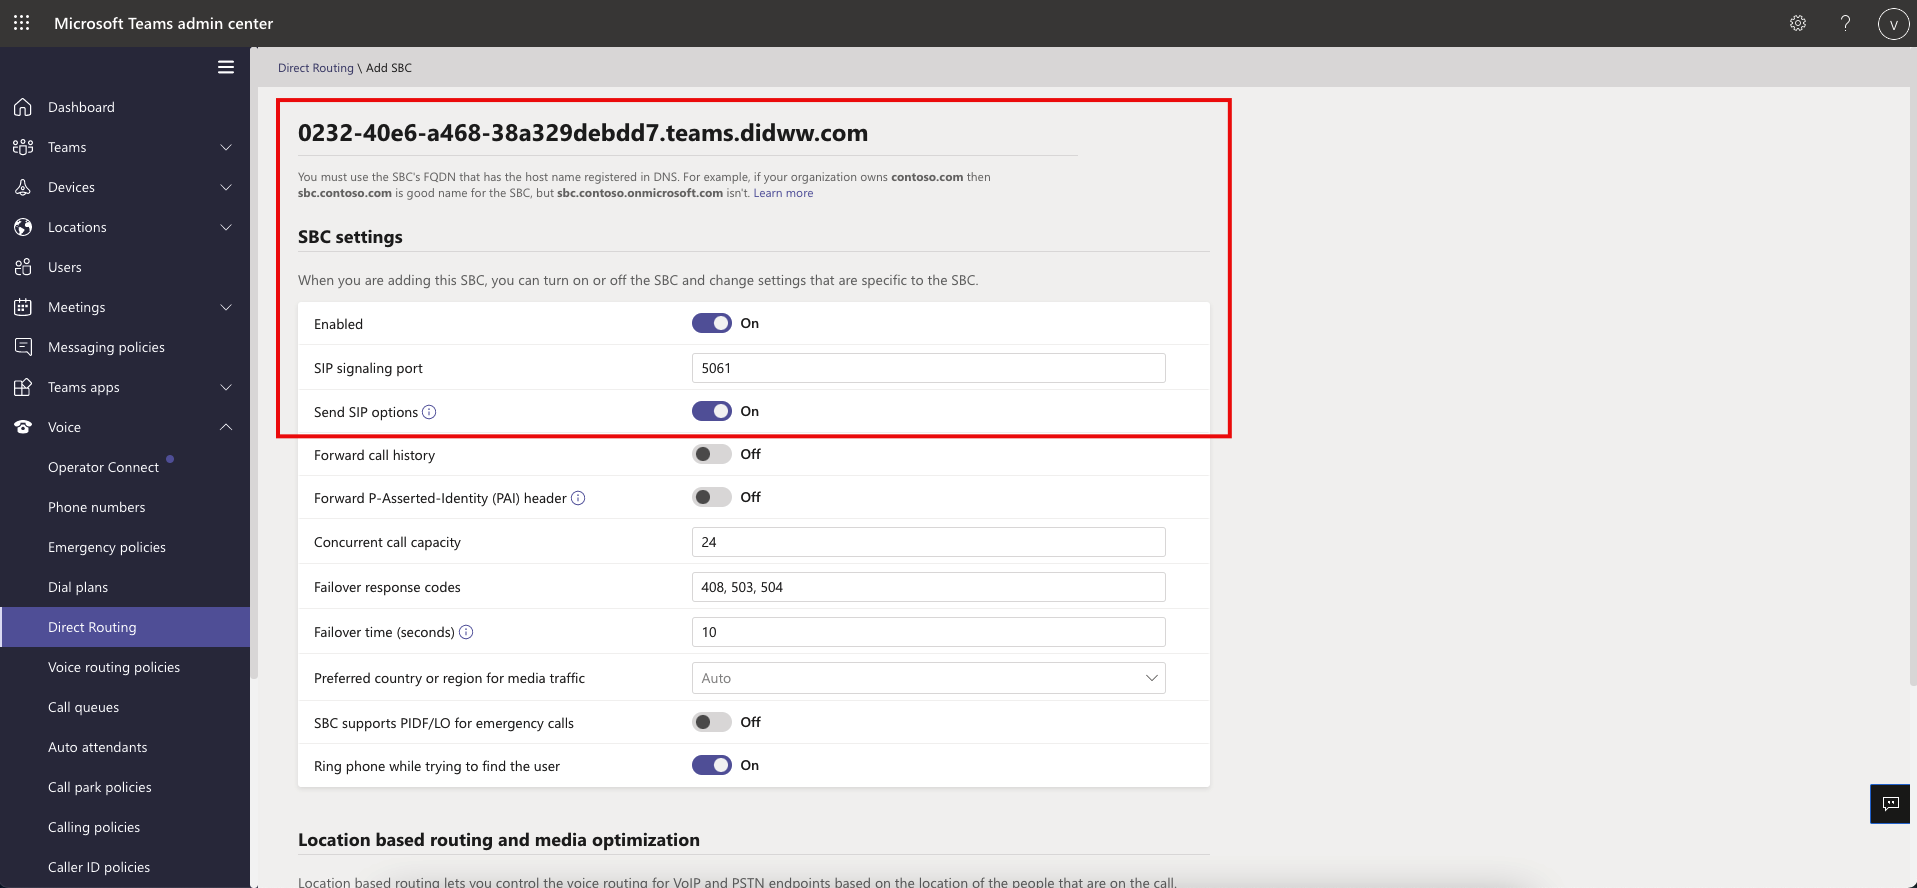
Fig. 8. Configuring new SBC#
PowerShell alternative#
Alternatively, you can use the following PowerShell command:
New-CsOnlinePSTNGateway -Identity 0232-40e6-a468-38a329debdd7.teams.didww.com -SipSignalingPort 5061 -Enabled $True -MaxConcurrentSessions 100
Step 4: Configure voice routing#
Add the voice route#
In the Teams Admin Center, follow these steps to configure voice routes:
Click the Voice Menu.
Open the Direct Routing sub-menu.
In the Direct Routing page, open the Voice routes tab.
Click Add under the Voice Routes tab.
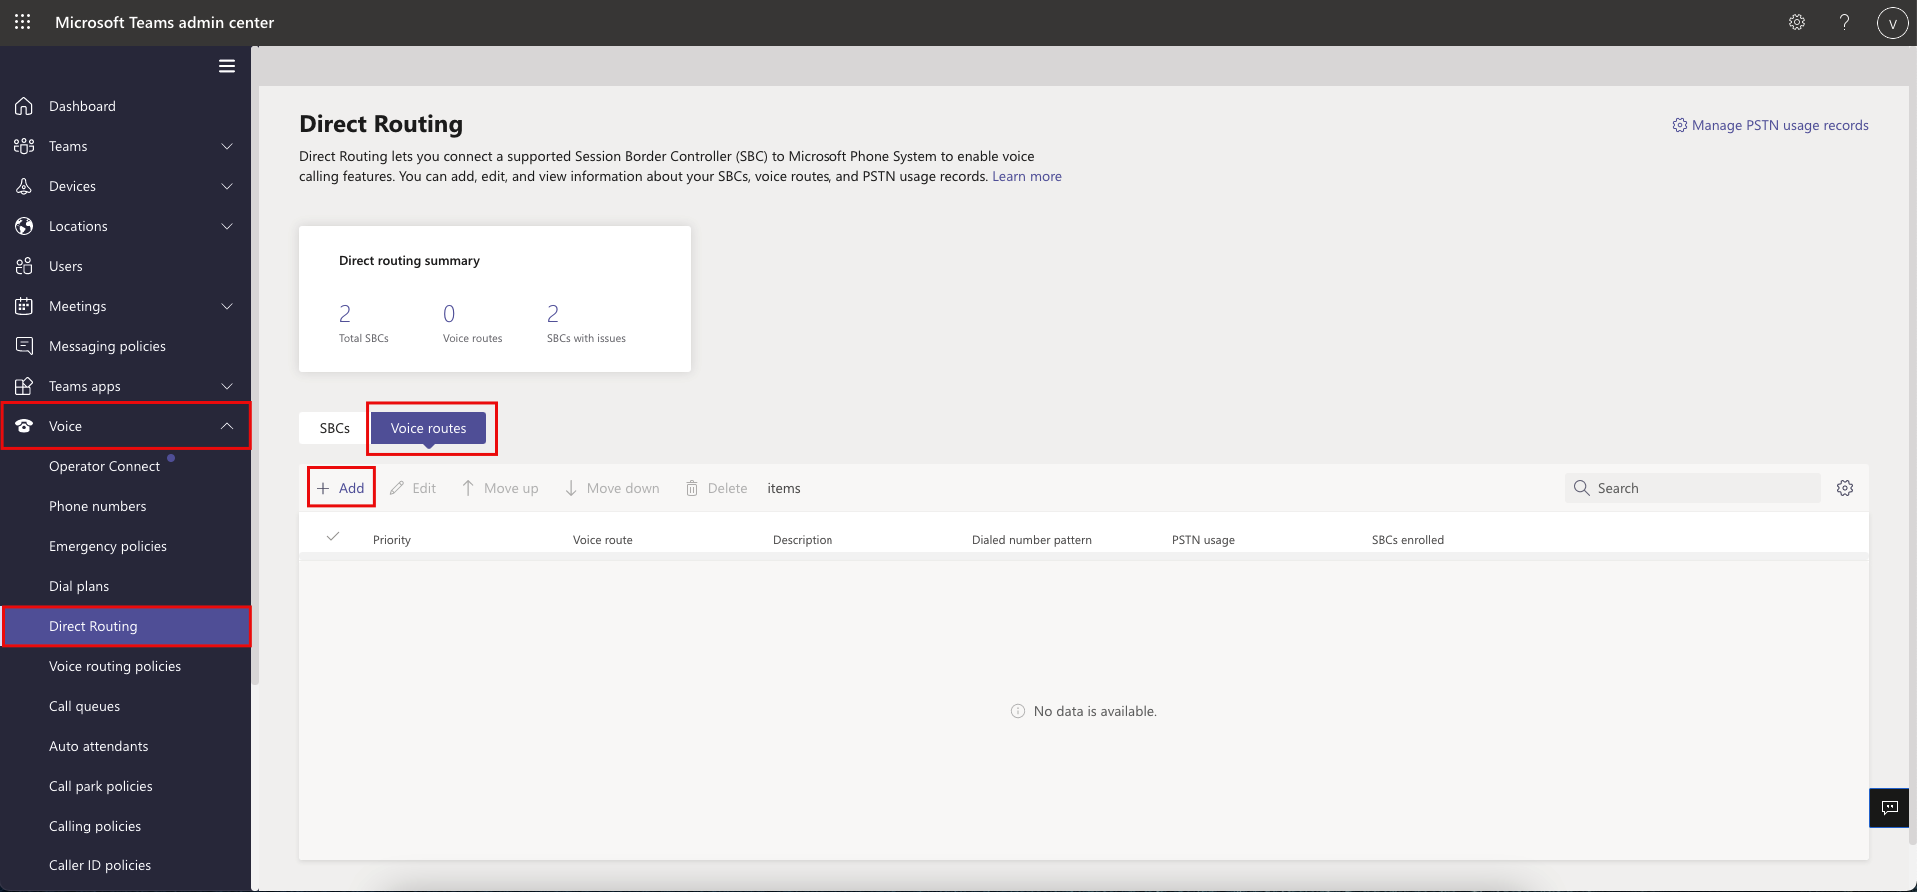
Fig. 9. Adding a Voice Route#
Create the voice route#
To create the voice route, you will need to configure the following details:
Add the Dialed Number pattern
Assign the SBC
Add PSTN usage records
Add the Dialed Number pattern#
To configure the Dialed Number pattern:
Leave the Priority on the default
1value.Use the pattern
^(.*)$to match any dialed number in the exact format.Note
If you do not want to require dialing in E.164 format, configure alternate number patterns.
For example, to allow dialing North American numbers without the
+1prefix, use the pattern^(\+1[0-9]{10})$.Update the pattern as necessary for other dialing formats and regions.
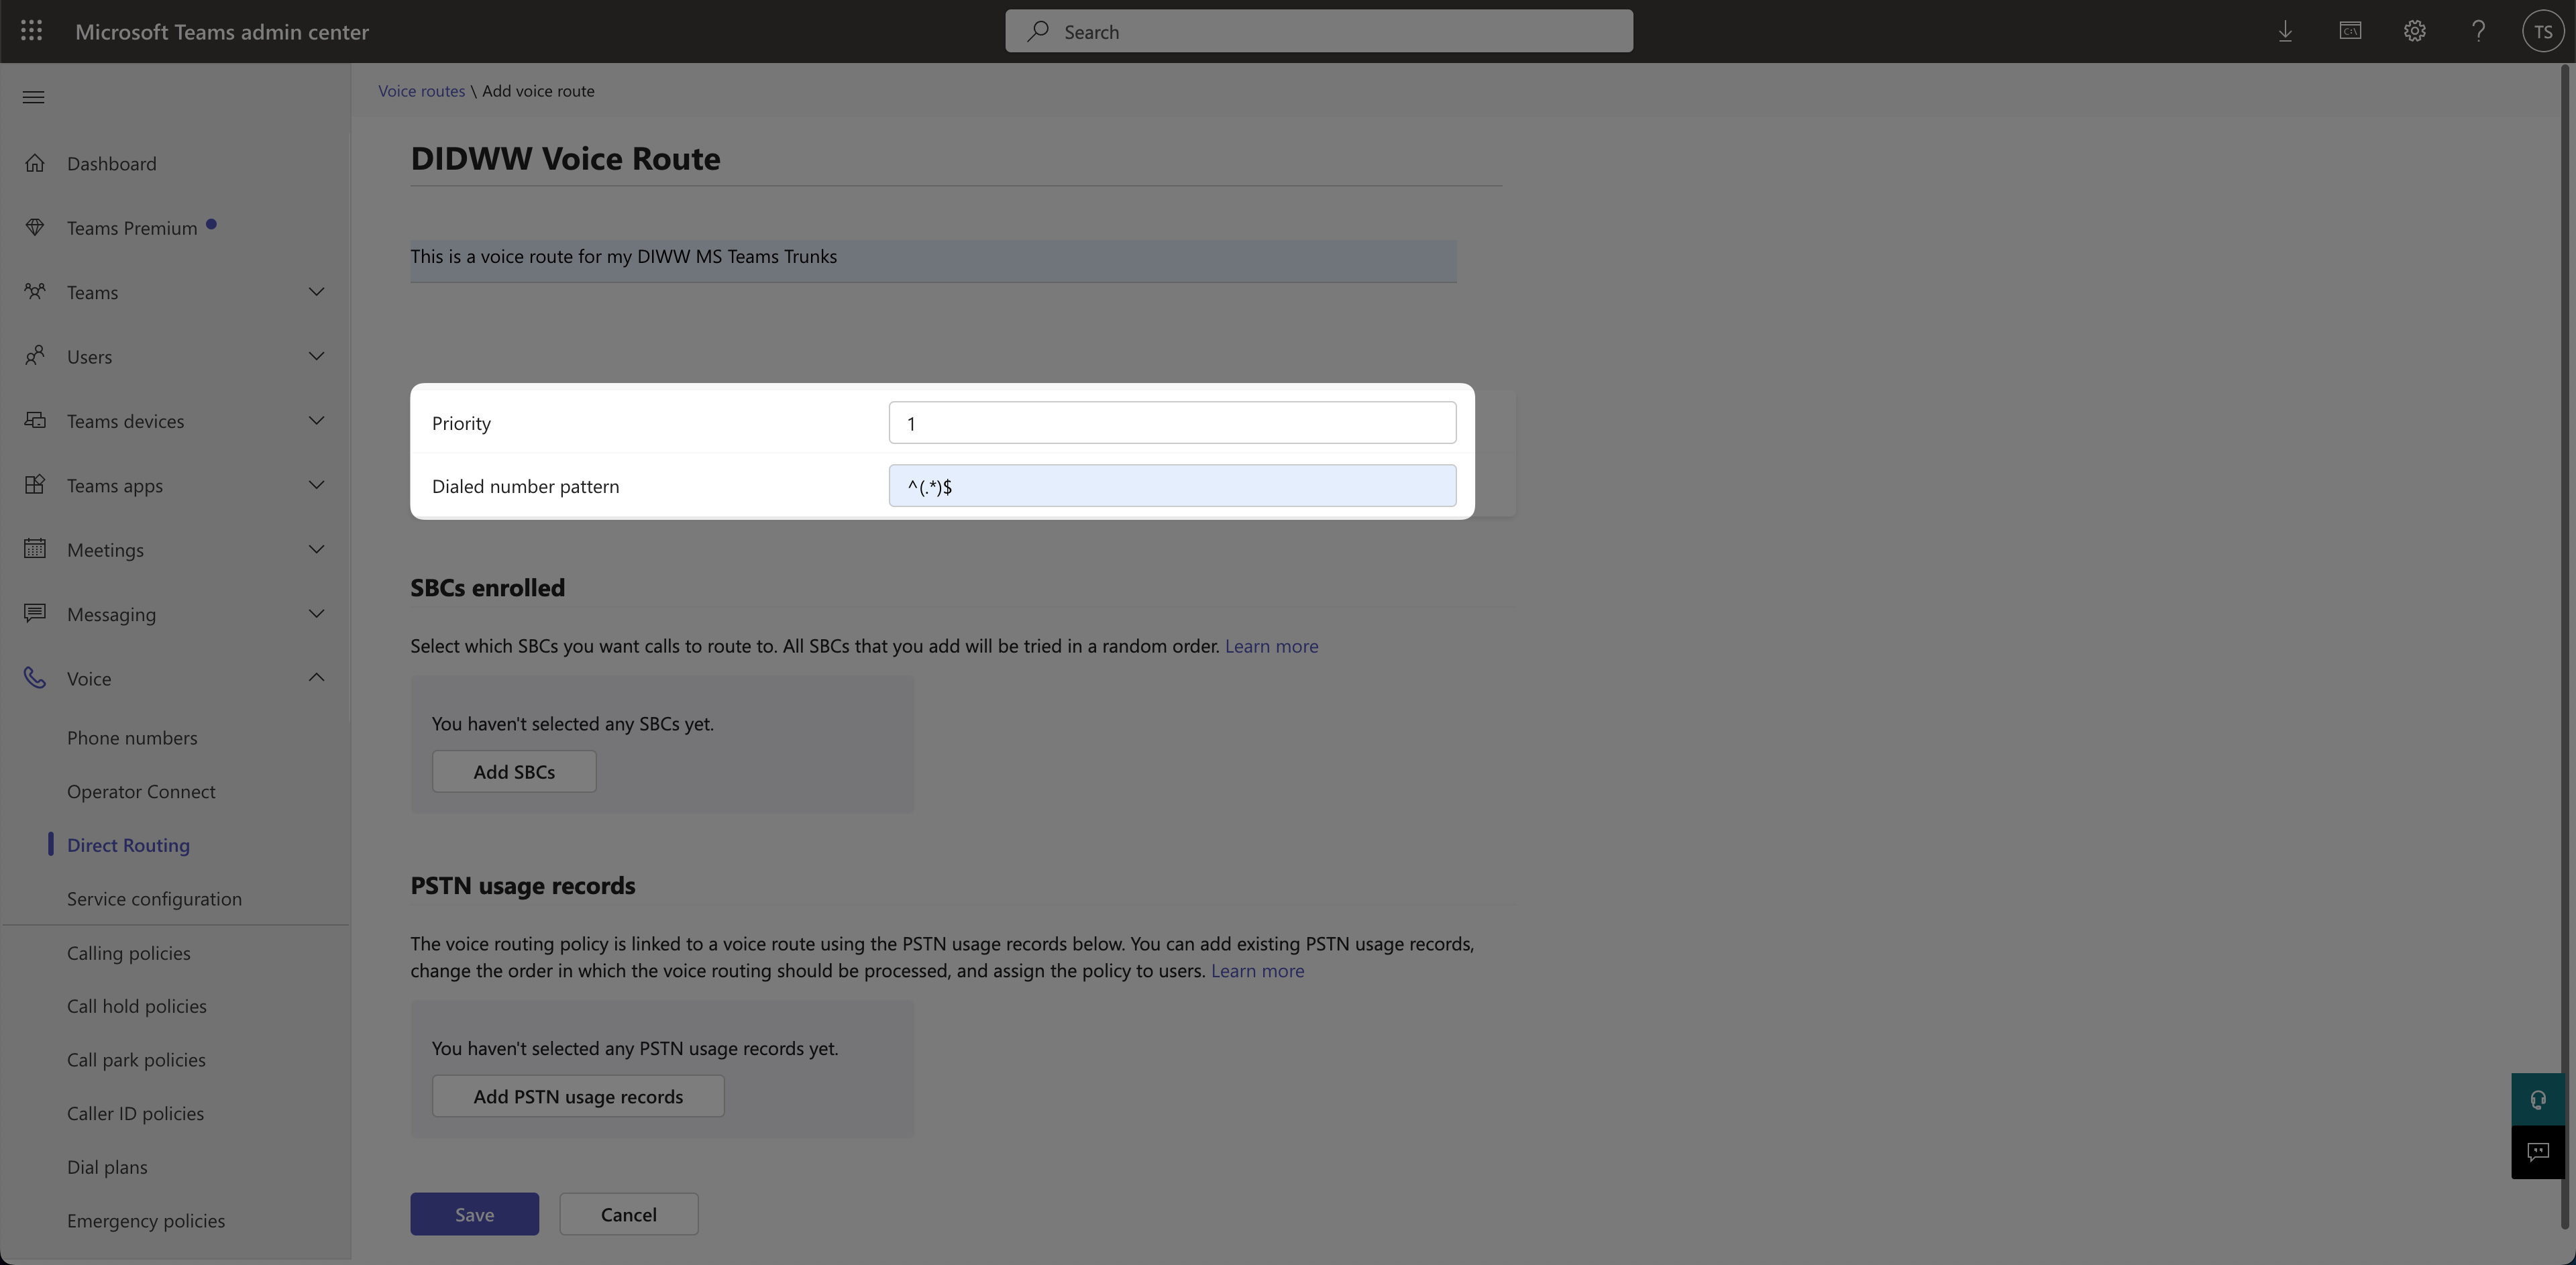
Fig. 10. Dialed number pattern#
Assign the SBC#
After configuring the dialed number pattern:
Click Add SBCs.
In the Select existing SBC to Add dropdown, choose the SBC (e.g.,
0232-40e6-a468-38a329debdd7.teams.didww.com).Click Apply.
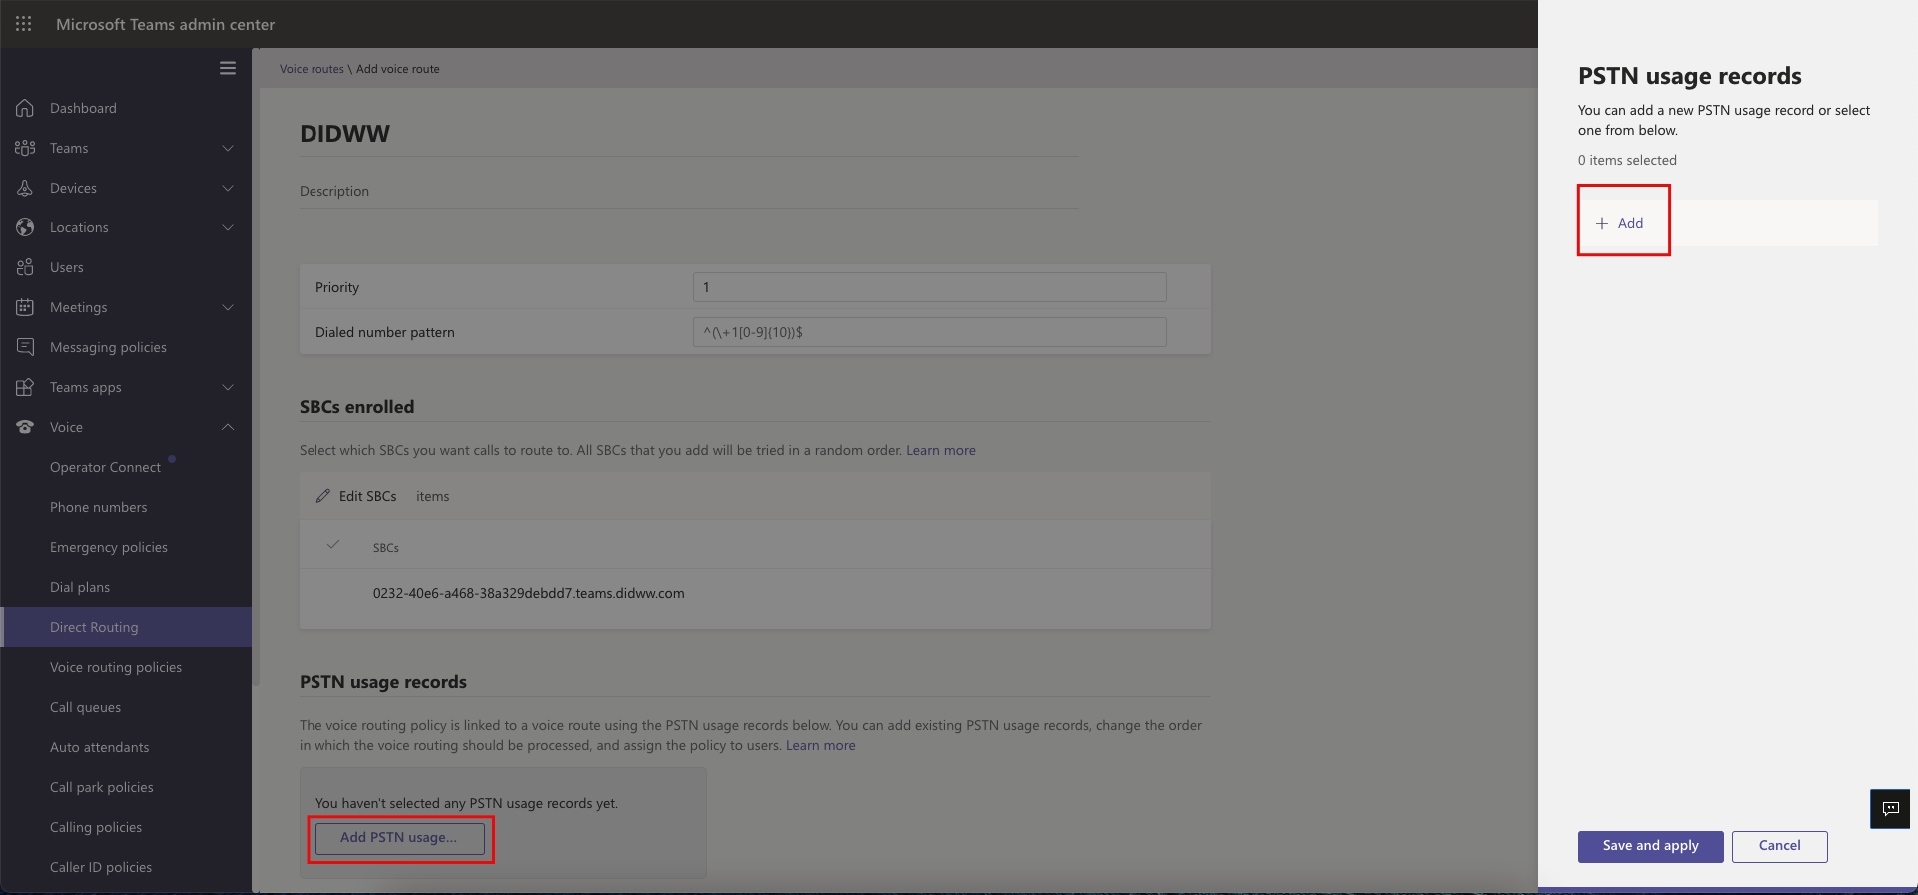
Fig. 11. Assigning the SBC#
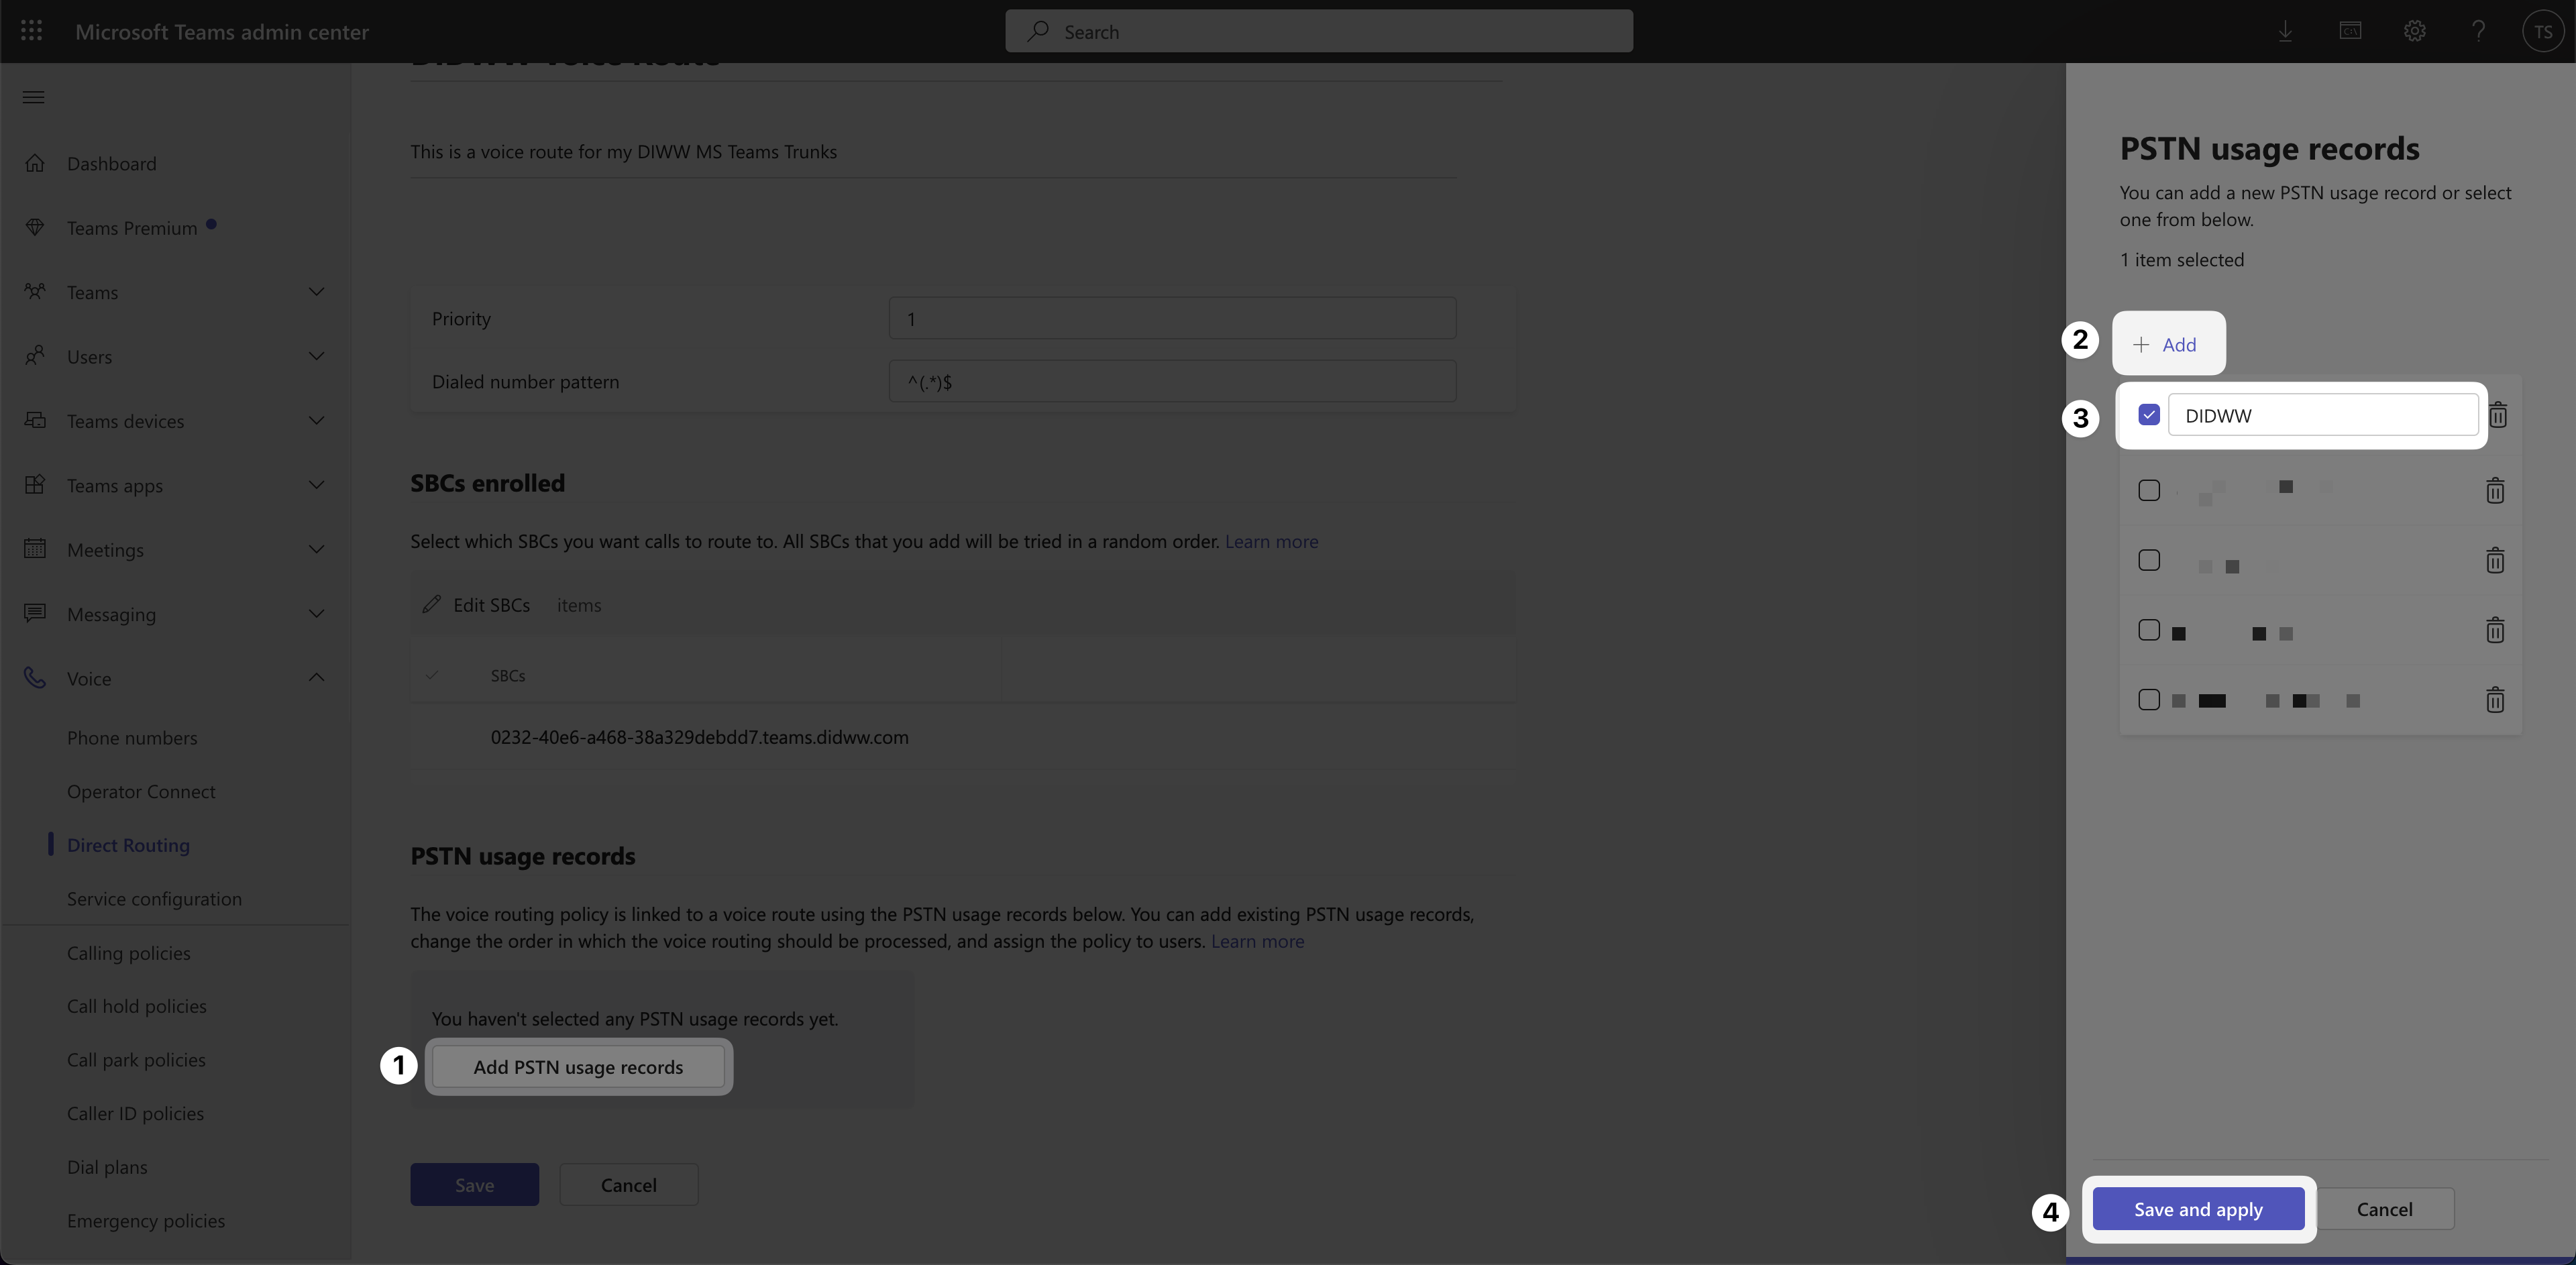
Add PSTN usage records#
PowerShell alternative#
You can also configure the voice route using PowerShell:
Set-CsOnlinePstnUsage -Identity Global -Usage @{Add="DIDWW"}

New-CsOnlineVoiceRoute -Identity "DIDWW" -NumberPattern "^(.*)$" -OnlinePstnGatewayList 0232-40e6-a468-38a329debdd7.teams.didww.com -Priority 1 -OnlinePstnUsages "DIDWW"
Step 5: Create a voice routing policy#
Add a voice routing policy#
In the Teams Admin Center, follow these steps to configure a new voice routing policy:
Click the Voice menu.
Open the Voice routing policies sub-menu.
Click Manage policies.
Click Add to create a new voice routing policy.
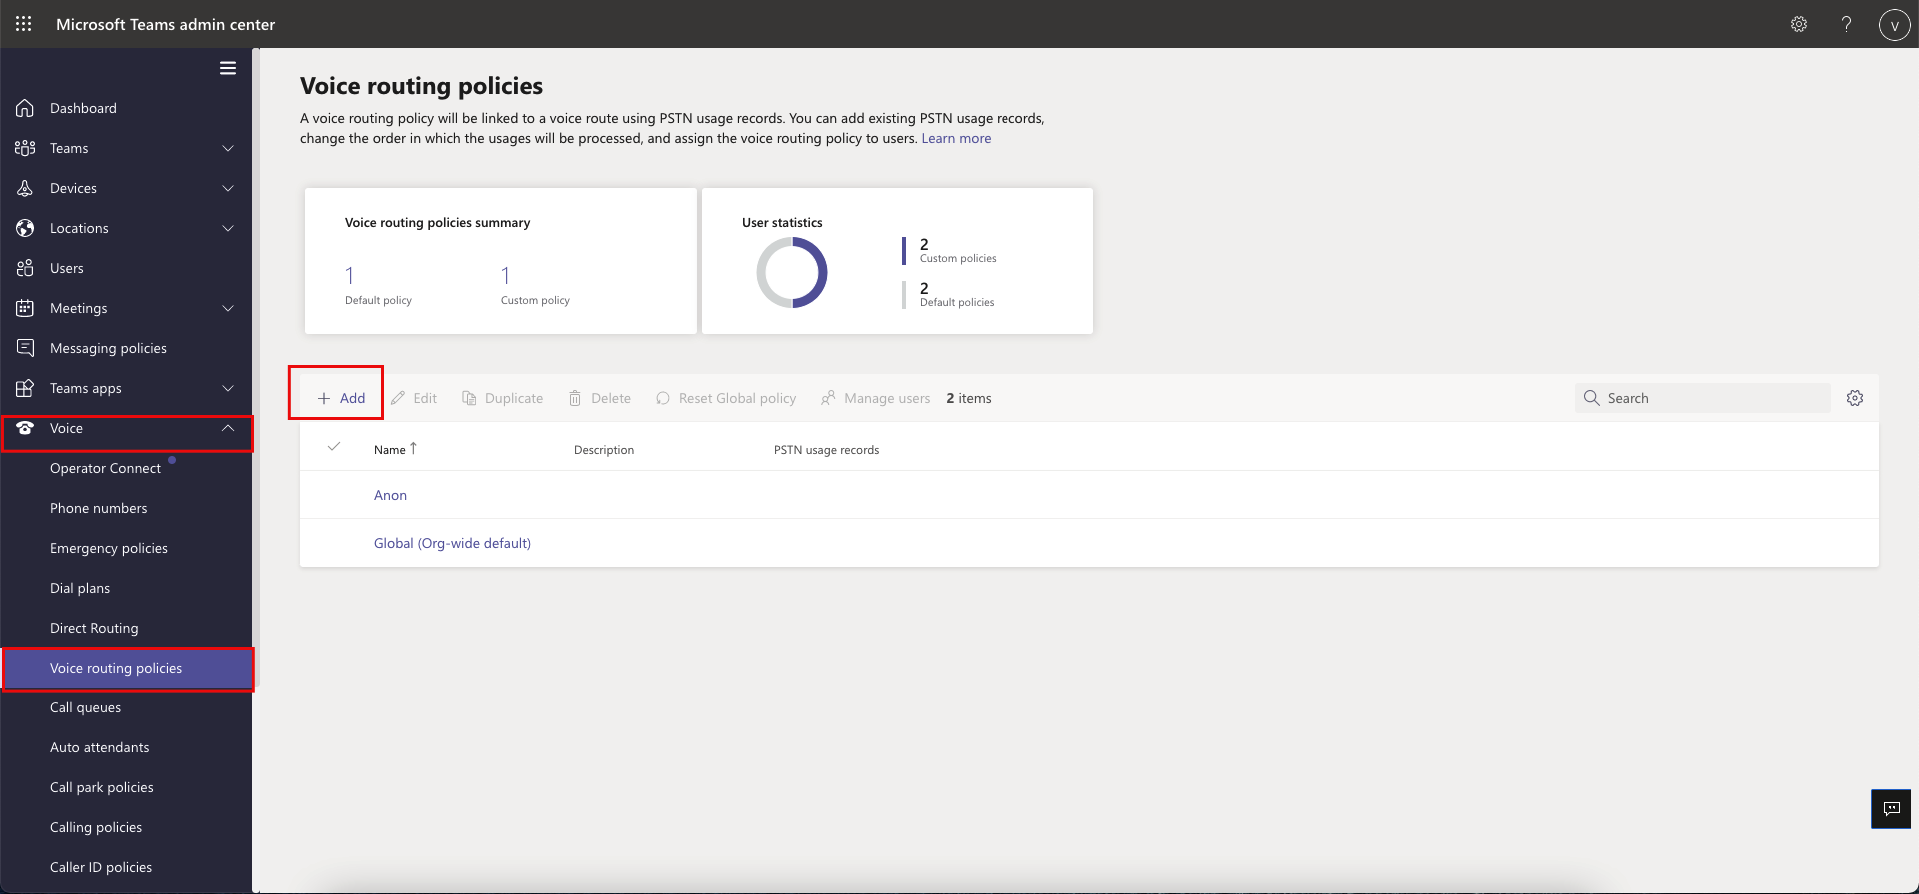
Fig. 14. Adding a new voice routing policy#
Assign the PSTN usage record#
Click Add PSTN usage records.
In the pop-up screen, select the usage record (e.g.,
DIDWW).Click Apply.
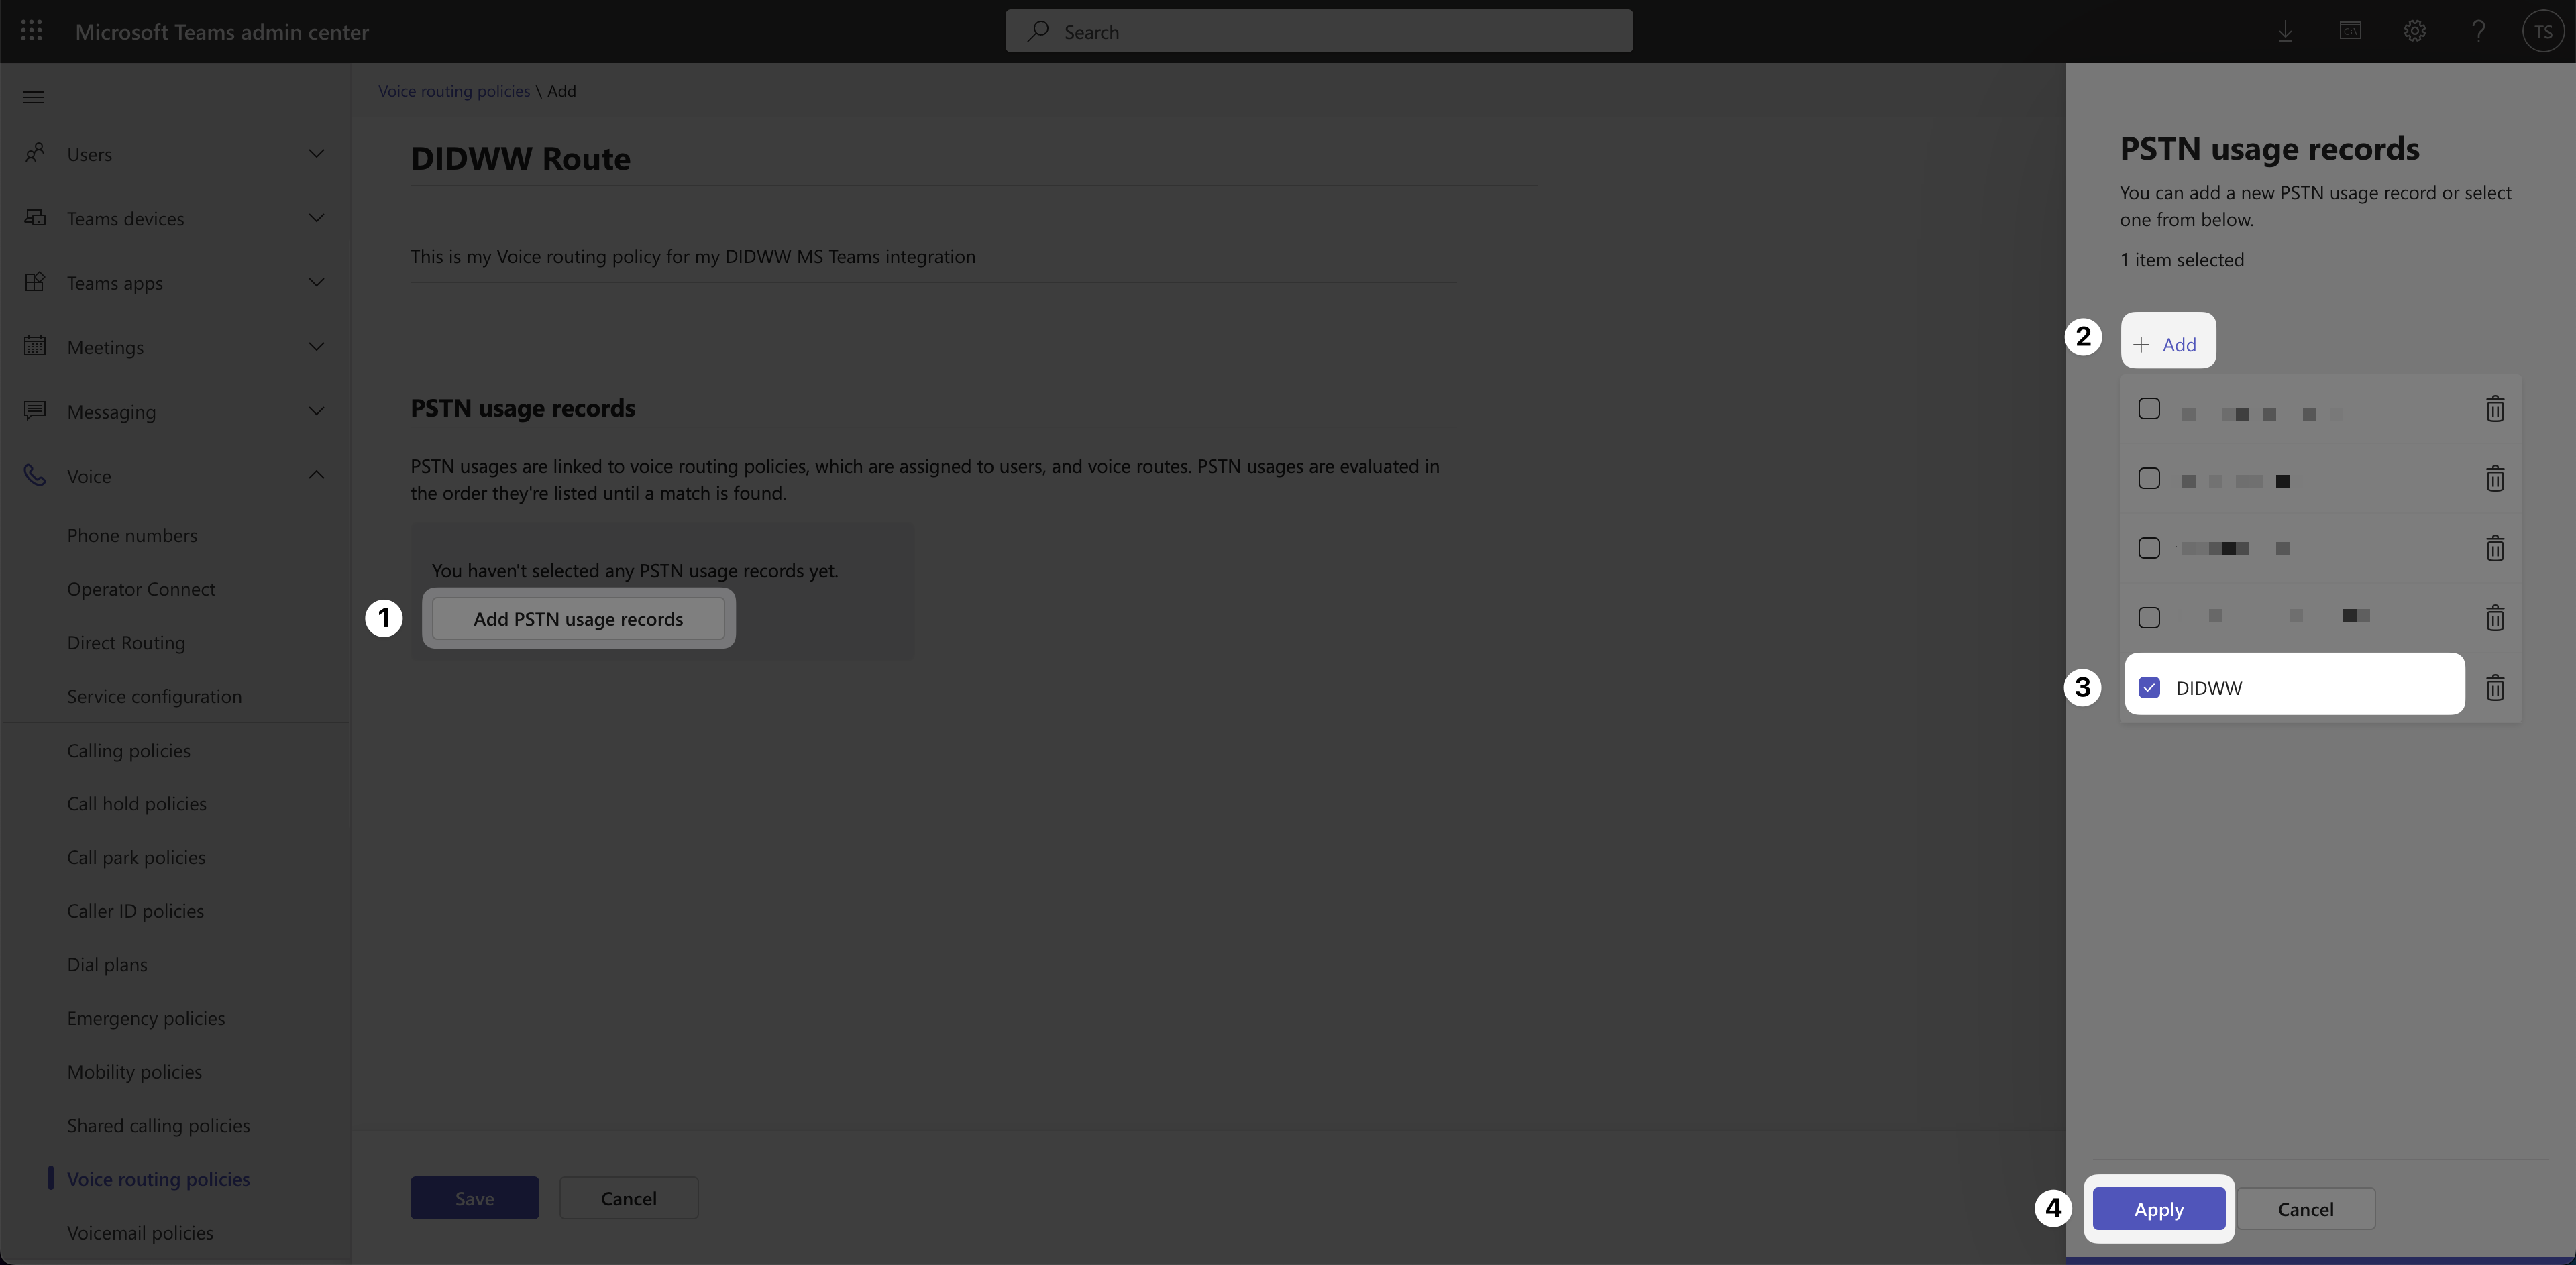
Fig. 15. Assign PSTN usage records with new voice routing policy#
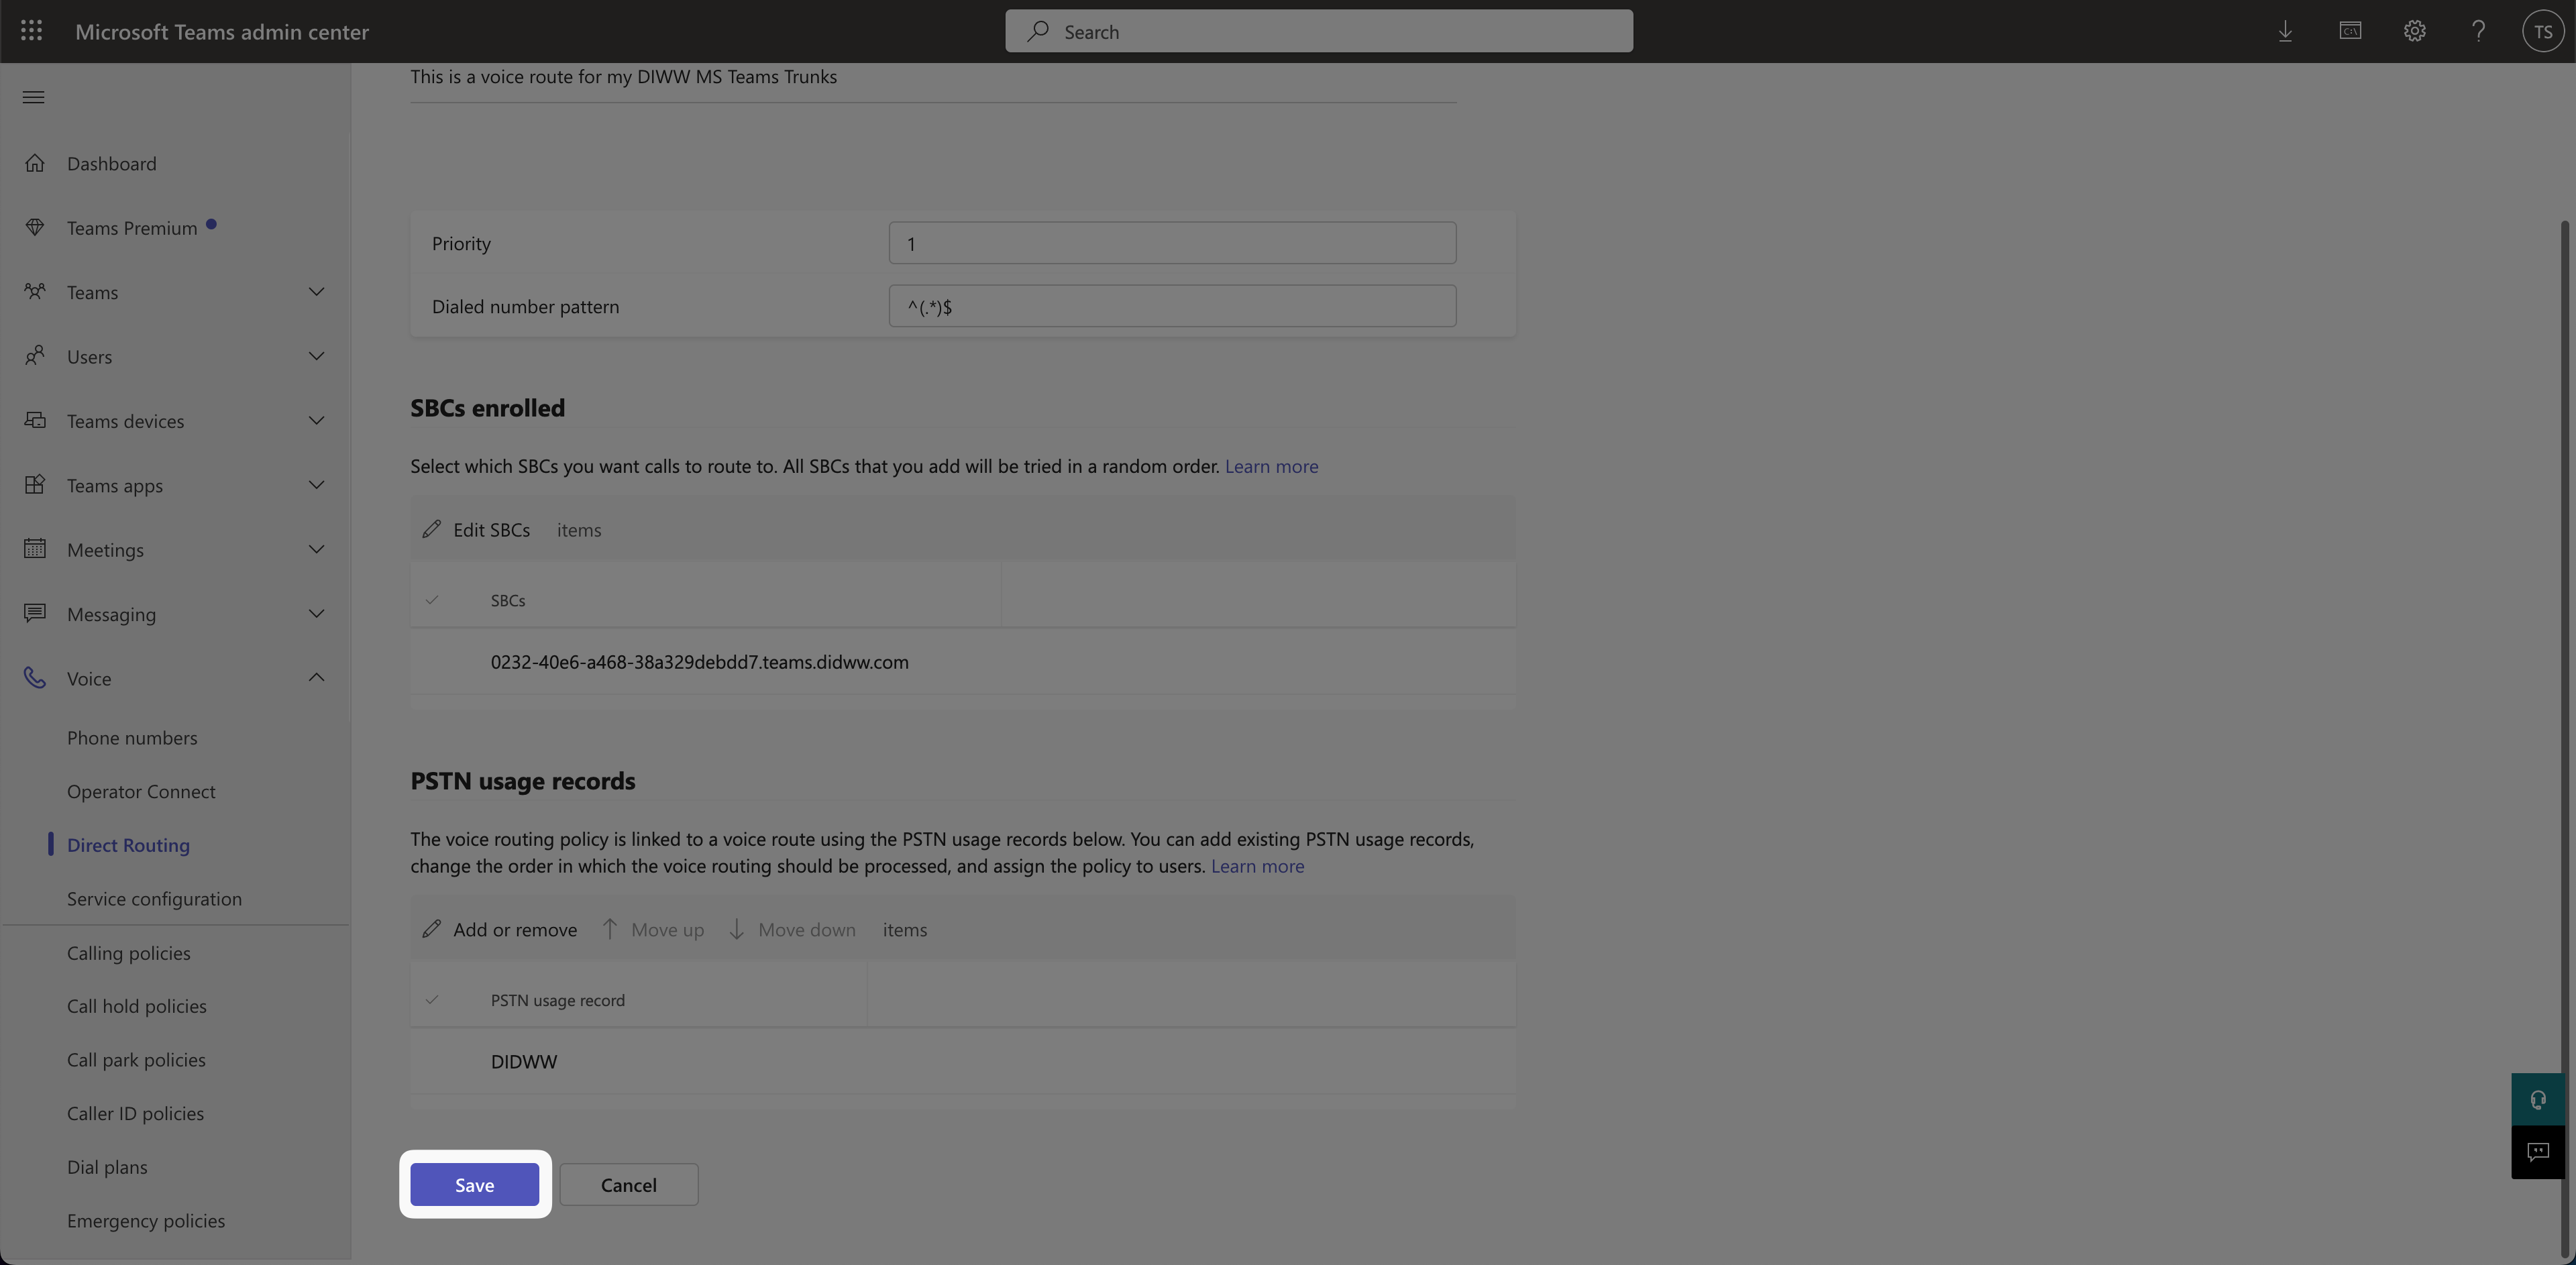
Save the voice routing policy#
After assigning the PSTN usage record, click Save to create the policy.
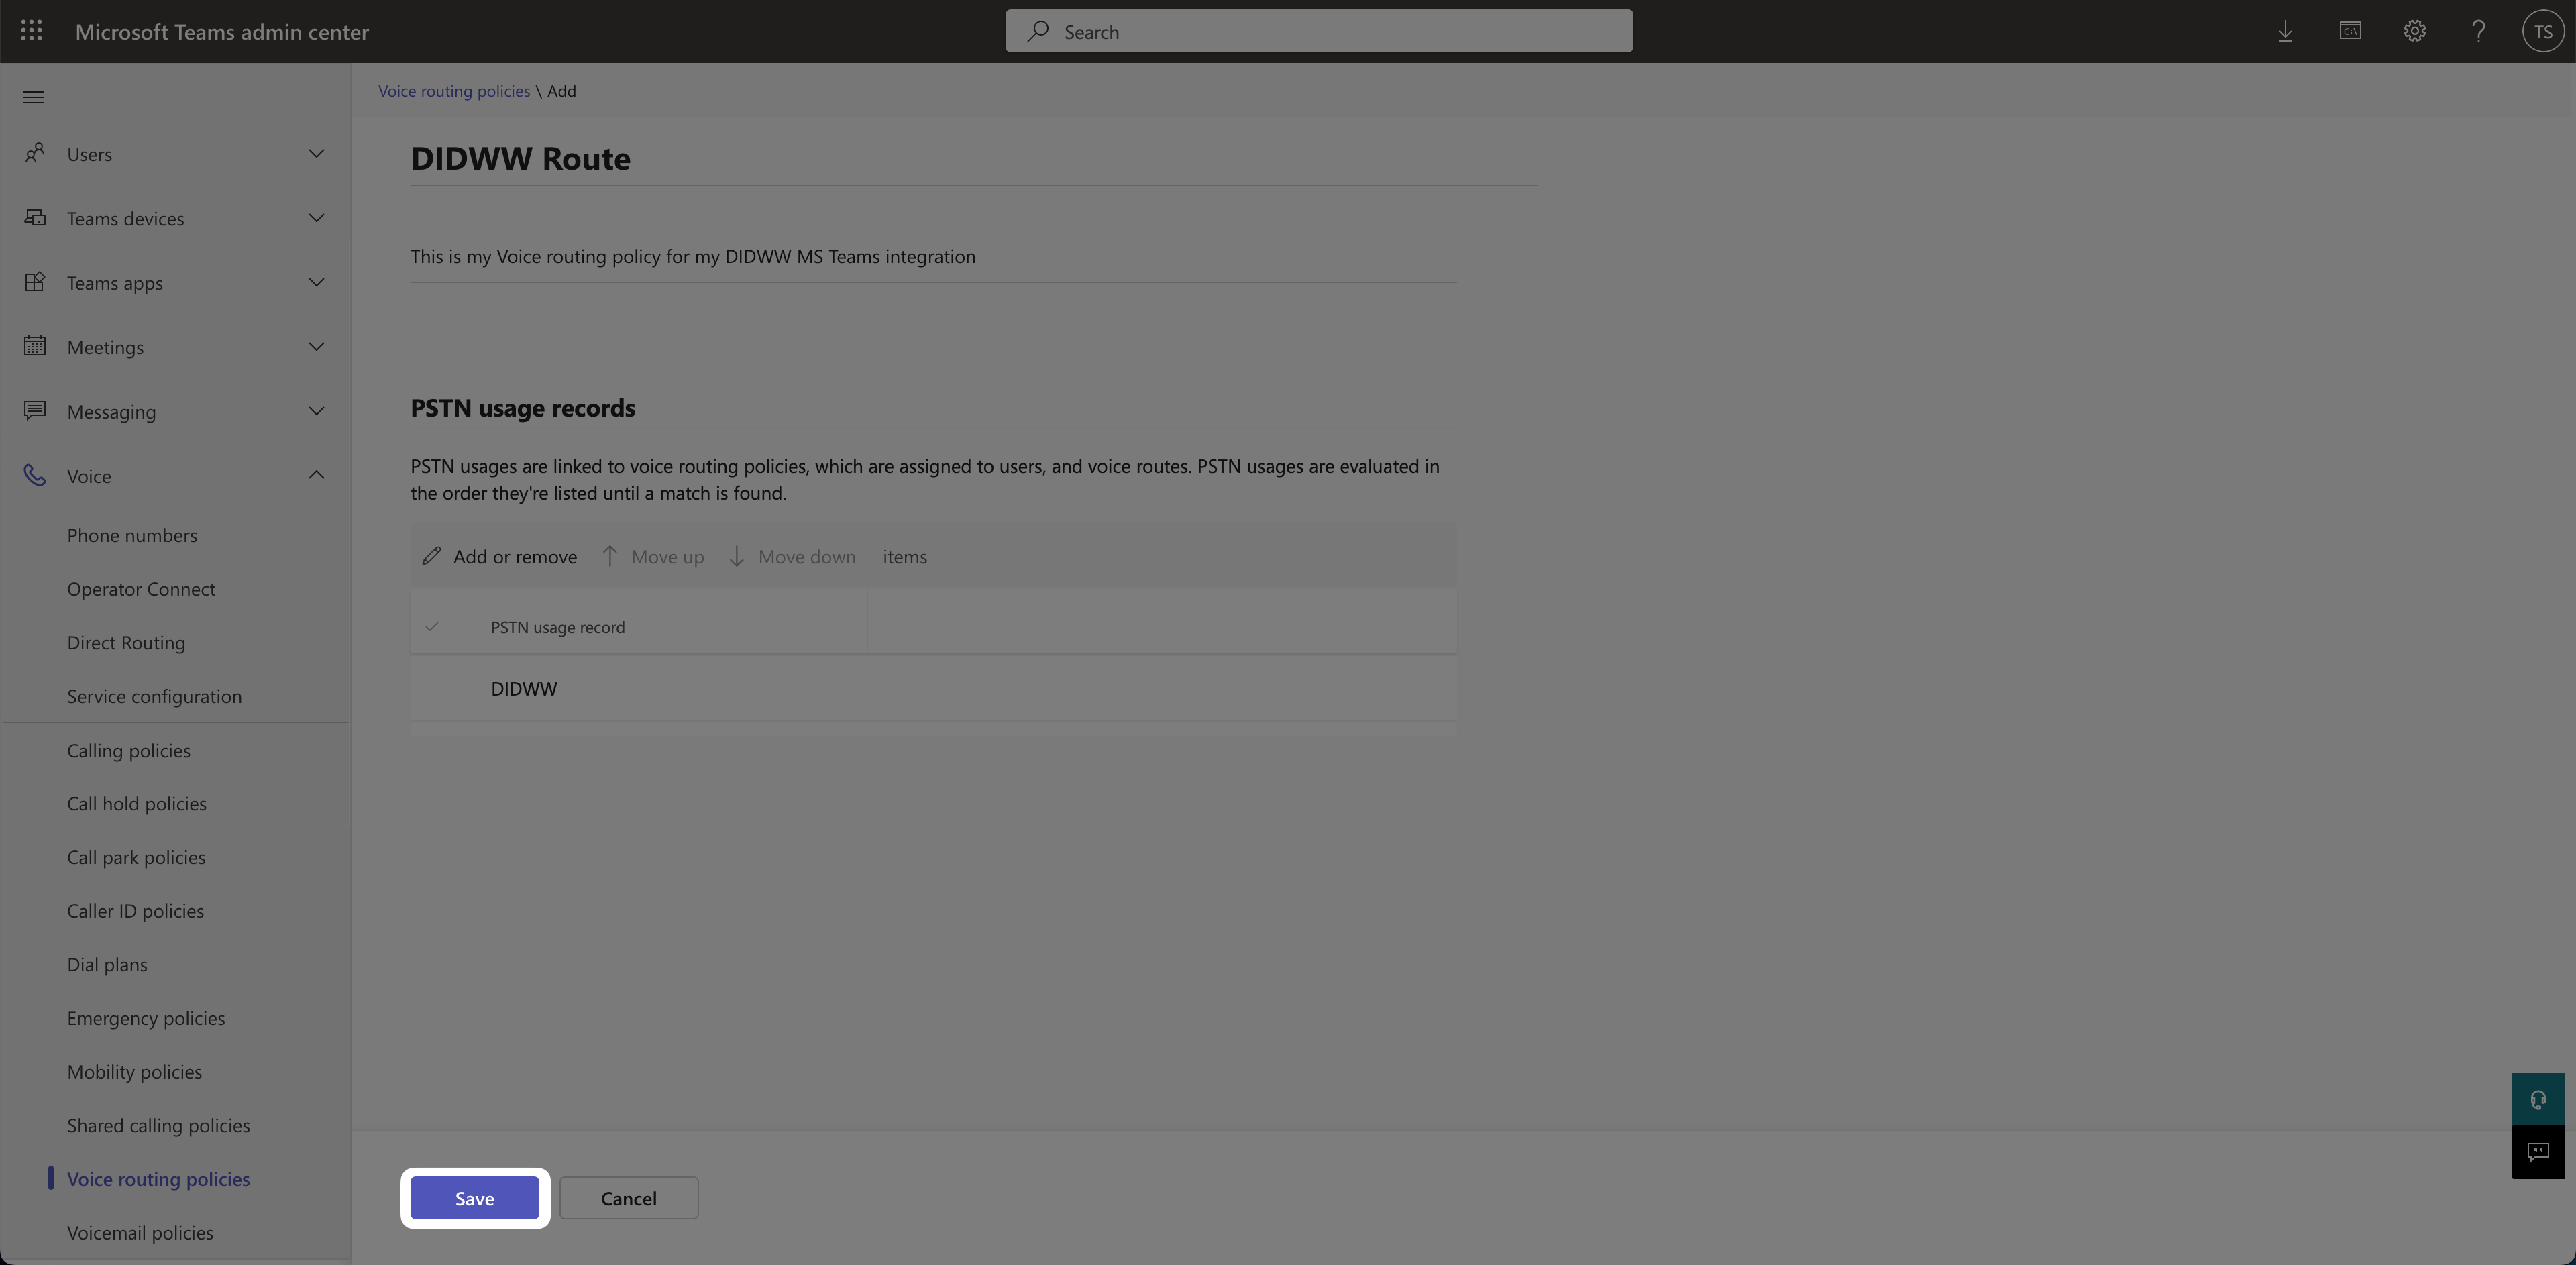
Fig. 16. Save the voice routing policy#
PowerShell alternative#
You can also create the voice routing policy using PowerShell:
New-CsOnlineVoiceRoutingPolicy "DIDWW Route" -OnlinePstnUsages "DIDWW"
Step 6: Assign users to policies#
To assign voice routing policy in the Teams Admin Center, follow these steps:
Click the Users > Manage users to open the Manage users sub-menu.
Select one or more users from the list.
Click Edit settings.
Under Voice routing policy, select DIDWW Route.
Under Calling policy, select AllowCalling.
Click Apply to save the changes.

Fig. 17. Assigning the DIDWW voice routing policy#
PowerShell alternative#
Use the following commands to assign both the voice routing policy and the calling policy to a user:
Grant-CsOnlineVoiceRoutingPolicy -PolicyName "DIDWW Route" -Identity DIDWW@0232-40e6-a468-38a329debdd7.teams.didww.com

Grant-CsTeamsCallingPolicy -PolicyName "AllowCalling" -Identity DIDWW@0232-40e6-a468-38a329debdd7.teams.didww.com
Note
Policy changes may take several hours to propagate.
Step 7: Assign a DIDWW phone number and verify call functionality#
Open the user profile#
To begin assigning a DIDWW number to a user, first navigate to their profile:
Click the Users > Manage users menu and sub-menu.
Click the name of the user (e.g., Technical Support).
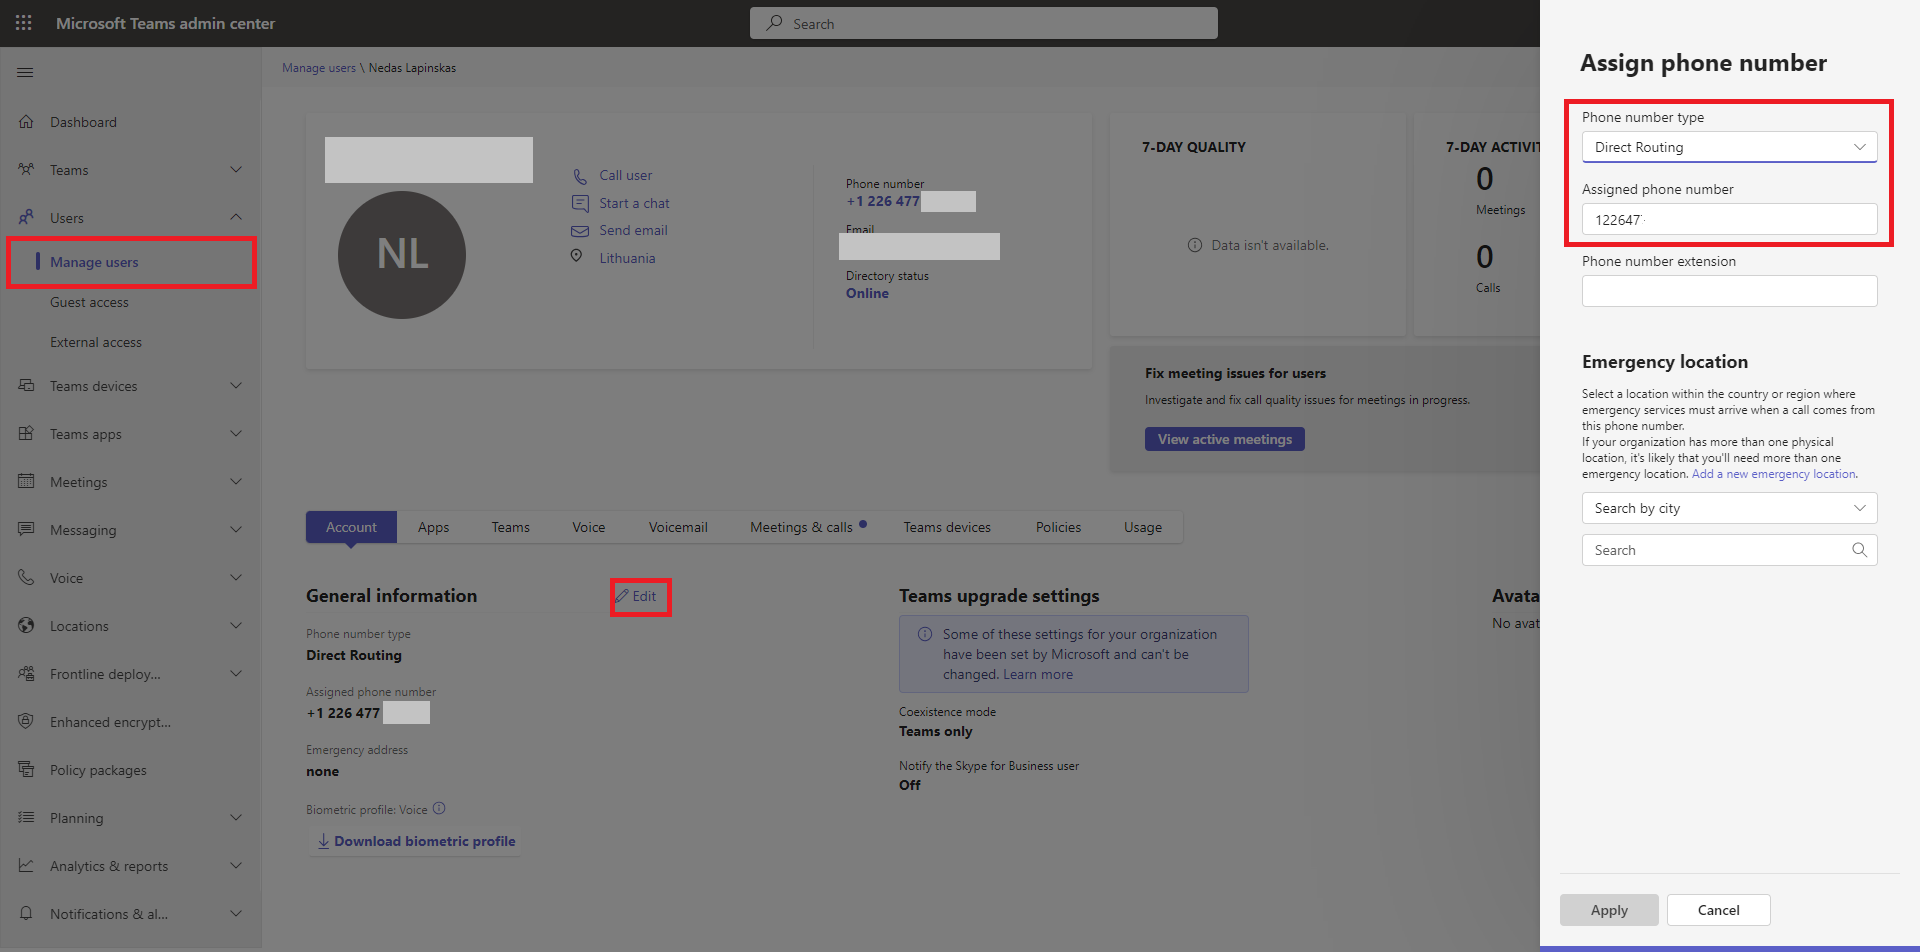
Fig. 18. Edit the user#
Open the phone number editor#
From the user’s account page, open the phone number assignment editor:
Under the Assigned phone number section, click Edit.

Fig. 19. Editing the assigned phone number#
Assign the DIDWW number#
In the phone number assignment pane, configure the DIDWW number:
Set Phone number type to Direct Routing.
Select the Assigned phone number from the dropdown.
Click Apply to save the assignment.
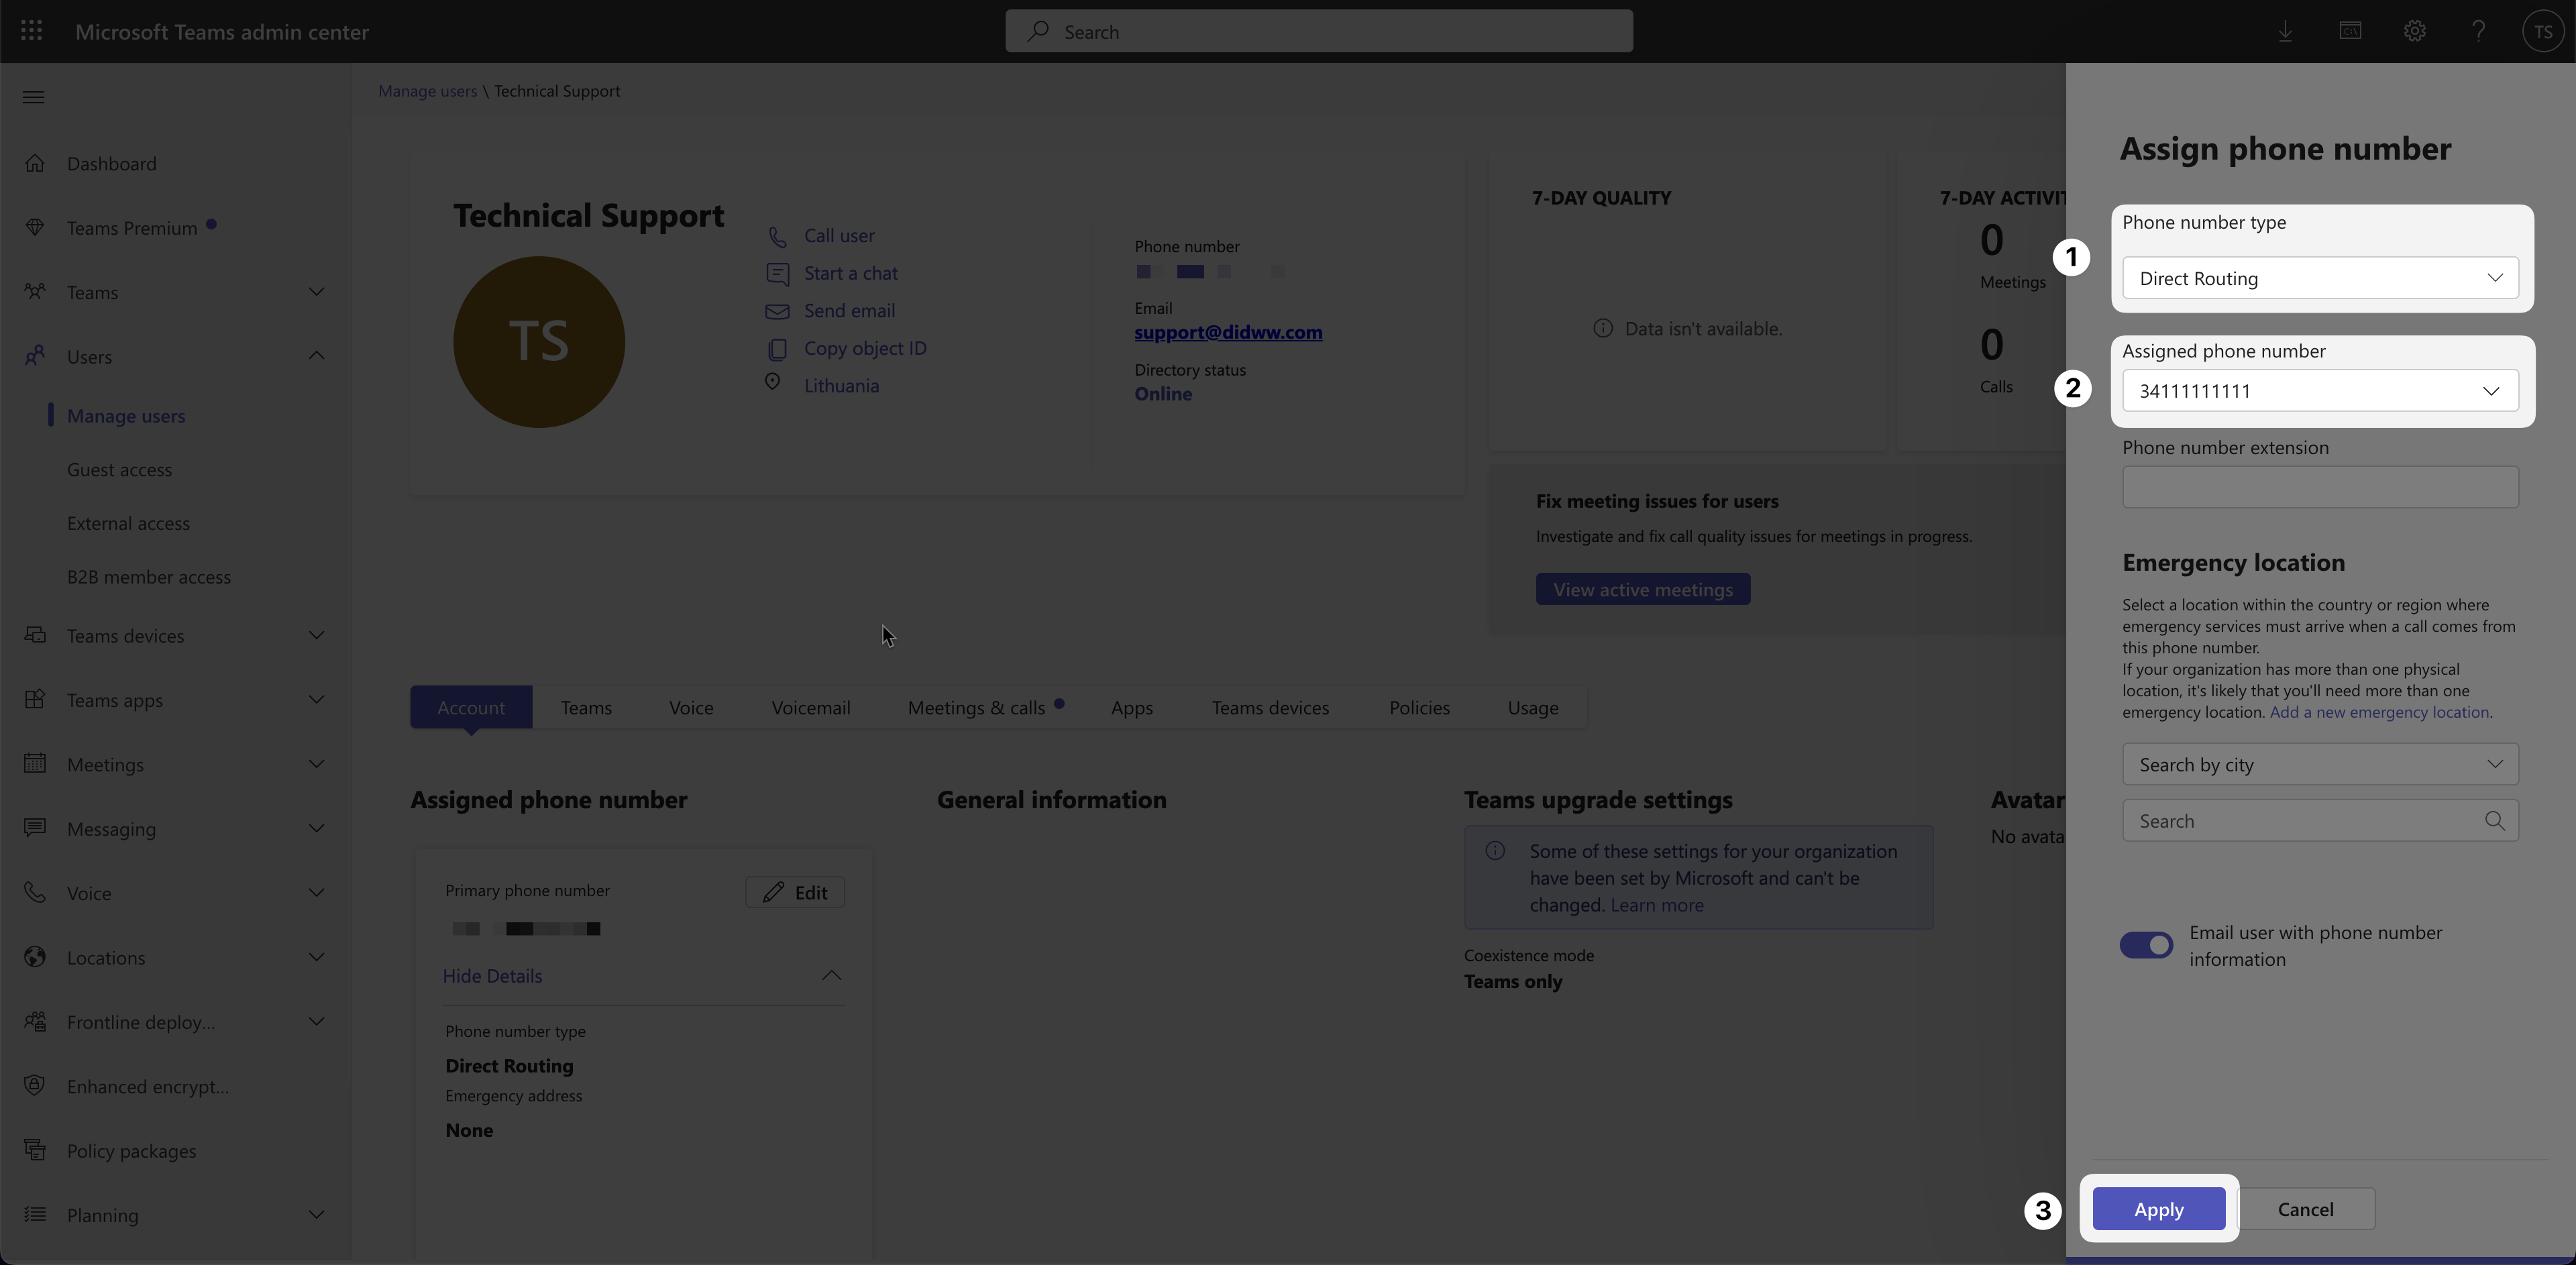
Fig. 20. Assigning the DIDWW number#
PowerShell alternative:#
To assign the DIDWW number using PowerShell, use the following command:
Set-CsPhoneNumberAssignment -Identity didww@0232-40e6-a468-38a329debdd7.teams.didww.com -PhoneNumber +99999999999 -PhoneNumberType DirectRouting
Verify call functionality#
Use the Microsoft Teams client to:
Place an outbound call using the assigned DIDWW number.
Receive an inbound call to confirm routing is functioning correctly.
Note
For additional help, contact the DIDWW Support Team at support@didww.com .
Additional Information#
Learn about outbound dialing, number format, local routes, and short numbers.