Flow Builder Actions and Rules
In automation flows, Actions and Rules are the foundational elements used to build the flow logic. They determine what happens when a selected trigger is activated, enabling precise control over the flow’s execution.
These actions and rules provide the ability to automate communication, manage contact data, integrate with external systems, and apply conditional logic. Each component performs a specific task to support dynamic and responsive automation flows.
The flow builder components are organized into the following categories. Select a category below to learn more about each one:
Send automated messages via Email, WhatsApp, and SMS using templates.
Add, remove, update, or delete contact records within a workflow.
 Webhook Actions
Send real-time HTTP requests to external systems for integration.
Add delays or conditional logic to control workflow execution.
Messaging Actions
Messaging actions are organized by channel type: Email, WhatsApp, and SMS. Each action is designed to help you automate communication with contacts using a specific messaging platform.
Select a channel type below to learn how to configure the messaging action, review its prerequisites, and understand when it is recommended to use each component.
 Send Email
Send an email to a contact using a predefined template.
 Send WhatsApp
Send a WhatsApp message using the WhatsApp Business API.
 Send SMS
Send an SMS to a contact using a predefined template.
Send Email
The Send Email action lets you send predefined email templates to contacts automatically within an automation flow. It is ideal for sending notifications, confirmations, or marketing messages.
Before You Start
Ensure the following requirements are met before using the Send Email action:
Sufficient Messaging Platform Email Credits – Emails can only be sent if there are available credits.
Verified Email Domain – Ensure the selected domain is verified. For details, see the email domain verification documentation.
Configured Email Template – You need to create and select an email template. For help, see the email templates documentation.
Configure Send Email Component
When you add the Send Email component to the flow, a configuration panel appears on the left side of the Flow Builder. You must complete the following fields to enable email delivery:
Email Template – Select a predefined template that defines the structure and content of your email.
Domain – Choose a verified domain that will be used to send the email.
Sender – Specify the email address that will appear as the sender.
Reply-to Address (Optional) – Enter the address where replies should be directed. If left blank, replies will be sent to the sender’s email.

Fig. 1. Configure the Send Email component in the automation flow.
When to Use the Send Email Component
The Send Email action is ideal for automating communication within your automation flows. Common real-time use cases:
Sending welcome emails to new subscribers or customers.
Notifying contacts about order confirmations or shipping updates.
Delivering reminders, follow-ups, or re-engagement messages.
Each email sent through this action must use a predefined Email Template and be sent from a verified domain.
Send WhatsApp
The Send WhatsApp action enables you to send predefined WhatsApp messages to contacts automatically within an automation flow. This is ideal for sending order updates, appointment reminders, or promotional content.
Before You Start
Ensure the following requirements are met before using the Send WhatsApp action:
Sufficient Account Balance – Your DIDWW account must have enough balance to send WhatsApp messages.
Configured WhatsApp Source Number – The sender number must be connected to a valid WhatsApp Business API account. See WhatsApp Integration for details.
Approved WhatsApp Template – Only WhatsApp-approved templates can be selected to create Send WhatsApp component.
Configure Send WhatsApp Component
When you add the Send WhatsApp component to the flow, a configuration panel appears on the left side of the Flow Builder. Complete the following fields:
WhatsApp Template – Select a pre-approved template that defines the message content.
Source – Choose the WhatsApp-enabled number from which the message will be sent.
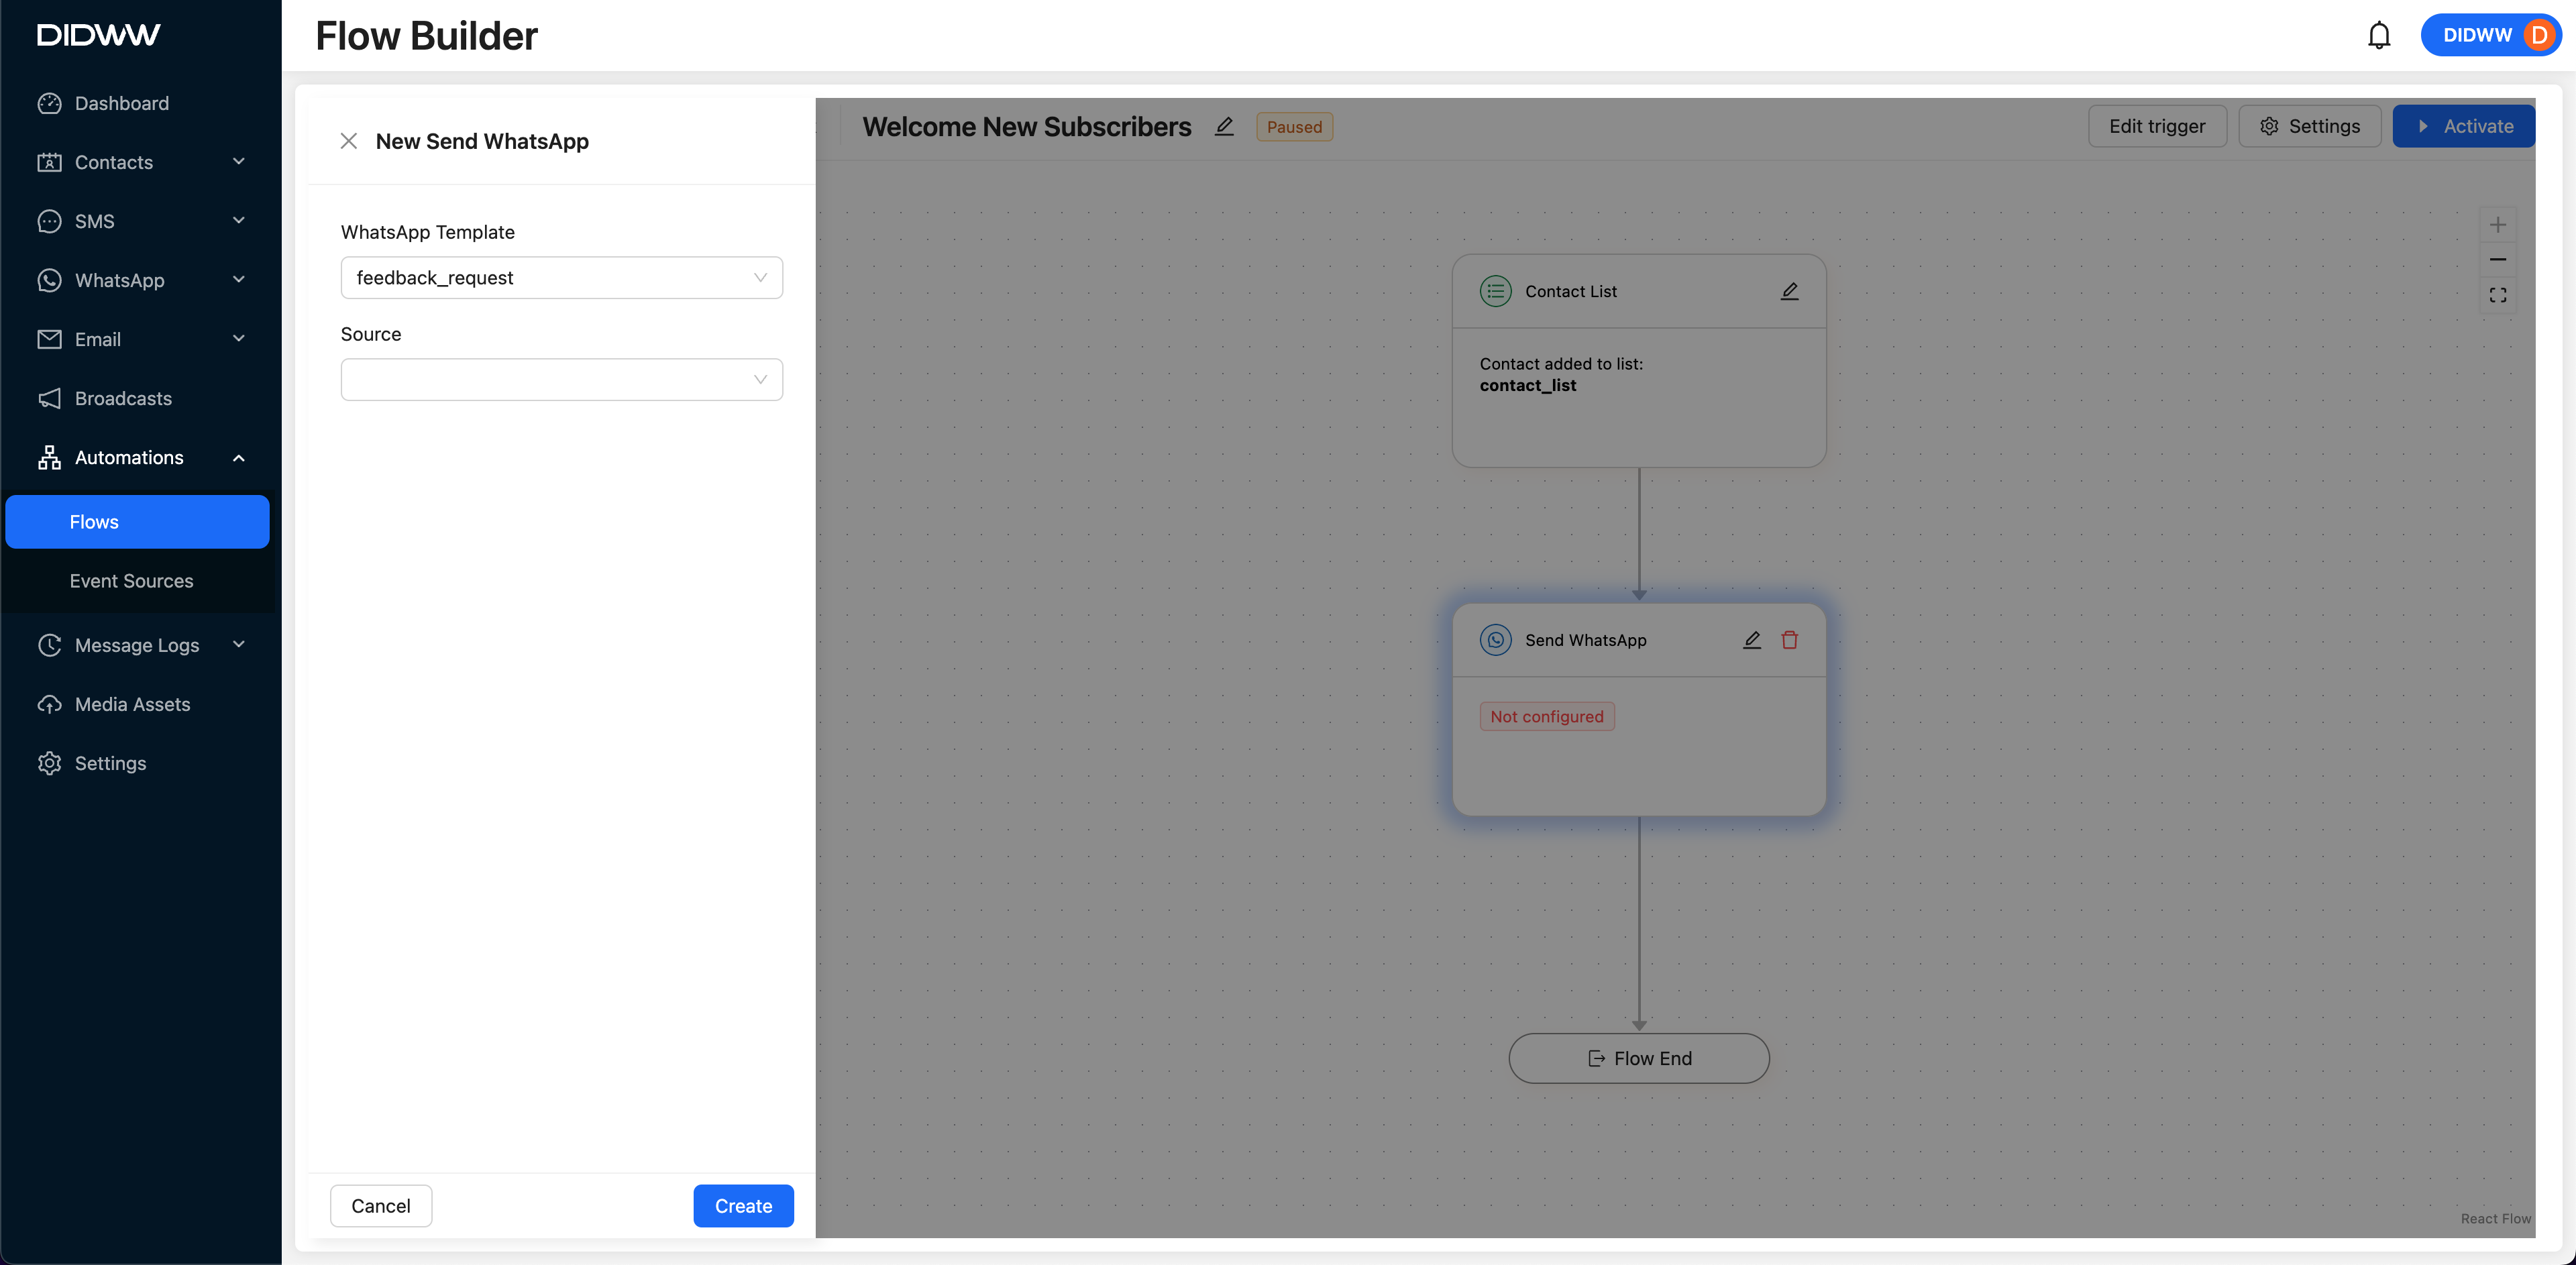
Fig. 2. Configure the Send WhatsApp component in the automation flow.
When to Use the Send WhatsApp Component
Use the Send WhatsApp action to automate communication within your flows. Typical use cases include:
Sending order confirmations or delivery updates.
Reminding contacts of appointments or time-sensitive events.
Engaging users with personalized promotions or alerts.
All WhatsApp messages must use an approved template and should be sent from a Verified WhatsApp Business Number.
Note
WhatsApp templates in Pending status cannot be edited during execution.
To deliver WhatsApp messages, the user must be subscribed (opted-in) to WhatsApp before any messages are sent.
Send SMS
The Send SMS action allows you to send predefined SMS templates to contacts automatically as part of an automation flow. It’s ideal for sending order confirmations, appointment reminders, or promotional alerts.
Before You Start
Ensure the following requirements are met before using the Send SMS action:
Sufficient Account Balance – Your DIDWW account must have enough balance to send SMS messages.
Registered A2P Campaign – In regions where SMS messaging is regulated, your messages must be associated with a registered A2P campaign. To learn more, see the A2P Campaign documentation.
Predefined SMS Template – Only existing templates can be used for outbound SMS messages. For more details, visit the SMS Template documentation.
Configure Send SMS Component
When you add the Send SMS component to the flow, a configuration panel opens on the left side of the Flow Builder. Complete the following fields:
SMS Template – Select an existing SMS template that defines the message content.
Unsubscribe Footer – Choose whether to include an opt-out option: Disabled, URL, or Reply SMS.
SMS Campaign – Assign the SMS message to a specific A2P campaign.
Source – Select the phone number or sender ID that will be used to send the message.
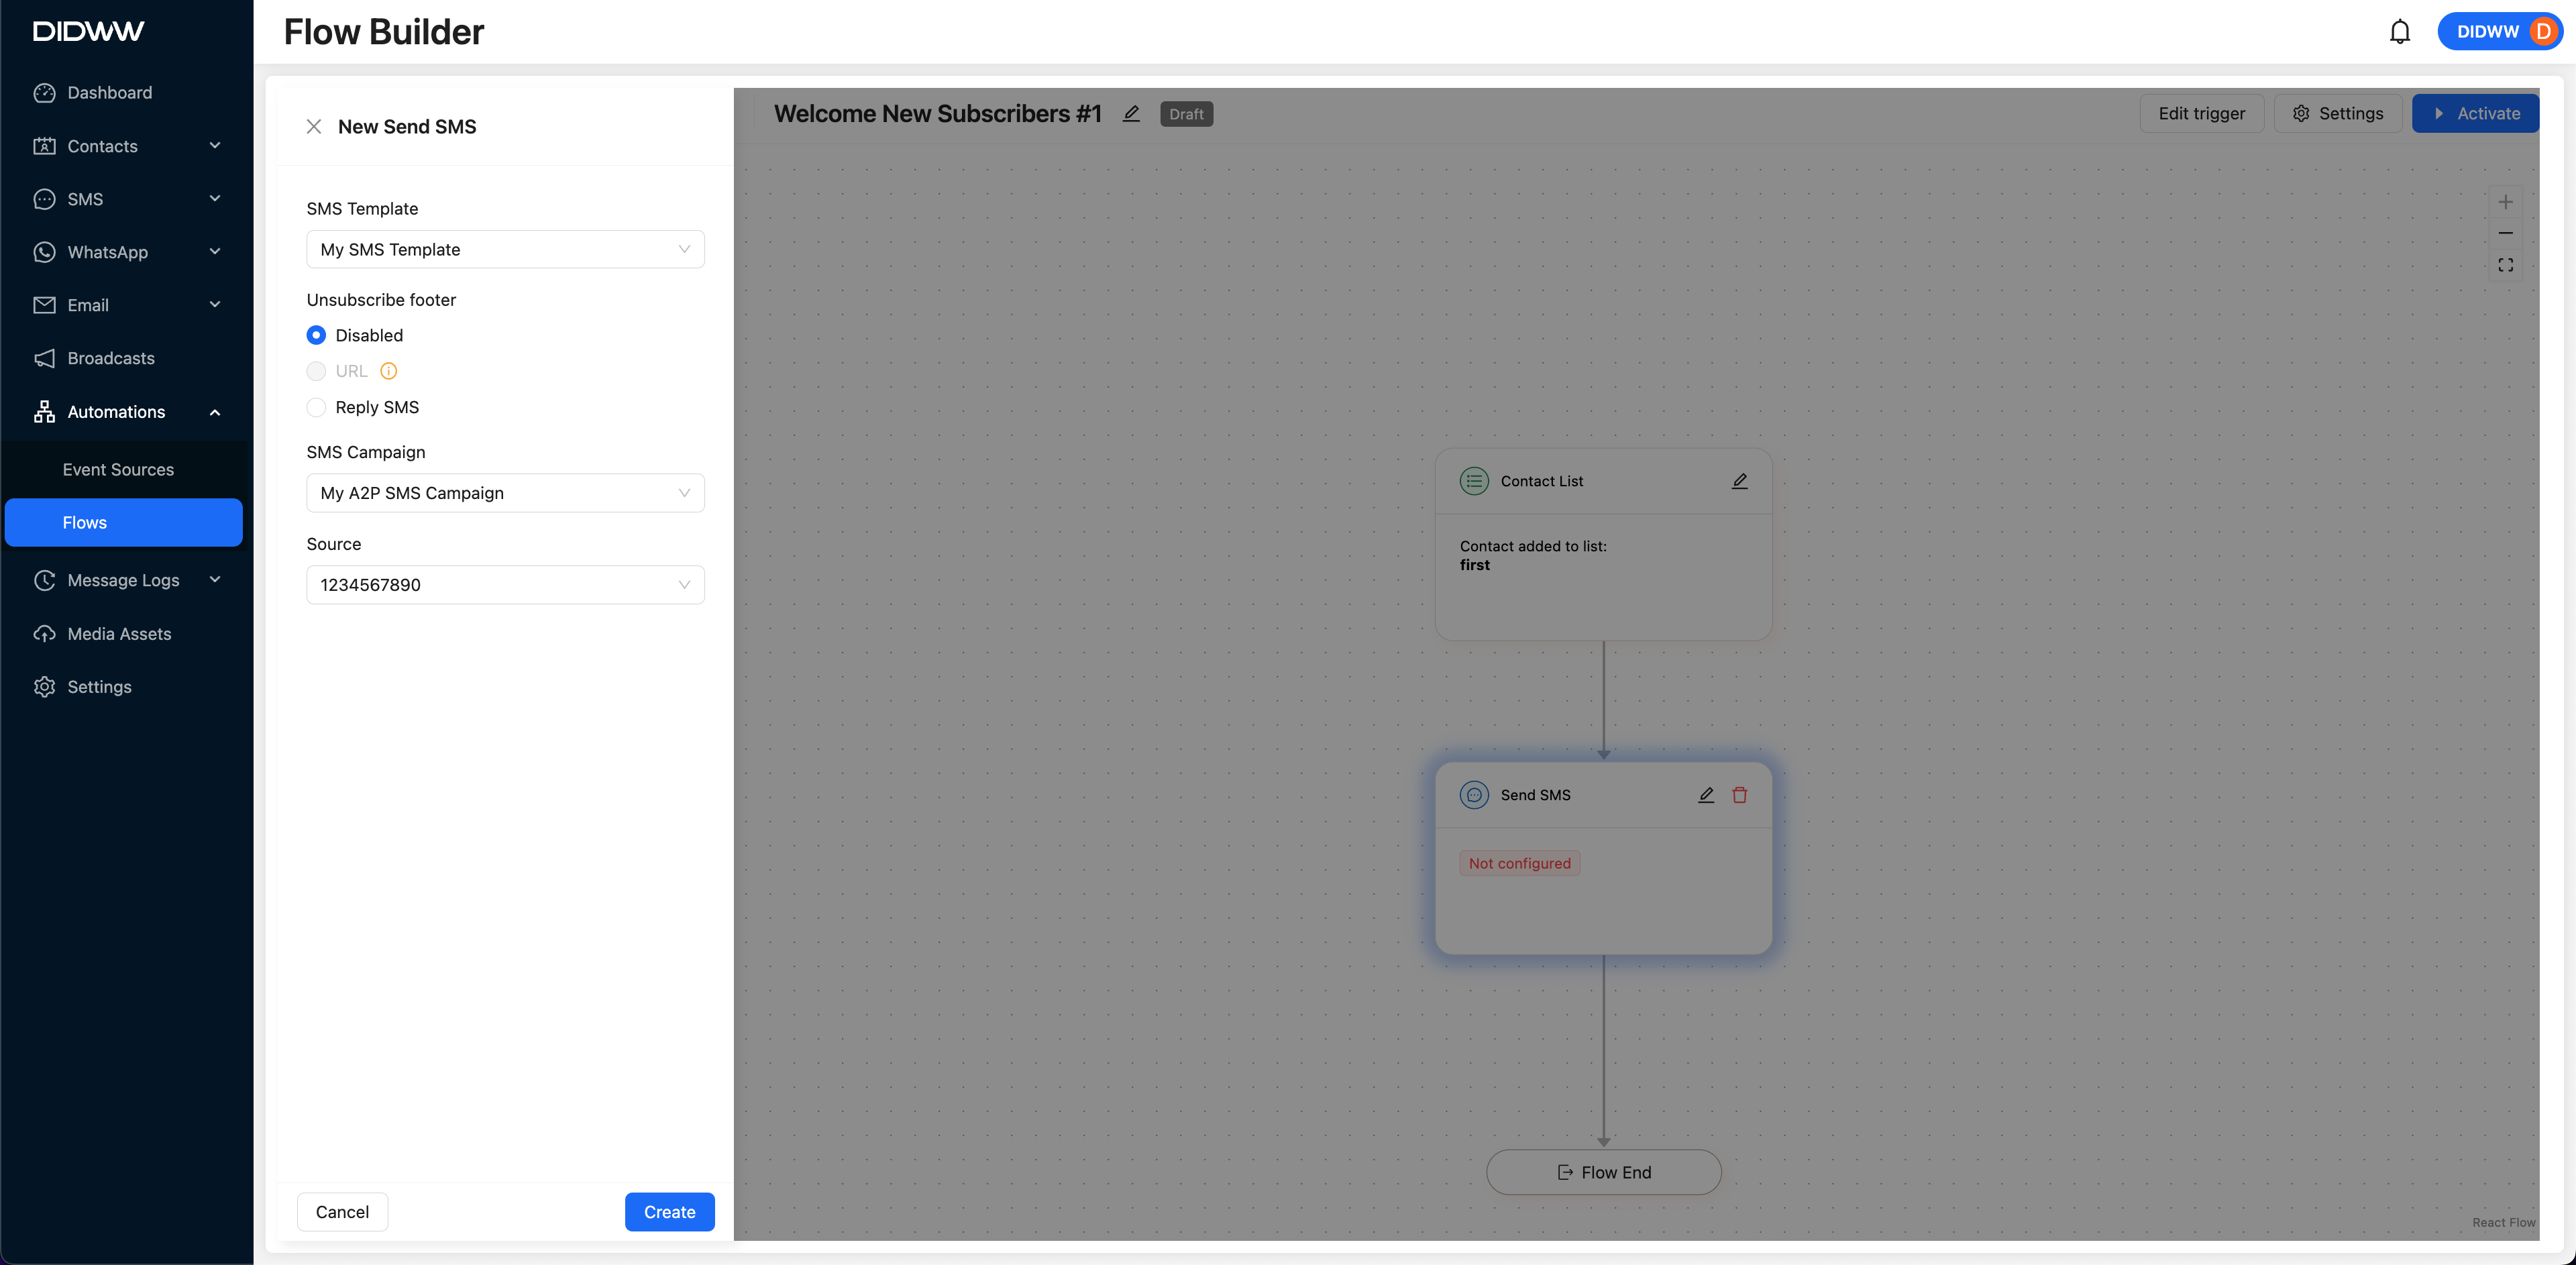
Fig. 3. Configure the Send SMS component in the automation flow.
When to Use the Send SMS Component
The Send SMS action is useful for automating direct text communication with contacts. Common use cases:
Sending welcome messages to new customers.
Notifying users about order or appointment confirmations.
Delivering promotions or time-sensitive alerts.
All SMS messages must use a predefined SMS Template and comply with A2P messaging regulations and opt-out requirements.
Note
If the Unsubscribe Footer is enabled, recipients will see an opt-out option in the message.
Carrier filtering may apply based on the content, sender ID, and campaign type.
Contact Actions
Contacts actions are used to manage contact data within automation flows. These actions allow you to update contact attributes, modify list memberships, or permanently delete a contact from your database.
Select an action below to learn how to configure it, review its prerequisites, and understand when it is appropriate to use each component.
 Remove from List
Remove a contact from a specific list in real time.
 Add to List
Add a contact to a selected list dynamically.
 Update Contact
Update one or more contact attributes using defined templates or values.
 Delete Contact
Permanently remove a contact from the database.
Remove from List
The Remove from List action lets you automatically remove a contact from a specified list as part of an automation flow. It’s commonly used for unsubscribing users, managing segmentation, or excluding contacts from further communications.
Before You Start
Ensure the following requirements are met before using the Remove from List action:
Existing Contact List – The list from which the contact will be removed must already exist in the system. For more information, see the Contact Lists documentation.
Correct List Selection – Verify that the appropriate list is selected to prevent accidental removal from unrelated lists.
Configure Remove from List Component
When you add the Remove from List component to the flow, a configuration panel opens on the left where you must select the list from which the contact will be removed.

Fig. 4. Configure the Remove from List component in the automation flow.
When to Use the Remove from List Component
Use the Remove from List action to manage contact participation in different lists. Typical use cases:
Unsubscribing contacts from marketing or newsletter lists.
Excluding users from a specific campaign or sequence.
Dynamically cleaning up inactive or bounced contacts.
This ensures that contacts are no longer part of the selected list and won’t receive messages associated with it.
Note
This action only removes the contact from the selected list, it does not delete the contact from your system.
If a contact is removed from all lists, they may no longer receive any communications from active workflows.
Add to List
The Add to List action allows you to automatically add a contact to a specified list during an automation flow. This is commonly used to subscribe users to communications, segment contacts based on behavior, or enroll them into targeted campaigns.
Before You Start
Ensure the following requirements are met before using the Add to List action:
Existing Contact List – The list you want to add the contact to must already exist in your account. For more information, see the Contact Lists documentation.
Accurate List Selection – Make sure the correct list is chosen to avoid adding contacts to unintended lists.
Configure Add to List Component
When you add the Add to List component to the flow, a configuration panel opens on the left where you must select the list to which the contact will be added.

Fig. 5. Configure the Add to List component in the automation flow.
When to Use the Add to List Component
Use the Add to List action to include contacts in communication segments or automated campaigns. Common use cases:
Subscribing users to newsletters or promotional campaigns.
Segmenting contacts based on specific triggers or actions.
Assigning new leads to relevant workflows or audience groups.
This ensures that contacts are added to the correct list and receive communications associated with that list.
Note
This action only adds contacts to an existing list, it does not create a new list.
If a contact is added to multiple lists, they will receive messages from all associated automation flows.
Update Contact
The Update Contact action allows you to modify a contact’s attributes as part of an automation flow. This is helpful for updating profile information, managing preferences, or keeping records current based on automation flow logic.
Before You Start
Ensure the following requirements are met before using the Update Contact action:
Existing Contact Record – The contact must already exist in your system to apply updates. See more in the Contacts documentation.
Defined Attribute Templates – Select the attribute(s) you want to update from the available templates. Learn more in the Contact Attributes documentation.
Configure Update Contact Component
When you add the Update Contact component to the flow, a configuration panel opens on the left. Fill in the required fields to define how the contact’s attribute will be updated:
Attribute Template – Select the attribute you want to update.
Value Type – Choose between Static (a fixed value) or Dynamic (based on data from the flow).
New Value – Define the value that will be assigned to the attribute.
Empty Attribute Handling – Choose to either Clear existing values or Keep existing values if no new value is provided.
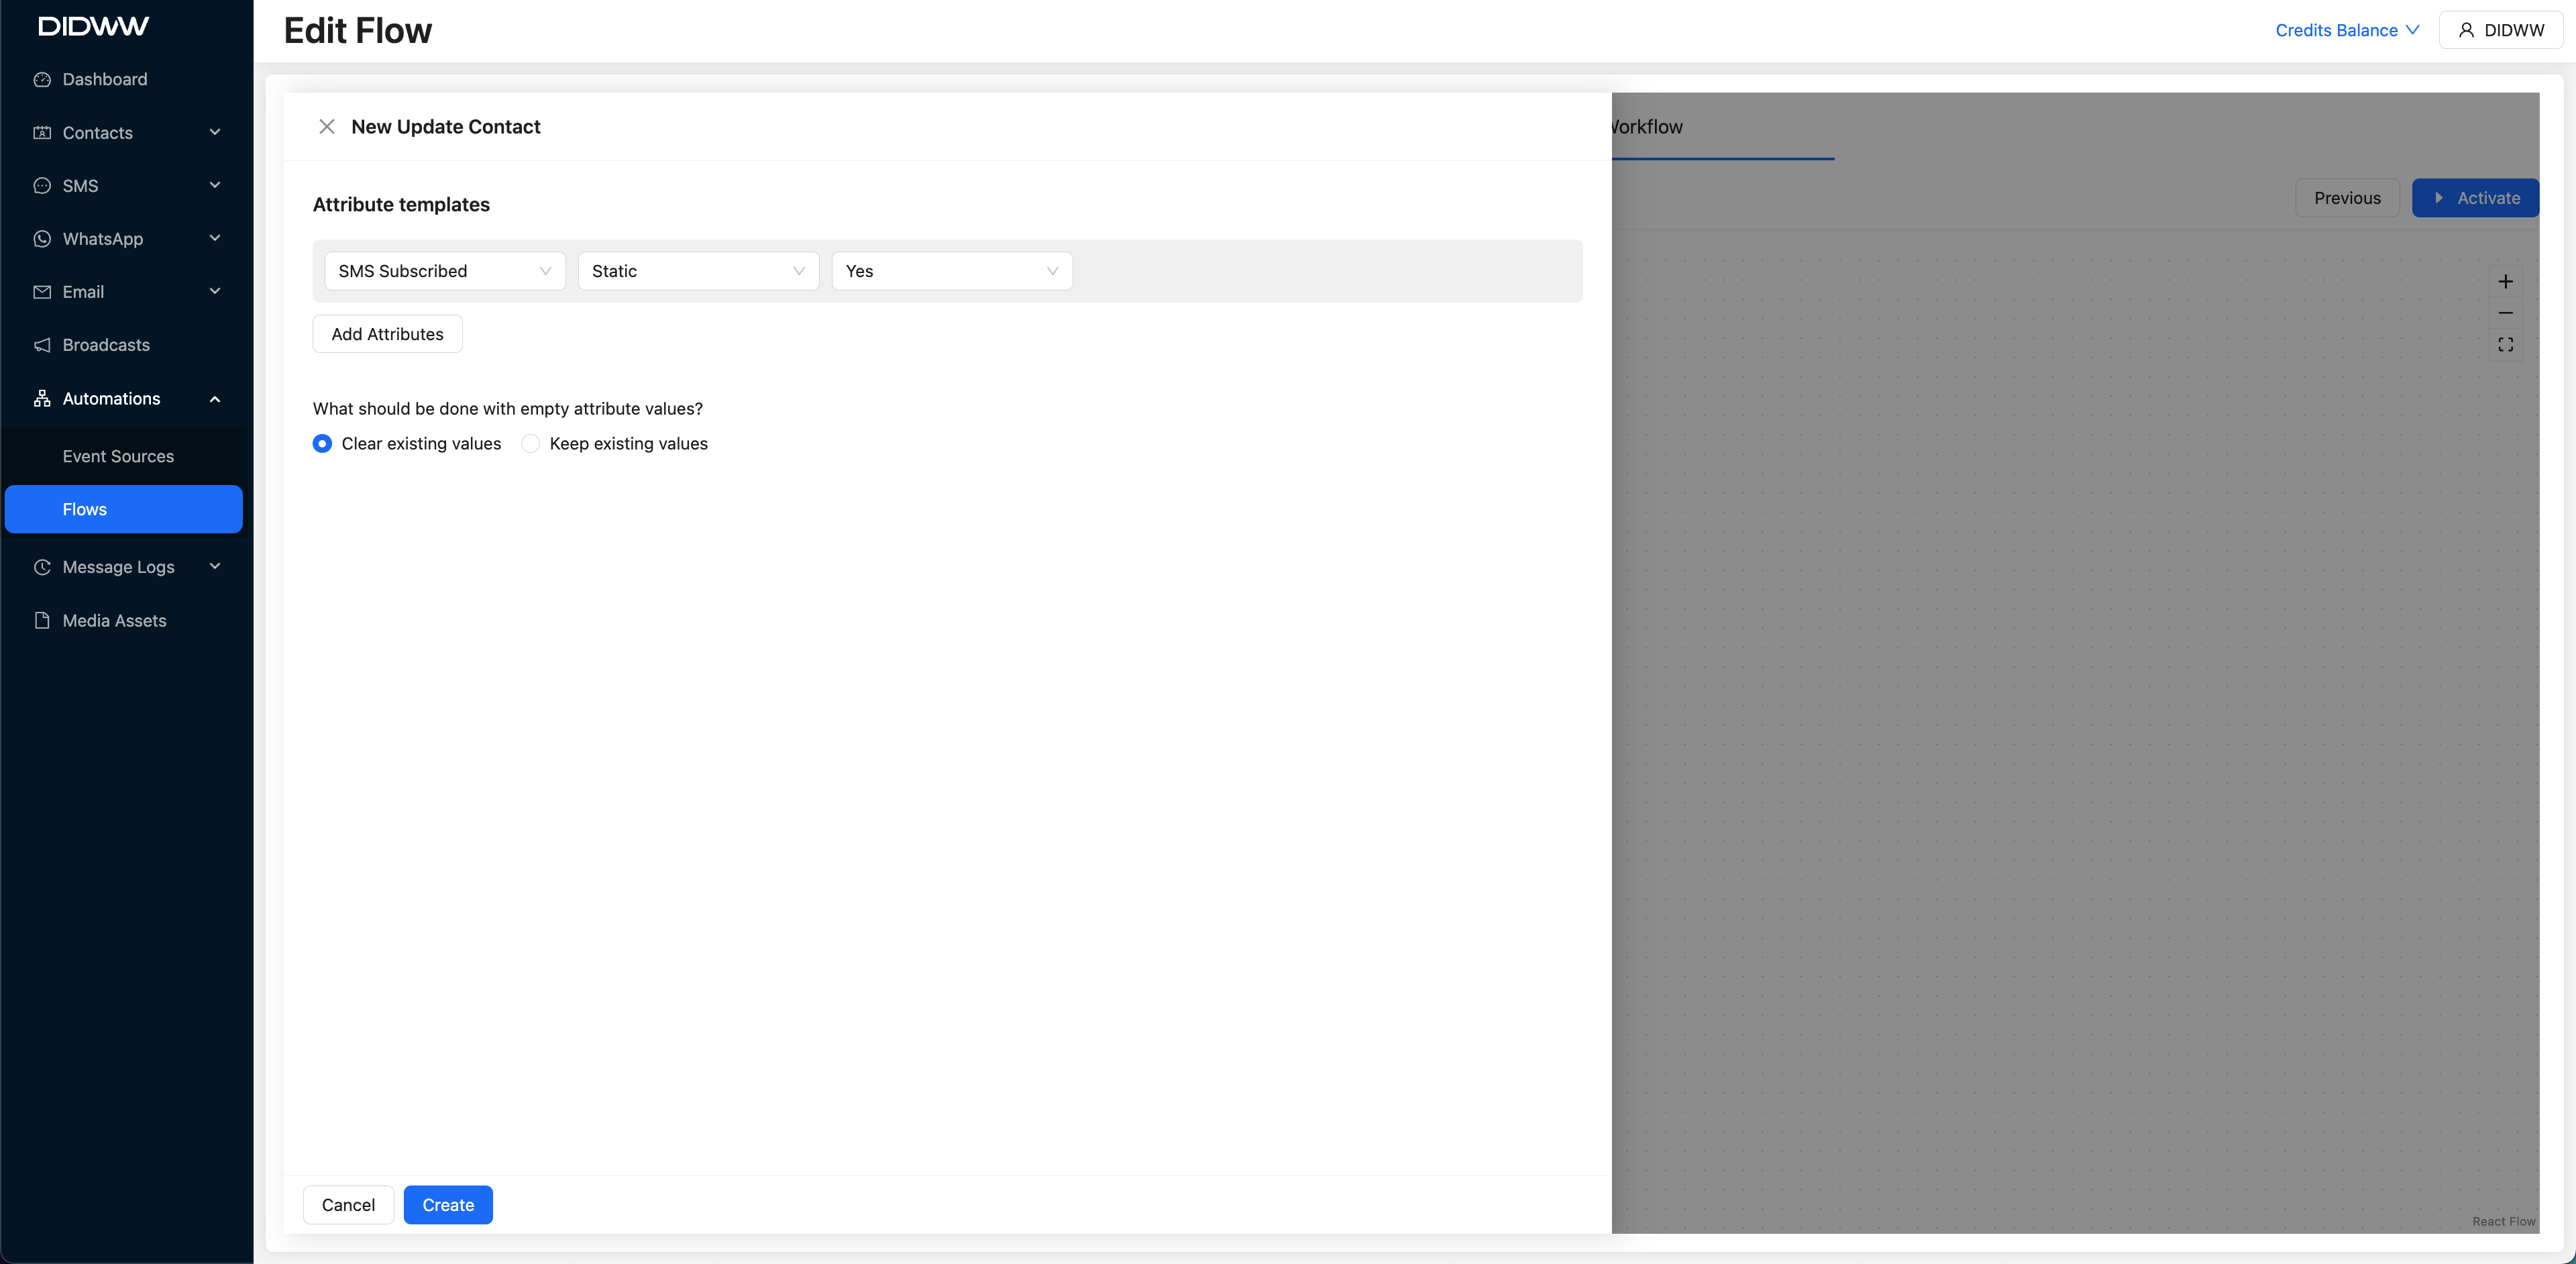
Fig. 6. Configure the Update Contact component in the automation flow.
When to Use the Update Contact Component
Use the Update Contact action to manage and personalize contact data within a flow. Common scenarios:
Changing a contact’s subscription preferences (e.g., opting into SMS or email).
Updating personal information like name, region, or preferences.
Tracking engagement by setting custom tags or flags.
This ensures that your contact database remains accurate and aligned with user behavior and preferences.
Note
Selecting Clear existing values will remove current data if no new value is provided.
Selecting Keep existing values will preserve the current attribute if no new data is available.
Delete Contact
The Delete Contact action permanently removes a contact and all associated data from your system. It is typically used for data hygiene, regulatory compliance, or managing unsubscribed and inactive users.
Before You Start
To use the Delete Contact action, ensure the contact exists in your system. For details, see the Contacts documentation.
Configure Delete Contact Component
When you add the Delete Contact component to the flow, a configuration panel appears on the left. You will see a message indicating that the contact will be permanently deleted upon entering this step. This action is irreversible.
To proceed click Create to confirm the deletion configuration.
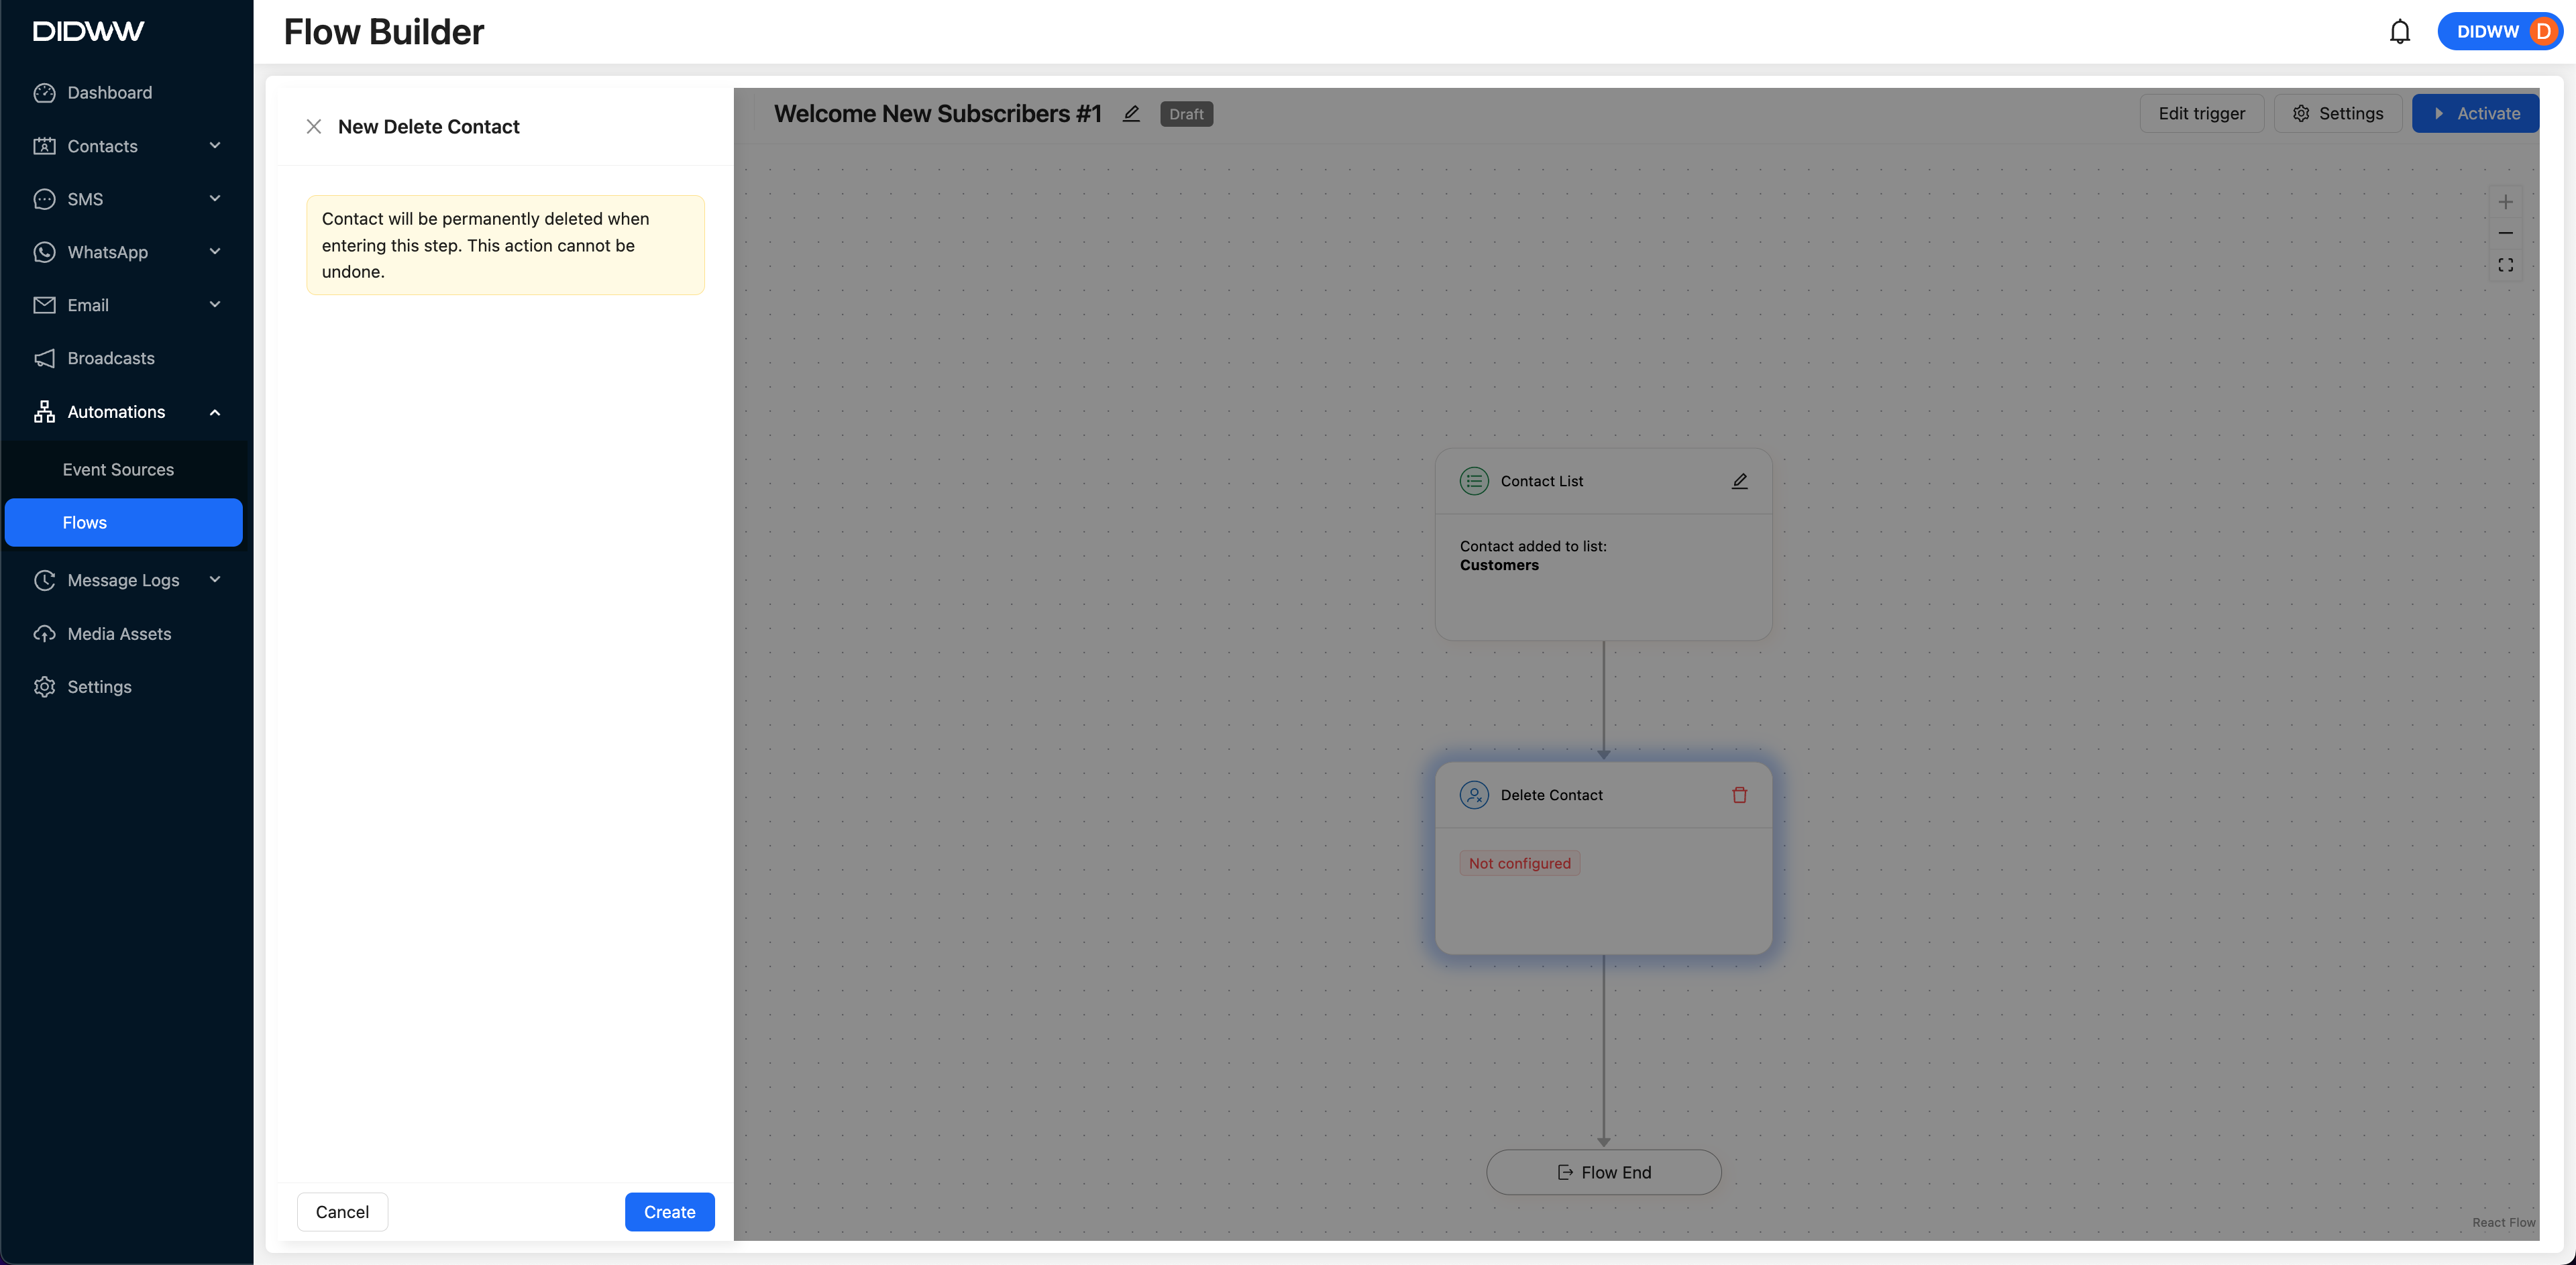
Fig. 7. Configure the Delete Contact component in the automation flow.
When to Use the Delete Contact Component
Use the Delete Contact action for permanent removal of contacts in situations like:
Deleting users who have opted out or withdrawn consent.
Removing inactive, bounced, or duplicate contacts.
Complying with data protection regulations such as GDPR.
This ensures that the selected contact is fully removed from your system and excluded from all future communications.
Note
This action will remove the contact from all lists and active workflows.
The contact’s data will not be archived and cannot be recovered once deleted.
Webhook Actions
Webhook actions enable workflows to send real-time data to external systems using HTTP requests. These actions are ideal for integrating with third-party services, triggering external processes, or synchronizing data with other platforms.
Select the action below to learn how to configure it, review its prerequisites, and understand when to use it in your automation flow.
WebhookSend an HTTP request to a specified URL with custom payload and headers.
Webhook
The Webhook action allows you to send real-time HTTP requests to an external URL during an automation flow. It is ideal for integrating with third-party systems, updating databases, triggering external workflows, or logging events automatically.
Before You Start
Ensure the following requirements are met before using the Webhook action:
Valid Webhook URL – The endpoint must be accessible and able to receive HTTP requests.
Correct Header Configuration – Know which headers need to be included for your endpoint (e.g., Content-Type: application/json) to ensure the request is accepted.
Structured Request Body – The payload must be formatted properly, typically as JSON, to match the schema expected by the receiving system.
Configure Webhook Component
When you add the Webhook component to the flow, a configuration panel appears on the left side of the Flow Builder. Complete the following fields:
URL – Enter the endpoint where the webhook should send the request.
Headers – Define key-value pairs to be included in the request headers (e.g., authentication or content type).
Body – Provide the request payload. You can include dynamic fields using contact placeholders to personalize the data.
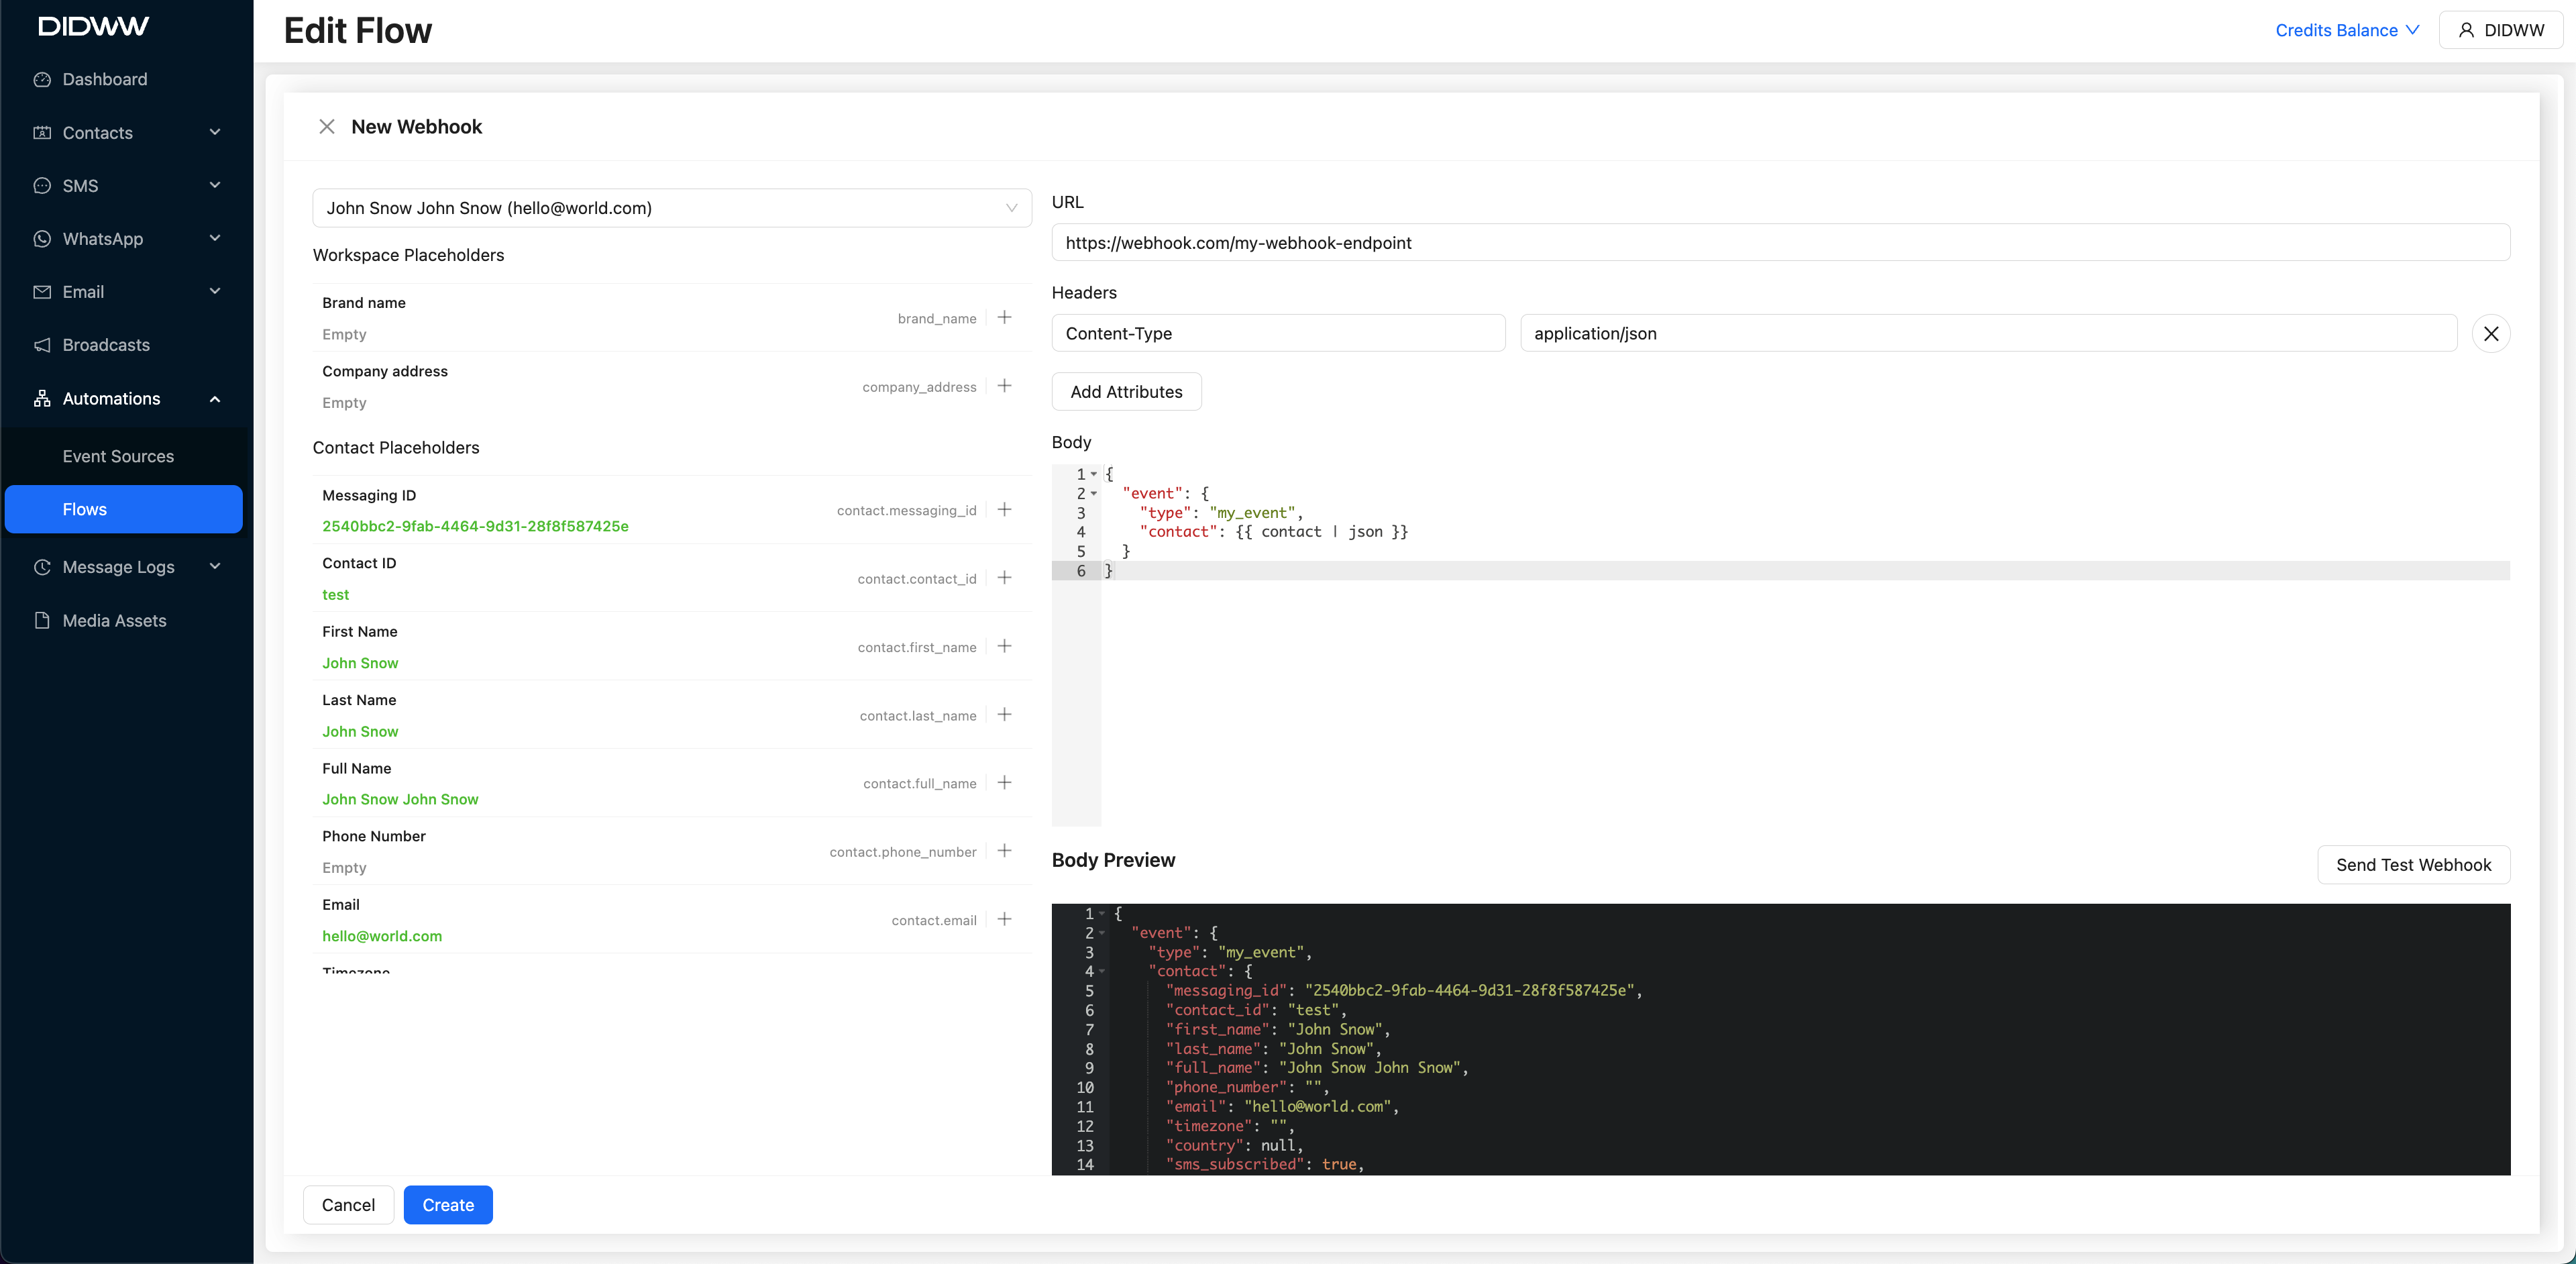
Fig. 8. Configure the Webhook component in the automation flow.
Testing Webhooks
You can test the webhook before saving the configuration:
Complete the URL, Headers, and Body fields.
Click Send Test Webhook.
Confirm the test when prompted.
The platform will send a test request to the URL and display the response.
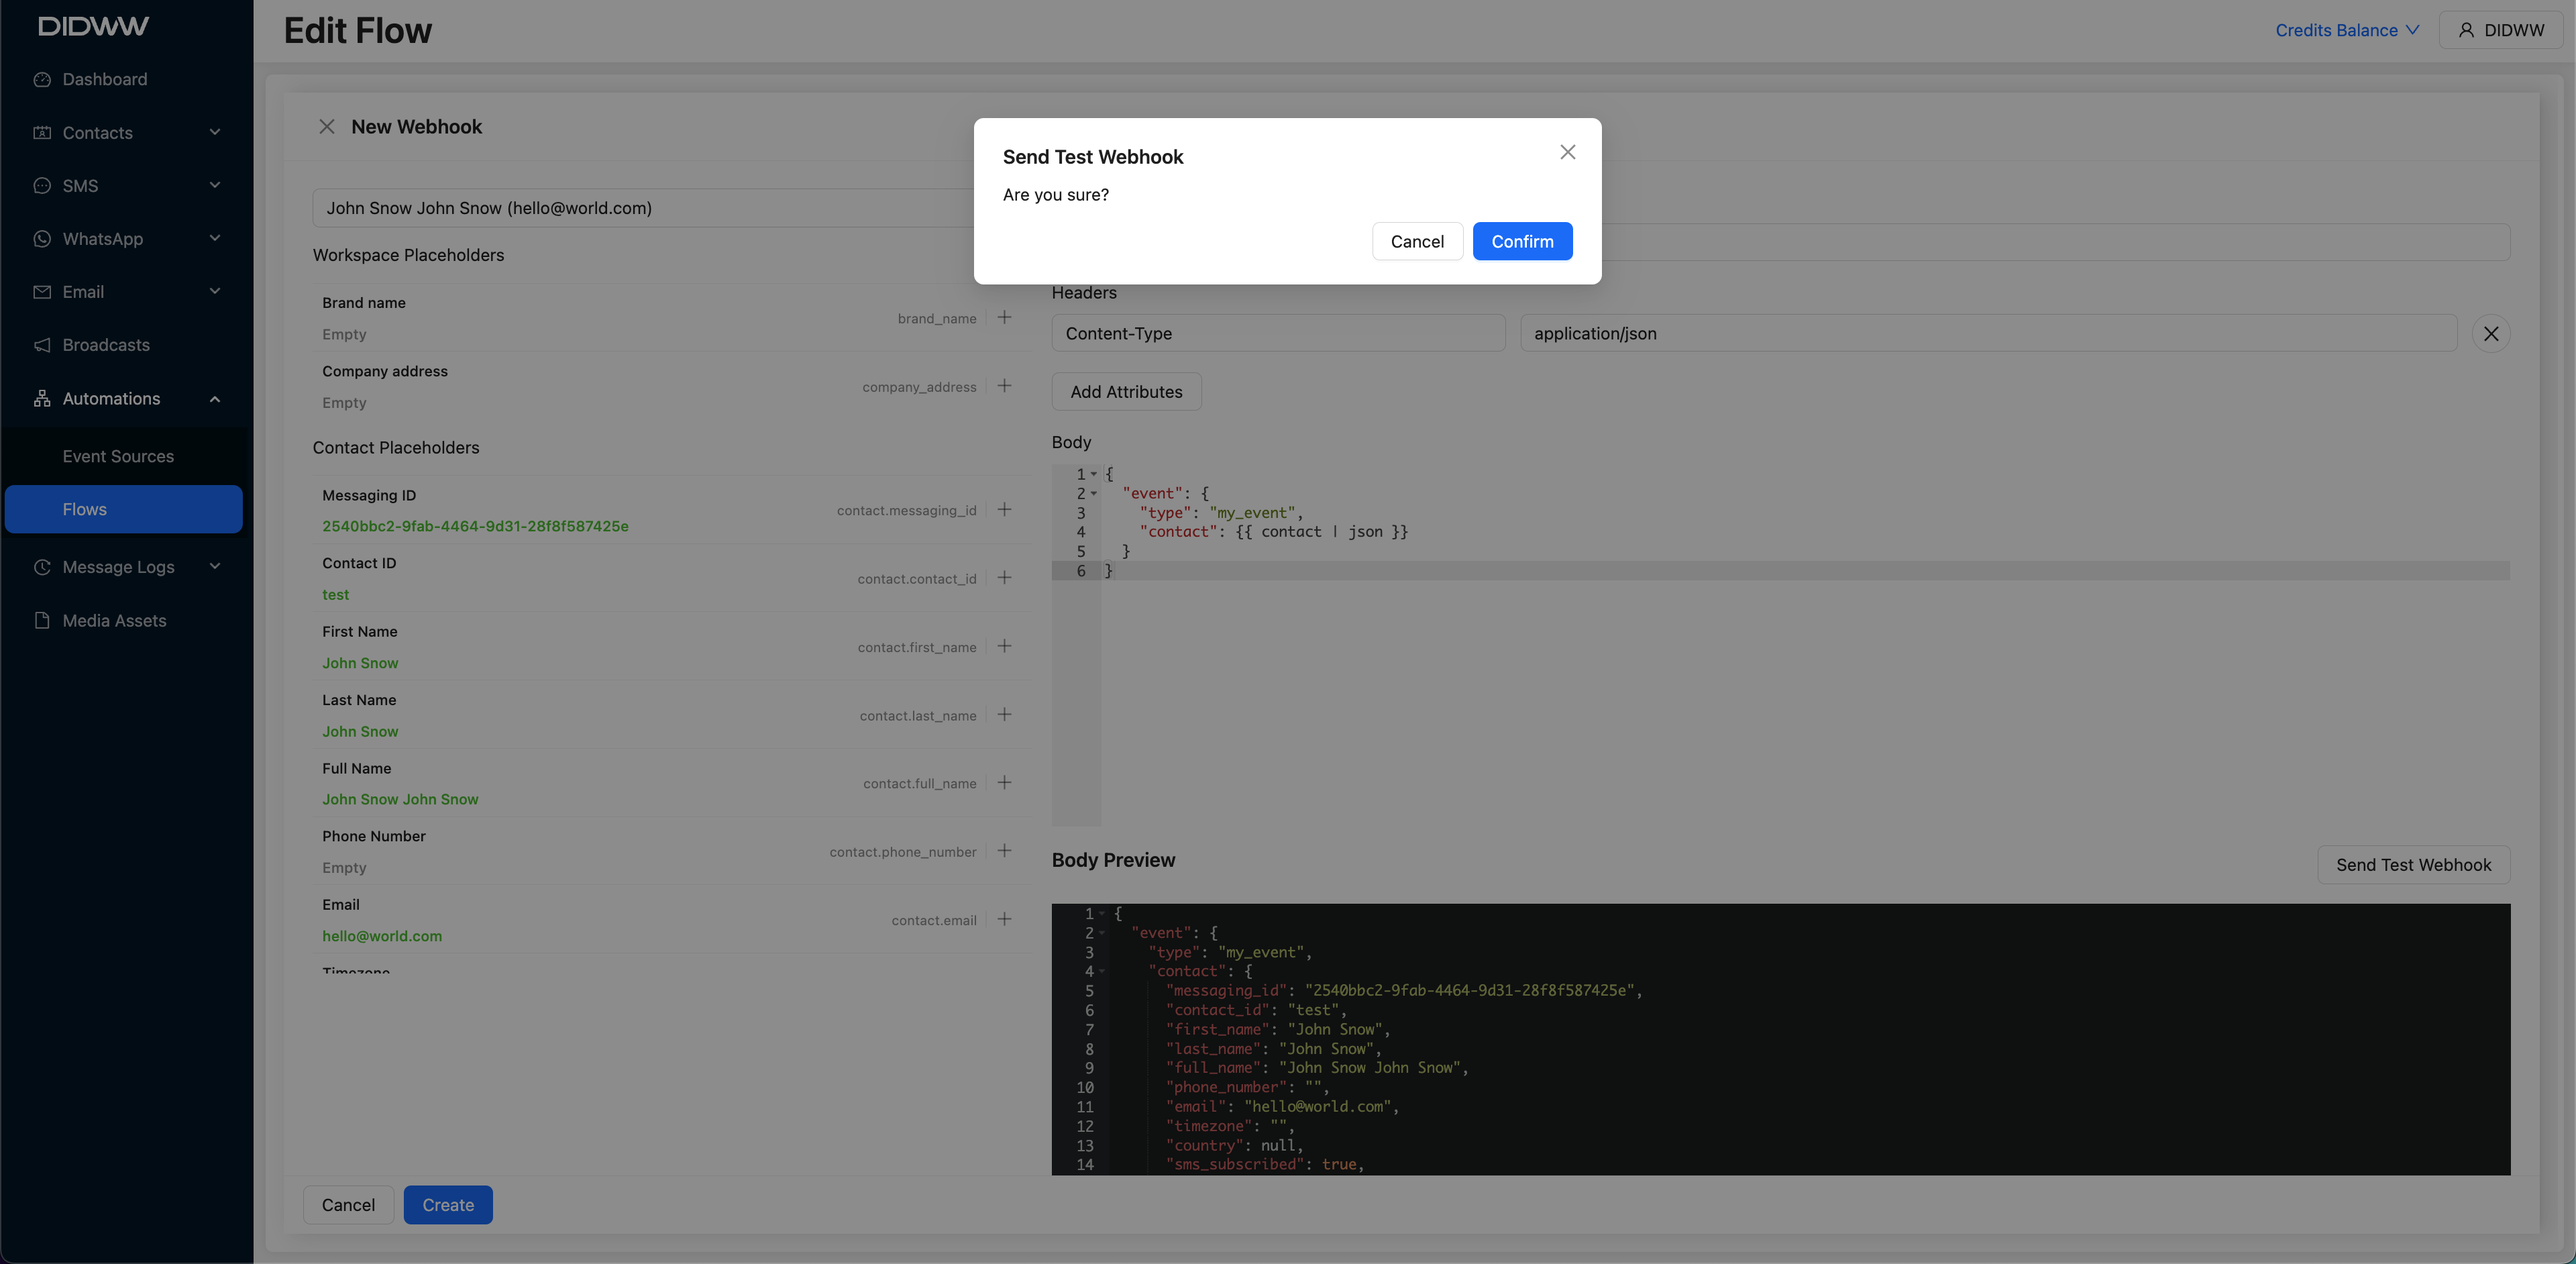
Fig. 9. Webhook test confirmation modal.
Note
Testing ensures the external system responds correctly before the webhook is live.
When to Use the Webhook Component
Use the Webhook action when you need to send real-time data to other systems or trigger external processes. Common use cases:
Pushing data into CRM, analytics, or marketing platforms.
Logging activity to external databases.
Initiating third-party workflows, such as order creation or ticketing.
Webhooks are highly flexible and support dynamic content, custom headers, and secure endpoints.
Note
Webhook payloads can include contact placeholders for personalized data.
The receiving system must be configured to parse and process the request format.
Automation Flow Rules
Automation flow rules allow you to control the timing and direction of your automation flows by adding delays or conditional logic. These components help ensure that each action occurs at the appropriate time and under the right conditions.
Select a rule below to learn how to configure it, review its prerequisites, and understand when to use it in your automation design.
 Time Delay
Pause the automation flow for a defined period before moving to the next step.
 True/False Branch
Split the flow into two paths based on whether a defined condition is True or False.
Time Delay
The Time Delay rule allows you to pause the automation flow for a specific period before continuing to the next step. This is useful for managing timing between actions, such as spacing out message delivery or waiting before checking conditions.
Configure Time Delay Rule
When you add the Time Delay component to the flow, a configuration panel appears on the left. Complete the following fields to define the delay behavior:
Delay – Enter the number of units for the pause duration.
Time Unit – Select the unit of time (e.g., minutes, hours, days) for the delay.
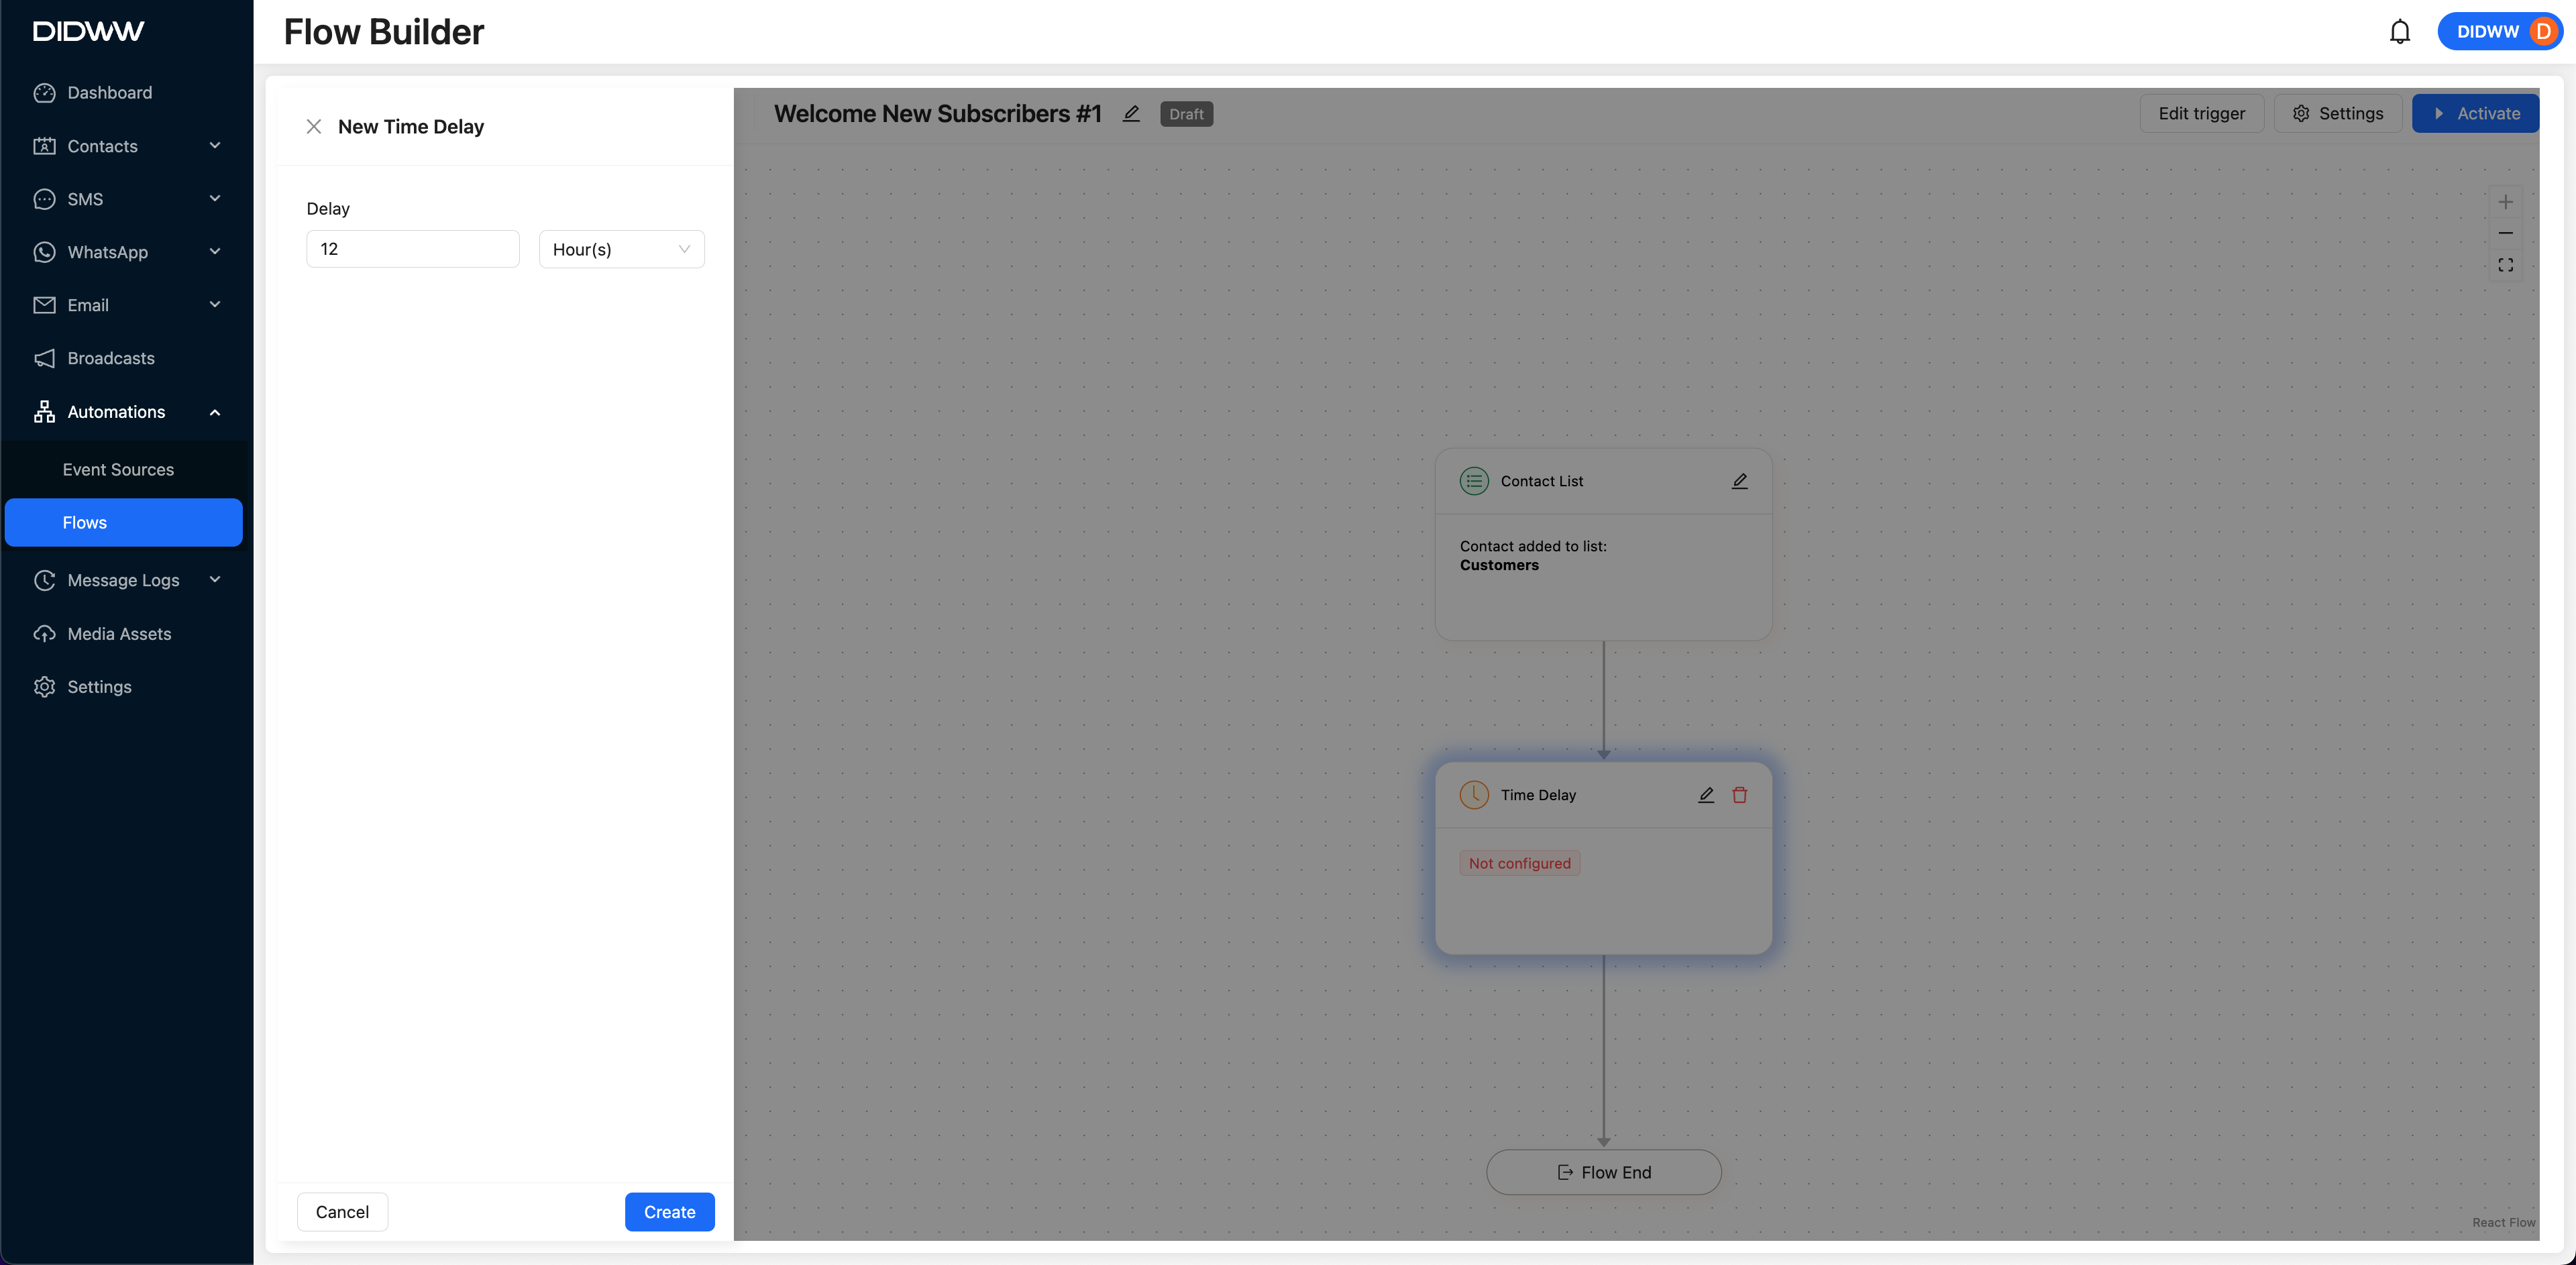
Fig. 10. Configure the Time Delay rule in the automation flow.
When to Use the Time Delay Rule
Use the Time Delay rule to introduce intentional pauses between actions. Common use cases include:
Waiting a few hours before sending a follow-up email.
Pausing between steps to improve pacing and avoid overwhelming contacts.
Delaying the next step until a specific period has passed.
This delay only affects contacts currently passing through the flow and does not impact other workflows or contacts.
Note
The delay timer starts once the contact reaches this step.
Avoid setting excessively long delays unless necessary, as they can slow down automation performance.
True/False Branch
The True/False Branch rule splits the automation flow into two paths based on whether a defined condition is met. It helps you build flexible, logic-driven workflows that adapt to a contact’s data or behavior.
Configure True/False Branch Rule
When you add the True/False Branch component to the flow, a configuration panel opens on the left. Enter the condition that should be evaluated to control which branch the contact follows.
If the condition is True, the contact proceeds down the True path.
If the condition is False, the contact follows the False path.
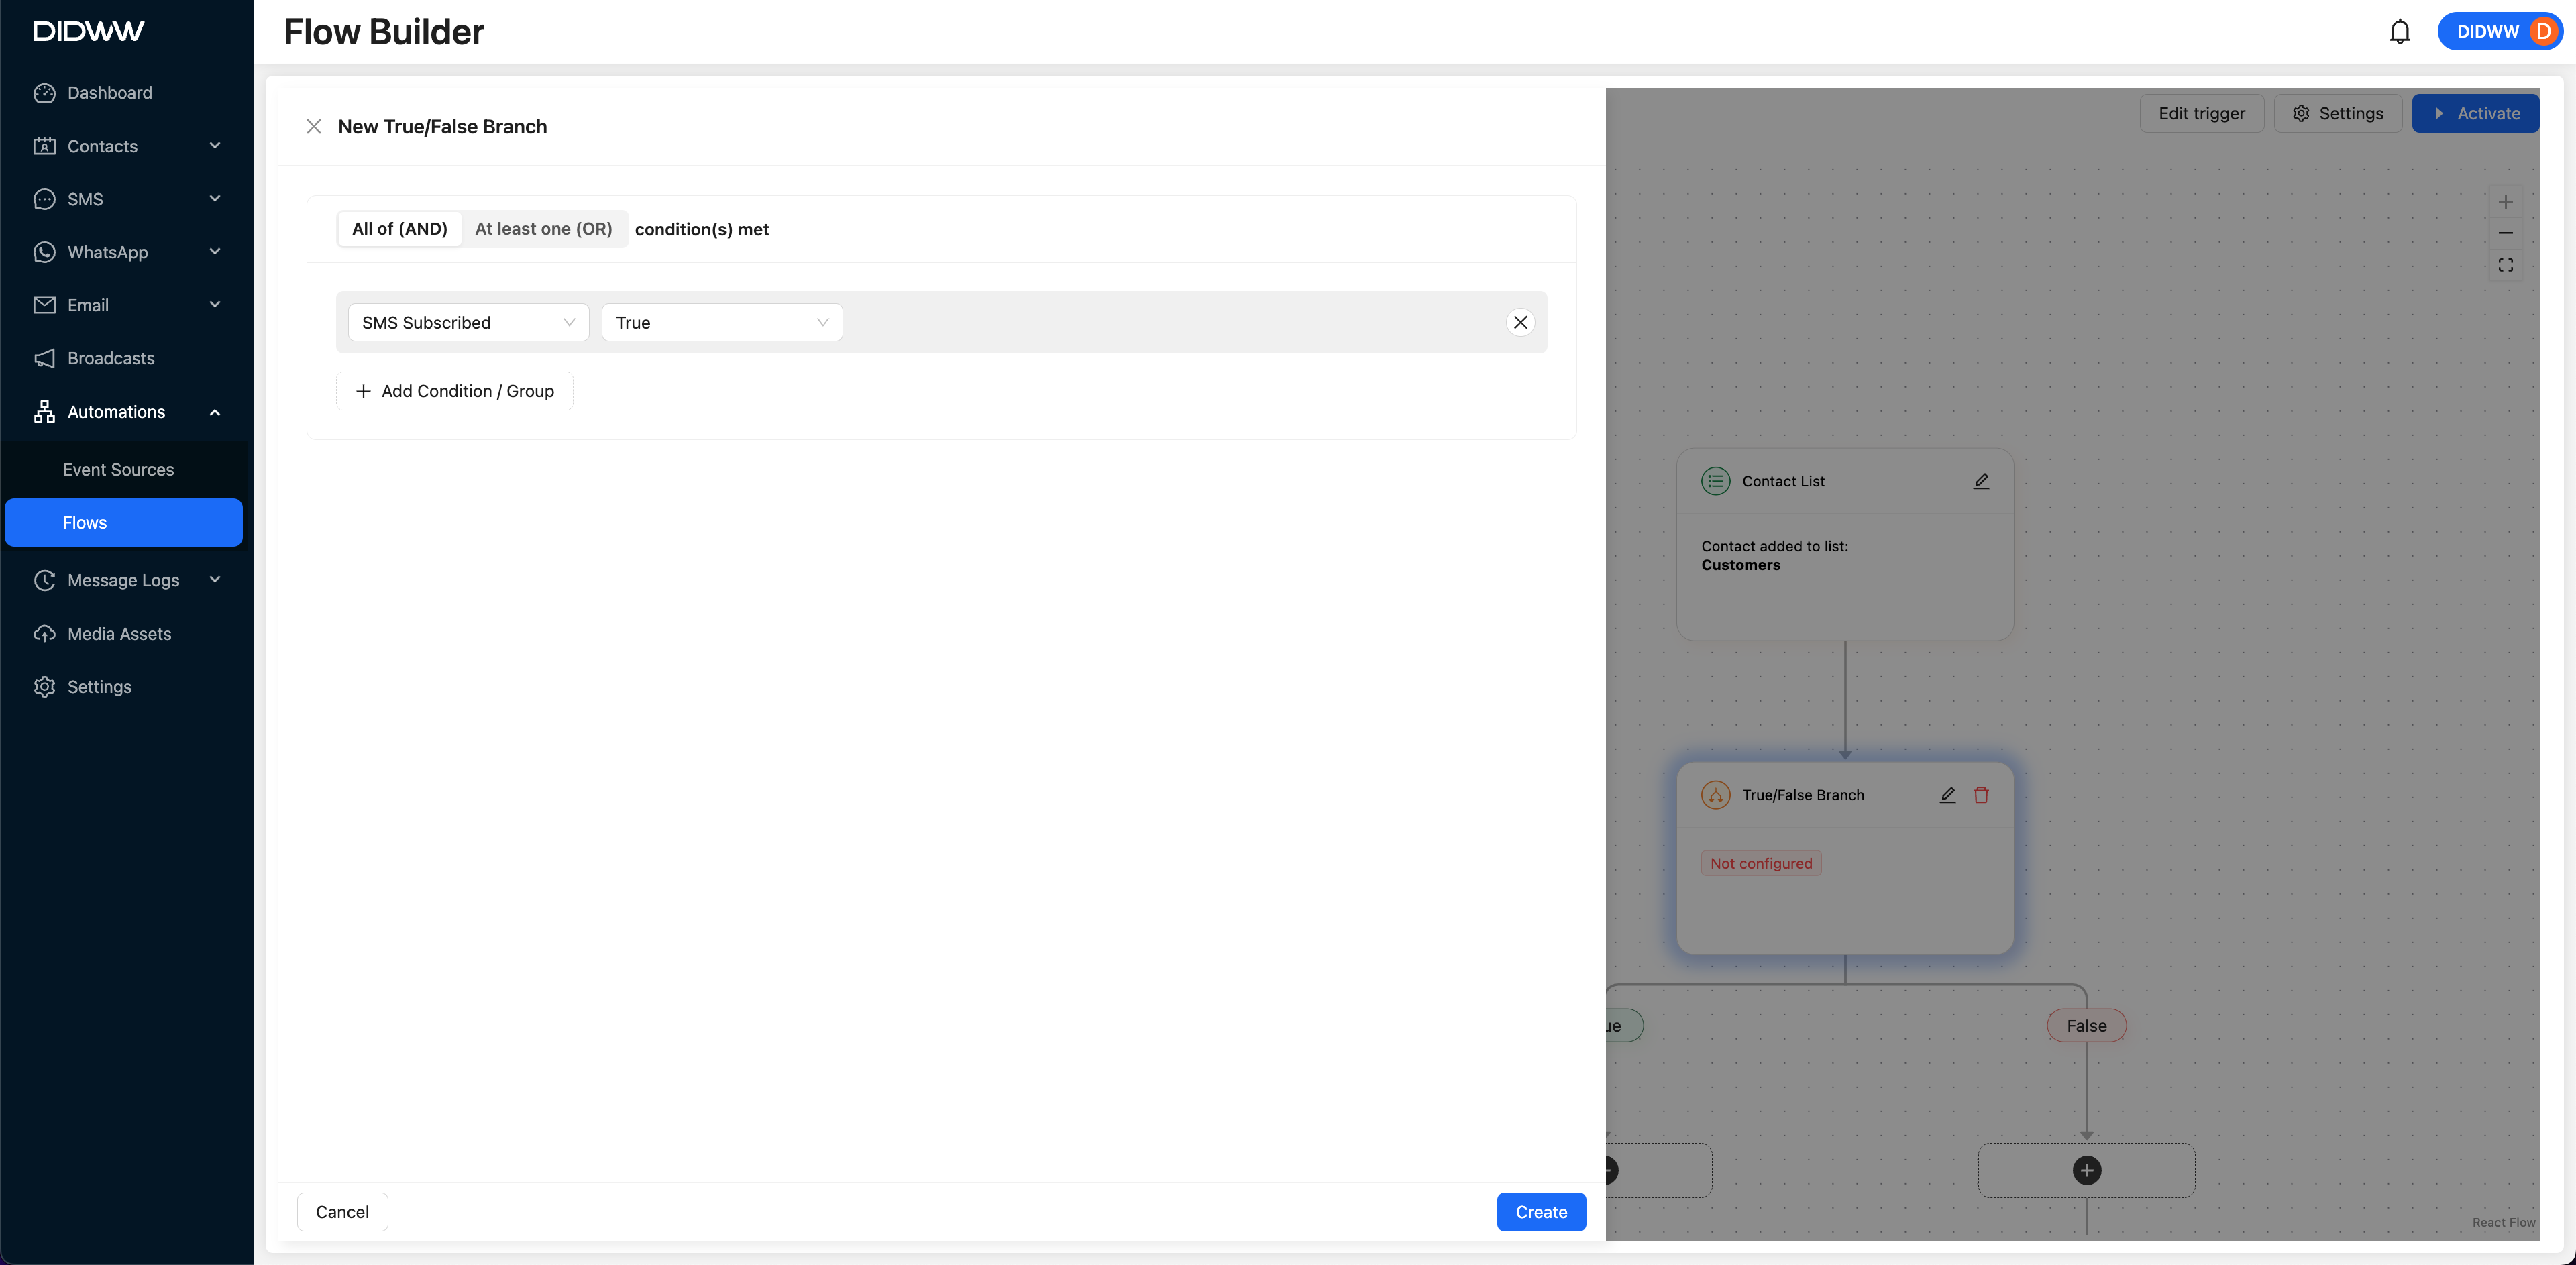
Fig. 11. Configure the True/False Branch rule in the automation flow.
When to Use the True/False Branch Rule
Use this rule to introduce logic-based decision-making into your automation. Common examples include:
Checking if a contact is subscribed to SMS or email before sending messages.
Differentiating workflows based on user preferences or actions.
Routing contacts to different paths based on form inputs or attributes.
This helps create personalized, dynamic flows that respond to contact conditions in real time.
Note
If the condition is not met, the False path is followed by default.
For more advanced logic, combine multiple True/False Branch rules in a sequence.


