Date Attribute Automation Flows
Date Attribute triggered automation flows run based on a specific date or date_time attribute within a contact’s profile. This type of automation is ideal for time-sensitive messaging such as birthdays, subscription renewals, appointment reminders, or anniversaries.
By using date attributes in your flows, you can deliver timely and personalized communications that align with key milestones or events in the contact lifecycle. These flows help enhance engagement, retention, and user satisfaction.
Here are a few ways you can use the Date Attribute Trigger automation type:
Birthday messages – Automatically send greetings to contacts on their birthday.
Subscription renewals – Remind contacts of upcoming renewal dates.
Appointment reminders – Notify contacts ahead of scheduled appointments.
Anniversary celebrations – Mark key milestones such as account creation or first purchase anniversaries.
Before You Begin
Make sure you have added at least one custom contact attribute
dateordate_time. You’ll need it to configure the trigger. For more details, see the contact attribute documentation.
Create a Date Attribute Automation Flow
Use the steps below to create an automation flow triggered by a specific date or date_time attribute in a contact’s profile.
Step 1: Open the Create Flow Panel
Navigate to Automations > Flows.
Click the + Create Flow button.
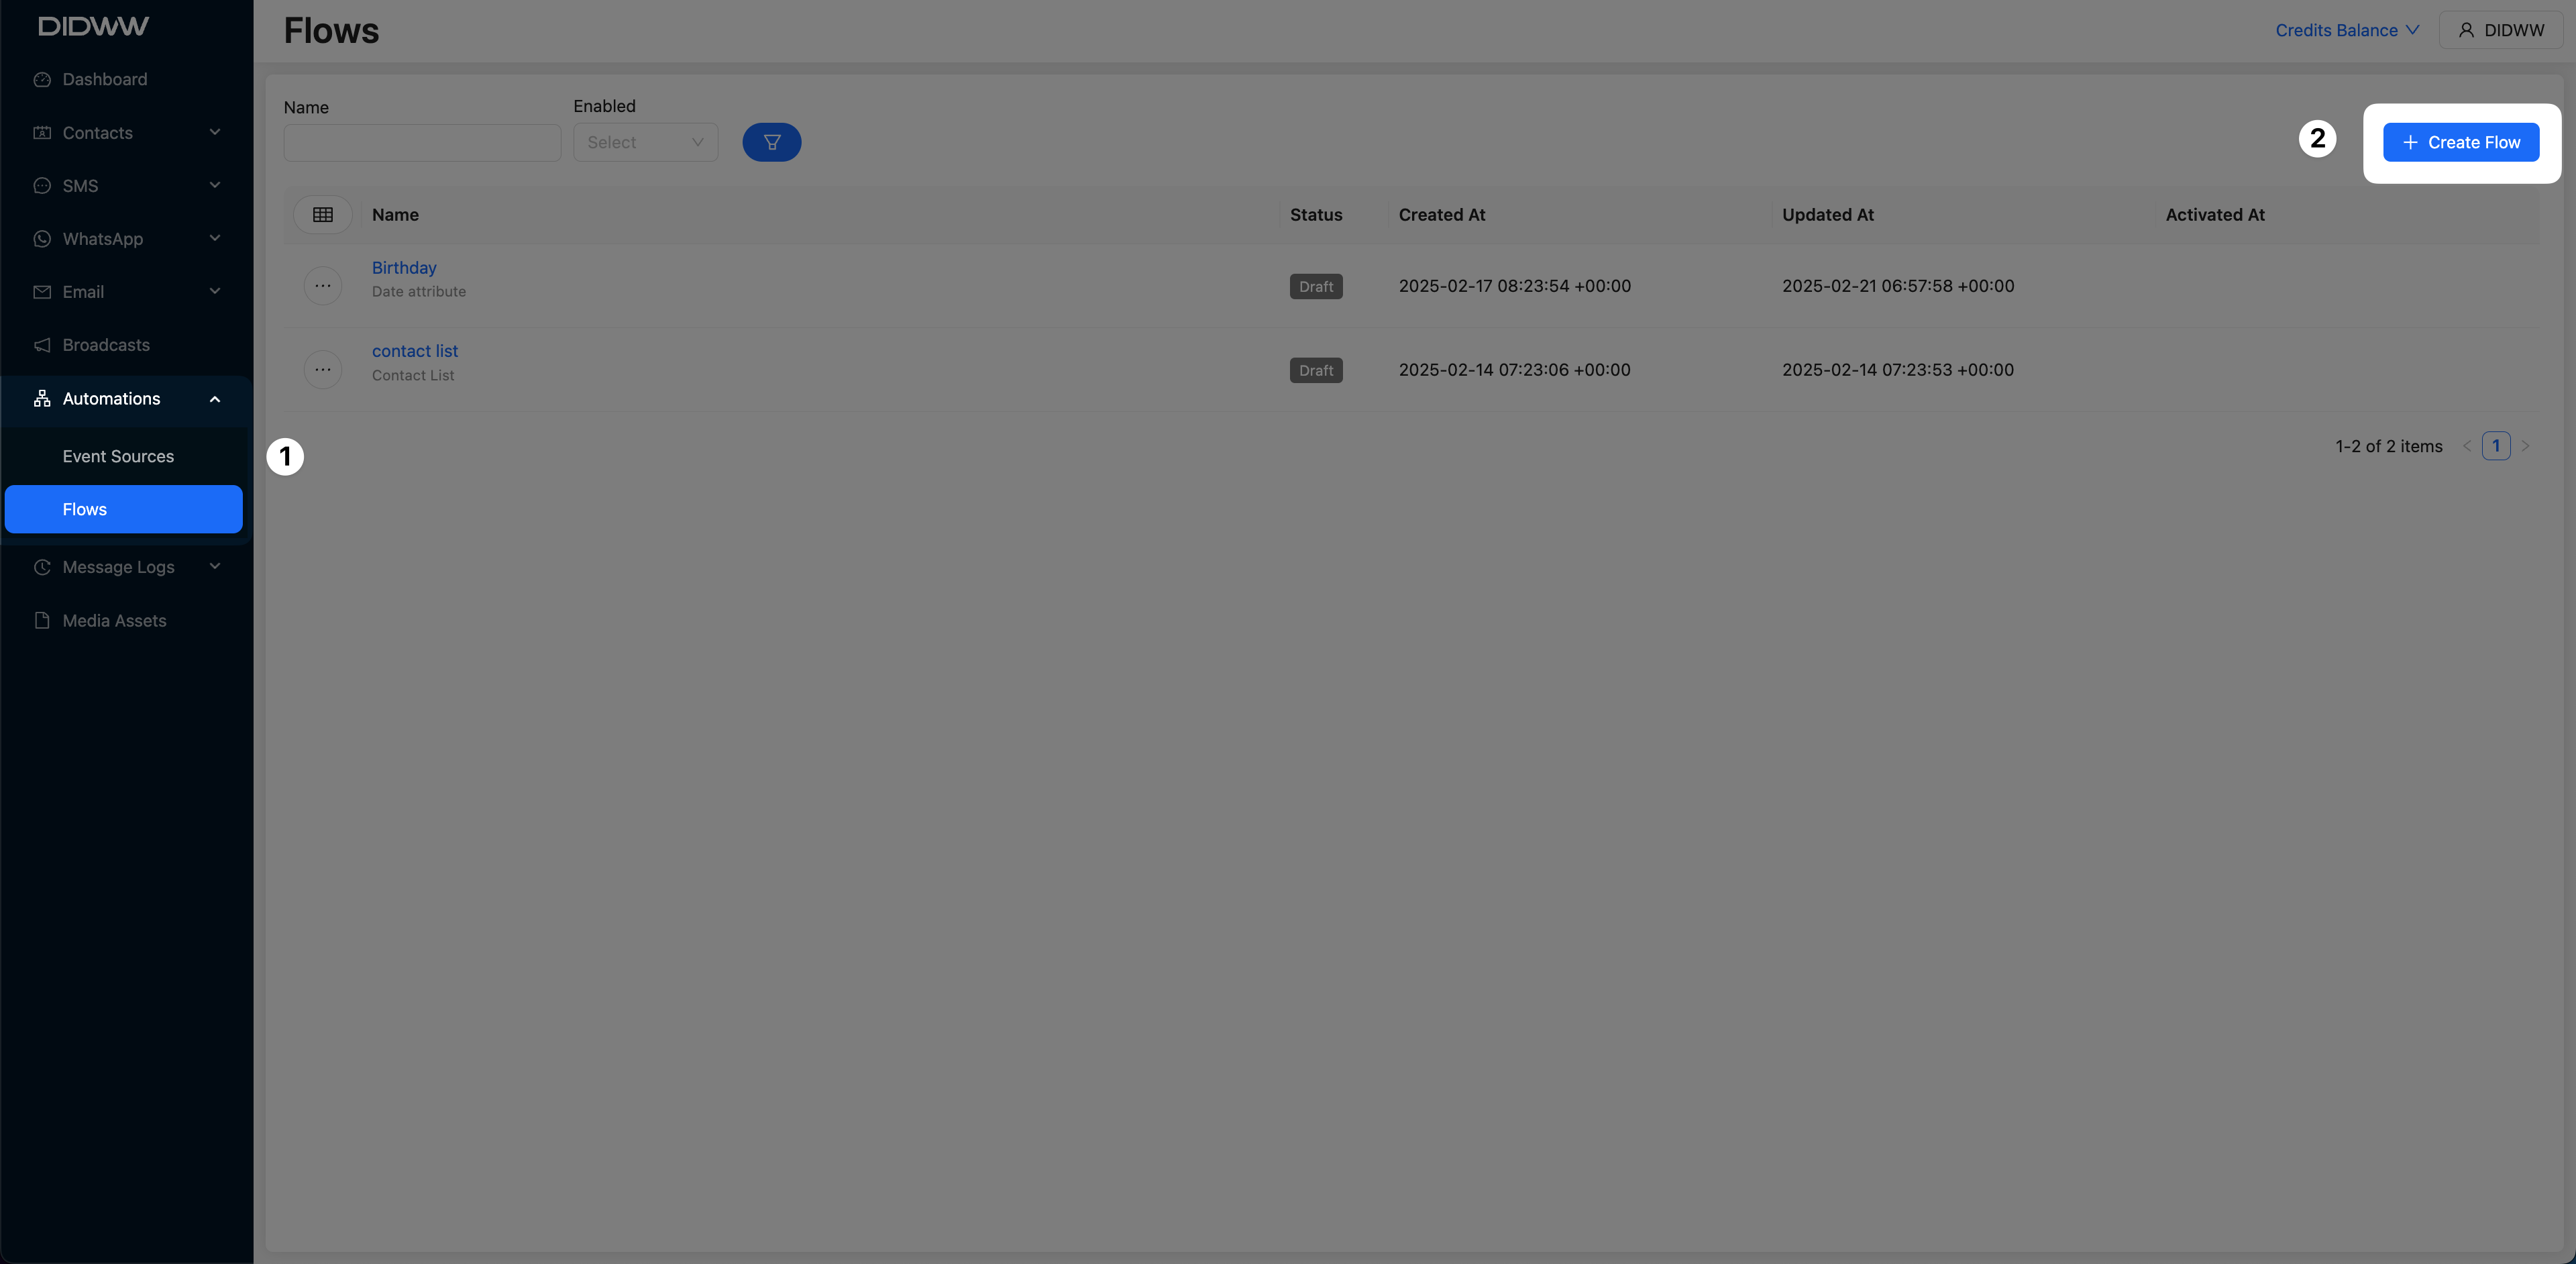
Fig. 1. Open the Create Flow Panel.
Step 2: Select the Date Attribute Trigger
Enter a descriptive name for your automation flow (for example, Happy Birthday).
In the Select a trigger window, click Date Attribute.
Click OK to confirm.
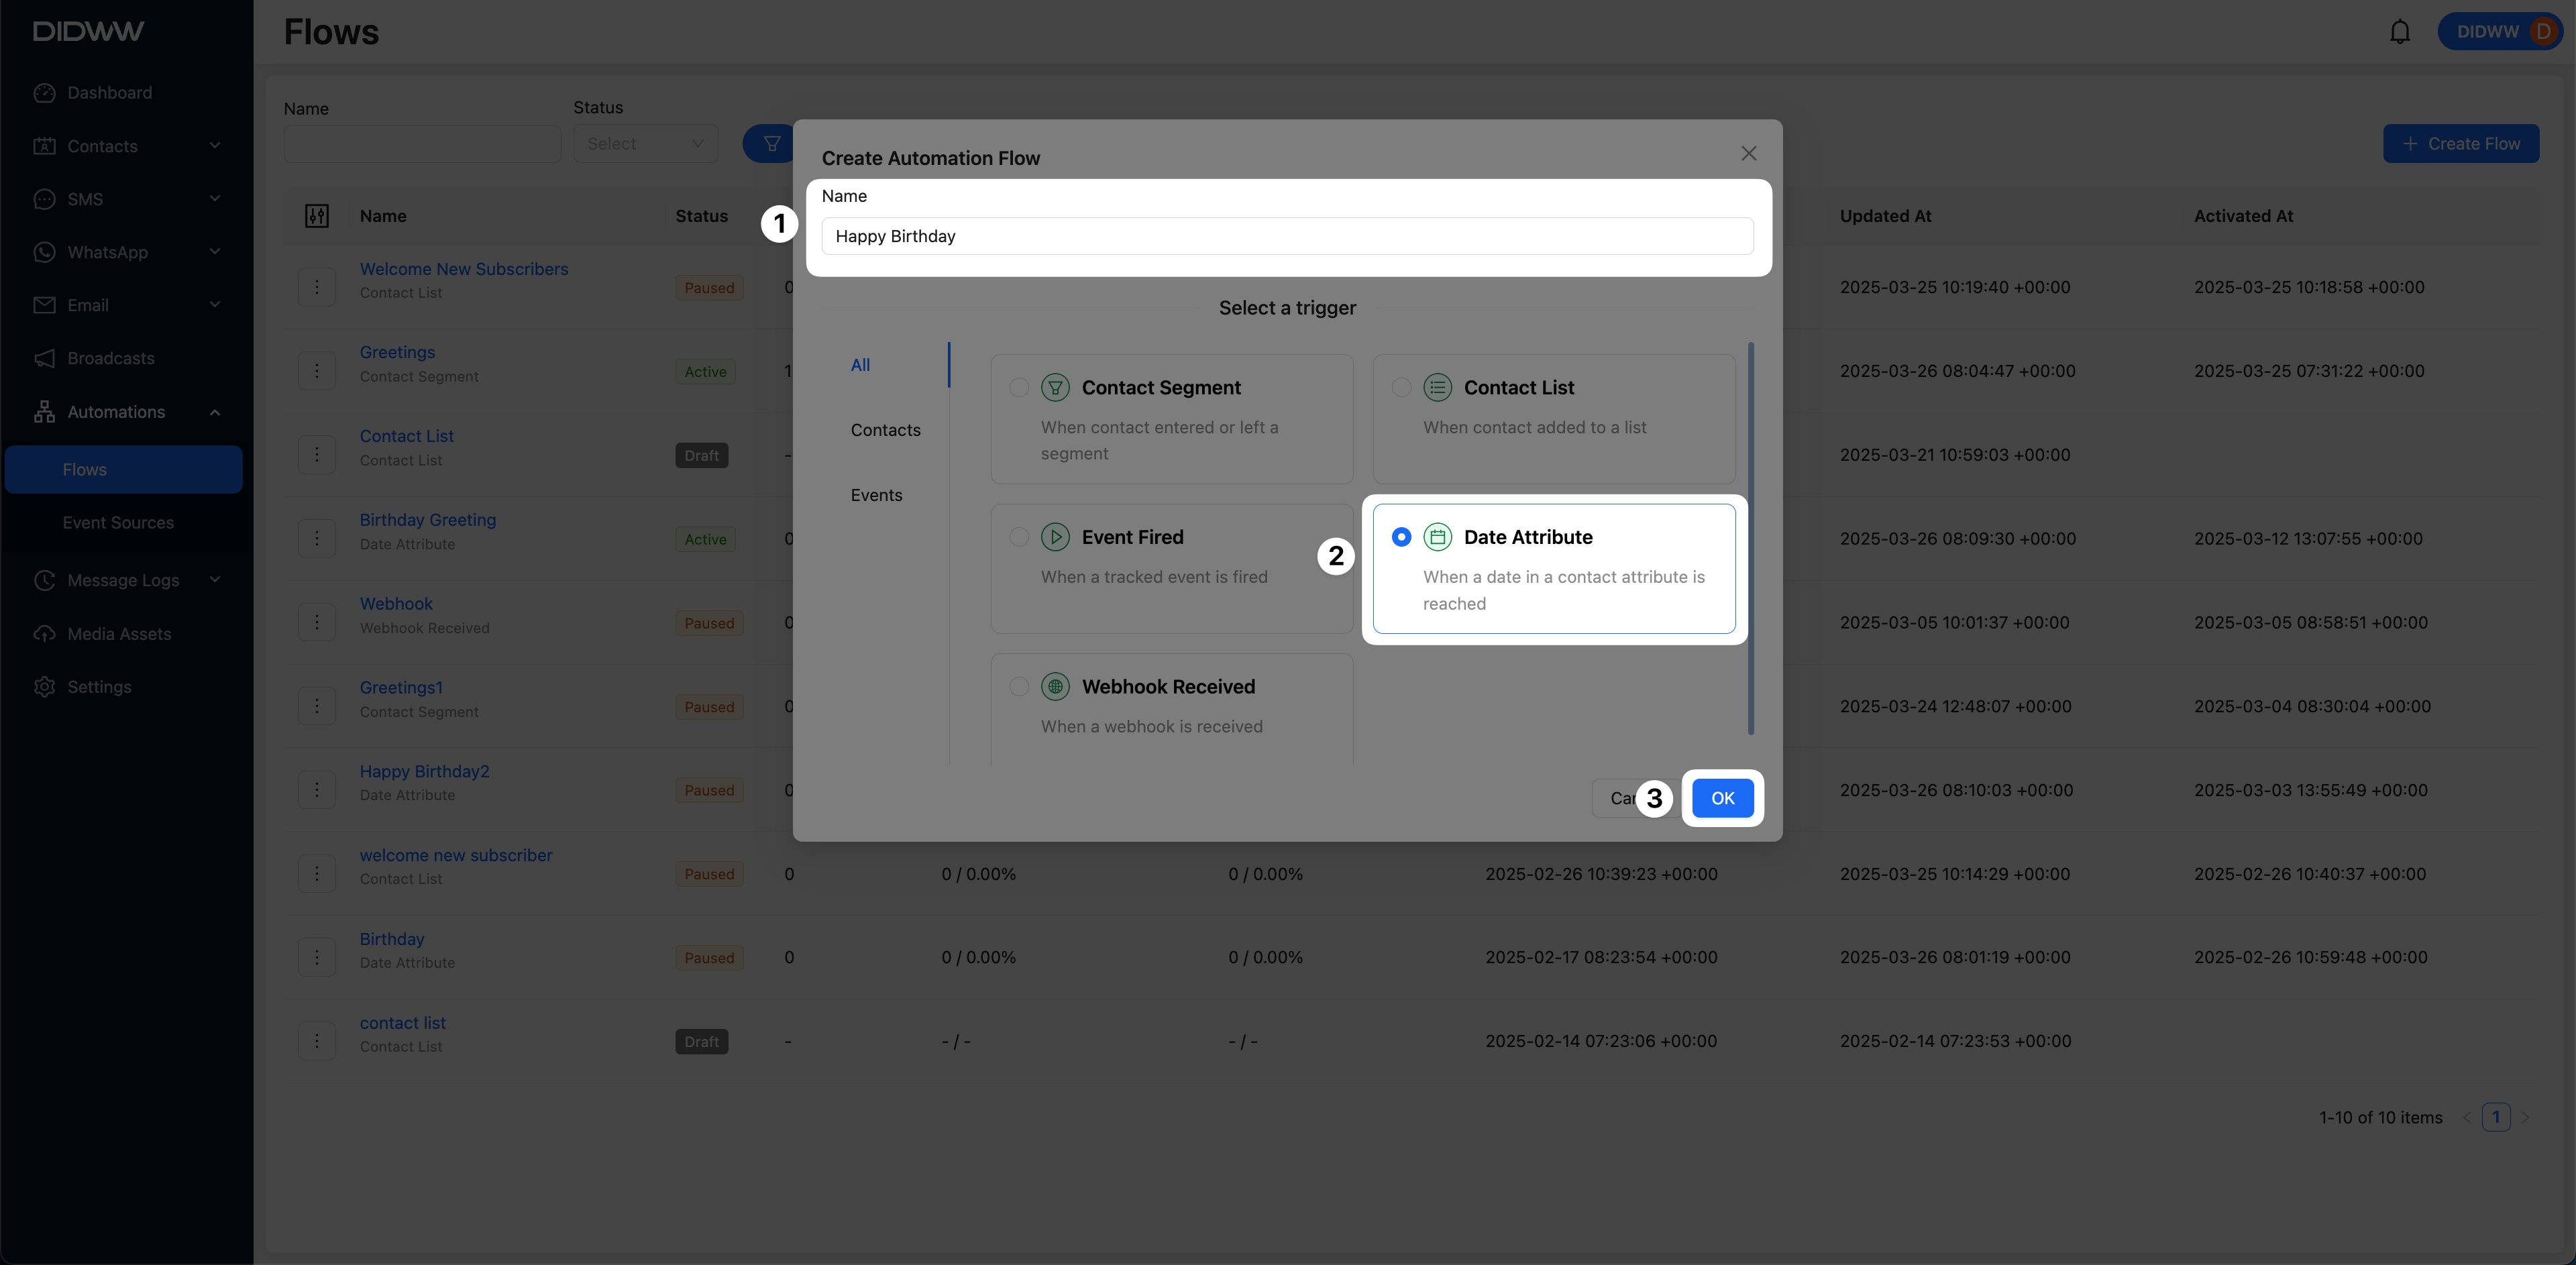
Fig. 2. Select the Date Attribute Trigger.
Step 3: Edit the Date Attribute Trigger
To proceed with the automation setup, the Date Attribute Trigger must be configured. This is a required step before the flow can be activated.
You can edit the Date Attribute Trigger using one of the following methods:
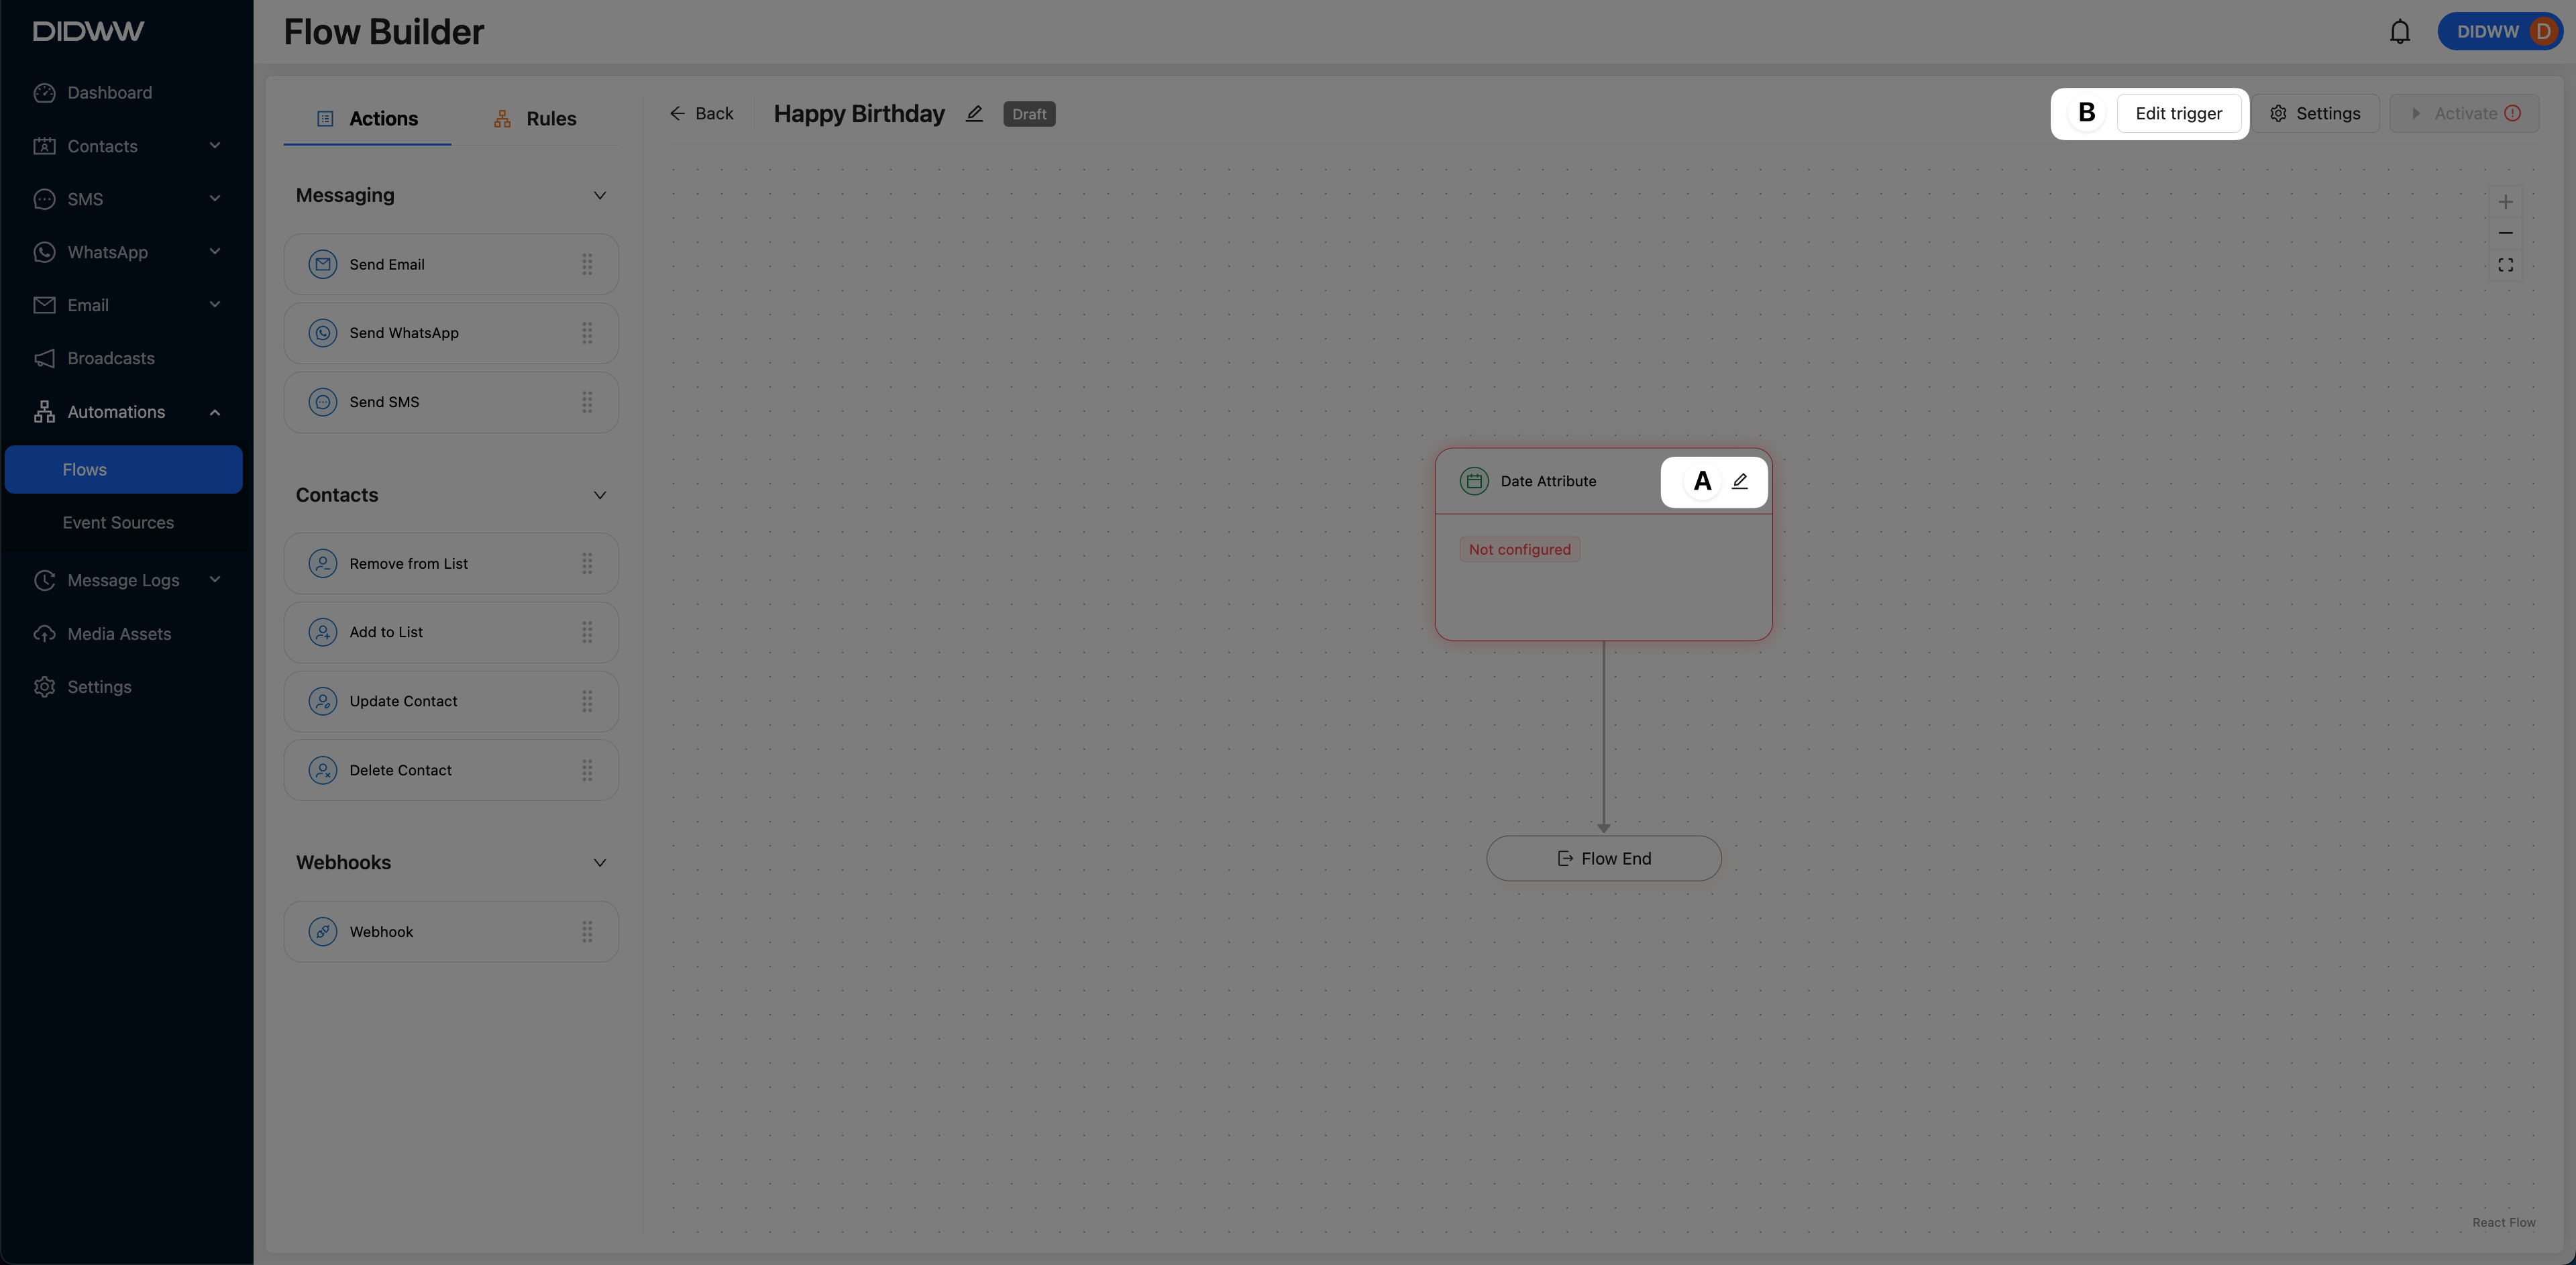
Fig. 3. Edit the Date Attribute Trigger.
Step 4: Configure the Trigger Settings
In the Edit Date Attribute Trigger panel, complete the following steps:
Choose a date attribute – Select the date field that will trigger the automation (e.g., Happy Birthday).
Note
If you do not have any Date Attributes, create them in the contact attributes menu.
Set the entry timing – Define when the flow should trigger relative to the selected date:
On the same day – Trigger the automation exactly on the date.
Before the date – Trigger a specified number of days before the date.
After the date – Trigger after the specified date has passed.
Set the trigger time and frequency – Choose the specific time, time zone, and how often the automation should run:
Time and Time Zone – Set the exact time and associated time zone for evaluation.
Frequency: - Never – Trigger once only. - Monthly – Repeat every month. - Yearly – Repeat every year (ideal for birthdays or anniversaries).
(Optional) Add filters – Refine which contacts enter the automation flow using additional conditions:
Use All of (AND) or At least one (OR) logic to group multiple conditions.
Click + Add Condition / Group.
Select a filter, such as Contact Attribute: SMS Subscribed = True.
(Optional) Preview with contact – Select a sample contact to simulate and preview how the trigger applies.
Click Save to apply the trigger settings and return to the automation flow builder.
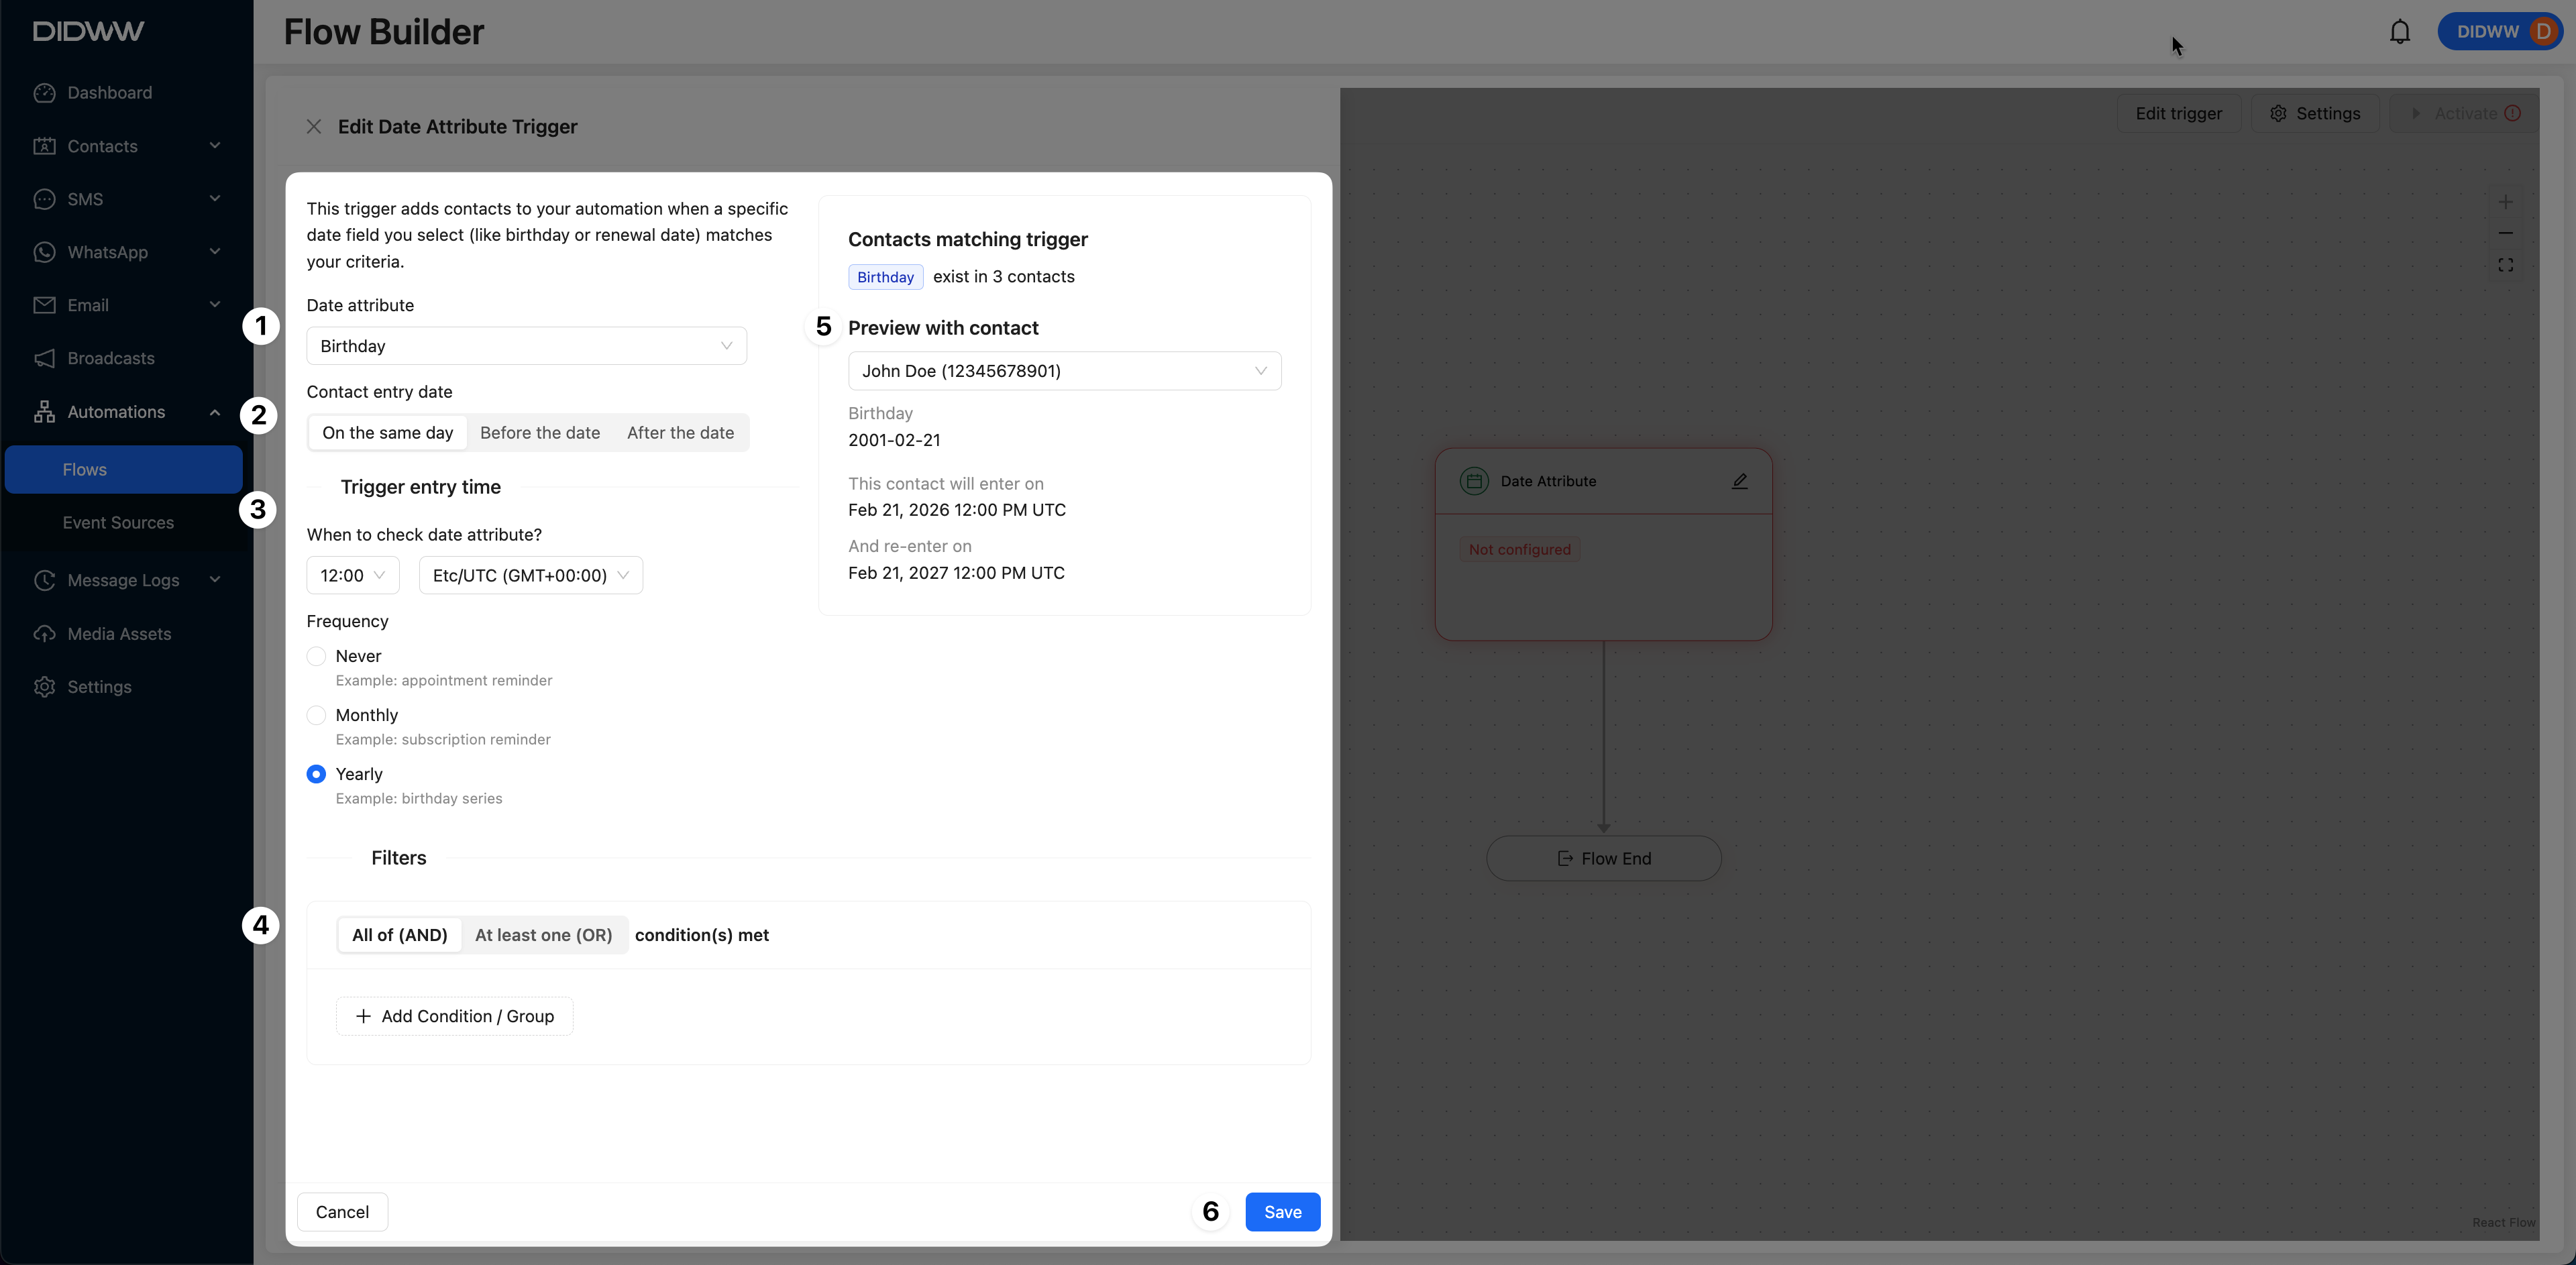
Fig. 4. Configure the Trigger Settings.
Step 5: Build the Automation Flow
After configuring the Date Attribute trigger, proceed to build the automation flow using available Actions and Rules in the drag-and-drop interface.
To build your automation flow, you will use two types of components:
Actions – Define what should happen (e.g., send a message, update a contact attribute).
Rules – Logic-based controls that determine how and when actions are executed (e.g., wait, branch, check conditions).
Start by adding an action. For example, to send a reminder email:
From the Actions panel, select Send Email.
Drag the Send Email object to the + rectangle in the automation flow canvas.
Once placed, a configuration window will appear where you can customize the email content and sender details.
You can repeat this process with other messaging channels or logic-based rules to create a fully automated flow tailored to your date-driven use case.
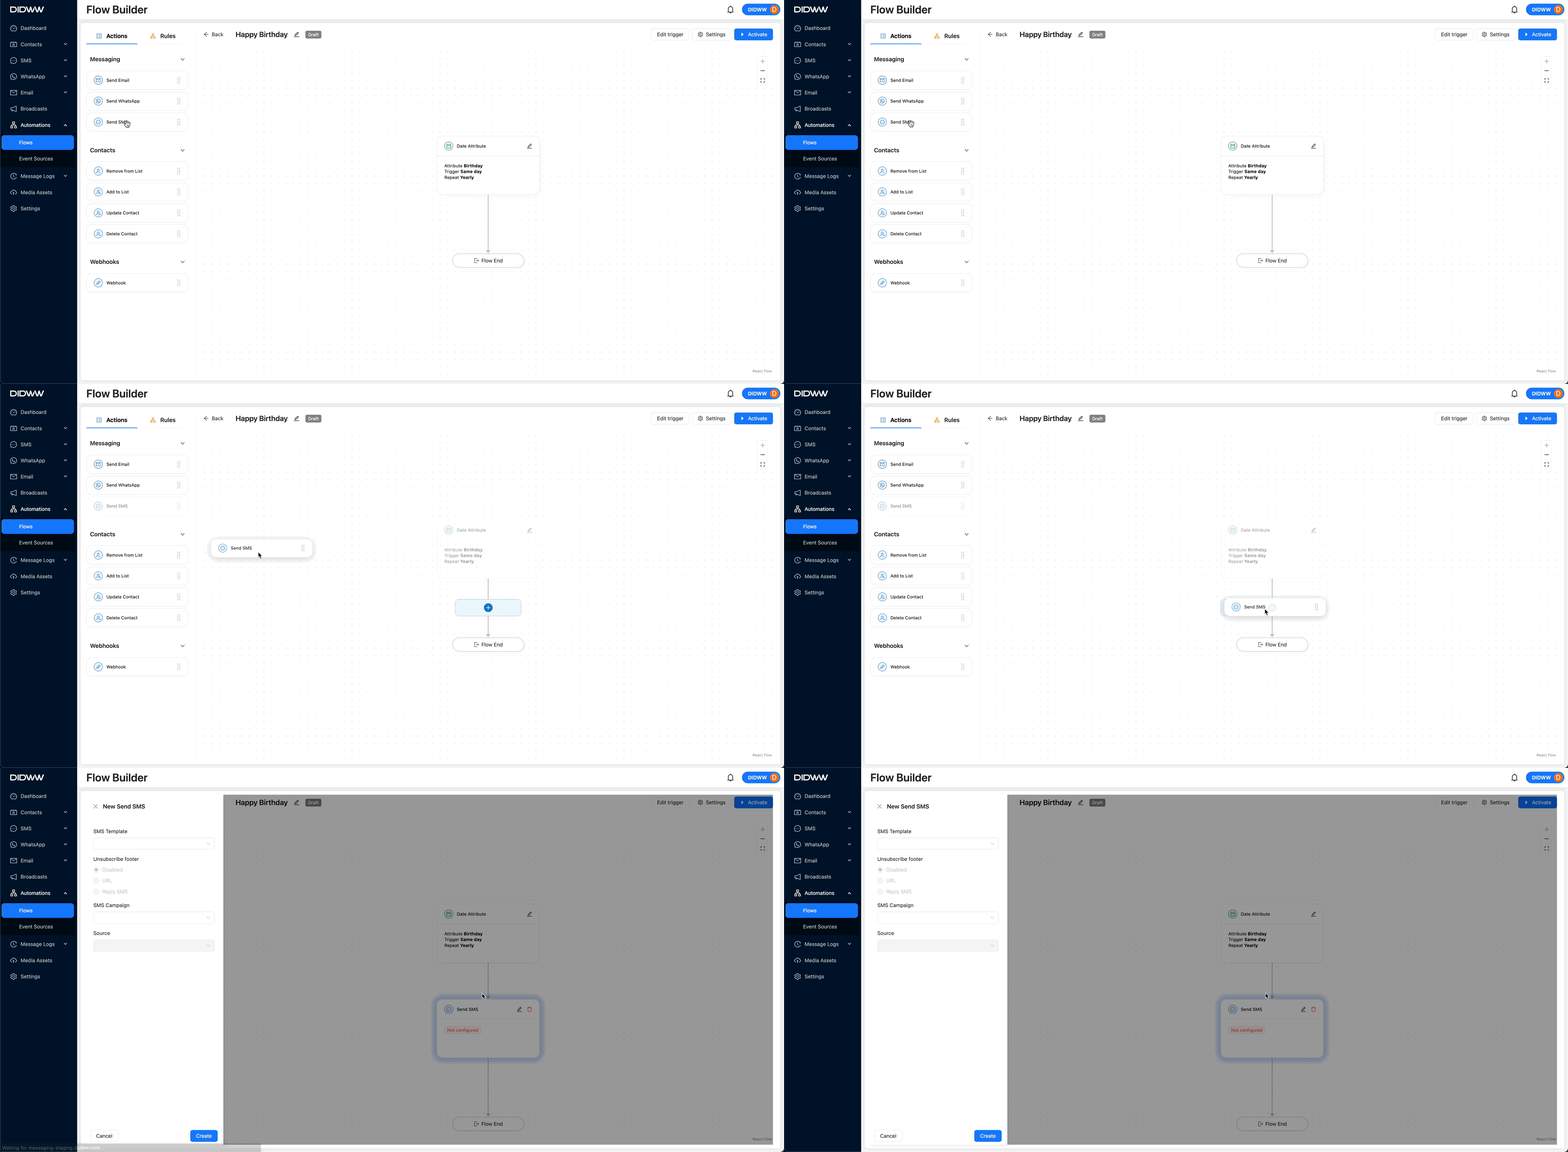
Fig. 5. Flow Builder.
Once you understand the drag-and-drop process, review the available Actions and Rules described in the following documentation to configure your automation flow in more detail:
Actions in Flow Builder
Actions define what happens when a flow is triggered. These actions allow you to send messages, update contact information, manage lists, or interact with external systems.
The table below outlines each available action, including a description, required inputs, and common usage examples.
Action |
Description |
Inputs Required |
Usage Examples |
|---|---|---|---|
Sends an email to the contact using a predefined template. |
|
|
|
Sends a WhatsApp message via the WhatsApp Business API using |
|
|
|
Sends an SMS message using a selected template and campaign. Supports opt-out footers for compliance. |
|
|
|
Removes a contact from a specified list. Useful for segmentation and managing opt-outs. |
|
|
|
Adds a contact to a specified list. Used for managing subscriptions or categorizing contacts. |
|
|
|
Updates a contact’s attributes such as name, |
|
|
|
Permanently deletes a contact from the system. Used for compliance or list cleanup. |
|
|
|
Sends structured data to external systems via an HTTP request. Enables real-time integrations. |
|
|
Rules in Flow Builder
Rules define the logic that controls how and when actions are executed within an automation flow. They are used to introduce delays, evaluate conditions, and create decision branches based on contact data or behavior.
The table below describes the available rules, including what each rule does, the configuration inputs required, and examples of when to use them.
Rule |
Description |
Inputs Required |
Usage Examples |
|---|---|---|---|
Pauses the flow for a specified duration before executing |
|
|
|
Splits the flow into two paths based on whether a condition |
|
|
For detailed configuration steps and advanced usage, see the full documentation:
View the full guide on how to configure each available automation flow Action and Rule in the Flow Builder.
Step 6: Activate the Flow
Once you’ve configured the Date Attribute trigger and built the flow based on your use case, you’re ready to activate the automation.
Note
The Activate button will be disabled if the trigger object (shown at the top of the flow) has not been configured. To complete this setup, click Edit Trigger or refer to Step 3.
After activation, you can pause the automation at any time if you need to make changes or temporarily stop the flow.
Follow these steps to activate the flow:
Click Activate in the top-right corner of the automation flow builder.
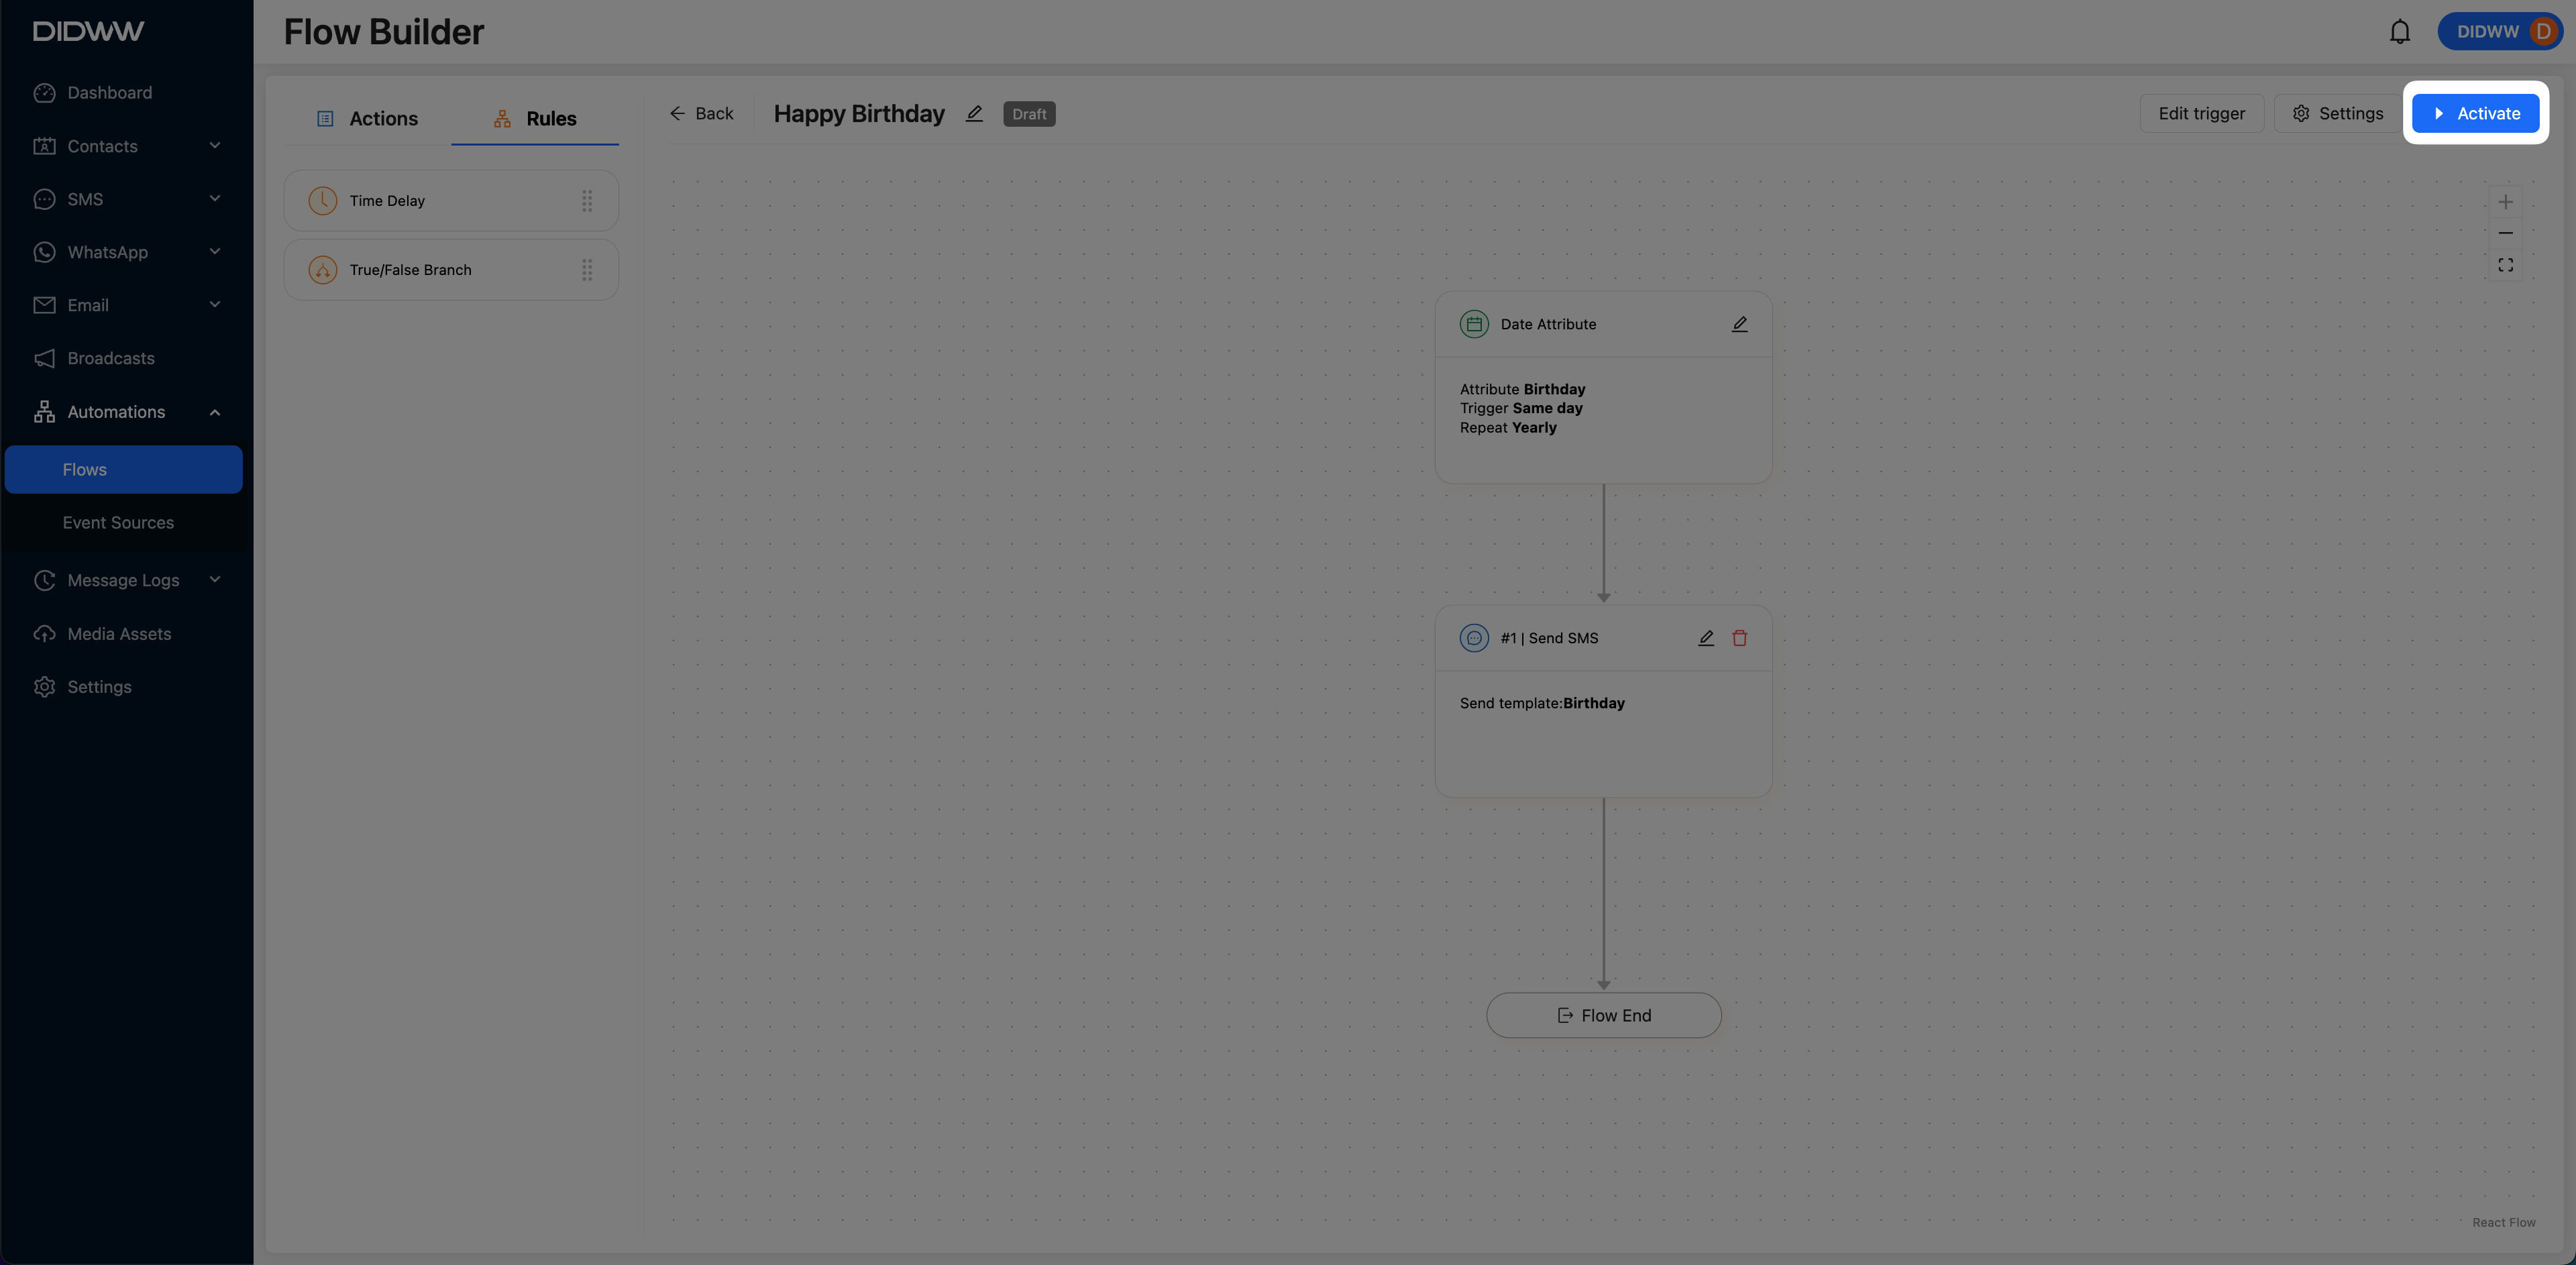
Fig. 6. Activating the Flow.
A modal window appears with optional settings you can configure before activating the flow:
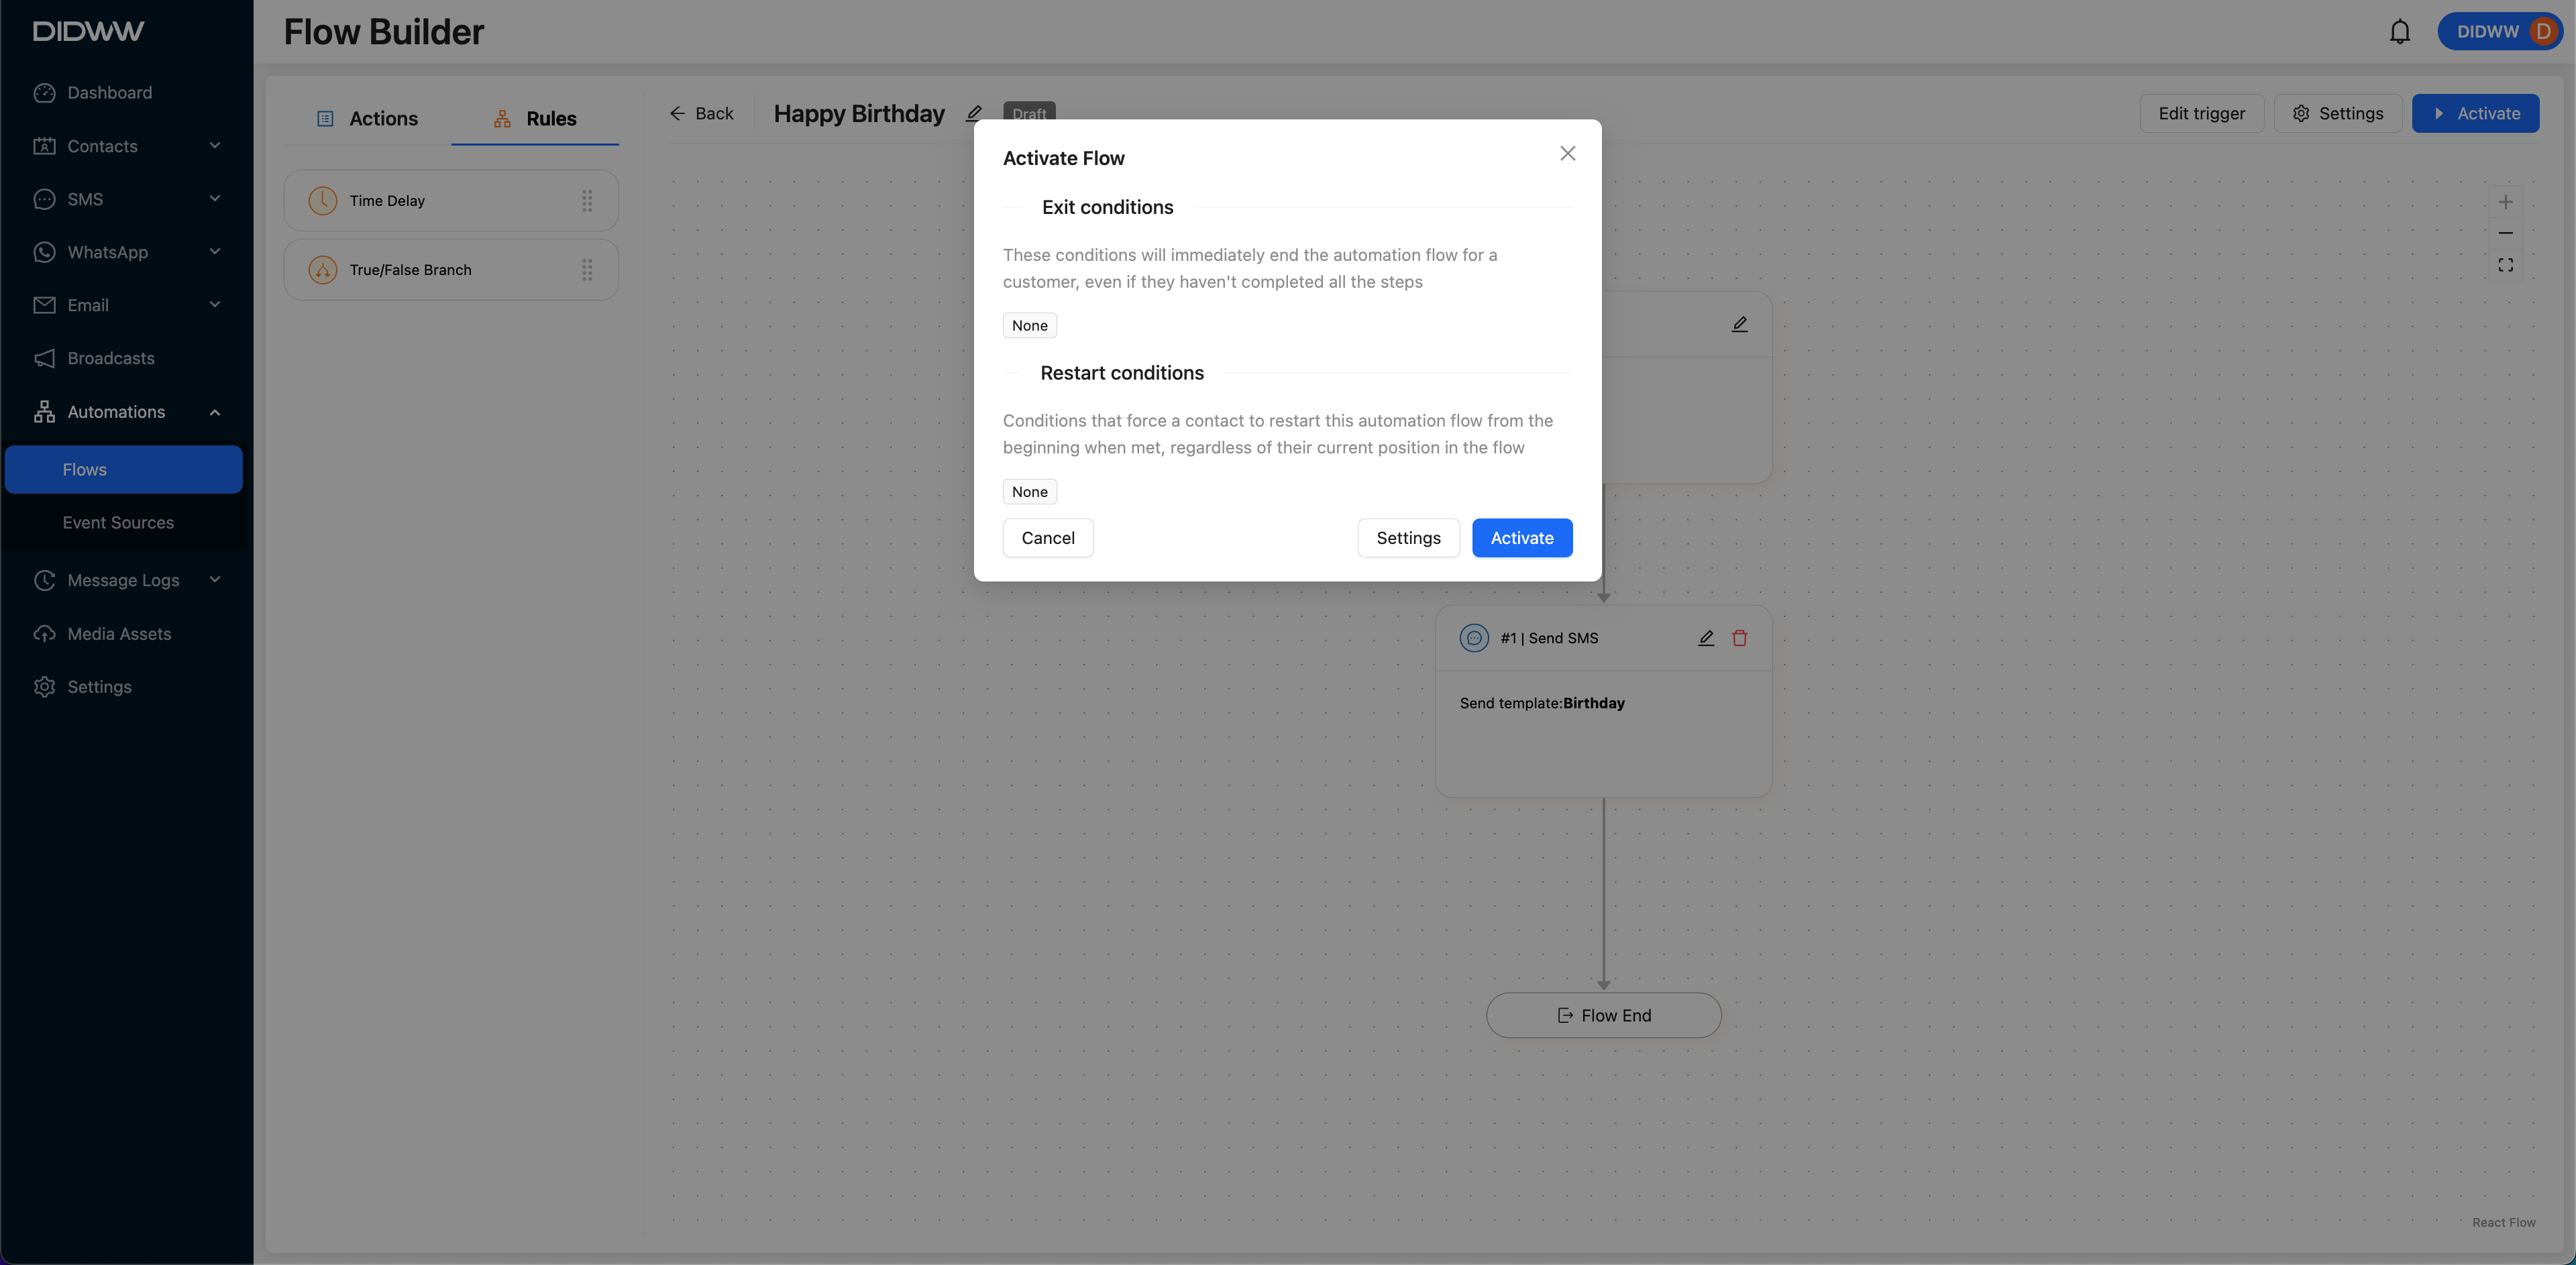
Fig. 7. Activate Flow Window.
In the Activate Flow window, you can configure optional settings to control how contacts re-enter, exit, or restart the automation:
Option
Description
Allow contact re-entry after exit
Allows contacts to re-enter the automation if they meet the trigger conditions again after exiting.
Set up wait time (only visible if re-entry is enabled)
Specifies how long the system should wait before checking if the contact matches the trigger conditions again.
Exit conditions
Defines when a contact should immediately exit the flow. For example, if the date attribute value changes or no longer meets filter criteria.
Restart conditions
Forces a contact to restart the flow from the beginning, regardless of their current progress.
Note
To configure Exit Conditions and Restart Conditions, click the Settings button inside the modal. These settings are optional and depend on your flow logic.
Tip
If your date-triggered flow should stop when a date becomes irrelevant or a contact’s status changes, consider setting a clear exit condition to maintain flow accuracy.
Once you’ve reviewed or configured the optional settings, click Activate to launch the automation.
The flow status will change from
 to
to
 and will automatically run based on the defined date attribute conditions.
Edit the Date Attribute Automation Flow
To update an existing contact segment automation flow, use the Flow Builder to access and modify its configuration. Follow the steps below to edit the flow, including its triggers, actions, and other components.
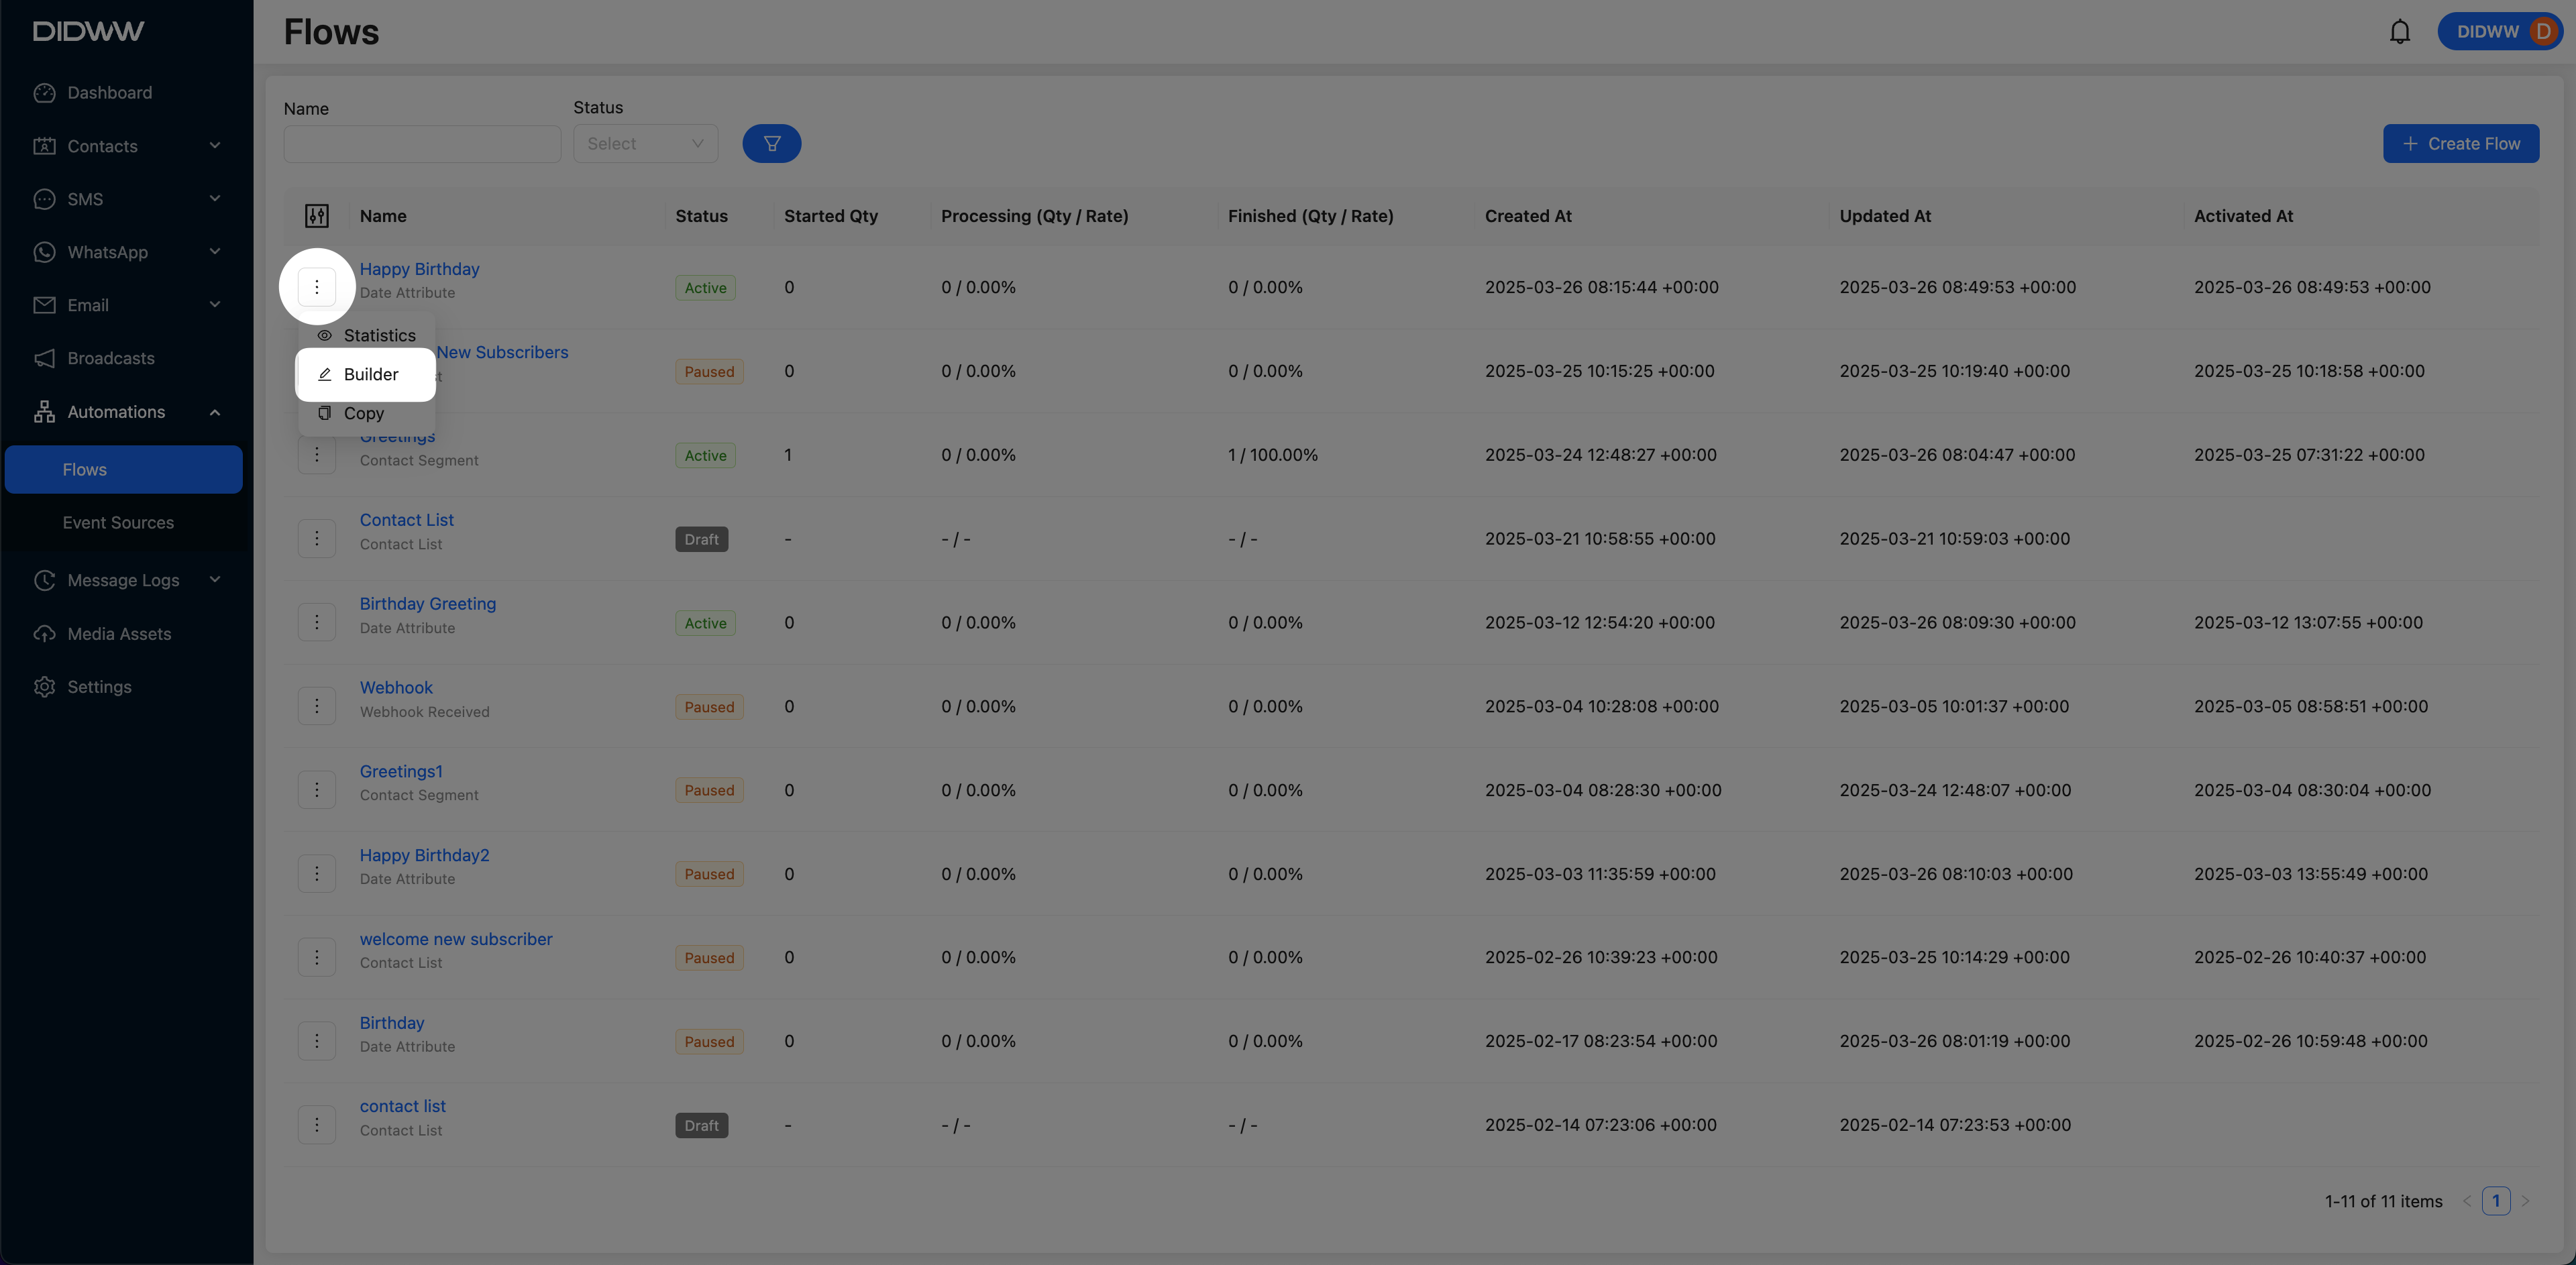
Fig. 8. Edit the Contact Segment Automation Flow.
Pause an Active Date Attribute Automation Flow
To temporarily stop an automation from running, you can pause the contact segment automation flow. Follow the steps below to access the Flow Builder and pause the active flow.
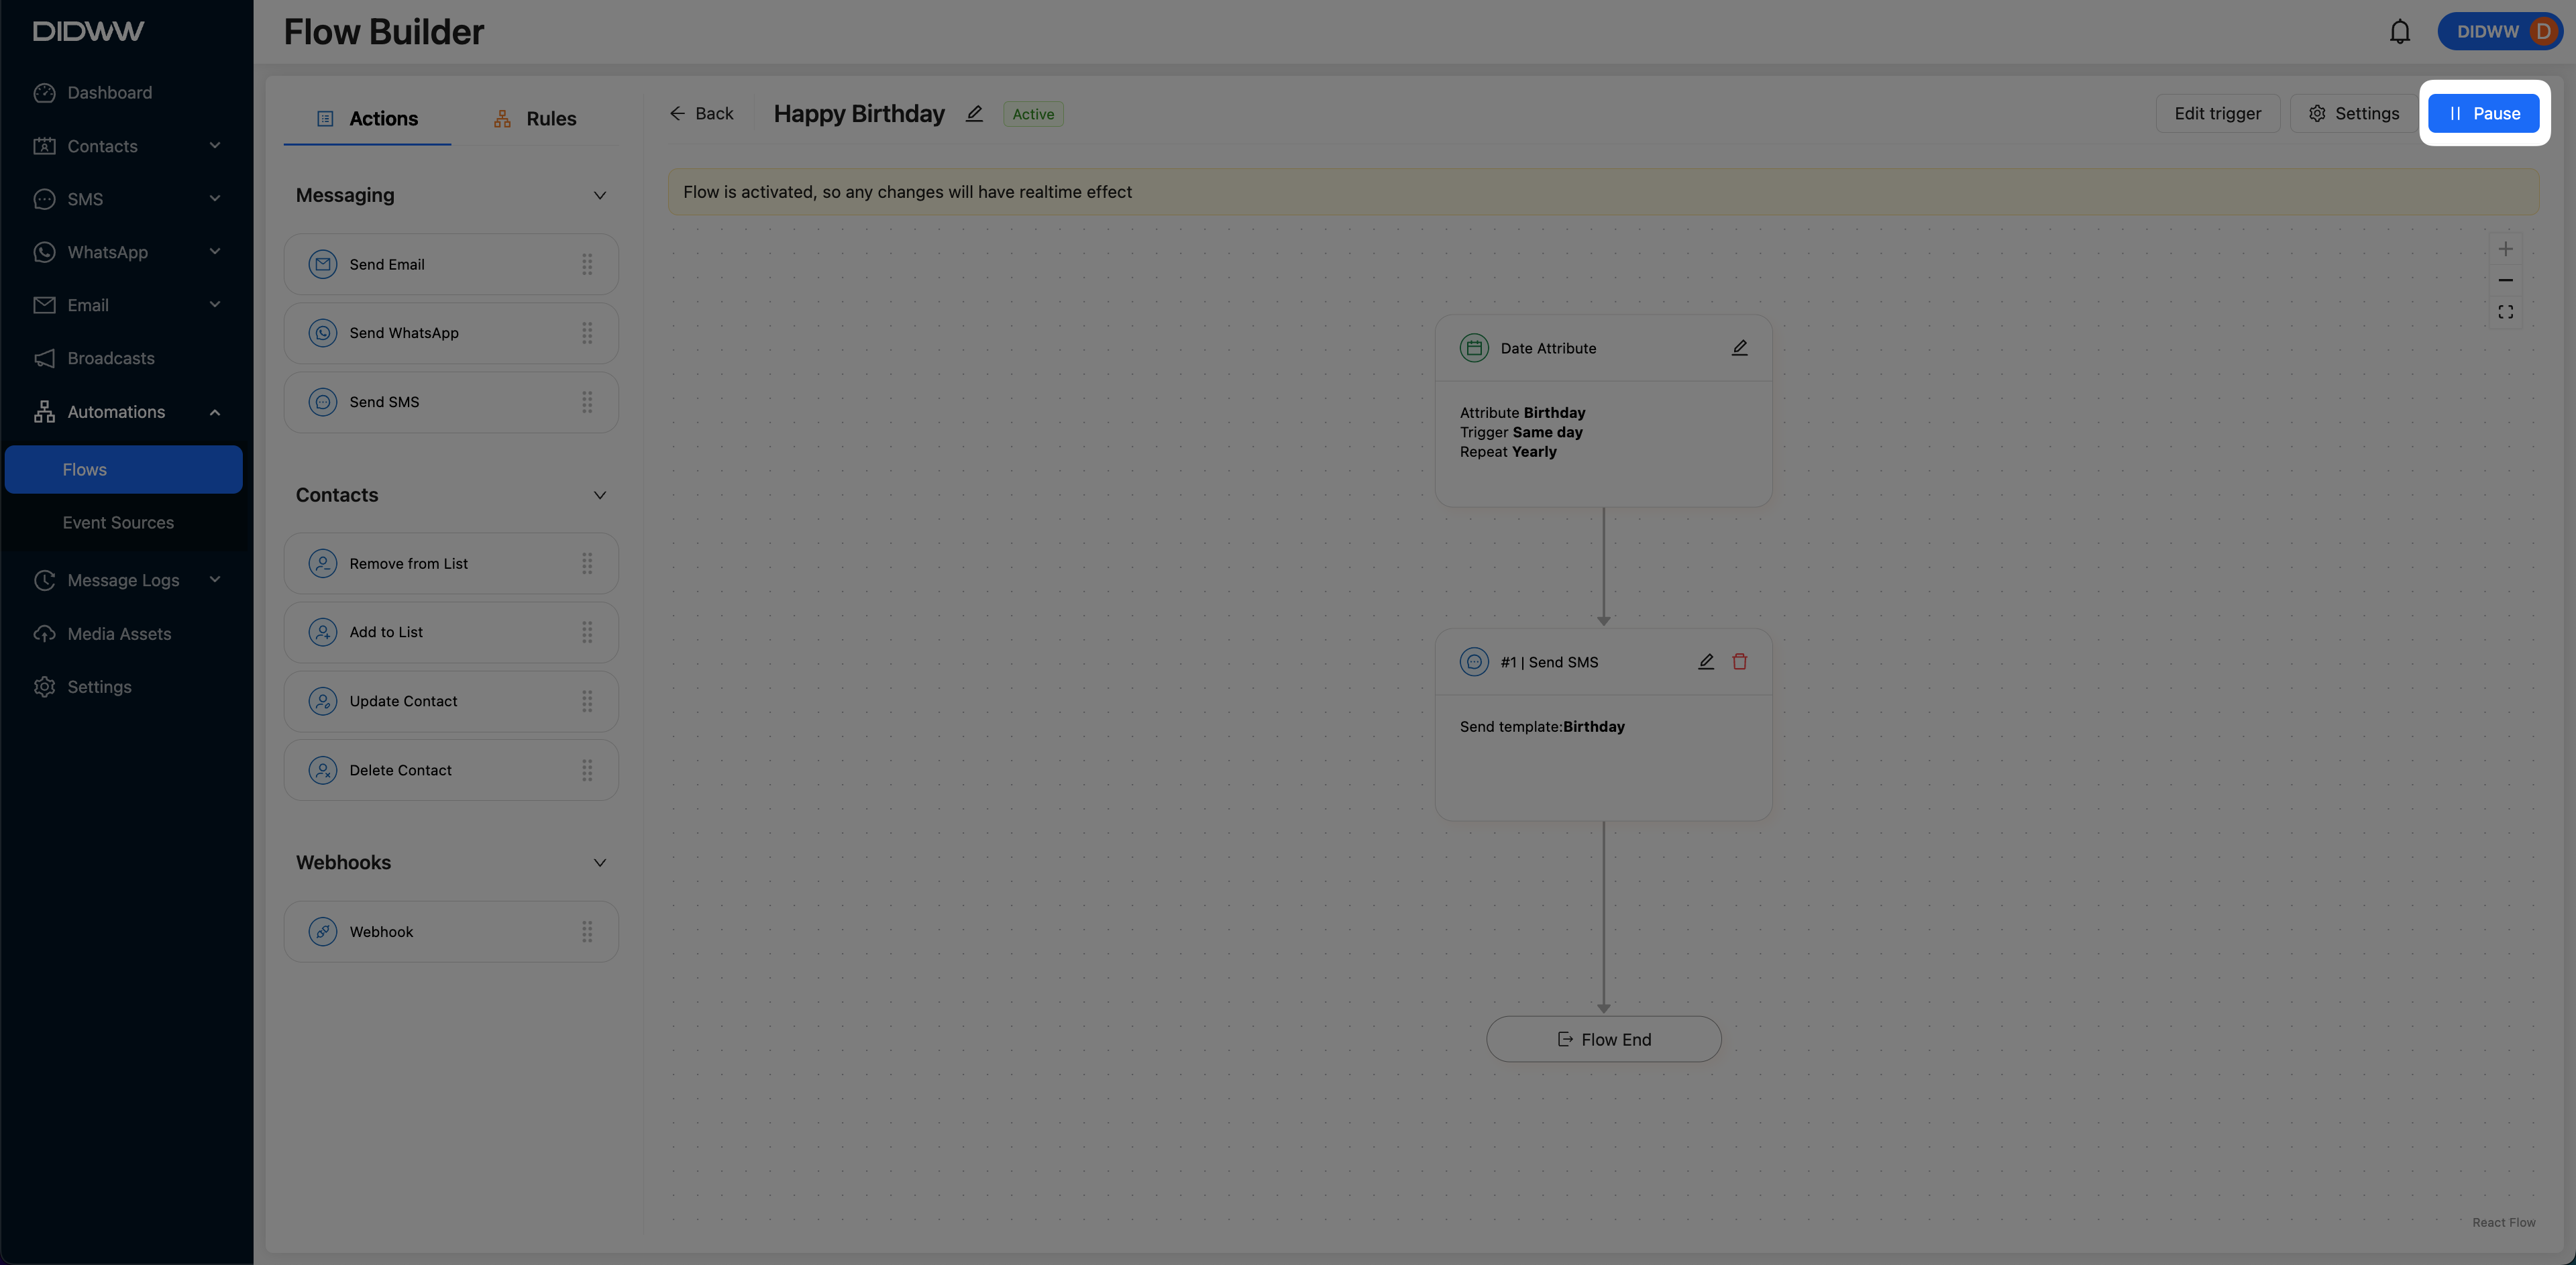
Fig. 9. Pause an Active Date Attribute Automation Flow.
Activate a Paused Date Attribute Automation Flow
To resume a previously paused contact segment automation flow, follow the steps below. During activation, you can review and adjust settings such as re-entry rules, wait times, and exit or restart conditions before reactivating the flow.
Navigate to Automations > Flows.
Find the flow in the list.
In the Flow Builder, click Activate to reactivate the automation flow.
A modal window appears with optional settings you can configure before activating the flow. These settings control how contacts enter, exit, or restart the automation. Adjust them as needed before proceeding. To learn more about optional settings, see Step 6: Activate the Automation Flow.
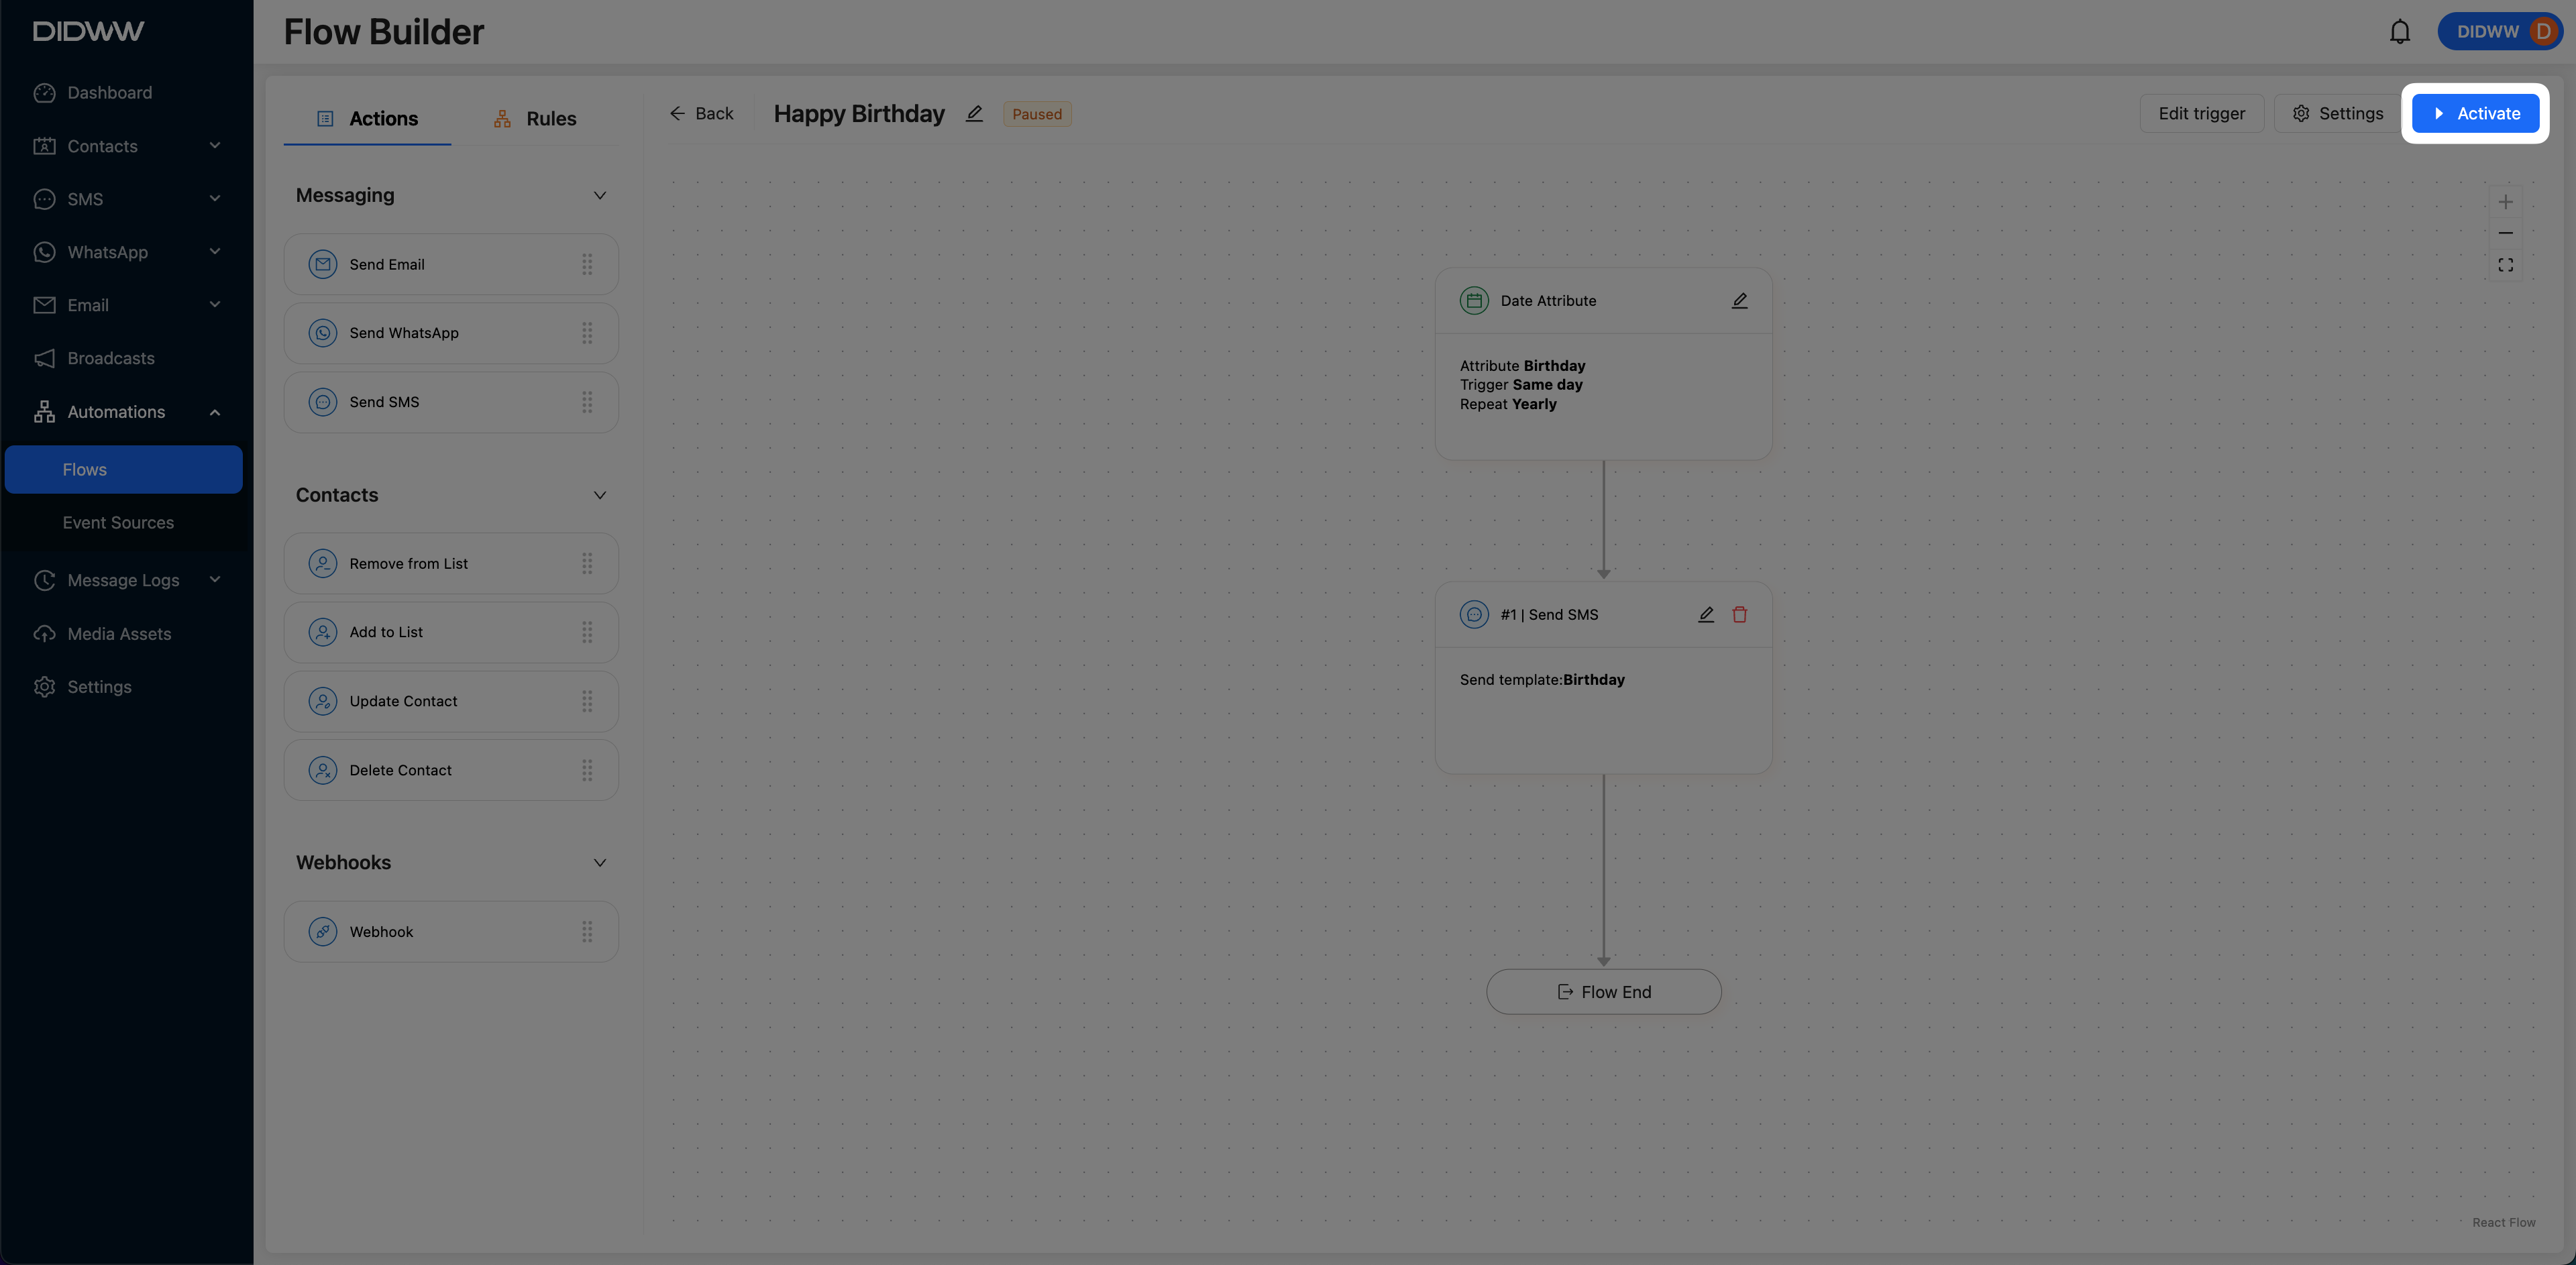
Fig. 10. Activate a Paused Date Attribute Flow.


