All Contacts
The All Contacts page provides a centralized view of every contact stored in your workspace. It serves as the main interface for managing your contact database, offering complete access to creation, filtering, updating, and exporting functions.
All Contacts is especially useful when you want to:
Quickly view, filter, and search across all saved contacts
Create, edit, or delete individual contacts
Export your entire contact list to a CSV file for updating existing contacts, reporting or backup
Access detailed contact profiles and attribute information
Manage Your Contacts
The Messaging Platform provides flexible options for managing your contact data. You can either manually add a single contact or import and update multiple contacts using a CSV file.
Choose one of the following methods:
Manually create an individual contact by filling out a contact form.
Upload a CSV file containing multiple contact records for bulk import.
Update existing contact records by uploading a CSV file.
Create a Single Contact
Use this option to manually add one contact at a time to your workspace.
Step 1: Open a Single Contact Creation Form
Go to Contacts, select All Contacts
Click Add New and select Create Contact.
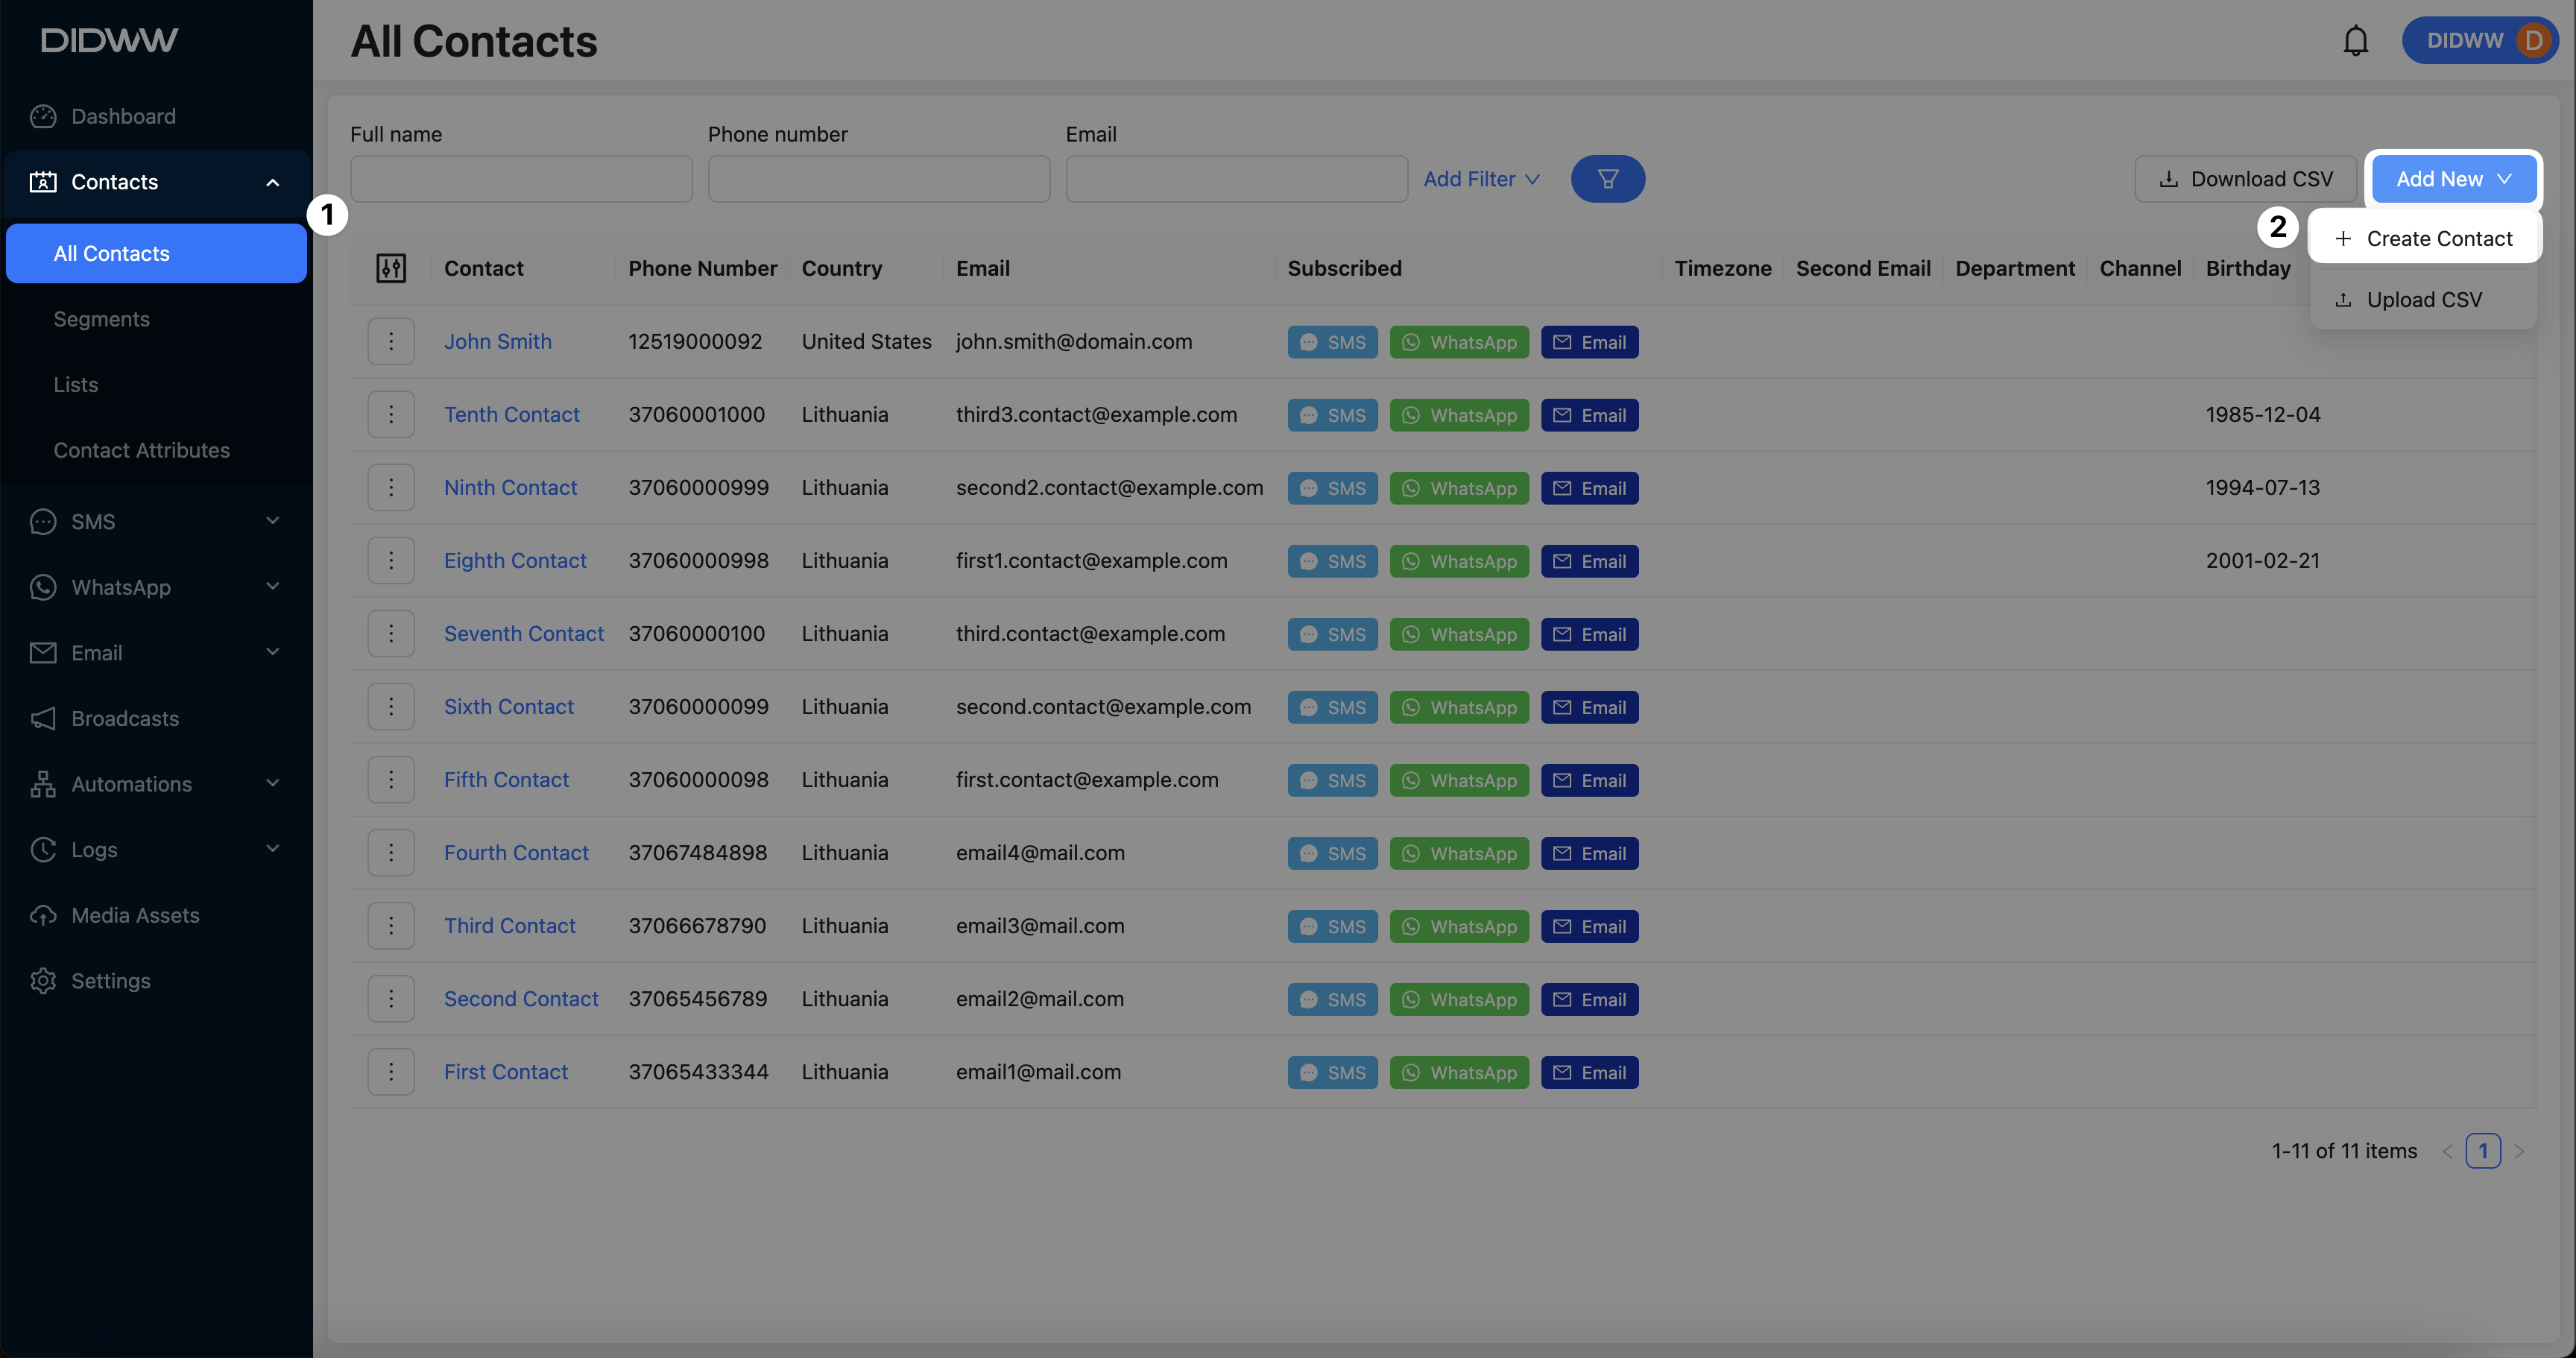
Fig. 1. Start Contact Creation.
Step 2: Enter Contact Details
Fill in the contact’s information using the available generic and custom attribute section values. Enter values as appropriate for each field, including First Name, Phone Number, and any additional custom attributes you’ve configured.
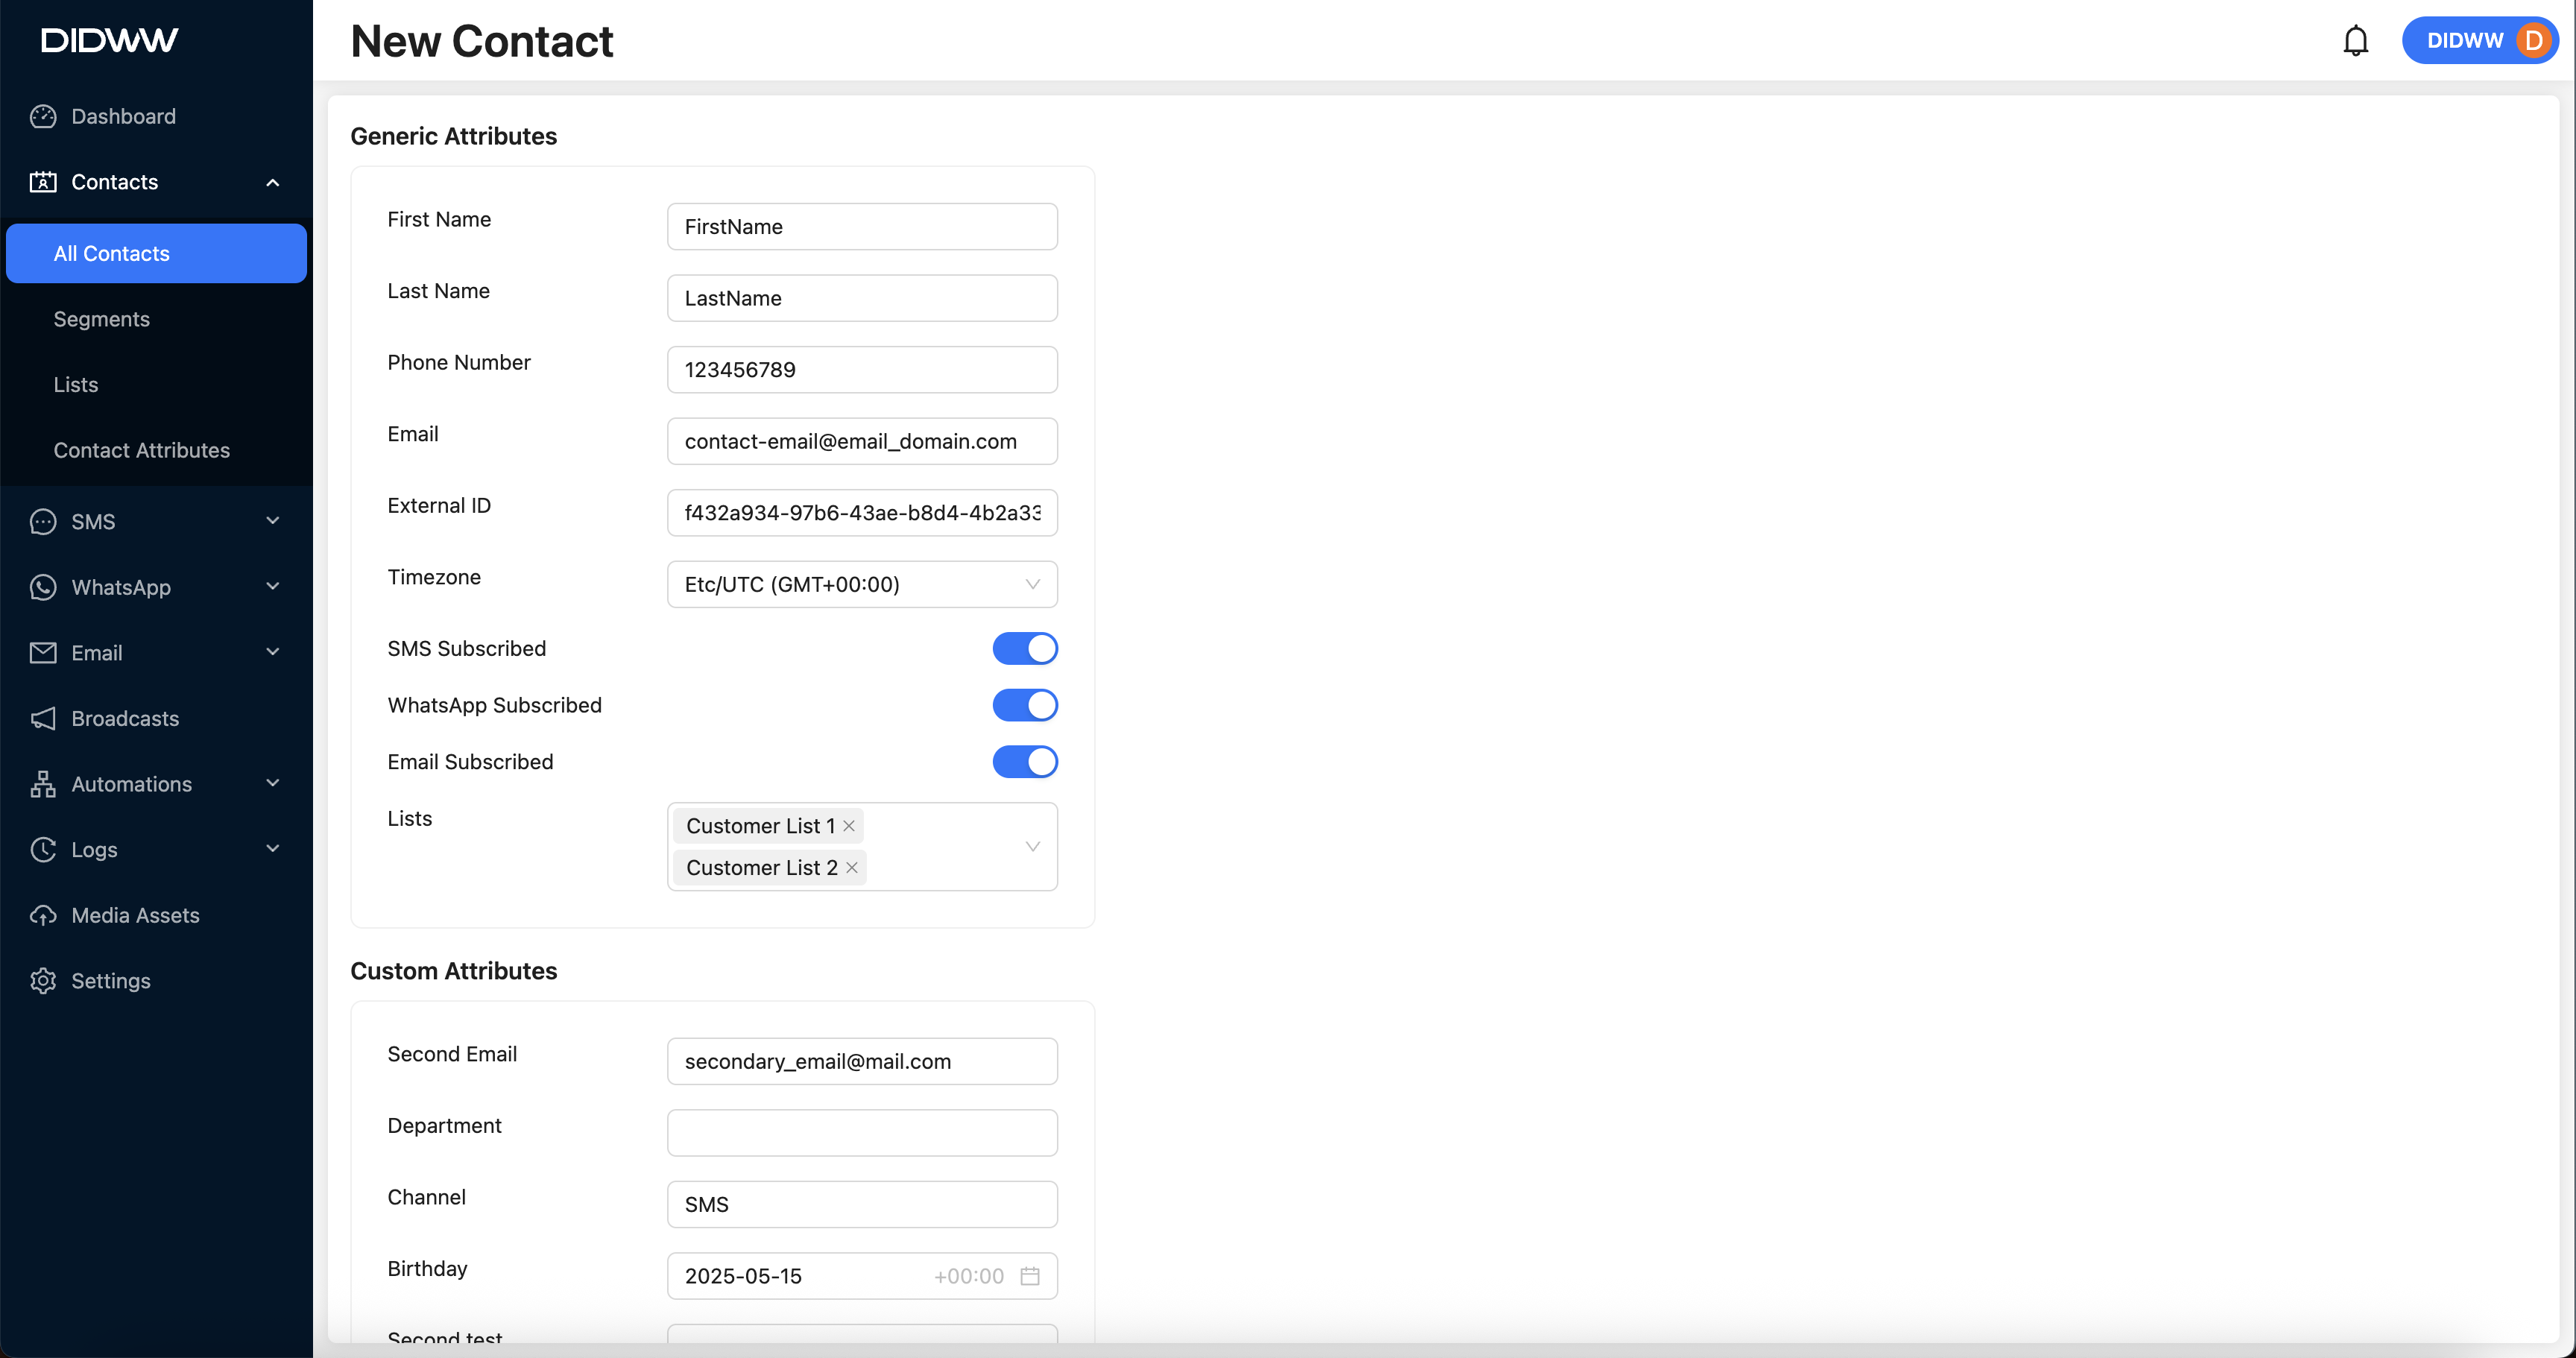
Fig. 2. Contact Form.
Step 3: Save the Contact
Click Submit to save the new contact to your workspace.
Import Multiple Contacts from a CSV file
Use this option to upload and create multiple contacts from a single CSV file.
Before You Begin
To import multiple new contacts, you must first prepare a properly formatted CSV file containing the contact information.
Use the following template to get started:
DownloadThis file includes the required columns such as First Name, Last Name, Phone Number, Email.
Note
Replace the sample values in the CSV file with your actual contact data.
Ensure the file is saved in .csv format and encoded in UTF-8.
The file size must not exceed 50 MB.
Step 1: Open Upload CSV form
Go to Contacts, select All Contacts
Click Add New and select Upload CSV.
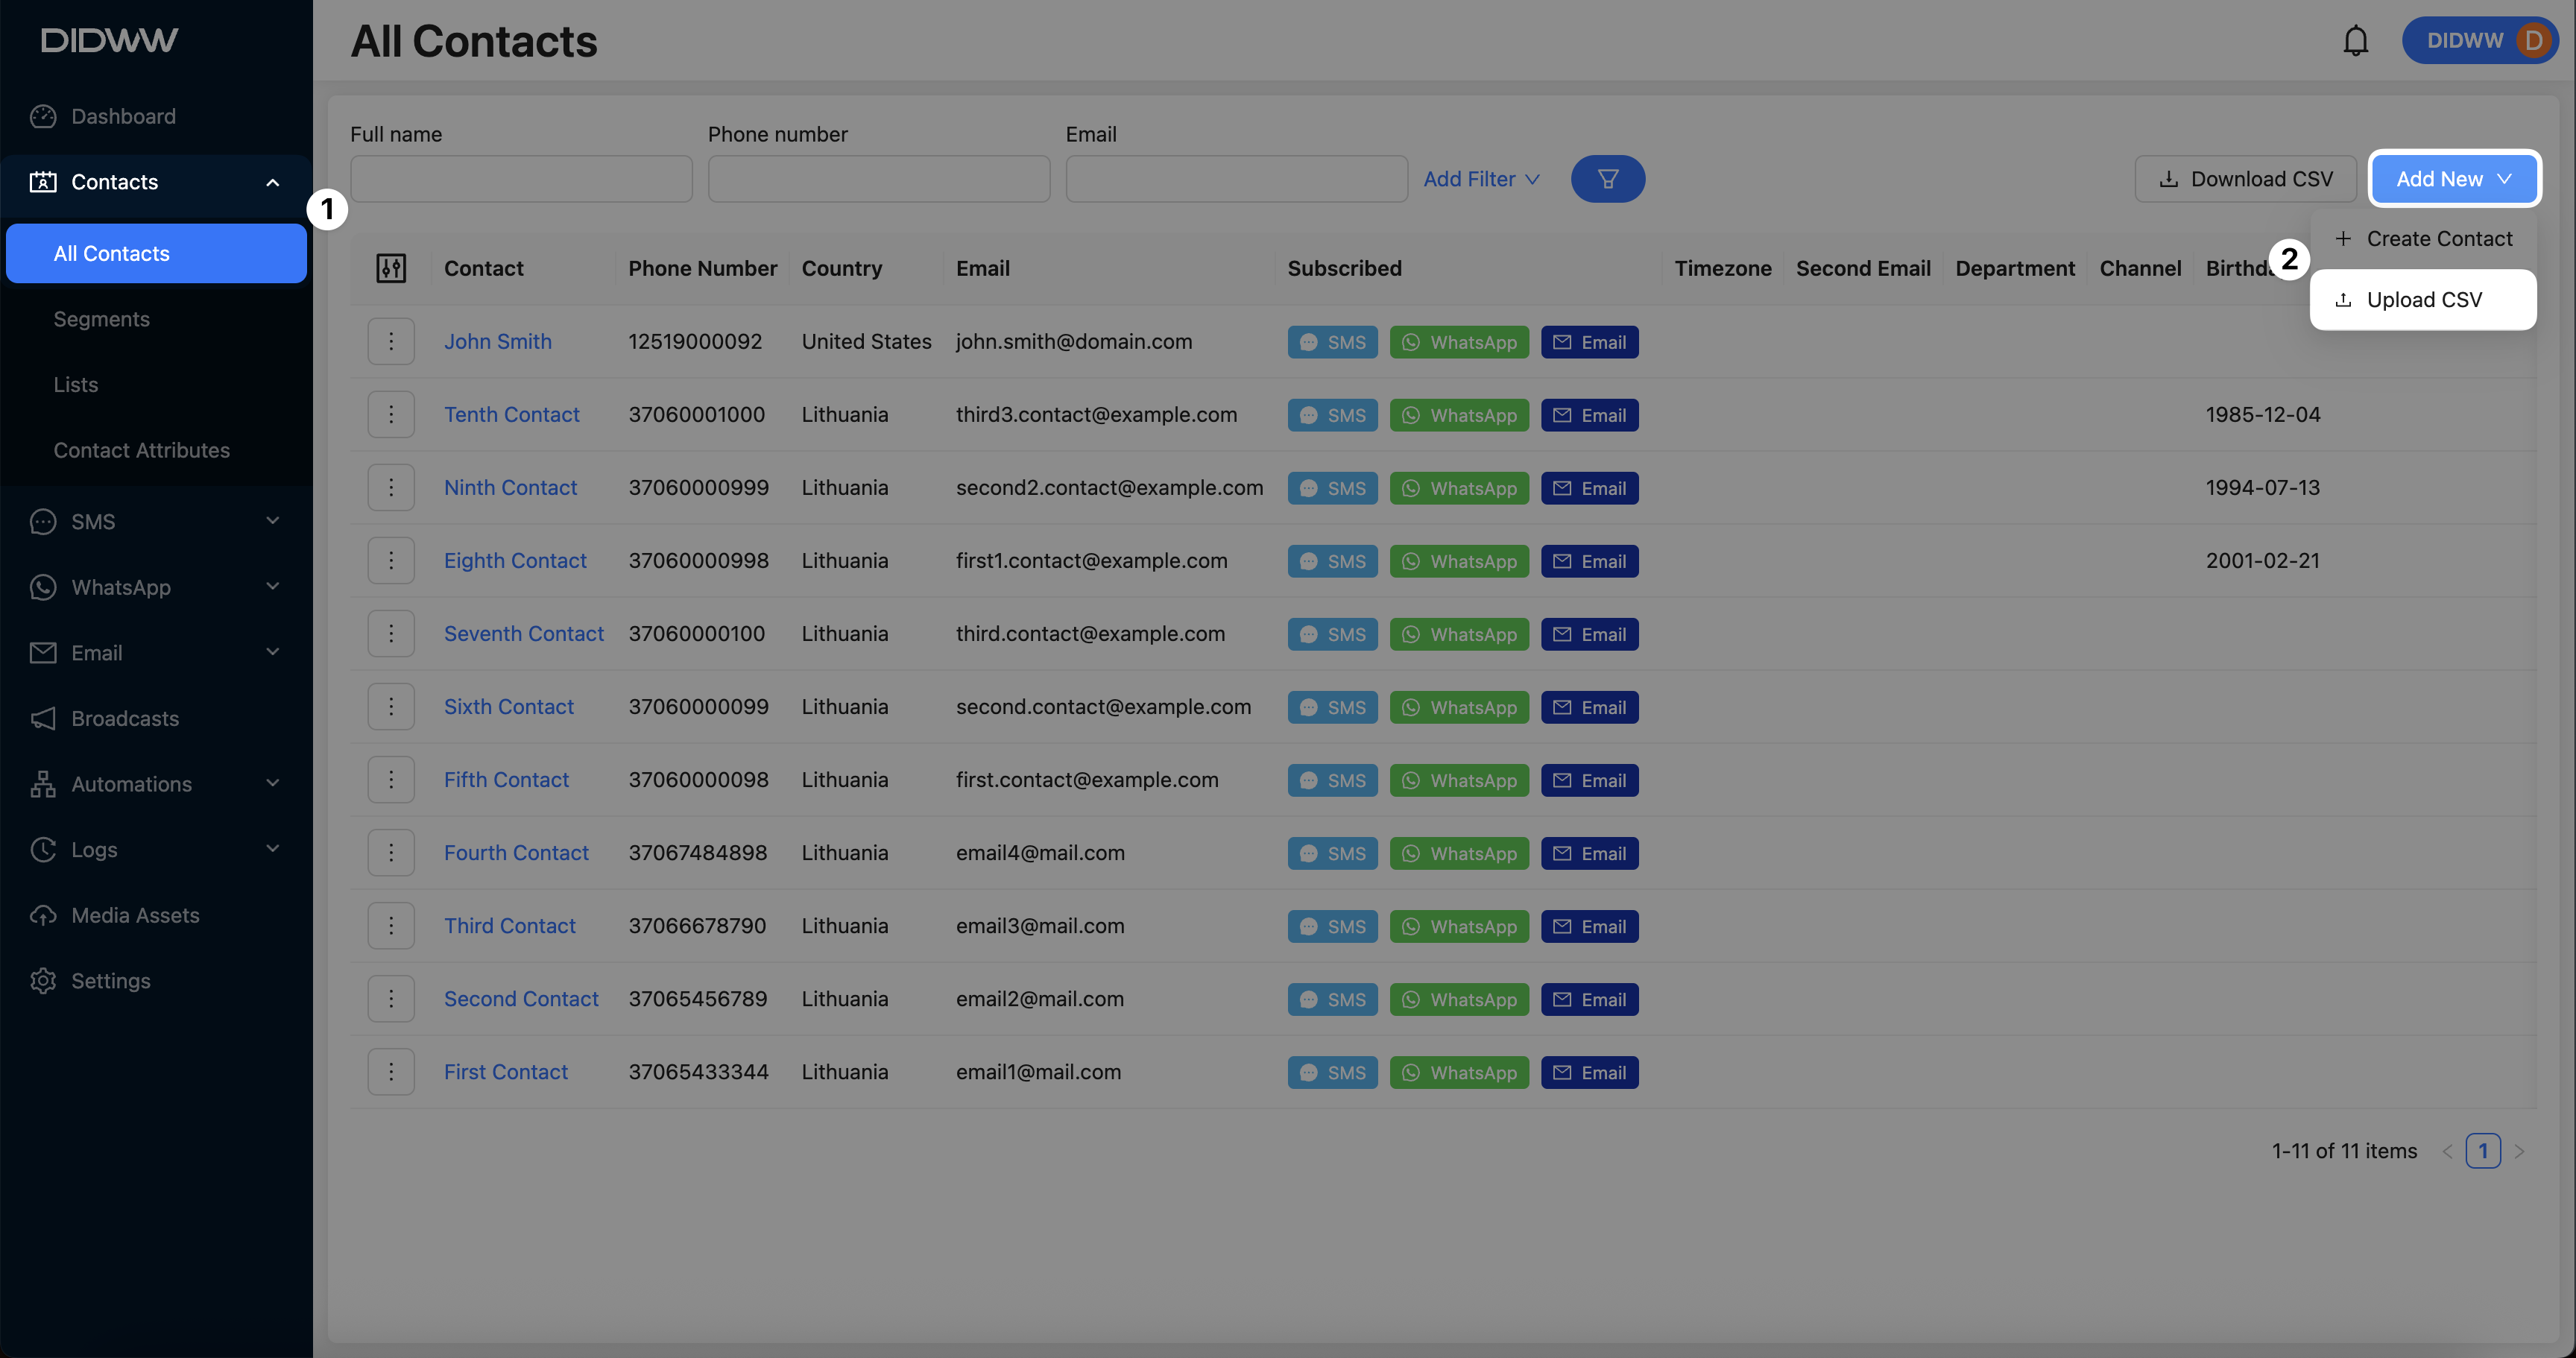
Fig. 3. Start Contact Creation.
Step 2: Upload the CSV File
When the upload page opens, click the selection area or drag and drop your CSV file into the designated upload zone.
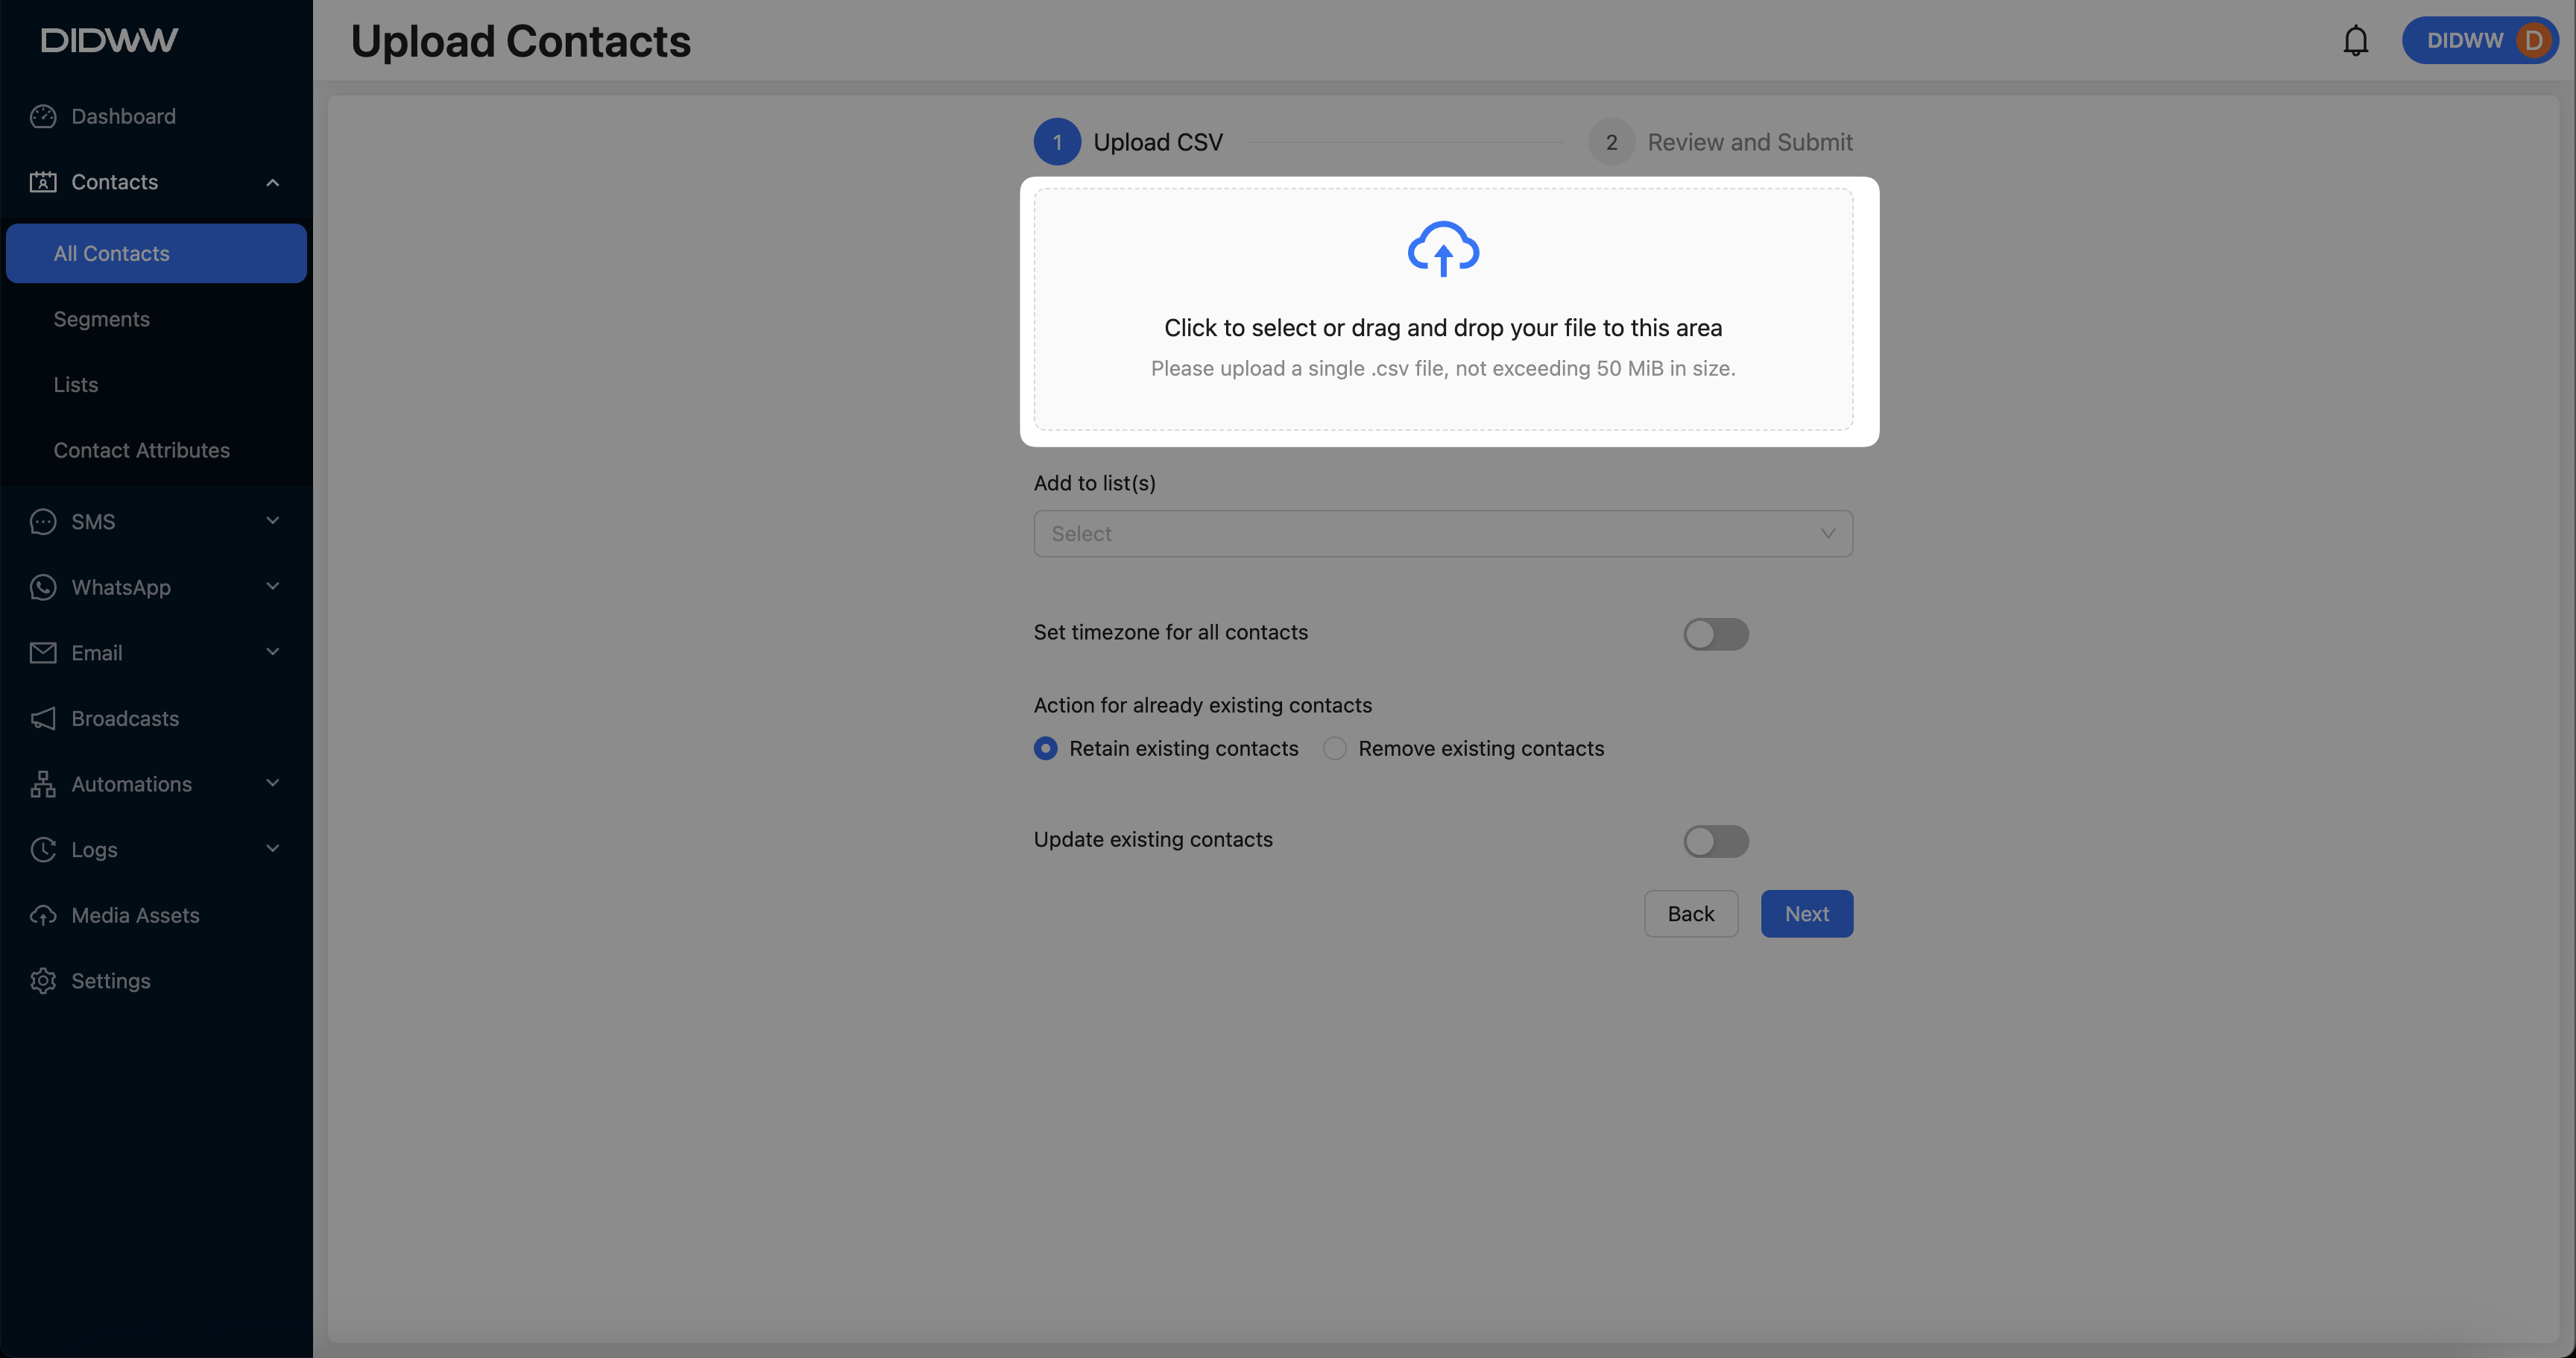
Fig. 4. Upload a single CSV File.
Step 3: Configure Upload CSV Settings
After selecting your CSV file, configure the available upload options to ensure proper handling of your contact data.
Add to List(s) – Assign the uploaded contacts to one or more existing contact lists. See Lists for more information.
Set Timezone – Optionally apply a default timezone to all imported contacts.
Action for Existing Contacts – Choose whether to retain or remove existing contacts in your workspace.
Update Existing Contacts – Disable this option if you are adding new contacts and do not want to overwrite existing records.
Note
In this example, we are uploading new contacts only. Make sure to disable the Update Existing Contacts option if you do not intend to overwrite existing records.
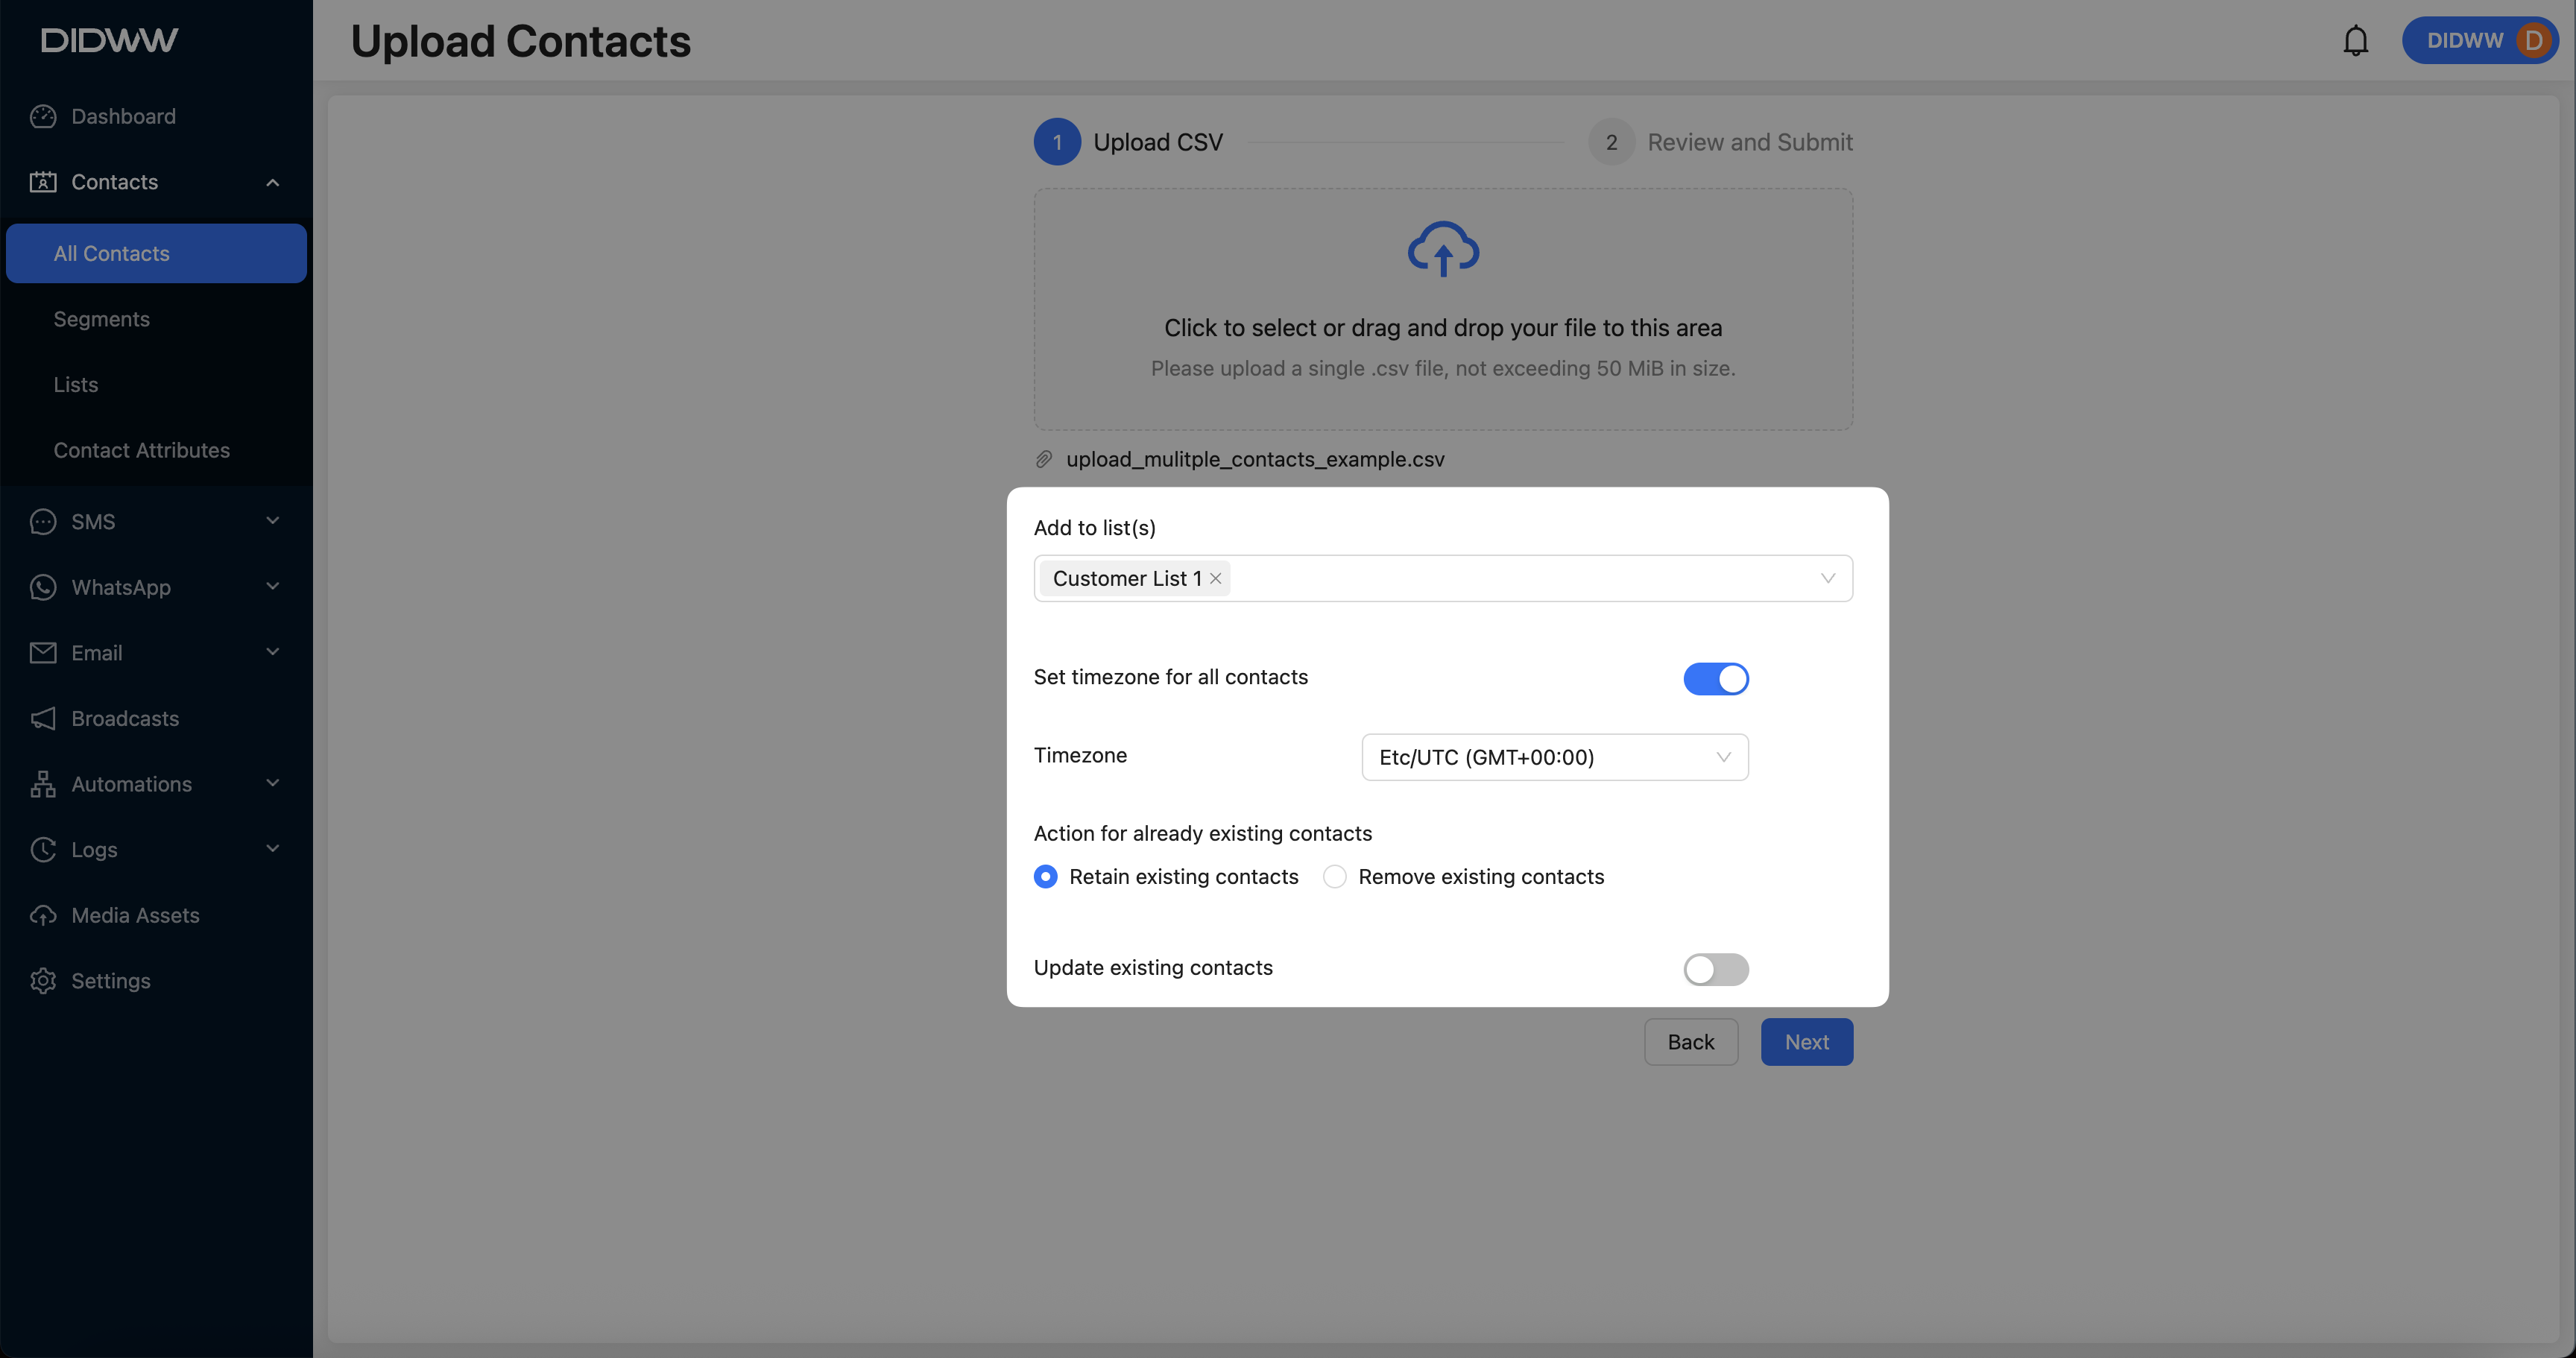
Fig. 5. Configure Upload CSV Settings.
Step 4: Review and Map to Attributes
In the Review and Submit step, the system will automatically detect and parse each column from your CSV file, then attempt to match them to the appropriate contact attributes (e.g., First Name, Last Name, Phone Number).
Carefully review each column to ensure the data is correctly aligned with its corresponding attribute before proceeding.
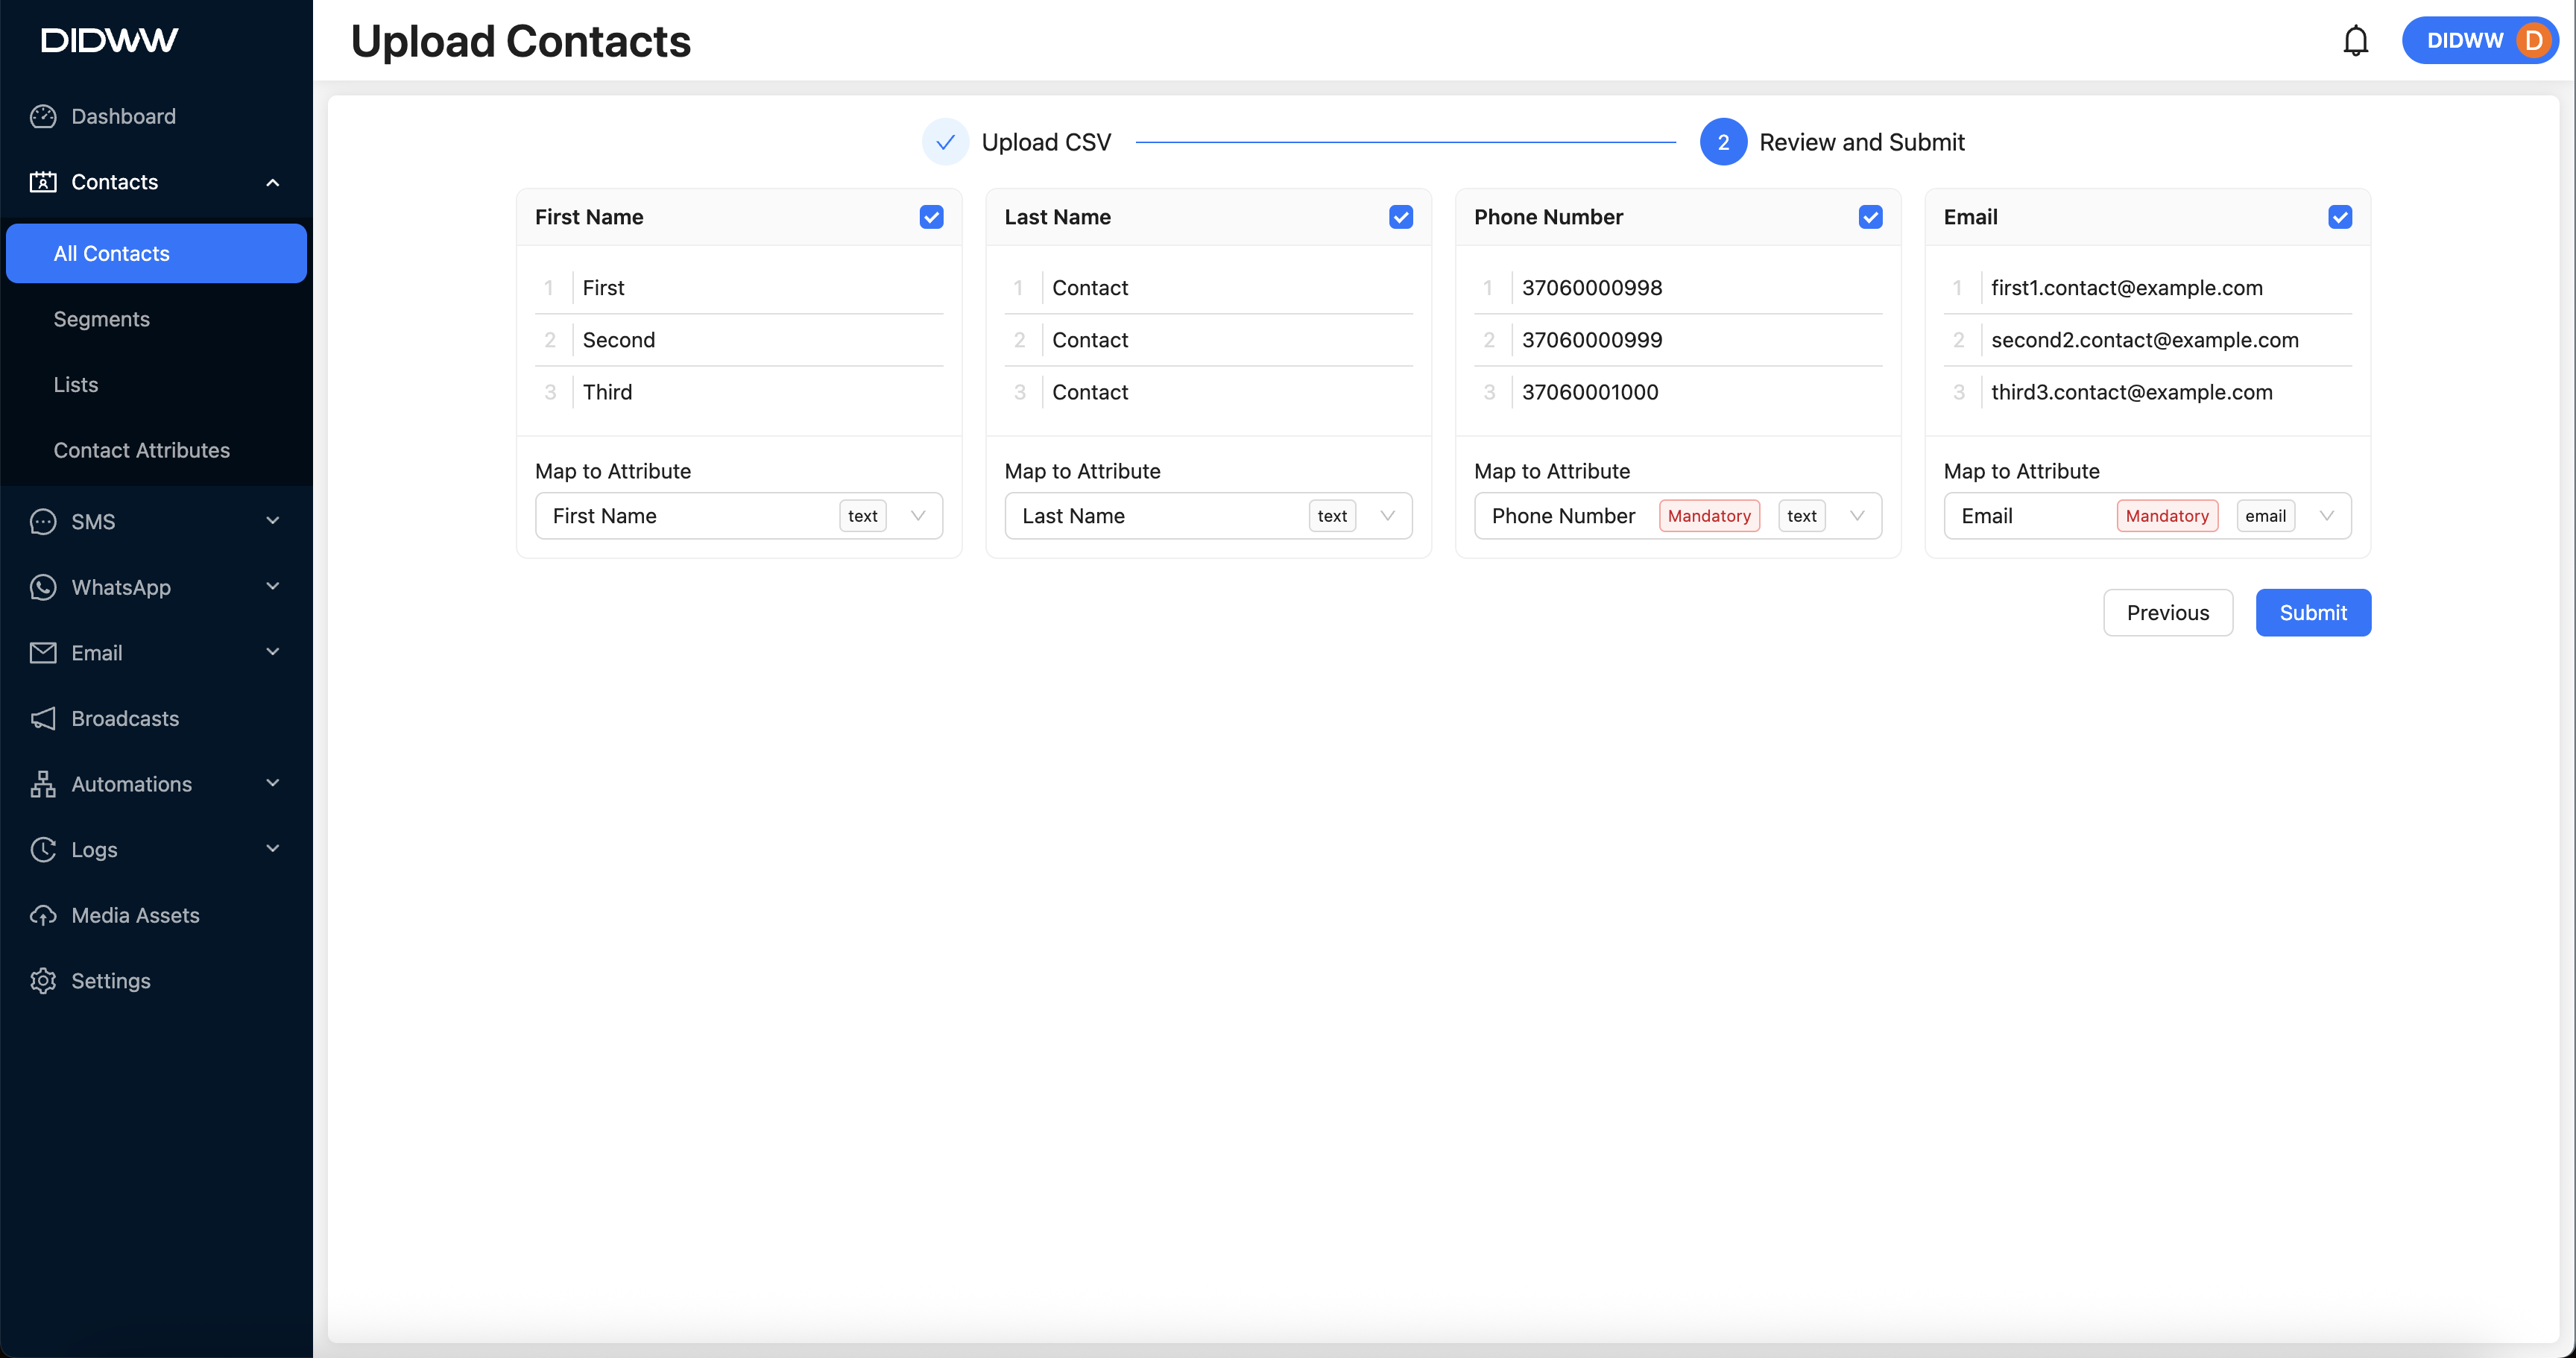
Fig. 6. Assign Columns to corresponding Contact Attributes.
Step 5: Submit and Import Contacts
After reviewing and confirming the mapped attributes, click Submit to begin the import process.
The system will create new contacts based on the uploaded data. Once the import is complete, a confirmation message will appear: Contacts uploaded successfully.
Note
If you encounter issues uploading a CSV file or receive an error message during the process, please contact us via live chat or email us at support@didww.com .
Updating Existing Contacts
Use this option to update existing contact records by uploading a CSV file containing the External ID (My ID) and any attributes you want to add or modify.
In this example, we will add a new attribute (Birthday with a Date value type) to existing contacts. The same process can be applied to update any custom attribute that has already been defined.
Before You Start
To update contact records, you must first prepare a properly formatted CSV file.
The file must include the mandatory columns: External ID, Phone Number, and Email. These are used to identify and match existing contacts in the system. Example template:
DownloadThe attribute you want to update (e.g., Birthday with a Date value type) must already exist in your contact attributes. Learn more: Contact Attributes
Export your existing contacts to obtain the current External ID (My ID) values before preparing the update file.
Note
If your file includes data for attributes that do not yet exist in the system, those attributes will be automatically created. However, their value types may not be set correctly. It is recommended to manually define contact attributes in advance with the appropriate value types.
Step 1: Prepare the File for Upload
To begin the update process, export your current contacts and prepare the data:
Go to Contacts > All Contacts.
Click the Download CSV button. The External ID column will be included in the export.
Open the downloaded CSV file and locate the custom column (e.g., Birthday).
Enter the new column values for each contact (e.g., Birthday in YYYY-MM-DD format).
Remove any columns and data you do not intend to update. Ensure that External ID, Email, and Phone Number remain in the file.
Save the file.
Note
Save the file in .csv format with UTF-8 encoding.
The file size must not exceed 50 MB.
Step 2: Open Upload CSV form
Go to Contacts > All Contacts
Click Add New and select Upload CSV
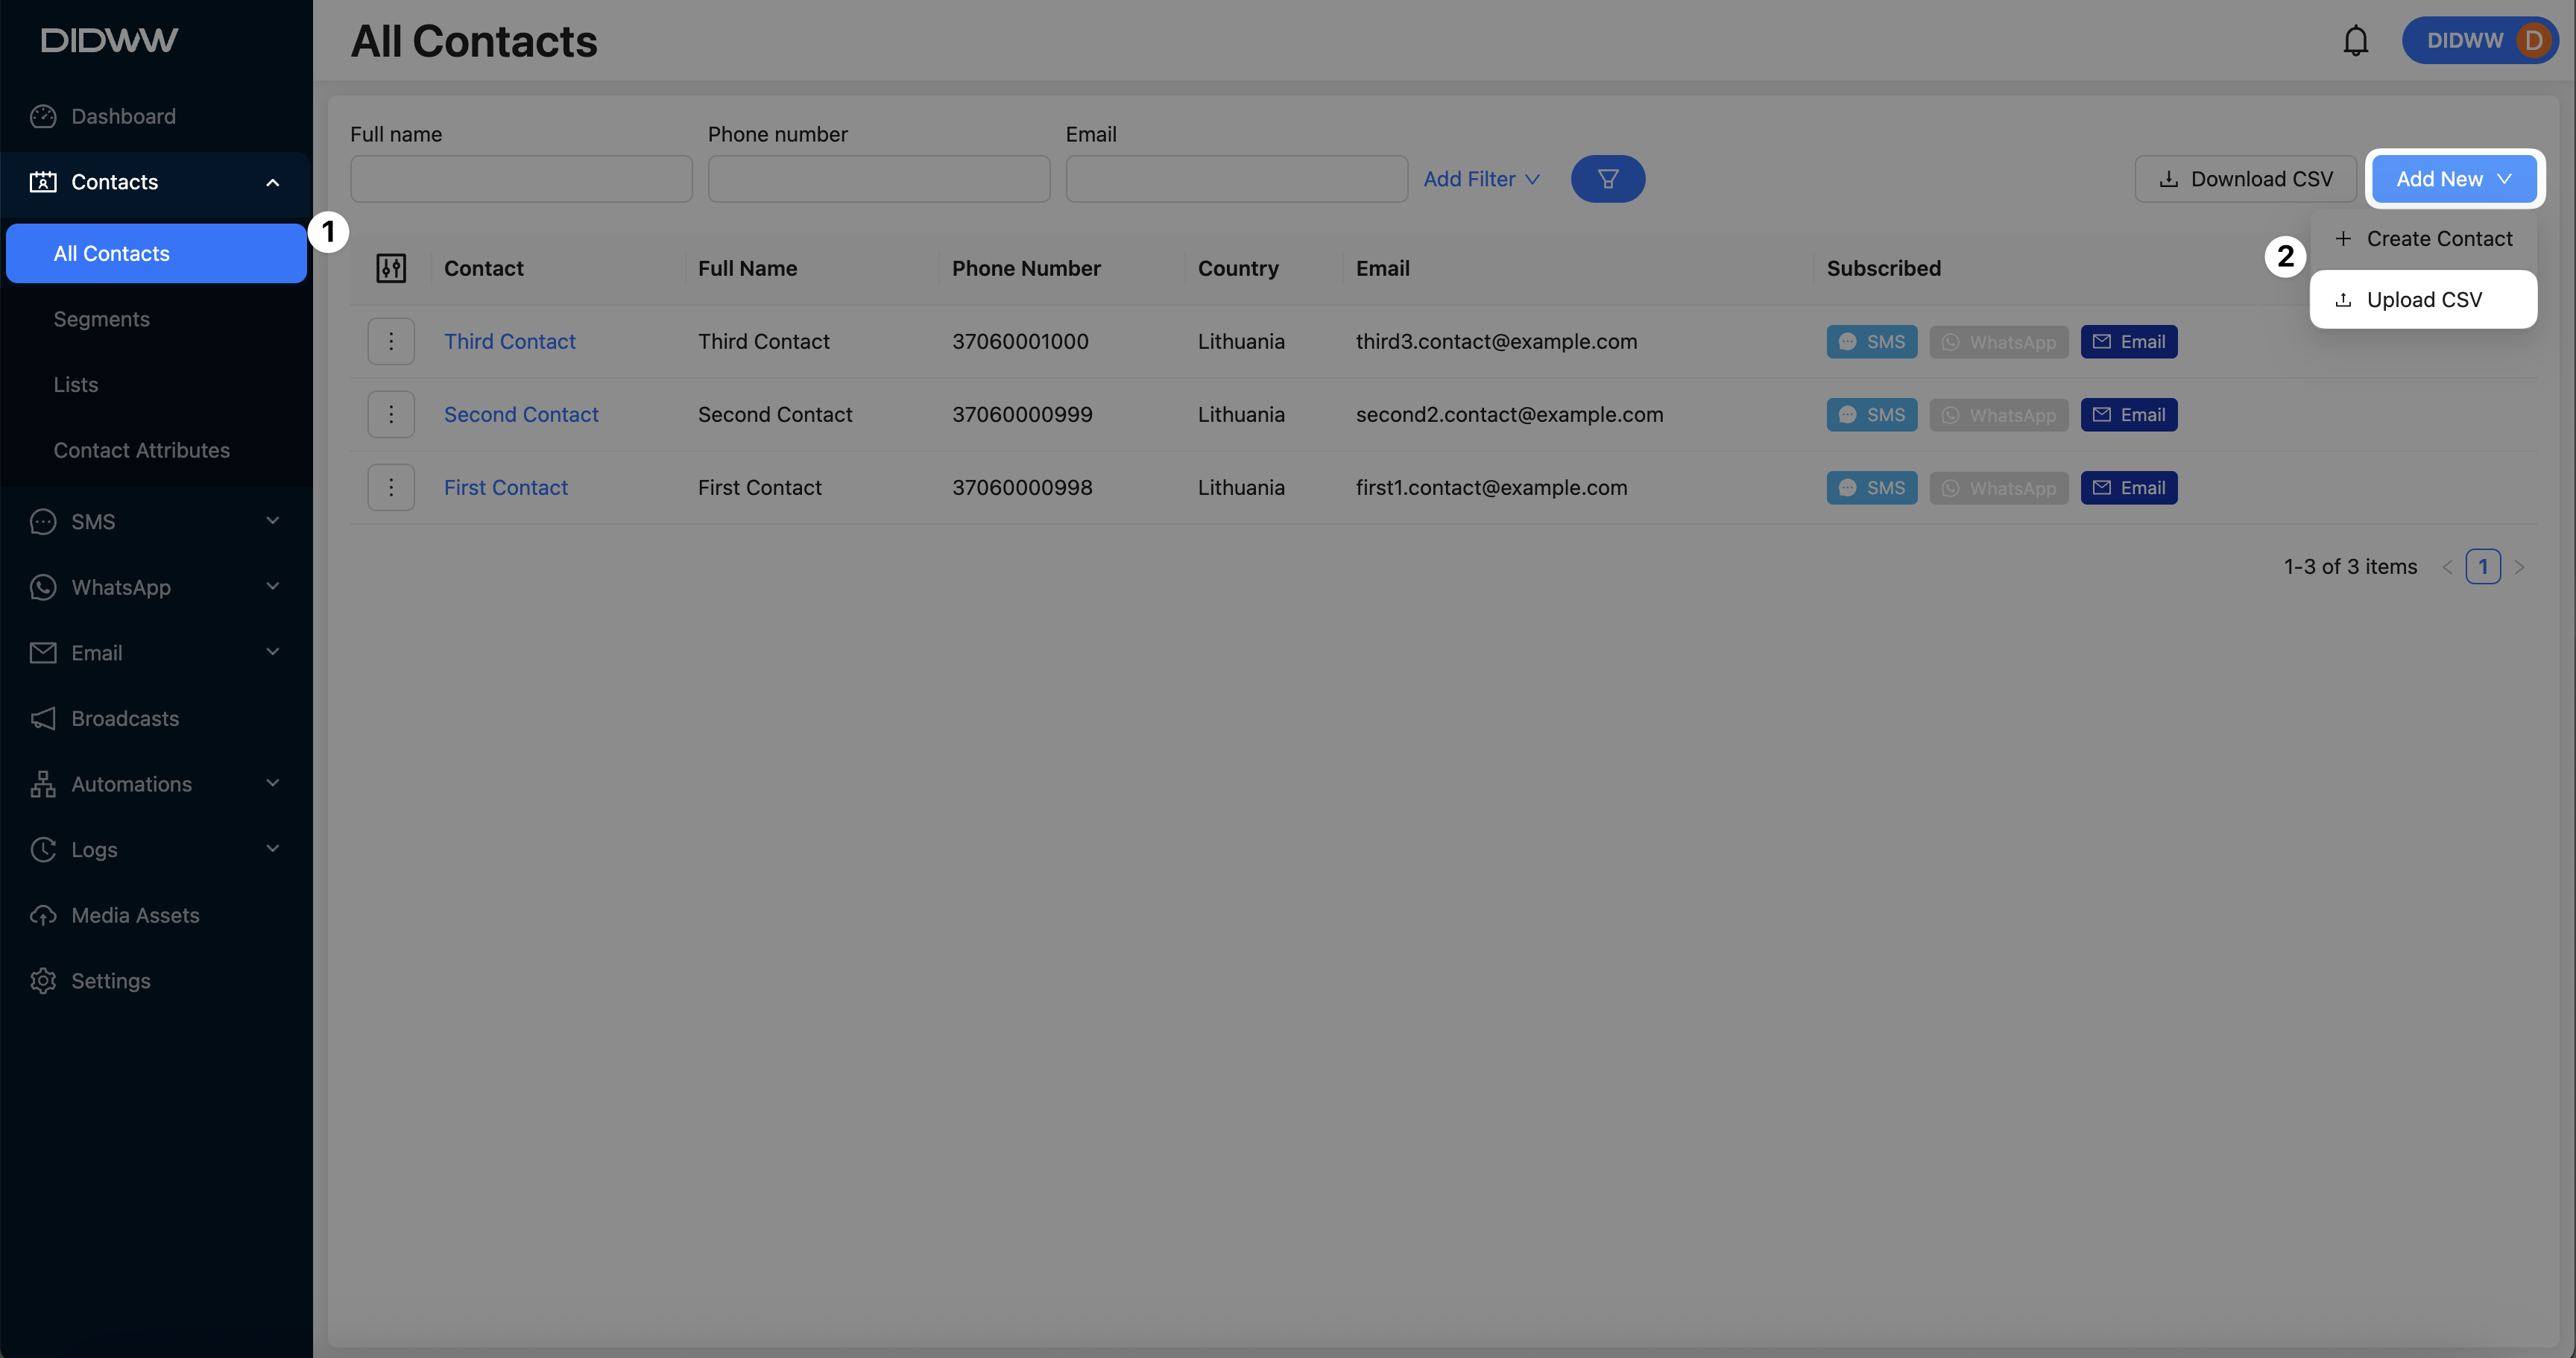
Fig. 1. Start Upload.
Step 3: Upload the CSV file
When the upload page opens, click the selection area or drag and drop your CSV file into the designated upload zone.
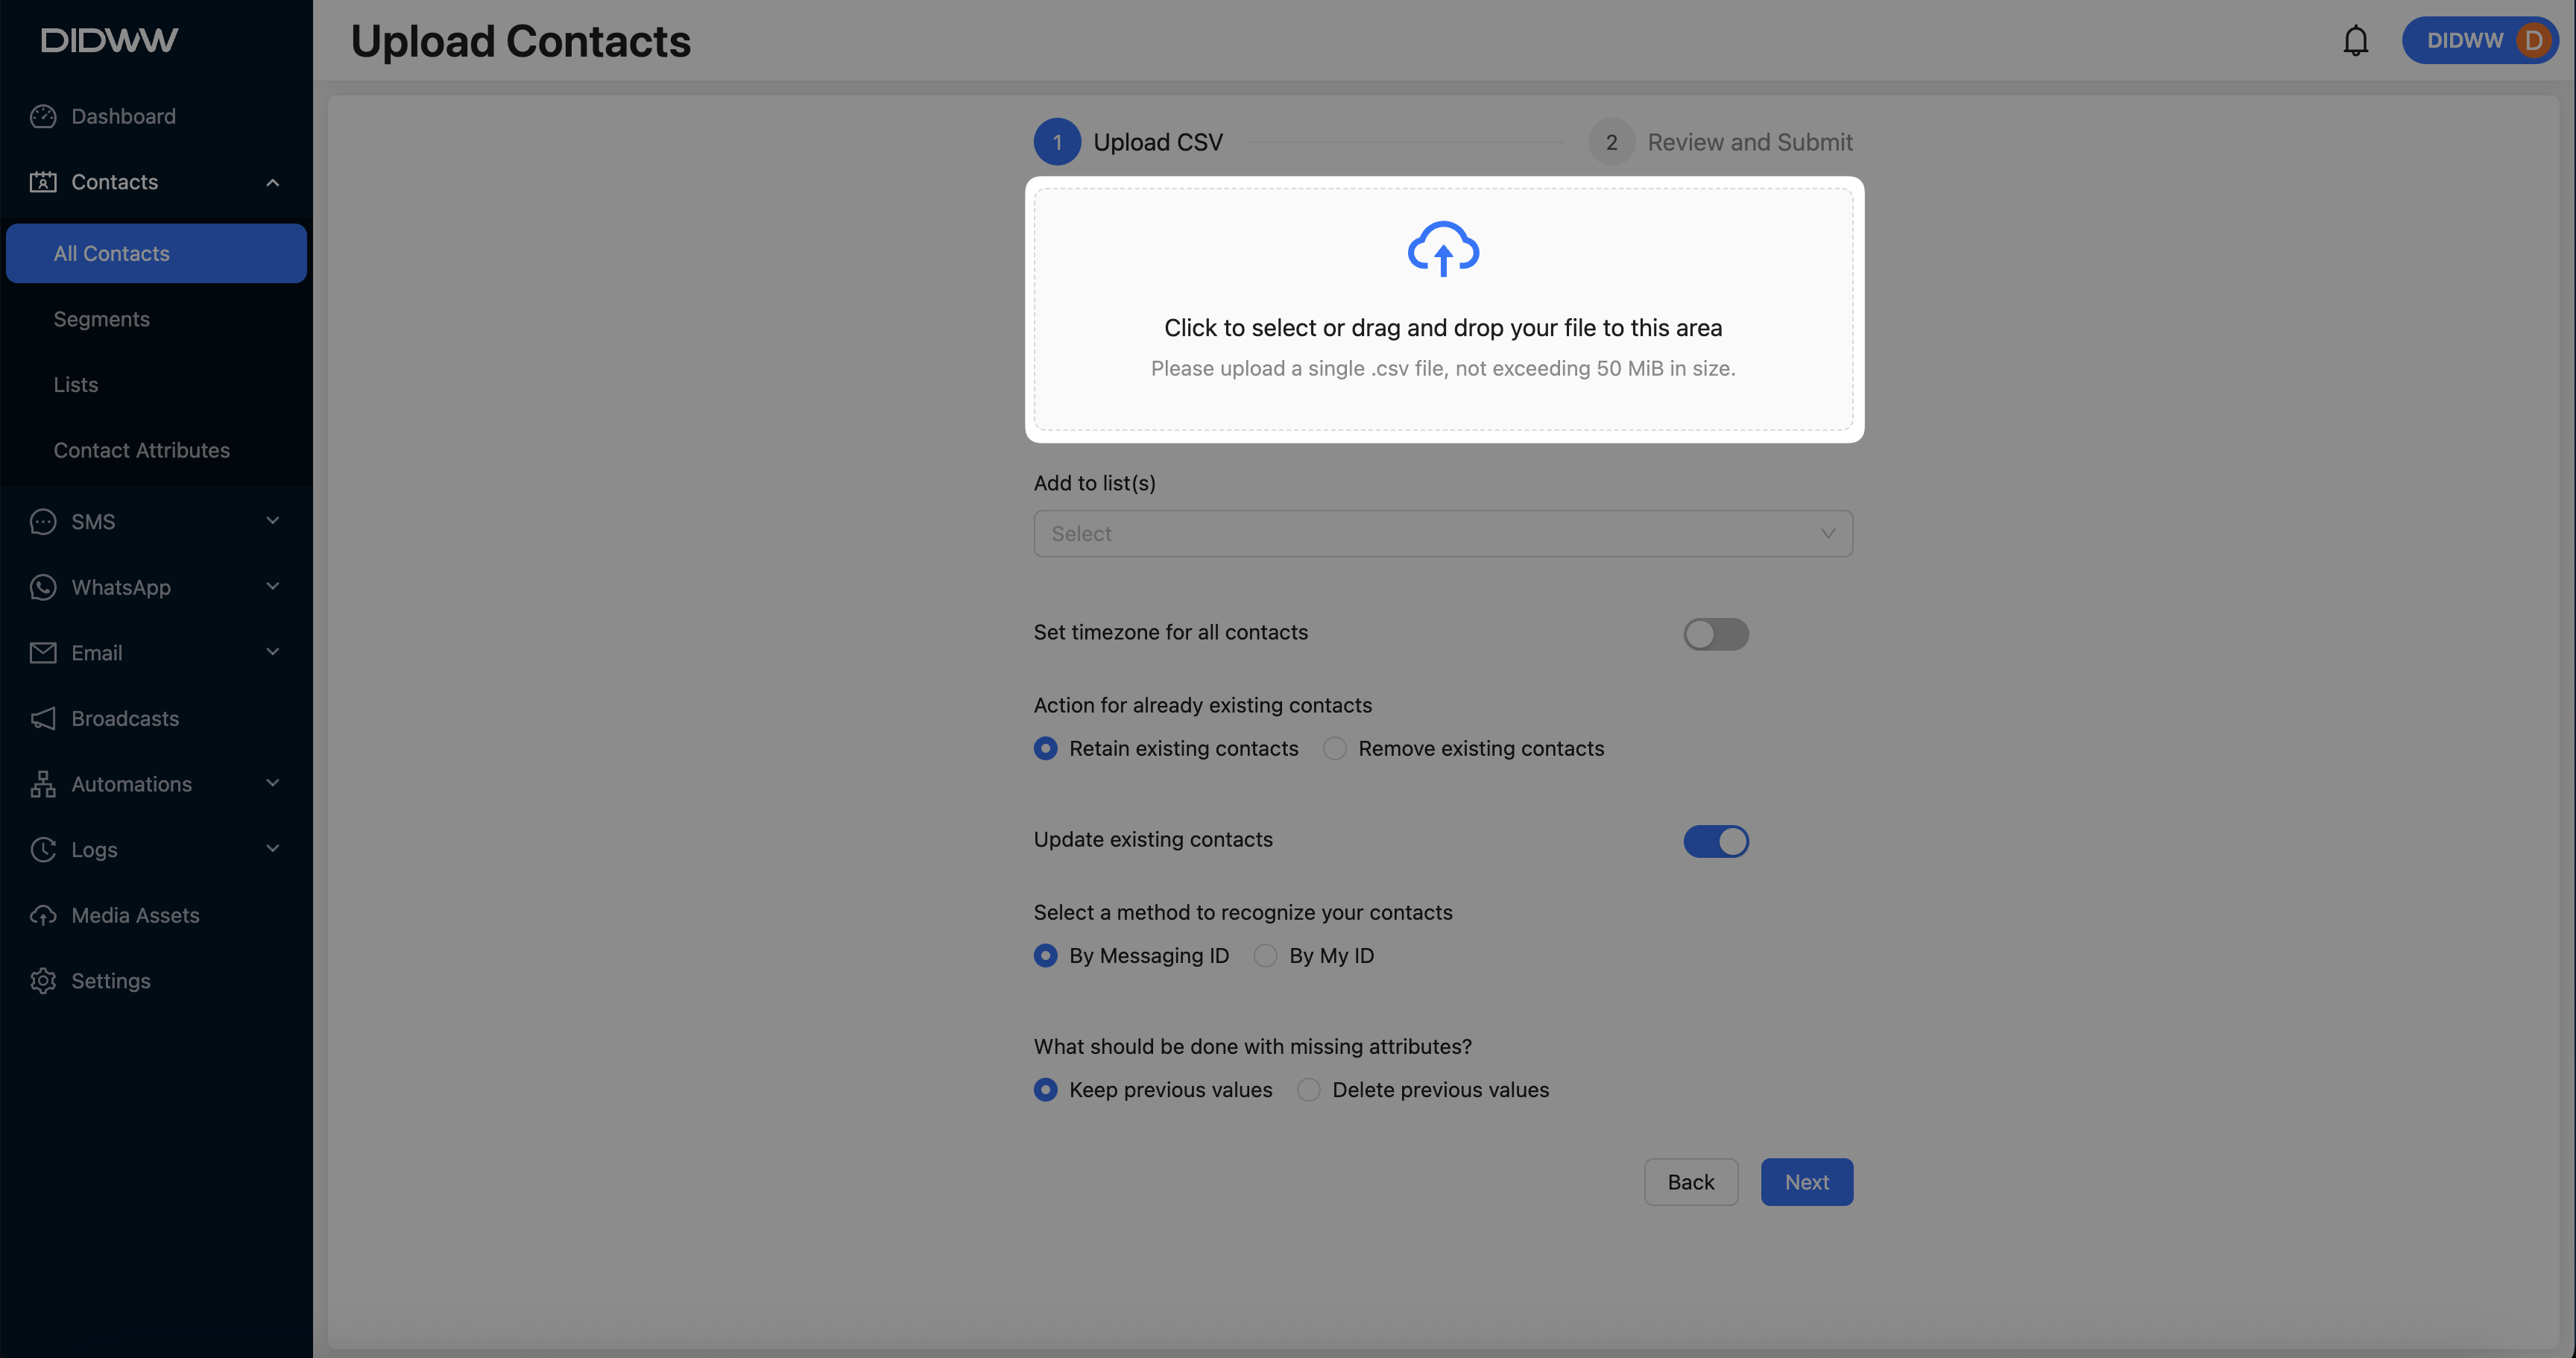
Fig. 4. Upload a single CSV File.
Step 4: Configure Upload CSV Settings
Make the following selections during upload configuration:
Add to List(s) – Leave empty unless needed
Set Timezone – Optional
Action for Existing Contacts – Retain existing contacts
Update Existing Contacts – Enable this option to overwrite records
Select a method to recognize contacts – Choose By My ID
- Handle Missing Attributes:
Keep previous values – Retain existing attribute values for fields that are not included in your CSV file.
Delete previous values – Clear any attribute not present in the uploaded CSV and reset it to an empty state.
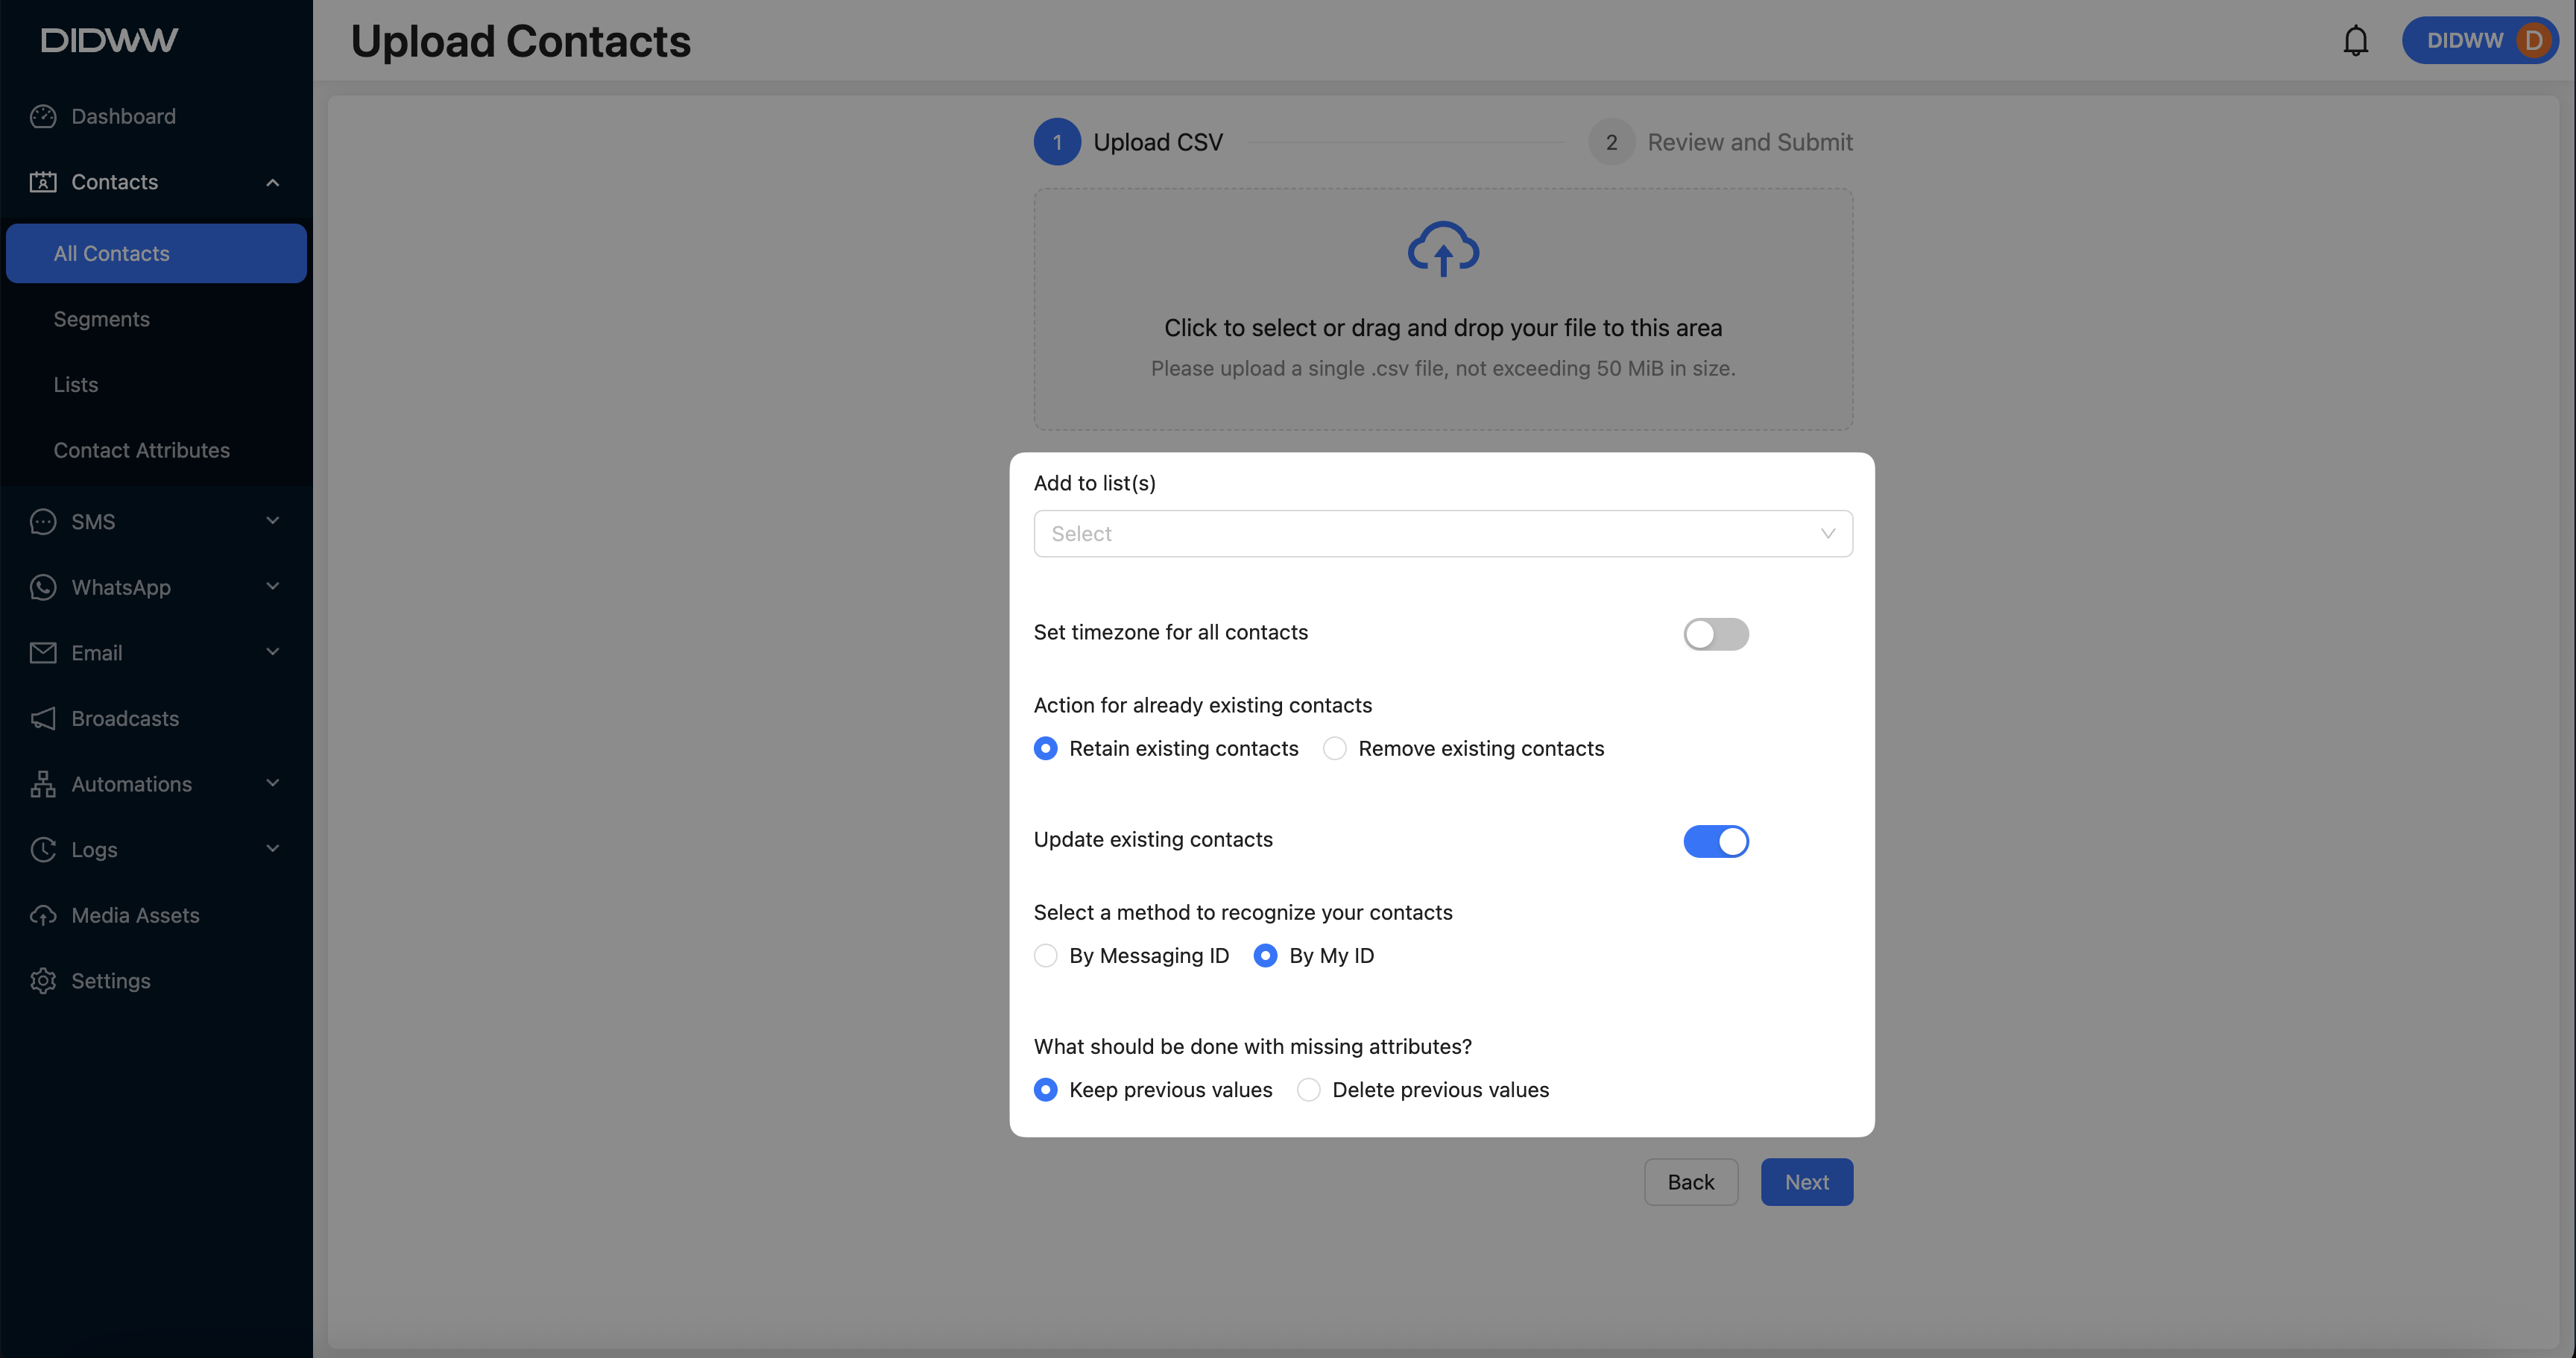
Fig. 2. Configure Upload Settings.
Step 5: Review and Assign Columns
In the Review and Submit step, the system will display each column from your CSV and attempt to assign them to existing contact attributes.
Follow these steps to configure the recognised columns:
Verify that all mandatory identifier fields (External ID, Phone Number, and Email) are selected. These fields are required to match and update the correct contact records.
Confirm that each column is assigned to the appropriate contact attribute. Unselect any columns that you do not wish to update.
Ensure the custom column intended for update is selected and correctly assigned to the corresponding attribute. For example, the Birthday column should be assigned to the Birthday attribute with the Date value type.
Review all other selected columns and verify that the attributes reflect the updates you intend to apply.
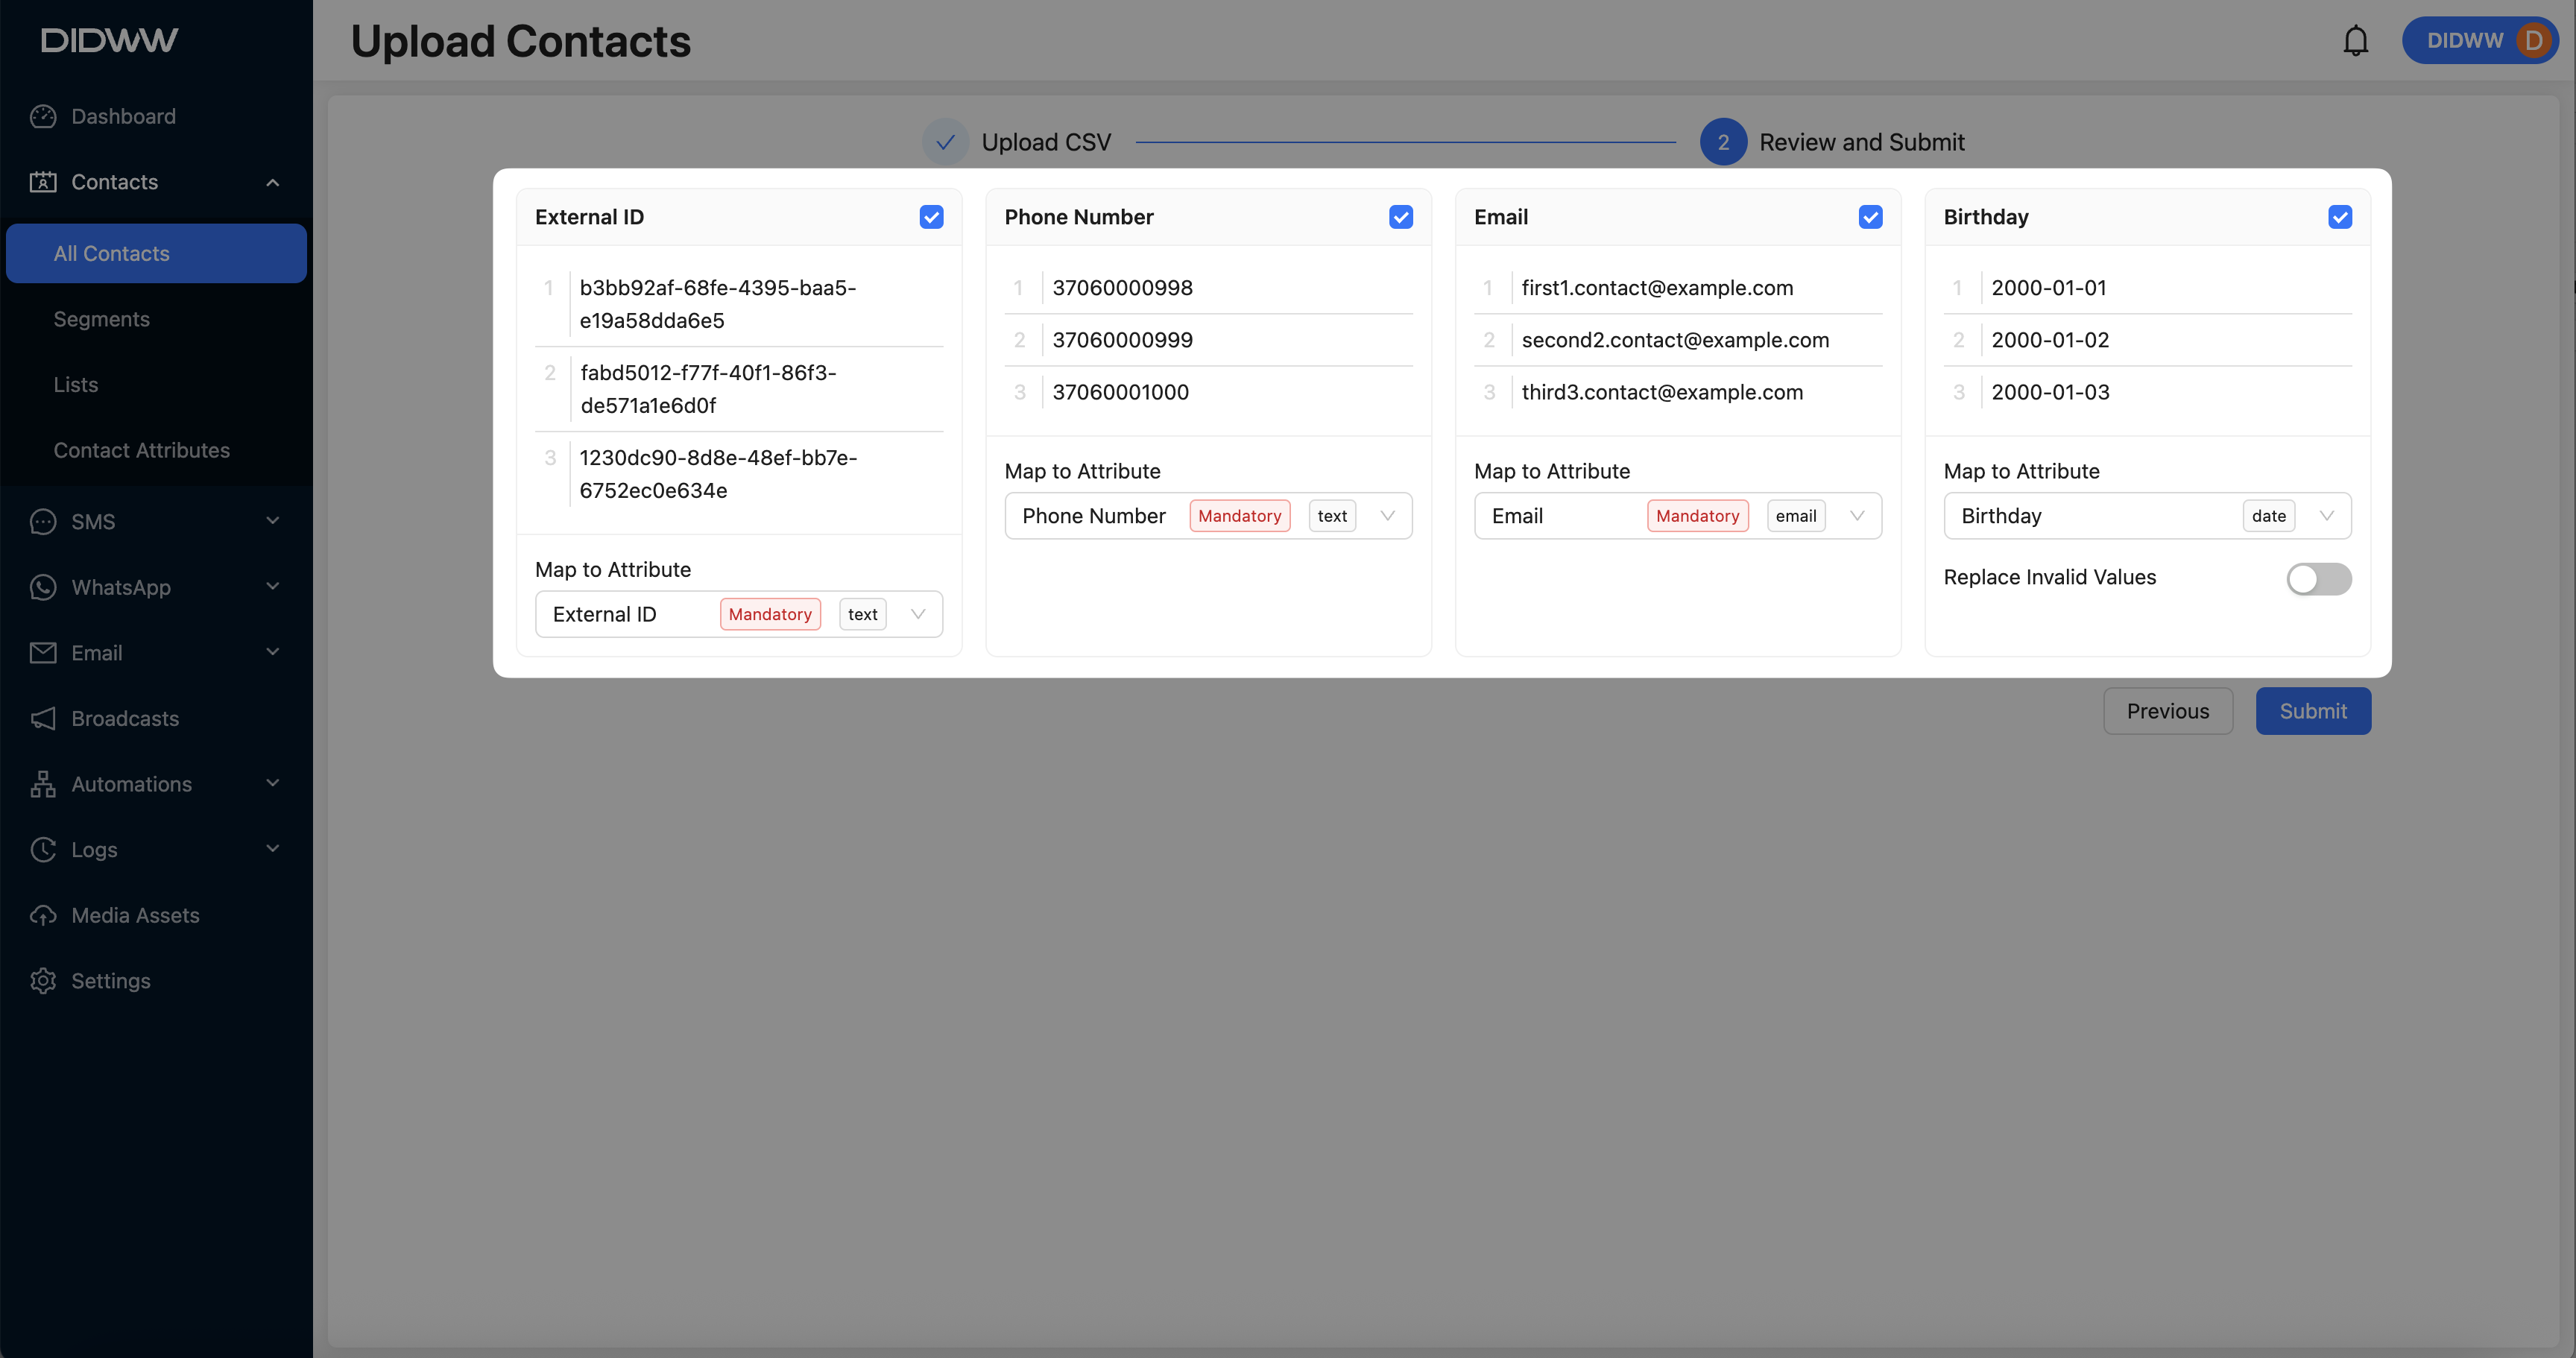
Fig. 3. Attribute Mapping Preview.
Step 6: Submit and Apply Updates
Click Submit to process the update.
The system will match each contact by External ID and update the Birthday attribute accordingly.
Note
If you encounter upload issues or receive an error message, please contact support via live chat or email: support@didww.com
Viewing, Editing, or Deleting a Contact
Go to Contacts and open the All Contacts section.
Locate the contact you want to manage.
Click the Actions button and choose one of the following options:
Details – View contact information.
Edit – Modify contact details.
Delete – Permanently remove the contact.
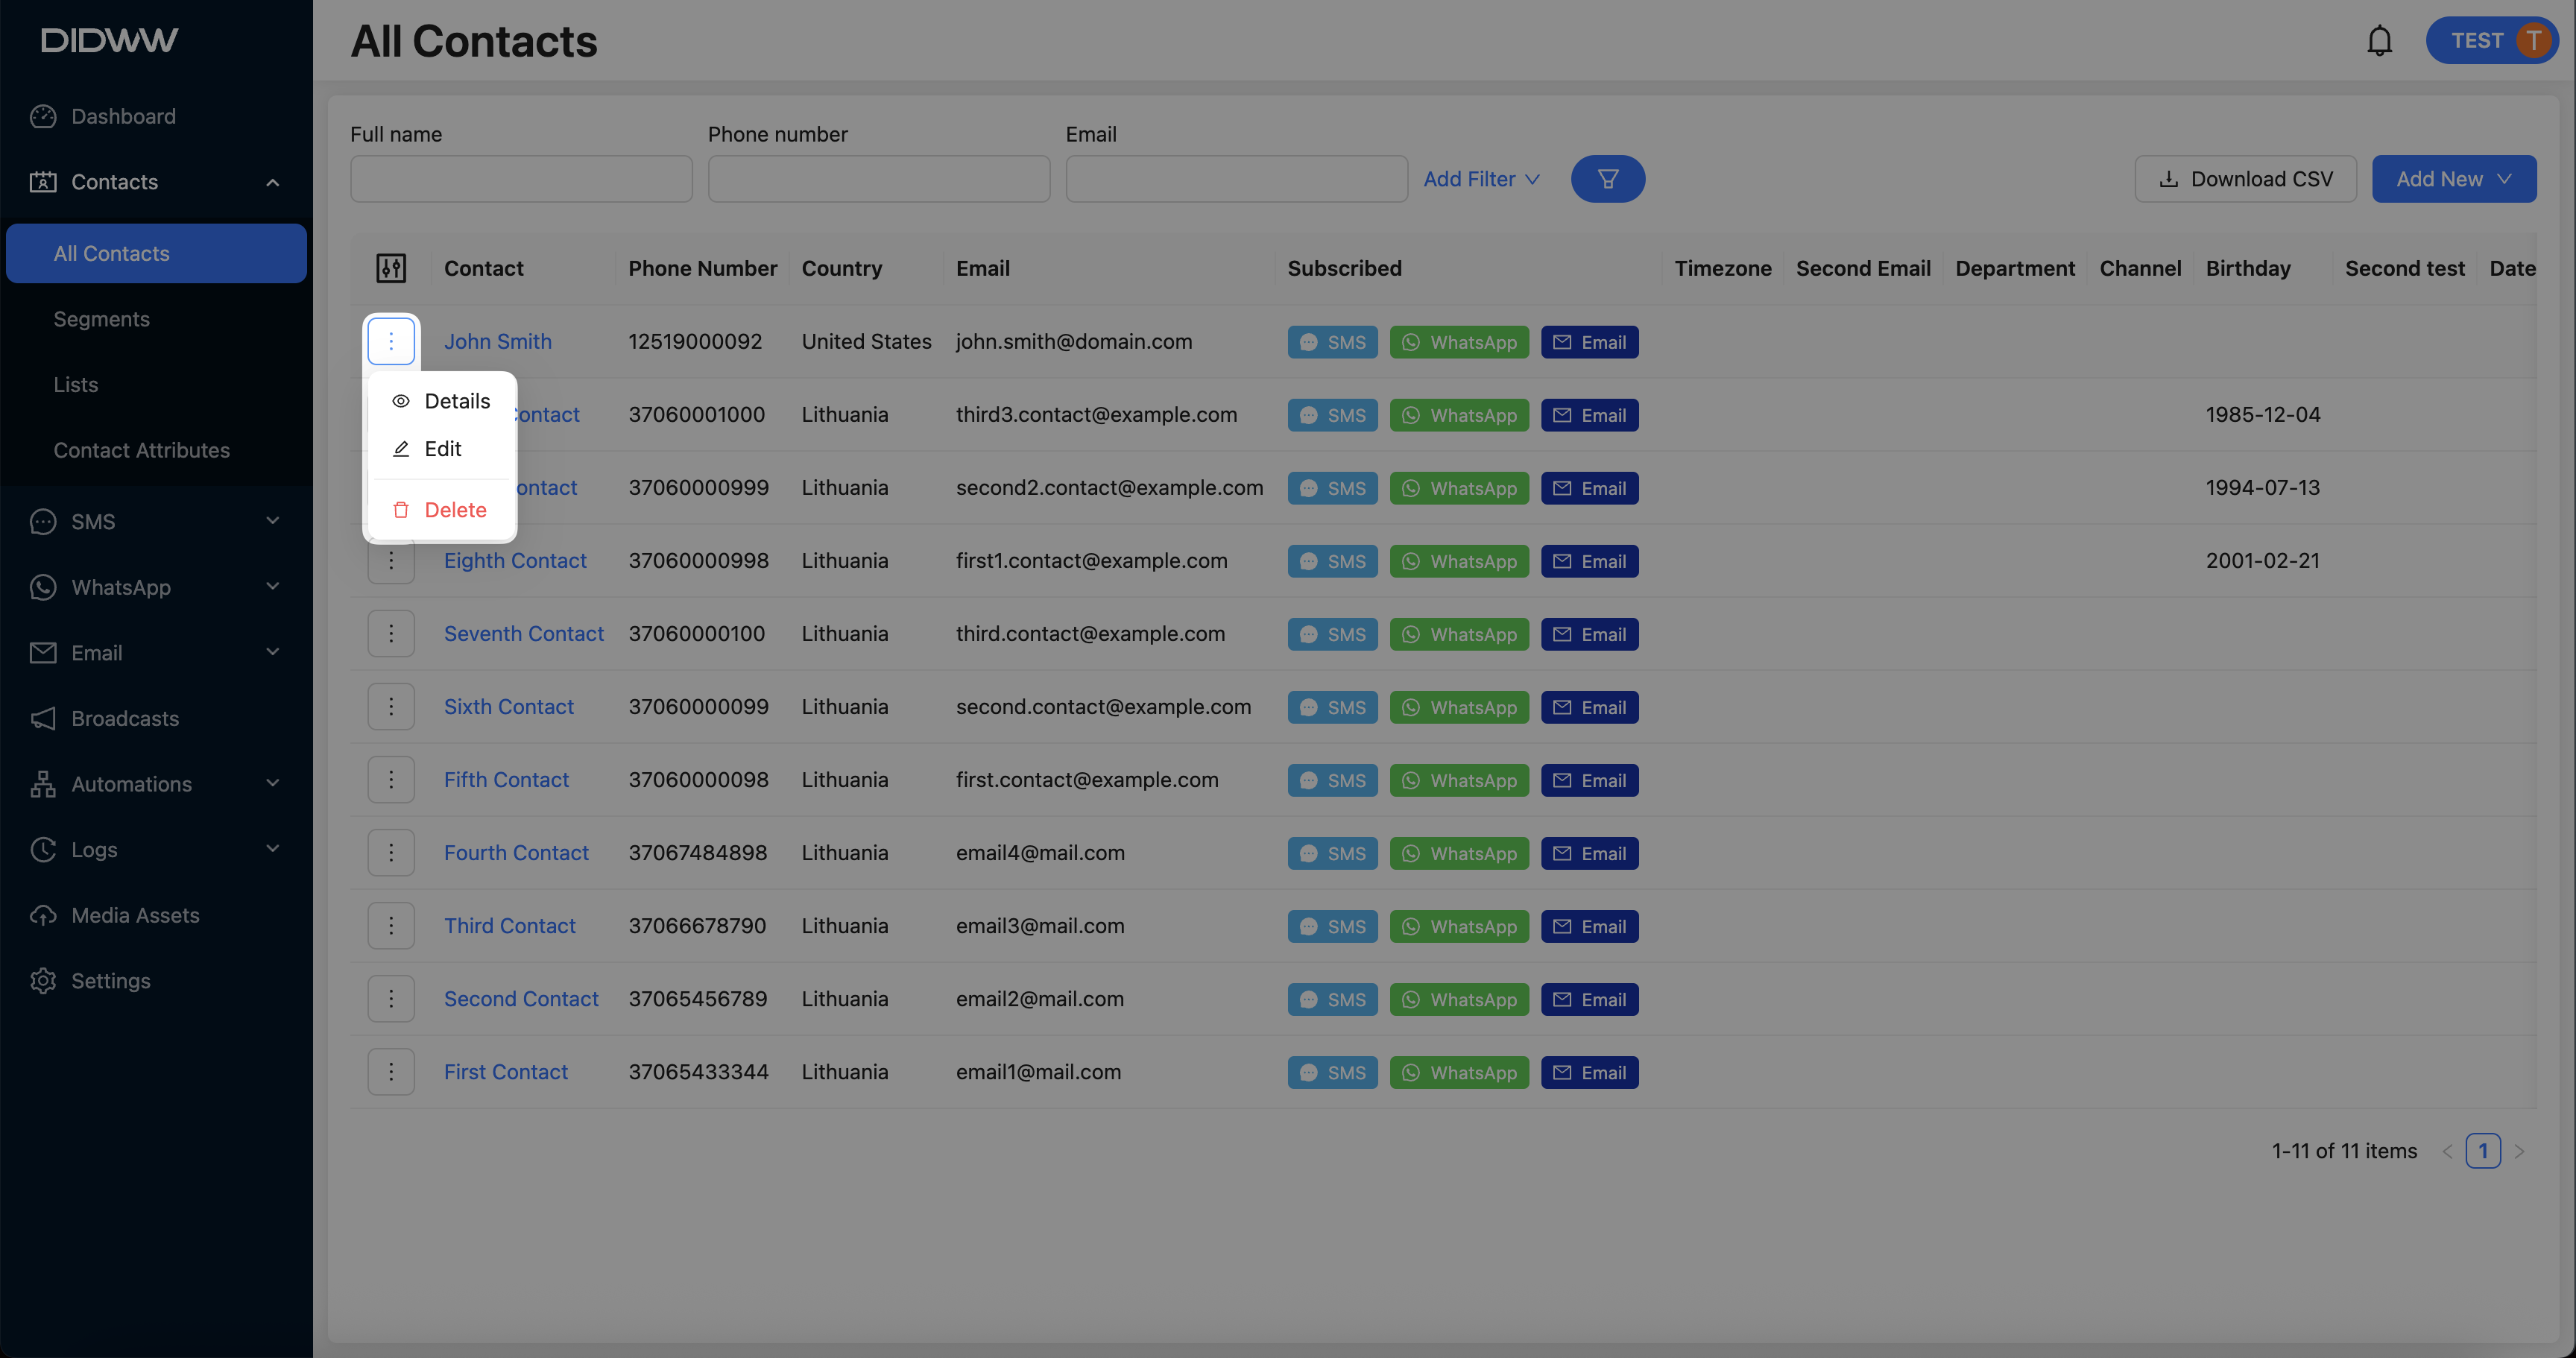
Fig. 1. Actions Menu for Managing a Contact.
Downloading All Contacts to a CSV File
You can export all contact records from the Messaging Platform in CSV format for backup or external processing.
Navigate to Contacts and open the All Contacts section.
Click the Download CSV button located at the top of the page.
In the pop-up window, enter a file name and select the destination on your device.
Click Save to complete the download.
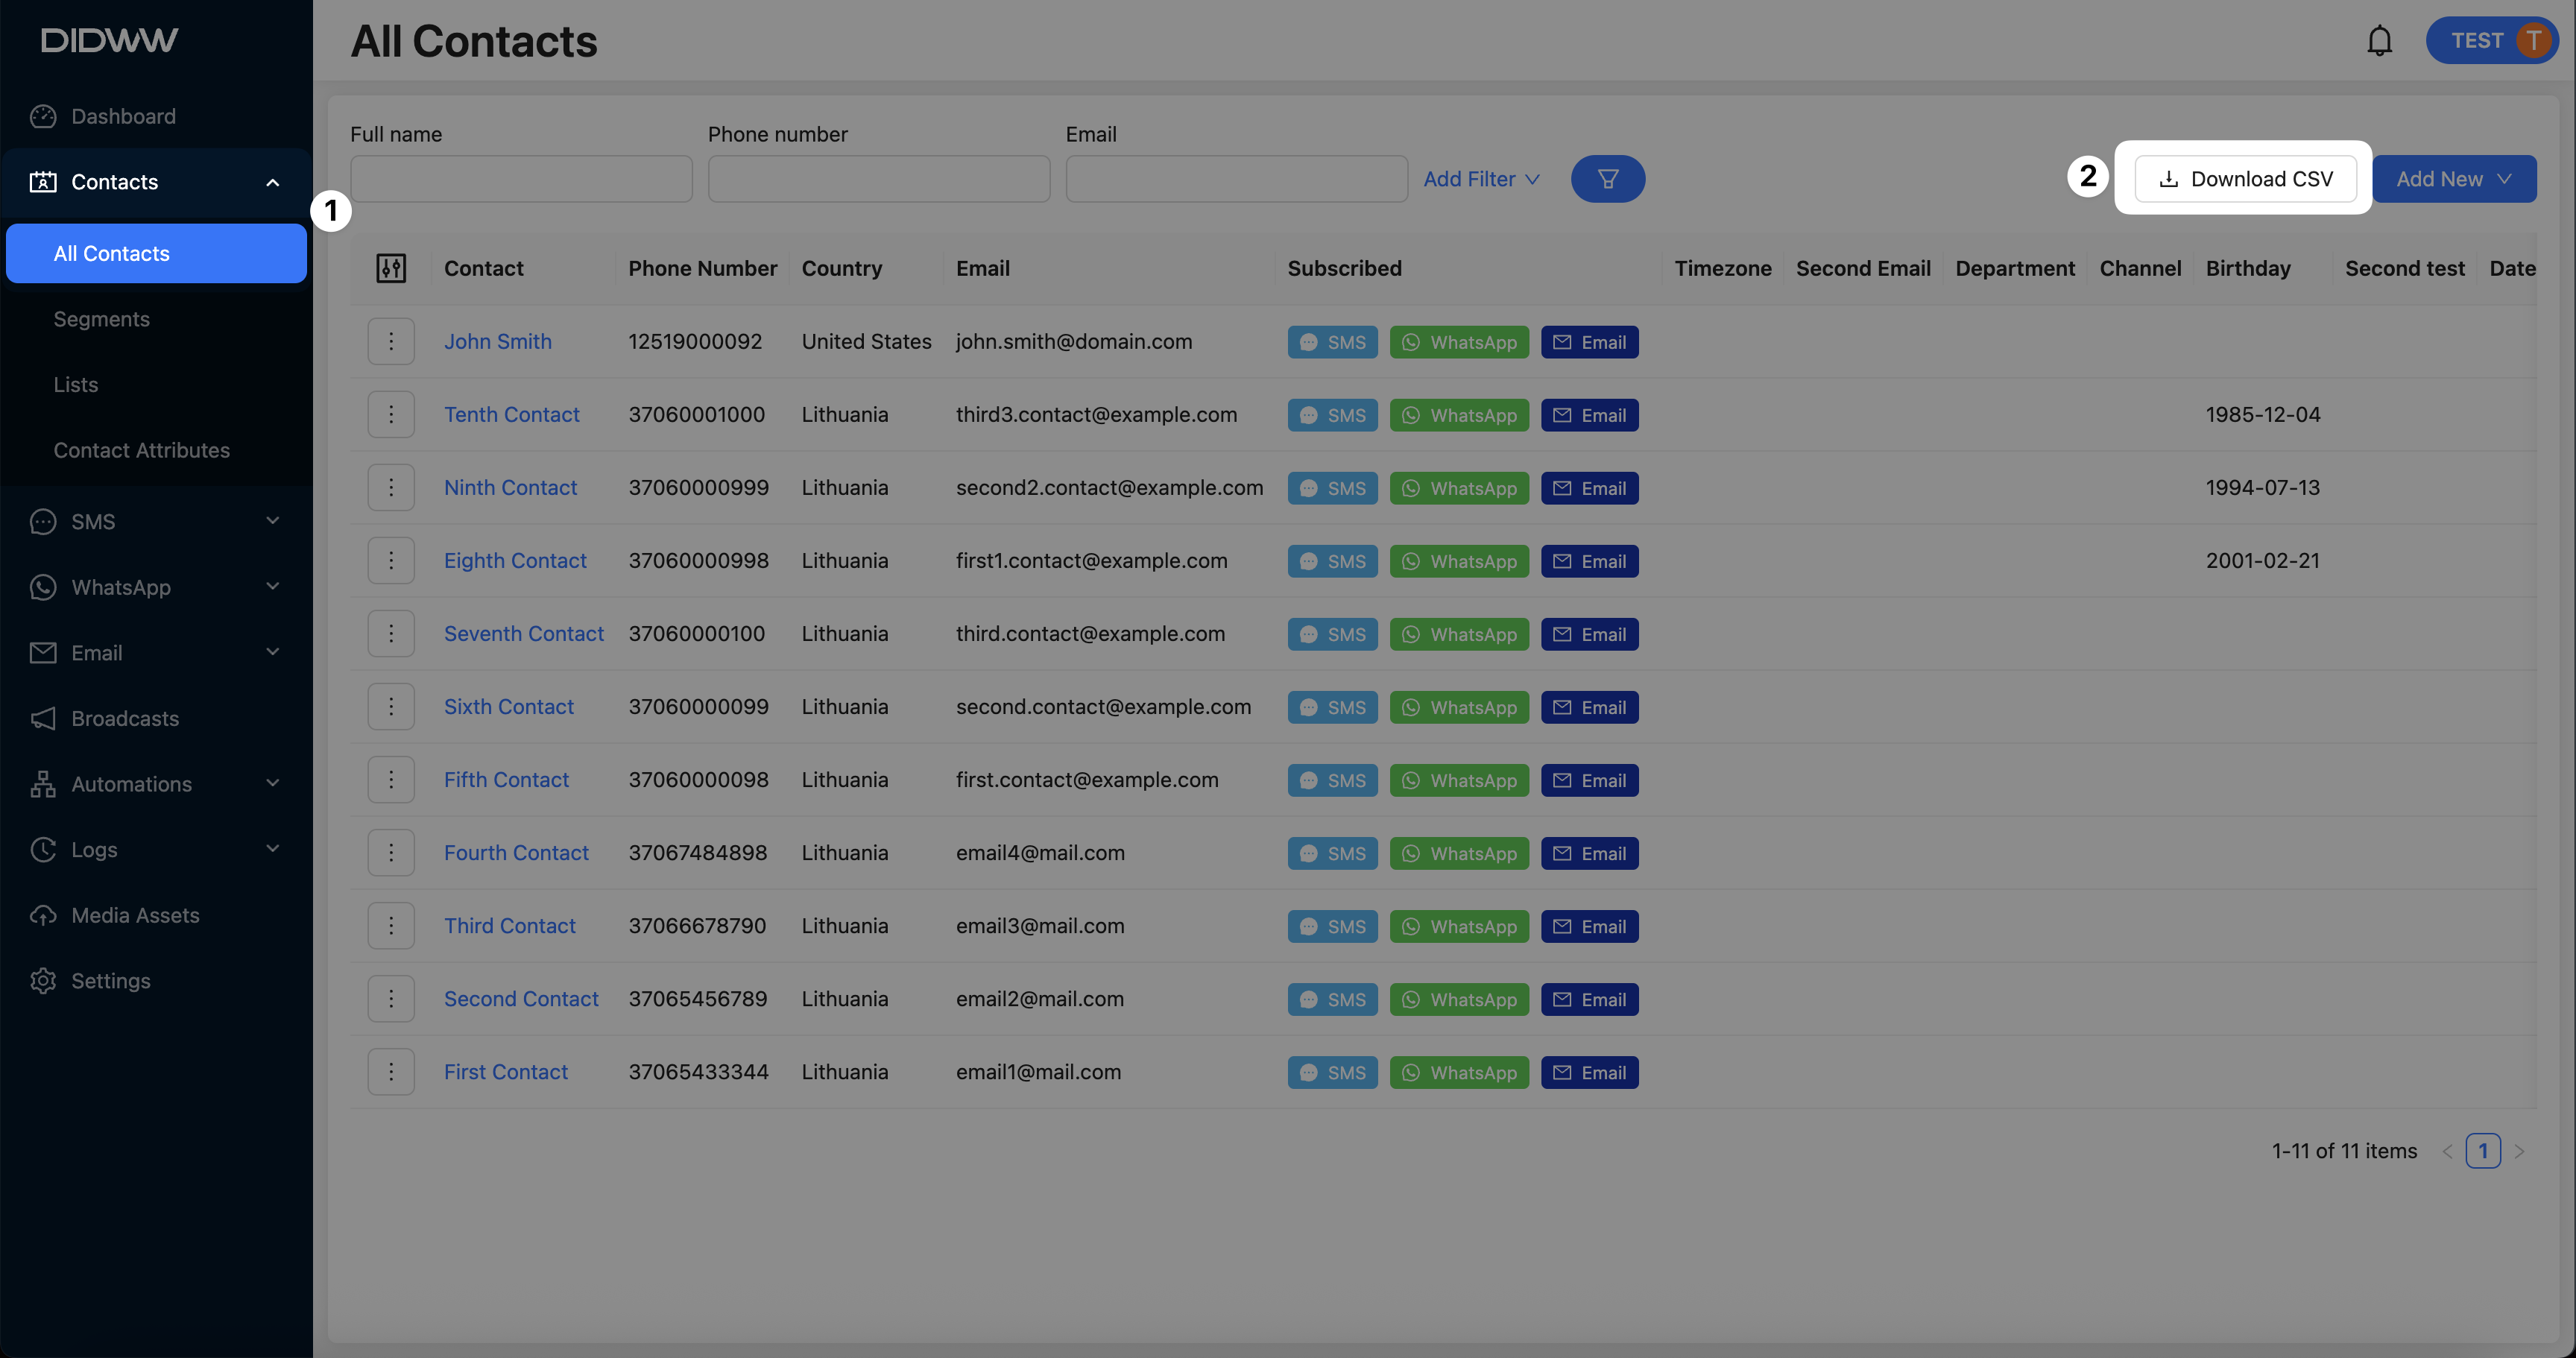
Fig. 1. Download CSV Button.