WhatsApp Integration
Note
To use the WhatsApp feature on the Messaging Platform, you need a Facebook account.
For detailed steps on integrating WhatsApp Embedded Signup, refer to our guide or visit the Official Meta Website .
Link Your WhatsApp Business Account
Step 1: To start integrating WhatsApp with the DIDWW Messaging Platform, click on the account settings icon in the top-right corner of the screen. Then select Connect Facebook Account.

Fig. 1. WhatsApp Integration.
Log into Facebook
Step 2: Log into Facebook if you haven’t already or click Continue as [your name] if you are already signed in.

Fig. 2. Logging into the Facebook account.
Step 3: Facebook will then ask you to allow DIDWW to manage your WhatsApp Business Account. Click Start to proceed.

Fig. 3. Linking WhatsApp business account.
Step 4: On the next screen, Enter your company information. Click Next.
Fig. 4. Enter company information.
Select or Create a new WhatsApp Business Account and WhatsApp Business profile
Step 5: Since you are onboarding a new WhatsApp Sender, select Create a new WhatsApp Business profile.
Fig. 5. Creating a WhatsApp business account.
Step 6: On the next screen, you will need to enter in the following information:
WhatsApp Business Account Name - This is only used for internal purposes and is not consumer facing.
WhatsApp Business Display Name - This is what your customers will see. The name must meet the requirements set by WhatsApp .
Category - Select the category that best describes your business. This is shown to consumers when they view your profile.
Click Show more options to fill additional information (optional).
Business Description - This is also shown to consumers when viewing your profile in the WhatsApp application.
Website - This is also shown to consumers when viewing your profile in the WhatsApp application. Once you register your WhatsApp Sender, you will have the ability to add an additional website if you wish.
Fig. 6. Creating a WhatsApp business profile.
Add and Verify your WhatsApp Sender
Step 7: Meta requires you to add a phone number and verify the ownership as a part of the registration process. This is done by sending a verification code using either SMS or an automated voice call. Follow the instructions below based on the type of your phone number:
Select the Add a new number option
Input the phone number, which you want to assign to your WhatsApp business account.
Choose how you want to verify your number:
Text message (recommended).
Phone call.
Click Next.
Warning
A valid phone number that is not linked to your WhatsApp personal or business app accounts is necessary.
DID numbers may not be eligible for registration with a WhatsApp Business account due to Meta’s policies. For more information, read the Official WhatsApp website .
Fig. 7. Add and verify your WhatsApp Business number.
The verification code will be delivered to the destination number.
Copy and paste it into the Facebook pop-up window.
Click Next.
Fig. 8. Verification code.
Step 8: Grant DIDWW the required permissions.
DIDWW needs the following permissions:
Manage your WhatsApp accounts
Manage and access conversations in WhatsApp
Click Continue to proceed with the configuration.
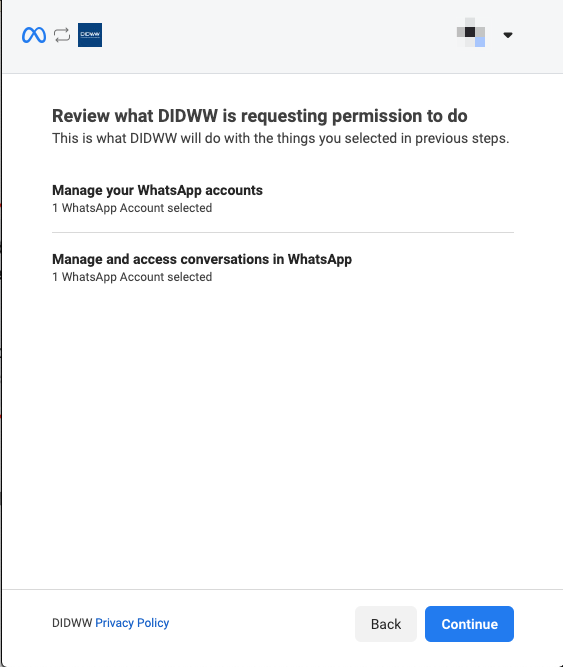
Fig. 9. Granting permissions.
Completing registration
Step 9: When the WhatsApp business number integration is complete, click Finish to return to the DIDWW Messaging Platform.
Fig. 10. Integration finish.
Step 10: After the integration is complete, your WhatsApp business number will appear in the account settings.
Fig. 11. Account settings.