Hybrid Capacity#
Hybrid capacity combines multiple channel types so inbound calls always use the most cost-effective and available option first.
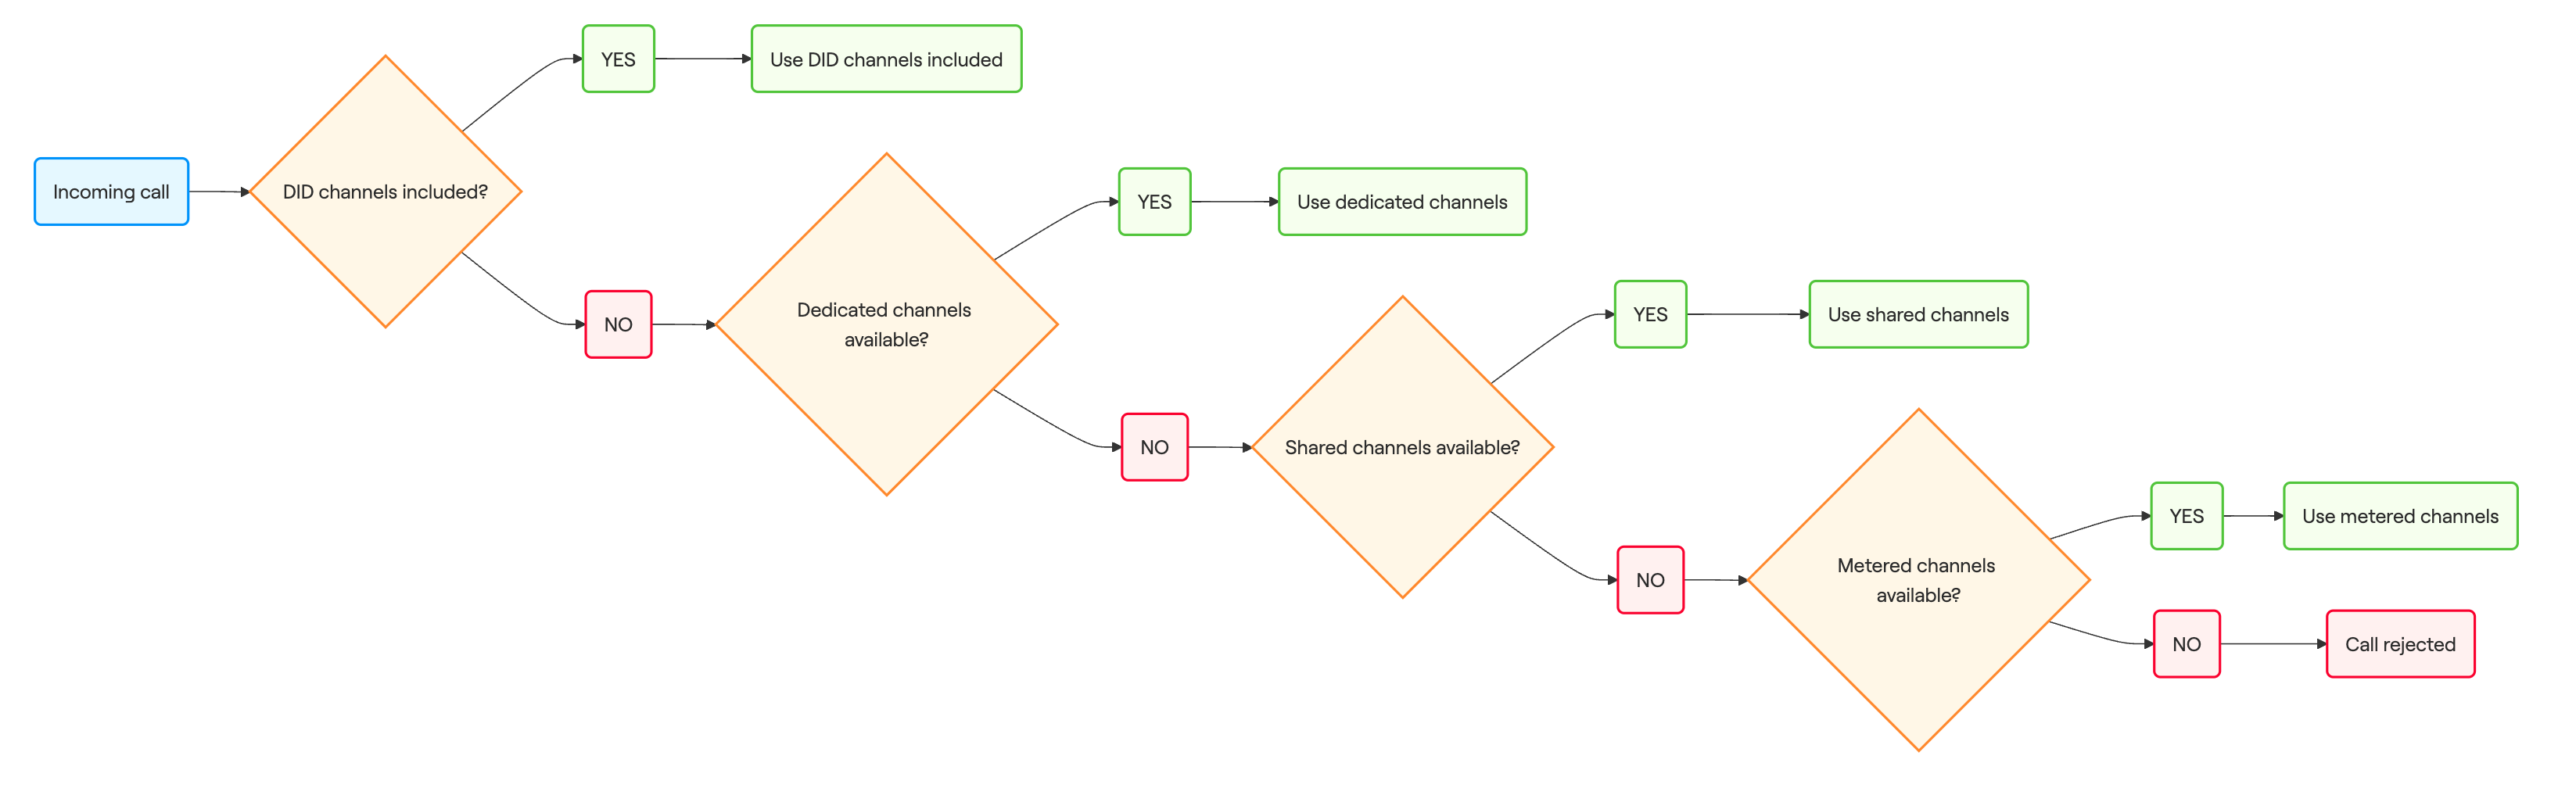
When different capacity types are available, calls use them in this order:
DID included channels — Channels assigned automatically with a DID plan (e.g., DID+2 includes 2 inbound voice channels in the price of the service).
Dedicated flat-rate channels — Channels assigned to a single DID that are billed monthly at a fixed rate.
Shared flat-rate channels — Channels assigned to a Capacity Group and can be shared by multiple DIDs, billed monthly at a fixed rate.
Metered (pay-per-minute) channels — Channels assigned to a Capacity Group and billed per minute, with no setup or monthly fees.
Hybrid Capacity Call Flow#
This call flow shows how inbound calls use capacity in a hybrid setup. Calls use the available types in order of priority, ensuring that included, dedicated, shared, and metered channels are used efficiently.
Hybrid Capacity Combinations#
A DID+2 plan includes 2 inbound voice channels by default. This means the first two calls always use the included channels. Any additional calls are routed using the assigned extra capacity (dedicated, shared, or metered), depending on the configuration.
Capacity Combination |
Priority Usage |
|---|---|
Only Metered |
Calls first use 2 channels included. |
Only Shared |
Calls first use 2 channels included. |
Only Dedicated |
Calls first use 2 channels included. |
Shared and Metered |
Calls first use 2 channels included, then shared channels. |
Dedicated and Shared |
Calls first use 2 channels included, then dedicated channels. |
Dedicated and Metered |
Calls first use 2 channels included, then dedicated channels. |
Dedicated, Shared, and Metered |
Calls first use 2 channels included, then dedicated channels. |
A DID+0 plan does not include any channels. To receive inbound calls, you must assign additional capacity (dedicated, shared, or metered). Calls are always routed using the assigned capacity options.
Capacity Scenario |
Detailed Priority Usage |
|---|---|
Only Metered |
All calls are billed per-minute using metered channels. |
Only Shared |
All calls use shared channels. |
Only Dedicated |
All calls use dedicated channels. |
Shared and Metered |
Calls first use shared channels. |
Dedicated and Shared |
Calls first use dedicated channels. |
Dedicated and Metered |
Calls first use dedicated channels. |
Dedicated, Shared, and Metered |
Calls first use dedicated channels. |
Note
DID numbers can switch between DID+2 (with 2 included channels) and DID+0 (no included channels). Mode changes take effect in the next billing cycle unless you renew the DID immediately for the selected period. For details, see Change Next Capacity Mode.
Assign Shared and Metered Channels#
Combine shared and metered (pay-per-minute) channels in a hybrid setup to provide flexible capacity options. Shared channels are always used first, while metered channels act as backup when shared capacity is in use.
Before You Begin#
At least one active DID number is required to assign shared and metered channels.
At least one flat-rate channel is required to configure Shared channels. See Flat-rate Channels.
A positive prepaid balance is required to use metered (pay-per-minute) channels. To add funds, go to Payment Methods and use your preferred payment option.
Step 1. Create a Capacity Group#
To use shared and metered channels in a hybrid capacity setup, you first need to create a Capacity Group.
In the DIDWW User Panel, go to Phone Numbers > Capacity.
Select the capacity pool (Standard or Extended) where you have at least one unassigned channel.
Click Create Capacity Group.
Note
DIDs purchased with the DID+0 pay-per-minute channels included option are automatically placed in a Standard Capacity Group with a default 100 metered channel limit, which you can adjust later by opening Edit Capacity Group from the Actions (three dots) menu.
Flat-rate channels can be assigned only if they are available as Unassigned Channels. To release assigned channels, see Unassign Flat-rate Channels.
A Capacity Group can include both shared channels and shared pay-per-minute (metered) channels.
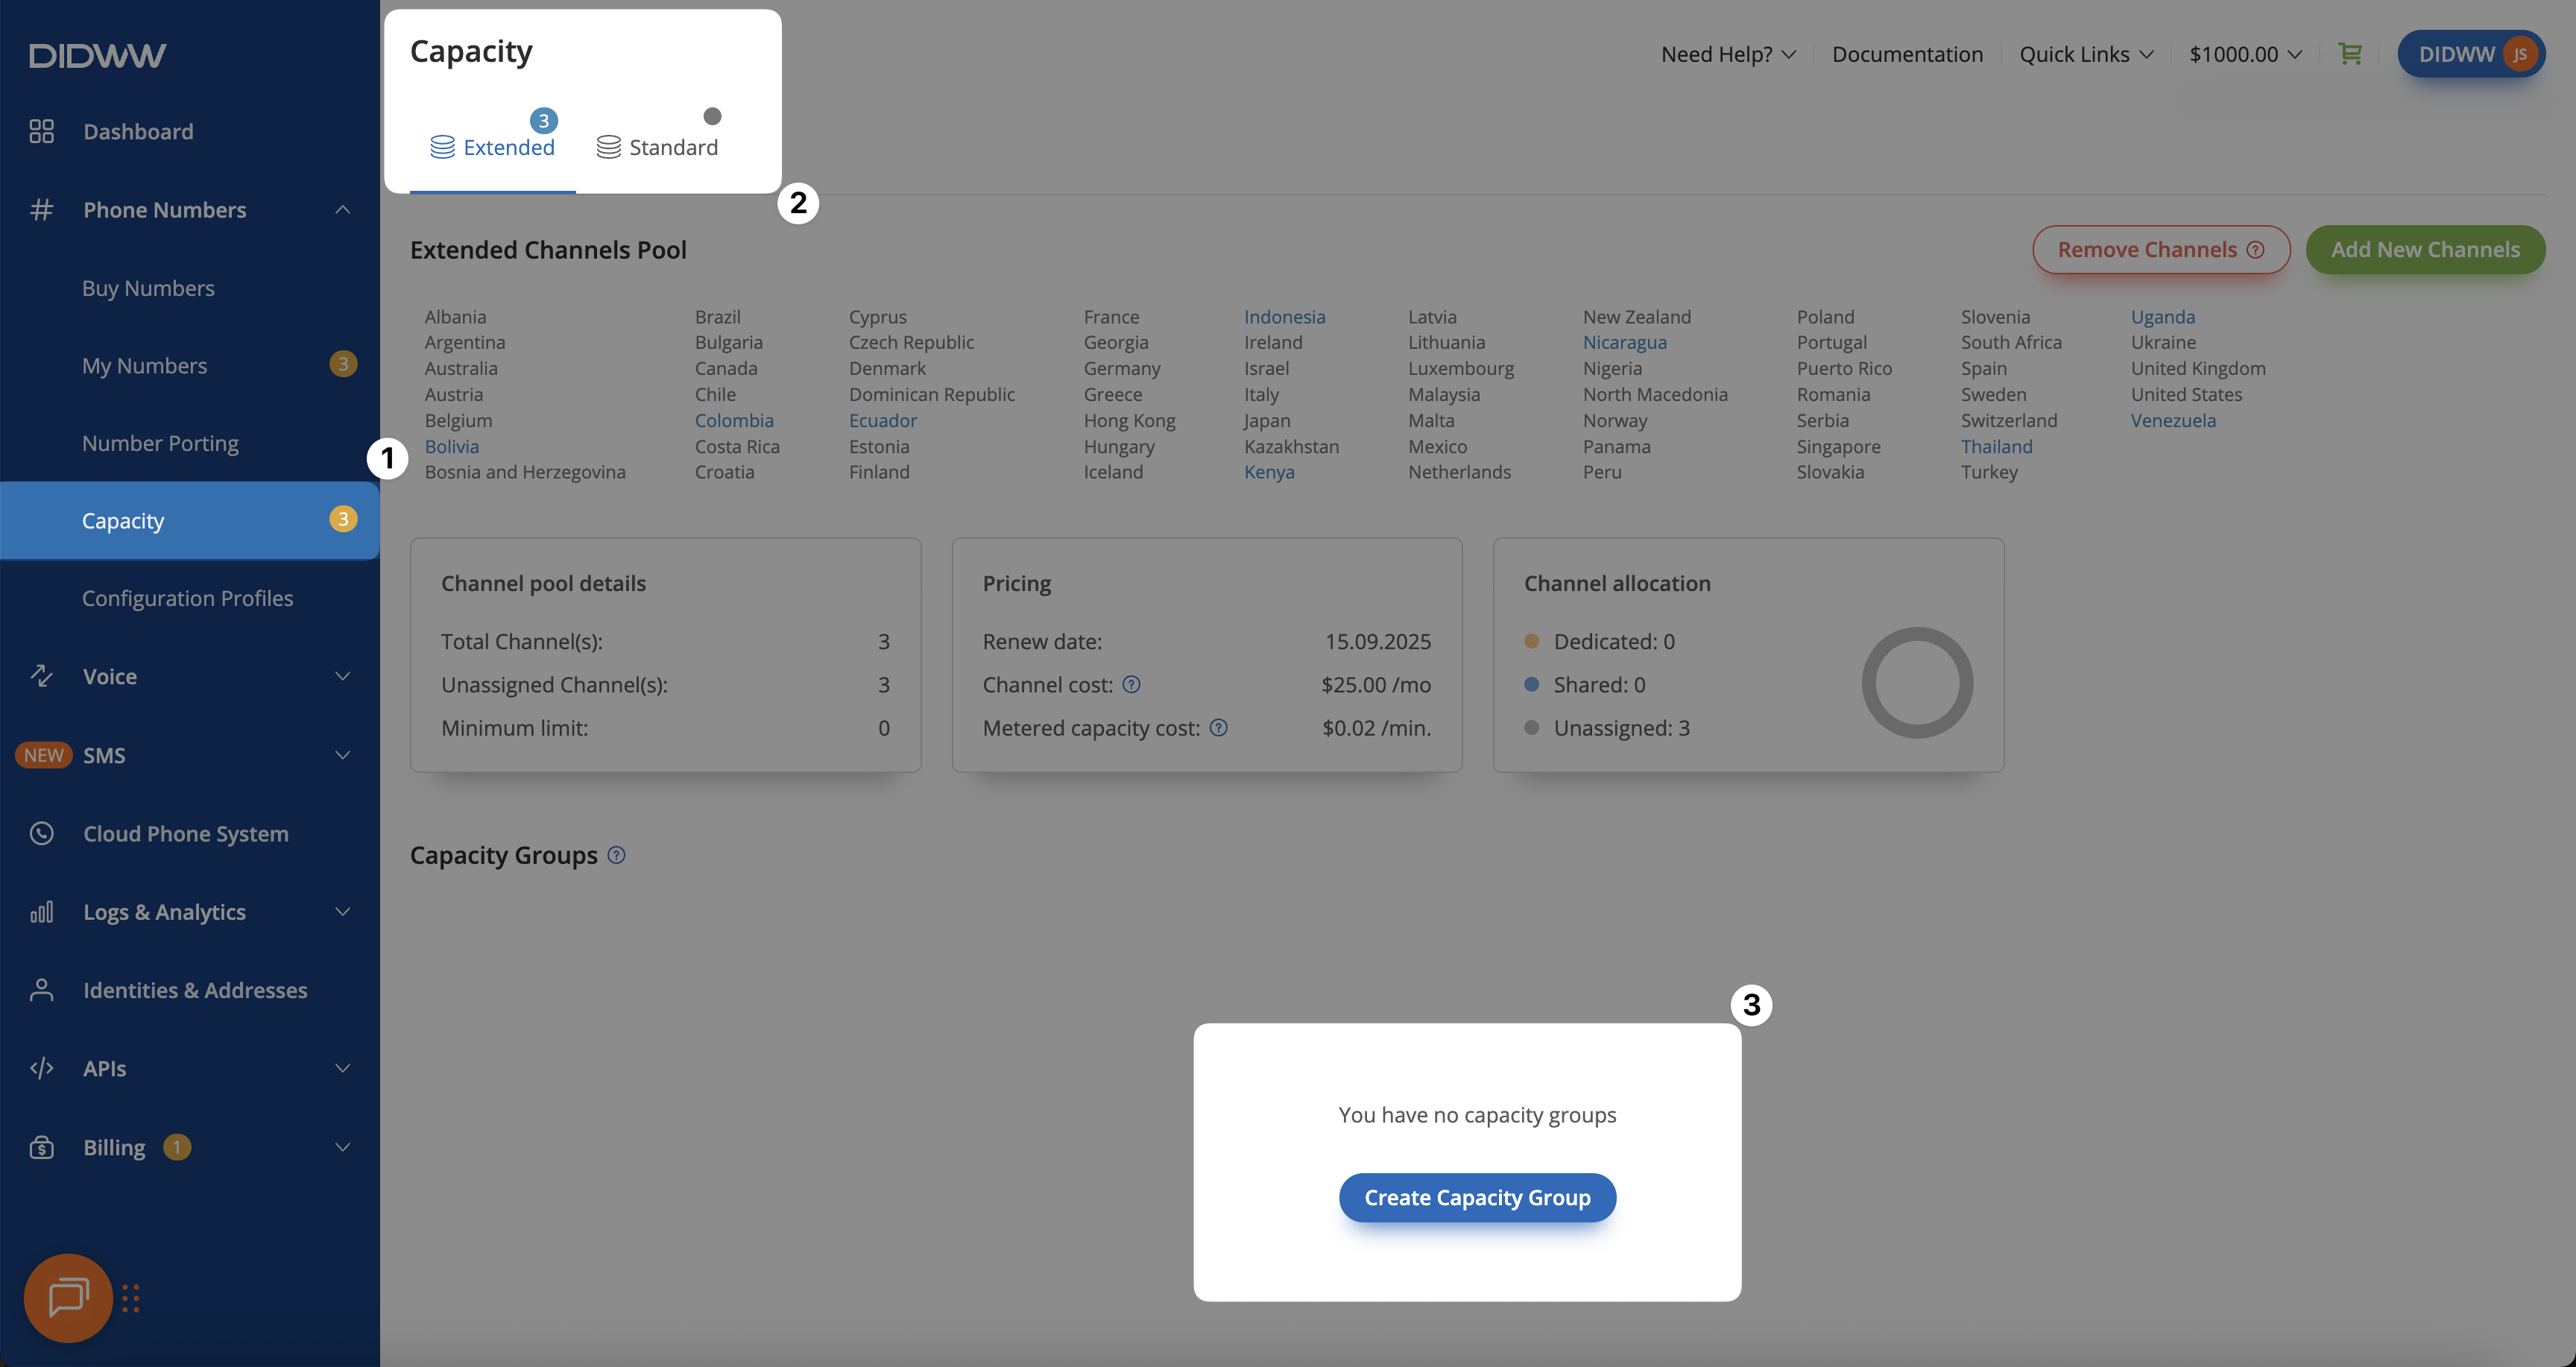
Fig. 1. Creating a Capacity Group for hybrid capacity with shared and metered channels#
Step 2. Assign Shared and Metered Channels#
For a hybrid capacity setup, assign both shared and metered (pay-per-minute) channels together in the Create Capacity Group (or Edit Capacity Group) pop-up.
Enter the number of Shared channels to assign (up to the number of available unassigned channels).
Enter the number of Metered channels to assign (up to 1,000).
Click Create.
Important
At least one shared or metered channel must be assigned when creating or editing a Capacity Group.
In a hybrid capacity setup with both shared and metered channels assigned, calls always use shared (flat-rate) channels first. Metered channels are used when all flat-rate channels are occupied.
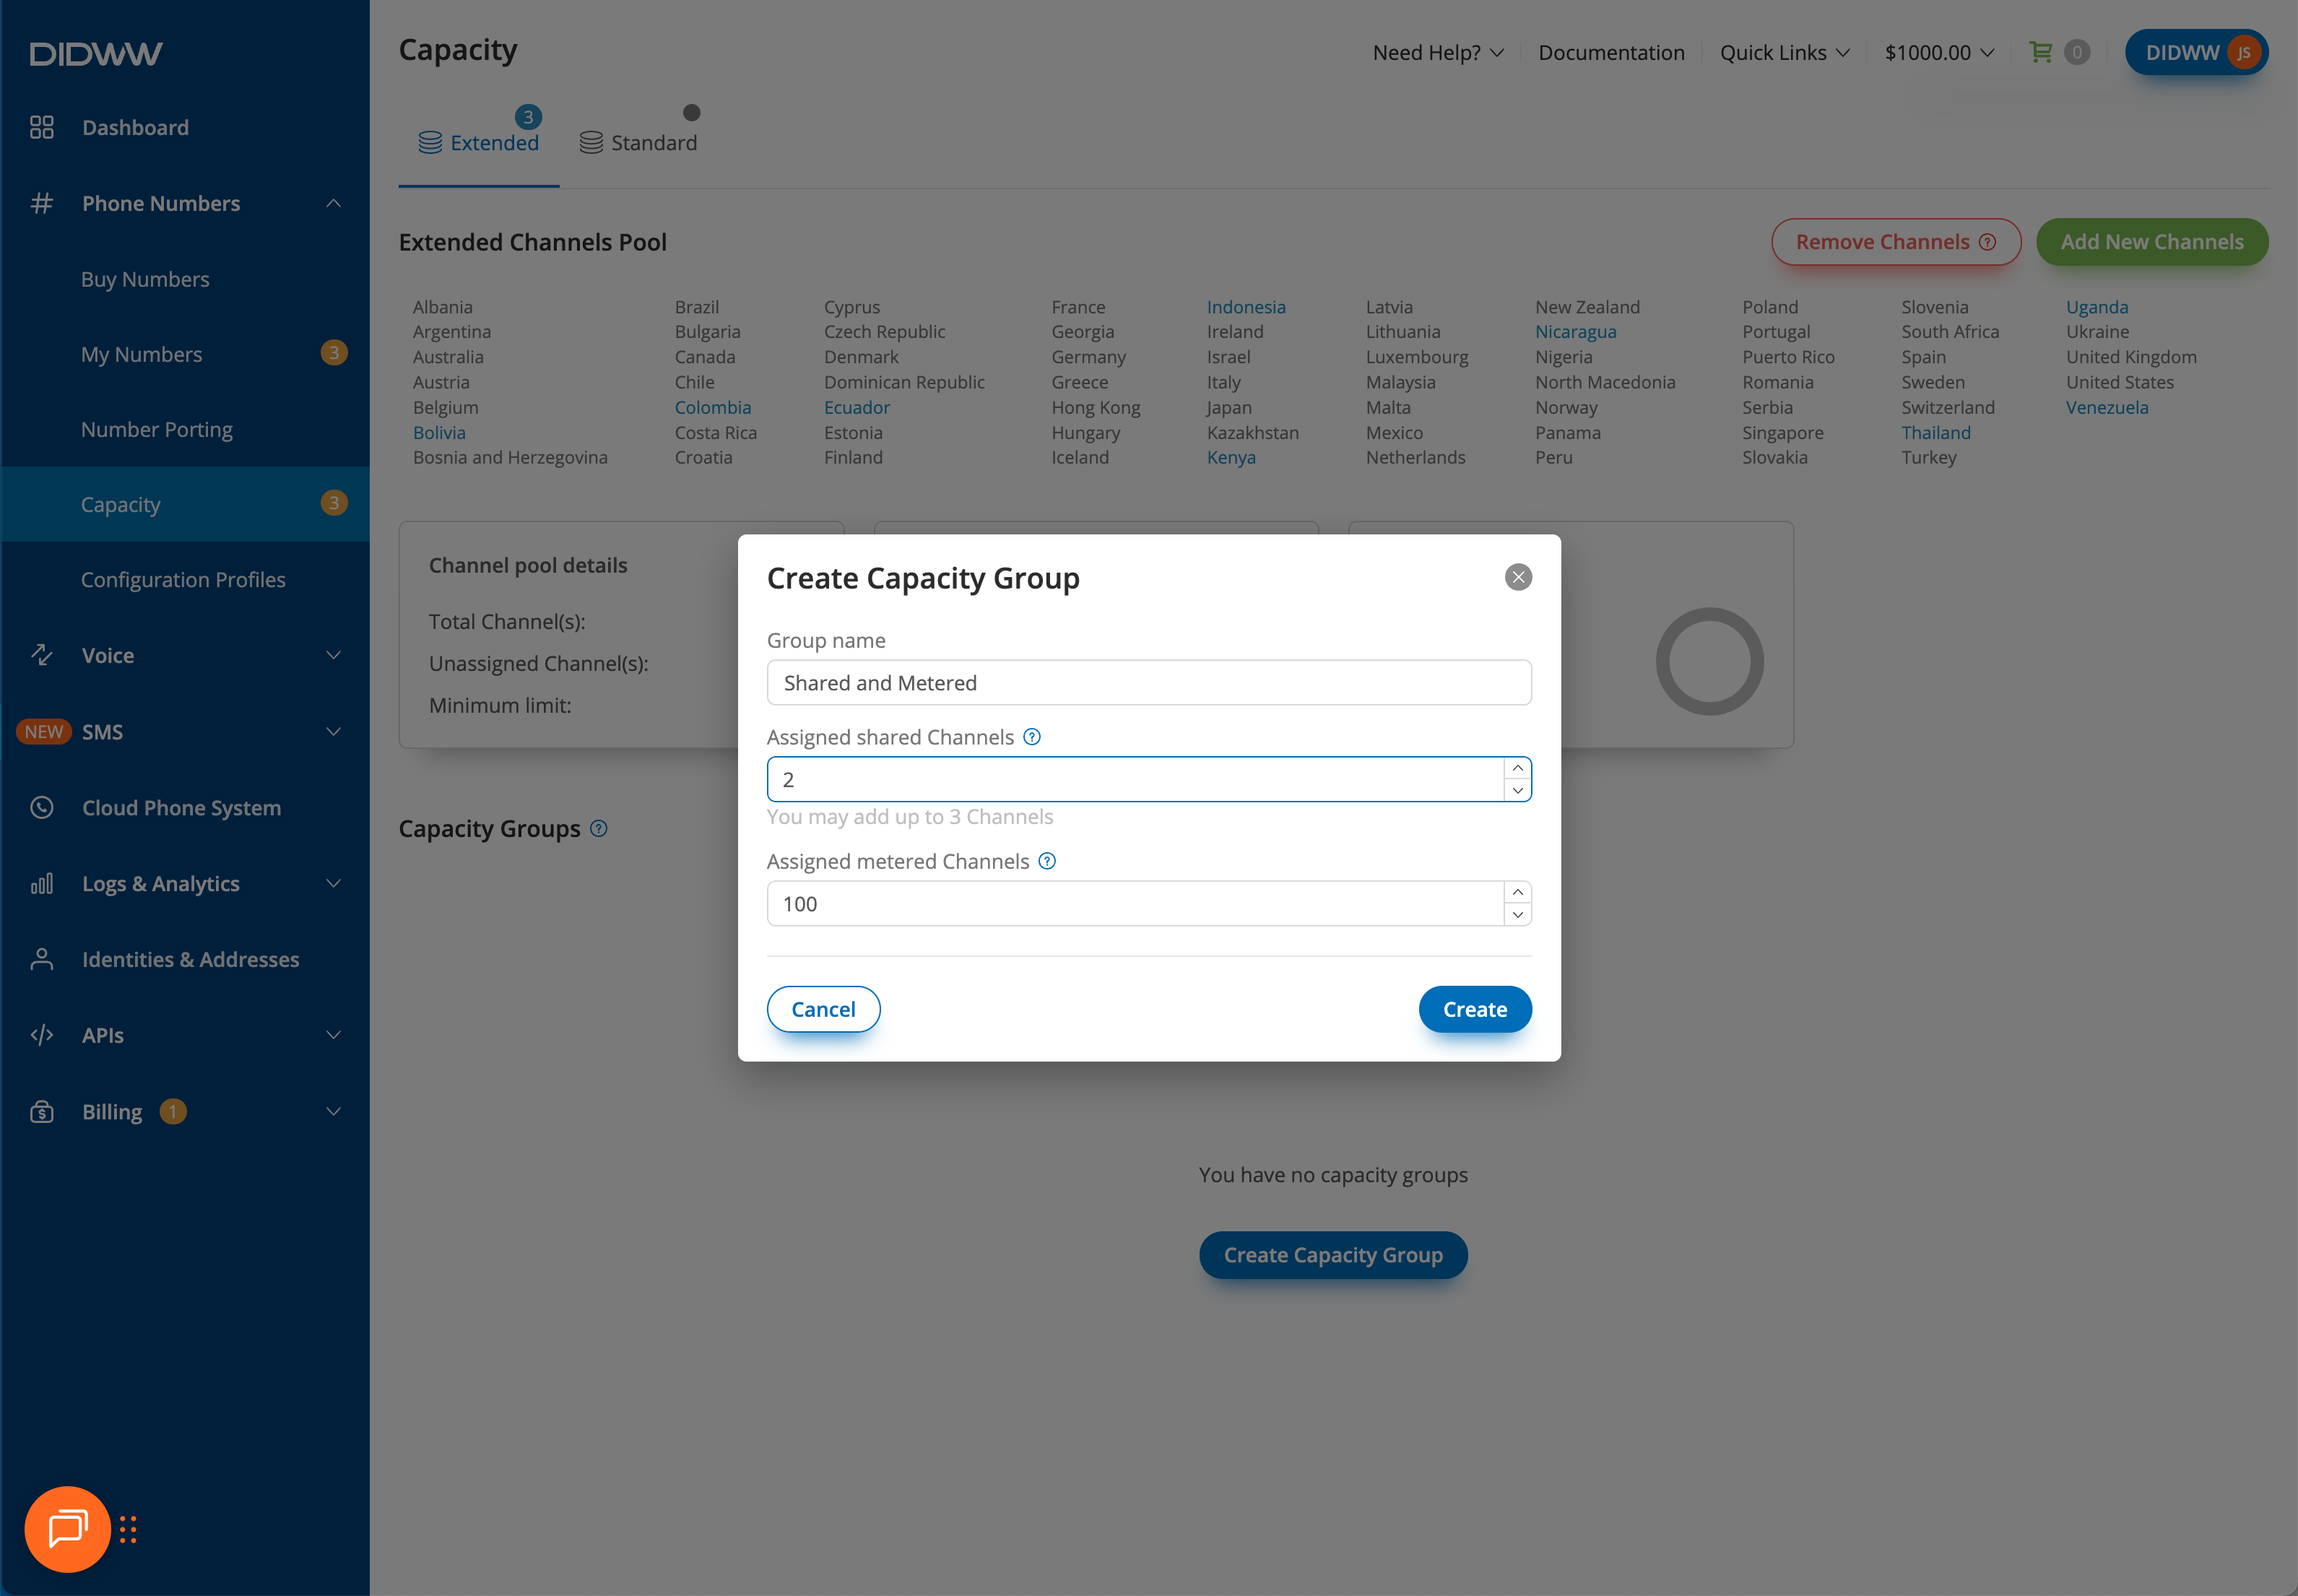
Fig. 2. Creating a Capacity Group for hybrid capacity with shared and metered channels#
Step 3: Select DID(s) and Open Batch Actions#
After creating a Capacity Group in a hybrid setup with shared and metered channels, you need to Update Capacity Group and assign your DID numbers to that group.
In the DIDWW User Panel, go to Phone Numbers > My Numbers.
Use filters to quickly locate the DID number(s) you want to update, and select them.
At the bottom of the page, click Batch Actions and choose Update Capacity Group.
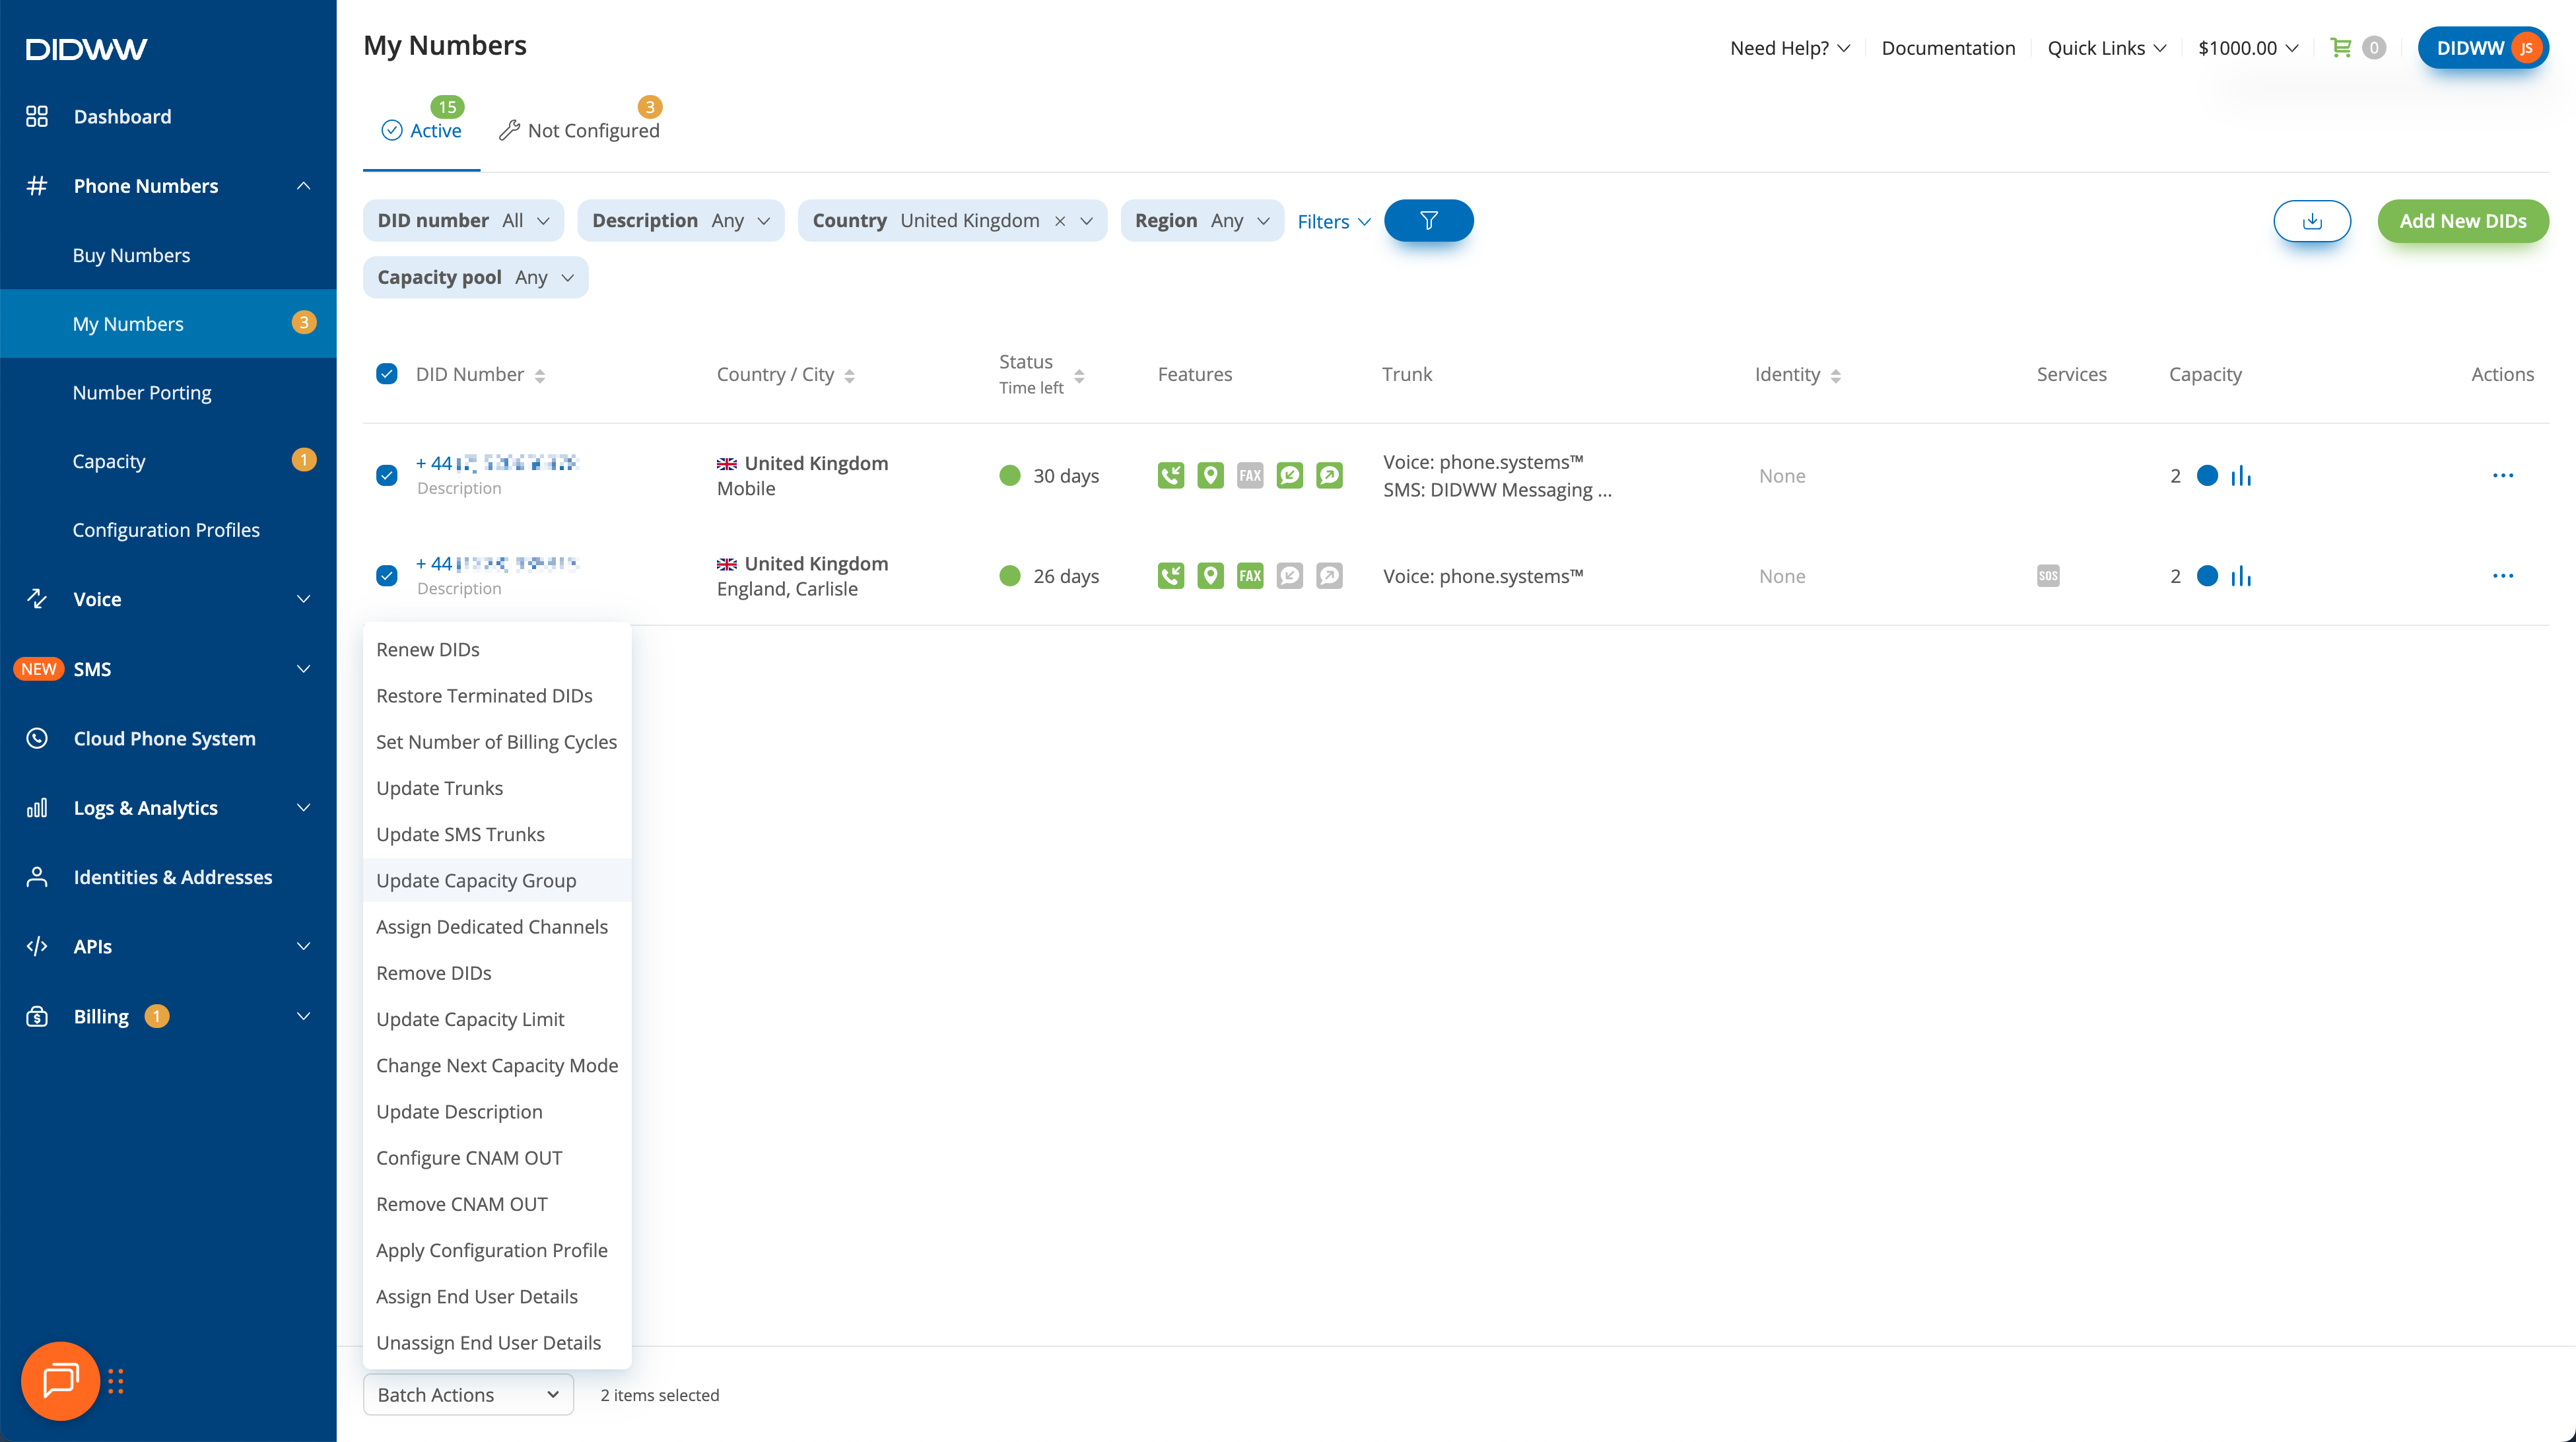
Fig. 3. Selecting DIDs for hybrid capacity with shared and metered (pay-per-minute) channels and opening Batch Actions#
Step 4. Update Capacity Group#
Important
Only DIDs that support additional capacity can be assigned to a Capacity Group.
When multiple DIDs share a Capacity Group, they use the same shared channels (and metered channels if assigned).
In the Update Capacity Group pop-up, review the list of selected DID numbers.
Open the Capacity group dropdown.
Select capacity group name (e.g., Shared and Metered).
Click Confirm to assign the DID(s) to this group.
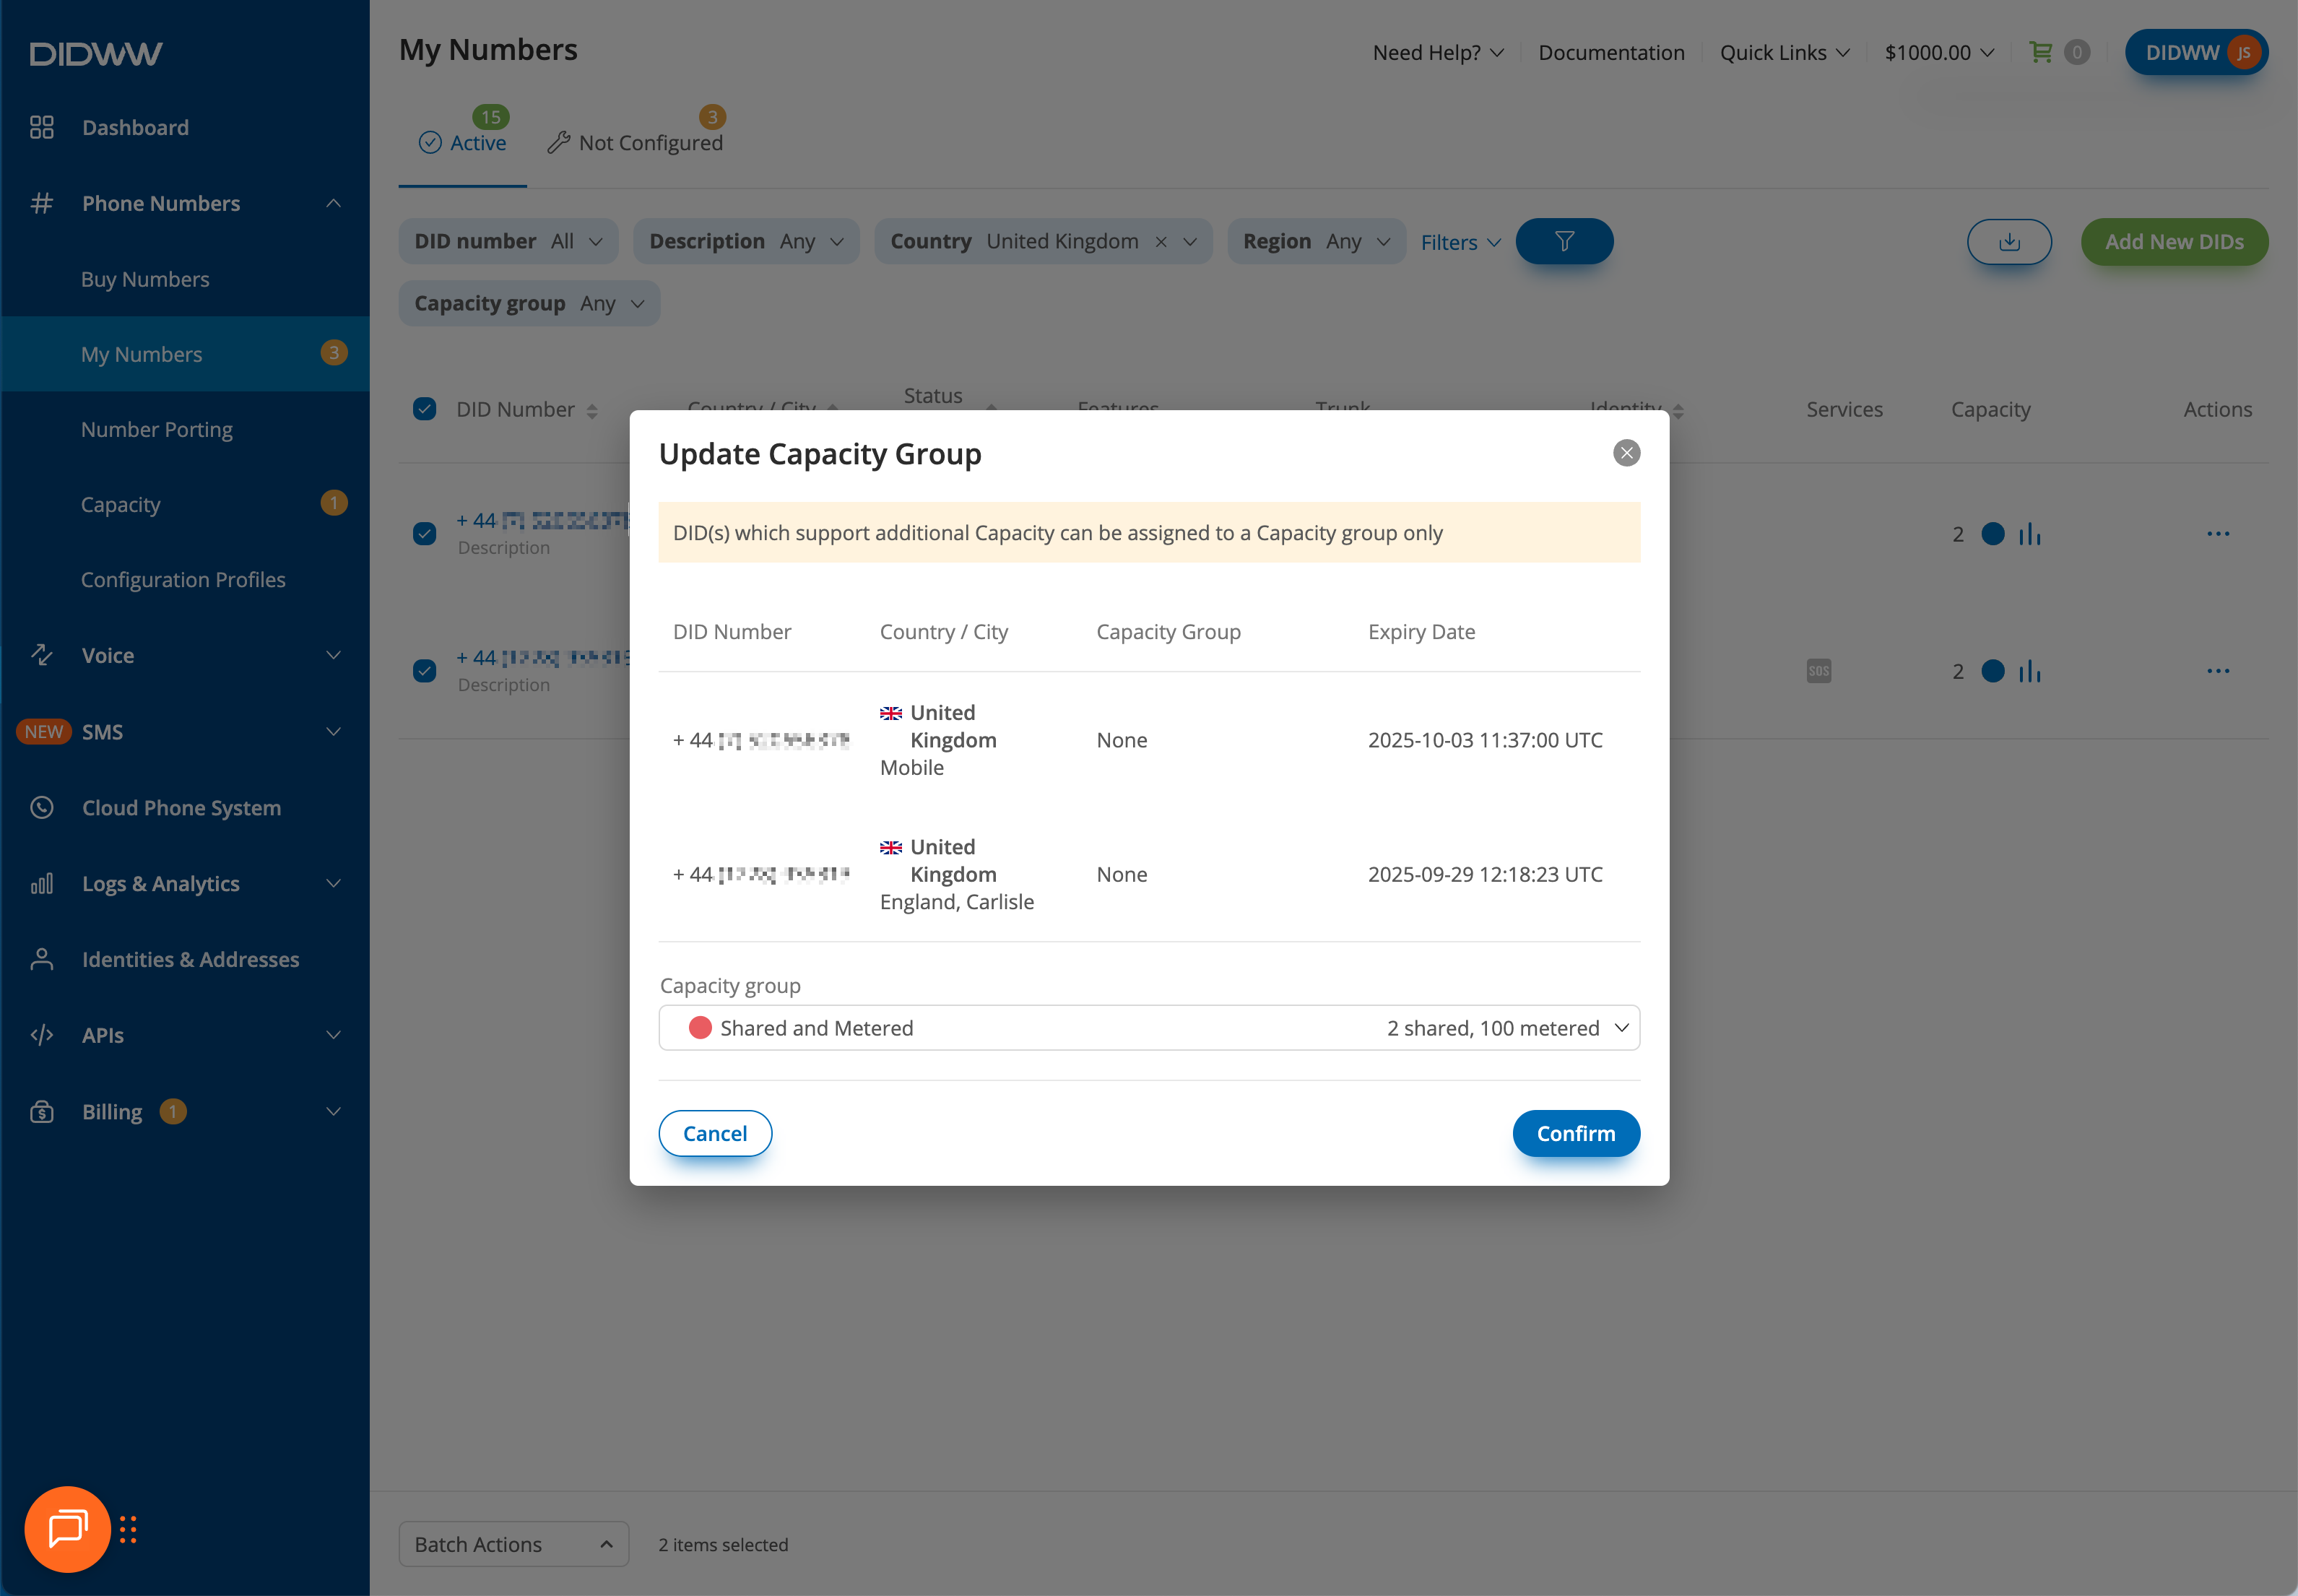
Fig. 4. Updating the Capacity Group for selected DIDs in a hybrid setup with shared and metered (pay-per-minute) channels#
Assign Dedicated Channels#
Combine dedicated channels with shared and metered channels in a hybrid setup to provide flexible capacity options. Dedicated channels guarantee capacity for the assigned DID and are always used before shared or metered channels.
Before You Begin#
At least one active DID number is required to assign dedicated channels.
At least one flat-rate channel is required to configure Dedicated channels. See Flat-rate Channels.
Step 1: Select DID(s) and Open Batch Actions#
In the Phone Numbers > My Numbers section, select the DID number(s) you want to assign dedicated channels.
At the bottom of the page, click Batch Actions and choose Assign Dedicated Channels.
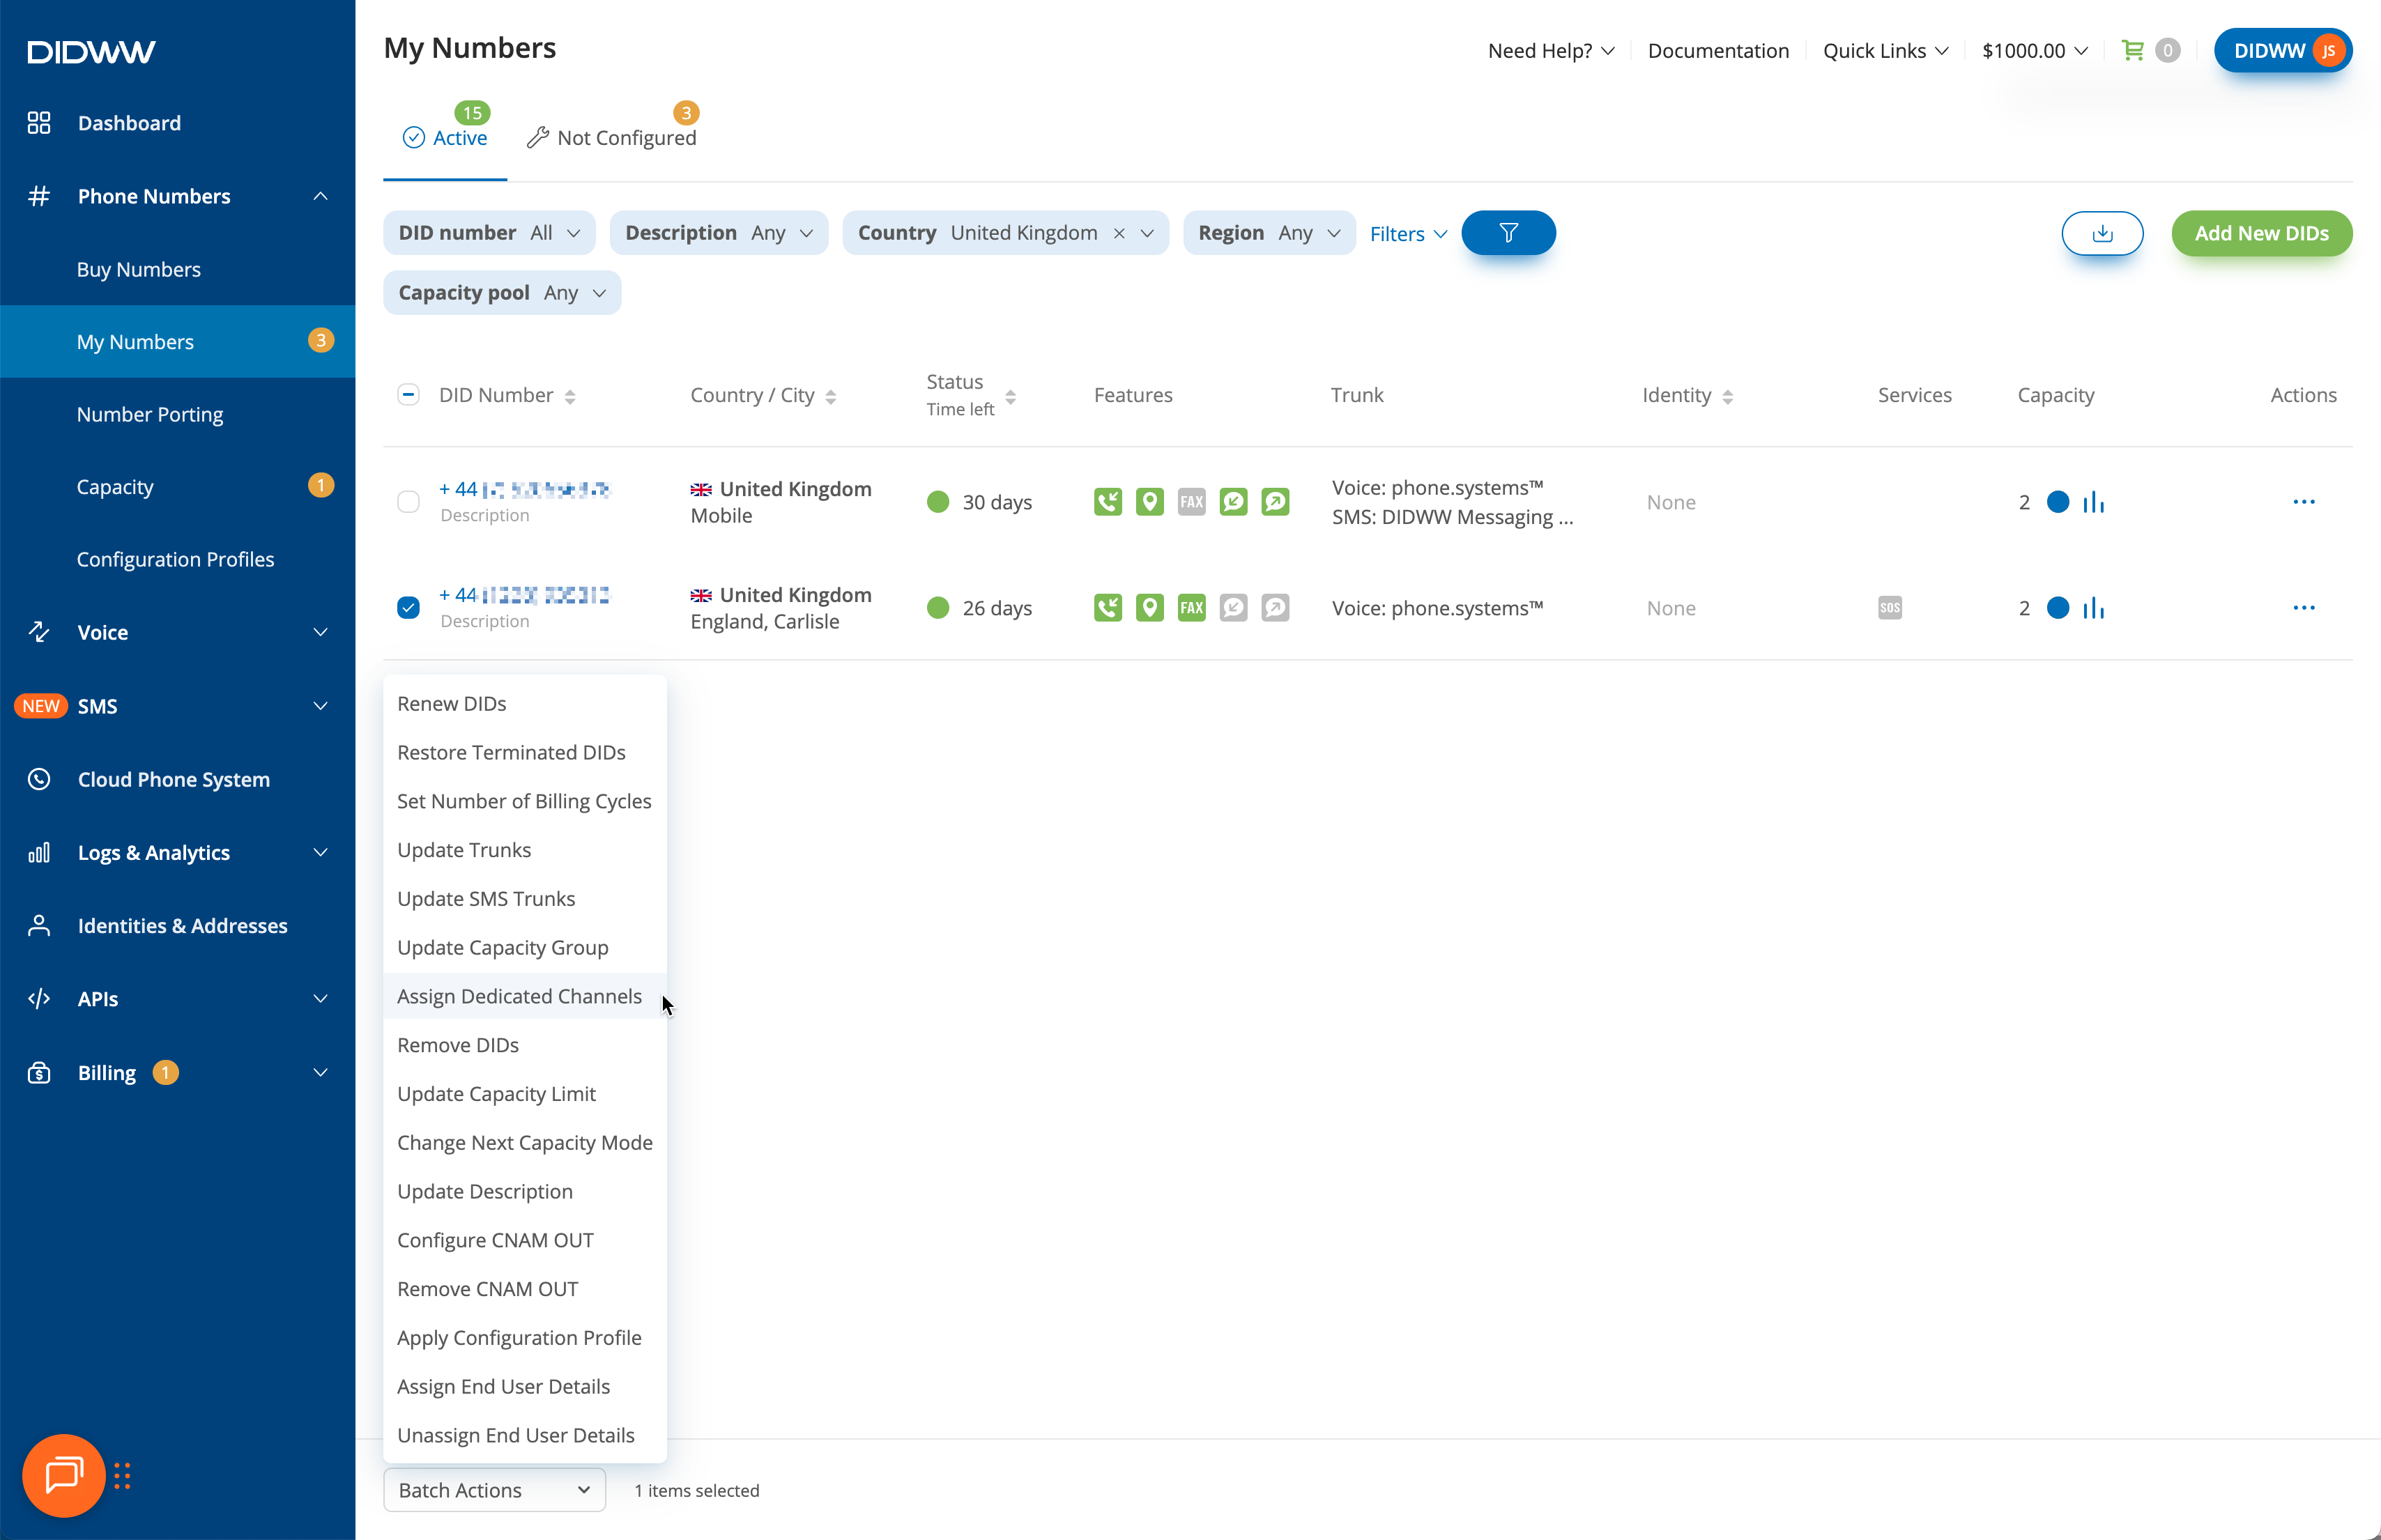
Fig. 5. Selecting DID(s) in a hybrid capacity setup to assign flat-rate dedicated channels#
Step 2: Assign Dedicated Channels#
In the pop-up, choose the channel pool (Standard or Extended) where unassigned channels are available.
In the Available / Total column, review the available capacity and enter a number in Assigned Dedicated Channels.
Click Confirm to complete the assignment.
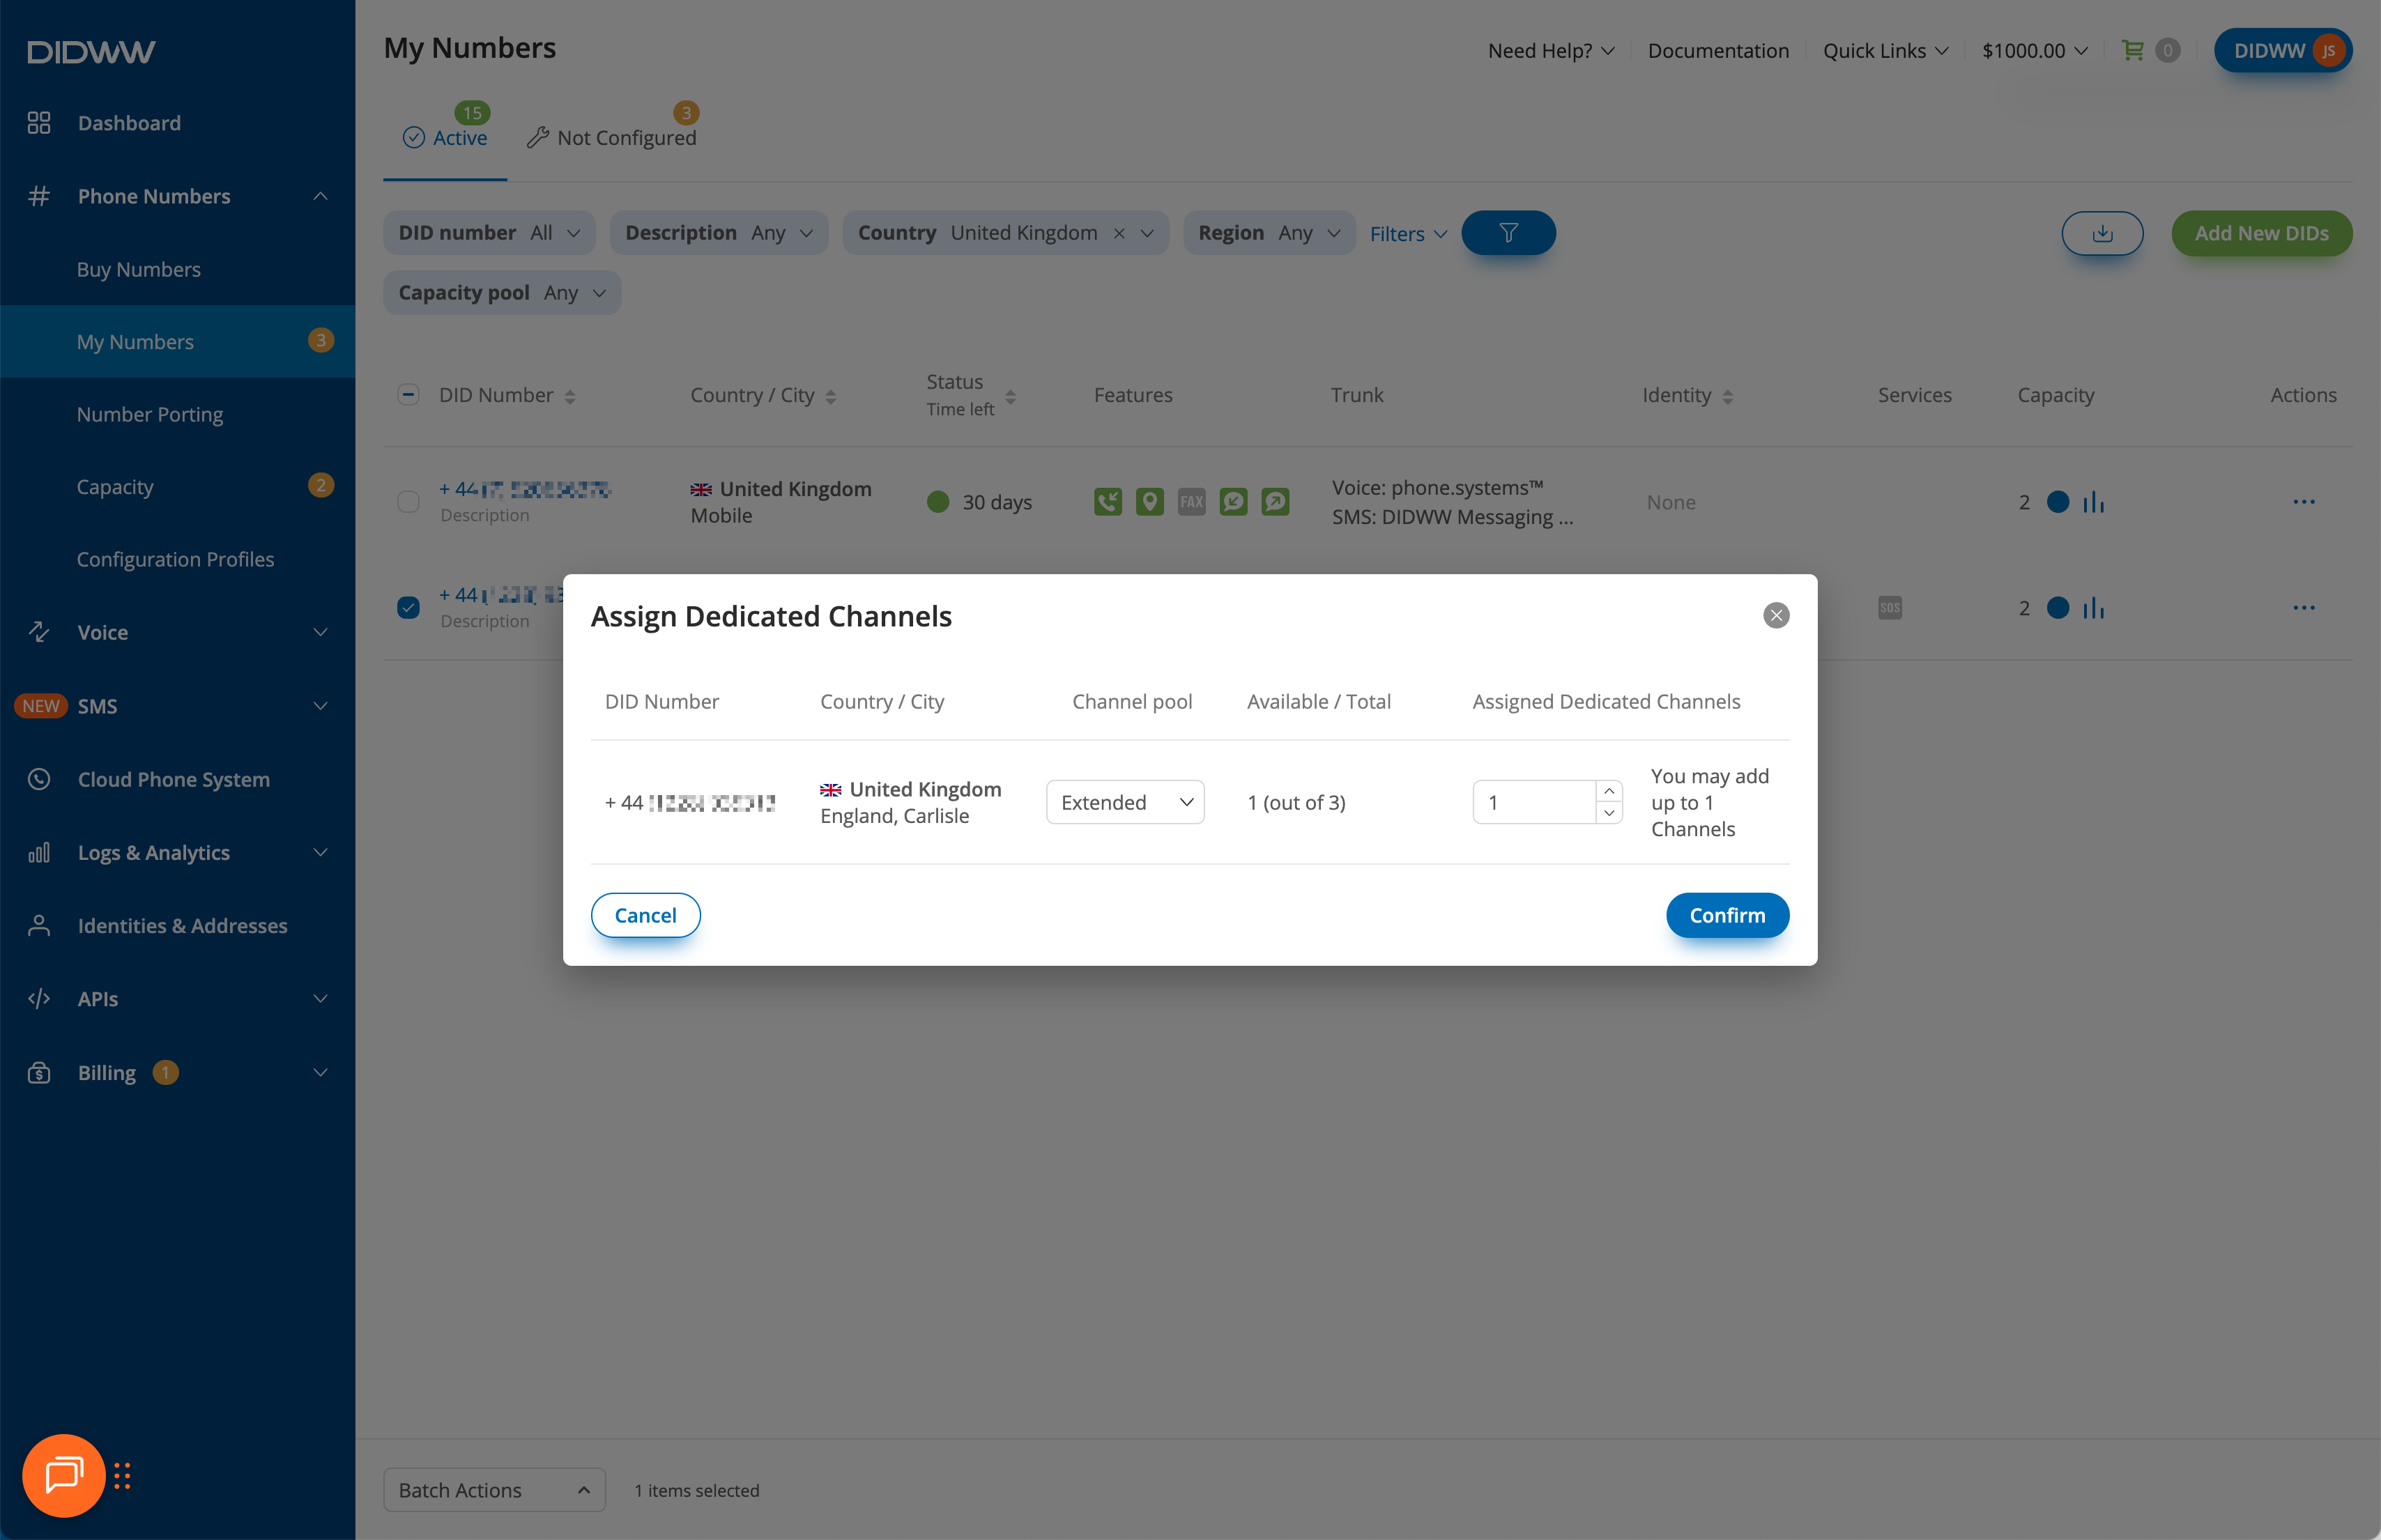
Fig. 6. Assigning flat-rate dedicated channels to a single DID in a hybrid capacity setup#