Manage Porting Requests#
When you submit a porting request, each phone number in that request goes through a review and transfer process. This process checks whether the numbers can be transferred (ported) to our network. If at least one number is portable, the entire porting request moves into a Pending status, and our Porting Team begins reviewing it.
Every porting request has its own overall status, and each phone number inside that request also has its own individual status. You can manage the porting request as a whole or review each number separately to see its exact progress.
Update identity or address details and reassign end user information before resubmitting.
Cancel an entire porting request before it is completed.
Cancel numbers in one status group without stopping the porting process.
Update and resubmit numbers that require additional information or corrections to continue the porting process.
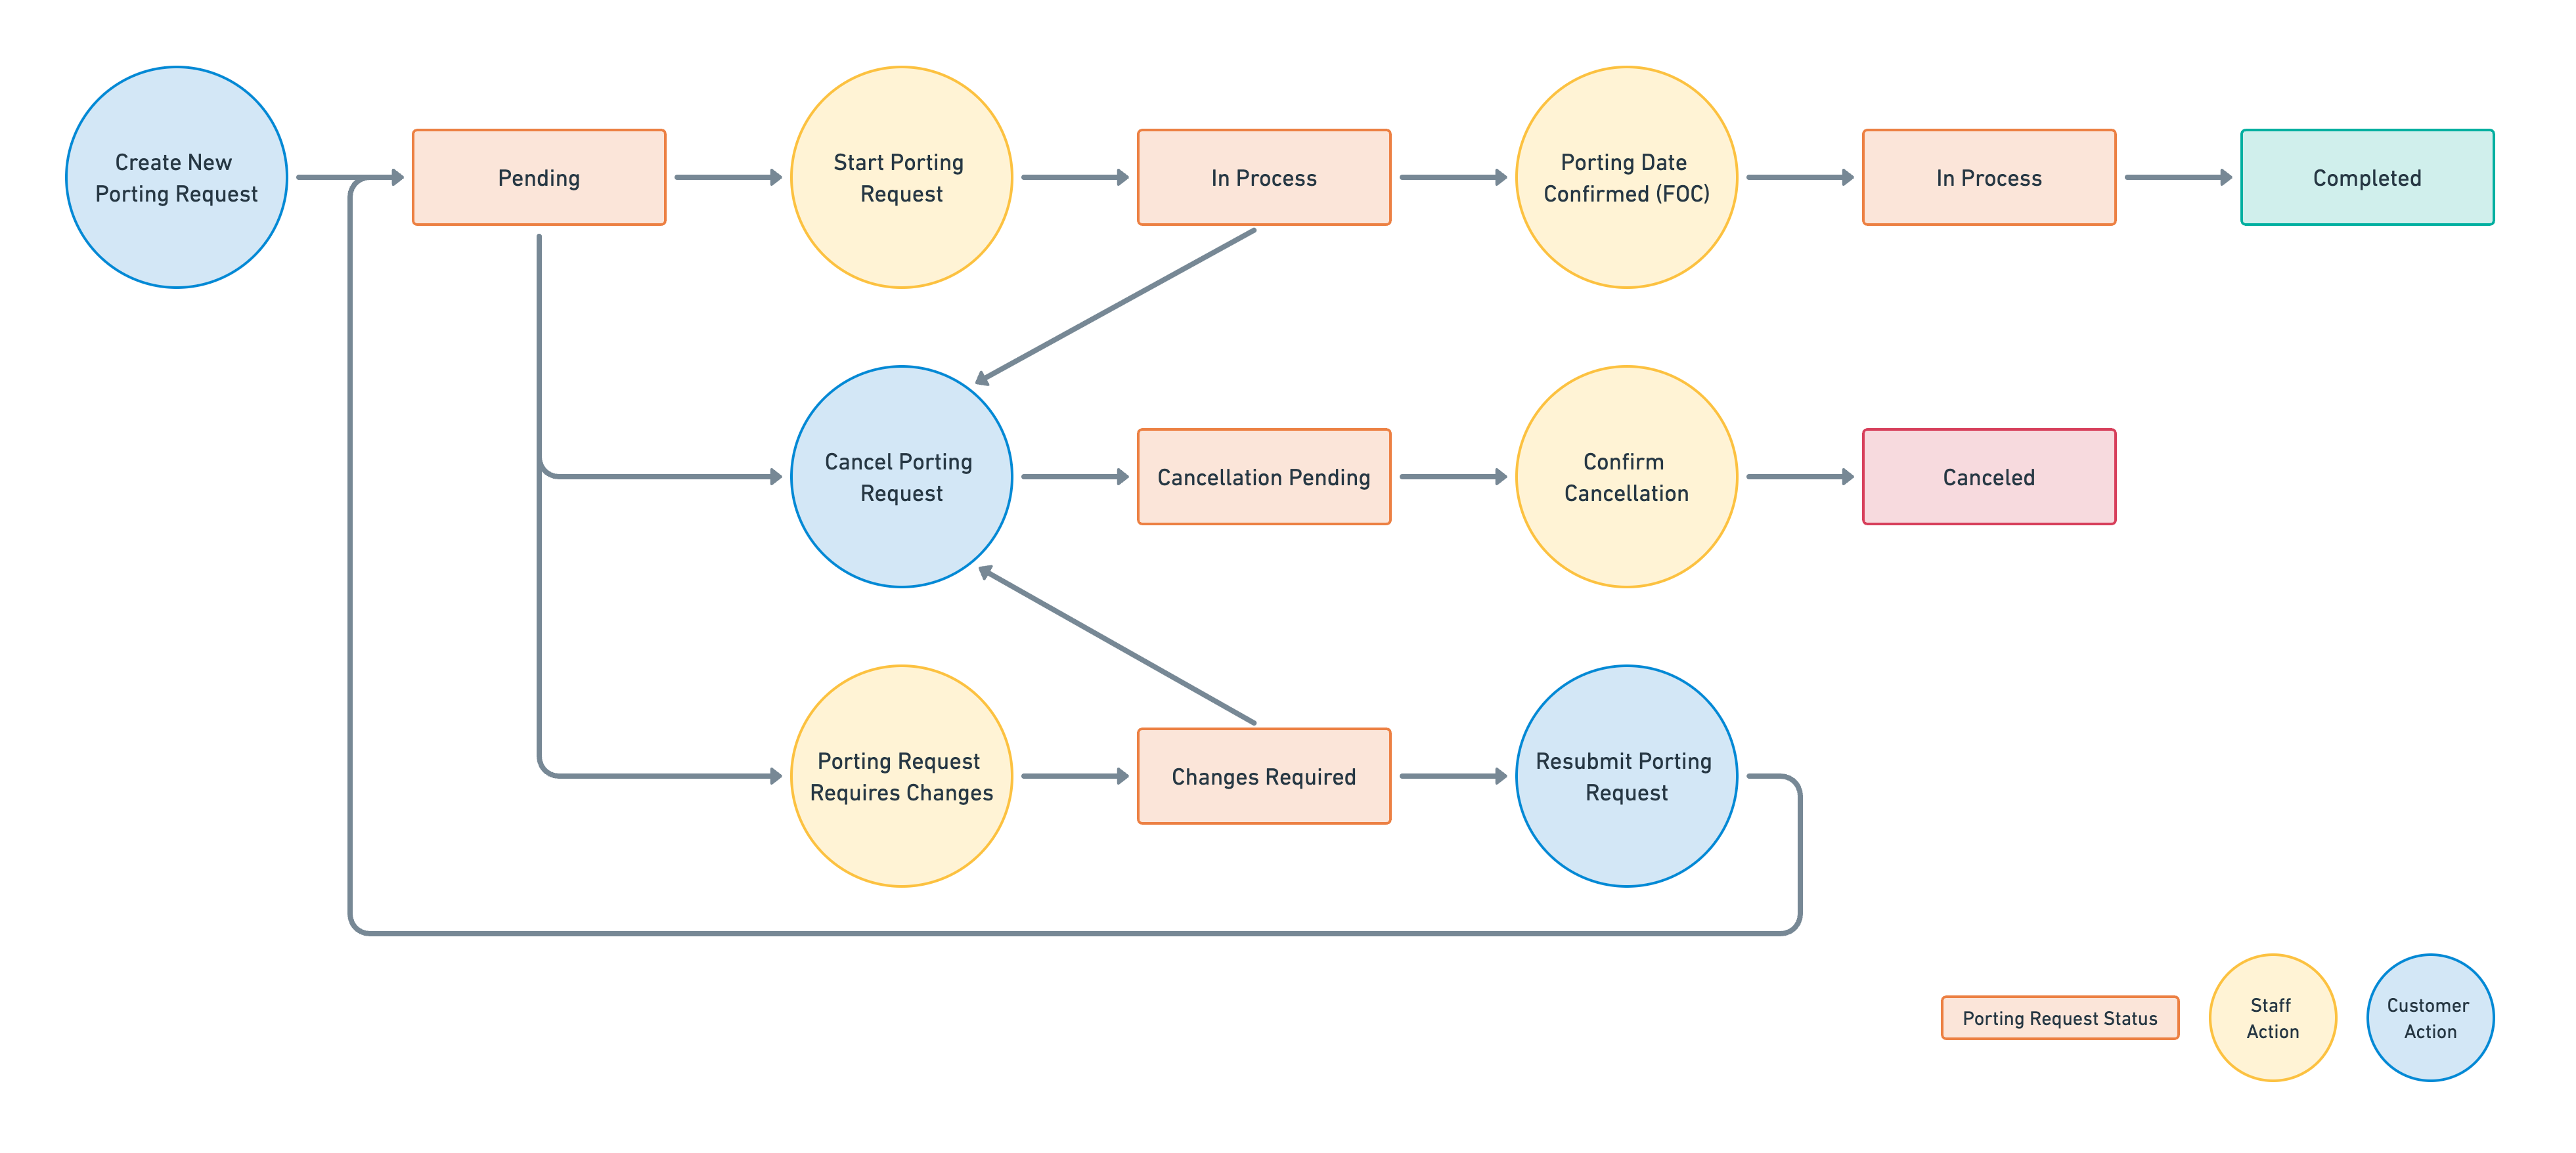
Porting Request Flow#
This porting flow illustrates how a number porting request progresses through different stages. The process begins with creating a new request, moves through review and validation, and continues to completion once the porting date is confirmed. Along the way, specific actions taken by staff and customers help move the request forward, including reviewing details, making required changes, resubmitting information, or canceling the request if necessary.
Porting Request Statuses#
Status |
Description |
|---|---|
Pending |
Your porting request has not been reviewed by our staff. |
In Progress |
Your porting request has been reviewed and is currently in process. |
Changes Required |
Your porting request needs to be resubmitted. |
Completed |
Your porting request has been completed. |
Cancellation Pending |
Your request to cancel this porting is currently under review. |
Canceled |
Your porting request has been canceled. |
Resubmit Porting Request#
Before a porting request can be processed, it goes through a verification stage to confirm that end user details are correct. While in Pending status, the request is under review. If the information is incorrect, incomplete, or cannot be verified, the request will move to Changes Required status. In this state, staff will provide a reason and, if needed, additional comments to help you resolve the issue before resubmitting.
Step 1. Filter Porting Requests by Status: Changes Required#
In the DIDWW User Panel, go to Phone Numbers → Number Porting.
Open the Request Status filter.
Select the Changes Required status to display the relevant porting requests.
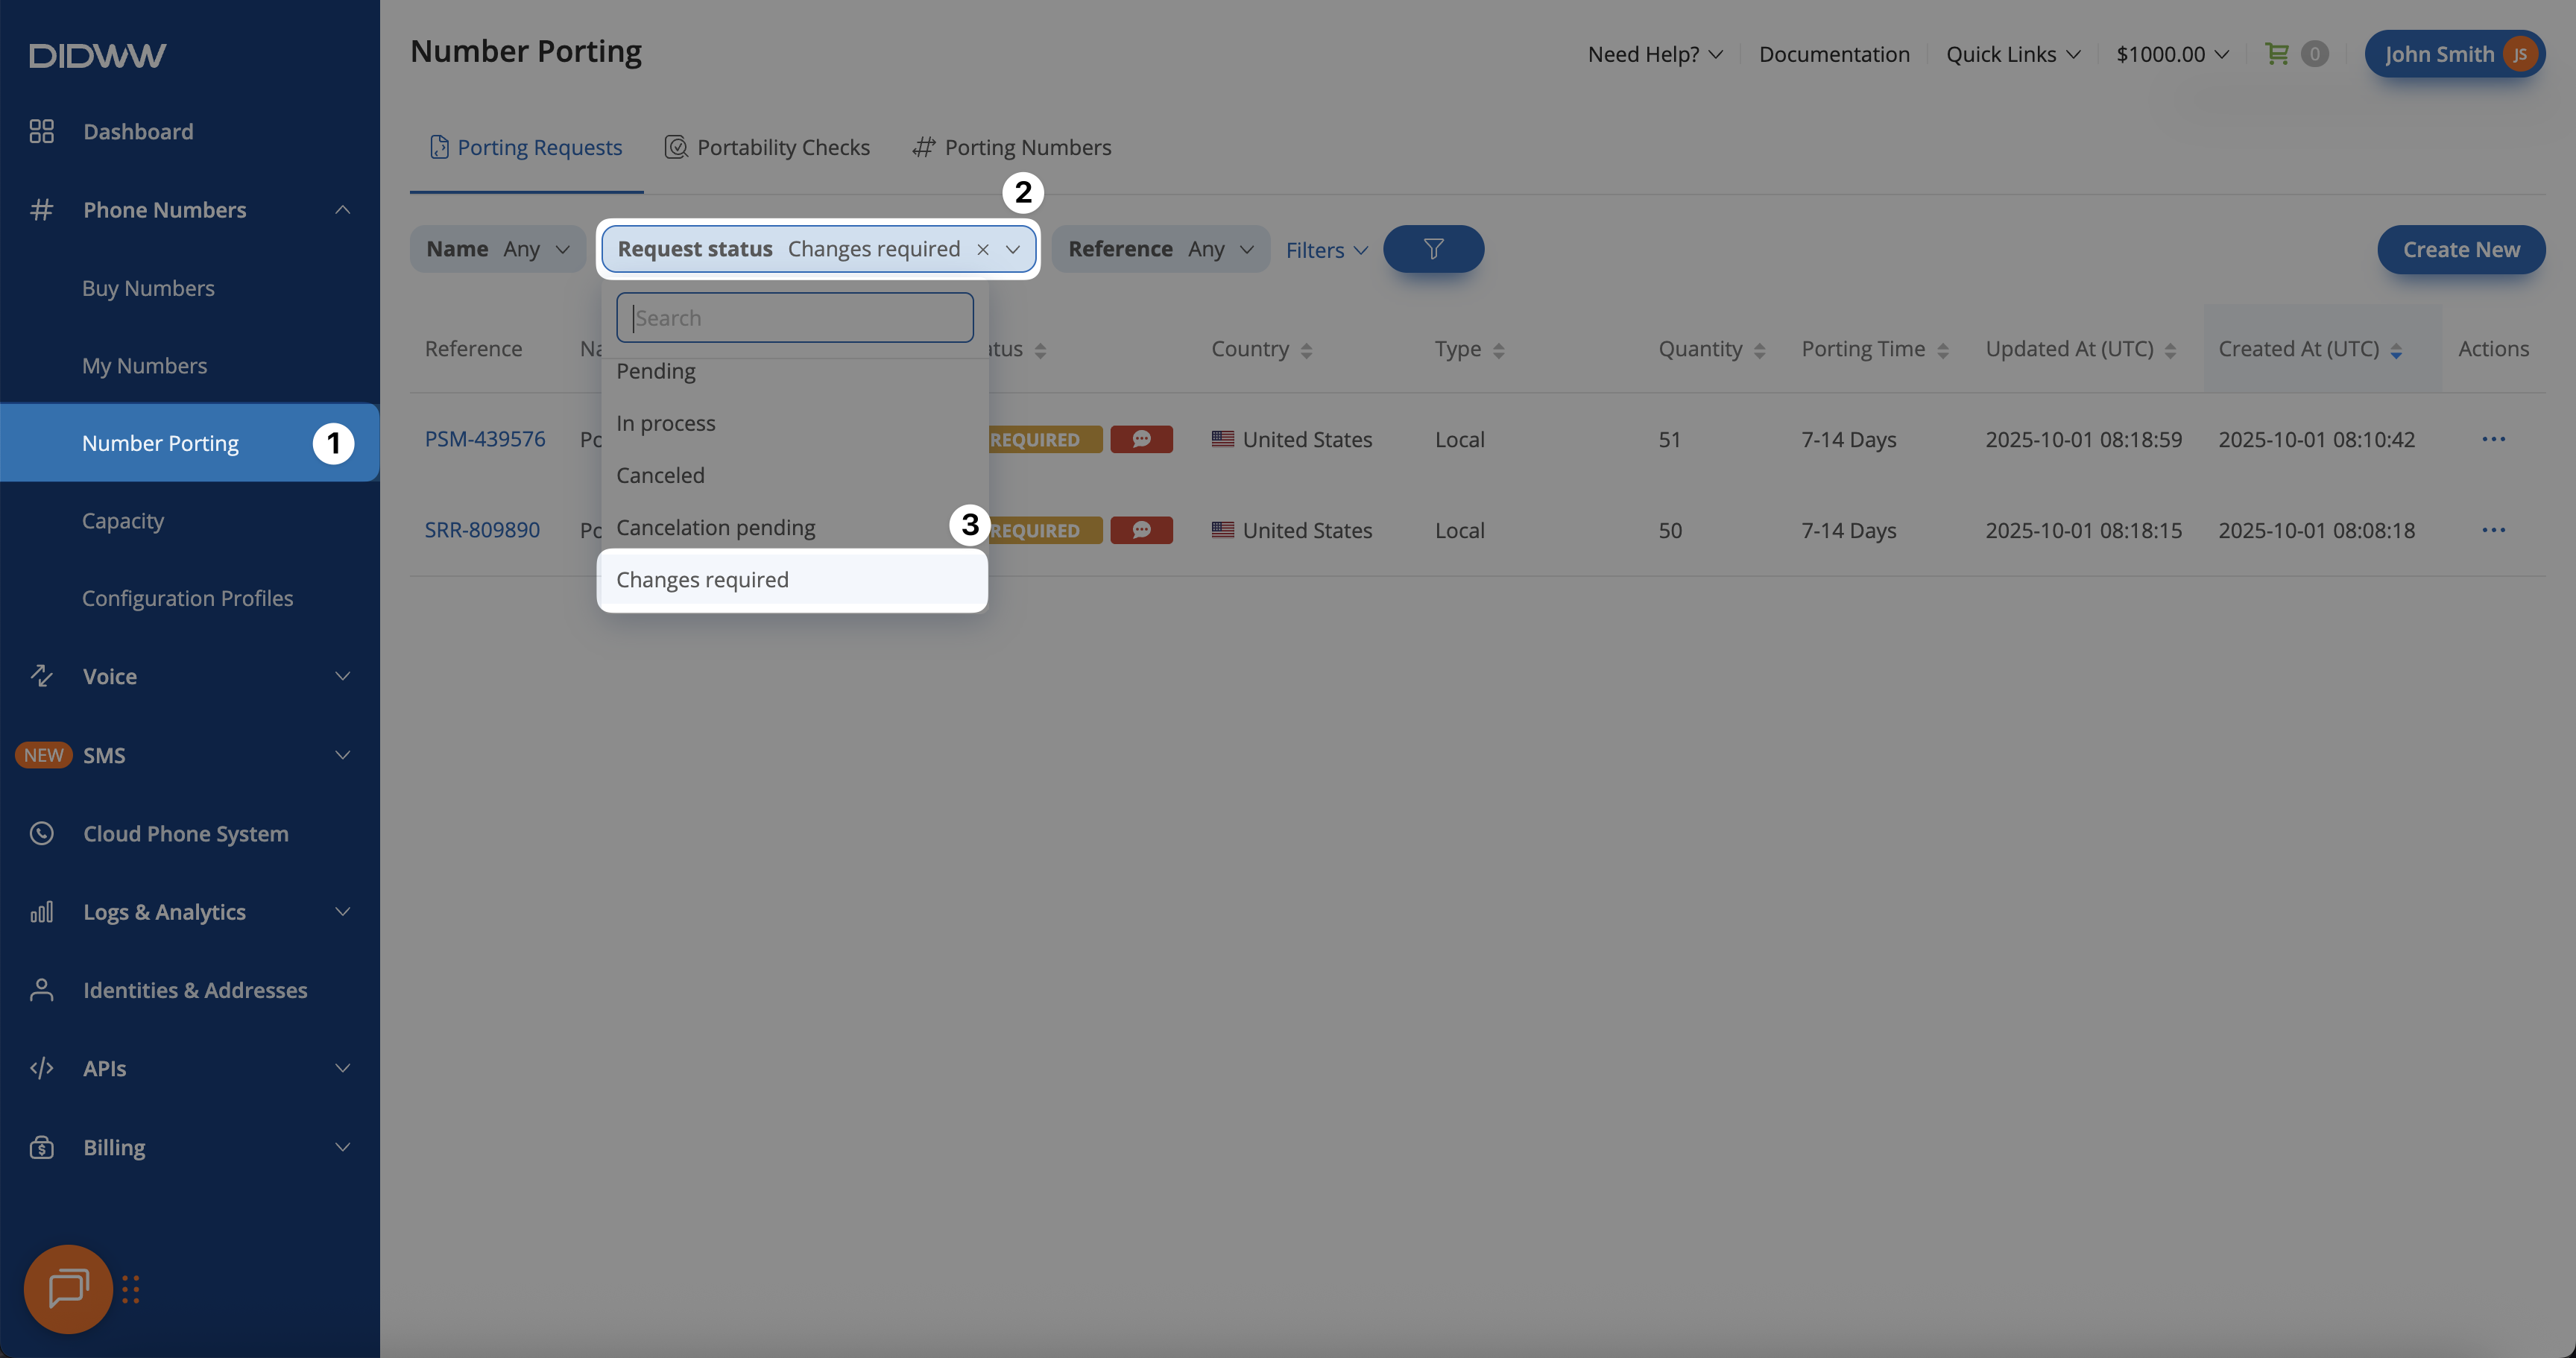
Fig. 1. Filtering porting requests in Changes Required status.#
Step 2. Open the Porting Request Edit Page#
Locate the porting request, then click the Reference ID or use the Actions (⋯) menu and select Edit.
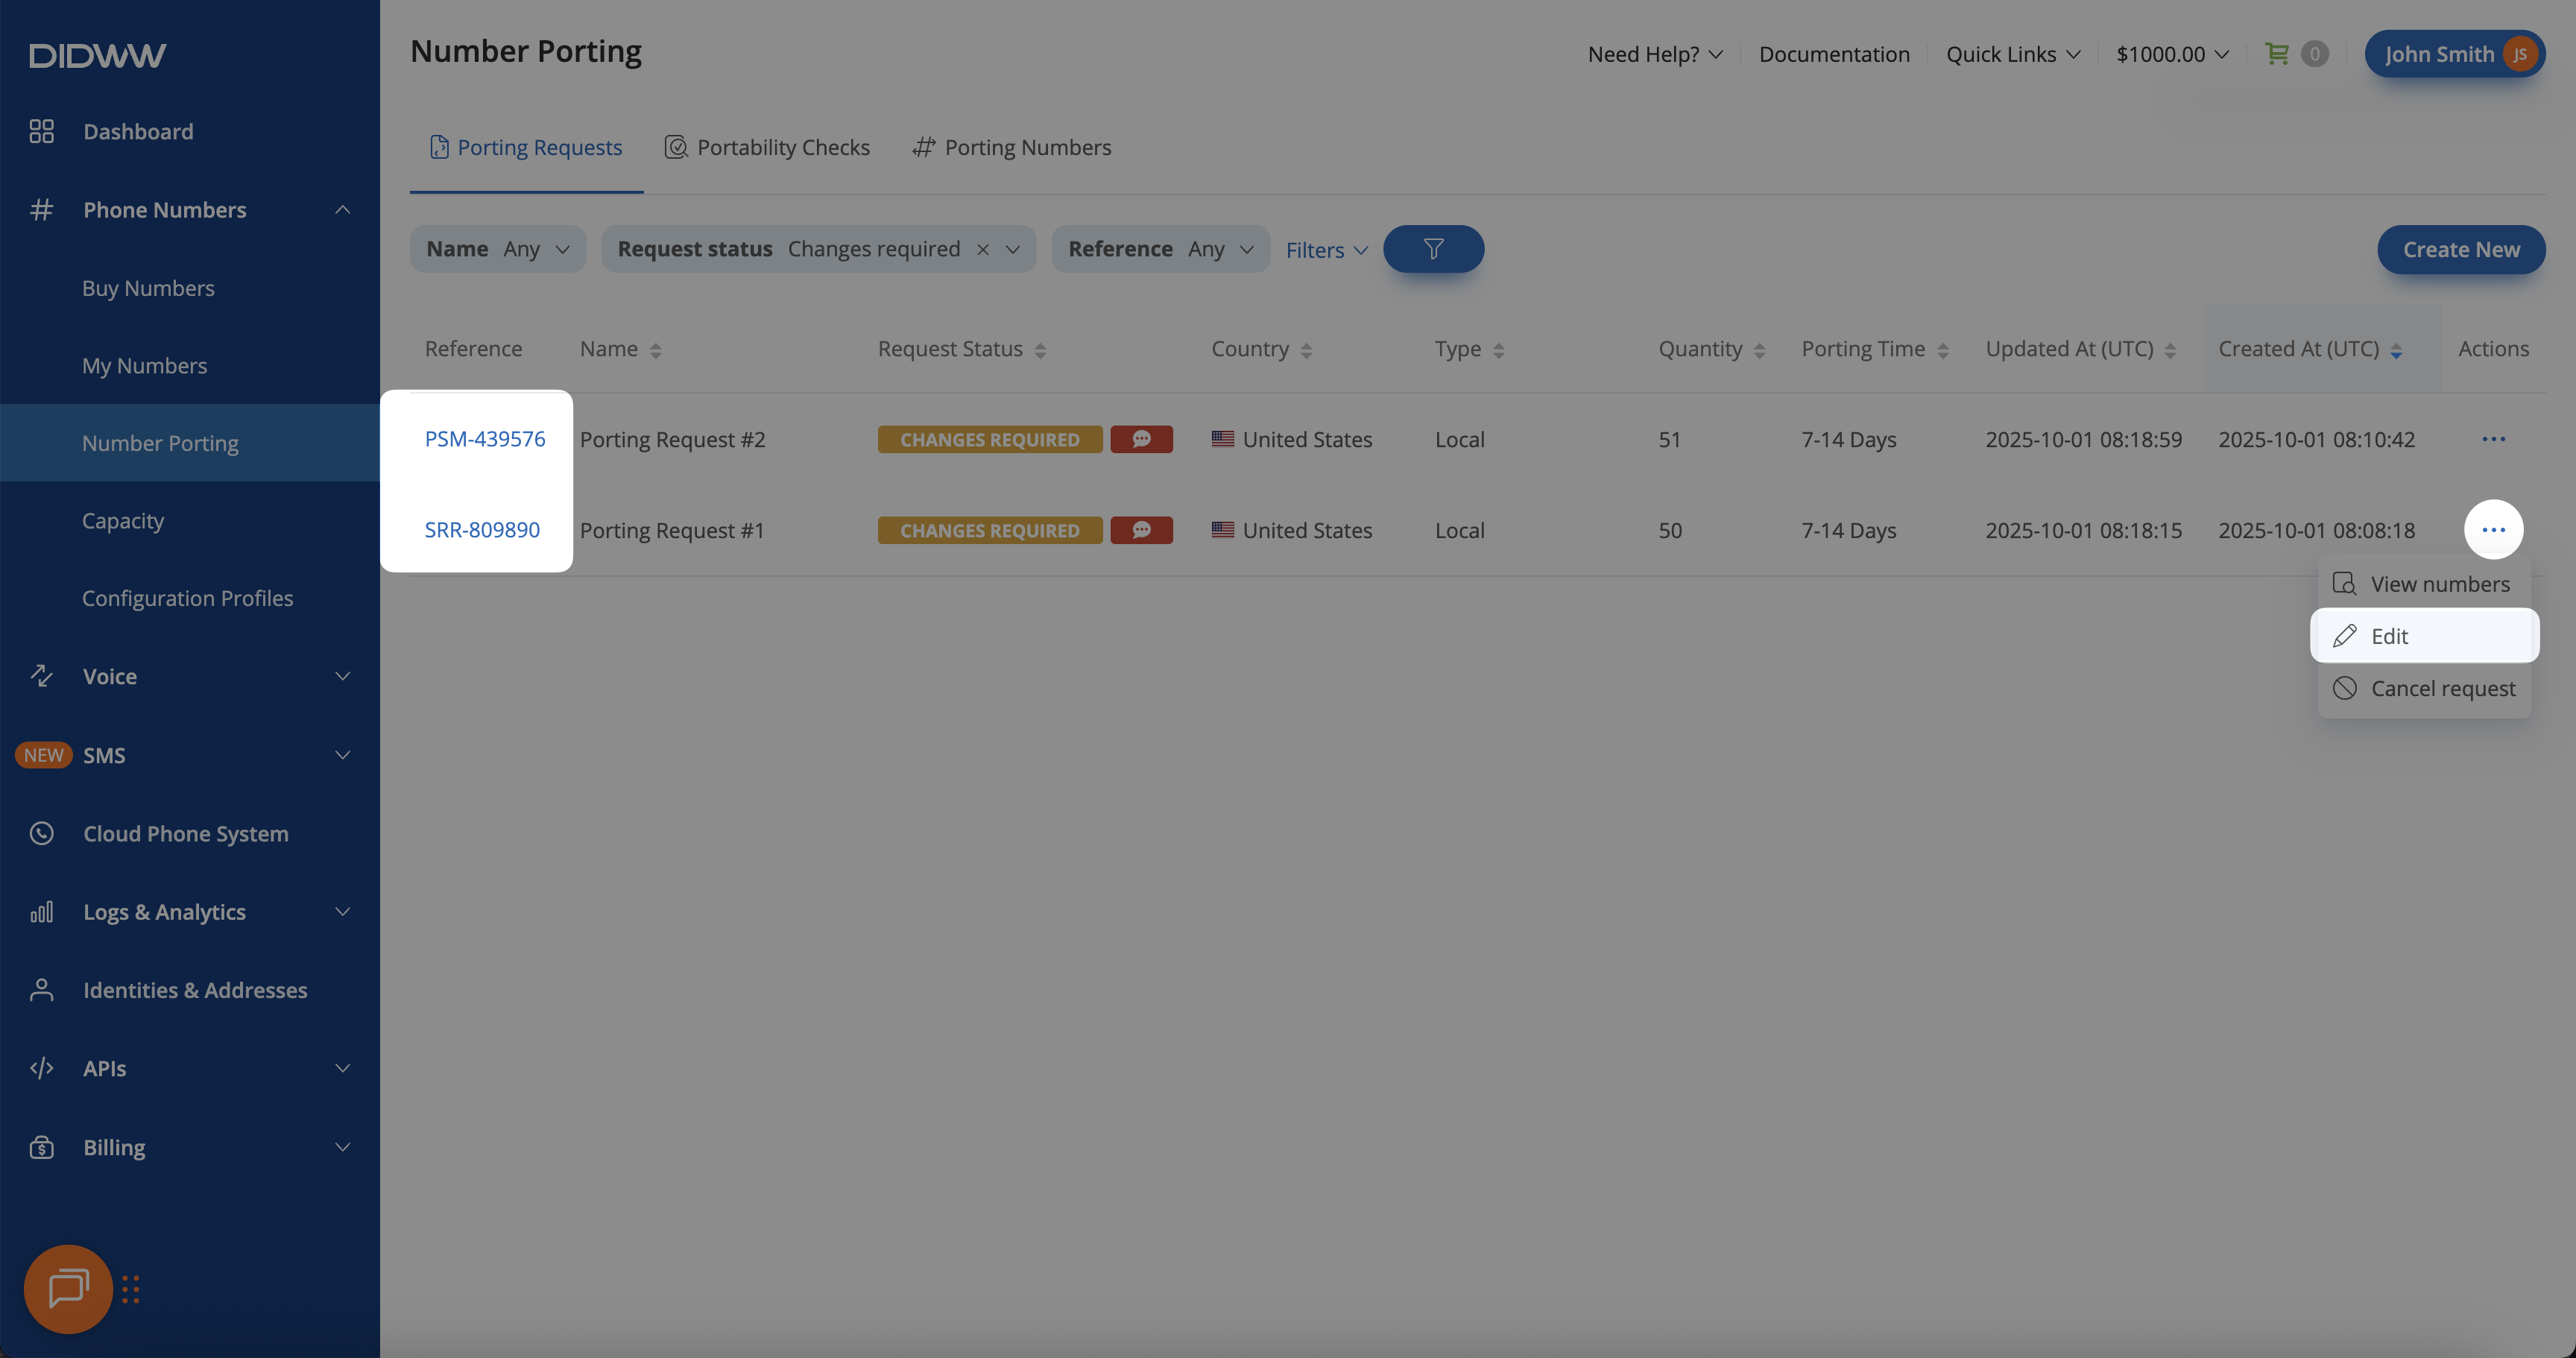
Fig. 2. Opening the porting request to review details and rejection reasons.#
Step 3. View Verification Details and Reject Reason(s)#
On the Edit Porting Request page, review the Verification Details and Reject Reason(s) sections. This will show exactly why the request requires changes (for example, a missing proof of address).
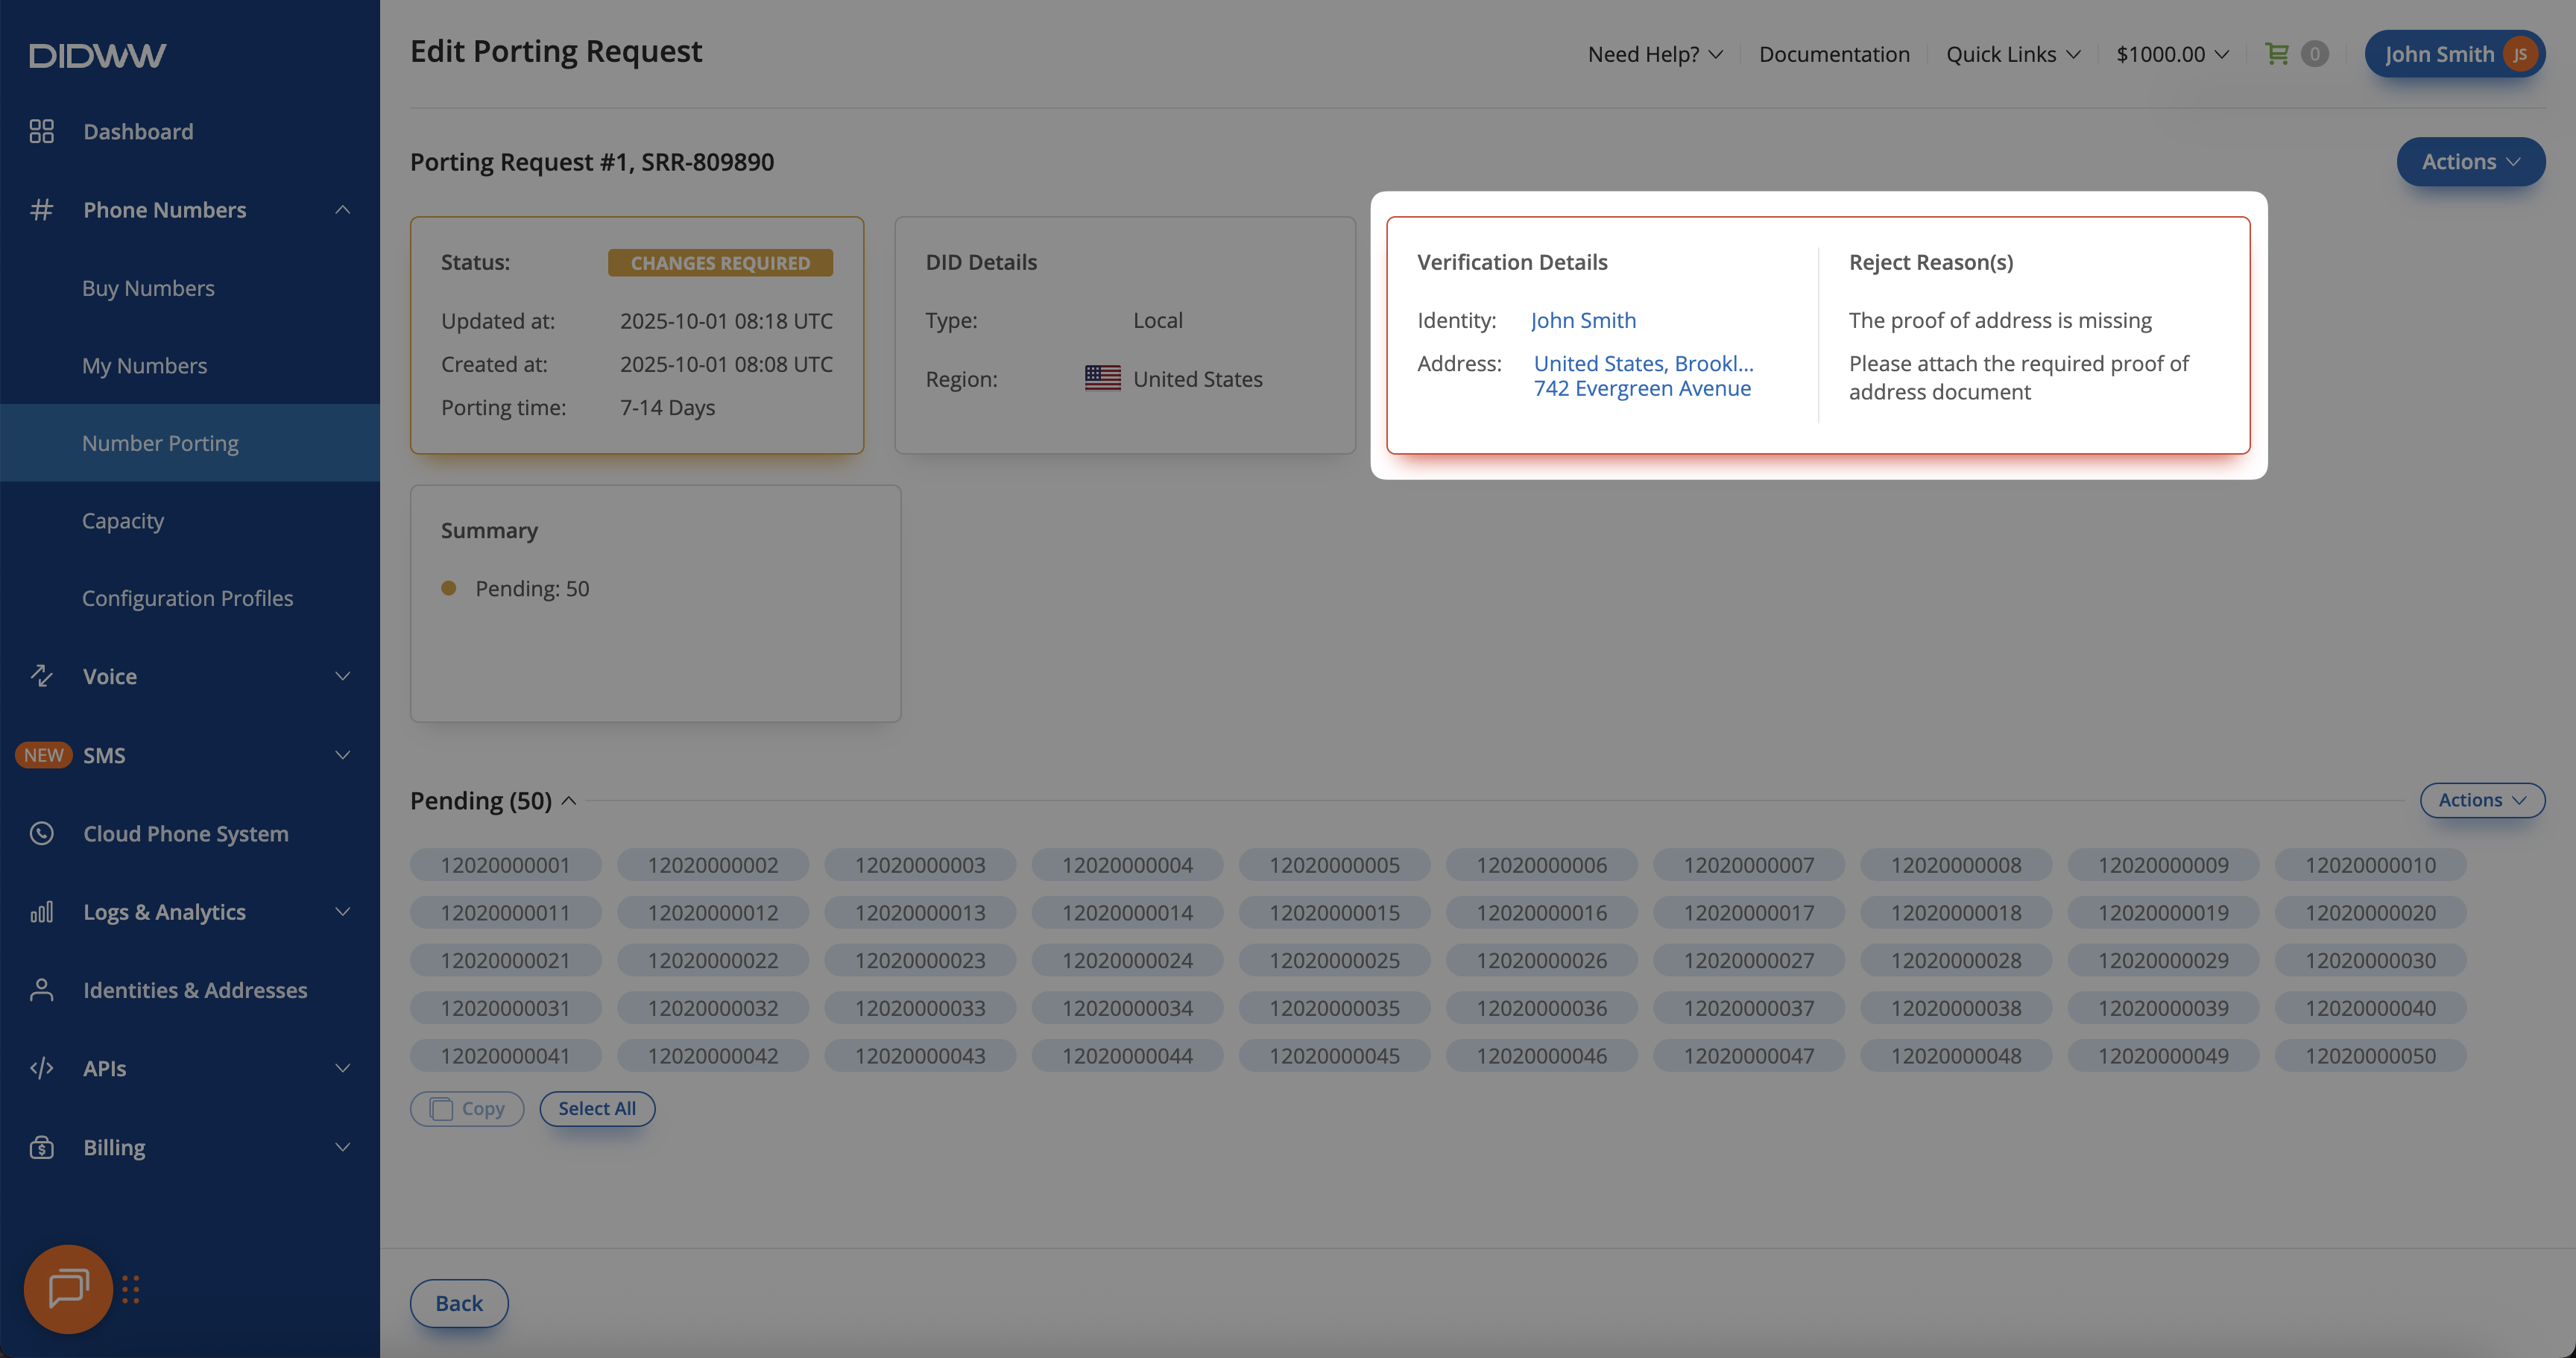
Fig. 3. Verification details and rejection reasons for the porting request.#
Step 4. Update Identity or Address Information#
Depending on the rejection reason(s), you may be required to update either the Identity details, the Address details, or both. For example, this may happen if the provided information is outdated, incomplete, or does not match the verification documents.
In the Edit Porting Request page click Actions → Edit assigned identity or Edit assigned address.
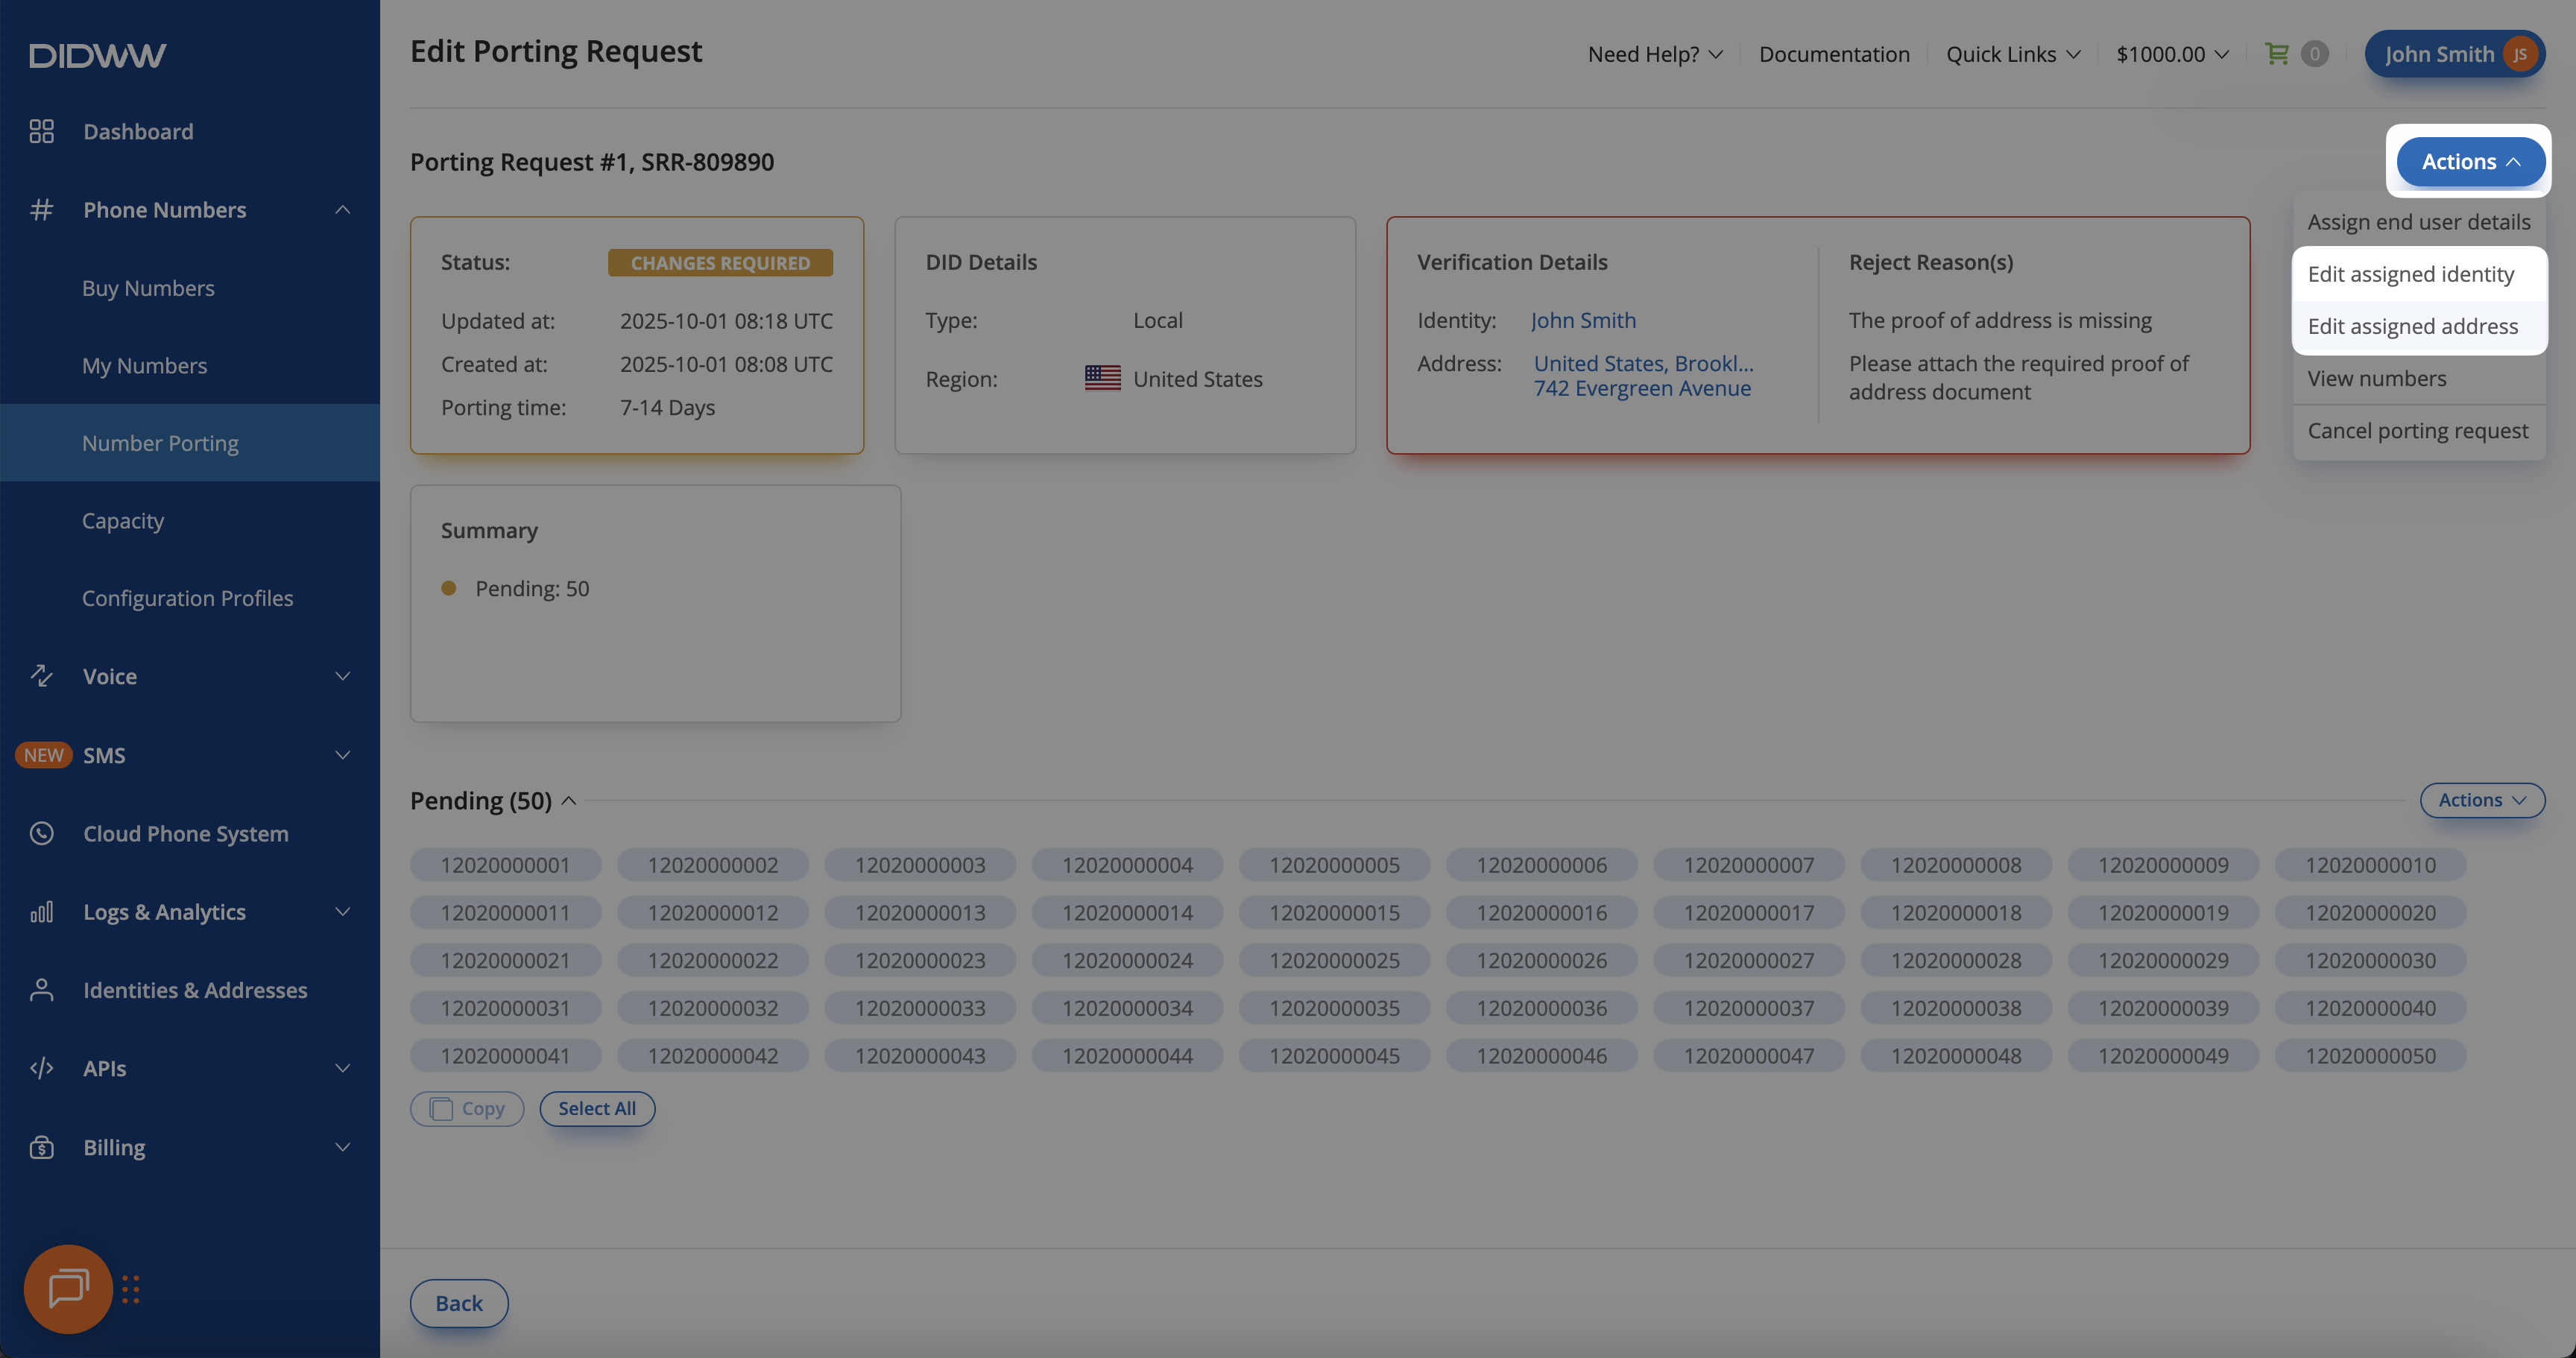
Fig. 4. Editing assigned address or identity based on rejection reasons.#
Update the required fields with the correct information, upload any missing or corrected documents (e.g., proof of address), and click Submit to save the changes.
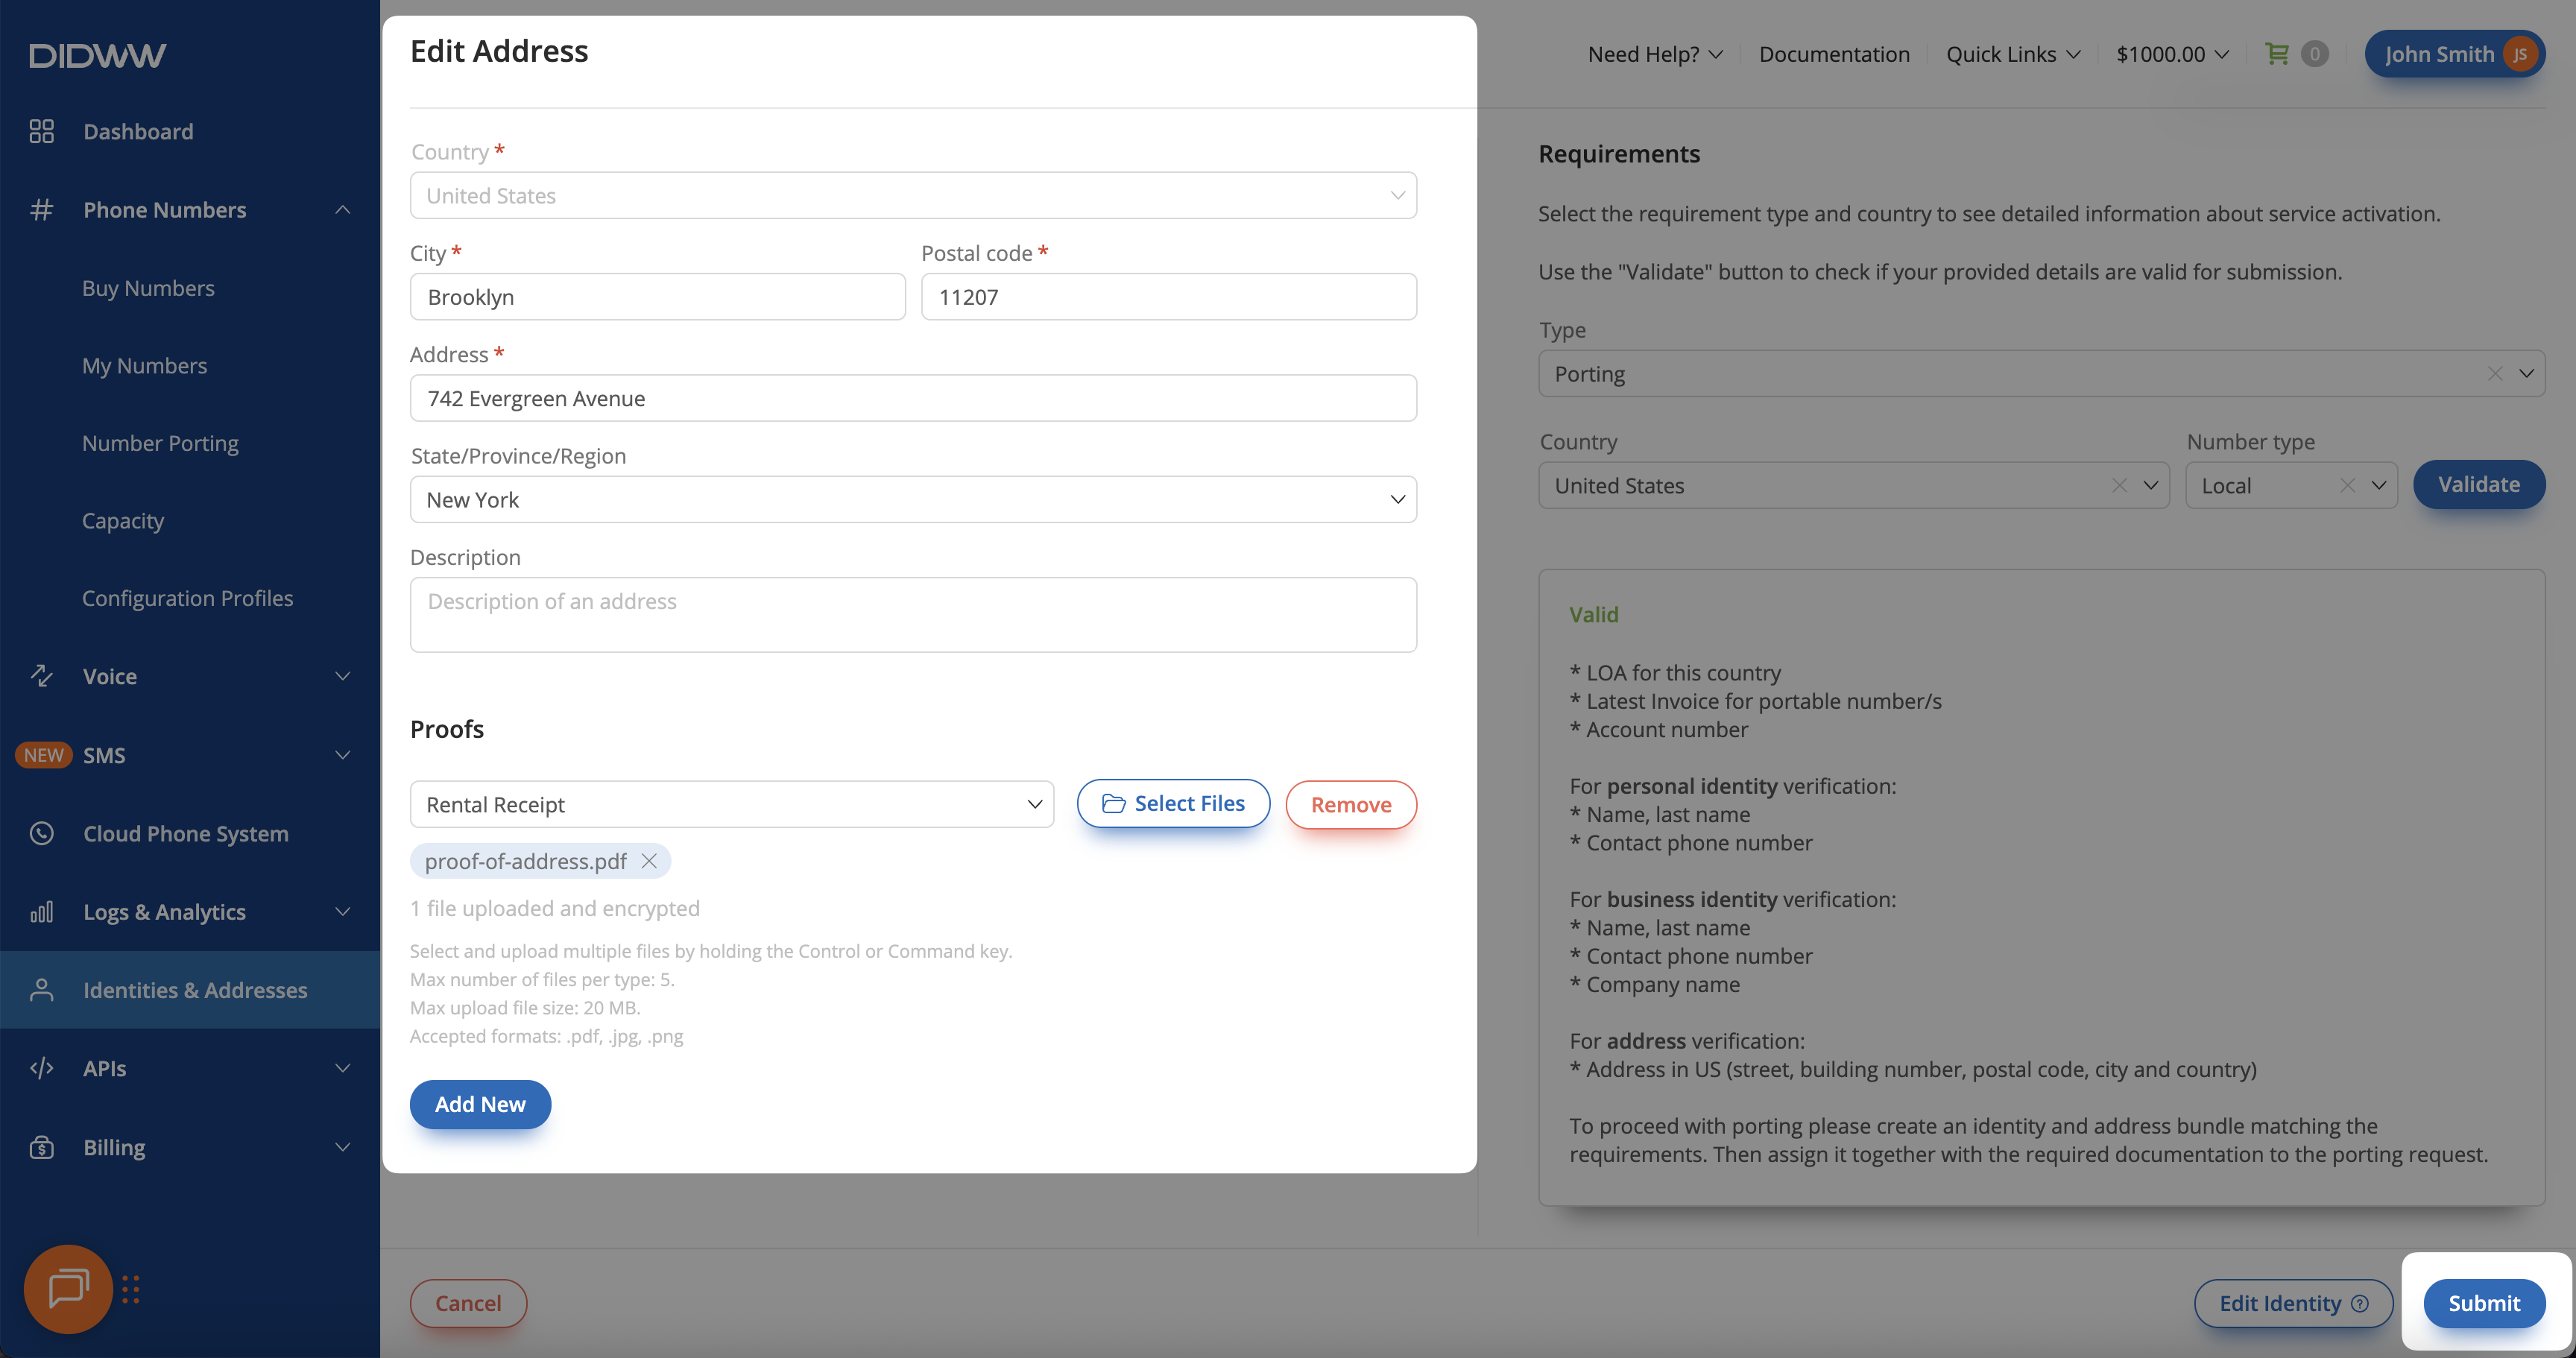
Fig. 5. Uploading proof documents and submitting changes.#
Step 4. Assign End User Details#
After updating the necessary information, you will be redirected back to the Edit Porting Request page, where you must reassign the updated end user details before resubmitting the request.
To reassign end user details, click Actions → Assign end user details.
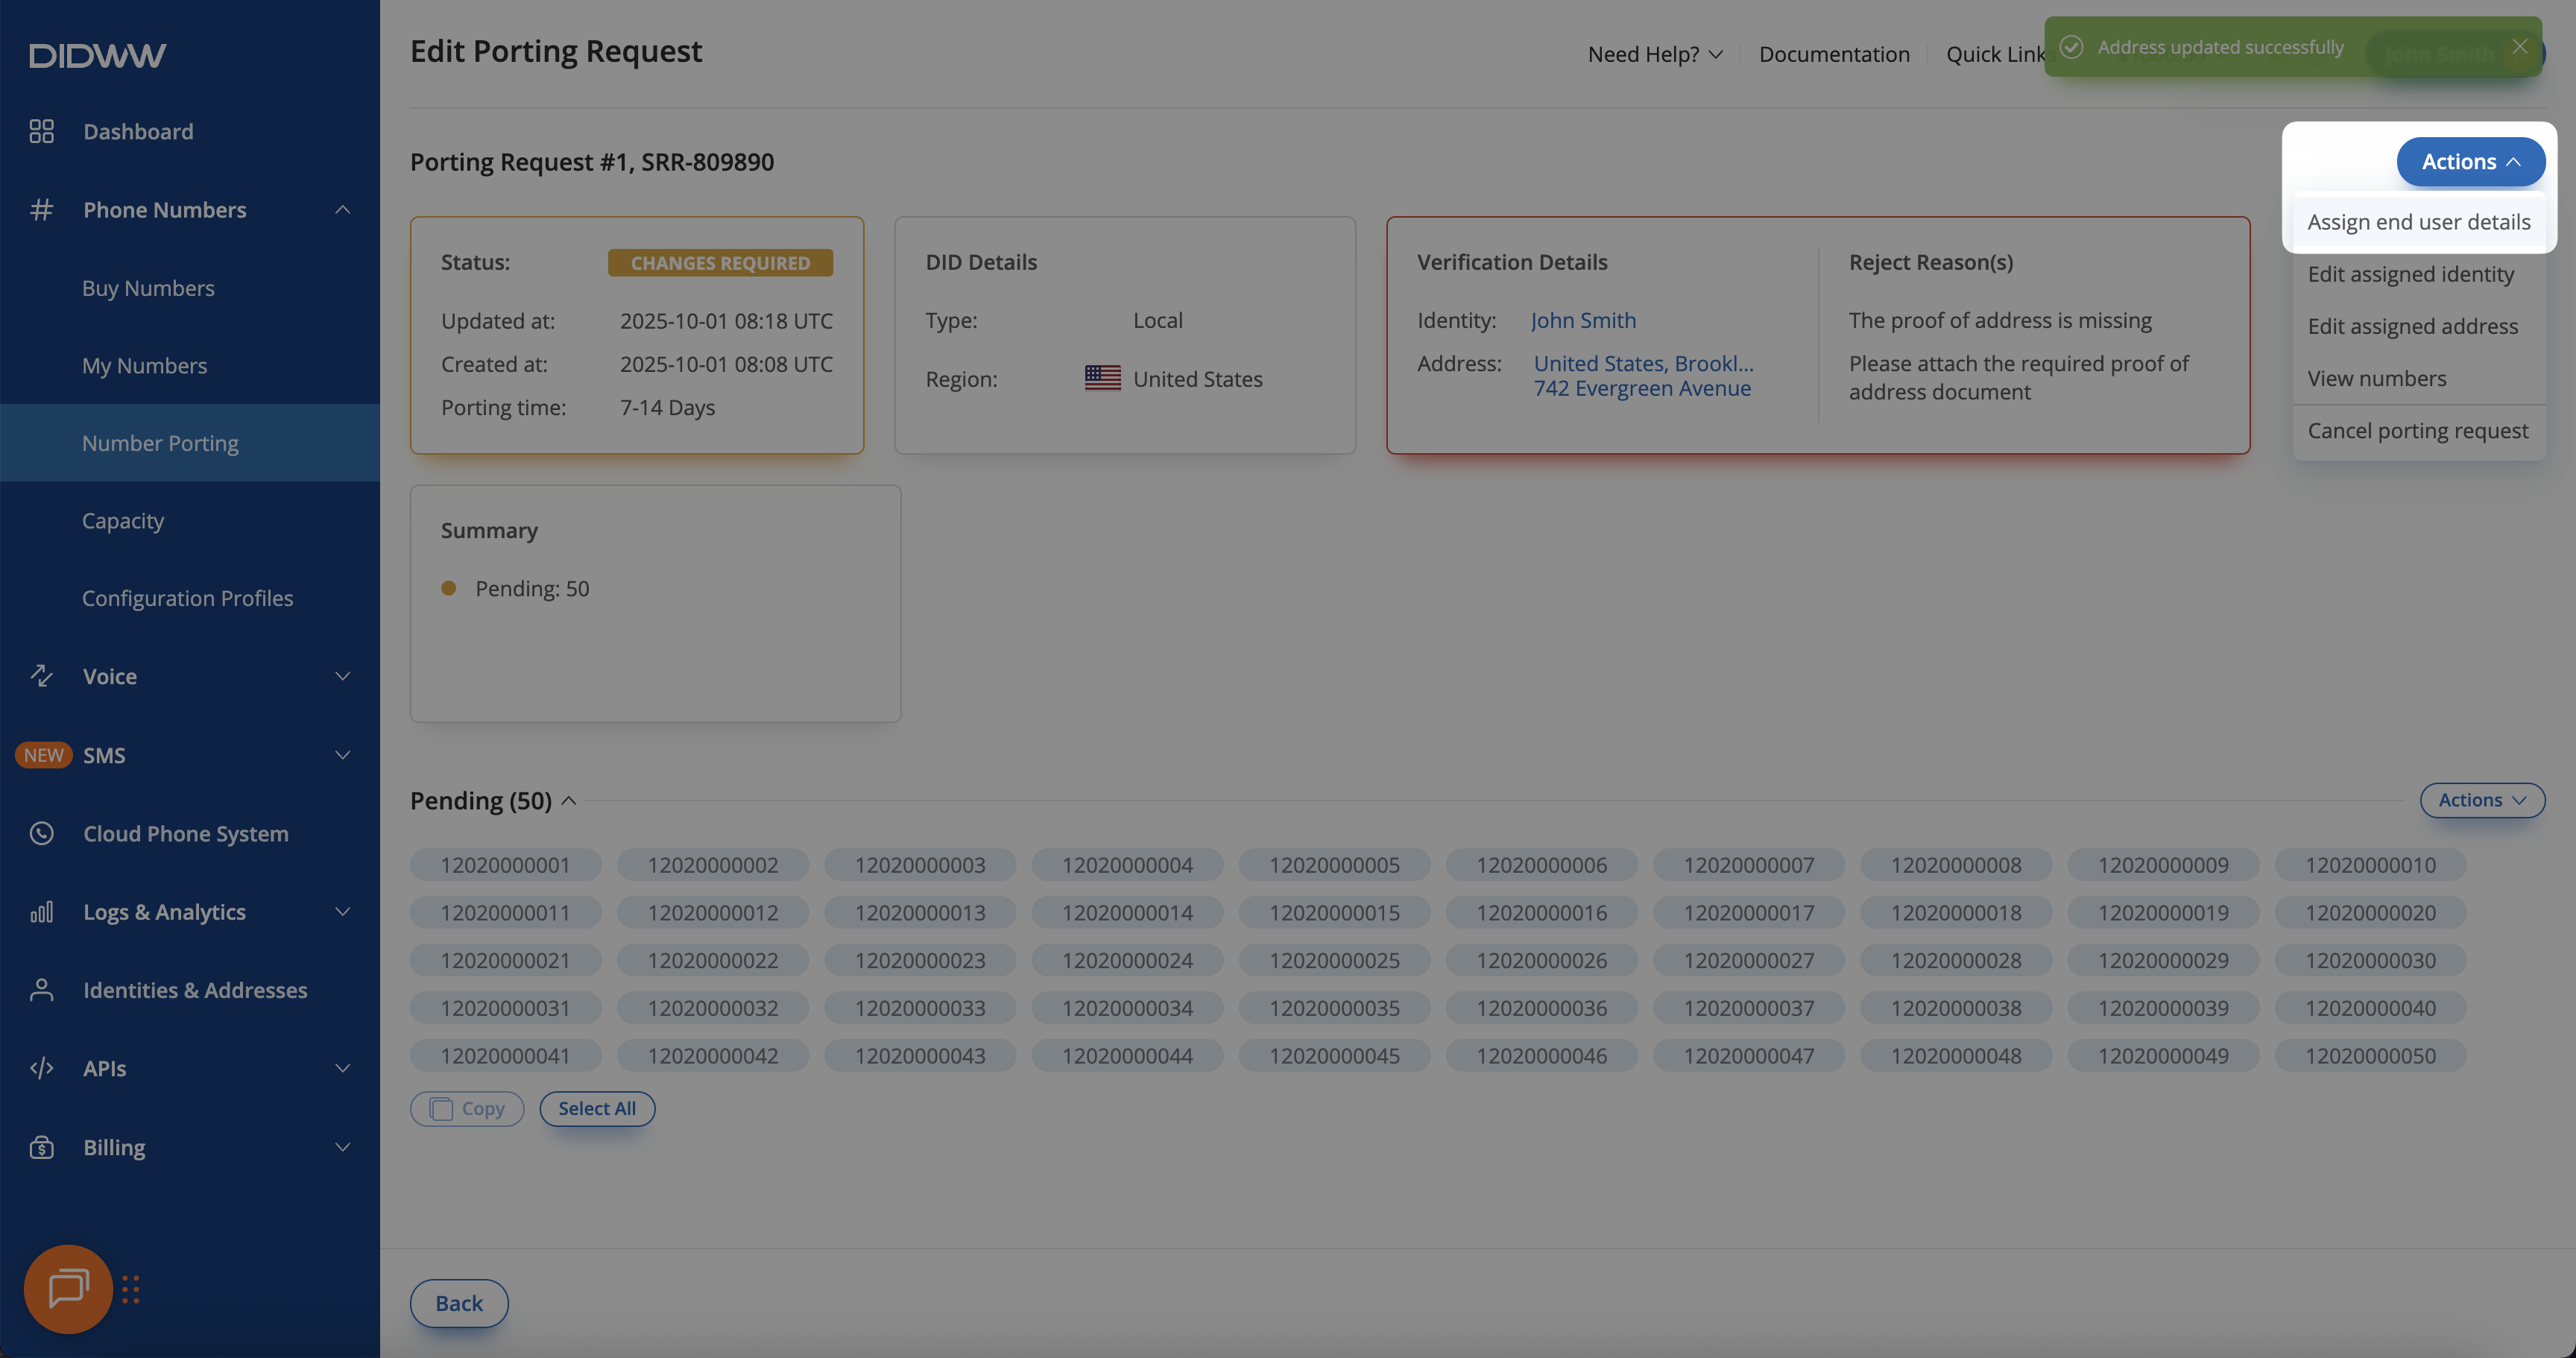
Fig. 6. Assigning end user details with the updated information.#
An Assign End User Details pop-up window will appear, displaying a banner message with the rejection reason and any staff comments (if provided).
Select the correct and updated Identity and Address from the dropdown menus.
Upload the required LOA document and enter the current carrier account number.
Click Submit to confirm.
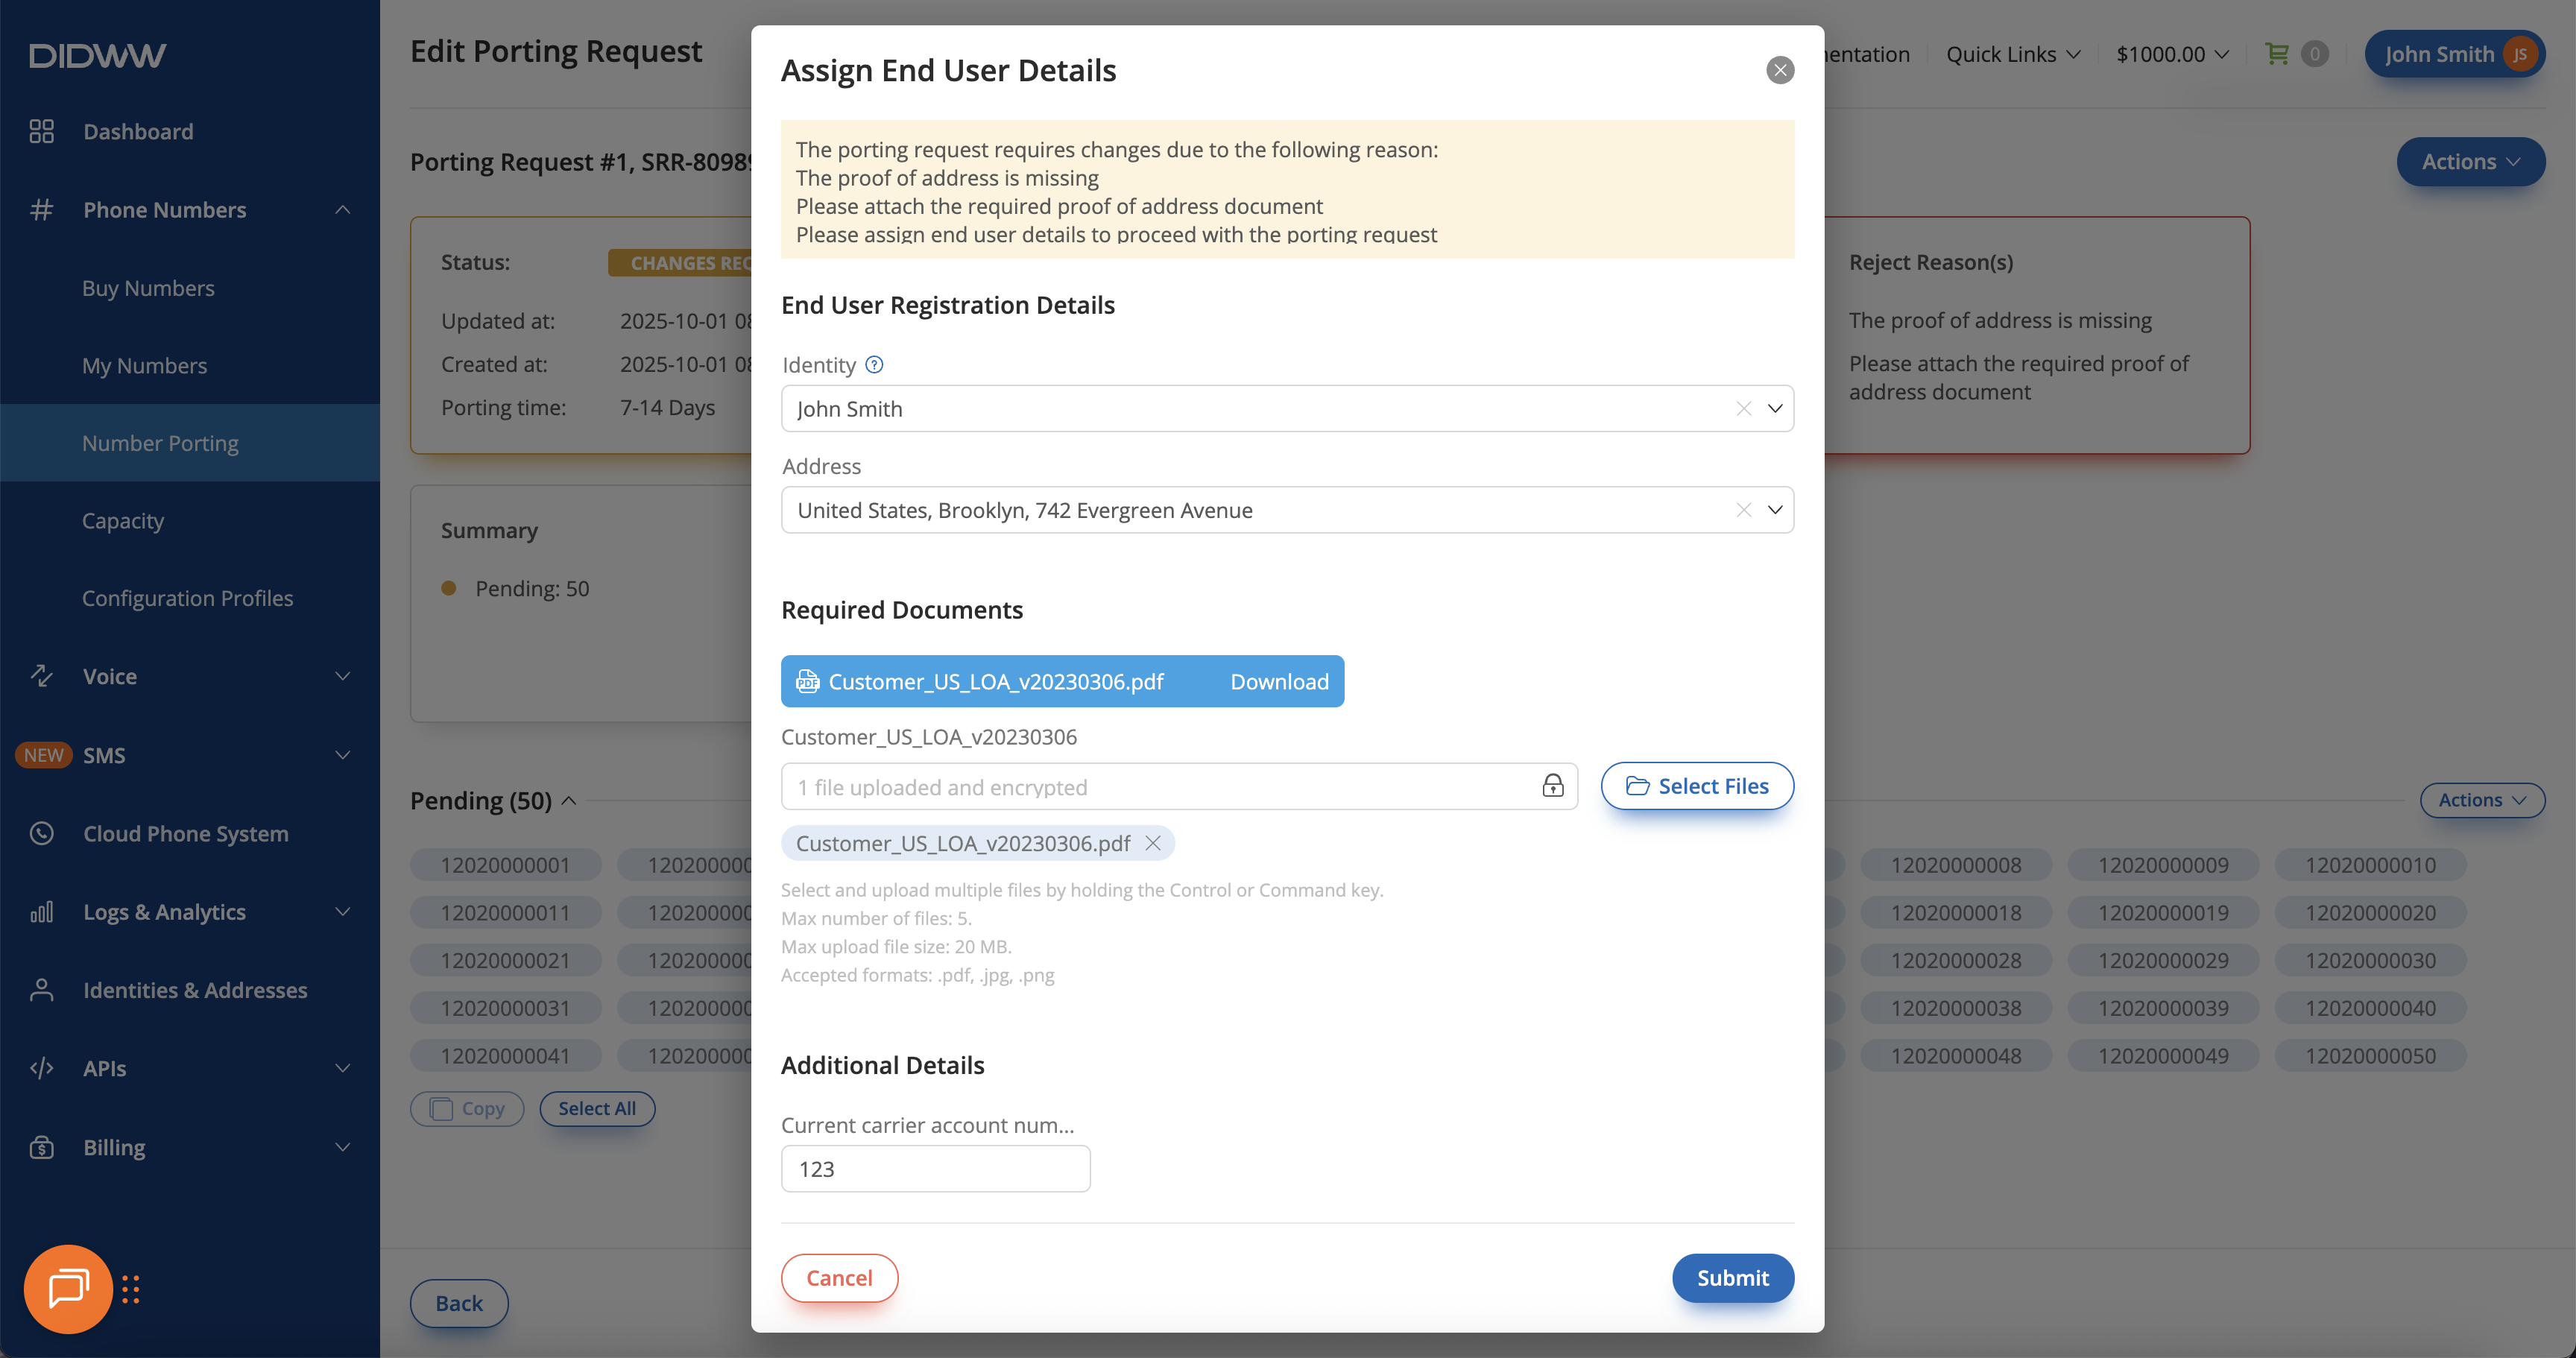
Fig. 7. Uploading LOA and required documents before resubmitting.#
Step 5. Porting Request Returns to Pending Status#
Once the end user details are successfully assigned, the porting request will return to Pending status for re-verification.
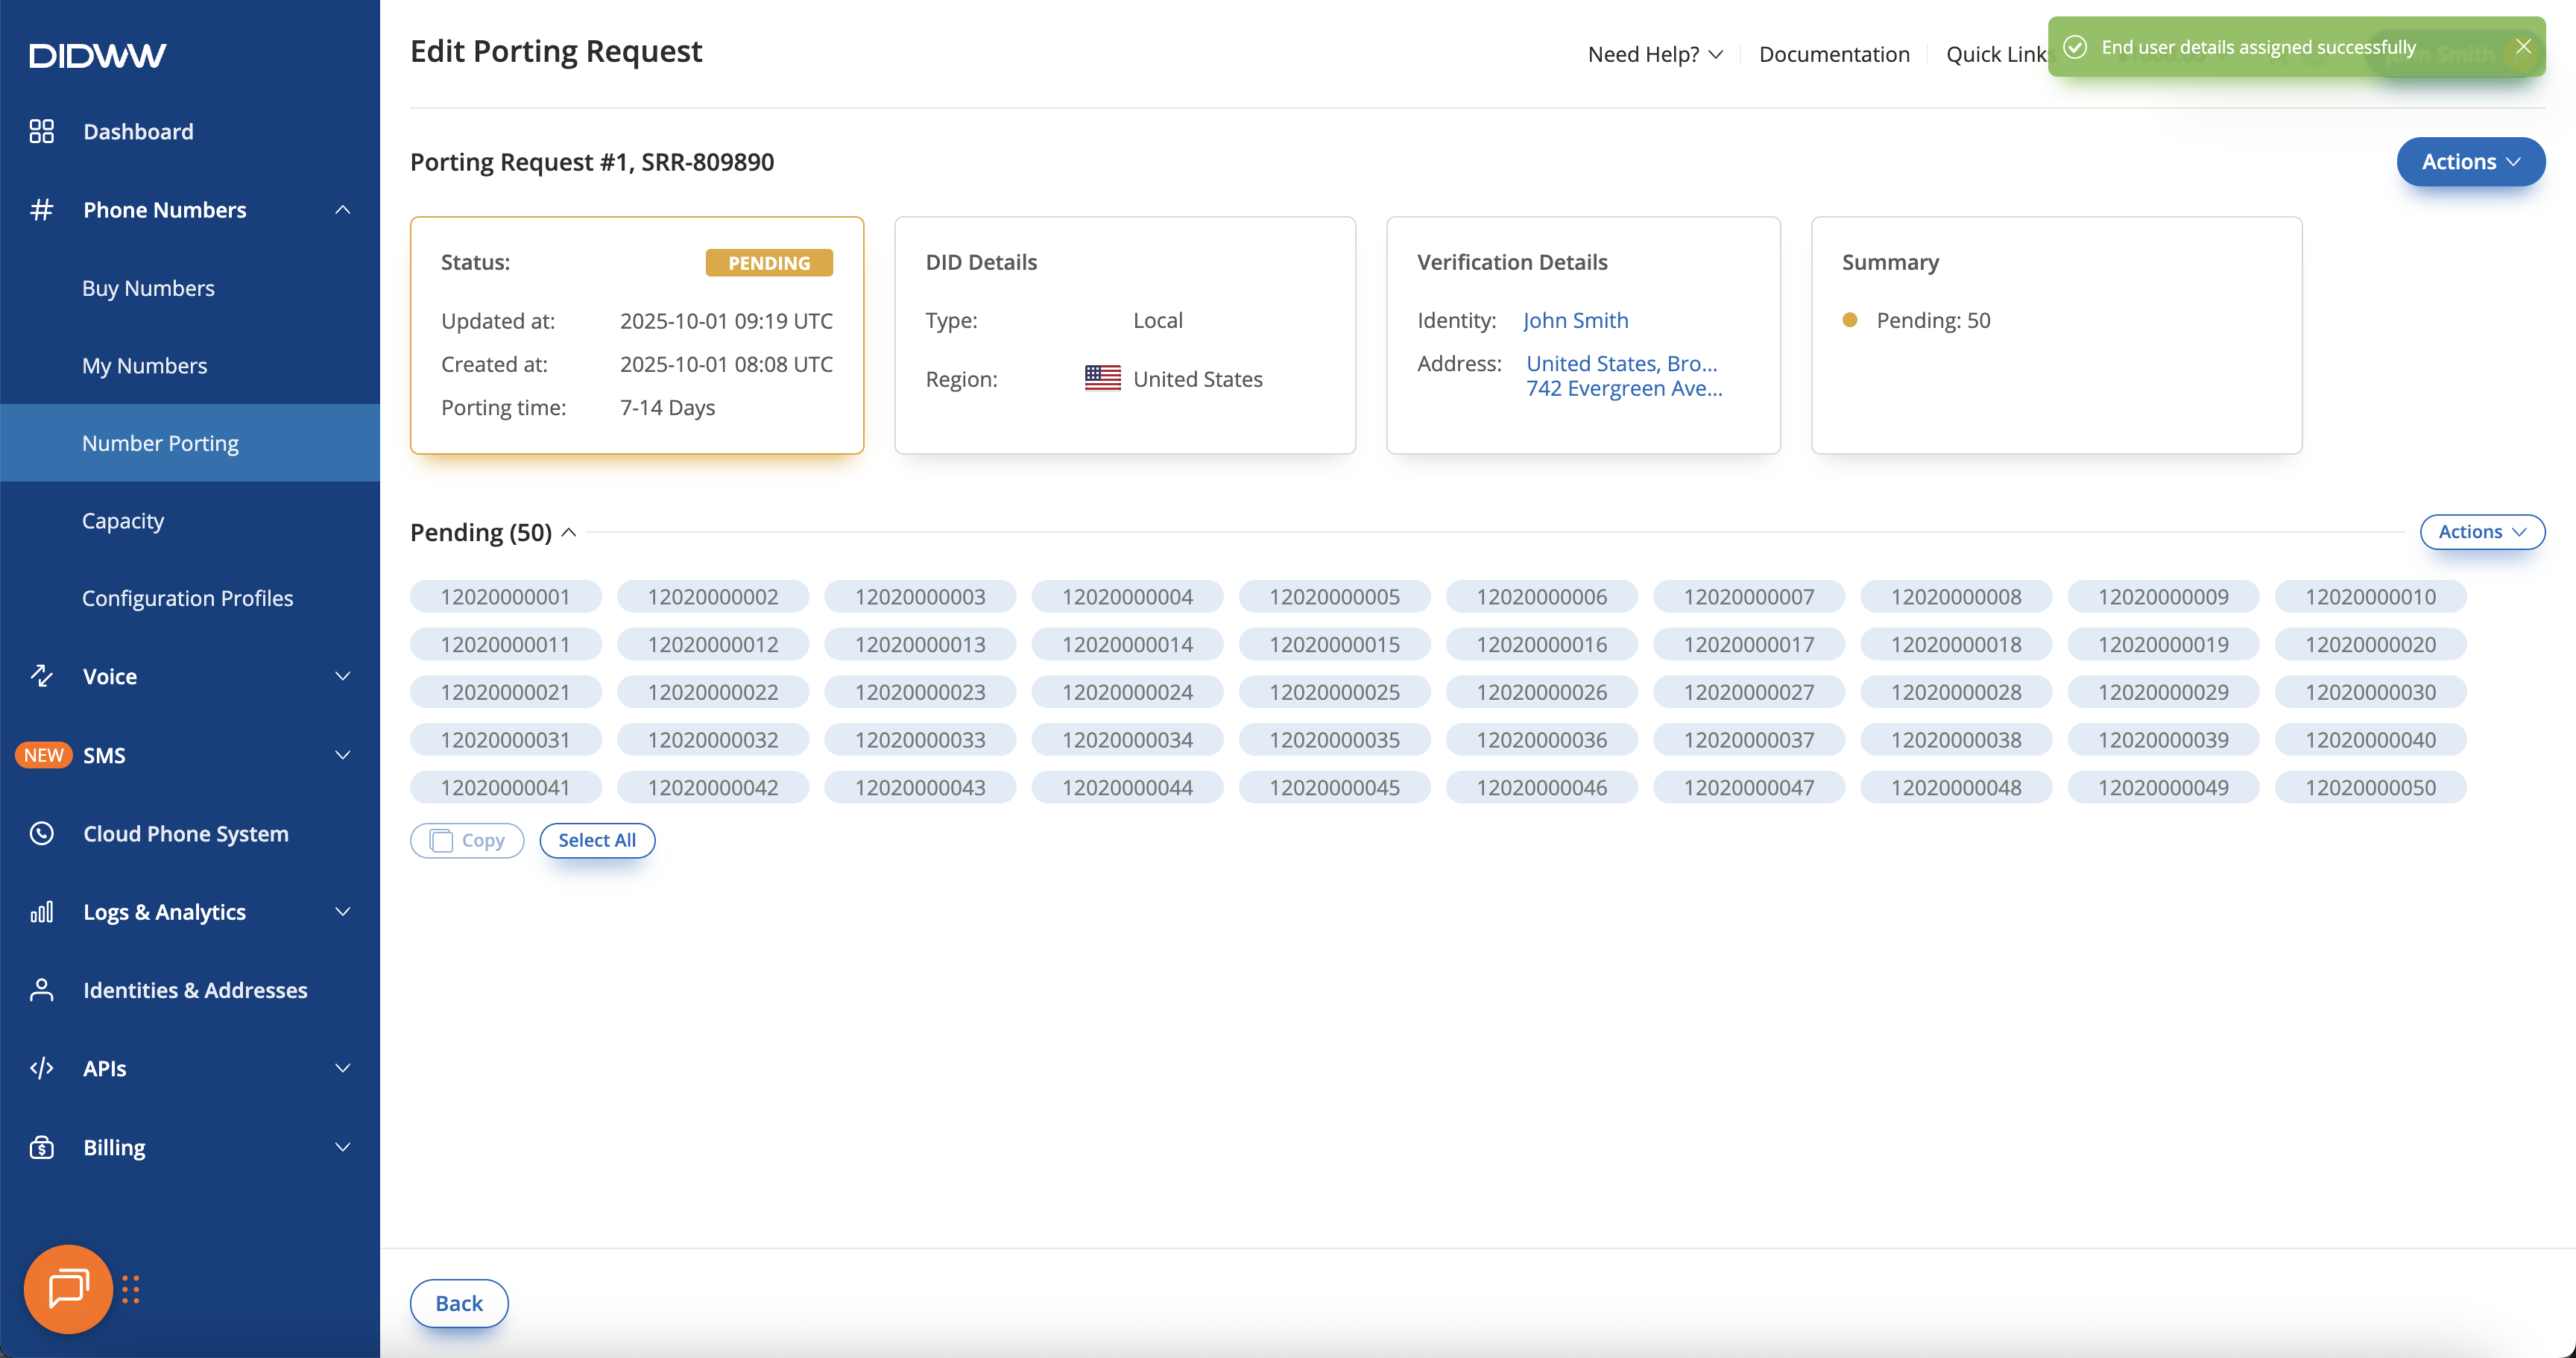
Fig. 8. Confirmation message indicating successful reassignment of end user details.#
Cancel Porting Request#
You can cancel a porting request while it is in Pending, In Process, or Changes Required status. Canceling the request will stop the porting process for all numbers that have not yet been completed within this request.
In the DIDWW User Panel, go to Phone Numbers → Number Porting.
Open the Porting Requests tab to view all existing requests.
Click the Actions (⋯) next to the porting request you want to cancel.
Select Cancel request from the dropdown list.
Note
For porting requests In Process, cancellations are reviewed by staff.
When still possible, the request is approved and the numbers are canceled.
If it’s too late, the request is rejected and porting continues.
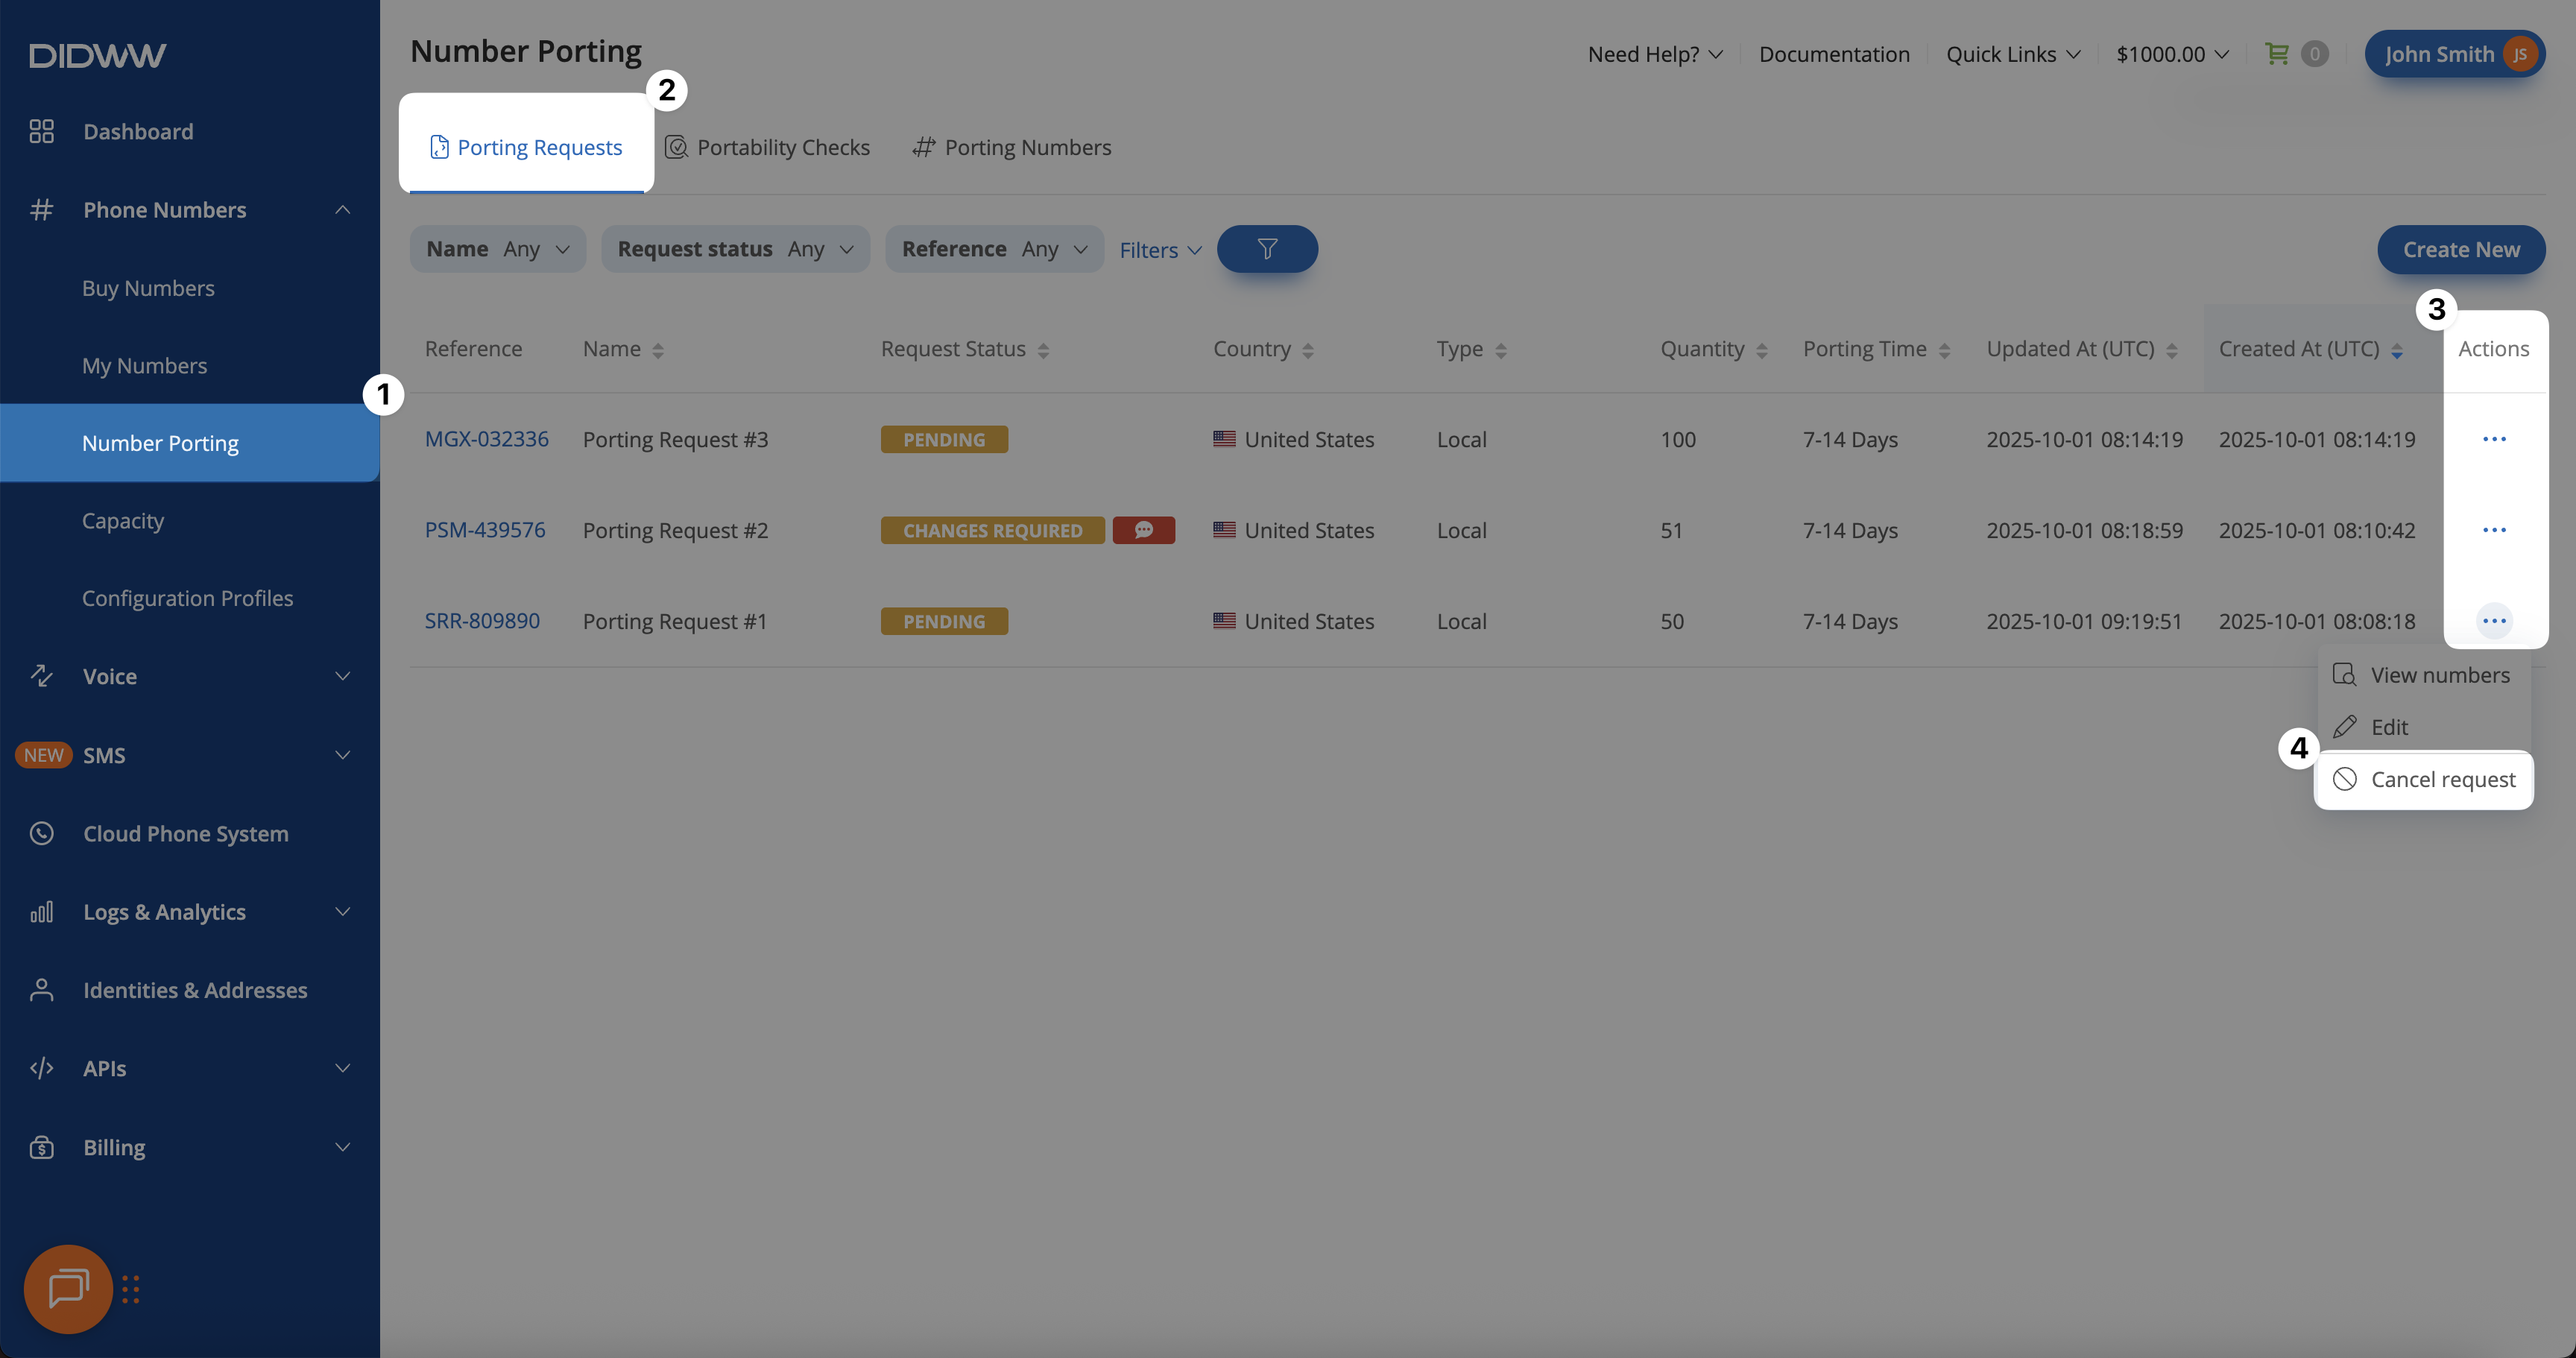
Fig. 9. Canceling a porting request using the Actions menu.#
Cancel Numbers in a Porting Request#
You can request to cancel numbers that belong to the same porting request. Numbers are grouped by their Porting Number Status, and you can cancel all numbers that belong to the same group at once. If there are other numbers in different groups, the porting process for those numbers will continue as usual.
Step 1. Open the Porting Request Edit Page#
In the DIDWW User Panel, go to Phone Numbers → Number Porting.
Open the Porting Requests tab to view all existing requests and locate the one you want to edit.
Click the Actions (⋯) next to the porting request.
Select Edit from the dropdown list.

Fig. 10. Opening the Porting Request Edit Page.#
Step 2. Select Porting Number Status Group#
On the Edit Porting Request page, find the Porting Number Status group you want to cancel. For example, expand the In Process group to view the numbers.
For the selected group, click Actions → Request cancellation.
Note
Numbers cannot be canceled if they are in Canceled, Cancellation Pending, or Completed status.
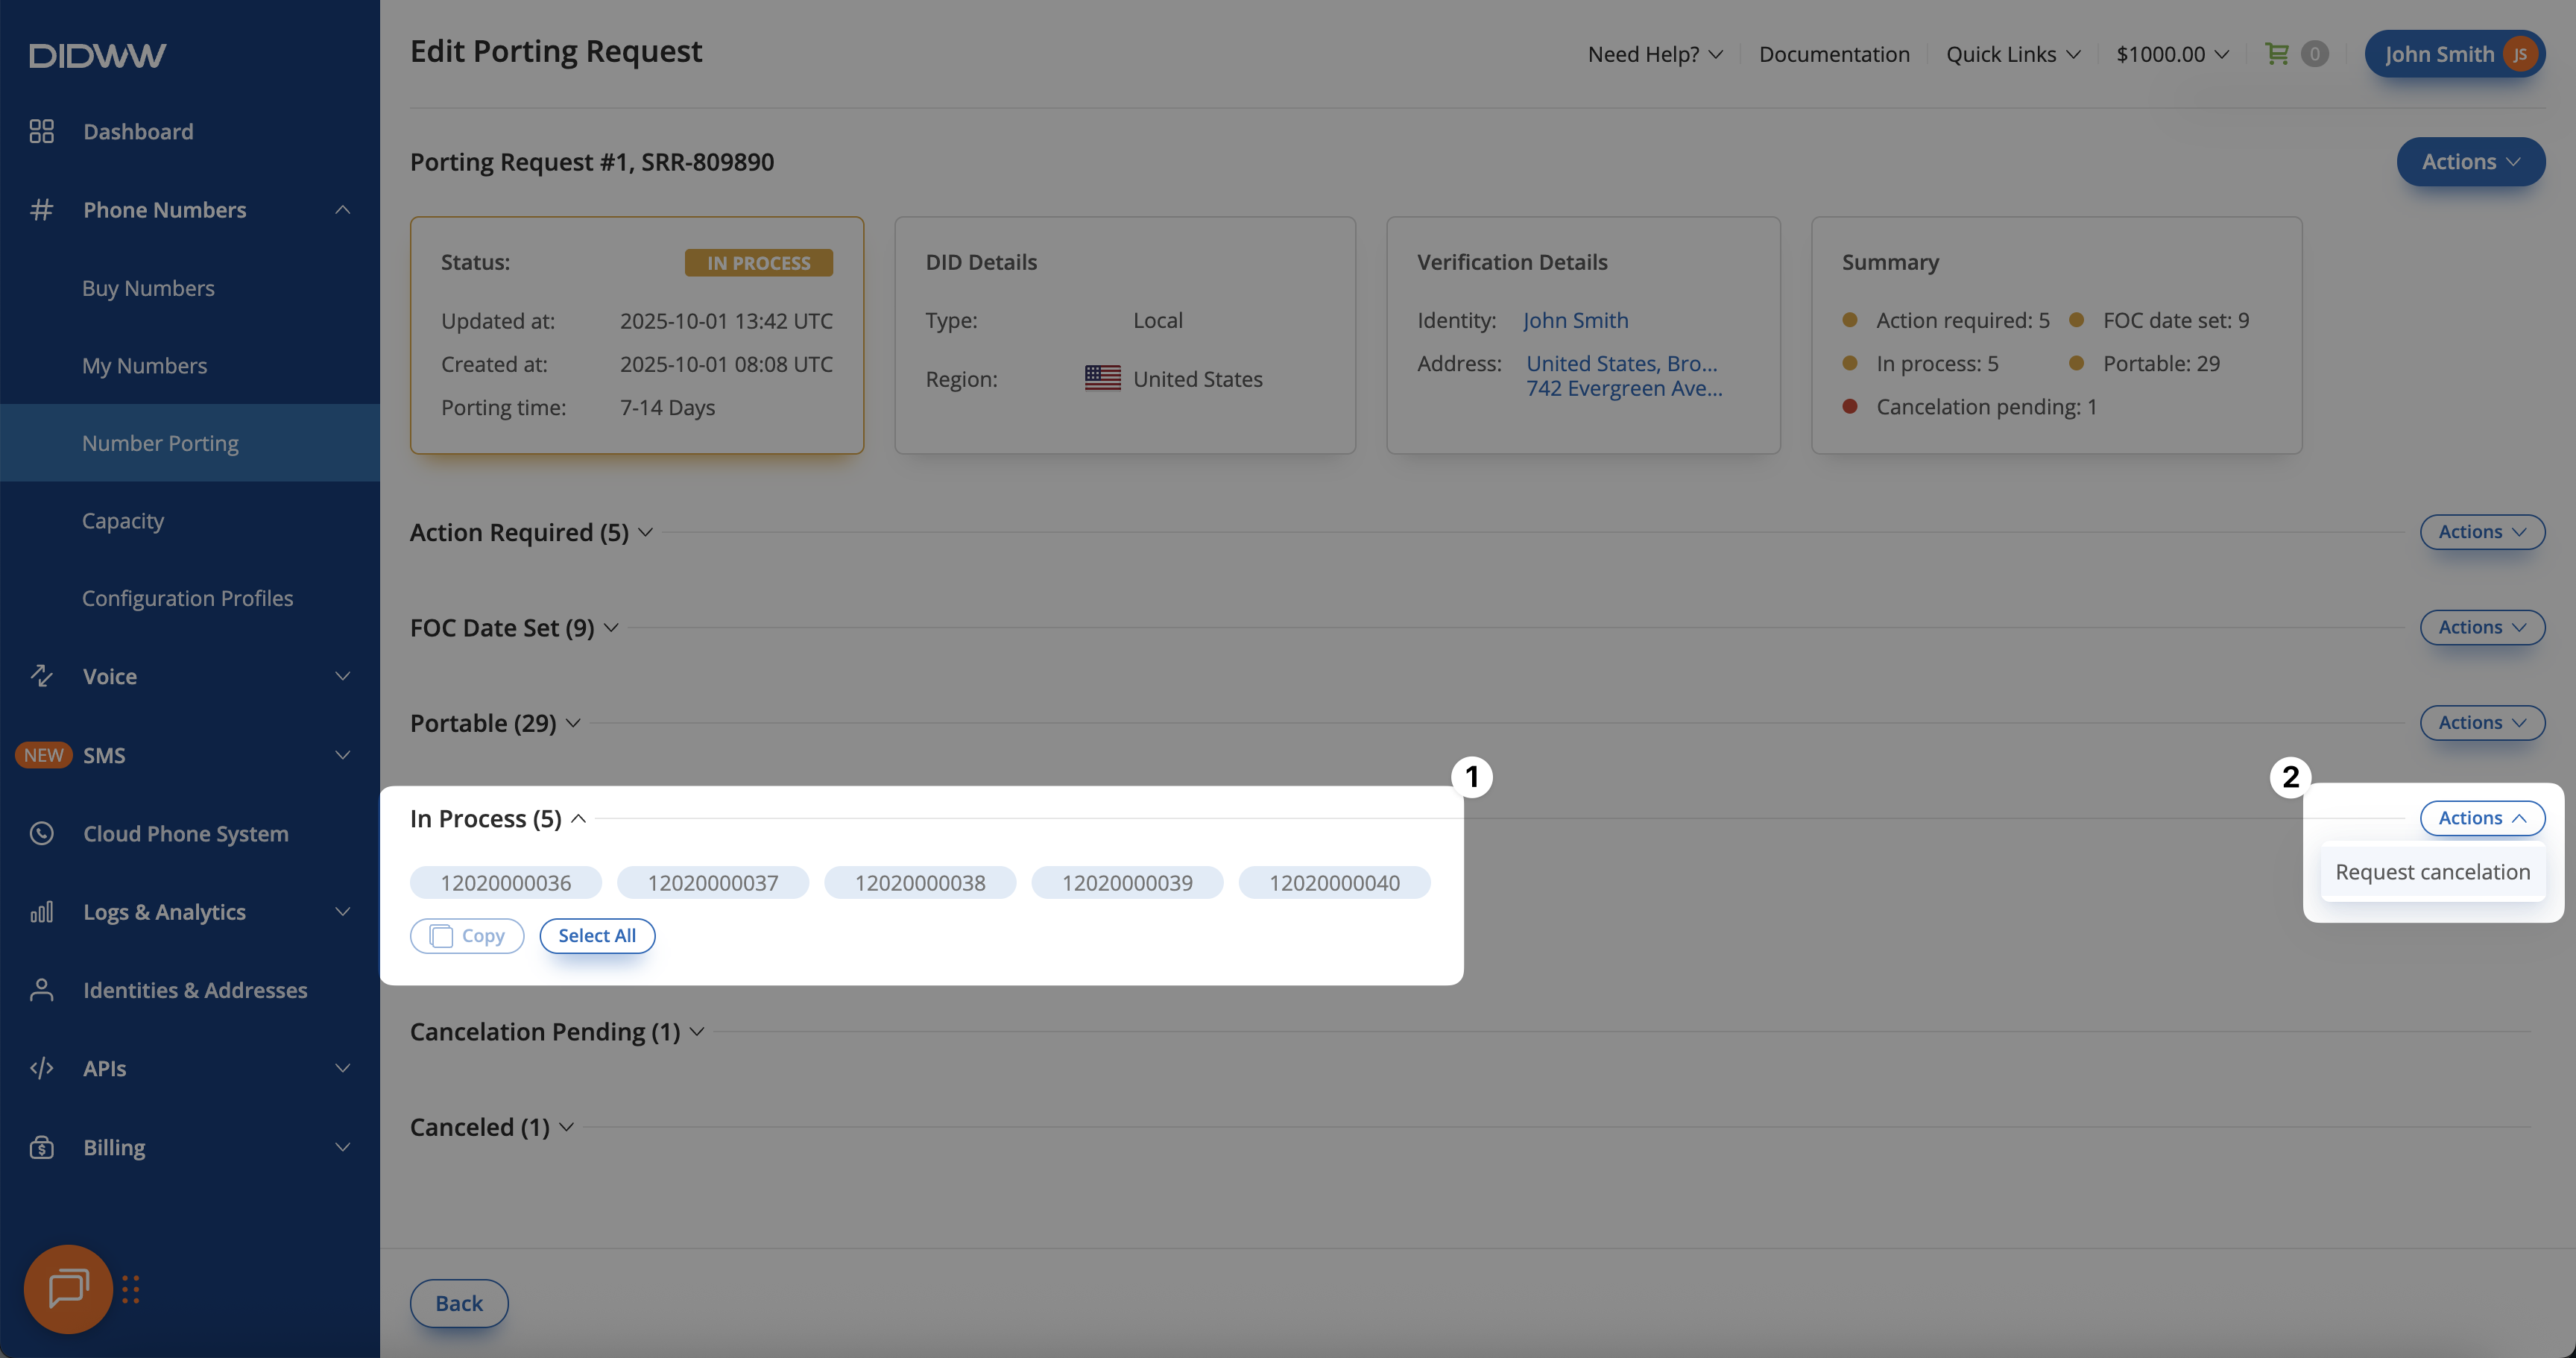
Fig. 11. Selecting the group of numbers for cancellation.#
Step 3. Confirm the Cancellation Request#
A Request Cancelation pop-up will appear, listing all numbers included in the selected group. Review the list to ensure the correct numbers are selected, then click Confirm to submit the cancellation request.
Note
For porting requests In Process, cancellations are reviewed by staff.
When still possible, the request is approved and the numbers are canceled.
If it’s too late, the request is rejected and porting continues.
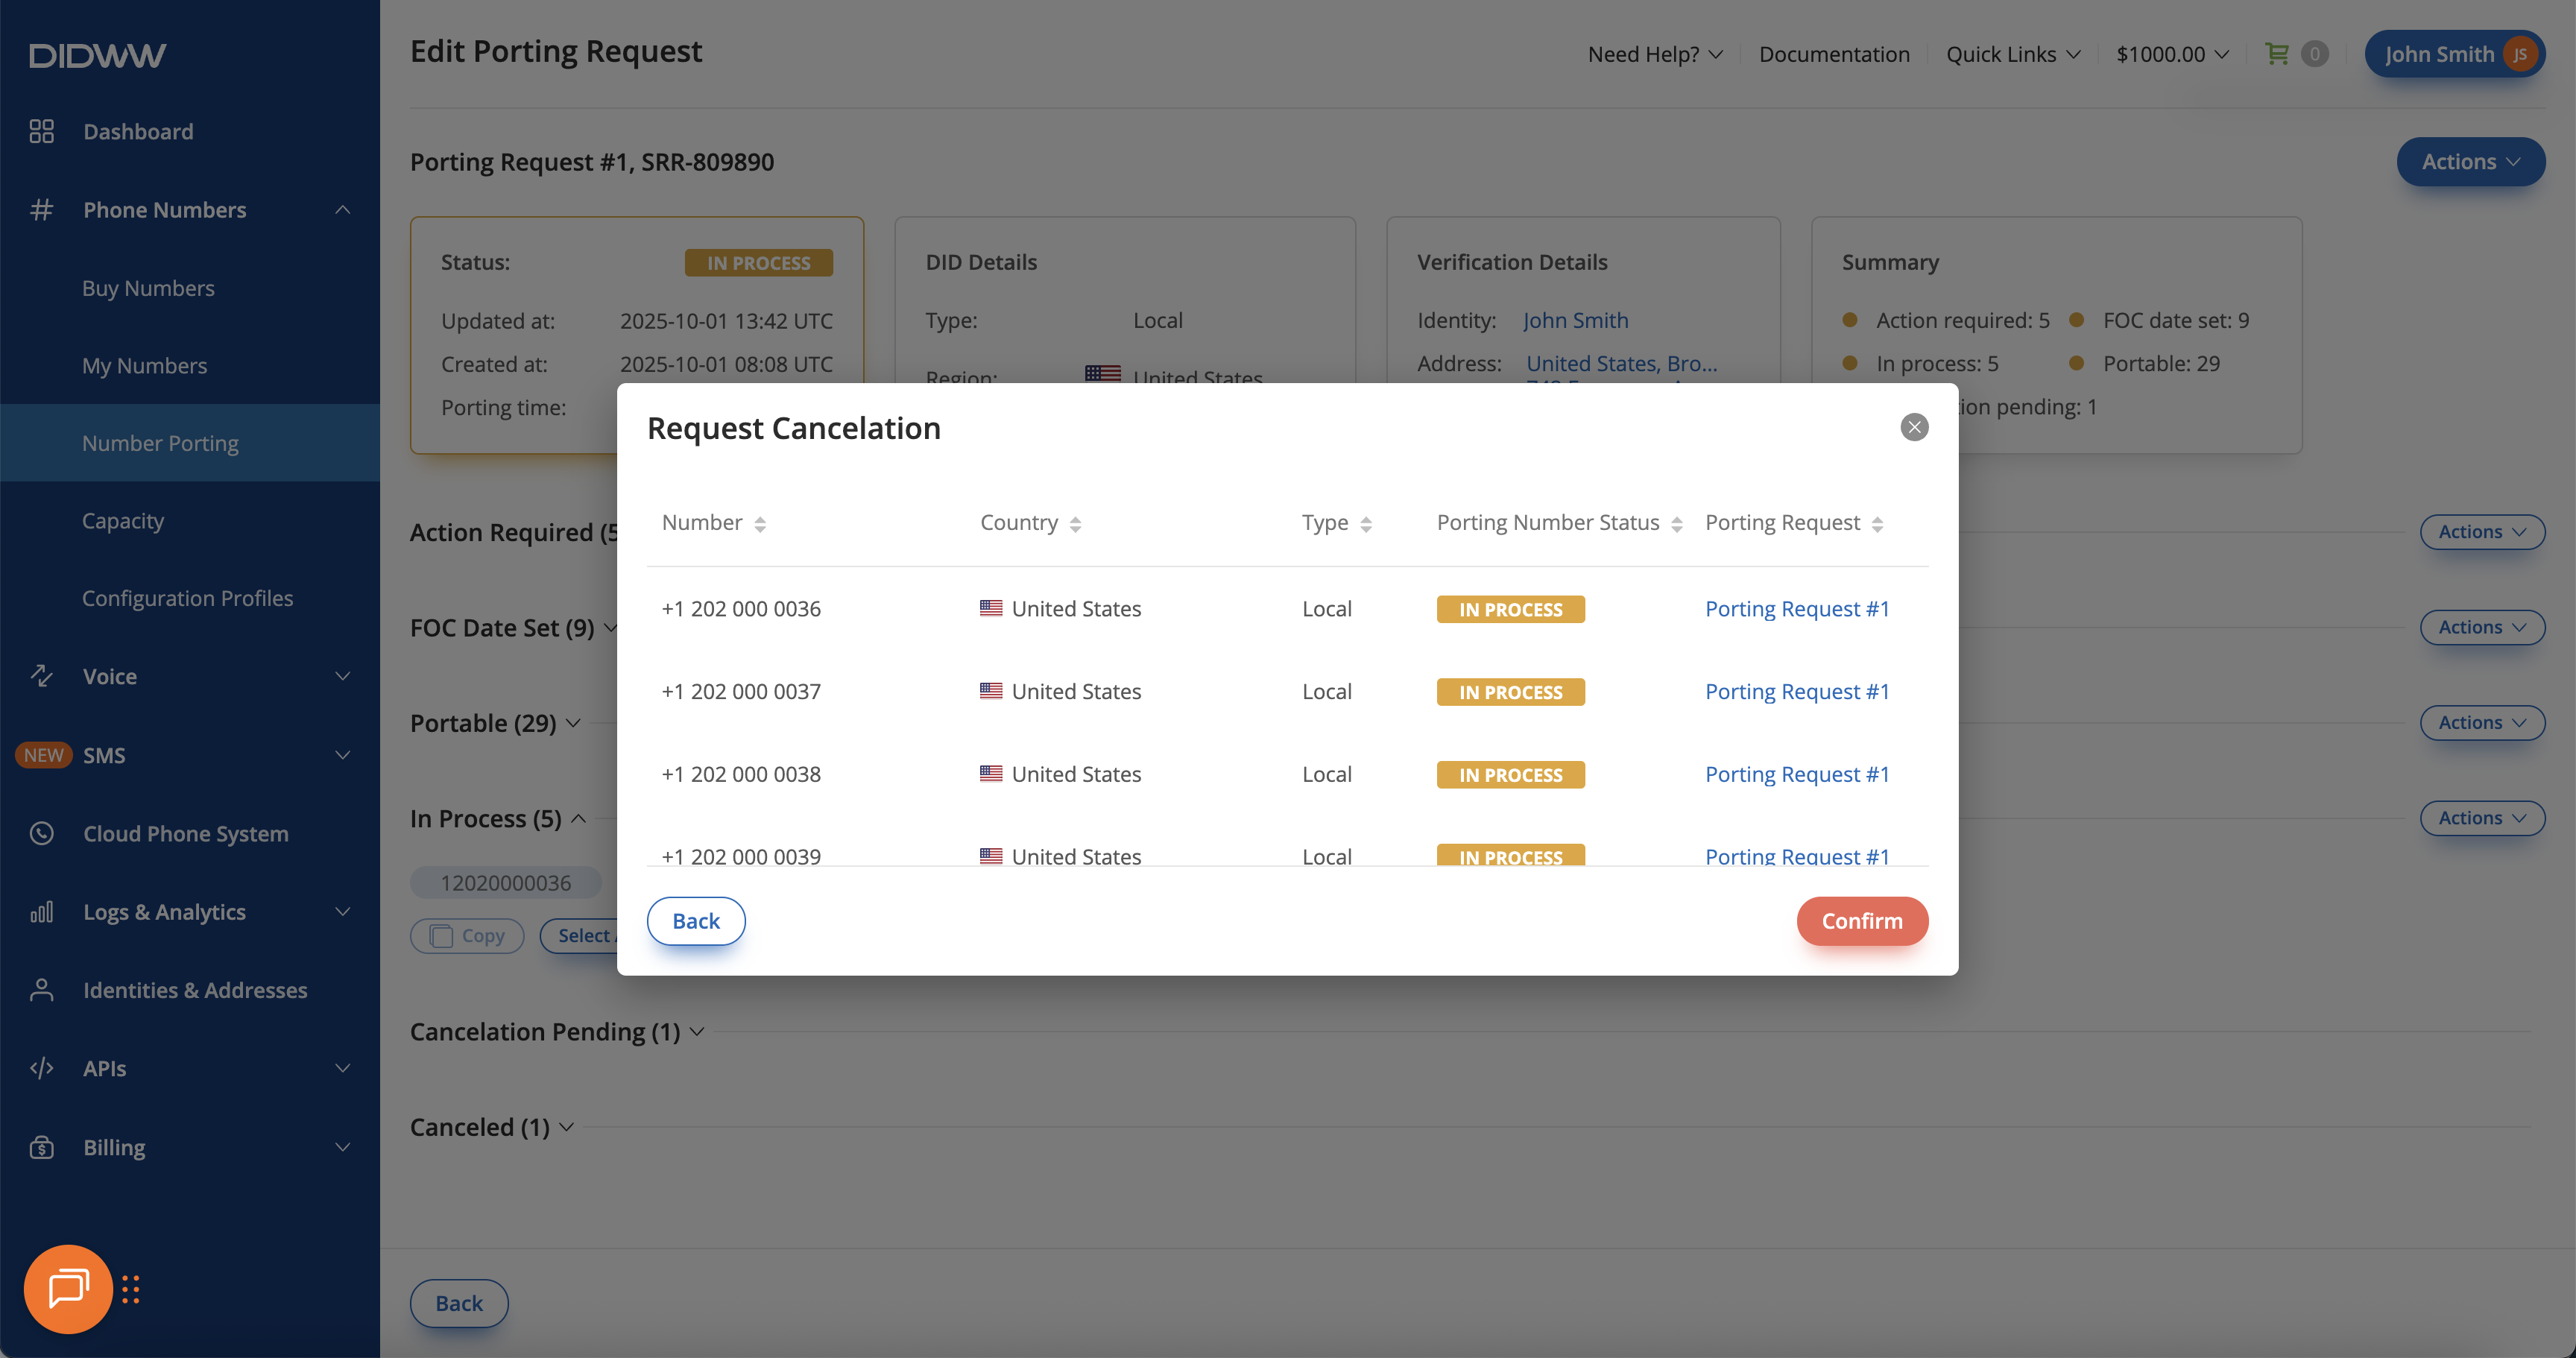
Fig. 12. Confirmation of number cancellation for a specific group.#
Resolve Action Required Status#
During the porting process, specific numbers within a porting request may be moved to the Action Required status if additional information or corrections are needed. This can occur after the request has already been submitted and usually affects only certain numbers, not the entire porting request. These numbers must be updated and any issues resolved before the porting process can continue.
Step 1. Open the Porting Request Edit Page#
In the DIDWW User Panel, go to Phone Numbers → Number Porting.
Open the Porting Requests tab to view all existing requests and locate the one you want to edit.
Click the Actions (⋯) next to the porting request.
Select Edit from the dropdown list.
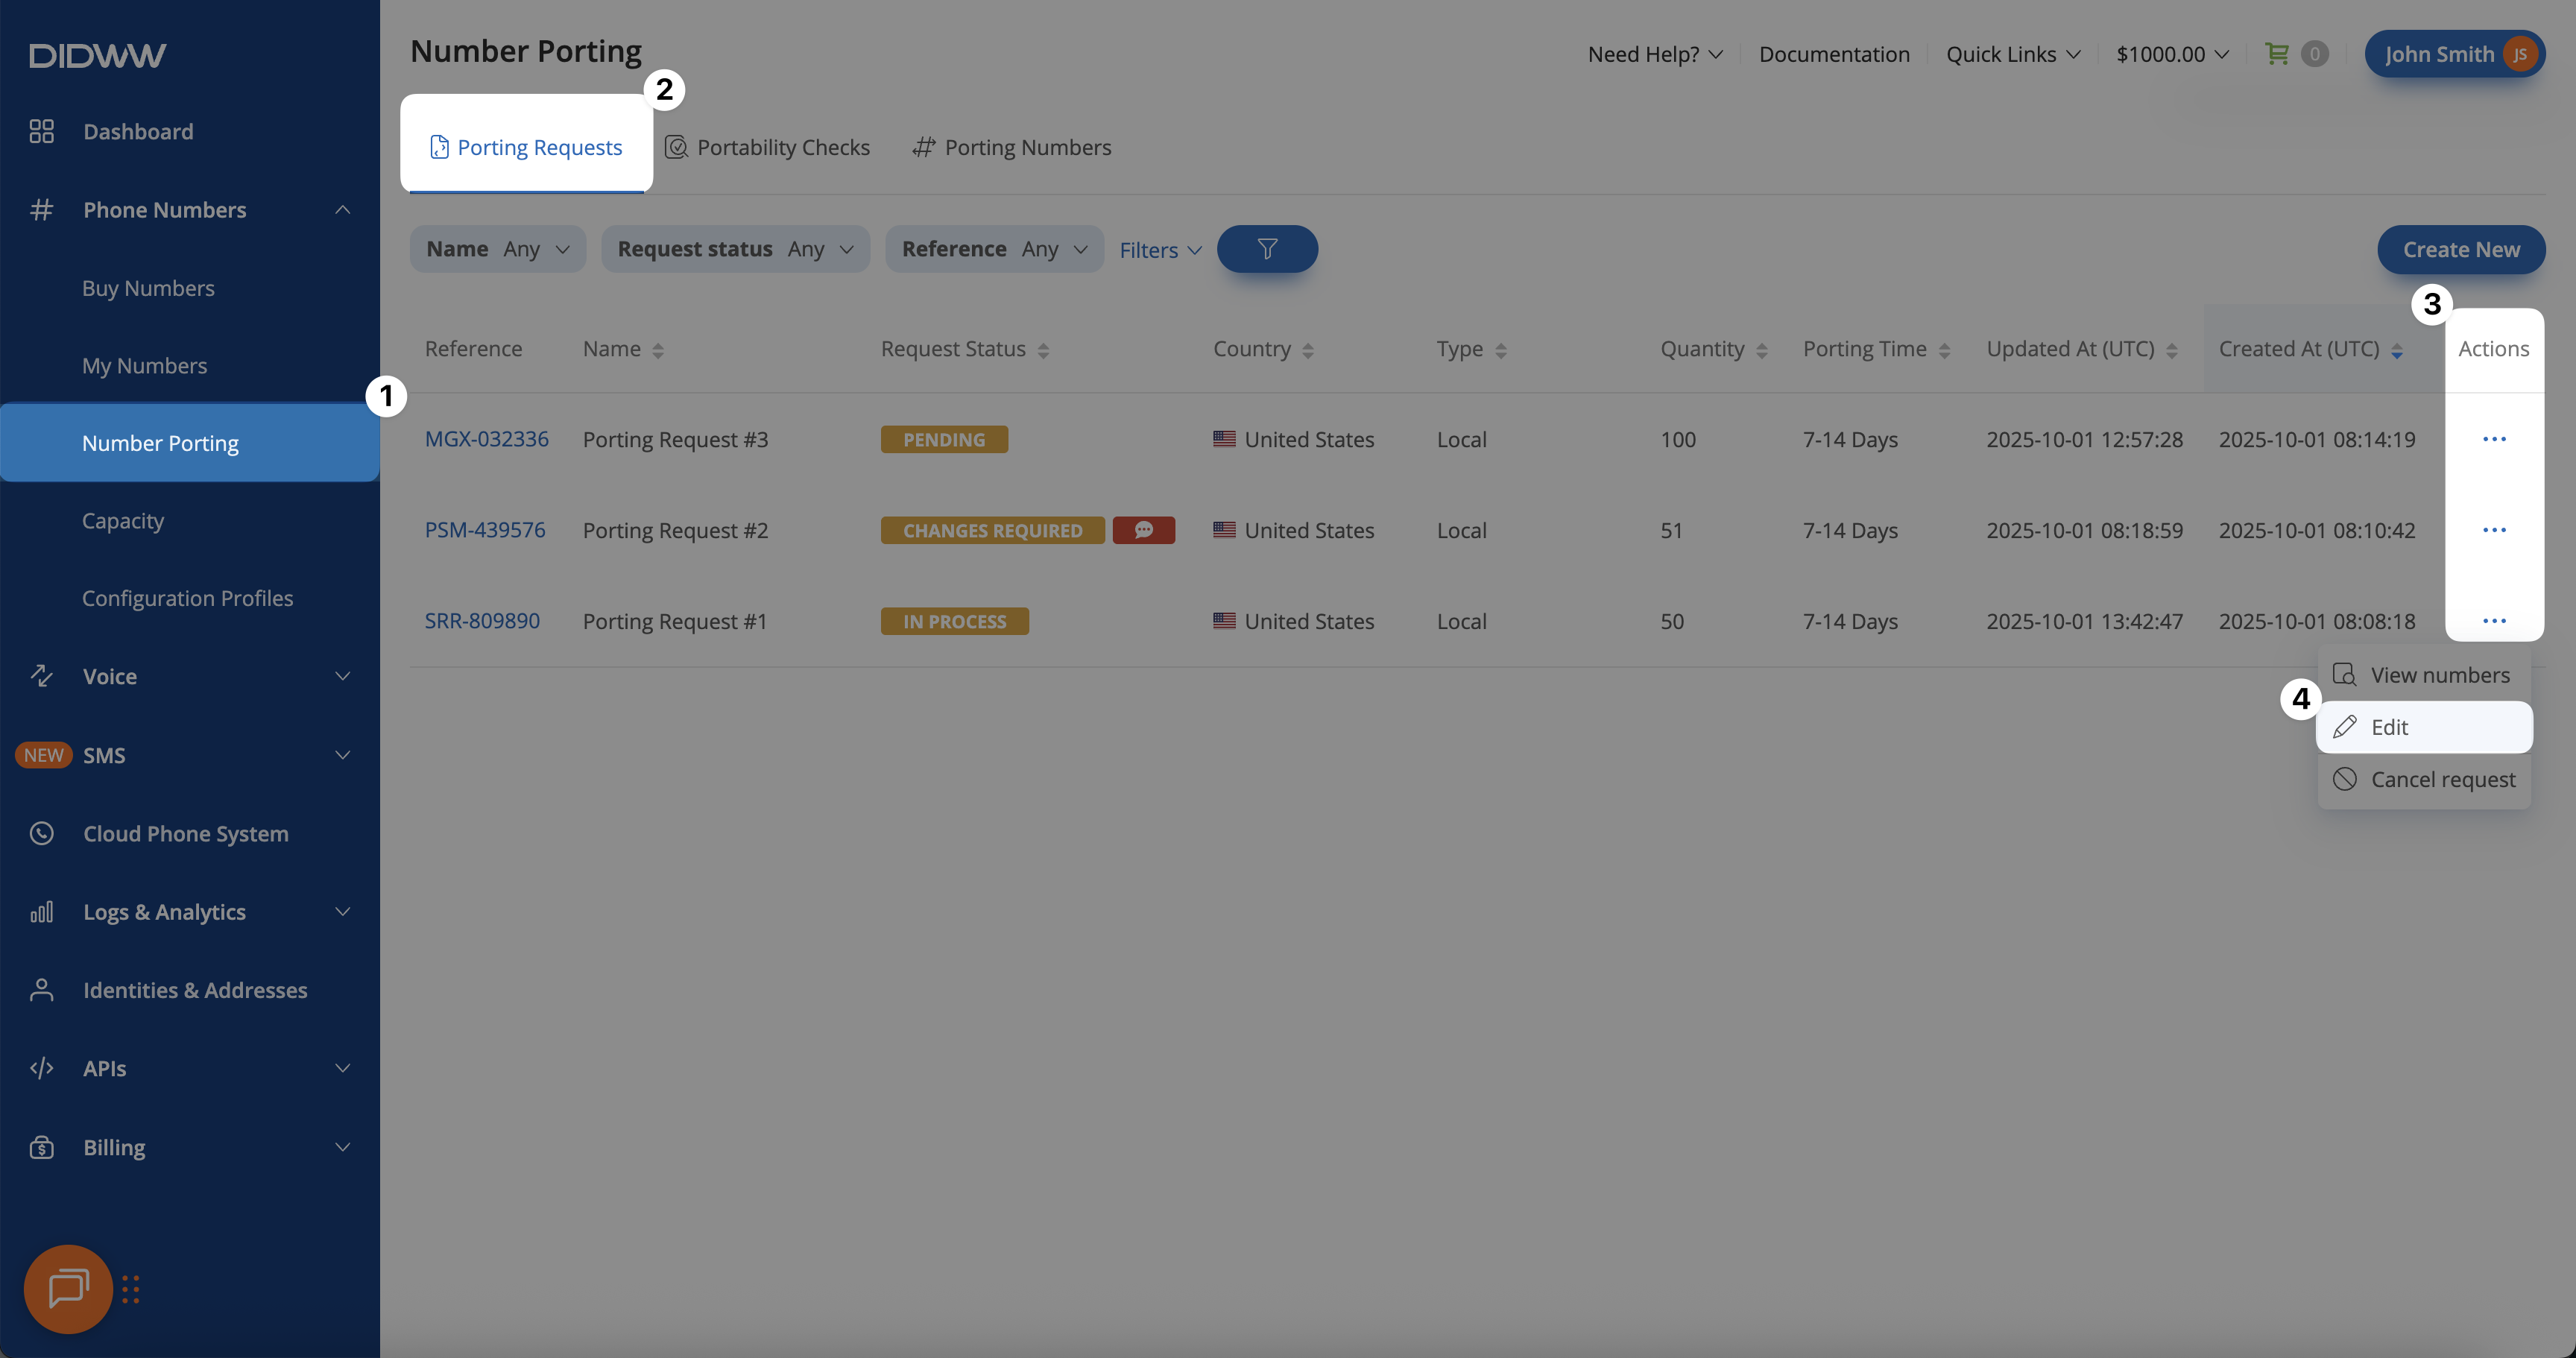
Fig. 13. Numbers grouped under Action Required status.#
Step 2. Resubmit Action Required Numbers#
Expand the Action Required group to view the affected numbers.
Click Actions → Resubmit.
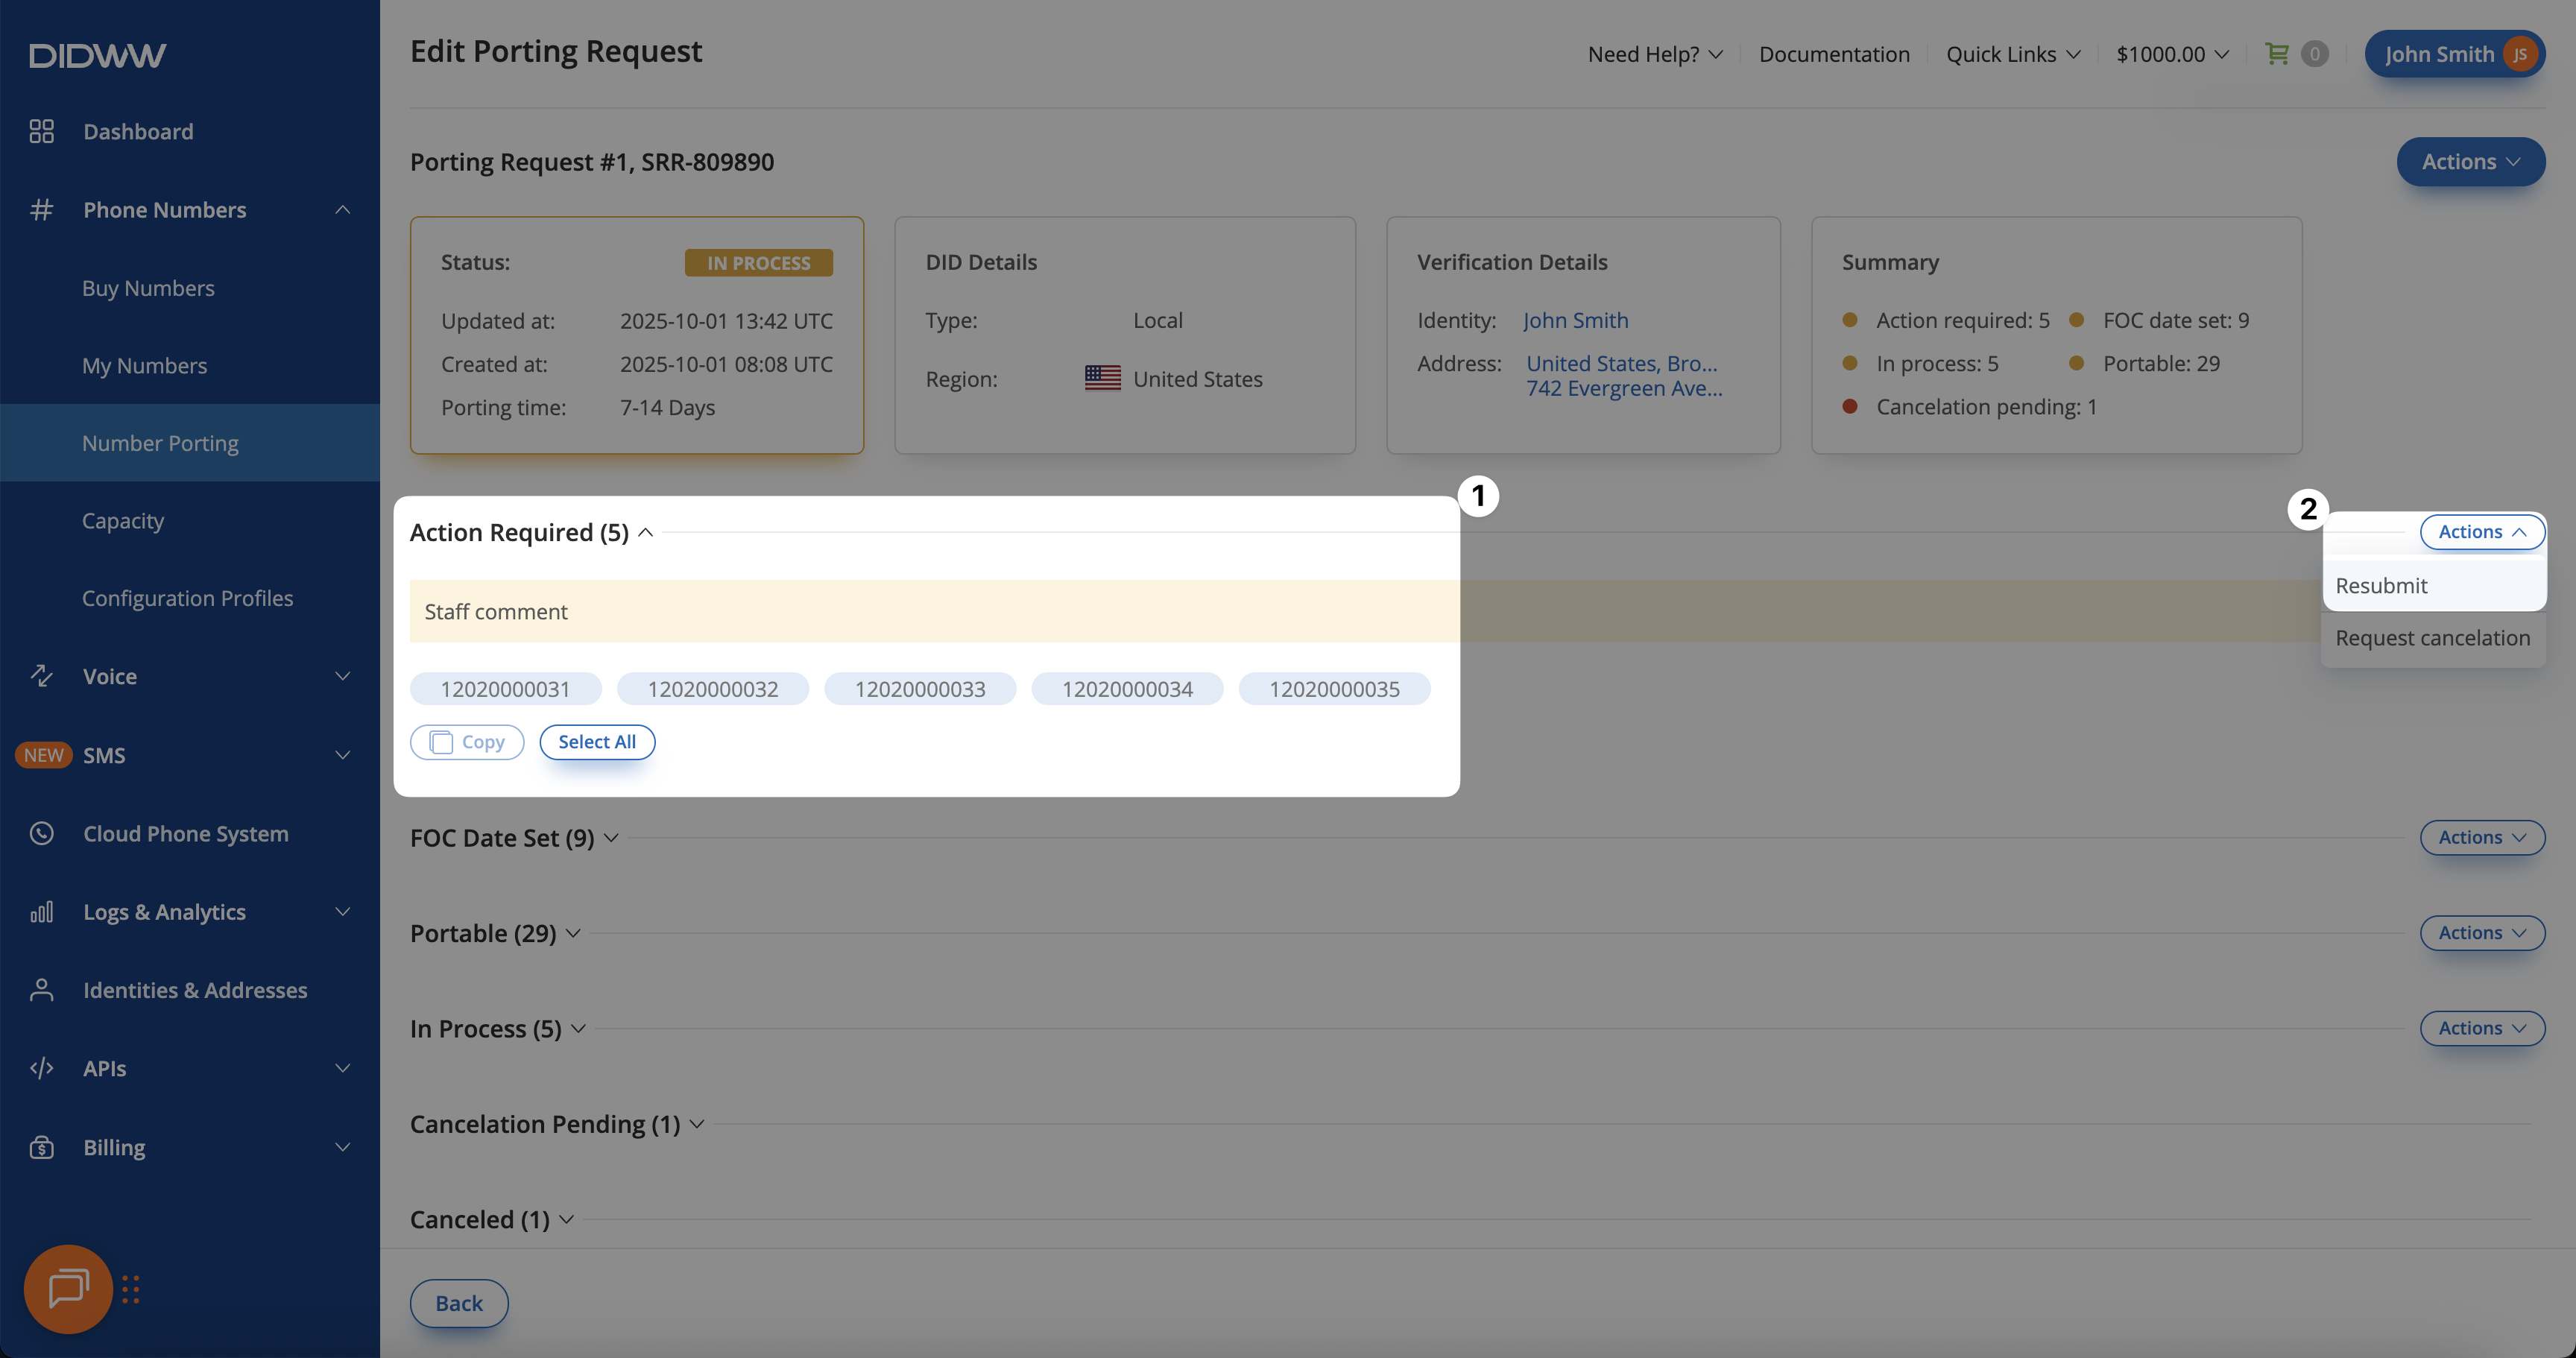
Fig. 14. Selecting Resubmit for numbers in Action Required status.#
Step 3. Add Comments and Supporting Documents#
A Resubmit Porting Request pop-up will appear, allowing you to provide any additional details needed to resolve the issue.
Add comments to provide clarification or additional information for the porting team.
Upload any required documents, depending on the reason the numbers were moved to Action Required status.
Click Submit to resubmit the numbers and continue the porting process.
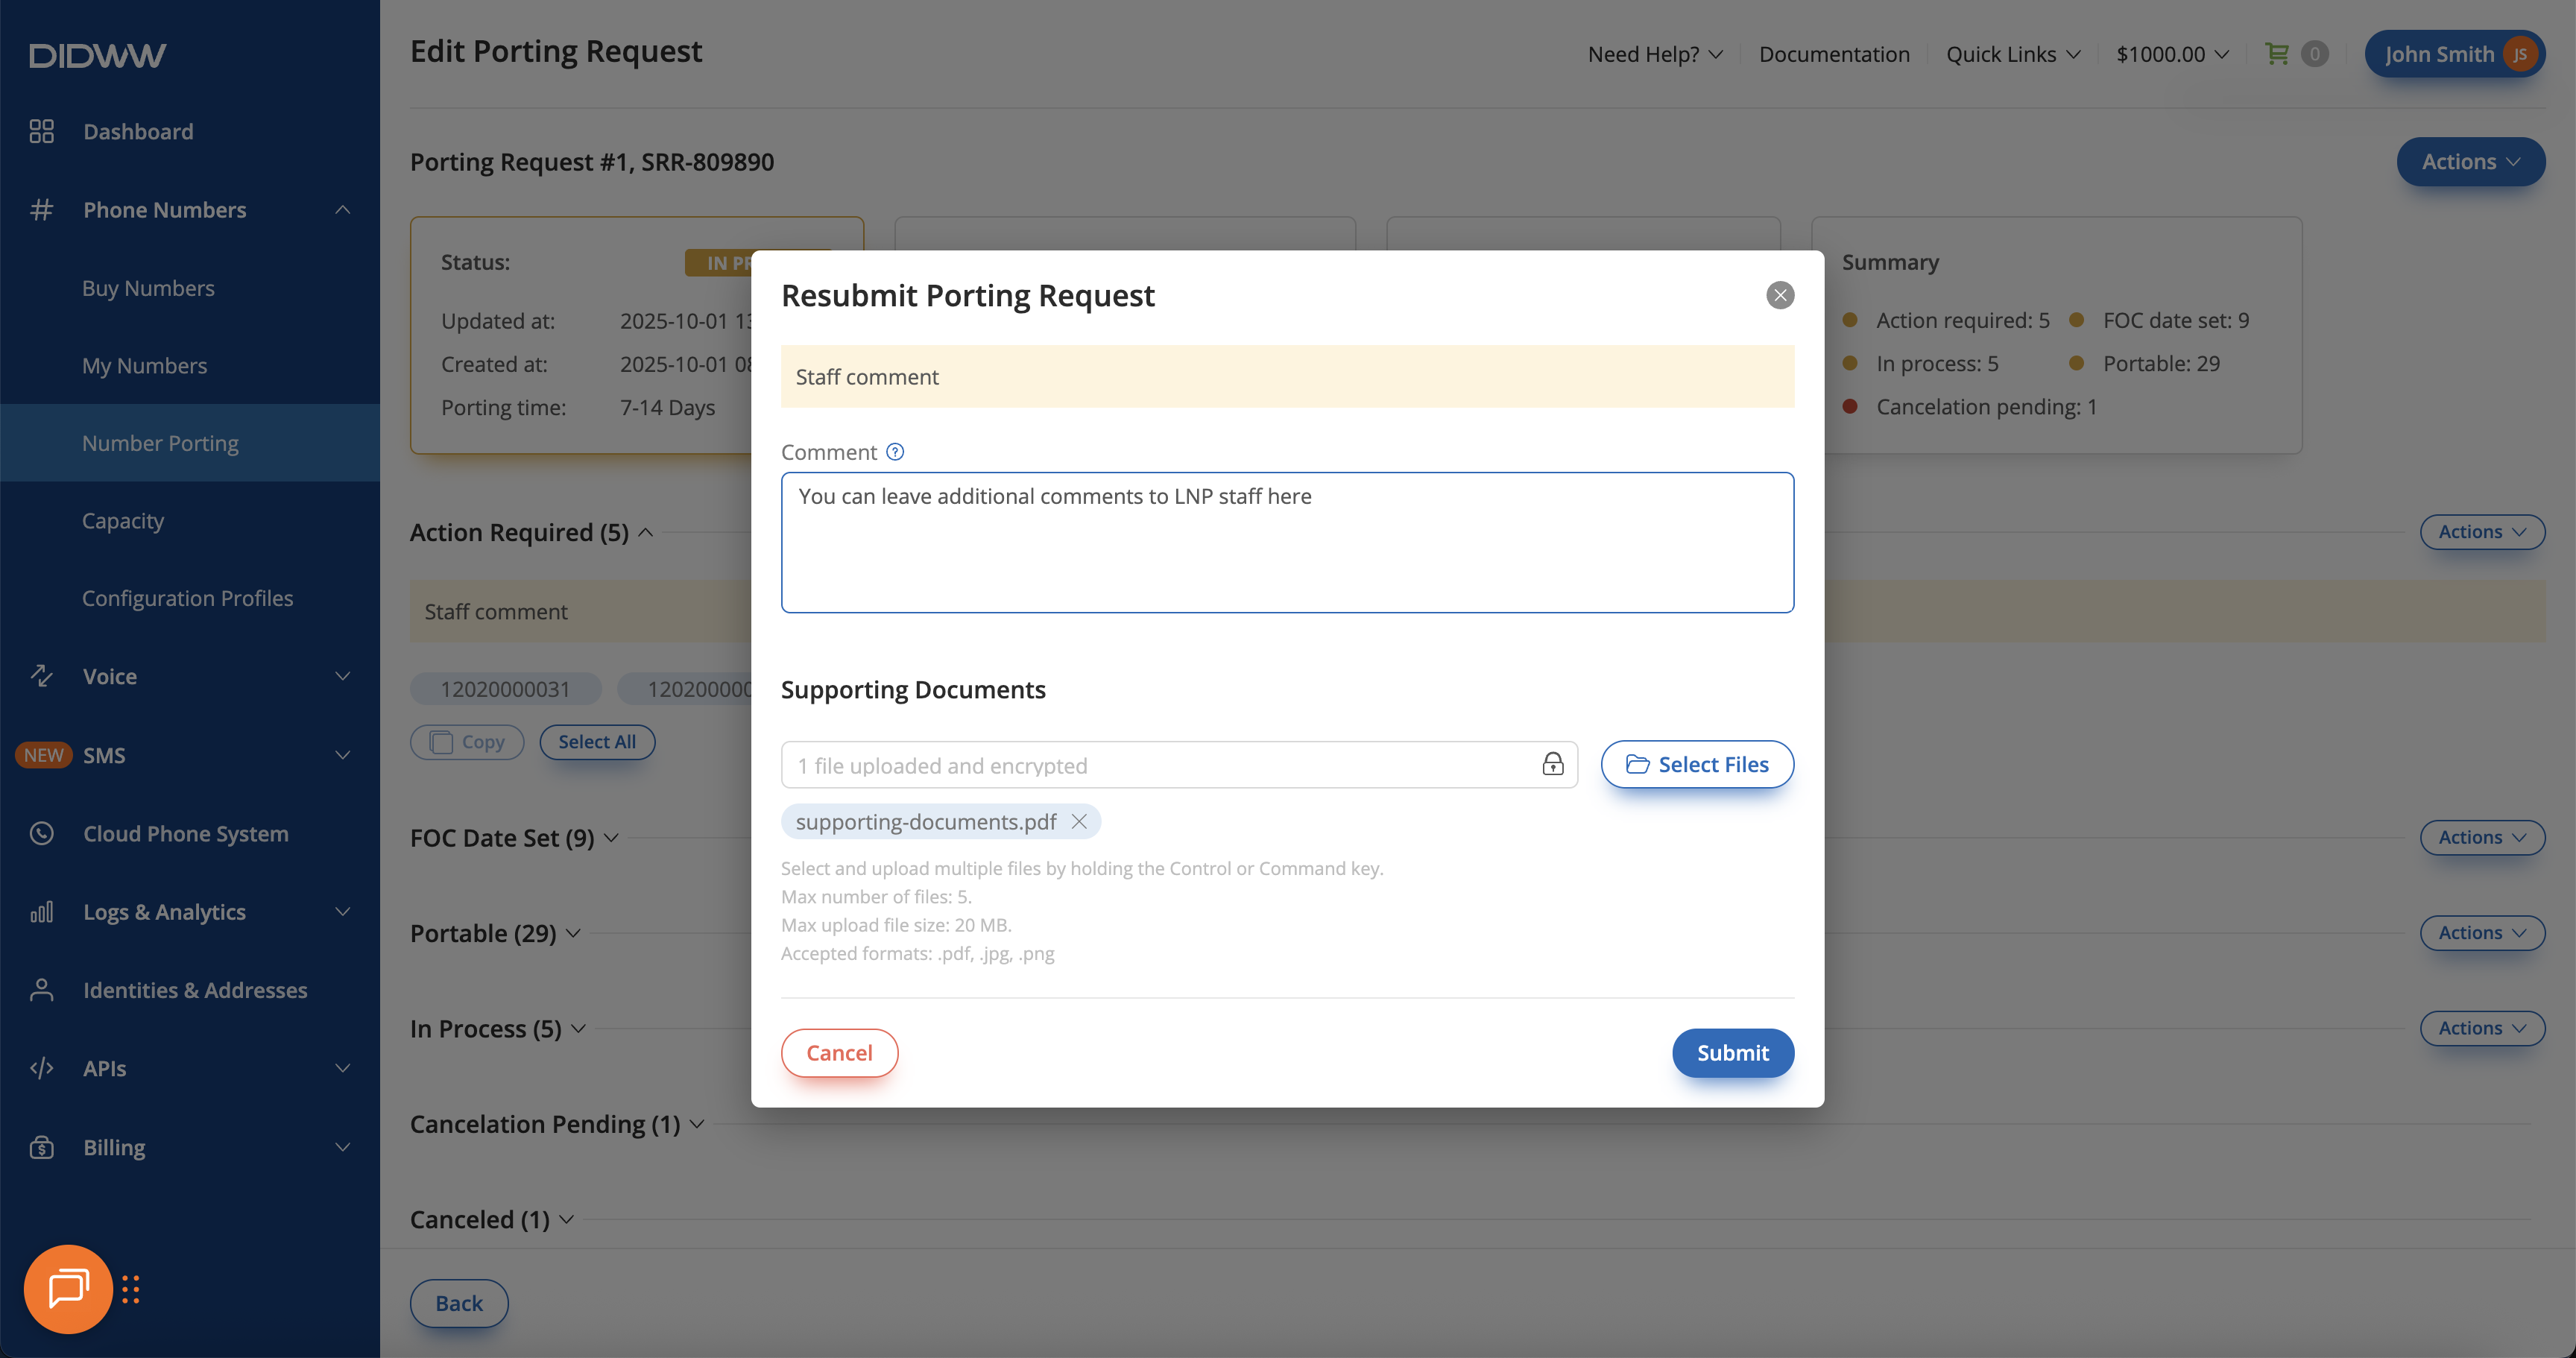
Fig. 15. Adding comments and documents before resubmitting the request.#