Profiles and Rules Examples#
Use these examples to understand how Profiles and Rules work together to automate the configuration of new DID numbers. Each example shows how different configurations can be applied automatically based on location or number type.
Note
Rules only apply to newly purchased numbers and do not change the settings of numbers that already exist in your account.
The results depend on the Rule Priority logic. More specific rules, such as City, always override broader ones, such as Country.
Apply one profile to all new DIDs across all countries.
Apply profiles based on country and number type.
Apply a profile for the USA, Canada, or UK by selecting a specific region.
Apply a profile for one country, number type, and specific city.
Before You Begin#
At least one Inbound Voice Trunk is required if you plan to assign inbound voice trunk.
At least one Inbound SMS Trunk is required if you plan to assign inbound SMS tunk.
A Capacity Group is required to assign or manage additional call capacity.
Example 1: Global Rule#
This setup ensures that all newly purchased numbers are automatically configured to receive incoming calls and messages.
If a number supports SMS IN, the SMS trunk is assigned for inbound messages.
Optional pay-per-minute capacity can be added to handle additional calls when the included channels are already in use, ensuring reliable service for all numbers across countries.
Step 1: Create the Global Configuration Profile#
In the DIDWW User Panel, go to Phone Numbers > Configuration Profiles.
Open Profiles tab.
Click Create Profile to open the profile creation form.
Fill in the configuration details and click Create to save the profile.
Name: Enter the profile name.
Capacity Group: Select the capacity group.
Trunk: Choose the voice trunk.
SMS Trunk: Select the SMS trunk.
Description: Add a short note to identify the profile.
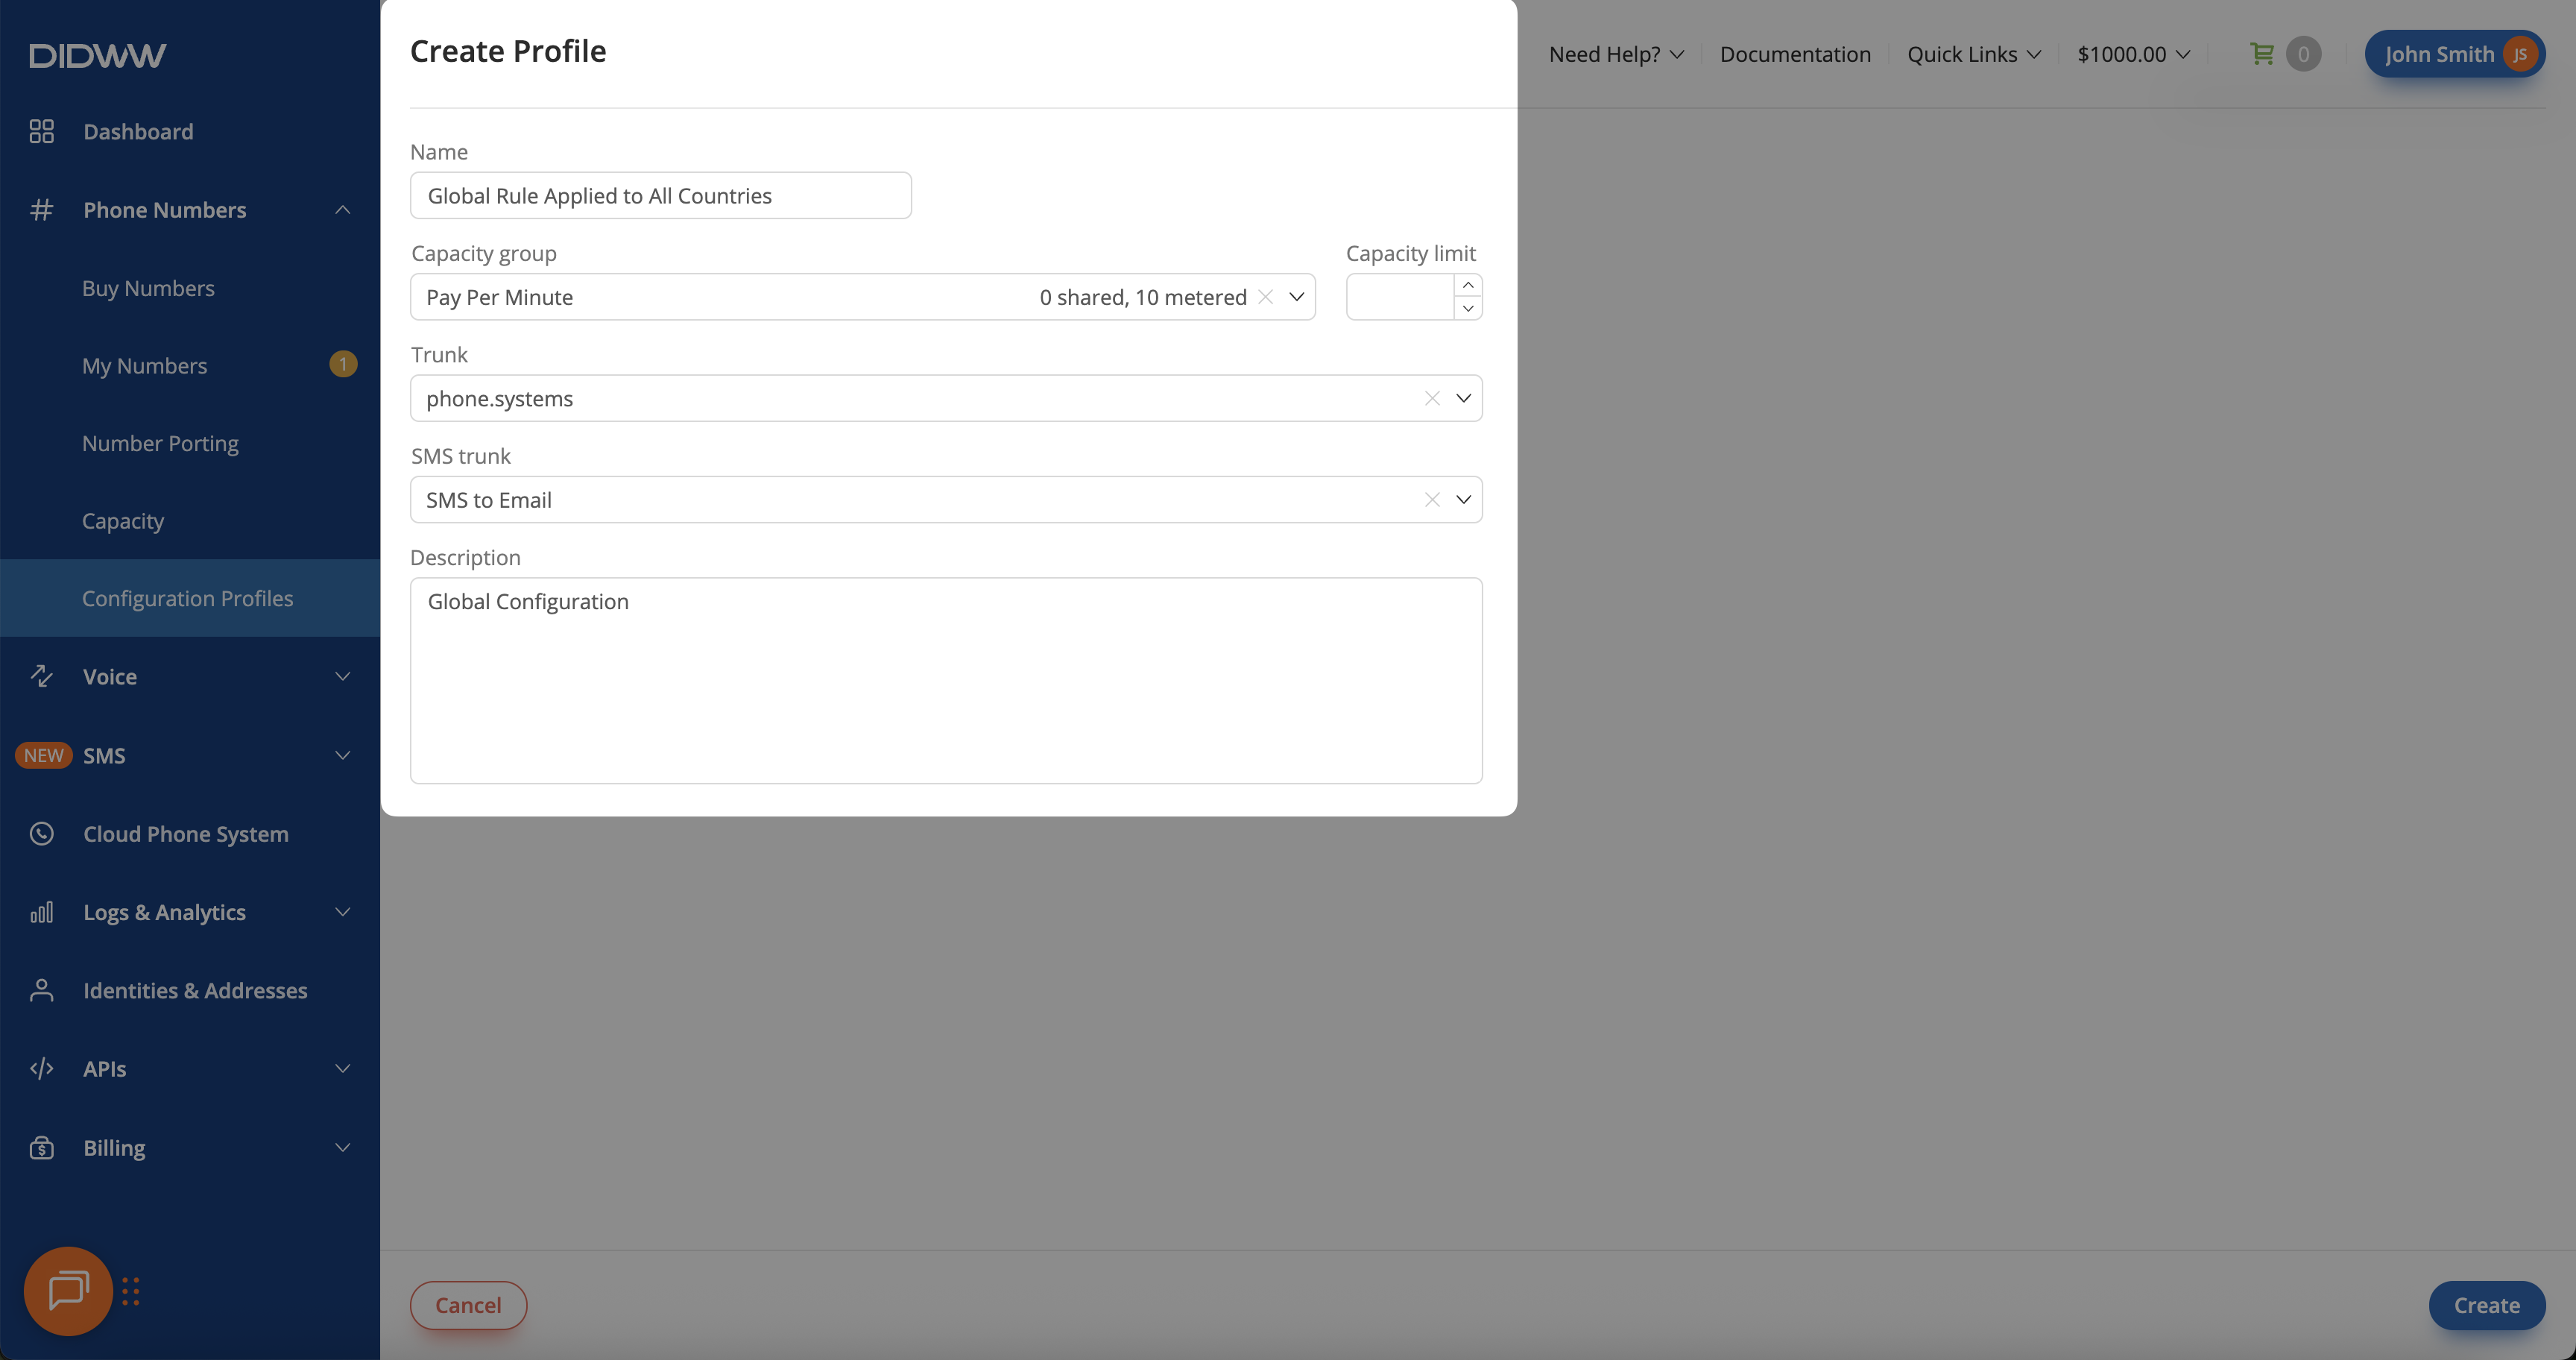
Fig. 1. Creating the Global Default Profile.#
Step 2: Create the Global Rule#
Once the default configuration profile is created, go to the Rules tab.
Click Create Rule to open the rule creation form.
Enter the rule details and click Create to save it.
Name: Enter the name of the rule.
Profile: Select the configuration profile.
Countries: Leave empty to apply the rule to all countries.
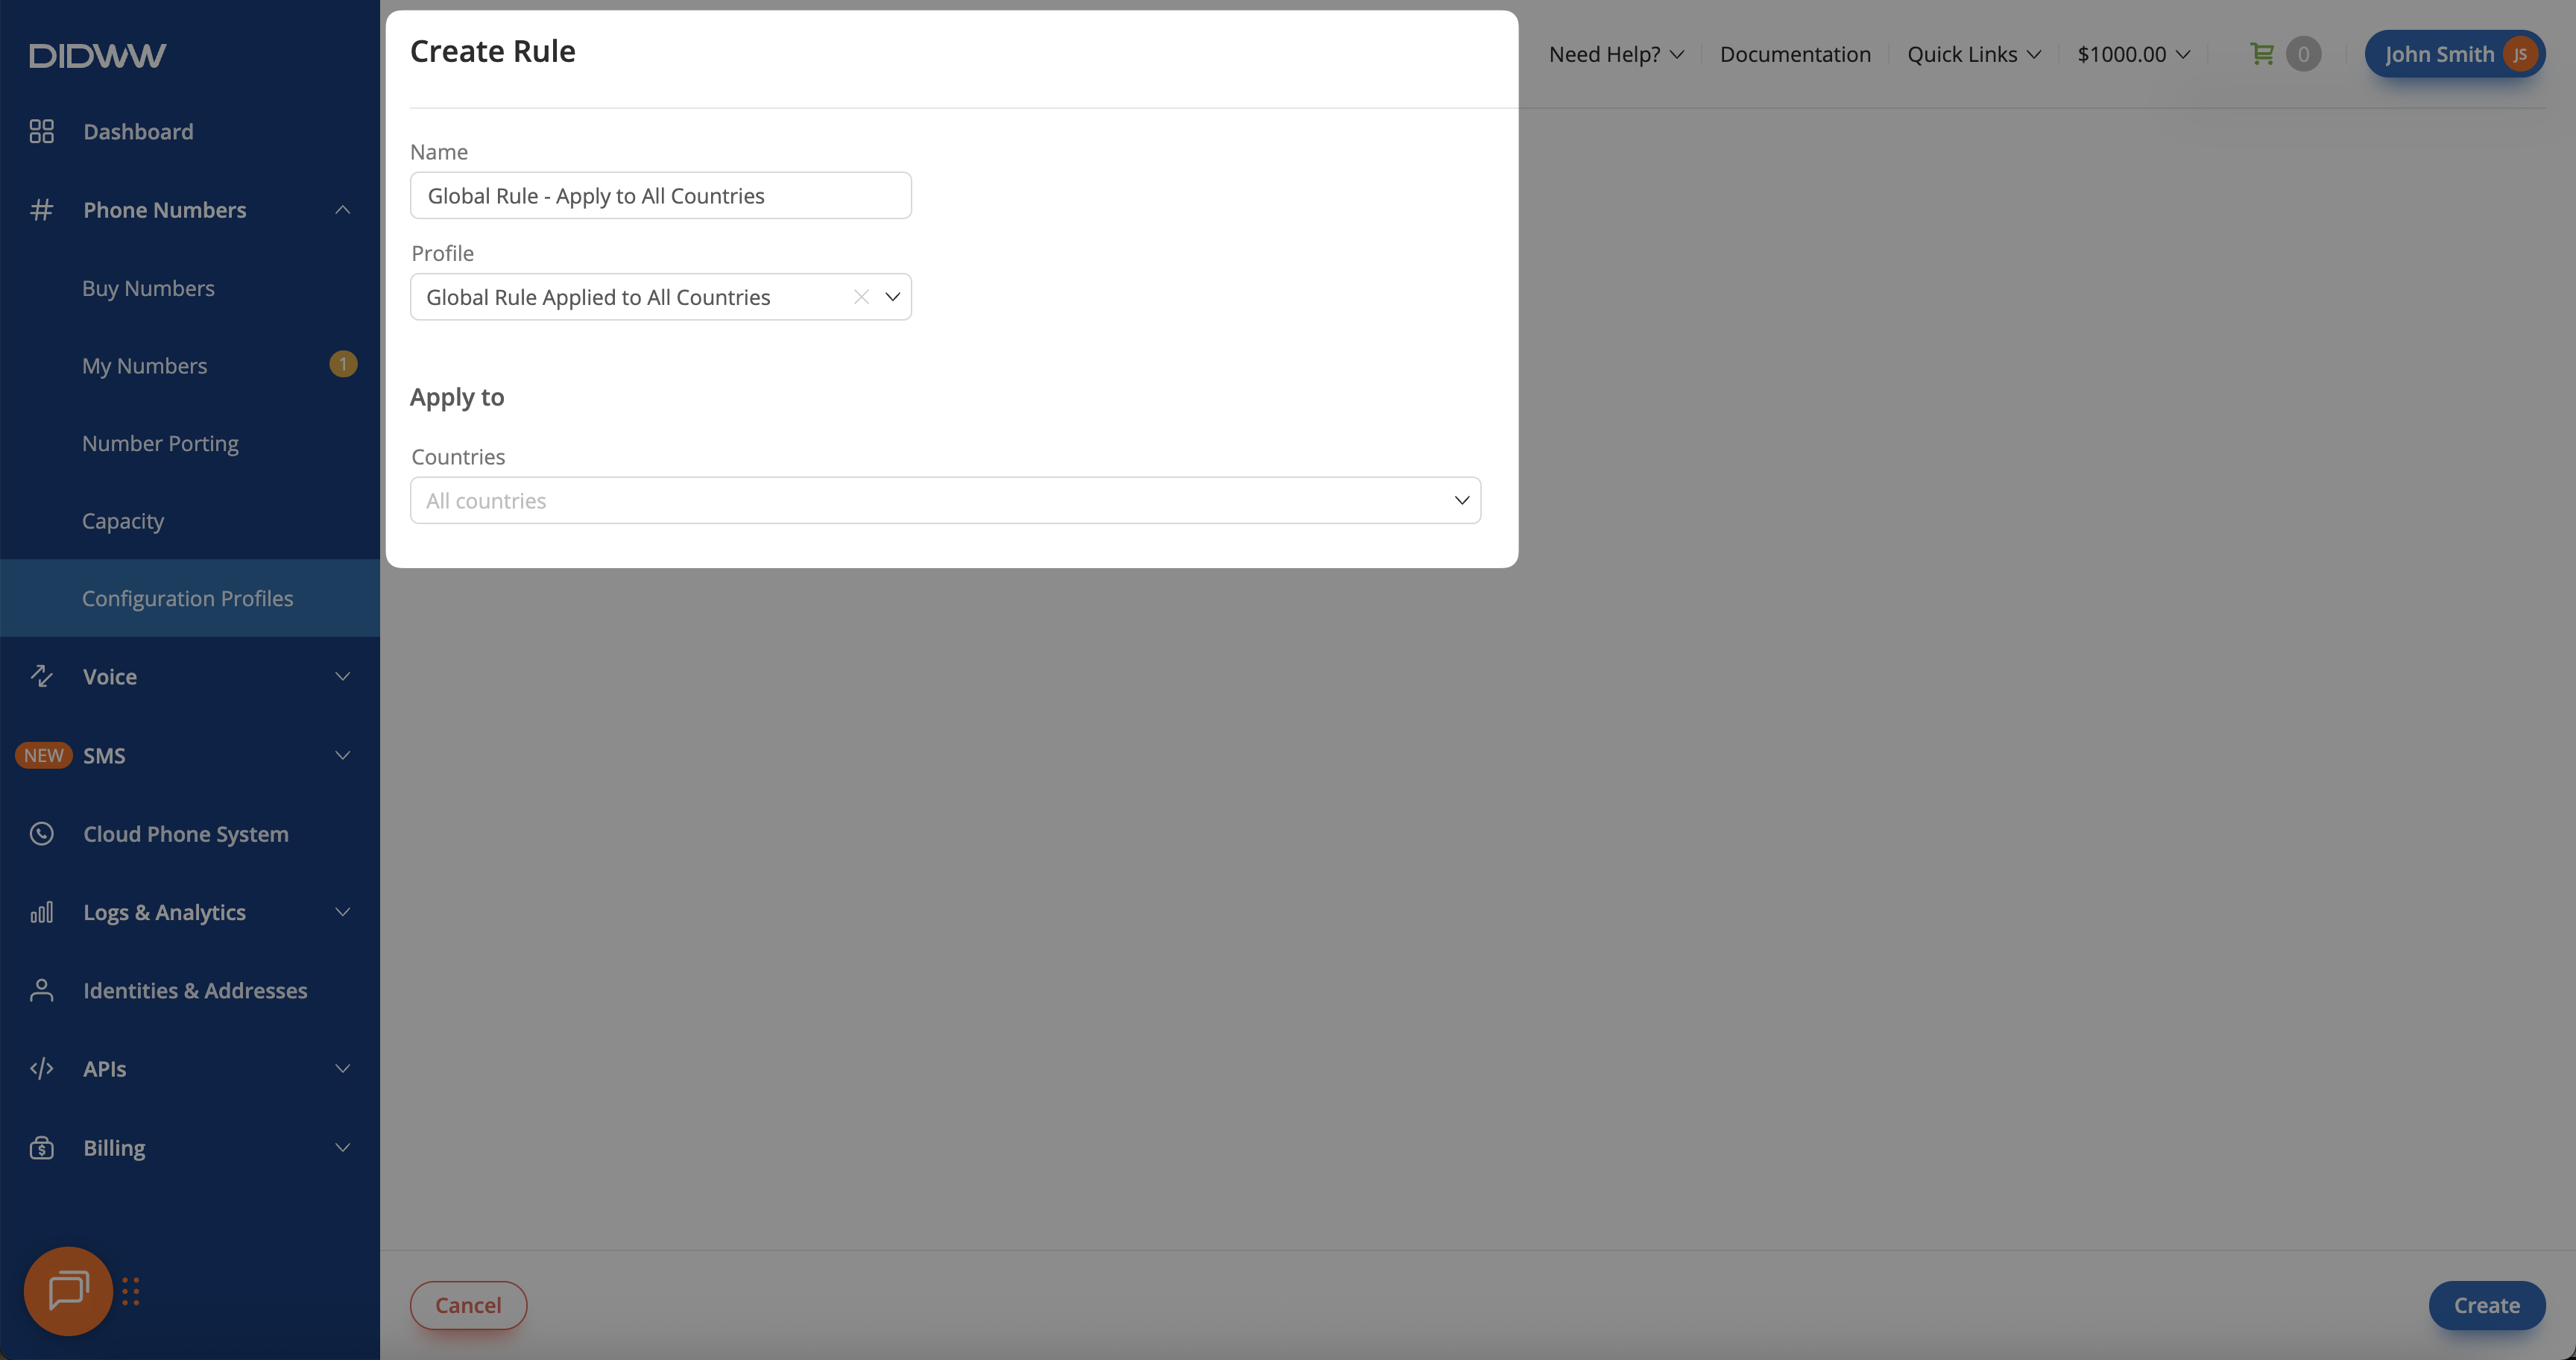
Fig. 2. Creating the Global Rule applied to all countries#
Example 2: Country & Number Type Rule#
This setup automatically assigns different configurations to new numbers based on their type within the same country.
For example, Local numbers in the United States can be routed to a PBX system for regular calls, while Toll-Free numbers can be directed to a phone.systems™.
If a number supports SMS IN, the same SMS trunk is used for inbound messages, keeping communication consistent and easy to manage.
Step 1: Create Configuration Profiles for Local and Toll-Free Numbers#
To prepare different routing setups for Local and Toll-Free numbers, start by creating two separate configuration profiles. These profiles will later be used in rules that apply different settings to each number type within the same country.
In the DIDWW User Panel, go to Phone Numbers > Configuration Profiles.
Open Profiles tab.
Click Create Profile to open the profile creation form.
Create a configuration profile for Local numbers that forwards calls to your PBX system. This setup includes a shared capacity group to allow additional calls when needed.
Name: Enter the profile name (e.g., USA Local Type Profile).
Capacity Group: Select a capacity group if you want to add extra call capacity (e.g., Pay Per Minute).
Trunk: Choose your SIP trunk (e.g., My PBX).
SMS Trunk: Select your SMS trunk (e.g., SMS to Email).
Description: Add a short note to help identify the profile (e.g., USA Local Settings).
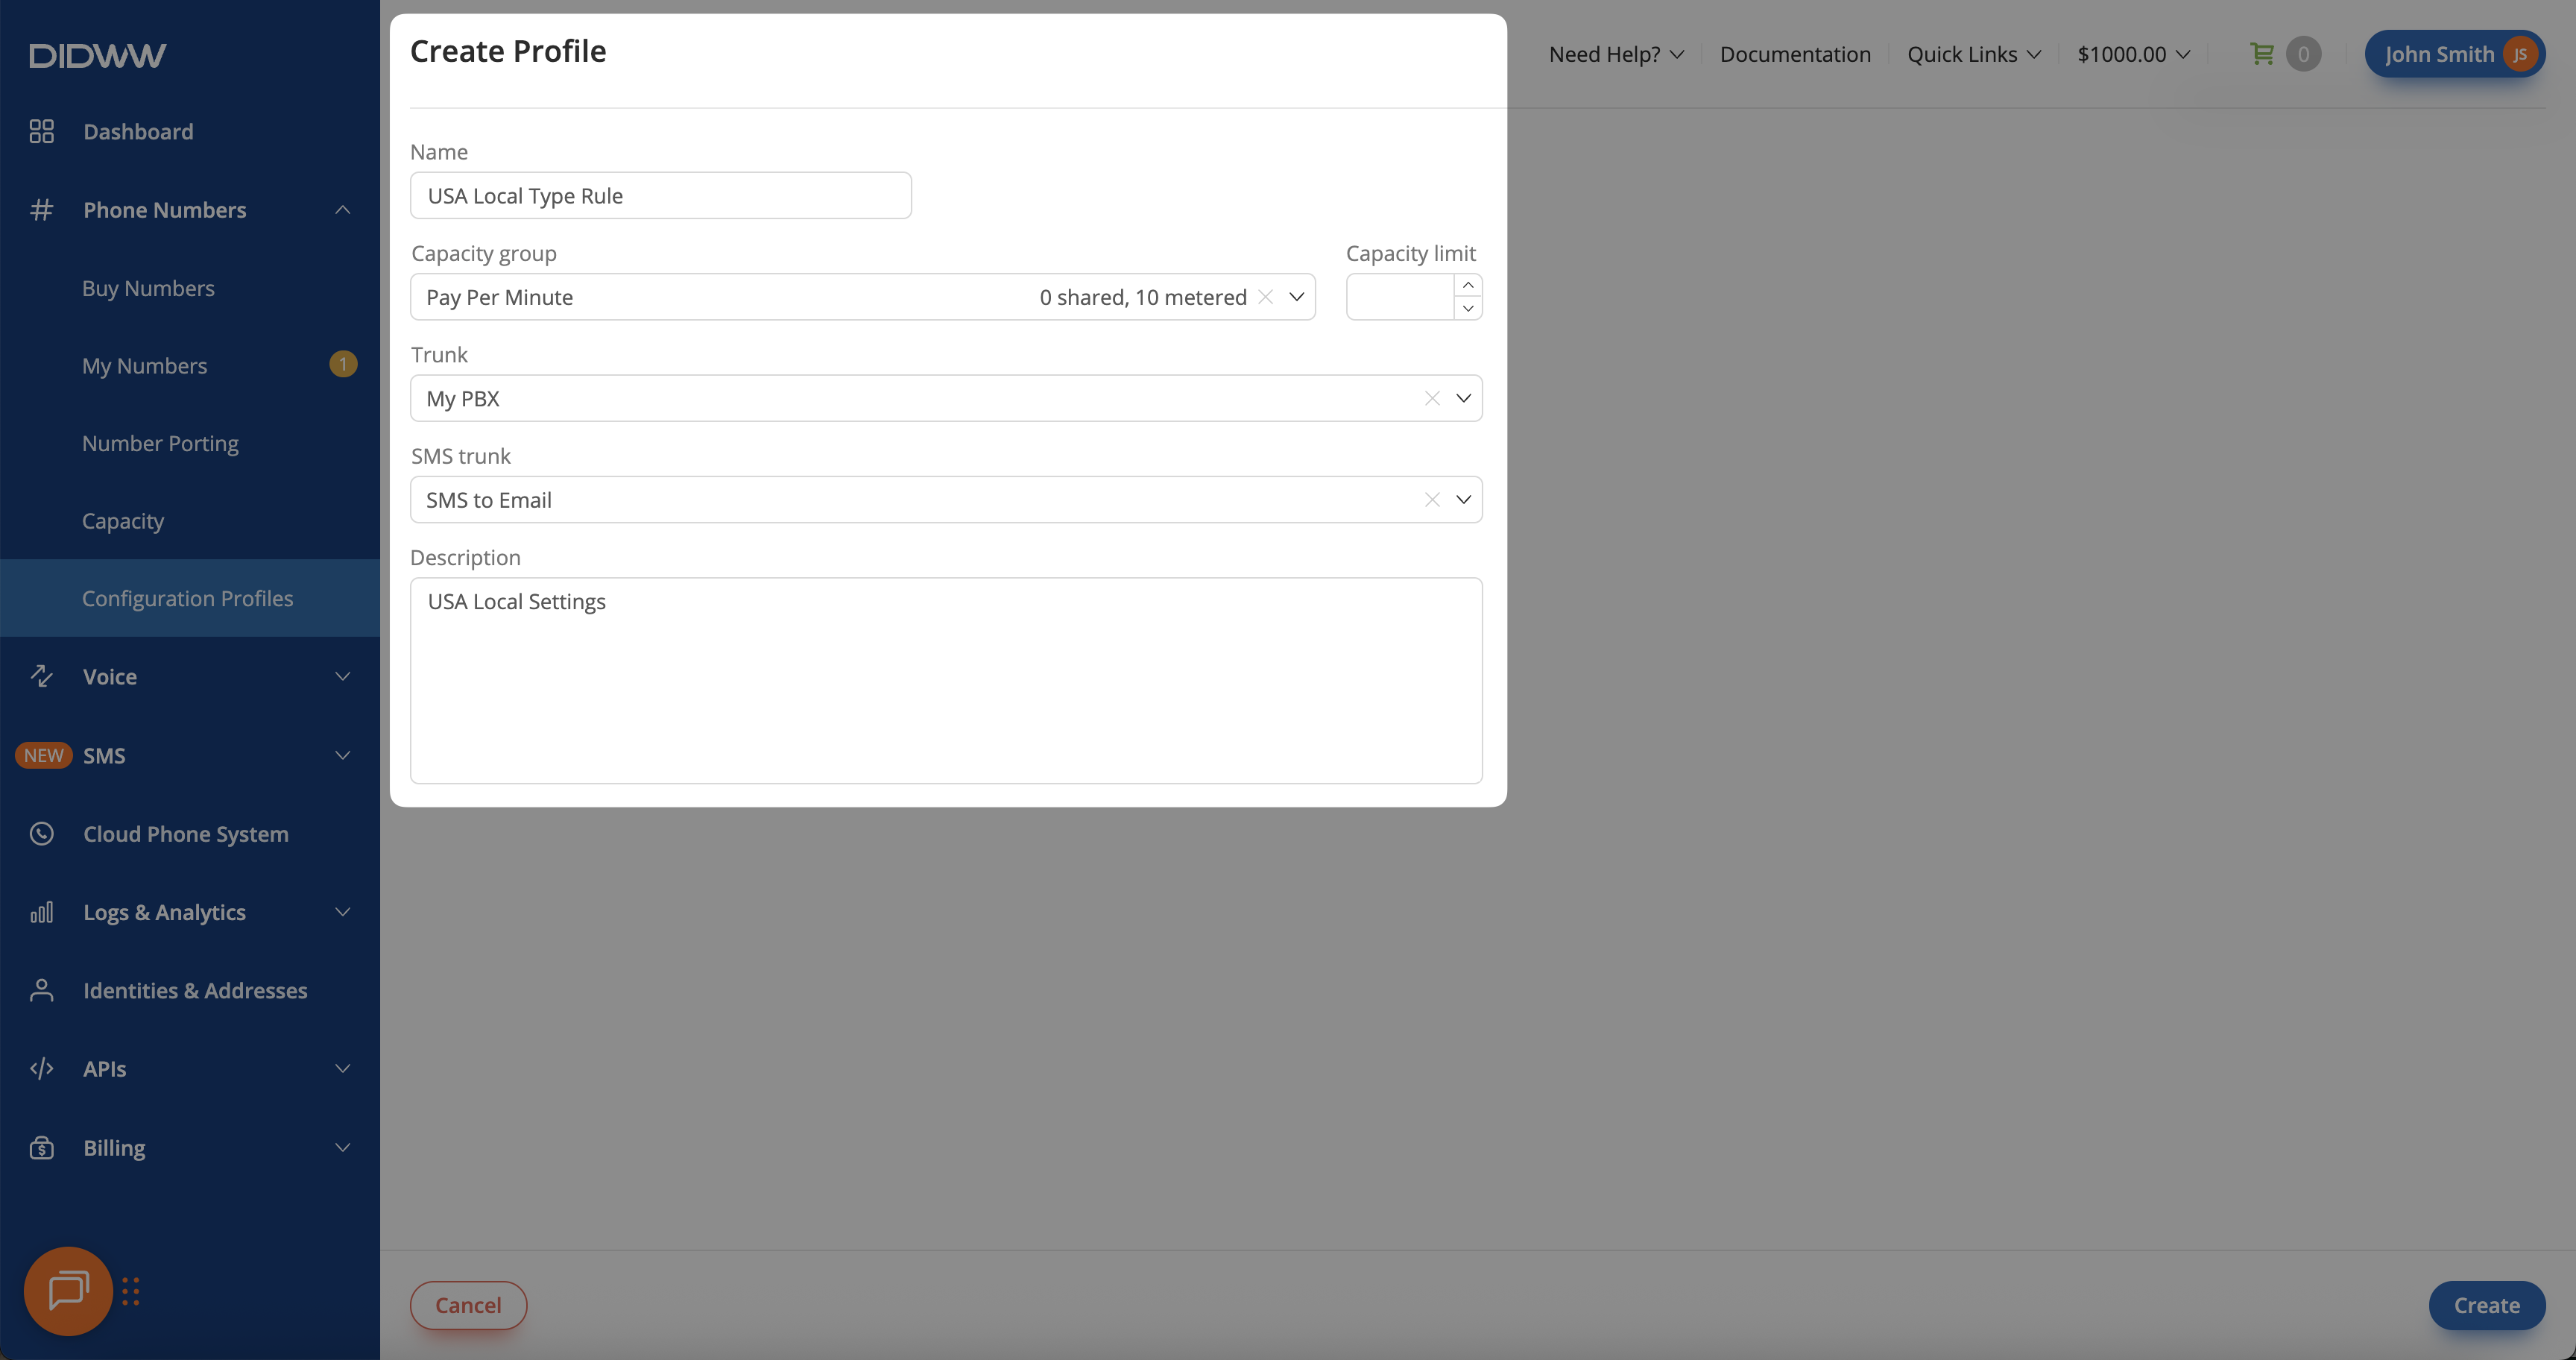
Fig. 3. US Local PBX Profile#
Create a configuration profile for Toll-Free numbers that forwards calls to phone.systems. This setup does not include a capacity group, as it uses standard call routing.
Name: Enter the profile name (e.g., USA Toll-Free Profile).
Capacity Group: Leave this field empty — Toll-Free numbers already include 300 channels by default and don’t require additional capacity.
Trunk: Choose your SIP trunk (e.g., phone.systems).
SMS Trunk: Select your SMS trunk (e.g., SMS to Email).
Description: Add a short note to identify the profile (e.g., USA Toll-Free Settings).
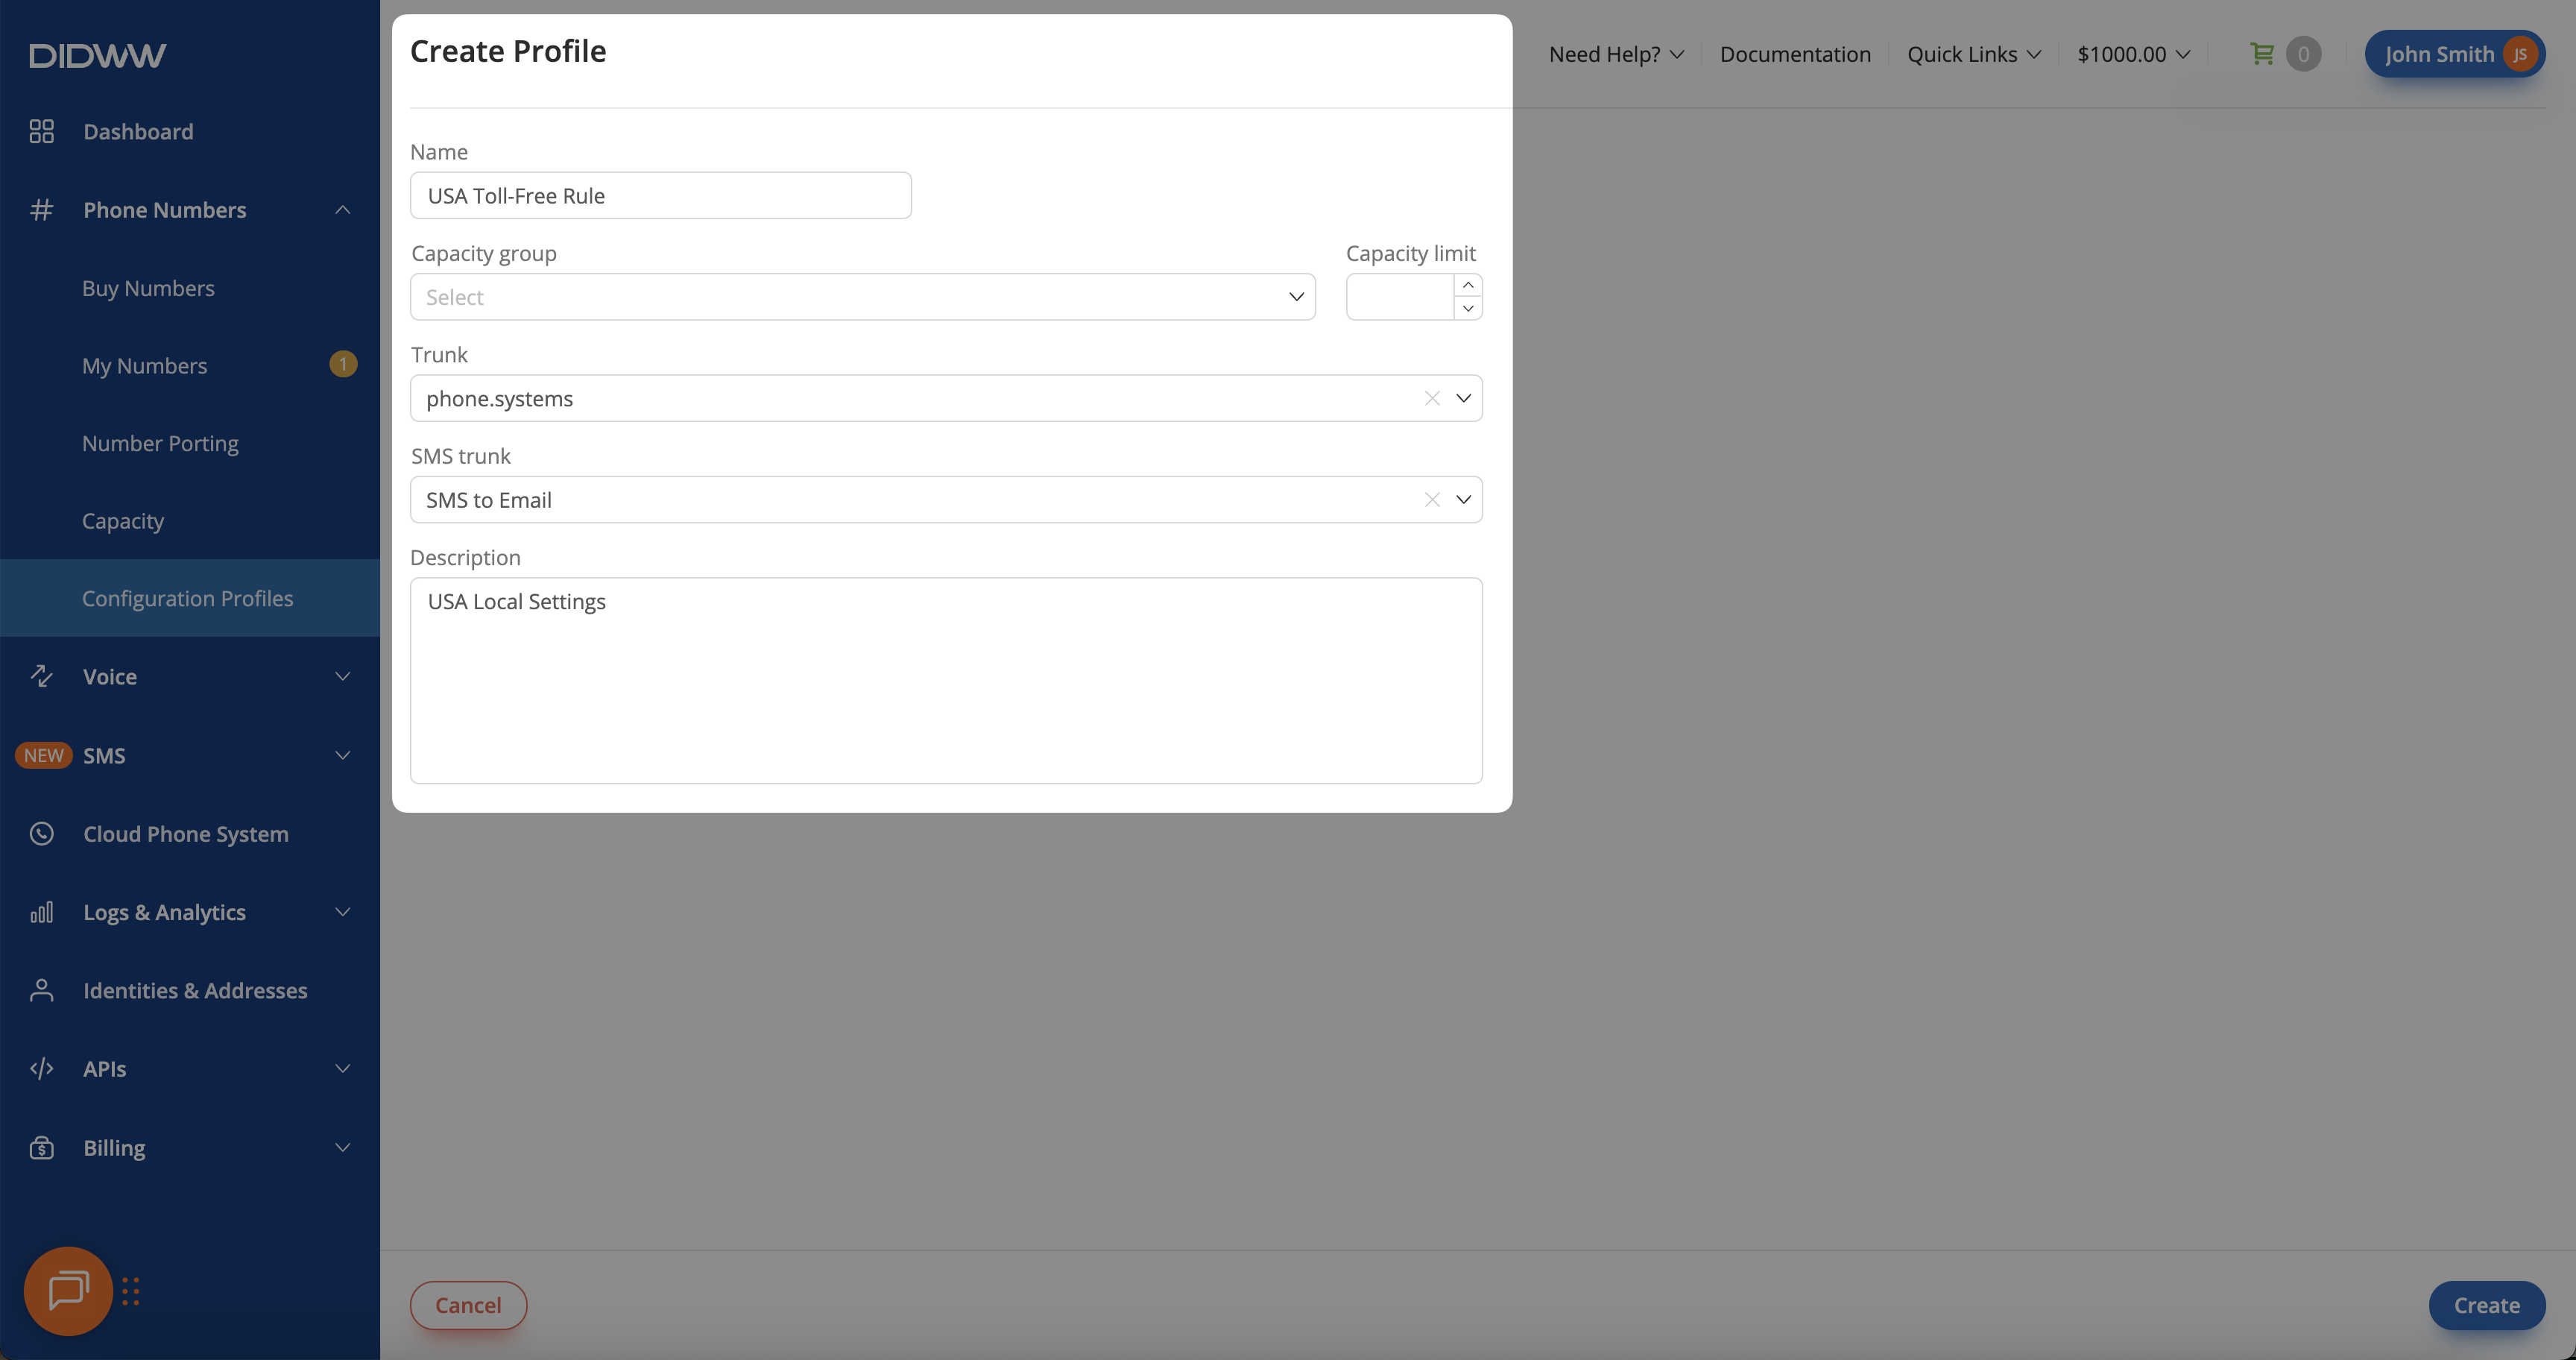
Fig. 4. US Toll-Free Profile#
Step 2: Create Rules for Local and Toll-Free Numbers#
After the Local and Toll-Free configuration profiles are created, set up two rules so that each profile is automatically applied to new numbers based on their type.
In the DIDWW User Panel, go to Phone Numbers > Configuration Profiles > Rules.
Click Create Rule to open the rule creation form.
Create a rule that applies the Local profile to newly purchased Local numbers in the United States.
Name: Enter the rule name (e.g., USA Local Rule).
Profile: Select the configuration profile (e.g., USA Local Type Profile).
Countries: Choose the country (e.g., United States).
Number Types: Select the number type (e.g., Local).
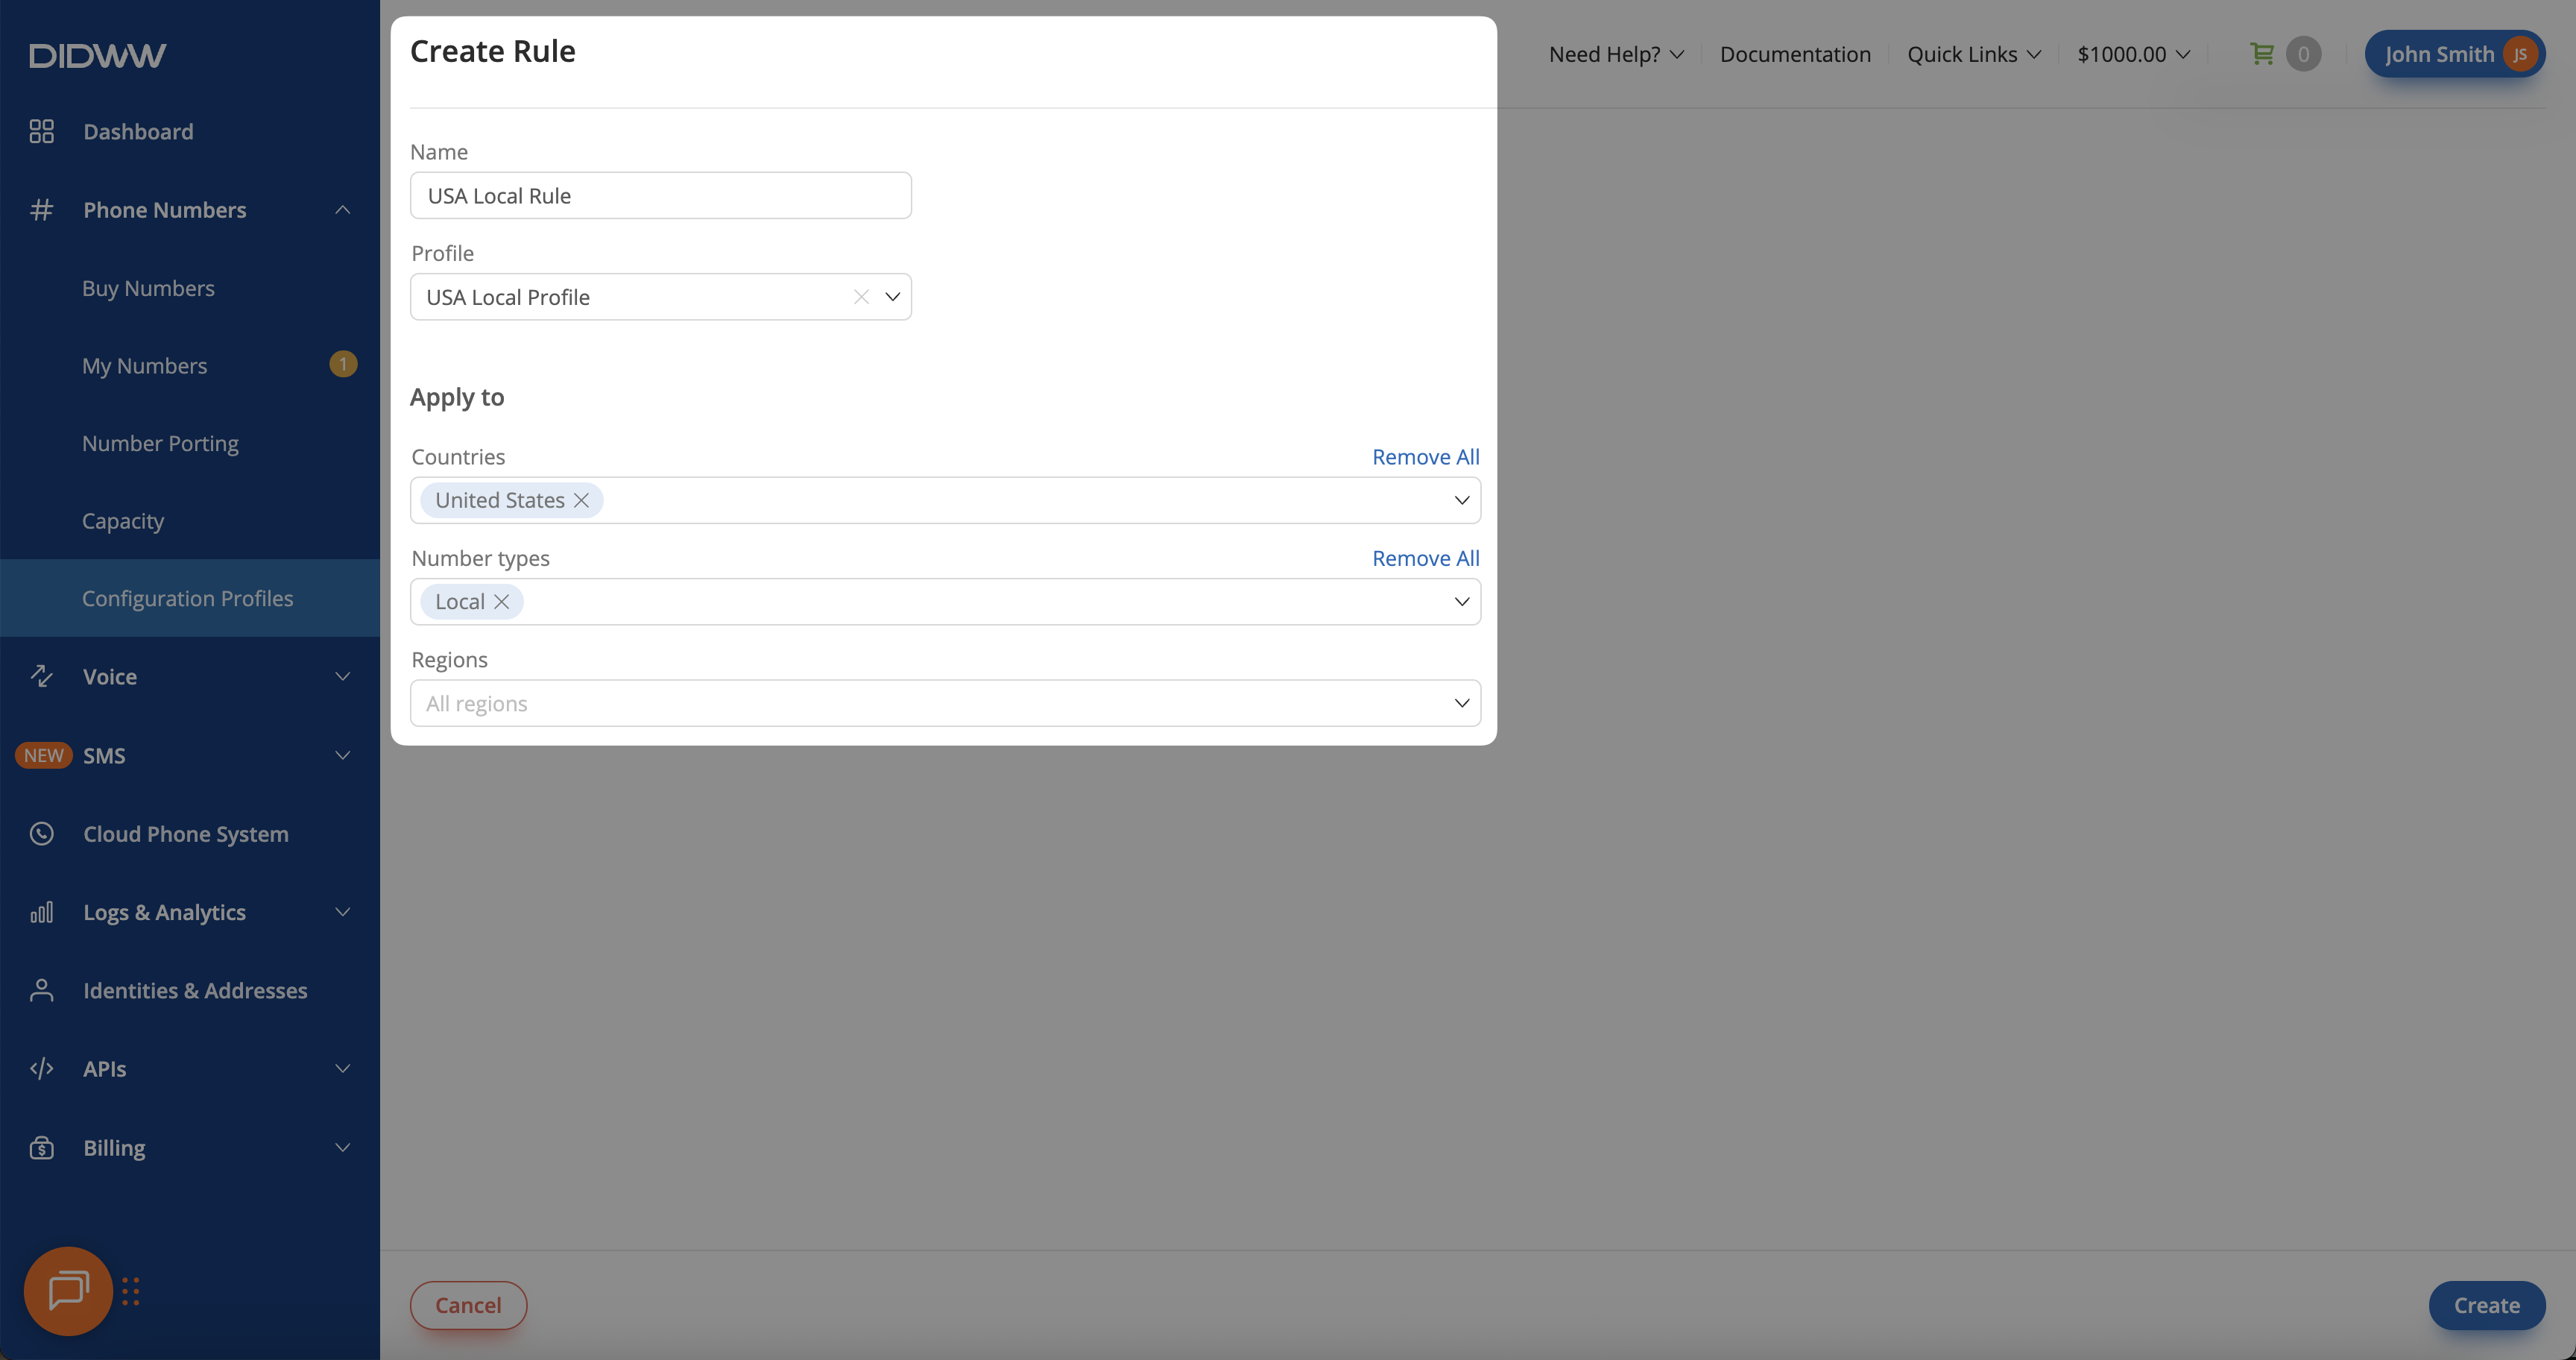
Fig. 5. USA Local Rule#
Create a rule that applies the Toll-Free profile to newly purchased Toll-Free numbers in the United States.
Name: Enter the rule name (e.g., USA Toll-Free Rule).
Profile: Select the configuration profile (e.g., USA Toll-Free Profile).
Countries: Choose the country (e.g., United States).
Number Types: Select the number type (e.g., Toll-Free).
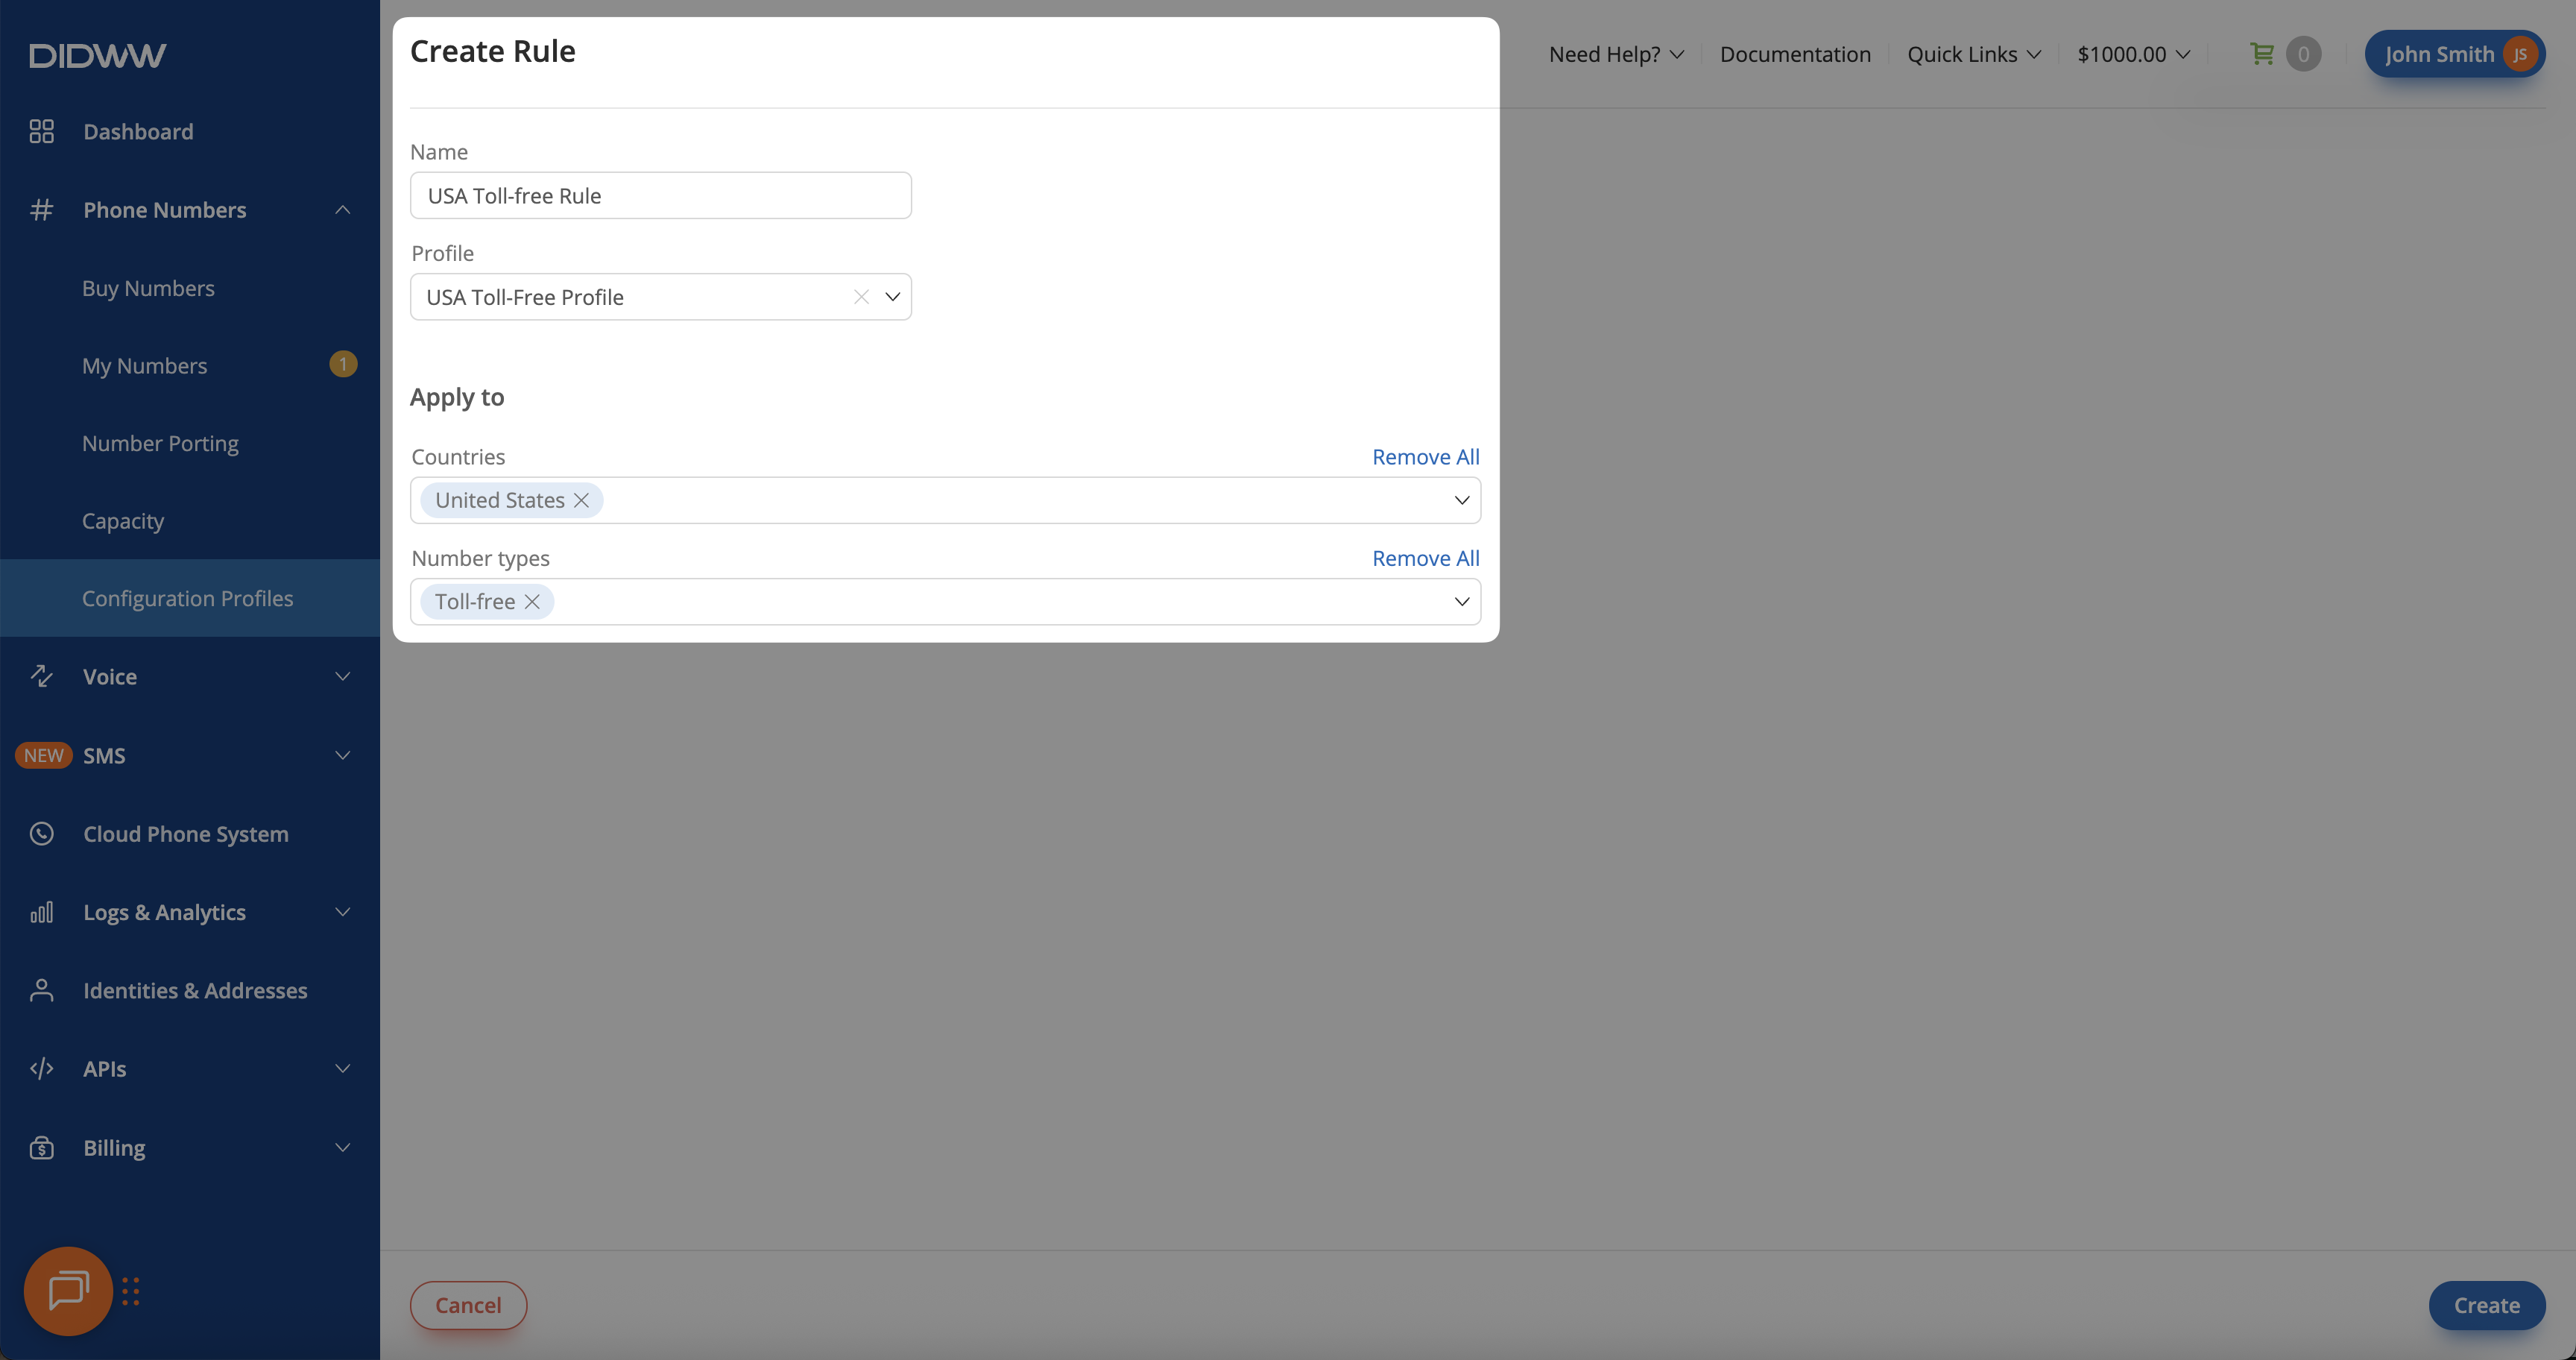
Fig. 6. USA Toll-Free Rule#
Example 3: Regional Rule#
This setup automatically applies different configurations to new numbers in countries that support regional rules, such as the United States, Canada, and the United Kingdom.
For example, two regional trunks can be created to automatically handle all cities within their respective regions. The California regional trunk will cover all cities in the California region, while the New York regional trunk will handle all cities within the New York region.
Step 1: Create Regional Configuration Profiles#
To manage routing for different regions within the same country, create two separate configuration profiles. These profiles will later be linked to rules that automatically apply region specific settings for numbers in each area.
In the DIDWW User Panel, go to Phone Numbers > Configuration Profiles.
Open the Profiles tab.
Click Create Profile to open the creation form, and set up two profiles for the California and New York regions.
Create a configuration profile for all cities within the New York region that routes calls through the New York SIP trunk.
Name: Enter the profile name (e.g., USA New York Profile).
Capacity Group: Select a capacity group if you want to add extra call capacity (e.g., Pay Per Minute).
Trunk: Choose your SIP trunk (e.g., USA East Coast SIP Trunk).
SMS Trunk: Select your SMS trunk (e.g., SMS to Email).
Description: Add a short note to identify the profile (e.g., East Coast Regional Settings).

Fig. 7. USA New York Region Profile#
Create a configuration profile for all cities within the California region that routes calls through the California SIP trunk.
Name: Enter the profile name (e.g., USA California Profile).
Capacity Group: Select a capacity group if you want to add extra call capacity (e.g., Pay Per Minute).
Trunk: Choose your SIP trunk (e.g., USA West Coast SIP Trunk).
SMS Trunk: Select your SMS trunk (e.g., SMS to Email).
Description: Add a short note to identify the profile (e.g., West Coast Regional Settings).

Fig. 8. USA California Region Profile#
Step 2: Create Regional Rules#
After creating the California and New York configuration profiles, set up rules so that each profile is automatically applied to new numbers within its respective region.
In the DIDWW User Panel, go to Phone Numbers > Configuration Profiles > Rules.
Click Create Rule to open the rule creation form.
Create a rule that applies the New York configuration profile to all Local numbers in the New York region.
Name: Enter the rule name (e.g., USA New York Region Rule).
Profile: Select the configuration profile (e.g., USA New York Profile).
Countries: Choose the country (e.g., United States).
Number Types: Select the number type (e.g., Local).
Regions: Choose the region (e.g., New York).
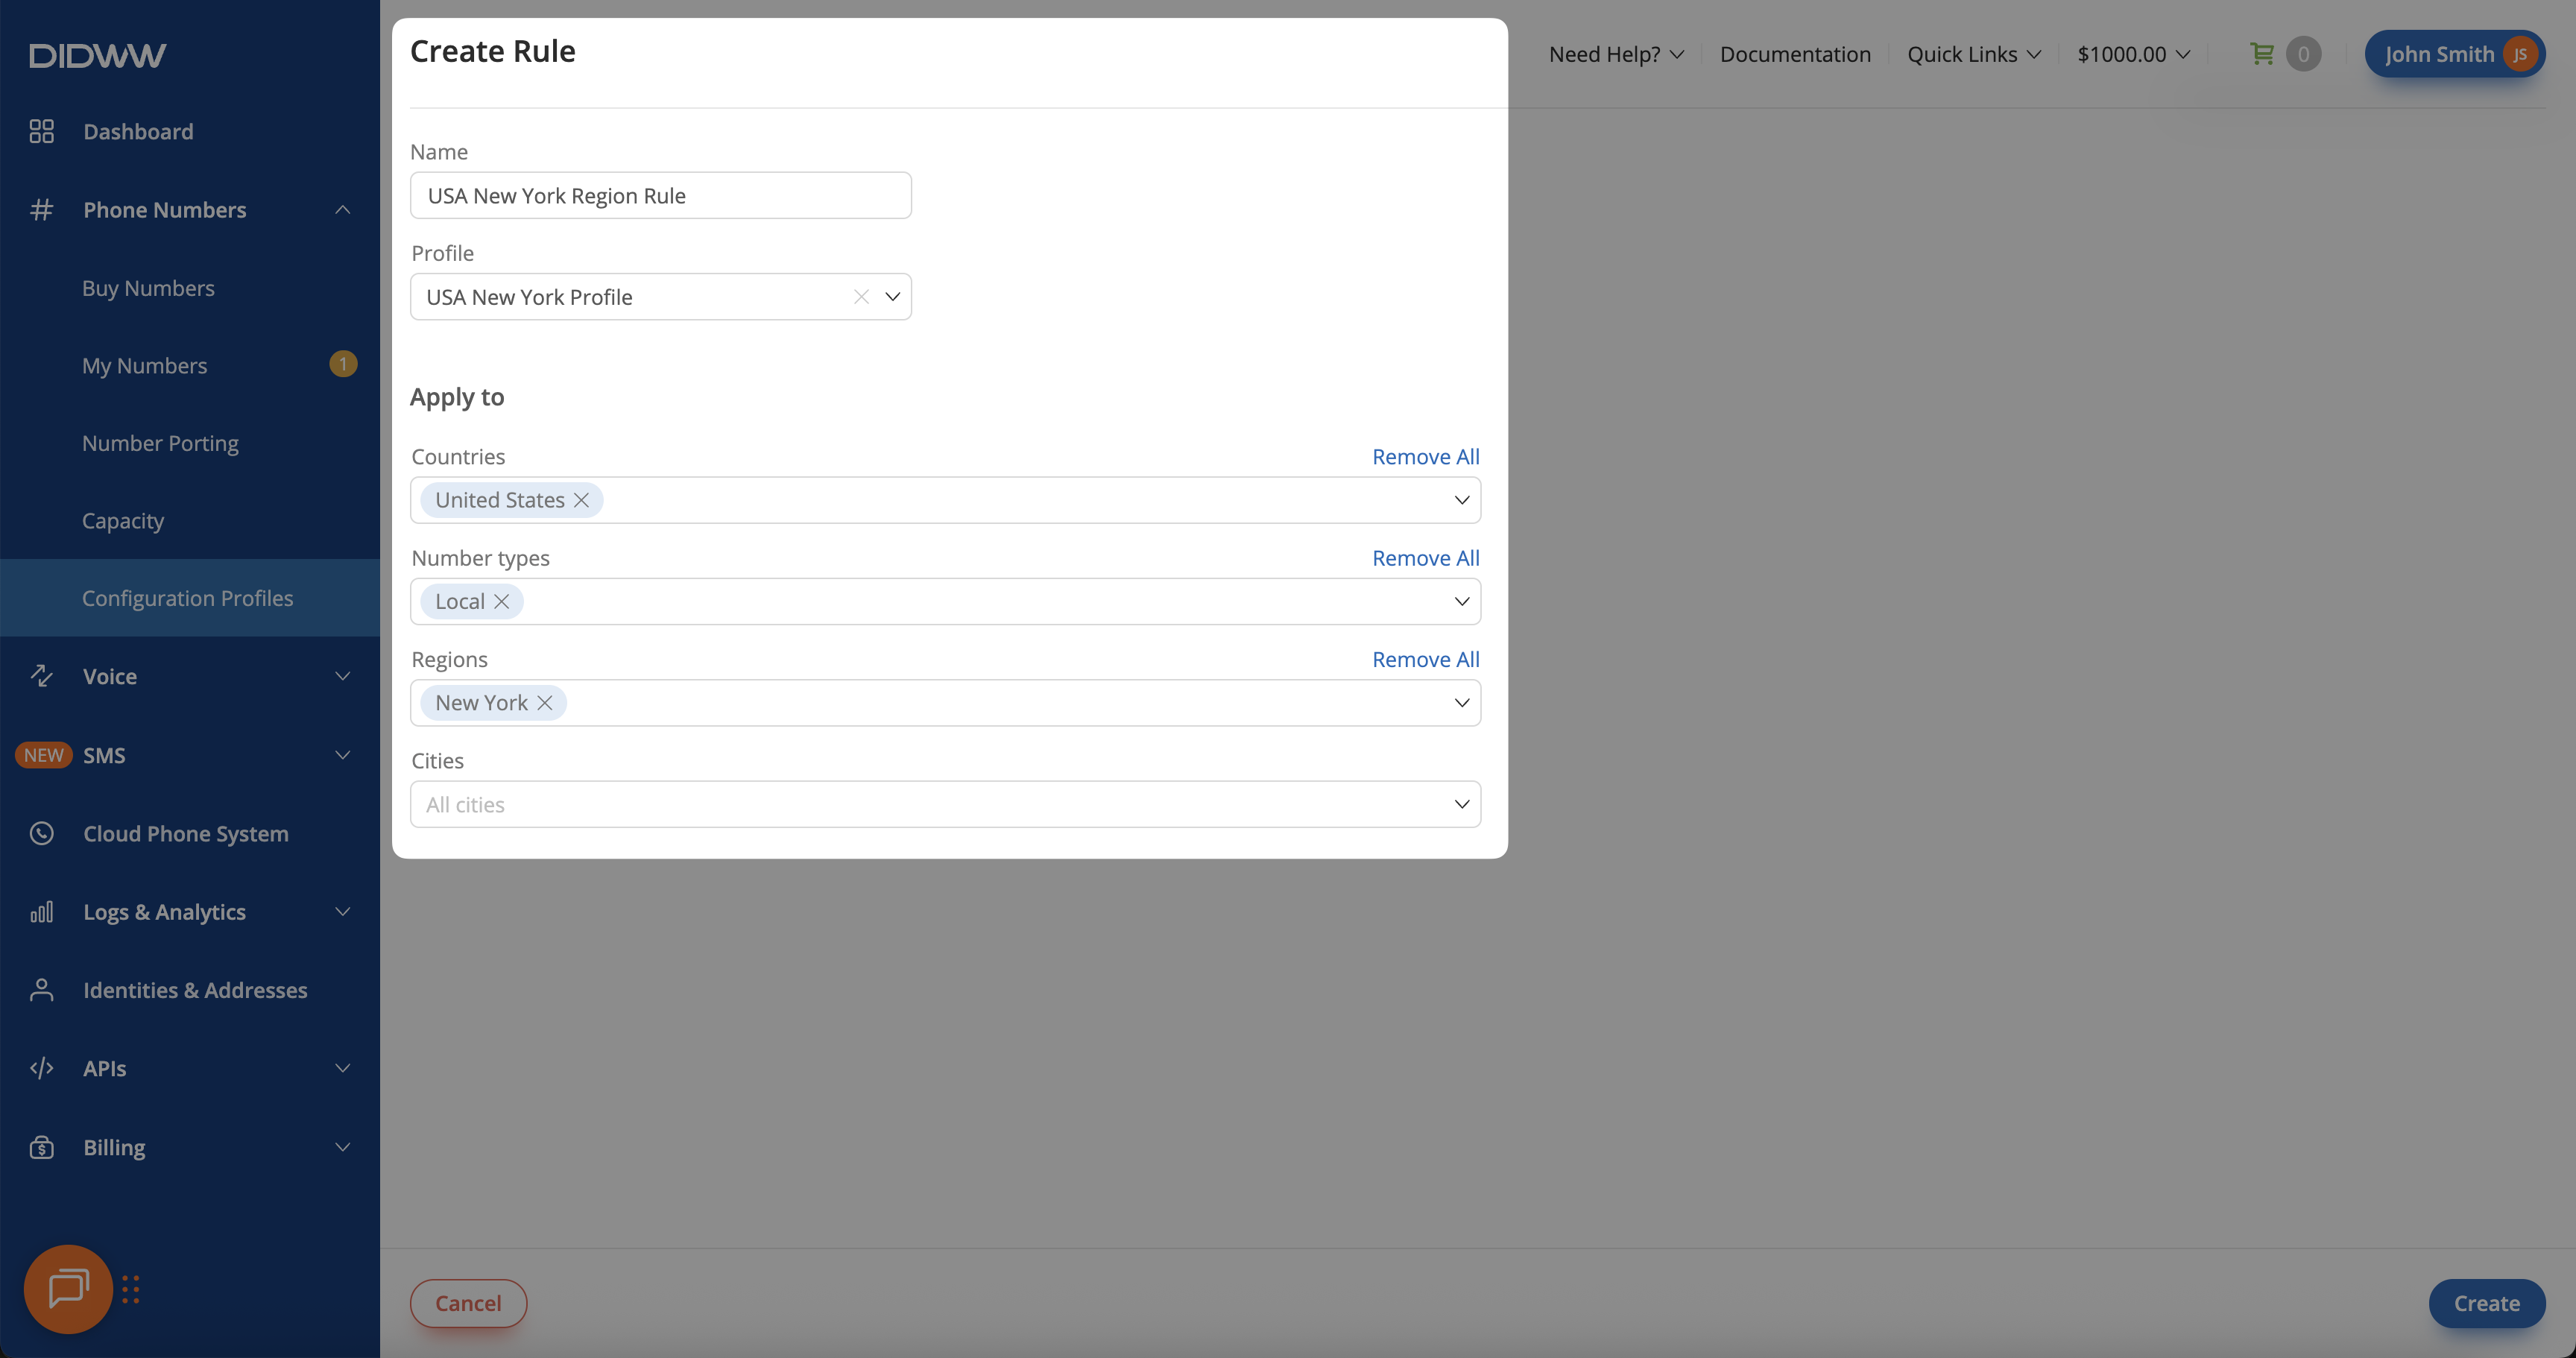
Fig. 9. USA New York Region Rule#
Create a rule that applies the California configuration profile to all Local numbers in the California region.
Name: Enter the rule name (e.g., USA California Region Rule).
Profile: Select the configuration profile (e.g., USA California Profile).
Countries: Choose the country (e.g., United States).
Number Types: Select the number type (e.g., Local).
Regions: Choose the region (e.g., California).
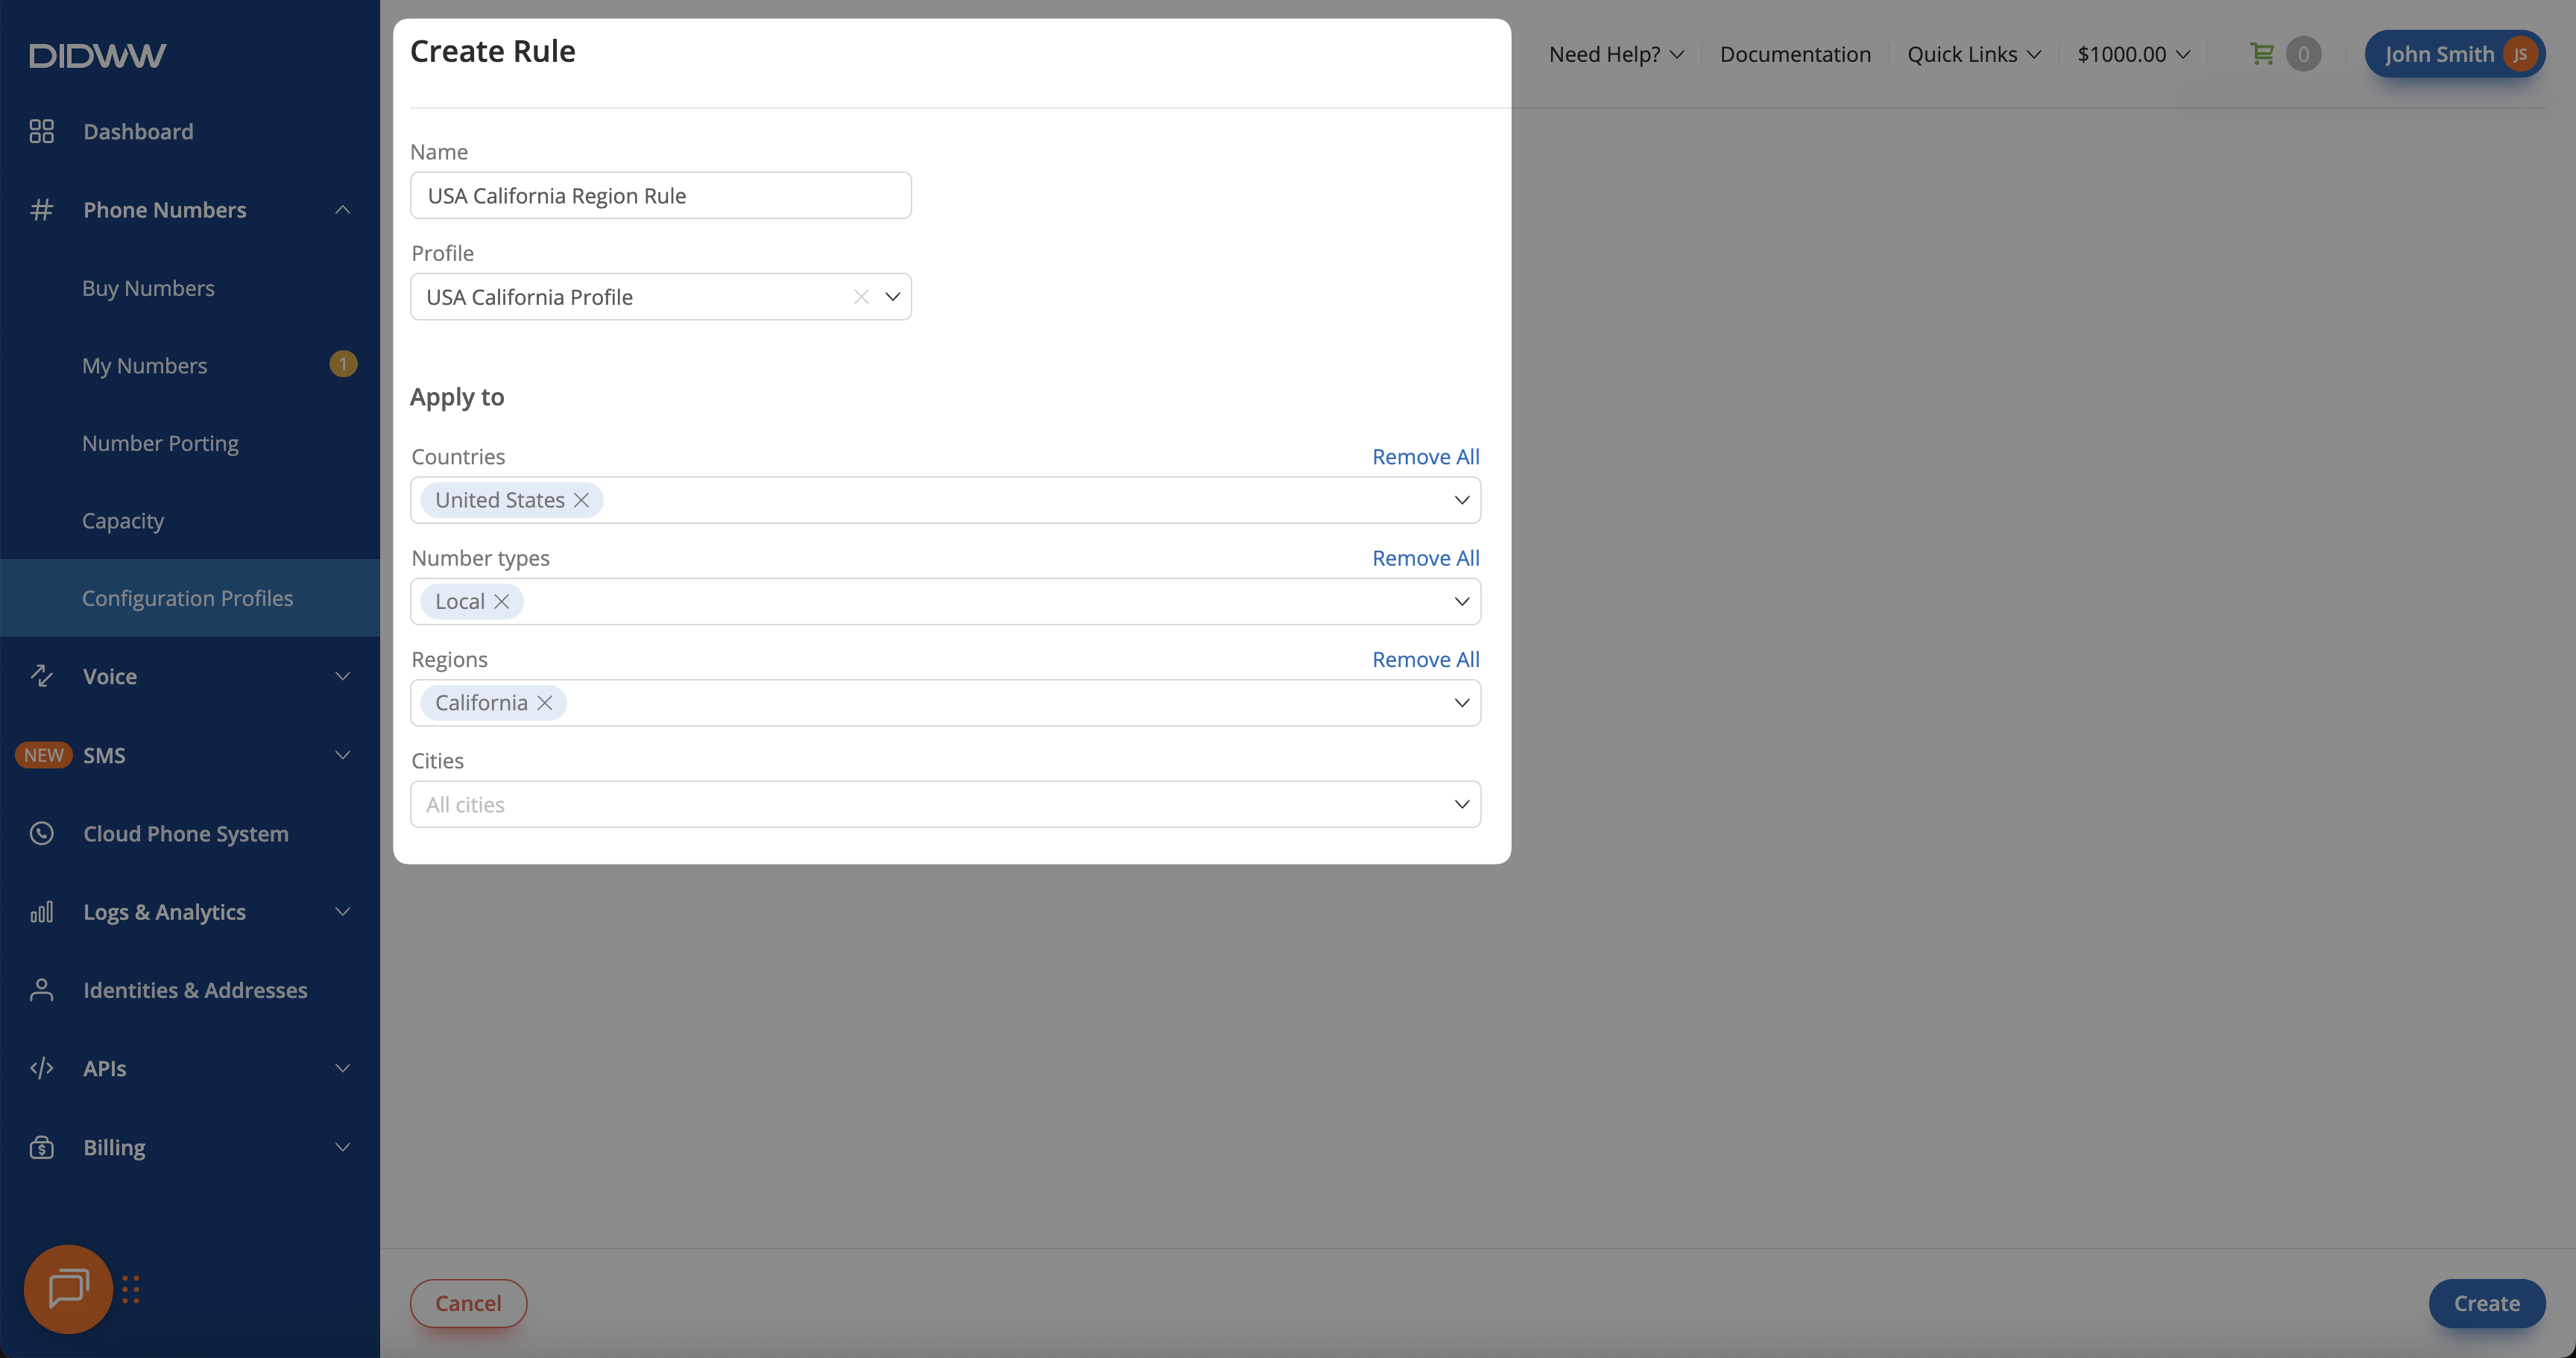
Fig. 10. USA California Region Rule#
Example 4: City Rule#
This setup automatically assigns specific configurations to new numbers based on the city they belong to. For instance, numbers in Stockholm (Sweden) and Warsaw (Poland) can each use their own SIP trunks and settings for city-level call routing.
Step 1: Create City Configuration Profiles#
To apply different call routing settings for specific cities, create separate configuration profiles for each city. In this example, profiles are created for Stockholm and Warsaw.
In the DIDWW User Panel, go to Phone Numbers > Configuration Profiles.
Open the Profiles tab.
Click Create Profile to open the profile creation form.
Create a configuration profile for all numbers in Stockholm that routes calls through the Sweden Stockholm City SIP Trunk. This profile includes a pay-per-minute capacity group for handling additional concurrent calls when needed.
Name: Enter the profile name (e.g., Sweden Stockholm City Profile).
Capacity Group: Select a capacity group if you want to add extra call capacity (e.g., Pay Per Minute).
Trunk: Choose your SIP trunk (e.g., Sweden Stockholm City SIP Trunk).
SMS Trunk: Select your SMS trunk if applicable.
Description: Add a note to identify the profile (e.g., Stockholm City DID Configuration).
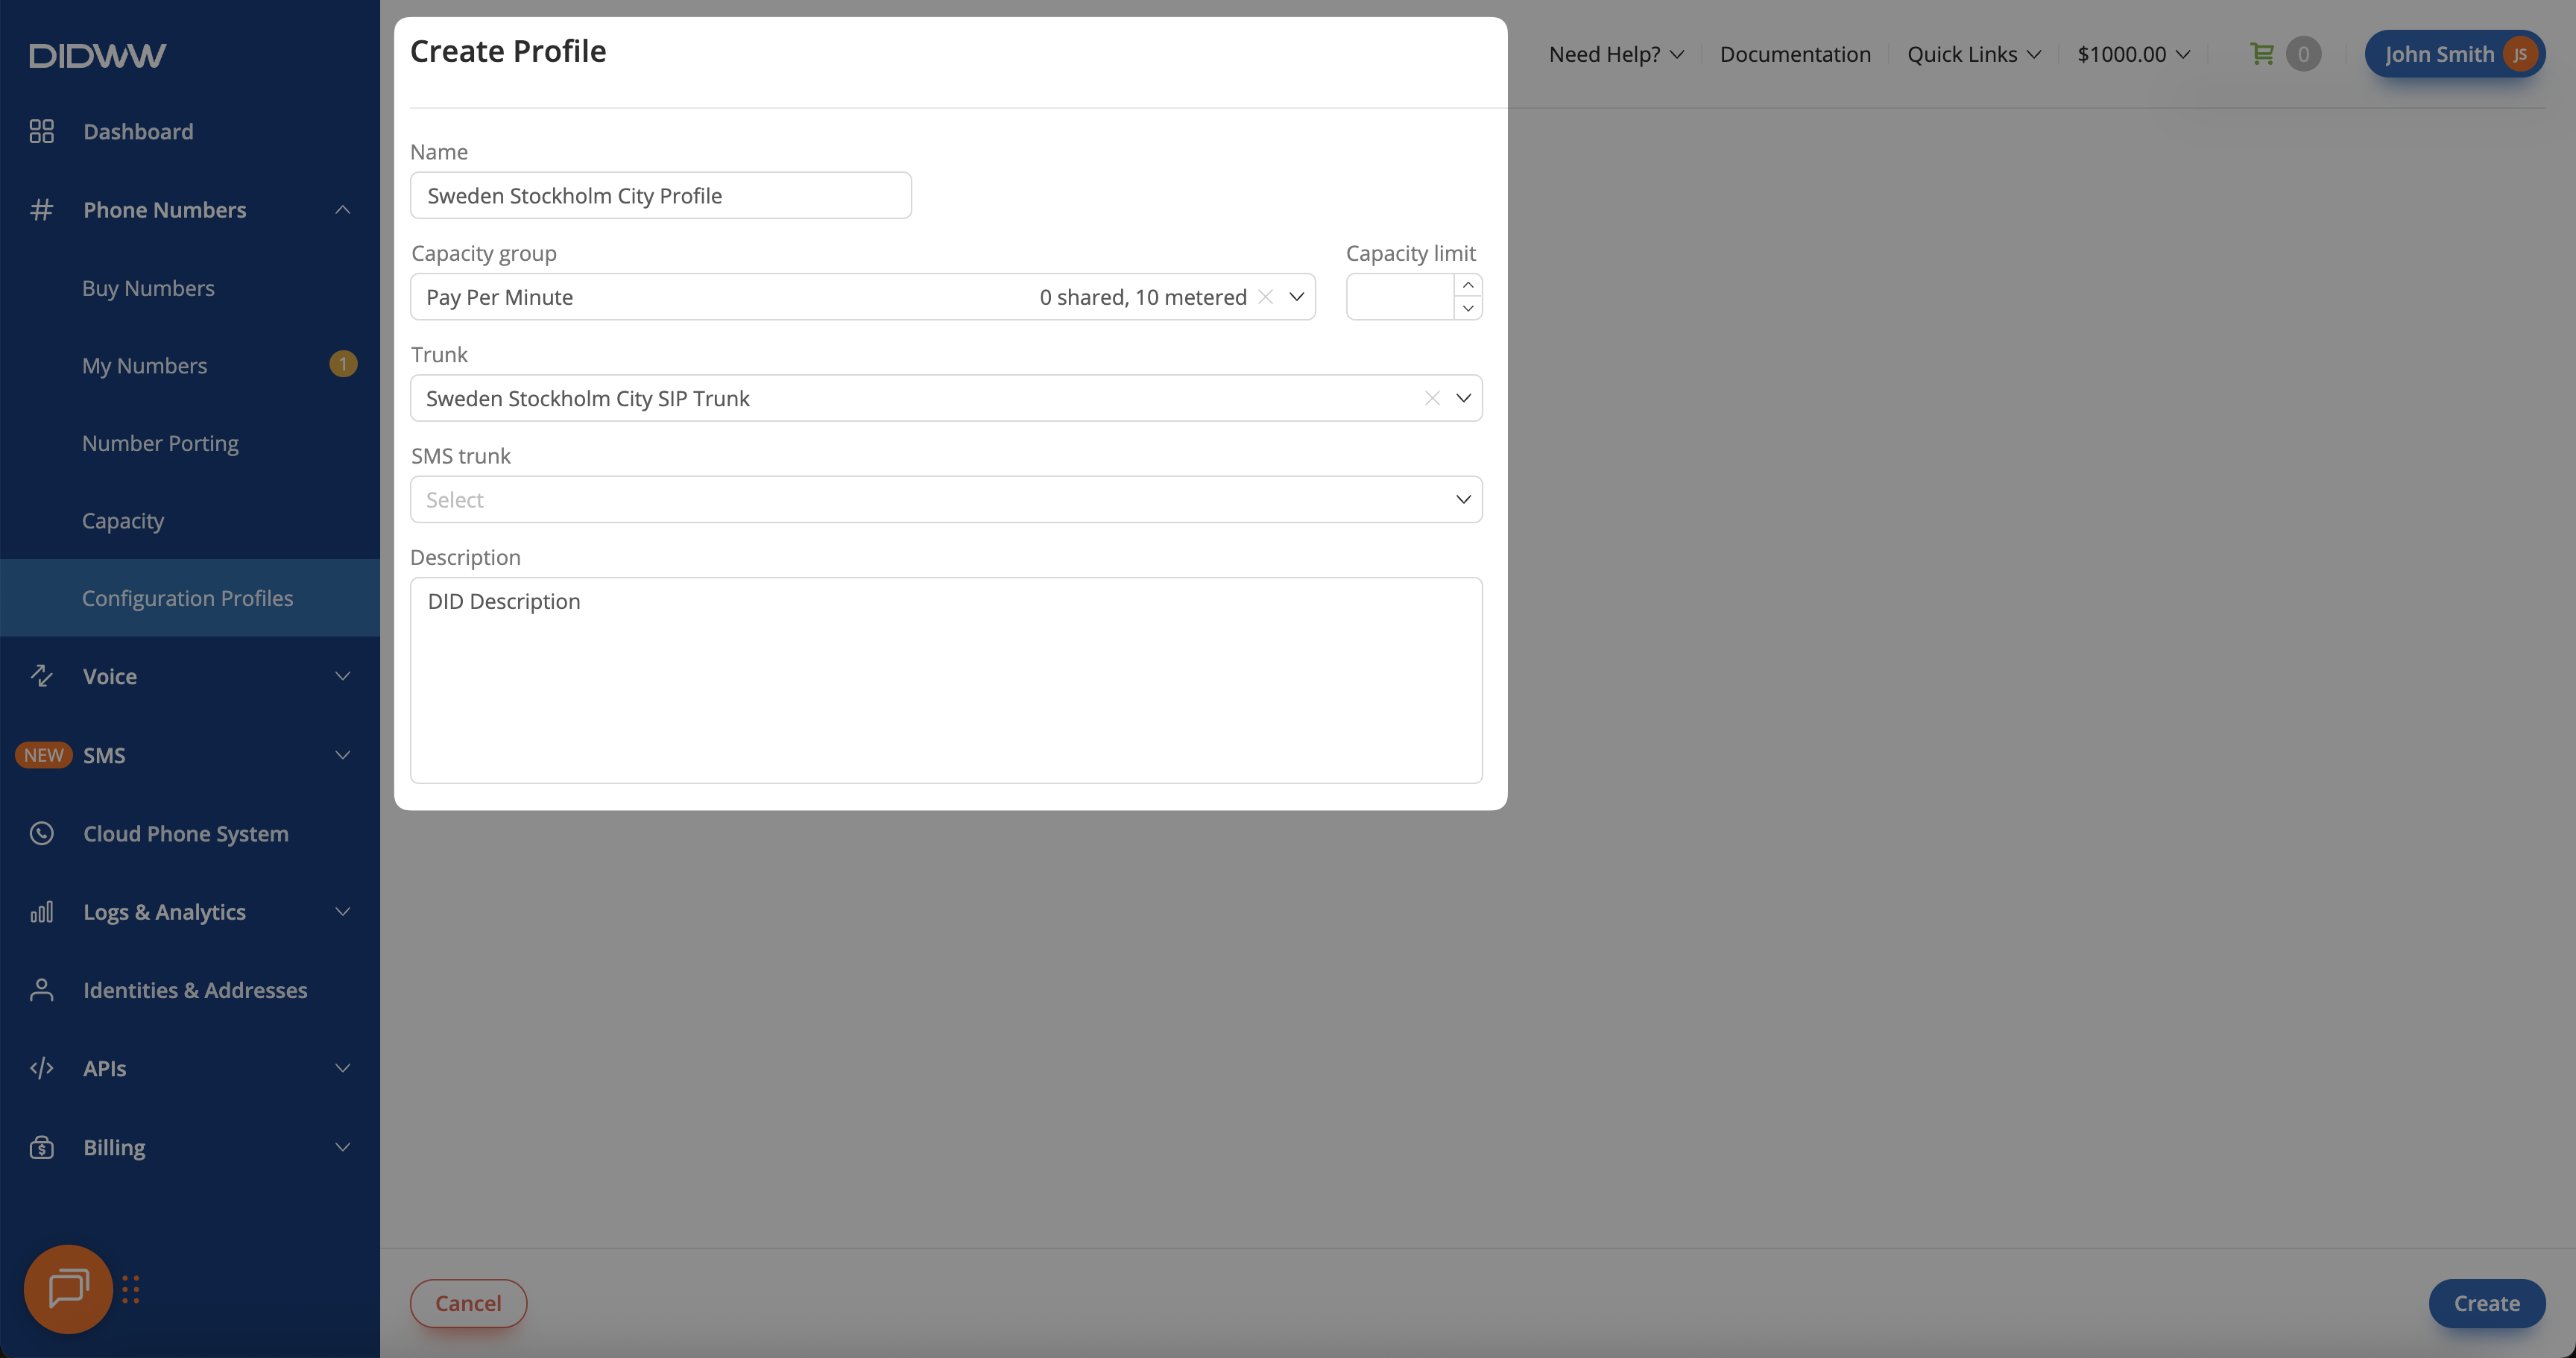
Fig. 11. Sweden Stockholm City Profile#
Create a configuration profile for all numbers in Warsaw that routes calls through the Poland Warsaw City SIP Trunk. Like the Stockholm setup, this profile includes a pay-per-minute capacity group and can share the same SMS trunk.
Name: Enter the profile name (e.g., Poland Warsaw City Profile).
Capacity Group: Select a capacity group (e.g., Pay Per Minute).
Trunk: Choose your SIP trunk (e.g., Poland Warsaw City SIP Trunk).
SMS Trunk: Select your SMS trunk if applicable.
Description: Add a short note for identification (e.g., Warsaw City DID Configuration).
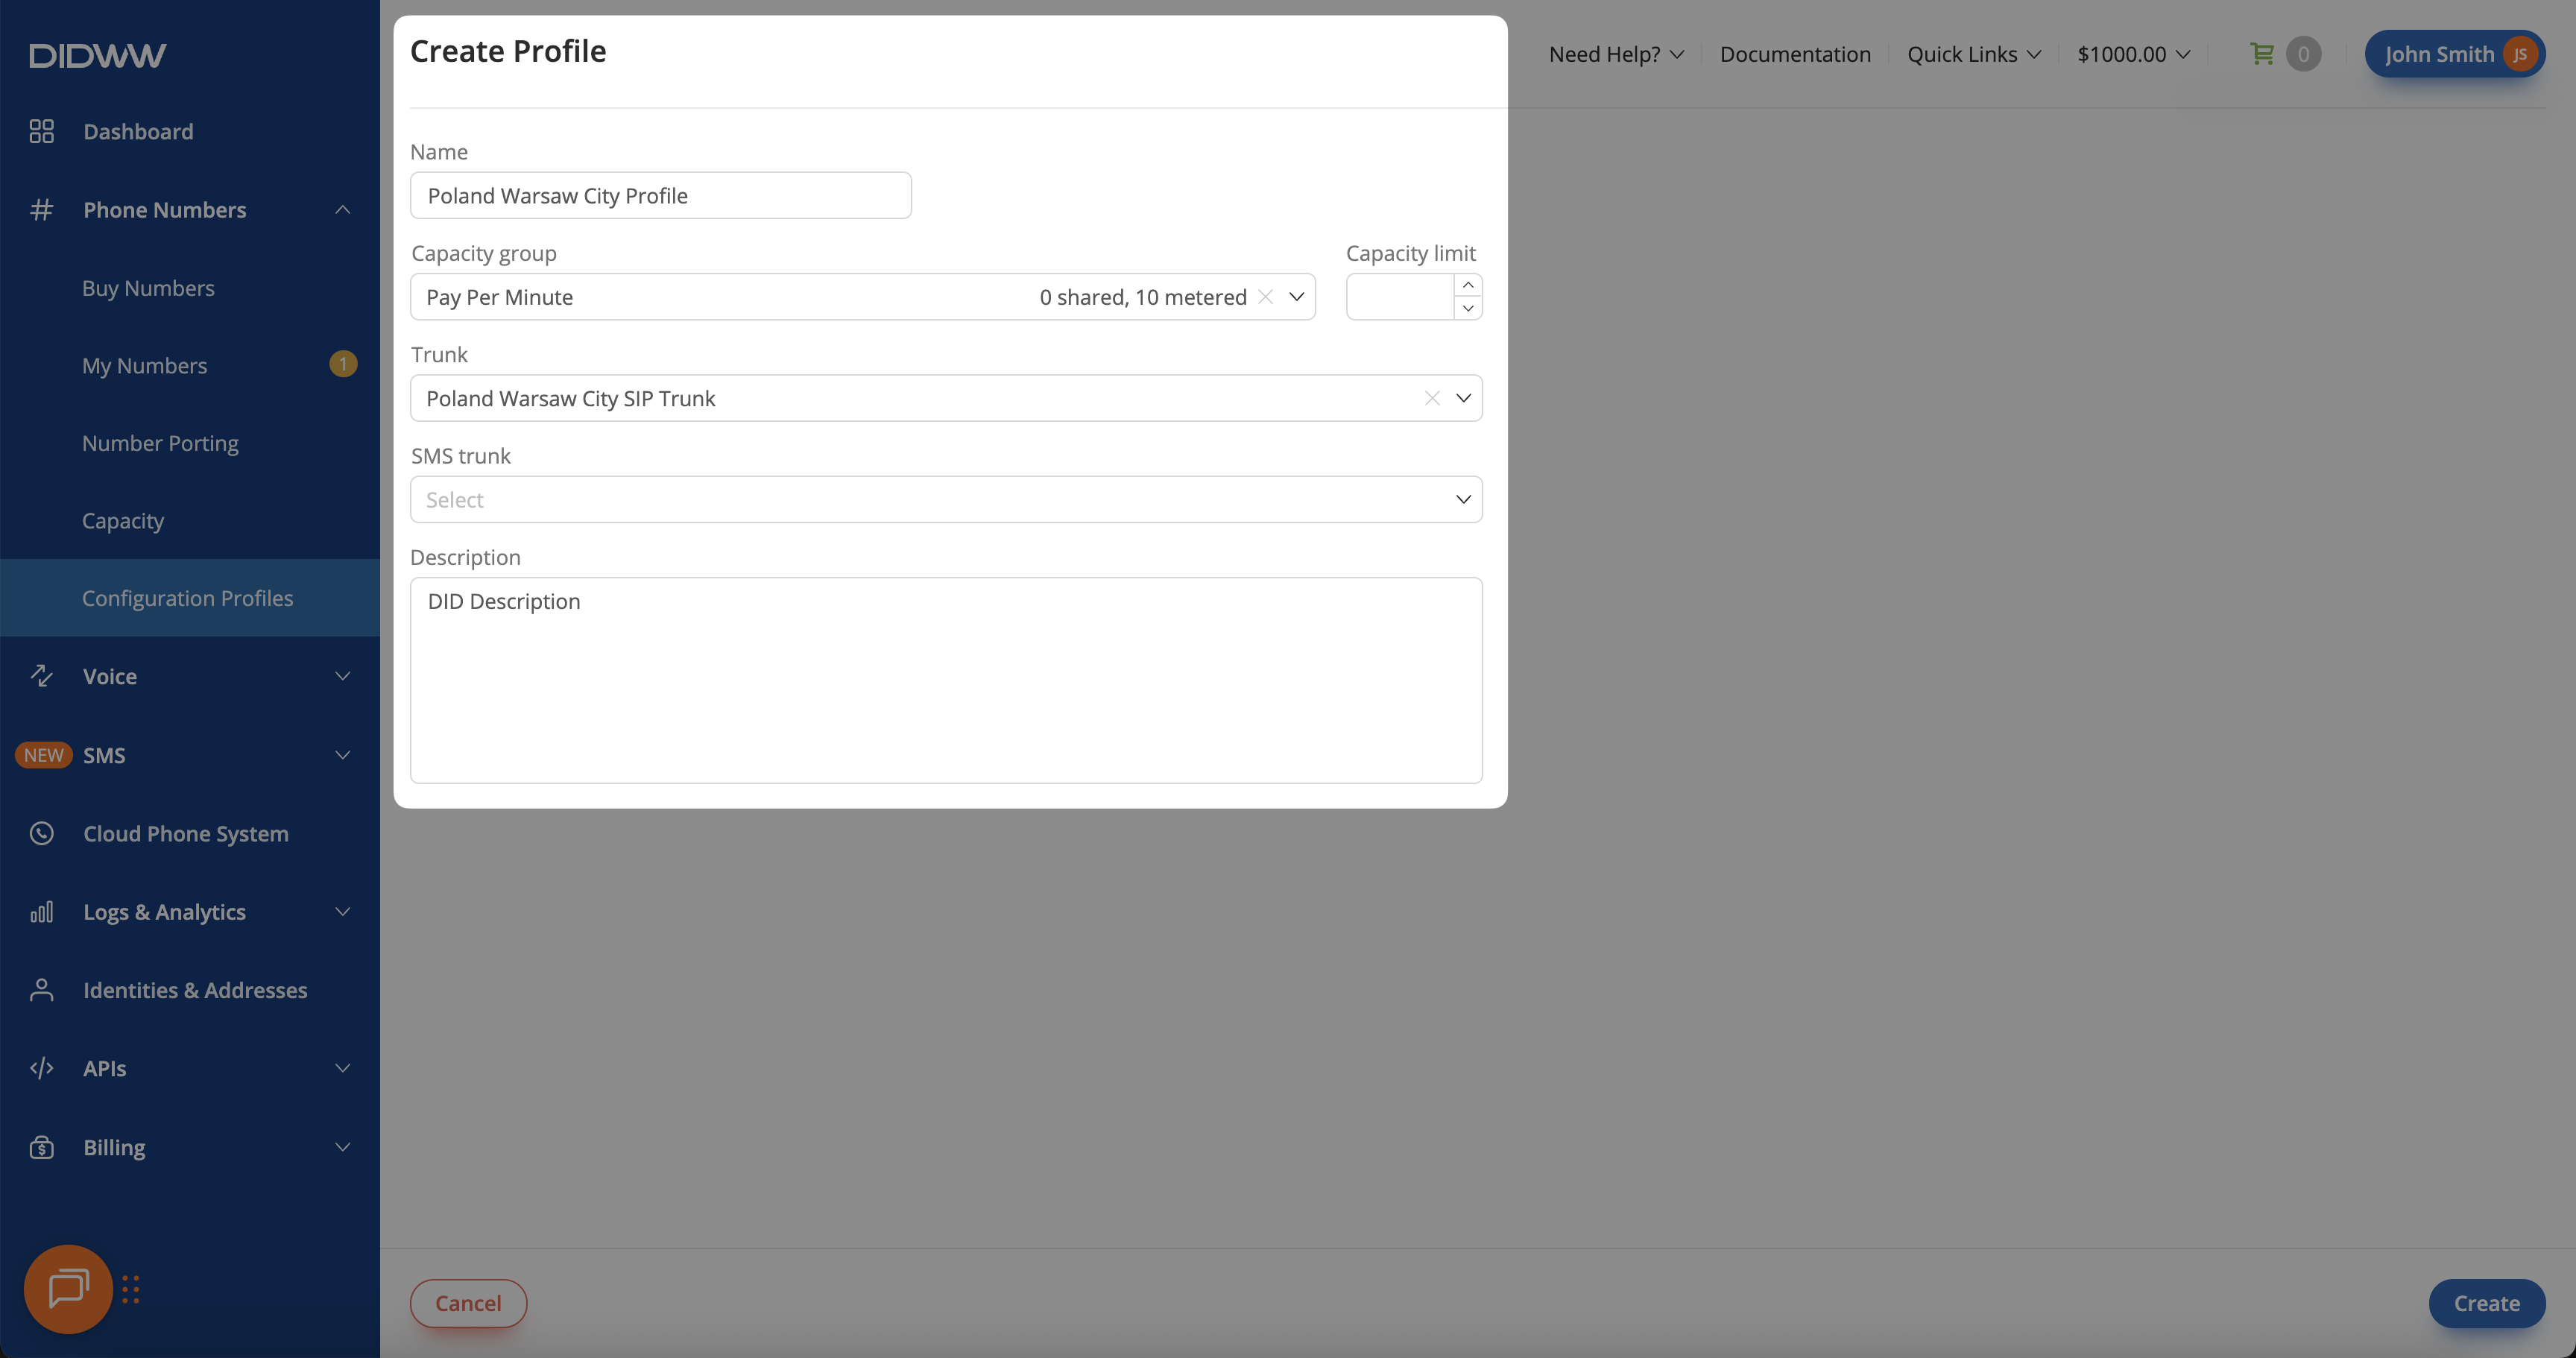
Fig. 12. Poland Warsaw City Profile#
Step 2: Create City Rules#
After creating the Stockholm and Warsaw city configuration profiles, set up rules so that each profile is automatically applied to new numbers in its respective city.
In the DIDWW User Panel, go to Phone Numbers > Configuration Profiles > Rules.
Click Create Rule to open the rule creation form.
Create a rule that applies the Sweden Stockholm City Profile to all Local numbers in Stockholm.
Name: Enter the rule name (e.g., Sweden Stockholm City Only Rule).
Profile: Select the configuration profile (e.g., Sweden Stockholm City Profile).
Countries: Choose the country (e.g., Sweden).
Number Types: Select the number type (e.g., Local).
Cities: Choose the city (e.g., Stockholm).
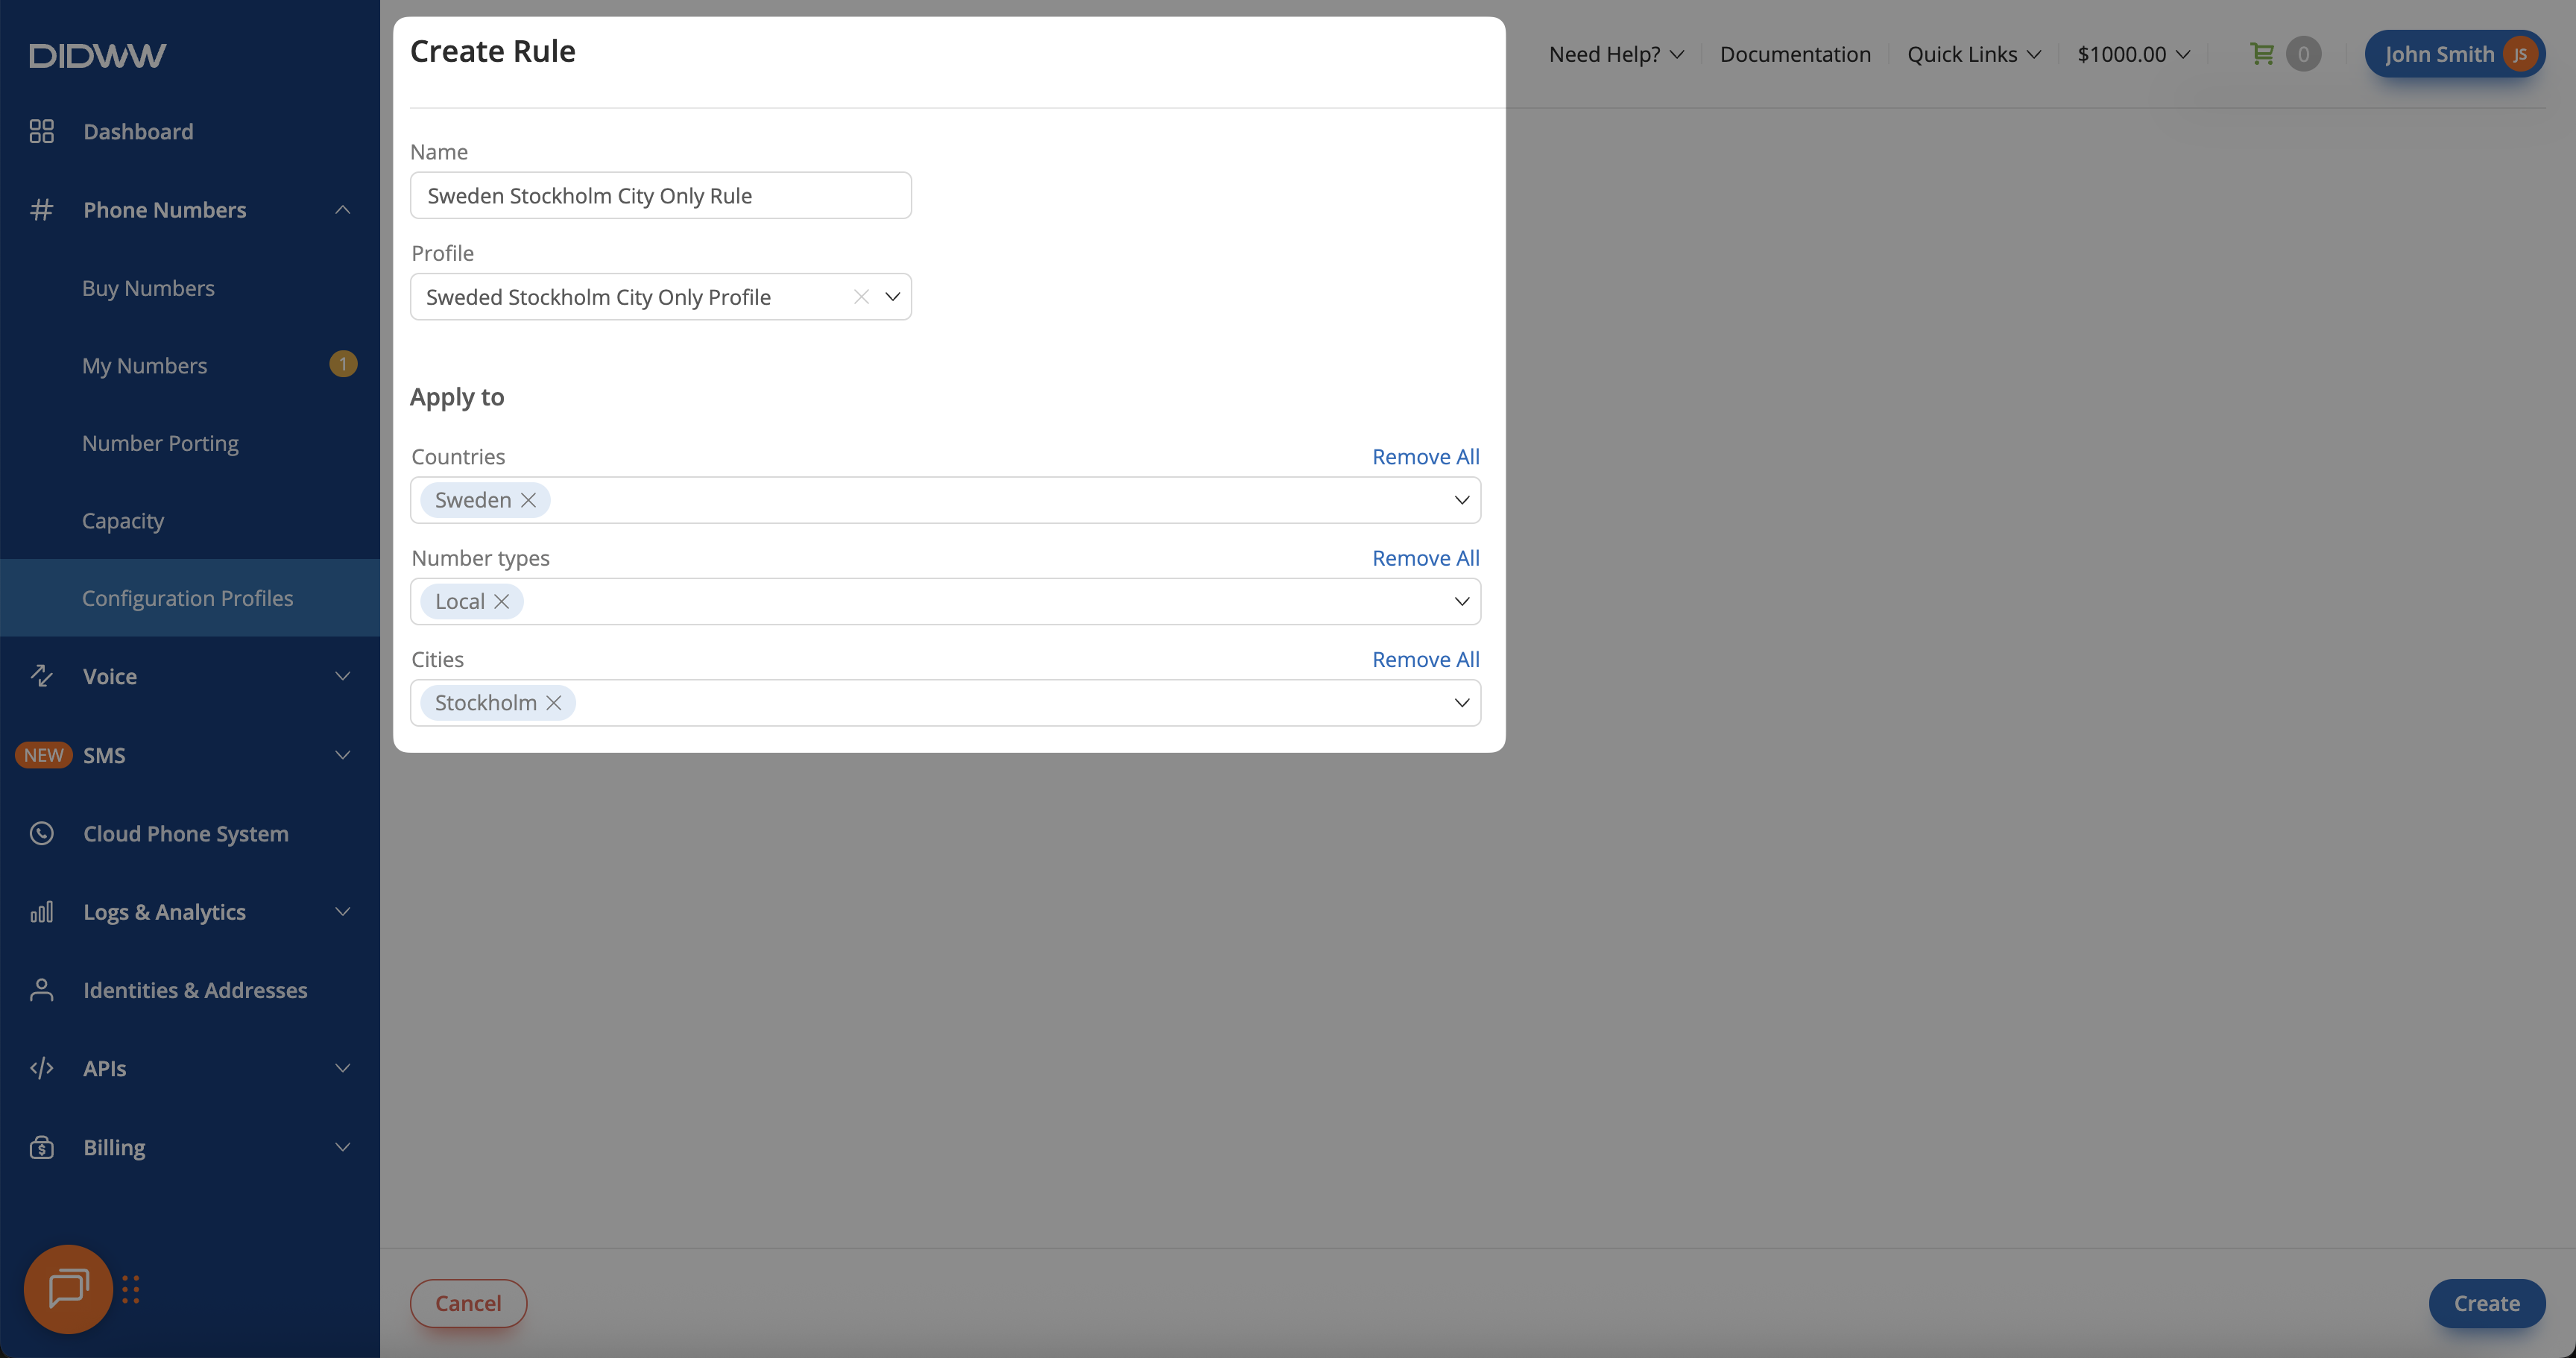
Fig. 13. Sweden Stockholm City Rule#
Create a rule that applies the Poland Warsaw City Profile to all Local numbers in Warsaw.
Name: Enter the rule name (e.g., Poland Warsaw City Only Rule).
Profile: Select the configuration profile (e.g., Poland Warsaw City Profile).
Countries: Choose the country (e.g., Poland).
Number Types: Select the number type (e.g., Local).
Cities: Choose the city (e.g., Warsaw).
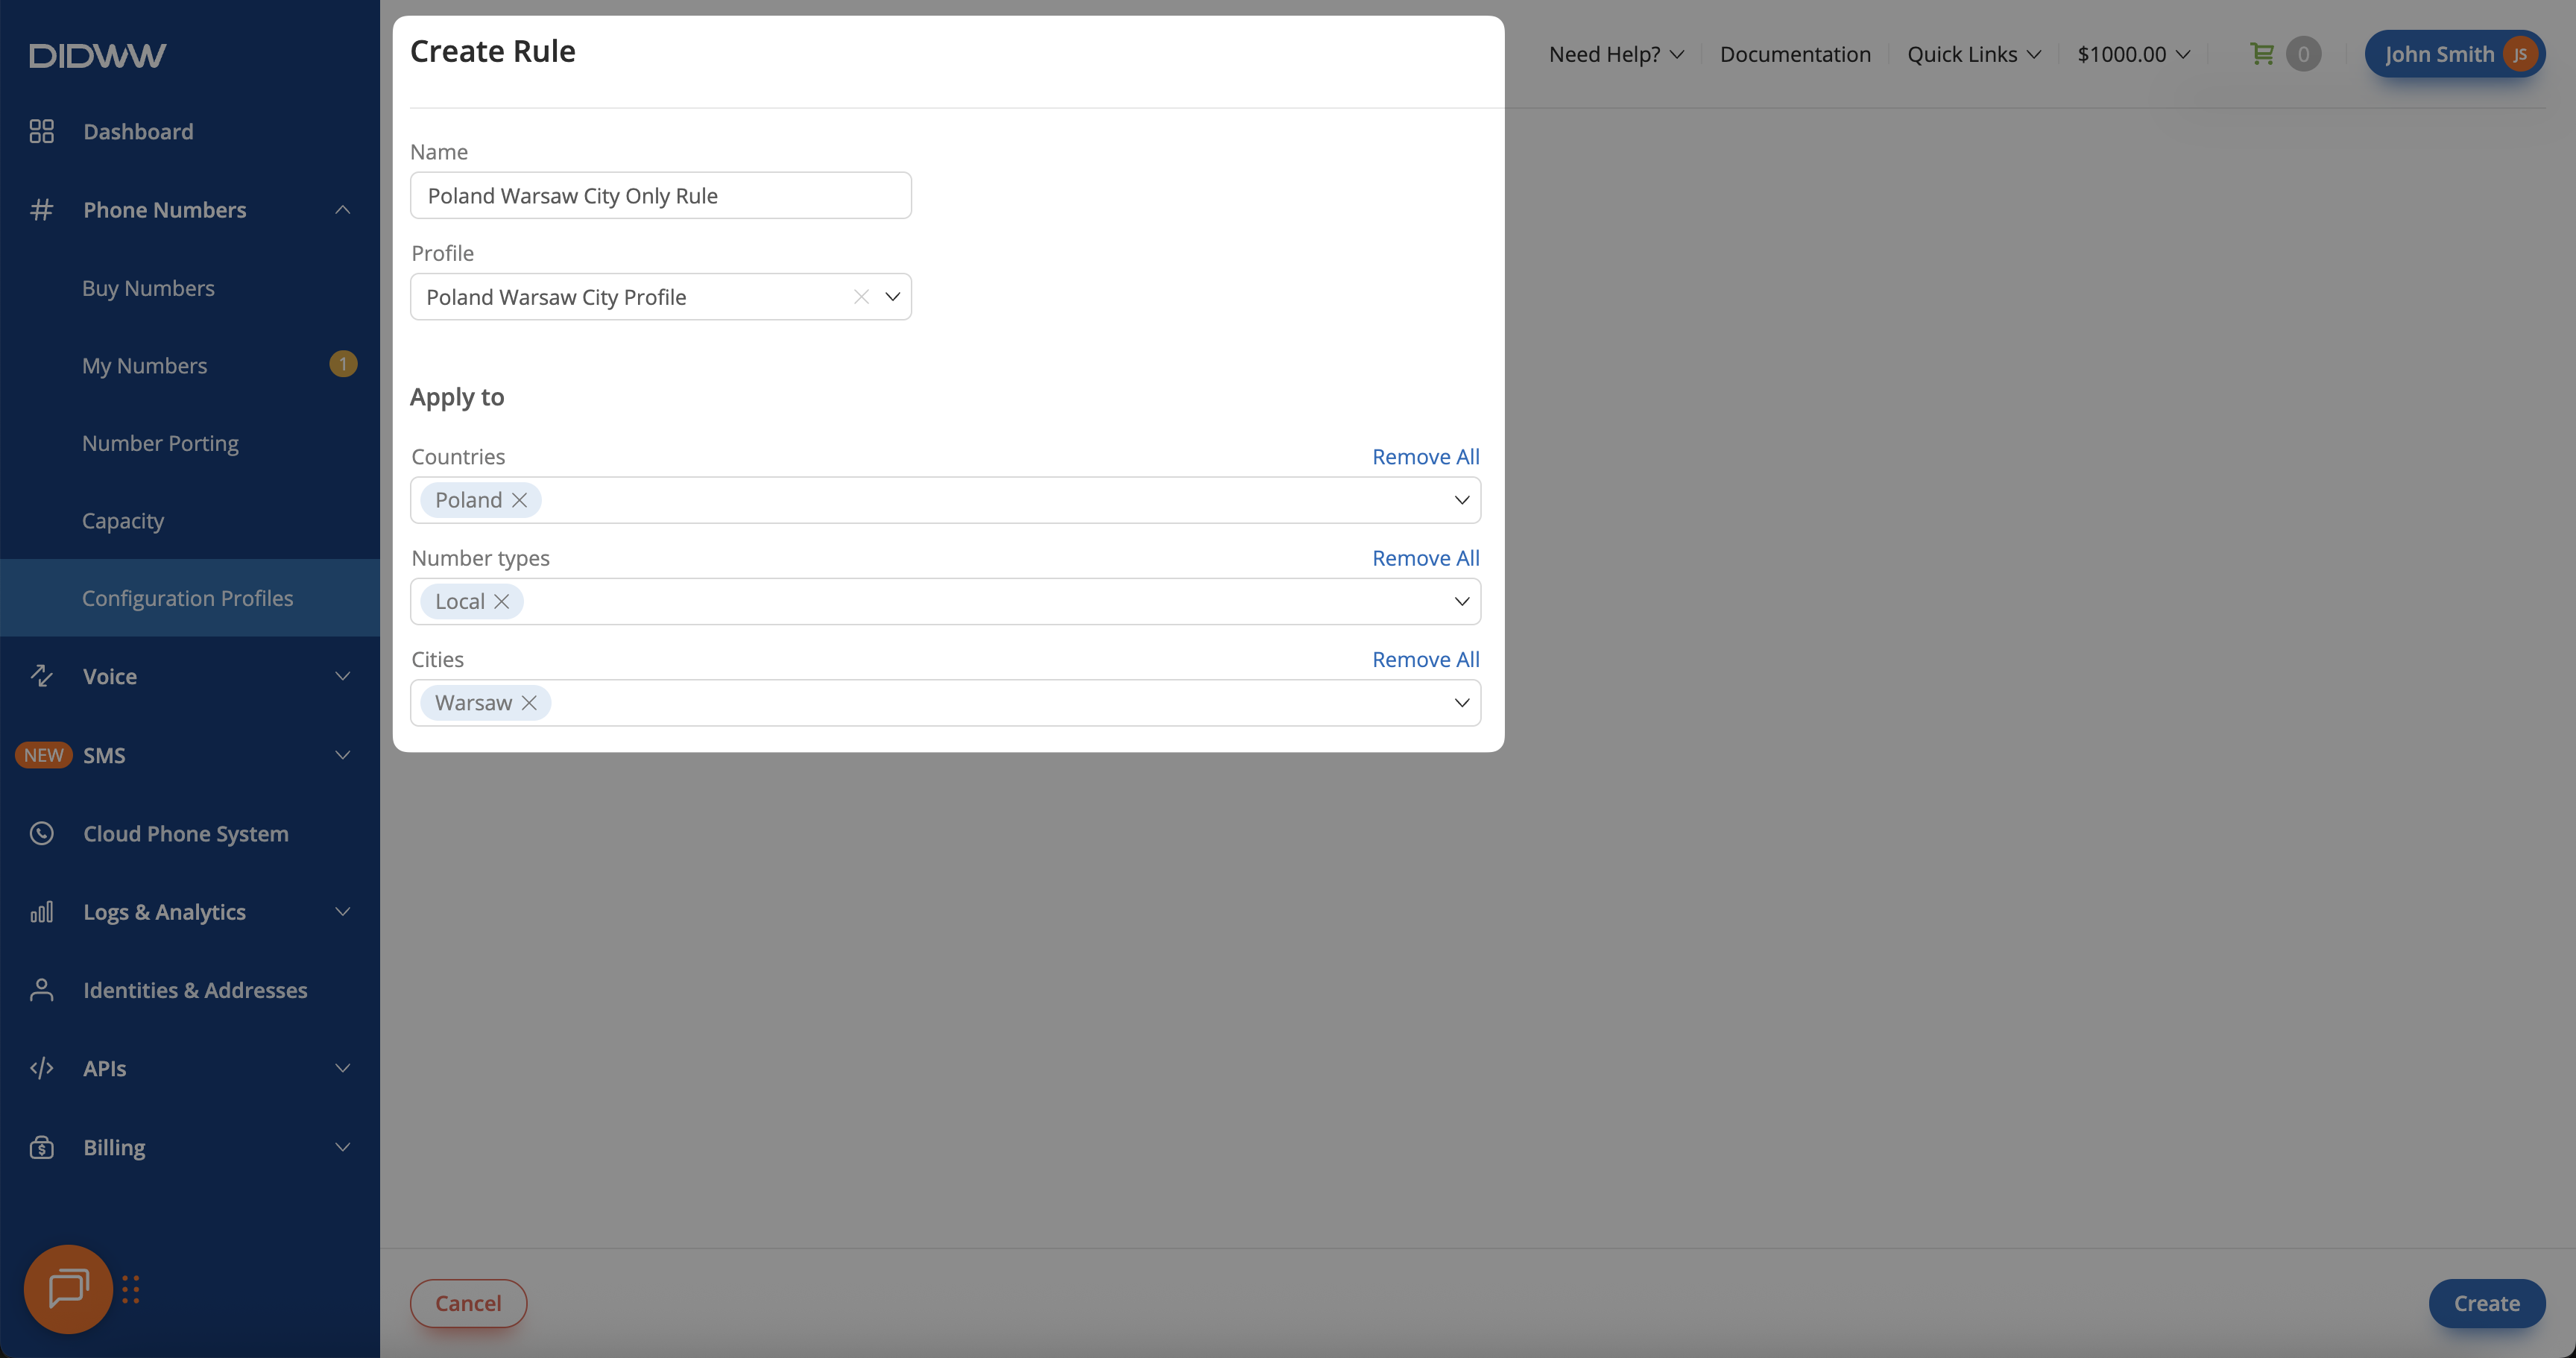
Fig. 14. Poland Warsaw City Rule#
Additional Resources#
Learn how to create and manage the configuration profiles used in these examples.
Get a detailed breakdown of how to create, manage rules and how the priority system works.