Trunk Groups#
Trunk Groups allow you to group multiple inbound trunks together for easier management and routing. By using Trunk Groups, you can configure call routing more efficiently, distribute traffic across trunks, and set up reliable failover for incoming calls.

Fig. 1. Inbound Trunks#
Create Trunk Group#
To create a Trunk Group, click the Create New button and select Trunk Group.
Fig. 1. Creating a new Trunk Group.#
The Create Trunk Group page will open. Enter the following details:
Enter a Friendly Name: Enter a descriptive name for the Trunk Group. This name will be displayed in the Inbound Trunks list and should help you identify the group easily.
Set a Capacity Limit: Specify the maximum number of simultaneous calls the Trunk Group can handle. The default setting is Unlimited.
Tip
If you do not need to impose restrictions on the number of calls, leave the capacity limit set to Unlimited. Otherwise, use this field to manage resources.
Select Trunks: Use the dropdown menu to select one or more inbound trunks to include in the group. Each selected trunk will appear as a tag below the dropdown.
Assign the Trunk Group to All DIDs (Optional): If you want this Trunk Group to be automatically linked to all your DID numbers, enable the Assign Trunk to All DIDs toggle.
Warning
Enabling this setting will override any existing trunk assignments for all DIDs. Be sure this change aligns with your routing configuration before proceeding.
After completing the configuration, click the Create button to save the Trunk Group.

Fig. 2. Creating a new Trunk Group.#
Edit Trunk Group#
To edit an existing Trunk Group, locate the Trunk Group in the list and click the
 button. From the dropdown menu and select Edit.
Fig 1. Actions Button.#
On the Edit Trunk Group page, make the necessary changes to the group’s properties, such as updating its name, capacity limit, or the list of trunks. When you have finished making your changes, click the Submit button to save them.
Fig 2. Editing a Trunk Group.#
Manage Priorities and Weight#
The Priority and Weight settings control how calls are routed within a Trunk Group or across multiple trunks.
Priority#
The Priority setting determines the order in which trunks are used for routing calls. Trunks with lower priority numbers are used first. This setting is useful for failover scenarios, ensuring backup trunks are only used when higher-priority trunks are unavailable.
Weight#
The Weight setting distributes call traffic among trunks with the same priority. Trunks with higher weights handle a greater share of calls, enabling effective load balancing.
Adjust Priorities and Weights#
To modify the Priority or Weight settings:
Locate the Trunk Group you want to configure.
Click the
 icon to expand and display the trunks in the group.
Update the values in the Priority and Weight columns as needed.
Figure 1. Adjusting Priority and Weight.#
Changes to Priority and Weight are applied immediately after selection.
Note
Use Priority to define the order in which trunks are used, and Weight to balance call traffic among trunks with the same priority.
Delete Trunk Group#
To delete an existing Trunk Group, locate the Trunk Group in the list and click the
button. From the dropdown menu and select Delete.
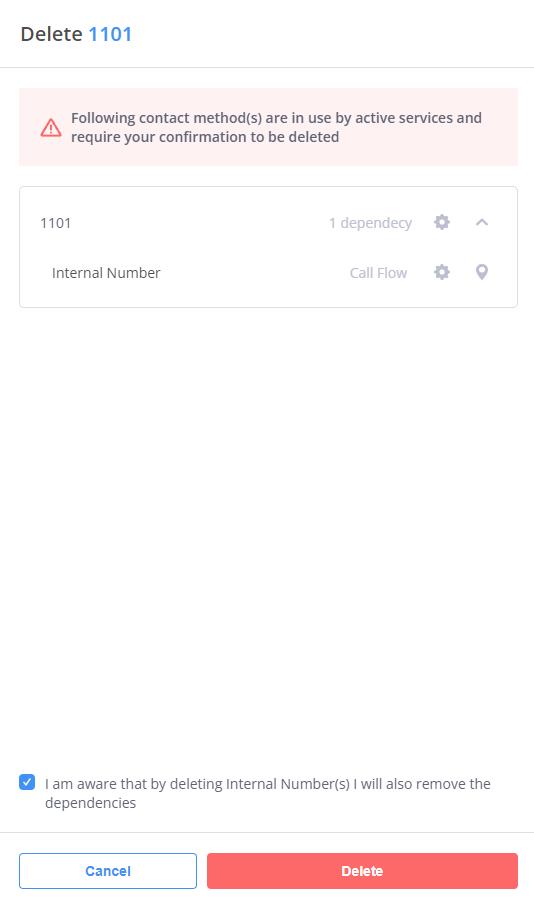
Fig. 1 Actions Button.#
When the confirmation dialog appears, choose one of the following options:
Delete Trunk Group only This option will remove the Trunk Group while keeping its associated trunks intact.
Delete Trunk Group and Trunks This option will delete both the Trunk Group and all the trunks that are part of it.
Warning
If the Trunk Group is currently assigned to any DID numbers, you will need to unassign it before you can delete the group.
After selecting one of the options, click the Delete button to confirm.
Fig. 2 Deleting a Trunk Group.#
Additional Information#
Understand how to configure DID numbers with trunks and trunk groups for routing inbound calls.
Create and configure SIP trunks for inbound calls, set transport protocols, authentication, media options, and more.
Access general SIP information, including supported IP addresses, RTP ports, encryption options, codecs, and DTMF transport methods.