Genesys Cloud CX#
Use Genesys Cloud CX with DIDWW SIP Trunking to deliver inbound and outbound voice services. DIDWW SIP trunks integrate with Genesys Cloud CX to bring calls from your DID numbers into the platform, apply Genesys routing and call handling, and deliver outbound calls through DIDWW termination.
Forward inbound calls from your DIDWW DIDs into Genesys Cloud CX.
Route calls to queues, IVRs, and agents using Genesys Cloud CX.
Apply Genesys routing and call controls.
Use DIDWW outbound SIP trunks for agent and customer calls.
Present DIDWW DIDs as Caller ID.
Combine DIDWW connectivity with Genesys Number Plans and Sites.
1. Create Inbound SIP Trunk#
To connect DIDWW with Genesys Cloud CX, first create an Inbound SIP Trunk in the DIDWW User Panel. This trunk defines where DIDWW should send incoming calls.
Before You Begin#
An active DIDWW account is required. Sign in to DIDWW or Create DIDWW account .
At least one active DID number with capacity to receive incoming calls is required. Buy Numbers .
Step 1: Create New SIP Trunk#
In the DIDWW User Panel , go to Voice > Inbound Trunks.
Click Create New > SIP Trunk.
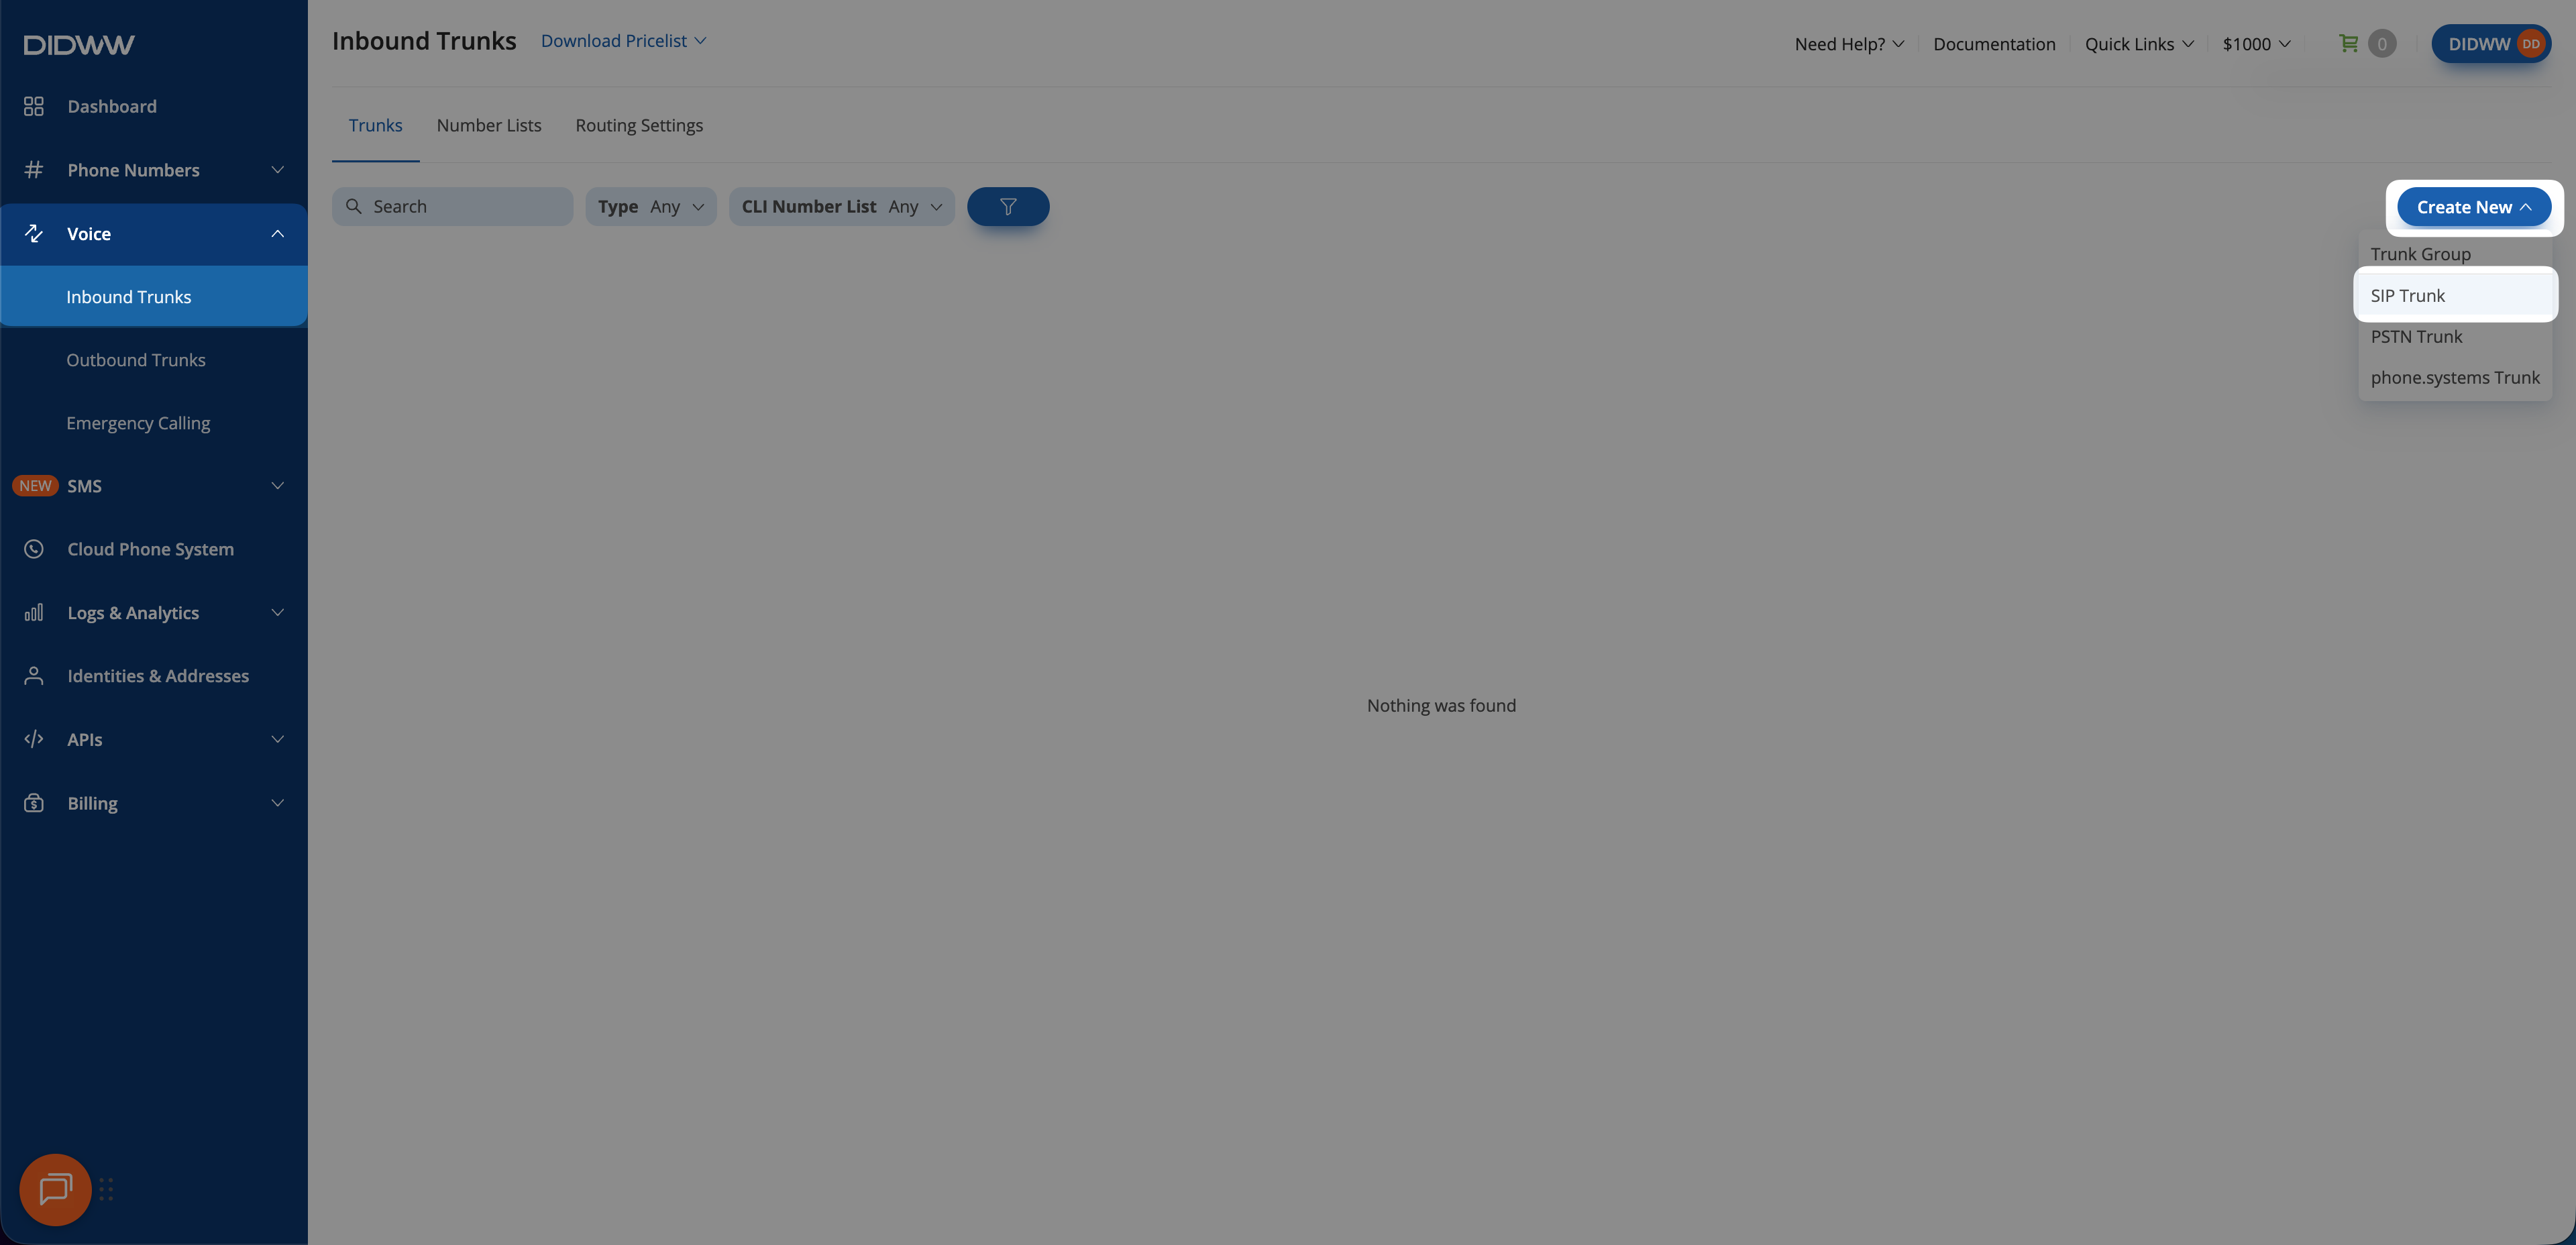
Fig. 1. Creating a new inbound SIP trunk.#
Step 2: Configure SIP Trunk Settings#
Enter a descriptive Friendly Name (e.g.,
Genesys Cloud CX).Enter the Genesys inbound FQDN in the Host field (e.g.,
didww.byoc.euw1.pure.cloud).Select the Transport Protocol and Port:
5060for UDP/TCP5061for TLS
Click Create.
Note
The Genesys inbound FQDN is created once you define the Termination Identifier in your Genesys External Trunk configuration.
If you have not created the Genesys External Trunk yet, enter a placeholder (e.g.,
placeholder.domain) and update it later during the Genesys External Trunk Configuration step.
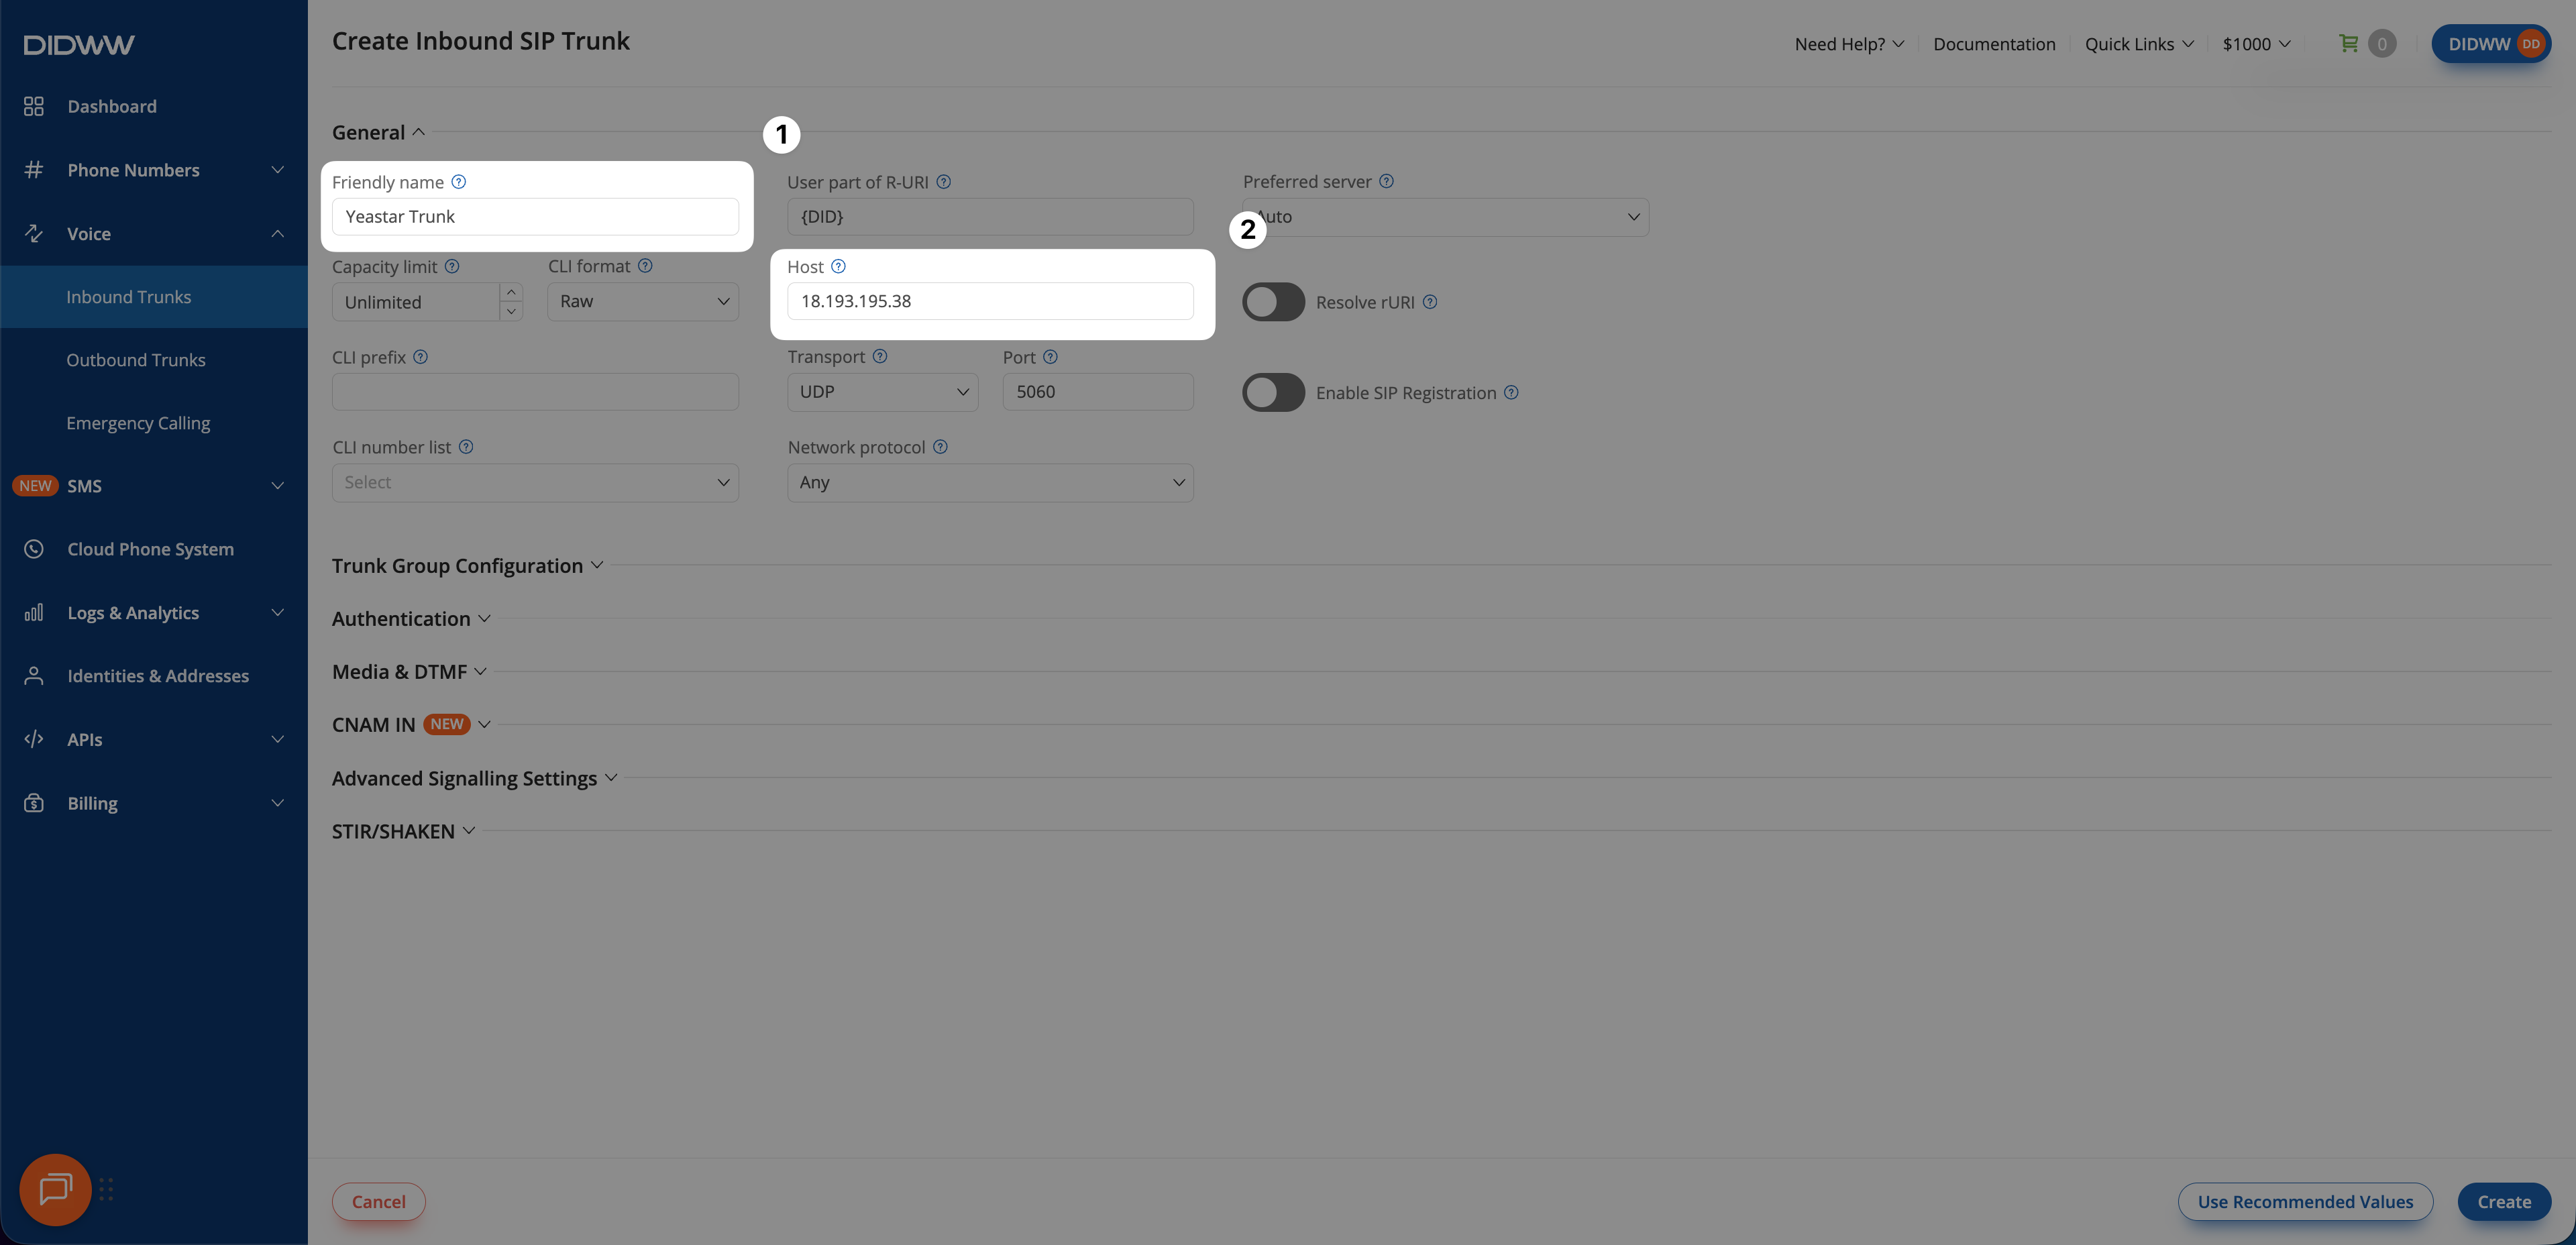
Fig. 2. Configuring the Inbound SIP Trunk for Genesys Cloud CX#
Step 3: Assign DIDs to the Trunk#
Go to Phone Numbers > My Numbers.
Select the DID numbers you wish to assign.
Click Batch Actions > Update Trunks.
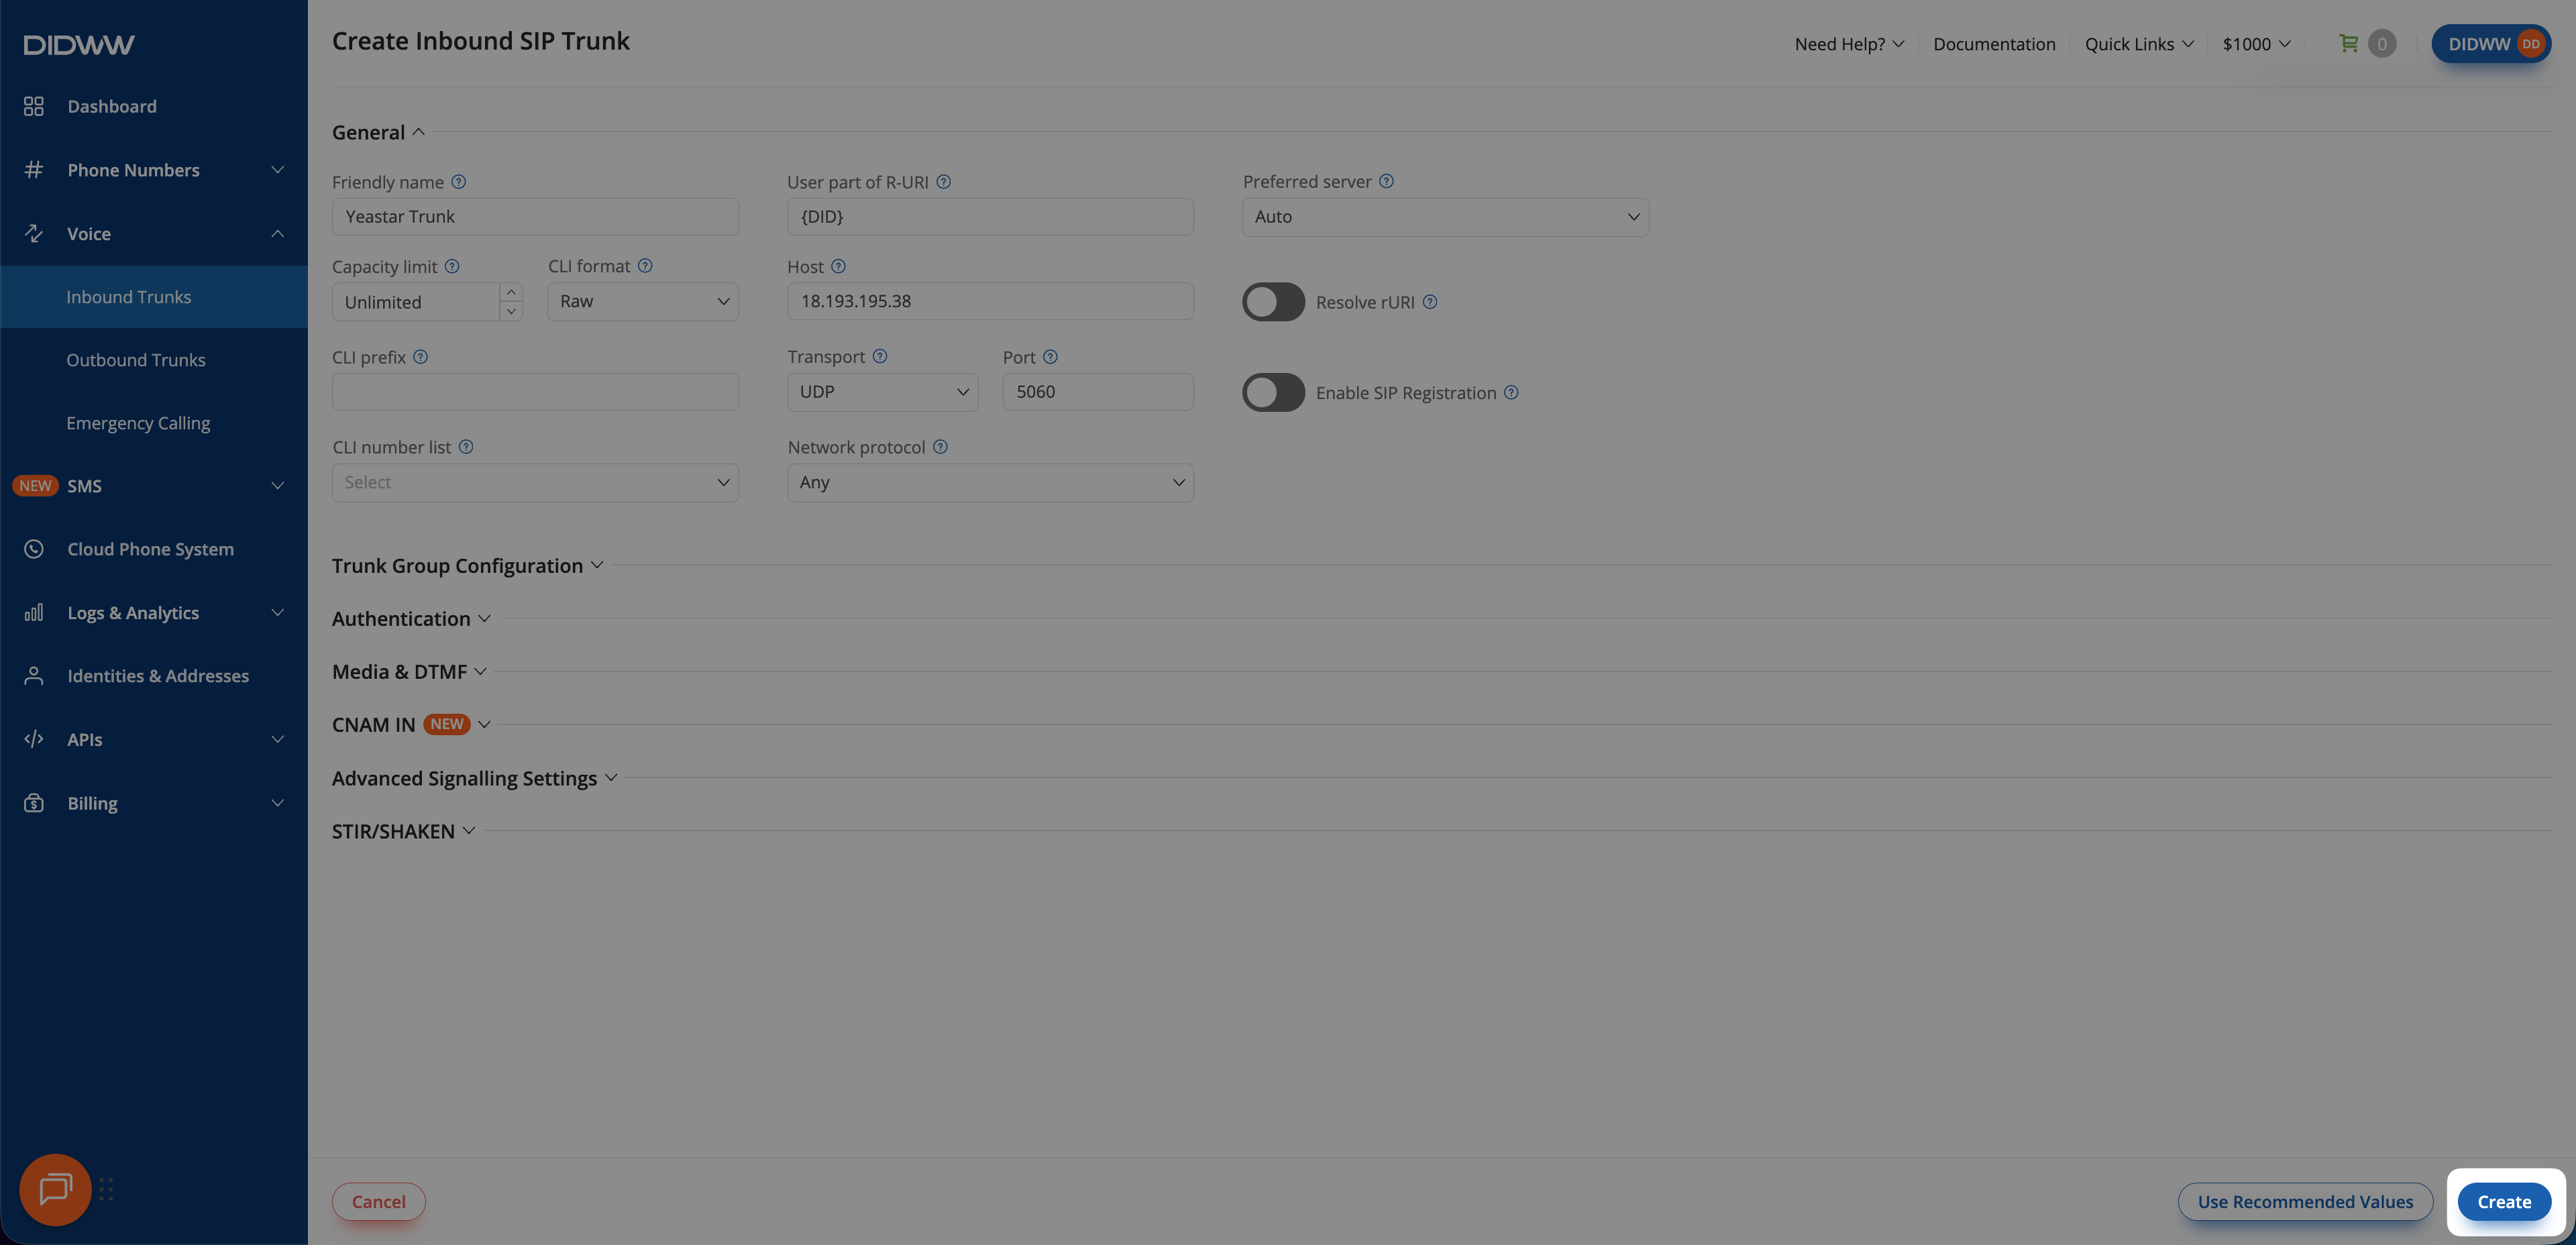
Fig. 3. Assigning DIDs to the trunk.#
Select the Genesys Cloud CX trunk and click Confirm.

Fig. 4. Selecting the Genesys trunk.#
2. Create Outbound SIP Trunk#
To enable outbound calling from Genesys Cloud CX, create an Outbound SIP Trunk in DIDWW.
Before You Begin#
Access to DIDWW Outbound Trunks is required for outbound calling. See Get Access to DIDWW Outbound Termination.
Step 1: Create New Outbound Trunk#
In the DIDWW User Panel, go to Voice > Outbound Trunks.
Click Create New.
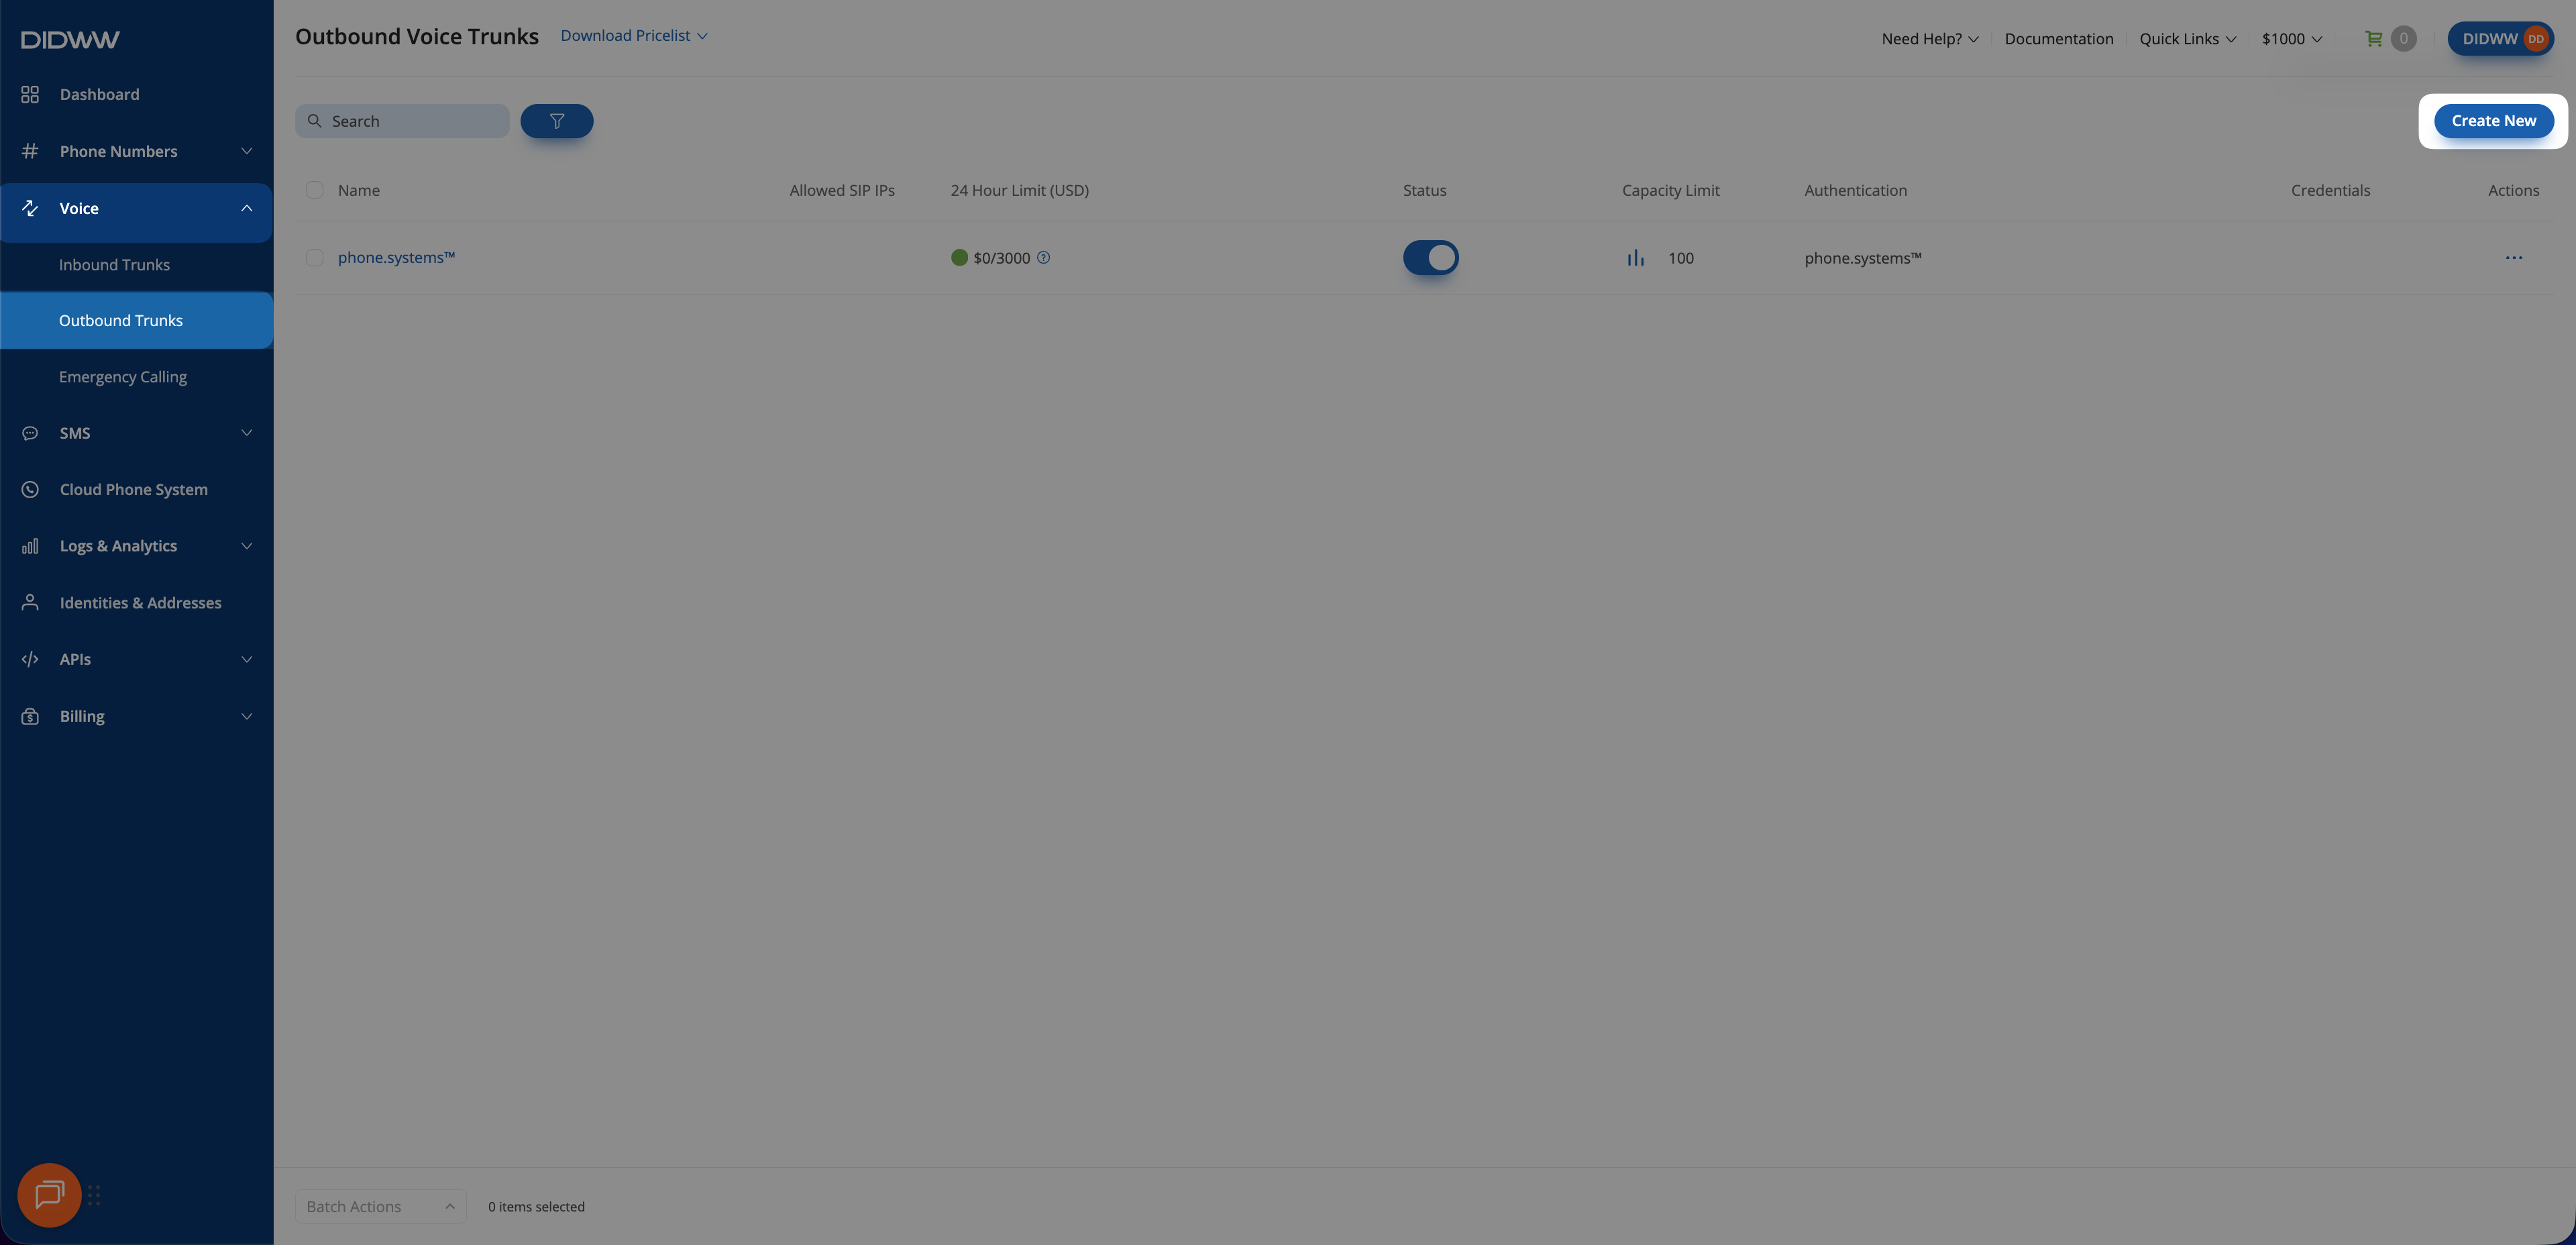
Fig. 5. Creating a new outbound trunk.#
Step 2: Configure Trunk Settings#
Enter a Friendly Name (e.g.,
Genesys Outbound).In Allowed SIP IP addresses, add the Genesys BYOC Cloud IPs for your region.
Click Create.
Note
Identify your region code from your Genesys login URL (e.g.,
.ieindicates euw1) and whitelist the IP Addresses listed in the table for that region in the Genesys BYOC Cloud IP list .Alternatively, entering
0.0.0.0/0removes IP restrictions but is not recommended for production.
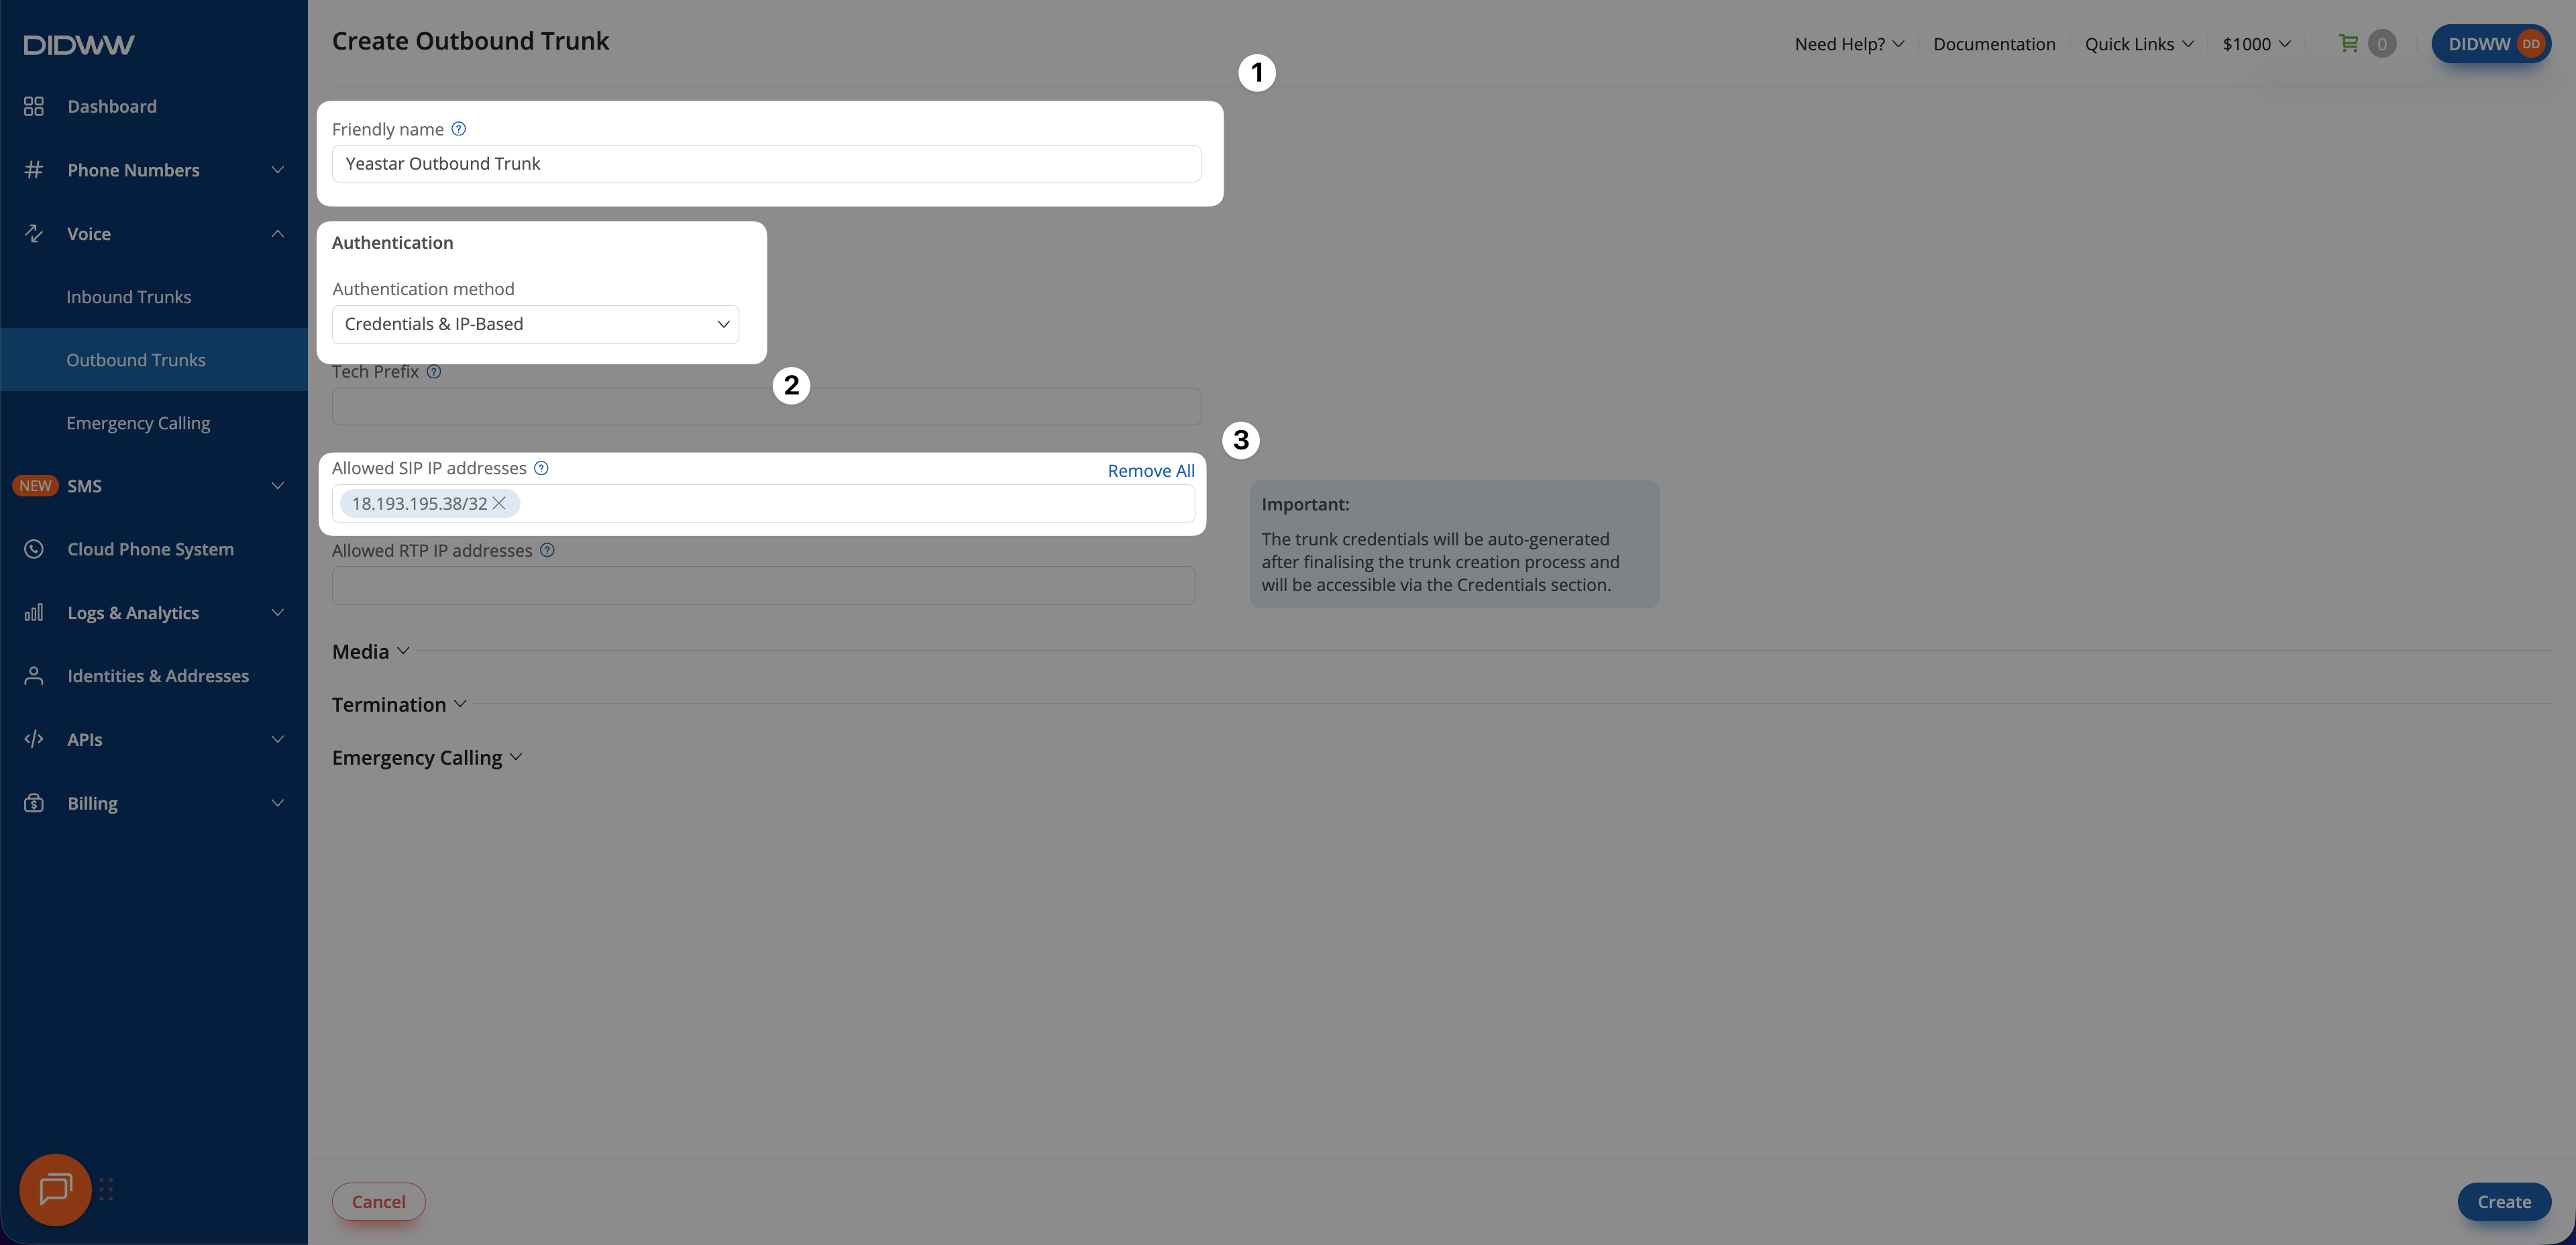
Fig. 6. Outbound trunk configuration.#
Step 3: Retrieve Credentials#
Go to Voice > Outbound Trunks.
Click the key icon in the Credentials column.

Fig. 7. Revealing the credentials.#
Copy and save the Username and Password (click the eye icon to reveal the password) for use in the later Configure Genesys Cloud CX steps.
Warning
If the credentials become exposed to unauthorized parties, rotate them immediately in the DIDWW User Panel.
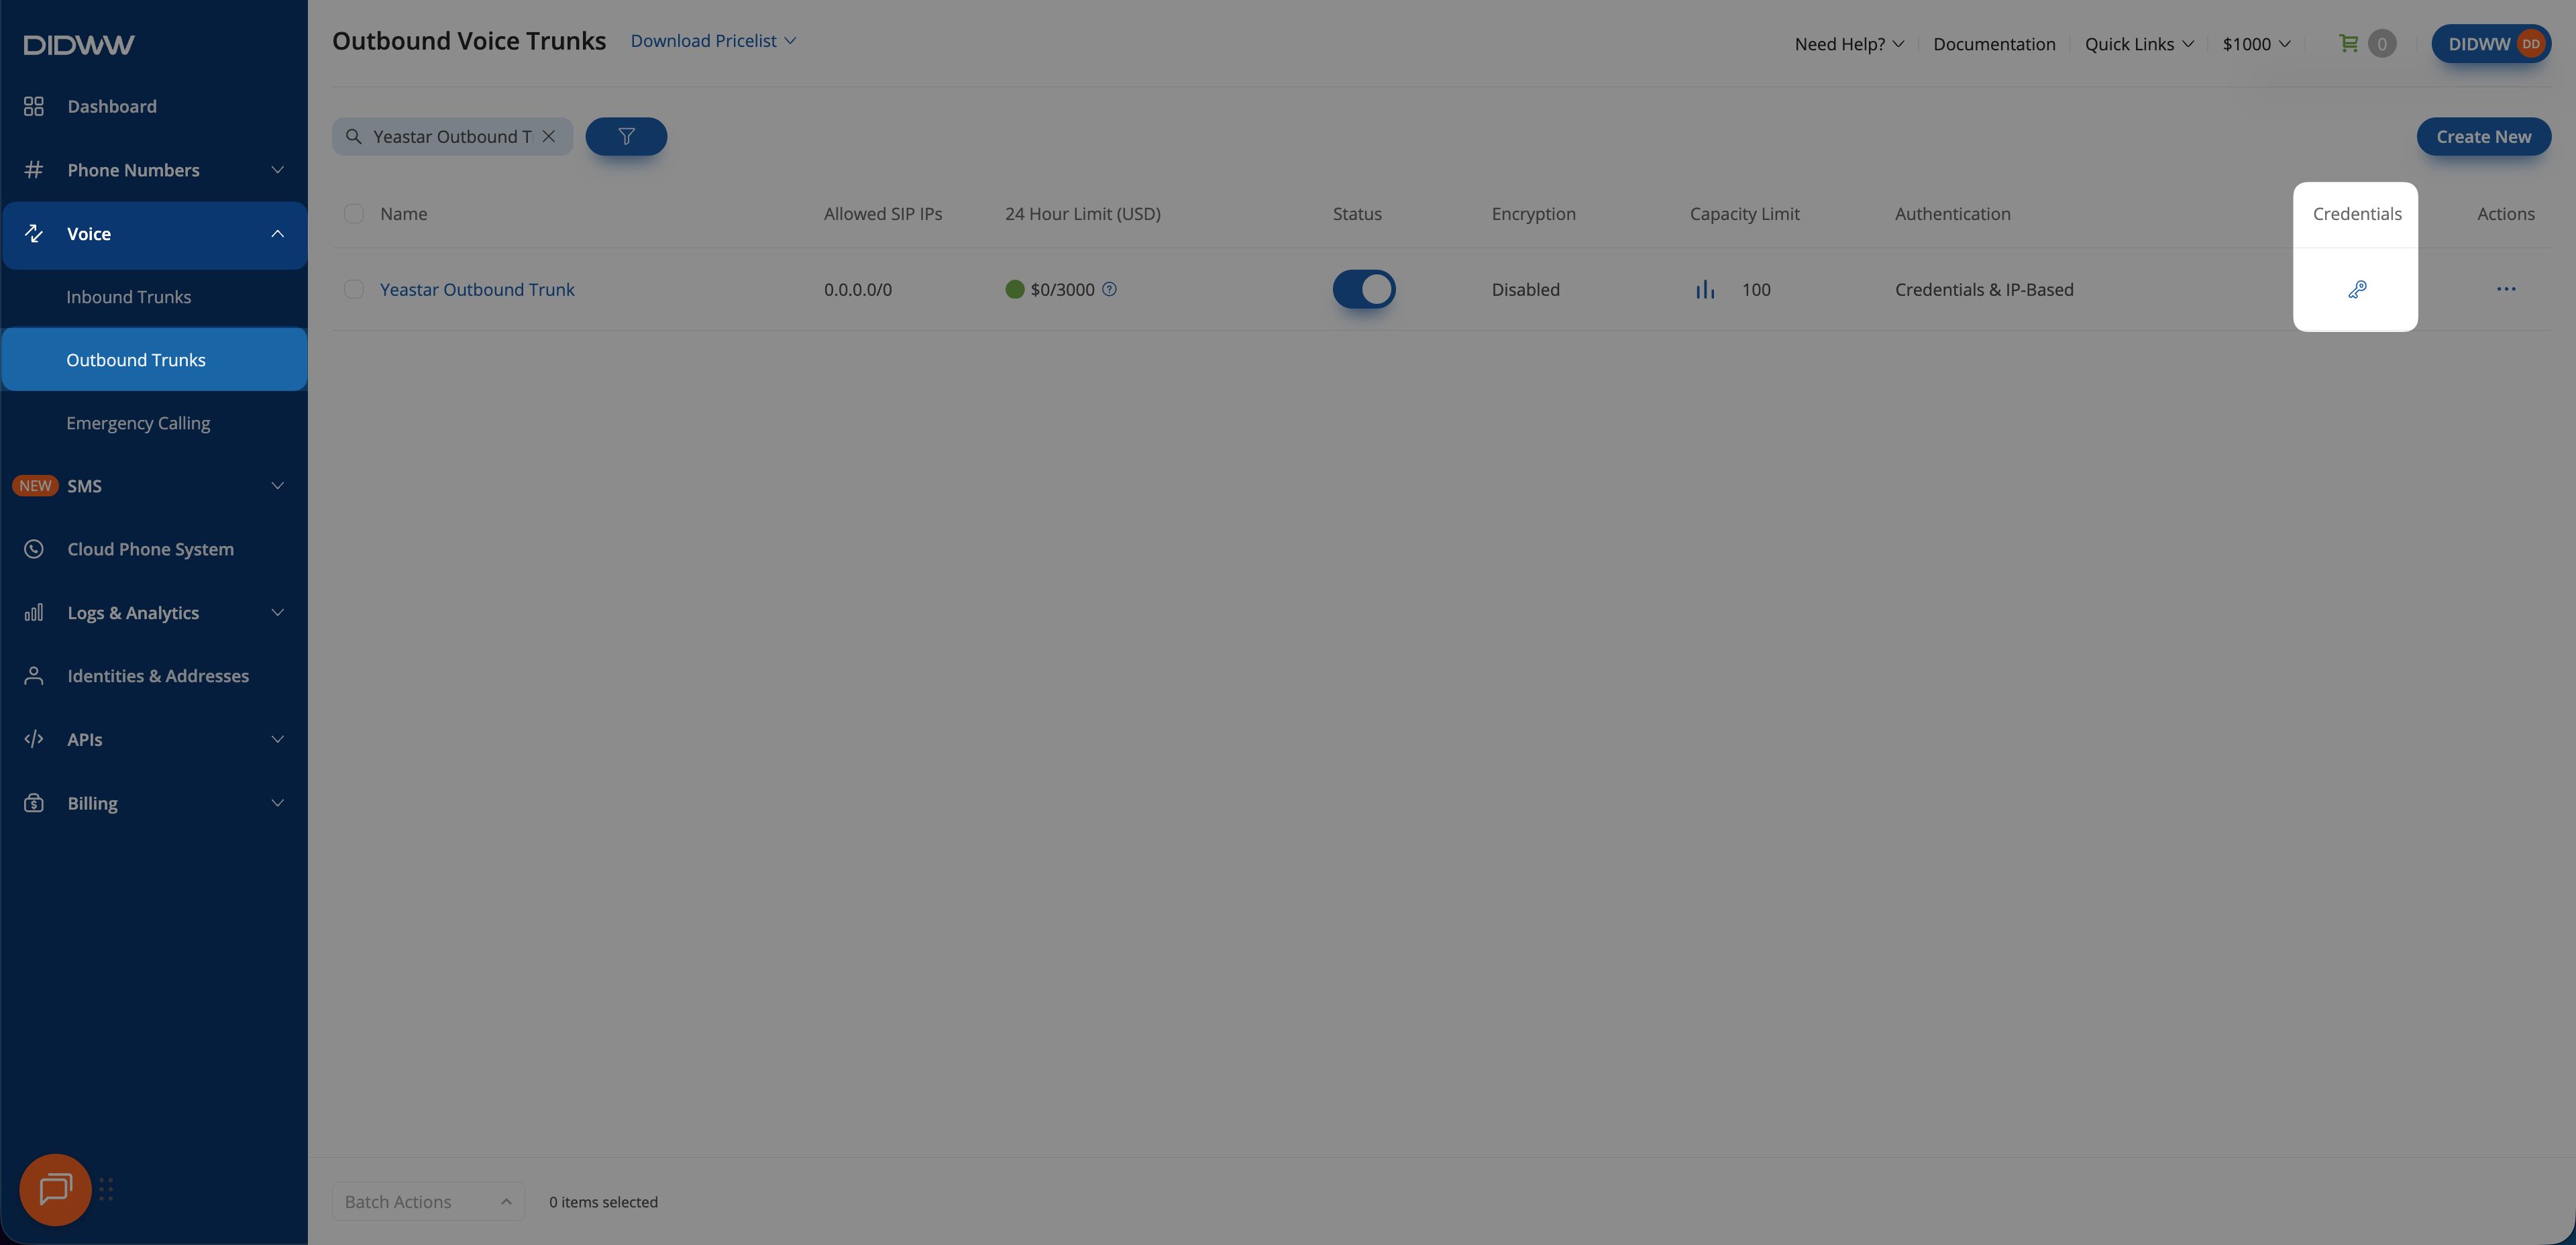
Fig. 8. Retrieving outbound credentials.#
3. Configure Genesys Cloud CX#
This section covers the Genesys Cloud CX configuration:
Create a Site
Create an External Trunk
Configure DID Ranges & Assignments
Before You Begin#
Genesys Cloud CX admin access and BYOC Cloud Addon are required.
A Location must exist before creating a Site.
Step 1: Site Configuration#
A Site in Genesys Cloud CX defines the telephony properties and routing rules for a location. You must create a Site before assigning Trunks to it.
Create a New Site#
Navigate to Digital and Telephony > Telephony > Sites.
Click Add.

Fig. 9. Adding a new Site.#
Enter:
A descriptive Site Name (e.g.,
Headquarters).Your physical Location.
Cloudas the Media Model.Your preferred Time Zone.
Click Create.
Note
The Media Model cannot be changed after creating the site.
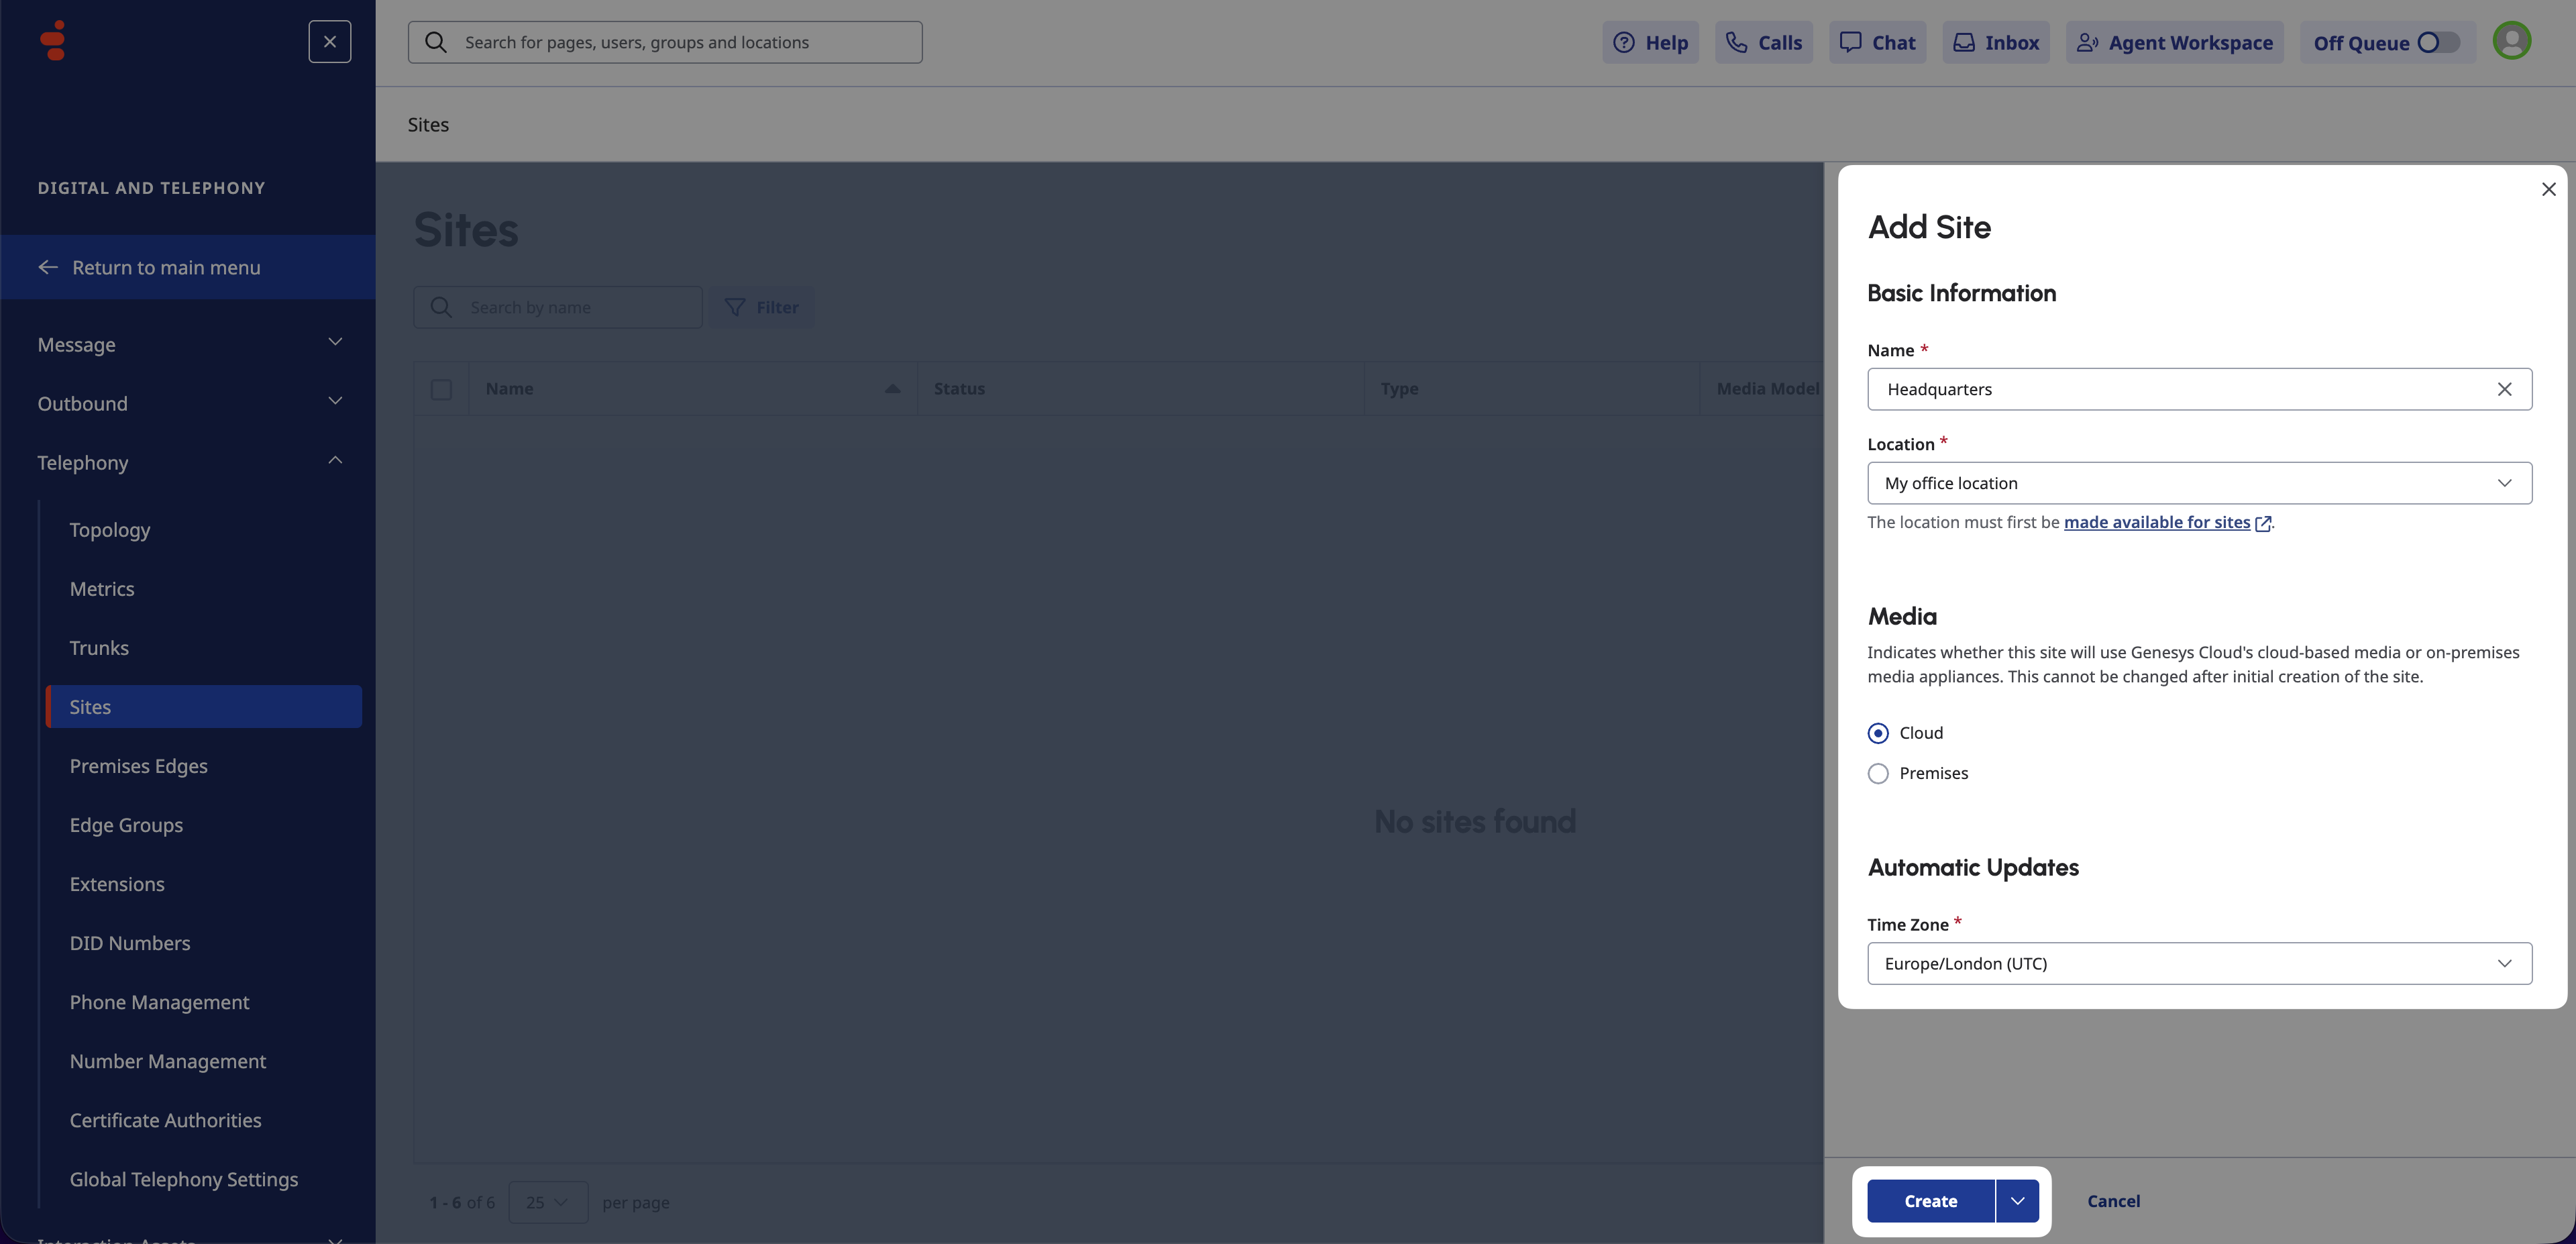
Fig. 10. Creating a new Site.#
Set as Default Site#
Open the General tab.
Click Make this site the default site.
Confirm by clicking Yes, Make Default.
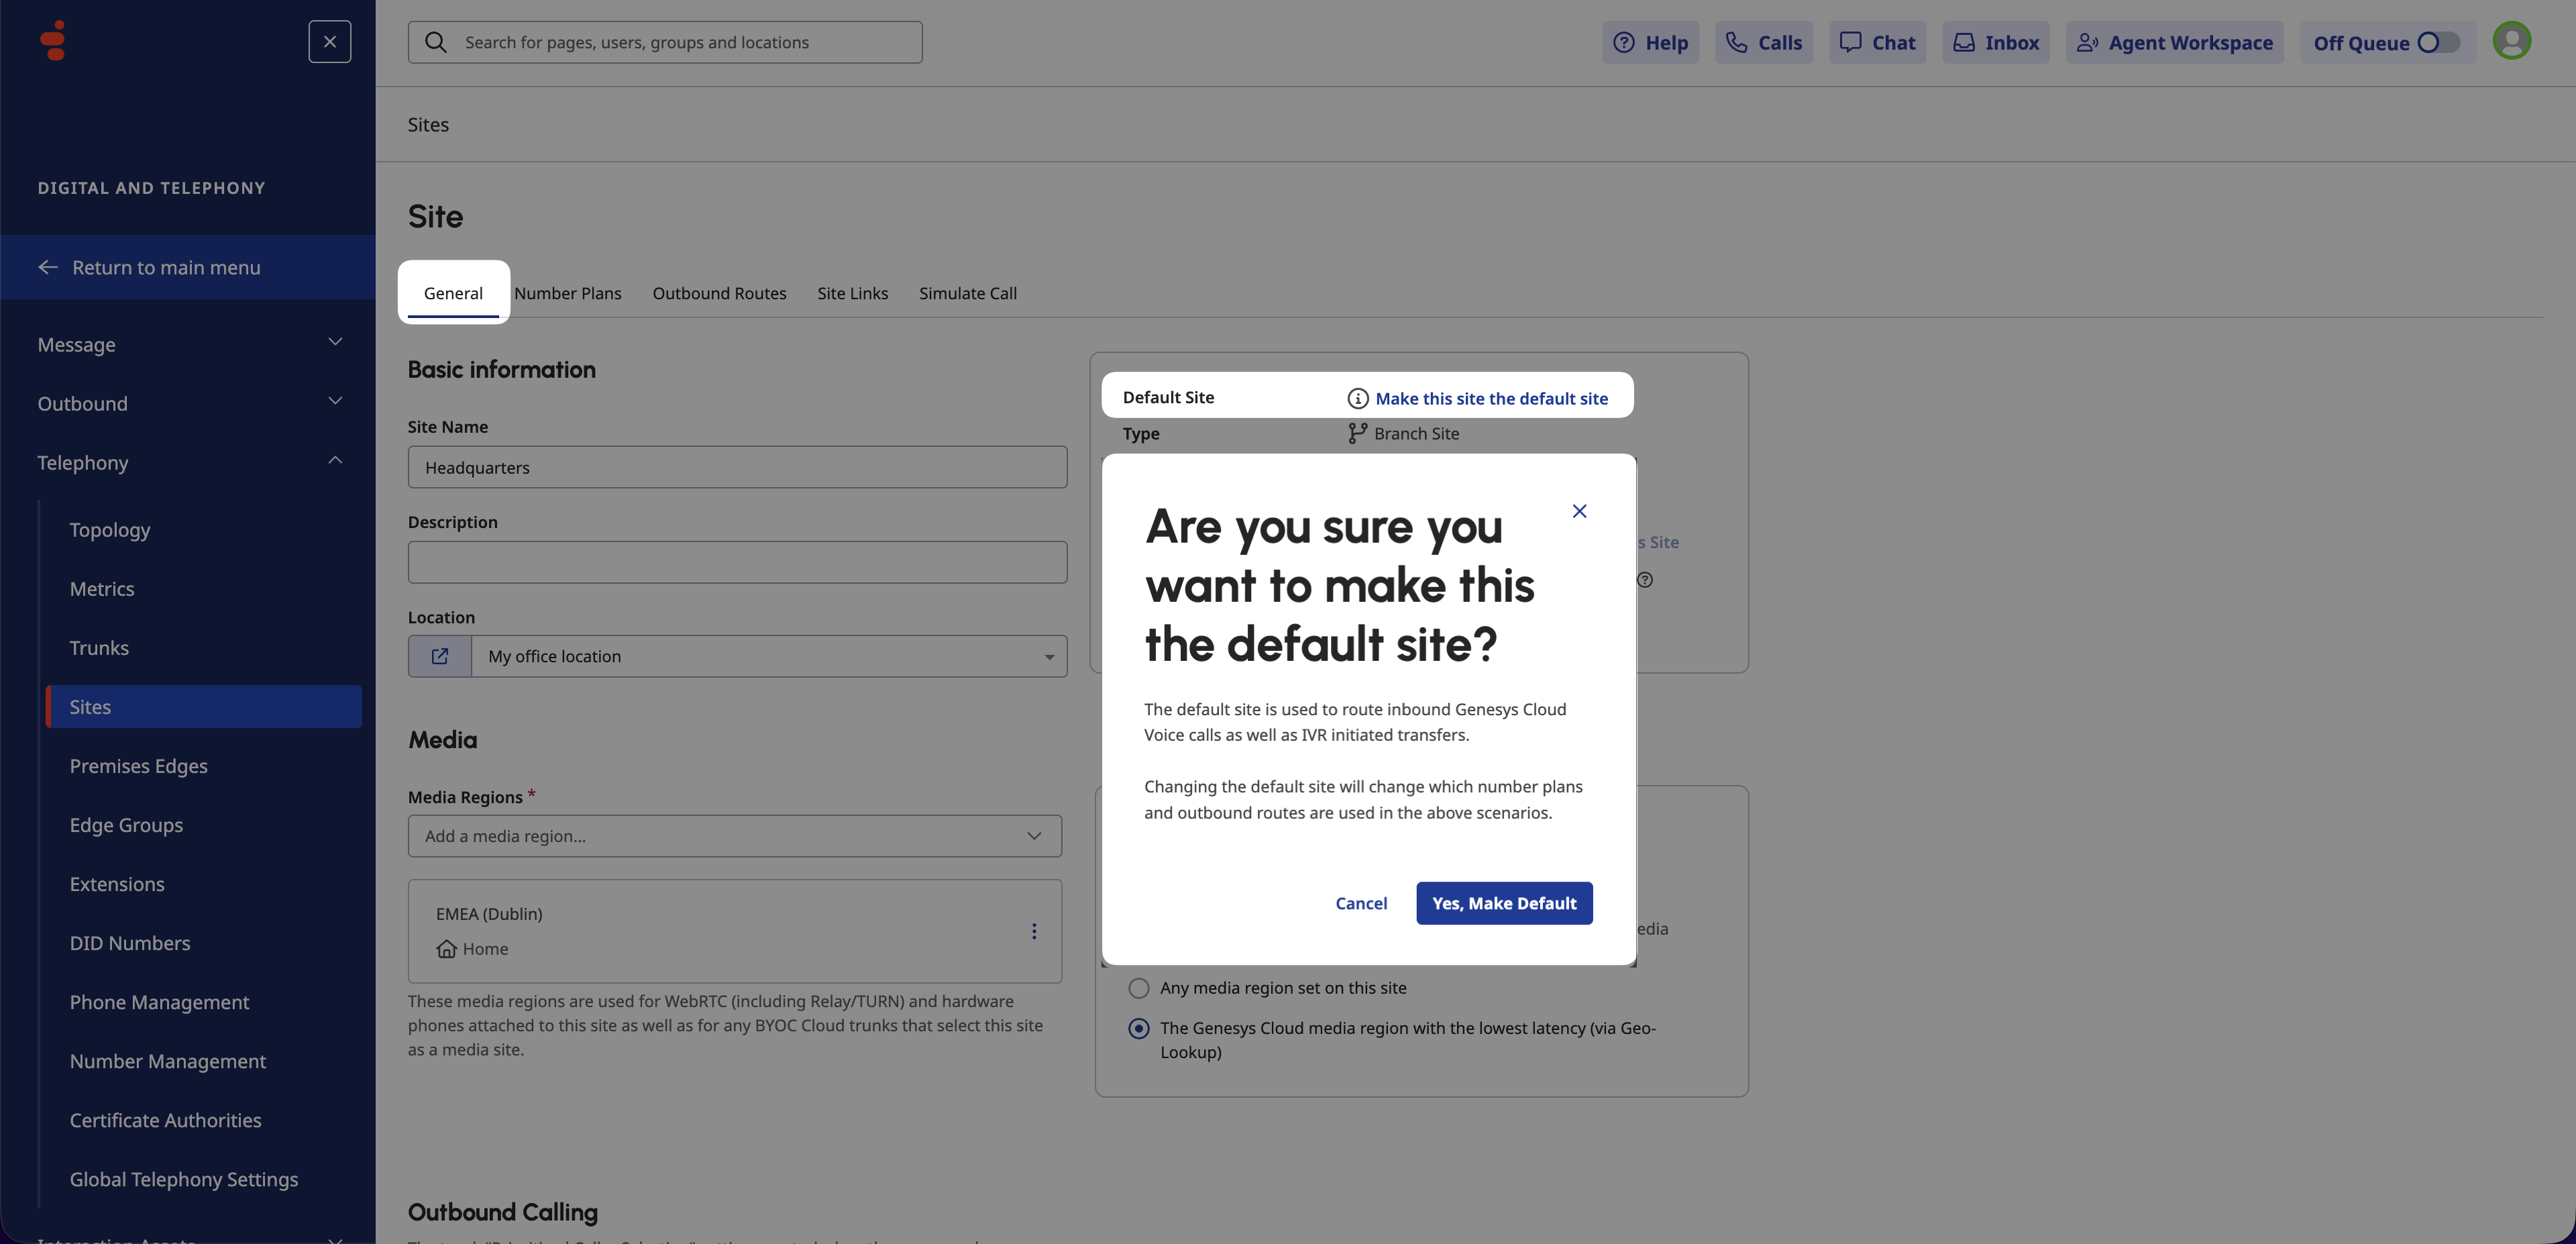
Fig. 11. Setting the default site.#
Step 2: External Trunk Configuration#
In this step, you will configure the SIP connection between Genesys Cloud CX and DIDWW.
Create the External Trunk#
Go to Digital and Telephony > Telephony > Trunks.
Click Create New.
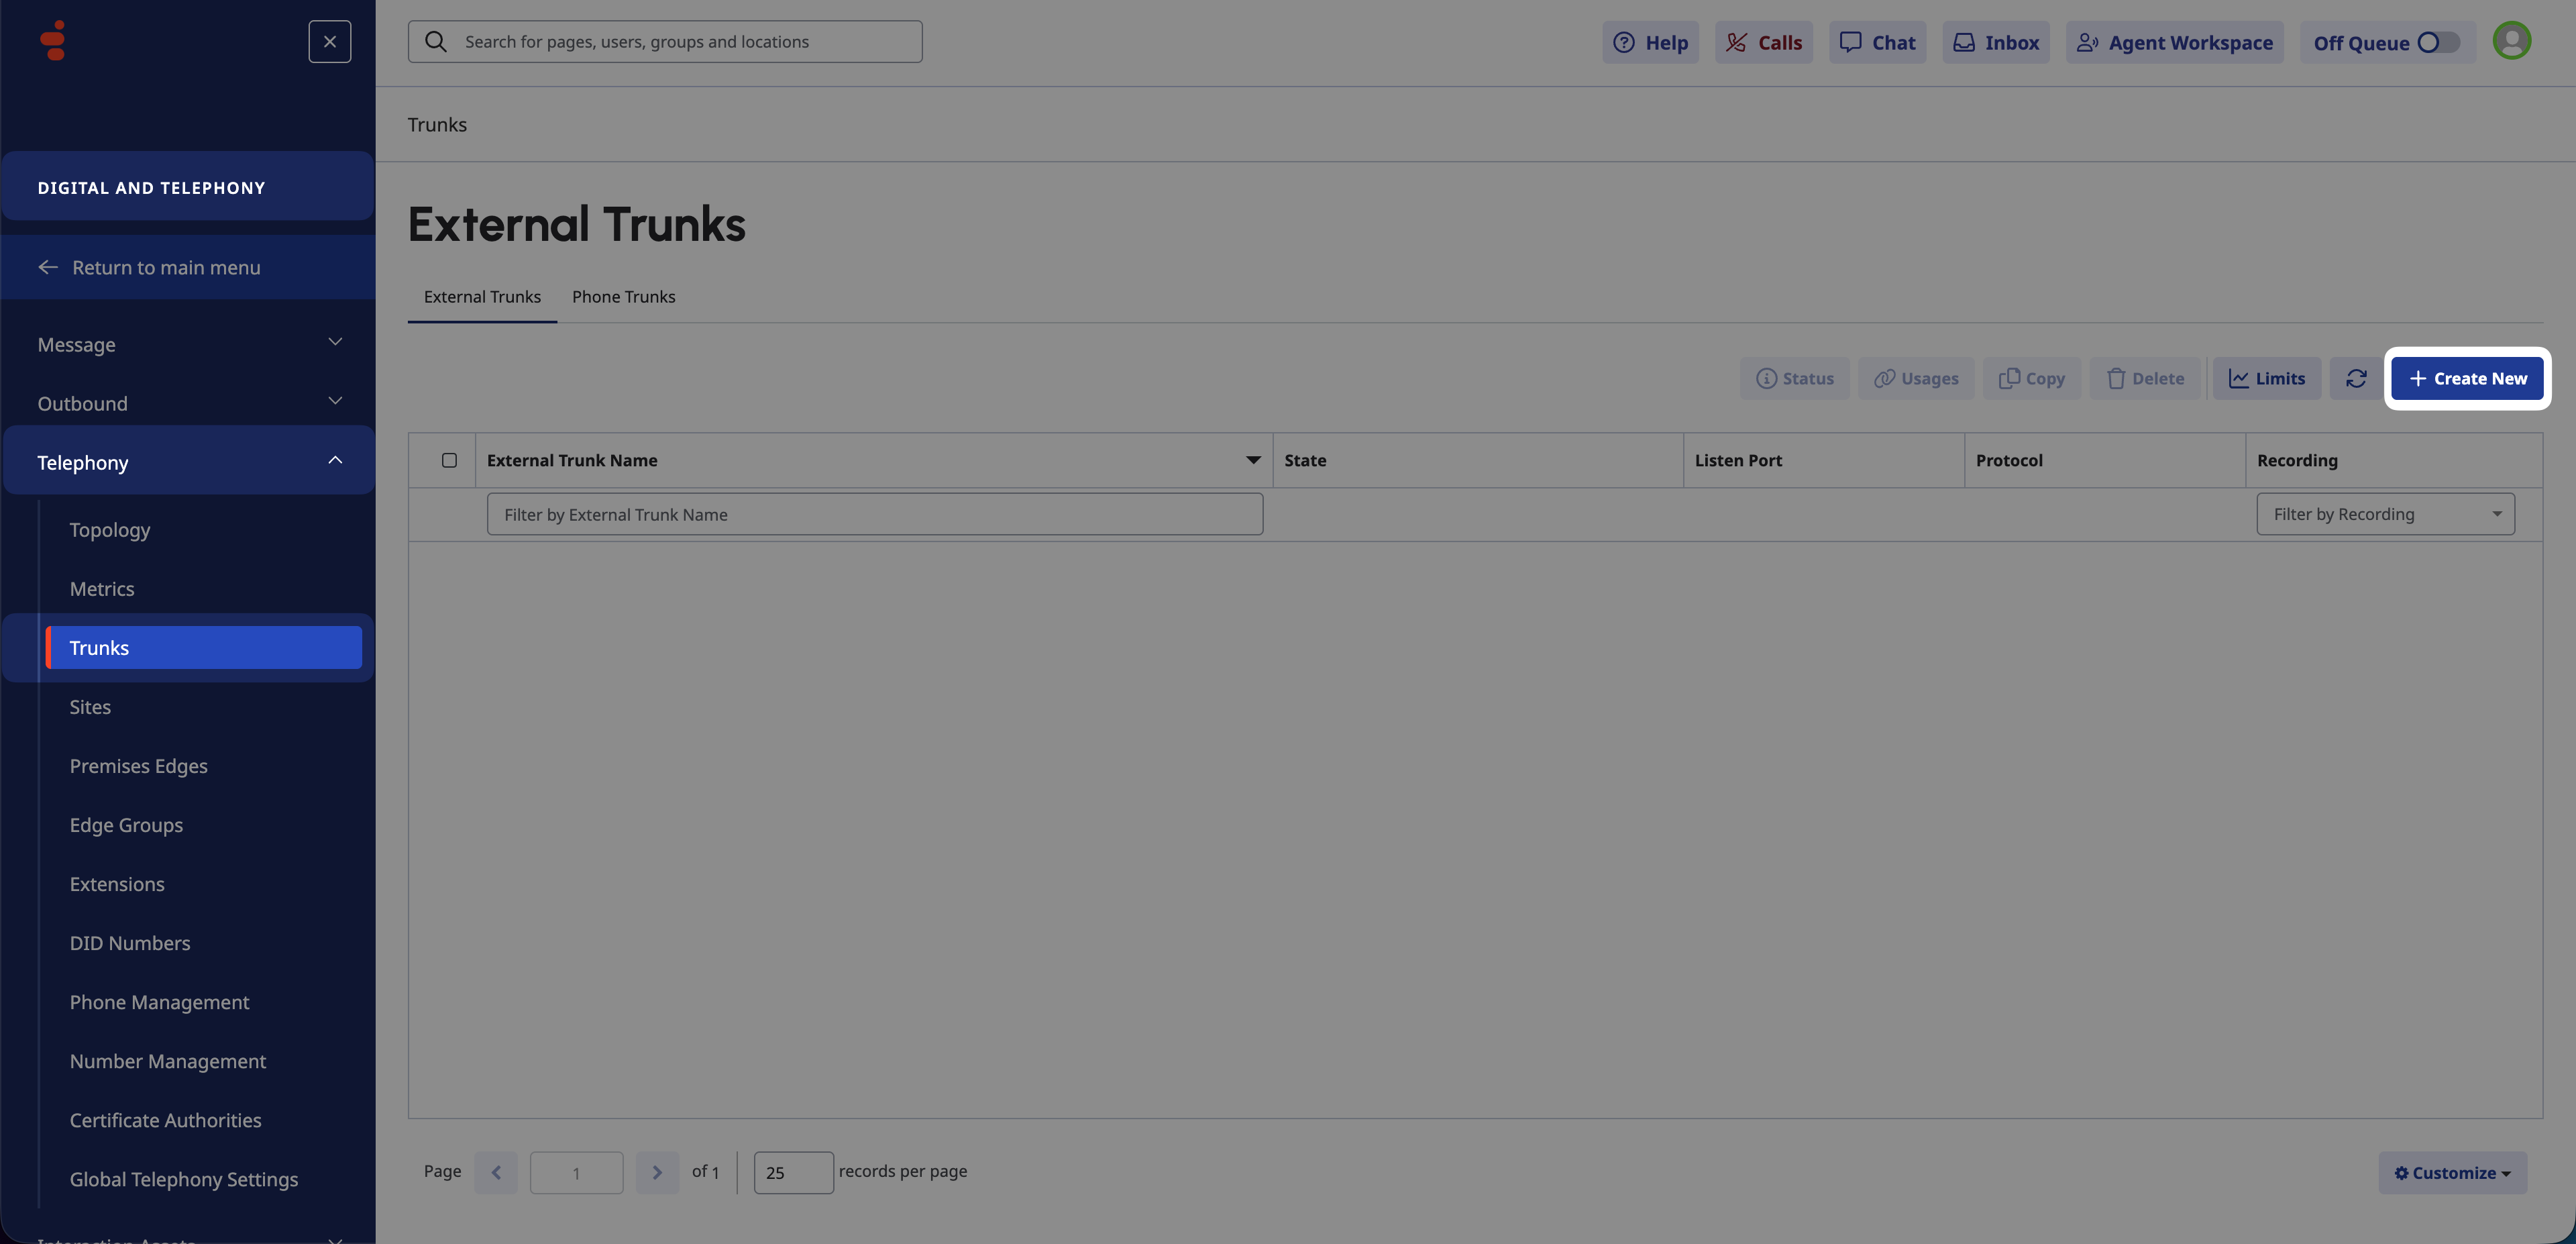
Fig. 12. Creating a new External Trunk.#
Enter:
A descriptive External Trunk Name (e.g.,
DIDWW).BYOC Carrieras the Type.Generic BYOC Carrieras the Subtype.
Select the Protocol (UDP, TCP, or TLS).
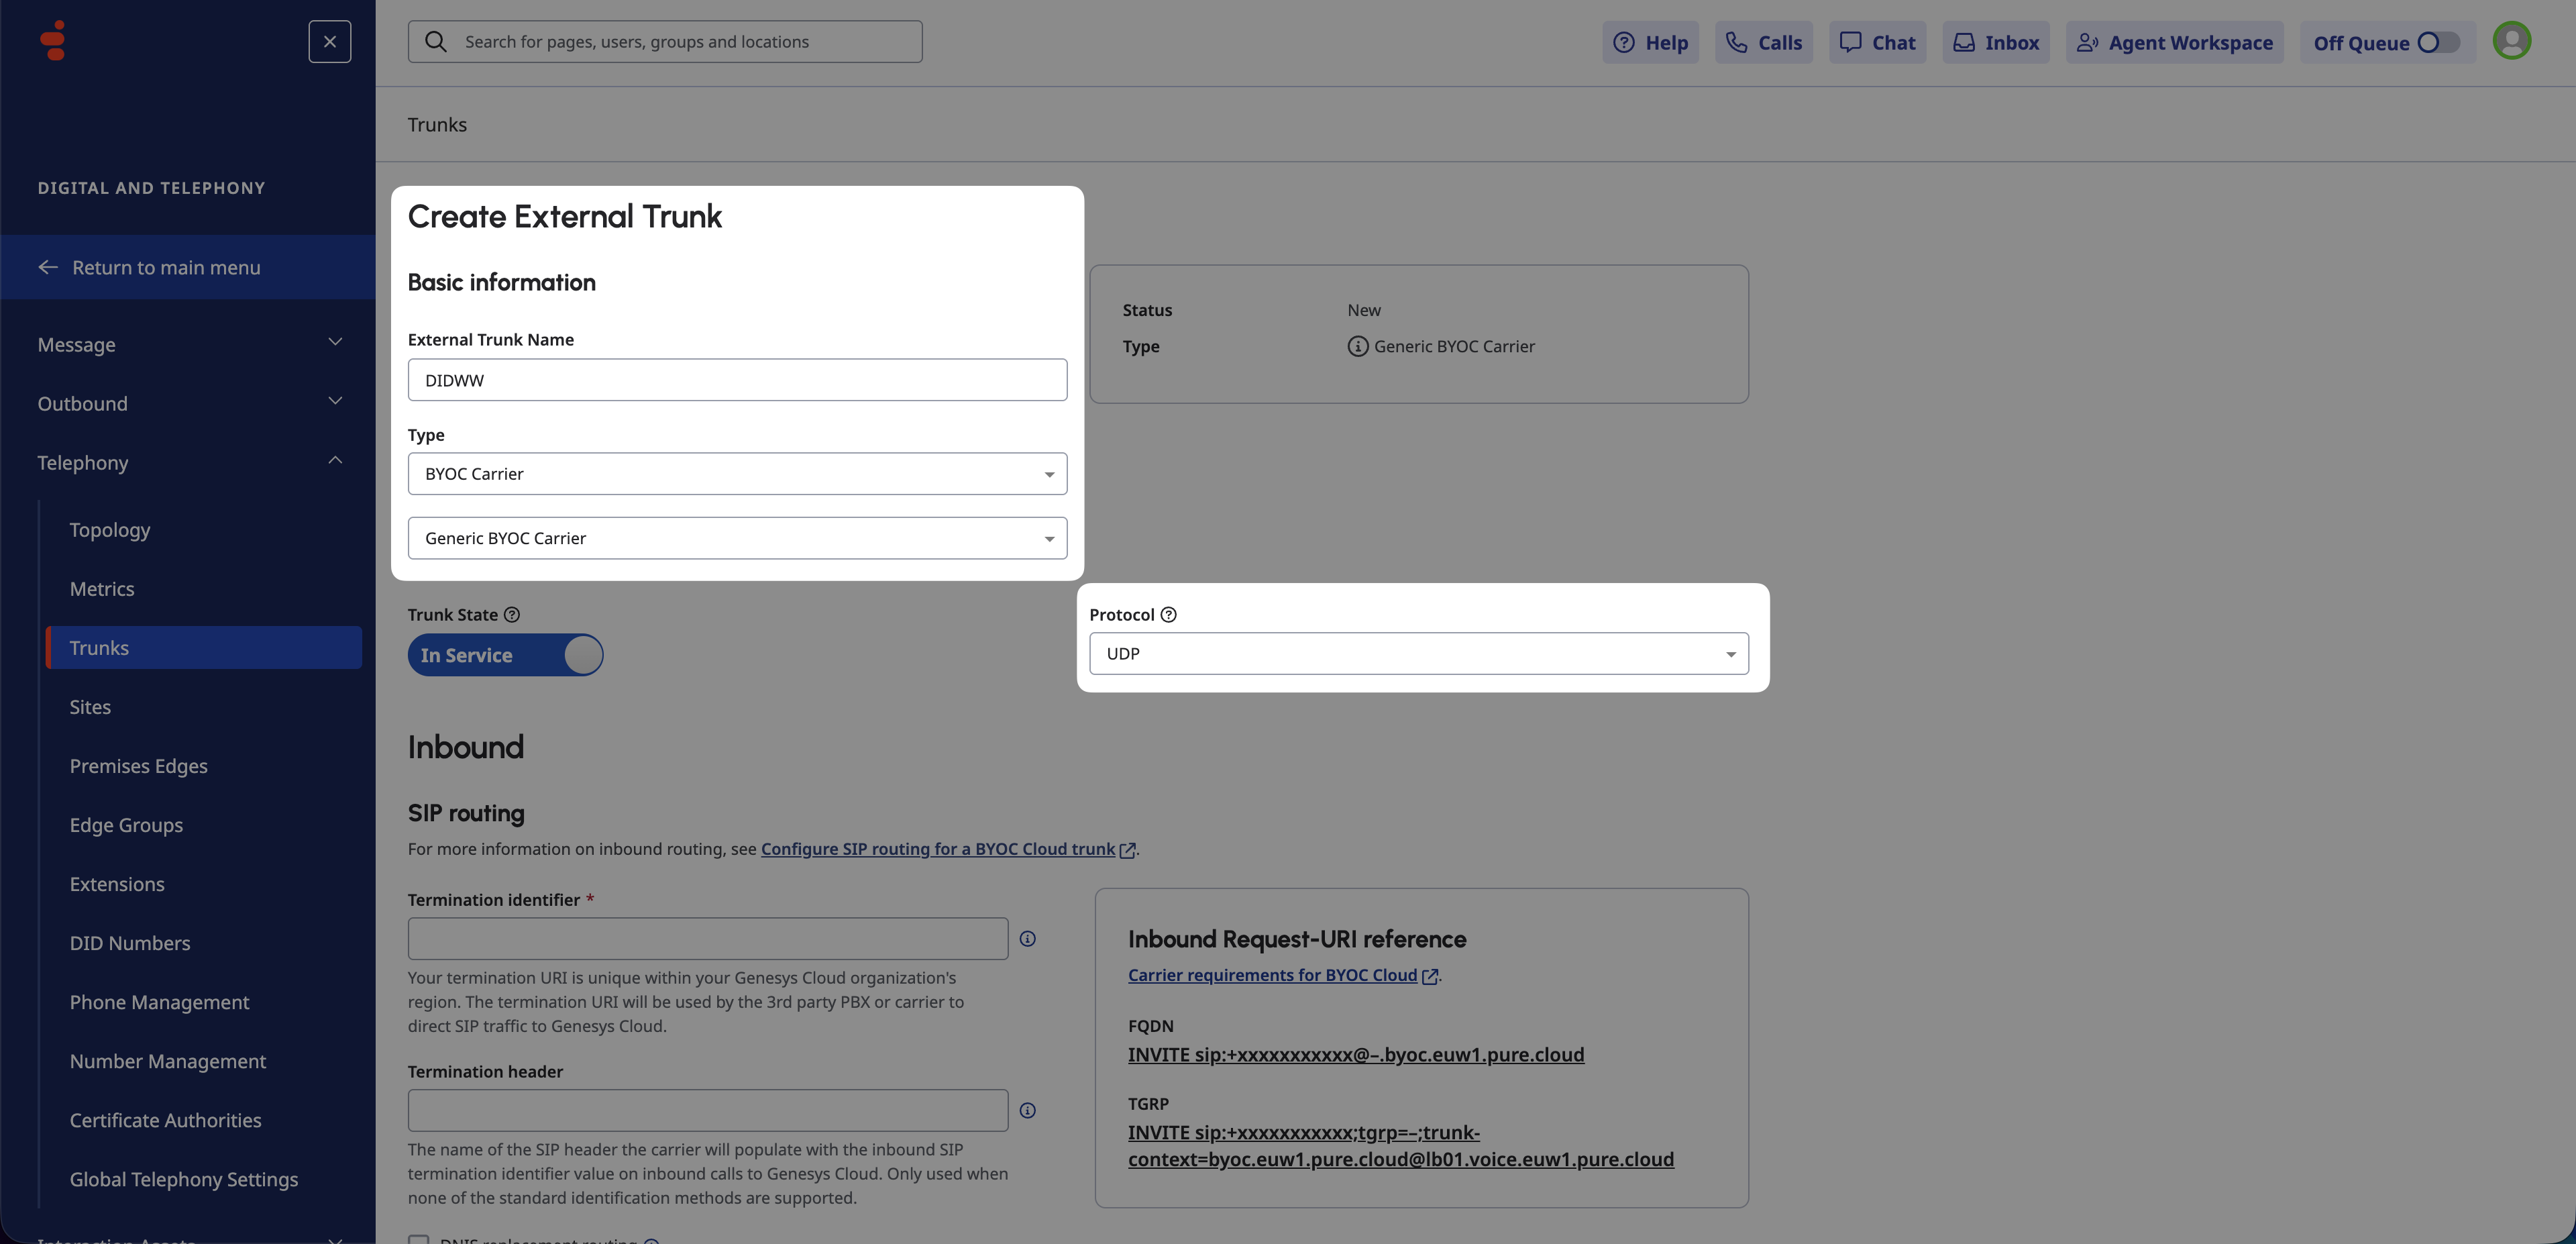
Fig. 13. Basic External Trunk settings.#
Configure Inbound SIP Routing#
In the Inbound section, enter a unique Termination Identifier (e.g.,
didww).Scroll down to Number Plan and select your previously created Site in the From site field.
Important
The Termination Identifier generates your unique FQDN (e.g., didww.byoc.euw1.pure.cloud). If you used a placeholder earlier, copy this FQDN and update the Host field in your DIDWW Inbound Trunk settings.
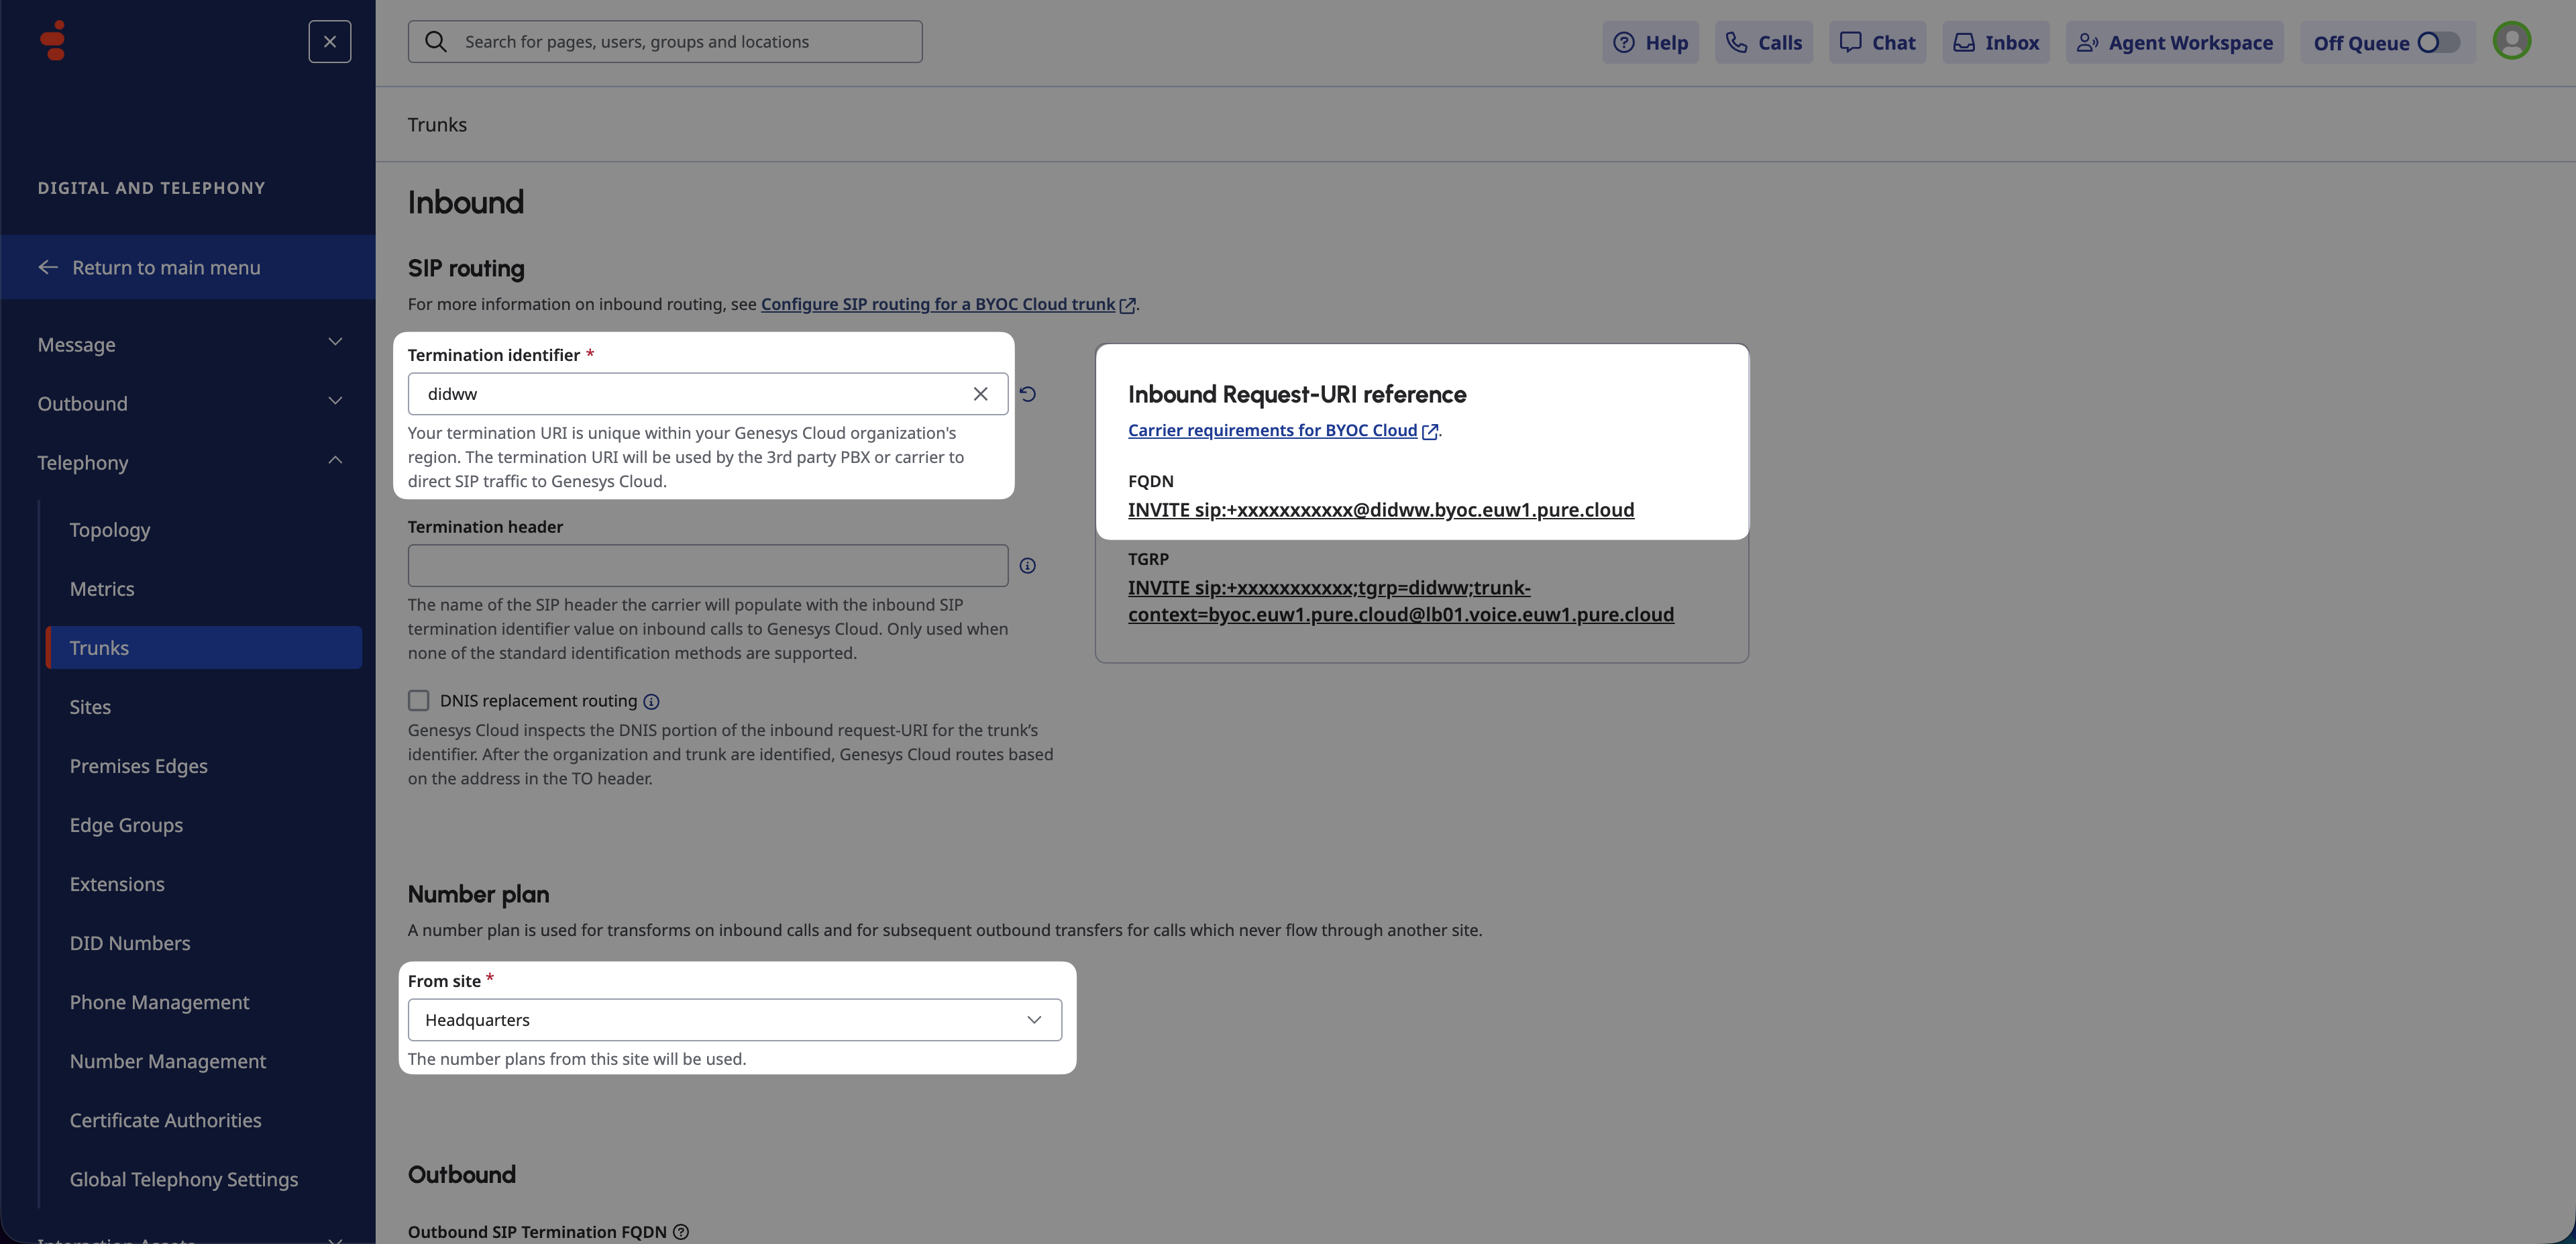
Fig. 14. Inbound SIP routing configuration.#
Configure Outbound SIP Settings#
Scroll to the Outbound section.
In the Outbound SIP Termination FQDN field, enter the DIDWW FQDN (e.g.,
fra.eu.out.didww.com).Under SIP Servers or Proxies, enter the same FQDN (e.g.,
fra.eu.out.didww.com) and the Port (5060for UDP/TCP,5061for TLS), then click the + (Plus) button to add it.Enable Digest Authentication.
In the Realm field, enter
out.didww.com.Enter the User Name and Password obtained from the DIDWW Outbound Trunk in Step 3: Retrieve Credentials.
Note
It is recommended to configure the DIDWW FQDN closest to your location. See Outbound DIDWW Signaling Endpoints.
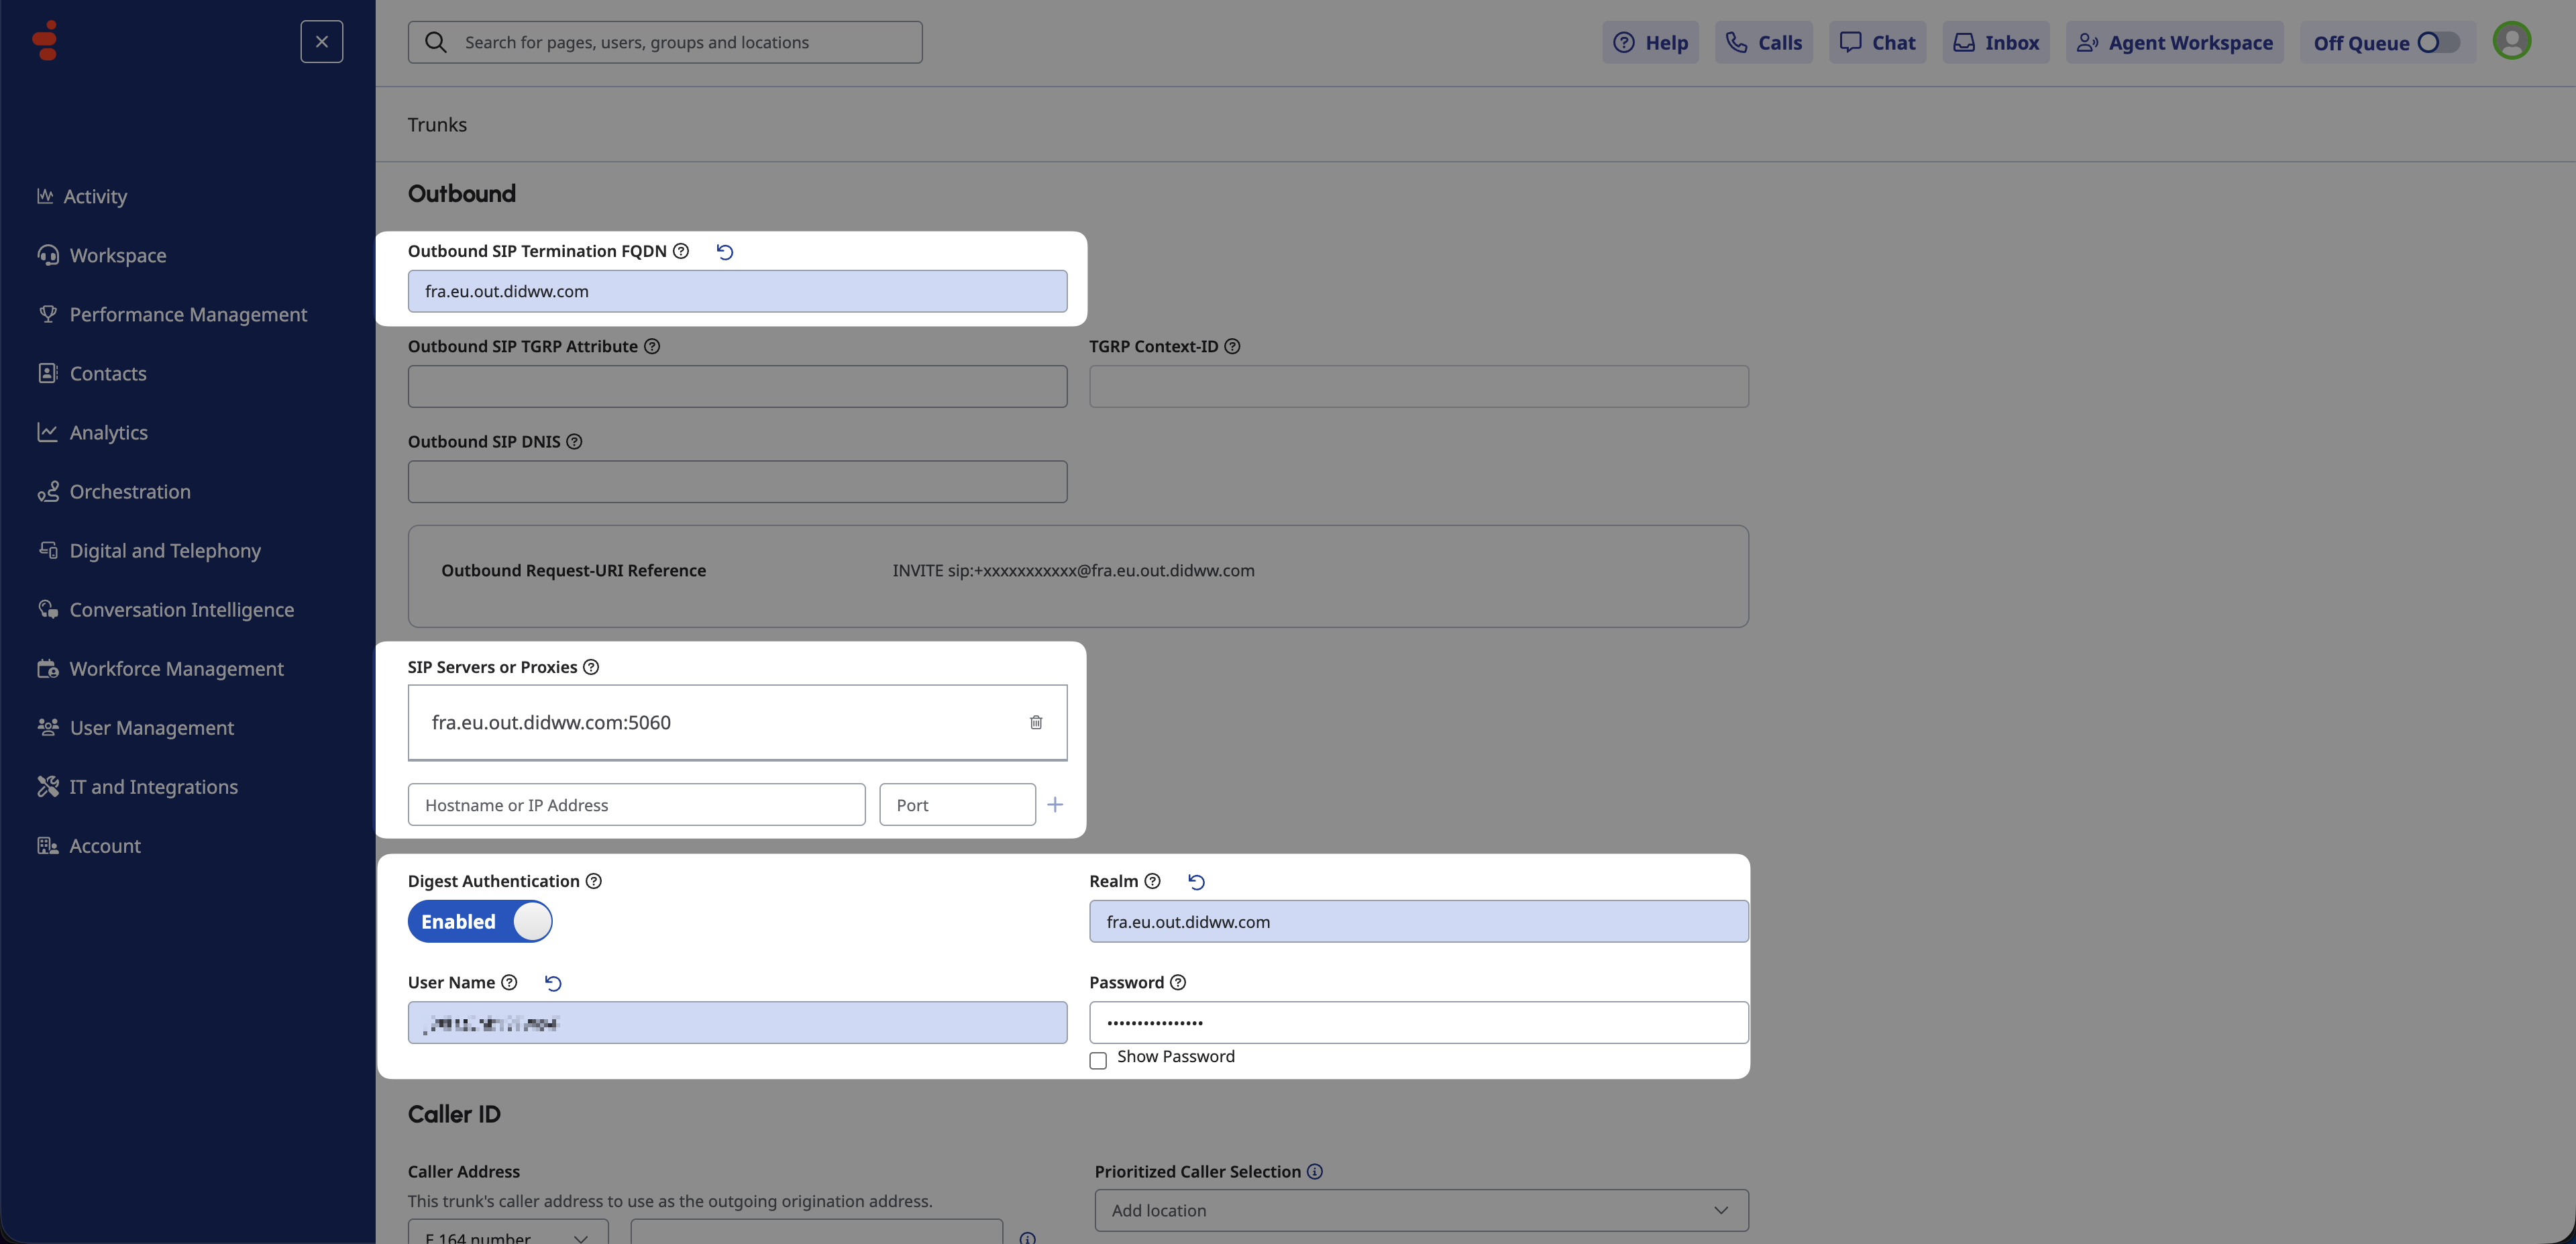
Fig. 15. Configuring outbound SIP settings.#
Configure SIP Access Control#
Scroll to SIP Access Control.
Add the required DIDWW IP ranges:
Description |
Allowed IP / CIDR |
|---|---|
DIDWW Global Range |
|
Amsterdam Range |
|
Click Save External Trunk.
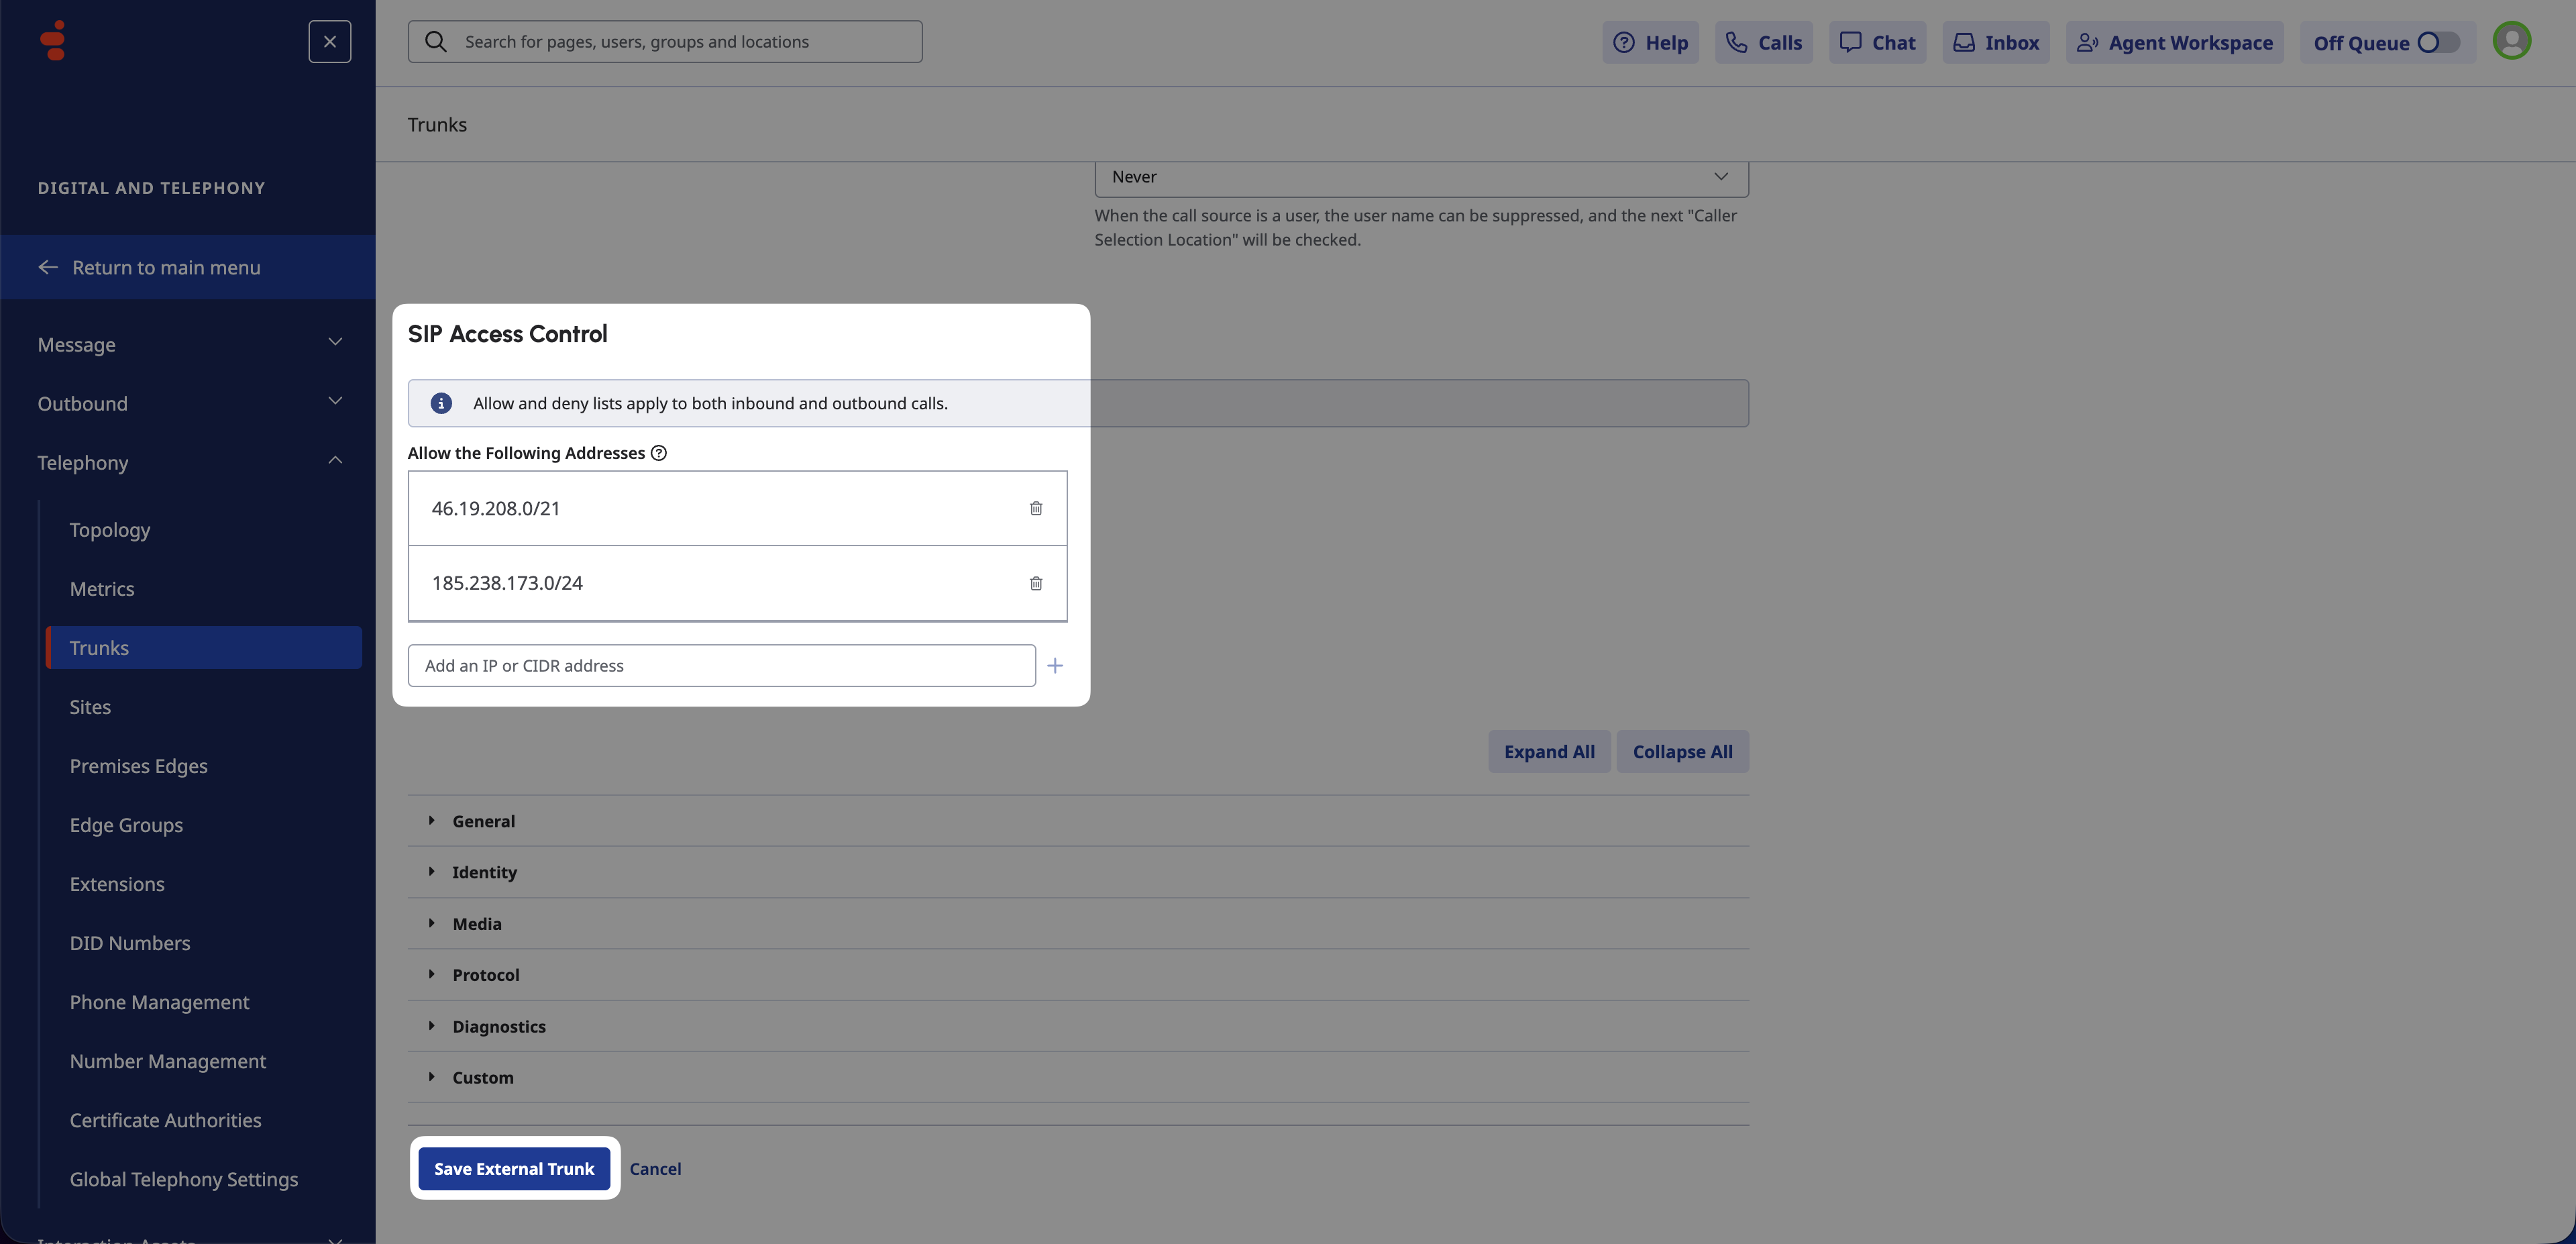
Fig. 16. Adding DIDWW IP ranges.#
Add Trunk to Outbound Route#
Go to Telephony > Sites and click on your Site’s name.
Open the Outbound Routes tab.
Click on the Default Outbound Route name to open its settings.
Ensure the State toggle at the top is Enabled.
Select the DIDWW trunk under External Trunks.
Click Save Outbound Routes.
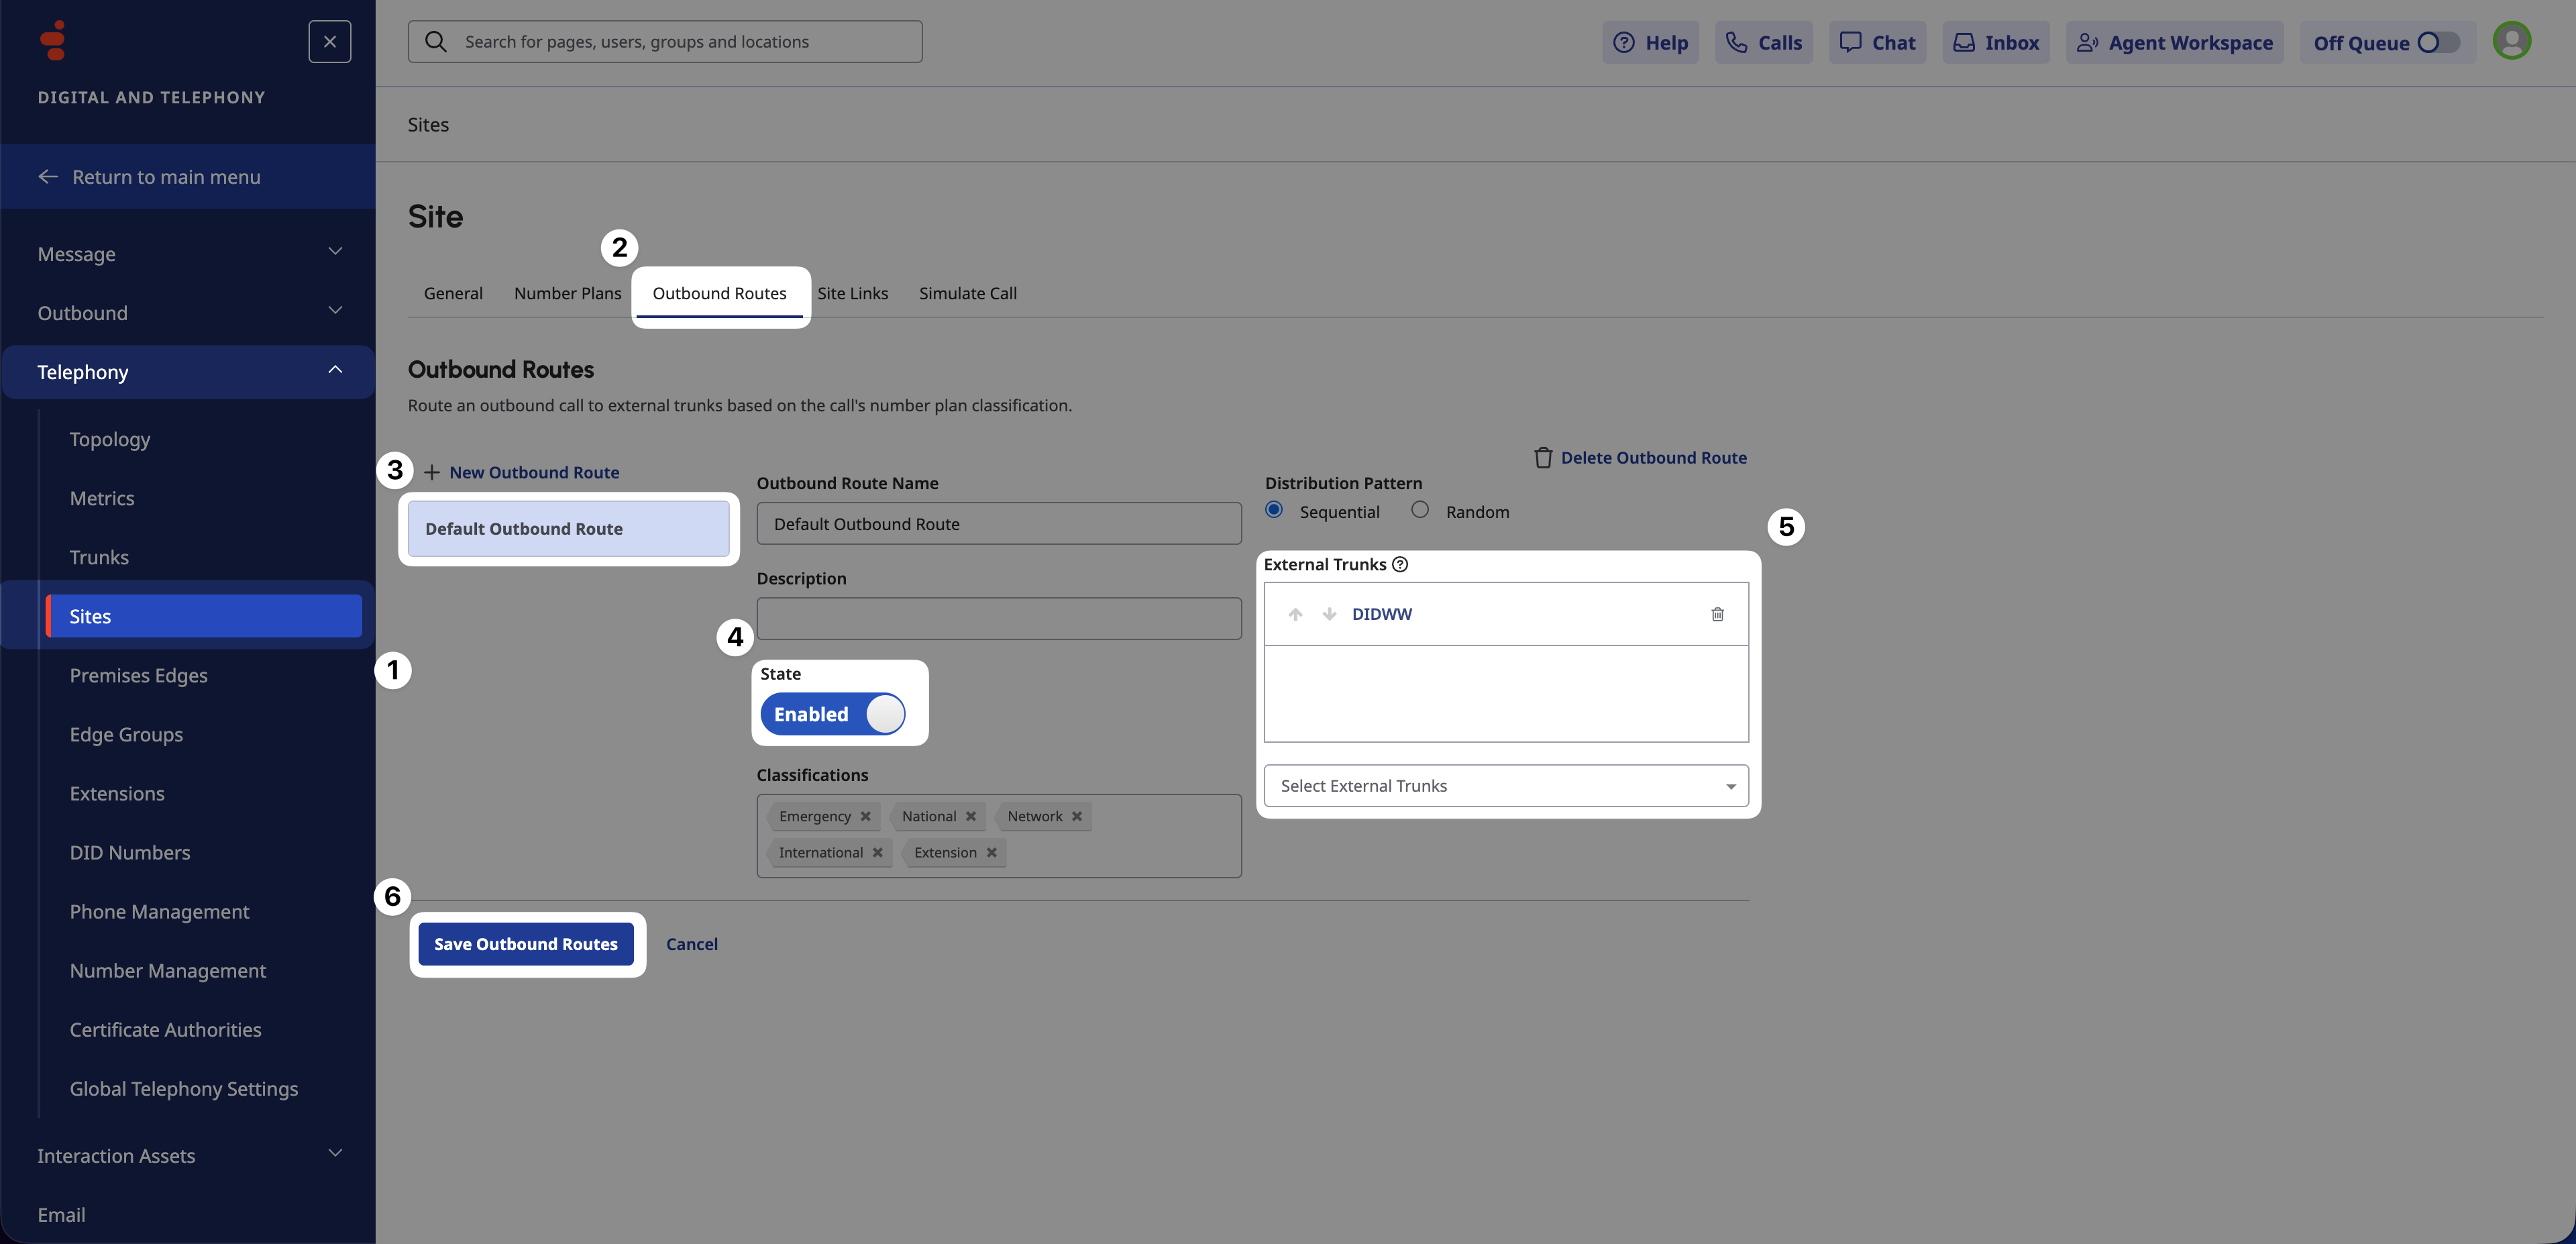
Fig. 17. Adding an External Trunk to the Outbound Route.#
Simulate a Call#
While you remain in your Site’s settings, open the Simulate Call tab.
Enter a destination number.
Click Simulate Call.
Confirm that the simulation is Successful.
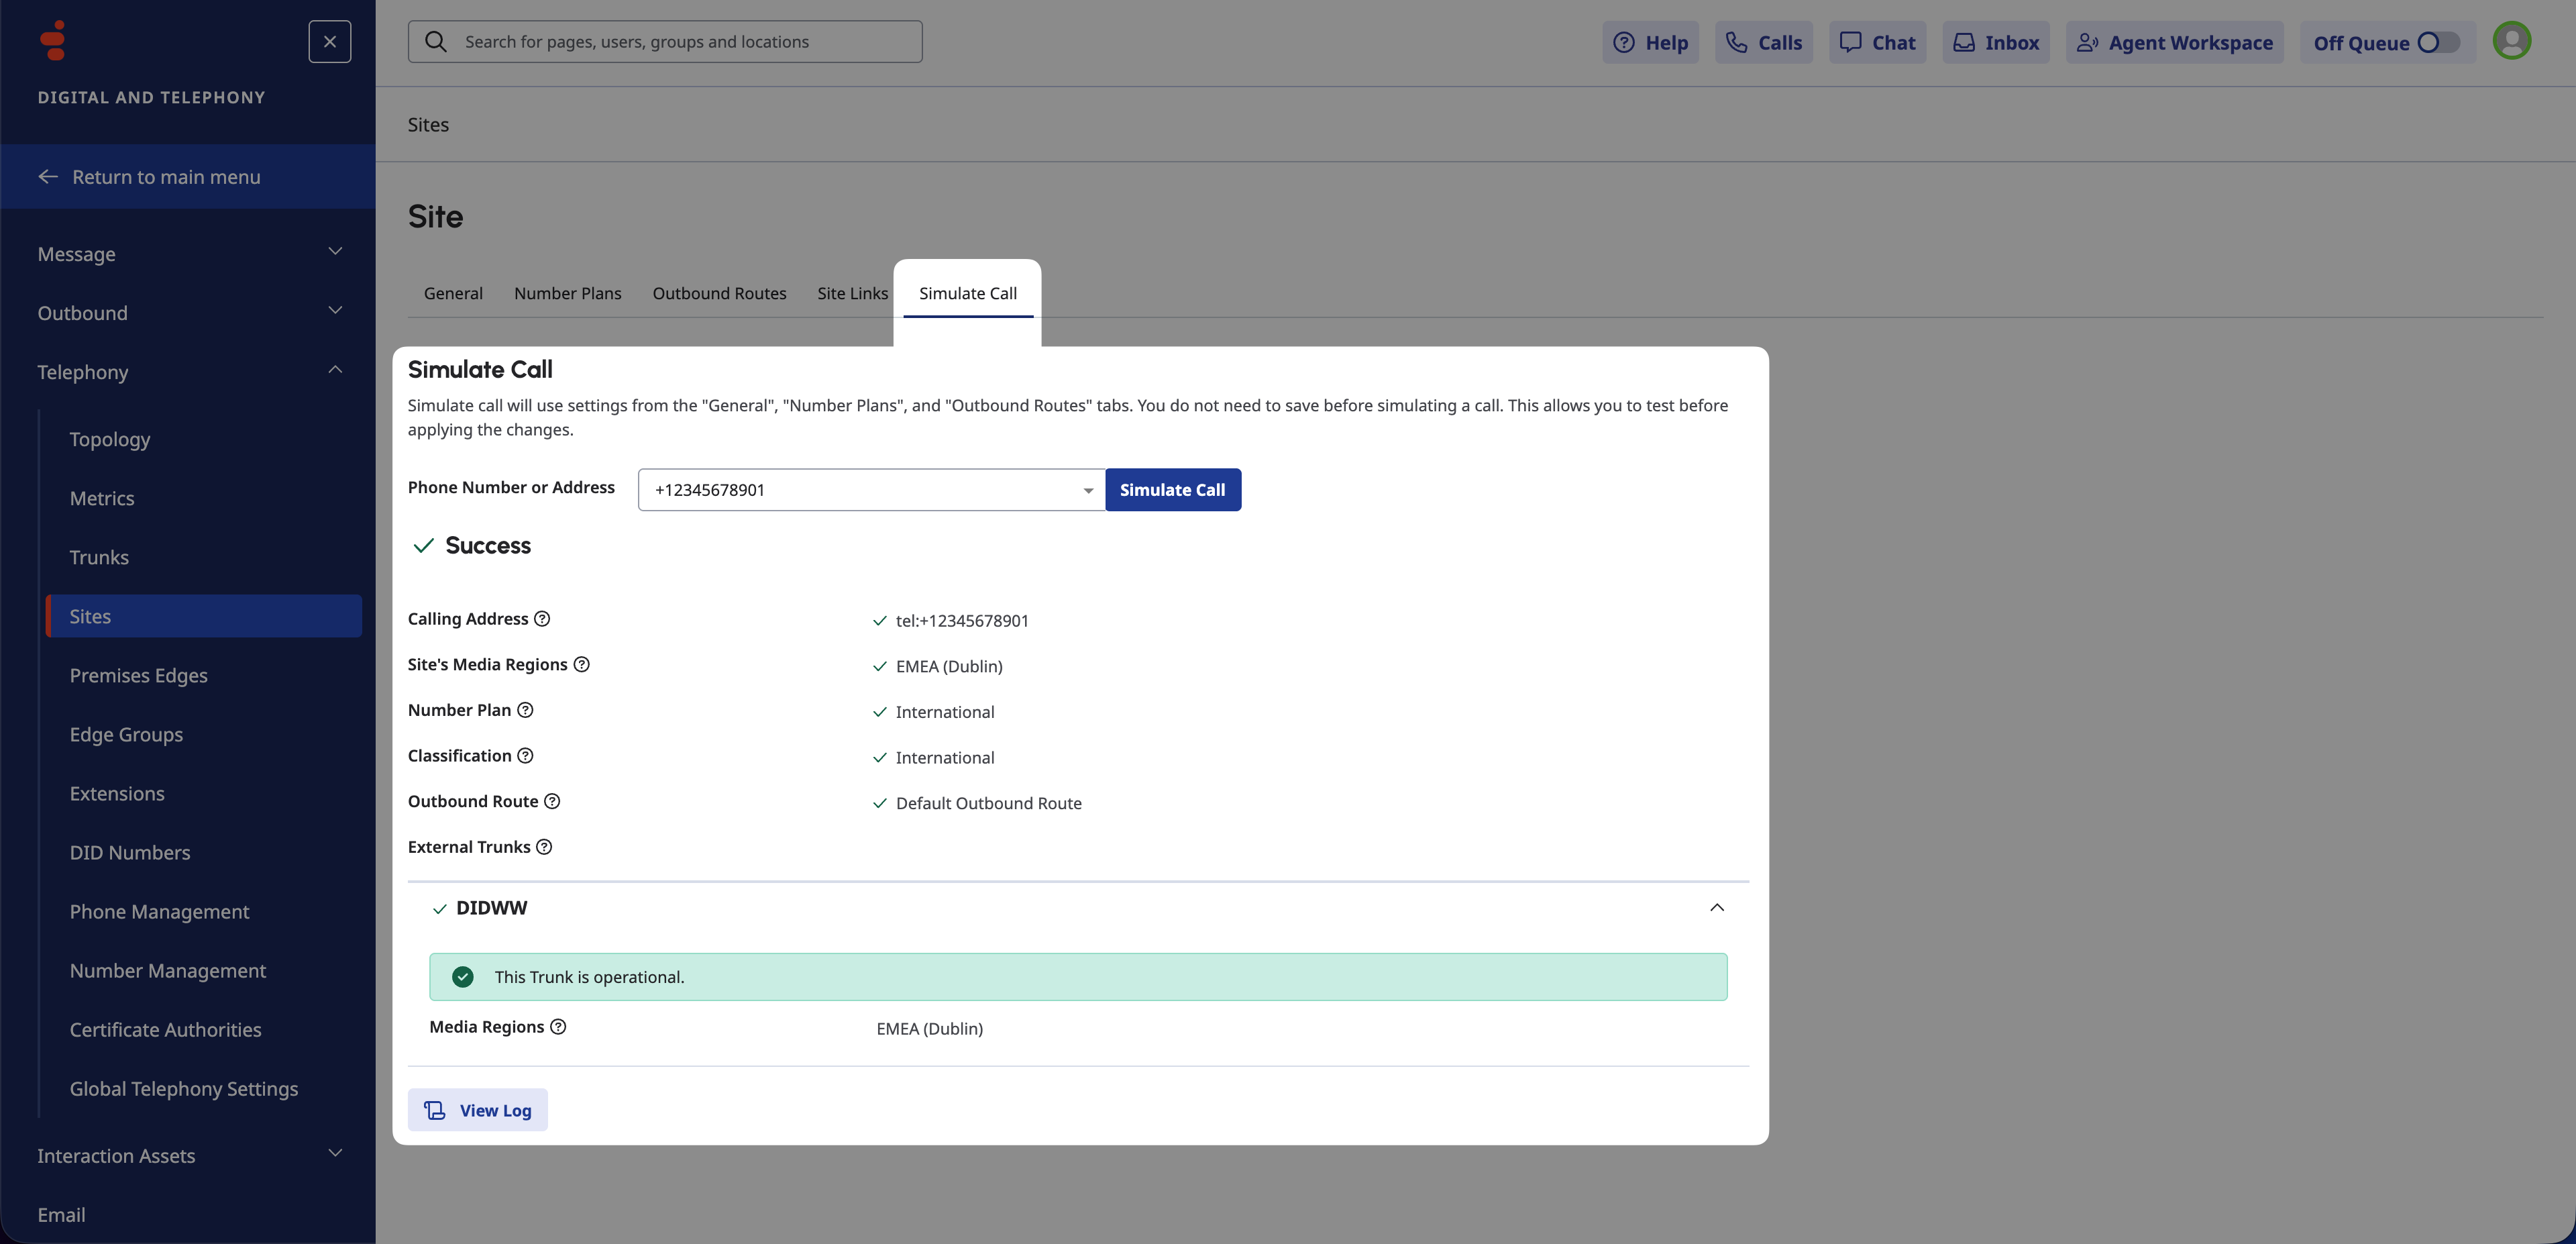
Fig. 18. Simulating a call.#
Step 3: DID Number Configuration#
Create and assign DID ranges so Genesys Cloud CX can route incoming calls.
Create DID Range#
Navigate to Digital and Telephony > Telephony > DID Numbers.
Select the DID Ranges tab.
Click Create Range.
Enter:
DID Start and DID End numbers. The country flag selector appears automatically; enter the number in E.164 format (e.g.,
18489005419).Enter
DIDWWas the Service Provider.Add an optional Comment (e.g.,
My DIDWW DID Number).
Click Save.
Note
For a single DID, enter the same value in DID Start and DID End.
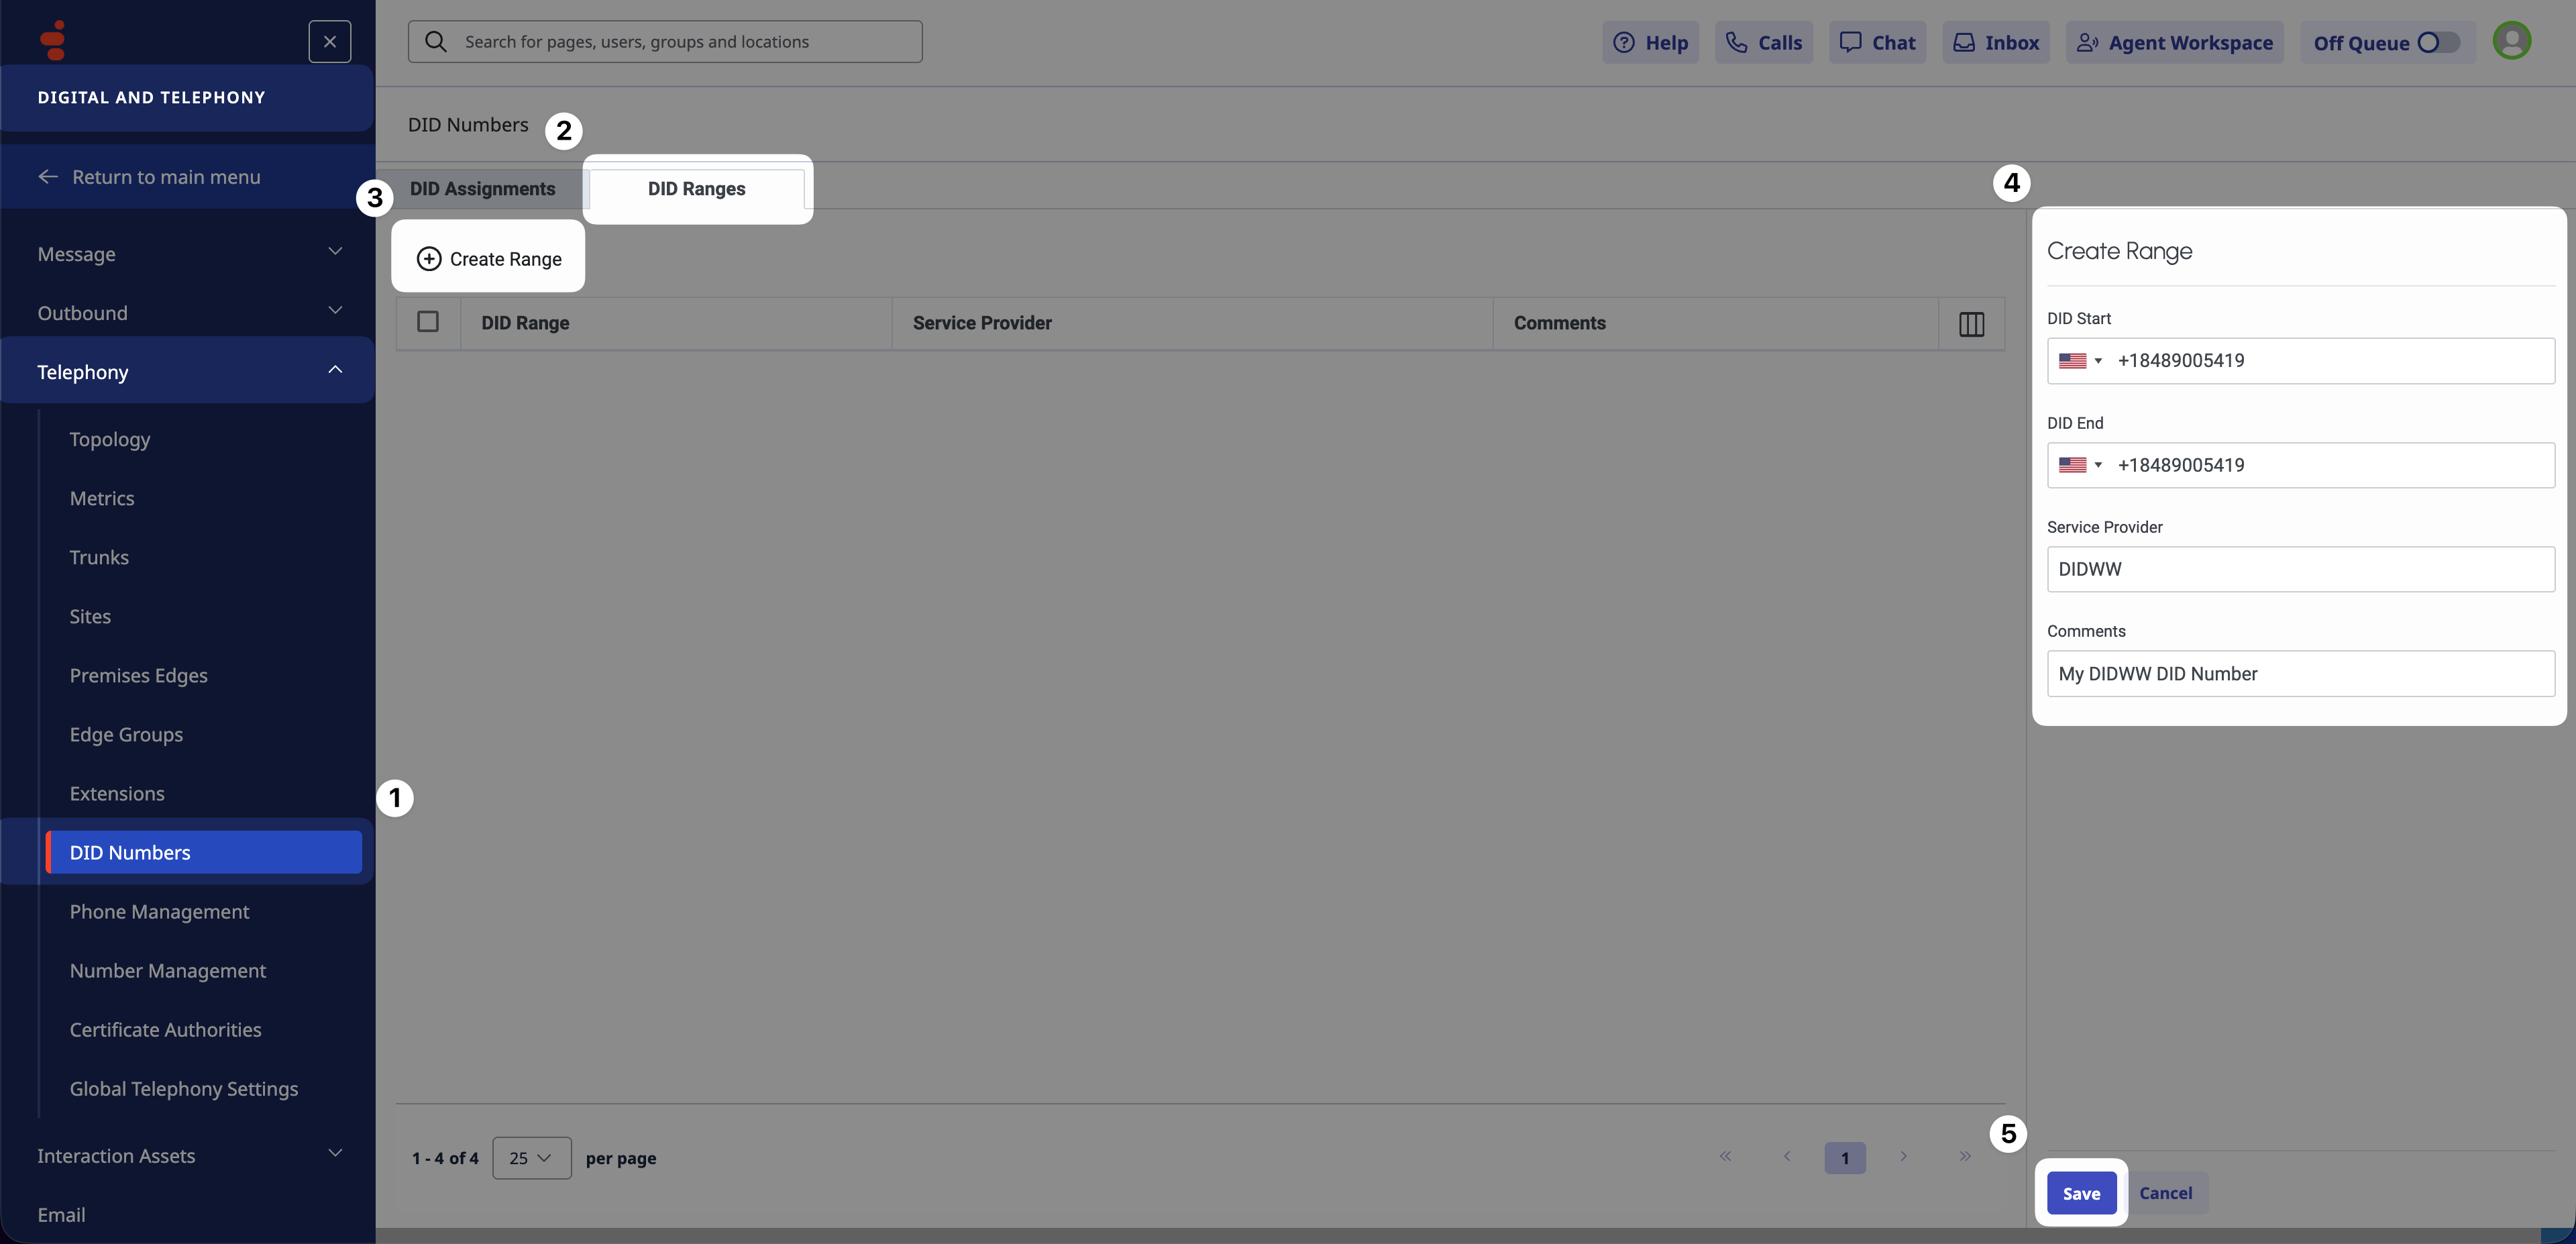
Fig. 19. Creating a DID range.#
Assign DID Numbers#
Open the DID Assignments tab.
Click Assign.
Configure:
Select the Assignee Type (e.g.,
Person,Queue,IVR).Choose the Assignee.
Select Save Number As (e.g.,
Work Phone).Select the DIDWW DID Number.
Click Save.
Note
Only DID numbers added in the DID Ranges tab appear in the DID Number dropdown.
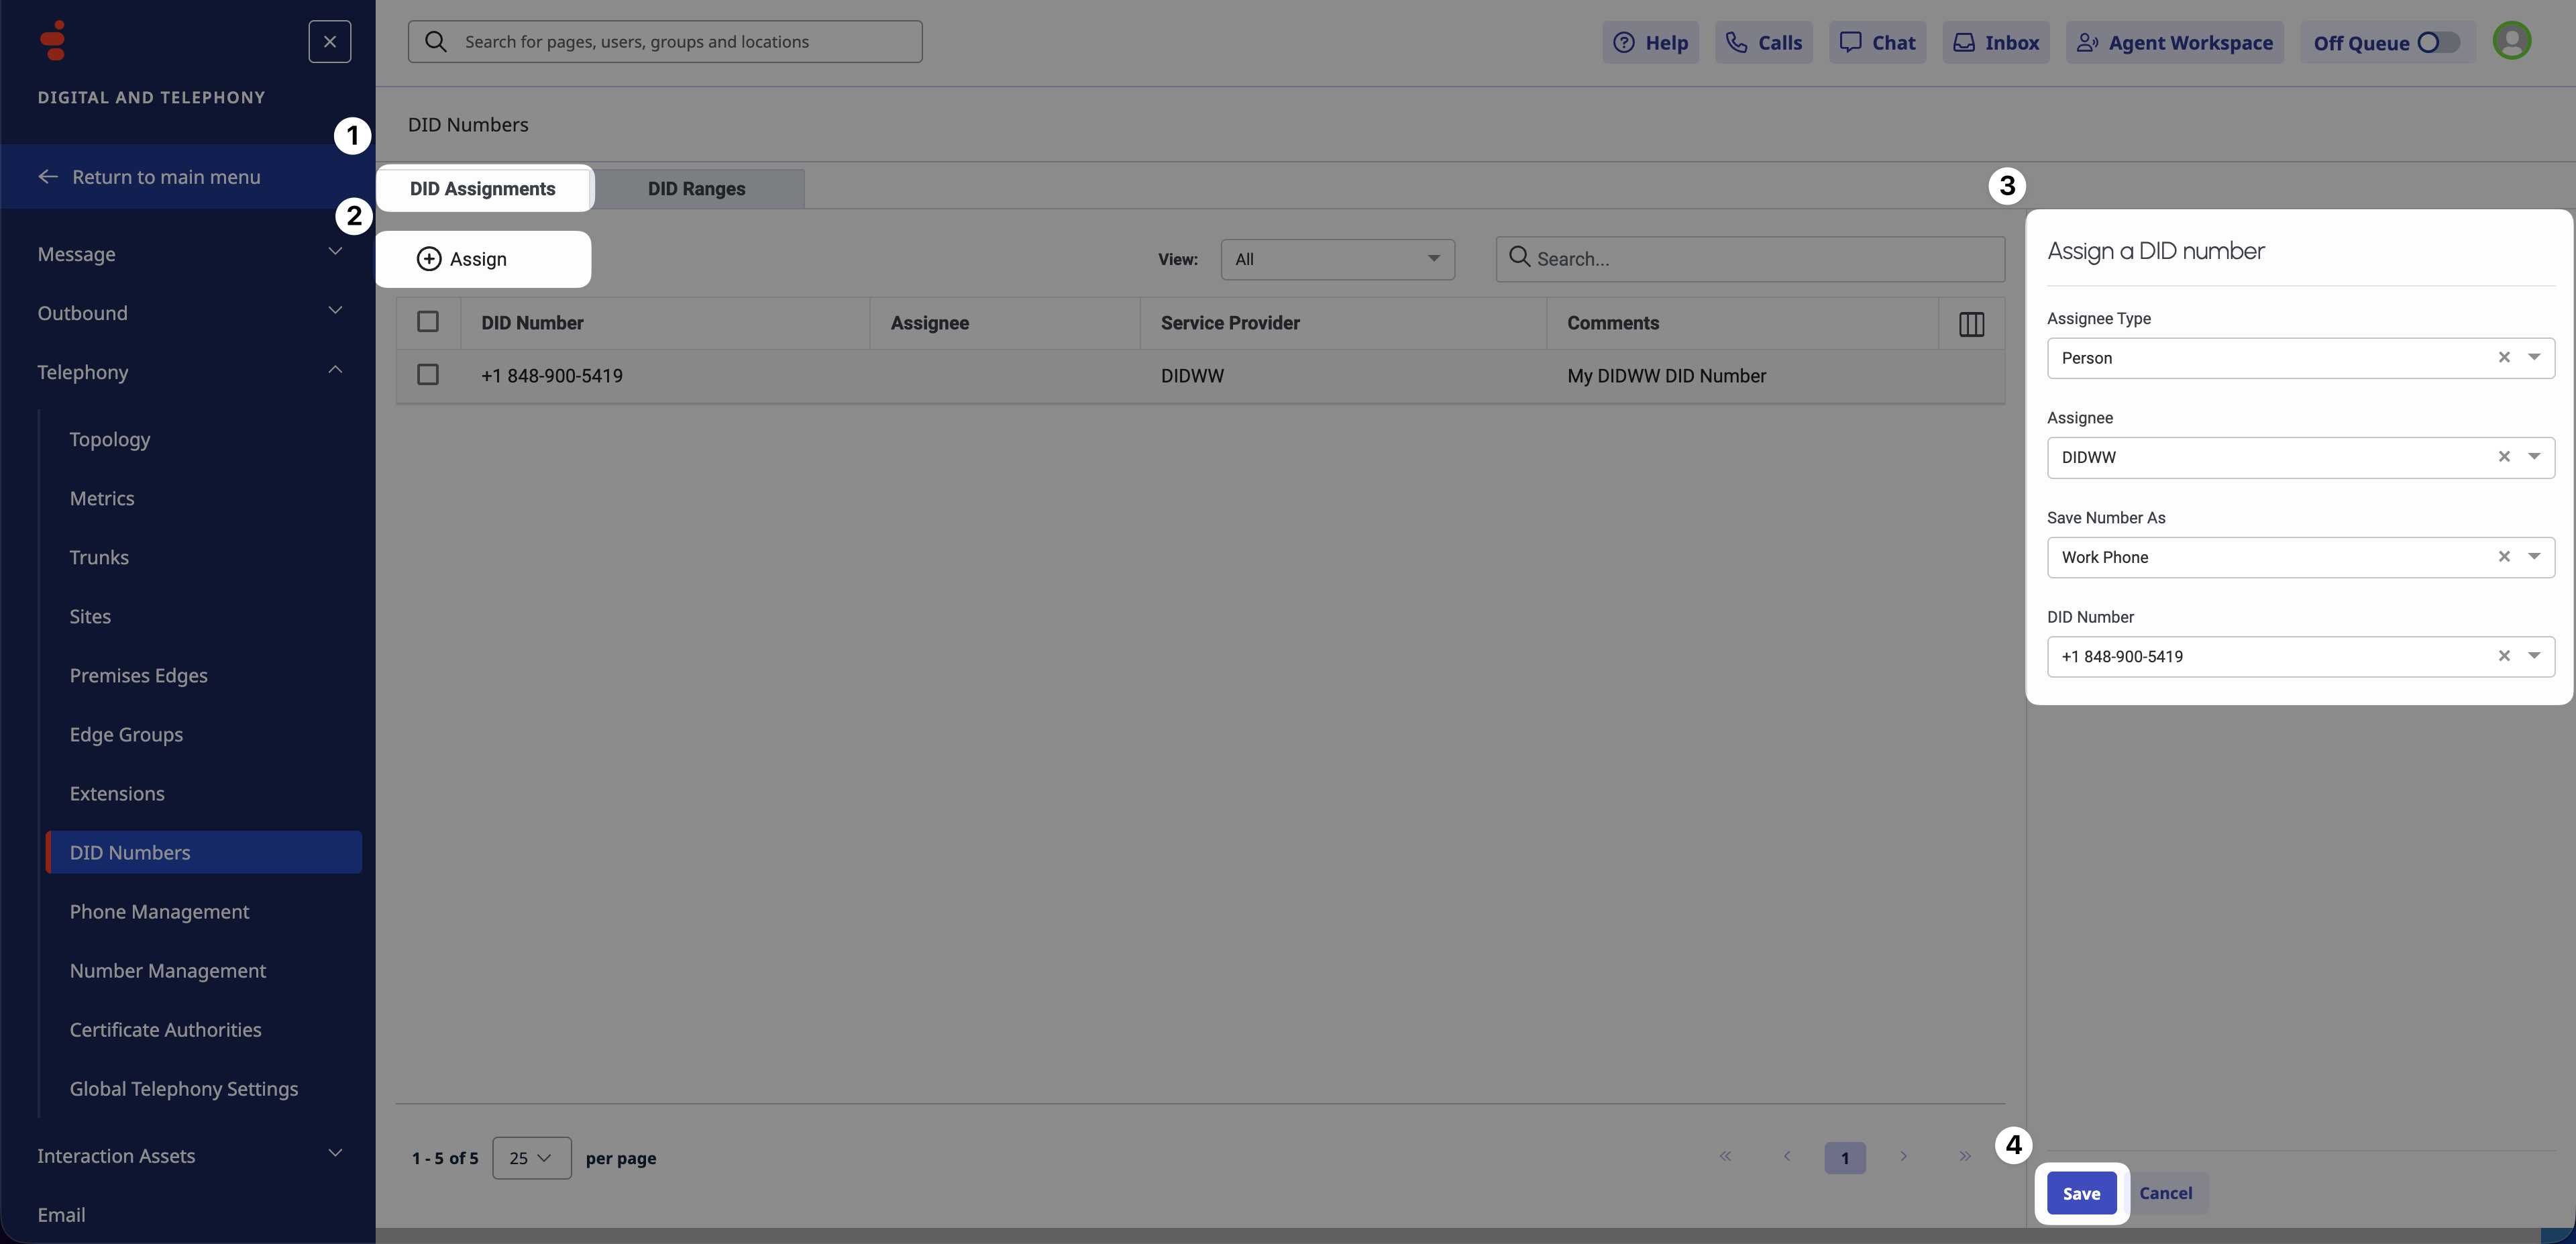
Fig. 20. Assigning a DIDWW number.#