Zapier
Introduction
Zapier https://zapier.com/ allows to interact between popular applications and empowers you to automate your tasks across many different apps. Creates automated workflows and tasks to use different web applications together. It is often described as a translator between web APIs, helping to increase worker productivity by saving time through automation of recurring tasks, and business processes such as lead management. Through an interface in which users can set up workflow rules to determine how its automations function, it orchestrates flow of data between tools and online services that wouldn’t otherwise communicate with one another.
This configuration guide describes how to set up Zapier to interwork with DIDWW SMS and/or Voice call-events services.
DIDWW SMS OUT App enabled by Zapier
DIDWW SMS OUT App allows you to send SMS messages from your existing DIDWW SMS-enabled DID number to any other SMS enabled destination number. It can be used with apps from Zapier platform, enabling non-sms capable applications to send SMS messages. For example, an SMS message notification may be triggered by a certain action on your CRM or other task management software. Please read more about SMS OUT service at DIDWW.
Getting started
What you need to get started:
Configuring DIDWW SMS OUT App
As a use case example, we will connect Google form to send SMS messages upon form submission. Answers submitted to Google form will be sent via SMS message to the configured phone number.
Step 1. Create a Google form with two short answer type questions: SMS Destination Number, and SMS Text (Fig. 1).
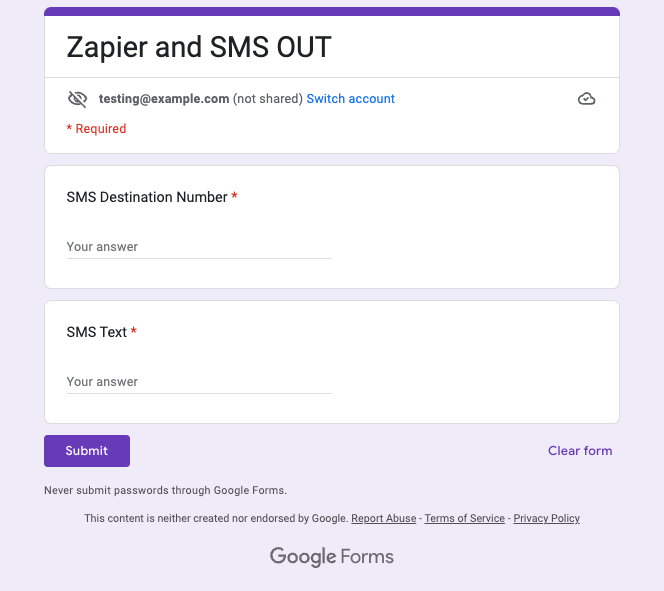
Fig. 1. Google form.
Step 2. Create Zap in your Zapier account (Fig. 2).

Fig. 2. Creating a new Zap.
Step 3. In the Zap creation process, under the App Event, search for Google Forms and select it (Fig. 3).

Fig. 3. Trigger App selection.
Step 4. Select the New Form Response as your Trigger Event (Fig. 4).
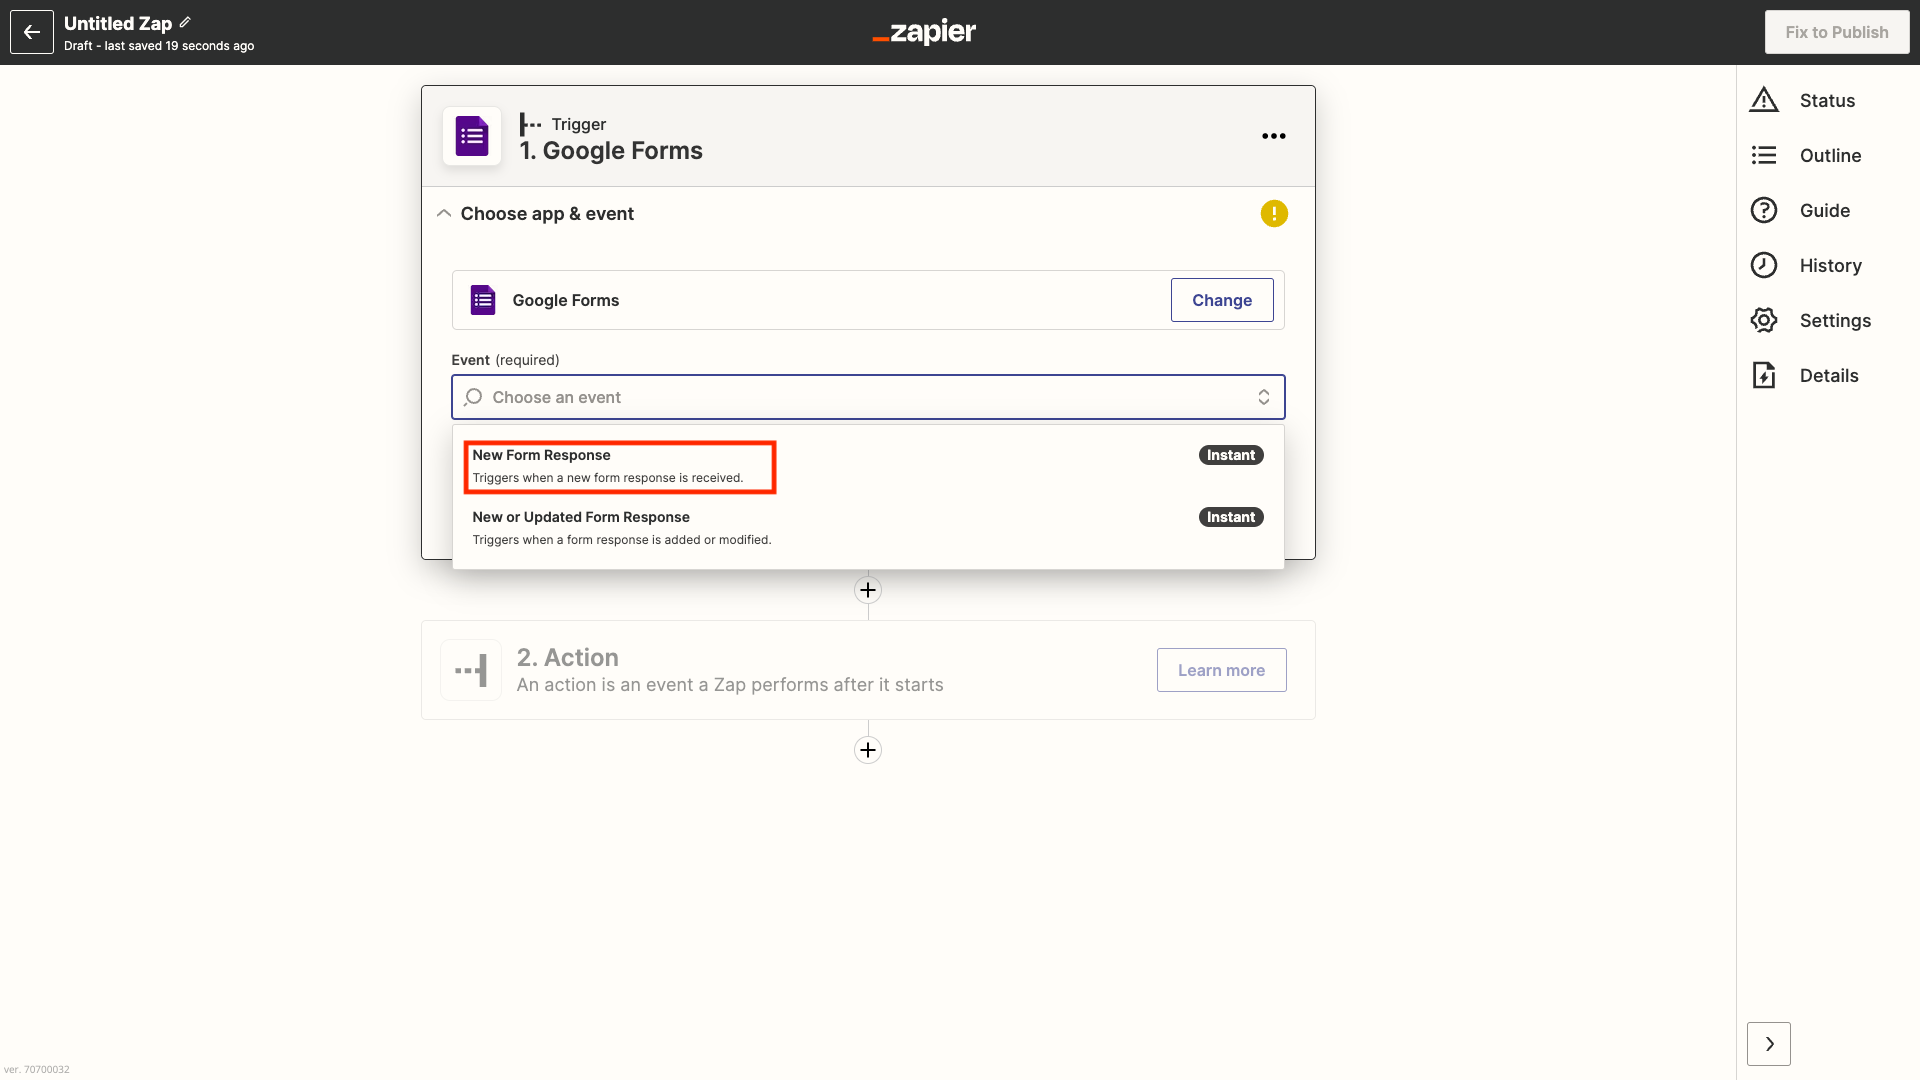
Fig. 4. Trigger Event selection.
Step 5. Sign in to your Google Account on which the Google Form was created (Fig. 5). After successful authentication, continue to the next step.
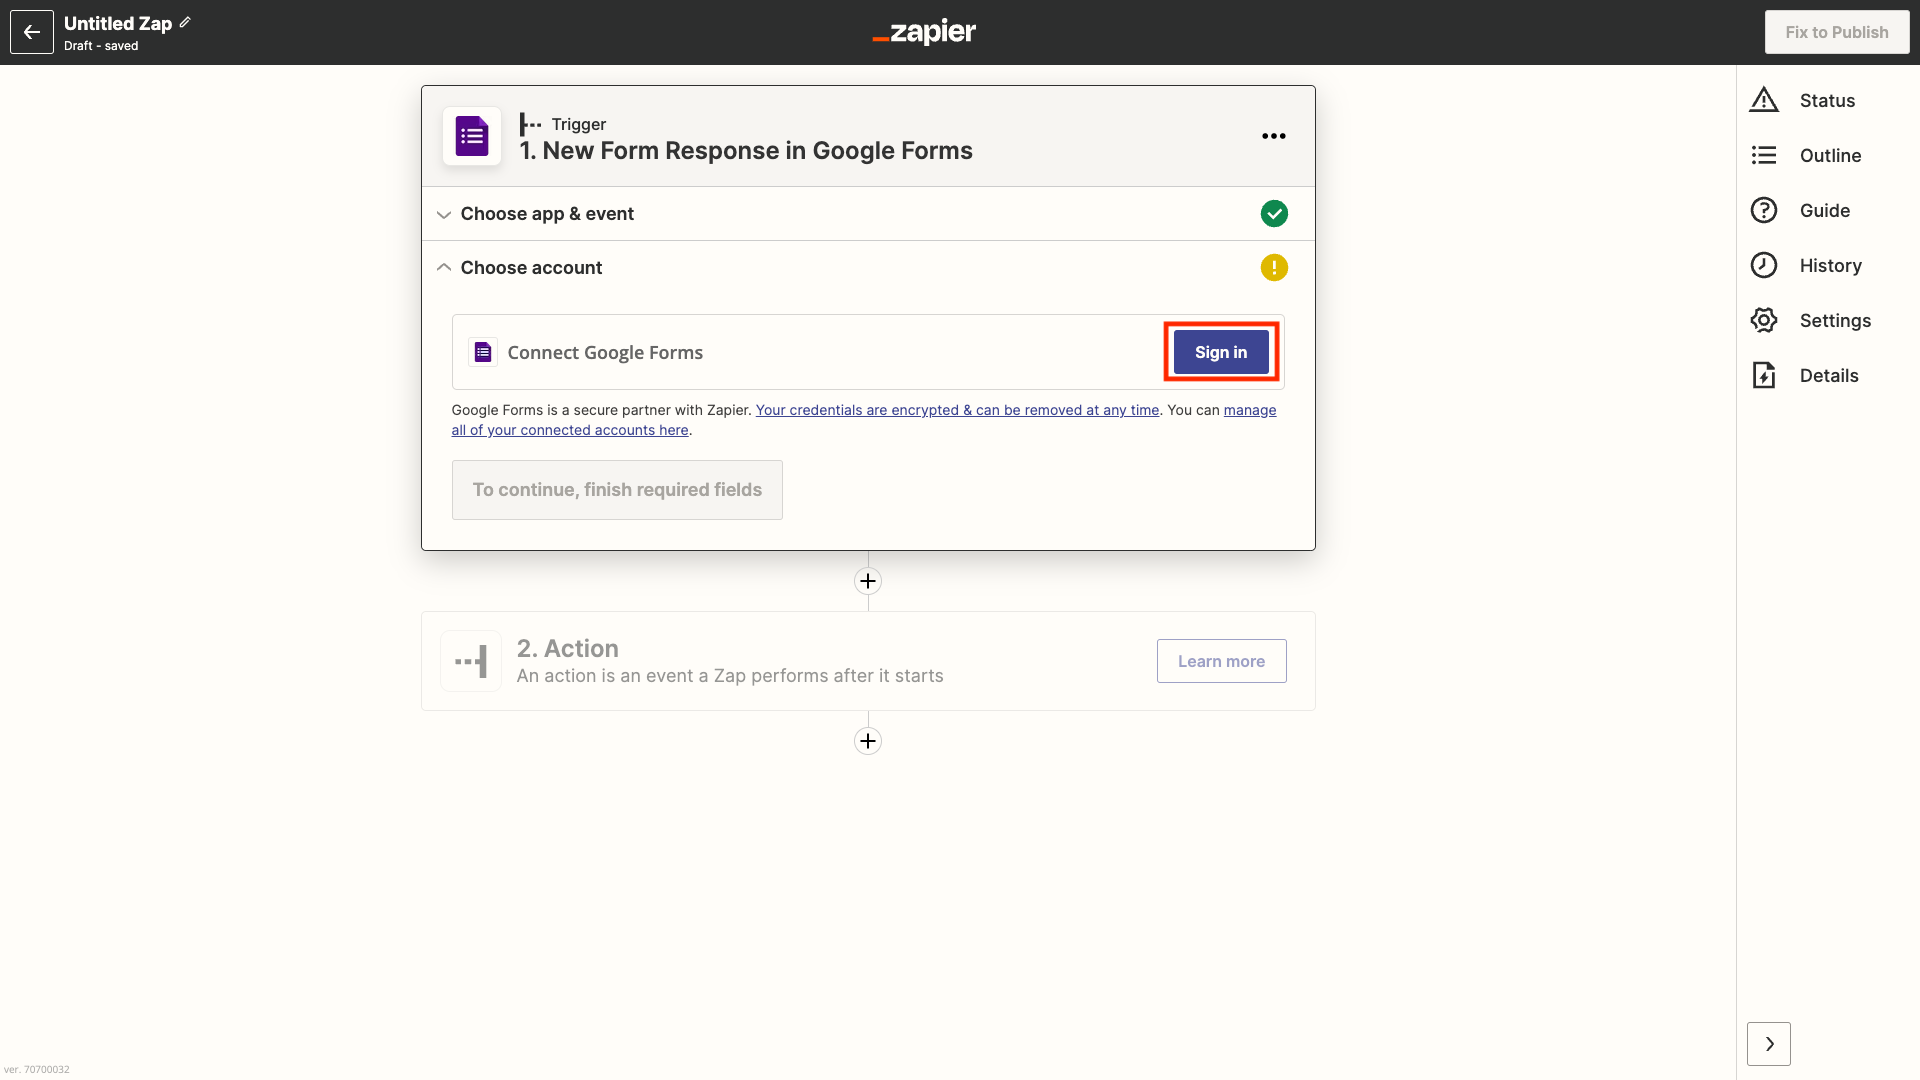
Fig. 5. Signing in to your Google Account.
Step 6. Select your previously created Google Form and click to continue (Fig. 6). After a successful Google Form verification, click Continue to move to the Actions section.
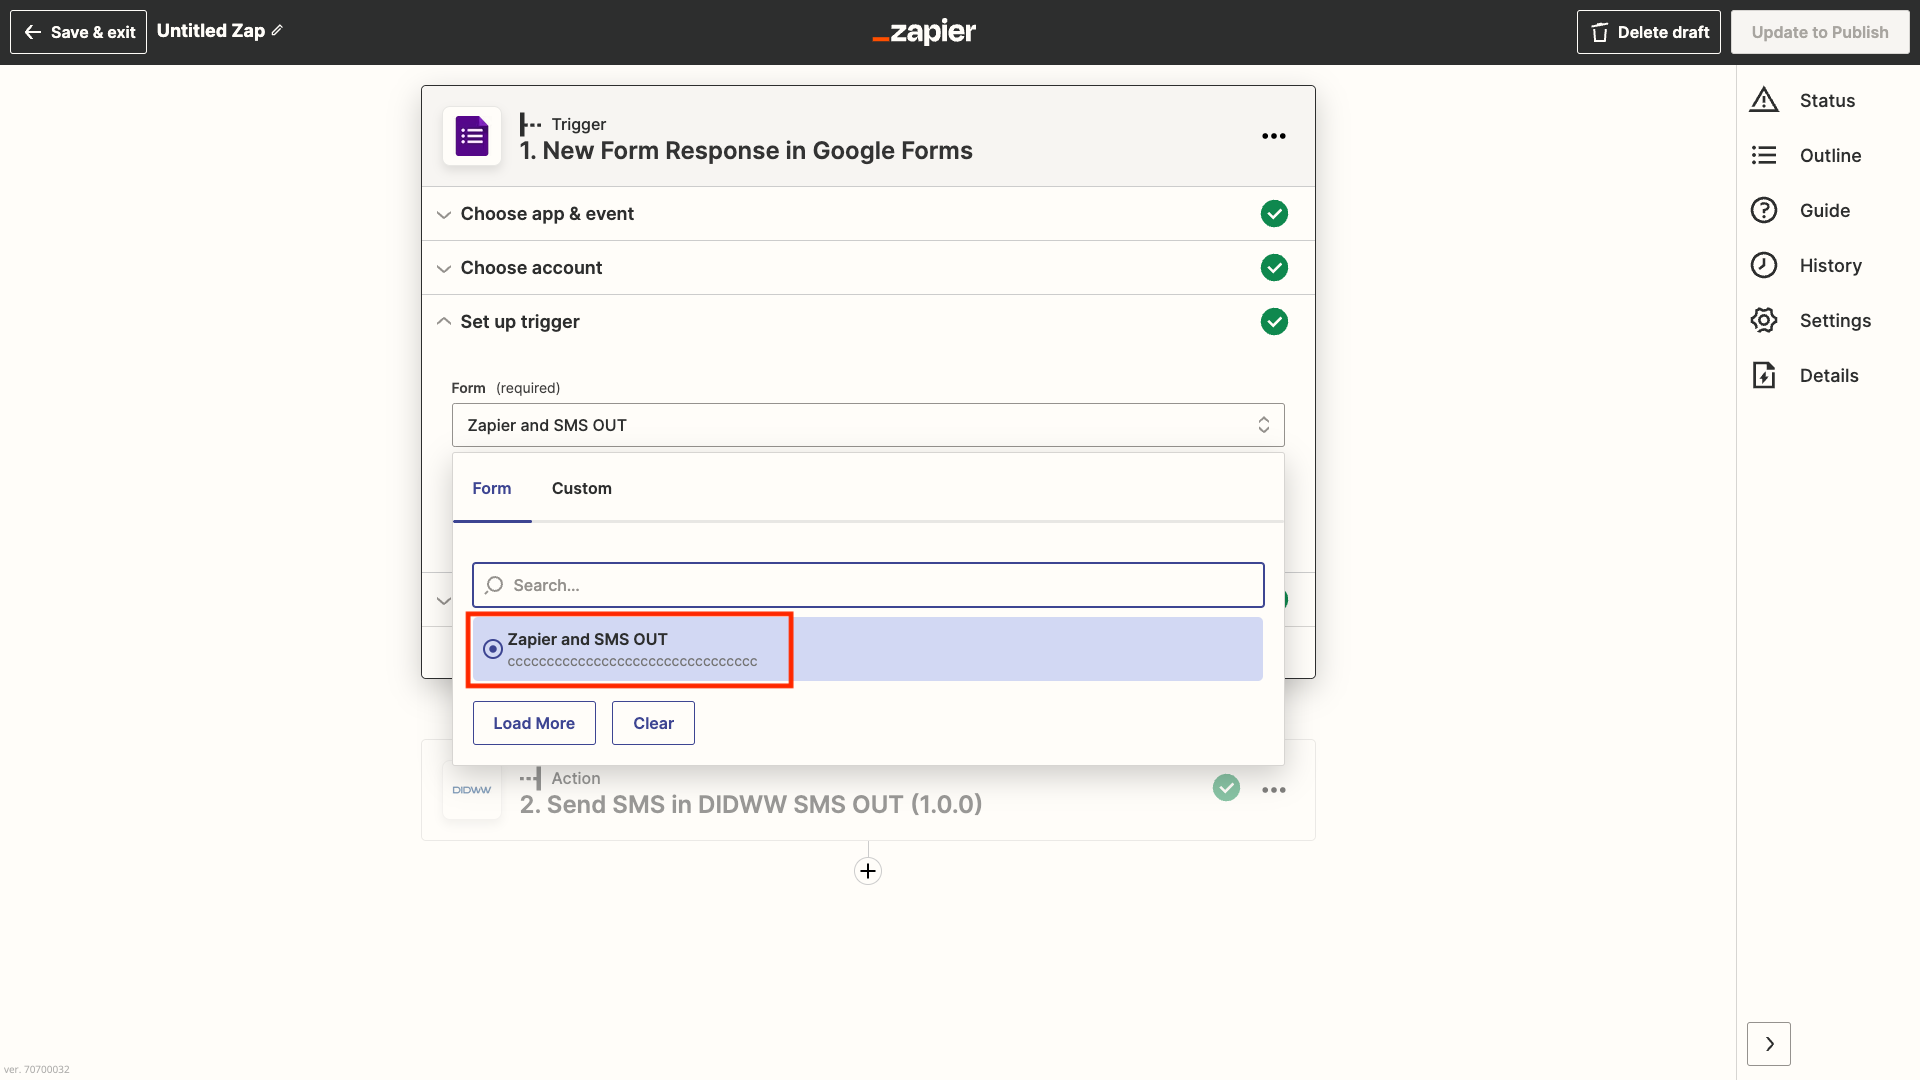
Fig. 6. Selecting the previously created Google Form.
Step 7. Search for DIDWW SMS OUT under the App event search menu and select it (Fig. 7).

Fig. 7. Selecting the previously created Google Form.
Step 8. Under the Event selection menu search for Send SMS and select it. Click Continue. (Fig. 8).
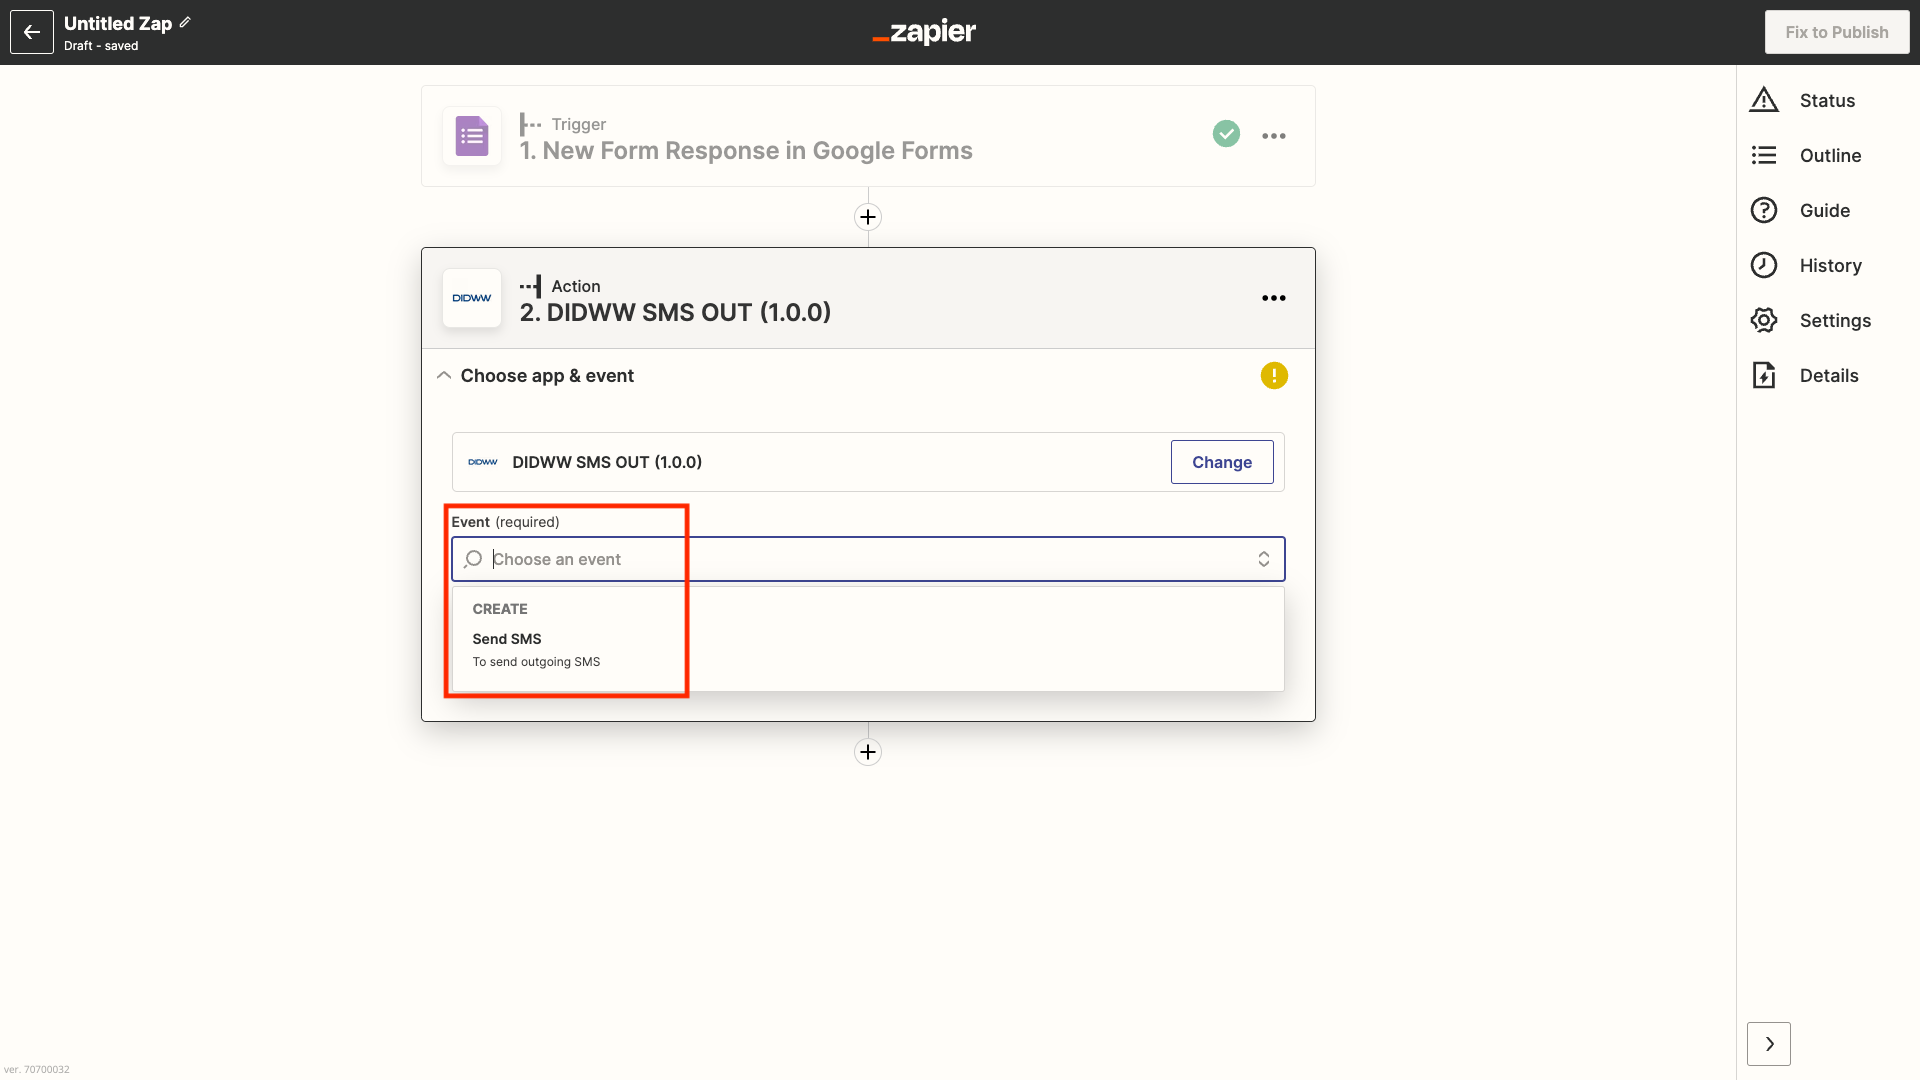
Fig. 8. Selecting the Send SMS event.
Step 9. Click Sign in and connect the DIDWW SMS OUT App with credentials from the DIDWW SMS OUT Trunk (Fig. 9).
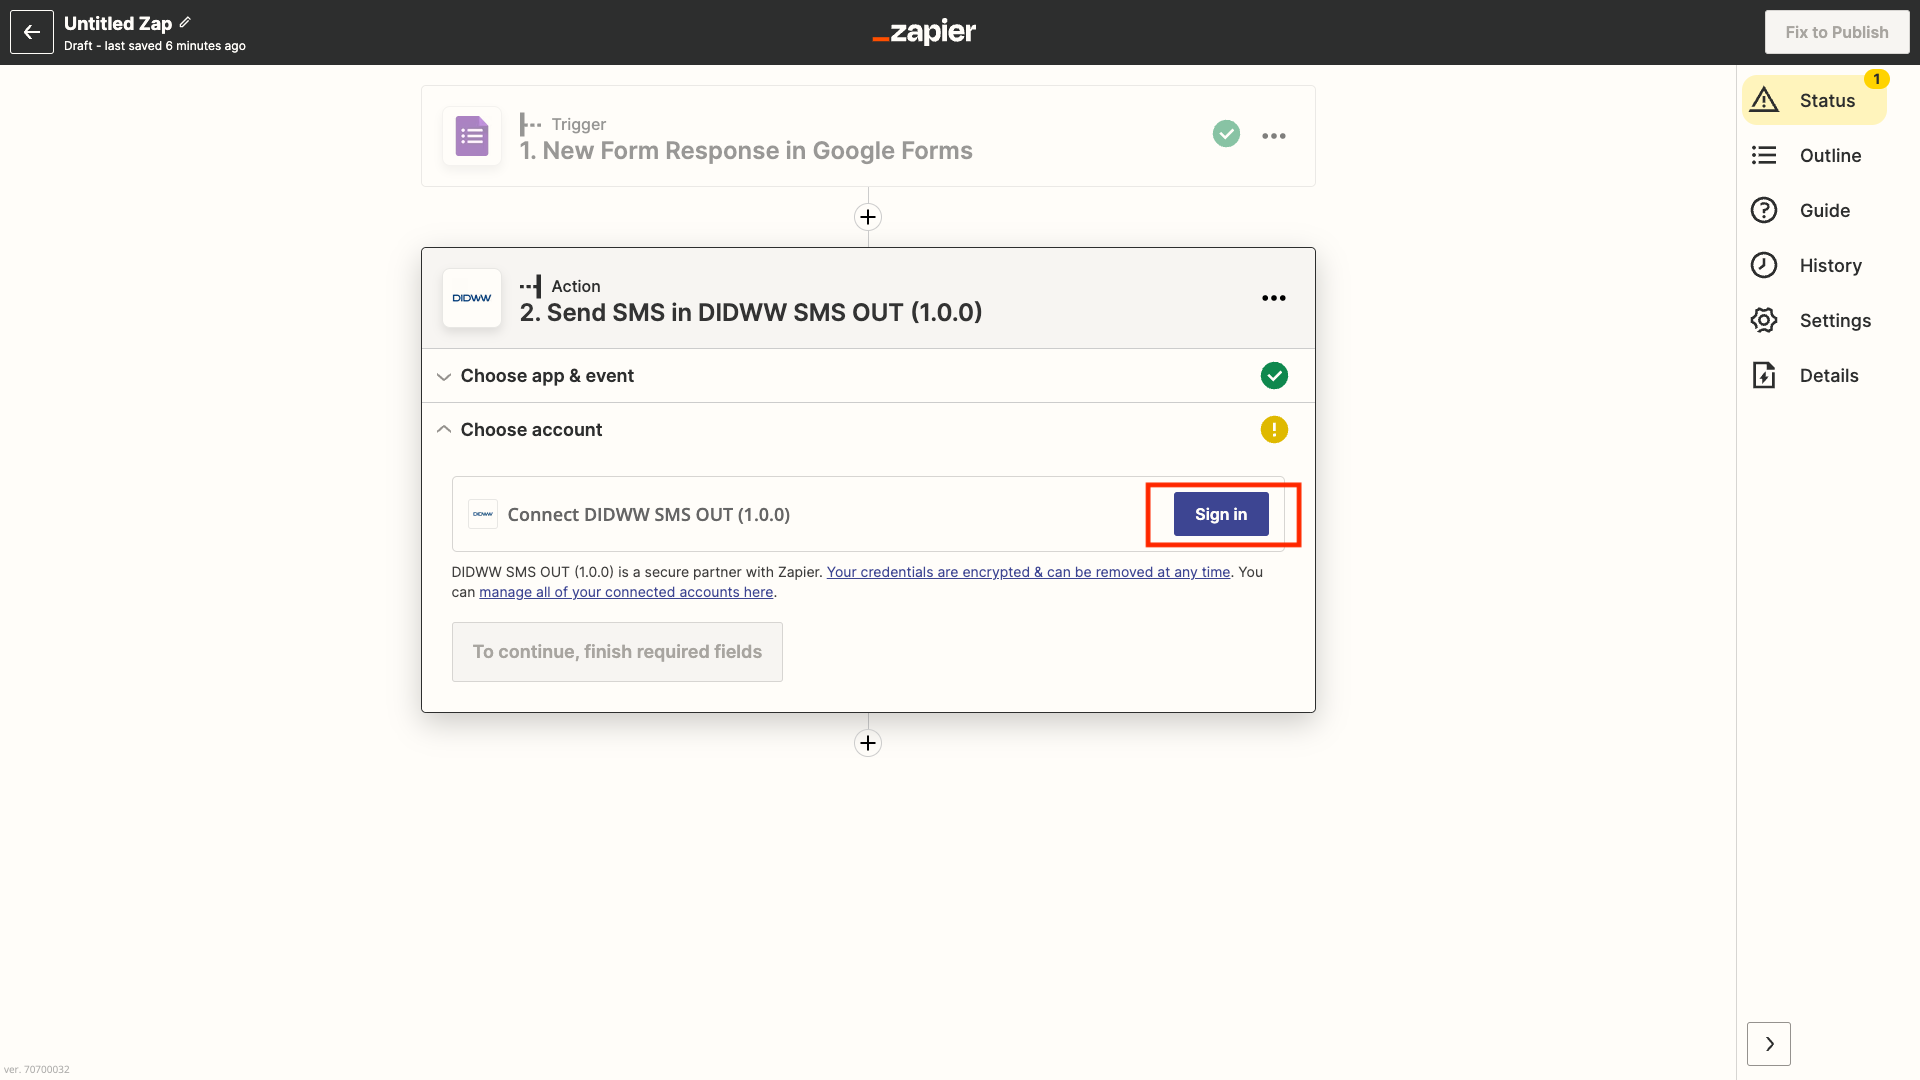
Fig. 9. Connecting the DIDWW SMS OUT Zapier App.
Step 10. In the next window (Fig. 10) enter your DIDWW HTTP SMS OUT trunk username and password which were generated upon SMS HTTP OUT Trunk creation. Also, you may specify the trunk name for better identification (in case multiple trunks are authenticated). Click Continue after successful authentication.
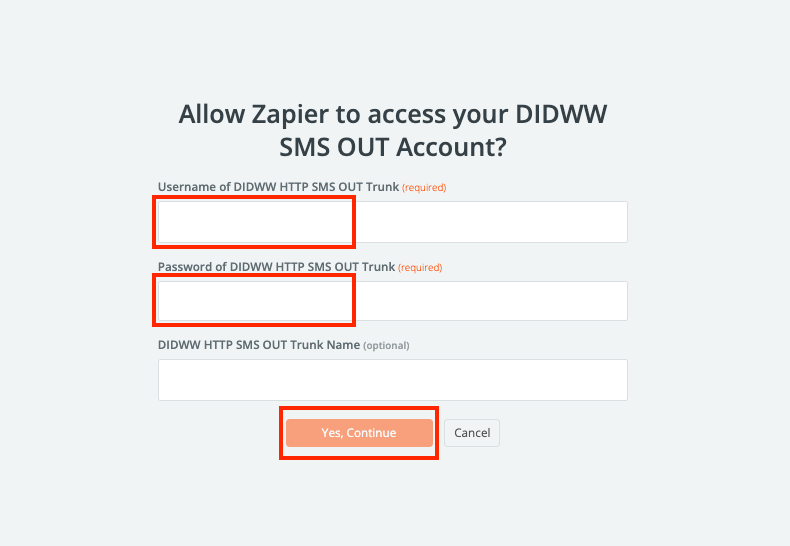
Fig. 10. Entering HTTP SMS OUT trunk credentials.
Step 11. Open up the Set up action tab (Fig. 11) where you can add static values or take placeholders of previously created and connected Google Form (Fig. 1).
For the DID Number add a static phone number. This should be an SMS enabled DID number existing on your DIDWW account and added to the SMS HTTP OUT trunk source addresses list. The accepted number formats are: E.164 or +E.164 (Country Code + Area Code + Number).
For the Destination Number select the SMS Destination Number Google Form from the dropdown menu. The accepted number formats are: E.164 or +E.164 (Country Code + Area Code + Number).
For the SMS Text select the SMS Text Google Form from the dropdown menu.
After all fields have been selected click “Continue” (Fig. 11).
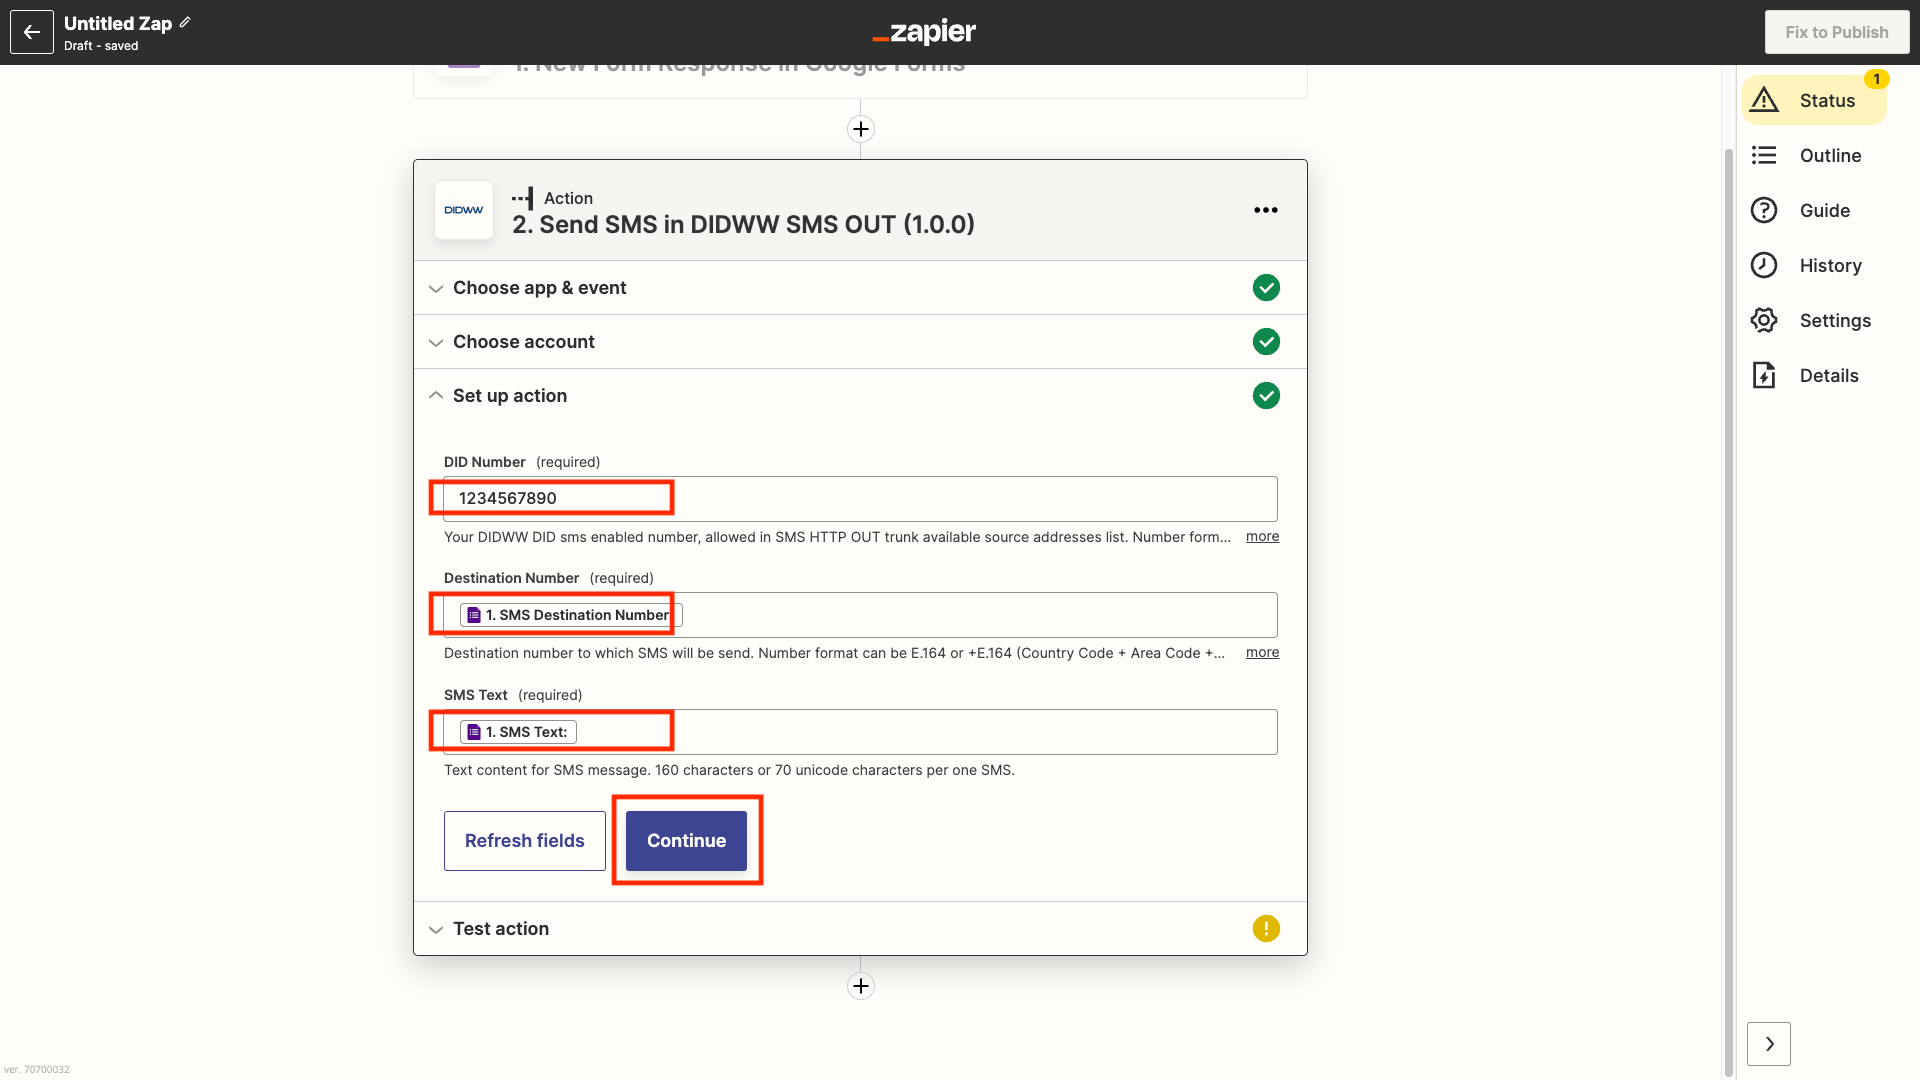
Fig. 11. Configuring action values.
Step 12. After clicking “Continue” an automatic test will be initiated and an SMS message will be sent with your configured values. Also, the result response data (message type and id) will be shown in the Zapier test action window (Fig. 12). Proceed to publishing your Zap (Fig. 12).
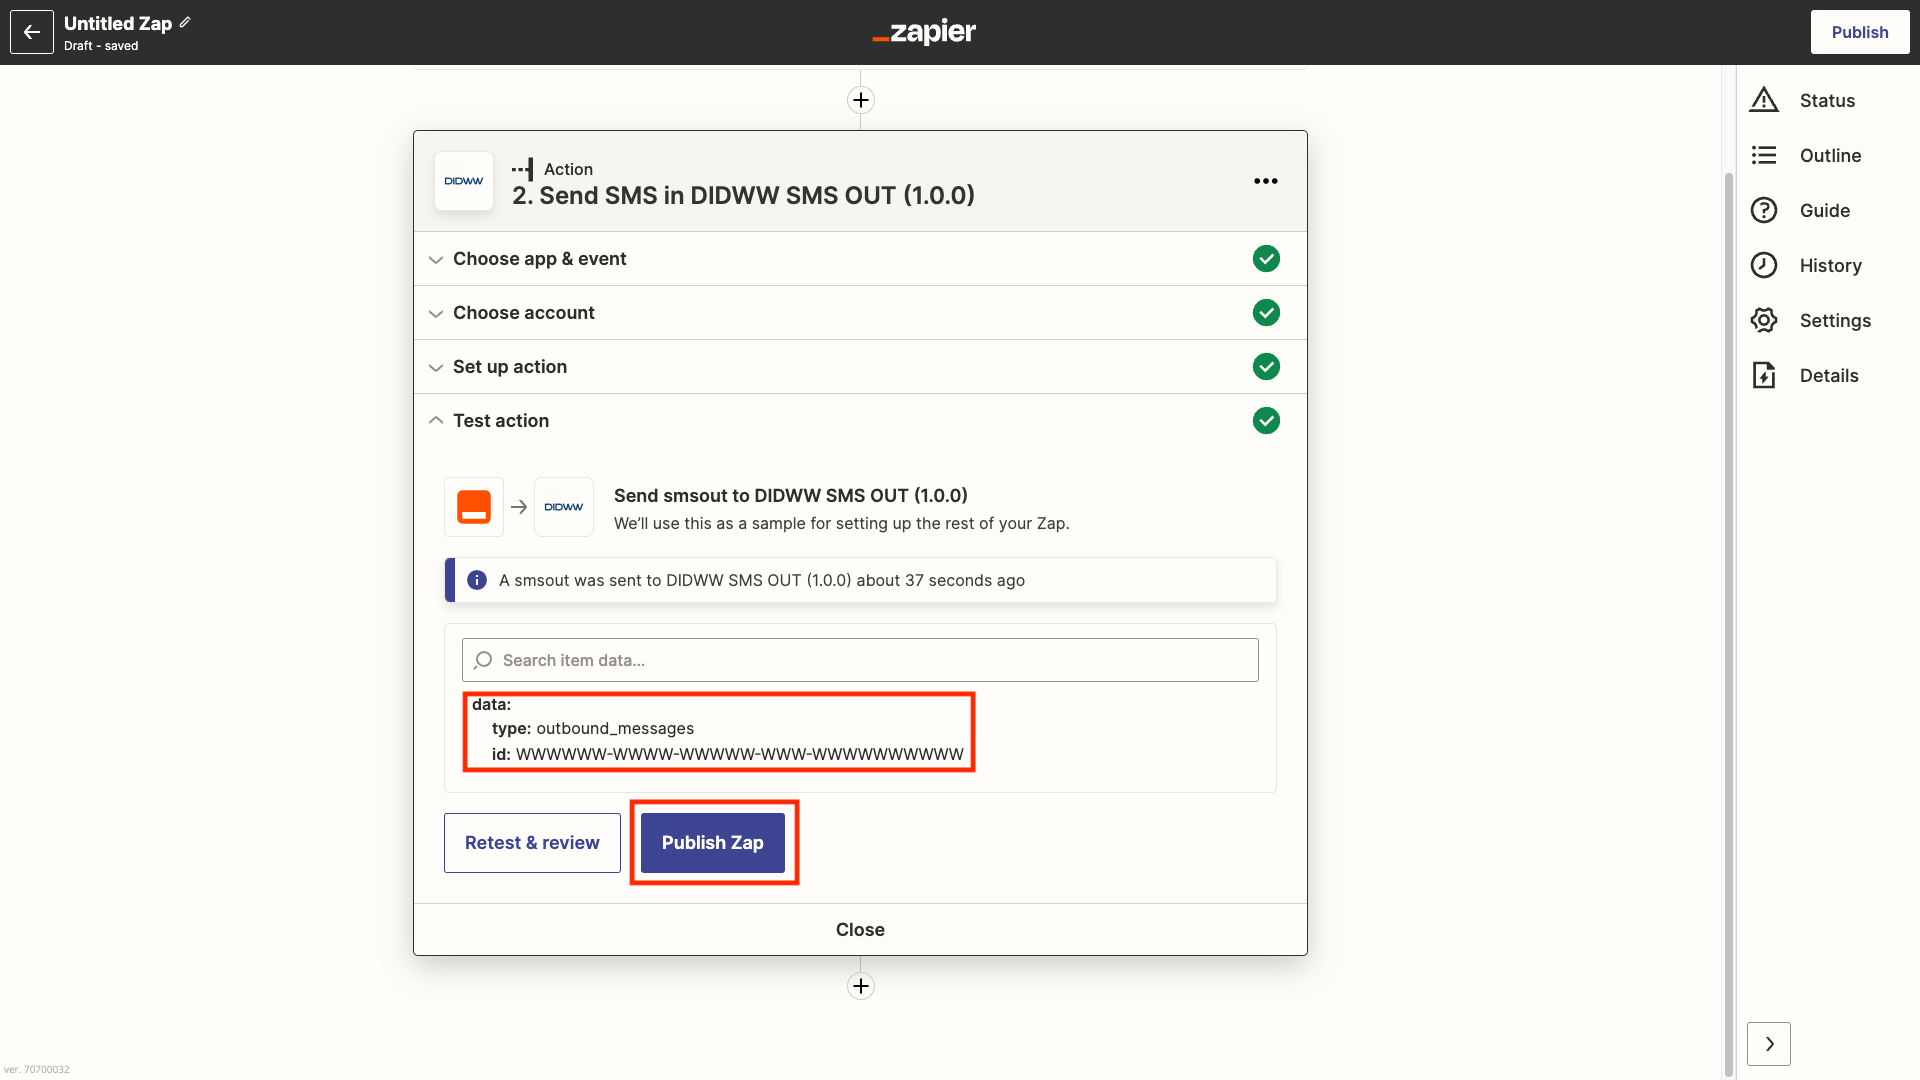
Fig. 12. Testing the action and publishing Zap.
Step 13. Open your previously created Google Form, enter SMS Destination Number, SMS Text and click Submit (Fig. 13). An SMS message should be sent to the specified destination number with the entered text in it. If something went wrong and the SMS did not reach the destination number, you can check the Outbound SMS Log on your DIDWW account or in the Zap History log.
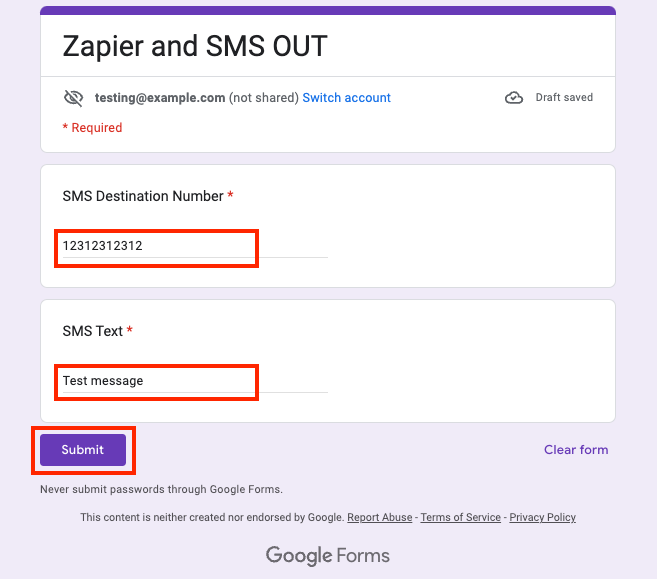
Fig. 13. Submitting Google Form.
DIDWW SMS HTTP IN and Zapier Webhook
DIDWW SMS IN service allows you to receive SMS messages to your existing DIDWW SMS enabled DID numbers. Zapier Webhook allows DIDWW SMS IN service to be used with Apps available on Zapier platform, enabling non-sms capable applications to receive SMS messages. For example, an incoming SMS message can create an event or task in your CRM or other task management software. Please read more about DIDWW SMS IN service.
Getting started
What you need to get started:
Configuring DIDWW SMS HTTP IN and Zapier Webhook
As a use case example, we will connect a DIDWW SMS enabled DID number for incoming messages to be stored in Google Sheets. You may choose any other available Zapier App required for your idea/automation/task/project as an Action for incoming DIDWW SMS messages.
Step 1. Create Zap in your Zapier account (Fig. 1).

Fig. 1. Creating a new Zap.
Step 2. Select Webhooks by Zapier as your trigger for the App event. (Fig.2).

Fig. 2. Selecting Webhooks by Zapier trigger.
Step 3. Select “Catch Hook” in the event dropdown menu (Fig.3)

Fig. 3. Selecting “Catch Hook”.
Step 4. Leave the Child Key field empty and click Continue (Fig.4).
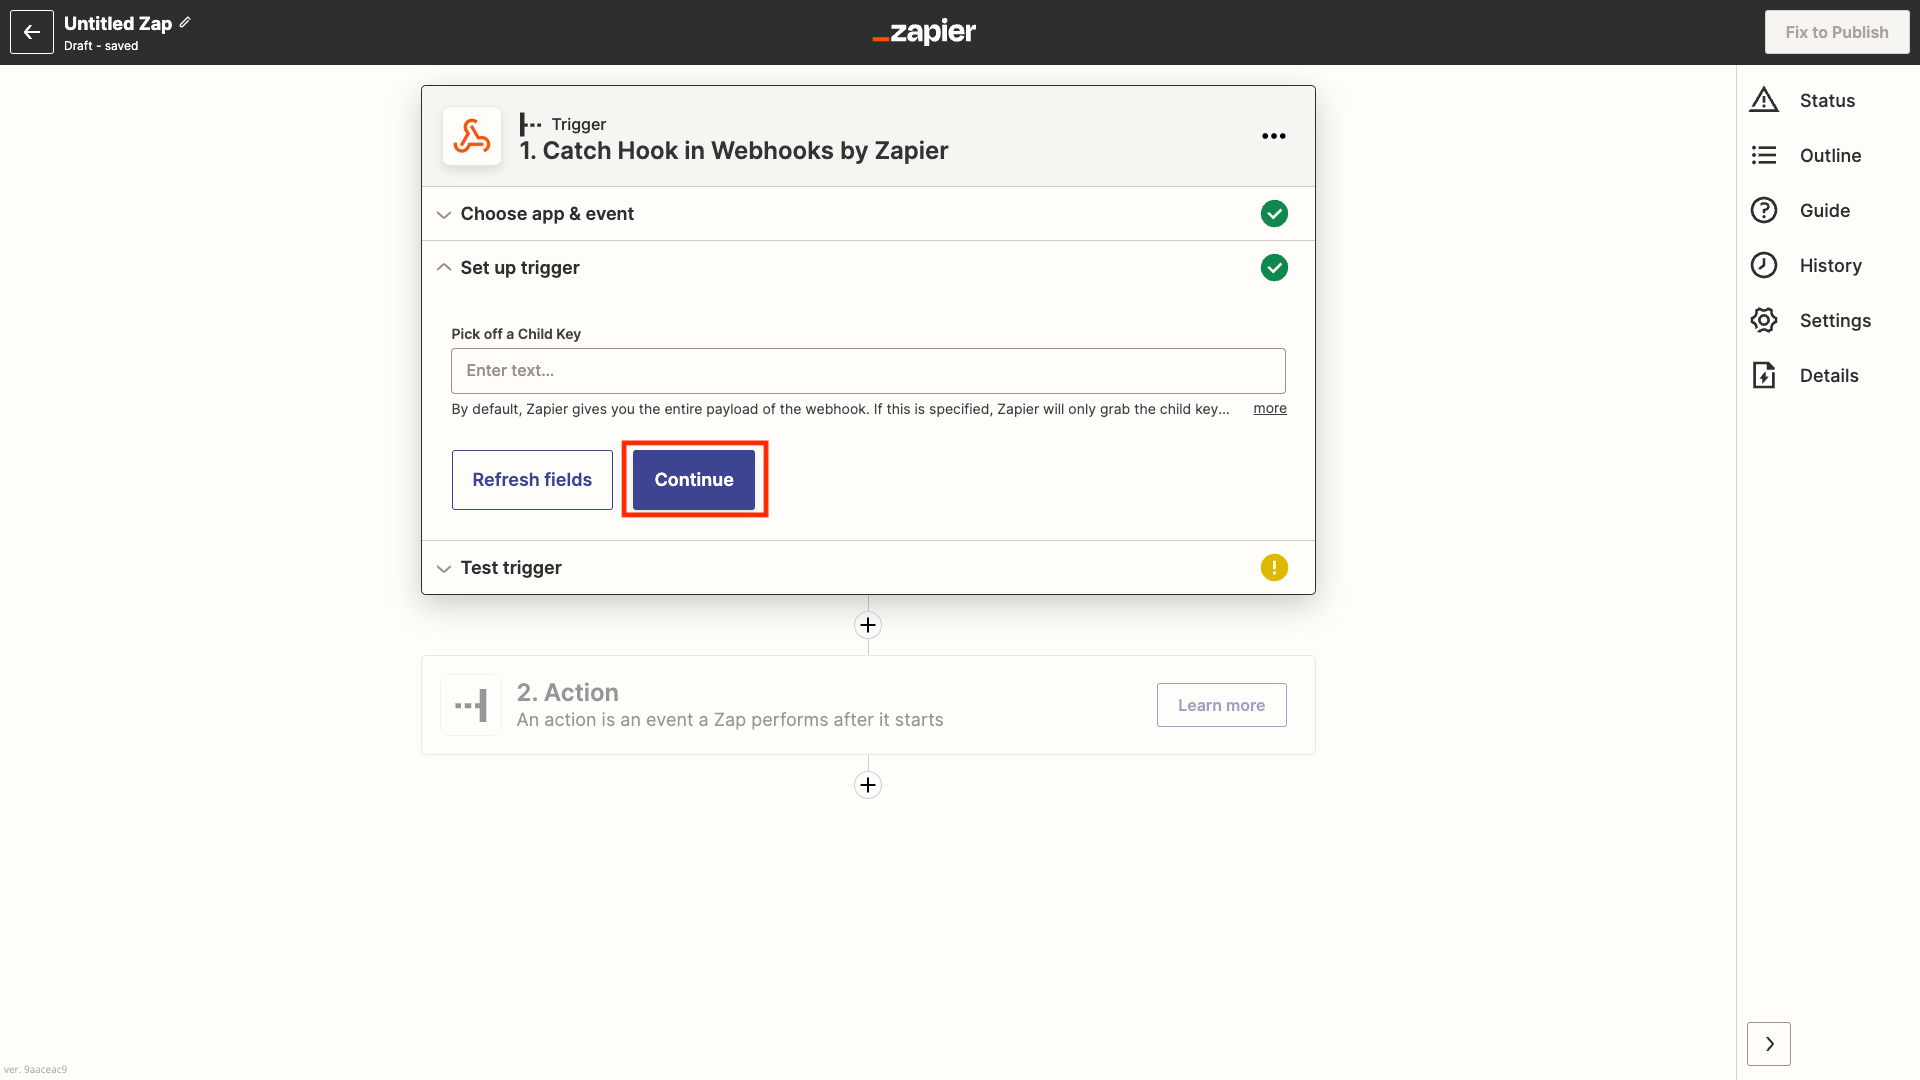
Fig. 4. Child key field is left empty.
Step 5. A webhook URL will be generated for testing your trigger. Copy it for the next step (Fig. 5) and click the Test trigger button.

Fig. 5. Copy Zapier webhook URL.
Step 6. On your DIDWW account create or edit the previously created SMS HTTP IN trunk (Fig. 6). Make the following trunk configurations:
HTTP method – select POST
Request URL – paste URL which was copied in Step 5
Body type - select JSON
Request body – add placeholders which you need.
For example:
{"TIME":"{SMS_TIME}","SRC":"{SMS_SRC_ADDR}","DID":"{SMS_DST_ADDR}","TEXT":"{SMS_TEXT}"}
Submit to save changes to the HTTP IN trunk.
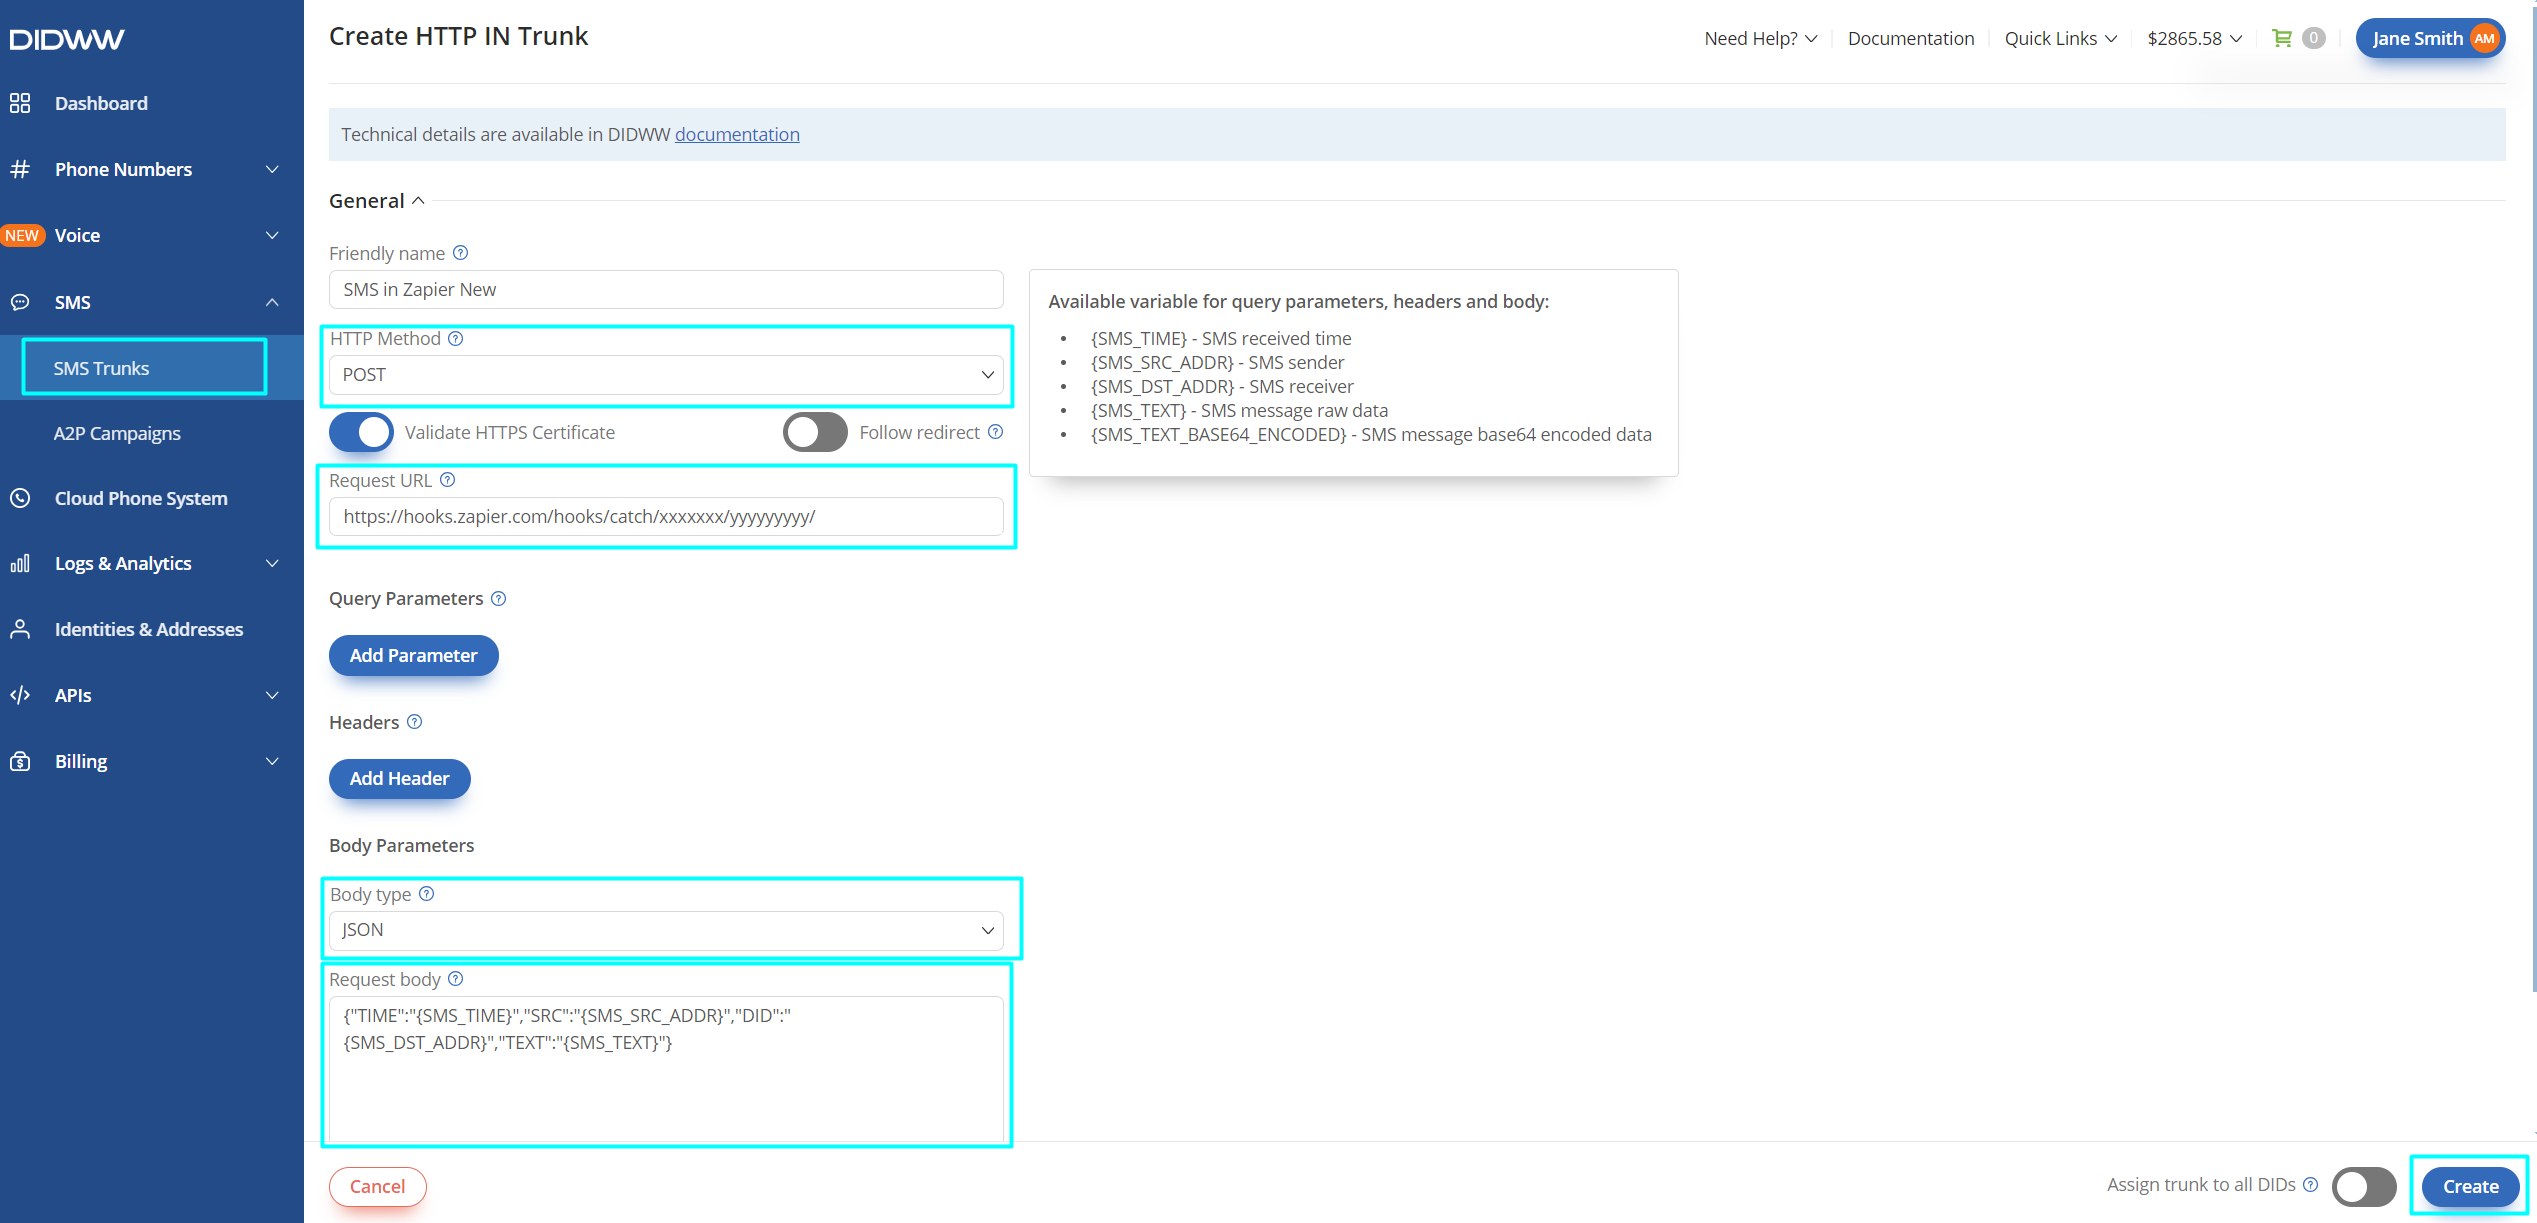
Fig. 6. Configure DIDWW SMS HTTP IN trunk.
Step 7. Send any test SMS message from your mobile device to the DIDWW DID number which the SMS trunk was previously configured for. If everything was done correctly you should see the values configured on DIDWW SMS trunk appear (Fig. 7). Click Continue.
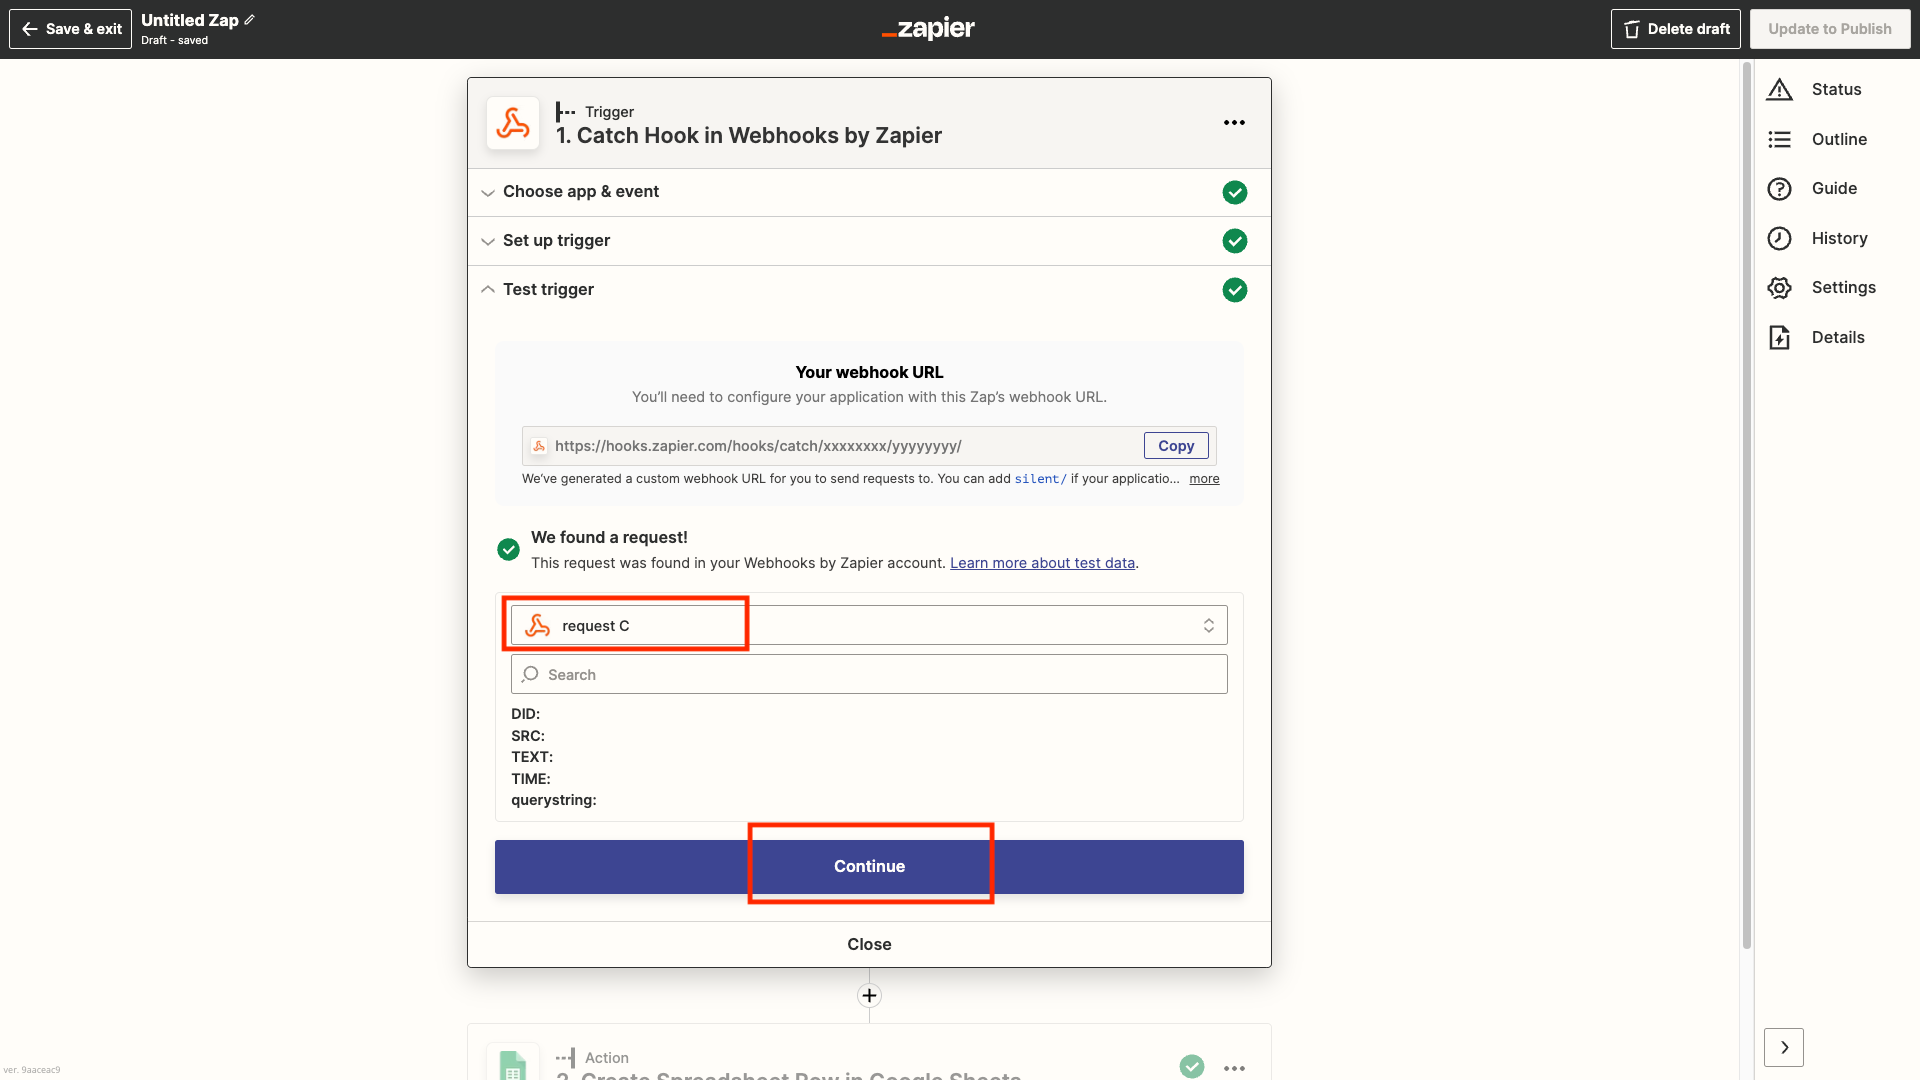
Fig. 7. Testing Zapier webhook trigger.
Step 8. Next, we will be configuring an Action event after a successful trigger. This guide uses Google Sheets as an example. (Fig. 8). Click Google Sheets in the event selection menu.
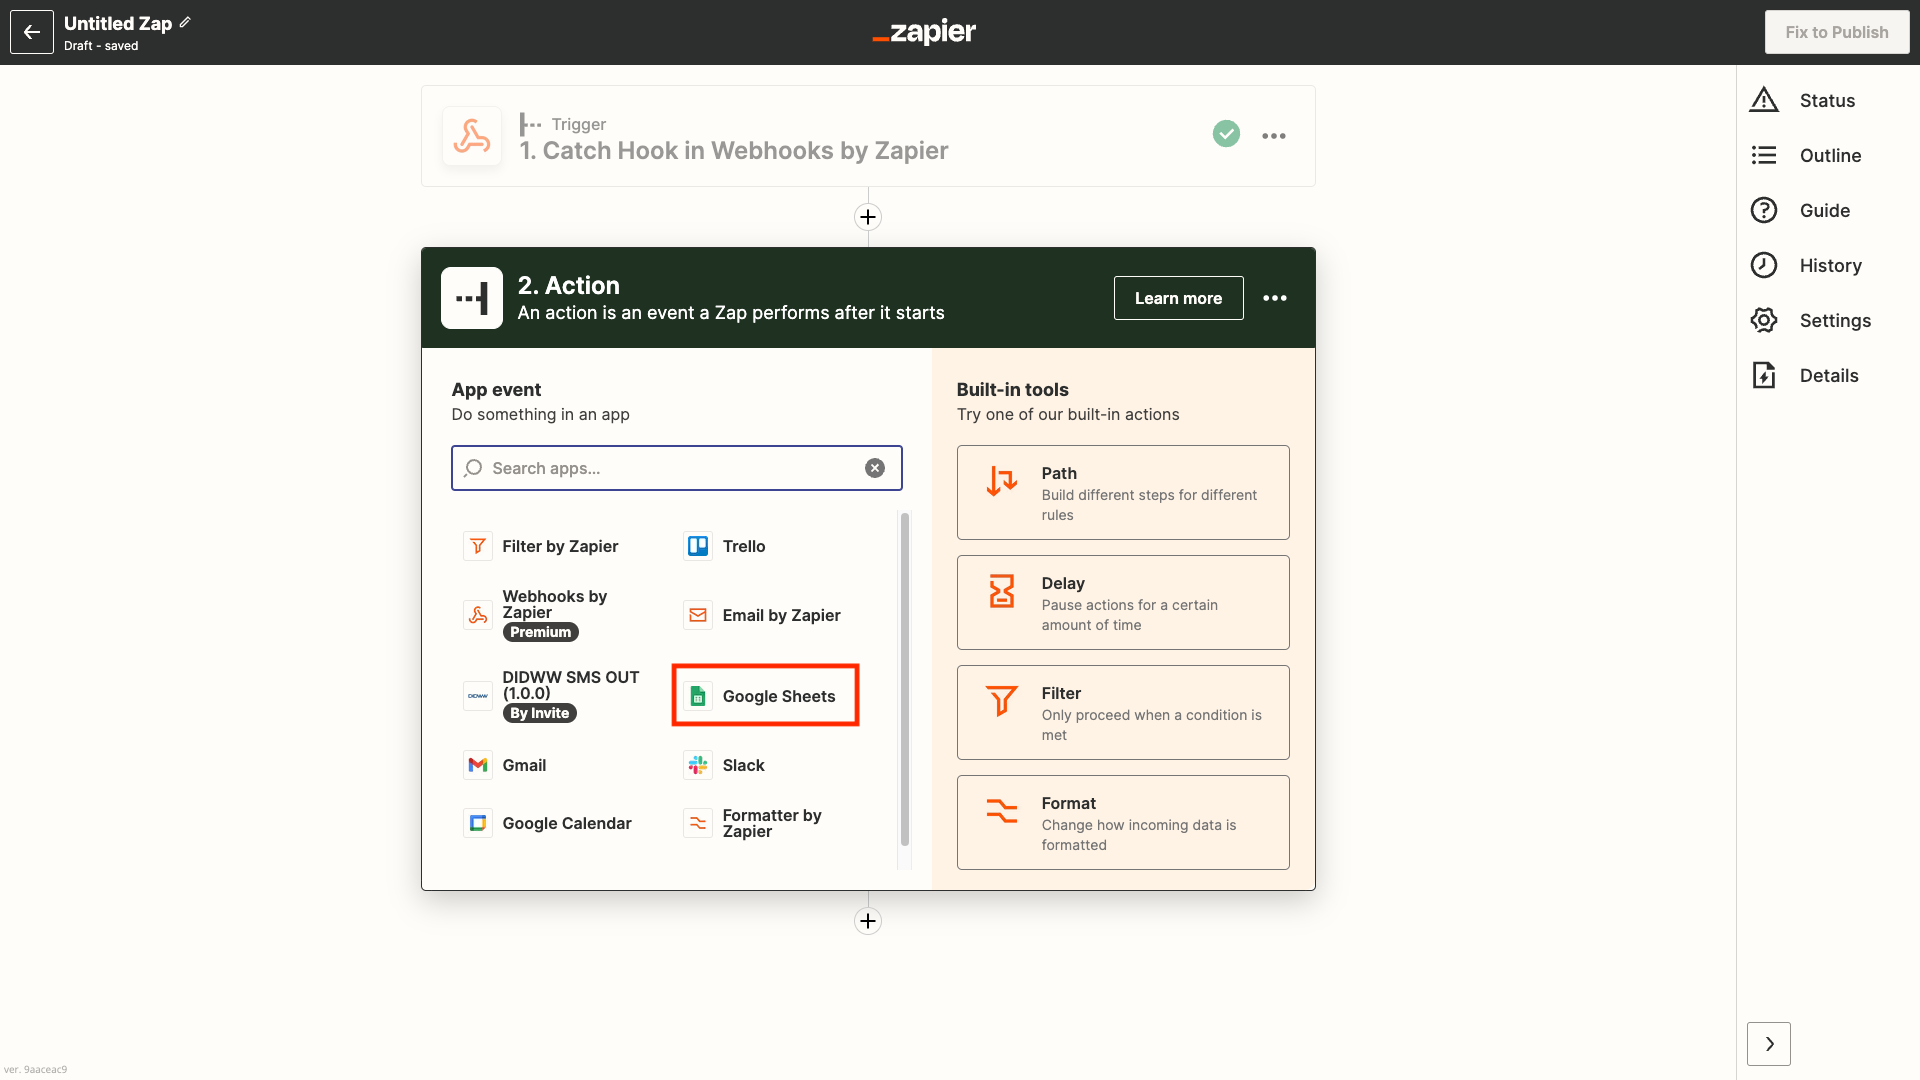
Fig. 8. Selecting Action Google Sheets.
Step 9. Select Create Spreadsheet Row from the event selection dropdown list (Fig. 9).
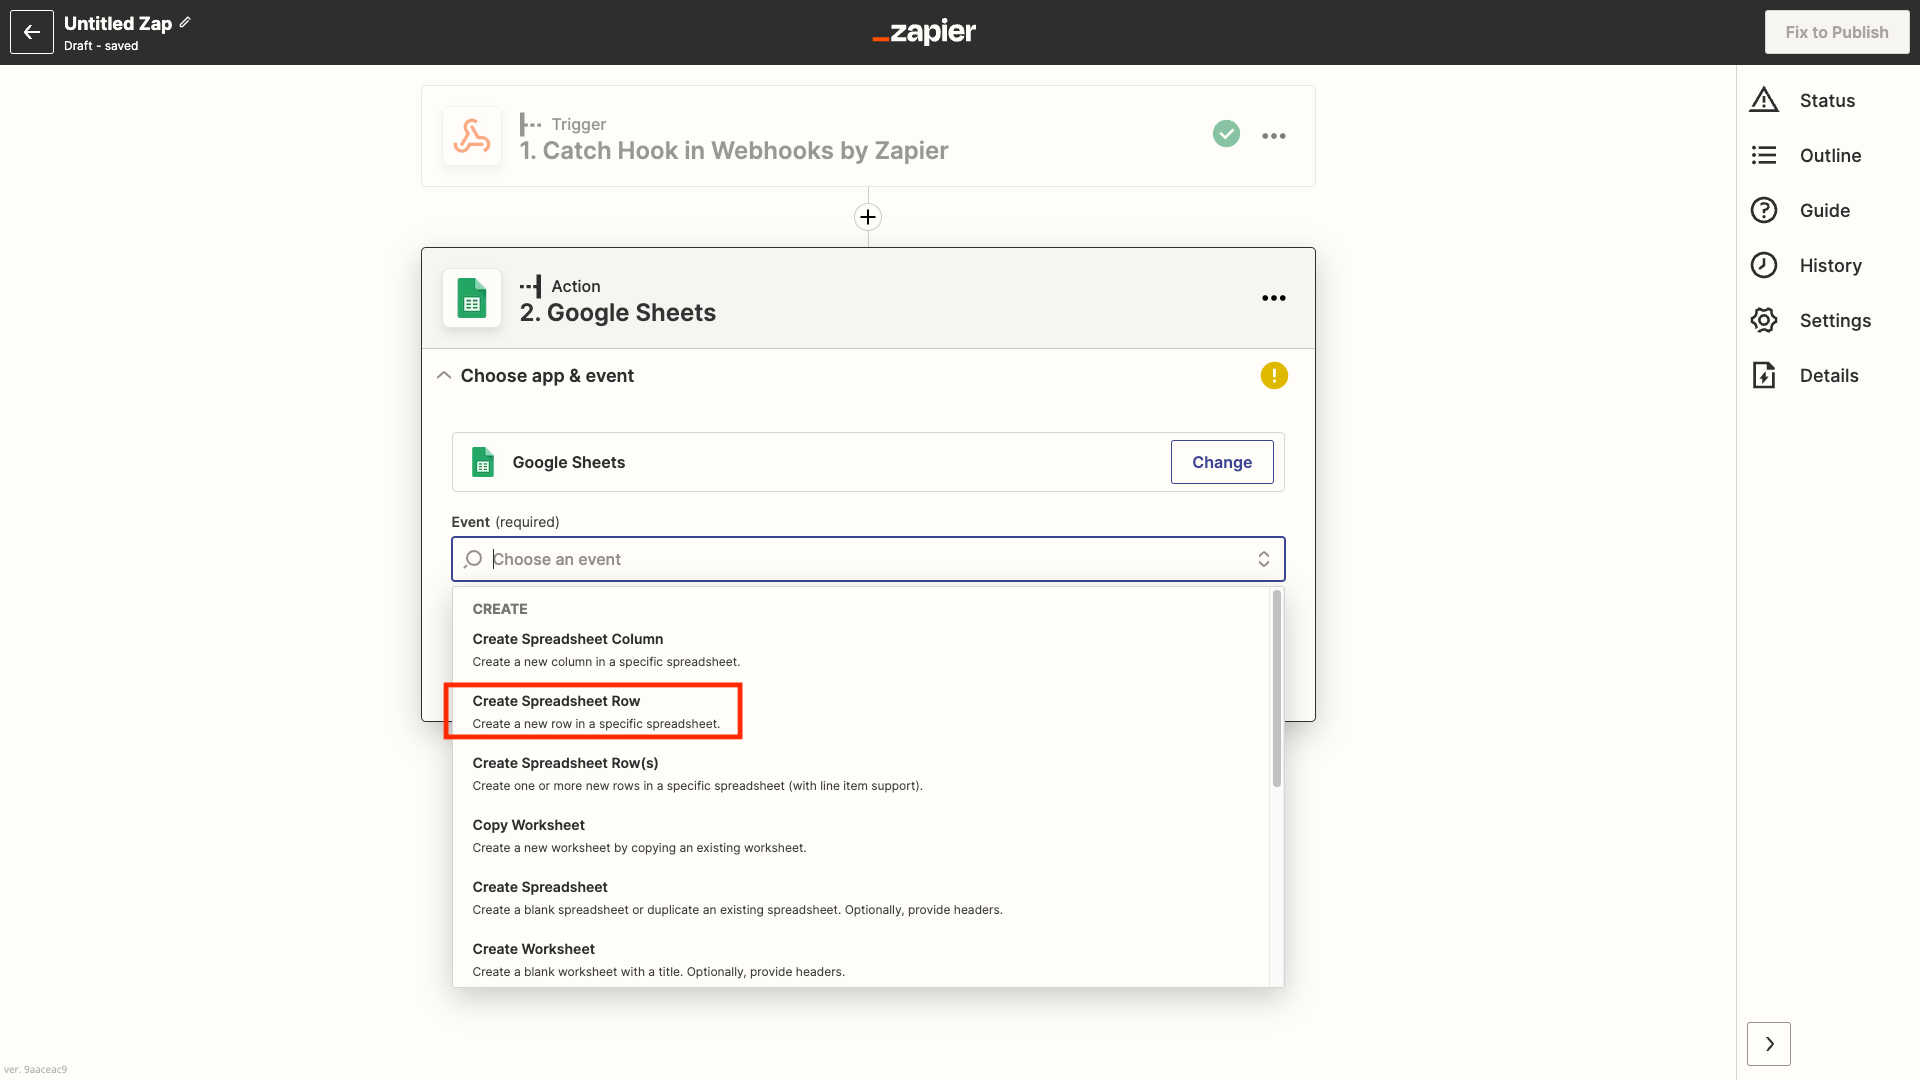
Fig. 9. Selecting Create Spreadsheet Row event.
Step 10. Before moving to the next step, prepare a spreadsheet in Google Sheets with any relevant information, such as Time, Source number, DID number, SMS text (Fig. 10).
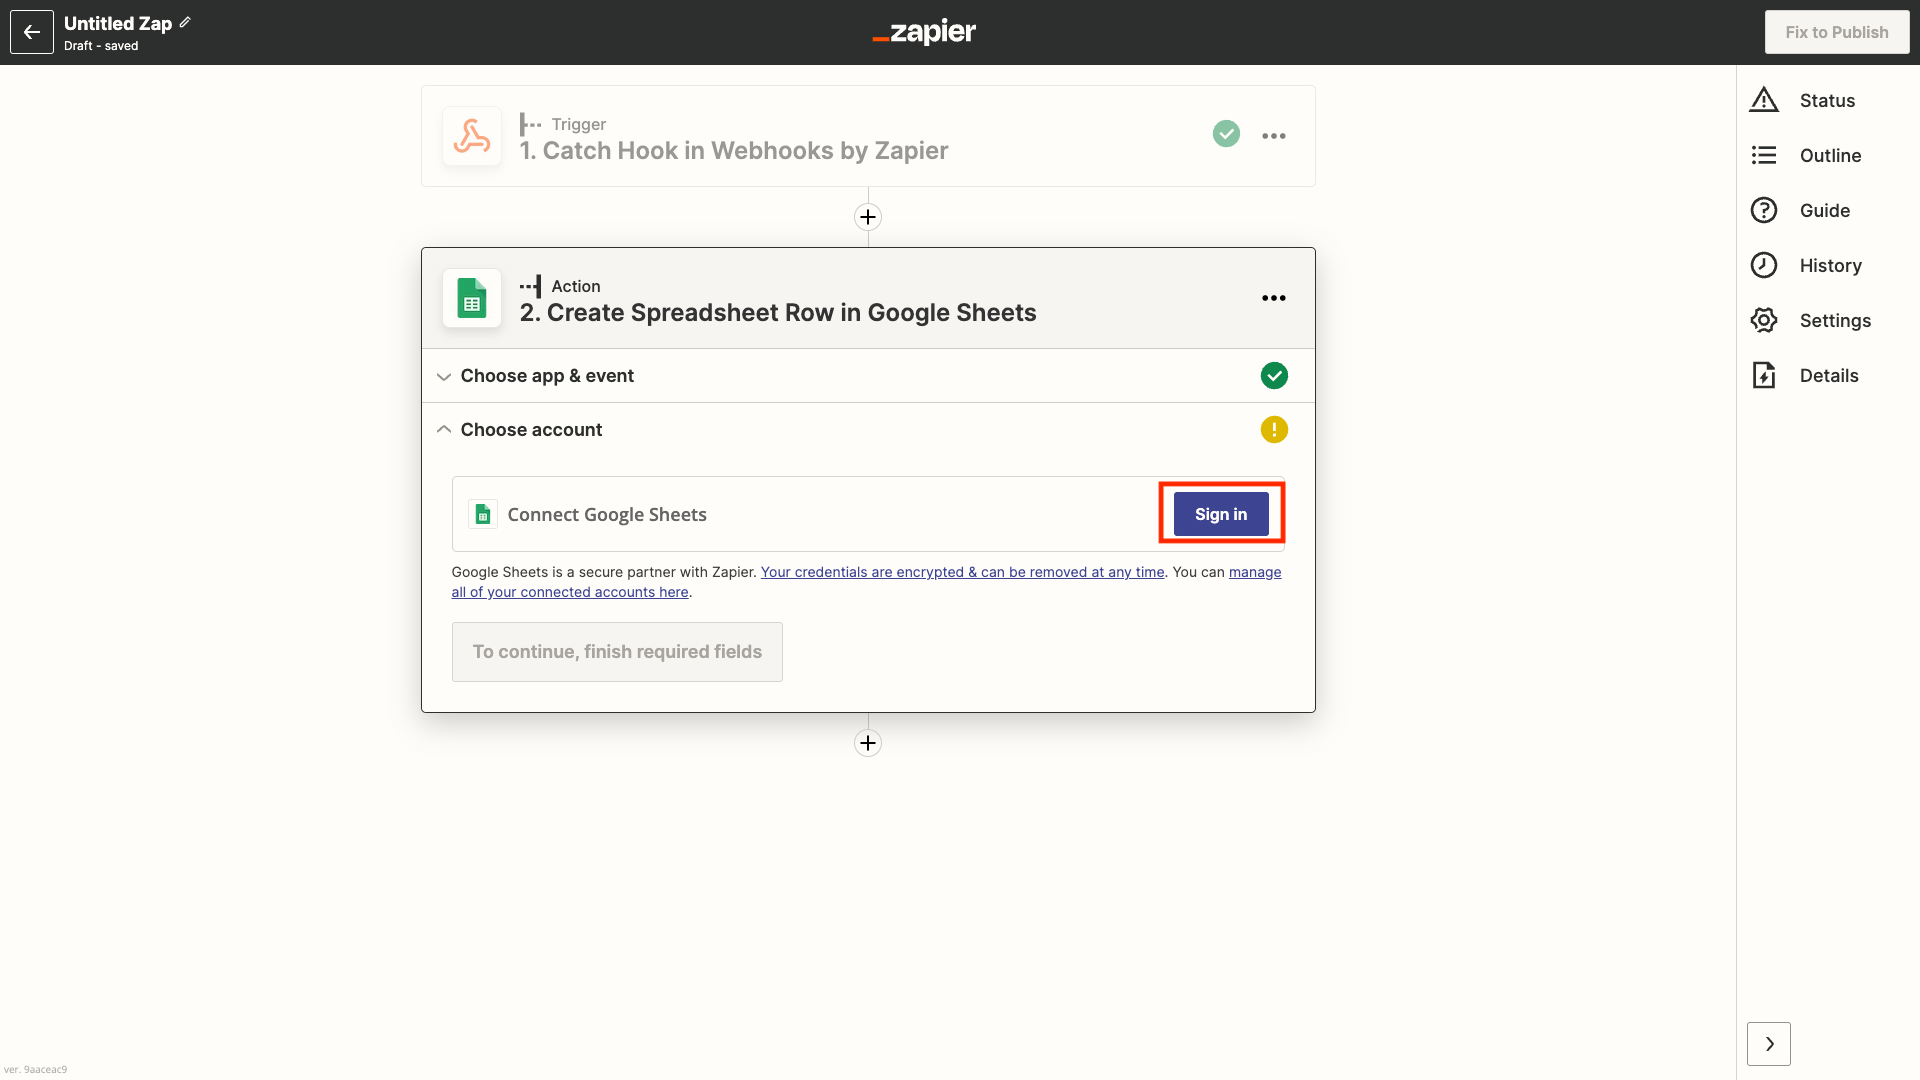
Fig. 10. Example of a Google Spreadsheet.
Step 11. Sign in to your Google Sheets account (Fig. 11), select it, and click Continue (Fig. 12).
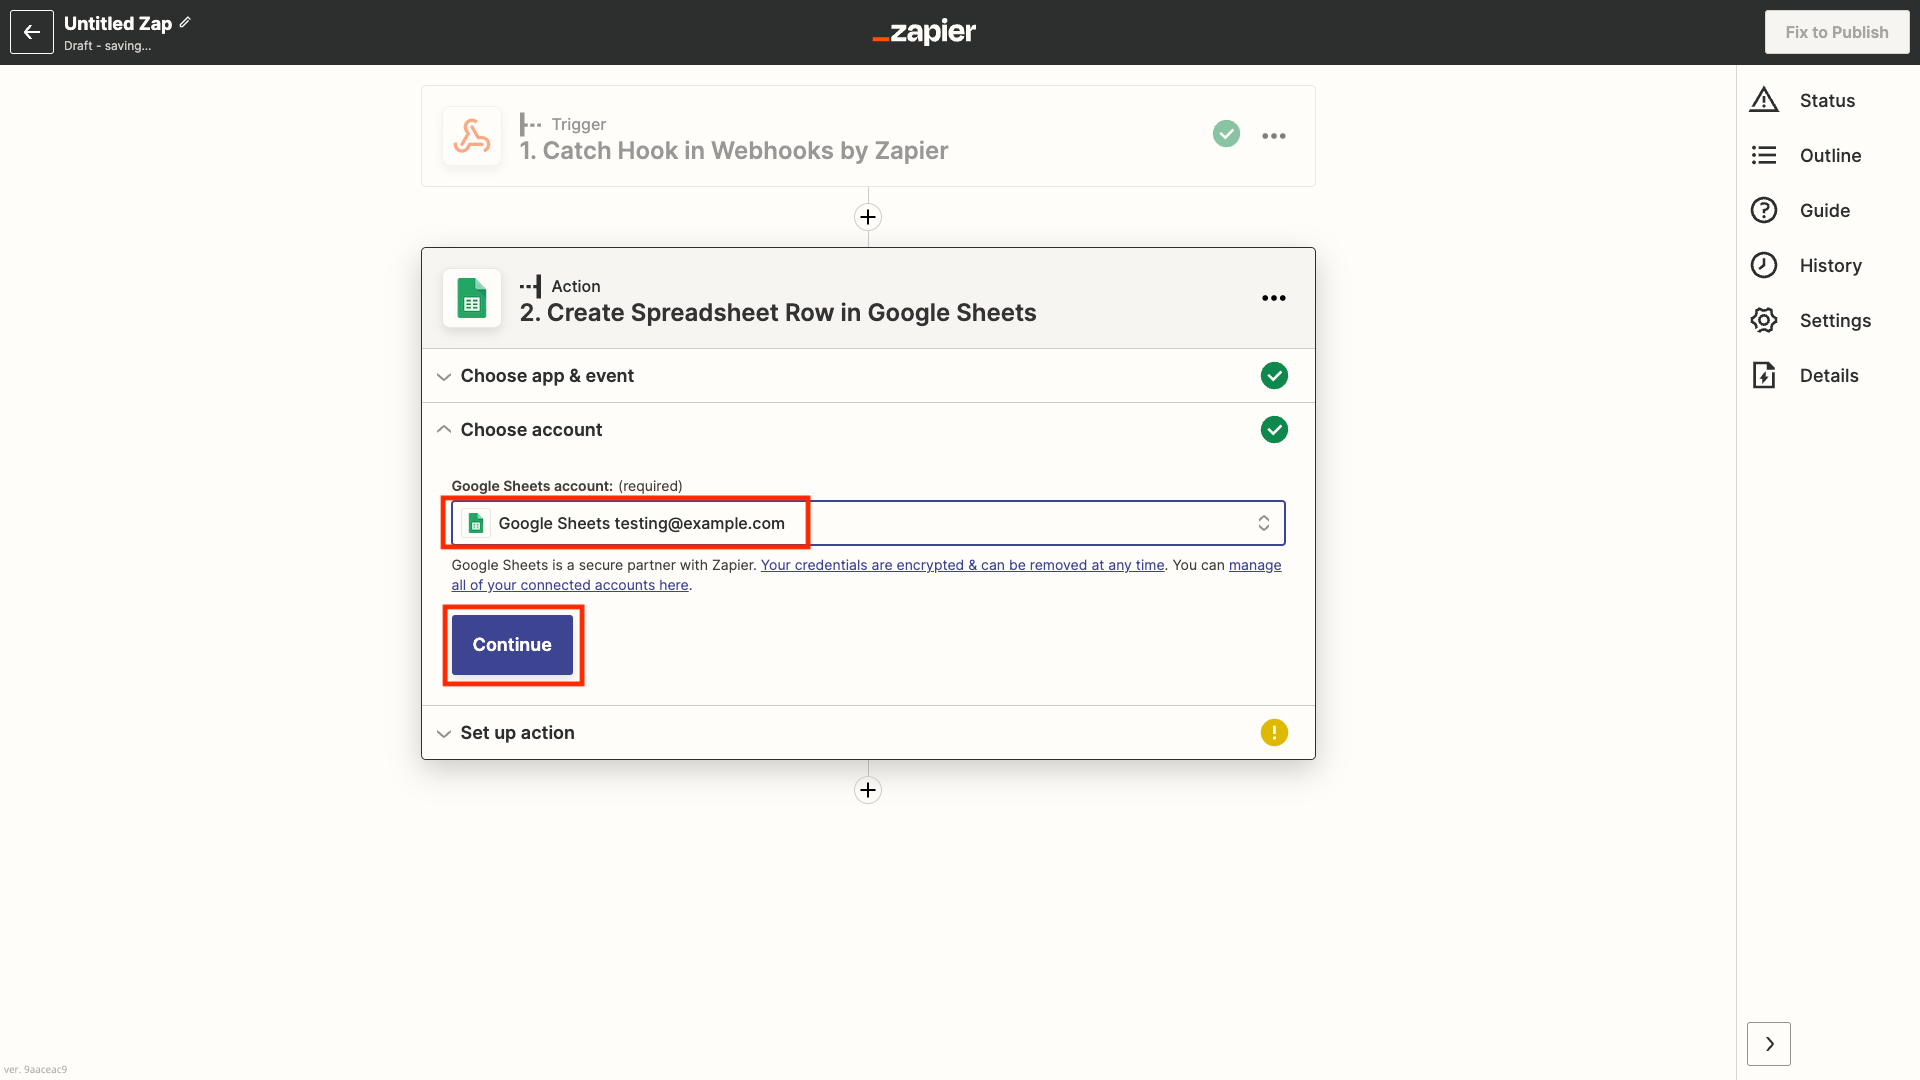
Fig. 11. Sign in to Google Sheets.
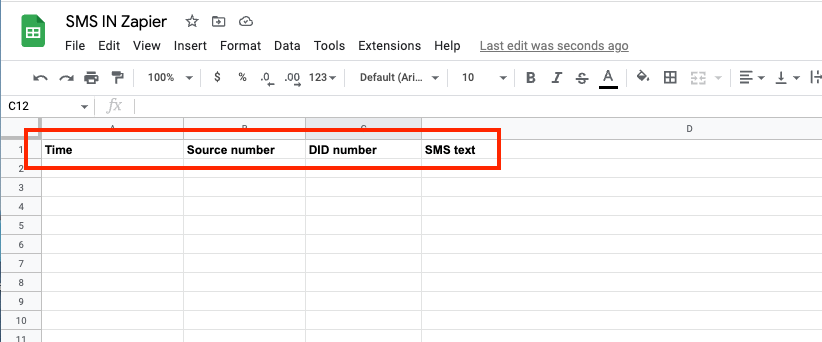
Fig. 12. Select your Google Sheets account.
Step 12. Select the following in the Set up Actions menu (Fig.13):
Drive – Google Drive location of the created spreadsheet
Spreadsheet – spreadsheet which was created in step 10
Worksheet – sheet of the spreadsheet
Column Time – TIME placeholder
Column Source number - SRC placeholder
Column DID number -DID placeholder
Column SMS text – TEXT placeholder
After selecting all the values click Continue (Fig. 13).
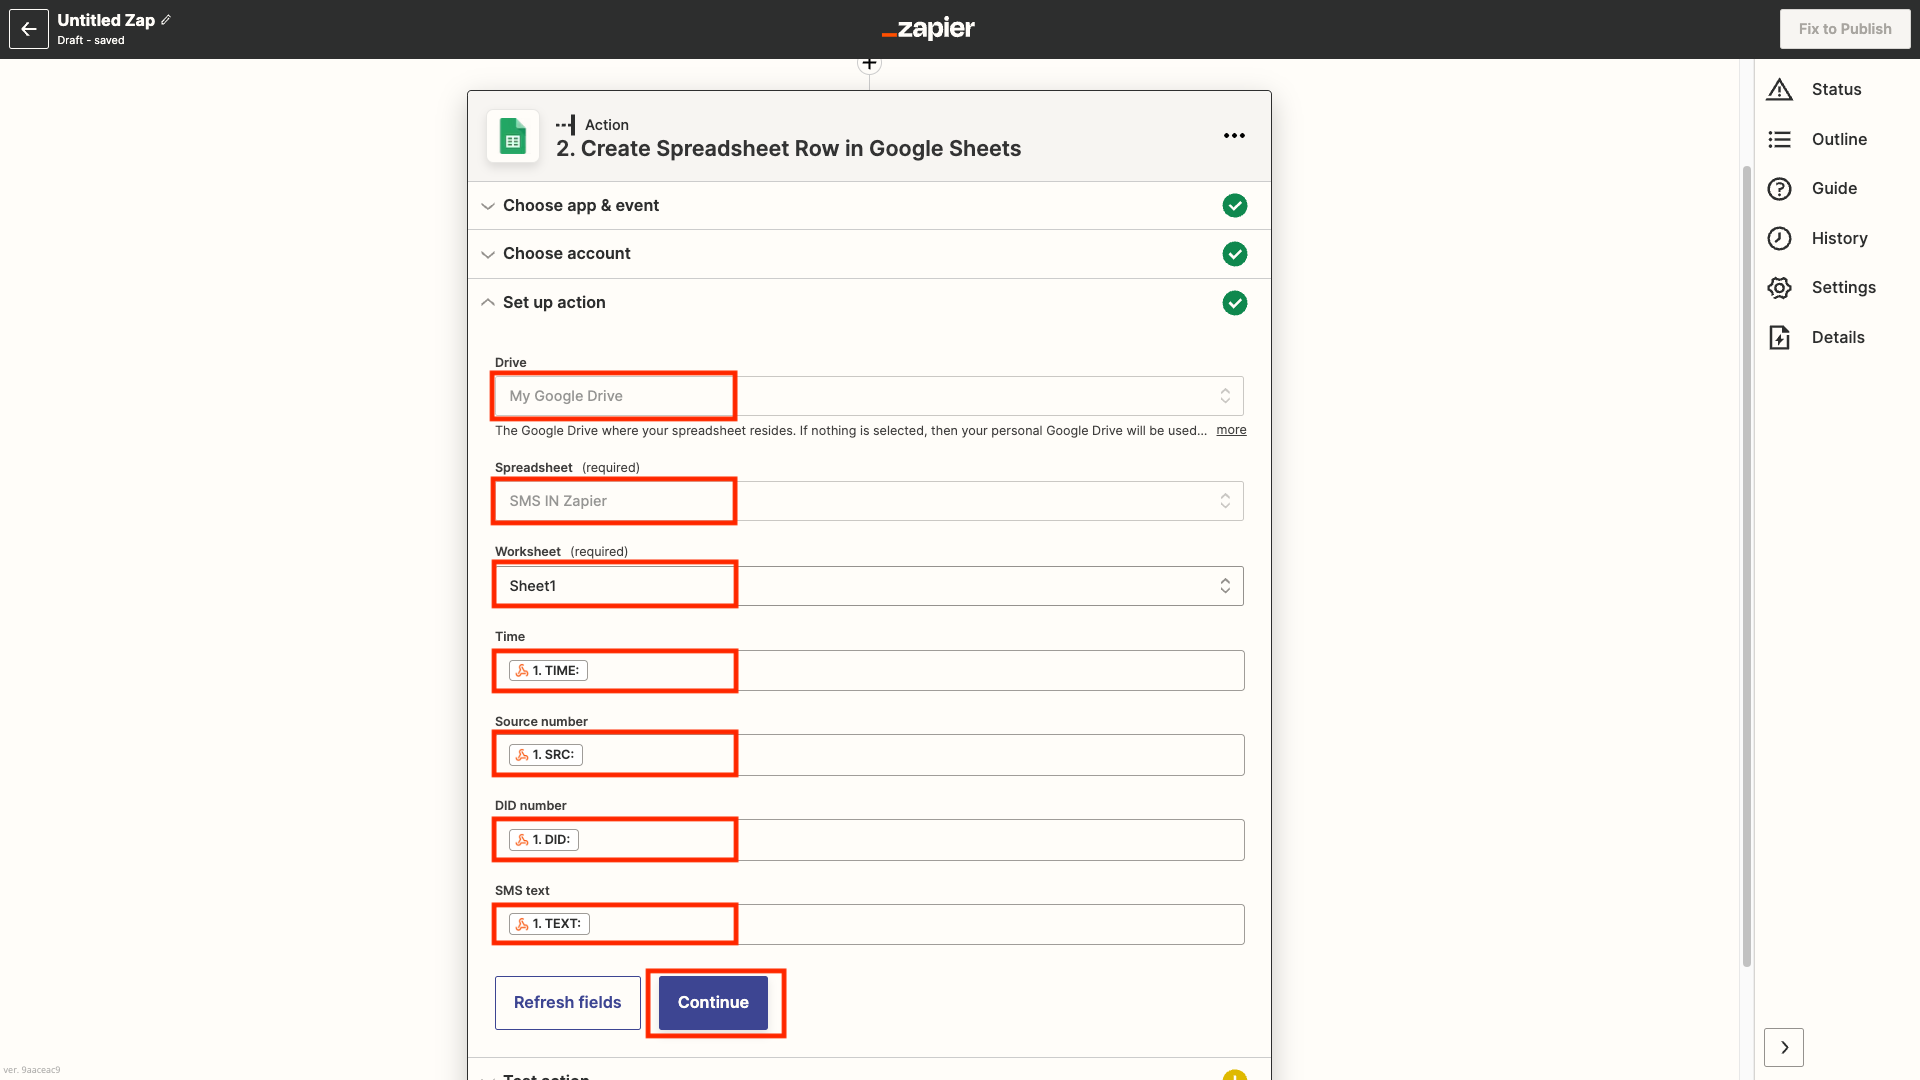
Fig. 13. Setting up action for Google Spreadsheet Row creation.
Step 13. Click Test Action button and after successful testing proceed to Publish Zap (Fig. 14).
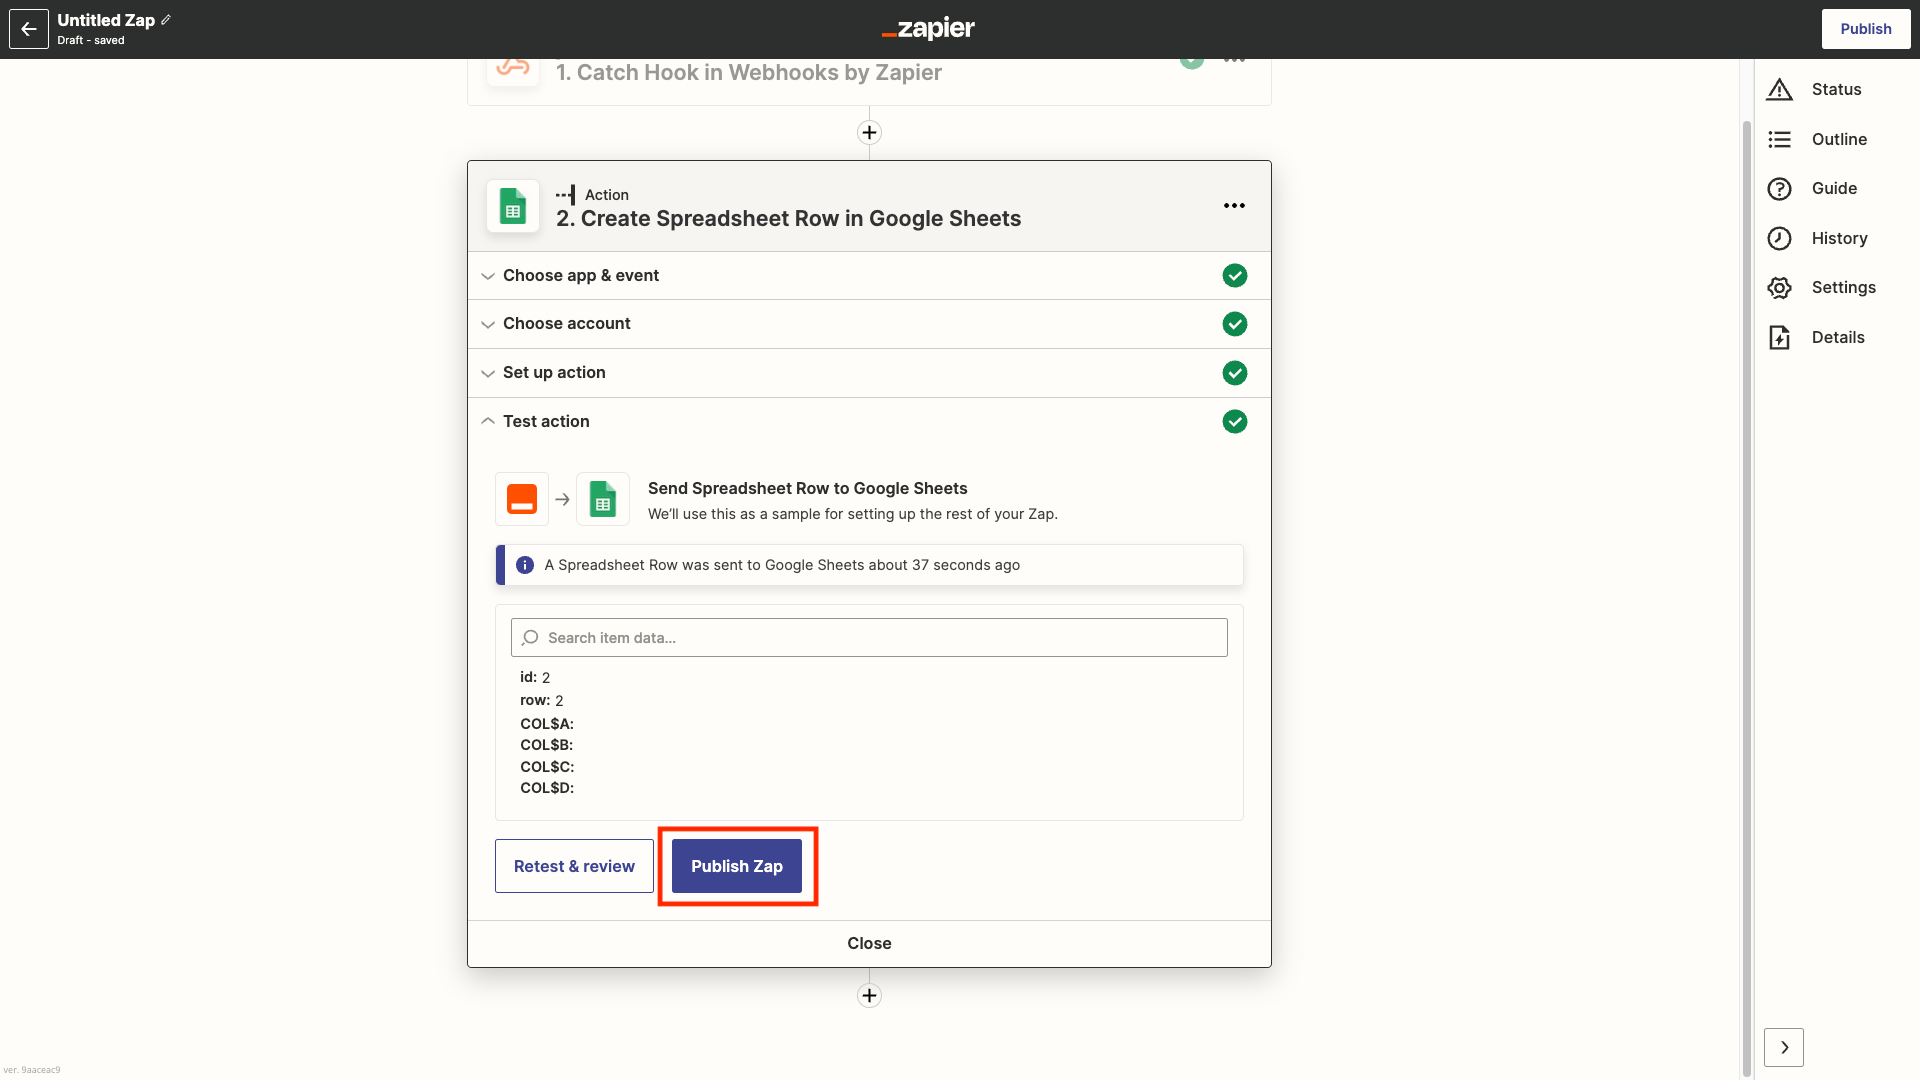
Fig. 14. Publishing your Zap.
DIDWW Voice IN Call Events and Zapier Webhook
DIDWW Voice IN Call Events allow you to receive events upon incoming calls to your existing DIDWW DID numbers. Together with Zapier Webhook it can be used to enable other applications to receive info about started, connected or ended calls made to a specific DID number. As an example, incoming voice calls can create an event or task in your favorite CRM or tasks management software. Please read more about DIDWW Voice IN Call Events.
Getting started
What you need to get started:
Configuring DIDWW Voice IN Call Events and Zapier Webhook
As a use case example, we will configure DIDWW Voice IN Call Events for a DID number. All the details of a call to that number will be sent to and stored in a Google Sheet after the call ends. You may choose any other available Zapier App required for your idea/automation/task/project as an Action for DIDWW Voice IN Call Events.
Step 1. Create Zap in your Zapier account (Fig. 1).
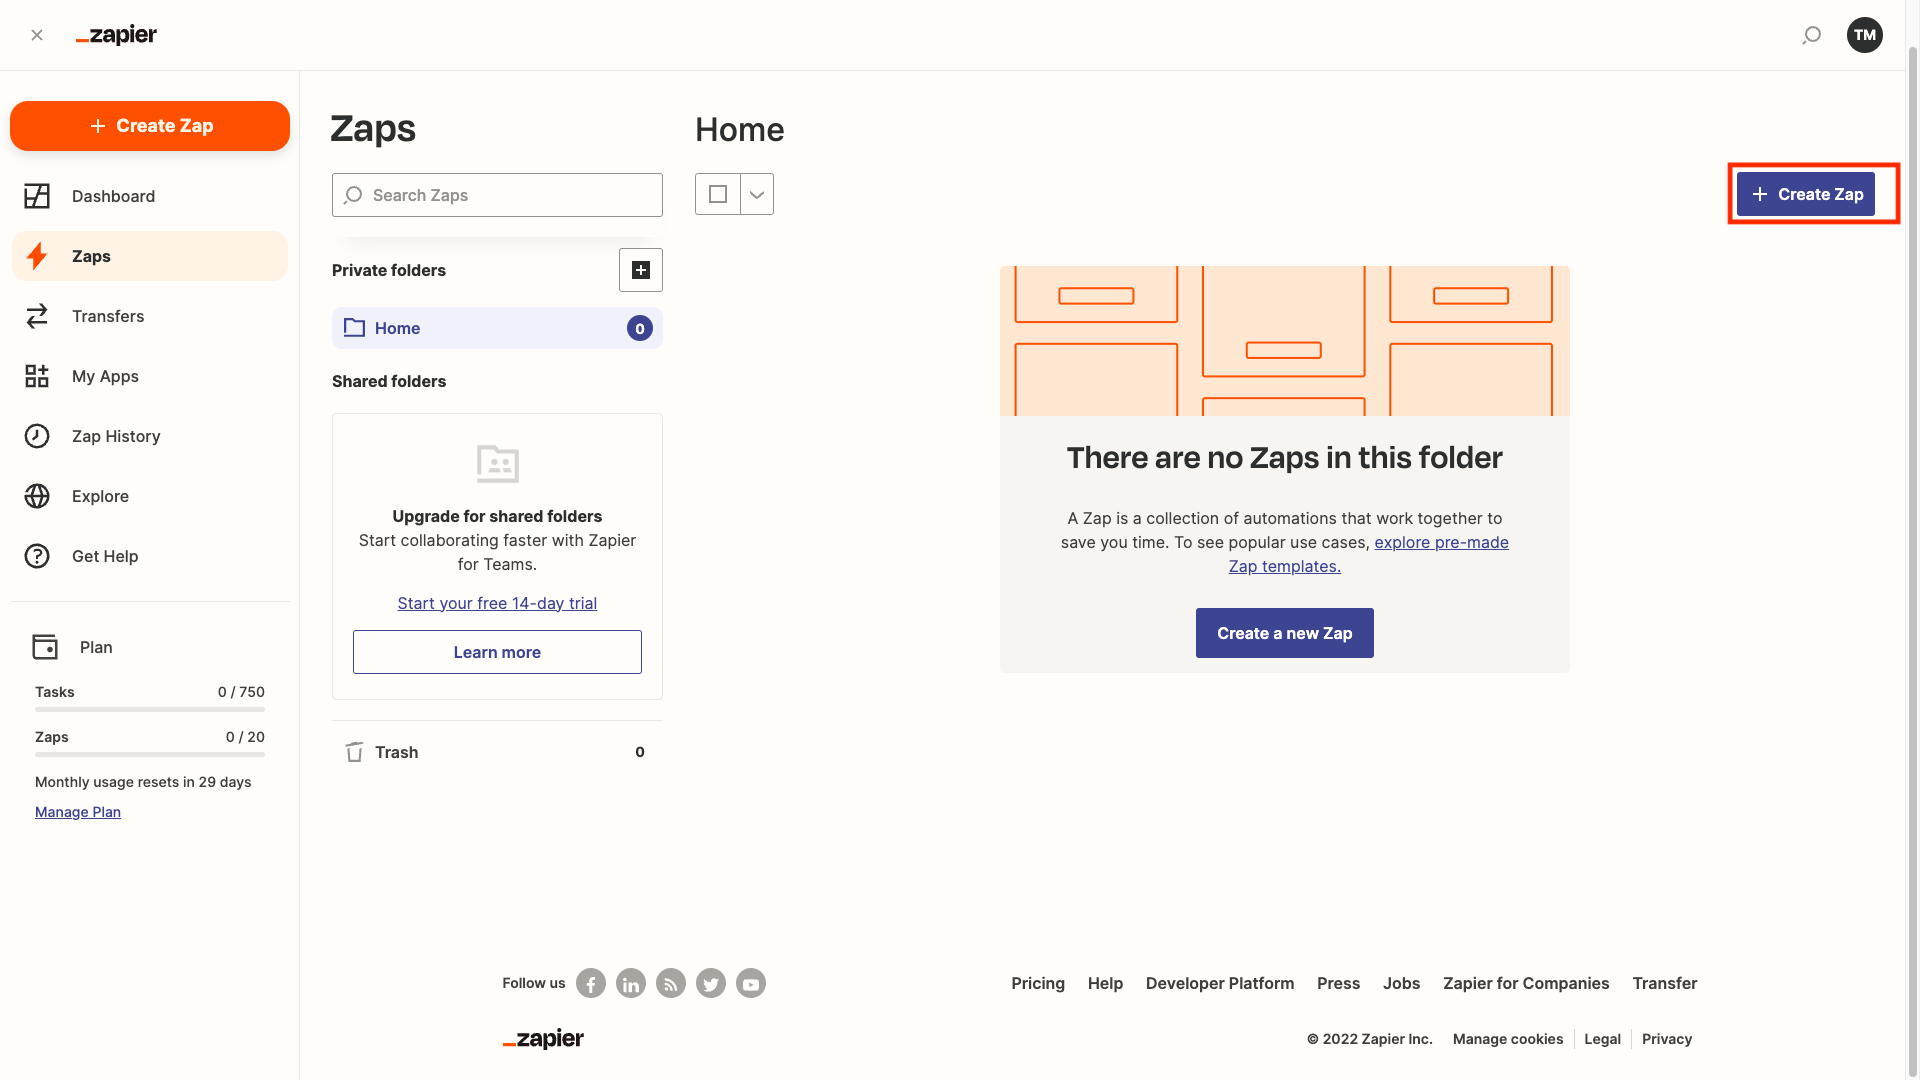
Fig. 1. Creating a new Zap.
Step 2. Select Webhooks by Zapier as your trigger for the App event. (Fig. 2).

Fig. 2. Selecting Webhooks by Zapier trigger.
Step 3. Select Catch Hook in the event dropdown menu (Fig. 3).
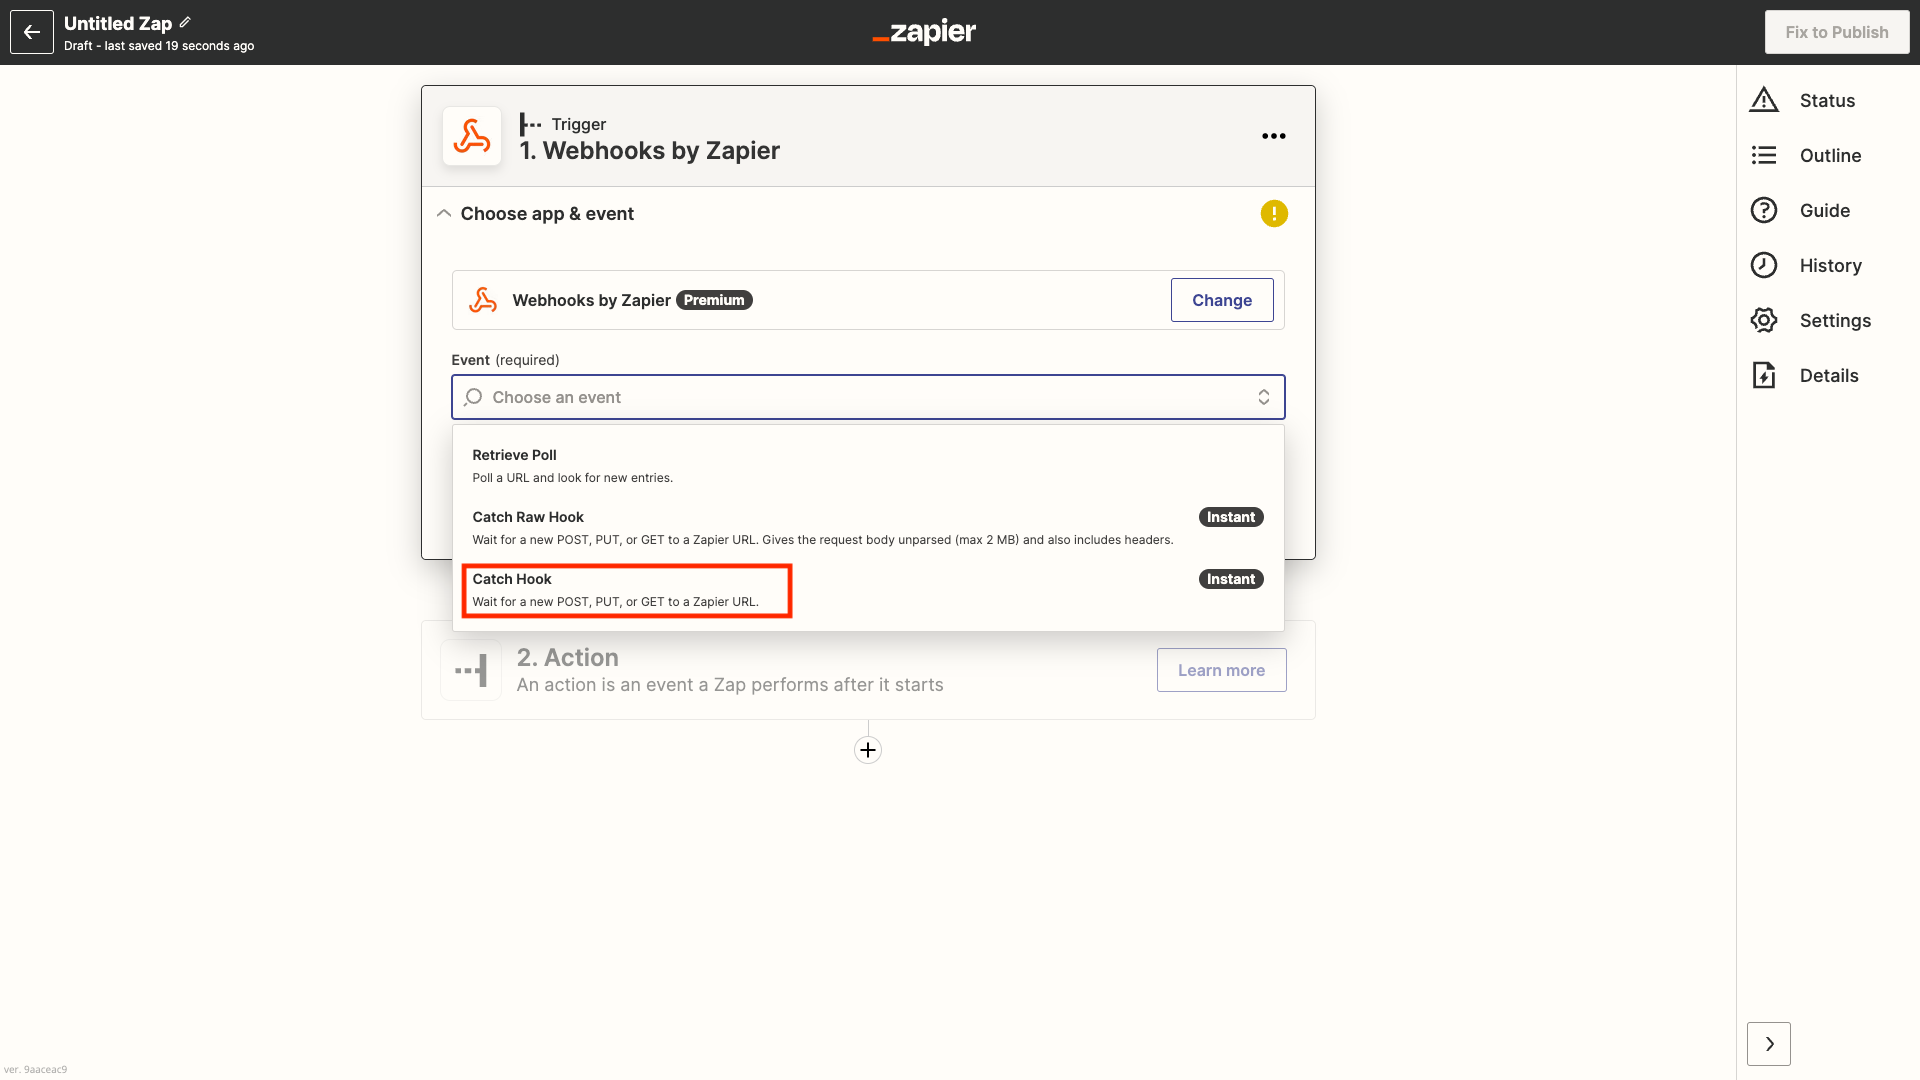
Fig. 3. Selecting Catch Hook.
Step 4. Leave the Child Key field empty and click Continue (Fig. 4).

Fig. 4. Child key is left empty.
Step 5. A webhook URL will be generated for testing your trigger. Copy it for the next step (Fig. 5).
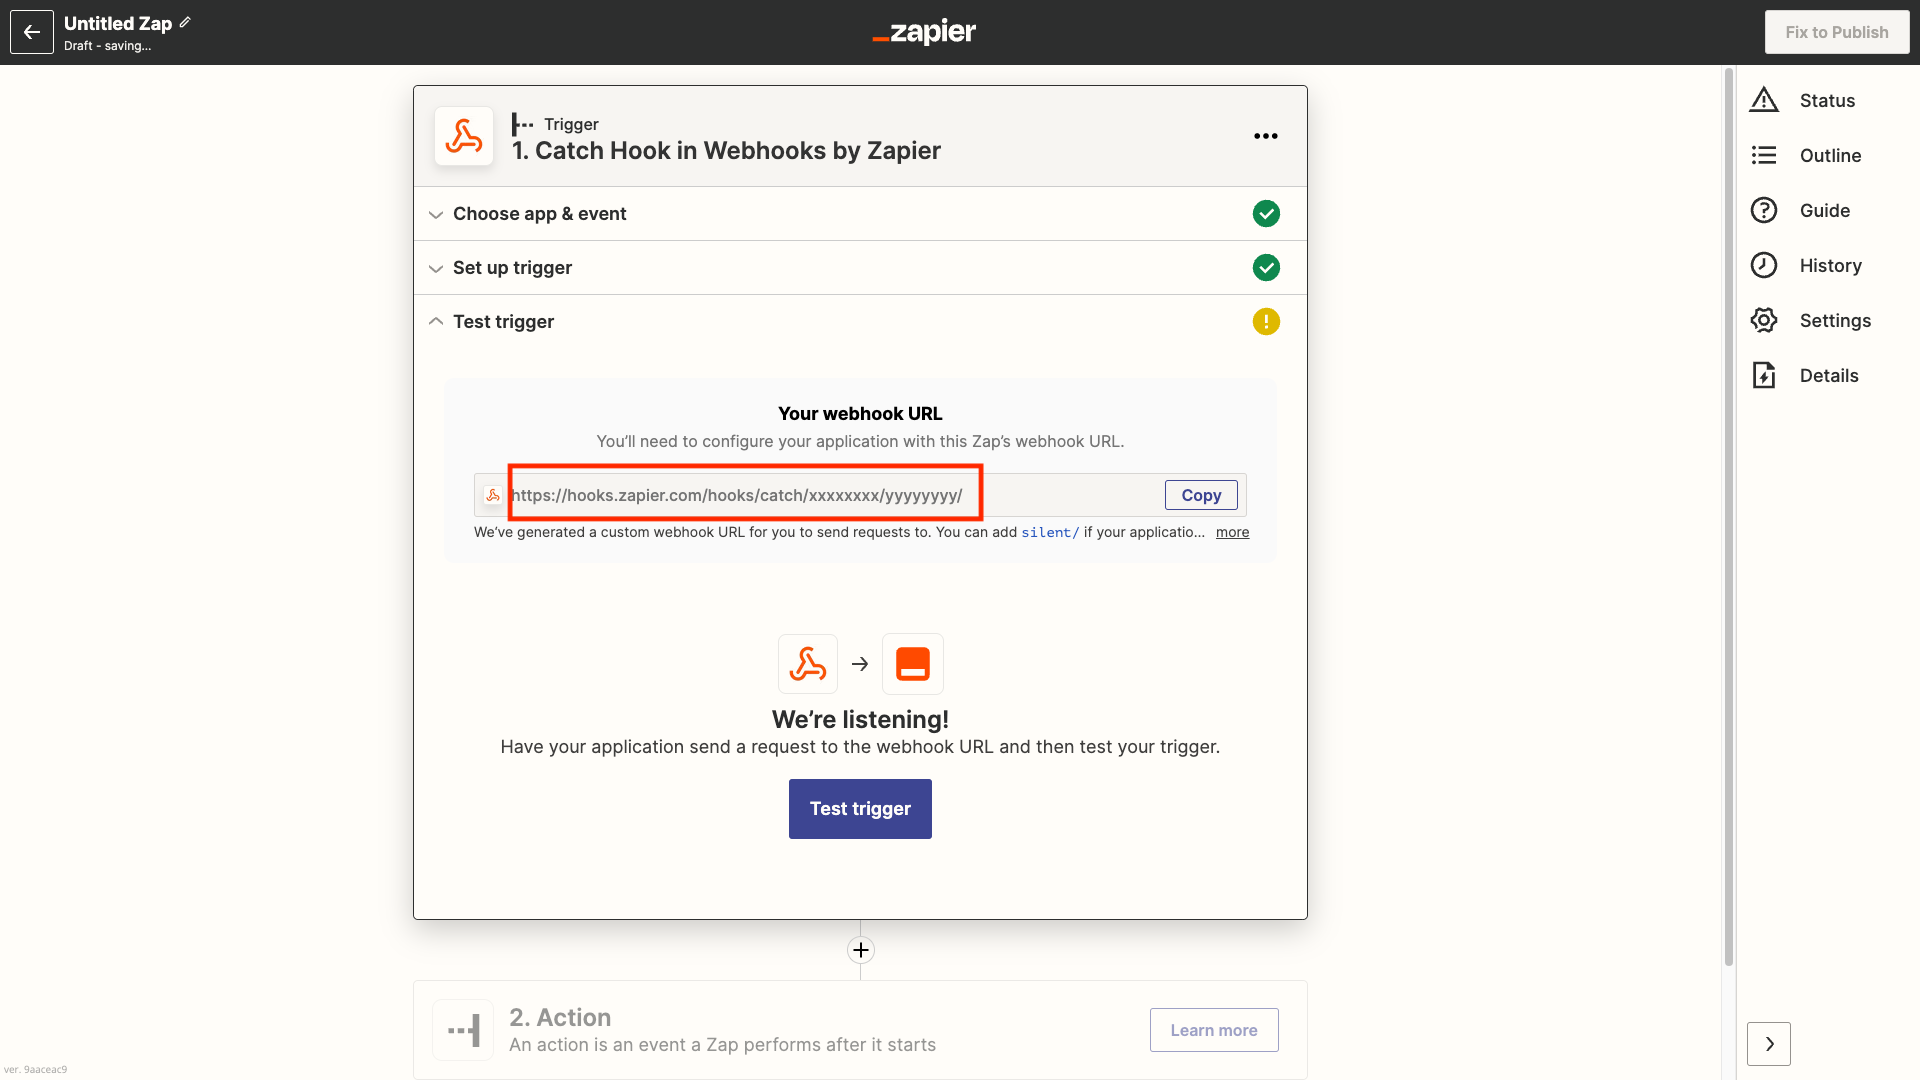
Fig. 5. Copy Zapier webhook URL.
Step 6. Log in to your DIDWW account and navigate to section APIs -> Call Events API -> Call Events and then click Configure for Voice IN service (Fig. 6).
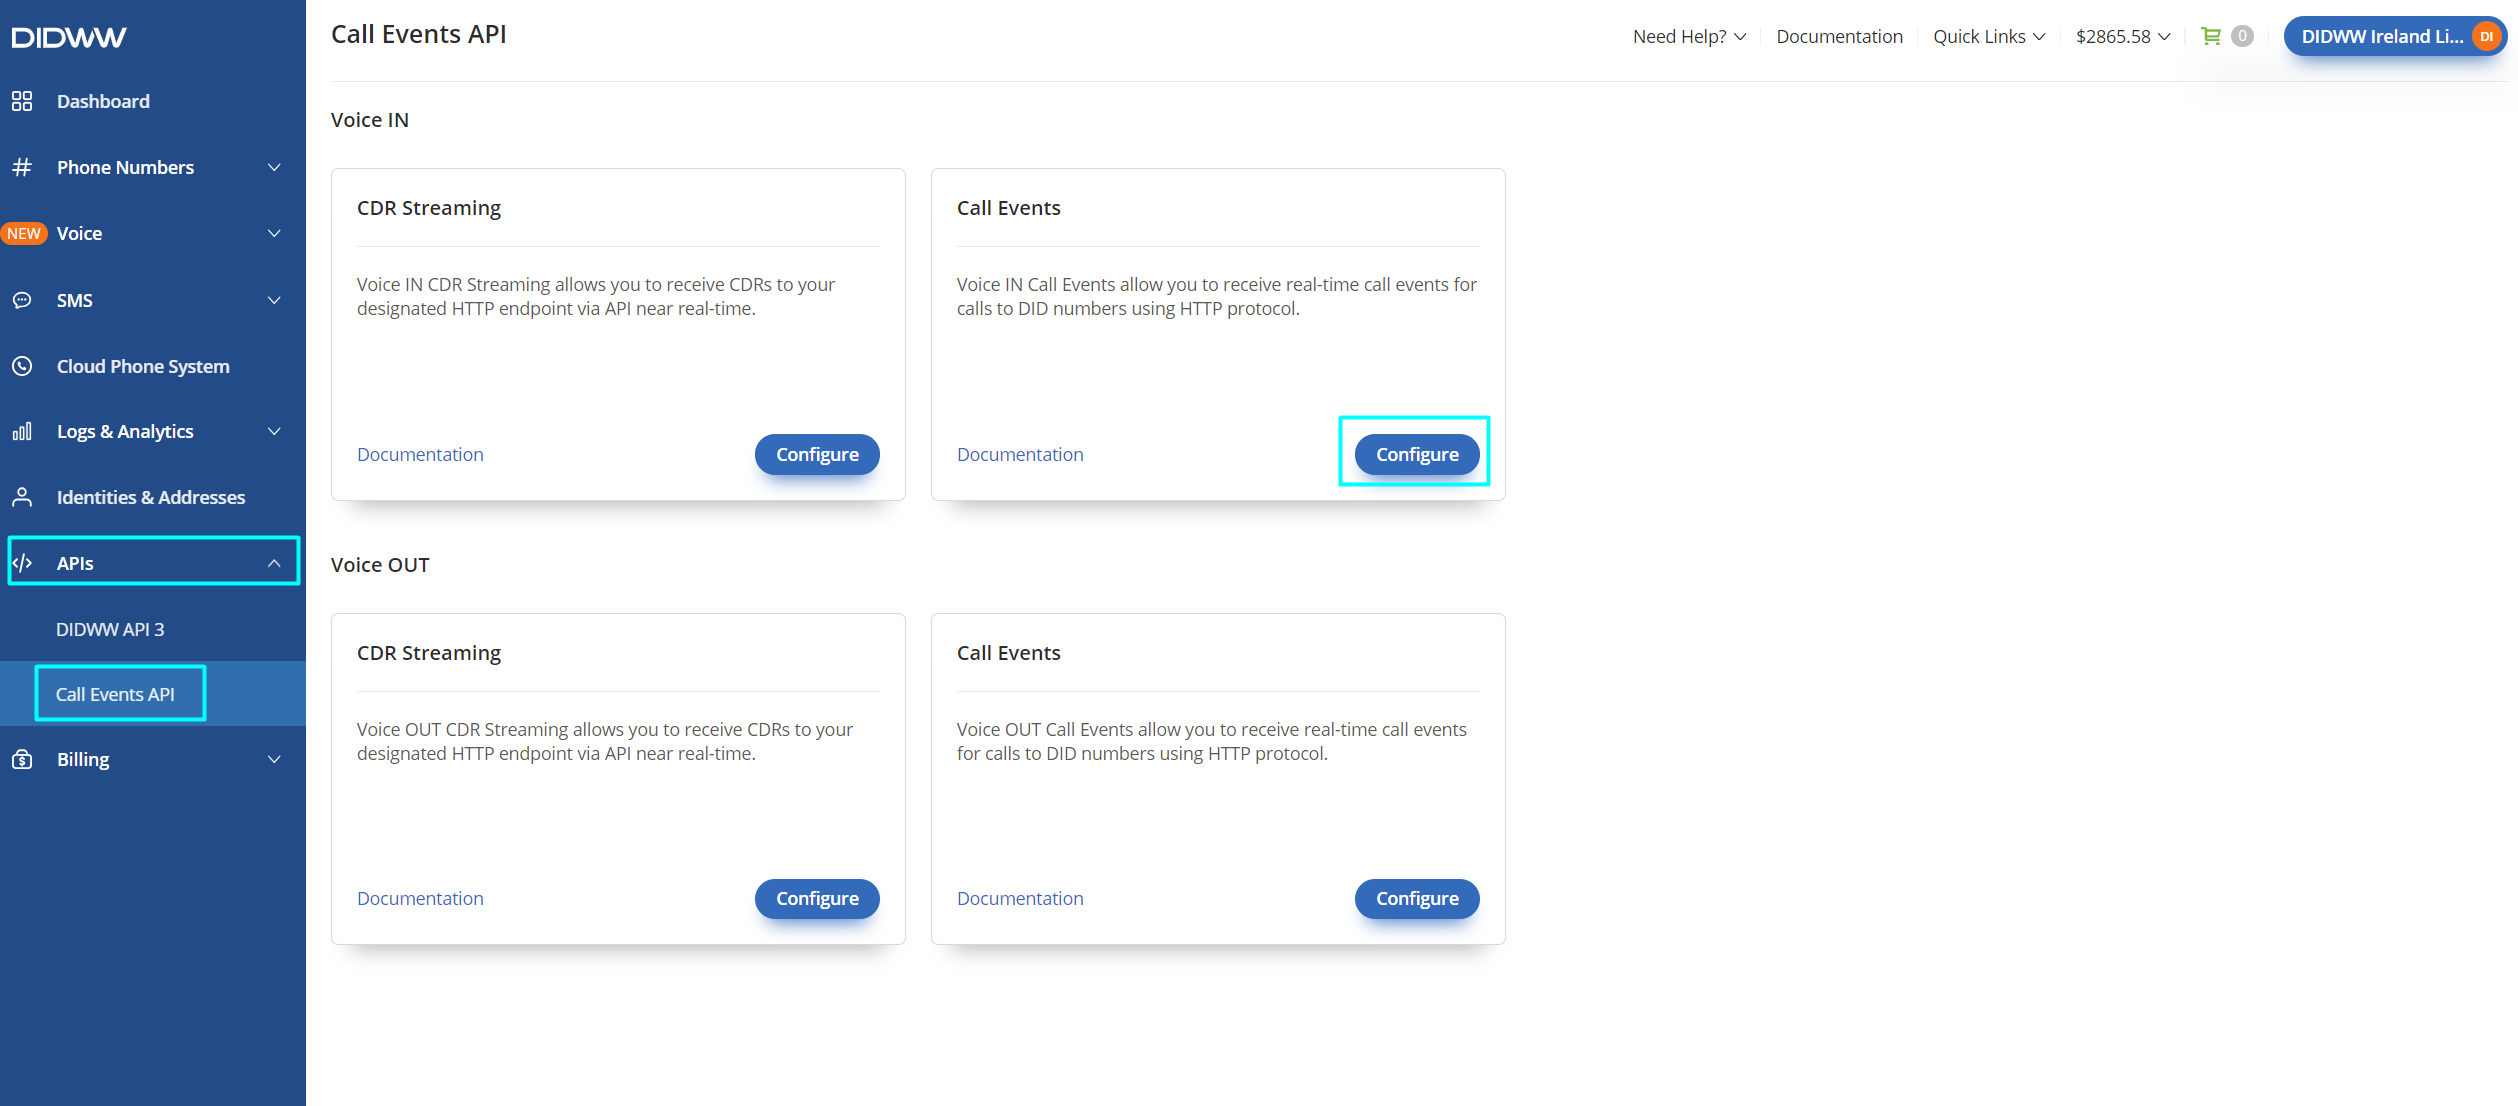
Fig. 6. Enabling and configuring DIDWW Voice IN Call Events.
Step 7. On the Voice IN Call Events configuration page (Fig. 7) add the Zapier Webhook URL address generated in step 5, disable GZIP compression, and click Submit to save the configuration.

Fig. 7. Add Zapier URL address and disable GZIP compression.
Step 8. Place a test call to any of your DIDWW DID numbers. Once a webhook request is found, call data will appear in Zapier Test trigger form (Fig. 8).
DIDWW Voice IN Call Events sends three requests (incoming-call-start-event, incoming-call-connect-event, incoming-call-end-event). In the dropdown request selection menu you may choose ‘incoming-call-end-event’ which contains most of the data. Full details and all possible values of DIDWW Voice IN Call Events can be found here.
If trigger testing is successful, click Continue.
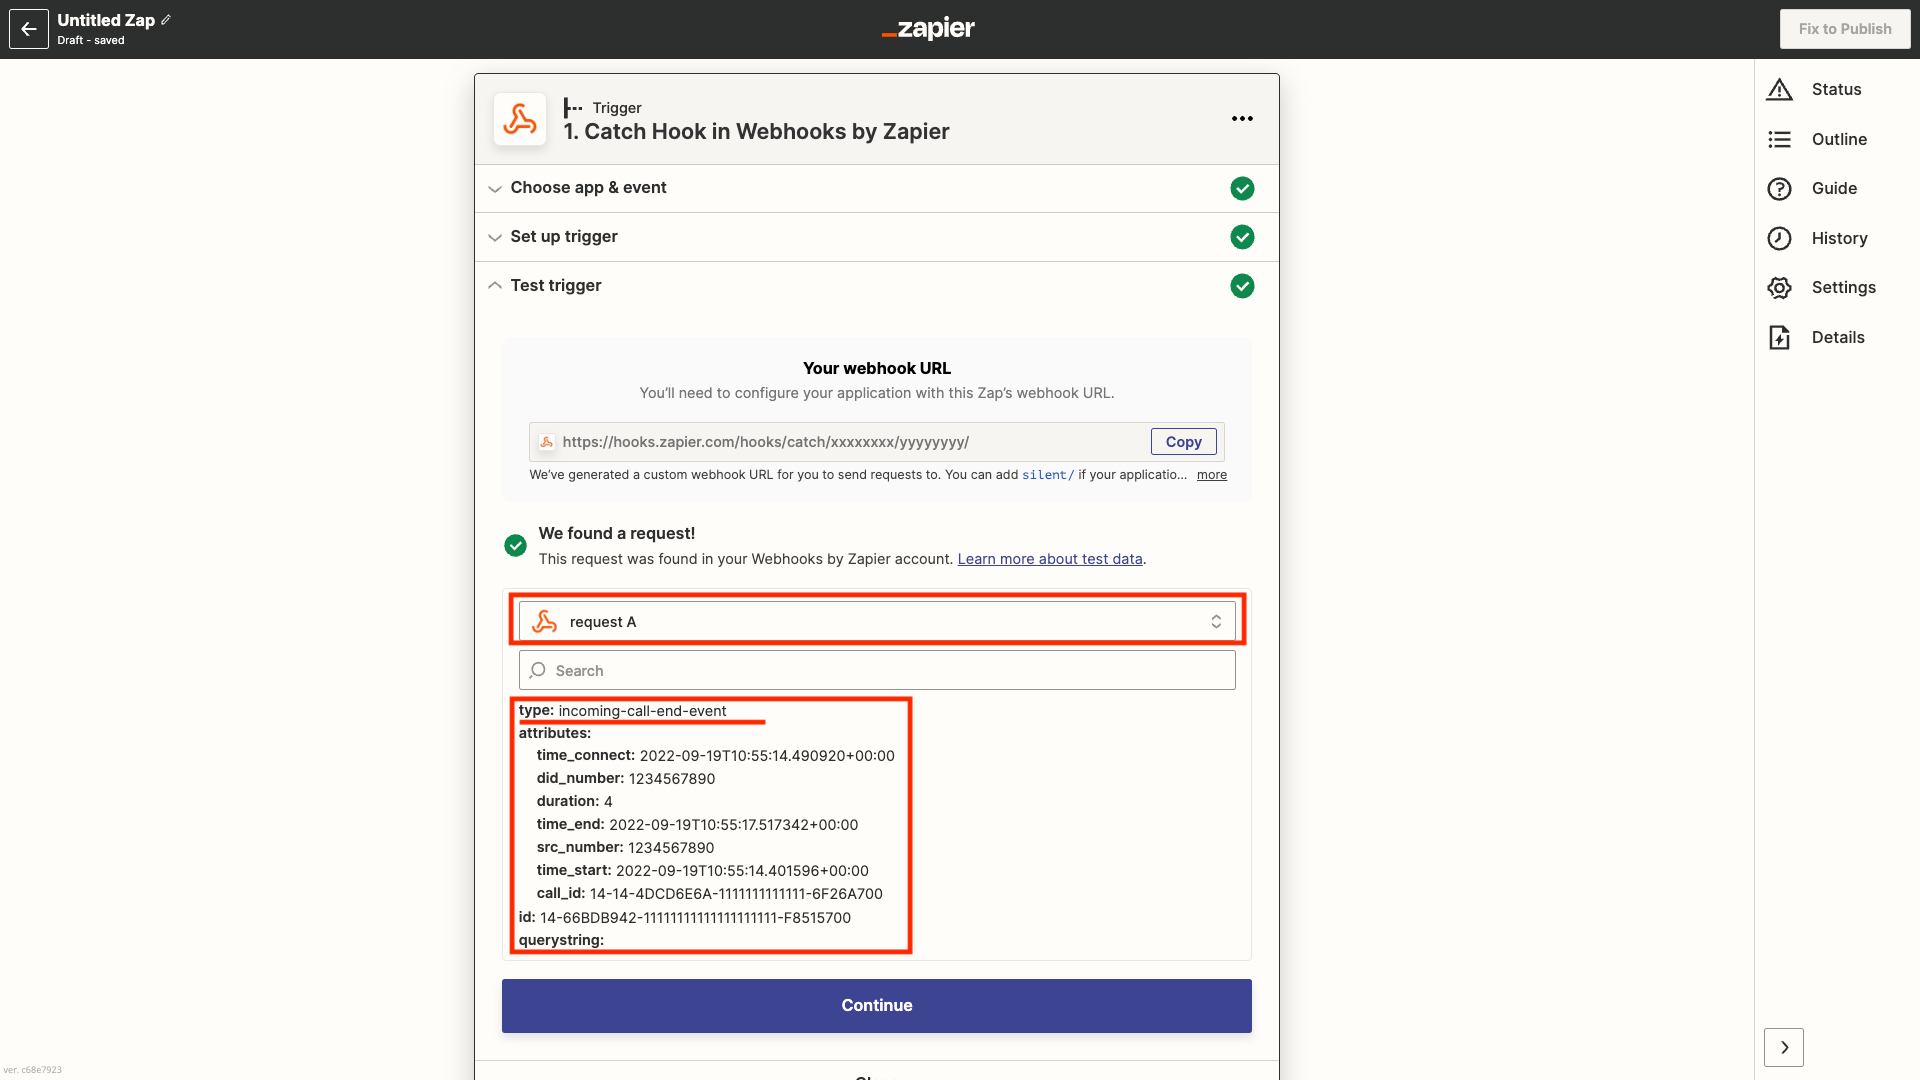
Fig. 8. Trigger test form.
Step 9. To execute action only at certain conditions, for example for calls to a specific DID after the call already ended, choose Filter in Zapier built-in actions list (Fig. 9).

Fig. 9. Selecting Filter action.
Step 10. As an example we will define that action will continue only if the call has ended and if the call came to a specified DID number (Fig. 10).
In the first dropdown select: Type
In the second dropdown select: (Text) Exactly matches
In the third box enter text: incoming-call-end-event
Click And button to add a second condition.
In the first dropdown select: Attributes DID number
In the second dropdown select: (Text) Exactly matches,
In the third box enter your existing DIDWW DID number (in full format with country code and without any other additional symbols).
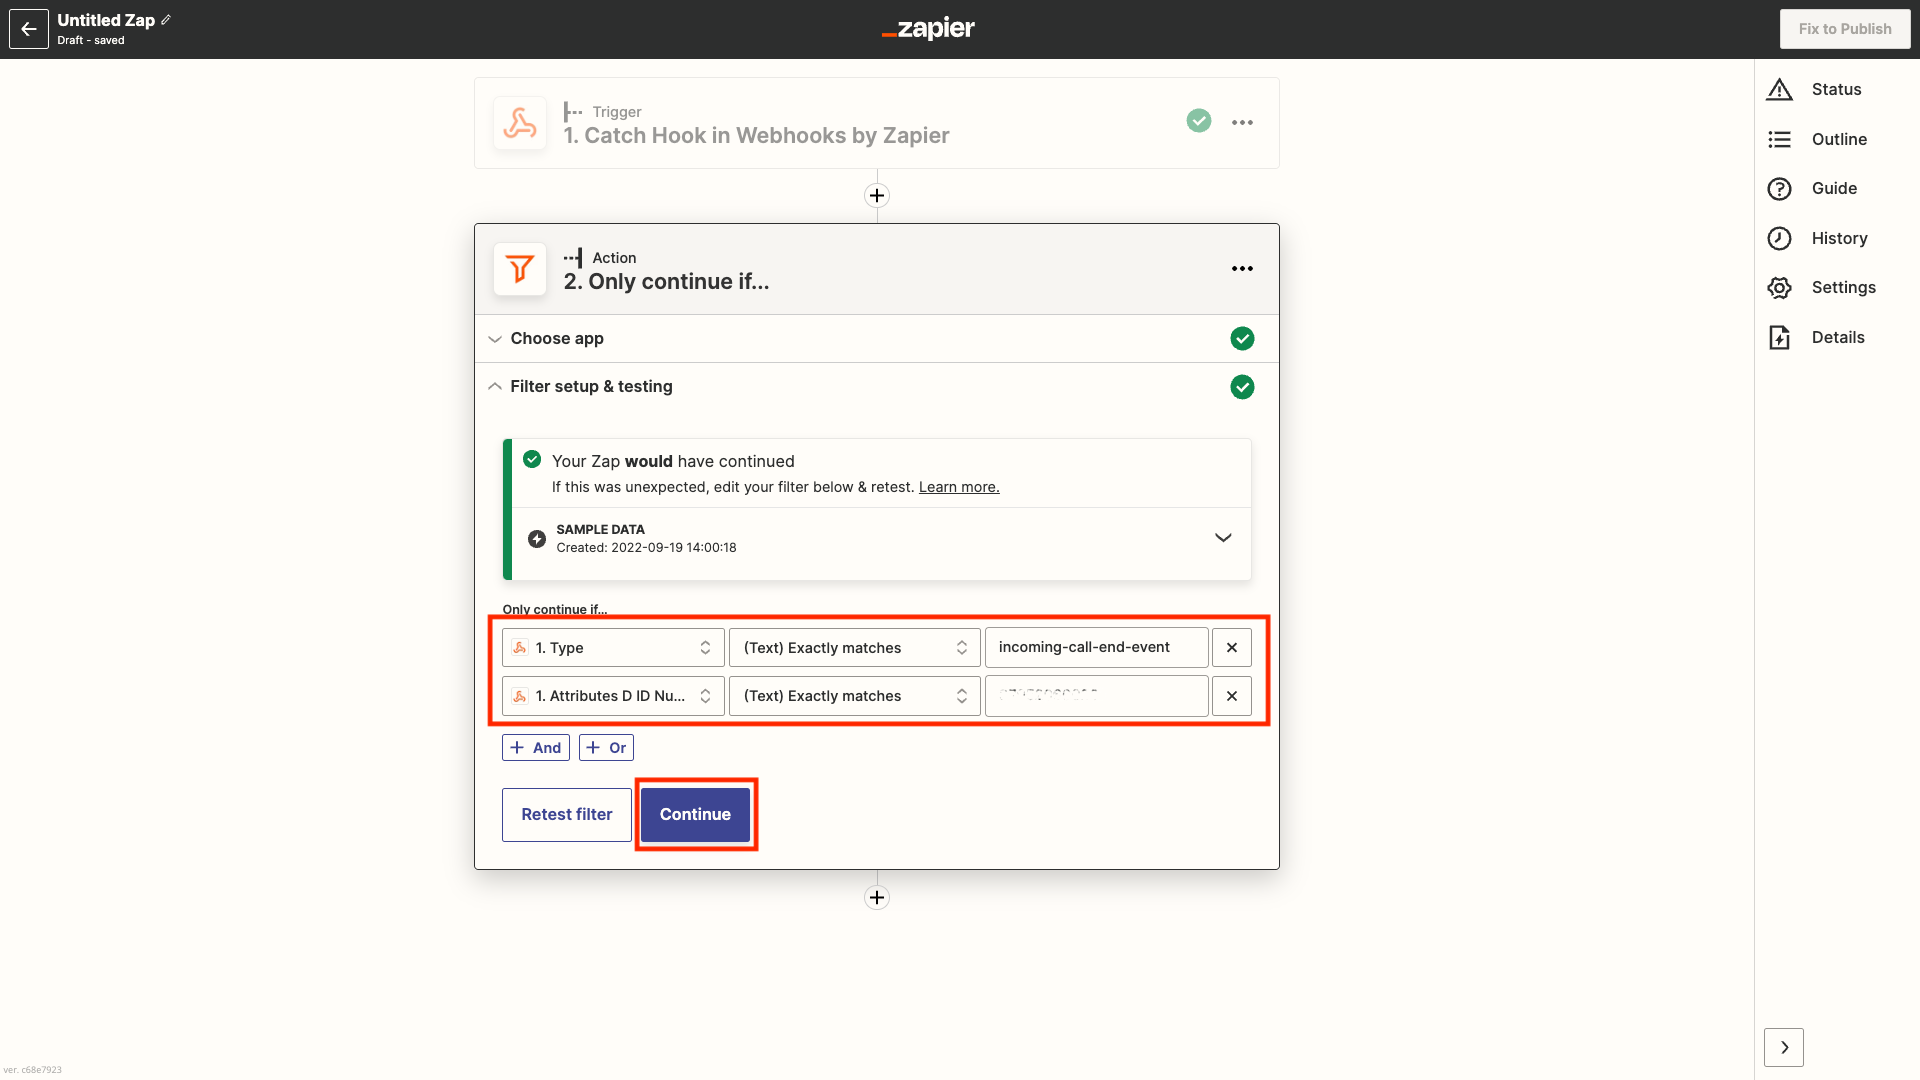
Fig. 10. Action filter configuration.
Step 11. In the above example a call to your DID number will execute an action which will add a row in Google Sheets, therefore it is necessary to prepare a Google Sheet with the following columns: Time, Duration, Source, DID, id (Fig. 11).
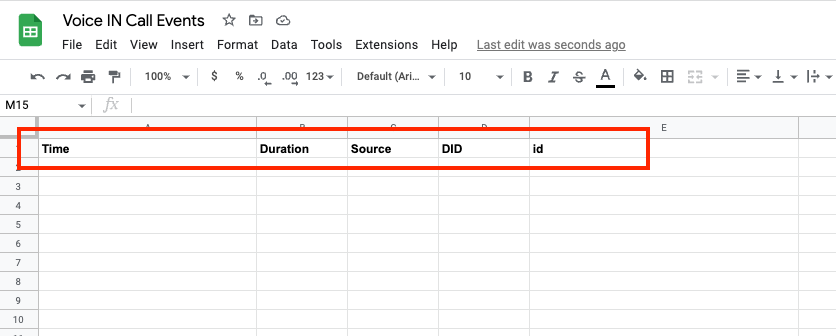
Fig. 11. Google Sheet with necessary columns.
Step 12. Select Google Sheets in the Action tab (Fig. 12).
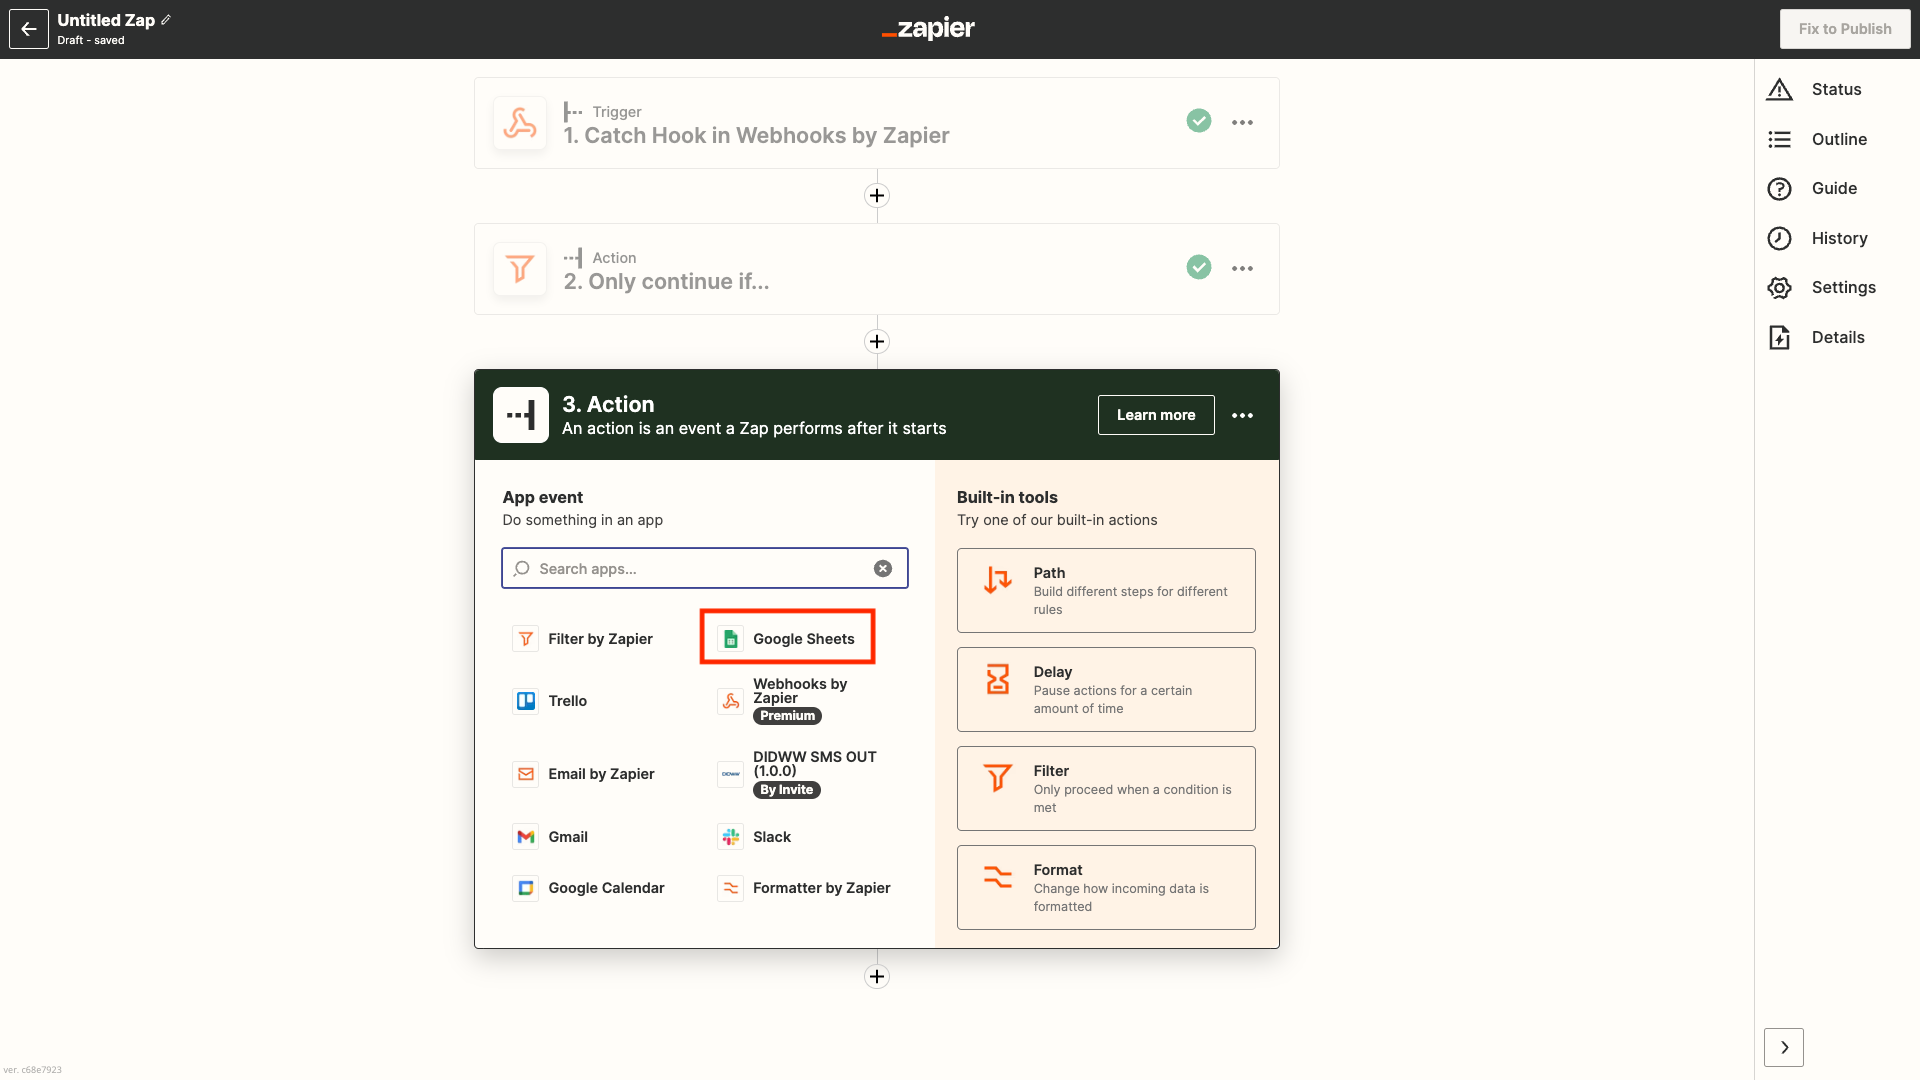
Fig. 12. Selecting Google Sheets in the Action tab.
Step 13. Select Create Spreadsheet Row from the event selection dropdown list (Fig. 13) and click Continue.
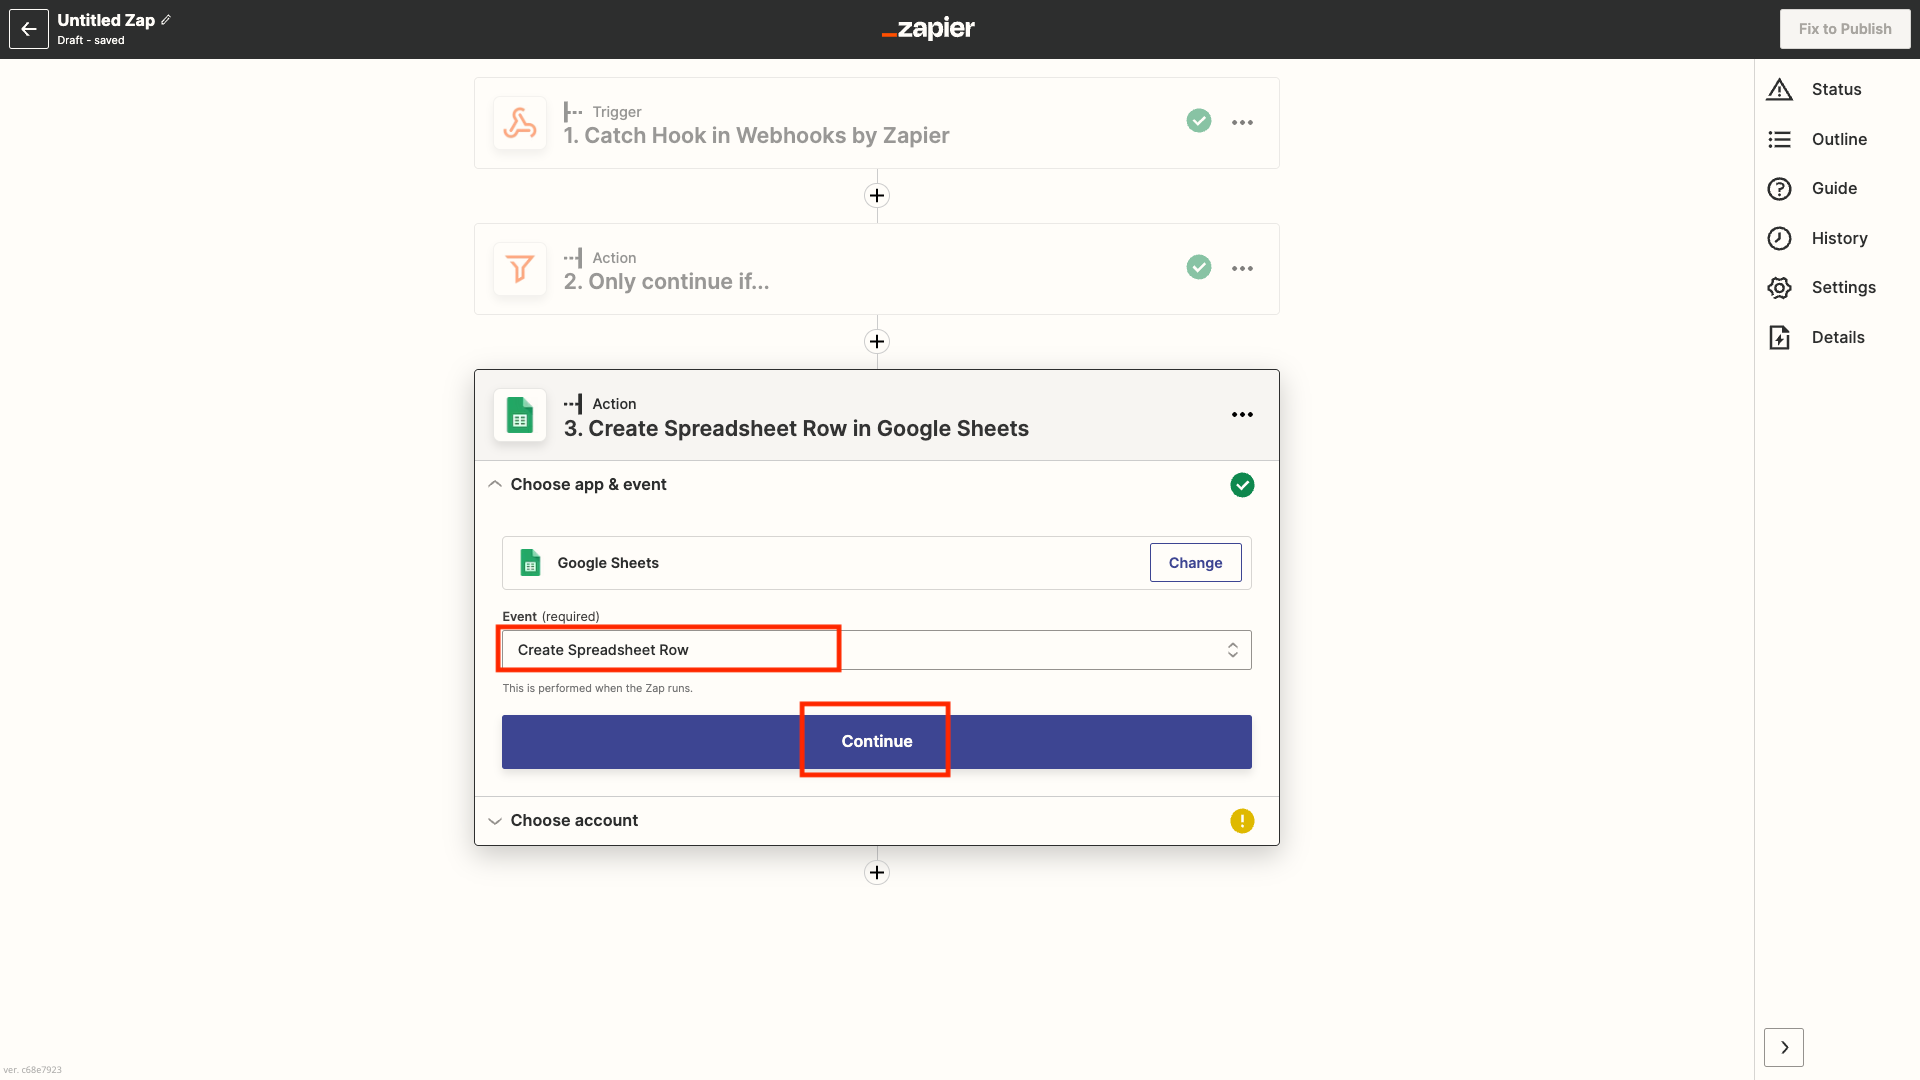
Fig. 13. Selecting Create Spreadsheet Row event.
Step 14. Select the previously added Google Sheets account or add a new one and click Continue (Fig. 14).

Fig. 14. Selecting Google Sheets account.
Step 15. Select the following in the Set up Actions menu (Fig. 15):
Drive – Google Drive location of the created spreadsheet
Spreadsheet – spreadsheet which was created in step 10
Worksheet – sheet of the spreadsheet
Column Time – Attributes Time Start placeholder
Column Duration – Attributes Duration placeholder
Column Source - Attributes Src number placeholder
Column DID - Attributes DID Number placeholder
Column id – ID placeholder
Click Continue (Fig. 15).
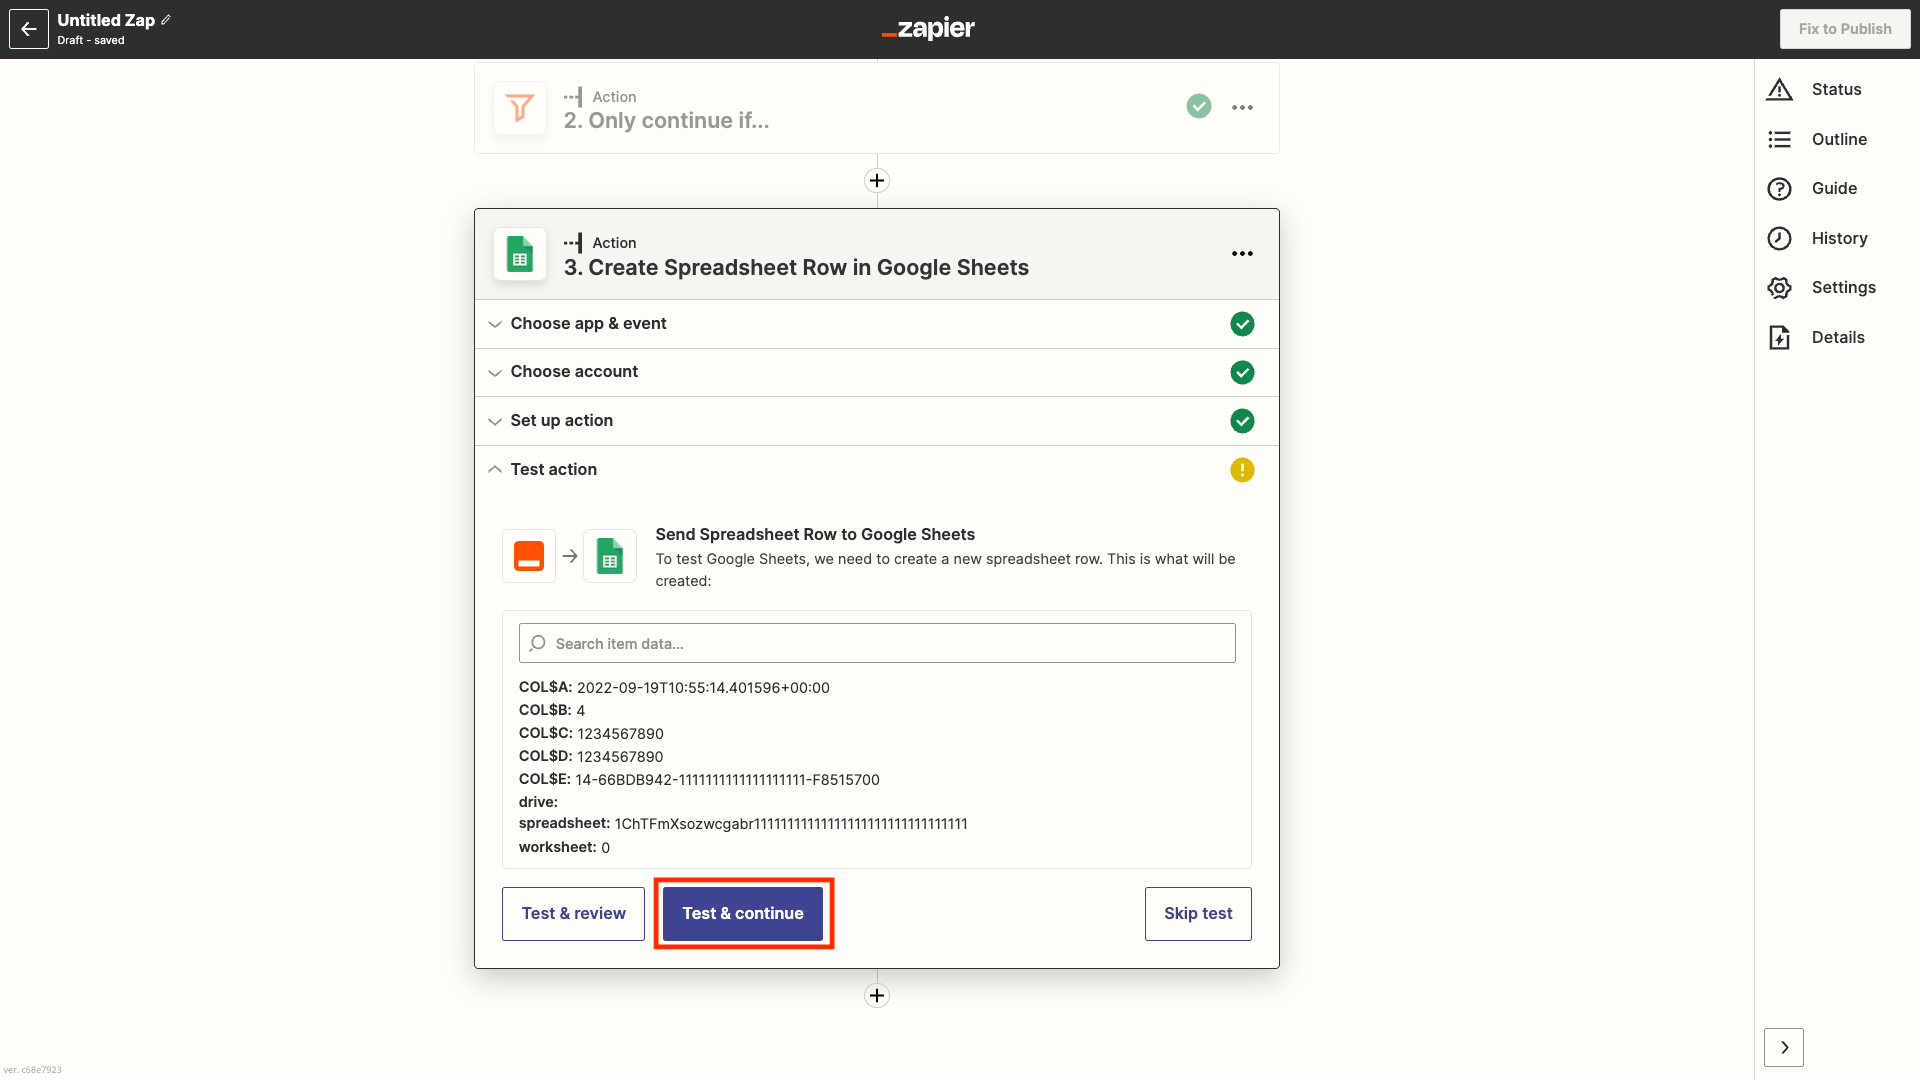
Fig. 15. Setting up action for Google Spreadsheet Row creation.
Step 16. Click Test & continue (Fig. 16), after successful testing of spreadsheet row creation, publish your Zap.
Fig. 16. Testing the action.
Step 17. When your Zap is successfully published, at the end of each incoming call to your DIDWW DID number, Google Sheet will be updated with a new row containing call details (Fig. 17).
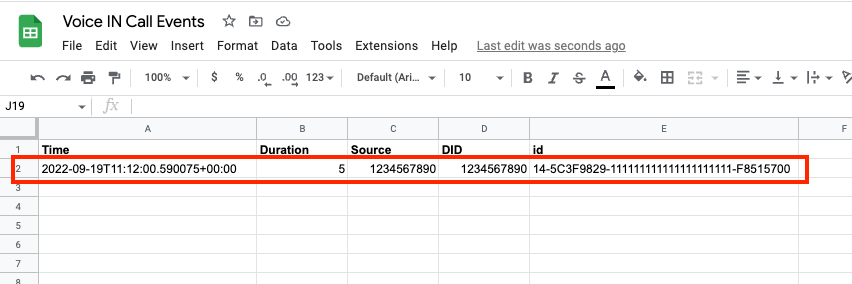
Fig. 17. Call details successfully added to Google Sheet.
DIDWW Voice OUT Call Events and Zapier Webhook
DIDWW Voice OUT Call Events allows to receive events when outgoing calls are made via DIDWW Voice OUT Trunk. Together with Zapier Webhook configuration it can be used with Apps available in Zapier platform, enabling other applications to receive events about started, connected, or ended calls.
Getting started
What you need to get started:
Configuring DIDWW Voice OUT Call Events and Zapier Webhook
As a use case example, we will configure DIDWW Voice OUT Call Events for a DID number. After ending the outbound call, details of it will be stored in a Google Sheet. You may choose any other available Zapier App for your idea/automation/task/project as an action for DIDWW Voice OUT Call Events. As an example, outgoing voice calls can create events or tasks in your favorite CRM or task management software.
Step 1. Create Zap in your Zapier account (Fig. 1).

Fig. 1. Creating a new Zap.
Step 2. Select Webhooks by Zapier as your trigger for the App event. (Fig. 2).

Fig. 2. Trigger App Webhook by Zapier selection.
Step 3. Select Catch Hook in the event dropdown menu (Fig. 3).

Fig. 3. Selecting event type.
Step 4. Leave the Child Key field empty and click Continue (Fig. 4).

Fig. 4. Child key is left empty.
Step 5. A webhook URL will be generated for testing your trigger. Copy ir for the next step (Fig. 5) and click the Test trigger button.

Fig. 5. Copy Zapier webhook URL.
Step 6. In your DIDWW account navigate to menu section APIs -> Call Events API -> Call Events and then click Configure for Voice OUT service (Fig. 6).
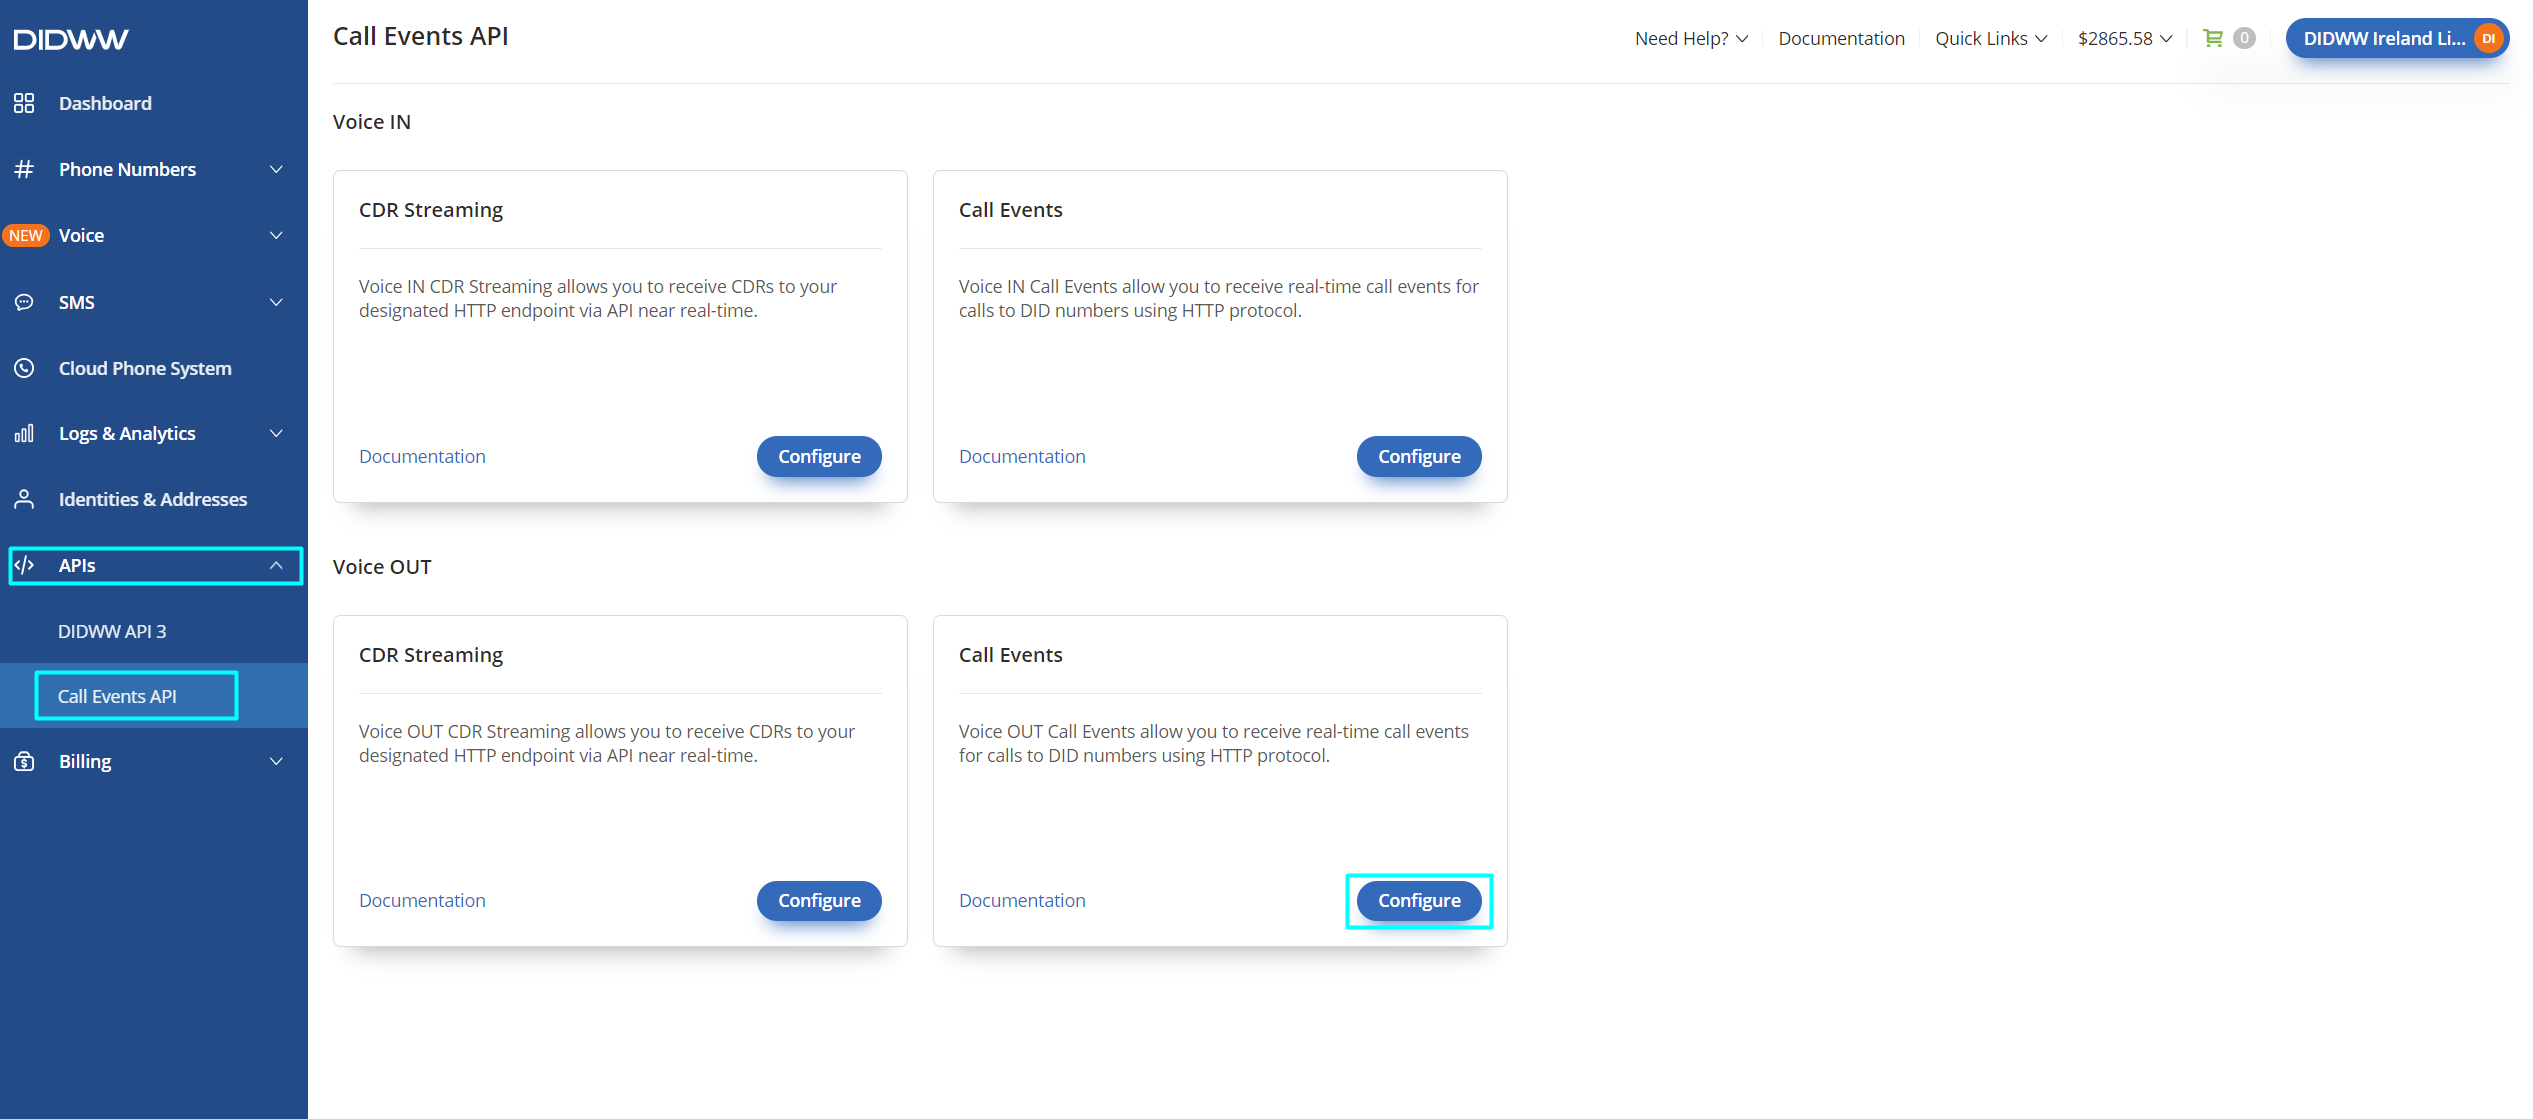
Fig. 6. Enabling and configuring DIDWW Voice OUT Call Events.
Proceed with the following configuration (Fig. 7). Add Zapier Webhook URL address which was generated in step 5. Disable GZIP compression and click Submit to save the configuration.

Fig. 7. Add Zapier URL address and disable GZIP compression.
Step 7. Make a test call via your DIDWW Voice OUT Trunk. You should see the webhook request and call data appear in Zapier “Test trigger” form (Fig. 8).
DIDWW Voice OUT Call Events sends three requests (outbound-call-start-event, outbound-call-connect-event, outbound-call-end-event). By selecting request A, B or C in the dropdown list you can choose the corresponding call data of start, connect, or call end events. Full details and all possible values of DIDWW Voice OUT Call Events can be found here.
If trigger testing is successful, click Continue.
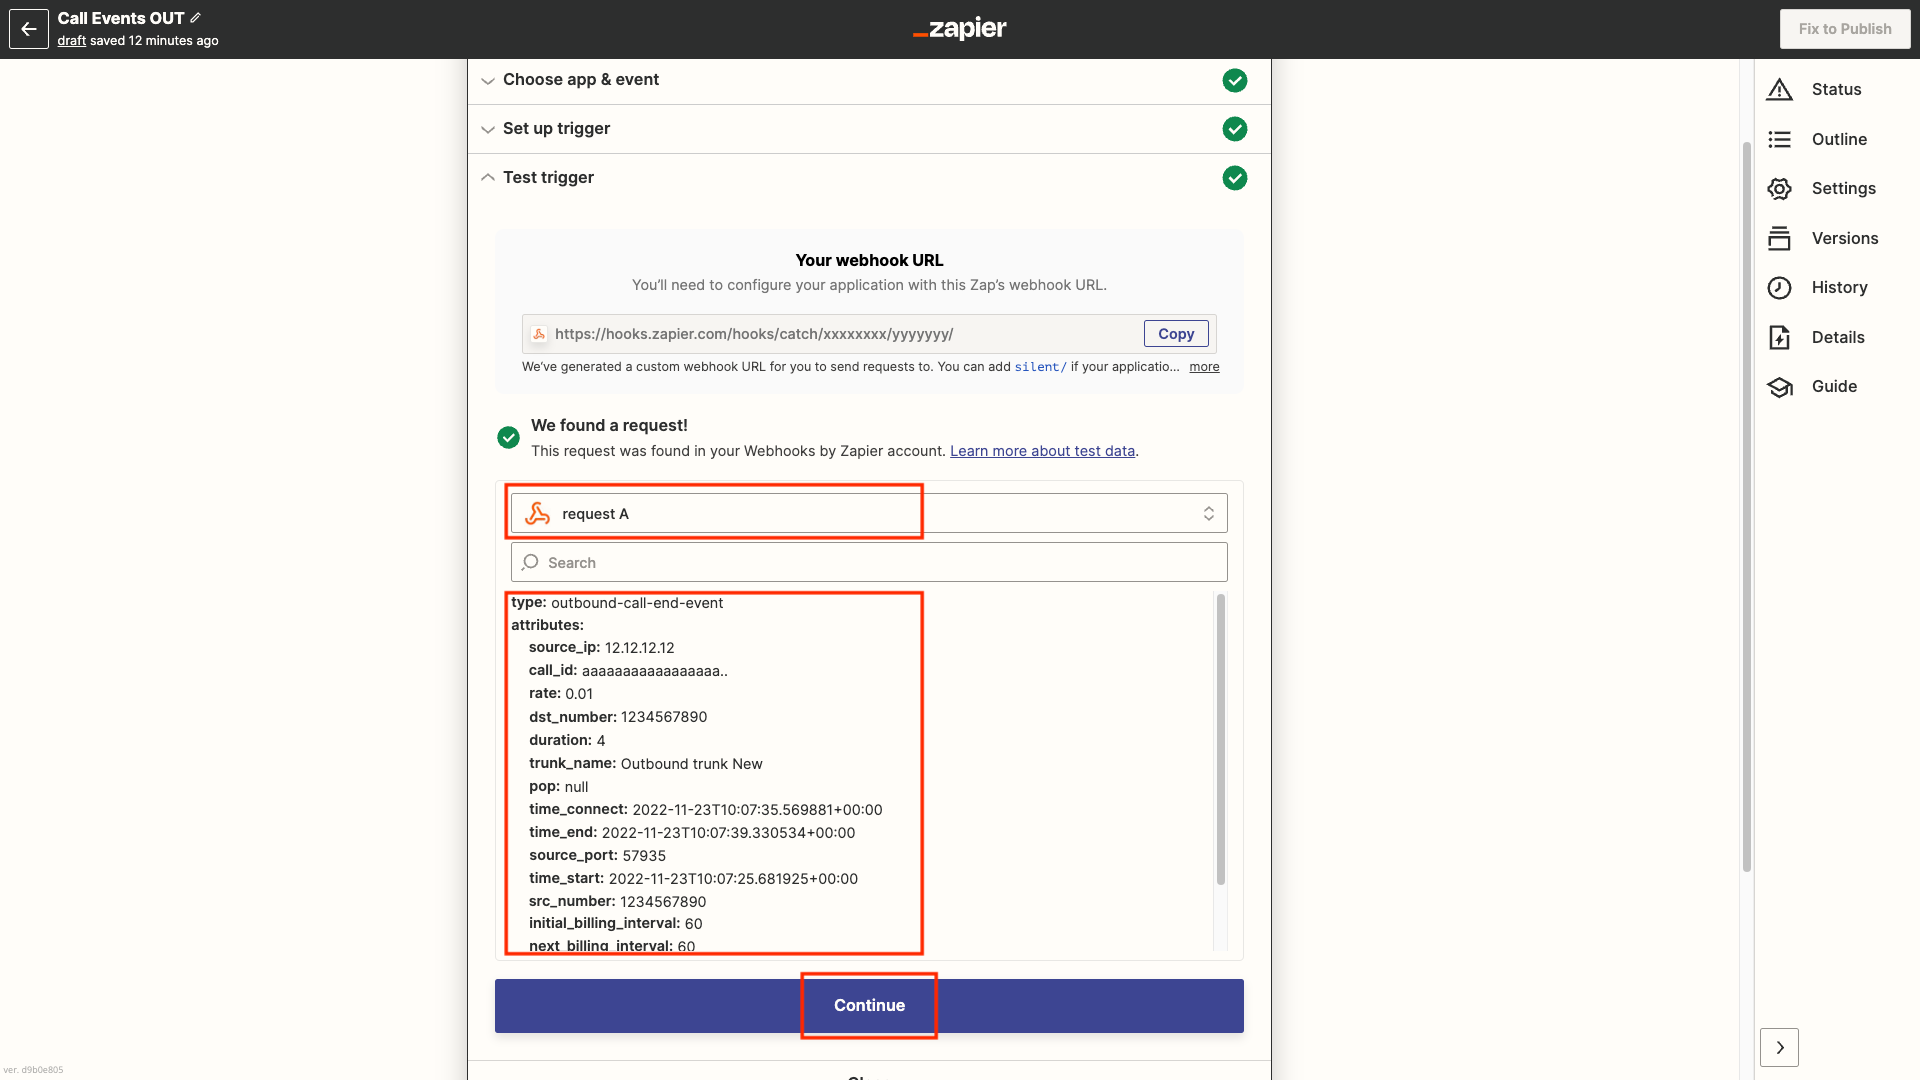
Fig. 8. Trigger test form.
Step 8. To execute actions only at certain conditions, i.e. for calls made with specific DID and after ending the call, choose Filter from the Zapier built-in actions list (Fig. 9).

Fig. 9. Selecting Filter.
Step 9. We will define that action will be executed only after the call has ended and if the call was made with a specified DID number (Fig. 10).
In the first dropdown menu select: Type
In the second dropdown menu: (Text) Exactly matches
In the third text box enter: outbound-call-end-event
Click And button to add a second condition.
In the first dropdown menu select: Attributes Src number
In the second dropdown menu select: (Text) Exactly matches,
In the third text box enter your existing DIDWW phone number: DID number (in full format with a country code and without any additional symbols).
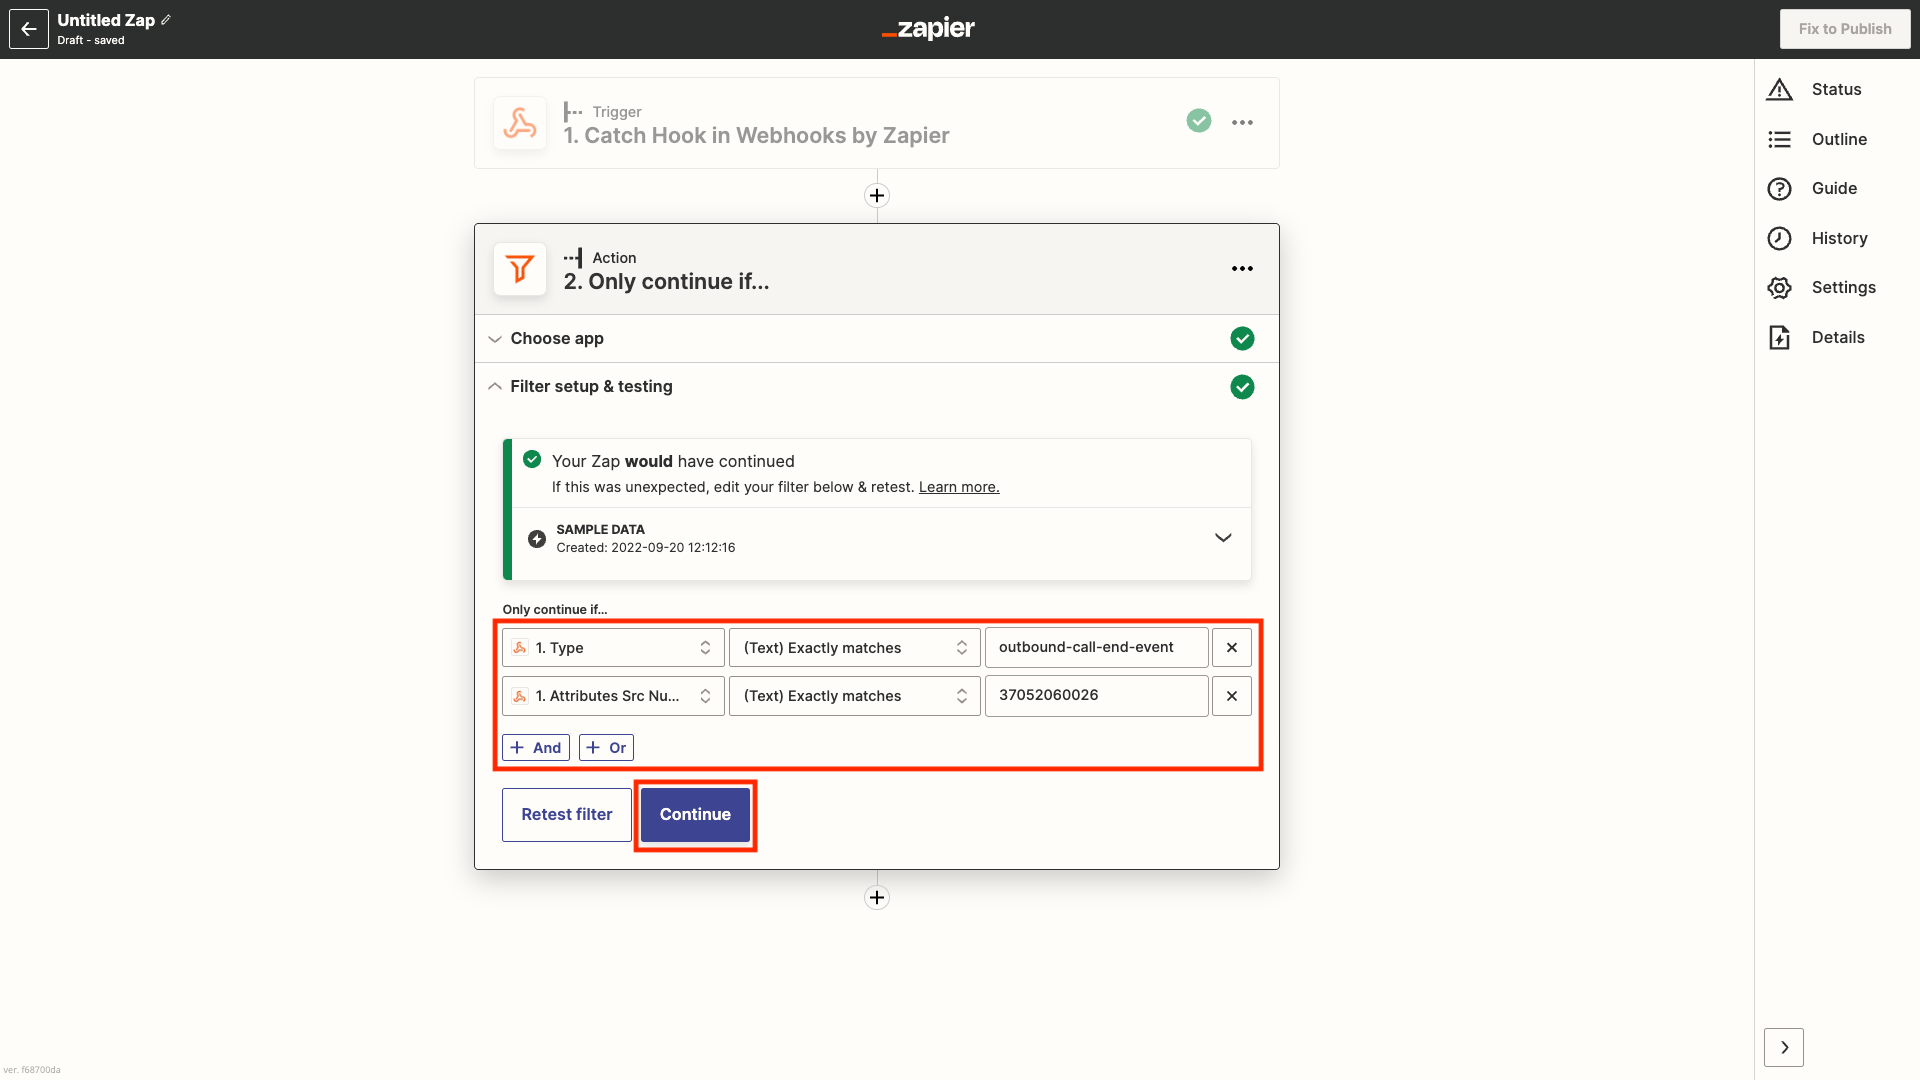
Fig. 10. Action filter configuration.
Step 10. Prepare a Google Sheet with the following columns: Time, Duration, Source, Destination, Trunk, Rate (Fig. 11). The configured call event will add a row in the sheet each time it is executed.
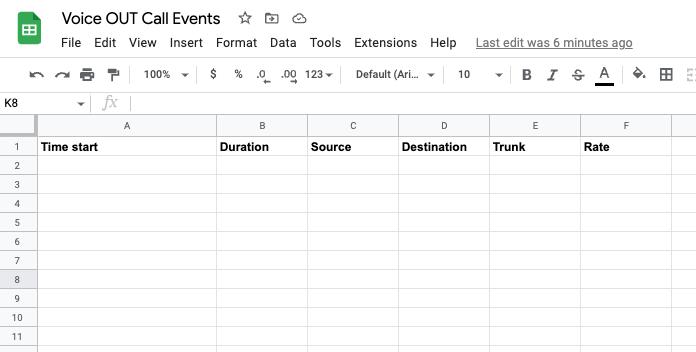
Fig. 11. Google Sheet with the necessary columns.
Step 11. In the Action tab select Google Sheets (Fig. 12).
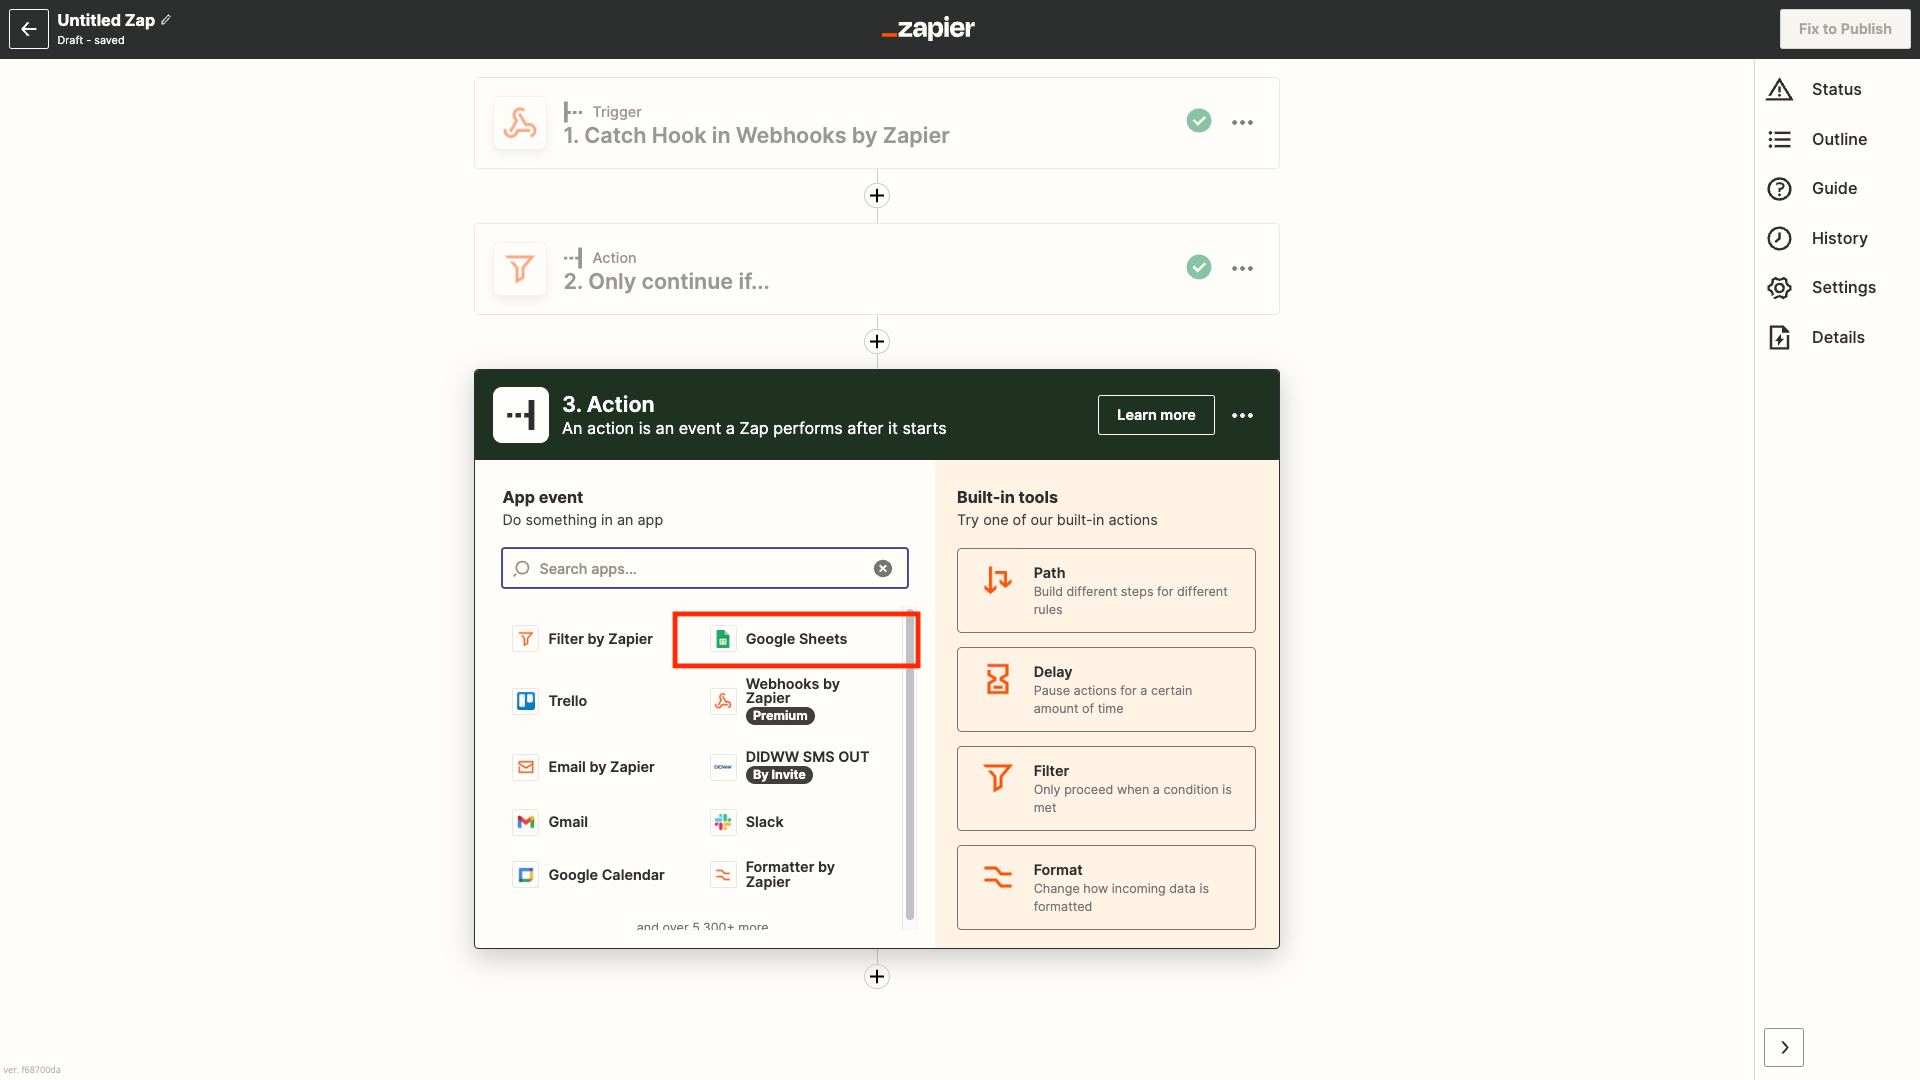
Fig. 12. Selecting Google Sheets in the Action tab.
Step 12. Select Create Spreadsheet Row from the event selection dropdown list (Fig. 13) and click Continue.
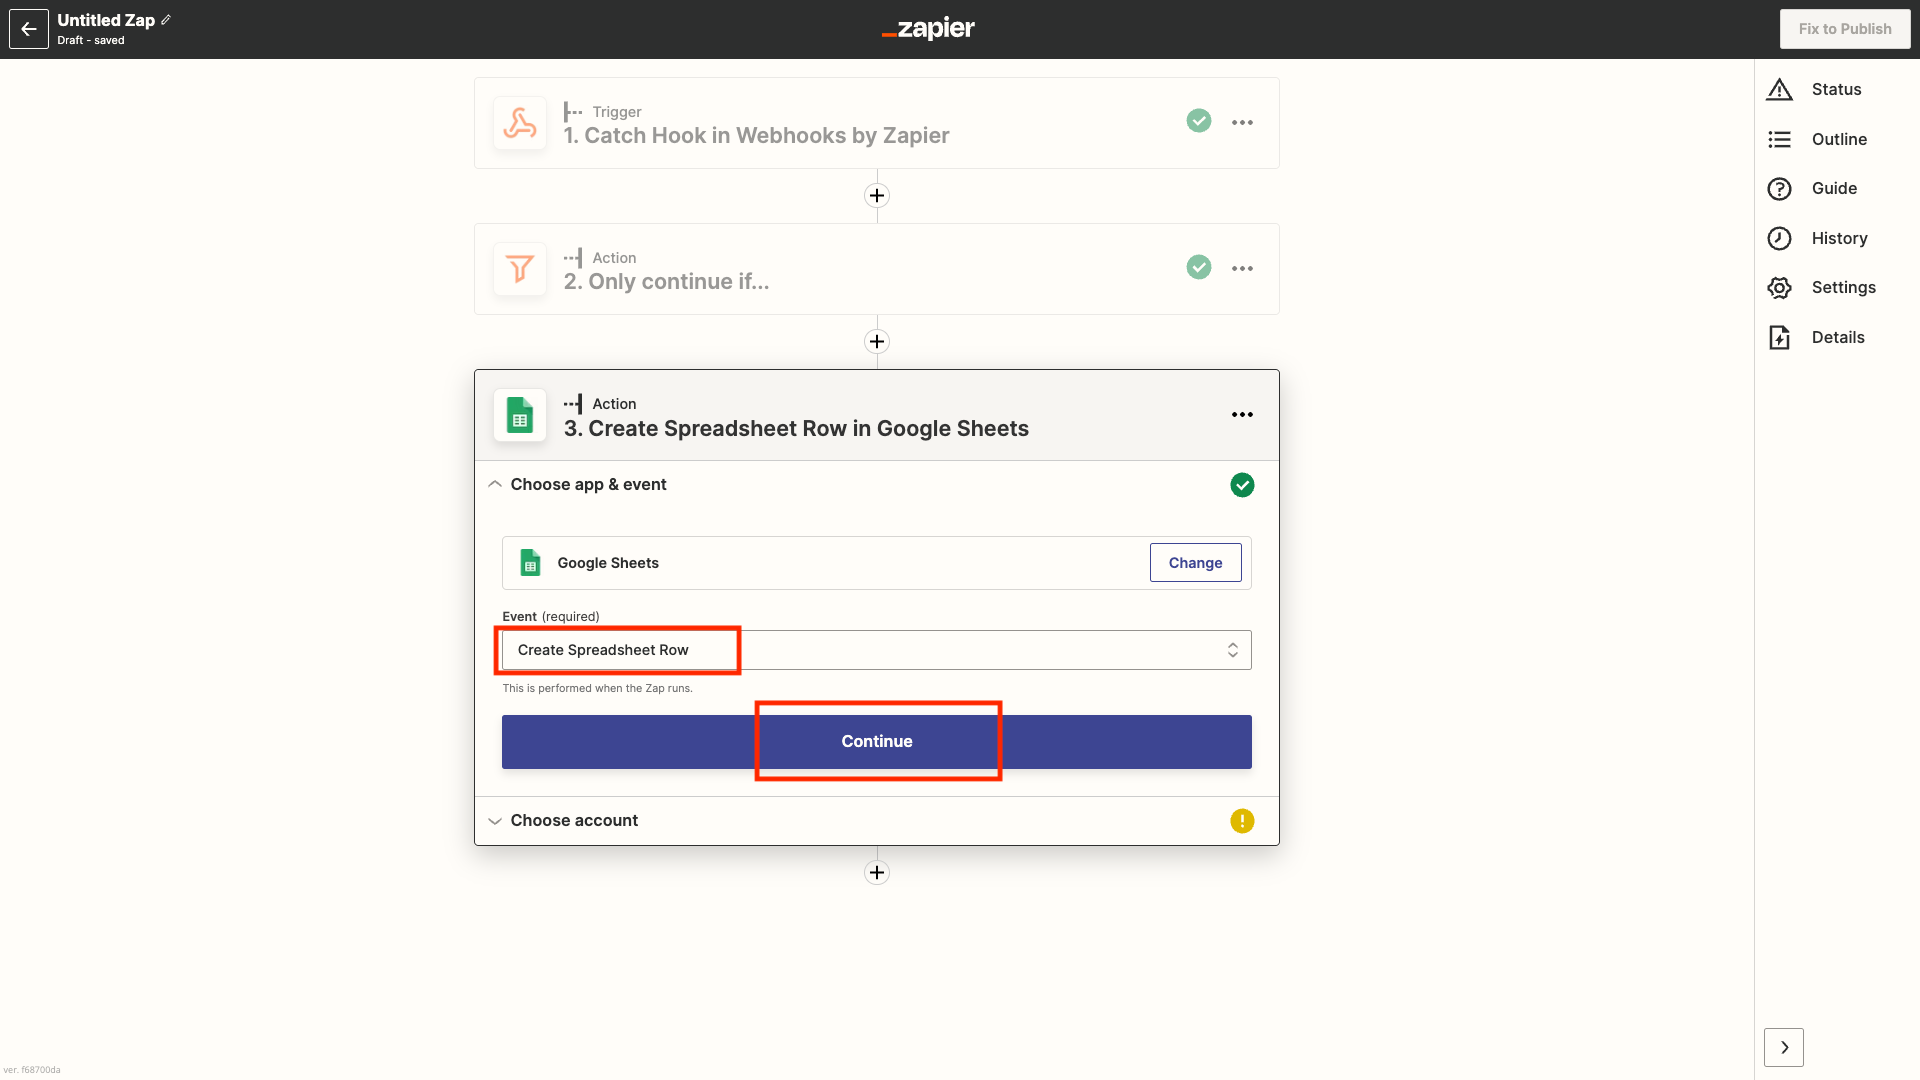
Fig. 13. Selecting action event.
Step 13. Select the previously added Google Sheets account or add a new one and click Continue (Fig. 14).
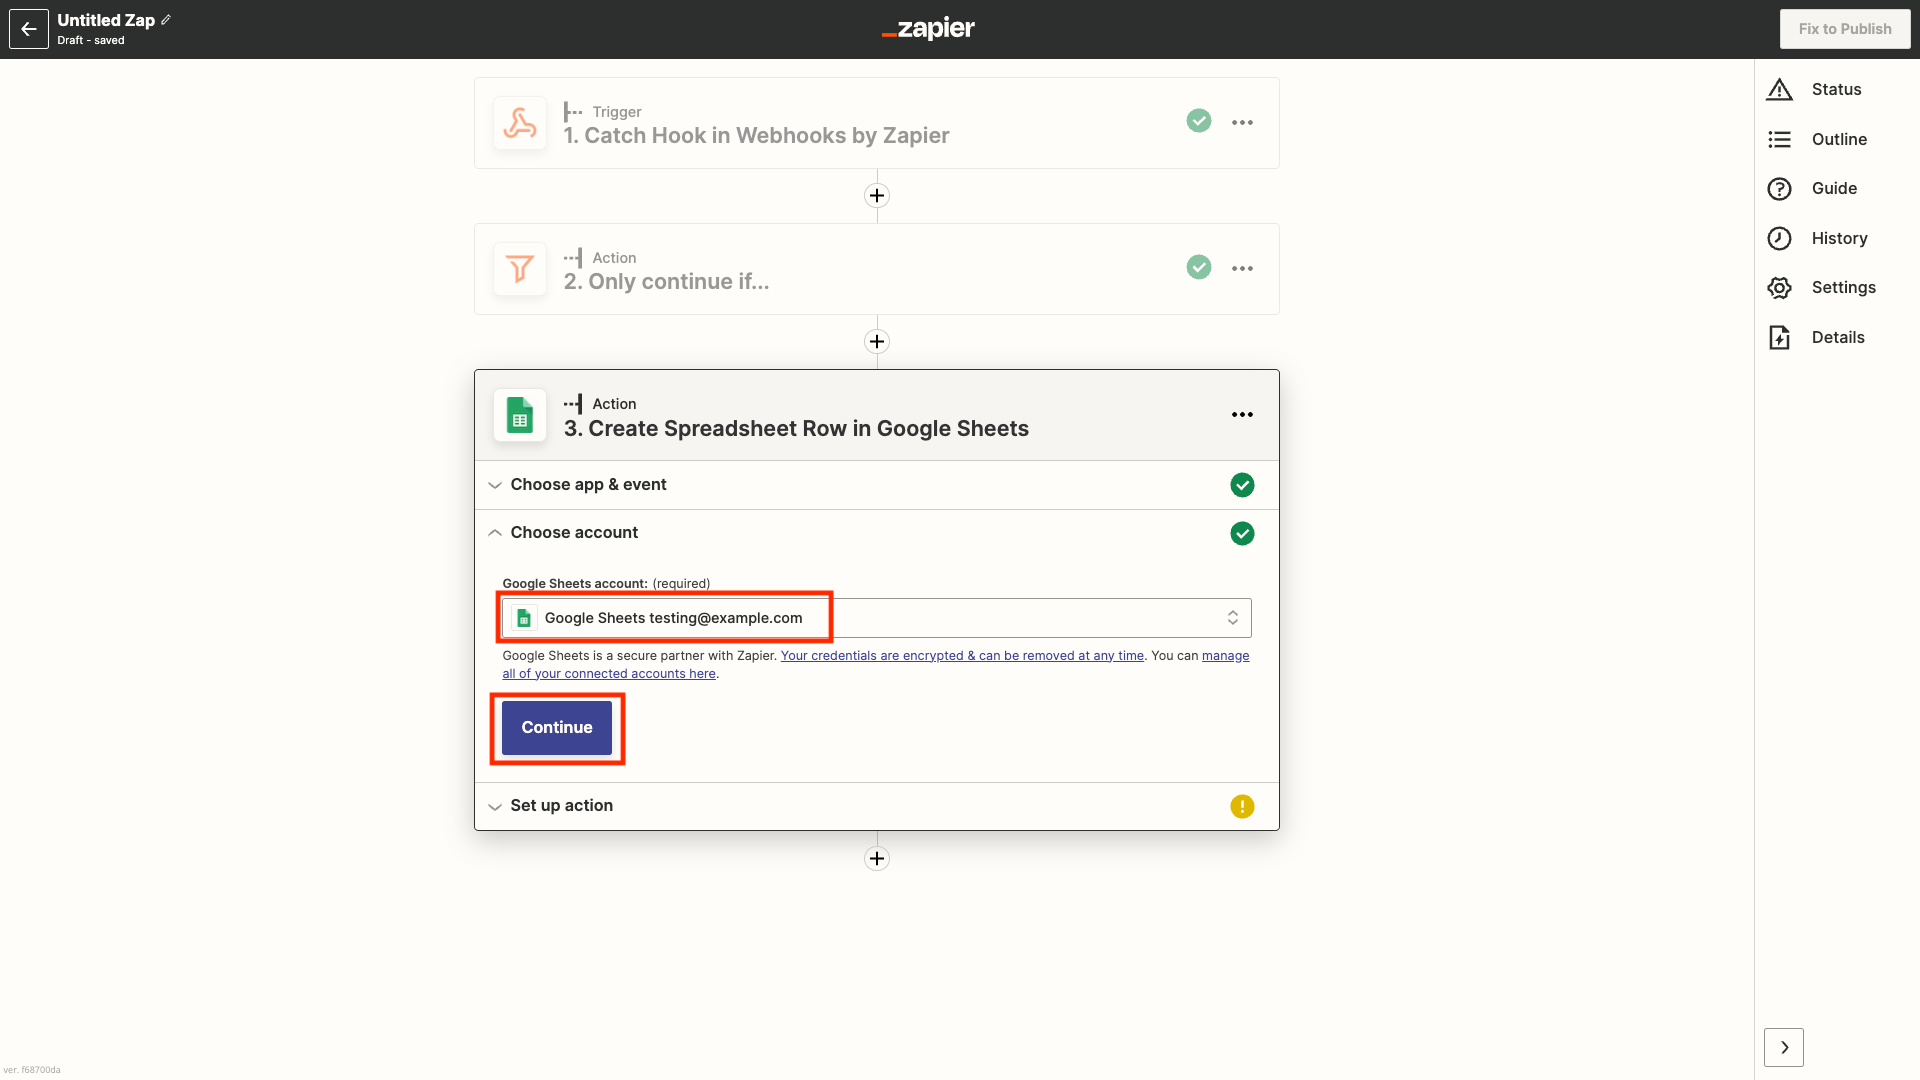
Fig. 14. Selecting Google Sheets account.
Step 14. Select the following in the Set up action fields:
Drive – Google Drive location of the created spreadsheet
Spreadsheet – spreadsheet which was created in step 10
Worksheet – sheet of the spreadsheet
Column Time start – Attributes Time Start placeholder
Column Duration – Attributes Duration placeholder
Column Source - Attributes Src Number placeholder
Column Destination - Attributes Dst Number placeholder
Column Trunk – Attributes Trunk Name placeholder
Column Rate – Attributes Rate placeholder
Click Continue (Fig. 15).
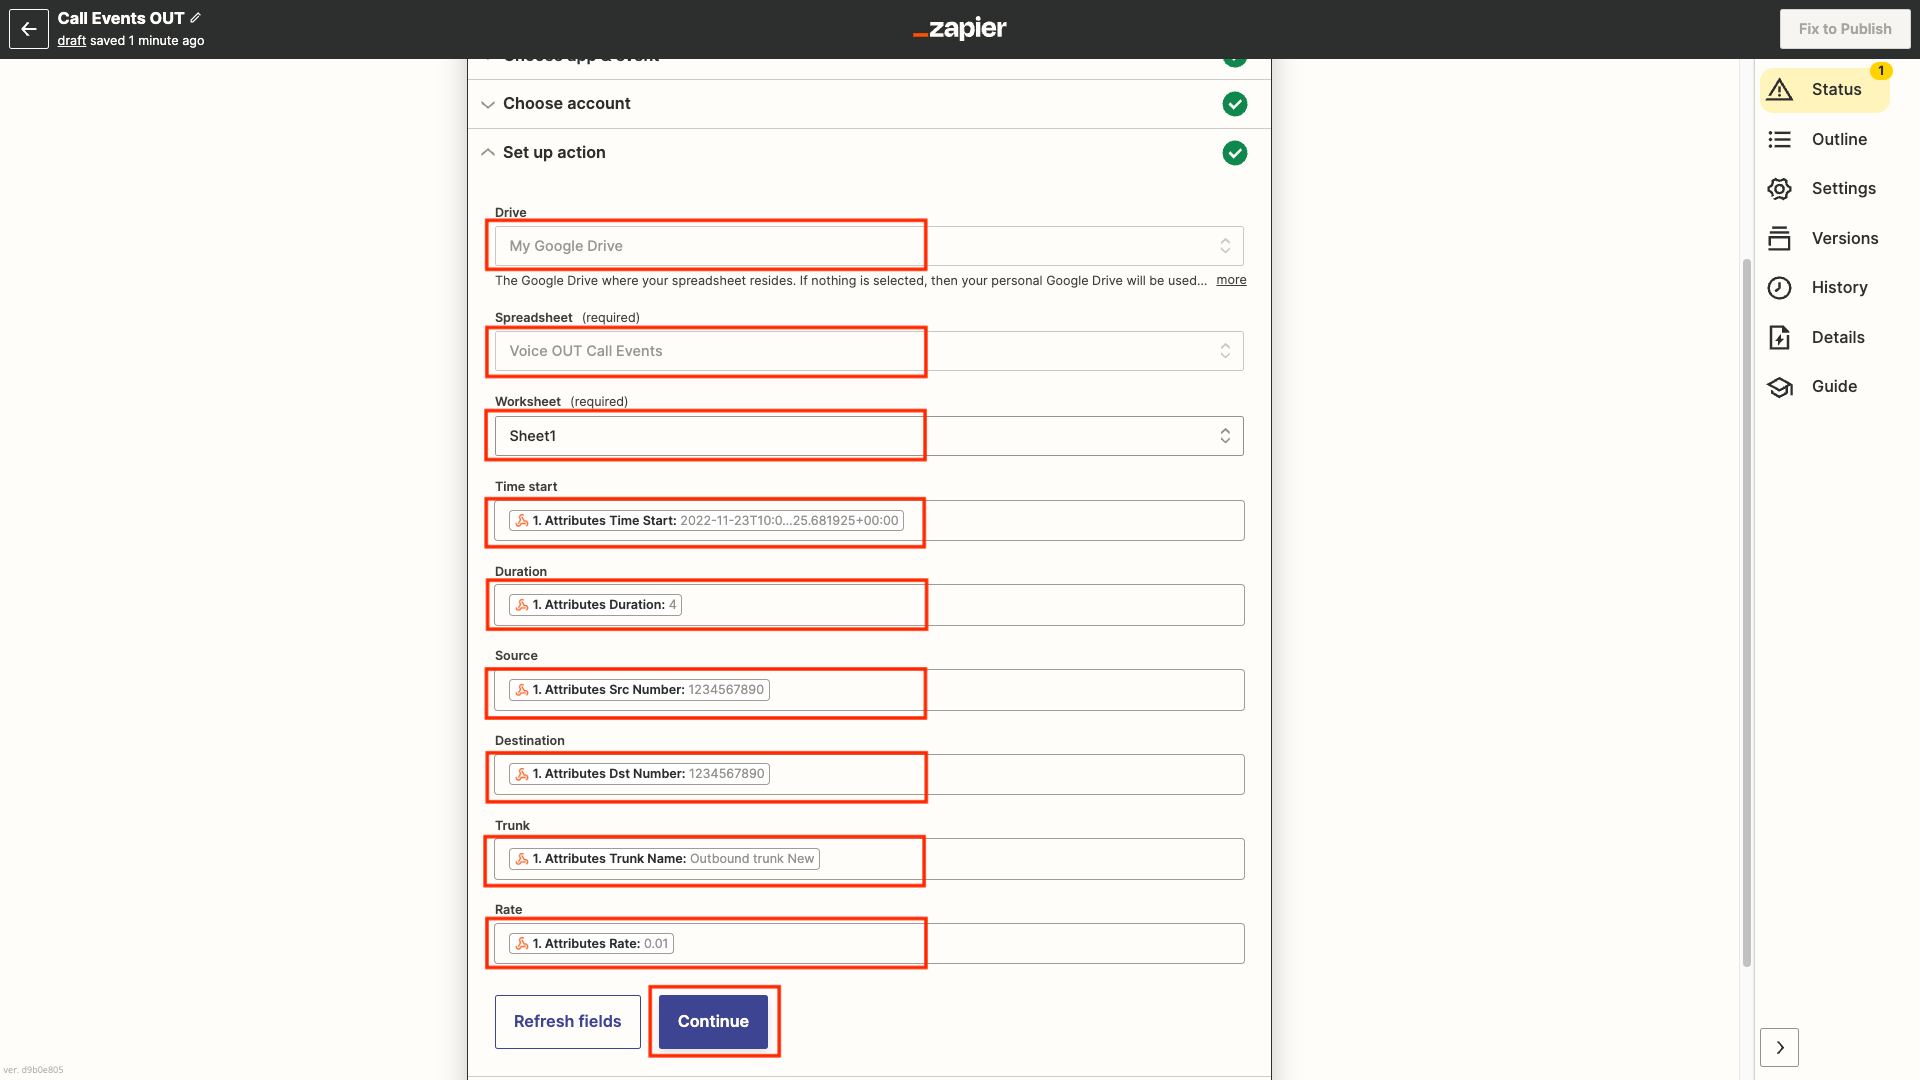
Fig. 15. Setting up action for Google Spreadsheet Row creation.
Step 15. Click Test & continue (Fig. 16), after successful testing of spreadsheet row creation, publish your Zap.
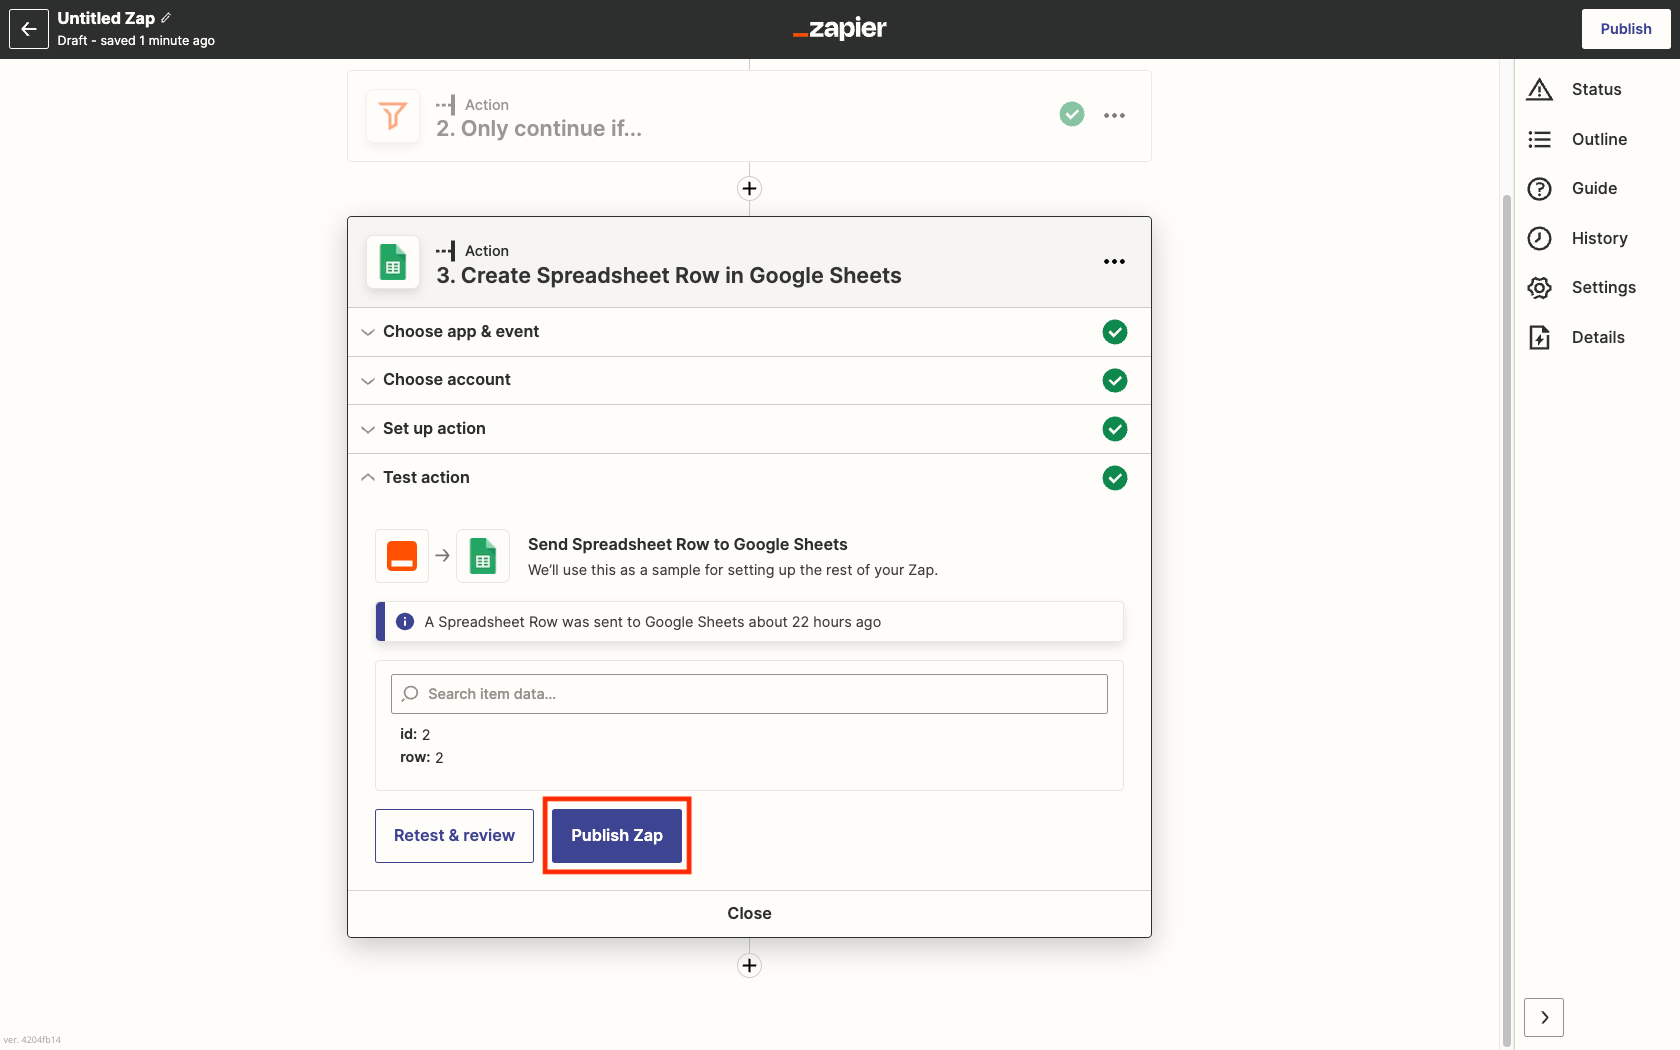
Fig. 16. Testing and publishing Zap.
Step 16. At the end of each outgoing call via your DIDWW Voice OUT Trunk with specified DID number, Google Sheet will be updated with a new row containing call details (Fig. 17).
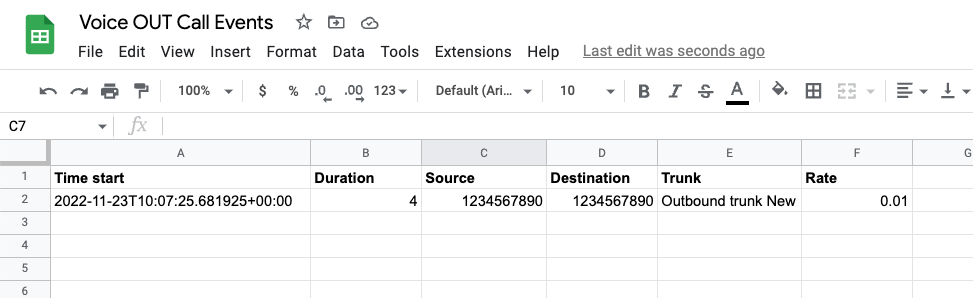
Fig. 17. Call details successfully added to Google Sheet.
Templates
Here you can find templates that might help you with starting your integration: